figure drawing with virtual models - getting the most...
TRANSCRIPT

Figure Drawing withVirtual Models:Getting the Most Out ofPoser Figure Artist
Les Pardew
®

© 2007 Thomson Course Technology, a division of Thomson LearningInc. All rights reserved. No part of this book may be reproduced ortransmitted in any form or by any means, electronic or mechanical,including photocopying, recording, or by any information storage orretrieval system without written permission from Thomson CourseTechnology PTR, except for the inclusion of brief quotations in areview.
The Thomson Course Technology PTR logo and related trade dress aretrademarks of Thomson Course Technology, a division of ThomsonLearning Inc., and may not be used without written permission.
Poser is a registered trademark of Curious Labs, Inc. and e frontier, Inc. All other trademarks are the property of their respective owners.
Important: Thomson Course Technology PTR cannot provide softwaresupport. Please contact the appropriate software manufacturer’stechnical support line or Web site for assistance.
Thomson Course Technology PTR and the author have attemptedthroughout this book to distinguish proprietary trademarks fromdescriptive terms by following the capitalization style used by themanufacturer.
Information contained in this book has been obtained by ThomsonCourse Technology PTR from sources believed to be reliable.However, because of the possibility of human or mechanical error byour sources, Thomson Course Technology PTR, or others, thePublisher does not guarantee the accuracy, adequacy, or completenessof any information and is not responsible for any errors or omissionsor the results obtained from use of such information. Readers shouldbe particularly aware of the fact that the Internet is an ever-changingentity. Some facts may have changed since this book went to press.
Educational facilities, companies, and organizations interested inmultiple copies or licensing of this book should contact the Publisherfor quantity discount information. Training manuals, CD-ROMs, andportions of this book are also available individually or can be tailoredfor specific needs.
ISBN-10: 1-59863-328-7
ISBN-13: 978-1-59863-328-3
Library of Congress Catalog Card Number: 2006906791
Printed in the United States of America
07 08 09 10 11 BU 10 9 8 7 6 5 4 3 2 1
Publisher and General Manager,Thomson Course Technology PTR:Stacy L. Hiquet
Associate Director of Marketing:Sarah O’Donnell
Manager of Editorial Services:Heather Talbot
Marketing Manager:Heather Hurley
Acquisitions Editor:Megan Belanger
Marketing Coordinator:Adena Flitt
Project Editor/Copy Editor:Cathleen D. Snyder
Technical Reviewer:Laslo Vespremi
PTR Editorial ServicesCoordinator:Erin Johnson
Interior Layout Tech:Bill Hartman
Cover Art and Design:Tobias C. Sugar
Cover Designer:Mike Tanamachi
Indexer:Sharon Hilgenberg
Proofreader:Sandy Doell
Thomson Course Technology PTR, a division of Thomson Learning Inc.25 Thomson Place ■ Boston, MA 02210 ■ http://www.courseptr.com

A C K N O W L E D G M E N T S
✎
iii
Iwant to acknowledge and thank all of the many people who havehelped me to create this book. My deepest thanks go to my family andespecially to my wife, who has put up with living with an artist and all of
the ups and downs that brings. I also want to thank the many mentors whohave taught me about art. Special thanks go to Laslo Vespremi and the teamfrom e frontier for all of their help with the book. They may never know howmuch they have influenced my life. I also want to thank my editors, CathleenSnyder, Megan Belanger, and Stacy Hiquet, without whose help this bookwould’ve been impossible.
A B O U T T H E A U T H O R
Les Pardew is a video game and entertainment industry veteran withmore than 22 years of experience. His work in the industry includesmore than 120 video game titles, 12 books, and numerous illustrations
for magazines, books, and film. He began his career in film animation andlater moved to video games, where he has found a permanent home. He cur-rently serves as president of Alpine Studios, which he founded with RossWolfley in the fall of 2000.
Les is a prolific artist who loves to work on the computer and with traditionalmedia. On the computer he is an accomplished 3D artist, creating and ani-mating characters for many video games. In traditional media, his first love isdrawing, followed closely by oil painting. His favorite subject is people. Hecan often be seen drawing a portrait or designing a character for a game in hissketchbook.

iv
C O N T E N T S
Introduction vi
1 The Human Figure 1
Drawing People 2The Human Form 2Photographic Reference 4Copyright Laws 4Pornography and Art 4Learning to Be a Figure Artist 5
Physical 6Knowledge 6Vision 8
Learning about the Figure 9Basic Proportions of the HumanForm 9
2 Figure Construction 17
Drawing from the Inside Out 17Gesture Drawing 21Creating the Manikin 27Drawing the Manikin 29
3 Figure Anatomy 33
The Skeleton 34The Muscles 40Using Figure Artist 49
4 Hands, Feet, and Head 51
Hands 51Anatomy of the Hand 52
The Foot 56The Head 59
Anatomy of the Head 59Proportions 60Facial Features 67
Using Figure Artist 73
5 Posing the Figure 75
What Pose? 76Balance and Weight 77
Balance 77Weight 83
Body Language 86Facial Expressions 88Beauty 90
Action Line 91Drawing Beauty 94
6 Composition 99
The Picture Plane 100Purpose 100Placement 102
Points 102Lines 102Shapes 105Form 110Closer 113

v
Contents
Balance 114Formal Balance 115Informal Balance 118
Focal Points 121Linear Focus 122Contrast Focus 123Detail Focus 124Color Focus 125Action Focus 126
Pathways 127
7 Lighting the Figure 133
Types of Light 134Absorption, Reflection, and PassThrough 135Light and Shadow 136
Highlight 137Raking Light 137Light Area 138Shadow Area 138Core Shadow 139Reflected Light 140Cast Shadow 140Front and Rim Lighting 142Multiple Light Sources 142
Figures 143Adjusting Shadows 144Opposing Lights 144Light Location 145Emotion 146Image-Based Lighting 146
Shading a Figure 149Designing Light 155
8 Dynamic Figure Drawing 157
Limitations of a Live Model 157Posing the Dynamic Figure 160
Extreme Movement 160The Action Line 161
Posing Multiple Figures 163Moving the Point of View 165
Posing with Objects 167Adding Clothing 169Ending Note 171
Index 172

I N T R O D U C T I O N
✎
vi
Welcome to Figure Drawing with Virtual Models: Getting the Most Out of Poser FigureArtist. This book is intended to be your guide to the use of virtual models as a ref-erence tool for the creation of works of art. Recent advancements in technologyhave made it possible for artists to have good-quality figure reference at their fin-gertips almost anytime that they need it. This new technology offers great oppor-tunity to study and learn about the human figure in ways that were never avail-able before.
Figure drawing is an old, well-established aspect of art. It has been around forcenturies, dating all the way back to the earliest cave paintings. As art hasadvanced over the ages, artists have spent countless hours trying to master thedrawing of the figure. Today, the demand for believable figure art has never beenstronger.
The very best way to learn how to draw the human figure is to draw from the realthing, either by hiring a model or attending a life drawing class. However, havinga live model available every time an artist needs to draw or paint a picture isimpractical. Because of the limitations surrounding live models, artists haveresorted to using wooden manikins to help with proportions or to buying actionfigures. Although these tools are okay, they really don’t have the detail that anartist needs to understand the figure. Therefore, a better method of helping artistswas needed. Figure Artist is not the perfect substitute for a live model, but it maybe the best solution yet.
Figure Artist, in conjunction with solid art training, is a very good tool for explor-ing the human form. This book is designed to help you learn how to use virtualmodels as you work to gain mastery of the human figure. It covers many basic figure-drawing aspects, so even if you are a beginner, you will be able to followthe lessons and instructions on your path to better drawing.

vii
Introduction
Included with the book is a trial version of the soft-ware so you can start working with it right away.
The human figure is one of the most difficult anddemanding subjects for any artist to tackle. It takesyears of practice to begin to understand all of thecomplex anatomy that makes up our bodies. No soft-ware program will make you an instant figure artist,but if this software can help make the huge task oflearning to draw the figure easier, it is well worth it.
When I was first asked to write this book, I was veryexcited about the possibilities virtual models open upfor artists. After working with the software for a fewmonths, I began to see that I could improve my ownvisualization abilities because now I had the power toset up models and work from any angle with anylighting that I wanted in just a few minutes. If I don’tlike the pose, I can change it. If I don’t like the light-ing, I can change it. If I need multiple figures, I canput them all in the scene. The possibilities are almostendless.

C H A P T E R 1

T h e H u m a n F i g u r e
✎
1
One of the greatest challenges to confront an artist is drawing thehuman figure. Our bodies are infinitely complex yet intimatelyfamiliar, giving rise to a subject that is difficult to depict accurately
yet judged incessantly.
The human figure is almost overwhelmingly complex for the artist to draw.The human figure is an organic structure that defies geometric simplification.It is composed of bones, muscles, and organs, all of which are covered by aflexible layer of skin. The body has many moving parts that make it almostimpossible to define as a shape. Within its skeleton are more than 200 indi-vidual bones. Attached to the skeleton and throughout the body are morethan 650 muscles.
Figure drawings are held to the highest standards. Because the body is veryfamiliar to us—we each have one of our own—we generally know a lot aboutit. We admire its beauty and we recognize its flaws. Physical perfection issought by many, giving rise to such industries as cosmetics, plastic surgery,and a plethora of diet programs. This basic familiarity can often become thebane of the figure artist because his artwork is judged by a higher standardthan almost any other art form.
Any artist desiring to learn how to draw the figure needs all the help he canget. Fortunately, in addition to books and other forms of instruction, a newway to help artists with their figurative work is becoming available throughtechnology. This new technology gives the artist access to virtual figure mod-els to use as references for figure drawing. Figure Artist, a new software pro-gram, now brings the power of virtual models to everyone with access to acomputer. Figure 1.1 shows a screen shot of Figure Artist.

2
Figure Drawing with Virtual Models
Although virtual models shouldnot take the place of human mod-els, they do add a valuable resourcefor the artist when real models areunavailable or the pose is unattain-able. Often artists are faced withneeding to draw a figure with notime, money, or availability of amodel. Sometimes the pose neededfor a drawing is something thatcan’t be held by a model, such asin the case of something requiringdynamic motion in sports or otherextreme physical activity. In thesesituations, artists in the past had torely on their own visualizationabilities. Now, however, artists canset up models in Figure Artist anduse them as reference for their fig-ure work. This book will help toexplain how virtual models can beused to help artists improve theirfigure drawing.
Drawing People
I find drawing people both fasci-nating and challenging. People arefascinating because we come in somany shapes and sizes and have somany different characteristics, suchas ethnic and cultural differences.Yet with all the differences, we arestill very much alike. Most peoplehave two eyes, walk on two legs,
and talk with one mouth. It is diffi-cult to imagine any subject so simi-lar yet so individual.
There is a rich history of art cen-tered on the human figure. Thehuman form transcends the historyof art from the earliest cave paint-ings to the present time. Greatmasters such as Rembrandt, daVinci, Michelangelo, Velasquez,Rubens, David, Picasso, and morehave all focused on the human fig-ure in their work. One can scarcelywalk through a major art museumwithout finding an abundance ofwork depicting the figure. Therange is enormous, from breathtak-ing realism to thought-provokingabstraction and everything inbetween.
One of the reasons for the abun-dance of figure art is the amazingrange of emotional potential withhumans as subjects. Althoughother animals may have emotion,no creature has the immediateemotional impact that a persondoes. In fact, we judge all emotionbased on our own human experi-ence. We cry. We smile. We laugh.We cheer. We quietly wait out ourdays. No other subject has thepotential for emotional diversitythat comes packaged in one person.
Drawing the human form is excit-ing and rewarding. Although thetask might seem daunting, therewards are great. Not only doesthe study of figure drawingstrengthen all of your art skills, italso enables you to express your-self in ways that would be difficultwith any other subject. The veryfact that we ourselves are humanallows us to appreciate the inspiredwork of a figure artist.
The Human
Form
Drawing the human form is a chal-lenge that requires extensive study.Any artist who wishes to masterthe drawing of the human formneeds to spend extended timestudying the anatomy that makesup the human body. Althoughsome artists might gain the abilityto construct a believable figurefrom experience and knowledgewithout visual reference, this usu-ally doesn’t happen until consider-able time has already been spentdrawing from reference. The bestreference, of course, is to drawfrom life. This means that the artisteither hires a model or attends alife-drawing class.

3
The Human Figure
A life-drawing class allows theartist to study the human formfrom a live model. There is no sub-stitute for being able to see anddraw an actual person. In a life-drawing class, the artist is con-fronted with the reality of a livinghuman being in actual 3D spacewith specific lighting. Some life-drawing classes have clothed mod-els, but more often than not themodel is nude.
Some artists might feel uncomfort-able drawing from a nude model.Often there are personal, social,and even religious pressures thatcan cause an artist to feel this way.I can understand these feelings. Ihad to deal with many of themmyself over the years as I haveworked to become an artist. Let meshare some observations that mighthelp you.
✎ It is impossible for anartist to accuratelydraw something that isunknown or that he isunfamiliar with. Like adoctor who has toknow the human bodyto practice his profes-sion, the artist has tounderstand anatomy,proportions, and mus-cle locomotion todepict believablehuman forms in hiswork.
✎ The study and drawingof the human formshould always be keptprofessional andrespectful. The modelis a person, not anobject, and should beaccorded the utmostrespect. Anything thatwould demean,degrade, or offend thedignity of the modelhas no place in a life-drawing class. Any per-son who would say,act, or draw anythingthat would demean,degrade, or offend thedignity of the modelhas no place in a life-drawing class.
✎ The human form has adivine, inherent beautythat goes beyondalmost anything else inthe human experience.As figure artists, it isour job to capture andexpress that beauty inour work.
✎ Artists who are profes-sional and dedicated totheir craft treat thestudy of the humanform as an essentialstep in depicting thepower, beauty, andgrace of the physicalbody. They are seriousand focused about theirwork. They are notgawkers at a peepshow; rather, they arestudents trying to com-prehend an immenselycomplicated subject.
In a perfect world, an artist wouldalways have a live model for refer-ence. In the reality of life, however,it is rare that the artist can alwayshave a live model to work from.Often the artist will need to workfrom other resources. Theseresources might include plastercasts, mannequins, books, onlinecourses, and other forms of artinstruction. Added to this list ofresources is Figure Artist. FigureArtist might be as close as an artistcan get to a live model withoutactually having a live model.

4
Figure Drawing with Virtual Models
Photographic
Reference
Sometimes drawing from life isimpractical or impossible. A cam-era can be a great friend to theartist. A photograph is only a sin-gle view of the world, but a singleview is much better than no view.Many artists keep files, either onhard copies, such as prints orslides, or digitally on computerfiles, a morgue. I don’t know wherethe term “morgue” for referencephotographs came from, but it isoften used to describe a box of pic-tures used by an artist for refer-ence. A large and well-organizedmorgue can be an invaluable toolfor an artist. I started collectingphotographs for my morgue whenI first was studying art in college.My collection of pictures is a realtimesaver.
Figure Artist works much like acamera for taking pictures of yourdigital models. In fact, the softwarehas several cameras. You can useFigure Artist to pose your models,and then render the images to adigital file that can be printed orviewed on a computer screen. Oneof the nice things about FigureArtist is that you don’t have toworry about copyright laws whenusing images from it for yourwork.
Copyright Laws
When you draw a picture, youautomatically own that picture.Your ownership is called acopyright. You can even registeryour picture with the government.In the US, copyright registration iswith the Library of Congress. Youcan download a copyright formfrom http://www.copyright.gov.
Regardless of registration, you ownyour own work. So does the pho-tographer who takes a picture.
When collecting pictures for yourown morgue, you should be verycareful of copyright laws. The lawstates that every image has anowner. You should not use some-one else’s photograph in your workwithout getting permission fromthe owner first. If you don’t getpermission, you are in violation ofcopyright laws. Remember that thelaws that give you ownership ofyour art are the same laws that pro-hibit you from using someone else’sproperty for your art reference. It isimportant for artists to respect eachother’s work.
Pornography
and Art
I feel it important to touch brieflyon the subject of art and pornogra-phy. Pornography is often in theeye of the viewer. What may bepornographic to one individualmay not be to another. Regardless,the intent and purpose of pornog-raphy are often very different fromthat of art. While the artist is tryingto express the qualities and wonderof the human form, the pornogra-pher exploits the sexual aspects ofthe body. The use of pornographicimages for artistic reference is amoral decision that every artistshould understand before theymake that decision.
Sometimes it is difficult for theartist who must study the humanform to avoid the temptation to usepornographic images for reference.Unfortunately, I have seen theaddictive nature of pornographyadversely affect many artists. If youwant to learn more about thedestructive nature of pornographyaddictions, you can read moreabout it at these Web sites:
✎ www.family.org/cforum/fosi/pornography/
✎ www.afa.net/pornography/
✎ www.americande-cency.org/porn.htm

5
The Human Figure
I recommend that you not includeany pornographic images in yourmorgue for four basic reasons.
1Most pornography is unrealistic.The models used are oftenselected for qualities that havevery little to do with how mostpeople look, and the poses areoften blatantly sexual in nature. Itis easy to spot an artist who usespornographic material as refer-ence because he usually has adistorted view of the humanform.
2Pornographic books, magazines,and Web sites are usually copy-righted, and therefore it is againstthe law for you to copy them inyour artwork. Like any other pho-tograph, you should only usewhat you have permission to use.
3Pornography addiction isextremely dangerous. Not onlycan it rob time from your art, itcan completely monopolize yourlife. Studies have shown thatpornography addictions can beharder to overcome than addic-tions to tobacco, cocaine, orheroin. The following Webaddresses are for testimonybefore the US Senate Committee
on Commerce Science &Transportation; they show thedestructive nature of pornogra-phy addiction:
✎ http://commerce.senate.gov/hearings/testimony.cfm?id=1343&wit_id=3912
✎ http://www.commerce.senate.gov/hearings/testimony.cfm?id=1343&wit_id=3911
✎ http://www.commerce.senate.gov/hearings/testimony.cfm?id=1343&wit_id=3910
4The human form is a beautifuland wonderful creation. It shouldbe treated with the utmostrespect and dignity. Pornographyexploits rather than dignifies thehuman form.
Figure Artist helps to solve theproblem of art and pornographybecause it is designed to be ananatomical reference tool that usesvirtual models rather than pictures.It was designed to help fill a needfor poseable anatomical reference.For those who want to seriouslystudy the human form without thepitfalls of pornography, FigureArtist is a good solution.
Learning to Be a
Figure Artist
Good figure drawing is a consciouseffort that takes time, patience, andknowledge. I have often told mystudents that art is more closelyrelated to an athletic event than itis to an academic endeavor. Ibelieve that art instructors wouldbe better served to think of them-selves as coaches than as teachers.Like athletics, art takes very refinedphysical facility, adeptness, andinspiration.
N O T E
Figure Artist uses virtualmodels that are anatomicallycorrect, including genitalia;however, it also includes afeature to remove genitalsfrom the models. The defaultis off, showing no genitalia.The images in this book usethe default setting.

6
Figure Drawing with Virtual Models
Physical
Art has a very tactile aspect to itscreation. It is a physical act thatrequires immense dextral controland extreme delicacy. This type ofcontrol can only be learnedthrough long practice. Like theathlete, an artist must spend count-less hours practicing. The artistneeds to learn control and han-dling of the drawing instruments.The artist must gain a feeling forthe surface.
Practicing drawing can createwithin an artist drawing skill. Inother words, the artist can learn tomake the pencil behave and dowhat the artist wishes. An artistcan learn to draw boldly andstrongly or delicately and subtly. Ifyou have ever watched a good cari-cature artist at work, you knowwhat I mean. The drawing justseems to flow from his or her pen-cil. It is almost a performing art.But just learning to use a pencilwell does not make a person agood figure artist. The artist alsoneeds to have knowledge.
Knowledge
Knowledge is key to creating greatfigure drawings. When talkingabout figure drawings, words suchas anatomy, gesture, proportion, com-position, perspective, line quality,form, and lighting always seem tocrop up. Each of these wordsdenotes specific knowledge thatthe artist needs to have to consis-tently create meaningful figuredrawings. In other words, justbeing able to control a pencil is notenough—the artist also has tounderstand structure and compo-nents of the figure and the drawingitself.
For the artist to use knowledge tohelp with drawing, it must beaccurate knowledge. Familiaritywith himself both helps and hin-ders the artist in learning how todraw people. It helps because theartist already knows the subject. Ithinders because the artist assumesan understanding of the subjectand draws without really lookingat it.
Let me give a quick example. Oftenone of the most glaring errors thatbeginning artists make is to draw aperson with the features of the facetoo high on the head. The artistassumes that because there is somuch going on between the eyesand the chin and so little betweenthe eyes and the top of the head,the features of the face should takeup most of the room on the head.The fact is that a normal humanhead has the eyes about halfwaybetween the top of the head andthe bottom of the chin, as shownin Figure 1.2.
Figure 1.2 The eyes are only abouthalfway up from the chin on theaverage face.

7
The Human Figure
Artists gain knowledge from manysources, but the greatest source ofknowledge comes from observa-tion. This is especially true of thefigure artist. Learning to see thefigure as it really appears will domore for increasing a person’s abil-ity to draw the figure than almostany other ability.
Probably the most significant thingthat I have learned through intentobservation is to see how thingsreally are instead of how I thinkthey should be. A big revelation forme when I started really learninghow to draw was how manyassumptions I made in life. Let megive you an example. Take thehuman eye, which many think isshaped like a football. I have seenmany beginning art students draweyes similar to footballs, as shownin Figure 1.3.
Close examination shows that eventhough the eye might resemble theshape of a football, it is much morecomplicated. Look at Figure 1.4.The eye itself is actually a roundsphere within the eye socket. Theupper and lower eyelids cover theball of the eye, allowing only asmall portion to be seen. Rarelydoes the iris of the eye show com-pletely below the upper eyelid.There is a tear duct on the side ofthe eye near the nose. And the eye-lids have thickness, which is mostnoticeable on the lower lid.
When teaching students how todraw eyes, I first have to unteachthe football shape and get them toreally look at the eye. As long asthey assume they know the shapeof the eye, they don’t really look atit; they just draw footballs. Oncethey really start to look at the eye,they begin to understand how itreally looks and can draw it withconfidence (see Figure 1.5).
Figure 1.3 Beginning artists oftendraw eyes in the shape of a foot-ball.
Figure 1.4 The shape of the eye ismore complex than a simple foot-ball.
Figure 1.5 It helps to know thetrue nature of the eye to draw itwell.

8
Figure Drawing with Virtual Models
Vision
In addition to drawing skill andknowledge, a good figure artistneeds one more ingredient—vision. It doesn’t take vision todraw something well and accu-rately, but it does take vision tocreate art.
Not long ago I was discussing witha friend his recent experiences intaking a drawing class at a localuniversity. He commented onsomething I have often seen whenteaching my own students draw-ing. He told me that he wasamazed at all of the things he hadnever noticed before—things suchas the way light defines objects andhow reflected light makes objectslook like they have dimension. Hespoke of colors and shading, oftextures and motion, of composi-tion and perspective. He com-mented that he really wasn’t a verygood artist, but that taking a draw-ing class was teaching him how tosee. He stated, “I never knew howmuch I was missing in life until Itook this art class.”
My friend was gaining more in hisdrawing class than just the abilityto draw. He was gaining artisticvision—the ability to see the worldin a truer, clearer way. In otherwords, he was gaining the ability tosee and understand the worldaround him in a deeper, more pro-found manner. This ability enablesthe artist to see what most people
miss. What the artist sees might bethe subtle shading from light todark across a surface, or it mightbe the underlying personality ofthe person he or she is drawing. Itmight be that the artist has aunique way of looking at social sit-uations, as Norman Rockwell did,or it might be that the artist can seethe inner spirit of man, asMichelangelo did. The artist thentakes that vision and infuses it intohis work to give the world a mean-ingful work of art.
A trained artist who has learned todraw and paint realistically experi-ences life at a completely differentlevel than does a person who hasnot had art training. The worldbecomes a rich and beautiful placefull of wonder and excitement.
Even mundane objects and placesbecome interesting. Major artmuseums are filled with paintingsof mundane scenes made interest-ing by the hand of great masterswhose vision helped the rest of theworld see wonder in the ordinary.
Artistic vision requires the artist tofocus and see what others mightmiss. It is difficult to say which ele-ments the artist might pick up thatothers miss, but let me give you asimple example from my ownwork. While drawing a portraitone day, I noticed that the pupil ofthe eye was set back from the lens.Look at the drawing of the eye inFigure 1.6. Notice that the clearlens of the eye has thickness, andboth the iris and the pupil sitbehind the lens.
Figure 1.6 The iris and pupil sit behind the clear lens of the eye.

9
The Human Figure
For me, this simple discovery wasmeaningful because it changed theway I thought of eyes, and I beganto recognize the inherent quality ofoffsetting the iris and pupil fromthe outer edge of the eyeball whenthe eyes are turned at an angle.This might sound like a little thing,but the little things sometimesmake the biggest differences in anartist’s work.
Learning about
the Figure
In this book I hope to help you todevelop all three aspects of figureart just mentioned. I will be givingyou practice exercises to help youdevelop your physical art abilities.I will give instruction to helpincrease your knowledge of figuredrawing. And last of all, I will giveyou creative challenges to help youunlock your artistic vision. Let’sstart by going over some of thebasics of the figure. This will helpyou to gain a foundation uponwhich you can then learn how todraw the human form.
Basic Proportions
of the Human
Form
As mentioned earlier, human bod-ies come in a great variety ofshapes, sizes, and colors. It wouldbe almost impossible to describeevery variation while trying to giveyou some basic guidelines fordrawing the figure. Instead, I willattempt to give you some generalproportions based on an idealhuman body. The creators ofFigure Artist have been kindenough to supply ideal male andfemale virtual models that I willuse as references to show you theproportions. Let me introducethem to you. Meet James andJessica, shown in Figure 1.7.
James and Jessica are virtual mod-els and not real people; therefore,they are not based on a single bodytype, but rather are designed to bethe ideal body types. Figure 1.8shows our models without clothingso you can better see theiranatomy.
Figure 1.7 James and Jessica areour two virtual models.
Figure 1.8 Without their clothing,you can better see the models’body type.

10
Figure Drawing with Virtual Models
When working from the ideal fig-ure as reference, the artist needs tokeep a couple things in mind.First, the ideal figure is an ideal,not an average. For example, theaverage figure is about seven-and-a-half heads high. (When measur-ing, the figure artist will often usethe model’s head as a standard unitof measurement because the head
doesn’t radically change dimen-sions.) The ideal figure is abouteight heads high, giving it a slightlylarger-than-life feel. Look at Figure1.9, which shows the proportionsof the ideal figure.
The “eight heads high” rule appliesto the female figure the same way itapplies to the male, as shown inFigure 1.10.
Even though the female figure isgenerally smaller than the male fig-ure, the proportions are the samebecause a person’s head is usuallyproportional to their body. Thus,taller people generally have largerheads than shorter people do.
Figure 1.9 The ideal figure is eight heads high. Figure 1.10 The female figure is also eight headshigh.

11
The Human Figure
I also included a few other linesover our male and female figures toshow some other interesting facts.
✎ The male figure isabout three head-widths wide at theshoulders and onlyabout two to two-and-a-half wide at the hips.
✎ The female figure isabout two to two-and-a-half head widths forboth the shoulders andthe hips.
✎ The halfway point forthe height of the figureis just above the crotcharea of the model.
✎ The distance from thecenter of the body tothe tip of the finger isabout half the height ofthe model. Therefore,the distance from fin-gertip to fingertip isequal to the model’sheight.
✎ If the body was dividedin height by four, thebottom quarter linewould intersect theknees, and the topquarter line would bejust above the nipples.
✎ With the exception ofthe hips and upper
legs, the male figure isusually thicker than thefemale figure.
✎ The widest point of thehips on a female iseven with her crotch,while the widest pointfor the male is abovehis crotch.
✎ If the male figure ismuscular, the upper legmuscles will be widerthan the hips.
Figure 1.11 shows the male fromthe front, side, and back. Noticethat the lower leg is almost entirelyto the right of the centerline in theside view.
Figure 1.11 Look how the proportions line up with the figure from front, side, and back views.

12
Figure Drawing with Virtual Models
Figure 1.12 shows the female fromthe front, side, and back.
You can use these general propor-tions to help you set up your fig-ures in your drawings. They createa base for better understanding thehuman form. Try sketching ourtwo models, shown in Figure 1.13.
For this drawing don’t worry toomuch about getting a beautiful fig-ure drawing. This is just an exer-cise to show how to use the pro-portions to set up a drawing.
Figure 1.12 The female figure seen from the front, side, and back
Figure 1.13 The twomodels are walking andwearing bathing suits.

13
The Human Figure
S T E P - B Y - S T E P
1Make two lines where you want to place yourtwo figures. Make the lines about the heightyou think the figures should be, as shown inFigure 1.14.
Figure 1.14
Start withtwo lines.
Figure 1.16 Use perspective lines to check your work.
2Now measure your lines and make markswhere the head, crotch, knees, and feetshould be, as shown in Figure 1.15.
3You can use linear perspec-tive to check the relationshipbetween the two figures, asshown in Figure 1.16. Theperspective does not need tobe exact because of differ-ences in body types, but thetwo figures need to look as ifthey are in the right placesand they are the right sizes.
Figure 1.15
Make measure-ment marks for
the head,crotch, knees,
and feet.

14
Figure Drawing with Virtual Models
Figure 1.17 Draw the skeletal structures for thetwo figures.
Figure 1.18 Now block in your figures.
4Now fill in a rough skeletal structure for thetwo figures, as shown in Figure 1.17.
5Once things feel right, you can move forwardwith blocking in your figures, as shown inFigure 1.18.

15
The Human Figure
An eight-heads-high figure mightbe the ideal height, but in somecases it might not be ideal enough.Fashion drawings, for example,may use a character that is closerto eight-and-a-half heads high, andif you are doing a superhuman fig-ure, such as in a comic book, thefigure might even be nine heads
high. Figure 1.19 shows the fash-ion and heroic proportions next tothe ideal figure. Notice the differ-ent feeling that each has.
You are in charge of your drawings.Once you know the basic propor-tions of the human figure, you canadjust the proportions to get thelook you want.
This chapter has only touchedbriefly on some of the importantaspects of figure drawing. I hopeyou have had a chance to pull outthe Figure Artist CD and experi-ment with it a little. In the nextchapter, we will cover figureanatomy and construction.
Figure 1.19 Changing the number of heads-high a figure is changes the feeling of the figure.
C H A P T E R 2
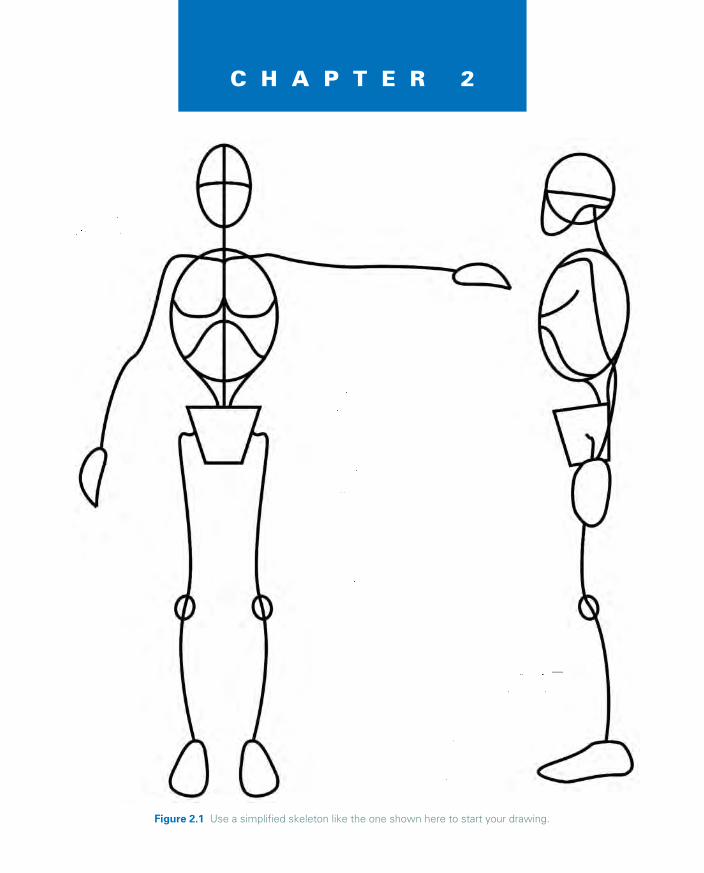
Figure 2.1 Use a simplified skeleton like the one shown here to start your drawing.

F i g u r e C o n s t r u c t i o n
✎
17
In this chapter I will cover how to construct the figure using some sim-plified methods to make the process of drawing a little easier. I will startby showing you how to build a simple structure as the basis for defining
dimension and proportion. This structure will become the foundation of yourfigure drawings. You will then be able to use it to develop a finished figuredrawing.
Drawing from the Inside Out
At the beginning of every figure drawing, the artist is faced with a daunting task indefining a subject that is painfully complex yet supremely organized. Without ini-tially simplifying the figure, the artist may become overwhelmed.
It is very important in the initial stages of a figure drawing to be able to use somekind of simple framework to define the dimensions and proportions of the figureon the paper. The artist needs a simple and accurate system for starting the figureon paper without getting bogged down in too much detail. One way of doing thisthat works well for me is to go back to the foundation of the figure itself and drawa simplified skeletal structure. Figure 2.1 shows a simplified skeleton; notice thatit isn’t too much more complex than a simple stick figure.

18
Figure Drawing with Virtual Models
The simplified skeleton should beproportionally correct, as shown inFigure 2.2, where I have overlaidthe same proportion chart used inChapter 1.
This simplified figure is very usefulin roughing out figures and figur-ing out compositions. It is easy todraw and doesn’t get bogged downin detail. Here is an example ofhow you can use it in conjunctionwith Figure Artist.
Figure 2.2 Make your skeleton the correct proportions.

19
Figure Construction
S T E P - B Y - S T E P
1Start by creating a pose in Figure Artist, simi-lar to the one shown in Figure 2.3.
2Using the posed figure for a reference, startwith the figure’s ribcage by drawing a simpleoval with a few lines to indicate the front ofthe ribcage and the overlying pectoral mus-cles, as shown in Figure 2.4.
Figure 2.3 Pose and render a figure from FigureArtist.
3Next draw a line for the spine andattach another oval for the head, asshown in Figure 2.5.
4At the base of the spine, draw ablock for the hips, as shown inFigure 2.6. The hips will usually berotated from the ribcage because theback is flexible and the lower part ofthe human torso usually counterbal-ances the upper torso.
Figure 2.4 Startby drawing anoval for theribcage.
Figure 2.5 Addthe spine andhead to yourdrawing.
Figure 2.6 Drawthe hips next.

20
Figure Drawing with Virtual Models
Figure 2.7 Draw the legs and arms of the figure. Figure 2.8 Draw in the hands, feet, and knees.
7The last step is to draw simple shapes for thehands, feet, and knees, as shown in Figure2.8.
5Now draw lines indicating the shoulders andarms across the top of the ribcage.
6Draw the legs coming down from the hips, asshown in Figure 2.7.

21
Figure Construction
The skeleton that you just drewshould fit over the top of the fig-ure, as shown in Figure 2.9. Infact, a useful exercise for beginningartists is to use a piece of tracingpaper and define the skeleton ofphotographs from magazines andother sources.
The nice part about drawing theskeleton first is that you can use itto create a number of very expres-sive figures in very little time.
Gesture
Drawing
One of the most important aspectsof learning to draw the figure isgetting the feeling of life and actionin your drawings, as shown inFigure 2.10. This is often referredto as capturing a gesture or gesturedrawing.
Gesture drawing is the foundationof good figure drawing. A gesturedrawing is a quick drawing of thefigure focusing on just the figure’saction. It doesn’t need to be accu-rate, but it does need to get thefeeling of life and movement that isinherent in any figure.
Figure 2.9 The skeleton and figure should match upwith each other.
Figure 2.10 The skeleton can show action.

22
Figure Drawing with Virtual Models
The first step in doing a gesturedrawing is to establish the actionline of the figure. The action line isa single line that shows the direc-tion of the main movement of thebody. Figure 2.11 shows an actionline for a figure.
On top of the action line, theskeleton can be roughed in quickly,as shown in Figure 2.12. You willnotice that the construction lines
are really not very precise. They arealmost sloppy. That is okay.Sometimes a good scribble hasmore feeling than a well-plannedline.
Once you have an idea of generalproportions, you can draw theactual skeleton, as shown in Figure2.13.
The entire process of creating agesture drawing should take onlyabout 30 to 60 seconds. It is veryimportant to set a time limit andpush yourself when doing gesturedrawings. The time limit forces theartist to focus only on the mainaction and not on the detail. Figure2.14 shows a page of gesture draw-ings from a live model. Each draw-ing was limited to 30 seconds.
Figure 2.11 The action line estab-lishes the action of the body.
Figure 2.12 Quickly scribble in theskeleton over the action line.
Figure 2.13 The skeleton is drawnin over the construction lines.

23
Figure Construction
Figure 2.14 Try drawing several gesture drawings.

24
Figure Drawing with Virtual Models
Beginning figure artists tend todraw stiff figures that have little orno life in them. Your drawings willimprove dramatically if they have agood gesture drawing as theirfoundation. The timed gesturedrawing focuses on the continuityin the figure, rather than the dis-continuity of the joints.
Often a figure will seem stiff andawkward because the artist willfocus on the joints rather than theline that goes through the joints ofthe body, causing a stiff roboticlook. The human form is made upof curves. There is really nothingstraight about it. If you complainthat you can’t draw a straight line,
then you might be just right forfigure drawing.
Think of the body as a series ofcurves. Some of the curves havesharper angles than others, butthey are all curves. There is a curvethat goes through every joint,including the elbow and kneejoints. The limbs of the bodyshould flow into each other, even ifthey are bent at extreme angles.Take a look at the example inFigure 2.15. The figure in thisexample has his legs bent sharply,yet as you can see from the over-laid lines, the joints can still flowinto each other.
Now it is time to do a little practic-ing. Figures 2.16 through 2.21show examples of our virtual mod-els posed in some action poses.Time yourself and draw a gesturedrawing with the simplified skele-ton. Give yourself only about 30seconds to do each drawing. Youmight need to draw them morethan once to get a good gesturedrawing in that short of a time, buthang in there until you have cap-tured the action in each figure.
In Figure 2.16, the model is stand-ing in a power position with hisfeet spread and his arms to hissides. See whether you can capturethe power behind the stance.
Figure 2.15 The joints should flow into each other.
Figure 2.16 Try to capture the power behind themodel’s stance.

25
Figure Construction
In Figure 2.17, the model hasshifted his stance and is reachingup with his right arm. See whetheryou can capture the weight andpressure in the model’s legs and hisarm straining in the action.
In Figure 2.18, the model has justcompleted a punch. His weight issupported on his left leg, but thepower behind the punch camefrom the right leg. Notice the twist-ing of the torso.
In Figure 2.19, the model is in adramatic pose with both her armsextended to the sides as if she werea sorceress casting a major spell.
Can you capture the tension anddrama of the pose in your draw-ing?
In Figure 2.20, the model iscrouching low, looking to springinto action. This pose might bemore of a challenge because of theoverlapping limbs, but give it a tryand see whether you can capturethe coiled tension of the pose.
In this last pose in Figure 2.21, themodel is sagging as if she were verytired. Maybe she was just hurt andis trying to get up. See whetheryou can put these aspects of thepose into your drawing.
Each of the poses I just used asexamples is part of the library ofposes supplied with Figure Artist.You can find them and many moreon the CD that came with thisbook. Figure Artist is a greatresource for working with theaction of a figure and then drawingthe result. You can use the sup-plied poses or come up with someof your own. In Chapter 5, we willcover posing the virtual models inmore detail.
Figure 2.17 The model moves into action. Figure 2.18 Look to which leg is supporting themodel’s weight.

26
Figure Drawing with Virtual Models
Figure 2.19 Try to capture the drama of this pose. Figure 2.20 Try to draw the overlapping limbs in thiscrouching pose.
Figure 2.21 This pose is more of a sagging, tiredpose.

27
Figure Construction
Creating the
Manikin
The next step in drawing figures isto create a simplified manikin ofthe body. The manikin is like thesimplified skeleton in that it usesonly minimal detail, but unlike theskeleton that works mostly withinner structure of the body, themanikin deals more with surfacedetail. Drawing simplified skele-tons and gesture drawings is fine,but at some point you will want to
add some flesh and muscle to yourdrawings.
Figure 2.22 shows a male manikin.You can use this for an example ofhow to draw your manikin.
The manikin does not need to bevery detailed to work well; it justneeds to show the bulk anddimension of the figure. You cansimplify your manikin beyondwhat I have done here if it willmake it easier to draw.
You will notice that in my manikin,a lot of detail such as fingers, toes,and facial features are omitted.This is because the purpose of themanikin is to establish the figureon the paper, not to deal withdetail. The detail will come later.Artists use the manikin as a simpli-fied figure for working out compo-sitions and for quickly sketchingtheir ideas and inspiration.
When you draw the manikin, sim-plify the muscle groups. Think of
Figure 2.22 The manikin adds surface detail to the beginning stages of the figure drawing.

28
Figure Drawing with Virtual Models
them as lying over or around thebones of the skeleton. In Chapter3, “Figure Anatomy,” we will coverhuman anatomy in more detail,but for now just do the best youcan with what you already know.
The human body is made formovement. The muscles are placedso that they can contract and movevarious limbs or other body parts.The muscles at the top of theshoulders are called deltoids. Theypull the arm up. The muscles
across the chest are the pectoralmuscles, and they pull the arms for-ward. The large muscles of theback are called the latissimus dorsimuscles, or lats for short. They areused to pull the arms back. Theseare just three of the many musclesused to move the arm.
If you do any weightlifting, youknow that lifting weight aboveyour head will work your deltoidmuscles and make those musclesmore pronounced. The bench
press will work the pectoral mus-cles, and rowing will work the lats.Sometimes it is a good practice forthe artist to go to the gym andwork the different muscle groupsto see how they affect movement.You will know which muscles youworked because they will be theones that ache the next morning.
Figure 2.23 shows the femalemanikin. If you compare her to themale version, you can readily seethat she is very different than themale.
Figure 2.23 The female manikin is different than the male manikin.

29
Figure Construction
Although male and female bodieshave many similarities, they arealso very different. A singlemanikin will not work well fordrawing both figures. You shoulddevelop your own manikins forboth the male and female figures.Some of the main differencesbetween the two manikins are inthe pelvis. On the female, the hipbones are higher, wider, and
deeper than on the male. Thefemale waistline is higher than themale’s. The female ribcage issmaller and the shoulders are nar-rower. The female’s arms are gener-ally more slender than the male’s,but her upper thigh area is oftenthicker. Her legs tend to have moreof an overall taper from the hip tothe ankle. Her hands and feet areoften smaller than those on the
male manikin. As you becomemore familiar with the male andfemale figures, you will noticeother differences.
Drawing the
Manikin
Let’s take a look at drawing themanikin.
S T E P - B Y - S T E P
1Start with the action line, as shown inFigure 2.24.
2Over the action line, draw the simpli-fied skeleton of the figure. Make sureyou establish the gesture in your skele-ton. Don’t worry about being exactlyaccurate. The two things you are look-ing to accomplish at this stage are cap-turing the figure’s gestures and defin-ing the general proportions of thefigure (see Figure 2.25).
Figure 2.24 The actionline establishes thedynamics of the figure.
Figure 2.25 Capture thegesture with the simpli-fied skeleton.

30
Figure Drawing with Virtual Models
Figure 2.26 Draw the manikin over the top ofthe skeleton.
3Over the skeleton draw the manikin. Just like the action line isa guide for drawing the skeleton, the skeleton is a guide fordrawing the manikin. Each step builds on the preceding one.The manikin is shown in Figure 2.26.
N O T E
In this drawing exercise, I drew the action line and skeleton much darker than I would normally drawthem so that you could see them. Typically I draw the action line, skeleton, and manikin very lightly so Ican do a finished drawing over the top of them. You will notice that in Figure 2.26 the action line andskeleton are much lighter. I went in with a kneaded eraser and pulled much of the graphite off the pageso that you could better see the manikin drawing. I usually don’t erase when I draw because it has a ten-dency to disturb the paper fibers, causing unwanted textures. By drawing the initial stages very lightly, Ican establish my figures without needing to erase the construction lines, and I can still create delicatedrawings.

31
Figure Construction
Draw the manikin a number oftimes until you become comfort-able with it. Figure 2.27 shows themale and female manikin in someaction poses.
Try filling your sketchbook withmanikin figures drawn from yourimagination and from reference.Figure Artist can be a valuable toolbecause you can set up the figurein a number of poses and createsketches of it. Try sketching thesame pose from different angles. Abig advantage that Figure Artist hasover photographs for figure refer-ence is that you can set up a figureand then look at it from any angle.
The manikin is a very useful toolfor the figure artist. With it, youcan quickly (and in most cases,accurately) sketch and build upideas for your drawings. Workingwith a manikin helps you drawbetter from reference because itbuilds confidence in figure draw-ing. One of the reasons why begin-ning figure artists experience prob-lems sketching the figure is thatthey are afraid that they will drawsomething wrong. By learning howto draw the manikin, the artist canovercome that fear and focusinstead on learning to draw the fig-ure well.
Be aware that in learning to drawthe manikin, you need to con-stantly work on getting the overallproportions right. If the propor-tions are off, the drawing will lookodd or awkward. As you draw,measure your drawing and com-pare it to the basic proportions ofthe body to keep it correct.
As you can see from this chapter,the idea is to learn to draw the fig-ure from the inside out. You startwith the action line and then builda gesture sketch using simplifiedskeletons over the top of it. Theskeleton establishes the gestureand the proportions of the figurewithout any surface detail. It canbe done in a matter of seconds.
On top of the skeleton you drawthe manikin, which adds flesh tothe bones. The manikin defines theshape and mass of the body. Majormuscle groups are lightly definedin the manikin, but most surfacedetail, such as facial features andfingers, are omitted. The manikincan be used for drawing from ref-erence and for developing figuresfrom your imagination.
Figure 2.27 Draw the manikin in action.

C H A P T E R 3

F i g u r e A n a t o m y
✎
33
Understanding human anatomy will help you achieve greaterexpressive ability in figure drawing. By understanding the many dif-ferent aspects of the human form, you can better grasp how the fig-
ure works as a whole. For example, if you feel along the bone on the lowerpart of your jaw, you will notice that there is a small indentation abouthalfway between the chin and the back of the jaw. This indentation is to allowa blood vessel to pass under the jaw. The indentation helps to protect the ves-sel. The significance of this little indentation is that it affects the curvature ofthe jaw. The jawbone is actually concave here, rather than convex. A slenderperson who has little fat around the jaw will show this distinct feature of thejaw more clearly than a heavy person will. Knowing this little aspect of thefigure can help the artist who wishes to express a thin person.
In a way, the study of anatomy increases your figure drawing arsenal. Bystudying the underlying structure, you can develop a greater feel for the sur-face, expanding creative possibilities. In essence, the human form is made upof soft and hard tissue held together by tendons and ligaments. The bonesform the underlying structure of the body and in some cases act as protectionfor delicate internal organs. Around and over the bones are muscles that areused to drive movement. The whole system is controlled by an extensivenervous system.
The human form is capable of extreme movement and flexibility. The musclesthat power body movement expand and contract, causing surface changes toappear. Take a look at your arm. Hold it out in front of you with the palmdown. Now twist your arm so the palm is facing up. Notice how the musclebeneath the skin move as the arm rotates. As the arm rotates, some muscles inthe forearm will expand and twist, while others will contract to cause the

34
Figure Drawing with Virtual Models
movement. Now bend your armup at the elbow. The muscles ofthe upper arm will bunch to pullthe arm up. These muscles arethe biceps, so named becausethere are two muscles.
Drawing from life, an artist isoften confronted with a numberof organic surfaces. It is helpful ifthe artist understands not onlywhy the surface changes inmovement, but also what theunderlying structure is doingduring those changes. This willhelp the artist to recognize thesubtle aspects of the figure thatmight go unnoticed if the artistdidn’t have the proper instruc-tion in anatomy.
The Skeleton
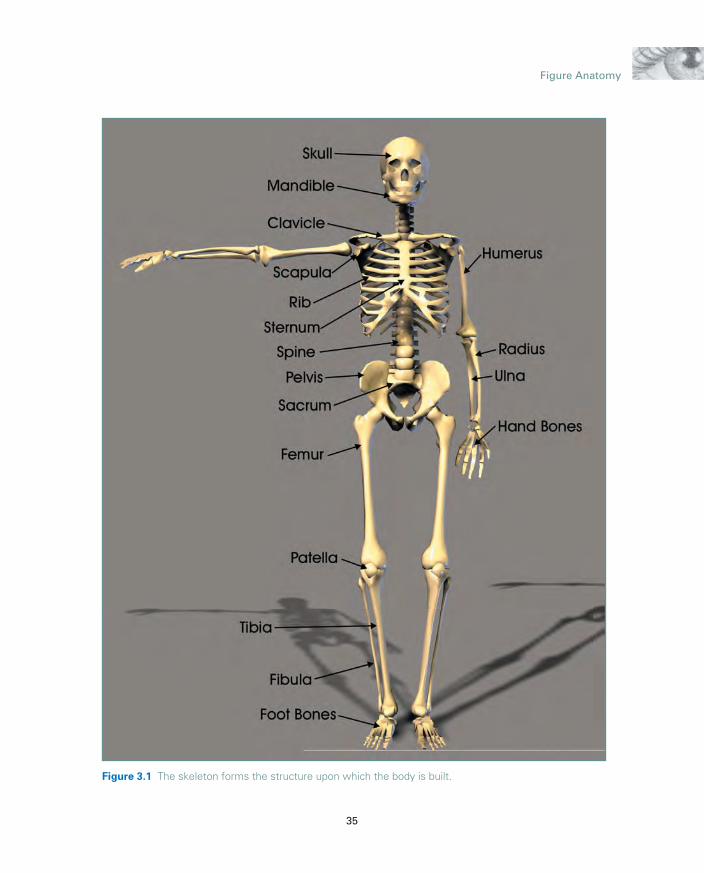
In Chapter 2 you created a simpli-fied skeletal structure to use as abase for drawing the figure. Wecalled it drawing from the insideout. Now you will have the oppor-tunity to better understand theactual skeletal structure of thehuman body. Figure 3.1 shows themale skeleton. This skeleton comeswith Figure Artist’s bigger cousin,Poser, and is available as additionalcontent for Figure Artist.
The human skeleton contains morethan 200 individual bones.Although it might not be essentialfor you to learn the names of all200 bones, you should becomefamiliar with some of the majorbones listed here.
✎ Skull. The skull is thebony framework uponwhich the head is built.It is composed of eightcranial and 14 facialbones. The cranialbones are the dome-shaped bones thatcover the top of yourhead. They are verynear the surface. If youpress on the top ofyour head, you can feelthe hard surface of thebone just below theskin. The shape of thecranium pretty muchdetermines the shapeof the head. The facialbones make up thebones of the front ofthe head and con-tribute greatly to how aperson looks.
✎ Mandible. Themandible, sometimesreferred to as the jaw-bone, is actually one ofthe facial bones of theskull. It is the moveable
bone on the lower partof the head. It is hingedto the rest of the skullup near the ears. It isimportant to notewhere the bone ishinged because thatcontrols the bonemovement.
✎ Clavicle. The clavicle islocated on the upperfront of the chest nearthe neck. It is a verypronounced bone nearthe surface, connectingthe arms to the chest.There are two claviclebones—one on eachside of the body. Theclavicle’s flexible move-ment allows for thevariety of movement inthe shoulder.
✎ Scapula. The scapula isa plate-like triangularbone located on theright and left side ofthe upper back. It issometimes called theshoulder blade. It hasquite a range of move-ment under the skinand is more pro-nounced in a slenderperson. It will also pro-trude more in a personwith poor posture.
35
Figure Anatomy
Figure 3.1 The skeleton forms the structure upon which the body is built.

36
Figure Drawing with Virtual Models
✎ Ribcage. The ribs areactually a group ofbones that surroundthe chest cavity andserve as protection forthe delicate organshoused in that area. Alltogether, the ribs forma somewhat egg-shaped structure that isopen at the bottom andmore closed at the top.The ribcage also actsas an anchor for manyof the muscles of theupper back and chest.
✎ Sternum. The sternumis located in the centerof the chest and con-nects the ribs of the leftand right sides by wayof cartilage, whichgives the chest the flex-ibility to expand andshrink with breathing.The sternum has a dis-tinctive dagger shapeand is sometimesreferred to as thebreastbone.
✎ Spine. The spine is acolumn of bones thatextends from the skullto the pelvis. The spineis a very flexible com-bination of bones andcartilage that enclosesand protects the spinalcord. The spine is also
the structure that holdsthe upper body erect.There are 33 separateirregularly shapedbones called vertebraein the spinal column.The top bone of thespinal column is calledthe Atlas, and the nextis called the Axis. Theshape of the Atlasallows the head to nodyes, and the shape ofthe Axis allows thehead to shake no. Thevertebrae at the top ofthe spinal column aresmaller than those nearthe bottom. They con-nect the ribcage in theback and support mostof the major muscles ofthe back. They can beseen as a row of ridgeswhen a person bendsforward.
✎ Pelvis. The pelvis islocated in the lowerbody and forms yourhips. There are actuallytwo pelvic bones—oneon either side of thebody. They are joinedtogether in the back bythe sacrum and in thefront by a musclecalled the pubic sym-physis. The pelvisserves to support thebody by anchoring the
spinal column, and italso protects many ofthe delicate organs ofthe lower body. Thepelvis on a female iswider, and the centralopening is larger thanon a male. This differ-ence helps the femaleto support a baby dur-ing pregnancy. Thewider opening allowsfor the baby to be bornbecause the baby mustpass through themother’s pelvis.
✎ Sacrum. The sacrum isa V-shaped bone that isactually several verte-brae fused together asa person reaches adult-hood. This boneattaches the spinal col-umn to the pelvisbones.
✎ Femur. The femur isthe large bone thatruns from the hip to theknee. It would be thelargest bone in thebody except that thereare two of them, andsince they are usuallythe same size, theyboth share that honor.The femurs are thelargest, longest, andstrongest bones in thebody. They support themassive thigh muscles
37
Figure Anatomy
and are mostly sur-rounded by those mus-cles so that the bone isnot very close to thesurface, except nearthe knee and aroundthe hip.
✎ Patella. The patella isthe small bone that fitsover the knee and issometimes called thekneecap. It protects theknee joint and strength-ens the tendons of thatarea. It is very near thesurface and is quite dis-tinctive in the leg.
✎ Tibia. The tibia is thebone that connects theknee to the foot and isthe larger of the twolower-leg bones. It issometimes referred toas the shinbone. It isnear the surface on thefront of the leg, and itscurve is very evidentwhen you are viewingthe leg from the front.
✎ Fibula. The fibula is thesmaller of the twolower-leg bones and isprimarily used for mus-cle support in that area.It is located on the out-side of the body and ismostly covered withmuscle, so it is less evi-dent than the tibia.
✎ Foot bones. There are26 bones in each footfrom the ankle to thejoints of the toes. Thelargest bone is the cal-caneus or heel bone.The tarsal bones formthe ankle and are com-posed of seven sepa-rate bones. They arenear the surface andprotrude outward oneither side of the leg,forming the knobs wecall ankles. The insideknob is slightly higherthan the outside knob.The bones of the footare closer to the sur-face on the top of thefoot and toes than onthe bottom, which iscovered by thickpadding.
✎ Humerus. The humerusis the largest andstrongest of the armbones and runs fromthe shoulder to theelbow. It connects tothe scapula at theshoulder and the ulnaand radius at theelbow. It is covered bymuscles and only nearsthe surface at theelbow, where it pro-tects the ulnar nerve.Sometimes when theelbow is struck the
ulnar nerve causes atingling sensation,leading the humerus tosometimes be calledthe funny bone.
✎ Ulna. The ulna is thelonger of the twolower-arm bones and ismore firmly connectedto the humerus nearthe back of the elbow.The ulna is near thesurface, and if you runyour hand from theback of the elbow toyour wrist, you can feelthe hard surface of thisbone.
✎ Radius. The radius isalso connected to thehumerus, but not asfirmly as the ulna. It isalso more responsiblefor the movement ofthe wrist.
✎ Hand bones. There are27 bones in the handand fingers, runningfrom the wrist to thetips of the fingers. Theunderside of the handis covered withpadding and muscletissue, and the bonesare not as close to thesurface as they are onthe back of the hand,where they can be verydistinctive.

38
Figure Drawing with Virtual Models
Try to learn how these bones lookand function even if you don’tremember all their names. If youcan make sketches of each individ-ual bone, such as the humerus inFigure 3.2, you will gain a betterunderstanding of how the bonesaffect the shape of the body.
If you look closely at the skeleton,you will notice that there are nostraight bones. Every bone iscurved. In fact, every bone is madeup of many curves. If you draw thebones of the body as straight, youwill end up with a stiff, robotic-looking drawing. Your drawingswill look better if you understandthe direction of the curves of thebones and emphasize those curvesin your figures.
Figure 3.3 shows the female skele-ton. You can see from the skeletonthat there are many differencesbetween the male and femaleskeletons even though they aremade up of the same number andtypes of bones.
In the female, the pelvis is moreopen and proportionally largerthan in the male skeleton. Themale ribcage is proportionallylarger, giving the male skeletonwider shoulders and narrowerhips. They also give the female fig-ure wider hips, a higher waistline,and lower buttocks than the male.
In general, the female skeleton issmaller and more delicate than themale skeleton. The male skeleton isbuild for power and lifting. If you
look at how the bones are builtand the muscles, you will see thatthe male is more massive. Thebones are thicker, and the musclegroups are bulkier. On the femalethe bones are smaller and moreslender. The muscles are less bulky,almost strap-like, except for thearea around the hip and thigh,where the female tends to be morebulky than the male does.
A good example of how the twoskeletons differ is in the elbowjoint. The male elbow is a fairlydirect joint, whereas the femalejoint tends to have the lower armflare out. Take a look at your ownarm. Hold it out with the palm fac-ing up. If you are male, the armshould remain fairly direct. If youare female you will notice that the
Figure 3.2 Sketch individual bones of the skeleton.

39
Figure Anatomy
Figure 3.3 The female skeleton is different than the male skeleton.

40
Figure Drawing with Virtual Models
arm curves at the joint, and thelower arm is attached at an angle.There is actually a good reason forthis difference between the maleand female forms. The male arm isbuilt for power and lifting heavyobjects, therefore it needs a moredirect joint. The female arm is bet-ter suited to holding and carrying.A female can carry an infant longerwithout fatigue than a male can,based on the curvature of the arm.
An interesting side note to the dif-ferences in the arms between malesand females is that the slight curvein the female arm tends to give thefemale form a greater sense ofgrace. This greater sense of grace isvery evident in dance. If you noticethe arm movements of accom-plished dancers, the female canachieve a greater feeling of gracethan the more directly jointedmale. This subtle difference canhave a huge impact on your figuredrawings if you are aware of it.
Another aspect of the female formthat tends to give it a greater feel-ing of grace and beauty is the angleof the legs. The female leg tends tobe more oblique than the malebecause of her relatively wider
hips. Some women are taught toaccentuate this angle in charmschool or training for fashion mod-eling by walking with their feetplaced in a line directly in front ofeach other. Walking in this fashiontends to accentuate the curves ofthe hip and thigh.
In general, the female skeleton isrelatively smaller in most of thejoints, especially around the wristand ankles. The hand and feet ofthe female figure are smaller andmore delicate, and the feet aremore arched. The neck is moreslender, and the facial features areusually smaller and more delicate.
It is important that the artist real-izes the many differences betweenthe male and female skeletons.Although there are many similari-ties, the more you study the differ-ences, the more you will realizethat the male and female skeletonsare very different. Learning the dif-ferences in addition to learning thecomponent parts of the skeletonwill help you to better express themale and female figures in yourdrawings.
The Muscles
There are more than 600 musclesin the body, and they fall into threegroups—skeletal, smooth, and car-diac. The smooth and cardiac mus-cles deal primarily with internalorgans and are not evident in sur-face anatomy. Skeletal muscles, onthe other hand, make up a largeportion of tissue that is next to theskin on an ideal figure, and theyplay a large part in how the humanbody looks and moves. Figure 3.4shows the male figure with manyof the important muscle groupsshown.
Many of the skeletal muscles of thebody are close to the surface andhave dramatic influence on how ahuman form looks. There are alsomany muscles that are deeper inthe body and have little directvisual impact on it. Memorizing allof the muscles might help the artistunderstand the body, but under-standing the main muscles of thebody is essential to good figuredrawing.

41
Figure Anatomy
Figure 3.4 Many muscles are near the surface.

42
Figure Drawing with Virtual Models
The following is a list of the moreimportant muscles and what theydo.
✎ Sternomastoid.
Sternomastoids are thelarge muscles on thesides of the neck. Theyare attached to theskull on the top and theclavicle on the bottom.These proponent mus-cles help to give theneck its distinctiveshape.
✎ Trapezius. The trapez-ius muscles extendfrom the shoulder tothe spinal column andfrom the bottom of theskull to about halfwaydown the back. Theyare triangular musclesused for raising andlowering the shouldersand also pulling thescapula closer together.In addition, the trapez-ius muscles contributeto the movement of theneck and head. Theyare mostly prominentas the large muscles onthe back of the shoul-der leading from theshoulder to the neck.When highly developedin the male figure, themuscles will have apronounced bulge.
✎ Deltoid. The deltoidmuscle is one of themost prominent mus-cles in the body. Itforms the outer part ofthe shoulders. It isattached to the claviclein the front and thescapula in the back,and also the humerusin the arm. The deltoidmuscle is a powerfulmuscle that is used toraise a person’s arm. Ifyou hold your handover the deltoid and liftyour arm in the air, youcan feel the musclecontracting.
✎ Pectoral. The pectoralmuscles are the large,prominent musclescovering the upperribcage. They form twobulky masses that aremost prominent in themale figure. In thefemale figure, they aresomewhat covered bythe breasts. A commonmistake of beginningfigure artists is to focuson the breasts on afemale figure and notrecognize the underly-ing muscles beneaththem. The pectoral
muscles are the pri-mary muscles for mov-ing the arm forward. Ifyou hold your armsstraight out in front ofyou and press yourhands together, youcan feel the strain onyour chest, and youcan even see the pec-toral muscles bunch.
✎ Serratus anterior. Theserratus anterior is agroup of muscles alongthe outer ribcage thatattach to the inside ofthe scapula. They helpto rotate the scapula,and thus the arms,downward. They havea distinctive rib-likeappearance in a leanperson and are oftenmistaken for the ribbones themselves.
✎ External oblique. Theexternal oblique mus-cles form the fleshymuscles running fromthe lower ribcage to theupper pelvis on thesides of the torso. Theyare the musclesresponsible for bend-ing the torso from sideto side.

43
Figure Anatomy
✎ Abdominal. Theabdominal muscles arethe muscles on thefront of the body thatattach the ribcage tothe front of the pelvis.They are lumpy mus-cles that are mostprominent in a lean,muscular figure. Thereare six muscles at thetop of the abdomen,three on each side,which form what body-builders often call a six-pack. Don’t make themistake of drawingmore muscles in theabdomen than areactually there.
✎ Iliac crest. The iliaccrest is not a muscle,but rather the bonyarea of the pelviswhere it is close to thesurface. The crest pro-trudes on a thin or eld-erly person and is adimple on a heavy person.
✎ Sartorius. The sartoriusmuscle is a long strap-like muscle thatextends from the outerpelvis to the inside ofthe leg, attaching to theupper tibia. It is an
important muscle thatgives the thigh its dis-tinctive curvature. It isresponsible for helpingin the rotation of theupper leg.
✎ Quadricep. The quadri-cep is made up of fourmajor muscles on thefront of the thigh. Thevastus medialis is onthe inside of the legand bulges just abovethe knee. The vastusintermedialis is nearthe center of the leg.The vastus lateralis ison the outside of theleg and forms the out-ward bulge of the thighas seen from the frontview. The rectusfemoris is the largest ofthe four muscles andcovers much of thecentral part of the frontof the thigh.
✎ Gastrocnemius. Thegastrocnemius, alsoknown as the calf mus-cle, is the large fleshymuscle on the back ofthe lower leg. It is mus-cle we use when westand on our toes. Itpulls the heel up andthe foot down.
✎ Tibialis. The tibialis ison the front of thelower leg and is muchsmaller than the calfmuscle on the back. Itis used to pull the heeldown and the foot up.
✎ Bicep. As the namesuggests, the bicep isactually two musclesthat are used to pull thelower arm up. This isthe muscle that is oftenmost associated with astrong, muscular per-son. Bodybuilders willoften flex this muscleto show their armdevelopment. It is oneof the most prominentand recognized mus-cles on the body.
✎ Tricep. The tricep isthree muscles on theback of the arm thatpull the lower armcounter to the bicep.They form the massybulge on the upper partof the back of the armbelow the deltoid.

✎ Brachioradialis. Thebrachioradialis is justone of the many mus-cles of the forearms. Itis prominent in that itforms a bulge on theouter part of the armrunning from betweenthe tricep and bicepand around to thewrist. It is one of the longer forearmmuscles.
✎ Flexor carpi radialis.
On the opposite side ofthe forearm from thebrachioradialis is theflexor carpi radialis.This muscle forms thedistinctive bulge on theunderside of the arm.
Figure 3.5 shows some of themajor muscle groups from theback.
Some muscle groups that are betterseen in the back view of the figureare as follows:
✎ Latissimus dorsi. Thelatissimus dorsi is thelargest muscle in thebody and gives theback the familiar Vshape. They are some-times referred to as latsfor short. They extendfrom the shoulder tothe small of the back
and are used to pull thescapula together andthe arms back. You useyour latissimus dorsimuscles when you do arowing motion. Theyattach to the spinal col-umn and form the dou-ble ridge of the back oneither side of the spine.
✎ Lumbodorsal fascia.
The lumbodorsal fasciaare the massive mus-cles located in thelower back area. Theycontinue the doubleridge of the spine downto near the pelvis. Theyare the muscles usedfor bending the torsoback and lifting.
✎ Gluteus medius. Thebulging muscles of thebuttocks are formed onthe top by the gluteusmedius. These musclesare involved in liftingbecause they pull thepelvis back in relationto the thigh. They arealso used to pull theleg back when walkingor running.
✎ Gluteus maximus. Thelower, bulkier part ofthe buttocks is made ofthe gluteus maximusmuscles. These power-ful muscles work in the
same way as the glu-teus medius muscles inthat they pull the legback in relation to thepelvis. If you hold yourhand over the musclewhile standing up, youcan feel the muscleflex. These muscles arevery pronounced anddistinctive on thehuman figure.
✎ Biceps femoris. Like thebicep in your arm,there is also a bicep inyour leg called thebiceps femoris muscle.These muscles work tobend the leg at theknee similar to thebicep in the arm. Theyattach to the lowerpelvis and the upperfibula and by ligamentsto the tibia.
✎ Achilles tendon. TheAchilles tendon is not amuscle, but rather atendon. It attaches thegastrocnemius, or calfmuscle, to the heel.The Achilles tendon isthe most pronouncedtendon in the body andserves a very importantfunction. Without them,it would be impossibleto stand or walk.
44
Figure Drawing with Virtual Models

45
Figure Anatomy
Figure 3.5 Muscles as seen from the back

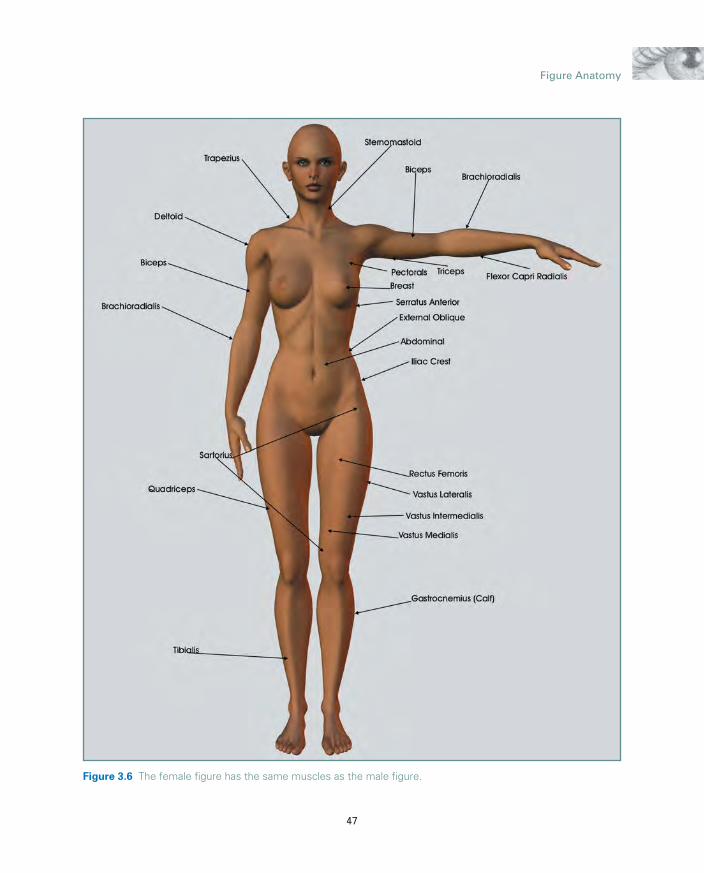
Figure 3.6 shows the female figurewith her muscles labeled.
As you can see from the labels, allof the muscles of the male figureare also present in the female fig-ure. However, the size and bulk ofthe female muscles are very differ-ent from the male’s. In almostevery case, except for the hip andthigh, the male muscles are moremassive and defined.
The female figure naturally has alittle more fatty tissue than themale figure. This fatty tissue tendsto smooth out some of the muscledefinition, causing the female formto look smoother than the male figure.
The female breast is one of themost distinguishing aspects of thefemale figure. The breasts are madeup of fatty material and are notmuscles. Because of this, thebreasts tend to change shape as thefigure moves to different positions.
Figure 3.7 shows the female figurefrom the back.
From the back the female figurehas a distinctive hourglass shape.The more slender the person, themore pronounced the hourglassshape of the figure. Because thisshape is considered beautiful bymany, women often go to greatlengths to maintain a slender fig-ure.
I hope that this explanation of themuscles is helpful in your study ofanatomy. As you become morefamiliar with muscles, you willlearn how they react to each otherto create motion. You should studyhow the muscle looks when it isrelaxed and how it looks when it isflexed.
Some muscles rotate, such as in the lower arms and legs. Thesemuscles can look very differentdepending on the extent of therotation. Take, for example, theforearm. Look at your forearmrelaxed. Now rotate the arm to the left without turning the upperarm. See how the muscles change?Now try rotating the arm to theright. Look at the differences in themuscles.
It is insufficient to study the mus-cles by themselves. The figure artistmust also understand how themuscles work together to move thebody. Some muscles flex to movethe body one way, and others flexto move the body another. Youneed to understand which musclesdo what.
Another element of the humanform is that there is a great deal ofdifference in the figure dependingon how much fat the person is car-rying on their body. Fat tends toobscure the muscles and bonyareas of the body because it oftenforms a layer between the skin andthe muscles. Placement of fat dif-fers greatly in individuals as well.Some people will carry fat high,forming large bellies, while otherswill carry it low, forming largehips.
46
Figure Drawing with Virtual Models
47
Figure Anatomy
Figure 3.6 The female figure has the same muscles as the male figure.

48
Figure Drawing with Virtual Models
Figure 3.7 The female figure has a distinctive hourglass shape from the back.

Using Figure
Artist
Figure Artist contains virtual figuremodels that are as anatomicallycorrect as possible for the type ofmodels that they are. When theymove, they closely approximate themovement of an actual person’sanatomy. Although they are notperfect and there are situations inwhich the model does not followthe figure completely, the modelsdo serve as useful tools for study-ing human anatomy. Figure Artistshould not replace the study ofbones and tissue from live models,but it can be a great tool for learn-ing and understanding the differentbones and muscles of the body.
If you are interested in deeperstudy of the human form, I suggestthat in conjunction with FigureArtist, you pick up some goodbooks on artistic anatomy and usethe knowledge you gain from thesesources in some live drawing ses-sions where you can see the realfigure.
Because the human body is verycomplex, anatomy is not a simplesubject, and it takes some time tolearn all of the different aspects ofthe human form. Don’t feel thatyou need to learn it all at once. It isbetter learned through practice.Study an aspect of anatomy for awhile, and then practice drawingit. Drawing is the best way for anartist to learn the human form.
In this chapter you covered manyimportant aspects of humananatomy. This book is not intendedto be an anatomy book, so theinformation here should just getyou started on your way to under-standing this fascinating aspect offigure drawing. In the next chapter,we will cover some of the more dif-ficult aspects of drawing the figure,such as drawing hands, feet, andfacial features.
49
Figure Anatomy

C H A P T E R 4

H a n d s , F e e t , a n d H e a d
✎
51
Some areas of the figure are complex enough to warrant special atten-tion by the figure artist because they are more difficult to draw than therest of the figure. These areas are the head, hands, and feet, and they
merit special attention from the artist who really wants to master figure draw-ing. In this chapter we will take a closer look at each of these aspects of thefigure.
Hands
The human hand is probably the most versatile tool ever created. It is capable ofgreat strength, yet it can perform the most delicate operations. Its design allowspeople to lift, hold, mold, rip, manipulate, caress, build, squeeze, sense, andrearrange objects of all types. It can be used as a weapon or to give comfort. Weuse our hands to greet others and even to communicate. The hand is the very def-inition of the all-around instrument. With all that our hands can do, is it any won-der that it is one of the more complex parts of the body to draw?
There is no quick and easy formula for drawing hands. To draw the hands well,the artist must know the hands. He must take time to study and understand howthe hand works so that his drawings become more believable. Often the beginningartist will be intimidated by the complexity of the hand and will avoid drawing itby hiding it in a pocket or placing it behind the figure. Many otherwise good fig-ure drawings will omit the hands, or they will just indicate the hands without anyreal attempt to draw them correctly.
Part of the frustration that artists have in drawing the hand is that it is the mostflexible part of the body. It can assume almost infinite positions. It is full of mov-ing parts. There are four fingers and a thumb, each jointed with no less than three

52
Figure Drawing with Virtual Models
joints. The fingers and thumb areeach capable of independent move-ment. Because of this extreme flexi-bility, there is not one view of thehand that is adequate for learningto draw it. It has to be studiedfrom many angles and in manypositions for the artist to trulyunderstand its overall nature.
Anatomy of the
Hand
Our hands are made up of 27bones that can be split into threegroups. The bones of the wrist arecalled the carpals. They are smallbones that work together to givethe wrist its flexibility. The wristitself is composed of eight separatebones to allow for extreme move-ment of the hand.
The wrist can move in almost anydirection in a half circle around theend of the forearm. Unlike theshoulder and the hips, which use asingle joint between two bones, thejoints of the wrist and the foot useseveral bones. The bones of thewrist and ankle are different in thatthey need to be flexible yet sustainprolonged pressure. The ankle, forexample, must remain locked inplace for extended periods while aperson is standing. The wrist mustlock in place when a person ispushing with the hand. The manybones that make up the wrist andankle are designed to withstand
extended pressure while remainingflexible when needed. Figure 4.1shows the bones of the hand.
The metacarpal bones run throughthe palms of our hands. They arelonger and narrower than the
carpals and reach to the firstknuckles of the fingers and thumb.The metacarpal bones are evidenton the back of the hand in adultsand elderly people, but are coveredby a thin layer of fat in babies andchildren.
Figure 4.1 The carpal bones make the wrist flexible and strong.

53
Hands, Feet, and Head
If you flex and release your handyou will see that the metacarpalshave quite a range of movement,allowing for the hollow part of thehand to conform to almost anyobject that you might want to pickup. Unlike the other joints of thefingers that only bend in one direc-tion, they can move in multipledirections.
The bones in the fingers andthumb are called phalanges. Thesebones are on the back of the fin-gers. The joints of the phalangesonly move in one direction, andtheir range of motion is limited tothe palm side.
The bones of the hand are con-trolled by a number of ligamentsthat run across the back of thehand for opening the hand andthrough the palm for closing thehand. Many of the muscles thatcontrol the movement of the handare located in the forearms, not inthe hands themselves. The power-ful muscles of the arm give thehand such incredible strength with-out the size associated with themuscles needed for that strength.Because of this, the hand itself canbe very small, yet still have a stronggrip that is capable of holding theentire weight of the body.
The palm of the hand is hollowwith an indentation between thejoints of the fingers and the largemuscle of the thumb. This designfacilitates the operations of grasp-ing and holding objects.
The back of the hand in an adulthas much less padding than thepalm, so the ligaments, bones, andblood vessels are more evident.Whereas the palm is somewhatstandard in its look from hand tohand, the back of the hand canhave a big range in how it looksdue in large part to the veins thatcrisscross it. The veins of the backof the hand are unique to the indi-vidual in much the same way thatindividual fingerprints are unique.
One of the best sources for draw-ing hands is to draw your ownhand. You can also try drawingyour friends’ hands. Figure 4.2shows several hands drawn fromdifferent angles. Try drawing lots ofhands until you start to feel com-fortable with the subject. Think ofthe fingers and thumb as tubesconnected by hinges. This shouldhelp you to better visualize thehand in three dimensions.
Figure 4.2 Draw hands from different angles.

54
Figure Drawing with Virtual Models
To better understand the hand, let’stake a look at how it works. Thehand has two sides—the palm, orgrasping side, and the back, ornon-grasping side. Figure 4.3shows the palm of the hand.
The palm is characterized by beinga concave surface surrounded by
muscle tissue, the largest of whichis the muscle that controls themovement of the thumb. The fin-gers are attached at the end of thepalm, and the thumb is attached tothe side. Tendons that extendthrough the palm to the muscles ofthe forearm control the movementof the fingers. If you look carefully
at the underside of your wristwhile making a fist, you can seethe movement of these tendons.
The back of the hand is shown inFigure 4.4. This part of the hand ischaracterized by knuckles, ten-dons, and veins, giving it a some-times rough appearance.
Figure 4.3 The palm is the grasping side of the hand. Figure 4.4 You can see the tendons on the back ofthe hand.

55
Hands, Feet, and Head
The knuckles of the hand followconsecutive arcs that become moreand more pronounced from thebase of the hand outward, asshown in Figure 4.5.
Notice that the second knuckle ofthe thumb is along the arc of thefirst knuckles of the fingers. Whenconstructing the hand, it is oftenuseful to draw in the arcs beforeyou rough in the fingers. This willhelp to keep your hand unifiedand the proportions right.
Figure 4.5 The knuckles of the hand follow arcs.

56
Figure Drawing with Virtual Models
The Foot
The foot is a marvel of engineering.It is designed for holding the entireweight of the body in balance.Although it is relatively small com-pared to the rest of the body, thefoot is designed to support thebody in a wide range of movement.While most all other animals in theanimal kingdom walk on all fours,man is the only land creature thatcan balance walking on two legswithout the support of forepaws ora tail.
The foot contains 26 bones, similarto the hand’s 27, but the bones
of the foot are much larger andheavier than those of the hand.The largest bone of the foot is thecalcaneus that forms the heel. Thisbone acts counter to the otherbones and is attached to the body’slarges tendon, the Achilles tendon.Just above the calcaneus bone isthe talus bone. The talus bone actsas a pivot joint between the mas-sive calcaneus bone and the frontbones of the foot. Figure 4.6 showsthe bones of the foot.
The mid foot contains the tarsalbones. These bones form the archof the foot and act as weight dis-tributors and shock absorbers.
Figure 4.6 The foot contains 26 bones.
The metatarsal bones are similar tothe hand’s metacarpal bones. Theyare flexible joints that connect thetarsal bones with the phalangebones of the toes.
The phalange bones of the footcomprise the bones of the toes.There are 14 phalange bones—twoin the big toe and three in each ofthe other toes.
The bottom of the foot is paddedwith a layer of fat that acts as acushion for the foot. The plantarfascia ligament holds the bones ofthe arch together and lifts the arch.A series of tendons runs along thetop of the foot up through theankle. These tendons are very evi-dent in the foot, particularly whenthe toes are lifted.
The Achilles tendon connects thecalf muscle with the calcaneusbone on the heel of the foot. Thetendon forms the narrow ridge thatruns up the back of the foot.
The foot is basically wedge-shapedfrom the side and with a concaveindentation of the arch on theinside bottom. It is narrower at theback than it is at the front. Like thehand, a series of blood vessels

57
Hands, Feet, and Head
cross the upper foot, formingridges. Figure 4.7 shows some con-struction drawings of the foot.
Try to draw the foot as many timesas you can. With the aid of a mir-ror, you can get a good view ofyour own foot to work from. Inaddition, you can pose and drawfrom the feet of your virtual mod-els in Figure Artist. Figure 4.8shows a close-up shot of a footfrom Figure Artist. Although not asdetailed as an actual foot, the mod-
els in Figure Artist are great forlearning proportion and construc-tion of the foot.
Try isolating and drawing the footby itself so that you feel confident.I remember talking with an artistfriend of mine who was trying toget accepted at a major art gallery.He said he brought his paintingsinto the gallery and placed themagainst the wall. The gallery ownerwas talking with a customer anddidn’t pay much attention to himfor several minutes. Then, all at
once, he stopped talking andwalked over to my friend’s paint-ings. He picked up one of hispaintings and asked if my friendhad painted it. My friend answeredthat he had.
The gallery owner looked at myfriend and said, “You know how topaint feet! You don’t know howmany artists I see who don’t knowhow to paint feet.”
My friend was accepted into thegallery.
Figure 4.7 Draw the foot from many different angles.
Figure 4.8 You can use the virtual feet in Figure Artistas foot references.

Just because your feet are farthestfrom your head and at the bottomof the body does not mean thatthey are not important. Figure 4.9shows a more finished drawing of afoot.
58
Figure Drawing with Virtual Models
Figure 4.9 Some drawings should look for the subtle detail in the shading of the foot.

59
Hands, Feet, and Head
The Head
Although this is not a book aboutportraiture, it is still a book aboutdrawing the figure, and no figure-drawing book is complete withouttaking a close look at drawing thehead. There is probably no otherpart of human anatomy that isviewed more than our heads, andthere is probably no part of thehead that is more sought out byothers than the eyes. The head isthe central element of countlessworks of art. Whole industries,such as beauty salons and cosmet-ics companies, are devoted toenhancing the beauty of the head.
Drawing a great figure drawing ofthe body is wonderful, but if youcan’t put a decent-looking head onthe figure, your drawing willalmost immediately fail. Peopletend to search out the head andeyes of a person in a drawingbefore they look at anything else. Itis kind of like the opening chapterin a book. If you can’t grab theviewer’s attention with a well-drawn head, you will most likelylose the viewer.
To draw the head well, you need tolearn how to construct the headand how to place each feature in itsproper place. Like everything else,begin from the inside and workout.
Anatomy of the
Head
The head gains much of its shapefrom the skull. Although the skullmight appear to be a single bone, itis in fact made up of several bonesthat are completely or partiallyfused together. The areas where thebones are fused together are calledsutures. Some of the bones arefused at birth, but others fusetogether as a person grows tomaturity. Figure 4.10 shows thehuman skull from a side view,showing some of the sutures thatdivide the bones of the skull.
The bones of the skull form a pro-tective layer for one of the body’smost important and delicateorgans, the brain. If you feel alongyour forehead and back over yourhead, you will notice that thebones of the skull are very close tothe surface of the skin. If you pressyour fingers against your foreheador scalp and move them around,you will also notice that there is alittle give in the skin because it ismore loosely laid against the bonethan in other location on the body.As a person ages, the skin becomelooser and begins to sag.
Figure 4.10
The bones ofthe skull fusetogether as apersonmatures.

60
Figure Drawing with Virtual Models
Figure 4.11 shows the skull fromthe front.
The skull can be broken down intotwo parts—the cranium and themandible. The cranium includes allbones of the skull except the jaw-bone, which is called the mandible.The jaws are powered by two mus-cles on either side of the jaw thatare attached to the skull under thezygomatic arch. Other muscles ofthe head stabilize the bones andproduce facial expressions.
Figure 4.11
The skull isnear the sur-face on theforehead andscalp.
Proportions
Proportion in figure drawing is aterm used to describe accuratelydefining relative distances betweenphysical features of the humanbody. This means that when draw-ing people, all aspects of the bodyare related to each other so that nopart is drawn too small or toolarge.
Proportions of the Head
The proportions of the head arerather simple if you take the timeto study them. Figure 4.12 belowis a drawing of a head from thefront and the side.
Figure 4.12 A head from the front and side.

61
Hands, Feet, and Head
Although there are individual vari-ations, most heads fall within somegeneral guidelines.
✎ The face can be dividedvertically into four sec-tions. The hairline is inthe top section. The topof the eyes and theeyebrows are in thenext quarter section.The bottom of the eyesand the nose are in thenext lower quarter, andthe mouth and chin arein the bottom quarter(see Figure 4.13).
✎ The distance betweenthe eyes is about oneeye-width, as shown inFigure 4.14. Notice thatthe nose is also aboutan eye-width wide.Noses vary in widthquite a bit, so this isnot always the case.
✎ The width of the mouthgenerally falls insidethe distance betweenthe pupils of the eyes,as shown in Figure4.15.
✎ The ears usually are ashigh as the top of theeyes and extend tonear the bottom of thenose, as shown inFigure 4.16.
Figure 4.13 The face can bedivided vertically into four quarters.
Figure 4.14 The eyes are aboutone eye-width apart.
Figure 4.15 The mouth is usuallyinside the width between thepupils.
Figure 4.16 The ears are about thelength from the top of the eyes andthe bottom of the nose.

62
Figure Drawing with Virtual Models
✎ The ears usually fall inthe back half of thehead, as seen from theside (see Figure 4.17).
Figure 4.17 Theears are morethan halfway backon the head.
Figure 4.18 Thefront of the neckstarts abouthalfway back onthe head.
✎ When measuring fromthe tip of the nose tothe back of the head,the base of the front ofthe neck falls at aboutthe midpoint, as shownin Figure 4.18.

63
Hands, Feet, and Head
Construction Guide for
the Head
With these principles in mind, youcan now create a constructionguide for drawing heads. To helpthem accurately draw in 3D space,artists use construction guides as aframework for placing features.Here is how it works. First, startwith a circle. The circle will act as aguide for most of the skull.
The bottom of the circle will gener-ally fall somewhere between themouth and the nose, and most of
the time it will come just below thecheekbones, as shown in Figure4.19.
Notice that the circle extends outfrom the head on either side, pastthe ears. This is because the head isnot a perfect circle. When drawing,you need to remember to bring thesides of the head inside the circle.
Split the circle in half both verti-cally and horizontally. The head isfundamentally symmetrical. Thevertical line defines the center of
the face. The horizontal line isused as a guide for placing fea-tures.
Once you have established the cir-cle, draw in the jaw line. It willextend down below the circle, asshown in Figure 4.20. Extend thevertical line to the bottom of thejaw.
Divide the head construction withhorizontal lines for the eyes, nose,and mouth, as shown in Figure4.21.
Figure 4.19 Start the drawing witha simple circle.
Figure 4.20 Draw in the jaw line. Figure 4.21 Draw lines for theeyes, nose, and mouth.

This is the basic construction guidefor drawing a head from the front.Figure 4.22 shows the constructionfor drawing a head from the side.
Not every head you draw will be afront view or a side view. Often thehead will be turned to one side orthe other, or it will be looking upor down. Most of the time, youwill need to create the constructionguide as a 3D shape. Figure 4.23shows the construction guidemoved into a three-quarter turnwith the circle, cross lines, and thejaw line drawn in. Notice that thecross lines are drawn as ovals, indi-cating the turn of the head to theleft and the tilting of the headslightly down.
Next, draw in the lines defining theeyes, nose, and mouth, as shownin Figure 4.24. The lines goingaround the back of the head arelightened so you can better seehow they work.
64
Figure Drawing with Virtual Models
Figure 4.22 The construction lines work for a side view as well.
Figure 4.23 Draw the constructionguide as a 3D shape.
Figure 4.24 Finish drawing theconstruction guide in 3D space.

65
Hands, Feet, and Head
The lines can now be used todefine the location of the features.Figure 4.25 shows the constructionguide over the face and the draw-ing once the guide is removed.
It takes a little practice to get thefeatures in the right places using
Figure 4.25 Use the construction guide to draw the face.
the construction guide. Rememberthat the construction guide definesthe base of the nose where it pro-trudes from the face. The eyes, onthe other hand, generally recess infrom the line. The top cross line isjust about the level of the eye-brows. The sides of the face do not
extend all the way to the edge ofthe circle.
Try drawing a few faces on yourown. Figure 4.26 shows a con-struction guide that you can copyand use to practice.

66
Figure Drawing with Virtual Models
Figure 4.26 Use the construction guide to draw the head.

67
Hands, Feet, and Head
Facial Features
Drawing the head is easier if theartist is familiar with all of the fea-tures of the face. Each feature isunique, and understanding themcan improve your ability to drawhigh-quality heads for your charac-ters. A good way to understandhow to draw the head is to isolateeach feature and learn how to drawit. Try filling sketchbooks witheyes, noses, mouths, and ears.
Let’s take a look at the individualfeatures of the face and see howeach one is drawn.
Eyes
The human eye is a sphericalobject recessed into the skull. Weonly see a part of it. It is covered
by eyelids and protected by a ridgeof bone that makes up the browand cheekbones of the skull.Figure 4.27 shows the many partsof the eye.
Here are some tips for drawingeyes:
✎ Eyelids have thicknesson the top and the bot-tom. It is most evidenton the bottom lid.
✎ When drawing thelashes, plant the tip ofthe pencil at the baseof each lash andrelease pressure on thepencil stroke as youdraw in each lash.
✎ The highlights of theeye are direct reflec-tions of the lightsource. They arealways the brightestpart of the eye, evenbrighter than thewhites of the eye.
✎ There is often a foldabove the eye thatbecomes more evidentthe more the personopens his eyes.
✎ There is a cast shadowbelow the upper lid onthe eyeball.
✎ Remember to draw thetear duct on the innerside of the eye.
✎ The pupil sits behindthe lens of the eye, noton the surface of theeyeball.
✎ The eye bulges fromthe skull at the centerbecause of its ballshape (see Figure 4.28).
Figure 4.27 There are many parts that make up an eye. Figure 4.28 The eye bulges in themiddle.

Nose
The nose is often one of the hard-est features for a beginning artist todraw. That is because the nose is aprotrusion from the face and isindicated mostly by delicate shad-ing along the bridge. Often thebeginning artist will try to drawthe nose using lines from the eyes.It is better to think of the nose as aprotruding structure that blends inwith the other structures of theface, as shown in Figure 4.29.
A nose is made up of bone, carti-lage, and soft tissue. The bony
bump often seen on the ridge ofadult male noses is the transitionbetween the skeletal bone of thenose and the cartilage, as shown inFigure 4.30. There are three piecesof cartilage in a nose, one along thebridge and then two at the tip ofthe nose. If you feel the tip of yournose with your finger, you shouldbe able to sense the two plates andthe small recess where they cometogether. With some noses thisrecess between the cartilage platescan be seen.
Both nostrils have a soft tissue flapthat extends from the tip of the
nose and around each nostril. Theflap tucks in to the upper lip andoften forms a slight outward bulge.
The upper lip often reflects light tothe lower part of the nose. Themore ball-shaped the end of thenose is, the more this reflectedlight is evident.
The highlight of the nose is usuallyabove the tip of the nose.
Noses are generally larger on olderpeople because the nose continuesto grow throughout our lives.
68
Figure Drawing with Virtual Models
Figure 4.29 The nose is a protruding structure thatblends in with the rest of the face.
Figure 4.30 There are many parts that make up anose.

69
Hands, Feet, and Head
Mouth
The lips frame the mouth openingfor the face, as shown in Figure4.31. They are primarily fleshy tis-sue with underlying muscles thatenable movement. They form themost dominant feature of themouth and are divided into twoparts—the upper and lower lips.
The upper lip is attached to theskull, and the lower lip is attachedto the jawbone. Because of the twoseparate bone attachments, themouth has the widest range ofchange of any facial feature.
The lips cover the inner mouth andderive much of their shape fromthe teeth. If seen from one side orthe other, there is a pronouncedarch from the sides of the mouth tothe middle, as shown in Figure4.32.
When drawing the mouth, theupper lip is usually in shadowfrom overhead lighting. The lowerlip typically has more direct lightand a highlight. The upper lip willoften cast a shadow on the lowerlip when the lips are together andon the teeth when the lips areapart.
There is a ridge of transitionbetween the skin of the face andthe flesh of the lips. This area isslightly lighter than the surround-ing skin and is more noticeable onpeople with darker flesh tones andon men.
There is often a shadow beneaththe lower lip above the chin. Thelarger the lower lip, the more likelythe shadow will be evident.
When drawing the mouth open,draw the teeth as a single masswith shading. Come in later anddefine the individual teeth, asshown in Figure 4.33. Rememberthat the teeth are generally inshadow even though they arewhite.
Figure 4.31 The lips frame the mouth.
Figure 4.32 The mouth curvesaround the face.
Figure 4.33 The teeth are usuallyin shadow from the upper lip.

Ear
Ears vary widely in shape and sizefrom person to person. Some peo-ple have large ears, and some havesmall ears. Some ears lay flatagainst the skull, while others pro-trude. Older people tend to havelarger ears than younger peoplebecause the ear continues to growthroughout our lives. Even thoughthe ear is not prominently placedon the front of our faces, it is still a
significant facial feature and shouldnot be ignored. Figure 4.34 showsthe major parts of the ear.
The ear is basically a sound-catch-ing mechanism and, as such, actsas a funnel for sound waves. Thefleshy outer parts of the ear chan-nel sound to the concha, and thenthe inner ear through the ear can-nel. An anterior notch protects theear canal from damage.
The ear is made up of a stiff yetflexible tissue that keeps its shapebut can bend when needed. Aridge of skin called the helix sur-rounds the upper and back of theear. The lower part of the ear formsa lobe and is more flexible than therest of the ear.
When drawing the ear, think of themany shapes and shade themaccording to the shading principlesdiscussed earlier. There are manyareas of cast shadow and reflectedlight. Most drawings view the earfrom the front of the face, as shownin Figure 4.35.
70
Figure Drawing with Virtual Models
Figure 4.34 The human ear. Figure 4.35 The ear is seen from thefront in most portraits.

71
Hands, Feet, and Head
Hair
Okay, I know hair is not consid-ered a facial feature, but it is part ofthe head so we will take a look at itas well. Hair is not an individualfeature, such as a mouth or an eye,but rather it is made up of manyseparate strands. Often artists findhair difficult to draw because theydon’t understand how it catcheslight and how it flows. Figure 4.36shows some of the basic aspects ofdrawing hair.
Hair is usually shiny and catcheslight with many highlights. It isusually a good idea to look at thehighlights and shadow areas of hairfirst. The highlights will be thewhite of the paper unless the hairis very dark. Draw in the shadowareas first. Then draw in the transi-tional areas with individual pencilstrokes emanating from theshadow areas toward the highlightareas. Each stroke should startdark and then lighten as pressureis released from the pencil.
Longer hair usually clumps inlocks. A head of hair is made up ofseveral overlapping locks. This ismost evident in longer wavy orcurly hair.
When the hair is parted, as shownin Figure 4.37, there is usually ashadow area near the scalp and ahighlight as the hair changes direc-tion and lies against the skull.
As you can see, there are manyfacets to each facial feature on ahead. I suggest that you spendsome time working on each featureuntil you feel comfortable drawingit. Fill some sketchbooks with pic-tures of eyes, noses, mouths, ears,and hair. When you feel you’vemastered the individual features,try putting them together. Figure4.38 shows a finished head.
Figure 4.36 Hair is made up of many individualstrands.
Figure 4.37 A highlight runs parallel to a part in thehair.

72
Figure Drawing with Virtual Models
Figure 4.38 Put the features together to draw a head.

73
Hands, Feet, and Head
Using Figure
Artist
One of the biggest advantages ofusing Figure Artist to set up yourcharacters for figure drawing is thefact that the models are detailed.They have all of their fingers andtoes, and they are all proportion-ally correct. In addition, they areaccurate for studies of the head oreven of individual features, such asthe ear or nose. The models mightnot have every scrap of detail thatan actual person does, but they are
a great help as reference for con-struction and lighting. Figure 4.39shows a close-up of James. As youcan see, the construction andplacement of the facial features arevery accurate.
As the artist, you have completecontrol over how you use FigureArtist. You can just use it to helpyou sketch figures, and then laterhire a live model, or you can use itas your model for your pictures.
When it comes to learning how todraw the hands, feet, and head,Figure Artist is a great resource
because you have at your fingertipsan unlimited supply of referencethat you can pose and draw. Figure4.40 shows a close up of Jessi’shead. Try drawing her to see howyou do with her head.
Hopefully this book has given youa good foundation from which youcan build your drawings. Youshould now be ready to start pos-ing and drawing your own figuresfrom Figure Artist. In the next fewchapters, you will be learning howto pose, light, and compose yourvirtual models.
Figure 4.39 The facial features in Figure Artist arealmost lifelike.
Figure 4.40 Try drawing Jessi’s head.

C H A P T E R 5
Figure 5.1 The figure’s emotion is expressed by his stance.

P o s i n g t h e F i g u r e
✎
75
The human figure is an expressive form. Often you can tell what peopleare thinking by how they stand or hold themselves. When doing figuredrawings, you will be confronted with the choice of how to pose your
figures. This decision can be critical to the success of the drawing. Look at thedifference between the stances shown in Figure 5.1. Can you describe the emo-tion of each figure?
The human body has an expressiveness that communicates through an unspo-ken language often referred to as body language. As an artist, you must learn thislanguage and become as expressive with it as a writer is with words.
Much of the choice of how you want to pose the figures in your drawings isdetermined by the purpose or goal of your drawing. It begins with the creativegerm of an idea that is developed sometimes well before a pencil is put to paper.Sometimes the idea developed is wholly the artist’s, although many times theartist has influence from outside sources, such as in the case of commissionedwork or commercial art.
Another important aspect of posing a character is the physical association of thebody with the environment. Because we live in a physical world, our bodies aresubjected to a number of physical forces, not the least of which is gravity. A posethat is off balance or ignores the effects of gravity can often make for an awkward-looking drawing. While this may not be as much of a problem when drawingfrom life, it does become a problem when posing a figure in a virtual setting.
The third element to posing a figure that will be covered in this chapter isbeauty. The human form is considered by many to be the ultimate expression ofbeauty. It has the potential to inspire the mind and enrich the soul, but like anysubject, it can also be seen as awkward or unsettling depending on how it isportrayed.

76
Figure Drawing with Virtual Models
What Pose?
When faced with a white sheet ofpaper that is supposed to become afigure drawing, one of the firstquestions an artist must answer iswhat pose the figure should be in.This is true whether the drawing isa commissioned portrait or a sim-ple figure study.
Many elements go into determin-ing the pose for a drawing, butthey all begin with the purpose ofthe drawing. Maybe the drawing iscommissioned to illustrate a story.The artist has to visualize the storyand think of how the people in itwill interact with each other. Thecharacters in the story have to beenvisioned. The situations need tobe explored. The mood of the storyshould also be taken into consider-ation. For example, the story mightbegin with a woman waiting for afriend to arrive. Figure 5.2 shows afemale figure dressed in casualclothing, with an attitude of wait-ing for something or someone.
Using Figure Artist as a tool, theartist has the ability to explore anumber of visual options in detailbefore embarking on the task ofcreating the drawing. Using FigureArtist, you can explore creativepossibilities for posing the figuresin your drawings to help give you
the information you need to createbeautiful works of art without theexpense of hiring a model. If youneed a model for your work,Figure Artist can help you workout the lighting and poses prior toyour model session so there ismuch less wasted time and lesschance of not getting the best posefor your art.
One of the great advantages of asoftware program such as FigureArtist is that it has almost unlim-ited possibilities for setting up fig-ures as reference for your drawing.Not only can you pose the figuresin Figure Artist in almost any posi-tion possible for the human form,you can also change the figuresthemselves for a huge variety oflooks, from fat to thin and frommuscular to frail. A variety of cos-tumes and facial expressions forthe virtual mannequins are alsoavailable. But with all of this free-dom there is also a danger becausethe figure may not look natural orlike it fits into its environment.
In a real-world situation, the artisthas to follow natural laws, such asgravity. In a virtual situation, theartist has to remember that theselaws exist and simulate theireffects. If the artist does not planfor the effects of gravity or perspec-tive, then the pose can look odd oreven uncomfortable to the viewer.For example, in Figure 5.3 theseated figure is not in the sameperspective as the chair, makingthe pose seem very out of place.
Figure 5.2 The pose is of a girlwith the attitude of waiting.

77
Posing the Figure
Balance and
Weight
For a figure to look right in its sur-roundings, it needs to have balanceand look like it has weight. One ofthe problems with posing a figurein a virtual setting, whether it iswith a software program such asFigure Artist or with a woodenmannequin, is the fact that it iseasy to pose a figure that looksslightly odd or out of place. Therecould be a number of reasons forthis, but the most common one isthat the figure may not look like itfits in the setting. The perspectivecould be off. The lighting might be
wrong. More than likely, the char-acter might not be completely bal-anced or there might be a lack ofweight to the figure.
Balance
If the character is off balance, view-ing it will be uncomfortablebecause there will be a feeling of animpending fall. This is not alwaysbad if there is a good reason for theoff-balance pose, but it is bad if itis the artist’s oversight. In Figure5.4 the character is leaning to oneside. He looks as if he is about tofall. The viewer might feel the needto try to catch him.
Being off balance is not always abad thing. If you are working onan action drawing, you can usebalance as a point of action. Say,for instance, that you are workingon a picture of a person running.When a person runs, their weightis shifted forward in an off-balanceposition. Standing still in that posi-tion would likely cause the runnerto topple over. The viewer recog-nizes the off-balance position ofthe person and interprets it as partof the running motion.
Comic book artist often have theirsuperhuman characters in impossi-ble poses. The exaggeration of the
Figure 5.3 Inconsistent perspective makes the sceneuncomfortable.
Figure 5.4 This guy looks like he is about to fall.
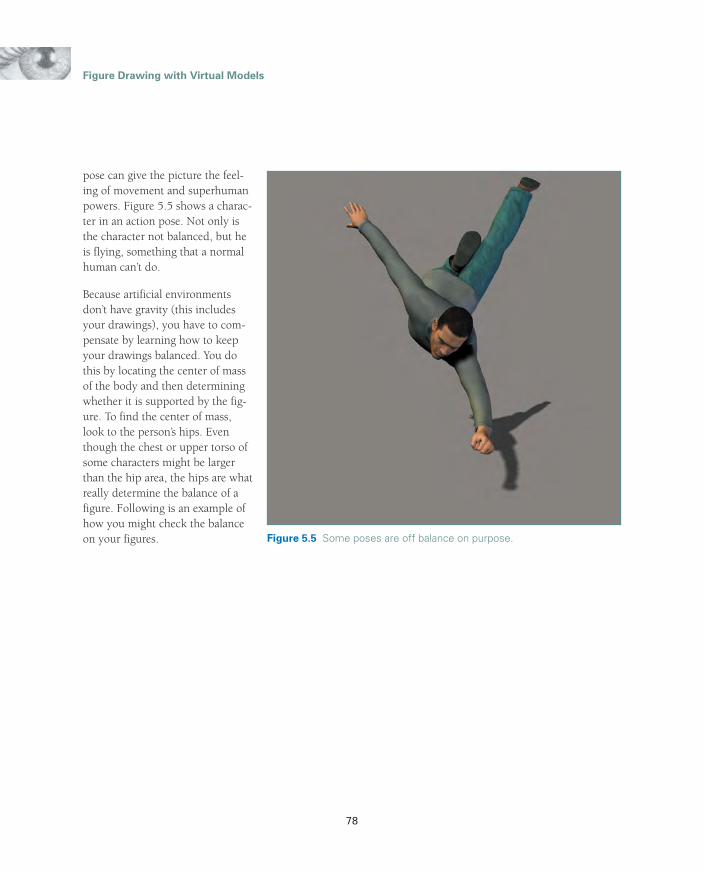
78
Figure Drawing with Virtual Models
pose can give the picture the feel-ing of movement and superhumanpowers. Figure 5.5 shows a charac-ter in an action pose. Not only isthe character not balanced, but heis flying, something that a normalhuman can’t do.
Because artificial environmentsdon’t have gravity (this includesyour drawings), you have to com-pensate by learning how to keepyour drawings balanced. You dothis by locating the center of massof the body and then determiningwhether it is supported by the fig-ure. To find the center of mass,look to the person’s hips. Eventhough the chest or upper torso ofsome characters might be largerthan the hip area, the hips are whatreally determine the balance of afigure. Following is an example ofhow you might check the balanceon your figures. Figure 5.5 Some poses are off balance on purpose.
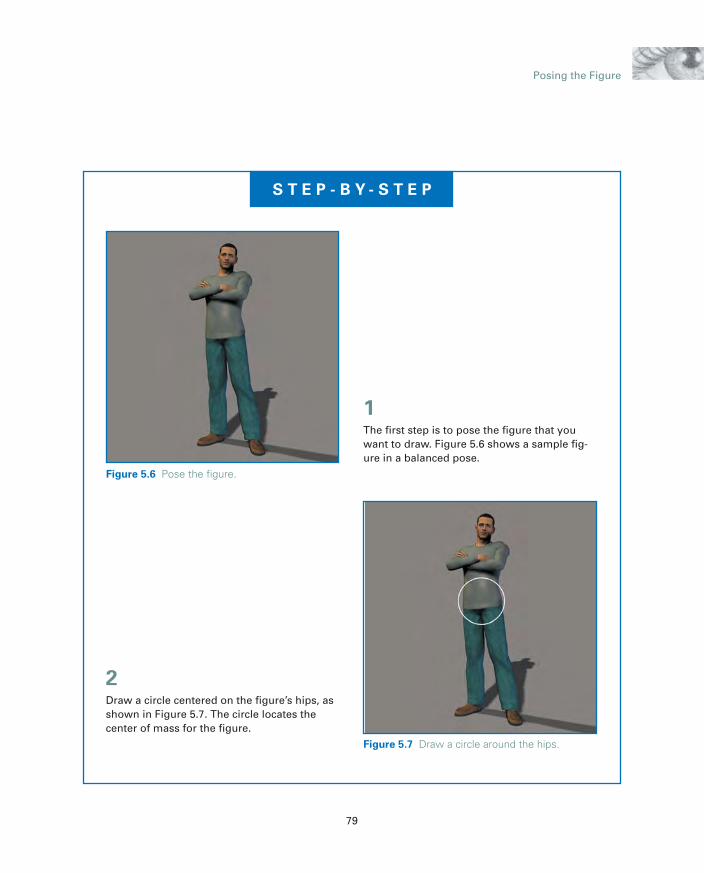
79
Posing the Figure
S T E P - B Y - S T E P
2Draw a circle centered on the figure’s hips, asshown in Figure 5.7. The circle locates thecenter of mass for the figure.
1The first step is to pose the figure that youwant to draw. Figure 5.6 shows a sample fig-ure in a balanced pose.
Figure 5.6 Pose the figure.
Figure 5.7 Draw a circle around the hips.

80
Figure Drawing with Virtual Models
Figure 5.8 Draw a vertical line through the cen-ter of the circle.
Figure 5.9 Draw the action line.
3Now draw a vertical line that bisects the cen-ter of the circle, as shown in Figure 5.8.Although the line might not fall directlybetween the figure’s feet, it does fall betweenthem. Most poses have more weight on onefoot than on the other, so the line will rarelybe in the exact center. You also need to thinkthree-dimensionally. In this example the char-acter is standing at an angle to us, so that willaffect the center line as well.
4Now draw the action line that shows the lineof motion for the figure, as shown in Figure5.9. Compare the action line with the verticalcenter of mass line. A balanced standing fig-ure’s action line and center of mass line willbe roughly the same. The closer these twoline are, the more evenly distributed the body weight will be between the figure’s legs.Use these lines to check the balance of yourcharacter.

81
Posing the Figure
This method of checking the bal-ance of a figure is a good way tounderstand whether your drawingwill look right. Let’s see how itworks for a figure that is off bal-ance. Look at Figure 5.10. I havedrawn in the center of mass line.Notice how it is shifted to the right.The figure looks like he should besitting or leaning on something.
When the action line is drawn, youcan see that it does not match thecenter of mass line very well, asshown in Figure 5.11. The moredeviation between the action lineand the center of mass line, themore likely the character is out ofbalance.
One caution about this method isworth mentioning: You need toexamine the figure from severaldifferent angles. Figures exist in 3D space even though your draw-ings will be in 2D. Often from aspecific angle, the action line will
the figure from other angles, thelines diverge distinctly. One of theadvantages of having a virtual 3Dmodel to draw from is that you cancheck the model from multipleangles to make sure it is correctbefore you start your drawing.
match the center of mass line. Forexample, look at the three views ofthe figure in Figure 5.12.
The figure is definitely not bal-anced, yet in the first view on theleft, the lines correspond well toeach other. However, if you look at
Figure 5.10 The center of massline is shifted to the right.
Figure 5.11 The action line deviatesfar from the center of mass line.
Figure 5.12 Make sure to check the figure for balance from several angles.

82
Figure Drawing with Virtual Models
Hip and Shoulder
Relationship
One of the most interesting aspectsof the human body is the spine.The spine is a flexible segmentedseries of bones that runs from thepelvis to the skull. The spine con-nects our upper body with ourlower body. One of the advantagesof flexibility in the spine is that ithelps us to keep our balance whilestanding or walking. For example,when a person walks, the hips willtilt from side to side. If the spinewere not flexible, the tilting of the pelvis would throw the body
off-balance. Because the spine isflexible, it bends and shifts theweight of the upper torso to com-pensate and counterbalance thetilting of the pelvis.
Usually the hips and pelvis movein opposite directions to try tokeep the body in balance. In art,this opposing movement is calledcontrapposto and often an artist willaccentuate the shift because it cre-ates a more interesting pose.
Figure Artist has a feature calledthe Hip-Shoulder Relationship
Guide that helps the artist to seethe relationship of the hips to theshoulders. The shoulders are repre-sented by a blue rectangle and thehips are represented by a yellowrectangle. When this feature isturned on, it is easy to see the posi-tion of the hips in relation to theshoulders. The guide is pictured inFigure 5.13.
In this example, the skeleton is inthe act of walking. Notice how theright hip is up while the rightshoulder is down. Figure 5.14shows the curvature of the spine.
Figure 5.13 The Hip-Shoulder Relationship Guidehelps to show the shift of the hips and shoulders.
Figure 5.14 The spine twists and turns as a personwalks.

83
Posing the Figure
Weight
Every figure in life has someweight unless it is floating in outerspace. Weight is closely related tobalance in that without weight,balance is not an issue. A figure’sweight is a combination of massand gravity. Gravity is constantlypulling a figure toward the ground.The figure’s skeletal and muscularsystems work together to help thefigure stand, move, and essentiallyfight the effects of gravity. Whenworking with a virtual figure in avirtual setting, you’ll find that the
model will often seem to have noweight. This can be a problem ifyou are working toward a realisticpicture. When posing a figure, youhave to take weight into account.
Figure 5.15 shows a figure in theact of lifting an object. Eventhough the object is missing, thereis a sense of weight to both the fig-ure and the object. This is becausethe figure is firmly planted on theground and his body is bent toindicate that there is tension in thearms and legs.
In essence, the figure needs to looklike it is interacting with gravity togive it a sense of weight.
Weight is better understood whendrawing the nude figure.Sometimes the tension of the mus-cles can play a big role in givingthe body a sense of mass andweight. In the next example, youwill be using Figure 5.16 as a posefor a drawing. The pose is anaction pose in which the figure’sfoot is pushing off in the beginningof a run. Notice how the push-offleg is powering the figure againstgravity. Try drawing this figure.
Figure 5.15 The pose shows weight by how the fig-ure interacts with gravity.
Figure 5.16 The muscles of the leg fight against grav-ity in a running pose.

84
Figure Drawing with Virtual Models
S T E P - B Y - S T E P
Figure 5.18 Draw the surfacedetail over the mannequin figure.
2One you feel comfortable withthe proportions, you can cre-ate a more detailed line draw-ing of the figure. In this stagethe figure’s minor proportionsare all defined, such as thedistances between facial fea-tures and the individual fin-gers and toes. The surfacedetail of the character’s mus-cular and skeletal systems isalso defined. Figure 5.18shows this stage in progress.
Figure 5.17 Lightly draw themajor proportions of the figure.
1Start by lightly drawing a basemannequin of the figure. Thebase mannequin defines thefoundation proportions and thesize of the figure on the paper.Pay attention to where the fig-ure overlaps and what parts ofthe figure are oriented towardyou, such as his right forearmand left thigh. These areas willneed at least some foreshort-ening. Figure 5.17 shows thisfirst step. I have purposelydarkened the exposure on thisexample so you can see thelines. Typically, these lines aredrawn so lightly that they don’tprint well in a book.
Figure 5.19 Begin the shadingaround the figure’s face.
3The purpose of Steps 1 and 2is to give you guides for draw-ing and shading the figure.Once you are satisfied thatyour drawing is accurate, startapplying the shading anddetail. I always start shadingaround the figure’s face if it isvisible in the picture becauseour eyes are naturally drawnto a person’s face. It is usuallythe most scrutinized part ofthe figure. Figure 5.19 showsthe drawing in progress.

85
Posing the Figure
Figure 5.20 Continue to shadethe figure.
4Continue shading the figure,working your way down fromthe head, defining the detailof the chest and arms. Figure5.20 shows the picture inprogress at this stage.
Figure 5.21 Add shading to theentire figure.
5Continue shading the figurethrough the hips and legs.Figure 5.21 shows the figureafter shading. Notice that Ieliminated the cast shadowon the figure’s thigh. Somecast shadows on the figureitself are a problem becausethey tend to obscure the form.Add just a hint of a castshadow on the ground nearthe figure’s planted foot.
Figure 5.22 Do the final touch-ups on your drawing.
6The last step is the cleanupand final detail phase of thedrawing. This is the only timethat I will use an eraser on thepicture. Here I remove any ofthe light construction linesthat are still showing in thehighlight areas. I also clean upthe edges and adjust the con-trast in any areas that needbalancing. Figure 5.22 showsthe final drawing.

86
Figure Drawing with Virtual Models
Body Language
Body language can be any expres-sive aspect of a person. It can be assimple as a facial expression or ascomplex as a way of walking. Itincludes the way a person movesand the specific position a personassumes in any given situation.
Some aspects of body language arecultural, such as bowing or shak-ing hands, while others are univer-sal, such as narrowing the eye-brows for anger and slumping theshoulders when one is tired. Thecustom of shaking hands, as shownin Figure 5.23, originated back inthe days when men carried swordsor knives. If someone offered you
his hand, it was a literal sign oftrust and friendship.
When you consider a pose for oneof your drawings, you might wantto first consider whether you wantto express a message as part of yourdrawing. Consider how that mes-sage can come across in the pose ofthe figure. For example, Figure5.24 shows a pose of a womanlooking at her watch. A drawing ofher could express impatience.
With an understanding of how toincorporate body language intoyour drawing, you can expressalmost any emotion. The pose inFigure 5.25 indicates surprise. Herbody posture and her facial expres-sion emphasize this emotion. Her
hands are open and turned up. Sheis leaning away from the source ofher surprise, as if she is aboutready to run.
Figure 5.26 shows a confidentswagger in the figure’s walk.
Learning the language of the bodycan help to give your drawing amore expressive touch. The bestway to learn is to watch. Go out toa park for lunch and watch peopleas they interact with each other.See whether you can pick up onpersonality traits just by how peo-ple move, sit, stand, or play. Take asketchbook with you and makesome quick sketches, concentrat-ing mainly on learning the lan-guage of the human form.
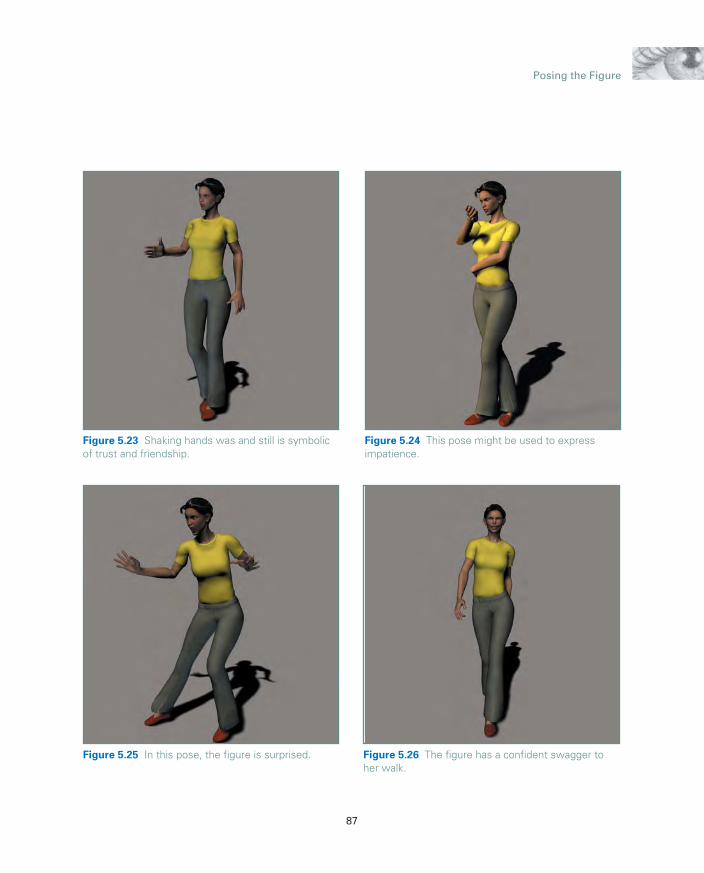
87
Posing the Figure
Figure 5.23 Shaking hands was and still is symbolicof trust and friendship.
Figure 5.24 This pose might be used to expressimpatience.
Figure 5.25 In this pose, the figure is surprised. Figure 5.26 The figure has a confident swagger toher walk.

88
Figure Drawing with Virtual Models
Facial
Expressions
Facial expressions play a big role inportraying emotion. Often we wearour emotions in our countenance.Sometimes it is pronounced, as inthe case of anger, whereas othertimes it is subtler, as in confusionor daydreaming.
One big advantage of Figure Artistas a reference for your drawings isthat you can pose the figure’s face.
Facial expressions can have a hugeimpact on your drawings. Figures5.27 and 5.28 show a few exam-ples of facial expressions. Figure5.27 shows an example of threedifferent emotions. Drawings ofeach emotion are just below theposes.
When a person is angry, he or sheoften displays a lot of tensionaround the top of the bridge of thenose. Eyebrows tend to pulltoward the center of the face, asdoes the mouth. Fear is kind of the
opposite—the eyebrows pull awayfrom the center of the face and arelifted. The eyes are open, as is themouth. With a worried look youare kind of between anger and fearin facial expression. Notice that theexpression is more subtle, with justa slightly pinched look to it.
Figure 5.28 shows a few moreemotions. Try drawing these andsee whether you can capture thefeeling of each pose.
Figure 5.27 The face canhave many emotions.

89
Posing the Figure
Figure 5.28 Try draw-ing these emotions.

90
Figure Drawing with Virtual Models
Beauty
As the old saying goes, beauty is inthe eye of the beholder, and so it iswith the drawings you create.What is beautiful to one personmight not be very appealing toanother. Some people may loveyour work, whereas others mayhate it. In general, however, thereare some basic concepts that helpto make your drawings more beau-tiful by our culture’s generallyaccepted standards for beauty.When it comes to posing the fig-ure, beauty can generally bedefined as grace. Capturing thepotential for gracefulness in yourdrawings is the goal of this section.In addition to grace, there areother aspects of beauty, such aslighting and composition. Lightingwill be covered in Chapter 7 andcomposition will be covered inChapter 6.
The human form is graceful by itsnatural design, so posing a figureto take the best advantage of dis-playing an aspect of the humanform can be very beautiful. This isone reason why I suspect artistshave been fascinated by the humanform for centuries. It is also whymany artists spend a great deal oftime in figure drawing classes andstudying the nude figure.
Anyone who has studied the ele-gance of the human form willprobably agree that the grace andbeauty of how the body is puttogether is nothing short of amaz-ing. From the skeletal structure tothe way our muscles attach andflow, the human body is one of themost versatile and ingeniousdesigns for movement and grace.Take, for example, the femur boneof the leg and how it is shaped.Figure 5.29 shows the femur nextto a straight rod. Notice how muchmore interesting the shape of thebone is compared to the rod.
Often beginning artists (and evensome professional artists) haveproblems getting their figures tolook alive. Their work often lookscontrived or stilted because theydon’t follow the natural dynamicsof the figure. This is often the casewhen using photography becauseit is difficult for a model to hold adynamic pose, such as the one inFigure 5.30.
The idea is to have your poses looknatural, not posed. When posing afigure, try to keep the action con-sistent and, where possible, relaxedrather than forced. A good way toimprove your poses is to establishan action line.
Figure 5.29 The femur is a moregraceful shape than a straight rod.
Figure 5.30 Try to make yourposes flow gracefully.

91
Posing the Figure
Action Line
A curved line is generally moreinteresting and pleasing than astraight line. Look at the two linesin Figure 5.31. The curved line ismuch more expressive than thestraight line.
Figure 5.31 Curves aremore interesting thanstraight lines.
Figure 5.32 Pay attention to the action line in the figure.
The action line helps artists keeptheir drawings from becomingstilted by unifying the form. InFigure 5.32, the action line is onecontinuous arch.
All figures have an action line, evenwhen they are at rest. In Figure5.33, the figure is seated on theground. Even though the figure isnot moving it still has an actionline, as shown in the picture.

92
Figure Drawing with Virtual Models
Try looking for the action linewhen observing people in life.Think in terms of reducing the fig-ure to a single line of motion. Youwill soon notice that the moredefined the action line is, the moregraceful the pose will be.
When posing the figure, youshould avoid 90-degree angles asmuch as possible. As shown inFigure 5.34, 90-degree angles onlimbs give figures a robotic look.
A good way to look for gracefulmotion is to study dance, particu-larly ballet, because of the empha-sis on beauty and grace. Figure5.35 is a pose of a dancer. Seewhether you can draw in theaction line for this pose.
Figure 5.36 shows the action linefor the dancer pose.
Secondary action lines can also beused to unify the figure and addgrace to the pose. Figure 5.37shows two additional action linesfor the arms and the other leg.
Try posing a few figures yourself tosee whether you can get the feel ofestablishing action lines in yourposes. If you can get the action lineto work well in the poses you cre-ate, then they will likely translateinto good drawings.
Figure 5.33 Even a seated figure has an action line.

93
Posing the Figure
Figure 5.34 Try to make your poses flow gracefully. Figure 5.35 Can you find the action line in this pose?
Figure 5.36 The action line follows the major curve ofthe body.
Figure 5.37 Secondary action lines can help to unifythe form.

94
Figure Drawing with Virtual Models
Drawing Beauty
Now that you understand how togive your poses an action line, let’smove on to drawing the figure. InFigure 5.38 I have prepared a posefor the drawing.
Learning to pose your figures wellin your drawings will help you togain more confidence in yourwork. The number of ways you canpose the figure is limitless.Remember, your best source ofinformation is observation. Look atthe people around you and makesome quick sketches. There are fewthings as expressive as the humanform.
Figure 5.38 Startthe drawing withthis pose as a ref-erence.
S T E P - B Y - S T E P
1The first step is to find the action line in thepose. I have overlaid the action line in Figure5.39.
Figure 5.39 Find the action line.

95
Posing the Figure
Figure 5.40 Draw the beginning construction lines verylightly.
Figure 5.41 Lightly block in the details of the drawing.
2Using the pose from Figure Artist,begin to construct the mannequin ofthe figure. Make sure to also use theaction line as a guide. Figure 5.40shows the beginning constructionlines for the drawing.
3When the general proportions arefinished, work in the finer details in alight outline, as shown in Figure 5.41.

96
Figure Drawing with Virtual Models
Figure 5.42 Start by shading the head and hair.
Figure 5.43 Continue to shade the drawing.
4Begin shading at the face, makingany minor adjustments that areneeded. Draw in the hair by usingsingle strokes of a sharp penciltoward the highlights (see Figure5.42).
5Continue to shade the drawing, pay-ing attention to the subtle detail onthe surface. Figure 5.43 shows theshading in progress.

97
Posing the Figure
Figure 5.44 Finish shading the body down to the toes.
Figure 5.45 Clean up the drawing and add cast shadows.
6Finish the first pass of shading thebody by working in the darker areason the legs and feet, as shown inFigure 5.44.
7Next add the cast shadows and cleanup any residual construction lines inthe highlight areas and around theouter edges of the figure. Figure 5.45shows the finished drawing.

C H A P T E R 6

C o m p o s i t i o n
✎
99
There are two basic decisions that an artist has to make with regard tofigure drawing.
1. What to put into the drawing
2. How to arrange the elements in the drawing
These two major decisions are the foundation of composition. From an artis-tic standpoint, composition means the arrangement or design of a picture. Itis the process of selecting what to draw and then deciding how to draw it. Inthe last chapter, we covered posing the figure, which is an element of compo-sition but does not take into account the rest of the picture area.

100
Figure Drawing with Virtual Models
The Picture
Plane
Whether you are drawing with apencil on a piece of paper or usinga digitizing pad and stylus on acomputer to create your figuredrawing, you are working in whatis called a two-dimensional medium.In other words, the drawing sits ona flat surface. This flat surface iscalled the picture plane. Anotherway to think of it is that if youwere to frame your drawing, thearea inside the frame and matwould be the picture plane.
To be good at composing yourdrawings, you need to take fullresponsibility for the picture plane.In other words, every square inchof the drawing should be con-sciously arranged under yourdirection. I know that might seemobvious because you are drawingthe picture, but how many timeshave you started a drawing only tofind that it doesn’t fit on the paper?
Compositions can be good or bad.The goal of the artist in creating agood drawing is to make the com-position good. For someone new toart, composition might seem like amystery, but like organizing any-thing from your taxes to your daily
schedule, organizing a picture isunderstandable if you know a fewfundamental principles.
✎ Purpose
✎ Placement
✎ Balance
✎ Focal points
✎ Pathways
In many ways, organizing a pictureis similar to organizing your dailyschedule. First you have to lay outthe reason or purpose for theplanned tasks. Next you have toplace the tasks within the availabletime. Each task has to be balancedwith all of the other tasks and obli-gations. You must focus on impor-tant tasks in order to completethem, and there must be clearavenues or pathways to go fromone task to another.
Purpose
Years ago when I was attendingschool, I had an English professorwho taught me an important les-son about art and life. At thebeginning of the term a studentasked him about the importance ofspelling and grammar. His replywas that while he felt those thingswere important, he didn’t reallycare if there were a few mechanical
mistakes in the work we turned infor our assignments in the class.He was more interested in whetherwe had anything to say. In otherwords, he wanted us to do what Icall meaningful writing: He wantedour work to mean something. Hisfeeling was that he would rathersee a meaningful paper with a fewmechanical errors than a well-crafted paper of meaningless prose.
That day the professor opened up anew dimension in my thoughtsabout writing. In many of my pre-vious English classes, I was sostressed over getting the spellingright or trying to decipher the mys-teries of English grammar that Inever felt truly free to expressmyself. It made me think about myart and how I would often getcaught up in the mechanics andforget having a purpose for my pic-tures. The result was that while Idid okay with proportions andshading, my work lacked inspira-tion.
Every drawing can and shouldhave a purpose. The purposemight be as simple as seeing aninteresting pose and drawing it. Orthe purpose might be that the artisthas a specific agenda, message, orfeeling that is expressed in the art.

101
Composition
In commercial art the purposes arealmost always well-defined. Thepurpose is part of the assignmentthe artist is given. Sell this car.Convey this thought. Draw thisbuilding. Express this feeling.Draw attention to this product. Allof these things are challenges forthe commercial artist, and many ofthem are accomplished by the useof figure drawing. The architectuses people in his pictures to rep-resent scale. The illustrator mightuse people in her pictures to depicta story or sell an idea. The designermight show a person using hisproduct. The animator might havepeople as the characters in hershow.
In fine art the need for a purpose isstill there, but the artist generallydetermines what that purpose israther than receiving it as anassignment. The purpose might beto capture a feeling, such as seren-ity or excitement. It might be todepict the lighting of a scene tobring out the colors, or it might beto express a personality in a por-trait.
There really is no limit on the typesof purposes for a drawing. One ofthe intrinsic values of art is thatalmost anything can be expressedthrough visual media. Often begin-ning artists will limit the scope oftheir expression by drawing or
painting exactly what they see andnever going beyond that to seewhat they express in their work. Itis like living a life without direc-tion: You never really get any-where. The beauty of art is theexploration of forms, shapes, col-ors, and values.
So how do you develop purposefor a picture? The simple truth isthat most pictures have a purpose,even if the picture is just a doodlewhile waiting for the train. Thepurpose of the doodle might haveonly been to explore somethoughts while relaxing. If, on theother hand, the doodles were smalldesigns related to a product theartist was thinking about or theywere pictures of a place the artistwanted to visit, the purpose of thedoodle could be more than simplerelaxation.
Take a minute and think about thepurpose of a picture of a favoritepet. The purpose of the picturemight be to show others what yourpet looks like. However, therecould be more to that purpose.Maybe you not only want to showwhat your pet looks like, but youalso want to show your pet’s per-sonality. Maybe your pet is playfuland active. Instead of drawing yourpet resting, it might be more mean-ingful to draw your pet at play, asin the drawing in Figure 6.1.
A deeper meaning for a picture ofyour pet might be to somehowexpress your feelings about the pet.Maybe you have a deep emotionalattachment to your pet and youwant your picture to capture thatattachment. What could you drawthat would express your feelingsthough your art?
Can you see how having a purposefor a picture moves the drawingfrom a simple picture to a work ofart? Many of the most famous pic-tures in the grandest museums arethere not because the artist was askilled painter, but rather becausethe art had meaning.
Figure 6.1 The line drawing cap-tures the personality of the pet.

102
Figure Drawing with Virtual Models
Placement
Placement is the arrangement ofpictorial elements within the pic-ture frame. It is not merely theplacement of the figure; rather, it isthe placement of all elements ofdrawing. The elements of drawingare what make up a picture; theyinclude points, lines, shapes, andforms.
Points
The smallest mark an artist canmake and thus the smallest designelement is the point. Some draw-ings, such as stipple drawings, aremade up of nothing but points. Astipple drawing is usually drawn inink on paper. The drawing consistsof dots of ink that can vary in sizeand distance from each other tomake up shades of light and dark.Figure 6.2 shows an example of astipple drawing.
Lines
When a point becomes longer inany one direction, it is no longer apoint and becomes a line. The lineis the most common and versatiledrawing element. Lines can beused to indicate areas, show depth,lead the viewer, delineate edges,define detail, and depict value.
Lines are more expressive thanpoints because they have directionand they can vary in weight. Lookat the example in Figure 6.3.Notice that there are three drawingelements. The first is a point, thesecond is a line, and the third is aline that varies in weight. Can yousee how the line is more expressivethan the point, and the line withvariation in weight is more expres-sive than just a simple line?
Figure 6.2 Stipple drawings are made up of many tiny dots.
Figure 6.3 Adding variation inweight can make a line moreexpressive.

103
Composition
Varying the weight of a line is oftencalled using thick and thin lines inart. The technique of drawing withthick and thin lines is most oftenused in pen and ink drawings. Thebasic idea of varying the weight ofa line for compositional purposesis that a heavier line emphasizesthat part of the line and thus thatpart of the drawing. Figure 6.4 is aline drawing of a character usingthick and thin lines. Notice howthe thick and thin lines add a moredramatic feel to the drawing. Alsonotice how the thicker areas of thelines in the drawing add weight toemphasize that area.
Beginning artists often ask thequestion of what lines should bethicker and what lines should bethinner. Although there is not hardrule about thick and thin lines,there are a few general rules thatmight help.
✎ Contrast. Thick lineshave more contrastwith the white of thepaper than thin linesdo. Thick lines arounda specific area of yourdrawing will drawmore attention to thatarea. I wanted theviewer to look first atthe character’s head, soI gave that area of thedrawing more contrast,as shown in Figure 6.5.
✎ Movement. Variation inthe weight of a linetends to cause the eyeto move from the nar-rower area of the lineto the thicker area. Byplacing lines in a draw-ing that vary in thick-ness over their length,the artist can orches-trate the way a personlooks at the picture.Think of it in terms ofcreating a racetrack inwhich the lines are thetrack. In Figure 6.6,there is a sense ofmovement in the char-acter’s hat.
Figure 6.4 Adding variation inweight can give a line moreemphasis.
Figure 6.5 Use thicker lines inareas of emphasis.
Figure 6.6 The viewer’s eye tendsto follow the lines in a drawing.

104
Figure Drawing with Virtual Models
✎ Curves. Lines goingaround an arc tend tolook better if the line isthicker as it swingsaround the curve.Going back to our anal-ogy of the racetrack,motion tends to slow ina curve. By addingwidth to a line in acurve, you give morespace for swingingaround the curve, mak-ing the curve easier tofollow with the eye. Inthe curves on the char-acter’s shoulder shownin Figure 6.7, the linesare thicker, making thecurve easier to follow.
✎ Tapered ends. Abruptendings cause harshstops in a drawing. It ismuch easier for the eyeto begin and end at atapered point. Figure6.8 shows several linesin the drawing thatbegin or end in taperedpoints.
✎ Corners. Sharp cornersare abrupt changes ofdirection. They canhappen in the course ofa line or when two ormore lines meet.Adding more weight tothe lines at a cornerhelps keep the viewer’seyes on the drawing.The corner then acts asa launch pad for theeyes to move in a dif-ferent direction. Figure6.9 shows where thecorners of the charac-ter’s pants causeabrupt changes indirection.
Figure 6.7 Adding weight to curvesmakes them easier to follow.
Figure 6.8 A tapered end is easierfor the eye to begin and end.
Figure 6.9 A heavy corner can make an abrupt change in direction morenatural.

105
Composition
This list does not cover everyaspect of using thick and thinlines, but hopefully it will give you a start. One of the wonderfulaspects of art is taking basic concepts and exploring new applications.
Lines are the building blocks ofmost drawings. Using lines, theartist can define almost anything.When it comes to composition,one of the most important thingsthat lines define is shape.
Shapes
A shape is a defined area in a draw-ing. For example, Figure 6.10shows the familiar shape of a heart.The shape is composed of twolines, but the meaning of the shapegoes way beyond just the two linesbecause the shape is also a symbol.
Not all shapes have symbolicmeaning, but the fact that they canhave meaning beyond a mark on apiece of paper shows an importantdistinction between a shape and a line.
As you approach creating a figuredrawing, try to look beyond thefigure and look at the entire pic-ture as a set of shapes. Sometimeslooking at the silhouette of shapesin a picture helps define them.Figure 6.11 shows the silhouette ofa figure.
Figure 6.10 Some shapes havesymbolic meaning.
Figure 6.11 The figure is a shape in the drawing.

106
Figure Drawing with Virtual Models
The figure is a shape because it is adefined area in the drawing.Understanding the shapes in yourdrawings will help you developgood compositions. For example,here there are three basic shapes—a square, a circle, and a heart. Oneor more lines define each shape.
The quality and placement of thelines not only define the shapes,they also define the picture. Thepicture is somewhat static becauseall of the lines are similar in weightand spacing. The shapes also are ofequal size and centered on thepaper.
By adjusting some of the drawingelements, you can see how thedynamics of the picture canchange. In Figure 6.13, the shapeof the circle was enlarged and theother two shapes were reduced.The circle is now the dominantshape. The dominant position ofthe circle is also enhanced by thefact that it is in the center of thepicture.
In Figure 6.14, the circle is movedto the side but the weight of theline is heavier, so even though it isnot central, it is still dominantbecause of the heavier line.
Figure 6.12 The picture contains three basic shapes.
Figure 6.13 The circle is the dominant shape in the drawing.
Figure 6.14 The circle is dominant in both size and line weight.

107
Composition
Another method of emphasizing ashape is to have it overlap othershapes, as shown in Figure 6.15.The overlapping helps to increasethe importance of the top shapeand diminish the importance of theother two shapes.
One aspect of a shape is the factthat by defining a shape in a draw-ing, you also define others shapes.Notice that in the last picture thereare three overlapping shapes, butthere is also the shape of the sur-rounding area of the picture. Theareas defined outside the pictorialshapes in a drawing are oftenreferred to by artists as negativeshapes. Figure 6.16 shows the neg-ative shape in white.
Figure 6.16 The negative shape surrounds the other shapes in the picture.
Figure 6.15 Overlapping shapes can emphasize importance.

108
Figure Drawing with Virtual Models
Negatives shapes are very impor-tant in a composition. If they areorganized correctly, they can have abig impact on the success of yourdrawing. For example, Figure 6.17shows a group of negative and pos-itive shapes.
When the shapes are put togetherin the correct organization, thenegative shapes carry the messageof the drawing, as shown in Figure6.18.
The way you place pictorial ele-ments can have a big effect on thequality of your composition. Whenplacing shapes in a drawing, thereare a few things that you shouldavoid, such as monotony, tangents,and unwanted inclusion.
Figure 6.17 The picture shows some unorganized shapes.
Figure 6.18 When organized, the negative shapes spell the words nega-tive shapes.

109
Composition
Monotony
Monotony is the repetition ofshapes that closely match eachother in size and spacing. A goodexample of monotony is back inFigure 6.12, in which all of theshapes are roughly the same sizeand are spaced statically across thedrawing. The best way to avoidmonotony is to vary the size andspacing of the pictorial shapes inyour drawings.
Tangents
Sometimes the placement ofobjects can cause problems. Forexample, tangents can cause visualconfusion. In Figure 6.19, the sealis supposed to be in the fore-ground. However, the placement ofthe seal’s nose on the line of thebarn gives the impression that theseal is balancing the barn on hisnose.
When placing items in a picture,you should always watch out forpotential problems with tangents
that cause confusion in the place-ment of the visual elements inthree-dimensional spaces.
Tangents can also be painful. InFigure 6.20, the diamond shape isplaced next to the edge of the pic-ture. This causes two problems.First, the placement is uncomfort-able because it is poking the side ofthe picture frame. It is almost likethe frame is getting hurt! Second,sharp corners can often act asarrows, directing viewers’ attentionaway from the picture.
Figure 6.19 The seal looks like he is balancing the barn onhis nose.
Figure 6.20 Some tangents can be painful.

110
Figure Drawing with Virtual Models
Unwanted Inclusion
Sometimes a shape might bebehind another shape, causing thetwo shapes to run together andblend. This is particularly truewhen the two shapes are of similarvalue. Figure 6.21 shows a simpleexample of this problem. Thesquare shape is overlapping thecross shape, but they are so closein value that they seem to be oneshape rather than two.
Sometimes you might want theshapes of your drawing to runtogether, so this is only a problemwhen the blending is unwanted yetstill present. It is always a goodidea to create a value sketch ofyour drawing first to see whetherthere is any potential for unwantedinclusion.
Form
In nature there really aren’t anylines. Lines are what artists use tointerpret nature. Lines are oftenused by artists to define edges orsuggest contours, but there isanother aspect of composition thatbrings pictorial elements intothree-dimensional representations;it is called form. Form is the depic-tion of objects based on the effectsof light on that object. It brings theelement of shading into drawings.In Figure 6.22 there are two cir-cles. The one on the left showsonly the shape of the circle,whereas the one on the right showsthe form of the circle as a sphere.
Figure 6.21 The cross and square blend together because they are similarin value.
Figure 6.22 The circle on the right indicates the form of the circularshape.

111
Composition
Form is important in compositionbecause it shows solidity anddimension. In figure drawing,often the artist will want to repre-sent the figure as a three-dimen-sional element of the picture.Compositionally, this means thatthe drawing will take into accountthe effects of lighting on it.
Lighting creates tonal differenceson figures. These tonal differencescreate patterns and shapes of theirown. In Figure 6.23, you can see aposed figure in tonal grays. Thereare shapes that make up the lightside of the figure and others thatmake up the dark side.
Tonal qualities of a figure are visu-ally very powerful—sometimesmore powerful than the silhouetteof the figure itself, depending onthe harshness of the light. InFigure 6.24, I increased the con-trast to emphasize the dark andlight shapes of the figure.
Figure 6.23 Light and shadow create shapes on thefigure.
Figure 6.24 The contrast is increased in the figure toshow clearly the shapes of the light side and the darkside.

112
Figure Drawing with Virtual Models
As an artist, you have to see theshapes of the light and dark onyour figures. Often shadows—particularly cast shadows—obscurethe dimensional qualities of the fig-ure. For example, look at Figure6.25. Notice how the lightingshows the form of the armextended toward us very clearly,whereas the one pointing away isalmost entirely in shadow, giving italmost no sense of form at all. Inaddition, the cast shadow on thefigure’s knee destroys any sense ofform in that area.
Before you start to draw a figure,take a close look at the lighting todetermine whether it enhances orobscures the form of the figure.
Figure 6.25 Shadows can obscure the form of the figure.

113
Composition
Closer
Obscuring the form of a figuremight not always be a bad thing.The shapes in the picture do not
Figure 6.26 Leonardo da Vinci blends the values of the figure withthe background in the Mona Lisa. Réunion des Musées Nationaux/ArtResource, NY.
Figure 6.27 Leonardo da Vinciuses closer in the Mona Lisa.Réunion des Musées Nationaux/ArtResource, NY.
Lisa by Leonardo da Vinci inFigure 6.26.
In this famous painting, da Vincipurposefully arranges the valuesaround the figure so that theyblend into each other. Rather thanputting a hard line around the fig-ure, da Vinci leaves it up to us tofill in the gaps. This concept in artof blending edges is called closer.Visually, this gives the viewer’s eyespathways to and from the figure.Looking at the picture in black andwhite, the blending of the valuesbecomes more evident, as shownin Figure 6.27.
always have to be completelydrawn. The concept of blendingsome parts of the form with otherforms in the picture is an old prac-tice. For example, look at the Mona

114
Figure Drawing with Virtual Models
Balance
Basic to composition is balance. Ifa picture is out of balance, it willfeel uncomfortable to the viewer,just like the out-of-balance figurediscussed in Chapter 5. In Figure6.28, the character is way off to theright and facing away from thecenter of the picture. It creates alarge, uncomfortable, empty areain the middle and left side of thepicture. It is off balance.
A good way to think of picture bal-ance is to imagine that the pictureis perched on a triangle, as shownin Figure 6.29. If the picture feelslike it would be heavier on oneside than on another, the picturewill seem off balance.
Granted, this illustration is exag-gerated for purposes of this lesson.But even pictures that are just a lit-tle off balance can be uncomfort-able. If a person is uncomfortablewith a picture, he or she will tendto not enjoy looking at it and willprobably move on to other pic-tures.
Figure 6.29 The right side of the picture is visually heavier than the left.
Figure 6.28 The picture seems off balance.
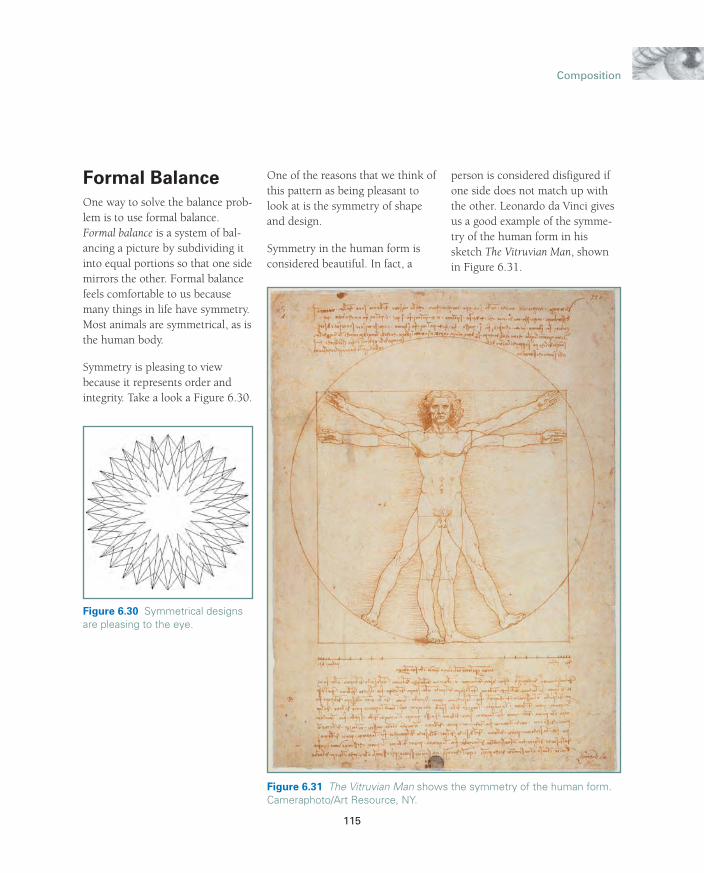
115
Composition
Formal Balance
One way to solve the balance prob-lem is to use formal balance.Formal balance is a system of bal-ancing a picture by subdividing itinto equal portions so that one sidemirrors the other. Formal balancefeels comfortable to us becausemany things in life have symmetry.Most animals are symmetrical, as isthe human body.
Symmetry is pleasing to viewbecause it represents order andintegrity. Take a look a Figure 6.30.
One of the reasons that we think ofthis pattern as being pleasant tolook at is the symmetry of shapeand design.
Symmetry in the human form isconsidered beautiful. In fact, a
person is considered disfigured ifone side does not match up withthe other. Leonardo da Vinci givesus a good example of the symme-try of the human form in hissketch The Vitruvian Man, shownin Figure 6.31.
Figure 6.30 Symmetrical designsare pleasing to the eye.
Figure 6.31 The Vitruvian Man shows the symmetry of the human form.Cameraphoto/Art Resource, NY.

For compositions in which theartist wants to have a feeling ofdignity or majesty, formal balanceor symmetry is a great approach.Not everything needs to be mir-rored from one side to the other,but there should be a sense of
equality in the masses from oneside to the other for a picture tohave formal balance.
Many of the great masters used for-mal balance in their paintings.Giovanni Arnolfini and his Wife
Giovanna Cenami (The ArnolfiniMarriage) by Jan van Eyck is agreat example of formal balance,shown here in Figures 6.32 and6.33.
116
Figure Drawing with Virtual Models
Figure 6.32 Jan van Eyck used formal balance to organize the elements ofhis painting. Erich Lessing/Art Resource, NY.
Figure 6.33 Dividing the picturehelps to show the formal balance.Erich Lessing/Art Resource, NY.

117
Composition
The Madonna with Canon van derPaele, also by Jan van Eyck andshown in Figure 6.34, is anothergreat example of formal balance.Notice how both these paintings
have a formal, almost majesticpresence.
Formal balance is great for formalpictures, but because it is so bal-anced, the picture can sometimes
lack dynamics. Formal balance isnot very good for creating picturesthat give the feeling of motion oraction. The artist needs to haveother ways to balance a picture.
Figure 6.34 Jan van Eyck used formal balance in many of his paintings. Erich Lessing/Art Resource, NY.

Informal Balance
Objects or characters in a composi-tion don’t have to be equal in sizeor mass to balance a picture.Artists can use the principle of thefulcrum lever in compositions tocreate a feeling of balance, even
118
Figure Drawing with Virtual Models
Figure 6.35 The fulcrum lever approach can be used to balance a picture.
though the objects are two differ-ent sizes. A fulcrum lever is like ateeter-totter, as shown in Figure6.35.
The center of the teeter-totter is thefulcrum. A heavier person canteeter-totter with a lighter personby moving closer to the fulcrum or
having the lighter person move far-ther away from the fulcrum. Byplacing a larger object or characternear the center of the picture andplacing the smaller object fartherfrom the center, the picture willhave a sense of balance. Thisapproach to balance can add moredrama to a picture.

119
Composition
Figure 6.36 Rembrandt van Rijn often used informal balance in his paint-ings. Art Resource, NY.
Figure 6.37 The picture has twodominant elements balanced witheach other. Art Resource, NY.
In Figure 6.36, Christ and theWoman Taken in Adultery shows anexample of the fulcrum-leverapproach to balance in the compo-
sition by the great master of thenorthern Renaissance, Rembrandtvan Rijn.
The black and white illustration inFigure 6.37 shows the fulcrum leverin use in Rembrandt’s painting

120
Figure Drawing with Virtual Models
Figure 6.38 Rubens used diagonals to heighten tension and drama in hispainting. Erich Lessing/Art Resource, NY.
Figure 6.39 Supporting diagonalelements are used to balance thepicture. Erich Lessing/Art Resource,NY.
Diagonal pictorial elements tend tohave a greater sense of tension andmotion than vertical or horizontalelements. A good example of thiscompositional approach can befound in The Raising of the Cross by
Pieter Pauwel Rubens, as shown inFigure 6.38.
Strong diagonal elements still needto be balanced; otherwise, they will seem to be falling, Rubens
supported the strong diagonalimage of Christ on the cross byusing other secondary diagonal ele-ments, as shown in Figure 6.39.

121
Composition
Focal Points
Have you ever noticed that whilelooking at a picture, your eyes tendto be drawn to a specific area? It’salmost like that part of the pictureis screaming, “Hey! Look at mefirst!” That doesn’t always happenby accident. In fact, many artistsspend a great deal of time planninghow you will view their picture.They create focal points and path-ways in their work.
A focal point is an area in the pic-ture that calls for attention. Thecall can be blatant, like a noisychild in a quiet classroom, or it canbe gentle, like a bubbling brook inthe mountains. In Rembrandt’sJeremiah Lamenting the Destructionof Jerusalem, shown in Figure 6.40,a very strong focal point is evident.The eye almost automatically goesto the figure in the painting.
In many pictures there is morethan one focal point. The artistmight build a chain of two or morefocal points, with the major focalpoint demanding the most atten-tion and each succeeding focalpoint diminishing in importance. A picture with two equallydemanding focal points can befrustrating to the viewer.
Figure 6.40 Rembrandt has a strong focal point in his picture. BildarchivPreussischer Kulturbesitz/Art Resource, NY.

122
Figure Drawing with Virtual Models
Linear Focus
One of the most effective methodsof creating a focal point is to usethe lines in the picture to drawattention to the an area. This iscalled linear focus and it is derivedfrom the viewer’s tendency to notview lines or edges as static images.When viewing a picture, your eyeswill tend to slide along a line. Ifmany of the lines converge on asingle point or area of the picture,a focal point is created. This alsohappens with values in tonal pic-tures. In Figure 6.41, Pieter PauwelRubens uses the form of the figure’sbody and other pictorial elementsto draw the viewer’s attention tothe character’s head.
The overlaid lines in Figure 6.42indicate the general direction of theelements in Rubens’ painting.
Figure 6.41 Rubens useslinear focus to draw atten-
tion to the character’shead. Erich Lessing/Art
Resource, NY.
Figure 6.42 The linesshow how the elements ofthe picture converge at thecharacter’s head. ErichLessing/Art Resource, NY.

123
Composition
Contrast Focus
Another excellent way to create afocal point is to use value contrast.Value is the quality of light or darkin a picture. In theater, spotlightsare used to isolate individual actorson the stage. In art, the sameapproach can be taken to focusattention on specific areas.Rembrandt used contrast focus inalmost all of his paintings. If youtake a look at Jeremiah Lamentingthe Destruction of Jerusalem inFigure 6.40 again, you can see howthe light shining on the prophetilluminates him like a spotlight.
To create a focal point using value,the artist places the highest con-trast between light and dark at thefocal point. All other images in thepicture will have less contrastbetween light and dark, as shownin Figure 6.43.
In Figure 6.43, you can see a moresubtle use of contrast focus. Noticehow the greatest contrast in valueis in the girl’s eyes. The eyesdemand that the viewer pay atten-tion to them.
Figure 6.43 The contrast in the eyes draws attention.

124
Figure Drawing with Virtual Models
Detail Focus
Detail in a picture will create afocal point. The eye is naturallydrawn to areas of the picture thathave greater detail. This is becausethose areas demand greater exami-nation. As an artist, you can usethis to bring attention to thoseparts of your drawings that youwant the viewer to look at most.
Another look at the Mona Lisa willshow how Leonardo da Vinci useddetail to draw the viewer’s attentionfirst to the face and then second tothe hands in the painting (seeFigure 6.44).
Figure 6.44 Leonardo put more detail in the face to draw attention there.Réunion des Musées Nationaux/Art Resource, NY.
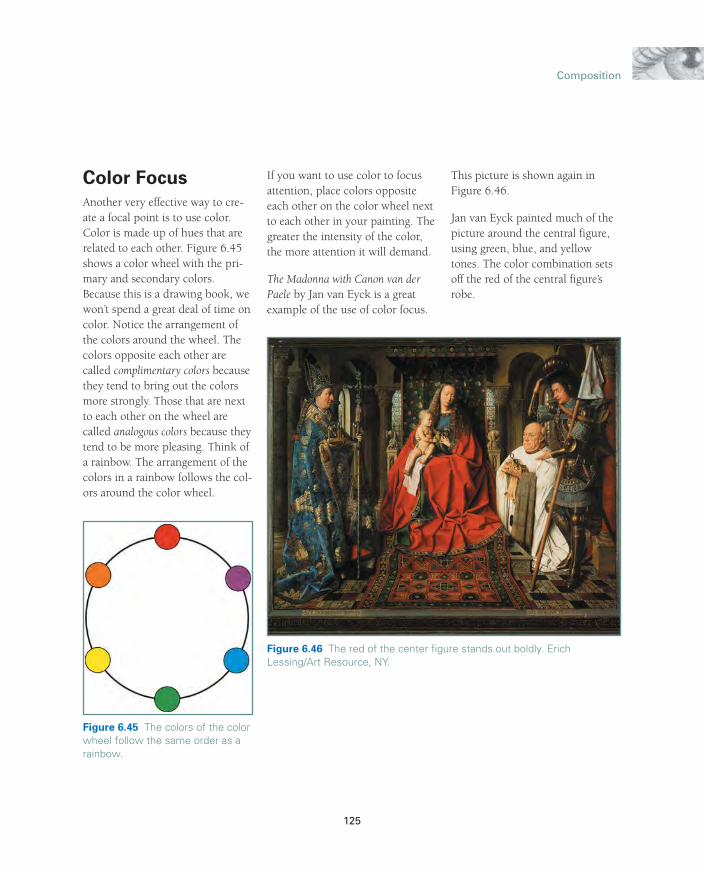
125
Composition
Color Focus
Another very effective way to cre-ate a focal point is to use color.Color is made up of hues that arerelated to each other. Figure 6.45shows a color wheel with the pri-mary and secondary colors.Because this is a drawing book, wewon’t spend a great deal of time oncolor. Notice the arrangement ofthe colors around the wheel. Thecolors opposite each other arecalled complimentary colors becausethey tend to bring out the colorsmore strongly. Those that are nextto each other on the wheel arecalled analogous colors because theytend to be more pleasing. Think ofa rainbow. The arrangement of thecolors in a rainbow follows the col-ors around the color wheel.
If you want to use color to focusattention, place colors oppositeeach other on the color wheel nextto each other in your painting. Thegreater the intensity of the color,the more attention it will demand.
The Madonna with Canon van derPaele by Jan van Eyck is a greatexample of the use of color focus.
This picture is shown again inFigure 6.46.
Jan van Eyck painted much of thepicture around the central figure,using green, blue, and yellowtones. The color combination setsoff the red of the central figure’srobe.
Figure 6.45 The colors of the colorwheel follow the same order as arainbow.
Figure 6.46 The red of the center figure stands out boldly. ErichLessing/Art Resource, NY.

126
Figure Drawing with Virtual Models
Action Focus
Action and movement are verystrong attention devices that areoften used in motion pictures,video games, and the Internet.Because drawings don’t generallymove, the application of action as afocal point is somewhat difficult.Instead of having something movein the drawing, the artist has toimply movement. Implied movementis movement that is about to hap-pen, such as when you capture adynamic moment during a dra-matic action.
Impending action is a powerfulattention-grabber. If the subject ina picture looks like he is about todo something, it naturally calls usto look to see what he is about todo. Michelangelo did a masterfuljob of capturing impending actionin his sculpture of David, shown inFigure 6.47. David is relaxed, yetholding his sling over his shoulder,looking as if he is about to moveinto action.
These are only a few examples ofways that lines, value, detail, color,and action can be used to focus theviewer’s attention on a point in thepicture. Take some time to look atthe many paintings by the greatmasters and see whether you cantell how they used these methodsto focus attention on their paint-ings.
Be careful that you don’t overdoyour pictures with blatant compo-sitional devices to draw attention.In practice, the artist should usejudgment in the methods used tofocus attention. The danger inbeing too heavy-handed with compositions is that when any
technique or method of composi-tion becomes too overbearing, theviewer can feel manipulated.Composition techniques should beused in such a way that they seemnatural to the viewer, not con-trived.
Figure 6.47 David looks as if he is about to move. Scala/Art Resource, NY.

127
Composition
Pathways
Sometimes, rather than a singlefocal point in a picture, the artistmight want to have a series of focalpoints connected by pathways. Apathway is usually a linear or valuepictorial element that connects onefocal point to another. Strong path-ways help keep the viewerinvolved in your drawing. Figure6.48 shows an example taken fromMichelangelo’s work on the ceilingof the Sistine Chapel that shows agood use of creating a pathway forthe viewer.
Figure 6.49 shows the picture withlines indicating the pathways thatMichelangelo created.
If there are natural pathways in thepicture, the viewer will be able tocomfortably scan the picture, mov-ing from focal point to focal point.If the picture lacks natural path-ways, it will feel uncomfortable tothe viewer, causing tension.
Figure 6.48 A strong pathway keeps the viewer involved in the picture.Erich Lessing/Art Resource, NY.
Figure 6.49 The lines help to show the pathways. Erich Lessing/ArtResource, NY.

128
Figure Drawing with Virtual Models
Another example of building path-ways can be found in Rembrandt’spainting of Aristotle with a Bust ofHomer, shown here in Figure 6.50.See whether you can find the path-ways in this picture.
You have just covered a number ofcomposition concepts in a singlechapter. I hope that composition isnot such a mystery for you now. Avery good way to test yourself is totake an art history book and seewhether you can find some of theconcepts covered here in the artthat you find in it. You can also tryposing figures in Figure Artist tohelp solidify the concepts.Following are some renderings ofposes in Figure Artist taken fromsome of the paintings in this chap-ter. See whether you can match theposes with the paintings.
Figure 6.50 Try to find the pathways in this picture by Rembrandt.

129
Composition
These poses are also included on the CD for thisbook. Taking the time to pose figures and set upscenes from great master paintings is an excellentway to improve your understanding of compositionalconcepts. After you pose the figures, try drawing afew of them.

130
Figure Drawing with Virtual Models

131
Composition

C H A P T E R 7
Figure 7.1 The lighting shows what kind of material the dress is made of.

L i g h t i n g t h e F i g u r e
✎
133
Light is essential to sight. Without light there is no sight, at least notwith our natural eyes. Because figure drawing begins with seeing, abook about figure drawing should have some significant information
on the nature of light and how our eyes perceive it. Understanding how lightworks on objects in a scene helps the artist create a feeling of depth and sub-stance in a drawing. In Figure 7.1 the lighting on the dress indicates that it isa dark satin material.
In nature the artist often doesn’t have much control over the lighting of ascene. About all that can be done to change the lighting is to wait for the sunto move to a better position. Once the sun is in the right place you had betterdraw quickly, though, because it will continue to move, changing the lighting.In the studio the artist has a lot more control over the lighting of a figure.
In a studio situation the artist can change the lighting of the figure by movingthe light sources or by opening and closing window coverings. Too often theartist does not take enough time to make sure the lighting of the figure isexactly right. When using a virtual model, such as in Figure Artist, lightingbecomes even more critical because all lighting in the scene is staged in theprogram. Not only does the artist need to understand how to move lights, healso must understand how to simulate actual lighting effects from real life.

134
Figure Drawing with Virtual Models
Take a look at Figure 7.2. Canyou see any lighting problems?Would this lighting setup make agood figure drawing?
In this chapter we will be lookingat how to light a figure. We willalso cover many aspects of shad-ing your drawings.
Types of Light
There are basically two types oflight in drawing—direct light andreflected light. Direct lightemanates from a light source, suchas a light bulb or the sun. During anormal sunny day, the world isbathed in light with the sun as thelight source. If you were to lookdirectly at the sun (something yourmother probably told you not todo), you would be looking at directlight, as shown in Figure 7.3. Thesame thing is true for a light bulbor a campfire. Anything that cre-ates light, such as a TV or a com-puter monitor, is giving off directlight.
Reflected light bounces off ofobjects. We see the world aroundus primarily through reflectedlight. The yellow, green, and red inFigure 7.3 are all reflected light.The light of the sun is bouncingfrom the objects and reflectingback to the viewer.
Figure 7.2 Is this good lighting for a figure drawing?
Figure 7.3 Light that comes directly from a light source is called directlight.

135
Lighting the Figure
Absorption,
Reflection, and
Pass Through
Light travels in a straight path fromthe light source until it hits some-thing. When light hits an object, itwill do one of three things: It willbounce off the object, it will beabsorbed by the object, or it willpass through the object. In Figure7.4, light is coming from the sun.When light hits the blue object,blue light is reflected to theviewer’s eyes. All non-blue light isabsorbed into the object.
The color of an object is deter-mined by the light that is absorbedinto it and the light that is reflectedoff of it. A white light contains allcolors of visible light. If a whitelight strikes a blue object, all colorsother than those that are blue willbe drawn into the object. The bluelight is reflected. What makes theobject blue is that it is reflectingblue light, as shown in Figure 7.4.
Have you ever noticed that blackclothing is much hotter to wear ona sunny day than white clothing?That is because black absorbs all ofthe visible light and doesn’t reflectany light. When light is absorbedinto a surface, it creates heat. Onthe other hand, a white shirtreflects all of the light of the visiblespectrum.
If the object is transparent, some ofthe light will pass through theobject. In the case of a transparentobject, such as glass, almost all ofthe light will pass through theobject. Figure 7.5 shows light pass-ing through the blue object. Not
only is blue light reflected, but it isalso the only light that passesthrough the blue object, as shownin Figure 7.5. All of the other lightbands are absorbed into the blueobject.
Figure 7.4 An object is blue because it reflects blue light.
Figure 7.5 Blue light passes through the object.

136
Figure Drawing with Virtual Models
Light and
Shadow
Where there is light there is alsoshadow. A shadow is an area ofdiminished light because the objectis blocking some of the light fromentering. The light and shadow ofan object help show its shape anddimensions. In Figure 7.6, theshadow gives the figure the appear-ance of standing on the ground,even though the figure is only seenin silhouette.
Now let’s take a look at how lightdefines a three-dimensional object.We will start with a simple shape,such as a sphere. Look at Figure7.7 and try drawing the picture of a ball sitting on a tabletop before you go on to the rest of the chapter.
Figure 7.6 The shadow helps to plant the figure on the ground.
Figure 7.7 Draw and shade the sphere.

137
Lighting the Figure
Highlight
The highlight of an object is thepart that light directly reflects fromthe light source to the viewer’seyes. The highlight is located onthe brightest area of the ball, asshown in Figure 7.8. The highlightarea is at a direct reflection anglefrom the light source. If you areusing white paper and a pencil, thehighlight will generally be left asthe white of the paper. For this reason, you don’t actually draw the highlight; rather, you draw therest of the object and leave thehighlight.
Highlight
Figure 7.8 The highlight is a direct reflection of the light source.
Figure 7.9 Raking light hits a curved surface at an angle.
Raking Light
The area that surrounds the high-light where the light is not asdirectly reflected is called rakinglight. The name comes from theway the light skims across the sur-face and hits it at an angle. Thisarea extends outward from thehighlight and gradually gets darkerbecause the surface of the object isturning away from the light, asshown in Figure 7.9.
Raking light
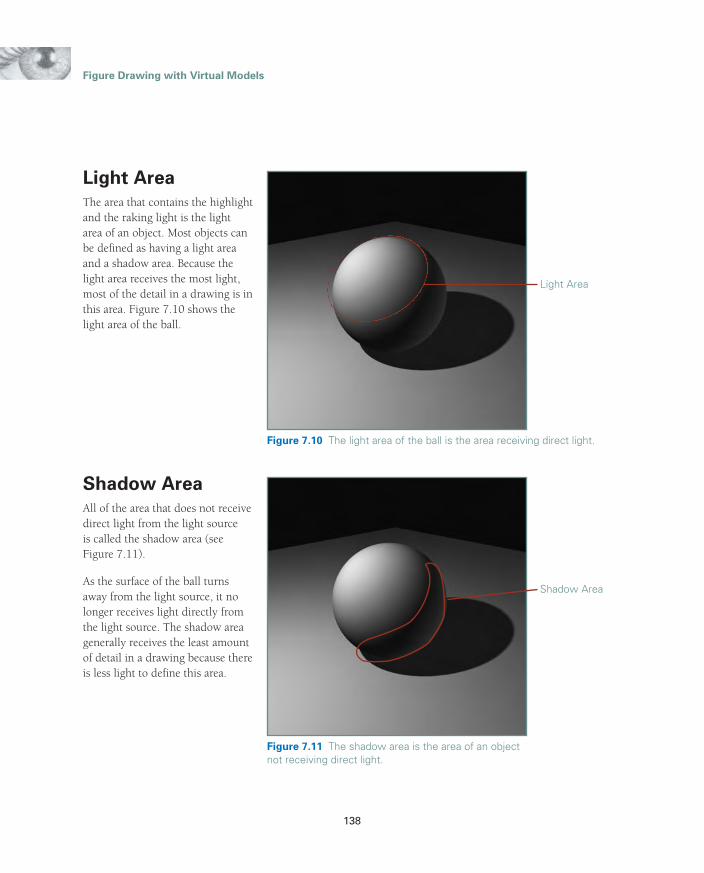
138
Figure Drawing with Virtual Models
Light Area
The area that contains the highlightand the raking light is the lightarea of an object. Most objects canbe defined as having a light areaand a shadow area. Because thelight area receives the most light,most of the detail in a drawing is inthis area. Figure 7.10 shows thelight area of the ball.
Figure 7.10 The light area of the ball is the area receiving direct light.
Figure 7.11 The shadow area is the area of an object not receiving direct light.
Shadow Area
Light Area
Shadow Area
All of the area that does not receivedirect light from the light source is called the shadow area (seeFigure 7.11).
As the surface of the ball turnsaway from the light source, it nolonger receives light directly fromthe light source. The shadow areagenerally receives the least amountof detail in a drawing because thereis less light to define this area.

139
Lighting the Figure
In situations where there is onlyone light shining on an object,such as a ball, roughly half of theball will be in the shadow area andhalf will be in the light area.Viewing the ball directly to the sideof the light source illustrates howthe light and shadow areas aredivided, as shown in Figure 7.12.
Figure 7.12 Half the ball is on the light side, and half is on the shadow side.
Figure 7.13 The core shadow runs on the line next to the light side of an object.
Core shadow
Light side
Dark side
Core Shadow
There is a band of shadow thatseparates the raking light from theshadow area of the ball. Thisshadow is called the core shadow,and it is shown in Figure 7.13.
The core shadow runs along theedge of the object that is directlypast the influence of the light. It isa very important shadow for theartist because the core shadow,more than any other shading,defines the form. The core shadowis the darkest shadow on the ballbecause it receives the leastamount of light.

140
Figure Drawing with Virtual Models
Reflected Light
The shadow area does not receivedirect light from the light source,but it does receive indirect light.Indirect light is reflected fromother surfaces onto the ball. In thepicture of the ball, the light thathits the table and reflects back tous also reflects back toward theball. The reflected light gives defi-nition to the shadow area of adrawing, as shown in Figure 7.14.
Figure 7.15 The cast shadow is the area of shadow cast from an object onto another surface.
Cast shadow
Figure 7.14 Half the ball is on the light side and half is on the shadow side.
Reflected light
Cast Shadow
Because the ball interrupts some ofthe light traveling from the lightsource to the table, there is an areaof shadow on the table. This areaof shadow is called the cast shadow.It is shown in Figure 7.15.

141
Lighting the Figure
Cast shadows are not just flat shad-ows. They have unique characteris-tics that an artist must understandto make them look correct. As theshadow becomes more distantfrom the object, the edge becomesless distinct. This happens becausethere is more chance for reflectedlight to reach the shadow area. Theshadow has a diffused edge, asshown in Figure 7.16.
Figure 7.17 Reflected light also bounces from the ball to the cast shadow.
Twice-reflectedlight
Figure 7.16 The edge of a shadow is diffused as it goes away from an object.
Diffused edge
There is also a slightly lighter areajust beneath the ball. This area isthe twice-reflected light area. Thelight that is reflected to the ballbounces off the ball and into thecast shadow area, giving that area asmall amount of light, as shown inFigure 7.17. This is one reasonwhy some cast shadows seem to belighter near the middle.

142
Figure Drawing with Virtual Models
Front and Rim
Lighting
Many artists like to light theirscenes with the light coming frombehind the artist and to the side sothey can show most of the light,but also some of the shadow areas.This type of lighting best definesthe form of the objects in theirdrawings. Lighting from the frontor the back of the object tends toflatten the form of the object, asshown here. However, sometimesthese types of lighting effects canadd drama to a drawing, especiallyin the case of rim lighting, asshown in Figure 7.18.
Multiple Light
Sources
Many times, objects we see in lifehave more than one light source.This is particularly true of charac-ters or objects that are in interiorsettings. A single room inside abuilding might have many lightsilluminating a character or objectfrom multiple angles. Each lightwill have an effect on how thecharacter or object looks. This canoften be confusing for the artistwho has to track the direction ofthe lights to understand the anglesof the lights. The picture in Figure7.19 shows the ball with threelights. Notice the multiple cast
Figure 7.19 It can sometimes be confusing to draw an object with multiple light sources.
Figure 7.18 Front and rim lighting tend to flatten objects.
Front lighting Rim lighting

143
Lighting the Figure
shadows. The cast shadows are thebest clue for determining the num-ber and location of all the lightshitting the object.
Did you realize there was so muchinvolved in the lighting of a simpleball? We see light every day, butunless we are familiar with itsnature, we might miss manyaspects. Try drawing the ball again,and this time use what you havejust learned about light to definethe lighting of the ball. Compareyour drawings. Was your seconddrawing a better depiction of theball?
We are not done yet. There is still alot more to learn about light.
Figures
So far we have talked about light-ing a ball. Now let’s see how lightaffects a figure in Figure Artist.Figure 7.20 shows a seated figurewith the default lighting in FigureArtist.
You could use this lighting (andmany who use the program mightjust do that), but I recommend thatyou come up with your own light-ing for your figures.
Figure 7.20 The default lighting is a start, but should be adjusted in most cases.

144
Figure Drawing with Virtual Models
Adjusting
Shadows
The default lighting is nice, but forthis figure there are some prob-lems. Notice that the cast shadowsare very dark, obscuring parts ofthe figure. Figure Artist allows youto adjust the darkness of the shad-ows from each light. In Figure 7.21I lightened the cast shadows on thefigure. Notice how the lighting is alot more pleasant.
Figure 7.21 Lighter shadows make the figure more pleasant.
Figure 7.22 Use opposing lights to simulate reflected light.
Opposing Lights
When lighting your figure, youneed to have opposing lights. Theopposing light is the light sourcefor reflected light. Without it yourpictures will not look natural.Figure 7.22 shows a figure withlighting from only one direction.
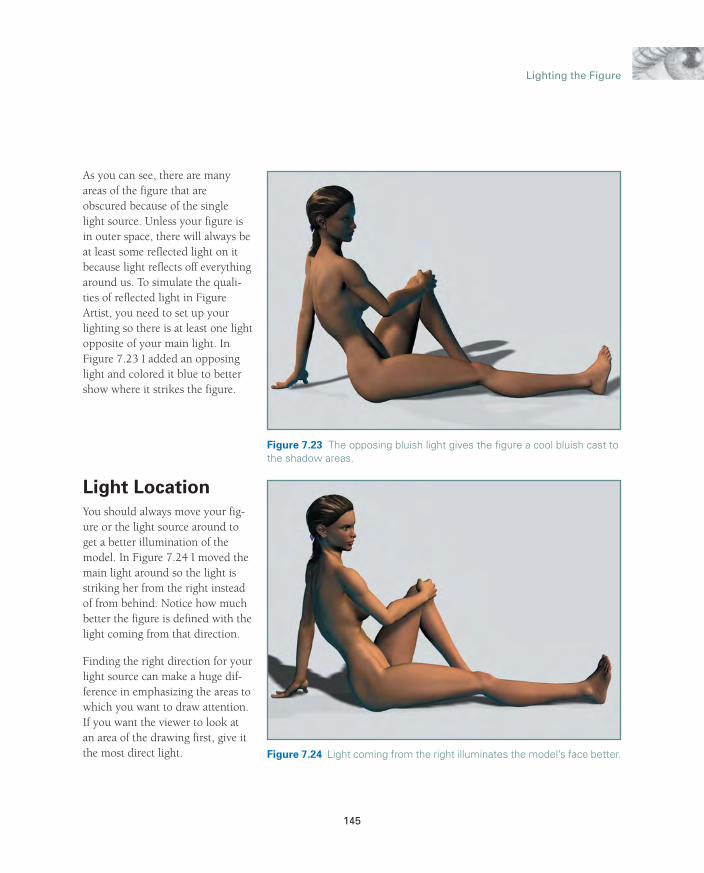
145
Lighting the Figure
As you can see, there are manyareas of the figure that areobscured because of the singlelight source. Unless your figure isin outer space, there will always beat least some reflected light on itbecause light reflects off everythingaround us. To simulate the quali-ties of reflected light in FigureArtist, you need to set up yourlighting so there is at least one lightopposite of your main light. InFigure 7.23 I added an opposinglight and colored it blue to bettershow where it strikes the figure.
Figure 7.23 The opposing bluish light gives the figure a cool bluish cast tothe shadow areas.
Figure 7.24 Light coming from the right illuminates the model’s face better.
Light Location
You should always move your fig-ure or the light source around toget a better illumination of themodel. In Figure 7.24 I moved themain light around so the light isstriking her from the right insteadof from behind. Notice how muchbetter the figure is defined with thelight coming from that direction.
Finding the right direction for yourlight source can make a huge dif-ference in emphasizing the areas towhich you want to draw attention.If you want the viewer to look atan area of the drawing first, give itthe most direct light.

146
Figure Drawing with Virtual Models
Emotion
Lighting can have an emotionalaspect to it. Take a look at thelighting of the two figures in Figure7.25. Even thought they are theexact same model from the exactsame point of view, the figure onthe left looks almost spooky com-pared to the one on the right. Thisis because the figure on the left hasa light source coming from under-neath, while the light source forthe one on the right is comingfrom above. The mood of the sceneis changed simply by changing thedirection of the light source.
Image-Based
Lighting
Figure Artist has a special lightingoption for image-based lighting.Image-based lighting is a way ofsetting up the lighting of a charac-ter based on an image of naturallighting. The lighting simulates thelighting effects found in real envi-ronments through an image of thatenvironment. When the image isprocessed through Figure Artist,the program creates lights that sim-ulate the environment.
Image-based lights are a quick wayto achieve a natural-looking light-ing effect without having to manip-ulate the lights themselves. Figure7.26 shows image-based lightingfor a bright, sunny day.
Figure 7.25 Lighting can express emotion.
Figure 7.26 Image-based lighting simulates natural lighting.

147
Lighting the Figure
The image can be of almost anyenvironment. Figure 7.27 was ren-dered with lighting taken frominside an office. Notice the strongyellow cast from the incandescentlight bulbs.
Figure 7.27 Interior lighting has a yellow cast.
Figure 7.28 Evening lighting gives the scene a cooler, bluish cast.
A more subdued, cool bluish light-ing effect is evident in this render-ing shown in Figure 7.28, using anevening seaside image.

148
Figure Drawing with Virtual Models
An image of a shady area can beused for scenes in which the figureis posed outside, under an over-hanging tree. The cooler colors fil-tering through the leaves and the
Figure 7.29 This lighting has an interesting combination of cool and warm lights.
warmer colors from the sun givethe rendering in Figure 7.29 aninteresting combination of warmand cool lighting.

149
Lighting the Figure
Shading a
Figure
The figure is basically a solid struc-ture that interacts with light inmuch the same way as the ballused earlier in this chapter. All ofthe lighting principles of light sideand shadow side are present. Thereare highlights, raking lights, coreshadow, reflected light, and cast
shadow. All the artist needs to do isdetermine where the light source isand how the light is falling on thefigure. The figure is first brokeninto a light side and a dark side.From there, the artist defines thedifferent aspects of lighting andshades the drawing accordingly.Follow along with this exercise tosee one way of shading your figuredrawings.
To get a good feeling of form andsolidity in a figure drawing, theartist must shade the drawing sothat the light is clearly defined. Acommon mistake of the beginner isto have areas in the shadow thatare too light and areas in the lightthat are too dark. When this hap-pens, the drawing will sufferbecause it will be confusing to theviewer. The light side of the draw-ings should always be lighter thanthe shadow side.
S T E P - B Y - S T E P
1First set up the lighting of the figure in FigureArtist so it brings out the form by having asingle strong light for defining the light sideand a more subdued opposing light for theshadow side, as shown in Figure 7.30. Astrong light that clearly defines the light andshadow sides of the figure helps to show theform of the body more clearly because of thecontrast between the two sides.
Figure 7.30 Pose a figure model with a stronglight.
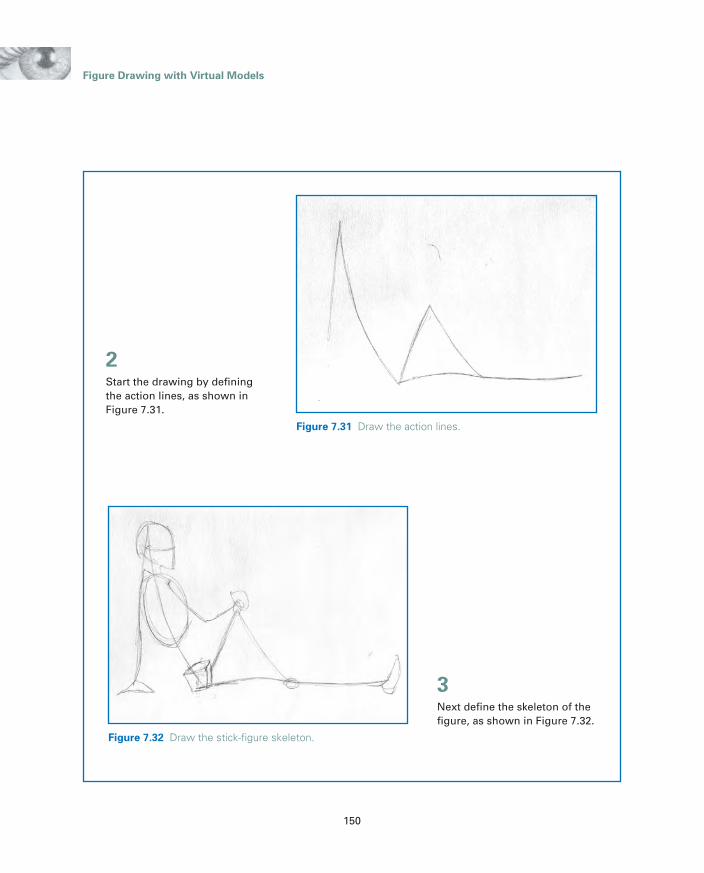
150
Figure Drawing with Virtual Models
2Start the drawing by definingthe action lines, as shown inFigure 7.31.
Figure 7.31 Draw the action lines.
Figure 7.32 Draw the stick-figure skeleton.
3Next define the skeleton of thefigure, as shown in Figure 7.32.

151
Lighting the Figure
4Next develop the contours ofthe body over the constructionlines, as shown in Figure 7.33.
Figure 7.33 Draw the contours of the figure.
N O T E
I usually draw all of the construction lines and contour lines for my drawings very lightly, sothat they can barely be seen. Because drawings done that lightly are difficult to see whenprinted in a book, I drew the lines much darker here than normal. The picture used for theremaining steps is different than the one used at the beginning. The construction lines arestill there, but they are probably too light to see well. This is so that they don’t interfere withthe delicate shading of the figure drawing.
When doing your own drawings, remember that you have control over how boldly you lay inyour construction lines. Some drawings might look better with the construction lines stillshowing, while others will look better if the lines are not showing. If you don’t want the linesto show, draw very lightly. It is better to draw lightly than to erase because erasing can dam-age the paper and ruin the drawing.

152
Figure Drawing with Virtual Models
Figure 7.34 Start defining the light and shadow at the head.
5Beginning with the head I startto lay in the values, defining thelight areas and the dark areasby first finding the core shad-ows, as shown in Figure 7.34.
Figure 7.35 Apply shading to the torso and arms.
6From the head I move to thetorso and arms, as shown inFigure 7.35.

153
Lighting the Figure
Figure 7.36 Continue working in the values of the figure.
7Next I work on the hips andlegs, trying to keep the shadingcohesive as I go (see Figure7.36).
Figure 7.37 The light and shadow areas are defined.
8I complete the initial shadingthrough the legs. The purposeof the initial shading of the fig-ure is to define the light andshadow areas. The drawing isnot finished at this stage, but it is defined, as shown in Figure 7.37.

154
Figure Drawing with Virtual Models
Figure 7.38 Build a stronger sense of solidity by darkening theshadow area.
9Now the drawing needs to beviewed as a whole. Notice thatalthough the light and darkareas are defined, they are notcohesive. There are areas in theshadow that are too light, giv-ing the drawing a spotty look,rather than making it look like itis a rounded shape. The laststep of the drawing is to clearlyput the shadow area in shadowand the light area in light, asshown in Figure 7.38.

155
Lighting the Figure
Designing Light
With the help of Figure Artist, youwill have the opportunity to designthe lighting of your figure draw-ings. Even if all you are doing isexploring lighting for a live model,you can experiment within FigureArtist to find lighting effects that
you can later use in your work.Lighting the figure is a core issuewith figure drawing that is oftenjust quickly passed over so theartist can start drawing.
Without light there could be nofigure drawing because the roomwould be too dark and you wouldnot be able to see the figure or
your paper. It makes sense that iflight controls how we see the fig-ure, controlling the light will helpto make our figure drawings moreinteresting and visually appealing.The more you learn about lightand how it works with the figure,the greater creative power you willhave over your drawings.
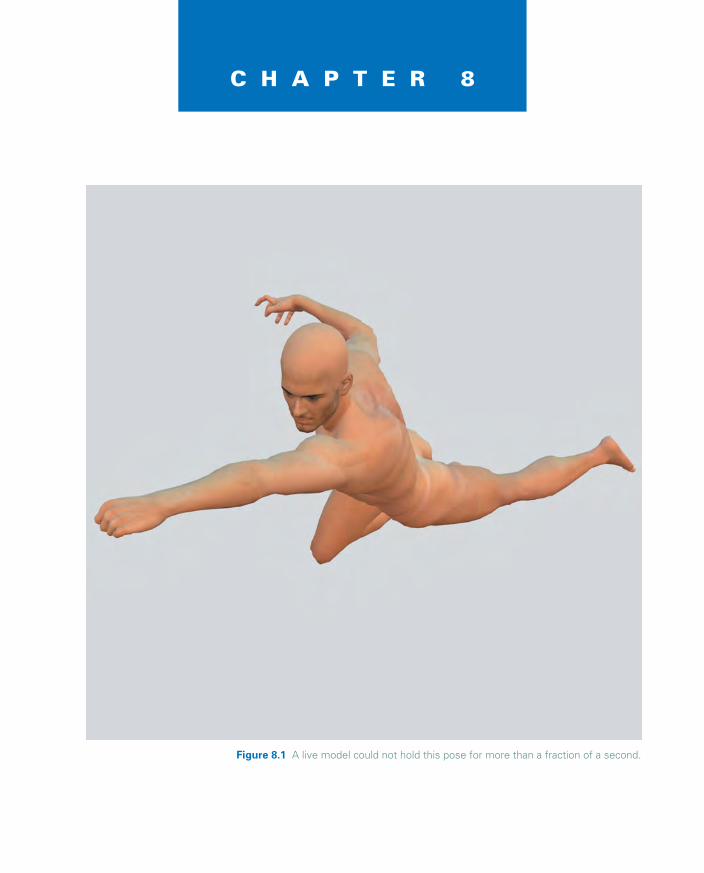
C H A P T E R 8
Figure 8.1 A live model could not hold this pose for more than a fraction of a second.

D y n a m i c F i g u r e D r a w i n g
✎
157
Figure Artist brings a whole new dimension to posing a figure thatwould be nearly impossible in real life. With Figure Artist, the abilityto catch an action pose is limitless. In real-life situations, about the best
an artist can do is ask the model to perform an action and then try to capturethe action with a camera, which is a haphazard approach at best. Figure 8.1shows a pose taken from a model in Figure Artist that would be impossiblefor a live model to hold for more than a fraction of a second.
This chapter deals with creating dynamic figure poses that would not be pos-sible with live models. My hope is that it will help you to unlock a world ofpossibilities that goes beyond those available in a life-drawing situation.
Limitations of a Live Model
Although a live model is always the preferred situation for drawing the figure,there are limitations to what you can have a model do. Live models are humanswho live in a real world. They get tired. Even a relaxed pose can’t be held indefi-nitely. The following are just a few limitations you will find when posing a livemodel:
✎ Gravity affects everything in life, including a model, causingfatigue. Some poses are easier to hold than others for longperiods of time. Out of respect and compassion for the livemodel, most figure-drawing situations tend to be poses thatthe model can hold without a great deal of difficulty. Dynamicposes are often short, giving the artist little time to fullydevelop the figure.

158
Figure Drawing with Virtual Models
✎ Some poses, such asrunning or jumping,can’t be held at allbecause they happen inthe air. Again, gravity isthe problem. I guess ifthere were a life-mod-eling class on the spacestation the model couldhold an action pose,but until artists canwork in the weightless-ness of space, a livemodel can only hold apose when planted onthe ground. Even rig-ging a harness to sus-pend the model doesn’twork very well becauseof the distortions andview obstructions theharness causes.
✎ Viewing the live modelis usually limited to arange near eye level.Not often can an artistview the model fromdirectly above becausemost studios or classesare not equipped withcatwalks or other over-head platforms fordrawing. Likewise,drawing from directlybelow the figure isimpossible because ofa thing we call the
floor. I guess it wouldbe possible to put themodel on an overheadglass platform, but Ihaven’t seen too manyof those.
✎ Time is also a limitationfor live models. Notonly is there the prob-lem of fatigue men-tioned a moment ago,but there is also thefact that models can’talways be aroundwhen you want them.They have lives of theirown, so drawing timehas to be scheduledwell in advance. Thus,if you have a great ideafor a drawing, youmight have to waitbefore you can pose amodel.
✎ Another limitation of alive model is the factthat there is usually anexpense involved inhiring the model. Fewmodels work for free.Modeling is work, andthe models deserve tobe paid for the timeand effort involved inmodeling for artists.
✎ Models are people, andbecause they are peo-ple, they come in avariety of shapes andsizes. You might not beable to find just theright person for yourdrawings. In addition,the person you findmight not be able toperform the requiredposes because of lackof training or ability.For example, youmight want to havesomeone pose for agraceful ballet pose,but you might not beable to locate a quali-fied model in yourarea.
✎ A living person willtend to move even if itis only a little bit.Holding a pose is hard,and often the modelwill shift or lean a littlewhile posing. When themodel takes a breakand then tries to reas-sume a pose, he or shewill never be in exactlythe same pose asbefore.

159
Dynamic Figure Drawing
Figure Artist does not solve everylimitation of live models, but itdoes go a long way toward solvingmany problems. A model in FigureArtist can hold a pose indefinitely,no matter how difficult the pose.Holding a pose indefinitely is agreat advantage because the artistcan study the figure in detail.What’s more, when a model fromFigure Artist is posed, it doesn’tmove at all. If you come back a
year later and load the pose, it willbe exactly the same.
Figure 8.2 shows a pose of a char-acter in the act of jumping in theair. This is a good example of apose that could not be held by alive model, but can be held by avirtual model.
The virtual model can hold thisaction pose for as long as the artist
needs it as reference. What ismore, the artist can adjust the poseas needed to fine-tune the action.Figure 8.3 shows another suchpose.
You can see from these examplesthat dynamics of figure movementthat go beyond the sedate, staticposes of the life-drawing class arenow available to the artist throughFigure Artist.
Figure 8.2 The virtual model can hold a pose indefi-nitely.
Figure 8.3 This is an example of an action pose.

160
Figure Drawing with Virtual Models
Posing the
Dynamic Figure
Dynamic figure poses are differentfrom other poses in that they pushthe envelope of human movement.In other words, dynamic figureposes are at the extremes of themotion that the human body iscapable of performing.
Extreme
Movement
Dynamic figure posing really hastwo main components that theartist needs to work with to be suc-cessful. The first is exploring theextremes of human motion with-out going beyond the physicalrestraints of the body. The secondis establishing a strong action linethat conveys a consistent momen-tum within the figure.
The joints of the body have naturallimits to movement. The arm, forexample, only bends at the elbowin one direction. Contortionistsmay defy the natural limitations ofthe human body, but drawing alimb that is pushed way beyond itsnatural limits will often result in adrawing that looks odd or disturb-ing rather than dynamic. Some
exaggeration is okay when posingdynamic figures, but overdoing itmight push your drawing fromdynamic to grotesque. To create agood dynamic pose, you need topush the limits of human move-ment, but not break them.
For years comic book artists andanimators have known that theextremes of movement are themost dynamic depictions of human
action. These art forms have con-sistently pushed the human figureinto more and more extreme move-ment to add drama and suspenseto art. Take a look at the three fig-ure poses shown in Figure 8.4.
You can see from these picturesthat the beginning and end of anaction are more dynamic than thepose that is partway through thepunch.
Figure 8.4 The beginning or end of an action holds the most dynamicpose.
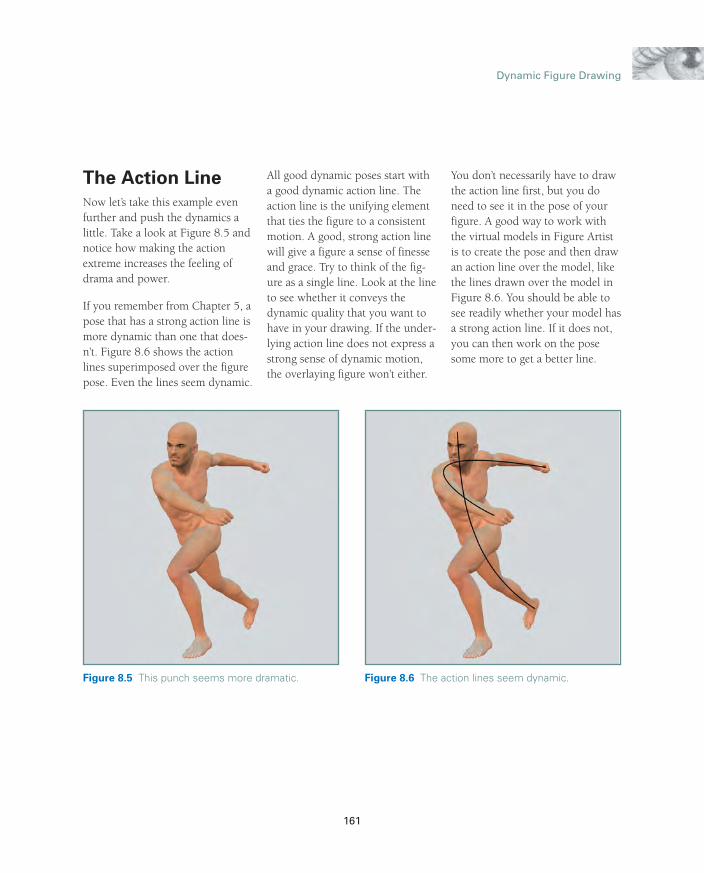
161
Dynamic Figure Drawing
The Action Line
Now let’s take this example evenfurther and push the dynamics alittle. Take a look at Figure 8.5 andnotice how making the actionextreme increases the feeling ofdrama and power.
If you remember from Chapter 5, apose that has a strong action line ismore dynamic than one that does-n’t. Figure 8.6 shows the actionlines superimposed over the figurepose. Even the lines seem dynamic.
Figure 8.5 This punch seems more dramatic. Figure 8.6 The action lines seem dynamic.
All good dynamic poses start witha good dynamic action line. Theaction line is the unifying elementthat ties the figure to a consistentmotion. A good, strong action linewill give a figure a sense of finesseand grace. Try to think of the fig-ure as a single line. Look at the lineto see whether it conveys thedynamic quality that you want tohave in your drawing. If the under-lying action line does not express astrong sense of dynamic motion,the overlaying figure won’t either.
You don’t necessarily have to drawthe action line first, but you doneed to see it in the pose of yourfigure. A good way to work withthe virtual models in Figure Artistis to create the pose and then drawan action line over the model, likethe lines drawn over the model inFigure 8.6. You should be able tosee readily whether your model hasa strong action line. If it does not,you can then work on the posesome more to get a better line.

162
Figure Drawing with Virtual Models
After you have a strong action line,drawing the dynamic figurebecomes easier. Figure 8.7 shows adrawing of the figure from theaction pose.
Figure Artist comes with a numberof poses for both the male andfemale models. These poses rangefrom relaxed, mundane actions todynamic comic book–style poses.To help you learn how to increasethe drama in your own poses, Isuggest that you load a few of theposes and adjust them. Seewhether you can make the posesmore dynamic. Work on the actionlines and see whether you can cre-ate some expressive dynamic posesfor your drawing from the posesthat come with the software.
Figure 8.7 After establishing the action line, the figure isthen drawn.
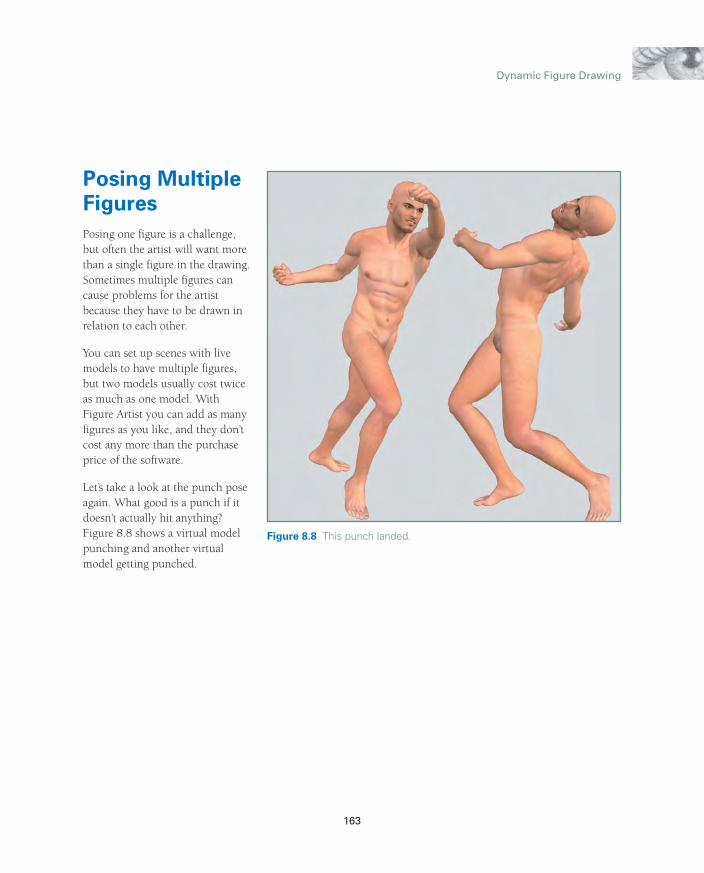
163
Dynamic Figure Drawing
Posing Multiple
Figures
Posing one figure is a challenge,but often the artist will want morethan a single figure in the drawing.Sometimes multiple figures cancause problems for the artistbecause they have to be drawn inrelation to each other.
You can set up scenes with livemodels to have multiple figures,but two models usually cost twiceas much as one model. WithFigure Artist you can add as manyfigures as you like, and they don’tcost any more than the purchaseprice of the software.
Let’s take a look at the punch poseagain. What good is a punch if itdoesn’t actually hit anything?Figure 8.8 shows a virtual modelpunching and another virtualmodel getting punched.
Figure 8.8 This punch landed.

164
Figure Drawing with Virtual Models
A great advantage of Figure Artistis that the models are to scale,which helps to keep the figures inyour scenes in scale with eachother. The perspective in FigureArtist is automatic.
Now let’s try a more dynamic posefor our two models. Instead of thelight tap that our models used, let’ssee some real action and reaction.Take a look at Figure 8.9. One ofour virtual models has just finisheda powerful punch, and the othermodel is feeling the effect.
Are you starting to see how movinga pose to the extreme of its motionenhances the action in the pose?
N O T E
These poses are other exam-ples of poses that would bedifficult to achieve in a livemodeling session. Not toomany models will be willingto have their jaw dislocatedjust so the artist can get agood look at a fight scene.However, the virtual modeldoesn’t really feel pain, so youcan beat him up as much asyou like, and he will stillcome back for more.
Figure 8.9 Now that is a powerful punch.

165
Dynamic Figure Drawing
Moving the Point
of View
Not only can the pose be dynamic,but the view can be as well. Astatic view from the side, such asthe one shown in Figure 8.8, mightnot always be the best view ofdynamic action. Although theaction lines may be strong, the pic-ture can look less dramatic becauseit is viewed from a perpendicularangle. Poses tend to look moredynamic if the view is at an angleother than a flat view of the action.Although it is not as noticeable insingle-character pictures, this
Figure 8.10 Change your point of view to increasedrama.
Figure 8.11 Receding action is not as dramatic asapproaching action.
becomes very evident in pictures inwhich there are two or more char-acters.
A view in Figure Artist is associatedwith a camera. By moving the cam-era, you are moving your point ofview. Take a look at Figure 8.10.The only thing that has changed isyour point of view.
In Figure 8.10, the action is head-ing more toward us, making thepicture more dramatic. Notice thatas you turn the scene, the figuresstart to overlap each other. Thediagonal lines in the scene also
become more dramatic. This viewof the scene has a lot more dramathan the one shown in Figure 8.9,without changing the poses ofeither model.
You should never accept the firstview you come up with of a scene.Always explore different angles tosee whether you might find a bet-ter view. Figure 8.11 shows thescene from the back of the punch-ing model. Although it has thesame (if not stronger) diagonallines as Figure 8.10, it doesn’t haveas much drama because the actionis going away from the viewer.

Figure Artist has no restrictions asto the angles from which you canview your poses. You can evenbecome creative and view theaction from a sky shot, as shown inFigure 8.12, or you can look at theaction from below, as shown inFigure 8.13.
Moving your models around cangive you a better view, and it canalso give you an opportunity toview your pose from other anglesto see whether it looks right. Thevirtual models simulate a real 3D
environment. A pose that mightlook right from one angle oftendoesn’t look as good from anotherunless you pose your model andlook at it from multiple angles.
166
Figure Drawing with Virtual Models
Figure 8.12 You can view the scene from up top. Figure 8.13 You can also view the scene from downbelow.

167
Dynamic Figure Drawing
Posing with
Objects
When you are drawing figures, youmight want to also add someobjects. Figure Artist has a numberof simple objects with which youcan have your virtual models inter-
act. These objects are by no meansa complete set of objects for any-thing you might want to do, butthey do form a basic set of shapesthat you can use. For example,Figure 8.14 is using a box objectfrom the available objects as a propwith the figures.
Figure 8.14 Props can also be added to scenes.

168
Figure Drawing with Virtual Models
Figure 8.15 Changing the view helps to show dimension of the box.
The view of the scene is kind ofstatic because it is taken from theside, but you should be able to seehow adding a prop can help withputting a group of figures together.Figure 8.15 shows a more dramaticview of the models pulling andpushing the box.
In this scene there are five figuresstruggling to move the box. Fromthe amount of effort these guys areputting into it, the box must bevery heavy. An aspect of virtualmodels that works very well is that
they can strain at something ashard as you like without ever get-ting tired. If these guys were realmodels, fatigue would cause themto only be able to hold a pose likethis for a few minutes.
Virtual models might have thedrawback of not showing theintense muscle strain of individualmuscles, but the models can be setup to show the overall stress puton the body with extreme exertion.From the poses with the box, youcan clearly tell that the models are
pushing and pulling a heavyobject. The hunched stances andoff-balanced positions of the threepulling imaginary ropes clearlyshow their exertion. The two push-ing the box show by their posturethat they are leaning hard againstthe back of the box.
With a little work you can haveyour virtual models interact withprops in a very realistic manner. Alot depends on how you set upeach pose in relation to the object.
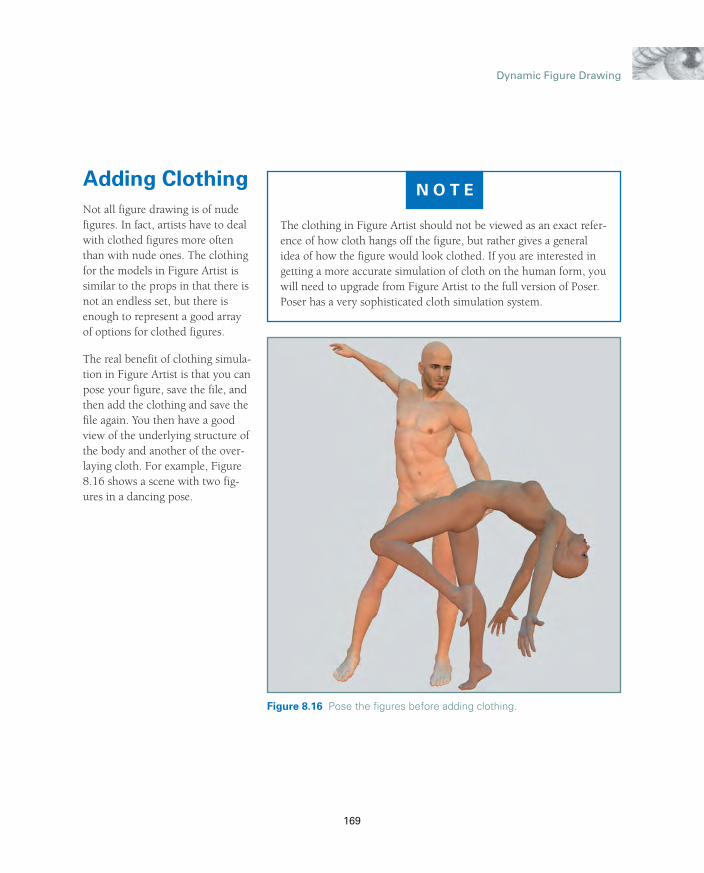
169
Dynamic Figure Drawing
Adding Clothing
Not all figure drawing is of nudefigures. In fact, artists have to dealwith clothed figures more oftenthan with nude ones. The clothingfor the models in Figure Artist issimilar to the props in that there isnot an endless set, but there isenough to represent a good arrayof options for clothed figures.
The real benefit of clothing simula-tion in Figure Artist is that you canpose your figure, save the file, andthen add the clothing and save thefile again. You then have a goodview of the underlying structure ofthe body and another of the over-laying cloth. For example, Figure8.16 shows a scene with two fig-ures in a dancing pose.
N O T E
The clothing in Figure Artist should not be viewed as an exact refer-ence of how cloth hangs off the figure, but rather gives a generalidea of how the figure would look clothed. If you are interested ingetting a more accurate simulation of cloth on the human form, youwill need to upgrade from Figure Artist to the full version of Poser.Poser has a very sophisticated cloth simulation system.
Figure 8.16 Pose the figures before adding clothing.

170
Figure Drawing with Virtual Models
In Figure 8.17, I have added cloth-ing to the figures.
I can use the two sources fromFigure Artist as reference for adrawing. The pose reference isgood for developing the underlyingstructures and defining the figures,and the clothed pose is good forworking on the overlaying shapesand textures.
Figure Artist uses a system calledconforming clothing. Each article ofclothing is actually a 3D modelseparate from the virtual model.When the clothing is applied to thefigure, it conforms to the figure asclosely as the 3D model will per-mit. For this reason, some articlesof clothing will not work withsome poses because the range ofmovement of the clothing model isnot as robust as that of the virtualmodel. You will need to experi-ment to see how each article ofclothing works with your pose.
The clothing in Figure Artist doesnot simulate the way cloth folds atjoints or gathers around the hipand waist. Unfortunately, theseaspects of figure drawing are betterdealt with in real life than they arein a software simulation. FigureArtist is better suited to the studyof the undraped human form thanit is to clothed figures.
Figure 8.17 Clothing is added over the figures.

171
Dynamic Figure Drawing
Ending Note
Exploring dynamic poses for figurereference can be a freeing experi-ence for the artist who has onlyhad sedate figures from which todraw. When you think of all thepossibilities available through atool such as Figure Artist, you willquickly notice that many of thelimitations of live models are elimi-nated or reduced.
Figure Artist is not and should notbe a replacement for studying the
live figure, but it is a great tool foran artist to use in planning, devel-oping, and creating figurative art. Itis a tool that can expand the artist’svision and increase the artist’sknowledge of the figure. Usedproperly, Figure Artist can becomea valuable ally in the struggle tounderstand one of the most com-plex and difficult subjects in art,the human figure.
As you read this book, I hope thatyou took the opportunity toexplore some of the vast possibili-ties presented by the virtual model.
This book is just the launching padfor all of the creative developmentpossible using a virtual model fordrawing reference. I, for one, lookforward to the impact that a toolsuch as Figure Artist will have onfigurative art in the future. I believethat its impact will be felt as artistsuse it to gain a better understand-ing of the human form in 3Dspace. I wish you luck in yourstudy of figurative art, and I hopethat this book has helped you inyour journey.

I N D E X
172
90-degree angles, 92
A
abdominal muscles, 43
absorption, 135
Achilles tendon, 44, 56
action, 126
action focus, 126
action lines, 29, 31, 80–81,91–94
defining, 150
dynamic figure, 161–162
establishing, 22
expressing sense of dynamicmotion, 161
as guide to mannequin, 95
lightly drawing, 30
matching mass line, 81
observing people in life, 92
roughing in skeleton, 22
secondary, 92–93
virtual models, 161
action poses, 24, 78, 83,157–158
AFA Pornography Web site, 4
American Decency Web site, 4
analogous colors, 125
anatomical reference tool, 5
anatomy, 3, 6
bones, 33
complexity, 49
elbow, 34
hands, 52–55
jawbone, 33
ligaments, 33
muscles, 33–34, 40–48
skeleton, 34–40
soft and hard tissue, 33
studying, 2
tendons, 33
understanding, 33
upper arm, 34
anger, 88–89
ankle, 37, 52
anterior notch, 70
architects and people represent-ing scale, 101
Aristotle with a Bust of Homer,128
arms, 29
accomplished dancers move-ments, 40
female and male, 40
muscles, 53
shading, 152
simplified figure, 20
tension in, 83
art
history and human figure, 2
little things making biggest dif-ferences, 9
mundane scenes made interest-ing, 8
physical act, 6
versus pornography, 4–5
artificial environments and grav-ity, 78
artistic anatomy, 49
artistic vision, 8–9
artists, 5
knowledge, 6–7
vision, 8–9
visualization abilities, 2
assumptions and drawing, 7
Atlas, 36
Axis, 36
B
balance, 77–81
checking, 79–80
composition, 114
formal, 115–117
hip and shoulder relationship,82
hips, 78
informal, 118–120
pelvis, 82
as point of action, 77
spine and, 82
base manikin, 84
basic proportions of humanform, 9–15
beauty
composition, 90
drawing, 94–97
general accepted standards, 90
grace, 90
lighting, 90
ultimate expression, 75
biceps, 34, 43
biceps femoris, 44
blending edges, 113

173
Index
blocking in figures, 14
body
divided in height by four, 11
grace and beauty, 90
locating center of mass, 78
moving parts, 1
physical association with envi-ronment, 75
as series of curves, 24
symmetry, 115
body language, 75, 86–87
bones, 1, 33
affecting shape of body, 38
ankle, 52
calcaneus, 56
carpals, 52
curves, 38
female, 38
foot, 56
hands, 52–53
metacarpals, 52–53
metatarsals, 56
phalanges, 56
skull, 59–60
smaller and more slender, 38
talus bone, 56
very close to surface of skin, 59
wrist, 52
brachioradialis, 44
brain, 59
breastbone, 36
breasts, 46
C
calcaneus, 37, 56
calf muscle, 43
cameras, multiple, 4
capturing gesture, 21
cardiac muscles, 40
carpals, 52
cartilage, 68
cast shadows, 85, 97, 112,140–141, 149
adjusting, 144
number and location of lights,143
center of mass, 78–79
chin, 60
Christ and the Woman Taken inAdultery, 119
circle, 106
clavicle, 34, 42
closer, 113
clothed pose, 170
color focus, 125
color wheel, 125
colors
determining, 135
intensity, 125
commercial art purposes, 101
complimentary colors, 125
compositions, 6, 90
balance, 114
blatant devices to draw atten-tion, 126
focal points, 121–126
form, 110–112
formal balance, 115–117
foundation of, 99
fulcrum lever principle,118–120
good or bad, 100
informal balance, 118–120
pathways, 127–129
picture plane, 100
placement, 102–114
purpose, 100–101
confident swagger, 86–87
conforming clothing, 170
confusion, 88
construction guides and placingfeatures, 63–65
construction lines, 85, 151
contour lines, 151
contrapposto, 82
contrast, 111
adjusting, 85
drawing attention, 123
highest, 123
thin lines, 103
contrast focus, 123
copyright laws, 4
copyrights, 4–5
core shadows, 139, 149, 152
corners, 104
cranial bones, 34
cranium, 60
cultures and generally acceptedstandards for beauty, 90
curved lines, 91
curves, 24
bones, 38
joints, 24
lines, 104
thick and thin lines, 104

174
Figure Drawing with Virtual Models
D
da Vinci, Leonardo, 2, 113, 115,124
dark, quality of, 123
dark areas, defining, 152
David, 2, 126
daydreaming, 88
defining shapes, 107
deltoid muscles, 28, 42
detail focus, 124
determined, 89
diagonal elements, 120
dimension, 111
direct light, 134
disgust, 89
dominant shape, 106
drawing, 5
assumptions, 7
beauty, 94–97
erasing, 30
facial features, 67–72
foot, 57
framework defining dimensionsand proportions, 17
gesture drawing, 21–26
hands, 51
human form, 2–3
from inside out, 17–21
knowledge, 6–7
from life, 2–3
manikin, 29–31
people, 2
physical act, 6
practicing, 6
proportion, 60–66
shading, 96–97
standards, 1
unknown or unfamiliar objects,3
your own hand, 53
drawings
element placement, 102–114
feeling of life and action, 21–26
form, 110–112
foundation of, 24
illustrating story, 76
lines, 102–105
messages in, 86
points, 102
potential for gracefulness, 90
purpose or goal, 75, 100–101
selecting poses, 76
shapes, 105–110
structure and components, 6
dynamic figure, 160–162
dynamic poses, 157
E
ear canal, 70
ears, 61–62, 70
“eight heads high” rule, 10
elbows, 34
female and male, 38, 40
elements
changing dynamics of picture,106
closer, 113
diagonal or horizontal, 120
form, 110–112
lines, 102–105
placement, 102–114
points, 102
shapes, 105–110
vertical, 120
visual confusion, 109
emotion, 86
based on own human experi-ence, 2
lighting, 146
portraying, 88
emphasizing shapes, 106–107
erasing, 30
evening lighting, 147
exaggerating poses, 77–78
external oblique muscles, 42
extreme movement, 33–34, 160
eyebrows, 60, 65
eyelids, 7
eyes, 58, 60, 67
construction guides, 65
distance between, 61
eyelids, 7
horizontal lines for, 63
location on head, 6
pupil set back from lens, 8
shape, 7
tear ducts, 7
tips for drawing, 67

175
Index
F
face, 60–62
features too high, 6
shading, 96
facial bones, 34
facial expressions, 88–89
Family.org Pornography Website, 4
fat, 46
fear, 88–89
features
drawing, 67–72
ears, 70
eyes, 67
female, 40
isolating and drawing, 67
models, 73
mouth, 69
nose, 68
placing, 58, 63–65
feet, 29
female, 40
simplified figure, 20
virtual models, 57
female figure, 36, 38, 40
breasts, 46
fatty tissue, 46
hips, 11
hourglass shape, 46, 48
muscles, 46, 47
proportions, 10–11, 12
female manikin, 28–29
female skeleton, 38, 40
femur, 36–37, 90
fibula, 37
Figure Artist, 1, 3
action pose, 157
anatomical reference tool, 5
cameras, 165
clothed pose, 170
clothing, 169–170
conforming clothing, 170
darkness of shadows, 144
default lighting, 143
designing lighting, 155
Hip-Shoulder RelationshipGuide, 82
image-based lighting, 146–148
library of poses, 25
models holding pose indefi-nitely, 159
multiple cameras, 4
objects, 167–168
pose reference, 170
predefined poses, 162
reflected light, 145
selecting poses, 76
simplified figure, 18–21
viewing poses, 166
views, 165
virtual figure models, 49
visual options, 76
figures
3D space, 3, 81
action line, 22, 80–81, 91–93
adding clothing, 169–170
average, 10
balance, 77–81
base manikin, 84
blocking in, 14
cast shadows, 85
center of mass, 79
checking balance, 79–80
complexity, 1
defining general proportions,29
detail, 84–85
deviation between action lineand center of mass, 81
drawing beauty, 94–97
evenly distributed weight, 80
fashion proportions, 15
fat, 46
focusing on joints, 24
foreshortening areas, 84
gestures, 29
height, 11, 13
heroic proportions, 15
history of art centered on, 2
learning to draw, 31
light, 143–148
lighting, 133
line of motion, 80
minor proportions, 84
muscular and skeletal systems,84

176
Figure Drawing with Virtual Models
natural dynamics, 90
number of heads high, 15
objects and posing, 167–168
off balance, 81
out-of-balance, 114
physical perfection, 1
posing, 75
posing multiple, 163–166
reference for drawing, 76
relationship between, 13
rough skeletal structure, 14
shading, 84–85, 149–154
simplified skeleton, 29
stiff, 24
structure and components, 6
tonal differences, 111
viewing from multiple angles,31, 81
weight, 83–85
finer details, 95
fingers, 53–54
finished head, 72
flexibility, 33–34
flexor carpi radialis, 44
focal points
action focus, 126
color focus, 125
contrast focus, 123
detail focus, 124
linear focus, 122
multiple, 121
series of, 127–128
value contrast, 123
foot, 37, 52, 56–57
foreshortening areas, 84
form, 6, 110–112
blending parts of, 113
obscuring, 113
unifying, 91
formal balance, 115–117
formal pictures, 117
front lighting, 142
fulcrum lever principle, 118–120
funny bone, 37
G
gastrocnemius, 43
general proportions, 95
gesture, 6, 29
gesture drawing, 21–26
establishing action line of fig-ure, 22
feeling of life and movement,21
as foundation of drawings, 21,24
practicing, 24
speed of, 22
time limit, 22–23
gesture sketch, 31
Giovanni Arnolfini and his WifeGiovanna Cenami (TheArnolfini Marriage) , 115
gluteus maximus, 44
gluteus medius, 44
grace, 90
graceful motion, 92
gravity, 75–76, 83
artificial environments, 78
interacting with, 83
live models, 157–158
H
hair, 71, 96
hairline, 60
hands, 29
anatomy, 52–55
back, 53–54
bones, 37, 52–53
complexity, 51
conforming to almost anyobject, 53
drawing, 51, 53
extreme movement, 52
female, 40
fingers, 53
grasping and holding objects,53
infinite positions, 51
knuckles, 54–55
ligaments, 53
metacarpals, 52–53
movement of thumb, 54
muscles, 53
nails, 54
opening and closing, 53
operation of, 54
palm, 53, 54
phalanges, 53
177
Index
proportions, 55
simplified figure, 20
thumb, 53
unified, 55
veins, 53–54
wrist, 52
head, 58
anatomy of, 59–60
base of front of neck, 62
construction guide, 63–66
ears, 61–62, 70
eyes, 6, 58, 63, 67
face, 60
features, 6
frontal view, 63
hair, 71
imperfect circle, 63
jaw line, 63
measuring from tip of nose toback, 62
mouth, 63, 69
muscles, 60
nose, 63, 68
placing features, 58
proportions, 60–62
side view, 64
simplified figure, 19
skull, 59–60
as standard unit of measure-ment, 10
symmetrical, 63
trapezius muscles, 42
heart, 106
heel bone, 37
height, 10–11, 13
helix, 70
highlights, 97, 137–138, 149
hips, 11
balance, 78
shading, 153
simplified figure, 19
Hip-Shoulder RelationshipGuide, 82
horizontal elements, 120
human form
anatomy, 3
basic proportions, 9–15
complicated subjects, 3
curves, 24
distorted view, 5
drawing, 2–3
emotional potential, 2
exploiting, 5
extreme movement, 33–34
flexibility, 33–34
inherent beauty, 3
muscle locomotion, 3
professional and respectfultreatment, 3, 5
proportions, 3
visual reference, 2
humerus, 37, 42
I
ideal figure, 10–11
ideal virtual models, 9
iliac crest, 43
illustrating story, 76
image-based lighting, 146–148
impatience, 86–87
implied movement, 126
informal balance, 118–120
inner ear, 70
inner spirit of man, 8
inside-out drawing, 17–21
interior lighting, 147
iris, 8
J
James virtual model, 9
jaw line, 63
jawbone, 33–34, 60
Jeremiah Lamenting theDestruction of Jerusalem,121, 123
Jessica virtual model, 9
joints, 24, 160
K
kneecap, 37
knees, 20
knocked out, 89
knowledge, 6–7
knuckles, 54–55

178
Figure Drawing with Virtual Models
L
lashes, 67
latissimus dorsi muscles (lats),28, 44
learning how to draw people, 6
legs, 29
shading, 153
simplified figure, 20
tension in, 83
lens, 8
Library of Congress, 4
life, drawing from, 2–3
life-drawing class, 2–3
ligaments, 33, 53
light, 111–112, 133, 136
absorption, 135
areas too dark, 149
cast shadow, 140–141
clearly defining, 149
core shadow, 139
defining three-dimensionalobject, 136
designing, 155
direct, 134
figures, 143–148
highlight, 137
light area, 138–139, 154
location, 145
multiple sources, 142–143
pass through, 135
quality of, 123
raking light, 137
reflected, 134–135, 140
shadow area, 138–139
source, 149
twice-reflected light area, 141
types of, 134
light areas, 138–139, 152–154
light source, 145–146
lighting, 6, 90, 112, 133
effects of, 111
emotion, 146
evening, 147
front, 142
image-based, 146–148
interior, 147
rim, 142
shady area, 148
strong light, 149
lights, 143–145
limbs flowing into each other, 24
line of motion, 80
linear focus, 122
linear perspective, 13
lines, 102–106, 110
placement, 106
quality, 6
lips, 69
live models, 3, 157–159
lobes, 70
locks, 71
lower lip, 69
lumbodorsal fascia, 44
M
The Madonna with Canon van derPaele, 117, 125
male figures, 10–11, 38, 40
muscles, 41, 45–46
pectoral muscles, 42
pelvis, 36
trapezius muscles, 42
male manikin, 27, 29
male skeleton, 38
mandible, 34, 60
manikin
action line, 29, 95
bulk and dimension of figure,27
creation, 27–29
defining shape and mass ofbody, 31
drawing, 29–31
male versus female, 29
muscle groups, 27–28
omitting details, 27
practicing, 31
proportions, 31
purpose of, 27
quickly sketching, 27
simplified skeleton, 29
surface detail, 27
working out compositions, 27
mass, 83
mass line, 81
meaningful writing, 100

179
Index
messages in drawings, 86
metacarpals, 52–53
metatarsals, 56
Michelangelo, 2, 8, 126–127
models, 3
better illumination, 145
center of body to tip of finger,11
detailed, 73
facial features, 73
fatigue, 168
fingertip to fingertip, 11
hiring, 2
holding pose indefinitely, 159
lighting and poses, 76
limitations of live, 157
photographic reference, 4
posing, 4
proportionally, 73
unavailable, 2
Mona Lisa, 113, 124
monotony and shapes, 109
morgue, 4–5
mouth, 60–61, 63, 69
movement
extreme, 160
feeling of, 78
implied, 126
natural limits, 160
thick and thin lines, 103
moving parts, 1
moving point of view, 165–166
multiple figures
drawn in relation to each other,163
more dynamic pose, 164
moving point of view, 165–166
moving pose to extreme ofmotion, 164
in scale with each other, 164
muscle locomotion, 3
muscles, 33–34, 40–48, 53
deltoids, 28
female, 38, 46–47
hand, 53
head, 60
latissimus dorsi, 28
male figure, 46
pubic symphysis, 36
ribcage as anchor for, 36
tension of, 83
N
nails, 54
natural laws, 76
natural lighting, 146
natural pathways, 127
neck, 40, 42, 62
negative shapes, 107–108
nervous system, 33
nose, 60, 68
construction guides, 65
horizontal lines for, 63
variations, 61
nostrils, 68
nude figure weight, 83
nude models, 3
O
objects
highlight, 137
placement problems, 109
posing figures with, 167–168
really looking at, 8
transparent, 135
observation, 7
off-balance figures, 81
off-balance poses, 77
opposing lights, 144–145
out-of-balance figures, 114
overlapping shapes, 107
P
palm, 53–54
pass through, 135
patella, 37
pathways, 127–129
pectoral muscles, 19, 28, 42
pelvis, 36, 38, 42–43, 82
pen and ink drawings, 103
people, 2
learning how to draw, 6
personality of, 8
personality traits, 86
personality, 8, 86
perspective, 6, 76
phalanges, 53, 56
photographic reference, 4
photographs
defining skeleton of, 21
morgue, 4

180
Figure Drawing with Virtual Models
physical forces, 75
physical perfection, 1
Picasso, 2
picture plane, 100
pictures
balance, 114
changing dynamics, 106
copyright, 4
depicting story or selling idea,101
focal point, 121–126
formal, 117
organizing, 100
out-of-balance, 114
permission to use, 4
quality and placement of lines,106
uncomfortable with, 114
placement, 102–114
placing shapes, 108–110
plantar fascia ligament, 56
point of view, moving, 165–166
points, 102
pornography, 4–5
Poser, 34
poses
action line, 91–94
balance, 77–81
beauty, 90
body language, 86–87
drawing beauty, 94–97
dynamic, 157, 165
exaggeration of, 77–78
facial expressions, 88–89
feeling of movement, 78
flowing gracefully, 93
gravity, 76
holding, 157–159
limitless, 94
more weight on one foot thanother, 80
moving to extreme of motion,164
multiple figures, 163–166
natural, 90
natural laws, 76
off-balance, 77
perspective, 76
reference, 19, 170
selecting, 76
sketching from different angles,31
unable to hold, 158
unattainable, 2
weight, 83–85
posing
90-degree angles, 92
dynamic figure, 160–162
figures before adding clothing,169–170
models, 4
with objects, 167–168
positive shapes, 108
power position, 24
practicing, 6
gesture drawing, 24
manikin, 31
proportions, 3, 6, 10–11
fashion, 15
figure drawing, 60–66
heroic, 15
manikin, 31
pupil, 8, 67
purpose, 100–101
Q
quadricep, 43
questioning, 89
R
radius, 37
The Raising of the Cross, 120
raking lights, 137–138, 149
really looking at objects, 8
rectus femoris, 43
reflected light, 134, 140,144–145, 149
reflection, 135
ribcage, 19, 29, 36, 42–43
ribs, 36
rim lighting, 142
Rockwell, Norman, 8
roughing out figures, 17
Rubens, Pieter Pauwel, 2, 120,122

181
Index
S
sacrum, 36
sad, 89
sample figure and balanced pose,79
sartorius muscle, 43
scapula, 34, 37, 42
scenes
lighting, 133
mood, 146
moving point of view, 165
secondary action lines, 92–93
serratus anterior, 42
shading, 84–85, 96, 110
figures, 149–154
from light to dark, 8
shadow area, 138–140, 153–154
shadows, 111–112, 136
adjusting, 144
areas too light, 149
cast shadow, 140–141
core shadow, 139
diffused edge, 141
shadow area, 154
too light areas, 154
shady area lighting, 148
shaking hands, 86–87
shapes, 167–168
centered, 106
circle, 106
defining, 107
dominant, 106
emphasizing, 106–107
equal size, 106
heart, 106
monotony, 109
negative, 107–108
not completely drawn, 113
overlapping, 107
placing, 108–110
positive, 108
silhouette of, 105
square, 106
symbolic meaning, 105
tangents, 109
unwanted inclusion, 110
shinbone, 37
shoulder blade, 34
shoulders, 11, 20, 42, 82
silhouette of shapes, 105
simplified figure, 17, 19–20
simplified skeleton, 17, 31
Sistine Chapel, 127
six-pack, 43
skeletal muscles, 40
skeletons, 1, 36–37
bones, 34–40
defining, 150
drawing manikin guide, 30
lightly drawing, 30
mandible, 34
photographs, 21
roughing in over action line, 22
scapula, 34
skull, 34
sketching same pose from differ-ent angles, 31
skull, 34, 59–60, 63
smooth muscles, 40
social situations, 8
soft and hard tissue, 33
solidity, 111
spine, 19, 36, 82
square, 106
standard unit of measurement,10
sternomastoids, 42
sternum, 36
stiff figures, 24
straight lines, 91
strong light, 149
studio lighting, 133
studying anatomy, 2
superhuman characters andimpossible poses, 77–78
surprise, 86–87, 89
sutures, 59
symbolic meaning, 105
symmetrical designs, 115
symmetry, 115–117
T
talus bone, 56
tangents, 109
tapered ends of lines, 104
tarsal bones, 37, 56
tear ducts, 7, 67
technology and virtual figuremodels, 1–2
teeth, 69
182
Figure Drawing with Virtual Models
tendons, 33
thick and thin lines, 103–104
three-dimensional objects, 136
thumb, 53–55
tibia, 37, 43
tibialis, 43
tonal differences, 111
torso
external oblique muscles, 42
shading, 152
transparent objects, 135
trapezius muscles, 42
tricep, 43
trust and friendship, 86–87
twice-reflected light area, 141
two-dimensional medium, 100
U
ulna, 37
unifying form, 91
upper arm, 34
upper lip, 68–69
U.S. Senate Committee onCommerce Science &Transportation
Web sites for testimony onpornography, 5
V
value contrast, 123
van Eyck, Jan, 115, 117, 125
van Rijn, Rembrandt, 2, 119,121, 123, 128
vastus intermedialis, 43
vastus lateralis, 43
vastus medialis, 43
veins, 54
Velasquez, 2
vertebrae, 36
vertical elements, 120
virtual models, 1–2, 49
action line, 161
action poses, 24
anatomically correct, 5
arm straining in action, 25
dramatic pose with armsextended, 25
fatigue, 168
feet, 57
genitalia, 5
holding pose, 159
ideal male and female, 9
power position, 24
relationship to each other, 163
sagging in defeat, 25
simulating real 3D environ-ment, 166
springing into action, 25
stress put on body, 168
twisting of torso, 25
weight, 25, 83
vision, 8–9
visual confusion, 109
visual reference, 2
The Vitruvian Man, 115
W
waistline, 29
weight, 83–85
weightlifting, 28
white light, 135
worried look, 88
worry, 89
wrist, 52
Z
zygomatic arch, 60

Call 1.800.648.7450 to order ■ Order online at www.courseptr.com
IMAGINE. BELIEVE. CREATE.
Basic Drawing for GamesISBN: 1-59200-951-4 ■ $29.99 U.S.
Lay the foundation for your career in game develop-ment. Learning to draw well is crucial to the develop-ment of the game artist. Basic Drawing for Gamesteaches fundamental drawing skills and principlesas they relate to game development. Beginning withbasic drawing techniques and concepts, the bookmoves on to focus on the areas that are critical forbeginning artists to understand when approachingart for games. Learn everything from how to properlyhold and use a pencil and how to add imaginationto your drawings, to more game-specific skills likecharacter design and storyboarding. Step-by-stepprojects reinforce each skill and allow you to applythem to game development scenarios. Get startedon the path to becoming a great game artist!
Beginning Illustration andStoryboarding for GamesISBN: 1-59200-495-4 ■ $29.99 U.S.
You are about to embark on a journey that will travelinto the heart and foundation of game creation—concept art. Creating concept art for games is unlikeworking with any other type of art. In a game, youare creating a self-contained world in which charac-ters can interact with each other to carry out actions.As a concept artist, you supply the vision for thegame and give direction to the development team.Beginning Illustration and Storyboarding for Gamestakes a basic look at the steps involved in creatinggame concept art. You will not need any game artdevelopment experience to begin your journey. Followalong as you work your way through several step-by-step examples that are designed to help youunderstand how game concept art is created. Getready to set your vision into motion!

License Agreement/Notice of Limited Warranty
By opening the sealed disc container in this book, you agree to the following terms and con-ditions. If, upon reading the following license agreement and notice of limited warranty, youcannot agree to the terms and conditions set forth, return the unused book with unopeneddisc to the place where you purchased it for a refund.
License:The enclosed software is copyrighted by the copyright holder(s) indicated on the software disc. Youare licensed to copy the software onto a single computer for use by a single user and to a backupdisc. You may not reproduce, make copies, or distribute copies or rent or lease the software in wholeor in part, except with written permission of the copyright holder(s). You may transfer the encloseddisc only together with this license, and only if you destroy all other copies of the software and thetransferee agrees to the terms of the license. You may not decompile, reverse assemble, or reverseengineer the software.
Notice of Limited Warranty:The enclosed disc is warranted by Thomson Course Technology PTR to be free of physical defects inmaterials and workmanship for a period of sixty (60) days from end user’s purchase of the book/disccombination. During the sixty-day term of the limited warranty, Thomson Course Technology PTR willprovide a replacement disc upon the return of a defective disc.
Limited Liability:THE SOLE REMEDY FOR BREACH OF THIS LIMITED WARRANTY SHALL CONSIST ENTIRELYOF REPLACEMENT OF THE DEFECTIVE DISC. IN NO EVENT SHALL THOMSON COURSETECHNOLOGY PTR OR THE AUTHOR BE LIABLE FOR ANY OTHER DAMAGES, INCLUDINGLOSS OR CORRUPTION OF DATA, CHANGES IN THE FUNCTIONAL CHARACTERISTICS OFTHE HARDWARE OR OPERATING SYSTEM, DELETERIOUS INTERACTION WITH OTHER SOFT-WARE, OR ANY OTHER SPECIAL, INCIDENTAL, OR CONSEQUENTIAL DAMAGES THAT MAYARISE, EVEN IF THOMSON COURSE TECHNOLOGY PTR AND/OR THE AUTHOR HAS PREVI-OUSLY BEEN NOTIFIED THAT THE POSSIBILITY OF SUCH DAMAGES EXISTS.
Disclaimer of Warranties:THOMSON COURSE TECHNOLOGY PTR AND THE AUTHOR SPECIFICALLY DISCLAIM ANYAND ALL OTHER WARRANTIES, EITHER EXPRESS OR IMPLIED, INCLUDING WARRANTIES OFMERCHANTABILITY, SUITABILITY TO A PARTICULAR TASK OR PURPOSE, OR FREEDOM FROMERRORS. SOME STATES DO NOT ALLOW FOR EXCLUSION OF IMPLIED WARRANTIES ORLIMITATION OF INCIDENTAL OR CONSEQUENTIAL DAMAGES, SO THESE LIMITATIONS MIGHTNOT APPLY TO YOU.
Other:This Agreement is governed by the laws of the State of Massachusetts without regard to choice oflaw principles. The United Convention of Contracts for the International Sale of Goods is specificallydisclaimed. This Agreement constitutes the entire agreement between you and Thomson CourseTechnology PTR regarding use of the software.