fig 7 - van drongelen lab | the university of chicago · absorption ratio a to obtain an ... for...
TRANSCRIPT

VII. FOURIER TRANSFORM APPLICATIONS
p. 1 of 27 04/11/16
7.2 TWO DIMENSIONAL FOURIER TRANSFORM APPLICATIONS IN
IMAGING
The first aspect of application of Fourier transformation to imaging is that an
image has two dimensions, unlike the one dimension of a single recording of neural
activity. Therefore we need to extend the 1D Fourier transform in Equation (6.4) to a 2D
version. This can be done as follows. Let’s start with an image ),( yxI and create the
Fourier transform with respect to x and associated spatial frequency u. Then we take that
result and perform a Fourier transform with respect to y and its associated spatial
frequency v. These two steps give:
By combining the two integrals we get ),( yxIF , the 2D Fourier transform of ),( yxI :
(7.9)
By performing this transform, we obtain the 2D spatial frequency domain that can be
used for a variety of image processing applications. In the following, we will discuss
several examples in optics and image reconstruction in medical imaging.
7.2.1 Fourier Transform by Lenses
In addition to ray optics most of us are familiar with, there is a significant part of
optics known as Fourier optics. This part of optics is based on the Fourier transformation
properties of optical devices such as a slit or a lens. The goal here is to present examples
of the application of the 2D Fourier transform. Therefore we won’t go into the details
governing the physics of Fourier optics here; such details can be found in Goodman
(2005), or an introduction in Hecht (2016).
An intuitive example of the Fourier transorm property of a lens is depicted in
Figure 7.8. Here it can be seen that a spatially uniform wavefront, i.e. a constant input, is
transformed into a dot at the focal distance (f, Fig. 7.8A), and a point light source placed
at the focal distance of the lens is transformed into a uniform wavefront (Fig. 7.8B). Now
recall from the examples in Section 6.2.1 and Equation (6.11) that the Fourier transform
of a constant (or a DC electrical signal) is a weighted delta function , and vice versa. If
we ignore the details of the weighting, this is exactly what the lens is showing in the
examples of Figs. 7.8A, B.
FIG 7.8
The Fourier transforming property of the lens can be employed to image objects
and to optically process images. One well known and widely applied example is the so
called 4f system (Fig. 7.8C). In this example we have an object placed at one focal

VII. FOURIER TRANSFORM APPLICATIONS
p. 2 of 27 04/11/16
distance of the objective lens that creates a 2D Fourier transform of the object in the
Fourier plane at its focal distance. The Fourier plane is also placed at one focal distance
to a second lens, the collector lens that performs the second Fourier transform. Due to the
duality property of the Fourier transform and its inverse transform (Section 6.2.1), the
collector lens creates an inverted image of the object in the image plane, again at its focal
distance. The image is inverted because of the different signs in the exponentials of the
Fourier transform and its inverse (see Equations (6.4) and (6.8)). To show this, let’s
define the coordinates of the object plane as x,y and the ones of the image plane as X,Y. If
we now substitute X=-x and Y=-y (i.e. inverted coordinates) in the expression for the 2D
Fourier transform (Equation (7.9)), we indeed obtain the correct expression for the
inverse Fourier transform of the inverted object:
(7.10)
Since we deal with four focal distances in this procedure, this system is known as the 4f
system. One important property of this setup is that we now can process the image in the
frequency domain by placing masks in the Fourier plane. If we, for example place a
pinhole mask in the Fourier plane, we remove high spatial frequencies from the image
that is produced, i.e. we attenuate edges and keep contrast information of the image. If,
on the other hand, we place a mask blocking the center part in the Fourier plane, we
remove the low spatial frequencies and keep the edge information; we now have an edge
detector. An example of the latter procedure, albeit obtained via a digital filter procedure
and not via direct optical processing, is depicted in Figure 18.4.
7.2.2 Tomography
In this section we apply the Fourier transform to a problem in tomography, used
in medical imaging. We will approach tomography in a general fashion; the principles we
discuss apply both to scanning emission and absorption profiles. Consider emission of
activity and passive absorption as the same type of process. In the case of emission, each
little voxel (or pixel in the 2-D case) emits its own contribution to the total that is
measured outside the volume. The absorption model is slightly more complicated since
each pixel instead contributes to attenuation across the area. We can use Beer’s law to
express the intensity of the output Io of a beam as a function of input intensity Ii and
attenuation caused by absorption ak across k = 1 - N elements:
N
kka
io eII 1 . Using the
property that the absorption law is exponential, we can use the logarithm of the
absorption ratio A to obtain an additive effect for each element k, i.e.:
N
k
k
i
o aI
IA
1
ln
7.22..1 Measured Absorption – Radon Transform

VII. FOURIER TRANSFORM APPLICATIONS
p. 3 of 27 04/11/16
In the following, we develop the Radon transform, the Fourier slice theorem,
and filtered back projection as each applies to CT image reconstruction. These
techniques require reconstruction of a density function representing the internal structure
of an object from sensor readings taken from outside that object. This is typically
accomplished by calculating a series of 2-dimensional density functions (or slices)
through the object on a set of planes and reconstructing the 3-dimensional image from
those images. The task is to calculate the 2-dimensional density function with readings
from a sensor which typically rotates around the object in a given plane. The following
derivations use Fourier analysis to relate a filtered version of this measured signal to the
density function of the object within the measured region.
For ease of explanation we use polar coordinates to derive the theorem. Assume a
source and detector moving at an angle with respect to the X-axis around an object
enclosed in a circle with radius R (Fig. 7.9). The distance of the source-detector (SD) line
from the origin is t, and the detector measures absorption (or emission) of all the points
along the line. In polar coordinates, all points r,on the SD line relate to t as:
cosrt (7.11)
If the emitter/detector pair is rotating at a constant speed, t represents time and the
measurement at the detector becomes a time series.
Fig. 7.9
The value of varies between 0-180 degrees. The total absorption along SD is
represented by m(t,) and is determined by the contributions of arbitrarily small surfaces
ddrr (Fig. 7.9, inset). Denoting the absorption function inside the circle as a(r,),
which corresponds to the mass to be scanned, we obtain:
ddrrrtratmR
)cos(),(),( (7.12)
Think of ddrrraR
),( as the total absorption of the whole object inside the circle
with radius R. For a particular measurement m(t,) we are only interested in the
contributions along the line of response (LOR, Fig. 7.8). We pull these out by adding a
function that sifts for the values for and r on the LOR at a given t and . The delta
function that accomplishes this must evaluate to zero within the LOR, i.e. the argument
should be 0)cos( rt and )cos( rt in equation (7.12) accomplishes
sifting the points on the LOR (see CH 2 for the sifting property). Using integration limits
reflecting area R instead of - is appropriate because: 0),( ra for Rr .
VII. FOURIER TRANSFORM APPLICATIONS
p. 4 of 27 04/11/16
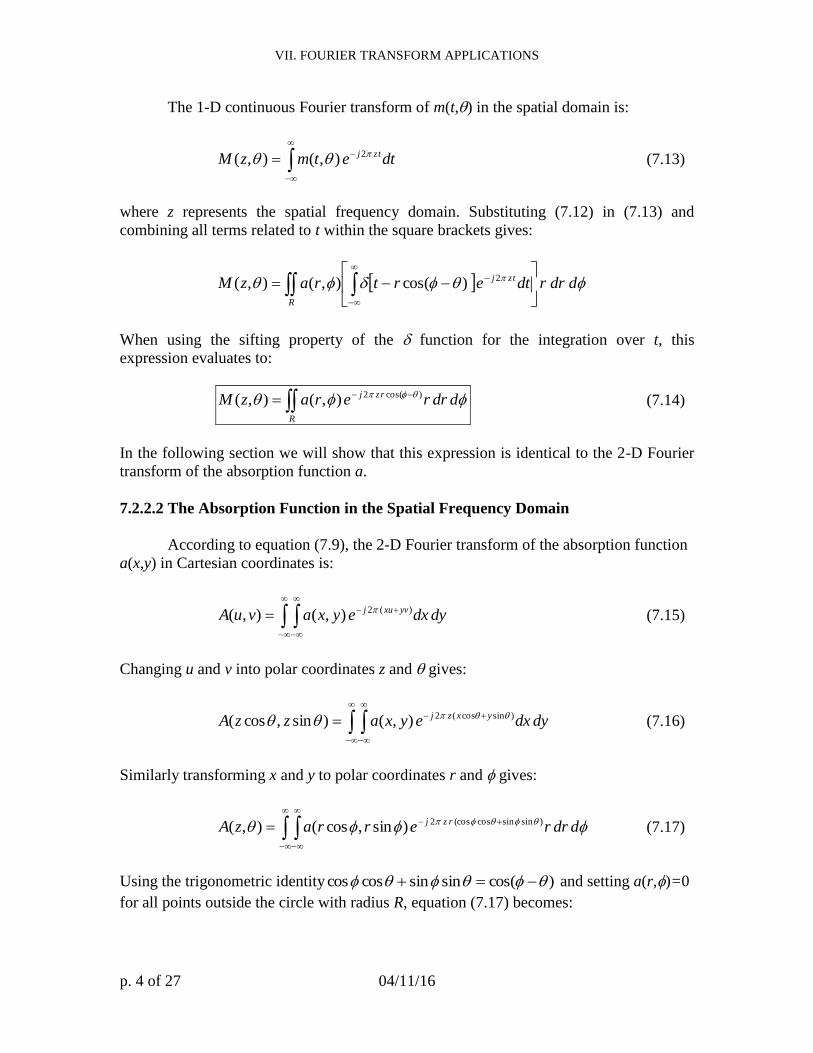
The 1-D continuous Fourier transform of m(t,) in the spatial domain is:
dtetmzM tzj
2),(),( (7.13)
where z represents the spatial frequency domain. Substituting (7.12) in (7.13) and
combining all terms related to t within the square brackets gives:
ddrrdtertrazMR
tzj
2)cos(),(),(
When using the sifting property of the function for the integration over t, this
expression evaluates to:
ddrrerazMR
rzj
)cos(2),(),( (7.14)
In the following section we will show that this expression is identical to the 2-D Fourier
transform of the absorption function a.
7.2.2.2 The Absorption Function in the Spatial Frequency Domain
According to equation (7.9), the 2-D Fourier transform of the absorption function
a(x,y) in Cartesian coordinates is:
dydxeyxavuA yvxuj
)(2),(),( (7.15)
Changing u and v into polar coordinates z and gives:
dydxeyxazzA yxzj
)sincos(2),()sin,cos( (7.16)
Similarly transforming x and y to polar coordinates r and gives:
ddrrerrazA rzj
)sinsincos(cos2)sin,cos(),( (7.17)
Using the trigonometric identity )cos(sinsincoscos and setting a(r,)=0
for all points outside the circle with radius R, equation (7.17) becomes:

VII. FOURIER TRANSFORM APPLICATIONS
p. 5 of 27 04/11/16
ddrrerazAR
rzj
)cos(2),(),( (7.18)
Thus the 2-D Fourier transform of the absorption function a evaluates to the same
expression as the 1-D transform of the measured Radon transform m (equations (7.14)
and (7.18)), i.e.:
),(),( zMzA (7.19)
Equation (7.19) is known as the Fourier slice theorem.
7.2.2.3 The Inverse Transform
The inverse transform of equation (7.18) returns A(z,) to the spatial domain:
ddzzezAra rzj )cos(2),(),(
(7.20)
Using (7.19) and defining ),(),( zMzzG equation (7.20) becomes:
ddzezGra rzj )cos(2),(),(
(7.21)
The seemingly arbitrary multiplication of M(z,) with z in the frequency domain equates
to convolution of m(t,) with a high pass filter characteristic in the spatial domain (CH
17). The inverse transform of G(z,) is g(t,) can therefore be considered a high pass
filtered (differentiated) version of m(t,).
In the above expression, the part dzezG rzj )cos(2)(
can be written as:
)cos()( 2
rwwithdzezG wzj (7.22)
Recognizing this as the inverse Fourier transform of ),( wg , and changing the
integration limits for to 0180 degrees (or 0radian), equation (7.21) evaluates to:
00
)),cos((),(),( drgdwgra (7.23)

VII. FOURIER TRANSFORM APPLICATIONS
p. 6 of 27 04/11/16
Because the function g(…) is a filtered/differentiated version of m(…), equation (7.23) is
the filtered backprojection equation.
7.2.2.4 Backprojection in Cartesian Coordinates
For ease of use, we can transform (7.23) from polar to Cartesian coordinates. We
use:
)cos(sinsincoscos
Now equation (7.23) can be written as:
drrgra ]),sin()sin()cos()cos([),(0
(7.24)
With: 22 yxr , )cos(rx , )sin(ry equation (7.24) becomes:
dyxgyxa ],sincos[),(0
(7.25)
For a given , the original measurement of m(…) and its filtered version g(…) are
ordered according to the variable t. Next, we relate t to x, y and : sincos yxt ,
i.e. the standard procedure to recalculate the new x-coordinate after a counter clockwise
axis rotation of degrees.
Fig. 7.10
The image processing toolbox in MATLAB contains commands for the Radon
transform and it’s inverse. The script pr7_2 uses these commands for the Shepp-Logan
phantom (Fig. 7.10).
% pr7_2
% im_phantom: example of an imaging app
clear;
P=phantom('Modified Shepp-Logan');
figure; % Depict P
imagesc(P);
% Create Projections
theta=0:1:180; % steps of theta
R=radon(P,theta); % radon transform
figure; imagesc(R); % show radon transform

VII. FOURIER TRANSFORM APPLICATIONS
p. 7 of 27 04/11/16
figure;
for step=1:20;
theta=0:step:180;
Rtemp=R(:,theta+1);
p=iradon(Rtemp,theta); % perform filtered backprojection
% NOTE: the iradon transform
% includes high pass filtering
imagesc(p); % show result at each resolution ‘step’
drawnow;
pause; % pause before proceeding to the next
end;
7.2.3 Magnetic Resonance Imaging (MRI)
The MRI approach allows us to image anatomic structures inside the body,
somewhat similar to the procedure we discussed for CT. Although, filtered
backpropagation as described in the previous section, can in principle also be applied to
nuclear magnetic resonance (NMR) signals, the procedures for image reconstruction in
MRI are usually slightly different as compared to CT. In the following, the goal is to
demonstrate and clarify the algorithms that are used to reconstruct an image from signals
that originate from magnetic resonance of hydrogen nuclei in the tissue. A significant
amount of quantum mechanics is required to describe the NMR phenomena underlying
the MRI signal. Since this is nontrivial, many simplified explanations are available in text
books and online versions. These explanations are sometimes simplified to a degree that
they are even incorrect and misleading. Since an elaboration on the quantum mechanics is
outside the scope of this text on the principles of image creation in MRI, I will use a
simplified classical physics representation of the NMR phenomenon. This representation
avoids unnecessary detail, but it comes with the explicit warning to avoid using this
approach beyond its purpose. Further detail and background can be found in Bushong
(1996) and Weishaupt et al. (2006). For those interested in the details of the NMR
physics, including the phenomena at the level of quantum mechanics, see Haacke et al.
(1999).
The spin of the nucleus of the hydrogen atom creates a weak magnetic dipole, and
when placed in a strong magnet (B0, Fig. 7.11A), a very small majority of the dipoles
aligns in the direction of the field creating a net magnetization M0 in the z-direction, the
direction of B0 (Fig. 7.11B1). In addition to the dipole orientation, there is a movement
called precession, similar to the wobble of a gyroscope or spinning top. This precession
process occurs at the so called Larmor frequency fL, proportional to the field strength B0
(Fig. 7.11A), that is:
0BfL , with = 42.6MHz/T. (7.26)

VII. FOURIER TRANSFORM APPLICATIONS
p. 8 of 27 04/11/16
Using this relationship, we can determine that a field of 1.5T (Tesla) creates a precession
frequency of 63.9MHz.
Fig. 7.11
The small excess of dipoles that align with the external field (1/100,000 in a 3T field at
room temperature) is in a low energy state, while the remainder is in a high energy state.
If a radio frequency pulse (RF pulse) at the Larmor frequency is emitted, we evoke a
resonance phenomenon and some protons in the low energy state change their orientation
relative to B0, thereby going into the high energy state. In addition, precession now
occurs in phase. At the right amount of energy in the RF pulse, there is a net change of
the magnetization angle from the Mz direction. In the example in Figure 7.11B2 the angle
changes to a direction in the xy-plane, indicated as a flip angel of 90⁰. A magnetic
component in the xy-plane is critical for the MRI application because magnetic
components in the z-direction cannot be measured since they drown in the huge B0 field
while components perpendicular to the z-direction can be recorded.
The RF pulse excites the system and after termination of this pulse, the system
will show relaxation: i.e. the situation as in Figure 7.11B2 will return to a situation as
depicted in Figure 7.11B1. Two independent processes occur during relaxation: (1) the
vertical component will gradually increase because vectors reorient from the high energy
state back into the low energy one (Fig. 7.11C1), and (2) the horizontal component will
disappear due to spin-spin interactions causing a dephasing of the components of the xy-
magnetization (Fig. 7.11C2). The two processes are indicated as T1 and T2 relaxation
respectively. The T2 relaxation is faster than T1 relaxation. In practice, due to local
inhomogeneity in the magnetic field, the dephasing process happens faster than the rate
dictated by the T2 value; the combined dephasing due to both the T2 and the
inhomogeneity is referred to as T2*.
A critical property that allows us to image different types of tissue is that the
relaxation rates are tissue dependent. In images of the brain, this allows one to distinguish
between the cerebrospinal fluid, grey and white matter. However, if the procedure of
nuclear resonance is applied to a human, a signal can obviously be recorded, but it is not
possible to determine where in the body the signal comes from! In order to accomplish
that, the MRI device creates magnetic gradients and since the Larmor frequency depends
on the magnetic field strength, these magnetic gradients determine the precession
frequency in a location specific manner.
To accomplish the spatial encoding of the signal, the imaging procedure consists
of a sequence of events. First the system applies a magnetic field gradient in the z-
direction. This means that according to Equation (7.26), the precession frequency
depends on and increases with z. Let’s assume we want to image a slice of the head as
indicated in Figure 7.12A. Now, by adjusting the frequency of the RF pulse to the Larmor
frequency in the desired slice, we can excite exactly that part of the head: i.e. the
excitation and relaxation processes shown in Figure 7.11B, C will only occur in that
slice! So now we know at least the z coordinate where our signal is generated, but within

VII. FOURIER TRANSFORM APPLICATIONS
p. 9 of 27 04/11/16
that slice we don’t know yet the x, y coordinates of signal contributions. To resolve this,
the system employs two additional gradients. First it briefly turns on a magnetic gradient
in the y direction; this causes the protons in the anterior part of the head to precess faster
than in the posterior part, and the faster ones get ahead in phase relative to the slower
ones. After turning off the posterior-anterior gradient, the Larmor frequencies across the
slice become uniform again, BUT now there is a phase difference that remains. Next, a
left-right magnetic gradient is turned on, and this causes the right side to precess faster
compared to the left side. During the application of the left-right field, we can measure
the remainder of the relaxation signal shown in Fig. 7.11D. To summarize, the result of
this whole sequence is that: (1) by turning on a gradient for slice selection (GSS, Fig.
7.12B) during the RF pulse, we only excite a slice of tissue around a specified value of z;
(2) by using a brief epoch in which a phase encoding gradient is turned on (GPE, Fig.
7.12B), signals are encoded by a phase difference in the posterior-anterior (y) direction;
and (3) due to a frequency encoding gradient (GRO, Fig. 7.12B), signals are encoded by a
frequency difference in the left-right (x) direction.
Fig. 7.12
The result of spatially encoding the signals in the selected slice is depicted in the
example diagram in Fig. 7.12C; for clarity we show a very coarse resolution of 3×3
voxels and exaggerated differences between the signals. A diagram summarizing the
sequence of events we described above is shown in Figure 7.13. Finally it should be
noted that the directions of slice selection, phase, and frequency encoding are specific for
this example, in practice they depend on several considerations including the orientation
of the desired image.
Fig. 7.13
Thus now we know, in principle, what distinguishes the contributions from different
voxels within the selected slice. Since the encoding of voxel contributions occurs by both
frequency and phase, it’s probably not a surprise that we will use frequency analysis to
tease the local signal contributions apart. This procedure of image reconstruction will be
explained in more detail below in Section 7.2.3.1.
One problem associated with measuring an FID is that, due to the T2* relaxation,
its amplitude rapidly decreases. To mitigate this, a second RF pulse is often employed to
rotate the rapidly dephasing proton spins by 180⁰. The pulse sequence for this protocol,
shown in Figure 7.14, creates an echo with a much better signal-to-noise ratio than the
signal we can measure from the FID. This sequence is known as the spin echo (SE)
sequence (Fig. 7.14).
Fig. 7.14

VII. FOURIER TRANSFORM APPLICATIONS
p. 10 of 27 04/11/16
The effect of rotating the vectors by 180⁰ can be explained by the following simplified
analogy described in Bushong (1996). Compare the vectors that start to dephase at the
90⁰ RF offset with runners that take off at a start signal, some are running fast and some
slow. After a while, at the 180⁰ RF signal the vectors/runners turn around and if they
keep running at the same pace, they will reach the start line simultaneously (Rephasing,
Fig. 7.14), and after passing the start line they will begin to dephase again. The phase
diagrams in Figure 7.14 represent this process of de- and rephasing as a result of the RF
pulses. The clear advantage is that the echo can be measured at a favorable moment when
the SNR is high. It should be noted here that this procedure of creating an echo does work
because of the deterministic component of dephasing in the T2* process; the stochastic
part of the dephasing process can, of course, not be turned into a rephasing one.
7.2.3.1 Image Reconstruction
An example of an MRI procedure including the measurement and image
reconstruction, is shown in the diagram in Figure 7.15. In this case we assume that the
sequence displayed in Figure 7.14 is repeated across a range of phase coding gradients.
Note that in the examples in Figures 7.14 and 7.15 only three of the series of phase
encoding gradients (color coded green, blue and red) are shown.
Fig. 7.15
Let’s assume we already have selected a slice, using the Gss gradient, and that
I(x,y) represents the intensity of the image in that slice. In the example in Figure 7.15, we
simplify the signal contributions of the voxels in the selected slice by a 5×5 grid. The
contribution of a single, small voxel to the measurement of the slice’s echo, i.e. a local
voxel signal ),( yxS can be represented by an oscillation that is weighted by the local
intensity:
jFeyxIyxS ),(),( . (7.27)
Here, F is a function of x and y, represented by a frequency and phase encoded
component respectively: yxtfF 2 , where the frequency xf encodes x and the
phase y encodes the y coordinate. We now introduce another variable to denote the
subsequent measurements with increasing phase encoding gradient (in Figures 7.14 and
7.15, three such examples of changing GPE are shown in red, blue and green). The
subsequent measurements across different phase encoding gradients are placed in order,
creating a data set that is called the k space. If we now increase y between each
repetition of the pulse sequence in steps of y , we get yy 2 . Combining all this
with Equation (7.27), we get the following expression for the individual voxel
contribution:
)22(
),(),( yxtfj
eyxIyxS
.

VII. FOURIER TRANSFORM APPLICATIONS
p. 11 of 27 04/11/16
The procedure to measure so called raw MRI data is to step through a series of values of
GPE, i.e. subsequent values of , and for each value of measure the echo that the slice
emits as a function of t, which we represent by M(t,). This measurement includes the
contributions of all the voxels. Thus, we integrate the contributions over x and y:
dydxeyxItM yxtfj
yx
)22(),(),(
. (7.28)
Note that due to the encoding, we have that xf and y are proportional to GRO (here Gx)
and GPE (here Gy) respectively. Since these gradients themselves are proportional to x and
y, we have: axfx and byy , with a and b constants. Next we set axu and byv ,
and rewrite Equation (7.28):
dvduevuIab
tM vutj
vu
)22(),(1
),(
. (7.29)
Here we recognize that ),( tM is the 2D inverse Fourier transform of the image, and
that tu and v are Fourier transform pairs (see Equation (7.10)). Thus
),(),( yxItM is also a Fourier transform pair. Hence we can reconstruct image
),( yxI by computing the Fourier transform of ),( tM , i.e. the k space.
Figure 7.15 shows an example of an image reconstruction for a very simple case, an
image with two high lights. This reconstruction was simulated with Matlab file
pr7_4.m.
% pr7_4.m
% Simulation of two sources at xx1,yy1 and xx2,yy2
clear;
close all;
t=-.32:.01:.31; % time of k-space (series of 64 points)
h=hann(64);
k=zeros(32,64); % the measured signal in k-space
% location and amplitude of peaks in the image
xx1=10;
yy1=10;
xx2=40;
yy2=25;
amp=100;
for tau=1:32 % the tau parm of k space
pmax=(63.5/31)*tau-32.5; % maximum phase

VII. FOURIER TRANSFORM APPLICATIONS
p. 12 of 27 04/11/16
for x=1:64; % x,y coordinates of the image
for y=1:32;
fx=(49/64)*x; % the freq parm
py=(pmax/32)*y; % the phase parm
sv=cos(2*pi*fx*t+py); % individual voxel contribution
% NOTE that we only usr the real component of the oscillator
% reflecting that we have one coil to pick up the signal
% Inject a peak in the image at xx1,yy1
if (x==xx1)&(y==yy1);
sv=sv*amp;
end;
% Inject a peak in the image at xx2,yy2
if (x==xx2)&(y==yy2);
sv=sv*amp;
end;
sv=sv.*h'; % smooth with Hann
k(tau,:)=k(tau,:)+sv; % fill k space
end;
end;
end;
% k space K is filled
figure;
surf(k);
title('k space');
figure;
contour(k);
title('k space');
% compute the 2D fft
im=fft2(k);
figure;
contour(abs(im).^2);
axis([0 35 0 14]);
axis('square');
tmp=max(max(abs(im).^2))/10^9;
ttl=['coord: ' num2str(xx1) ',' num2str(yy1) ' and ' num2str(xx2) ',' num2str(yy2) ' amp: '
num2str(amp) ' max: ' num2str(tmp)];
title(ttl);
xlabel('x (unscaled)');
ylabel('y (unscaled)');
drawnow;

VII. FOURIER TRANSFORM APPLICATIONS
p. 13 of 27 04/11/16

VII. FOURIER TRANSFORM APPLICATIONS
p. 14 of 27 04/11/16
APPENDIX 7.1
Parseval’s theorem states that the energy of a signal in the time domain equals
the energy of the transformed signal in the frequency domain. Preservation of this
equality is the underlying reason why the spectrum is normalized by 1/N in equation
(7.1). In order to understand this normalization, we will first determine what the
relationship is between the energy of a time series and its equivalent representation as a
complex Fourier series. From this result we will subsequently develop the normalization
for the DFT.
Consider three finite time series f(t), f1(t) and f2(t) periodic over period T=Nt,
with f(t) = f1(t) f2(t). For each of the time series we can generate the complex Fourier
series (equations (5.19) and (5.20)), i.e.:
dtetfT
cectf
dtetfT
gegtf
dtetfT
dedtf
tjn
T
n
tjn
n
n
tjn
T
n
tjn
n
n
tjn
T
n
tjn
n
n
)(1
)(
)(1
)(
)(1
)(
22
11
(A7.1-1)
Using the relationship between the three signals, we can write cn as:
dtetftfT
c tjn
T
n
)()(1
21 (A7.1-2)
Replacing f1 by its Fourier series:
dtetfedT
c tjn
T m
tjm
mn
)(
12 (A7.1-3)
and changing the order of the integral and summation operations results in:
T
tmnj
m
mn dtetfT
dc )(
2 )(1
(A7.1-4)
Using equation (A7.1-.1), the terms in between the brackets can be set to gn-m:
mn
m
m
tjn
T
n gddtetftfT
c
)()(1
21 (A7.1-5)

VII. FOURIER TRANSFORM APPLICATIONS
p. 15 of 27 04/11/16
For n = 0, we get:
m
m
m
T
gddttftfT
)()(1
21 (A7.1-6)
In order to evaluate the power of a single time series x we can substitute functions x(t)
and x*(t) for f1(t) and f2(t):
dttxtxT
PT
)()(1 *
(A7.1-7)
The * in x*(t) indicates the complex conjugate of x(t). The complex Fourier series and
coefficients of x(t) and x*(t) can be determined with:
dtetxT
yeytx
dtetxT
hehtx
tjn
T
n
tjn
n
n
tjn
T
n
tjn
n
n
)(1
)(
)(1
)(
**
(A7.1-8)
The expression for yn can be written as:
*
*
)(1
n
tjn
T
n hdtetxT
y
(A7.1-9)
Combining equations (A7.1-9), (A7.1-6), and (A7.1-7):
** )()(1
n
n
n
T
hhdttxtxT
2
2)(1
n
n
T
hdttxT
(A7.1-10)
Note that mg from equation (A7.1-6) is substituted by **
)( nn hh in equation (A7.1-10).
Finally we translate the above relationship in (A7.1-10) for the complex Fourier
series into the DFT of a signal with finite duration. The expression left on the left-hand
side in (V.10) becomes
1
0
2 )(1 N
n
nxN
. The expression to the right of the equal sign is
proportional to the DFT, but must be corrected by a factor 1/T0 (Equations (6.4) and
(6.5)) and t (Equations (6.18) and (6.21)), i.e. t/T0 = 1/N (see the diagram in Fig. A7.1-
1). Using X(k) to denote the DFT and taking into account this correction, the expression

VII. FOURIER TRANSFORM APPLICATIONS
p. 16 of 27 04/11/16
on the right-hand side becomes:
1
0
* )(1
)(1N
k
kXN
kXN
1
0
2
2)(
1 N
k
kXN
. Combining
the above, we obtain Parseval’s identity for the DFT:
1
0
2
2
1
0
2 )(1
)(1 N
k
N
n
kXN
nxN
1
0
21
0
2 )(1
)(N
k
N
n
kXN
nx (A7.1-11)
In equation (A7.1-11) we see that the energy in the time series x(n) can be related to the
energy in the spectrum by the factor 1/ N. This is the underlying reason for the
normalization of X(k) X*(k) by 1/N in equation (7.1). Of course one might disagree with
this approach and prefer the normalization that derives from the amplitude, i.e. normalize
by 1/N2. Again if you only show half of the power spectrum, you must multiply the
correction factor by 2, giving correction factors of 2/N or 2/N2.

VII. FOURIER TRANSFORM APPLICATIONS
p. 17 of 27 04/11/16
Fig. 7.8
A lens as a Fourier transforming device. (A) A constant illumination is transformed into a single dot at the
focal distance of the lens and (B) a point light source is transformed into a uniform, constant wavefront. (C)
An example of a so called 4f system by which an object is imaged via a pair of lenses, and where optical
processing in the spatial frequency domain can be accomplished in the Fourier plane of this lens system.
Note that the focal distances of the two lenses in the 4f system are the same in this example, but they don’t
have to be identical.

VII. FOURIER TRANSFORM APPLICATIONS
p. 18 of 27 04/11/16
Fig. 7.9
Diagram of a CT scan procedure with a source-detector setup scanning an object within a circle with radius
R. LOR – Line Of Response.

VII. FOURIER TRANSFORM APPLICATIONS
p. 19 of 27 04/11/16
Fig. 7.10
Examples of reconstruction of an image. The upper row represents the transform and reconstruction of an
image (shown as a surface) composed of three pixels set to one in a field of zeros. The lower row is a
similar example using the modified Shepp-Logan phantom available in MATLAB’s image processing
toolkit.

VII. FOURIER TRANSFORM APPLICATIONS
p. 20 of 27 04/11/16
Fig. 7.11
Simplified representation of the physics of the nuclear magnetic resonance phenomena underpinning MRI.
Proton spin is associated with a magnetic dipole. In an external magnetic field B0, the magnetic dipole
precesses at the so called Larmor frequency, similar to a gyroscope or spinning toy (A). In the tissue, the
magnetic dipoles create a net magnetization M0 in the z-direction (B1). A Radio Frequency (RF) pulse at
the Larmor frequency can excite the system and flip this net magnetization at an angle, in this example at
90⁰, resulting in a measurable magnetization in the xy-plane (B2). After the RF offset, two independent
types of relaxation occur. So called T1 relaxation restores the magnetization in the z-direction (C1) and due
to T2 relaxation, the xy-component decreases (C2, top diagram). The T2 relaxation is caused by a
dephasing process, represented in the three bottom diagrams in panel (C2). A diagram of the combined
relaxation processes is depicted in panel (C3). The signals in the z-direction cannot be measured because of
the huge external magnetic field (B0), but the xy-component can be recorded. The signal associated with
this measurement is called the Free Induction Decay (FID), and an example is depicted in panel (D).

VII. FOURIER TRANSFORM APPLICATIONS
p. 21 of 27 04/11/16
Fig. 7.12
Gradients in the magnetic field strength create location specific precession speeds. (A) A gradient in the z-
direction determines the slice of tissue that will become excited at emission of an RF signal. (B) Each
direction is encoded using a gradient: GSS – slice select; GPE – phase encode; GRO – frequency encode. (C)
A very coarse and exaggerated diagram that shows how gradients associated with the x and y directions,
within the selected slice, affect the frequency and phase of the signal in a location specific manner:
frequency increases from left to right, and phase from bottom to top.

VII. FOURIER TRANSFORM APPLICATIONS
p. 22 of 27 04/11/16
Fig. 7.13
Diagram of a pulse sequence to perform slice selection, plus phase- and frequency encoding within the
selected slice. This sequence is repeated with different phase encoding gradients; here only three are
shown. The bottom row shows the phase diagrams, similar to the diagrams in Fig. 7.11C2. Further
explanation is provided in the text.

VII. FOURIER TRANSFORM APPLICATIONS
p. 23 of 27 04/11/16
Fig. 7.14
The Spin Echo (SE) Sequence.
A 90⁰ RF signal has the usual FID effect. When the initial pulse is followed by a 180⁰ RF pulse, an echo
will occur. Further explanation is provided in the text.

VII. FOURIER TRANSFORM APPLICATIONS
p. 24 of 27 04/11/16
Fig. 7.15
Diagram of an MRI image reconstruction procedure showing three out of 2n measurements in k space and
its 2D Fourier transform generating the image. At each repetition of the pulse sequence, each voxel
contributes its portion S(x,y) to the measured signal M(t,). The example simulation was done with
MATLAB scripts pr7_3.m and pr7_4.m. Further details are provided in the text.
VII. FOURIER TRANSFORM APPLICATIONS
p. 25 of 27 04/11/16
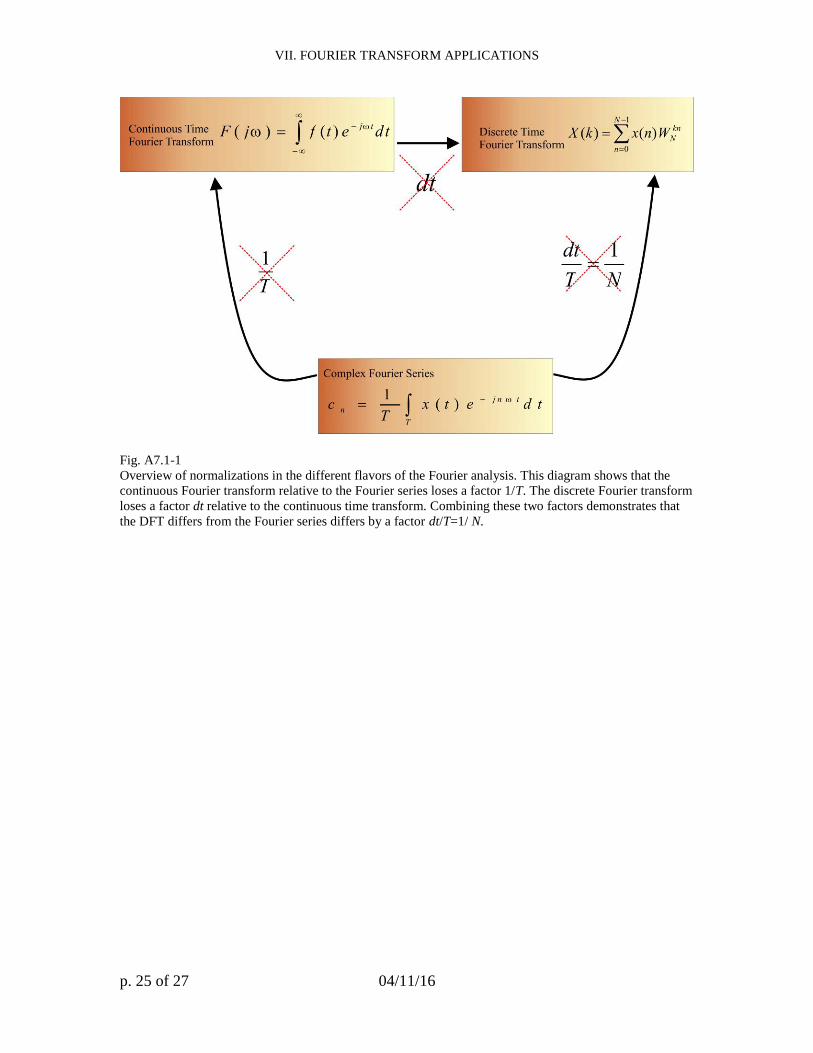
Fig. A7.1-1
Overview of normalizations in the different flavors of the Fourier analysis. This diagram shows that the
continuous Fourier transform relative to the Fourier series loses a factor 1/T. The discrete Fourier transform
loses a factor dt relative to the continuous time transform. Combining these two factors demonstrates that
the DFT differs from the Fourier series differs by a factor dt/T=1/ N.
VII. FOURIER TRANSFORM APPLICATIONS
p. 26 of 27 04/11/16
Table 7.1
Example of an 8 point fft. Array x is the input and X the output of the algorithm. The real and imaginary
parts are indicated in the 4th
and 5th
columns. The non-normalized power spectrum in the 6th
column shows
symmetry around n = 4 (not including the first value n = 0 representing the DC component). The real part
of X is symmetric as well (corresponding to the even property of the cosine wave); whereas the imaginary
part of X gains symmetry from the odd property of the sine wave. The sum of squares in the time domain
(3rd
column) and the normalized spectrum S (7th
column) is 14 in both cases. All values in the table were
obtained using the MATLAB fft command.
n x xx R=real(X) I=imag(X) XX* S AS
0 0.5 0.25 4 0 16 2 1 0
1 1.5 2.25 2.4142 -5.8284 39.799 4.9749 1.5772 -1.1781
2 2.5 6.25 -2 2 8 1 0.7071 2.3562
3 1.5 2.25 -0.4142 0.1716 0.201 0.0251 0.1121 2.7489
4 -0.5 0.25 0 0 0 0 0 0
5 -1.5 2.25 -0.4142 -0.1716 0.201 0.0251 0.1121 -2.7489
6 -0.5 0.25 -2 -2 8 1 0.7071 -2.3562
7 0.5 0.25 2.4142 5.8284 39.799 4.9749 1.5772 1.1781
Sum 4 14 14

VII. FOURIER TRANSFORM APPLICATIONS
p. 27 of 27 04/11/16
Table 7.2
Overview of commonly used data window functions.
Data Window Equation window w(t) for epoch size -T T
Bartlett (Triangular, Fejér)
0
1)(
else
TtT
t
tw
Hamming
0
cos46.054.0)(
else
TtT
t
tw
Hann (von Hann, Hanning)
0
cos5.05.0)(
else
TtT
t
tw
Rectangular
0
1)(
else
Tttw