fields divisions with ms paint - modar university divisions with ms paint . ... “file” and...
TRANSCRIPT
Fancy Fields with MS Paint by Elizabeth Rohret (Lady Pipa Sparkes), [email protected] Page 1 is licensed under a Creative Commons Attribution-NonCommercial-NoDerivs 3.0 Unported License Back to Page 1
Fields Divisions with MS Paint MS Paint is a free graphics program included in all versions of Microsoft Windows. This handout will explain how to create some of the more common “complex” fields, which will be appropriate for black/white, line-drawing emblazons for submission forms. These instructions will result in a field that completely covers the Paint canvas… WITHOUT being enclosed inside an escutcheon or badge square. This will allow you the most flexibility later, when you are actually trying to use the fields in an emblazon. Instructions for adding a field treatment to armory are included at the end of this pamphlet. I recommend that you start with a canvas size of 7 inches by 7 inches to make sure you have plenty of room to work. To make this adjustment, hit Control-E. As you work, do not be overly concerned about the size of the image on the screen. After the device has been completely emblazoned in Paint, the final printed size can be determined by inserting the image file into an MS Word document and off-clicking the image. After you have completed a field and BEFORE using it to emblazon a client’s device, always click “File” and “Save As” to save the completed field. I recommend setting the file type as a TIFF file, which is a compact file size that won’t cause color gradients (“smudging” or “bleeding”), which saving as a GIF or JPG will sometimes do. A good file name format is “Field_<type>” for example: Field_Paly or Field_Barry. This way, all of your images of fields will be alphabetically sorted to the same section of the folder they are stored in, making them easier to find when needed. This pamphlet includes the following instructions:
I. Helpful MS Paint Info II. Paly
III. Barry IV. Barry of a Complex Line and variations V. Bendy
VI. Checky VII. Lozengy
VIII. Chevronelly IX. Potent and Variations X. Vair and Variations
XI. Paly-Bendy and Barry-Bendy XII. Fretty
XIII. Grillage XIV. Masoned XV. Ermine/Semy
XVI. Plummety XVII. Papellony I (Scaly)
XVIII. Papellony II XIX. Gyronny and Variations XX. Adding a Field Treatment to Armory
Maily and honeycombed are post-period motifs, and as such are not registerable (September 2002 and September 2001 LOARs, respectively). For that reason, I have opted to exclude them from this pamphlet.
Fancy Fields with MS Paint by Elizabeth Rohret (Lady Pipa Sparkes), [email protected] Page 2 is licensed under a Creative Commons Attribution-NonCommercial-NoDerivs 3.0 Unported License Back to Page 1
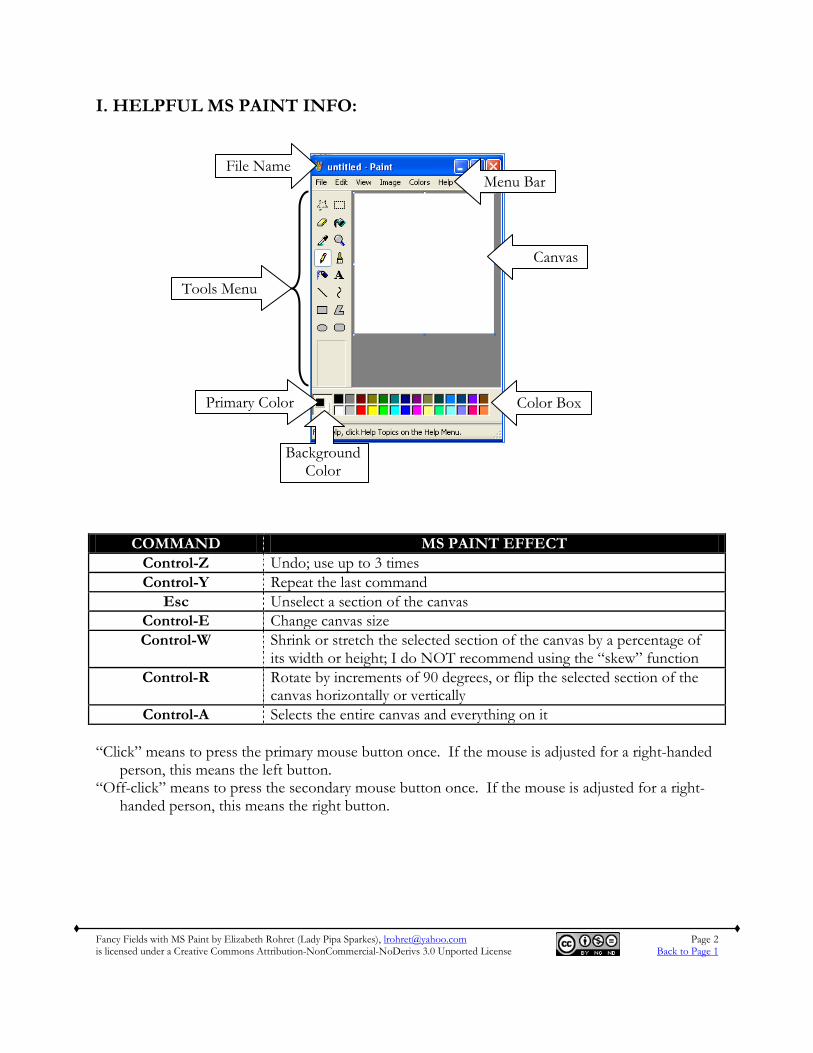
I. HELPFUL MS PAINT INFO:
COMMAND MS PAINT EFFECT
Control-Z Undo; use up to 3 times Control-Y Repeat the last command
Esc Unselect a section of the canvas Control-E Change canvas size Control-W Shrink or stretch the selected section of the canvas by a percentage of
its width or height; I do NOT recommend using the “skew” function Control-R Rotate by increments of 90 degrees, or flip the selected section of the
canvas horizontally or vertically Control-A Selects the entire canvas and everything on it
“Click” means to press the primary mouse button once. If the mouse is adjusted for a right-handed
person, this means the left button. “Off-click” means to press the secondary mouse button once. If the mouse is adjusted for a right-
handed person, this means the right button.
File Name Menu Bar
Canvas
Color Box Primary Color
Background Color
Tools Menu

Fancy Fields with MS Paint by Elizabeth Rohret (Lady Pipa Sparkes), [email protected] Page 3 is licensed under a Creative Commons Attribution-NonCommercial-NoDerivs 3.0 Unported License Back to Page 1
II. PALY 1. Click the straight line tool from the Tools menu: 2. Hold down the Shift key while you click and drag to draw a vertical line all the way to the
bottom of the canvas.
3. Hold down the Shift key while you click on the line and drag up so the line reaches all the
way from the bottom edge to the top edge.
4. Repeat the previous steps so you have 2 vertical lines that are parallel.
5. Click the rectangular select tool on the left menu and click the invisible background
selection at the bottom of the Tools menu 6. Select the entire image and hit Control-C to copy it. 7. Hit Control-V to paste the copy. 8. Overlap the right-most original line with the left-most copied line, and hit the Esc key to
leave the copy in place. This ensures even spacing of the pales.
9. Copy and paste until you have a total of 7 or 9 vertical lines. An odd number works best at
this stage – it will actually result in an even number of pales when used in an emblazon. Using too many pales can result in reduced contrast.
10. Save as “Field_Paly”.
Fancy Fields with MS Paint by Elizabeth Rohret (Lady Pipa Sparkes), [email protected] Page 4 is licensed under a Creative Commons Attribution-NonCommercial-NoDerivs 3.0 Unported License Back to Page 1
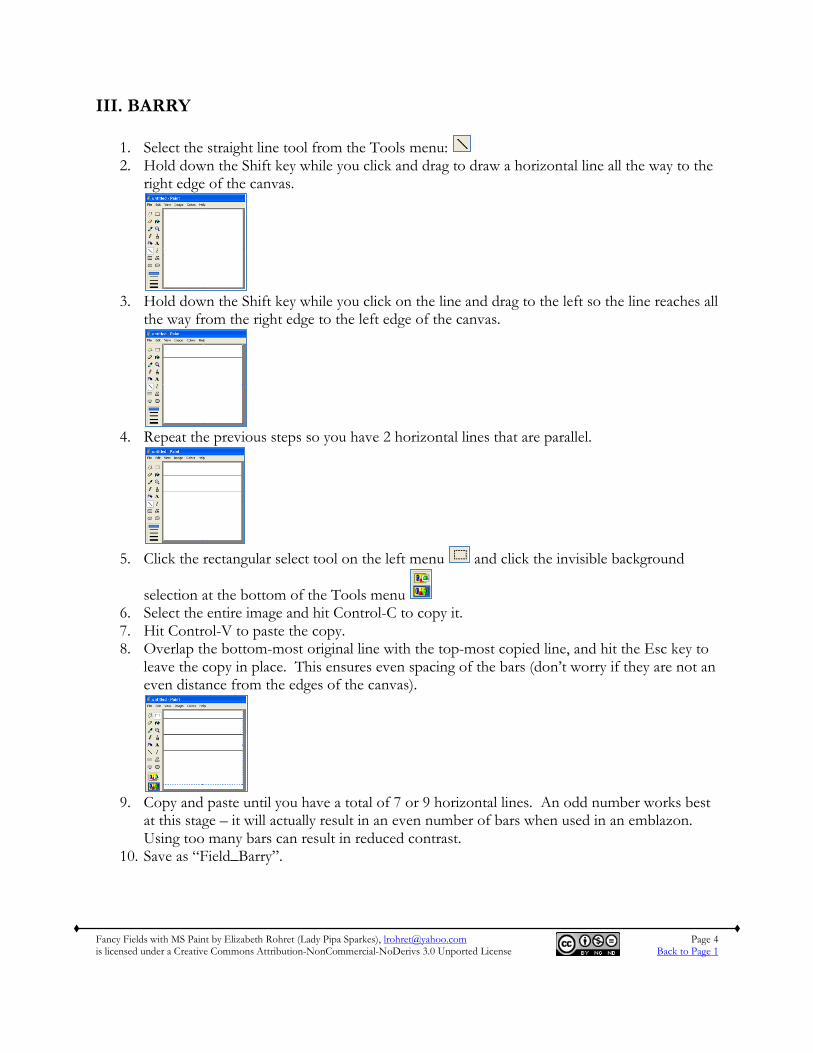
III. BARRY
1. Select the straight line tool from the Tools menu: 2. Hold down the Shift key while you click and drag to draw a horizontal line all the way to the
right edge of the canvas.
3. Hold down the Shift key while you click on the line and drag to the left so the line reaches all
the way from the right edge to the left edge of the canvas.
4. Repeat the previous steps so you have 2 horizontal lines that are parallel.
5. Click the rectangular select tool on the left menu and click the invisible background
selection at the bottom of the Tools menu 6. Select the entire image and hit Control-C to copy it. 7. Hit Control-V to paste the copy. 8. Overlap the bottom-most original line with the top-most copied line, and hit the Esc key to
leave the copy in place. This ensures even spacing of the bars (don’t worry if they are not an even distance from the edges of the canvas).
9. Copy and paste until you have a total of 7 or 9 horizontal lines. An odd number works best
at this stage – it will actually result in an even number of bars when used in an emblazon. Using too many bars can result in reduced contrast.
10. Save as “Field_Barry”.
Fancy Fields with MS Paint by Elizabeth Rohret (Lady Pipa Sparkes), [email protected] Page 5 is licensed under a Creative Commons Attribution-NonCommercial-NoDerivs 3.0 Unported License Back to Page 1
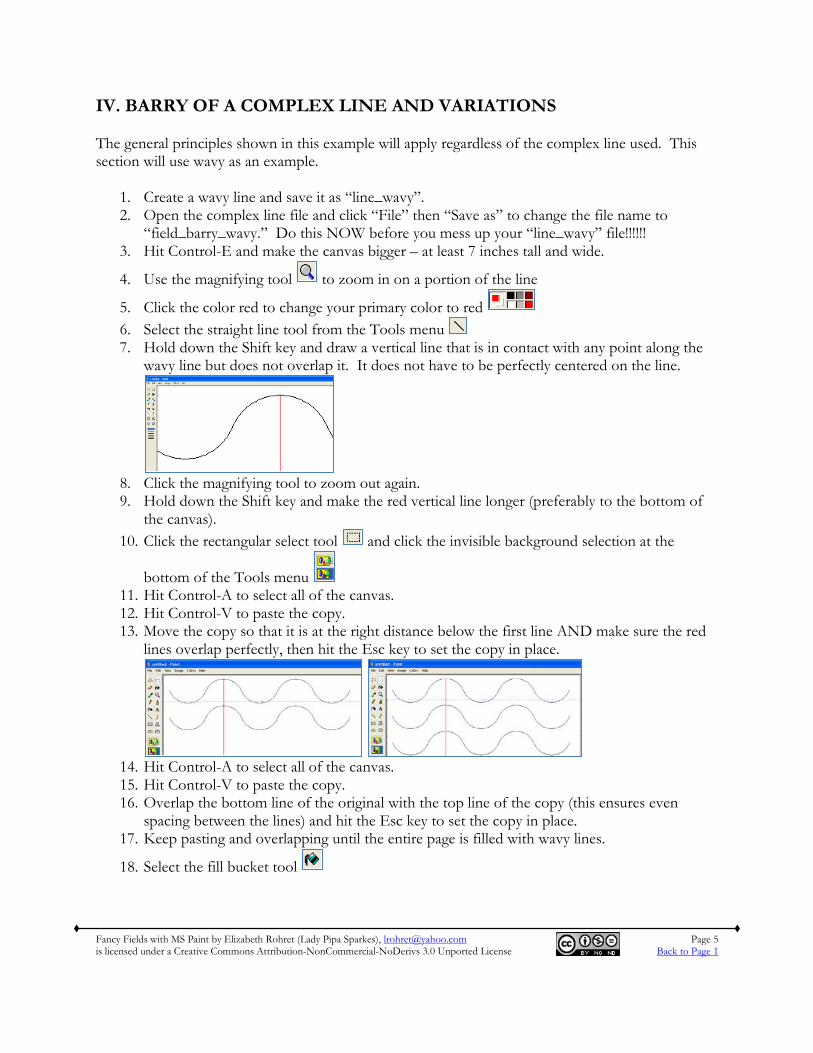
IV. BARRY OF A COMPLEX LINE AND VARIATIONS The general principles shown in this example will apply regardless of the complex line used. This section will use wavy as an example.
1. Create a wavy line and save it as “line_wavy”. 2. Open the complex line file and click “File” then “Save as” to change the file name to
“field_barry_wavy.” Do this NOW before you mess up your “line_wavy” file!!!!!! 3. Hit Control-E and make the canvas bigger – at least 7 inches tall and wide.
4. Use the magnifying tool to zoom in on a portion of the line
5. Click the color red to change your primary color to red 6. Select the straight line tool from the Tools menu 7. Hold down the Shift key and draw a vertical line that is in contact with any point along the
wavy line but does not overlap it. It does not have to be perfectly centered on the line.
8. Click the magnifying tool to zoom out again. 9. Hold down the Shift key and make the red vertical line longer (preferably to the bottom of
the canvas). 10. Click the rectangular select tool and click the invisible background selection at the
bottom of the Tools menu 11. Hit Control-A to select all of the canvas. 12. Hit Control-V to paste the copy. 13. Move the copy so that it is at the right distance below the first line AND make sure the red
lines overlap perfectly, then hit the Esc key to set the copy in place.
14. Hit Control-A to select all of the canvas. 15. Hit Control-V to paste the copy. 16. Overlap the bottom line of the original with the top line of the copy (this ensures even
spacing between the lines) and hit the Esc key to set the copy in place. 17. Keep pasting and overlapping until the entire page is filled with wavy lines.
18. Select the fill bucket tool
Fancy Fields with MS Paint by Elizabeth Rohret (Lady Pipa Sparkes), [email protected] Page 6 is licensed under a Creative Commons Attribution-NonCommercial-NoDerivs 3.0 Unported License Back to Page 1
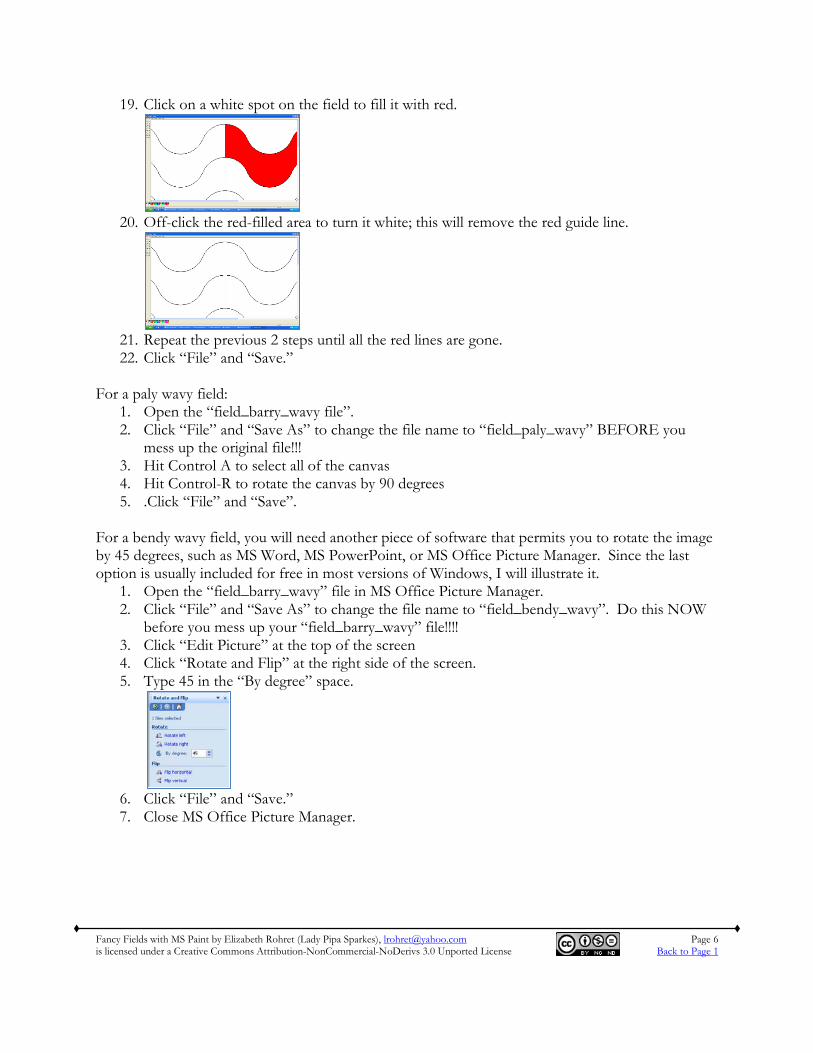
19. Click on a white spot on the field to fill it with red.
20. Off-click the red-filled area to turn it white; this will remove the red guide line.
21. Repeat the previous 2 steps until all the red lines are gone. 22. Click “File” and “Save.”
For a paly wavy field:
1. Open the “field_barry_wavy file”. 2. Click “File” and “Save As” to change the file name to “field_paly_wavy” BEFORE you
mess up the original file!!! 3. Hit Control A to select all of the canvas 4. Hit Control-R to rotate the canvas by 90 degrees 5. .Click “File” and “Save”.
For a bendy wavy field, you will need another piece of software that permits you to rotate the image by 45 degrees, such as MS Word, MS PowerPoint, or MS Office Picture Manager. Since the last option is usually included for free in most versions of Windows, I will illustrate it.
1. Open the “field_barry_wavy” file in MS Office Picture Manager. 2. Click “File” and “Save As” to change the file name to “field_bendy_wavy”. Do this NOW
before you mess up your “field_barry_wavy” file!!!! 3. Click “Edit Picture” at the top of the screen 4. Click “Rotate and Flip” at the right side of the screen. 5. Type 45 in the “By degree” space.
6. Click “File” and “Save.” 7. Close MS Office Picture Manager.
Fancy Fields with MS Paint by Elizabeth Rohret (Lady Pipa Sparkes), [email protected] Page 7 is licensed under a Creative Commons Attribution-NonCommercial-NoDerivs 3.0 Unported License Back to Page 1
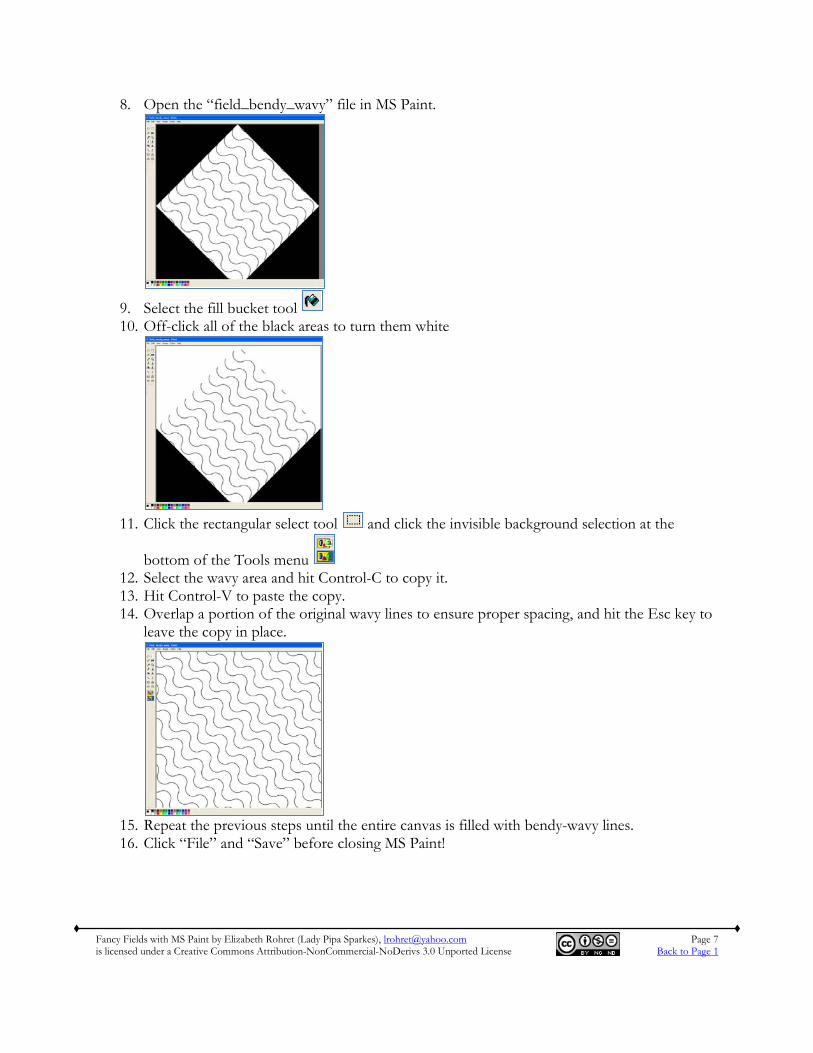
8. Open the “field_bendy_wavy” file in MS Paint.
9. Select the fill bucket tool 10. Off-click all of the black areas to turn them white
11. Click the rectangular select tool and click the invisible background selection at the
bottom of the Tools menu 12. Select the wavy area and hit Control-C to copy it. 13. Hit Control-V to paste the copy. 14. Overlap a portion of the original wavy lines to ensure proper spacing, and hit the Esc key to
leave the copy in place.
15. Repeat the previous steps until the entire canvas is filled with bendy-wavy lines. 16. Click “File” and “Save” before closing MS Paint!
Fancy Fields with MS Paint by Elizabeth Rohret (Lady Pipa Sparkes), [email protected] Page 8 is licensed under a Creative Commons Attribution-NonCommercial-NoDerivs 3.0 Unported License Back to Page 1
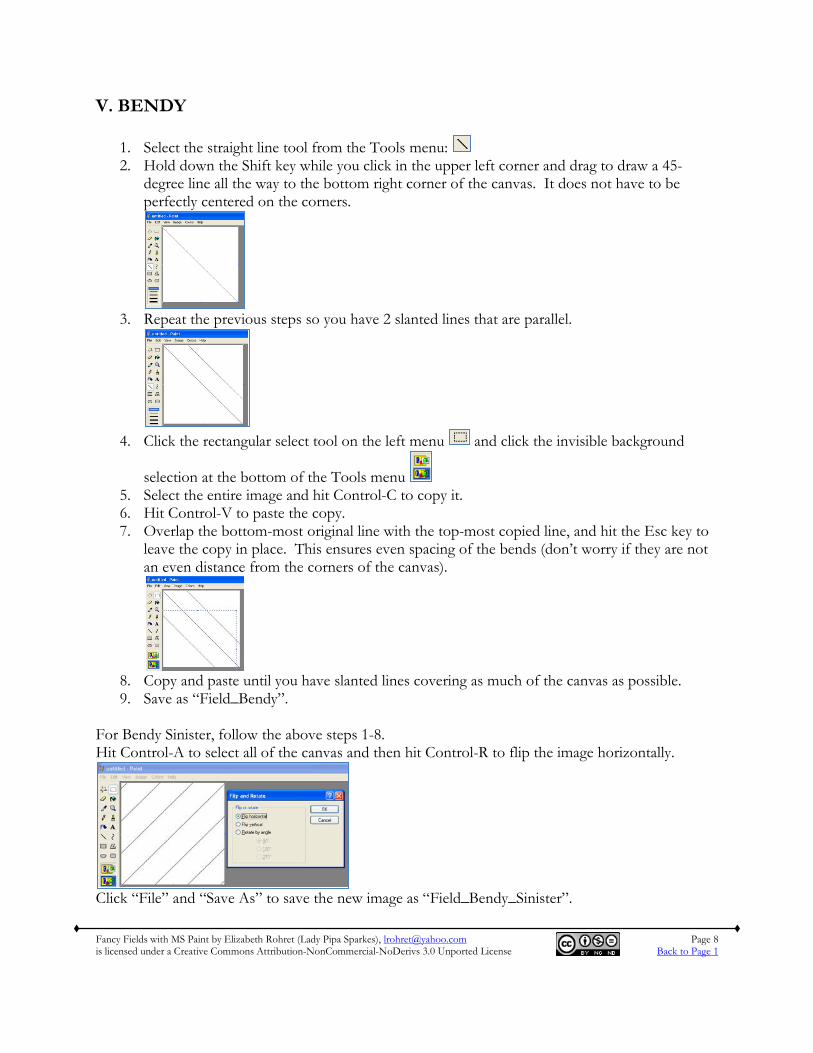
V. BENDY
1. Select the straight line tool from the Tools menu: 2. Hold down the Shift key while you click in the upper left corner and drag to draw a 45-
degree line all the way to the bottom right corner of the canvas. It does not have to be perfectly centered on the corners.
3. Repeat the previous steps so you have 2 slanted lines that are parallel.
4. Click the rectangular select tool on the left menu and click the invisible background
selection at the bottom of the Tools menu 5. Select the entire image and hit Control-C to copy it. 6. Hit Control-V to paste the copy. 7. Overlap the bottom-most original line with the top-most copied line, and hit the Esc key to
leave the copy in place. This ensures even spacing of the bends (don’t worry if they are not an even distance from the corners of the canvas).
8. Copy and paste until you have slanted lines covering as much of the canvas as possible. 9. Save as “Field_Bendy”.
For Bendy Sinister, follow the above steps 1-8. Hit Control-A to select all of the canvas and then hit Control-R to flip the image horizontally.
Click “File” and “Save As” to save the new image as “Field_Bendy_Sinister”.
Fancy Fields with MS Paint by Elizabeth Rohret (Lady Pipa Sparkes), [email protected] Page 9 is licensed under a Creative Commons Attribution-NonCommercial-NoDerivs 3.0 Unported License Back to Page 1
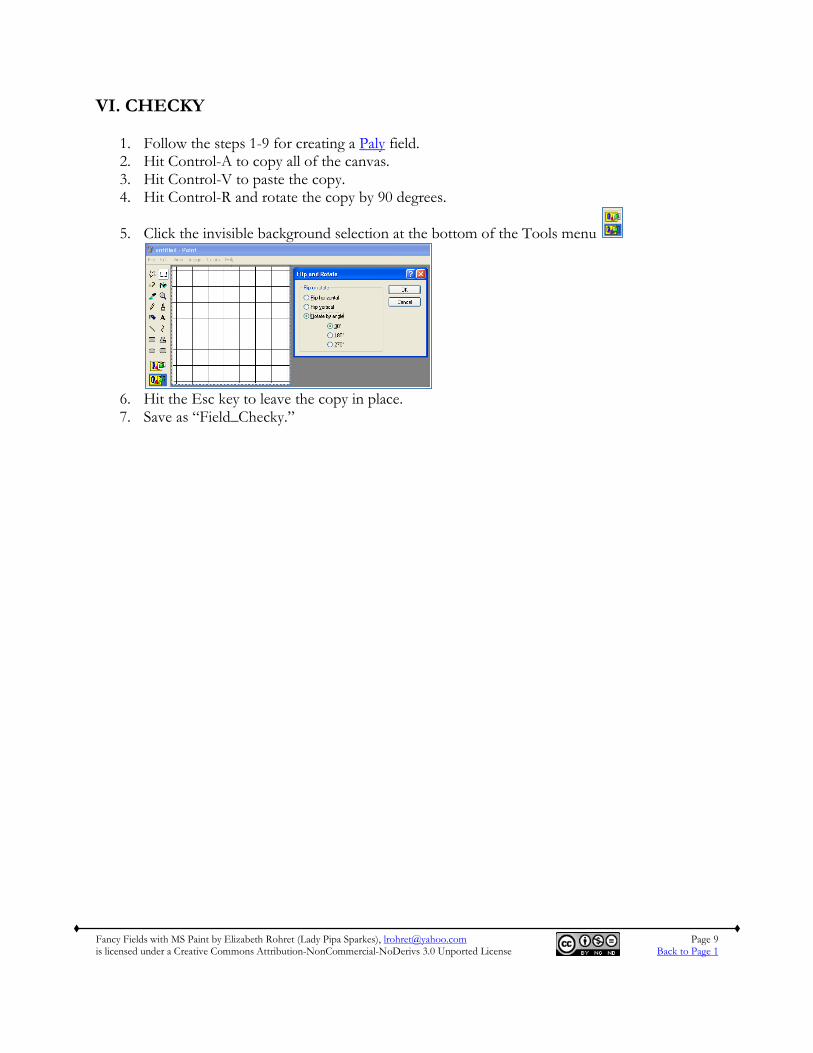
VI. CHECKY
1. Follow the steps 1-9 for creating a Paly field. 2. Hit Control-A to copy all of the canvas. 3. Hit Control-V to paste the copy. 4. Hit Control-R and rotate the copy by 90 degrees.
5. Click the invisible background selection at the bottom of the Tools menu
6. Hit the Esc key to leave the copy in place. 7. Save as “Field_Checky.”
Fancy Fields with MS Paint by Elizabeth Rohret (Lady Pipa Sparkes), [email protected] Page 10 is licensed under a Creative Commons Attribution-NonCommercial-NoDerivs 3.0 Unported License Back to Page 1
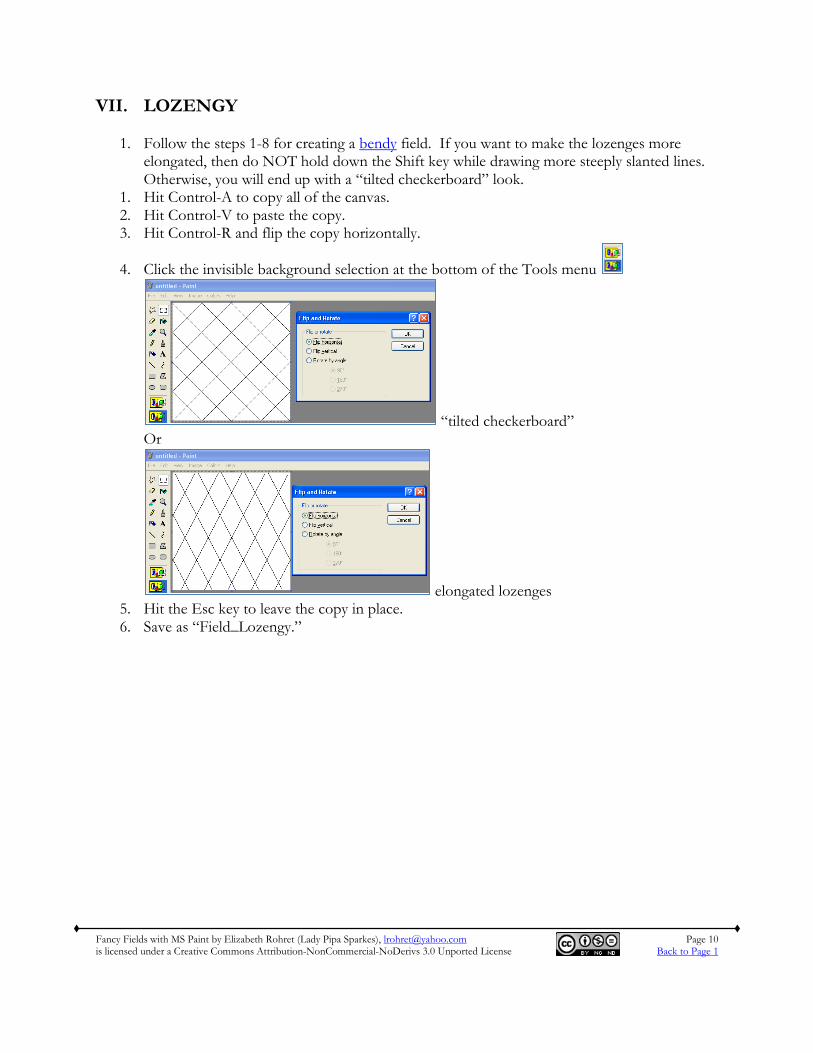
VII. LOZENGY
1. Follow the steps 1-8 for creating a bendy field. If you want to make the lozenges more elongated, then do NOT hold down the Shift key while drawing more steeply slanted lines. Otherwise, you will end up with a “tilted checkerboard” look.
1. Hit Control-A to copy all of the canvas. 2. Hit Control-V to paste the copy. 3. Hit Control-R and flip the copy horizontally.
4. Click the invisible background selection at the bottom of the Tools menu
“tilted checkerboard” Or
elongated lozenges 5. Hit the Esc key to leave the copy in place. 6. Save as “Field_Lozengy.”
Fancy Fields with MS Paint by Elizabeth Rohret (Lady Pipa Sparkes), [email protected] Page 11 is licensed under a Creative Commons Attribution-NonCommercial-NoDerivs 3.0 Unported License Back to Page 1
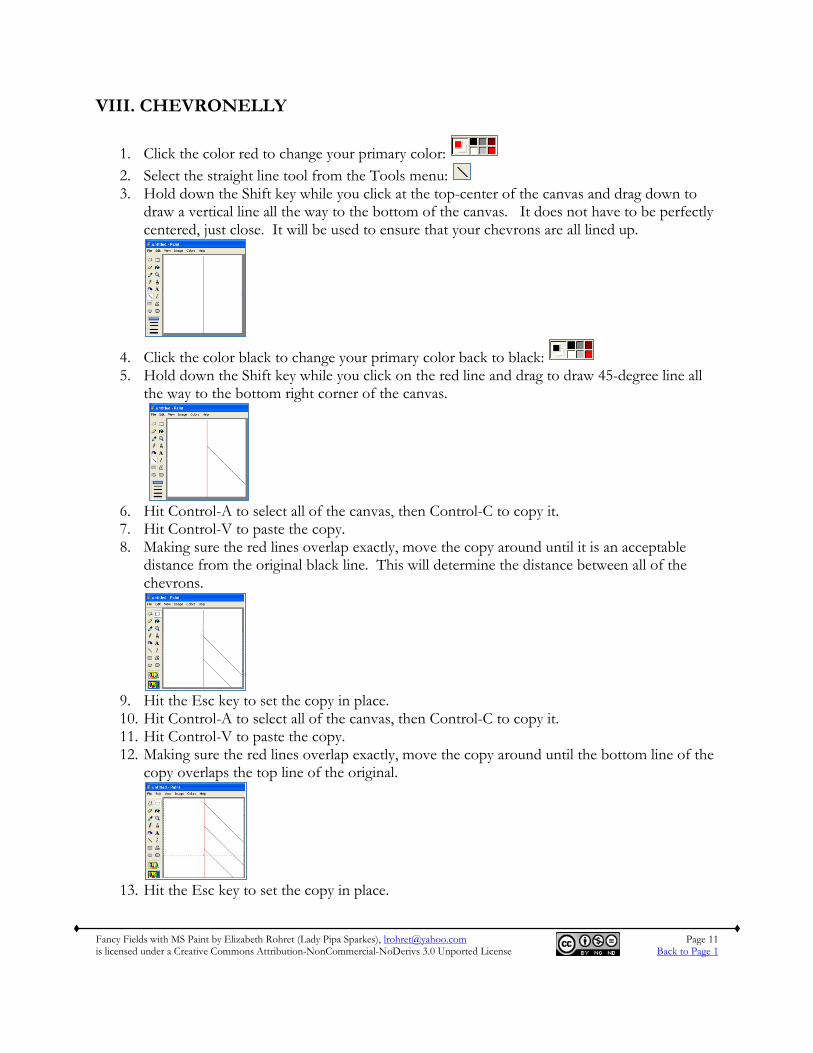
VIII. CHEVRONELLY
1. Click the color red to change your primary color: 2. Select the straight line tool from the Tools menu: 3. Hold down the Shift key while you click at the top-center of the canvas and drag down to
draw a vertical line all the way to the bottom of the canvas. It does not have to be perfectly centered, just close. It will be used to ensure that your chevrons are all lined up.
4. Click the color black to change your primary color back to black: 5. Hold down the Shift key while you click on the red line and drag to draw 45-degree line all
the way to the bottom right corner of the canvas.
6. Hit Control-A to select all of the canvas, then Control-C to copy it. 7. Hit Control-V to paste the copy. 8. Making sure the red lines overlap exactly, move the copy around until it is an acceptable
distance from the original black line. This will determine the distance between all of the chevrons.
9. Hit the Esc key to set the copy in place. 10. Hit Control-A to select all of the canvas, then Control-C to copy it. 11. Hit Control-V to paste the copy. 12. Making sure the red lines overlap exactly, move the copy around until the bottom line of the
copy overlaps the top line of the original.
13. Hit the Esc key to set the copy in place.
Fancy Fields with MS Paint by Elizabeth Rohret (Lady Pipa Sparkes), [email protected] Page 12 is licensed under a Creative Commons Attribution-NonCommercial-NoDerivs 3.0 Unported License Back to Page 1
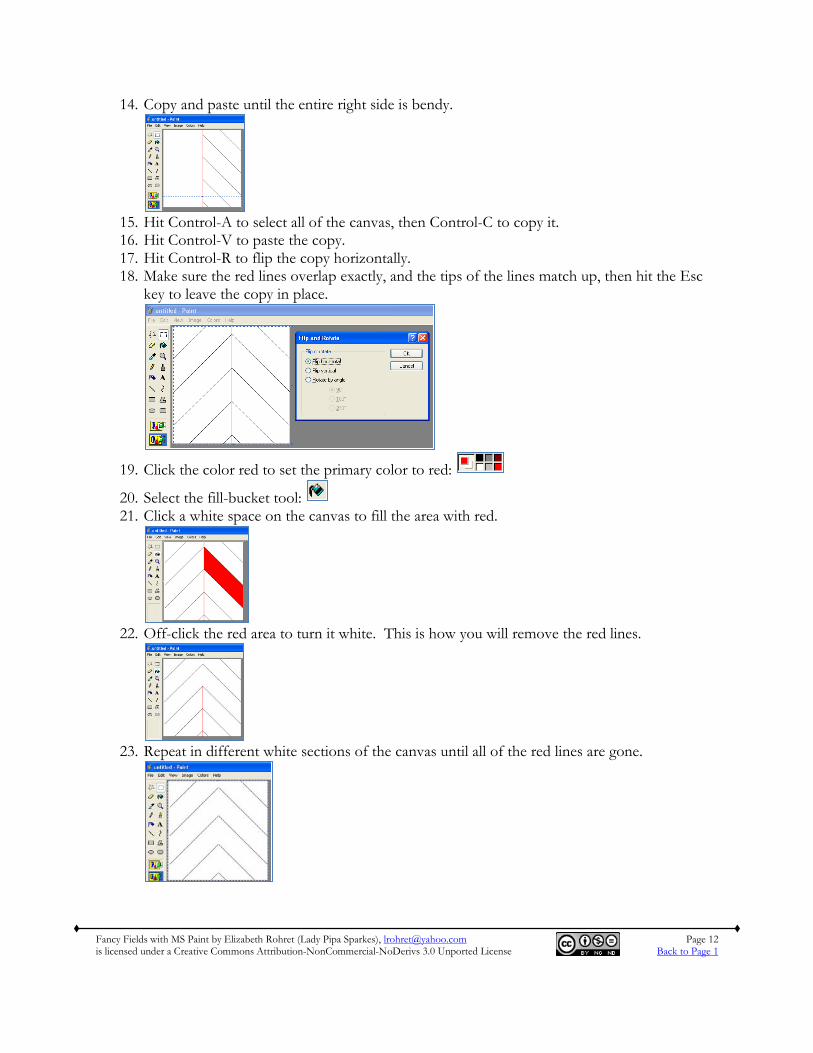
14. Copy and paste until the entire right side is bendy.
15. Hit Control-A to select all of the canvas, then Control-C to copy it. 16. Hit Control-V to paste the copy. 17. Hit Control-R to flip the copy horizontally. 18. Make sure the red lines overlap exactly, and the tips of the lines match up, then hit the Esc
key to leave the copy in place.
19. Click the color red to set the primary color to red:
20. Select the fill-bucket tool: 21. Click a white space on the canvas to fill the area with red.
22. Off-click the red area to turn it white. This is how you will remove the red lines.
23. Repeat in different white sections of the canvas until all of the red lines are gone.

Fancy Fields with MS Paint by Elizabeth Rohret (Lady Pipa Sparkes), [email protected] Page 13 is licensed under a Creative Commons Attribution-NonCommercial-NoDerivs 3.0 Unported License Back to Page 1
24. If you find that the very tips of the chevrons are missing:
a. Click the color black to set your primary color back to black:
b. Click the magnifying tool and then back on the canvas to zoom in
c. Click on the pencil tool and use it to draw the points back on the chevrons
25. Save as “Field_Chevronelly.”
Fancy Fields with MS Paint by Elizabeth Rohret (Lady Pipa Sparkes), [email protected] Page 14 is licensed under a Creative Commons Attribution-NonCommercial-NoDerivs 3.0 Unported License Back to Page 1
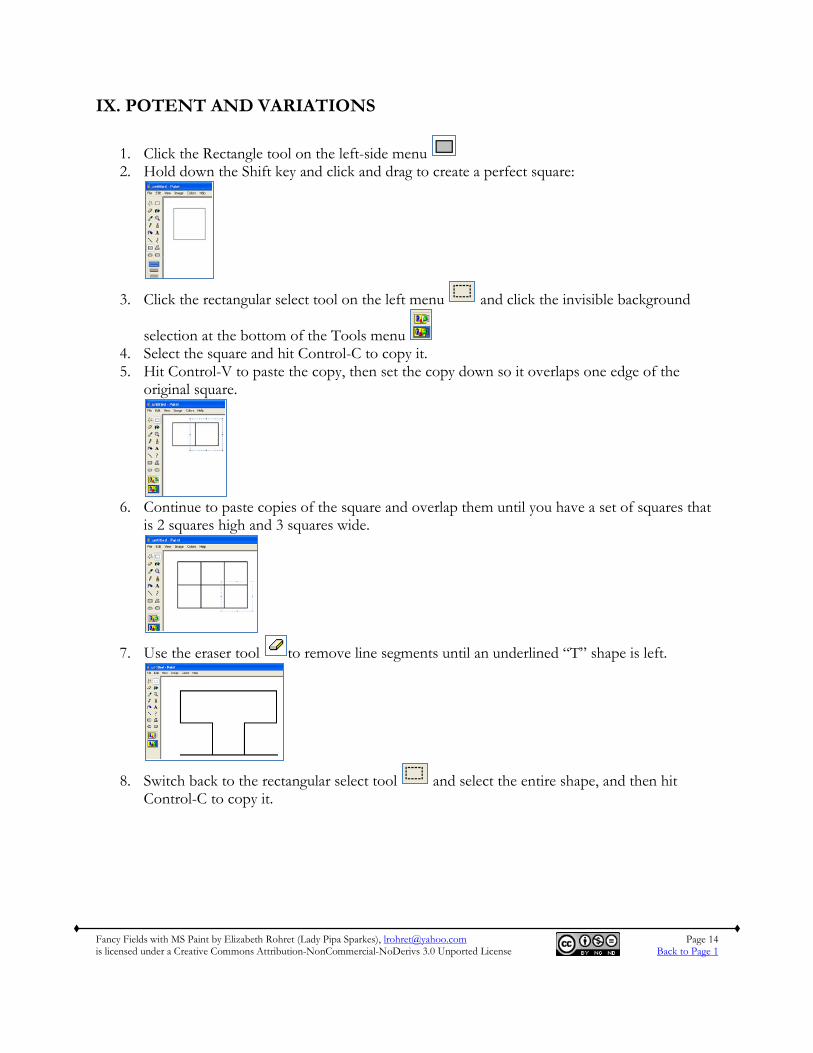
IX. POTENT AND VARIATIONS
1. Click the Rectangle tool on the left-side menu 2. Hold down the Shift key and click and drag to create a perfect square:
3. Click the rectangular select tool on the left menu and click the invisible background
selection at the bottom of the Tools menu 4. Select the square and hit Control-C to copy it. 5. Hit Control-V to paste the copy, then set the copy down so it overlaps one edge of the
original square.
6. Continue to paste copies of the square and overlap them until you have a set of squares that
is 2 squares high and 3 squares wide.
7. Use the eraser tool to remove line segments until an underlined “T” shape is left.
8. Switch back to the rectangular select tool and select the entire shape, and then hit
Control-C to copy it.
Fancy Fields with MS Paint by Elizabeth Rohret (Lady Pipa Sparkes), [email protected] Page 15 is licensed under a Creative Commons Attribution-NonCommercial-NoDerivs 3.0 Unported License Back to Page 1
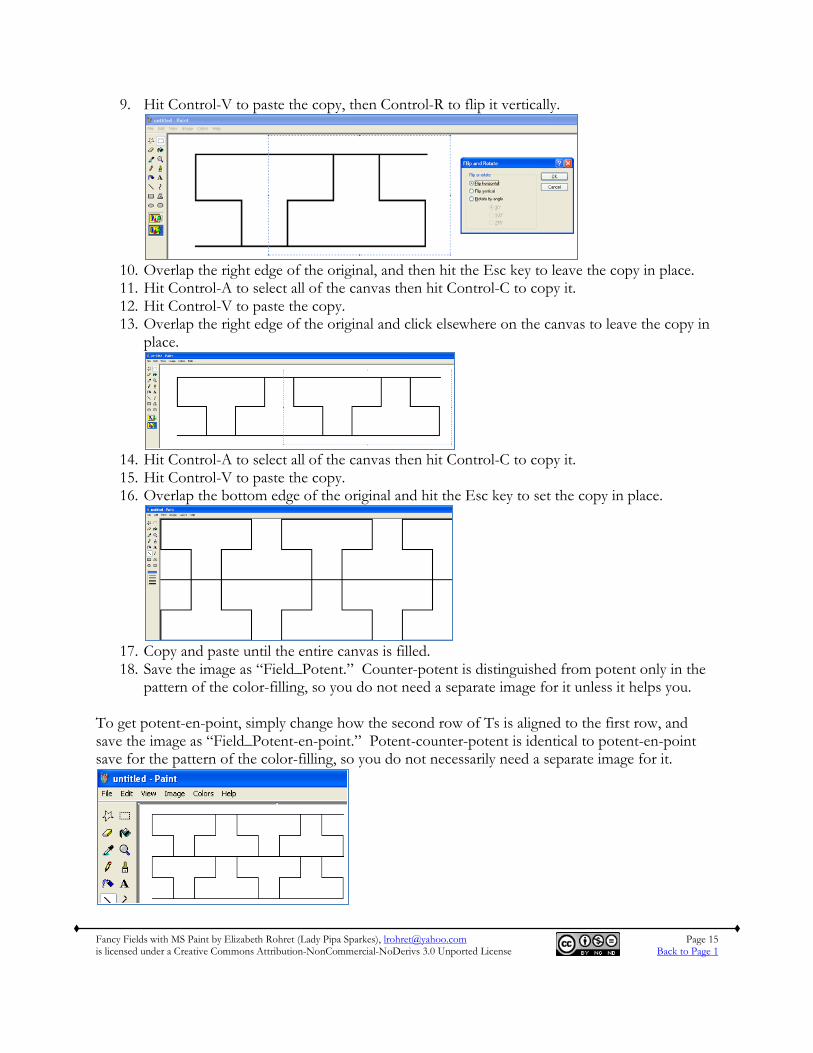
9. Hit Control-V to paste the copy, then Control-R to flip it vertically.
10. Overlap the right edge of the original, and then hit the Esc key to leave the copy in place. 11. Hit Control-A to select all of the canvas then hit Control-C to copy it. 12. Hit Control-V to paste the copy. 13. Overlap the right edge of the original and click elsewhere on the canvas to leave the copy in
place.
14. Hit Control-A to select all of the canvas then hit Control-C to copy it. 15. Hit Control-V to paste the copy. 16. Overlap the bottom edge of the original and hit the Esc key to set the copy in place.
17. Copy and paste until the entire canvas is filled. 18. Save the image as “Field_Potent.” Counter-potent is distinguished from potent only in the
pattern of the color-filling, so you do not need a separate image for it unless it helps you. To get potent-en-point, simply change how the second row of Ts is aligned to the first row, and save the image as “Field_Potent-en-point.” Potent-counter-potent is identical to potent-en-point save for the pattern of the color-filling, so you do not necessarily need a separate image for it.
Fancy Fields with MS Paint by Elizabeth Rohret (Lady Pipa Sparkes), [email protected] Page 16 is licensed under a Creative Commons Attribution-NonCommercial-NoDerivs 3.0 Unported License Back to Page 1
X. VAIR AND VARIATIONS
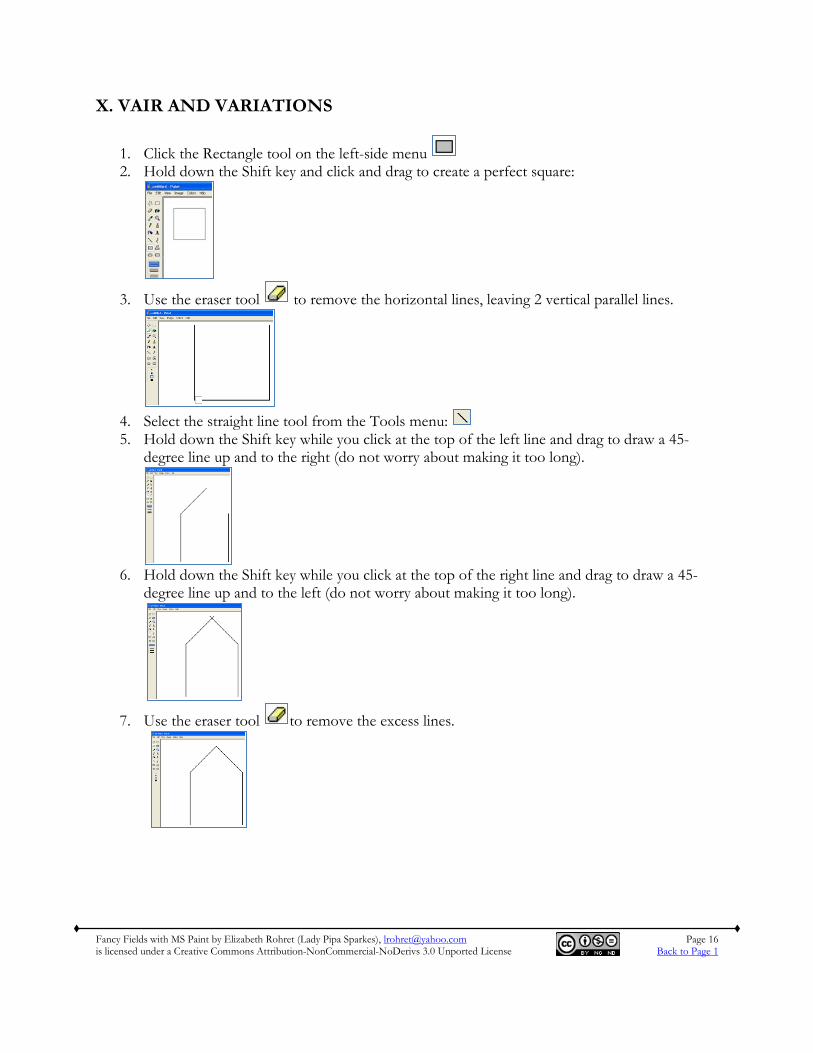
1. Click the Rectangle tool on the left-side menu 2. Hold down the Shift key and click and drag to create a perfect square:
3. Use the eraser tool to remove the horizontal lines, leaving 2 vertical parallel lines.
4. Select the straight line tool from the Tools menu: 5. Hold down the Shift key while you click at the top of the left line and drag to draw a 45-
degree line up and to the right (do not worry about making it too long).
6. Hold down the Shift key while you click at the top of the right line and drag to draw a 45-
degree line up and to the left (do not worry about making it too long).
7. Use the eraser tool to remove the excess lines.
Fancy Fields with MS Paint by Elizabeth Rohret (Lady Pipa Sparkes), [email protected] Page 17 is licensed under a Creative Commons Attribution-NonCommercial-NoDerivs 3.0 Unported License Back to Page 1
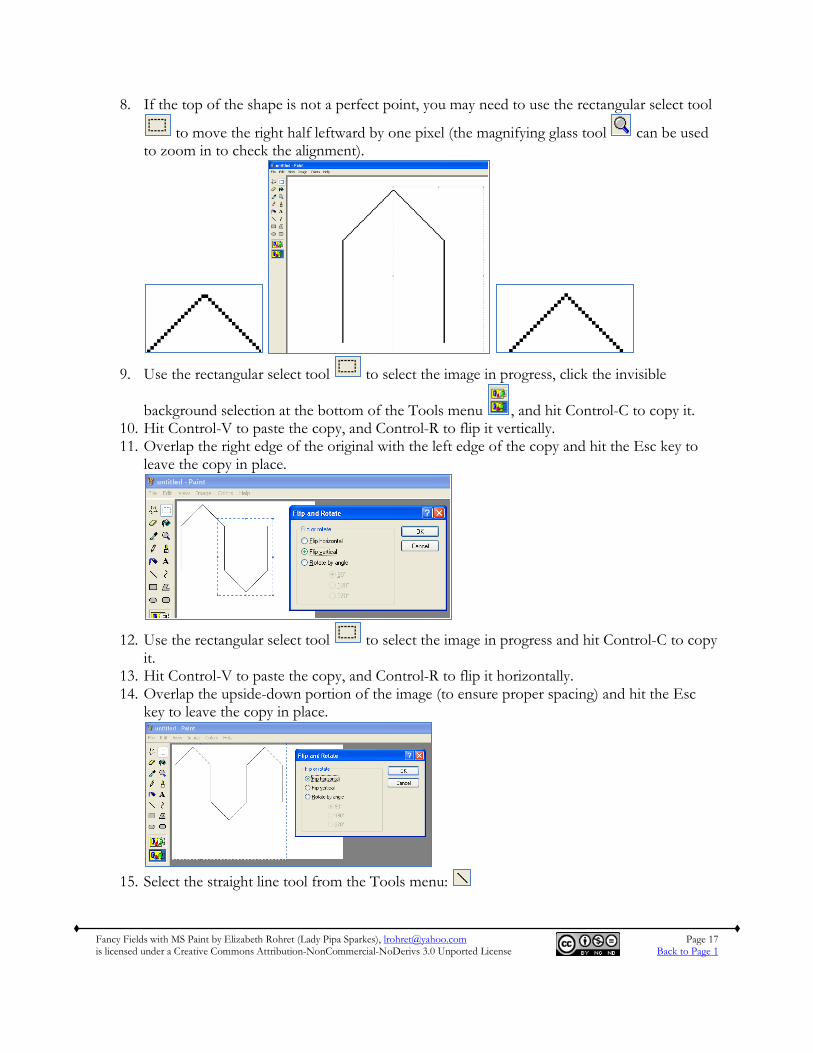
8. If the top of the shape is not a perfect point, you may need to use the rectangular select tool
to move the right half leftward by one pixel (the magnifying glass tool can be used to zoom in to check the alignment).
9. Use the rectangular select tool to select the image in progress, click the invisible
background selection at the bottom of the Tools menu , and hit Control-C to copy it. 10. Hit Control-V to paste the copy, and Control-R to flip it vertically. 11. Overlap the right edge of the original with the left edge of the copy and hit the Esc key to
leave the copy in place.
12. Use the rectangular select tool to select the image in progress and hit Control-C to copy
it. 13. Hit Control-V to paste the copy, and Control-R to flip it horizontally. 14. Overlap the upside-down portion of the image (to ensure proper spacing) and hit the Esc
key to leave the copy in place.
15. Select the straight line tool from the Tools menu:
Fancy Fields with MS Paint by Elizabeth Rohret (Lady Pipa Sparkes), [email protected] Page 18 is licensed under a Creative Commons Attribution-NonCommercial-NoDerivs 3.0 Unported License Back to Page 1
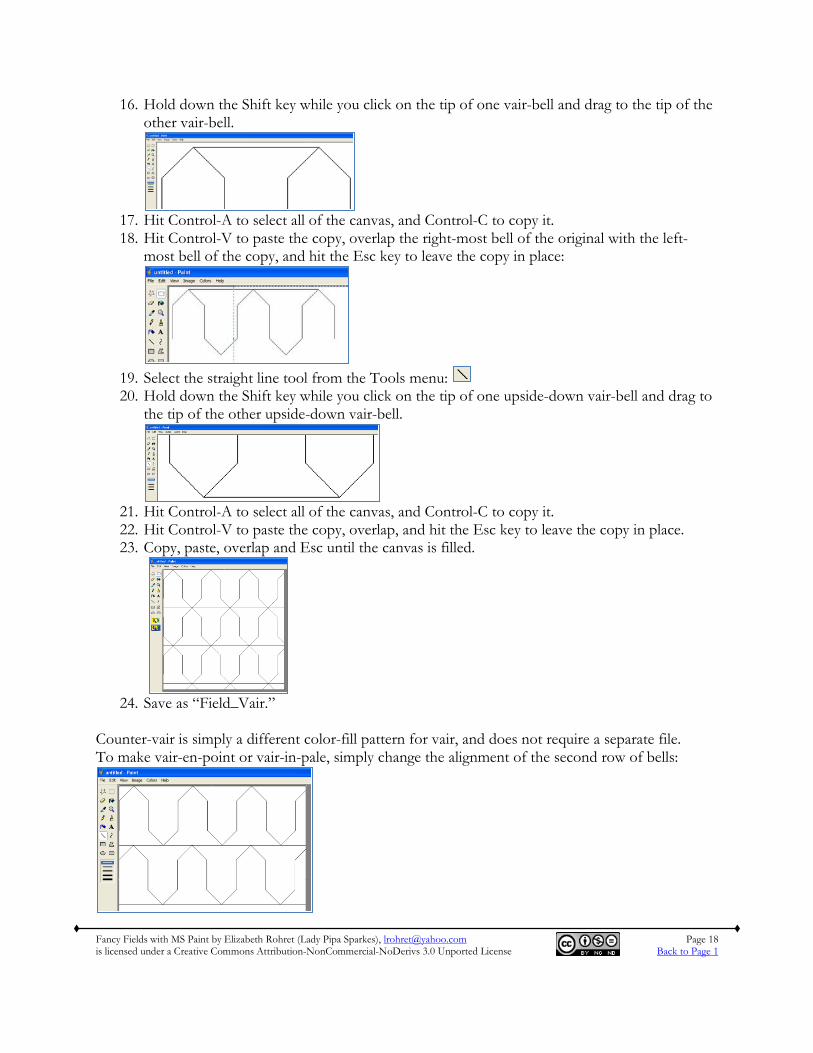
16. Hold down the Shift key while you click on the tip of one vair-bell and drag to the tip of the other vair-bell.
17. Hit Control-A to select all of the canvas, and Control-C to copy it. 18. Hit Control-V to paste the copy, overlap the right-most bell of the original with the left-
most bell of the copy, and hit the Esc key to leave the copy in place:
19. Select the straight line tool from the Tools menu: 20. Hold down the Shift key while you click on the tip of one upside-down vair-bell and drag to
the tip of the other upside-down vair-bell.
21. Hit Control-A to select all of the canvas, and Control-C to copy it. 22. Hit Control-V to paste the copy, overlap, and hit the Esc key to leave the copy in place. 23. Copy, paste, overlap and Esc until the canvas is filled.
24. Save as “Field_Vair.”
Counter-vair is simply a different color-fill pattern for vair, and does not require a separate file. To make vair-en-point or vair-in-pale, simply change the alignment of the second row of bells:
Fancy Fields with MS Paint by Elizabeth Rohret (Lady Pipa Sparkes), [email protected] Page 19 is licensed under a Creative Commons Attribution-NonCommercial-NoDerivs 3.0 Unported License Back to Page 1
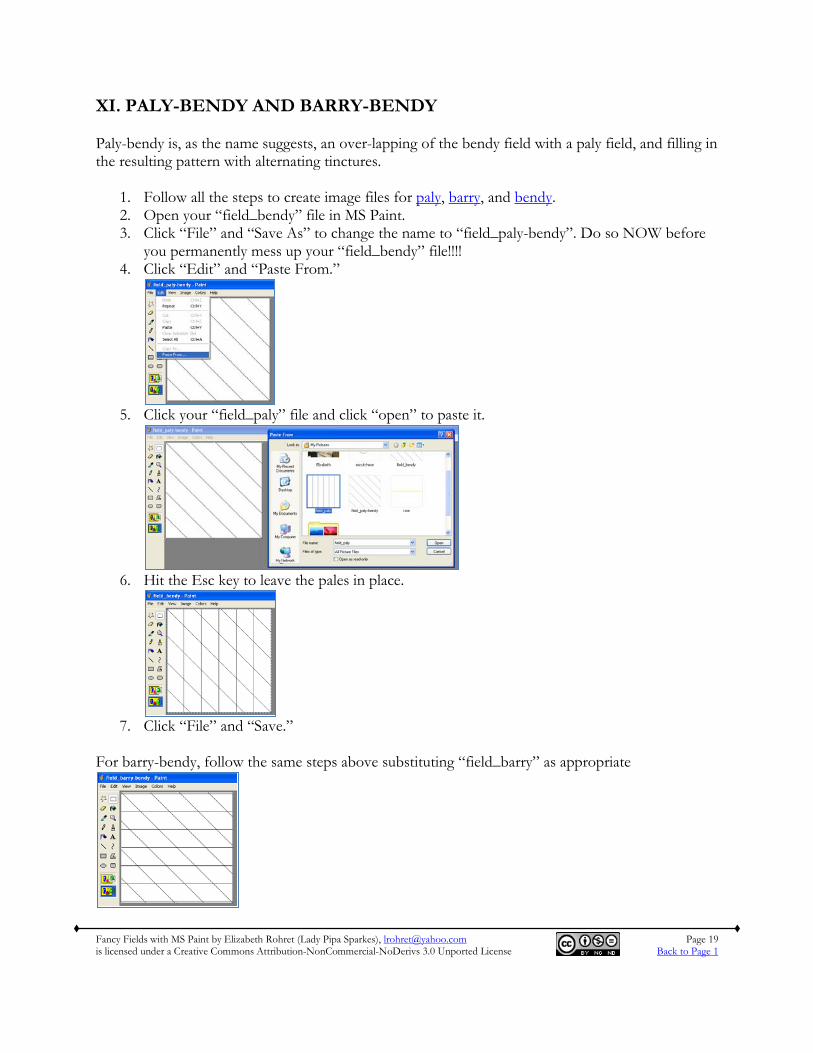
XI. PALY-BENDY AND BARRY-BENDY Paly-bendy is, as the name suggests, an over-lapping of the bendy field with a paly field, and filling in the resulting pattern with alternating tinctures.
1. Follow all the steps to create image files for paly, barry, and bendy. 2. Open your “field_bendy” file in MS Paint. 3. Click “File” and “Save As” to change the name to “field_paly-bendy”. Do so NOW before
you permanently mess up your “field_bendy” file!!!! 4. Click “Edit” and “Paste From.”
5. Click your “field_paly” file and click “open” to paste it.
6. Hit the Esc key to leave the pales in place.
7. Click “File” and “Save.”
For barry-bendy, follow the same steps above substituting “field_barry” as appropriate
Fancy Fields with MS Paint by Elizabeth Rohret (Lady Pipa Sparkes), [email protected] Page 20 is licensed under a Creative Commons Attribution-NonCommercial-NoDerivs 3.0 Unported License Back to Page 1
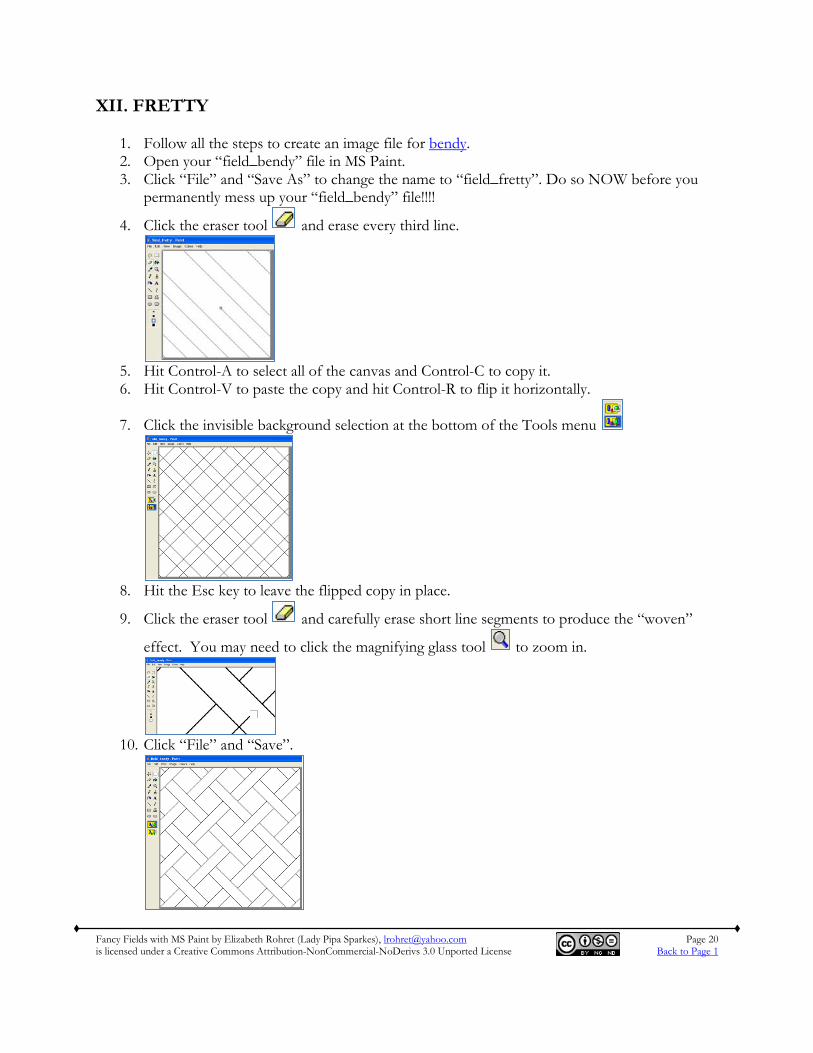
XII. FRETTY
1. Follow all the steps to create an image file for bendy. 2. Open your “field_bendy” file in MS Paint. 3. Click “File” and “Save As” to change the name to “field_fretty”. Do so NOW before you
permanently mess up your “field_bendy” file!!!!
4. Click the eraser tool and erase every third line.
5. Hit Control-A to select all of the canvas and Control-C to copy it. 6. Hit Control-V to paste the copy and hit Control-R to flip it horizontally.
7. Click the invisible background selection at the bottom of the Tools menu
8. Hit the Esc key to leave the flipped copy in place.
9. Click the eraser tool and carefully erase short line segments to produce the “woven”
effect. You may need to click the magnifying glass tool to zoom in.
10. Click “File” and “Save”.

Fancy Fields with MS Paint by Elizabeth Rohret (Lady Pipa Sparkes), [email protected] Page 21 is licensed under a Creative Commons Attribution-NonCommercial-NoDerivs 3.0 Unported License Back to Page 1
XIII. GRILLAGE
1. Follow all the steps to create an image file for paly. 2. Open your “field_paly” file in MS Paint. 3. Click “File” and “Save As” to change the name to “field_grillage”. Do so NOW before you
permanently mess up your “field_paly” file!!!!
4. Click the eraser tool and erase every third line.
5. Hit Control-A to select all of the canvas and Control-C to copy it. 6. Hit Control-V to paste the copy and hit Control-R to rotate it by 90 degrees.
7. Click the invisible background selection at the bottom of the Tools menu 8. Hit the Esc key to set the rotated copy in place.
9. Click the eraser tool and carefully erase short line segments to produce the “woven”
effect. You may need to click the magnifying glass tool to zoom in.
10. Click “File” and “Save”.
Fancy Fields with MS Paint by Elizabeth Rohret (Lady Pipa Sparkes), [email protected] Page 22 is licensed under a Creative Commons Attribution-NonCommercial-NoDerivs 3.0 Unported License Back to Page 1
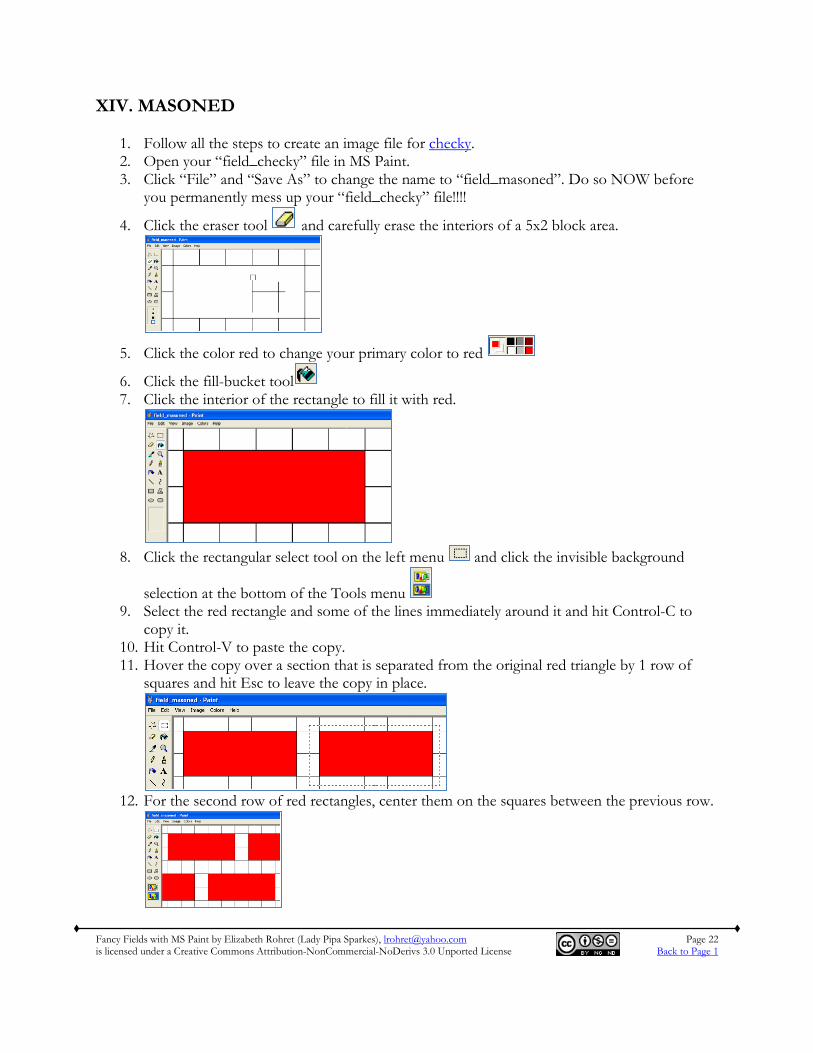
XIV. MASONED
1. Follow all the steps to create an image file for checky. 2. Open your “field_checky” file in MS Paint. 3. Click “File” and “Save As” to change the name to “field_masoned”. Do so NOW before
you permanently mess up your “field_checky” file!!!!
4. Click the eraser tool and carefully erase the interiors of a 5x2 block area.
5. Click the color red to change your primary color to red
6. Click the fill-bucket tool 7. Click the interior of the rectangle to fill it with red.
8. Click the rectangular select tool on the left menu and click the invisible background
selection at the bottom of the Tools menu 9. Select the red rectangle and some of the lines immediately around it and hit Control-C to
copy it. 10. Hit Control-V to paste the copy. 11. Hover the copy over a section that is separated from the original red triangle by 1 row of
squares and hit Esc to leave the copy in place.
12. For the second row of red rectangles, center them on the squares between the previous row.
Fancy Fields with MS Paint by Elizabeth Rohret (Lady Pipa Sparkes), [email protected] Page 23 is licensed under a Creative Commons Attribution-NonCommercial-NoDerivs 3.0 Unported License Back to Page 1
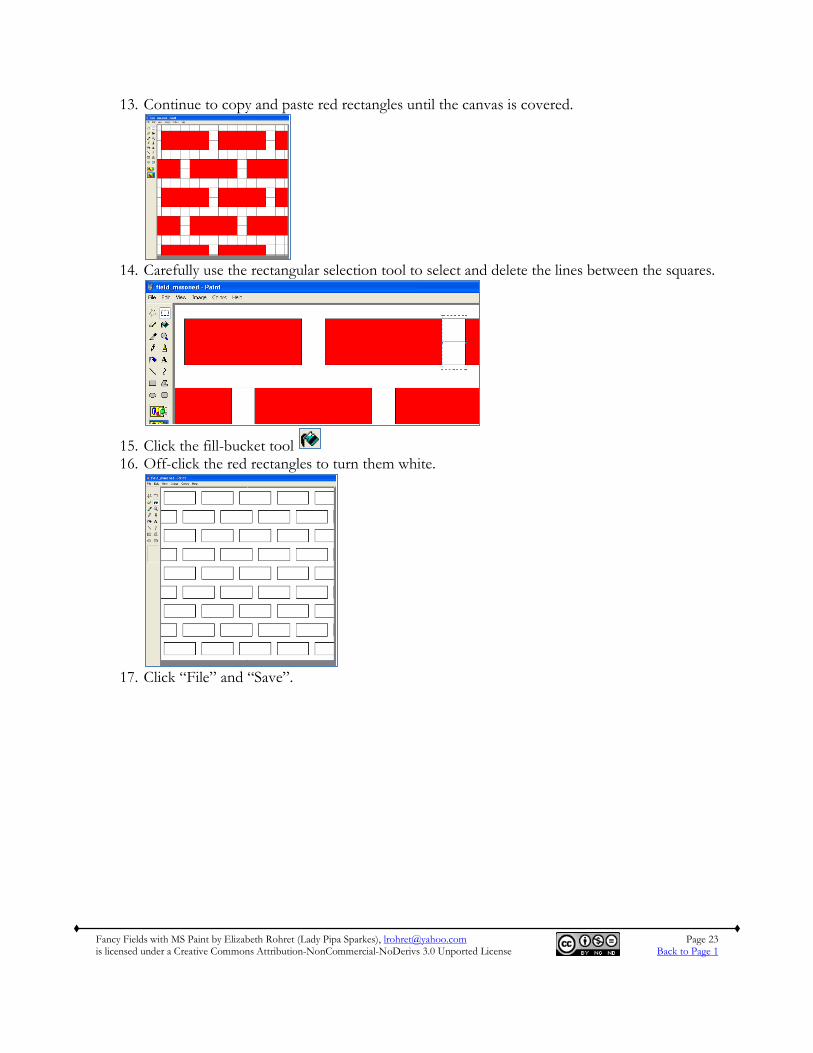
13. Continue to copy and paste red rectangles until the canvas is covered.
14. Carefully use the rectangular selection tool to select and delete the lines between the squares.
15. Click the fill-bucket tool 16. Off-click the red rectangles to turn them white.
17. Click “File” and “Save”.
Fancy Fields with MS Paint by Elizabeth Rohret (Lady Pipa Sparkes), [email protected] Page 24 is licensed under a Creative Commons Attribution-NonCommercial-NoDerivs 3.0 Unported License Back to Page 1
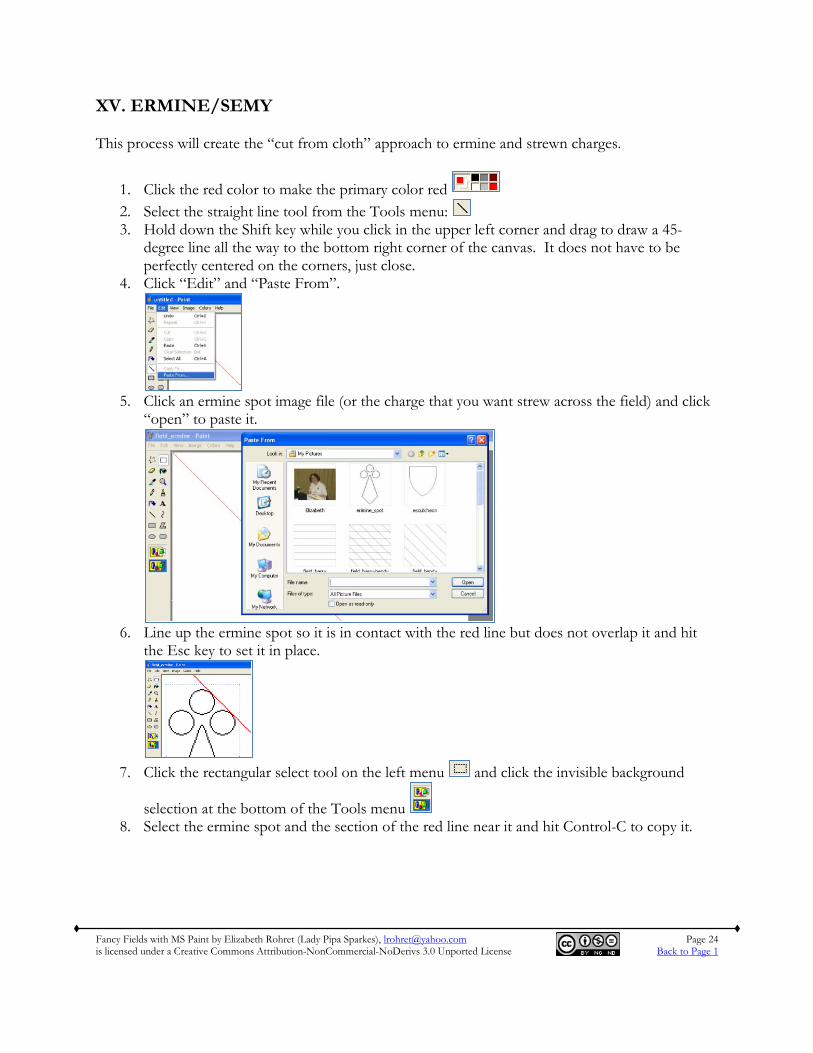
XV. ERMINE/SEMY This process will create the “cut from cloth” approach to ermine and strewn charges.
1. Click the red color to make the primary color red 2. Select the straight line tool from the Tools menu: 3. Hold down the Shift key while you click in the upper left corner and drag to draw a 45-
degree line all the way to the bottom right corner of the canvas. It does not have to be perfectly centered on the corners, just close.
4. Click “Edit” and “Paste From”.
5. Click an ermine spot image file (or the charge that you want strew across the field) and click
“open” to paste it.
6. Line up the ermine spot so it is in contact with the red line but does not overlap it and hit
the Esc key to set it in place.
7. Click the rectangular select tool on the left menu and click the invisible background
selection at the bottom of the Tools menu 8. Select the ermine spot and the section of the red line near it and hit Control-C to copy it.
Fancy Fields with MS Paint by Elizabeth Rohret (Lady Pipa Sparkes), [email protected] Page 25 is licensed under a Creative Commons Attribution-NonCommercial-NoDerivs 3.0 Unported License Back to Page 1
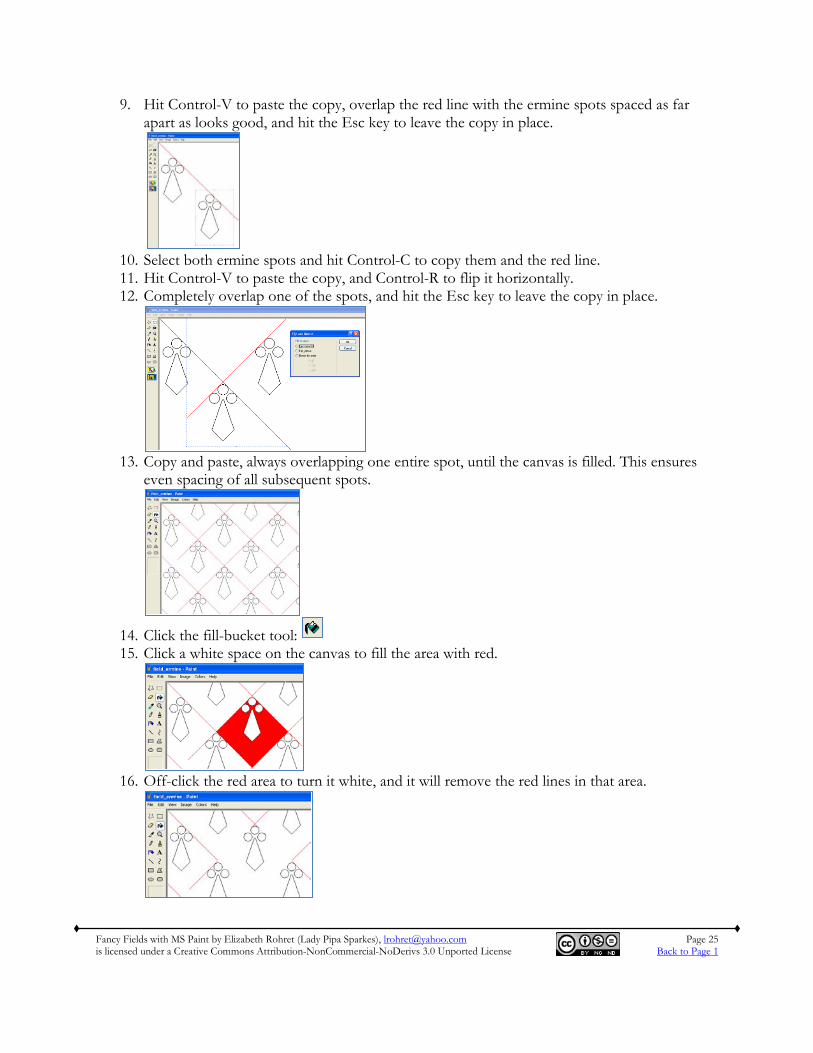
9. Hit Control-V to paste the copy, overlap the red line with the ermine spots spaced as far apart as looks good, and hit the Esc key to leave the copy in place.
10. Select both ermine spots and hit Control-C to copy them and the red line. 11. Hit Control-V to paste the copy, and Control-R to flip it horizontally. 12. Completely overlap one of the spots, and hit the Esc key to leave the copy in place.
13. Copy and paste, always overlapping one entire spot, until the canvas is filled. This ensures
even spacing of all subsequent spots.
14. Click the fill-bucket tool: 15. Click a white space on the canvas to fill the area with red.
16. Off-click the red area to turn it white, and it will remove the red lines in that area.
Fancy Fields with MS Paint by Elizabeth Rohret (Lady Pipa Sparkes), [email protected] Page 26 is licensed under a Creative Commons Attribution-NonCommercial-NoDerivs 3.0 Unported License Back to Page 1
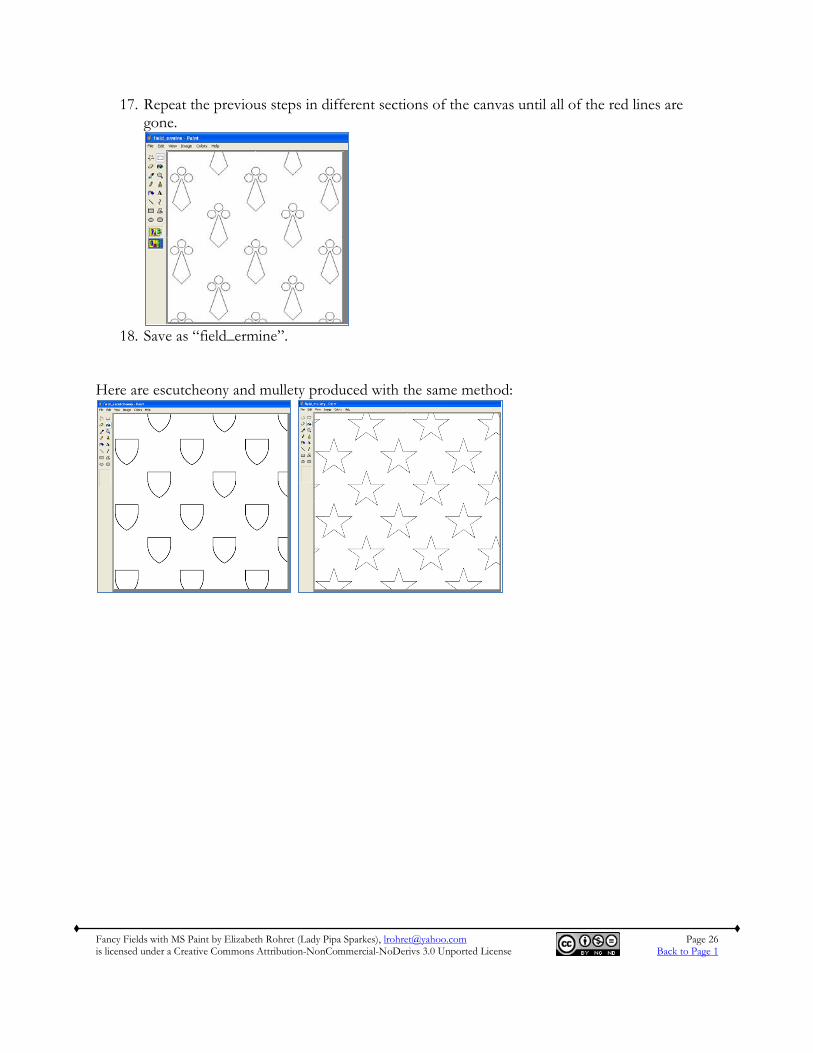
17. Repeat the previous steps in different sections of the canvas until all of the red lines are gone.
18. Save as “field_ermine”.
Here are escutcheony and mullety produced with the same method:

Fancy Fields with MS Paint by Elizabeth Rohret (Lady Pipa Sparkes), [email protected] Page 27 is licensed under a Creative Commons Attribution-NonCommercial-NoDerivs 3.0 Unported License Back to Page 1
XVI. PLUMMETY Plummety is extremely rare in Society heraldry (as of 2/1/12, there were only 8 registrations using it) probably due to the challenge of emblazoning it. Plummety is typically distinguished from scaly/papellony by the elongation of the “feathers” until they are slightly pointy, as well as internal detail to enhance the feathery look. The specific amount of internal detail is up to the individual, but depicting the feather shaft seems to be the minimum, which is what will be included in these instructions.
1. Click on the circle tool 2. Click and drag to create an oval that is much taller than wide.
3. Click the rectangular select tool on the left menu and click the invisible background
selection at the bottom of the Tools menu 4. Select the top half of the oval and hit the Delete key to remove it
5. Zoom in on the bottom of the half-circle with the magnifying glass tool . 6. Click the rectangular select tool on the left menu and select the bottom 3 horizontal
lines, then hit the delete key to remove them.
7. Zoom back out by clicking the magnifying glass tool and clicking the canvas. 8. Click the rectangular select tool on the left menu and select the right quarter-circle.
Drag it over until it matches up with the left hand.
Fancy Fields with MS Paint by Elizabeth Rohret (Lady Pipa Sparkes), [email protected] Page 28 is licensed under a Creative Commons Attribution-NonCommercial-NoDerivs 3.0 Unported License Back to Page 1
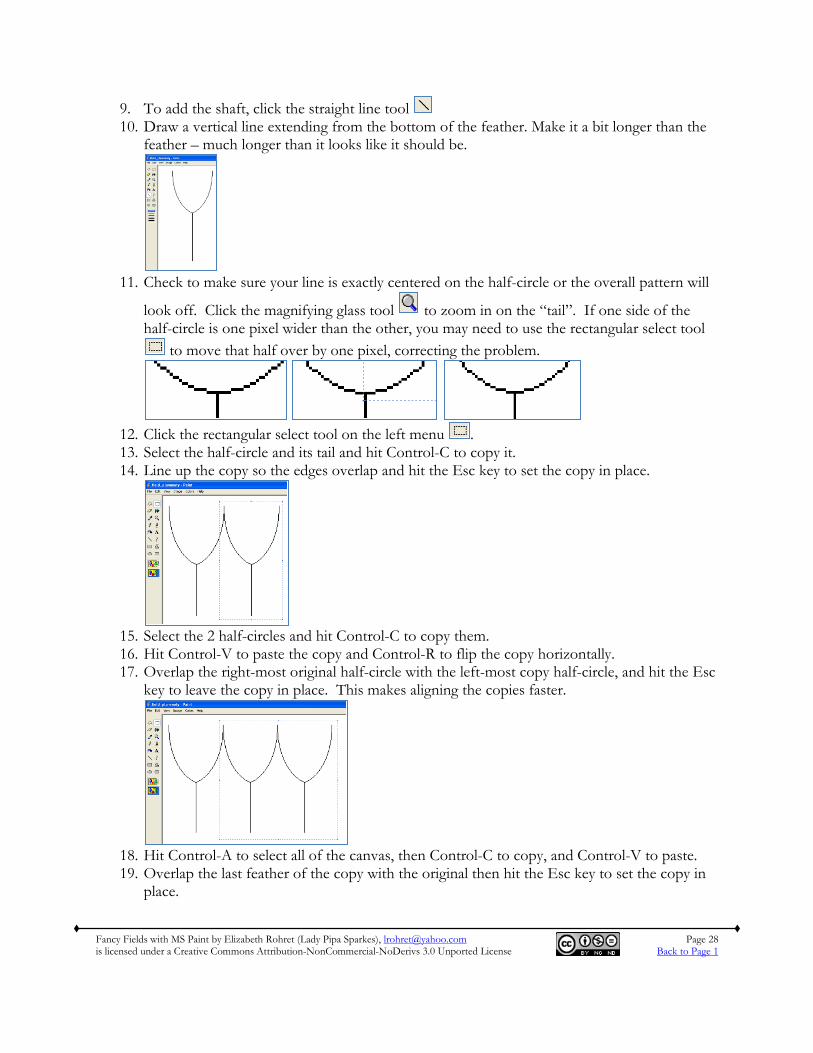
9. To add the shaft, click the straight line tool 10. Draw a vertical line extending from the bottom of the feather. Make it a bit longer than the
feather – much longer than it looks like it should be.
11. Check to make sure your line is exactly centered on the half-circle or the overall pattern will
look off. Click the magnifying glass tool to zoom in on the “tail”. If one side of the half-circle is one pixel wider than the other, you may need to use the rectangular select tool
to move that half over by one pixel, correcting the problem.
12. Click the rectangular select tool on the left menu . 13. Select the half-circle and its tail and hit Control-C to copy it. 14. Line up the copy so the edges overlap and hit the Esc key to set the copy in place.
15. Select the 2 half-circles and hit Control-C to copy them. 16. Hit Control-V to paste the copy and Control-R to flip the copy horizontally. 17. Overlap the right-most original half-circle with the left-most copy half-circle, and hit the Esc
key to leave the copy in place. This makes aligning the copies faster.
18. Hit Control-A to select all of the canvas, then Control-C to copy, and Control-V to paste. 19. Overlap the last feather of the copy with the original then hit the Esc key to set the copy in
place.
Fancy Fields with MS Paint by Elizabeth Rohret (Lady Pipa Sparkes), [email protected] Page 29 is licensed under a Creative Commons Attribution-NonCommercial-NoDerivs 3.0 Unported License Back to Page 1
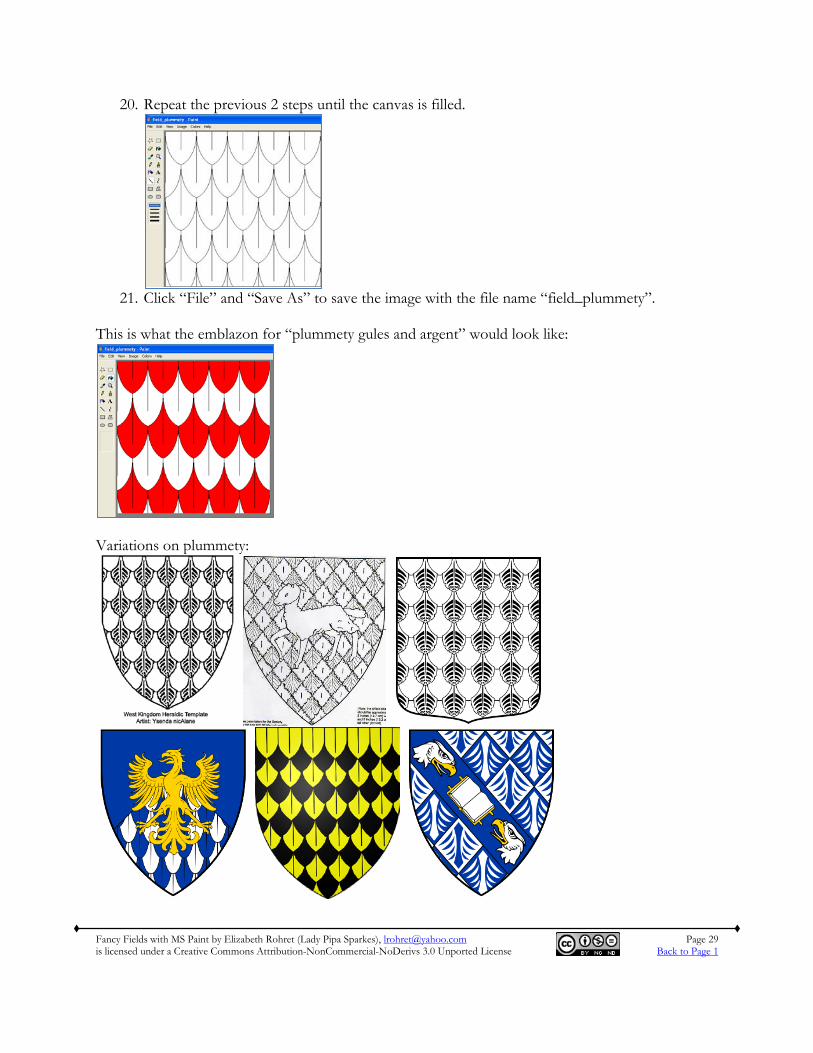
20. Repeat the previous 2 steps until the canvas is filled.
21. Click “File” and “Save As” to save the image with the file name “field_plummety”.
This is what the emblazon for “plummety gules and argent” would look like:
Variations on plummety:

Fancy Fields with MS Paint by Elizabeth Rohret (Lady Pipa Sparkes), [email protected] Page 30 is licensed under a Creative Commons Attribution-NonCommercial-NoDerivs 3.0 Unported License Back to Page 1
XVII. PAPELLONY I (SCALY) The main visual difference between scaly and plummety is that scaly consists of shallow crescent-shapes that are filled in with a tincture as specified in the blazon (much like masoned has the “mortar” tinctured per the blazon). For example, “purpure papellony Or” would have a purple field with yellow crescents. In contrast, plummety consists of elongated half-circles that are tinctured in alternating rows more like barry engrailed, with interior detail to enhance the “feather” look. The main visual difference between papelonny I (scaly) and papellony II is that papelonny II consists of blunt half-circles that are tinctured in alternating rows more like barry engrailed, but WITHOUT any interior detail.
1. Click on the circle tool 2. Hold down the Shift key while you click and drag to create a perfect circle.
3. Hold down the Shift key while you click and drag to create a slightly larger perfect circle next
to the first (do not overlap them yet!).
4. Click the red color to make the primary color red 5. Select the straight line tool from the Tools menu: 6. Hold down the Shift key while you click and drag to draw a vertical line inside both circles,
as centered as possible. Do not overlap the edges of the circles. This will help with alignment in subsequent steps
7. Click the rectangular select tool on the left menu and click the invisible background
selection at the bottom of the Tools menu
Fancy Fields with MS Paint by Elizabeth Rohret (Lady Pipa Sparkes), [email protected] Page 31 is licensed under a Creative Commons Attribution-NonCommercial-NoDerivs 3.0 Unported License Back to Page 1
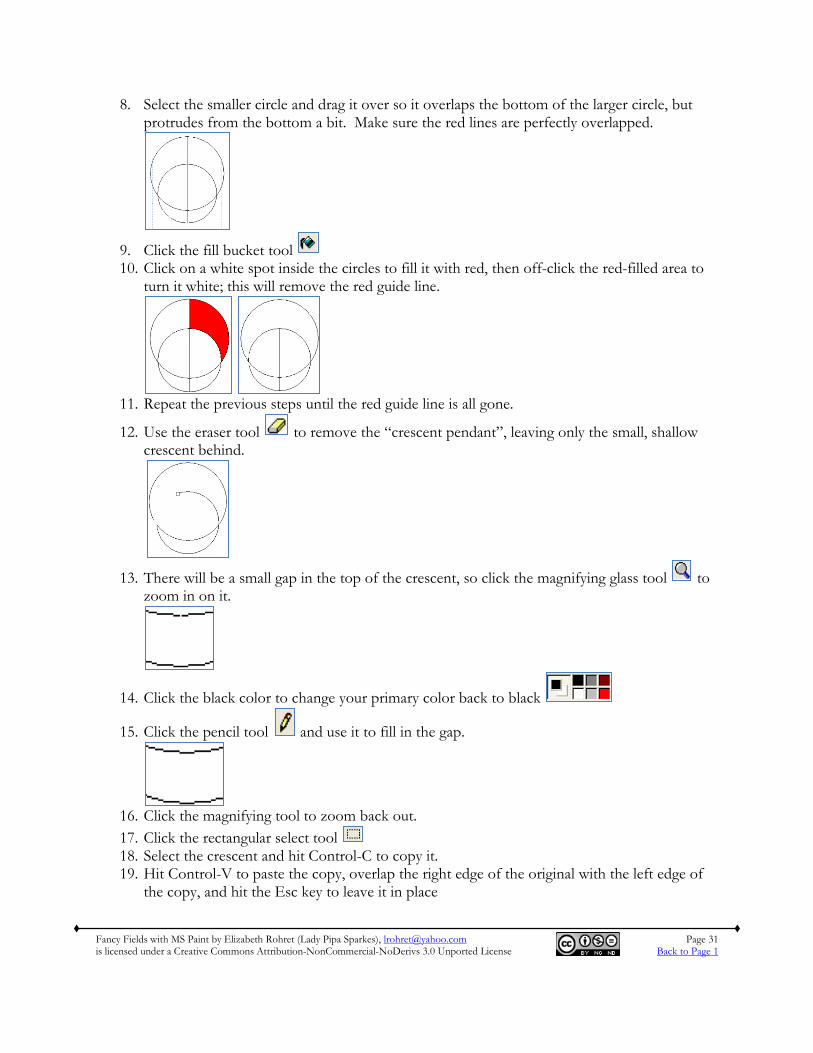
8. Select the smaller circle and drag it over so it overlaps the bottom of the larger circle, but protrudes from the bottom a bit. Make sure the red lines are perfectly overlapped.
9. Click the fill bucket tool 10. Click on a white spot inside the circles to fill it with red, then off-click the red-filled area to
turn it white; this will remove the red guide line.
11. Repeat the previous steps until the red guide line is all gone.
12. Use the eraser tool to remove the “crescent pendant”, leaving only the small, shallow crescent behind.
13. There will be a small gap in the top of the crescent, so click the magnifying glass tool to
zoom in on it.
14. Click the black color to change your primary color back to black
15. Click the pencil tool and use it to fill in the gap.
16. Click the magnifying tool to zoom back out. 17. Click the rectangular select tool 18. Select the crescent and hit Control-C to copy it. 19. Hit Control-V to paste the copy, overlap the right edge of the original with the left edge of
the copy, and hit the Esc key to leave it in place
Fancy Fields with MS Paint by Elizabeth Rohret (Lady Pipa Sparkes), [email protected] Page 32 is licensed under a Creative Commons Attribution-NonCommercial-NoDerivs 3.0 Unported License Back to Page 1
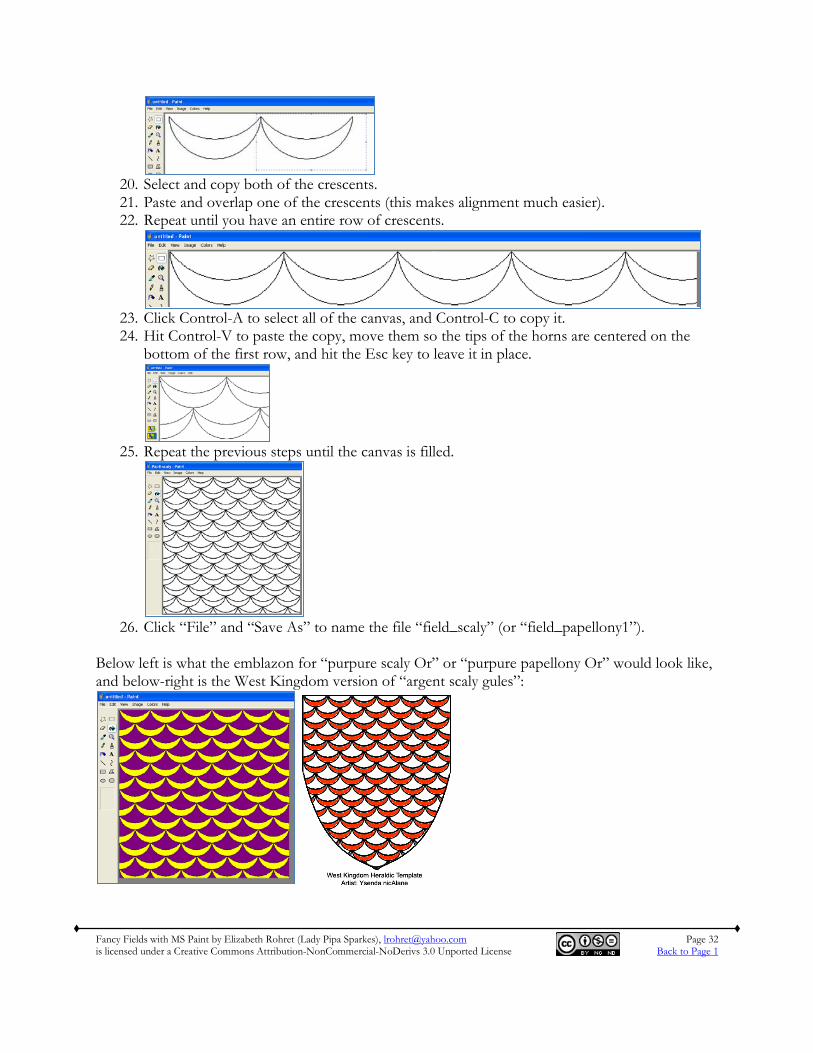
20. Select and copy both of the crescents. 21. Paste and overlap one of the crescents (this makes alignment much easier). 22. Repeat until you have an entire row of crescents.
23. Click Control-A to select all of the canvas, and Control-C to copy it. 24. Hit Control-V to paste the copy, move them so the tips of the horns are centered on the
bottom of the first row, and hit the Esc key to leave it in place.
25. Repeat the previous steps until the canvas is filled.
26. Click “File” and “Save As” to name the file “field_scaly” (or “field_papellony1”).
Below left is what the emblazon for “purpure scaly Or” or “purpure papellony Or” would look like, and below-right is the West Kingdom version of “argent scaly gules”:
Fancy Fields with MS Paint by Elizabeth Rohret (Lady Pipa Sparkes), [email protected] Page 33 is licensed under a Creative Commons Attribution-NonCommercial-NoDerivs 3.0 Unported License Back to Page 1
XVIII. PAPELLONY II This version of papellony (sometimes spelled papelloné) differs from plummety in that the papellony scales are blunt semi-circles with no interior detail. In fact, one could repeatedly copy and paste an engrailed line to make a “quick and dirty” papellony field. The blazon tells the difference between the two versions of papellony. “Tincture X papellony tincture Y” would yield the scaly version, papellony I. “Papellony tincture X and tincture Y”, would yield papellony II. The tinctures in the emblazon of papellony II would work the same as a field barry engrailed: alternating rows of the first tincture and the second tincture.
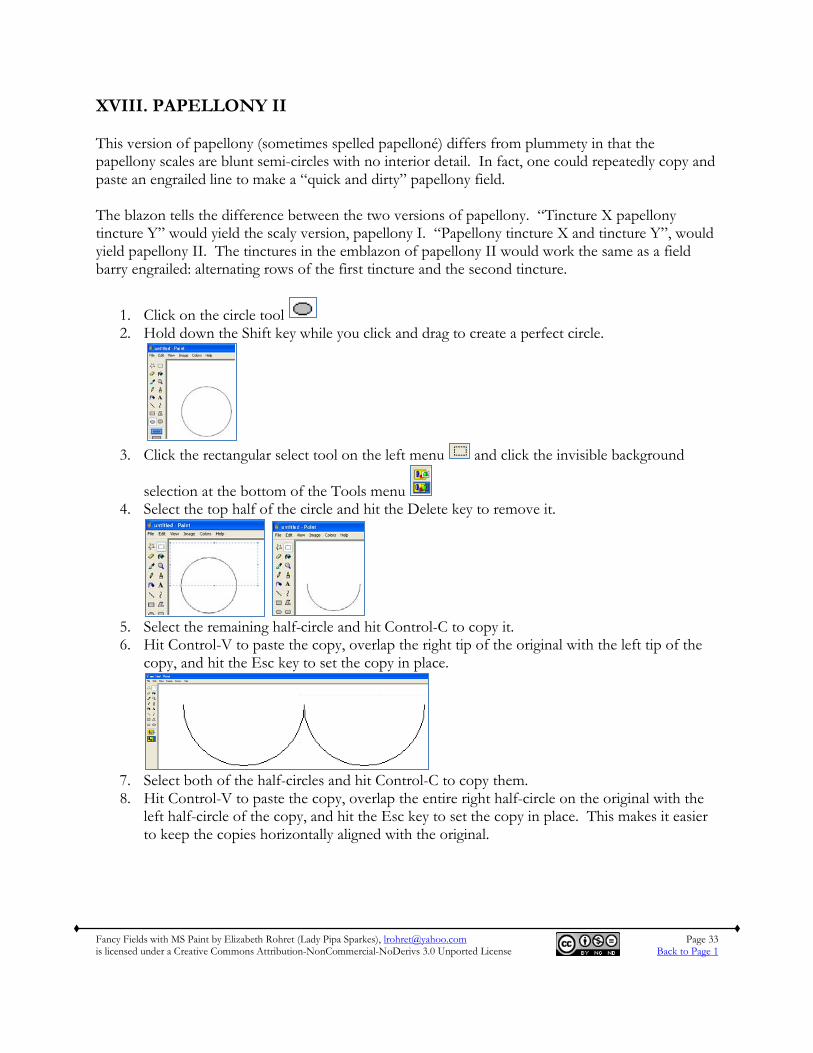
1. Click on the circle tool 2. Hold down the Shift key while you click and drag to create a perfect circle.
3. Click the rectangular select tool on the left menu and click the invisible background
selection at the bottom of the Tools menu 4. Select the top half of the circle and hit the Delete key to remove it.
5. Select the remaining half-circle and hit Control-C to copy it. 6. Hit Control-V to paste the copy, overlap the right tip of the original with the left tip of the
copy, and hit the Esc key to set the copy in place.
7. Select both of the half-circles and hit Control-C to copy them. 8. Hit Control-V to paste the copy, overlap the entire right half-circle on the original with the
left half-circle of the copy, and hit the Esc key to set the copy in place. This makes it easier to keep the copies horizontally aligned with the original.
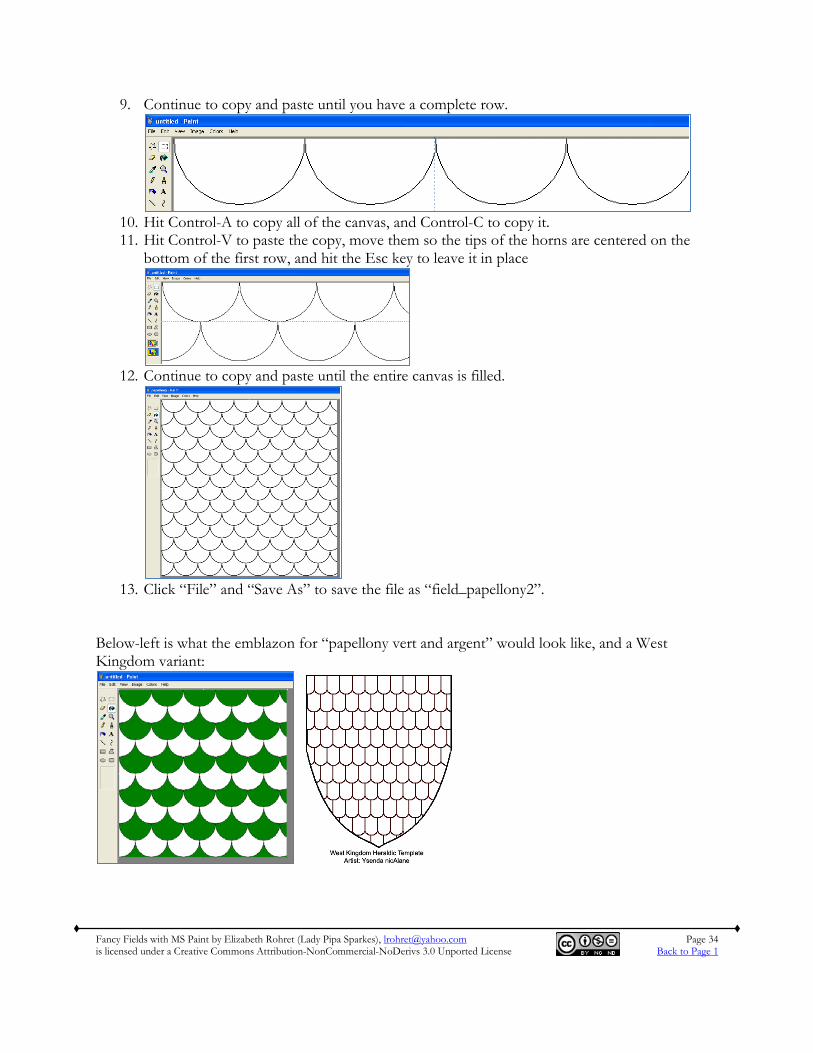
Fancy Fields with MS Paint by Elizabeth Rohret (Lady Pipa Sparkes), [email protected] Page 34 is licensed under a Creative Commons Attribution-NonCommercial-NoDerivs 3.0 Unported License Back to Page 1
9. Continue to copy and paste until you have a complete row.
10. Hit Control-A to copy all of the canvas, and Control-C to copy it. 11. Hit Control-V to paste the copy, move them so the tips of the horns are centered on the
bottom of the first row, and hit the Esc key to leave it in place
12. Continue to copy and paste until the entire canvas is filled.
13. Click “File” and “Save As” to save the file as “field_papellony2”.
Below-left is what the emblazon for “papellony vert and argent” would look like, and a West Kingdom variant:
Fancy Fields with MS Paint by Elizabeth Rohret (Lady Pipa Sparkes), [email protected] Page 35 is licensed under a Creative Commons Attribution-NonCommercial-NoDerivs 3.0 Unported License Back to Page 1
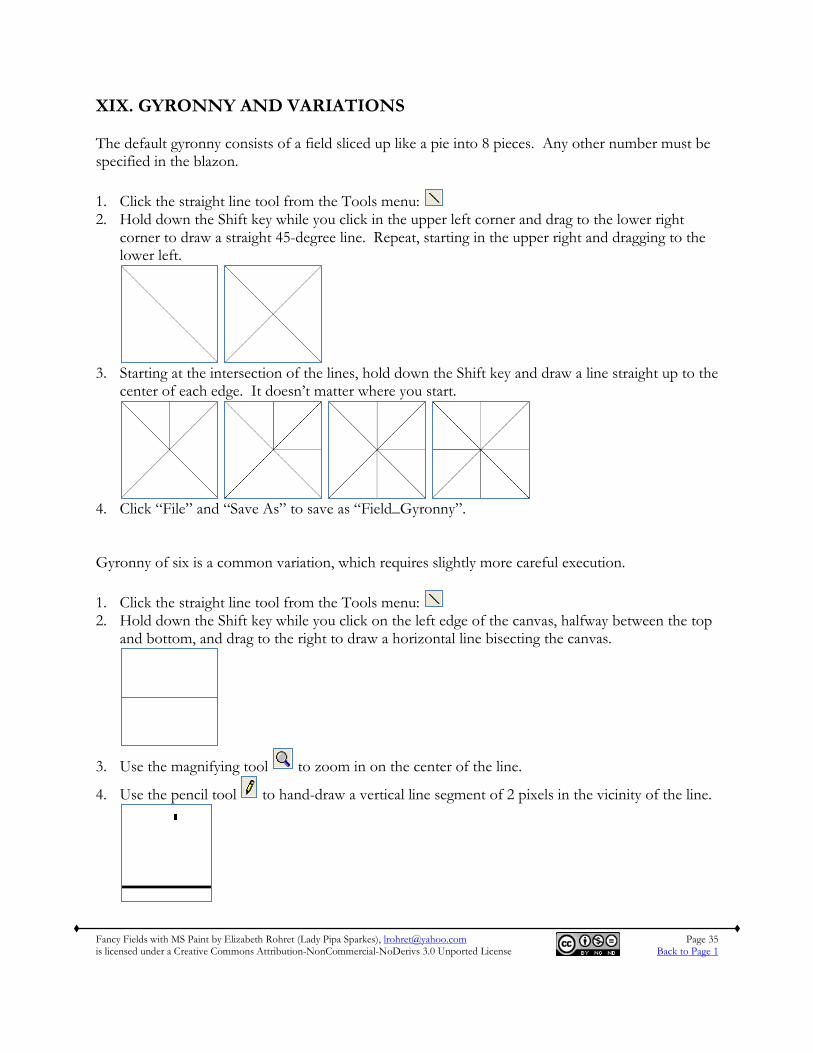
XIX. GYRONNY AND VARIATIONS The default gyronny consists of a field sliced up like a pie into 8 pieces. Any other number must be specified in the blazon. 1. Click the straight line tool from the Tools menu: 2. Hold down the Shift key while you click in the upper left corner and drag to the lower right
corner to draw a straight 45-degree line. Repeat, starting in the upper right and dragging to the lower left.
3. Starting at the intersection of the lines, hold down the Shift key and draw a line straight up to the
center of each edge. It doesn’t matter where you start.
4. Click “File” and “Save As” to save as “Field_Gyronny”. Gyronny of six is a common variation, which requires slightly more careful execution. 1. Click the straight line tool from the Tools menu: 2. Hold down the Shift key while you click on the left edge of the canvas, halfway between the top
and bottom, and drag to the right to draw a horizontal line bisecting the canvas.
3. Use the magnifying tool to zoom in on the center of the line.
4. Use the pencil tool to hand-draw a vertical line segment of 2 pixels in the vicinity of the line.
Fancy Fields with MS Paint by Elizabeth Rohret (Lady Pipa Sparkes), [email protected] Page 36 is licensed under a Creative Commons Attribution-NonCommercial-NoDerivs 3.0 Unported License Back to Page 1
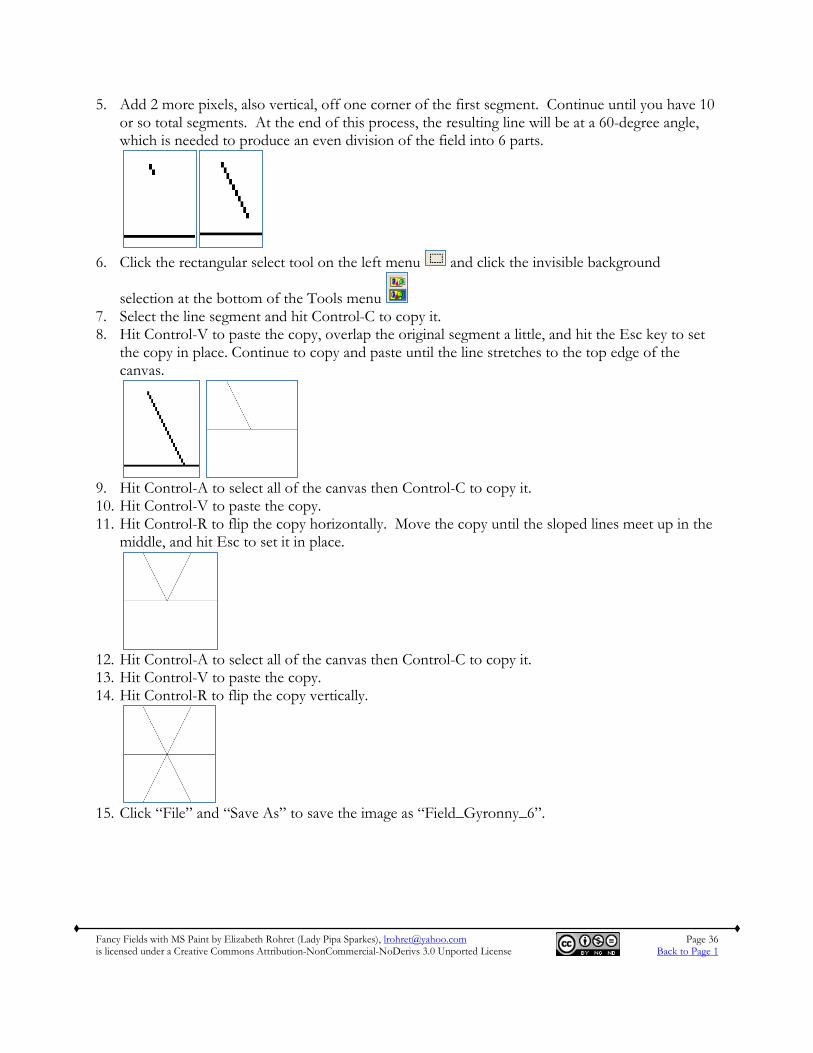
5. Add 2 more pixels, also vertical, off one corner of the first segment. Continue until you have 10 or so total segments. At the end of this process, the resulting line will be at a 60-degree angle, which is needed to produce an even division of the field into 6 parts.
6. Click the rectangular select tool on the left menu and click the invisible background
selection at the bottom of the Tools menu 7. Select the line segment and hit Control-C to copy it. 8. Hit Control-V to paste the copy, overlap the original segment a little, and hit the Esc key to set
the copy in place. Continue to copy and paste until the line stretches to the top edge of the canvas.
9. Hit Control-A to select all of the canvas then Control-C to copy it. 10. Hit Control-V to paste the copy. 11. Hit Control-R to flip the copy horizontally. Move the copy until the sloped lines meet up in the
middle, and hit Esc to set it in place.
12. Hit Control-A to select all of the canvas then Control-C to copy it. 13. Hit Control-V to paste the copy. 14. Hit Control-R to flip the copy vertically.
15. Click “File” and “Save As” to save the image as “Field_Gyronny_6”.
Fancy Fields with MS Paint by Elizabeth Rohret (Lady Pipa Sparkes), [email protected] Page 37 is licensed under a Creative Commons Attribution-NonCommercial-NoDerivs 3.0 Unported License Back to Page 1
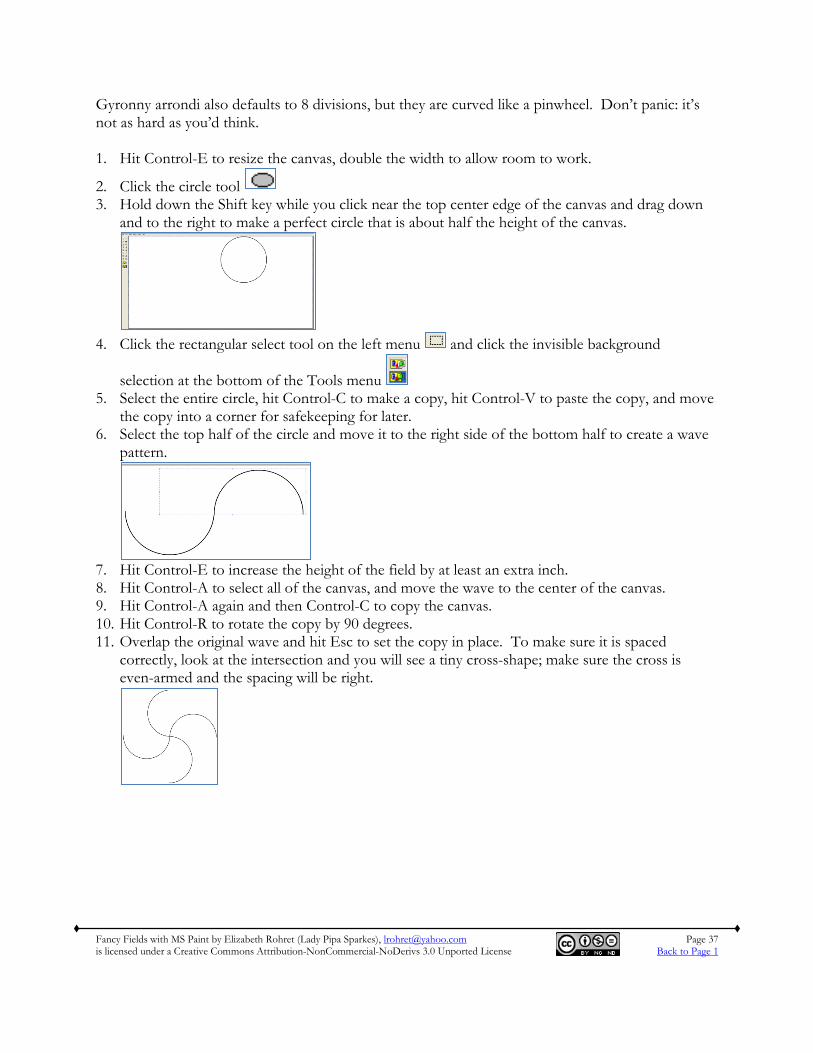
Gyronny arrondi also defaults to 8 divisions, but they are curved like a pinwheel. Don’t panic: it’s not as hard as you’d think. 1. Hit Control-E to resize the canvas, double the width to allow room to work.
2. Click the circle tool 3. Hold down the Shift key while you click near the top center edge of the canvas and drag down
and to the right to make a perfect circle that is about half the height of the canvas.
4. Click the rectangular select tool on the left menu and click the invisible background
selection at the bottom of the Tools menu 5. Select the entire circle, hit Control-C to make a copy, hit Control-V to paste the copy, and move
the copy into a corner for safekeeping for later. 6. Select the top half of the circle and move it to the right side of the bottom half to create a wave
pattern.
7. Hit Control-E to increase the height of the field by at least an extra inch. 8. Hit Control-A to select all of the canvas, and move the wave to the center of the canvas. 9. Hit Control-A again and then Control-C to copy the canvas. 10. Hit Control-R to rotate the copy by 90 degrees. 11. Overlap the original wave and hit Esc to set the copy in place. To make sure it is spaced
correctly, look at the intersection and you will see a tiny cross-shape; make sure the cross is even-armed and the spacing will be right.
Fancy Fields with MS Paint by Elizabeth Rohret (Lady Pipa Sparkes), [email protected] Page 38 is licensed under a Creative Commons Attribution-NonCommercial-NoDerivs 3.0 Unported License Back to Page 1
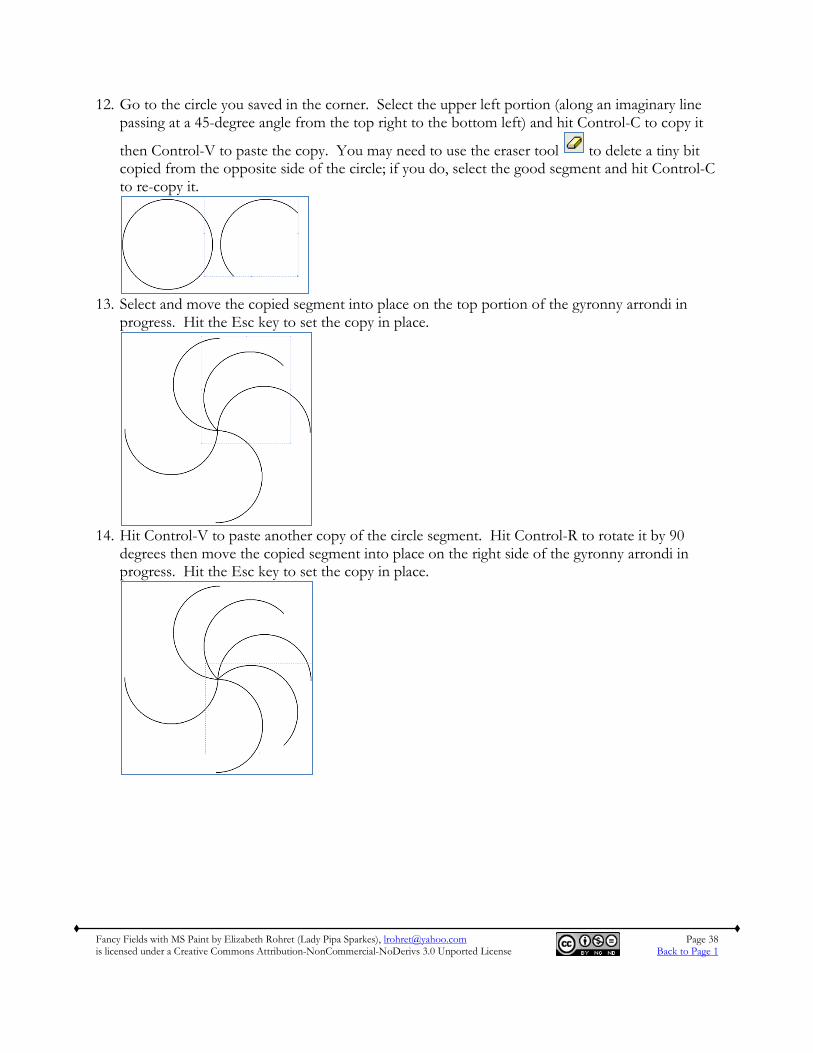
12. Go to the circle you saved in the corner. Select the upper left portion (along an imaginary line passing at a 45-degree angle from the top right to the bottom left) and hit Control-C to copy it
then Control-V to paste the copy. You may need to use the eraser tool to delete a tiny bit copied from the opposite side of the circle; if you do, select the good segment and hit Control-C to re-copy it.
13. Select and move the copied segment into place on the top portion of the gyronny arrondi in
progress. Hit the Esc key to set the copy in place.
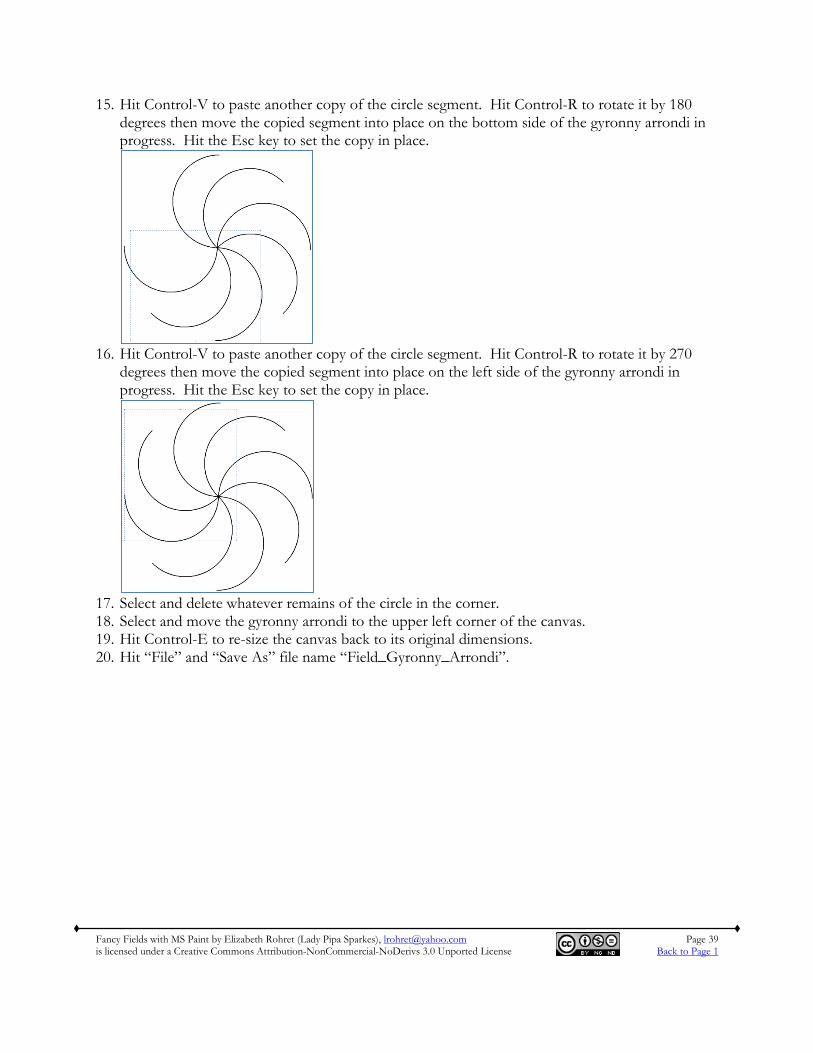
14. Hit Control-V to paste another copy of the circle segment. Hit Control-R to rotate it by 90
degrees then move the copied segment into place on the right side of the gyronny arrondi in progress. Hit the Esc key to set the copy in place.
Fancy Fields with MS Paint by Elizabeth Rohret (Lady Pipa Sparkes), [email protected] Page 39 is licensed under a Creative Commons Attribution-NonCommercial-NoDerivs 3.0 Unported License Back to Page 1
15. Hit Control-V to paste another copy of the circle segment. Hit Control-R to rotate it by 180 degrees then move the copied segment into place on the bottom side of the gyronny arrondi in progress. Hit the Esc key to set the copy in place.
16. Hit Control-V to paste another copy of the circle segment. Hit Control-R to rotate it by 270
degrees then move the copied segment into place on the left side of the gyronny arrondi in progress. Hit the Esc key to set the copy in place.
17. Select and delete whatever remains of the circle in the corner. 18. Select and move the gyronny arrondi to the upper left corner of the canvas. 19. Hit Control-E to re-size the canvas back to its original dimensions. 20. Hit “File” and “Save As” file name “Field_Gyronny_Arrondi”.
Fancy Fields with MS Paint by Elizabeth Rohret (Lady Pipa Sparkes), [email protected] Page 40 is licensed under a Creative Commons Attribution-NonCommercial-NoDerivs 3.0 Unported License Back to Page 1
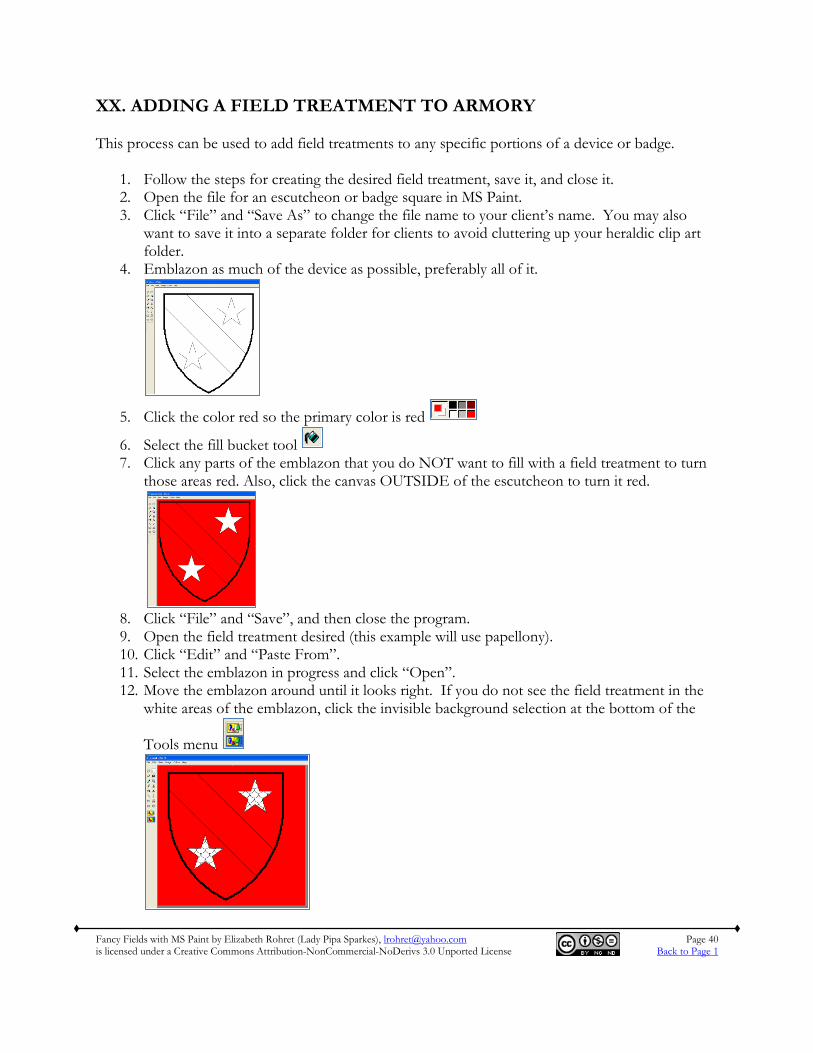
XX. ADDING A FIELD TREATMENT TO ARMORY This process can be used to add field treatments to any specific portions of a device or badge.
1. Follow the steps for creating the desired field treatment, save it, and close it. 2. Open the file for an escutcheon or badge square in MS Paint. 3. Click “File” and “Save As” to change the file name to your client’s name. You may also
want to save it into a separate folder for clients to avoid cluttering up your heraldic clip art folder.
4. Emblazon as much of the device as possible, preferably all of it.
5. Click the color red so the primary color is red
6. Select the fill bucket tool 7. Click any parts of the emblazon that you do NOT want to fill with a field treatment to turn
those areas red. Also, click the canvas OUTSIDE of the escutcheon to turn it red.
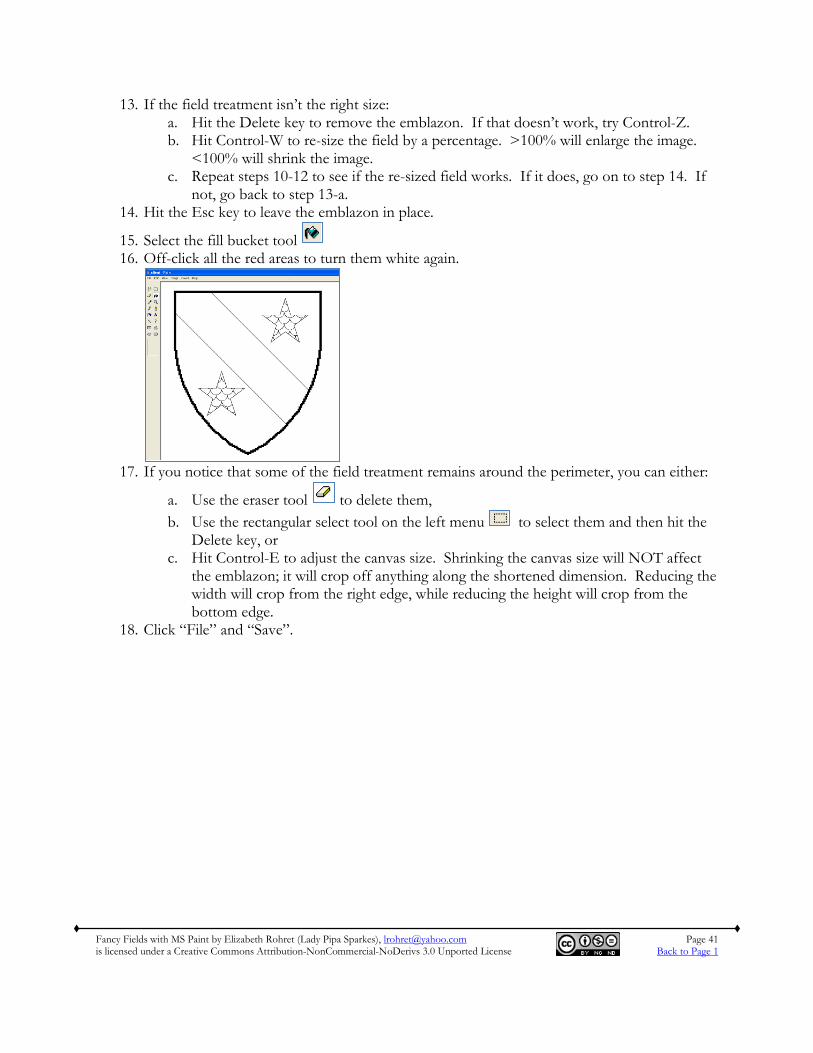
8. Click “File” and “Save”, and then close the program. 9. Open the field treatment desired (this example will use papellony). 10. Click “Edit” and “Paste From”. 11. Select the emblazon in progress and click “Open”. 12. Move the emblazon around until it looks right. If you do not see the field treatment in the
white areas of the emblazon, click the invisible background selection at the bottom of the
Tools menu
Fancy Fields with MS Paint by Elizabeth Rohret (Lady Pipa Sparkes), [email protected] Page 41 is licensed under a Creative Commons Attribution-NonCommercial-NoDerivs 3.0 Unported License Back to Page 1
13. If the field treatment isn’t the right size: a. Hit the Delete key to remove the emblazon. If that doesn’t work, try Control-Z. b. Hit Control-W to re-size the field by a percentage. >100% will enlarge the image.
<100% will shrink the image. c. Repeat steps 10-12 to see if the re-sized field works. If it does, go on to step 14. If
not, go back to step 13-a. 14. Hit the Esc key to leave the emblazon in place.
15. Select the fill bucket tool 16. Off-click all the red areas to turn them white again.
17. If you notice that some of the field treatment remains around the perimeter, you can either:
a. Use the eraser tool to delete them, b. Use the rectangular select tool on the left menu to select them and then hit the
Delete key, or c. Hit Control-E to adjust the canvas size. Shrinking the canvas size will NOT affect
the emblazon; it will crop off anything along the shortened dimension. Reducing the width will crop from the right edge, while reducing the height will crop from the bottom edge.
18. Click “File” and “Save”.