field trip to tempe butte - arizona state...
TRANSCRIPT

Field Trip to Tempe Butte
1
Field Trip to Tempe Butte
Synopsis
So far you have been identifying rocks and mapping their locations without actually
going there. Now it is your chance to put it all together and see real rocks out in their
natural setting. You will examine the rocks and structures, make a geologic map of the
butte, and reconstruct the geologic history.
You will meet at and hike part way up Tempe Butte north of campus. Wear
comfortable, sensible hiking shoes (high heels and most open-toed shoes are not
acceptable). Bring water, a writing utensil, your lab manual, some paper to take notes,
and perhaps a clipboard. Read “How to Take Field Notes” before the lab.
Introduction For this class you will need to meet on the northeast side of Tempe Butte (“A” Mountain)--a map is
shown above. We meet at the northwest edge of Parking Lot 59, north of the Stadium and south of Rio
Salado Parkway. Keep in mind, if you can see the “A,” you are on the wrong side of the butte. Be sure to
be on time, because you won’t want to miss a thing! If you have a disability that precludes climbing the
butte, speak to your instructor. Meet your class and instructor at Lot 59, just east of section C9.
Getting there will be a true test in your map-reading skills. Can you figure out where to meet? Look
at the map at the start of the lab and follow the path of the dotted line all the way around the east side of
the football stadium, until you are on the north side (back) of the football stadium and the butte. This is
the side next to the Salt River and Rio Salado Parkway.
Note: For this week’s lab, students may discuss out in the field what they observe, but must
work individually in the creation of their map, cross section, and report.

Field Trip to Tempe Butte
2
Goals for This Week While on a field trip to Tempe Butte, locate landscape features and yourself on a topographic map.
Make observations and take notes about different rock units.
On the topographic map, draw contacts between different geologic units.
After the field trip, complete a geologic map and cross section of Tempe Butte.
Write a bullet list about the geology of Tempe Butte.
Box 5-1. How to Take Field Notes – Read Before Going on Field Trip
As you hike on the butte, you will be observing various geologic features and must take notes on
what you see. Take complete and accurate notes, since they will be all you have to complete the
assignment. Go through each of the steps below.
Closely observe the rocks at each stop – write a description of the rocks in your notes!
After you have observed the rocks at each stop, try to identify what type of rocks they are:
crystalline versus clastic; sedimentary, igneous, or metamorphic. What rock name would you use?
Are there layers? If so, how thick are the layers? How thick is the unit?
If it is a sedimentary rock, how big is the grain size? If it is an igneous rock, how big are the
crystals? If it is a metamorphic rock, how foliated is it?
Are there any unusual features, such as fossils, faulting, folding, etc?
Are there any other observations you can make at this site? Ask yourself or a classmate questions
about what you see at this stop. Such questions will often lead you to make different observations –
and have new ideas – you had not thought of before asking yourself the question.
Make a sketch of a particular feature, or of the rock itself. A sketch is often a more effective, and
more efficient, way to record your observations and your thoughts.
Locate yourself on the topographic map and mark on your map that particular stop (in your notes,
there should be a corresponding stop #).
Exercise 5A. Exploring the Butte Now you get to actually look at the rocks and map them. For this field trip, you should organize
yourselves into groups of 3 to 5 people. With this group, compare what you observe, what each rock type
or locality represents, and what you conclude about the geologic history of the area. Your instructor will
lead you on a tour of the butte. Be sure to take good field notes because that is what you will use to
complete your work. Box 5-1 has hints on what to look for and how to take good notes. At the back of the
lab is a scratch copy of the topographic map to estimate where you are located on the map and where the
contacts are, and then a final map, both of which you will hand in.
At the first stop, in the parking lot, look at the landscape of the butte and try to find features that you
see on the topographic map. For example, where is the top of the butte on the map? Likewise, look
for distinctive places on the topographic map, such as a small drainage gully or a change from a
steeper slope to a less steep slope, then look up and find that feature on the actual butte.
On the topographic map are some bold letters (C, D, and E); find the actual location of these features
on the butte and compare your conclusions with those of your classmates.
From your vantage point at Stop 1, you can see that the butte is bedrock and the parking lot and flat
areas to the north are not. Beneath the parking lot and the flat areas to the north are old river gravels
and floodplain deposits. The boundary between the gravels and the bedrock goes right through Stop 1.
Look out! You are standing on a contact! The contact between bedrock and gravels runs right along

Field Trip to Tempe Butte
3
the base of the hill. This is an easy location to find on the topographic map, because it is an obvious
change in slope, from more closely spaced contours on the bedrock butte to very widely spaced
contours on the flat area.
Using this topographic change as a guide, draw the bedrock-gravel contact on a scratch copy of the
topographic map.
Next, looking west at Stop 1, you can see that the upper part of the butte is a different rock unit than
the lower part. Scan along the butte and follow the boundary (that is, the contact) between the two
rock types. Now try to find where this contact occurs on your topographic map; look for distinctive
features, such as a change in slope (spacing of contours) or where small gullies begin, end, or change
direction. Try to draw the contact on a scratch copy of the topographic map.
When the instructor leads you to each stop, observe the rock unit or geologic feature and record what
you see in your notes. The stops are located on the topographic map. When you get to a stop, look at
the topographic map and compare it with the small topographic features, like small ridges and gullies,
you see around the stop.
When you get to Stop 5, you will know what the rock units were on either side of the contact you
drew earlier. Write these on the scratch copy of the map, on the appropriate side of the contact.
Examine Figures 5-1 and 5-2 for an idea of how the rocks at Tempe Butte were formed and tilted,
and why they are exposed today.
Exercise 5B. After the Field Trip After you finish the field trip, you will be on your own to finish coloring in your geologic map, draw
a geologic cross section, and briefly summarize the geologic history. The recommended steps are:
On your geologic map, make sure the contact lines you saw in the field are clearly drawn. Note that
you only examined the north and east side of the Butte, so you will need to extrapolate what you have
seen to the rest of the butte to make a complete geologic map. Use a colored pencil to lightly color
each rock unit a different color, with a color of your choosing. Label the units.
Color in the boxes in the legend, corresponding to the colors of the rock units on your map. On your
legend the youngest rock should be at the top and the oldest should be on the bottom. Remember that
the alluvium (modern gravel and floodplain deposits) is a unit too.
Write the name of each rock unit next to its corresponding box, along with a brief, but thorough,
description of that unit.
Using the profile grid on your final copy of the topographic map, do a topographic profile of line A-B
on your topographic map. To do this, it is probably easiest to fold the scratch copy of the topographic
map along the profile line (A-B). Then line up the profile line A-B on this folded edge with the
profile grid on the sheet that has your final copy. The contours are so detailed on the topographic map
that you can just use every other contour to construct your profile. Figure 5-3 will remind you how to
construct a topographic profile.
Do a geologic cross-section within your profile. Mark on your profile where the contacts between
units cross your profile line. Now draw the upper contact dipping in the direction that was measured
out in the field by your instructor (strike and dip). The lower contact probably slopes gently to the
north, with the river gravels on top of the bedrock units. See Figure 5-3 to remind yourself how to
construct a geologic cross section.
Color in the units on your cross section the same as they are on your geologic map.
Construct a legend for your cross section, including all the units, with the youngest on the top and the
oldest on the bottom.
On the worksheet, write a bullet list summarizing the geologic history of the area.
Field Trip to Tempe Butte
4
Note: You must write your summary of the geologic history and create your cross section
on your own.
You do not need, nor are you allowed, to use the internet for any part of this report.
YOU WILL TURN IN NEXT WEEK
(1) your final geologic map, cross section, and geohistory bullet list,
(2) your scratch copy of the topographic map, and
(3) your notes and sketches from the field trip.
Please make sure that all work is your own! The instructor will be looking very
carefully for any evidence of copying or other forms of cheating.
If there is evidence that reports have been copied, the students involved
will be failed!

Field Trip to Tempe Butte
5
Figure 5-1. Cross sections illustrating the formation and evolution of tilted fault blocks and the
resulting sediments. This event caused the red beds at Tempe Butte to be deposited and tilted.
Field Trip to Tempe Butte
6
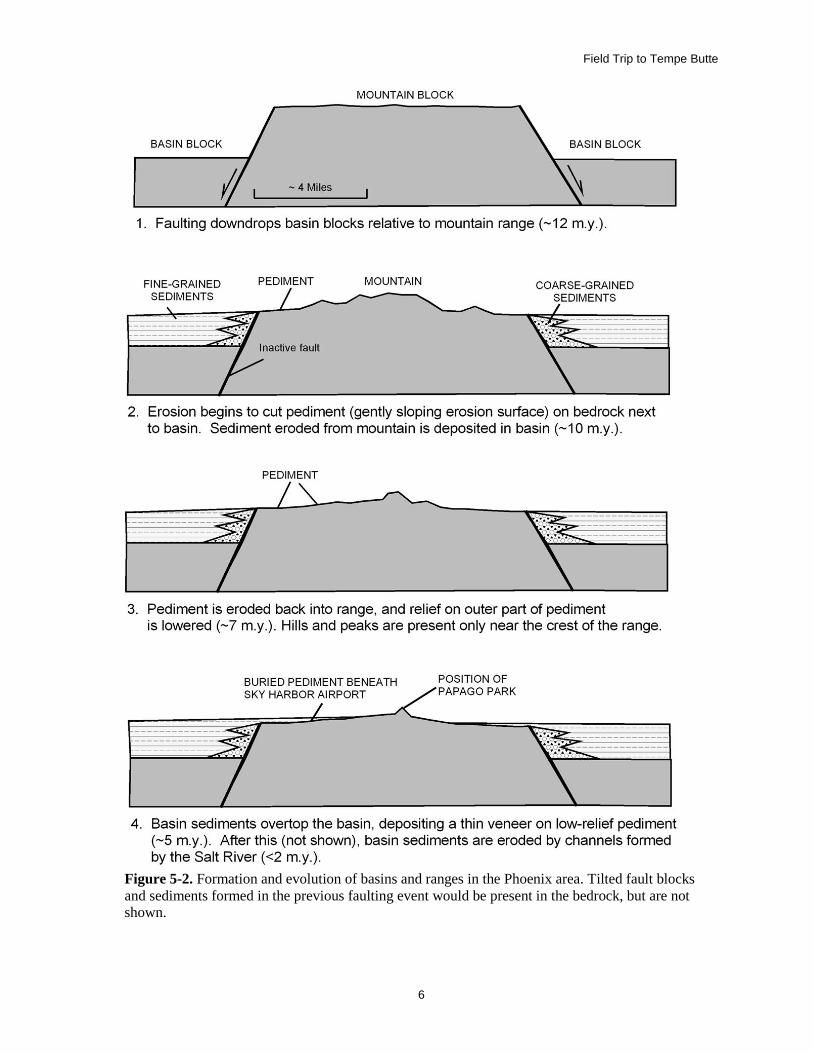
Figure 5-2. Formation and evolution of basins and ranges in the Phoenix area. Tilted fault blocks
and sediments formed in the previous faulting event would be present in the bedrock, but are not shown.

Field Trip to Tempe Butte
7
Geologic map,
showing line
along which
topographic
profile and cross
section will be constructed.
Topographic
profile with
position of
contours, contacts, and faults marked.
Finished geologic
cross section.
Legend, showing
symbols and rock
units.
Figure 5-3. Steps in going from a geologic map to a topographic profile and geologic cross section.
First, construct the topographic profile and mark on the profile the location of contours, contacts, and
geologic structures (such as faults, none of which are present in this area). Draw the layers into the
subsurface according to their tilt (in this case flat). Add some labels, patterns or color, and a legend,
and presto, there it is! (Derived from Davis, G.H., and Reynolds, S.J., 1996, Geologic Structures of Rocks and Regions, Second Edition, John Wiley and Sons.)