featuring sonata collection by
TRANSCRIPT

F R E E P A T T E R N
f e a t u r i n g S O N A T A C O L L E C T I O N B Y A M Y S I N I B A L D I

SINFONIE IN DANUBE
SINFONIE IN MELODY
FLORAL NO. 9 BOLD
FLORAL NO. 9 SHARP
VIENNA MOONLIGHT
VIENNA ROSEBEAM
INK LIGHT
INK THUNDER
PASTORAL CRESCENDO
PASTORAL MAGENTA
JOSEPHINE POETIC
JOSEPHINE CLASSIC
EIDELWEISS JOY
EIDELWEISS ODE
1812
OCTET
F A B R I C S D E S I G N E D B Y A M Y S I N I B A L D I
D E S I G N E D B Y PAT BRAVO
LU
DW
IGB
EE
TH
OV
EN

ar tga l le ry fabr ics.com
97" × 84"
FABR IC REQUIREMENTS
CUTT ING INSTRUCT IONS
Fabric A SNT-33108 4 5⁄8 yd. Fabric B SNT-23101 ½ yd. Fabric C SNT-23105 ¾ yd.Fabric D SNT-33101 ¼ yd.Fabric E SNT-33107 11⁄8 yd. Fabric F SNT-23103 11⁄8 yd. Fabric G SNT-33102 13⁄8 yd.Fabric H SNT-33103 1¼ yd.Fabric I SNT-23100 11⁄8 yd. Fabric J SNT-33104 1¼yd.
SNT-23101 8 yds (Suggested)
Fabric H SNT-33103 (Included)
Blocks
Seventy-four (80) 2" × WOF strips from fabric A.
Six (6) 2" × WOF strips from fabric B.
Ten (10) 2" × WOF strips from fabric C.
Two (2) 2" × 1 WOF strips from fabric D.
Six (6) 2" × WOF strips from fabric E.
Fifteen (15) 2" × WOF strips from fabric F.
Six (6) 2" × WOF strips from fabric G.
Ten (10) 2"× WOF strips from fabric H.
Fifteen (15) 2" × WOF strips from fabric I.
Six (6) 2" × WOF strips from fabric J.
CONSTRUCT ION
Sew all rights sides together with ¼"seam allowance.
Borders
Two 1½" × 79½" strips from fabric G.
Two 1½" × 93¾" strips from fabric G.
Two 2½" × 81½" strips from fabric E.
Two 2½" × 97¾" strips from fabric E.
Combination a:
Grab 2 strips of fabric H and 1 strip of fabric D
Sew them cross grain wise in the order HDH. (DIAGRAM 1)
Combination b:
Repeat previous steps with fabrics F & H, in the order of FHF until you have a total of 42 strips. (DIAGRAM 2)
Proceed to cut 2" strips parallel to the sel-vage. You will have 21 strips in total for blocks P1 and P2. (DIAGRAM 3)
keep cutting2"

ar tga l le ry fabr ics.com
Combination c:
Repeat with fabrics C & D, in the order of CDC until you have a total of 21 strips. (DIAGRAM 4)
Combination d:
Repeat with fabrics C & I, in the order of ICI until you have a total of 42 strips. (DIAGRAM 5)
Grab 2 combination b strips and 1 combination a strip at a time. Sew them together with a ¼" seam allowance cross grain wise making sure that all seams match.
Repeat until you have a total of 21 patches for the P1 and P2 blocks.
The finished square should look as follows:
Grab 2 combination d strips and 1 combination c strip at a time. Sew them together with a ¼" seam allowance cross grain wise making sure that all seams match.
Repeat until you have a total of 21 patches for the B1 and B2 blocks.
The finished square should look as follows:
Lateral Panels:
Grab 2 strips of fabric A and 1 strip of fabric F
Sew them cross grain wise in the order AFA.
Proceed to cut 9" strips parallel to the selvage. Per each time you do this with the WOF, you will have 4 panels.
Repeat until you have a total of 42 panels. Set aside.
Repeat previous steps with 2 strips of fabric A and 1 strip of fabric I.
Sew them cross grain wise in the order AIA.
Repeat until you have a total of 42 panels. Set aside.
LATERAL PANEL FOR P1 & P2 BLOCKS
LATERAL PANEL FOR B1 & B2 BLOCKS
Half Square Triangle Units:
Grab 3 strips of fabric A and 1 strip of each of the following fabrics: B, G, and C.
Sew them cross grain wise in the order BAG-ACA. Proceed to cut 9 ½" squares parallel to the selvage. Per each time you do this, you will have 4 squares.
Repeat the previous step until you have 22 squares, or about 6 times.
Now you will cut one-half of these squares diagonally upwards (x), and the other half diag-onally downwards (y) always positioning fabric B on top.

ar tga l le ry fabr ics.com
Grab one bottom triangle cut from way “x”, and one bottom triangle cut from way “y” and posi-tion them together on the diagonal so that the same fabrics match making 90º angles.
Repeat Step 3 for blocks B1 and B2, but this time grab 3 strips of fabric A and 1 strip of each of the following fabrics: E, J, and H.
Sew them cross grain wise in the order EAJA-HA with a ¼ seam allowance. Repeat steps as above only this time you can disregard 2 of the BOTTOM triangle cuts as they will not be need-ed for this quilt. In this case you will end up with 10 rectangles for B1 and 11 rectangles for B2.
BOTTOM TRIANGLES CUTS
fabric B fabric B
TOP TRIANGLES CUTS
x y
BOTTOM TRIANGLES CUTS
Sew along the diagonal with a ¼" seam allow-ance making sure that all seams match. Repeat this step with the top triangle cuts. You can disregard 2 of the TOP triangle cuts as they will not be needed for this quilt.
Repeat the previous step with all squares.
You will end up with 11 new squares for P1 block, and 10 new squares for P2 block.
P1 BLOCK P2 BLOCK
B1 BLOCK B2 BLOCK
Assemble Block:
Grab 1 nine-patch square, 2 lateral panels, and 1 Half-square triangle unit; for the latter always make sure to leave the smallest square toward the outside, whether you see it with fabric A or fabric B.
P1 BLOCK

ar tga l le ry fabr ics.com
After each row is sewn, assembly the rows together maintaining the order from top to bot-tom or vice versa.
The blocks in this quilt rotate as the assembling progresses; please refer to the cover picture to determine the original position of each block.
Sew the rows in the following order with the indicated angle rotations (or follow the cover photo):
TOP ASSEMBLE
1st ROW: P1 B2 -90º P2 B1 -90º P1 B2 -90º
2nd ROW: B2 90º P1 180º B1 90º P2 180º B2 90º P1 180º
3rd ROW: P2 B1 -90º P1 B2 -90º P2 B1 -90º
4th ROW: B1 90º P2 180º B2 90º P1 180º B1 90º P2 180º
5th ROW: P1 B2 -90º P2 B1 -90º P1 B2 -90º
6th ROW: B2 90º P1 180º B1 90º P2 180º B2 90º P1 180º
7th ROW: P2 B1 -90º P1 B2 -90º P2 B1 -90º
P2 BLOCK
B1 BLOCK
B2 BLOCK
Repeat for blocks B1 and B2. Always make sure to leave the smallest square toward the out-side, whether you see it with fabric A or fabric E.
Borders:
Inner Border:
Sew two 79 ½" × 1½" fabric G strips along the top and bottom sides of the quilt top.
Sew the other two 93 ¾" × 1½" fabric G strips along the left & right sides of the quilt top.
Outer Border:
Sew two 81 ½"× 2½" fabric E strips along the top and bottom sides of the quilt top.
Sew the other two 97 ¾" × 2½" fabric E strips along the left & right sides of the quilt top.
ar tga l le ry fabr ics.com
QUILT ASSEMBLY
Sew rights sides together
Place BACKING FABRIC on a large surface wrong side up. Stretch it with masking tape against that surface.
Place BATTING on top of backing fabric.
Place TOP on top of the batting with right side facing up. Smooth away wrinkles using your hands.
Pin all layers together and baste with basting thread, using long stitches. You can also use safety pins to join the layers.
Machine or hand quilt starting at the center and working towards the corners. Remember that quilting motifs are a matter of personal preference. Have fun choosing yours!
After you finished, trim excess of any fabric or batting, squaring the quilt to proceed to bind it.
-
B IND ING
Sew rights sides together.
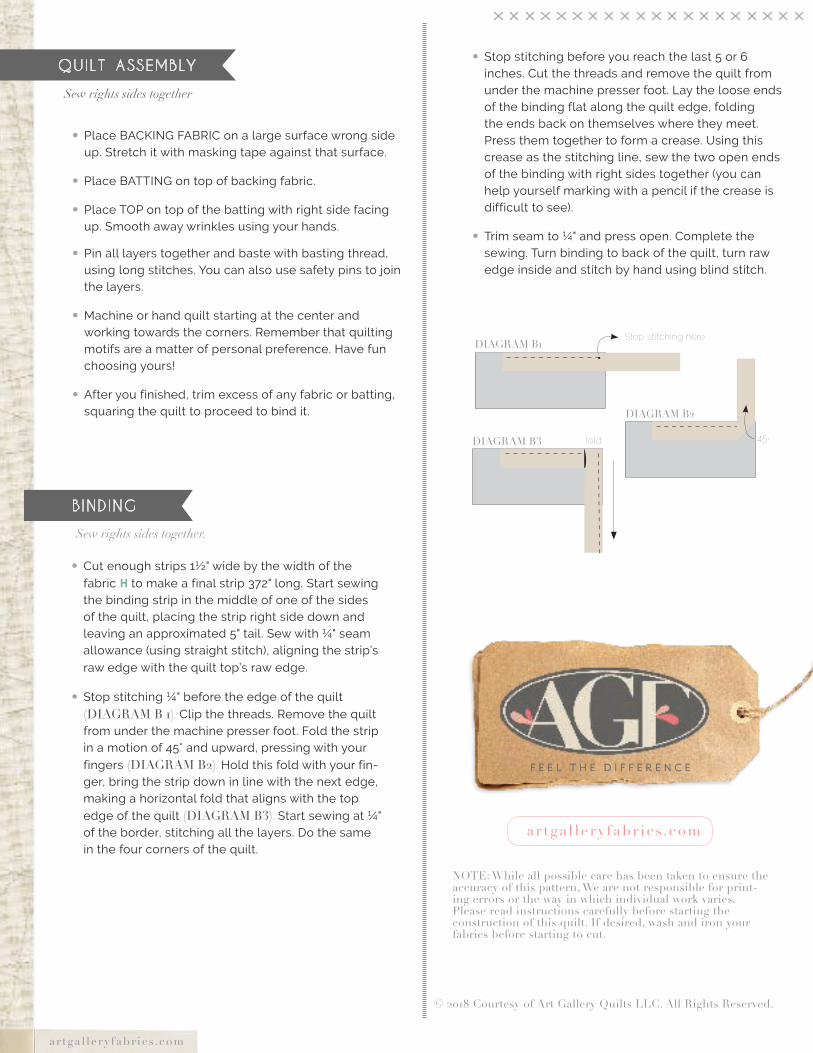
Cut enough strips 1½" wide by the width of the fabric H to make a final strip 372" long. Start sewing the binding strip in the middle of one of the sides of the quilt, placing the strip right side down and leaving an approximated 5" tail. Sew with ¼" seam allowance (using straight stitch), aligning the strip’s raw edge with the quilt top’s raw edge.
Stop stitching ¼" before the edge of the quilt . Clip the threads. Remove the quilt
from under the machine presser foot. Fold the strip in a motion of 45° and upward, pressing with your fingers . Hold this fold with your fin-ger, bring the strip down in line with the next edge, making a horizontal fold that aligns with the top edge of the quilt . Start sewing at ¼" of the border, stitching all the layers. Do the same in the four corners of the quilt.
Stop stitching before you reach the last 5 or 6 inches. Cut the threads and remove the quilt from under the machine presser foot. Lay the loose ends of the binding flat along the quilt edge, folding the ends back on themselves where they meet. Press them together to form a crease. Using this crease as the stitching line, sew the two open ends of the binding with right sides together (you can help yourself marking with a pencil if the crease is difficult to see).
Trim seam to ¼" and press open. Complete the sewing. Turn binding to back of the quilt, turn raw edge inside and stitch by hand using blind stitch.
45
Stop stitching here
fold