features - betonquest.plbetonquest.pl/betonquestdocumentation.pdf · last but not least, ... can be...
TRANSCRIPT

Documentation for 1.9 version
BetonQuest is advanced and powerful quests plugin. It offers RPG-style conversations with NPCs and a very flexiblequest system. Instead of being limited to creating "quest" objects with taking requirements and rewards uponcompletion, BetonQuest allows you to freely define what should happen (events), if it should happen (conditions)and what needs to be done for it to happen (objectives). Your quests don't have to look like "kill, bring, get reward":you can create multi-threaded stories, narrated with NPC conversations, with multiple endings affecting the player'sgameplay in many ways.
FeaturesMinecraft 1.9, 1.10 and 1.11 supportMultiple choice conversations with NPCs using an inventory GUIPowerful event system: anything you want can happen anywhere in a questEven more powerful condition system: you can limit whenever something should (or shouldn't) happenJournal in a bookBackpack for quest itemsAdvanced item handling which considers even text in booksParty system allowing for creation of group questsAbility to create various reputation systems (points)Firing events for a players when they enter specified area (global locations)Daily quests or repeatable reward collection ( delay objective)Variables in conversations - let the NPC tell how much more wood he needs!Quests can be organized into distributable packagesCitizens2 NPC supportIntegrated with Citizens, Denizen, EffectLib, Heroes, HolographicDisplays, LegendQuest, Magic, McMMO,MythicMobs, PlaceholderAPI, PlayerPoints, Quests, RacesAndClasses, Shopkeepers, SkillAPI, Skript, Vault,WorldEdit and WorldGuardMultiple languages and easy translatingAPI for creating your own events, conditions and objectivesSQLite and MySQL supportLast but not least, an active, open source project with development builds available
OverviewImagine you have a conversation with an NPC. You can choose from multiple options, and the NPC will reactdifferently, for example he will tell you to cut some trees when asked for a job. If you tell him that you accept his
offer, an event will be fired. It will start an objective for getting wood. It will also "tag" you as someone who startedthe quest. From now on the NPC will check for that tag, and use different options in the conversation, for exampletelling you to hurry up.
When you complete the objective (by breaking wood blocks), the objective will fire another event. This one will "tag"you as someone who collected the wood. When you go back to the NPC and tell him about it, he will check (using acondition) if you actually have the wood in your inventory. If so, he will fire another event, giving you the reward.
There was no single "quest" object. This was only a conversation, which was firing events and checking conditions.The objective also wasn't a "quest" - it only added a tag when you collected the wood, nothing more. It could notexist on it's own. The same conversation on the other hand could start some other quests afterwards (for examplemining some ore), so it's also not a "quest".
Don't be disappointed by my examples of getting wood and mining ore. These were only simplifications, so it'seasier to explain the system. BetonQuest is capable of much more. You can add entries to player's journal based onthe quests he's doing like in Morrowind, the conversations can be as multi-threaded as in Baldur's Gate and questscan be started by entering specific location like in Skyrim. You can create reputation systems, unique quest items,books that react to reading them and so on. Your quests can have multiple ways to different endings depending onplayers' decisions and they can require multiple players to do something.
You don't have to use BetonQuest for quests only. Conversations with NPCs can help your players, teleports themaround the map, describe server features, buy or sell stuff, give ranks etc. The only limit is your imagination!

Installation and ConfigurationInstallationFirst of all you should install Citizens plugin. You can find it on it's dev.bukkit.org page. It's not required, you can useNPCs made from clay blocks, but that would be less immersive. Download the BetonQuest plugin, place .jar file inyour plugins folder and start the server. BetonQuest generated configuration files. If you want to use MySQL for datastorage then open config.yml and fill your database informations. If not, just leave these fields blank, the plugin willuse SQLite instead. If you don't want to use autoupdater disable it in configuration before restarting the server orreloading the plugin. When you're finished you can reload the plugin (/q reload). Now tweak the configuration to yourliking and move on to Quick start tutorial chapter. You don't have to read about commands and permissions just yet,you should undestand how the plugin works first.
ConfigurationThe configuration of BetonQuest is done mainly in config.yml file. All options are described here. If you don't knowabout some aspect of BetonQuest you can skip the explanation here. It will be repeated later, in the description of aspecific feature.
Do not touch "version" option! It may corrupt your files!
First is connection data for MySQL database. Fill it to use MySQL, leave it blank (or incorrect) to use SQLite.Language is just translation of the plugin. Currently there are 7 available languages, English (en), Polish (pl),German (de), French (fr), Spanish (es), Chinese (cn) and Dutch (nl).update section controls the updater. It has the following settings:
enable option is set to true by default and it controls if the plugin should do anything update-related.download_bugfixes controls if BetonQuest should automatically update bugfix versions (like 1.7.3 -> 1.7.4
or 1.8.1 -> 1.8.3).These versions do not change how the plugin works, they only fix bugs, so it's good to set it to true .notify_new_release option is responsible for displaying a notification at startup about new releases (like
1.7.6 -> 1.8).These can change how the plugin works by introducing new features and changing existing ones, so theywon't be downloaded automatically. You can use /q update when you're ready.If you're using a development version, there will be a third setting here, notify_dev_build .This is the same as notify_new_release but it checks the development builds instead. There are nospecific version checking here, so if the found dev number is higher, it will appear. You downloaddevelopment builds on your own responsibility.
default_journal_slot is a number of slot where the journal will appear after using /journal command.max_npc_distance is a distance you need to walk away from the NPC for the conversation to end (in case of
using chat-based conversation interface).default_conversation_IO is a conversation interface. simple is a conversation in chat, tellraw is an
extension to provide clickable options and chest is a conversation in inventory window. Other plugins can addadditional IO types.display_chat_after_conversation this will prevent all chat messages from displaying during a conversation
and it will show them once it's finished.combat_delay is a delay (in seconds) the player must wait before he can start the conversation after combat.notify_pullback will display a message every time the player is pulled back by the stop option in
conversations (in case of chat-based conversations). It notifies players that they are in a conversation and thepullback is not some kind of a bug.default_package is a name of the package that should be used when you don't specify package in /q
command. It's for your convenience.remove_items_after_respawn option should be turned on if you don't use "keepInventory" gamerule. It
prevents other plugins from duplicating quest items after death.When the player dies, his quest items are removed from drops and stored in the backpack, but some plugins may
try to restore all items to the player (for example WorldGuard custom flag keep-inventory). That's why BetonQuestremoves the quest items that are in player's inventory after he respawns again, to be sure they were not readded.The "keepInventory" gamerule however works differently - the items are never dropped, so they cannot be addedto backpack. Removing them from the inventory would destroy them forever. Sadly, Bukkit does not allow forgamerule checking, so it's up to you to decide. Once again: if you have "keepInventory" gamerule true, thissetting has to be false, and vice versa.quest_items_unbreakable controlls whenever quest items can be broken by usage. It was used in the past,
when unbreakable tag couldn't be added to items. You can now turn it off and make your quest itemsunbreakable by vanilla means.Sounds define what sounds will be played on these occasions:
start and end refer to starting/ending conversationsjournal is just updating journalupdate is played when there's a changelog file, to draw your attentionfull can be played when the player uses /j command but his inventory is full.
List of all possible sounds can be found here.cmd_blacklist is a list of commands that can't be used while in conversation. Remember that you can type
here only single words (command names)!hook controls compatibility with other plugins. Here you can turn off each hook.journal controls various settings of the journal:
chars_per_page is a number of characters before a page break. If you set it too high, the text on a journalpage can overflow, becoming invisible.one_entry_per_page will make each entry take a single page. Note that it won't expand to other pages even
if it overflows, so keep your entries short.reversed_order controls the chronological order of entries in the journal. By default the entries are ordered
from newest to oldest. You can reverse it, but it will force players to click through a lot of pages to get to thelatest entry.hide_date hides the date of each entry. Set it to true if you don't want this functionality.full_main_page makes the main page take always a full page. If you display a lot of information you should
probably make this true. If you use main page only for small notifications, set it to false, so the entries canfollow immediately.
journal_colors controls the colors used in the journal. It takes color codes without the & character.date.day is a day numberdate.hour is a hour numberline is a delimiter between entriestext is the text of the entry
conversation_colors controls the colors of the conversation. It takes color names. If you want to add a fontstyle (bold, italic etc.) you can add it after a comma.
npc is the name of the NPCplayer is the name of the playertext is the NPC's textanswer is the text of player's answer (after choosing it)number is the option numberoption is the text of an option
date_format is the Java date format used in journal dates. It needs to have a space between the day and hour.effectlib_npc_effect is just a configuration of the NPC effect for EffectLib plugin. It affects the particles
around BetonQuest/Citizens NPC only if you have it installed.debug is responsible for logging plugin's activity to debug.log file in logs directory. You shouldn't turn this on as
it can slow your server down. However if you experience any errors turn this on, let the plugin gather the data andsend logs to the developer. Note that first run of the plugin will be logged anyway, just as a precaution.
UpdatingThe updating process is safe and easy. After updating to a new version (manually or automatically) configuration

files and database will be automatically backed up to a zip file so you never lose all your work due to an error. Thenconfiguration will be converted to a new version. At the end the localization will be updated with new languages andthe changelog.txt file will be created for you.
When you enter the server BetonQuest will alert you about changes and ask you to read changelog.txt file located inplugin's main directory. This way you will be always up to date with every changes made by new versions.
All next versions of BetonQuest should have full compatibility with your current version of the plugin and server. Thismeans that after updating the plugin should work exactly the same way as it did before (except for bugs). Thechanges will be visible only in configuration format or new features. (For example in 1.5 inverting conditions wasdone by adding --inverted argument to the instruction. It was changed to the current format (with exclamationmarks before the condition name) in 1.6 version. The plugin had updated the configuration files automaticly whenswitching to the new version, the only problem the user had was getting used to the new (better) way of negatingconditions).
If there were any unexpected errors during an update process just download previous version, restore your configsfrom backup and disable autoupdating feature. Don't forget to post your error so I can fix it!
BackupsEvery time the plugin updates the configuration there is a backup created. This is especially important if you usedevelopment versions, as they may be unstable. You can also create a backup manually by running /q backupcommand. It needs to be run from console on empty server, because it heavily uses the database.
You can find your backups in backup directory in plugin's folder. They are .zip files containing all your configurationand database-backup.yml file, which - as the name says - is your database backup. If you want to replace yourconfiguration with an older backup just delete all the files (except backups and logs) and replace them with the filesfrom .zip file.
If you want your database loaded you should also place database-backup.yml file in plugin's directory. When theplugin sees this file while enabling, it will backup the current database and load all data from that file to thedatabase. You can find a backup of old database in backups folder, so if you ever need to load it back, just rename itto database-backup.yml and place it back in main plugin's directory. Note that database-backup.yml file will be deletedafter loading, so it doesn't replace your database on next plugin start.
Migrating database from SQLite to MySQL and backFollow these few simple steps to migrate your database easily:
1. Create a backup with /q backup command.2. Extract database backup from it.3. Turn your server off.4. Place the database-backup.yml file inside plugin's directory.5. Edit in configuration which database type you want to use (correct credentials for MySQL, incorrect or empty for
SQLite).6. Start the server.7. Check for errors.8. If there are no errors, enjoy your migrated database.9. If there are any errors, post them to the developer or try to fix them if you know how.
Commands and permissionsCommands
/j - gives the journal/backpack - opens the backpack/q - lists all available admin commands/q reload - reloads the plugin/q objectives {playerName} [list/add/del/complete] [instruction] - shows player's currently active objectives/q tags {playerName} [list/add/del] [tag] - lists all player's tags/q points {playerName} [list/add/del] [category] [amount] - lists all player's points in all categories/q journal {playerName} [list/add/del] [package.pointer] [date] - lists/q event {playerName} {package.eventID} - fires an event for the player/q condition {playerName} {package.conditionID} - shows if the player meet specified condition or not/q item {package.itemID} - creates an item based on what you're holding in hand/q give {package.itemID} - gives you an item defined in the configuration/q config {set/add/read} {path} [value] - sets, adds or reads values from configuration/q purge {playerName} - deletes all player's data from the database/q rename {tag/point/objective/entry} {oldName} {newName} - renames all specified things in the database/q delete {tag/point/objective/entry} {name} - deletes all specified things in the database/q backup - creates a backup of configuration files and database/q update - updates the plugin to the newest release available. If you want to update to a development versioninstead, add --dev argument at the end of the command./q create {package}: creates new package with given name, filled with default quest/q vector {packname.variable} {newvariable}: calculates the vector from first location variable to you position andsaves it as second variable/questlang {lang} - changes the language for the player (and globally if used from console). default languagewill use the language defined in config.yml.
Aliases/j: bj, journal, bjournal, betonjournal, betonquestjournal/backpack: b, bb, bbackpack, betonbackpack, betonquestbackpack/q: bq, bquest, bquests, betonquest, betonquests, quest, quests
objective: o, objectivestag: t, tagspoint: p, pointsevent: e, eventscondition: c, conditionsjournal: j, journalsitem: i, itemsgive: grename: rdelete: d, delcreate: package
/questlang: ql
Permissionsbetonquest.admin - allows using admin commands (/q ...) and creating an NPC from blocksbetonquest.journal - allows using /j command (default for players)betonquest.backpack - allows using /backpack command (default for players)betonquest.conversation - allows talking with NPCs (default for players)betonquest.language - allows changing the language (default for players)

Don't give betonquest.admin permission to people you don't fully trust. They can use /q config command to add acommand event, and this way execute any command as the console. This might be dangerous.
Main command detailsReloading loads all data from configuration, but not everything is updated. Player's data isn't touched to avoid lagsmade by database saving. The database is also the same, you will have to reload/restart the whole server for thedatabase to change.
Tags subcommand allows you to easily list and modify tags. ' /q tags Beton ' would list tags for player Beton.' /q tags Beton add test ' would add "test" tag for that player, and ' /q tags Beton del test ' would remove it.
Points subcommand is similar - listing points is done the same way. Adding points to a category looks like that:' /q points Beton add reputation 20 ' (adding 20 points to "reputation" category). You can also subtract pointswith negative amounts. Removing the whole point category can be achieved by' /q points Beton del reputation '.
Journal subcommand works in the same way as those two above. Adding and removing looks like/q journal Beton add default.wood_started (or del ), and you can also specify the date of entry when adding
it, by appending date written like this: 23.04.2014_16:52 at the end of the command. Note that there is _character instead of space!
Objective subcommand allows you to list all active objectives (shown as their labels) of the player. It can alsodirectly add or cancel objectives using instruction strings. You can also complete the objective for the player usingcomplete argument - it will run all events and remove the objective.
Running events for online players can be done with event argument: ' /q event Beton give_emeralds ' would run"give_emeralds" for player Beton (if he's online) from default package (not necessarily "default" but rather the defaultone specified in config.yml). If you want to run a static event, replace player's name with - .
There is also condition argument for checking conditions, for example ' /q condition Beton has_food '. Eventsand conditions need to be defined in their files, this command doesn't accept raw instructions. You can skippackage name, the plugin will assume you're reffering to package specified in default_package option inconfig.yml file.
If you need to create for example "Nettlebane" quest item, just hold it in your hand and type ' /q item nettlebane '.It will copy the item you're holding into the items.yml file and save it there with the name you specified (in this case"nettlebane"). You can skip the package name here as well.
The ' /q give package.item ' command will simply give you specified item.
Config subcommand is used to modify or display values in configuration files. set option replaces the value withwhat you typed, add simply adds your string to the existing value. (Note on spaces: by default the plugin won'tinsert a space between existing and added value. You can however achieve that by prefixing the string with _character. For example: existing string is objective location , and you want to add 100;200;300;world;10 .Your command will look like /q config add default.events.loc_obj _100;200;300;world;10 ). read optionallows you to display config value without modifying it.
Path in this command is like an address of the value. Next branches are separated by dots. For example languagesetting in main configuration has path config.language , and a text in "bye" player option in default quest has pathdefault.conversations.innkeeper.player_options.bye.text
You can purge specific player with ' /q purge Beton ' command, where Beton is the name of the player. To purgethe entire database at once simply change the prefix in config.yml or delete database.db file.
Delete command (' /q delete ') allows you to delete from the database every tag, point, objective or journal entrywith specified name.

Rename command (' /q rename ') allows you to rename every tag, point, objective or journal entry in the database. Incase of an objective it will also rename the objective in objectives.yml, so it continues to work correctly.
If you want to backup your configuration and database make sure that your server is empty (this process requires alldata to be saved to database -> all players offline) and run ' /q backup ' command. You will get a zip file containingall your data, ready to be unzipped for restoring the plugin.
Update command (' /q update ') will try to download the newest version of the plugin and save it to the updatefolder. This folder is then handled by Spigot to update the plugin. If you accidentally use this command but do notwish to update the plugin, you should remove BetonQuest.jar file from the plugins/update folder beforerestarting/reloading the server.
Using ' /q create beton ' command you will create new package named ' beton '. It will contain the default quest.
The /q vector command allows you to create vector variables from the specified in first argument locationvariable to your position. The result will be saved to the "vectors.{second argument}" variable.

Quick start tutorialThe first thing you probably want to after installing the plugin is to check out how it's working. If you want to useinventory GUI open config.yml and change default_conversation_IO to chest , save the file and issue /q reloadcommand on the server.
Now log in and place somewhere in the world a block of stained clay. On top of it put a head (can be a Creeper'shead), and on the side of the clay block place a sign. Write this on first and second line:
[NPC]Innkeeper
Done. Now right-click on the NPC's head. The conversation should start. If it did not, check if you correctly built theNPC. Ask the Innkeeper for some quests. He will tell you to cut some trees. If you want, type /journal to get thejournal and see a new entry. Now, don't try to place any wood blocks. BetonQuest will detect that and increase thenumber of blocks to destroy. Just go and find some trees. Cut them down and if you're in creative mode, giveyourself 16 blocks of wood. Now you can return to Innkeeper and give him the wood. You will receive the reward.
Using events and conditionsNow that you know how a (very) simple quest looks like time to start learning how to write something similar. Let'sstart with events. We won't do conversations just now, since they heavily use events and conditions, so you need toknow them first. You can read complete reference to events in the Reference chapter. Do that now or just continuewith this tutorial.
Events
Let's just open events.yml file inside the default package. At the end add a new line:
foo: message Hello world!
This is an event instruction. BetonQuest will use it to determine what type of event it is and what exactly should itdo. foo is the name, message is the type and Hello world! tells the message type what it needs to display. Inthis case, if you run foo event, it will display to you Hello world! message. Now save the file, issue /q reloadcommand and run the event with /q e {name} foo command ( q is shortcut for quest , e is shortcut for event ,{name} is your Minecraft name without the brackets and foo is the name of the event we've just created). It
should show you white Hello world! message in the chat.
Let's create another event, more complicated one. teleport seems complicated enough. As you can read in theEvents list, it needs a single argument, the location. Press F3 and check out your current location (it's shown on theleft, three numbers, x , y and z ). Now add in events.yml another line:
bar: teleport 100;200;300;world
and replace 100 with your x coordinate, 200 with y and 300 with z . world needs to be replaced with yourcurrent world's name. Save the file, reload the plugin and run this event with a command described before. It shouldteleport you to the location you have specified.
Congratulations, you have just created your first events. Go ahead and do some experiments with other event types.You can find them in Events list chapter. Once you're done let's start learning conditions.
Conditions
Open the conditions.yml file and add there a new line:
foo: location 100;200;300;world;5

Can you see how we named the foo condition in the same way as the foo event? They are not connected in anyway. Condition names and event names are separated, so you can give them the same name without any problems.Now let's look at the instruction string. As you can suspect, location is a type of the condition. This one meansthat we'll be checking if the player is near that location (you should change the location to the place where you'restanding right now, so you don't have to run around the world). Note that at the end of location argument there is anadditional number, 5 . This is the maximum distance you can be away from the location to meet the condition.Alright, save the file and reload the plugin.
Now walk to the location you have defined in the condition. Try to stand on the exact block corresponding to thatlocation. Issue /q c {name} foo command ( c is shortcut for condition ). It should show you "checking conditionblah blah blah: true". We're focusing on that last word, true. This means that you're meeting the condition: you'restanding withing 5 block radius of the location. Now move 2 blocks away and issue that command again. Youshould still be meeting the condition. Walk 4 more blocks away and try now. It should show false. You are nowoutside of that 5 block radius. Get it? Great.
Now I'll show you the simplest use of those conditions. Open the events.yml file again, and at the end of fooinstruction add conditions:foo argument. By the way, rename foo event to baz , so the names won't getconfusing. Now you should have something like
baz: message Hello world! conditions:foo
Now baz event will run only if it meets foo condition. Reload the plugin, walk outside of the 5 block radius and tryto run baz event. Puff, nothing happens. It's because you're not meeting foo condition. Walk into the radius againand try to run that event now. It should happily display the Hello world! message.
It's very nice that we can add such conditions, but the problem is: what if you wanted to display the message only ifthe player is outside the radius? Don't worry, you don't have to specify inverted_location condition or anythinglike that. You can simply negate the condition. Negation makes the condition behave in the exact opposite way, inthis case it foo will be met only if the player is outside of the 5 block radius, and it won't be met if he's inside. Openthe events.yml and add an exclamation mark before the foo condition, so it looks like
baz: message Hello world! conditions:!foo
This means "display message Hello world! if the foo condition is not met". Save the file, reload the plugin andrun the event inside and outside of the radius to see how it works.
Basic tagsNow that you know how to use events and conditions I'll show you what tags are. Create new events:
add_beton_tag: tag add betondel_beton_tag: tag del beton
It's a good practice to give your events names that describe what they are doing. Imagine you have 100 events,foo24 , bar65 , baz12 etc. You would get lost pretty quickly. So, add_beton_tag event here simply adds beton
tag to the player, del_beton_tag removes it. Save the file, reload the plugin and run this event. Nothing happens...or does it? Issue /q t {name} command ( t is shortcut for tags ). It should show you a list with few entries. Rightnow focus on default.beton , the rest are used by the default quest for Innkeeper. Alright, default is the nameof the package in which the tag is, and beton is the name of the tag, as defined in add_beton_tag event. Now rundel_beton_tag event. Guess what, default.beton disappeared from the list! And that's it, you know how to add
and remove tags. Pretty useless.
Nothing could be more wrong. Tags are one the most powerful things in BetonQuest. They just need to be used withtag condition. Open conditions.yml and add
has_beton_tag: tag beton

line. As you can imagine, tag is the type of a condition (the same as tag event, but these are not the same things- one is an event, the other one is a condition) and beton is the name of the tag. You don't have to specifydefault.beton , but you can if you want. Now save, reload and check it with a command. It should show false,
since you have removed the tag with del_beton_tag event. Add it again with add_beton_tag event and check thehas_beton_tag condition again. Now it will show true.
Now you probably understand how powerful this system is. You could for example set a tag on the first time theplayer talks with an NPC, and if the NPC sees that tag next time they talk, he will tell something different, like"welcome back".
Creating objectivesTime to write some objectives! Open the objectives.yml file and add a new line:
kill_creepers: mobkill creeper 3 events:bar conditions:has_beton_tag
Now let's analyze it. kill_creepers is a name of the objective. mobkill is a type. In this case, to complete theobjective the player will have to kill some mobs. creeper is a type of the mob, so we know that these mobs willhave to be Creepers. 3 is the amount. It means that the player has to kill 3 Creepers. events:bar means thanonce the player kills those Creepers, the bar event will be run (it's the teleportation event).conditions:has_beton_tag tells us that the player will have to have beton tag while killing Creepers to complete
the objective. Save it, reload the plugin and issue /q o {name} add kill_creepers command ( o is for objective ,add tells the plugin to add an objective).
Now you can check if you actually have this objective with /q o {name} command, it will show you all your activeobjectives. It should show default.kill_creepers . Alright, remove (yes, remove!) the beton tag from you andfind some Creepers to kill. Once you killes 3 of them you will notice that nothing happened. It's becausehas_beton_tag condtion is not met, so the objective does not count your progress. Now add the tag again and kill
another Creepers. When the third is dead you should be teleported to the location defined in bar event.
Congratulations, now you know how to use objectives. You should experiment with other types now, sinceobjectives will be used very often in your quests. Once you're done check out the Writing your first conversationchapter to use your knowledge to write your fisrt conversation.
Writing your first conversationNow that you have seen BetonQuest in action and understood events, conditions and objectives, it's time for writingyour first conversation. There's a conversations directory inside the default package. It contains a single file,innkeeper.yml. This is the conversation with Innkeeper, the one who asks you to cut some trees. Open it, we'll usethat for reference. Now create a new file, let's say miner.yml. Now type (don't copy-paste it, you'll learn better whiletyping) that into the file:
quester: Minerfirst: greetingNPC_options: greeting: text: Hi there, traveler!
It's the most basic conversation possible. The NPC named Miner upon starting the conversation will usegreeting option, which means he will say Hi there, traveler! . Then the conversation will end, because there
are no player options defined.
Now you need to link the conversation with an NPC. You do that in the main.yml file. Open it now. As you can see,inkeeper.yml conversation is linked to Innkeeper word. It's the one you have put on the sign, remember? Now, addanother line under the Innkeeper: Miner: miner.yml , save the file and reload the server. This will link our newconversation with the NPC named "Miner". Construct a new NPC on the server, give him a sign with "Miner" name

and click on the head.
Guess what, the conversation finished right after it started. The Miner just said Hi there, traveler! , asexpected. Now go to the conversation file and edit it (again, manually, no copy-paste!) so the options look like this:
NPC_options: greeting: text: Hi there, traveler! pointers: hello, byeplayer_options: hello: text: Hello! bye: text: I need to go, sorry.
When you save the file, reload the plugin and start the conversation again you will notice that there are two optionsfor you to choose: Hello! and I need to go, sorry. Choosing any of them will end the conversation, becausethese options did not specify any pointers.
Now add a new NPC option, for example weather with text Nice weather. and make hello player option pointto it. When you save&reload, the Miner should say Nice weather. when you tell him Hello! . I think you get howit works.
NPC_options: greeting: text: Hi there, traveler! pointers: hello, bye weather: text: Nice weather.player_options: hello: text: Hello! pointer: weather bye: text: I need to go, sorry.
Now, every time you talk to the Miner, he will say the same thing. It would be nice if the second time you talk to himhe knew your name. We can do that with tags. Define a meet_miner event and has_met_miner condition. Whenyou talk to the Miner for the first time, he will check if you have met him. If not, he will meet you (with that event) andnext time you talk, the condition will be passed and he will use your name.
Now, rename greeting NPC option to first_greeting . Add meet_miner event and negated has_met_minercondition (negated because this option should only show if the player has not met the Miner yet). You will need tosurround the condition with '' , because strings cannot start with exclamation marks in YAML. It should look likethis:
first: first_greetingNPC_options: first_greeting: text: Hi there, traveler! condition: '!has_met_miner' event: meet_miner pointers: hello, bye

This means: first_greeting should be used if the player does not pass has_met_miner condition (meaning hedoesn't have a tag because he haven't talked to the NPC yet). When this option is used, it will fire meet_miner eventand display hello and bye options. Alright, but what happens if the player met the Miner and now negatedhas_met_miner condition doesn't work? NPC will try to use next option defined in first setting. There is none
yet, so let's add it.
first: first_greeting, regular_greetingNPC_options: regular_greeting: text: Hi %player%! pointers: hello, bye
This option does not have any conditions, so if the first_greeting fails, the NPC will always choose this one.Now take a look at the %player% thing. It's a variable. In this place it will show your name. There are more than thisone, they are described in Reference chapter. Alright, save&reload and start the conversation. If you did everythingcorrectly, the Miner should greet you as a "traveler", and the second time you talk to him, he should greet you withyour Minecraft name.
Here's the whole conversation you created, so you can check if you understood everything correctly:
first: first_greeting, regular_greeting NPC_options: first_greeting: text: Hi there, traveler! condition: '!has_met_miner' event: meet_miner pointers: hello, bye regular_greeting: text: Hi %player%! pointers: hello, bye weather: text: Nice weather. player_options: hello: text: Hello! pointer: weather bye: text: I need to go, sorry.
Now you should experiment some more with this conversation, you can help yourself by looking at the innkeeper.ymlfile. Try to understand how that conversation works step by step. As the excercise you should complete the MinerNPC, so he asks you to mine some iron ore, then smelt it in the furnace, next craft an armor with it and return to himwearing this armor.
You might want to check out the Reference chapter to see how to handle items in your quests and how to addentries to the journal. If you want to use Citizens NPCs instead of the ones made with clay you will find informationyou need in that chapter too. To find out more about events, conditions, objectives and variables, take a look at theappropriate lists (after the Reference chapter).
ReferenceThis chapter describes all aspects of BetonQuest in one place. You should read it at least once to know what you'redealing with and where to search for information if you ever have any problems.
ConversationsEach conversation must define name of the NPC (some conversations can be not bound to any NPC, so it’simportant to specify it even though an NPC will have a name) and his initial options.
quester: Namefirst: option1, option2stop: 'true'final_events: event1, event2NPC_options: option1: text: Some text in default language events: event3, event4 conditions: condition1, !condition2 pointers: reply1, reply2 option2: text: '&3This ends the conversation'player_options: reply1: text: en: Text in English pl: Tekst po polsku event: event5 condition: '!condition3' pointer: option2 reply2: text: 'Text containing '' character'
Note 1: Configuration files use YAML syntax. Google it if you don't know anything about it. Main rule is that you must usetwo spaces instead of tabs when going deeper into the hierarchy tree. If you want to write ' character, you must double itand surround the whole text with another ' characters. When writing true or false it also needs to be surroundedwith ' . If you want to start the line with & character, the whole line needs to be surrounded with ' . You can check if thefile is correct using this tool.
quester is name of NPC. It should be the same as name of NPC this conversation is assigned to for greaterimmersion, but it's your call.first are pointers to options the NPC will use at the beginning of the conversation. He will choose the first one
that meets all conditions. You define these options in npc_options branch.final_events are events that will fire on conversation end, no matter how it ends (so you can create e.g.
guards attacking the player if he tries to run). You can leave this option out if you don't need any final events.stop determines if player can move away from an NPC while in this conversation (false) or if he's stopped every
time he tries to (true). If enabled, it will also suspend the conversation when the player quits, and resume it afterhe joins back in. This way he will have to finish his conversation no matter what. It needs to be in '' ! You canmodify the distance at which the conversation is ended / player is moved back with max_npc_distance optionin the config.yml.NPC_options is a branch with texts said by the NPC.player_options is a branch with options the player can choose.text defines what will display on screen. If you don't want to set any events/conditions/pointers to the option,
just skip them. Only text is always required.conditions are names of conditions which must be met for this option to display, separated by commas.events is a list of events that will fire when an option is chosen (either by NPC or a player), defined similarly to
conditions.pointer is list of pointers to the opposite branch (from NPC branch it will point to options player can choose
from when answering, and from player branch it will point to different NPC reactions).
When an NPC wants to say something he will check conditions for the first option (in this case option1 ). If they aremet, he will choose it. Otherwise, he will skip to next option (note: conversation ends when there are no options leftto choose). After choosing an option NPC will say it, the events will fire and then the player will see options definedin player_options branch to which pointers setting points, in this case reply1 and reply2 . If the conditionsfor the player option are not met, the option is simply not displayed, similar to texts from NPC. Player will chooseoption he wants, and it will point back to other NPC text, which points to next player options and so on.
If there are no possible options for player or NPC (either from not meeting any conditions or being not defined) theconversations ends. If the conversation ends unexpectedly, check the console - it could be an error in theconfiguration.
This can and will be a little confusing, so you should name your options, conditions and events in a way which youwill understand in the future. Don't worry though, if you make some mistake in configuration, the plugin will tell youthis in console when testing a conversation. Also, study the default conversation included with the plugin to fullyunderstand how powerful this system can be.
Cross-conversation pointers
If you want to create a conversation with multiple NPCs at once or split a huge conversation into smaller, morefocused files, you can point to NPC options in other conversation. Just type the pointer asconversation.npc_option .
Keep in mind that you can only cross-point to NPC options. It means that you can use those pointers only in firststarting options and in all player options. Using them in NPC options will throw errors.
Conversation variables
You can use variables in the conversations. They will be resolved and displayed to the player when he starts aconversation. A variable generally looks like that: %type.optional.arguments% . Type is a mandatory argument, itdefines what kind of variable it is. Optional arguments depend on the type of the variable, i.e. %npc% does not haveany additional arguments, but %player% can also have display (it will look like that: %player.display% ). Youcan find a list of all available variable types in the "Variables List" chapter.
If you use a variable incorrectly (for example trying to get a property of an objective which isn't active for the player,or using %npc% in message event), the variable will be replaced with empty string ("").
Translations
As you can see in default conversation, there are additional messages in other languages. That's because you cantranslate your conversations into multiple languages. The players will be albe to choose their preferred one with/questlang command. You can translate every NPC/player option and quester's name. You do this like this:
quester: en: Innkeeper pl: Karczmarz de: Gastwirt
As said before, the same rule applies to all options and quester's name. The player can choose only from languagespresent in messages.yml, and if there will be no translation to this language in the conversation, the plugin will fall

back to the default language, as defined in config.yml. If that one is not defined, there will be an error.
You can also translate journal entries, quest cancelers and message events, more about that later.
Conversation displaying
By default BetonQuest uses the most native and safe way of displaying a conversation, which is the Minecraft chat.You choose the option by typing their number in. You can however change it with default_conversation_IOoption in config.yml file. Default value is simple . By changing it to tellraw you will add a possibility to click onoptions. Keep in mind that if the chat is quickly flowing, players will sometimes "miss" an option and click anotherone. There is a display type that doesn't suffer from this problem at all, it's called chest . It will display theconversation in an inventory GUI, where the NPC's text and options will be shown as item lore.
You can control the colors of conversation elements in the config.yml file, in conversation_colors section. Hereyou must use names of the colors.
If you're using the chest display method you can change the option's item to something else than Ender Pearl byadding a prefix to that option's text. The prefix is a name of the material (like in items.yml) inside curly brackets, withoptional damage value after a colon. Example of such option text: {diamond_sword}I want to start a quest!or {wool:10}Purple!
Conditions, events and objectives are defined with an "instruction string". It's a piece of text, formatted in a specificway, containing the instruction for the condition/event/objective. Thanks to this string they know what should theydo. To define the instruction string you will need a reference, few pages below. It describes how something behavesand how it should be created. All instruction strings are defined in appropriate files, for example all conditions are inconditions.yml config. The syntax used to define them looks like this:name: 'the instruction string containing the data' . Apostrophes are optional in most cases, you can find
out when to use them by looking up "YAML syntax" in Google.
ConditionsConditions are the most versatile and useful tools in creating advanced quests. They allow you to control whatoptions are available to player in conversations, how the NPC responds or if the objective will be completed. Thereference of all possible conditions is down below.
You can negate the condition (revert its output) by adding an exclamation mark ( ! ) at the beginning of it's name (inthe place you use it, i.e. in conversations, not in the conditions.yml file).
You can use conversation variables instead of numeric arguments in conditions. If the variable fails to resolve (i.e. itwill return an empty string) BetonQuest will use 0 instead.
EventsIn certain moments you will want something to happen. Updating the journal, setting tags, giving rewards, all theseare done using events. You define them just like conditions, by specifying a name and instruction string. You canfind instruction strings to all events in the event reference. At the end of the instruction string you can addconditions: or condition: (with or without s at the end) attribute followed by a list of condition names
separated by commas, like conditions:angry,!quest_started . This will make an event fire only when theseconditions are met.
You can use conversation variables instead of numeric arguments in events. If the variable fails to resolve (i.e. it willreturn an empty string) BetonQuest will use 0 instead.
ObjectivesObjectives are the main things you will use when creating complex quests. You start them with a special event,

objective . You define them in the objectives.yml file, just as you would conditions or events. At the end of theinstruction string you can add conditions and events for the objective. Conditions will limit when the objective canbe completed (e.g. killing zombies only at given location in quest for defending city gates), and events will fire whenthe objective is completed (e.g. giving a reward, or setting a tag which will enable collecting a reward from an NPC).You define these like that: conditions:con1,con2 events:event1,event2 at the end of instruction string .Separate them by commas and never use spaces! You can also use singular forms of these arguments:condition: and event: .
If you want to start an objective right after it was completed (for example die objective: when you die, teleport youto a special spawnpoint and start die objective again), you can add persistent argument at the end of aninstruction string. It will prevent the objective from being completed, although it will run all its events. To cancelsuch objective you will need to use objective delete event.
Objectives are loaded at start-up, but they do not consume resources without player actually having them active.This means that if you have 100 objectives defined, and 20 players doing one objective, 20 another players doingsecond objective, and the rest objectives are inactive (no one does them), then only 2 objectives will be consumingyour server resources, not 100, not 40.
PackagesAll the content you create is organized into packages. Each package must contain the main.yml file with package-specific settings. Additionally it can have conversations directory with conversation files, events.yml, conditions.yml,objectives.yml, items.yml and journal.yml. The default package is called simply "default". It is always present, and ifyou delete it, it will be regenerated with a sample quest.
If you want, you can simply ignore the existence of packages and write all your quests in the default one. You willhowever come to a point, when your files contain hundreds of lines and it gets a little bit confusing. That's why it'sbetter to split your quests into multiple packages, for example "main" for the quests in the main city, "dungeon" forsome interesting dungeon story etc.
Each package can be disabled/enabled in the main.yml file, by setting enabled to true or false .
It would be limiting if you couldn't interact between packages. That's why you can always access stuff from otherpackages by prefixing its name with package name. If you're writing a conversation in package village and youwant to fire an event reward from package beton , you simply name the event as beton.reward . The plugin willsearch for reward in beton package instead of the one in which the conversation is defined. All events,conditions, objectives, items and conversations behave this way. Note that you can't cross-reference journal entries!
Packages can be nested together in folders. A folder can either contain packages or be a package, never both. Thename of such nested package is prefixed by names of all folders, separated with a dash. This directory tree(main.yml represents a package):
BetonQuest/ ├─default/ └─quests/ ├─village1/ │ ├─quest1/ │ │ └─main.yml │ └─quest2/ │ └─main.yml └─village2/ └─quest1/ └─main.yml
contains these packages:

defaultquests-village1-quest1quests-village1-quest2quests-village2-quest1
Relative paths
You don't have to always specify a full package name. In the example above, if you wanted to reference packagequests-village1-quest2 from quests-village1-quest1 , you could write it as _-quest2 - this means "from
the current package ( quest1 ) go up one time and find there package quest2 ". Name _ has special meaninghere. Analogously, if you wanted to reference quests-village2-quest1 from that package, you would use_-_-village2-quest1 . Using _ twice will get you to quests package, and from there you're going intovillage2 and then quest1 .
Relative paths can be useful if you want to move your packages between directories. Instead of rewriting everypackage name to match current directory tree, you can use relative paths and it will just work. It can also be useful ifyou want to create a downloadable quest package which can be placed anywhere and not just on the root directory(BetonQuest/) or when working with BetonQuest-Editor + BetonQuestUploader combo - quest writers don't have toprefix every package call with their name (this feature will work soon, needs an update in the editor).
Unified location formatingWhenever you want to define some location in your events, conditions, objectives or any other things, you will defineit with this specific format. The location can consist of 2 things: base and vector. Only the base is always required.
The base is a core location. Currently there are two types: absolute coordinates and variables. Absolute coordinatesare defined like 100;200;300;world , where 100 is X coordinate, 200 is Y, 300 is Z and world is the name ofthe world. These can have decimal values. If you want you can also add two more numbers at the end, yaw and pitch(these are controlling the rotation, for example in teleportation event, both are needed if you decide to add them;example: 0.5;64;0.5;world;90;-270 ).
To use a variable as the location's base it must resolve to a valid absolute coordinates. An example of such variableis %location% , which shows player's exact location. Simply place it instead of coordinates. There is one rulethough: you can't use variable base types in events running without players (for example static events or the onesrun from folder event after their player left the server). BetonQuest won't be able to resolve the location variablewithout the player!
The vector is a modification of the location. It will be useful if you use global variables instead of base (described inthe next subsection) or the base itself is variable, like player . Vectors look like ->(10;2.5;-13) and are added tothe end of the base. This will modify the location, X by 10, Y by 2.5 and Z by -13. For example, location written as100;200;300;world_nether->(10;2.5;-13) will generate a location with X=110, Y=202.5 and Z=287 onworld_nether world.
Global variablesYou can insert a global variable in any instruction string. It looks like this: $beton$ (and this one would be called"beton"). When the plugin loads that instruction string it will replace those variables with values assigned to them inmain.yml file before the instruction string is parsed. This is useful for example when installing a package containinga WorldEdit schematic of the quest building. Instead of going through the whole code to set those locations, namesor texts you will only have to specify a few variables (that is, of course, if the author of the package used thosevariables properly in his code).
Note that these variables are something entirely different than conversation variables. Global ones use $characters and conversation ones use % characters. The former is resolved before the instruction string is parsedwhile the latter is resolved when the quests are running, usually on a per-player basis.

variables: village_location: 100;200;300;world village_name: Concrete
Canceling questsIf you want to let your players cancel their quest there is a function for that. In main.yml file there is cancel branch.You can specify there quests, which can be canceled, as well as actions that need to be done to actually cancelthem. You can find an example in the default package. The arguments you can specify are:
name - this will be the name displayed to the player. All _ characters will be converted to spaces. If you want toinclude other languages you can add here additional options ( en for English etc.)conditions - this is a list of conditions separated by commas. The player needs to meet all those conditions to
be able to cancel this quest. Place there the ones which detect that the player has started the quest, but he hasnot finished it yet.objectives - list of all objectives used in this quest. They will be canceled without firing their events.tags - this is a list of tags that will be deleted. Place here all tags that you use during the quest.points - list of all categories that will be entirely deleted.journal - these journal entries will be deleted when canceling the quest.events - if you want to do something else when canceling the quest (like punishing the player), list the events
here.loc - this is a location to which the player will be teleported when canceling the quest (defined as in teleport
event);
To cancel the quest you need to open your backpack and select a "cancel" button (by default a bone, can bechanges by naming an item "cancel_button" inside default package). There will be a list of quests which can becanceled. Just select the one that interests you and it will be canceled.
Global locationsGlobal locations are locations at which events can fire. They are defined as normal location objectives inobjectives.yml and will fire when any player is in range of that location. Global locations are active for all players,even if they don't have an active objective. They can be used for starting location specific quest (such asencountering a dungeon and checking it out), teleporting players to arenas, this kind of stuff. They use tags to tellwhich player has been at certain location and which hasn't. These tags follow syntax global_<tag> , where <tag>is location objective's tag, defined at the end of instruction string (eg. global_conversation_start , whereconversation_start is a tag of location objective). You can specify which events will be global locations in the
main.yml file inside a package, separating them with commas:
global_locations: dungeon_entrance,trap,something_else
Static eventsStatic events are events that will fire at the specified time of the day. They are not tied to a specific player, so not allof event types can be used as static. (Which player should receive a tag or objective? From which one should theitems be taken?) Also, static events cannot have conditions defined ( event-conditions: argument), as the plugincannot check any condition without the player. Events, that can be used as static are flagges with static keywordin this documentation. You can define your static events in main.yml file under static section, as such:
static: '09:00': beton '23:59': lightning_strike '11:23': some_command
The hour must be in '' to avoid problems, it needs leading zero if less than 10. beton , lightnint_strike etc.

are IDs of events. There can only be one event specified, but it can be of type "folder".
JournalThe journal is a book in which all your adventures are described. You can obtain it by typing /j command or /b andselecting it from backpack. You cannot put it into any chests, item frames and so on. If you ever feel the need to getrid of your journal, just drop it - it will return to your backpack. The journal is updated with the journal event, andthe text inside is defined in journal.yml config file. If you update these texts and reload the plugin, all players' journalswill reflect changes. Colors in the journal can be altered in config.yml. The entries can use color codes, but the colorwill be lost between pages.
The journal by default appears in the last slot of the hotbar. If you want to change that use default_journal_slotoption in config.yml, experiment with different settings until you're ok with it.
If you want to translate the entry do the same thing as with conversation option - go to new line, add language IDand the journal text for every language you want to include.
You can control behavior of the journal in config.yml file, in journal section. chars_per_page specifies how manycharacters will be placed on a single page. If you set it too high, the text will overflow outside of the page, too low,there will be too much pages. one_entry_per_page allows you to place every entry on a single page. Thechars_per_page setting is in this case ignored, BetonQuest will put entire entry on that page. reversed_order
allows you to reverse order of entries and hide_date lets you remove the date from journal entries.
You can control colors in the journal in journal_colors section in config.yml: date is a color of date of everyentry, line is a color of lines separating entries and text is just a color of a text. You need to use standard colorcodes without & (eg. '4' for dark red).
You can also add a main page to the journal. It's a list of texts, which will show only if specified conditions are met.You can define them in the main.yml file, in the journal_main_page section:
journal_main_page: title: priority: 1 text: en: '&eThe Journal' pl: '&eDziennik' conditions: 'quest_started,!quest_completed'
Each string can have text in different languages, list of conditions separated by commas (these must be met for thetext to show in the journal) and priority , which controls the order of texts. You can use conversation variables inthe texts, but they will only be updated when the player gets his journal with the /journal command. Color codes aresupported.
If you want your main page take a separate page (so entries will be displayed on next free page), setfull_main_page in config.yml to "true".
TagsTags are little pieces of text you can assign to player and then check if he has them. They are particularly useful todetermine if player has started or completed quest. They are given with tag event and checked with tagcondition. All tags are bound to a package, so if you add beton tag from within the default package, the tag willlook like default.beton . If you're checking for beton tag from within default package, you're actually checkingfor default.beton . If you want to check a tag from another package, then you just need to prefix it's name withthat package, for example quest.beton .
Points

Points are like tags, but with amount. You can earn them for doing quest, talking with NPC’s, basically for everythingyou want. You can also take the points away, even to negative numbers. Points can be divided to categories, so theones from beton category won’t mix with points from quests group. Of course then you can check if player has (ordoesn’t have) certain amount and do something based on this condition. They can be used as counter for specificnumber of quest done, as a reputation system in villages and even NPC’s attitude to player.
NPCsConversations can be assigned to NPCs. You do it in the main.yml file inside a package, in "npcs" section:
npcs: '0': innkeeper 'Innkeeper': innkeeper
The first string is the name of the NPC, second one is the corresponding conversation name. In case you useCitizens, name is the ID of an NPC (don't try to put Citizens NPC's name here, it must be the ID). To acquire it just selectthe NPC and type /npc . If you don't want to use Citizens, you can also build NPCs as any other building inMinecraft:
Place somewhere a block of stained clay, no matter the color. Then place a head on top of it (type doesn't matter, itmust be head). Now place a sign on the side of the clay block (it can be on it's back) and type in the first line [NPC] ,and on the second line the ID of the NPC (in case of the above code example, the ID would be Innkeeper ). Youneed to have permission betonquest.createnpc for that. Congratulations, you have created the NPC. Now you canadd levers (hands) to it and maybe even a fence gate (legs). Conversation is started by right clicking it's head.
ItemsItems in BetonQuest are defined in items.yml file. Each item has an instruction string, similarly to events, conditionsetc. Basic syntax is very simple:
item: MATERIAL other arguments...
The MATERIAL is a type of the item, as taken from here. It doesn't have to be all in uppercase. Other argumentsspecify data like name of the item, lore, enchantments or potion effects. There are two categories of thesearguments: the ones you can apply to every item and type specific arguments. Examples would be name (for everyitem type) and text (only in books).
Every argument is used in two ways: when creating an item and when checking if some existing item matches theinstruction. The first case is pretty straightforward - BetonQuest takes all data you specified and creates an item,simple as that. Second case is more complicated. You can require some property of the item to exist, other not toexist, or skip this property check altogether. You can also accept an item only if some value (like enchantment level)is greater/less than x.
These are arguments that can be applied to every item:
name - the display name of the item. All underscores will be replaced with spaces and you can use & colorcodes. If you want to specifically say that the item must not have any name, use none keyword.
lore - text under the item's name. Default styling of lore is purple and italic. All underscores will be replacedwith spaces and you can use & color codes. To make a new line use ; character. If you require the item not tohave lore at all, use none keyword. By default lore will match only if all lines are exactly the same. If you want toaccept all items which contain specified lines (and/or more lines), add lore-containing argument to theinstruction string.
data - data value of the item. An example of this would be different wool colors or damage of a pickaxe. Youcan require an exact value by specifying a number, or a value greater/less (and equal) than specified by adding

+ / - character at the end of the number.
enchants - a list of enchantments and their levels. Each enchantment consists of these things, separated bycolons:
namelevel (a positive number)
For example damage_all:3 is Sharpness III. You can specify additional enchantments by separating them withcommas.
You can require the item not to have any enchantments by using none keyword. You can also add + / -character to the enchantment level to make the check require levels greater/less (and equal) than specified. Ifyou don't care about the level, replace the number with a question mark.
By default all specified enchantments are required. If you want to check if the item contains a matchingenchantment (and/or more enchants), add enchants-containing argument to the instruction string. Eachspecified enchantment will be required on the item by default unless you prefix its name with none- , forexample none-knockback means that the item must not have any knockback enchantment. Do not use none-prefix unless you're using enchants-containing argument, it doesn't make any sense and will break the check!
unbreakable - this makes the item unbreakable. You can specify it either as unbreakable orunbreakable:true to require an item to be unbreakable. If you want to check if the item is breakable, useunbreakable:false .
Examples:
name:&4Sword_made_of_Holy_Concretename:nonelore:&cOnly_this_sword_can_kill_the_Lord_Rulerlore:&2Quest_Item lore-containinglore:nonedata:5data:500-enchants:damage_all:3+,none-knockbackenchants:power:? enchants-containingenchants:noneunbreakableunbreakable:false
These are the arguments that can be applied only to specific item types:
Books
This applies to a written book and a book and quill.
title - the title of a book. All underscores will be replaced with spaces and you can use & color codes. If youwant to specifically say that the book must not have any title, use none keyword.
author - the author of a book. All underscores will be replaced with spaces, you cannot use color codes here. Ifyou want to specifically say that the book must not have any author, use none keyword.
text - the text of the book. All underscores will be replaced with spaces and you can use & color codes. Thetext will wrap to the next page if amount of characters exceeds journal.chars_per_page setting in config.yml.If you want to manually wrap the page, use | character. To go to new line use \n . Keep in mind that you can'tuse any spaces here, you must only use underscores ( _ ). This needs to be a single argument, even if it's reallylong. If you don't want the book to have any text, use none keyword instead.

Examples:
title:Malleus_Maleficarumauthor:&eGallus_Anonymustext:Lorem_ipsum_dolor_sit_amet,\nconsectetur_adipiscing_elit.|Pellentesque_ligula_urna(...)
Potions
This applies to potions, splash potions and lingering potions.
type - type of a potion. Here's the list of possible types. Do not mistake this for a custom effect, this argumentcorresponds to the default vanilla potion types.
extended - extended property of the potion (you can achieve it in-game by adding redstone). It can be specifiedas extended or extended:true . If you want to check the potion that is NOT extended, use upgraded:false .
upgraded - upgraded property of the potion (you can achieve it in-game by adding glowstone). It can bespecified as upgraded or upgraded:true . If you want to check the potion that is NOT upgraded, useupgraded:false .
effects - a list of custom effects. These are independent of the potion type. The effects must be separated bycommas. Each effect consists of these things, separated by colons:
type (this is different stuff that the link above!)powerduration (in seconds)
An example would be WITHER:2:30 , which is a wither effect of level 2 for 30 seconds.
If you want to target only potions without custom effects, use none keyword. You can target potions with leveland time greater/less (and equal) than specified with + / - character after the number. If you don't care aboutthe level/time, you can replace them with question mark.
By default all specified effects are required. If you want to check if the potion contains these effects amongothers, add effects-containing argument to the instruction string. Now if you want to make sure the potiondoesn't contain a specific effect, prefix the effect name with none- . Don't use that prefix unless you're alsousing effects-containing argument, it doesn't make any sense and it will break the check.
Examples:
type:instant_healextendedupgraded:falseeffects:poison:1+:?,slow:?:45-effects:none-weakness,invisibility:?:? effects-containing
Heads
This applies to human heads.
owner - this is the name of the head owner. It will not use color codes nor replace underscores with spaces. Ifyou want to check for heads without any owner, use none keyword.
Examples:
owner:Co0showner:none

Leather armor
This applies to all parts of leather armor.
color - this is the color of the armor piece. It can be either one of these values, a hexadecimal RGB valueprefixed with # character or its decimal representation without the prefix. You can also check if the armor piecedoesn't have any color with none keyword.
Examples:
color:light_bluecolor:#ff00ffcolor:none
Fireworks
This applies to fireworks.
firework - this is a list of effects of the firework rocket. They are separated by commas. Each effect consists ofthese things separated by colons:
effect typea list of main colors (refer to leather armor colors above for syntax) separated by semicolonsa list of fade colorstrue / false keyword for trail effecttrue / false keyword for flicker.
Note the separation characters, this is important: commas separate effects, colons separate effect properties,semicolons separate colors.
If you want to target fireworks without any effects, use none keyword. If you want to target any effect type, usequestion mark instead of the effect name. If you don't want the effect to have any main/fade colors, use nonekeyword in the place of colors. If you don't care about main/fade colors, use question marks in that place. If youdon't care about trail/flicker effect, use question marks instead of true / false keyword.
By default the check will require all specified effects to be present on the firework. You can check if the fireworkcontains specified effects among others by adding firework-containing argument to the instruction string.To match the item which must not have an effect, prefix the effect name with none- keyword. Don't use thatprefix unless you're also using firework-containing argument, it doesn't make any sense and will break thecheck.
power - flight duration of the firework, in levels. You can use + / - character to target greater/less (and equal)levels.
Examples:
firework:ball:red;white:green;blue:true:true,ball_large:green;yellow:pink;black:false:falsefirework:burst:?:none:?:? firework-containingfirework:none-creeper firework-containingfirework:nonepower:3power:2+
Firework charges
This applies to firework charges.

firework - this is almost the same as fireworks. You can only specify a single effect and the power argumenthas no effects.
BackpackSometimes you'll want some items to be persistent over death. If the player has lost them the quest would bebroken. You can add a apecific line to item's lore to make it persistent ( &2Quest_Item by default, _ is a space initem's definition). Note that this must be a whole new line in the lore! Such item wouldn't be dropped on death,instead it would be placed in player's backpack. Example:important_sword: 'DIAMOND_SWORD name:Sword_for_destroying__The_Concrete lore:Made_of_pure_Mithril;&2Quest_Item'
To open your backpack just type /j command. The inventory window will open, displaying your stored items. The firstslot is always the journal, and if you get it, the slot will stay empty. You can transfer quest items back and forthbetween inventories by clicking on them. Left click will transfer just one item, right click will try to transfer all items.Normal items cannot be stored into the backpack, so it's not an infinite inventory.
If you will ever have more than one page of quest items, the buttons will appear. You can customize those buttonsby creating previous_button and next_button items in items.yml file. Their name will be overwritten with the onedefined in messages.yml.
Quest items cannot be dropped in any way other than using them. This way you can create a quest for eatingcookies by giving the player a stack of cookies flagged as quest items and not continuing until there are no morecookies in his inventory/backpack. The player cannot drop the cookies, so he must eat every one of them tocomplete the quest.
Don't worry if the item-dropping filter isn't working for your items when you're in creative mode - it's not a bug. It's afeature. Creative-mode players should be able to easily put quest items in containers like TreasureChests.
PartyParties are very simple. So simple, that they are hard to understand if you already know some other party system.Basically, they don't even have to be created before using them. Parties are defined directly in conditions/events( party event, party conditions, check them out in the reference lists below). In such instruction strings the firstargument is a number - range. It defines the radius where the party members will be looked for. Second is a list ofconditions. Only the players that meet those conditions will be considered as members of the party. It's mostintuitive for players, as they don't have to do anything to be in a party - no commands, no GUIs, just starting thesame quest or having the same item - you choose what and when makes the party.
To understand better how it works I will show you an example of party event. Let's say that every player has anobjective of pressing a button. When one of them presses it, this event is fired:
party_reward: party 50 quest_started cancel_button,teleport_to_dungeon
Now, it means that all players that: are in radius of 50 blocks around the player who pressed the button AND meetquest_started condition will receive cancel_button and teleport_to_dungeon events. The first one will
cancel the quest for pressing the button for the others (it's no longer needed), the second one will teleport themsomewhere. Now, imagine there is a player on the other side of the world who also meets quest_startedcondition - he won't be teleported into the dungeon, because he was not with the other players (not in 50 blocksrange). Now, there were a bunch of other players running around the button, but they didn't meet thequest_started condition. They also won't be teleported (they didn't start this quest).

Conditions ListItem in Inventory: item
This event is met only when player has specified item in his inventory. You specify items in a list separated bycommas (without spaces between!) Each item consists of its name and amount, separated by a colon. Amount isoptional, so if you specify just item's name the plugin will assume there should be only one item.
Example item emerald:5,gold:10
Item in Hand: hand
This event is met only when player is holding a specified item in his hand. Amount cannot be set here, though it maybe checked with item condition.
Example hand sword
Alternative: or
Alternative of specified conditions. This means that only one of conditions has to be met in order for alternative tobe true. You just define one mandatory argument, condition names separated by commas. ! prefix works asalways.
Example: or night,rain,!has_armor
Conjunction: and
Conjunction of specified conditions. This means that every condition has to be met in order for conjunction to betrue. Used only in complex alternatives, because conditions generally work as conjunction. Instruction string isexactly the same as in alternative .
Example: and has_helmet,has_chestplate,has_leggings,has_boots
Location: location
It returns true only when the player is closer to specified location than the specified distance. Just two mandatoryattributes - location and radius around it (can be a variable).
Example: location 100;200;300;survival_nether 5
Health: health
Requires the player to have equal or more health than specified amount. The only argument is a number (double).Players can have 0 to 20 health by default (there are some plugins and commands which change the maximum) (0means dead, don't use that since it will only be met when the player sees the red respawn screen).
Example: health 5.6
Experience: experience
This condition is met when the player has a specified level (default minecraft experience). It is measured by fulllevels, not experience points. The instruction string must contain an integer argument.
Example: experience 30
Permission: permission
The player must have a specified permission for this condition to be met. The instruction string must contain

permission node as the required argument.
Example: permission essentials.tpa
Point: point
Requires the player to have amount of points equal to the specified category or more. There are two requiredarguments, first is the category (string), second is the amount (integer). You can also add optional argument equalto accept only players with exactly equal amount of points.
Example: point beton 20
Tag: tag
This one requires the player to have a specified tag. Together with ! negation it is one of the most powerful toolswhen creating conversations. The instruction string must contain tag name.
Example: tag quest_completed
Armor: armor
The armor condition requires the player to wear specified armor, as an item defined in items.yml file.
Example: armor helmet_of_concrete
Potion Effect: effect
To meet this condition the player must have an active potion effect. There is only one argument and it takes valuesfrom this page: potion types.
Example: effect SPEED
Time: time
There must be specific (Minecraft) time on the player's world for this condition to return true. You need to specifytwo hour numbers separated by dash. These number are normal 24-hour format hours. The first must be smallerthan the second. If you want to achieve time period between 23 and 2 you need to negate the condition.
Example: time 2-23
Weather: weather
There must be a specific weather for this condition to return true. There are three possible options: sun, rain andstorm. Note that /toggledownfall does not change the weather, it just does what the name suggests: togglesdownfall. The rain toggled off will still be considered as rain! Use /weather clear instead.
Example: weather sun
Height: height
This condition requires the player to be below specific Y height. The required argument is a number or a location (forexample 100;200;300;world). In case of location it will take the height from it and use it as regular height.
Example: height 16
Armor Rating: rating
This one requires the player to wear armor which gives him specified amount of protection (armor icons). The firstand only argument should be an integer. One armor point is equal to half armor icon in-game (10 means half of the

bar filled).
Example: rating 10
Random: random persistent, static
This condition is met randomly. There is one argument: two positive numbers like 5-12 . They mean something likethat: "It will be true 5 times out of 12".
Example: random 12-100
Sneaking: sneak
Sneak condition is only true when the player is sneaking. This would probably be useful for creating traps, I'm notsure. There are no arguments for this one.
Example: sneak
Journal entry: journal
This condition will return true if the player has specified entry in his journal (internal name of the entry, like injournal.yml). The only argument is name of the entry.
Example: journal wood_started
Test for block: testforblock persistent, static
This condition is met if the block at specified location matches the given material. First argument is a location, andthe second one is material of the block to check against, from this list.
Example: testforblock 100;200;300;world STONE
Empty inventory slots: empty
To meet this condition the player has to have specified amount of empty slots in his inventory.
Example: empty 5
Party: party
To see details about parties read "Party" chapter in Reference section. This condition takes three optionalarguments: every: , any: and count: . "Every" is a list of conditions that must be met by every player in the party.Any is a list of conditions that must be met by at least one player in a party (it doesn't have to be the same player,one can meet first condition, another one can meet the rest and it will work). Count is just a number, minimal amountof players in the party. You don't have to specify all those arguments, you can use only one if you want.
Example: party 10 has_tag1,!has_tag2 every:some_item any:some_location,some_other_item count:5
Monsters in area: monsters persistent, static
This condition will return true only if there is a specified amount (or more) of specified mobs in the specified area.There are three required arguments - monsters, location and range. Monsters are defined as a list separated bycommas. Each mob type (taken from here) can have additional :amount suffix, for exampleZOMBIE:5,SKELETON:2 means 5 or more zombies and 2 or more skeletons. Location is standard. Range is a
number representing a radius in which the mobs will be looked for. You can also specify additional name:argument, with the name of the required mob. Replace all spaces with _ here. You can use marked: argument tocheck only for monsters marked in spawn event.

Example: monsters ZOMBIE:2 100;200;300;world 10 name:Deamon
Objective: objective
This conditions is very simple: it's true only when the player has an active objective. The only argument is the nameof the objective, as defined in objectives.yml.
Example: objective wood
Check conditions: check
This condition allow for specifying multiple instruction strings in one, longer string. Each instruction must be startedwith ^ character and no other dividers should be used. The condition will be met if all inner conditions are met. It'snot the same as and condition, because you can specify an instruction string, not a condition name.
Example: check ^tag beton ^item emerald:5 ^location 100;200;300;survival_nether;5 ^experience 20
Chest Item: chestitem persistent, static
This condition works in the same way as item condition, but it checks the specified chest instead of a player. Thefirst argument is a location of the chest and the second one is the list of items defined in the same way as in itemcondition. If there is no chest at specified location the condition won't be met.
Example: chestitem 100;200;300;world emerald:5,sword
Scoreboard: score
With this condition you can check if the score in a specified objective on a scoreboard is greater or equal tospecified amount. The first argument is the name of the objective, second one is amount (an integer).
Example: score kills 20
World: world
This conditions checks if the player is in a specified world. The first argument is the name of a world.
Example: world world
Game mode: gamemode
This condition checks if the player is in a specified game mode. The first argument is the game mode, i.e. survival,creative, adventure.
Example: gamemode survival
Achievement: achievement
This condition checks if the player has specified achievement (default Minecraft achievements). The first argumentis name of the achievement.
Example: achievement BUILD_FURNACE
Variable: variable
This condition checks if a variable value matches given pattern. The first argument is a variable (with % characters).Second one is the pattern (for example, if you want to check if it's "word", the patter would simply be word , but ifyou want to check if it's a number (positive or negative) you would use -?\d+ pattern - -? means a dash or nodash, \d means any digit and + allows that digit to be repeated one or more times).

Example: variable %objective.var.price% -?\d+

Events ListMessage: message static
This event simply displays a message to the player. The instruction string is the message. All & color codes arerespected. You can add additional translations by starting them with {lang} argument, just like in the example.The player will see his language or the default one if it's not defined. You can use conversation variables with thisevent. Just make sure not to use %npc% .
Example:message {en} &4You are banned, %player%! {pl} &4Jestes zbanowany, %player%! {de}&4Ich weiß nicht.
Command: command persistent, static
Runs specified command from the console. The instruction string is the command, without leading slash. You canuse variables here, but variables other than %player% won't resolve if the event is fired from delayed folder andthe player is offline now. You can define additional commands by separating them with | character.
Example: command kill %player%|ban %player%
Teleport: teleport
Teleports the player to a specified location, with or without head rotation. It will also end the conversation, if theplayer has one active. The first and only argument must be location. It's a good idea to use yaw and pitch here.
Example: teleport 123;32;-789;world_the_nether;180;45
Point: point persistent
Gives the player a specified amount of points in a specified category. Amount can be negative if you want tosubtract points. You can also use an asterisk to do multiplication (or division, if you use a fraction). First argumentafter the event name must be a category, and the second one - amount of points to give/take/multiply.
Example: point npc_attitude 10Example: point village_reputation *0.75
Tag: tag persistent
This event adds (or removes) a tag to the player. The first argument after event's name must be add or del . Nextgoes the tag name. It can't contain spaces (though _ is fine). Additional tags can be added, separated by commas(without spaces).
Example: tag add quest_started,new_entry
Objective: objective persistent
Manages the objectives. Syntax is objective <action> name , where <action> can be start/add (one of the two),delete/remove or complete/finish. Name is the name of the objective, as defined in objectives.yml.
Example: objective start wood
Journal: journal
Adds or deletes an entry to/from player’s journal. Entries are defined in journal.yml The first argument is action(add/del), the second one is name of the entry. You can also use only one argument, update , it will simply updatethe journal without addin any entries. It's useful when you need to update the main page.

Example: journal add quest_startedExample: journal update
Lightning: lightning static
Strikes a lightning at given location. The only argument is the location.
Example: lightning 100;64;-100;survival
Explosion: explosion static
Creates an explosion. It can make fire and destroy blocks. You can also define power, so be careful not to blow yourserver away. Default TNT power is 4, while Wither on creation is 7. First argument can be 0 or 1 and states ifexplosion will generate fire (like Ghast’s fireball). Second is also 0 or 1 but this defines if block will be destroyed ornot. Third argument is the power (float number). At the end (4th attribute) there is location.
Example: explosion 0 1 4 100;64;-100;survival
Give Items: give
Gives the player predefined items. They are specified exactly as in item condition - list separated by commas,every item can have amount separated by colon. Default amount is 1. If the player doesn't have required space in theinventory, the items are dropped on the ground, unless they are quest items. Then they will be put into the backpack.You can also specify notify keyword to display a simple message to the player about receiving items.
Example: give emerald:5,emerald_block:9
Take Items: take
Removes items from player’s inventory or backpack (in that order). If the items aren't quest items don't use takeevent with player options in conversations! The player can drop items before selecting the option and pickup themafter the event fires. Validate it on NPC’s reaction! Defining instruction string is the same as in give event. You canalso specify notify keyword to display a simple message to the player about loosing items.
Example: take emerald:120,sword
Potion Effect: effect
Adds a specified potion effect to player. First argument is potion type. You can find all available types here. Secondis integer defining how long the effect will last in seconds. Third argument, also integer, defines level of the effect (1means first level). You can also add --ambient parameter to make potion particles appear more invisible (just likebeacon effects).
Example: effect ABSORPTION 120 1 --ambient
Conversation: conversation
Starts a conversation at location of the player. The only argument is ID of the conversation. This bypasses theconversation permission!
Example: conversation village_smith
Kill: kill
Kills the player. Nothing else.
Example: kill

Spawn Mob: spawn static
Spawns specified amount of mobs of given type at the location. First argument is a location. Next is type of themob. The last, third argument is integer for amount of mobs to be spawned. You can also specify name: argument,followed by the name of the mob. All _ characters will be replaced with spaces. You can also mark the spawnedmob with a keyword using marked: argument. It won't show anywhere, and you can check for only marked mobs inmobkill objective.
You can specify armor which the mob will wear and items it will hold with h: (helmet), c: (chestplate), l:(leggings), b: (boots), m: (main hand) and o: (off hand) optional arguments. These take a single item withoutamount, as defined in items.yml. You can also add a list of drops with drops: argument, followed by a list of itemswith amounts after colons, separated by commas.
Example: spawn 100;200;300;world SKELETON 5 marked:targets
Example:spawn 100;200;300;world ZOMBIE name:Bolec 1 h:blue_hat c:red_vest drops:emerald:10,bread:2
Time: time
Sets or adds time. The only argument is time to be set (integer) or time to be added (integer prefixed with +), in 24hours format. Subtracting time is done by adding more time (if you think of this, it actually makes sense). Minutescan be achieved with floating point.
Example: time +6
Weather: weather
Sets weather. The argument is sun , rain or storm .
Example: weather rain
Folder: folder persistent, static
It's something like a container for multiple events. You can use it to clarify your code. It also features optional delaymeasured in seconds. It is persistent for events marked as persistent, which means that the events will be fired evenafter the player logs out. Beware though, all conditions are false then the player is offline (even inverted ones), sothose events should not be blocked by any conditions! The only required argument is a list of events separated bycommas. There are also two optional arguments: delay: and random: . Delay is a number of seconds and it'soptional (leaving it blank is the same as delay:0 . Random is the amount of events, that will be randomly chosen tofire. If set to 0 or omited, it does nothing (all events will fire).
Example: folder event1,event2,event3 delay:5 random:1
Set Block: setblock persistent, static
Sets a block at given location to specified material. Useful for triggering redstone contraptions. There are tworequired arguments. First is required, and should be material's name (List of materials). Second is a location and isalso required. Last, optional is data: with an integer, which defines block's data value. Default is 0.
Example: setblock REDSTONE_BLOCK 100;200;300;world
Damage player: damage
Damages the player by specified amount of damage. The only argument is a number (can have floating point).
Example: damage 20
Party event: party
Runs the specified list of events (third argument) for every player in a party. More info about parties in "Party"chapter in Reference section.
Example: party 10 has_tag1,!has_tag2 give_reward
Clear mobs: clear
This event removes all specified mobs from the specified area. The first required argument is a list of mobs (takenfrom here) separated by commas. Next is location. After that there is the radius around the location (a positivenumber or a variable). You can also optionally specify name: argument, followed by name which removed mobsmust have. You can use marked: argument to remove only mobs marked in spawn event.
Example: clear ZOMBIE,CREEPER 100;200;300;world 10 name:Monster
Run events: run
This event allow for specifying multiple instruction strings in one, longer string. Each instruction must be startedwith ^ character and no other dividers should be used. It's not the same as folder condition, because you canspecify an instruction string, not an event name. It is also fired on the same tick, not on the next one like in folder .Don't use conditions here, it behaves strangely. I'll fix this in 1.9 version.
Example: run ^tag add beton ^give emerald:5 ^entry add beton ^kill
Give journal: givejournal
This event simply gives the player his journal. It acts the same way as /j command would.
Example: givejournal
Sudo: sudo
This event is similar to command event, the only difference is that it will fire a command as the player.
Example: sudo spawn
Chest Give: chestgive persistent, static
This works the same as give event, but it puts the items in a chest at specified location. The first argument is alocation, the second argument is a list of items, like in give event. If the chest is full, the items will be dropped onthe ground. The chest can be any other block with inventory, i.e. a hopper or a dispenser. BetonQuest will log anerror to the console when this event is fired but there is no chest at specified location.
Example: chestgive 100;200;300;world emerald:5,sword
Chest Take: chesttake persistent, static
This event works the same as take event, but it takes items from a chest at specified location. The instructionstring is defined in the same way as in chestgive event.
Example: chesttake 100;200;300;world emerald:5,sword
Chest Clear: chestclear persistent, static
This event removes all items from a chest at specified location. The only argument is a location.
Example: chestclear 100;200;300;world

Compass: compass
When you run this event, the player will be able to select a specified location as a target of his compass. To selectthe target the player must open his backpack and click on the compass icon. The first argument is either add ordel , and second one is the name of the target, as defined in main.yml.
The destination must be defined in the main.yml file in compass section. You can specify a name for the target ineach language or just give a general name, and optionally add a custom item (from items.yml) to be displayed in thebackpack. Example of a compass target:
compass: beton: name: en: Target pl: Cel location: 100;200;300;world item: scroll
Example: compass add beton
Cancel quest: cancel
This event works in the same way as a quest canceler in the backpack. Running it is equal to the player clicking onthe bone. The only argument is a name of a quest canceler, as defined in main.yml
Example: cancel wood
Scoreboard: score
This event works in the same way as point event, the only difference is that is uses scoreboards instead of points.You can add, subtract, multiply and divide scores in objectives on the scoreboard. The first argument is the name ofthe objective, second one is a number. It can be positive for additon, negative for subtraction or prefixed with anasterisk for multiplication. Multiplying by fractions is the same as dividing.
Example: score kills 1
Lever: lever persistent, static
This event can switch a lever. The first argument is a location and the second one is state: on , off or toggle .
Example: lever 100;200;300;world toggle
Door: door persistent, static
This event can open and close doors, trapdoors and fence gates. The syntax is exactly the same as in lever eventabove.
Example: door 100;200;300;world off
If else: if
This event will check a condition, and based on the outcome it will run the first or second event. The instructionstring is if condition event1 else event2 , where condition is a condition ID and event1 and event2 areevent IDs. else keyword is mandatory between events for no practical reason.
Example: if sun rain else sun

Variable: variable
This events has only one purpose - to change variables stored in variable objective. The first argument is the IDof a variable objective (if you use any other type you will get an error). Second one is the key of the variable andthe third is the value. Both can use %...% variables. Refer to variable objective documentation for informationabout storing variables.
Example: variable some_var_obj name %player%

Objectives ListLocation: location
This objective completes when player moves in specified range of specified location and meets all conditions. Thefirst argument after objective's name must be location, the second - radius around the location. It can be a variable.
Location objective contains one property, location . It's a string formatted like X: 100, Y: 200, Z:300 .
Example: location 100;200;300;world 5 condition:test1,!test2 events:test1,test2
Block: block
To complete this objective player must break or place specified amount of blocks. First argument after name is typeof the block and data value after a colon (WOOD:2 means birch wooden planks). You can find possible types atBukkit reference page there: material types. Next is amount. It can be more than 0 for placing and less than 0 fordestroying. You can also use notify keyword to display messages to the player each time he updates amount ofblocks.
This objective has two properties, amount and left . Amount is current amount of blocks in the objective, left isamount needed to complete the objective. Note that it may sometimes be negative!
Example: block LOG:2 -16 events:reward notify
Mob Kill: mobkill
The player must kill specified amount of mobs You must specify mob type first and then amount. You can findpossible mob types here: mob types. Additionally you can specify names for mobs with name:Uber_Zombie , soonly killing properly named mobs counts. All _ are replaced with spaces, so in this example you would have to kill 5zombies with "Uber Zombie" above their heads. You can also specify notify keyword to display messages to theplayer each time he kills a mob. If you want to accept only mobs marked with spawn event, use marked: argumentfollowed by the keyword used in that event.
This objective also has two properties, amount and left . Amount is current amount of killed mobs, left is amountneeded to complete the objective.
Example: mobkill ZOMBIE 5 name:Uber_Zombie conditions:night
Action: action
This objective completes when player clicks on given block type. This can be further limited by location conditionand item in hand condition. First argument is type of the click, it can be right, left or any. Next is block type,optionally with data value after colon. You can also specify loc: argument, followed by standard location formatand range: followed by a number (or variable). It will define where the clicked block needs to be, as opposed to"where you must be" in location condition. If you add argument cancel , the click will be canceled (chest will notopen, button will not be pressed etc.)
Action objective contains one property, location . It's a string formatted like X: 100, Y: 200, Z:300 . It does notshow the radius.
Example: action right DOOR:1 conditions:holding_key loc:100;200;300;world range:5
Death: die
Death objective completes when the player dies meeting all conditions. You can optionally cancel death withcancel argument. It will heal player and optionally teleport him to respawn location. There can be two arguments:cancel , which is optional, and respawn: , which is also optional and only used if there is the cancel argument
set. You can add them right after type of objective.
Example: die cancel respawn:100;200;300;world;90;0 events:teleport
Crafting: craft
To complete this objective the player must craft specified item. First argument is ID of the item, as in items.yml. Nextis amount (integer).
Crafting objective has two properties, amount and left . Amount is current amount of crafted items and left isamount needed to complete the objective.
Example: craft saddle 5 events:reward
Smelting: smelt
To complete this objective player must smelt specified item. Note that you must define item as output from furnace,not the ingredient. This one does not support data values (it doesn’t have to). First argument is material name. Nextis amount (integer).
Smelting has the same properties as crafting objective.
Example: smelt IRON_INGOT 5 events:reward
Taming: tame
To complete this objective player must tame some amount of mobs. valid mob types are: WOLF, OCELOT and HORSEFirst argument is type, next is amount.
Taming has the same properties as mob kill objective.
Example: tame WOLF 2 events:wolfs_tamed
Delay: delay
This objective is just a long, persistent delay for firing events. It will run only after certain amount of time (measuredin minutes) and only when player is online and meets all conditions. If a player is offline at that time it will just waitfor them to log in. It is not 100% accurate though, as it can run up to a minute after the required amount of time. Youshould use it for example to delete tags so the player can complete quests multiple times. First argument is numberof minutes. You can specify an optional interval: argument, which specifies how many ticks should passbetween checks. One second is 20 ticks. Less makes the objective more precise, at the expense of performance.The rest is just like in other objectives.
Delay has two properties, left and date . The first one will show how much time needs to pass before the delay iscompleted (i.e. 23 days, 5 hours and 45 minutes ), the second one will show a date of completing the objectiveformatted using date_format setting in config.yml (it will look like the one above every journal entry).
Example: delay 1440 events:event1,event2
Arrow Shooting: arrow
To complete this objective the player needs to shoot the arrow into the target. There are two arguments, location ofthe target and precision number (radius around location where the arrow must land, should be small). Note that theposition of an arrow after hit is on the wall of a full block, which means that shooting not full blocks (like heads)won't give accurate results. Experiment with this objective a bit to make sure you've set the numbers correctly.
Example: arrow 100.5;200.5;300.5;world 1.1 events:reward conditions:correct_player_position

Experience: experience
This objective can by completed by reaching specified level (default Minecraft experience, whole levels). Theconditions are checked when the player levels up, so if they are not met the first time, the player will have to meetthem and levelup again. Instruction string consists only from integer - level to reach.
Example: experience 25 events:reward
Step on pressure plate: step
To complete this objective the player has to step on pressure plate at given location. The type of plate does notmatter. The first and only required argument is a location. If the pressure plate is not present at that location, theobjective will not be completable and will log errors in the console.
Step objective contains one property, location . It's a string formatted like X: 100, Y: 200, Z:300 . It shows anexact location of the pressure plate.
Example: step 100;200;300;world events:done
Logout: logout
To complete this objective the player simply needs to leave the server. Keep in mind that running folder eventhere will make it run in "persistent" mode, since the player is offline on the next tick.
Example: logout events:delete_objective
Password: password
This objective requires the player to type the password in the chat. The first argument is the password. All _characters are replaced with spaces. It's checked with regular expressions (if your password will be^beton.*beton$ the objective will accept all passwords that starts and ends with beton word ( ^ represents
beginning of a string, . represents any character, * allows the previous character (in this case any) repeat anynumber of times, and $ means end of the string), but you can also use something like beton - it will work). If youwant the objective to ignore case of the letters you can add optional ignoreCase argument. For this to work yourregular expression needs to use lower case letters. To answer, the player needs to type (in his language,configurable in messages.yml) password: here goes player's guess . If he fails, the message will not bedisplayed in the chat.
Example: password beton ignoreCase events:message,reward
Fishing: fish
Requires the player to catch a fish. It doesn't have to be a fish, it can also be a treasure or junk. The first argument ismaterial name of the item to catch, optionally with data value after a colon. Second argument must be amount offish to catch. You can also add notify argument if you want to display progress.
Fishing has the same properties as mob kill objective.
Example: fish raw_fish:1 5 notify events:tag_fish_caught
Sheep shearing: shear
To complete this objective the player has to shear specified amount of sheep, optionally with specified color and/orname. The first, required argument is amount (integer). Optionally, you can add name: argument with the name andcolor: with color name.
Sheep shearing has the same properties as mob kill objective.
Example: shear 1 name:Bob color:black
Enchant item: enchant
This objectie is completed when the player enchants specified item with specified enchantment. The first argumentis an item name, as defined it items.yml. Second one is the enchantment and a level, separated with a colon.
Example: enchant sword damage_all:1 events:reward
Put items in a chest: chestput
This objective requires the player to put specified items in a specified chest. First argument is a location of thechest, second argument is a list of items (from items.yml file), separated with a comma. You can also add amount ofitems after a colon. The items will be removed upon completing the objective unless you add items-stay optionalargument.
Example: chestput 100;200;300;world emerald:5,sword events:tag,message
Potion brewing: potion
To complete this objective the player needs to brew specified amount of specified potions. The first argument is apotion ID from items.yml. Second argument is amount of potions. You can optionally add notify argument to makethe objective display progress to players.
The brewing will be accepted if the player was the last one to click the ingredient slot in the brewing stand and therewere no matching potions there already.
Potion objective has amount and left: properties.
Example: potion weird_concoction 4 event:add_tag
Eat/drink: consume
This objective is completed by eating specified food or drinking specified potion. The only required argument is theID of an item from items.yml.
Example: consume tawny_owl events:faster_endurance_regen
Variable: variable
This objective is different. You cannot complete it, it will also ignore defined events and conditions. You can start itand that's it. While this objective is active though, everything the player types in chat (and matches special pattern)will become a variable. The pattern is key: value . So if you type that, it will create a variable called key , which willresolve to value string. These are not global variables, you can access them as objective properties. Let's say youdefined this objective as var in your objectives.yml file. You can access the variable in any conversation, event orcondition with %objective.var.key% - and in case of this example, it will resolve to value . The player can typesomething else, and the variable will change its value. Variables are per-player, so my key variable will be differentfrom your key variable, depending on what we were typing in chat. You can have as much variables here as youwant. To remove this objective use objective delete event - there is no other way.
You can also use variable event to change variables stored in this objective. There is one optional argument,no-chat . If you use it, the objective won't be modified by what players type in chat.
Example: variable
Kill player: kill
To complete this objective the player needs to kill another player. The first argument is amount of players to kill. You

can also specify additional arguments: name: followed by the name will only accept killing players with this name,required: followed by a list of conditions separated with commas will only accept killing players meeting these
conditions and notify will display notifications when a player is killed.
Example: kill 5 required:team_B
Breed animals: breed
This works only on Spigot 1.10.2 and later!
This objective is completed by breeding animals of specified type. The first argument is animal type (types) andsecond is amount (positive integer). You can add notify argument to display a message with remaining amounteach time the animal is bred. While you can specify any entity, the objective will be completable only for breedableones.
Example: breed cow 10 notify events:reward

Variables ListPlayer: player
This variable will be replaced with the name of the player. If you add display argument, it will use display nameinstead of real name.
Example: %player.display%
NPC: npc
It's a very simple variable. It's replaced by the name of the NPC in player's language.
Example: %npc%
Objective: objective
Using this variable you can display a property of an objective. The first argument is an ID of the objective as definedin objectives.yml (not the type). Make sure that the player has this objective active or it will be replaced with nothing(""). Second argument is the name of a property you want to display. All properties are described in "Objectives List"chapter.
Example: %objective.kill_zombies.left%
Point: point
This variable displays the amount of points you have in some category or amount of points you need to have toreach a number. The first argument is the name of a category and the second argument is either amount orleft:x , where x is a number.
Example: %point.reputation.left:15%
Item: item
With this variable you can display amount of specific items in player's inventory or a number needed to reachspecific amount. The first argument is the name of an item (as defined in items.yml) and the second one is eitheramount or left:x , where x is a number.
Example: %item.stick.amount%
Version: version
This variable displays the version of the plugin. You can optionally add the name of the plugin as an argument todisplay version of another plugin.
Example: %version.Citizens%
Location: location
This variable resolves to player's current location, formatted as an absolute location format (more about it in theReference chapter). The location will contain yaw and pitch. You can use it instead of coordinates as locationarguments in events, conditions and objectives.
Example: %location%

CompatibilityBetonQuest can hook into other plugins to extend its functionality. Currently there are 19 plugins: Citizens, Vault,EffectLib, MythicMobs, Magic, Skript, Denizen, WorldEdit, WorldGuard, mcMMO, Heroes, SkillAPI, RacesAndClasses,LegendQuest, Shopkeepers, Quests, PlaceholderAPI, HolographicDisplays and PlayerPoints.
CitizensIf you have this plugin you can use it's NPCs for conversations. I highly recommend you installing it, these NPCs areway more immersive. Having Citizens also allows you to use NPCKill objective.
Notice: When you use Citizens, in main.yml you need to specify the ID of the NPC instead of the name!
NPC kill objective: npckill
NPC Kill objective requires the player to kill an NPC with the given ID. You can also define how many times an NPChas to be killed. Right after objective's name there must be na ID of the NPC. You can also add an amount byamount: .
Example: npckill 16 amount:3 events:reward
NPC interact objective: npcinteract
The player has to right-click on the NPC with specified ID. It can also optionally cancel the action, so theconversation won't start. The first argument is number (ID of the NPC), and the second is optional cancel .
Example: npcinteract 3 cancel conditions:sneak events:steal
Move NPC event: movenpc
This event will make the NPC move to a specified location. It will not return on its own, so you have to set a singlepath point with /npc path command - it will then return to that point every time. If you make it move too far away, itwill teleport or break, so beware. You can change maximum pathfinding range in Citizens configuration files. Thefirst argument in this event is ID of the NPC to move. Second one is a location in a standard format (like inteleport event). You can also specify additional arguments: wait: is a number of tick the NPC will wait at its
destination before firing events, done: is a list of events fired after reaching the destination, fail: is a list ofevents fired if this event fails. Move event can fail if the NPC is already moving for another player.
Example:movenpc 121 100;200;300;world wait:20 done:msg_were_here,give_reward fail:msg_cant_go,give_reward
VaultBy installing Vault you enable Permission event and Money condition/event.
Permission event: permission
Adds or removes a permission or a group. First argument is add or remove . It's self-explanatory. Second is permor group . It also shouldn't be hard to figure out. Next thing is actual string you want to add/remove. At the end youcan also specify world in which you want these permissions. If the world name is ommited then permission/groupwill be global.
Example: permission remove group bandit world_nether
Money event: money
Deposits, withdraws or multiplies money on player's account. There is only one argument, amount of money to

modify. It can be positive, negative or start with an asterisk for multiplication.
Example: money -100
Money condition: money
Checks if the player has specified amount of money. You can specify only one argument, amount integer. It cannotbe negative!
Example: money 500
Money variable: money
There is only one argument in this variable, amount for showing money amount or left: followed by a number forshowing the difference between it and amount of money.
Example: %money.left:500%
MythicMobsHaving MythicMobs allows you to use MythicMobs MobKill objective and MythicMobs SpawnMob event.
MobKill objective: mmobkill
To complete this objective you need to kill specified amount of MythicMobs. The first argument must be the mob'sinternal name (the one defined in MythicMobs' configuration). You can optionally add amount: argument to specifyhow many of these mobs the player needs to kill. You can also add "notify" keyword if you want to display to playersthe amount of mobs left to kill.
Example: mmobkill SkeletalKnight amount:2 events:reward
SpawnMob event: mspawnmob
Spawn specified amount of MythicMobs at given location. The first argument is a location defined like100;200;300;world . Second is MythicMobs internal name (the one defined in MythicMobs' configuration)
followed by a colon and a level. Third one is amount and it's required!
Example: mspawnmob 100;200;300;world SkeletalKnight:1 5
McMMO
Level condition: mcmmolevel
This conditions checks if the player has high enough level in the specified skill. The first argument is the name ofthe skill, second one is the minimum level the player needs to have to pass this condition.
Example: mcmmolevel woodcutting 50
Experience event: mcmmoexp
This event adds experience points in a specified skill. The first argument is the name of the skill, second one is theamount of experience to add.
Example: mcmmoexp swords 1500
SkriptBetonQuest can also hook into Skript. Firstly, to avoid any confusion, I will refere to everything here by name of theplugin (Skript event is something else than BetonQuest event). Having Skript on your server will enable using

BetonQuest events and conditions in scripts, and also trigger them by BetonQuest event.
Skript event triggered by BetonQuest skript event
This entry will describe two things: Skript event and BetonQuest event.
1. Skript event - on [betonquest] event "id" - this is the line you use in your scripts to trigger the code.betonquest part is optional, and id is just some string, which must be equal to the one you specified in
BetonQuest event.2. BetonQuest event - skript - this event will trigger the above Skript event in your scripts. The instruction string
accepts only one argument, id of the event. It have to be the same as the one defined in Skript event for it to betriggered.
Example: in your script: on betonquest event "concrete": in events.yml:fire_concrete_script: skript concrete
Skript condition
You can check BetonQuest conditions in your scripts by using the syntaxplayer meets [betonquest] condition "id" . betonquest is optional, and id is the name of the condition, as
defined in conditions.yml.
Example: in your script: player meets condition "has_ore" in conditions.yml: has_ore: item iron_ore:5
Skript event
You can also fire BetonQuest events with scripts. The syntax for Skript effect isfire [betonquest] event "id" for player . Everything else works just like in condition above.
Example: in your script: fire event "give_emeralds" for player in events.yml:give_emeralds: give emerald:5
WorldGuard
Region objective: region
To complete this objective you need to enter WorldGuard region with specified name. The only argument ininstruction string is name of the region.
Example: region beton events:kill
Region condition: region
This condition is met when the player is inside the specified region. The only argument is the name of the region.
Example: region beton
WorldEdit
Paste schematic event: paste
This event will paste a schematic at the given location. The first argument is a location and the second one is thename of schematic file. The file must be located in WorldEdit/schematics and have a name likesome_building.schematic .
Example: paste 100;200;300;world some_building
EffectLib

If you install this plugin on your server you will be able to set a particle effect on NPCs with conversations and useparticle event.
You can control the behaviour of particles around the NPCs in config.yml file, in effectlib_npc_effect section. Alloptions here are described on the EffectLib page, except for delay . This option controls how often the effect isdisplayed (in seconds). The effect will be fired from the exact location of the NPC, upwards.
If you don't want to use particle effects on your NPCs just add disabled: 'true' in the effectlib_npc_effectsection.
Particle event: particle
This event will load an effect defined in effects section in custom.yml file and display it on player's location. Theonly argument is the name of the effect. You can optionally add loc: argument followed by a location written like100;200;300;world;180;-90 to put it on that location.
Example in custom.yml:
effects: beton: class: HelixEffect iterations: 100 particle: smoke helixes: 5 circles: 20 grow: 3 radius: 30
Example: particle beton loc:100;200;300;world;180;-90
PlayerPoints
PlayerPoints event: playerpoints
This event simply adds, removes or multiplies points in the PlayerPoints plugin. The only argument is a number, itcan be positive, negative or prefixed with an asterisk for multiplication.
Example: playerpoints *2
PlayerPoints condition: playerpoints
This condition simply checks if the player has specified amount of points in the PlayerPoints plugin. The onlyargument is a number.
Example: playerpoints 100
HeroesWhen you install Heroes, all kills done via this plugin's skills will be counted in MobKill objectives.
Experience event: heroesexp
This event simply gives the player specified amount of Heroes experience. The first argument is either primary orsecondary and it means player's class. Second one is the amount of experience to add.
Example: heroesexp primary 1000
Class condition: heroesclass
This condition checks the classes of the player. The first argument must be primary , secondary or mastered .Second is the name of a class or any . You can optionally specify level: argument followed by the required levelof the player.
Example: heroesclass mastered warrior
Skill condition: heroesskill
This condition checks if the player can use specified skill. The first argument is the name of the skill.
Example: heroesskill charge
Magic
Wand condition: wand
This condition can check wands. The first argument is either hand , inventory or lost . If you choose lost , thecondition will check if the player has lost a wand. If you choose hand , the condition will check if you're holding awand in your hand. inventory will check your whole inventory instead of just the hand. In case of hand andinventory arguments you can also add optional name: argument followed by the name of the wand (as defined
in wands.yml in Magic plugin) to check if it's the specific type of the wand. You can also use optional spells:argument, followed by a list of spells separated with a comma. Each spell in this list can have defined minimal levelrequired, after a colon.
Example: wand hand name:master spells:flare,missile:2
Denizen
Script event: script
With this event you can fire Denizen task scripts. Don't confuse it with skript event, these are different. The firstand only argument is the name of the script.
Example: script beton
SkillAPI
Class condition: skillapiclass
This condition checks if the player has specified class or a child class of the specified one. The first argument issimply the name of a class. You can add exact argument if you want to check for that exact class, withoutchecking child classes.
Example: skillapiclass warrior
Level condition: skillapilevel
This condition checks if the player has specified or greater level is the specified class. The first argument is classname, the second one is the required level.
Example: skillapilevel warrior 3
QuestsQuests is another questing plugin, which offers very simple creation of quests. If you don't want to spend a lot oftime to write advanced quests in BetonQuest but you need a specific thing from this plugin you can use Custom

Event Reward or Custom Condition Requirement. Alternatively, if you have a lot of quests written in Quests, but wantto integrate them with the conversation system, you can use quest event and quest condition.
Event Reward (Quests)
When adding rewards to a quest or a stage, choose "Custom reward" and then select "BetonQuest event". Nowspecify event's name and it's package (like package.eventName ). Quests will fire BetonQuest event when thisreward will run.
Condition Requirement (Quests)
When adding requirements to a quest, choose "Custom requirement" and then select "BetonQuest condition". Nowspecify condition's name and it's package (like package.conditionName ). Quests will check BetonQuest conditionwhen starting the quest.
Quest event: quest (BetonQuest)
This event will start the quest for the player. The first argument must be the name of the quest, as defined in nameoption in the quest. If the name contains any spaces replace them with _ . You can optionally addcheck-requirements argument if you want the event to respect this quest's requirements (otherwise the quest will
be forced to be started).
Example: quest stone_miner check-requirements
Quest condition: quest (BetonQuest)
This condition is met when the player has completed the specified quest. The first and only argument is the name ofthe quest. It it contains any spaces replace them with _ .
Example: quest stone_miner
Shopkeepers
Open shop window event: shopkeeper
This event opens a trading window of a Villager. The only argument is the uniqueID of the shop. You can find it inShopkeepers/saves.yml file, under uniqueID option.
Example: shopkeeper b687538e-14ce-4b77-ae9f-e83b12f0b929
Shop amount condition: shopamount
This condition checks if the player owns specified (or greater) amount of shops. It doesn't matter what type theseshops are. The only argument is a number - minimum amount of shops.
Example: shopamount 2
PlaceholderAPIIf you have this plugin, BetonQuest will add a betonquest placeholder to it and you will be able to use ph variablein your conversations.
Placeholder: betonquest
In any other plugin which uses PlaceholderAPI you can use BetonQuest variables with%betonquest_package:variable% placeholder. The package: part is the name of a package. If you skip this, the
plugin will assume you're using that variable in default package. The variable part is just a BetonQuest variablewithout percentage characters, like point.beton.amount .
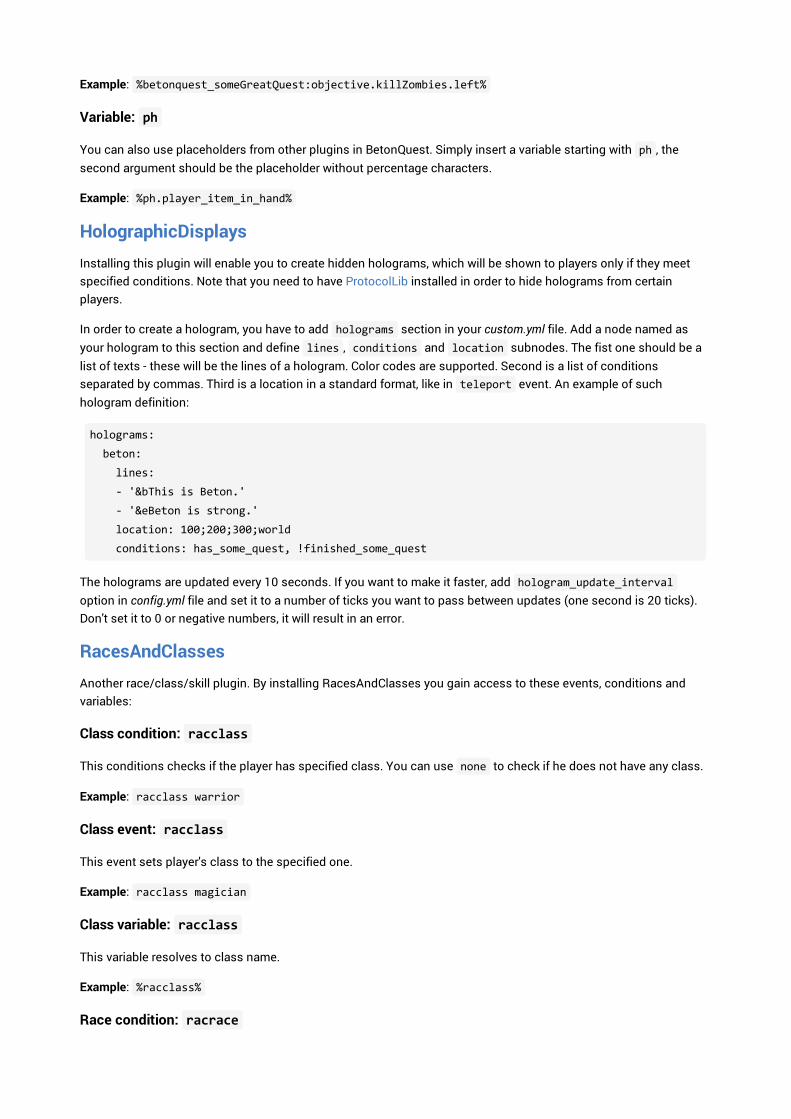
Example: %betonquest_someGreatQuest:objective.killZombies.left%
Variable: ph
You can also use placeholders from other plugins in BetonQuest. Simply insert a variable starting with ph , thesecond argument should be the placeholder without percentage characters.
Example: %ph.player_item_in_hand%
HolographicDisplaysInstalling this plugin will enable you to create hidden holograms, which will be shown to players only if they meetspecified conditions. Note that you need to have ProtocolLib installed in order to hide holograms from certainplayers.
In order to create a hologram, you have to add holograms section in your custom.yml file. Add a node named asyour hologram to this section and define lines , conditions and location subnodes. The fist one should be alist of texts - these will be the lines of a hologram. Color codes are supported. Second is a list of conditionsseparated by commas. Third is a location in a standard format, like in teleport event. An example of suchhologram definition:
holograms: beton: lines: - '&bThis is Beton.' - '&eBeton is strong.' location: 100;200;300;world conditions: has_some_quest, !finished_some_quest
The holograms are updated every 10 seconds. If you want to make it faster, add hologram_update_intervaloption in config.yml file and set it to a number of ticks you want to pass between updates (one second is 20 ticks).Don't set it to 0 or negative numbers, it will result in an error.
RacesAndClassesAnother race/class/skill plugin. By installing RacesAndClasses you gain access to these events, conditions andvariables:
Class condition: racclass
This conditions checks if the player has specified class. You can use none to check if he does not have any class.
Example: racclass warrior
Class event: racclass
This event sets player's class to the specified one.
Example: racclass magician
Class variable: racclass
This variable resolves to class name.
Example: %racclass%
Race condition: racrace

This condition checks if the player has specified race. You can use none to check if he does not have any race.
Example: racrace Elv
Race event: racrace
This event sets player's race to the specified one.
Example: racrace Orc
Race variable: racrace
This variable resolves to race name.
Example: %racrace%
Level condition: raclevel
This condition is met if the player has a level equal or greater than specified.
Example: raclevel 5
Level event: raclevel
This event adds (or removes if negative) levels.
Example: raclevel -2
Level variable: raclevel
This variable has 2 possible arguments: amount will resolve to player's level and left: will display how manylevels the player lacks to the specified number.
Example: %raclevel.left:5%
Experience condition: racexo
This condition is met if the player has experience equal or greater than specified.
Example: racexo 600
Experience event: racexo
This event adds (or removes if negative) experience.
Example: racexo 100
Experience variable: racexo
This variable has 2 possible arguments: amount will resolve to player's experience and left: will display howmuch experience the player lacks to the specified number.
Example: %racexo:amount%
Mana condition: racmana
This condition is met if the player has mana equal or greater than specified.
Example: racmana 1

Mana event: racmana
This event adds (or removes if negative) mana. You can use refill instead of a number to simply set mana toplayer's maximum.
Example: racmana refill
Trait condition: ractrait
This condition checks if the player has the specified trait.
Example: ractrait SwordDamageIncreaseTrait
LegendQuest
Class condition: lqclass
Checks if the player has specified class. It can also check subclass if you add --subclass argument.
Example: lqclass Cleric
Race condition: lqrace
Checks if the player has specified race.
Example: lqrace Dwarf
Attribute condition: lqattribute
Checks player's attributes. The first argument is attribute (STR, CON, DEX, INT, WIS, CHR) and the second argumentis a number - minimal required level of the attribute.
Example: lqattribute INT 10
Karma condition: lqkarma
Checks if the player has specified amount of karma. The only argument is a number - minimal amount of karmarequired.
Example: lqkarma 20
Class variable: lqclass
Resolves to player's class.
Example: %lqclass%
Race variable: lqrace
Resolves to player's race.
Example: %lqrace%
Attribute variable: lqattribute
Resolves to player's attribute. The first argument is name of the attribute (like in lqattribute condition), secondone is either amount or left: followed by a number. First of these will simply display attribute level and secondwill display the difference between attribute level and the number.
Example: %lqattribute.str.left:13

Karma variable: lqkarma
Resolves to player's karma. The only argument here is either amount or left: followed by a number. First of thesewill simply display karma amount and second will display the difference between karma amount and the number.
Example: %lqkarma.amount%

Tips and tricksHandling death in your questsSometimes, while writing a dangerous quest you will want something specific to happen when the player dies. If it'sa boss battle you may want to fail the quest, if it's a dungeon you may want to respawn the player at the beginning ofa level etc. You can do that with die objective - simply start it for the player at the beginning of the quest and makeit fire events that will do the thing you want (like teleporting the player to desired respawn point, removing tags setduring the quest etc). You can add persistent argument to the objective instruction string to make it active evenafter completing it. Remember to delete it after the quest is done!
Creating regions for one player at the timeImagine you have a room to which the player is teleported. Then suddenly mobs start to spawn and the player mustkill them (because it's a trap or something). The player has killed all the mobs, he got a tag and wants to proceed butall of the sudden another player teleports into the room and all the mobs start to spawn again. The first player isquickly killed and the second one easily kills all mobs. You can prevent such situations by using party condition.Just check with it if the party consisting of "players inside the room" has greater amount of players that 1. Set therange to something big enough so it covers the room and the party condition can be tag or location.
Racing with folder eventSince folder event can run tag events even for offline players you can create races. Create location objectivewhere you want the finish line to be and condition it with negated "race_failed" tag (or similar). It will mean that "if theplayer has not failed the race, he can win it by reaching the location". Now when the race starts fire folder eventwith the amount of time you want to give your players to complete the race. This event should set "race_failed" tag. Ifthe player reaches the location before this tag is set, he will fire all events in that location objective, but if the timehas passed, the objective will not be completed. You can figure the rest out for yourself.
Random daily questsStarting the random quest must be blocked with a special tag. If there is no such tag, the conversation optionshould appear. Create a few quests, each of them started with single folder event (they must be started by singleevent!). Now add those events to another folder event and make it random:1 . At the end of every quest adddelay which will reset the special blocking tag. Now add that folder event to the conversation option. When the
player chooses it he will start one random quest, and the conversation option will become available after defined indelay objective time after completing the quest.
Each day different quest (same for every player)To do this use something called "Static event". Using the static event run folder event every day at some late hour(for example 4am). The folder event should be random:1 and contain several different setblock events. Theseevents will set some specific block to several different material types (for example dirt, stone, wood, sand etc). Nowwhen the player starts the conversation and asks about the daily quest the NPC should check (usingtestforblock condition) which type of block is currently set and give the player different quest, depending on the
block type.
Make the NPC react randomlyImagine you want to lie to NPC and he has 15% chance of believing you completely, 35% of being suspicious and50% of not believing at all. The common denominator for those percentages is 20, so we can write it as 3/20, 7/20and 10/20. The NPC will check options one after another until it finds one which meets all conditions. We will userandom condition with our options. The first one will have 3-20 chance (that's the format used by random
condition). If this condition fails, the NPC will check next option. But it won't be 7-20 , because we already "used" 3of 20. If you wrote it like that, the chance would be too low. That's why it will be 7-17 . The third option should have

10-10 (because 17 - 7 = 10 and 50% is 10/20), but as you can see it will always be true. It's because we wantthe last option to be shown if both previous fail. You don't have to add the last condition at all.
Quest GUIIf you want your players to be able to choose a quest everywhere, every time, then you can create a conversationwhich can be started with an item. This one is a little hacky but it shows flexibility of BetonQuest. First you need aconversation which behaves as a quest choosing GUI. Name the NPC "Quester", add one option for each quest etc.Now you need an objective which will start this conversation using conversation event. It should be actionobjective, set to right click on any block. Add hand condition to make it accept only clicks with a specific item andmake the objective persistent (so players can use it multiple times). The item used here should be marked asQuest Item so players can't drop it. Now define new global location covering your whole map and using it start theobjective and give players the item. This way all players (existing and new) will get the quest item, which opens aGUI with quests when right clicked.

Frequently Asked QuestionsIf you have any questions please read it first. It's very likely that it has been already asked and answered. If not, feelfree to make an Issue or a comment on any of plugin's pages across the Internet.
Q: I updated to 1.9 version and I'm getting a lot of errors in the console.
A: Unless these are stack traces (that impossible to understand code stuff), the errors are correct. Version 1.9 hasan improved quest checking mechanism and it can detect more bugs in your setup. Most notably, it detects usageof undefined events, conditions and objectives.
Q: Can you make conversation options clickable?
A: Open config.yml file and set default_conversation_IO option to "tellraw". You can also set it to "chest" if youwant conversations to be displayed in an inventory GUI.
Q: Can you add particles over NPCs' heads like in Quests plugin?
A: Install EffectLib.
Q: The players don't know they have to end a conversation, can you add "auto-ending" when they walk away?
A: Set stop option to "false" in conversation file.
Q: I have an error which says "Cannot load plugins/BetonQuest/{someFile}.yml", what is wrong?
A: You have incorrect YAML syntax in your conversation file. Check it with YAML Lint to see what's wrong. Usuallyit's because you started a line with ! or & , forgot colons or made some weird things with apostrophes.
Q: Where is a command for creating quests?
A: There is no such command. BetonQuest is too complex to edit it with chat, commands and inventory windows. Ifyou don't like editing files directly you can get the editor.
Q: Conversations are not working! I created NPC "Innkeeper" and he won't talk to me.
A: Conversations are not linked to an NPC through names, as you can have multiple Innkeepers. You need toconnect them with their ID. Read this.
Q: Could you add some feature?
A: Check if it wasn't already added in development versions. You can see all changes in the changelog.

Info for developersAccessing the pluginYou can either add BetonQuest.jar directly to your build path or use Maven. First option if you're using Eclipse:
1. Create a folder called lib in your project folder.2. Put BetonQuest.jar in this folder.3. Refresh your project in Eclipse.4. In Eclipse Project Explorer right click on BetonQuest.jar and select Build Path -> Add to Build Path .
And if you're using Maven simply add this to your pom.xml:
<repositories> <repository> <id>betonquest-repo</id> <url>http://betonquest.betoncraft.pl/mvn</url> </repository></repositories>
<dependencies> <dependency> <groupId>pl.betoncraft.betonquest</groupId> <artifactId>BetonQuest</artifactId> <version>1.8.5</version> </dependency></dependencies>
Writing eventsWriting events is the easiest. You need to create a class extending QuestEvent for each new event. Theconstructor must take one argument, an Instruction object. In the constructor you must extract all informationfrom the instruction, for example skill names, locations etc. The description of the Instruction class is downbelow. Don't worry about checking event conditions, these are handled by the rest of BetonQuest's logic.
Events are not bound to any player so firing it is done through fire(String playerID) method. You have tooverride it with your code responsible for doing stuff your event should do. Here you should use data previouslyparsed by the constructor. Don't access Instruction object here, it will lower the performance. You can convertplayerID to Player object using the PlayerConverter class (it's a relict of times when both UUIDs and names
could be used in Bukkit to identify players).
If you want your event to be persistent, you need to set super.persistent variable to true in the constructor.This will make BetonQuest run this event even if the playerID points to an offline player, so prepare your code forthat.
If you want your event to be static, you need to set super.staticness variable to true in the constructor. Thiswill allow BetonQuest to run this event with playerID set to null , so prepare your code for that.
When you'll finish your class you need to invokeregisterEvents(String name, Class<? extends QuestEvent> class) from BetonQuest instance (which you
can get using BetonQuest.getInstance() static method). The name for your event will be used in instructionstrings (such as "journal" for journal event). The class argument is the Class object of your event. You can get itusing YourEvent.class . That's it, you created an event. Don't forget to check it for bugs!
Writing conditions

Writing conditions is easy too. They must extend Condition and override check(String playerID) method,which should return true or false , depending on if the condition was met. You register them usingregisterConditions(String name, Class<? extends Condition) method from BetonQuest instance as well.
The rest is almost the same, you're defining the constructor which will parse the Instruction object andoverriding check(String playerID) method to check if the player meets the condition. Don't worry aboutinverting it, as it's automatically done by BetonQuest.
Conditions are always getting an online player in the check(String playerID) method, so you don't need tocheck that manually.
Writing objectivesObjectives are more complicated because they use event handlers and they must store players' data. They extendObjective class. As always, you need to extract all data from supplied Instruction object in the constructor.
Don't register listeners in the constructor!
If your objective handles changing data (like amount of mobs left to kill) you should create a class extendingObjectiveData . For example block objective does need to store amount of blocks left to place/break, and it does
that using "BlockData" class. In the constructor it receives three strings: data string, ID of the player and ID of theobjective. The latter two are used by BetonQuest to correctly save and load the former one from the database.
The data string should contains all the information you need in your objective. You must write a parser which willextract the information, methods used in the objective to alter the information, and override the toString()method in so it returns data string in the format parsable by your parser. Everytime the data in your object changes(like when killing a mob), you need to call update() method. It will save the data to the database.
Now you should override getDefaultDataInstruction() method. It must return the default data instructionunderstandable by your parser. For example in tame objective it will return the amount of mobs to tame. If you don'tuse data objects, just return an empty string (not null , just "" ).
In order for your objective to use the data object you have created you need to set the template variable to thisobject's class. If you're not defining the data object (because you don't need to handle the changing data), youshould set the template simply to ObjectiveData.class .
Every time your objective accepts the player's action (for example killing the right mob in MobKill objective) it mustbe also verified with checkConditions() method. You don't want your objective ignoring all conditions, right?When you decide that the objective is completed you should call completeObjective() method. It will fire allevents for you, so you don't have to do this manually.
start() and stop() methods must start objective's listeners and stop them accordingly. It's because the pluginturns the objective's listeners off if there are no players having it active. Here usually you will register/unregisterlisteners, but some objectives may be different. For example delay objective starts and cancels a runnable,instead of using listeners.
If your objective has some properties (used in variables) you should override theString getProperty(String property, String playerID) method. At runtime, if anyone uses%objective.yourObjective.theProperty% variable, BetonQuest will call that method with theProperty keyword
as the first argument. Using it you should parse the data of the objective and return it as a String. If the suppliedproperty name is incorrect or there was an error during getting the value, return an empty String and optionally logan error ( Debug.error(String message) ).
Objectives are registered the same way as conditions and events, usingregisterObjective(String name, Class<? extends Objective>) method.
Reading Instruction object
The Instruction object parses the instruction string defined by the user and splits it into arguments. You can ask

it for required arguments one by one with next() method or a parser method like getQuestItem() . Requiredarguments are the ones specified at the very beginning of an instruction string, for example add someTag in tagevent. It will automaticly throw InstructionParseException for you if it encounters an error, for example whenthere were no more arguments in user's instruction or it can't parse the argument to the type you asked for.
You can also ask for optional arguments: if the instruction string contains argument arg:something and you askfor optional arg , it will give you something . If there is no optional argument, it will return null . Don't worry aboutpassing that null to parser methods like getLocation(String) , they won't throw an error, they'll simply returnthat null .
Parser methods are there for your convenience. You could write a location parser for yourself, but there's no need forthat, you can just use getLocation() or getLocation(String) method and receive LocationData object. Theformer method is simply getLocation(next()) .
If your instruction is more complicated and Instruction class doesn't provide necessary methods, you can stillparse the instruction string manually. You can get it with getInstruction() method. Just remember to throwInstructionParseException when the instruction supplied by the user is incorrect. BetonQuest will catch them
and display a message in the console.
Writing variablesAll variables need to extend Variable class. In the constructor you must parse the instruction and extract allinformation about your variable's behavior. Then you have to override the String getValue(String playerID)method. It should return the value of the variable for the supplied player. If it's impossible, it should return an emptyString. Registering variables is done viaBetonQuest.registerVariable(String name, Class<? extends Variable> variable) method.
Firing eventsThe plugin has a static method for firing events - event(String playerID, EventID eventID) . First parameter isID of the player. Second one represents ID of the event. To get it, simply create an instance of the EventID class.You can't fire an event directly using an instruction string.
Checking conditionsBetonQuest has static boolean method condition(String playerID, String conditionID) . It works similarlyas event method described above.
Starting objectivesThe newObjective(String playerID, String objectiveID) method will launch the objective from start. Youcan however use resumeObjective(String playerID, String objectiveID, String instruction) to passyour own ObjectiveData instruction to the objective. It will not be saved to the database, because it is assumedthat the objective has just been loaded from it and it exists there without any change. You should save it manually.
Creating additional conversation input/output methodsIn order to register an object as the conversation input/output it needs to implement ConversationIO interface.The constructor will receive three arguments: Conversation object, playerID String and NPC name String. It needs toparse the required data here and register all needed listeners. The setResponse(String response) method willreceive NPC's text from the conversation. The addOption(String option) method will be called by theconversation for each reply option for this NPC text. The object must store all this data and when display() iscalled, it must use it to display the player the output. When it detects that the player chose an answer, it should passit to the conversation using Conversation.passPlayerAnswer(int number) method. The integer is the number ofthe answer, starting at 1. clear() method will be called at the beginning of the new conversation cycle. It shouldclear all the previous options, so they do not overlap. end() method will be called when the conversation ends and
it should unregister all listeners. You can also call that message when you detect that the player forcedconversation ending (for example by moving away from the NPC). Remember to notify the conversation about thatusing Conversation.end() .
Registering the conversation inputs/outputs is done in the same way as objectives, events and conditions, throughBetonQuest.registerConversationIO(String name, Class<? extends ConversationIO>) method.
Listening to BetonQuest (Bukkit) eventsBetonQuest calls Bukkit events on a few occasions: when a conversation is started, finished and when an option isselected. You can find these events in pl.betoncraft.betonquest.api package and use them in your plugins. Ifyou need any additional events just open and issue on GitHub or send me a pull request.
DebuggingYou can debug your code using Debug class.

ContributingDo you like my work here? There are some ways you can help to make this plugin even better.
New ideasNeed something? Or just have a brilliant idea? Head to the Issues and create new one. Just remember to start thetitle with uppercase letter or I will edit it!
Bug reportsFound a bug? Great, create new issue so I can fix it in the next version!
TranslationsI love to see this plugin used by people from other countries. I would be happy if you could translate it to yourlanguage and share the translation with me. Just remember one thing - all special characters must go to advanced-messages.yml. The original messages.yml cannot contain any of them, because some servers are not able to parsespecial chars and throw errors while loading the configuration.
Contributing codeIf you know Java and Bukkit you can take some issue and create pull request. Just let me know and remember thesefew things:
The contributed code should be well tested and fully working.Use only tabs for indentation.Wrap your code at 120th column (most of the code should be wrapped).Comment everything so the code is easy to understand for everyone.Use block comments to document classes, methods and fields.
Positive feedbackI really like to hear that people are using my plugin. If you've got a server and have made a few quests just let meknow so I can check it out ^^
DonationsIf you have some spare money and REALLY like this plugin you can donate here. This project however is notdependent on donations, so it's really optional :)