feature article - steven kovacik-luthier" · guitarmaker 96 summer 20167. 3. feature article ....
TRANSCRIPT

Guitarmaker 96 Summer 20167 3
Feature Article
CONVERSION OF A 1938 MARTIN 00-40H HAWAIIAN GUITAR
By Steven Kovacik
Martin made several models of Hawaiian guitar during the Hawaiian music craze of the 20s and 30s. The most desirable is generally thought to be the 00-40H,
as it was one of the larger production Hawaiian guitars, it was rosewood rather than mahogany or Koa, and it was adorned with pearl trim. Martin made fewer than 250 of this model, and many of them have been converted to Spanish style play as the popularity of Hawaiian music faded and with it the population
of Hawaiian style guitar players. (Photo 1)
This 00-40H came to the shop for conversion in 2015. The process of conversion generally involves the following processes:
Reset of the neck angle: Martin •Hawaiian guitars were built to be played with a slide bar and with very high action, and to accommodate this Martin set the neck angle much shallower than one would when building a guitar for Spanish style play.
Removal of the frets, radius of •the fret board and re-fret with bar frets: MartinHawaiians had flatfret boards (no radius), and the originalbarfretsweregroundflushwith the fret board. The frets are removed, the fret board radiused, and new bar frets installed.
Filling and re-slotting the bridge saddle slot: Hawaiian •guitars had straight saddles, that is, there was no compensation to the saddle slot for intonation as the Hawaiian player controlled intonation with bar position.
New nut: the originals were very high for slide play, so a •new nut with proper height for Spanish play is made and installed.
The process begins with removal of the neck. First, the fret board extension is heated to weaken the bond between the board and the top of the guitar. I use a small Watlo heating blanket to heat the board for several minutes. When I can feel the heat by placing my hand inside the spruce top under the fret board, it is time to begin working the board loose with a thin spatula (Photo 2). Beginning at the corners, I test the bond of the glue. If the resistance to sliding the spatula under the board is too great I'll put the heat pad back on the fret board for several more
minutes, until the spatula slides easily between the fret board and the top, offering little resistance. When the glue reaches the right temperature the bond will loosen with little force. Care is taken to note the direction of any grain run out in the top when inserting the spatula. The spatula is worked under the board in the same direction as the run out grain (if any), as to go against the run out risks fracturing the top.
I'll generally loosen the top to within 1 fret of the dovetail (on this guitar, the 14th fret, as the 13th fret is just directly over the dovetail). The part of the
1
2

4 THE ASSOCIATION OF STRINGED INSTRUMENT ARTISANS
board closest to the dovetail is left glued in order to reduce the likelihood of steam escaping from the top of the dovetail pocket underneath the board. Next, the 13th fret is pulled from the fret board. This can be tricky on a MartinHawaiian,as theflushgroundfrets can be hard to raise so that they can be grasped with a tool to pull the fret. Once the 13th fret is out, a small hole is drilled through the 13th fret slot into the gap that exists in the front of the dovetail pocket (Photo 3). The hole drilled is no larger than the fret slot itself, and just accommodates the steam needle that I use during neck removal. Some luthiers will drill two holes in the fret slot, which allows for the control of where steam will escape (you'd like to avoid having it escape around the heel or under the fret board), but I've always drilled one as opposed to two as I believe that the containment of the steam hastens the softening of the glue and ends up requiring less steam over all to achieve removal.
Next, steam is injected into the joint to break the glue bond holding the neck to the body (Photo 4). I use an old Mr. Coffee espresso machine to generate the steam, and have a small valve on the steam arm to allow for good control of the steamflow. After aminuteortwo of steam injection, I'll attempt to wiggle the neck in the joint to see if it is beginning to loosen. If there is no movement then more steam is applied. Once movement is detected I'll attempt removal using the Stew-Mac neck removaljig.Applyingalittlepressurewith the jig will tell me if the neck is ready to come off, as it will push the neck out easily once the glue bond is broken.Ifitisstillfirmlyattached,orloose but not quite enough to come off, then I'll repeat the steam, wiggle and jig process. Typically, a neck glued on with hide glue will come apart in a few short minutes. Titebond generally takes a little longer to loosen and is more stubborn. Given that the neck joint on this one had never been disturbed, the joint was secured with hide glue and came apart easily (Photo 5).
Once the neck is off the dovetail and
3
4

Guitarmaker 96 Summer 20167 5
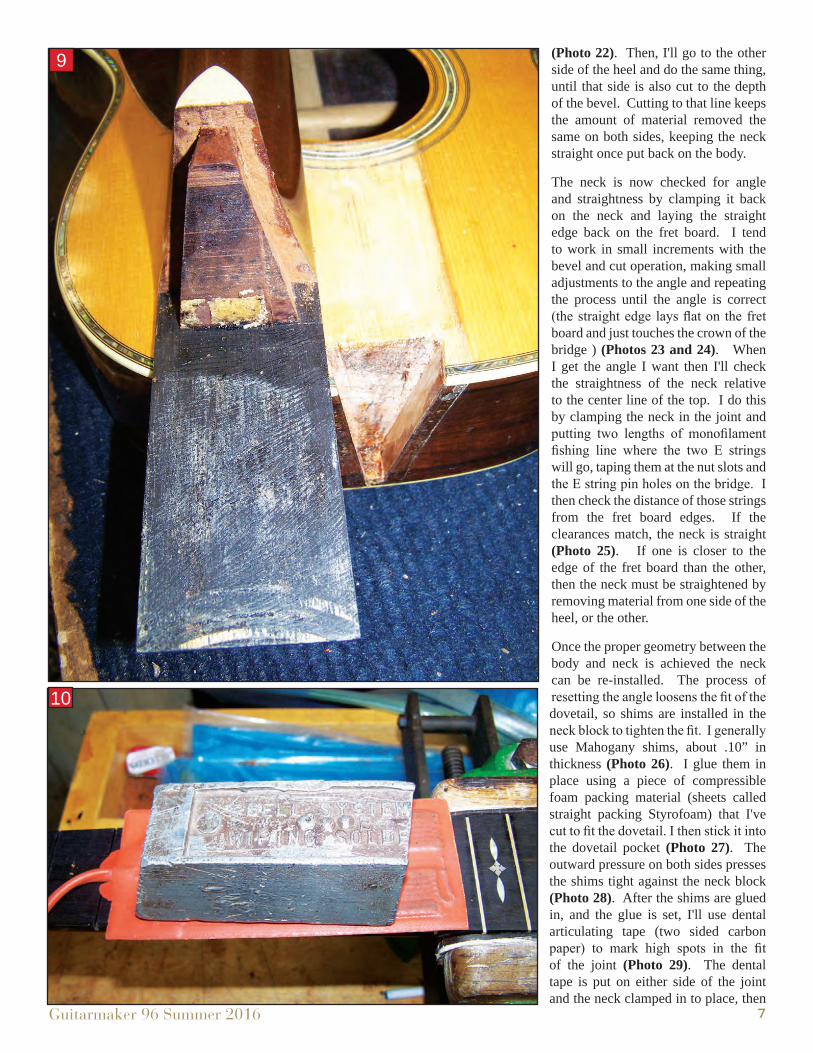
5 dovetail pocket it must be cleaned of old glue and any old shims that may be present. This joint had been shimmed on the bass side at the time the guitar was made, you can see the remnant of the maple shim, part of it still attached to the dovetail, the other part still stuck inside the neck block. (Photos 6 and 7). Afterremovingtheoldshimwitha chisel, I cleaned up the heel, dovetail and dovetail pocket from old glue residue. Excess glue is removed from the dovetail with a chisel. On the top of the guitar and underside of the fret board I use a rag dampened with warm water, as this will soften and remove old hide glue (Photos 8 and 9).
Now that the neck is off it is time to go to work on the fret board. Removal of these frets can be tricky as I noted earlier, as there's nothing protruding above the fret board that you can grab on to for removal. In addition, these old fret boards are often quite brittle and care must be taken not to chip the surface of the fret board when removing the frets. I use the Watlo blanket (with a small lead block to hold it in one spot) to heat the frets and fret board (Photo 10). Heating both generally makes removal easier with less risk of chipping, though chips sometimes still occur.Afterthefretsandfretboardareheated I use a small awl to get under the very end of the fret and gently raise it above the surface of the fret board. (Photo 11)Then,flushgroundnippersare used to remove the fret the rest of the way.
The fret board must be radiused before installing the new bar frets. I use a 16” radius sanding block with double stick 80 grit paper attached to establish the radius. Using a yellow marking pencil, I'll color the surface of the fretboard yellow so that I can observe my progress (Photo 12). Using the block along the length of the board, I'll sand the radius into the board, stopping to check progress every few minutes (Photo 13). The yellow marking allows me to see the radius, beginning on the edges and moving toward the center of the fret board. (Photo 14). Once I've sanded to the point that there is no more yellow marking down the
6

6 THE ASSOCIATION OF STRINGED INSTRUMENT ARTISANS
center of the fret board I know I've achieved the radius I want. I'll check along the length of the board with a radius gauge to make sure it is good all along the length of the board (Photo 15). Then I'll change to 120 grit on the radius block and sand justenoughtoremovethe80gritscratches.Afterthatfollowwith 220 grit. Now the neck can be re-fretted.
Theoriginalflushgroundfretsareshortenoughthattheycannotbe used again, unless they are shimmed up from the bottom of the fret slots. This can be done successfully, but I prefer to install new fret wire, as opposed to using the old frets, with shims. Bar frets have no tang on the bottom, as do T frets, so the properfittothefretslotiscritical.Asnugfitisimportantasthe
bar frets are part of the overall stiffness of the neck; frets that fit too looselywill mean that the neck will relieve more than desired under tension. The frets should tap easily into the fret slots but with a little resistance (Photo 16). I use a cradle that I made in my shop, to hold the neck on the bench, while thefretsaretappedin.Afterthefretsare installed they must be radiused to match the curvature of the fret board; then crowned and the ends dressed as you would standard frets. On bar fret wire this involves a good deal more time and labor to accomplish. Bar frets are much more labor intensive to install, level, crown and dress than standard frets (Photo 17).
With the frets installed it is time to set the neck angle. Photos 18 and 19 show the neck set into the joint with the body and a notched straight edge laid along the fret board (Photo 18). When the
neck angle is perfect for Spanish style play, the straight edge shouldrestflushonthefretboard,skippingoverthefrets,andrestingjustatopthecrownofthebridge.Asyoucansee,thereis a gap over 1/8” at the body joint, which means that the neck angle has to be tipped back in order to achieve proper playability (Photo 19). This is accomplished by removing material from the bearing face of the heel (the 'cheek'), removing the most at the bottom of the heel and tapering to nothing just under the fret board at the body joint.
Different craftsmen do this operation in different ways. Some remove the material with a chisel, some with sandpaper, and some with a sharp flatfile...Ihavedoneallthreewaysatdifferenttimes,andIpreferusingafile.I can work quickly without the concern for cutting too deep or too locally as one can with a sharp chisel...the filecuts along the length of the heel all at once, and therefore keeps the cheek of the heel dead flat along its lengthwith little effort. I begin by making ashallowbevelcutwithafileon theback edge of the heel (Photo 20). This will serve as a way to observe my progress as I remove material from the heel. I then remove material from one side of the heel, taking material down to the limit of the bevel I've described (Photo 21). By focusing the pressure on the file to the bottom of the heel,I remove more at the bottom, little to nothing at the top. Once I've hit the line of the bevel, I stop on that side
7
8
Guitarmaker 96 Summer 20167 7
(Photo 22). Then, I'll go to the other side of the heel and do the same thing, until that side is also cut to the depth of the bevel. Cutting to that line keeps the amount of material removed the same on both sides, keeping the neck straight once put back on the body.
The neck is now checked for angle and straightness by clamping it back on the neck and laying the straight edge back on the fret board. I tend to work in small increments with the bevel and cut operation, making small adjustments to the angle and repeating the process until the angle is correct (the straight edge lays flat on the fret board and just touches the crown of the bridge ) (Photos 23 and 24). When I get the angle I want then I'll check the straightness of the neck relative to the center line of the top. I do this by clamping the neck in the joint and putting two lengths of monofilament fishing line where the two E strings will go, taping them at the nut slots and the E string pin holes on the bridge. I then check the distance of those strings from the fret board edges. If the clearances match, the neck is straight (Photo 25). If one is closer to the edge of the fret board than the other, then the neck must be straightened by removing material from one side of the heel, or the other.
Once the proper geometry between the body and neck is achieved the neck can be re-installed. The process of resetting the angle loosens the fit of the dovetail, so shims are installed in the neck block to tighten the fit. I generally use Mahogany shims, about .10” in thickness (Photo 26). I glue them in place using a piece of compressible foam packing material (sheets called straight packing Styrofoam) that I've cut to fit the dovetail. I then stick it into the dovetail pocket (Photo 27). The outward pressure on both sides presses the shims tight against the neck block (Photo 28). After the shims are glued in, and the glue is set, I'll use dental articulating tape (two sided carbon paper) to mark high spots in the fit of the joint (Photo 29). The dental tape is put on either side of the joint and the neck clamped in to place, then
9
10

8 THE ASSOCIATION OF STRINGED INSTRUMENT ARTISANS
11
12
13
14
15
16

Guitarmaker 96 Summer 20167 9
removed. The dental tape will leave carbon marks on the high spots (contact spots) of the joint (Photo 30). A sharp chisel is used to carve away any carbon marked high spots on the shims. Care is taken to remove only a small amount of material. After the carbon markings are chiseled off, the carbon paper fit process is repeated. Each time this operation is done, the neck will drop a little further in the dovetail pocket, until the fret
17
18
19
board is flush with the top and the dovetail pulls the heel tight into the sides.
Finally, it's time to glue the neck back on to the body. I generally use hide glue for this operation on vintage guitars like the 00-40H shown here. The neck is clamped to the body using a cam clamp at the joint and several C clamps on the fret
20
21
22

10 THE ASSOCIATION OF STRINGED INSTRUMENT ARTISANS
board (Photo 31). I used a radiused clamping caul over the fret board, that is notched to skip over the frets, and a shaped caul inside the top (under the fret board). The final task before stringing is to make a new nut, as the original Ebony nut was tall for Hawaiian play. I generally replace the Ebony with bone (Photo 32). Once strung up the guitar shows action a just a hair over 6/64” at the low E. That, with just under 1/8” of saddle
23
24
25
showing above the slot (Photos 33, 34 and 35). c
26
27
28

Guitarmaker 96 Summer 20167 11
29
30
31
32
33
34
35
Steven Kovacik is a professional luthier in Scotia, NY and a certified Martin repairman. He is member of the ASIA Board of Directors, a regular ASIA Symposium presenter and is a frequent contributor to Guitarmaker.