fastening onto cd section
TRANSCRIPT

Technical processing

2
The impressive appearance of a Heradesign acoustic solution always depends on two factors: the acoustic panel itself and good workmanship. Knowing exactly what to do enables a quick, easy and clean installation of the panels and thus ensures the building owner’s satisfaction.
With this Technical Manual we provide you with a “tool” that shows all the neces-sary details, instructions and techniques – from storage and the substructure to the finishing. Make use of the technical data, photos and descriptions to ensure a so-phisticated assembly. If you have special individual requirements which we have not described here, our technicians will be pleased to assist you by phone.
Please also note the general information on page 82.
We look forward to a successful cooperation as well as many sustainable acoustic solutions!
Precision work – know-how

3
Table of contents
Fastening onto wood laths ..................
Fastening onto CD metal sections ..........
Suspended ceiling with visible T-sections .....
Wall mounting with holding profile ......................
Facing panel ...........................................................
Ceiling raft ...................................................................
Baffles ..............................................................................
Details ...................................................................................
Edge designs .............................................................................
Accessories .....................................................................................
Application and handling ......................................................................
Standard terms of sale and delivery ..........................................................
Contact/Service .............................................................................................
4
14
26
34
42
46
50
52
53
62
68
82
86

4
Fastening onto wood laths
see table on page 5
see table on page 6
Main Joist Spacing
approx. 600 or 625 mm
Cross Joist
approx. 125 mm
approx. 250 mmHanger centre distance
approx. 200 mm
a
b cD1
approx. 20 mm

5
30 mm30 mm
1) For panel dimensions 1200/600 and 1250/625, a centre distance of the laths of 1/3 of the panel length is permitted as an alternative. Panel thickness 15 mm: not suitable for outdoor applications and indoor swimming pools.2) Please note: edge design GK – straight edge without bevel, for screw installation on wood laths, only carry this
out with shadow gaps of 4 mm between the panels. Increased care is necessary during installation. Pay atten-tion to the modified grid dimensions! For edge designs, see pages 53, 54.
Please note: Knauf Insulation GmbH is not a system holder according to DIN-EN 13964.
Table 1
ProductThickness
mmWeight kg/m2
Edge Design 2)
Centre distance of the cross
joist mm
Panel di-mensions
mm
Pro
duct
Ran
ge
Heradesign® superfi ne 15 7.8AK-01 300; 312.5 1)
600/600 1200/600625/6251250/625
Heradesign® fi ne 15 8.2
Heradesign® superfi ne 2) 25 / 35 11.3 / 15.0AK-01AK-02AK-03
600; 625Heradesign® fi ne 2) 25 / 35 12.4 / 16.3
Heradesign® micro 25 / 35 15.0 / 19.0
Heradesign® superfi ne 35 15.0
VK-12 590; 615Heradesign® fi ne 35 16.3
Heradesign® micro 35 19.0
Pro
duct
Ran
geA
2
Heradesign® superfi ne A2 15 12.0AK-01 300; 312.5 1)
600/6001200/600
Heradesign® fi ne A2 15 13.0
Heradesign® superfi ne A2 25 18.0 AK-01AK-02AK-03
600Heradesign® fi ne A2 25 19.0
Pro
duct
Ran
geP
lus
Heradesign® superfi ne plus40 (15/25)50 (25/25)
10.113.6
AK-01 plus
600 1200/600Heradesign® fi ne plus40 (15/25)50 (25/25)
10.514.7
Heradesign® micro plus 50 (25/25) 17.3
Fastening of cross joist to main joist 60/30 or 48/24 with screws 4.5 x 55 mm as per DIN 7997. Thread engagement min. 25 mm.
Number of screws according to static requirements, recommenda-tion: two screws per junction point. As per DIN 18168/T1, however, a single screw is also permitted here ( 5 x 55 mm).
Detail D1 – Connection main joist/cross joist
Products
b
Fast
enin
g on
to w
ood
lath
s
Fastening onto wood laths

6
Table 2
Main joistsCross section: w/h
60/30 mm60/40 mm
Cross joistsMax. distance b
600 or 625 mm
Load classes(dead weight of the suspended ceiling in kN/m²)
Max. centre distance c
Cross section b/h 0.15 kN/m2 0.20 kN/m2 0.30 kN/m2
Permissible additional load*) in kN/m²for hanger spacing a (m)
C = 600 mm
60/300.30 kN/m2 a = 1.15 m
0.35 kN/m2
a = 0.90 m0.35 kN/m2
a = 0.75 m
50/300.30 kN/m2
a = 1.15 m0.35 kN/m2
a = 0.90 m0.35 kN/m2
a = 0.75 m
C = 800 mm
60/300.30 kN/m2
a = 1.05 m0.35 kN/m2
a = 0.80 m
50/300.20 kN/m2
a = 1.05 m0.25 kN/m2
a = 0.80 m
C = 1000 mm 60/300.30 kN/m2
a = 0.95 m
C = 1200 mm 60/300.30 kN/m2
a = 0.90 m
*) Additional load: surface loads of mineral wool lining, suction load from wind, etc. Fittings such as ceiling lights, sprink-lers, etc. must be hung separately.
Max. hanger load: 0.40 kN / With a permissible hanger load of 0.25 kN, the additional loads must be multiplied by 0.6, i.e. reduced. Wood quality class S 10 as per EN 1912. For F 30, EI 30 ceilings, or ceilings that are safe against ball throwing, the spacing and cross sections must be according to the test certificate.
Maximum spacing of the substructureFor deflection class 1 according to EN 13964 (max. deflection L/500)
Hangers
Cert. load f = 0.40 kNCert. load f = 0.15 kN
Fastening onto wood laths
Cert. load f = 0,25 kN Cert. load f = 0,40 kNCert. load f = 0,40 kN

7
Standard screw pattern for Heradesign® acoustic panels
Note: for covered outdoor areas, vibrating constructions, ceilings in indoor swimming pools and for installation of panels that are safe against ball throwing, at least three screws per panel width and support must be used.
Note: exact marking of the screwing points is carried out by means of the Heradesign drilling template. See page 63, Accessories. Heradesign screw: see page 63.
Minimum cross section according to DIN 18168 or EN 13964: 60 x 40 mm or at least 50/30 mm, if main and cross joists have the same cross section.
Recommended cross sections
Cross joists 60/30 mm or 80/24 mm; minimum cross section: 48 x 24 mm with a main joist 60 x 40 mm
Screw pattern Screw patternfor panel thickness of 15 mm for panel thickness of 25 or 35 mm
4 screws/panel
6 screws/panel
10 screws/panel
8 screws/ panel
600
625
400
417
400
416
400
417
600
625
600
625
60 mm
40 m
m
Main joists
Width
Screw
60 mm CD-section
20 mm40 mm
20 m
m
60 mm
After complete assembly, unpainted screw heads are to be painted.
Heradesignacoustic panel
Heradesign acoustic panel
Cross joist
60 x 30 mm
Fastening onto wood laths
Fast
enin
g on
to w
ood
lath
s

8
Design that is safe against ball throwing according toEN 13964, Annex D, or DIN 18 032/Part 3:
*) Please note: fitting pieces with a length of less than 500 mm must be supported on all four sides.
Screw pattern: To fasten Heradesign acoustic panels in a way that is safe against ball throwing, at least three screws must be used per panel width and support. Max. spacing of the screws 315 mm.
600
max
625
mm
Installation of maintenance openings
When installing maintenance openings with dimensions of 400 x 400 mm or 400 x 600 mm in panels with sizes of 1200 x 600 mm or 1250 x 625 mm, the middle lath must be left out over a length of 500 mm so that it is possible to access the ceiling cavity. Pay attention to the additional anchoring for the free ends of the laths. Heradesign maintenance openings are not safe against ball throwing.
Table 3
ProductThickness
(mm)Edge design Centre
distance of cross joists
Dimensioning of main and cross joists
Centre distance *) of main joists and
vernier hanger (mm)
Heradesign® superfine 35 AK-01
600; 625 60 x 30
900
Heradesign® fine 35 AK-01 900
Heradesign® micro 35 AK-01 900
*) Without additional loads. With additional loads distances according to Table 2 “Maximum spacing of the substructure” for screw mounting onto wood laths, page 6.
Fastening onto wood laths
60
0 m
m
max.
62
5 m
m

9
1 Heradesign acoustic panel, 25 or 35 mm 2 Drywall screw 4.5 x 50 mm, 3 screws per panel width, set at an angle of 10° 3 Wood lath 60 x 40 mm4 KI DP-5 rock wool, thickness 80 mm5 Quick hanger with tension spring: centre distances max. 630 mm edge distances max. 190 mm
F 30 ceiling with Heradesign® fine, Heradesign® micro acoustic panels
Thickness 25 or 35 mm, screwed to wood laths 60 x 40 mmCertificate: ABP P-3413/9499-MPA BS / Test Institute: iBMB Braunschweig
125 mm2 3
5
1 4
EI 30 ceiling with Heradesign® micro acoustic panels
Thickness 25 mm, screwed to wood laths 60 x 30 mmEdge connection with drywall frieze or butt-jointedCertificate: 3631/082/10 / Test Institute: iBMB Braunschweig
EI 30 ceiling with Heradesign® superfine A2 acoustic panels
Thickness 25 mm, screwed to wood laths 60 x 30 mmEdge connection with drywall frieze or butt-jointedCertificate: 3086/708/09/ Test Institute: iBMB Braunschweig
8
max. 200 mm
6 5 2 3 1 74
max. 200 mm
6 5
8
max. 200mm
2 3 1 74
max. 200mm
1 Heradesign micro, 25 mm2 Heradesign screw 4.5 x 50 mm, three screws per panel width3 Wood lath 60 x 30 mm, cross joist with metal strip 300/30/08 set out on the upper side every 400 mm 4 Wood lath 60 x 30 mm, main joist
1 Heradesign superfine A2, 25 mm2 Heradesign screw 4.5 x 50 mm3 Wood lath 60 x 30 mm, cross joist4 Wood lath 60 x 30 mm, main joist
5 Knauf GFK-A2 panel, 15 mm6 Knauf TN 3.5 x 35 mm screw7 KI DP-9 GS rock wool, thickness 2 x 25 mm8 Vernier hanger, max. distance: 900 mm
5 Knauf GFK-A2 panel, 15 mm6 Knauf TN 3.5 x 35 mm screw7 KI DP-9 GS rock wool, thickness 2 x 50 mm8 Vernier hanger, max. distance: 900 mm
Detail A3 / A4
Detail A5 / A6
Detail A1 / A2
Fastening onto wood laths
Fast
enin
g on
to w
ood
lath
s

1010
Aligning the laths with a spirit level or laser level and fastening of the lath to the hanger with two screws each per side.
Installing the ceiling grid from the centre of the room, e.g. by using a chalk line. Make sure the margins at the sides of the room are identical.
Installation of the main joists and cross joists. Max. distances see Table 2, page 6 and Detail D1, page 5.
Maximum spacing of main and cross joists to the wall, see sketch on page 4.
Installation photos
EI 30 ceiling with Heradesign® fine A2 acoustic panels
Thickness 25 mm, screwed to wood laths 60 x 30 mmEdge connection with drywall frieze or butt-jointedCertificate: 3620/383/09/ Test Institute: iBMB Braunschweig
8
max. 200 mm
6 5 2 3 1 74
max. 200 mm
1 Heradesign fine A2, 25 mm2 Heradesign screw 4.5 x 50 mm, 3 screws per panel width3 Wood lath 60 x 30 mm, cross joist with metal strip 300/30/08 set out horizontally on the upper side every 400 mm4 Wood lath 60 x 30 mm, main joist
5 Knauf GFK-A2 panel, 15 mm6 Knauf TN 3.5 x 35 mm screw7 KI DP-9 GS rock wool, thickness 2 x 25 mm8 Vernier hanger, max. distance: 900 mm
Detail A7 / A8
Attention: The classifications only apply to the tested structures. A change in the ceiling structure is not permitted. The exact test assemblies can be found in the indicated certificates or data sheet of the respective design.
Fastening onto wood laths

1111
Installation photos
Mineral wool absorber panels are inserted piece by piece along with the installation of the Heradesign acoustic panels. Panels that are jammed between the wood laths are cut to size.
Pressure join potential panel joints with the help of an installation block and hammer. Only work with the acoustic panels with clean hands and clean tools.
Install the acoustic panels by means of supports. Press the panel onto the lath with the ball of the hand while screwing. There must not be a gap between the panel and the wood lath. For larger ceilings, start panel installation from the centre of the room. Observe the installation direction for square panels.
Align the panel rows with an installation lath. Panel joints must be positioned to be centred under the section. No free panel joints are allowed.
Alternative: insertion of PE sheet as trickle protection or a vapour barrier piece by piece along with the instal-lation of the acoustic panels. Glue sheet joints together.
Paint over the screw heads with the supplied paint or an equivalent. The screw heads must be flush with the surface of the panel.
Fastening onto wood laths
Fast
enin
g on
to w
ood
lath
s

12
Mounting information For the implementation requirements, also see DIN 18168 T.1 “Lightweight ceiling linings and suspended ceilings”, or alternatively DIN-EN 13964 “Suspended ceilings – requirements and test methods”.
sufficient load-bearing capacity.
Fasten wood laths to the ceiling or the pre-installed hangers at the required centre distance with rust-protected screws.
Distribute laths symmetrically (equal edge fields).
Start panel installation for larger ceilings from the centre of the room.
nally in the bracing, transversely to the direction of the laths and fasten them with rust-protected drywall screws (DIN 7997) (head diameter 9 mm) to the laths. For each panel width and centre distance, two drywall screws are required. For covered outdoor areas, ceilings and walls in indoor swimming pools, vibrating constructions and for the version that is safe against ball thro- wing, three drywall screws (DIN 7997) are required. Please note: observe the necessary corrosion protection requirements.
: observe the installation direction marked on the back when installing the panels.
four panel corners meet at one point, which means increased accuracy is required when installing.
For F 30 constructions as per DIN: set the screws at an angle of 10 degrees or use washers.
Screws: Wood or drywall screws with partial thread and countersunk heads are suitable. Head diameter 9 mm). The necessary corro-sion protection must be matched to the condi-tions prevailing in the room. The screw heads must be set to be flush with the panel surface. After installation, unpainted screw heads must be covered with a paint supplied by the manuf-acturer or an equivalent.
Film or mineral wool is inserted piece by piece with the installation of the acoustic panels. Film joints and connections must be taped up. A PE film with a thickness of up to 30 μm does not degrade the sound absorption of the underlying absorbers and is recommended as trickle protec-tion for mineral wool lining.
Damaged or soiled panels or panels with colour deviations may not be installed.
installed because the panel size is smaller than the grid dimensions.
Facing panel see page 42 Light installation details 58Processing 68Please request expert opinion if required.
Rust-protected, universal drywall screw for attaching Heradesign acoustic panels to laths and CD-sections 60/27/06 mm. Partial thread, screw head with Torx T20, see page 63.
Maximum spacing: 600 or 300 mm / 625 or 312 mm, see page 7.Please note: not suitable for indoor swimming pools and outdoor applications.
Heradesign® screw
Table 4 – Screws required
Panel sizeScrews required approx. pieces / m²
600/600 625/625 1200/600 1250/625
Standard screw pattern – panel thickness 25 and 35 mm 12 11 9 8
Standard screw pattern – panel thickness 15 mm 23 21 14 13
Design that is safe against ball throwing 17 16 13 12
Fastening onto wood laths

13
Corrosion protection: to find suitable corrosion protection for screws for applications in indoor swim-ming pools, underground garages, covered outdoor applications or other special applications, please contact your screw supplier or screw manufacturer.
Table 5 – Delivery form of Heradesign® screws
Dimensions mm Colour of screw head
For panel thickness mm
Packaging unit pieces/boxLength Ø
35 4.5 -- 15 200
50 4.5 -- 25 200
50 4.5 white / natural colour 25 200
60 4.5 -- 35 200
Table 6
Panel thickness (mm) 15 25 35
Screw dimensions according to DIN 7997, ÖNORM M5027 (mm) 4.5/35 4.5/45 4.5/60
Notes
Fastening onto wood laths
Fast
enin
g on
to w
ood
lath
s

16
Fastening onto CD metal sections
max. 250 mm
Detail D1 – Alternative:Edge connection with UD edge section 28 x 27 mm
F
E
A
D
C
D2
CE
Cm
am
aE
max. 600 or
625 mm
D1Hanging system:Richter D112
14

17
Detail D2 – Edge connection with U-section
1 CD basic section 60/27/0.6
2 CD load-bearing section 60/27/0.6
3 Heradesign acoustic panel; always position panel joint in supporting direction under a CD-section.
4 DU 28/27 wall connection section; max. dowel distance 625 or 600 mm, the CD-section may not be screwed with the DU wall connection section.
3
124
1) For panel dimensions 1200/600 & 1250/625, a centre distance of the laths of 1/3 of the panel length is permitted as an alternative. Panel thickness 15 mm: not suitable for outdoor applications and indoor swimming pools.2) Please note: edge design GK – straight edge without bevel, for screw installation, only carry this out with shadow gaps of 4 mm between the acoustic panels. Increased care is necessary during installation. Pay attention to the modified grid dimensions! For edge designs, see page 53. Please note: Knauf Insulation GmbH is not a system holder according to DIN-EN 13964.
ProductsTable 7
ProductThickness
mmWeightkg/m2
Edge design 2)
Centre distance of cross
joists
Panel di-mensions
mm
Pro
duct
Ran
ge
Heradesign® superfi ne 15 7.8AK-01 300; 312.5 1)
600/600 1200/600625/6251250/625
Heradesign® fi ne 15 8.2
Heradesign® superfi ne 2) 25 / 35 11.3 / 15.0AK-01AK-02AK-03
600; 625Heradesign® fi ne 2) 25 / 35 12.4 / 16.3
Heradesign® micro 25 / 35 15.0 / 19.0
Heradesign® superfi ne 35 15.0
VK-12 590; 615Heradesign® fi ne 35 16.3
Heradesign® micro 35 19.0
Pro
duct
Ran
geA
2
Heradesign® superfi ne A2 15 12.0AK-01 300; 312.5 1)
600/6001200/600
Heradesign® fi ne A2 15 13.0
Heradesign® superfi ne A2 25 18.0 AK-01AK-02AK-03
600Heradesign® fi ne A2 25 19.0
Pro
duct
Ran
geP
lus
Heradesign® superfi ne plus40 (15/25)50 (25/25)
10.113.6
AK-01 plus
600 1200/600Heradesign® fi ne plus40 (15/25)50 (25/25)
10.514.7
Heradesign® micro plus 50 (25/25) 17.3
b
Fast
enin
g on
to C
D m
etal
sec
tions
Fastening onto CD metal sections
UD
15

18
Maximum spacing of the substructureMaximum section and hanger spacing for deflection class 1 according to EN 13964 (max. deflection L/500)
Table 8
Basic section60/27/0.6 mm
Load classes(dead weight of the suspended ceiling in kN/m²)
Max. centre distance c (mm)0.15 kN/m2 0.20 kN/m2 0.30 kN/m2
Permissible additional load AL*) in kN/m²for hanger spacing a (m)
cm = 600 mm (middle field)cE = 600 mm (edge field)
ZL = 0.20 kN/m2
am = 1.15 maE = 1.00 m
ZL = 0.40 kN/m2
am = 0.90 maE = 0.75 m
ZL = 0.50 kN/m2
am = 0.75 maE = 0.60 m
cm = 800 mm (middle field)cE = 600 mm (edge field)
ZL = 0.20 kN/m2
am = 1.05 maE = 0.90 m
ZL = 0.35 kN/m2
am = 0.80 maE = 0.70 m
ZL = 0.35 kN/m2
am = 0.70 maE = 0.60 m
cm = 1000 mm (middle field)cE = 800 mm (edge field)
ZL = 0.20 kN/m2
am = 0.95 maE = 0.80 m
ZL = 0.20 kN/m2
am = 0.75 maE = 0.60 m
cm = 1200 mm (middle field)cE = 1000 mm (edge field)
ZL = 0.10 kN/m2
am = 0.90 maE = 0.75 m
*) Additional load: Surface loads of mineral wool lining, suction load from wind, etc. Fittings such as ceiling lights, sprinklers, etc. must be hung separately.The max. spacing of the load-bearing sections 60/27/0.6 is 600 mm or 625 mm.For the edge fields of load-bearing section and hanger, the shorter spacing applies (cE, aE).am = spacing of the hangers in the panel.aE = edge distance of the hangers from the wall. The distances only apply in connection with an E wall connection section. Without wall connection section max. aE = 250 mm.Max. hanger load: 0.40 kN / With a permissible hanger load of 0.25 kN, the additional loads must be multiplied by 0.5, i.e. reduced.For F 30, EI 30 ceilings, or ceilings that are safe against ball throwing, the spacing and cross sections must be according to the test certificate.For details, see the F 30 - EI 30 designs.
Standard screw pattern for Heradesign® acoustic panelsScrew pattern for panel thickness of 15 mm
4 screws/panel
6 screws/panel
10 screws/panel
8 screws/panel
600
625
400
417
400
416
400
417
600
625
600
625
Note: exact marking of the screwing points is carried out using the Heradesign drilling template.See page 63, Accessories.
Screw patternfor panel thickness of 25 or 35 mm
Fastening onto CD metal sections
16

19
Table 9
Assembly componentSpacing
mmUnit
Approx. material requirements / m2 ceiling area*)
CommentLoad class kN/m2
0.15 0.20 0.30
ACD basic section
60/27/0.6 mm
C = 600
r.m.
1.7
For section lengths of 3600 mm
C = 800 1.3
C = 1000 1.1
C = 1200 0.9
BCD load-bearing section
60/27/0.6 mm
600 mmr.m.
1.7 Spacing is equal to panel width625 mm 1.6
C E wall connection section r.m. 0.4 - 0.8 Dependent on floor plan
DCD longitudinal connector
C = 600
pcs.
0.8
For section lengths of 3600 mm
C = 800 0.7
C = 1000 0.6
C = 1200 0.5
E CD cross connector
C = 600
pcs.
3.0
C = 800 2.2
C = 1000 1.9
C = 1200 1.5
F CD vernier hanger
C = 600
pcs.
1.6 2.1 2.4
Permissible hanger load: 0.4 kN
C = 800 1.4 1.7 2.0
C = 1000 1.2 1.5 --
C = 1200 1.1 -- --
*) Observe information from manufacturer! The specified values are non-binding guide values without cutting losses or other losses. Additional loads due to insulating material lining, lighting, wind, etc. must be borne separately.
Material requirements
Please note:In the event of increased requirements on fire protection F 30 / EI 30 or sound protection, a gypsum board can be put between the substructure and the Heradesign acoustic panels. Nevertheless, the substructure must be implemented such that the Heradesign acoustic panels can be screwed into the CD-sections. The spacing of the cross and main sections as well as the hangers must be matched.
It is not permissible to fasten Heradesign acoustic panels to gypsum boards using glue or a com-bination of glue and screws.
Fastening onto CD metal sections
Fast
enin
g on
to C
D m
etal
sec
tions
17

20
Design that is safe against ball throwing according to EN 13964, Annex D, or DIN 18 032/Part 3:
Please note: fitting pieces with a length of less than 500 mm must be supported on all four sides.
Screw pattern:To fasten Heradesign acoustic panels in a way that is safe against ball throwing, at least three screws must be used per panel width and support. Max. spacing of the screws 315 mm.
600
max
625
mm
Installation of maintenance openings
When installing maintenance openings with dimensions of 400 x 400 mm or 400 x 600 mm in panels with sizes of 1200 x 600 mm or 1250 x 625 mm, the middle section must be left out over a length of 500 mm so that it is possible to access the ceiling cavity. Pay attention to possible additionally required hangers. Heradesign maintenance openings are not safe against ball throwing.
Table 10
ProductThick-ness (mm)
Edge design
Centre distance of load-bearing sectionsCD-section 60/27/0.6b
(mm)
Centre distance of basic sections
CD-section 60/27/0.6 (mm)
Spacing of vernier hangers
(mm) *)
Heradesign® superfine 35 AK-01
600; 625 900
900
Heradesign® fine 35 AK-01 850
Heradesign® micro 35 AK-01 750
*) Without additional loads. With additional loads apply distances according to Table 8 “Maximum spacing of the substructure” for screw mounting onto CD-sections, page 18.
Fastening onto CD metal sections
900
60
0 m
m
max.
62
5 m
m
18

21
1 Heradesign acoustic panel, 25 or 35 mm2 Drywall screw 5 x 40 mm, spacing 290 mm, set at an angle of 10° 3 Load-bearing section CD 60/27/0.6; spacing 625 mm
4 Contact angle 24 x 24 mm, altern. E-section5 KI DP-5 lining, 80 mm, alternatively 2 x 40 mm6 Quick hangers with tension spring, altern. with vernier hanger, distance max. 630 mm
1 Heradesign superfine, thickness t = 25 mm2 Knauf GFK, thickness t = 15 mm3 CD-section 60/27/0.6 mm4 KI mineral wool DP-9, t = 50 mm, 2-layer5 Heradesign screw 4.5/50 mm6 Knauf drywall screw TN 3.5/35 mm
7 Cross connector, CD 60/27 rk8 U-connection sections 27/28.5/27/0.6 mm9 Vernier hanger Centre distance of basic sections 1000 mm Centre distance of load-bearing sections 600 mm Centre distance of hangers 900 mm
Ceiling in an F 30 design with Heradesign® fine or Heradesign® micro acoustic panelsThickness 25 or 35 mm, screwed to CD-sectionsCertificate: ABP 3413/9499-MPA BS, Test Institute: iBMB Braunschweig
Connection with a simple contact angle Edge connection with E-section
12
6
34
5
aR
1 2
4
5
6
Ceiling in an EI 30 design with Heradesign® superfine acoustic panelsThickness 25 mm, screwed to CD-sections,edge connection with drywall frieze and shadow gap and jointedCertificate: iBMB 3144/897/09, Test Institute: MPA Braunschweig
252750
5098
140
15
200
12 34 56
78 9
2527
5050
9814
0
10
200
1 34 5
7 89
5Detail B3, B4
Detail B1 Detail B2≤ 125 mm
Fastening onto CD metal sections
Fast
enin
g on
to C
D m
etal
sec
tions
19

2222
Installation photos
Installing the ceiling grid while making sure the mar-gins at the sides of the room are identical.
Stagger the position of the joints of the CD-sections. Additional hanger for each section joint.
Attention: the classifications only apply to the tested structures. A change in the ceiling structure is not permitted. The exact test assemblies can be found in the indicated certificates or data sheet of the respective design.
Ceiling in an EI 30 design with Heradesign® fine acoustic panelsThickness 25 mm, screwed to CD-sections,edge connection with drywall frieze and shadow gap and jointedCertificate: iBMB 3223/831/08, Test Institute: MPA Braunschweig
252750
5098
140
15
300
12 34 56
78 9
2527
5050
9814
0
10
250
1 34 5
7 89
5
1 Heradesign fine, thickness t = 25 mm2 Knauf GFK, thickness t = 15 mm3 CD-section 60/27/0.6 mm4 KI mineral wool DP-9, t = 50 mm, 2-layer5 Heradesign screw 4.5/50 mm6 Knauf drywall screw TN 3.5/35 mm
7 Cross connector, CD 60/27 rk8 U-connection sections 27/28.5/27/0.6 mm9 Vernier hanger Centre distance of basic sections 1000 mm Centre distance of load-bearing sections 600 mm Centre distance of hangers 850 mm
Fastening onto CD metal sections
2020

2323
Aligning the CD-sections with a spirit level or laser level.
Install the acoustic panels by means of supports. Press the panel onto the section with the ball of your hand while screwing. There must not be a gap between the acoustic panel and the section. Start panel installation from the centre of the room. Only work with the acoustic panels with clean hands and clean tools.
Finished ceiling grid.
Align the panel rows with an installation lath. Panel joints must be positioned to be centred under the section. No free, suspended panel joints are allowed. When installing square panels, observe the installati-on direction marked on the back of the panels.
Alternative: insertion of PE sheet as trickle protection or a vapour barrier matching the installation of the Heradesign acoustic panels. Glue sheet joints together.
Insertion of KI mineral wool piece by piece along with the installation of the Heradesign acoustic panels. Absorber panels that are jammed between the sections are cut to size. For EI 30 structures, the first layer of rock wool panels is placed on the load-bearing sections, the second layer on the basic sections. Joints must be tight.
Fastening onto CD metal sections
Fast
enin
g on
to C
D m
etal
sec
tions
2121

24
Installation of a maintenance opening. The load-bearing section must be disengaged.
Installation of a grid light. Two additional load-bea-ring sections have to be installed. Disengage basic sections and place additional hangers.
Mounting information
For the implementation requirements, see DIN 18168 T.1 “Lightweight ceiling linings and suspended ceilings”, or alternatively DIN-EN 13964 “Suspended ceilings – requirements and test methods”.
sufficient load-bearing capacity.
E wall connection sections all around (place dowels staggered approx. every 500 mm).
Push the CD load-bearing sections into the wall connection sections and fasten them to the pre-assembled hangers. Stagger the joints and place
an additional hanger at each joint. Hanging wire: 4 mm minimum diameter. Pinch hook with pliers after hanging in.
Start panel installation from the centre of the room.
Distribute cross sections symmetrically (equal edge fields).
acoustic panels in and align them
longitudinally in the bracing, transversely to the direction of the section and fasten them with rust-protected drywall screws (head diameter 9 mm) and suitable drill point to the load- bearing tracks. For each panel width and centre
Minimum edge distances for panel installation
Wall connection of the CD-sections with UD-28/27 wall connection sections as an alternative to E wall connection sections.
Screw
60 mm
Panel edge
20 mm40 mm
20 m
m
CD-section
Fastening onto CD metal sections
CD-Profi le
22

25
distance, two drywall screws are required. For covered outdoor areas, ceilings and walls in indoor swimming pools, vibrating constructions and for the version that is safe against ball thro wing, three drywall screws are required. Please note: observe the necessary corrosion protection requirements.
observe the installati-on direction marked on the back when installing the panels.
Cross joint: four panel corners meet at one point, which means increased accuracy is required when installing.
For F 30 constructions as per DIN: set the screws at an angle of 10 degrees or use was-hers. Only use F 30 / El 30 approved hanging systems.
Screws: drywall screws with special tips, fine thread, partial thread and bugle head screws with milled ribs on the underside are suitable. Head diameter 9 mm. The necessary corro- sion protection must be matched to the condi- tions prevailing in the room. The screw heads
must be set to be flush with the panel surface. After installation, unpainted screw heads must be covered with a paint supplied by the manu- facturer or an equivalent.
Film or mineral wool is inserted piece by piece with the installation of the acoustic panels. Film joints and connections must be taped up. A PE film with a thickness of up to 30 μm does not degrade the sound absorption of the underlying absorbers and is recommended as trickle pro-tection for mineral wool lining.
Damaged, or soiled panels or panels with colour deviations may not be installed.
Panels with edge design SK-04 may not be installed because the panel size is smaller than the grid dimensions.
Facing panel 42 Light installation details 58Processing 68
Please request expert opinion if required.
Rust-protected, universal drywall screw for attaching Heradesign acoustic panels to laths and CD-sections 60/27/0.6 mm. Partial thread, screw head with Torx T20, see page 63.Screws required: see Accessories, page 63.Maximum spacing: 600 or 300 mm / 625 or 312 mm.Please note: not suitable for indoor swimming pools and outdoor applications.
Heradesign® screw
Corrosion protection: to find suitable corrosion protection for screws for applications in indoor swim-ming pools, underground garages, covered outdoor applications or other special applications, please contact your screw supplier or screw manufacturer.
Table 11 – Delivery form of Heradesign® screws
Dimensions mm Colour of screw head
For panelthickness mm
Packaging unit pieces/boxLength Ø
35 4.5 -- 15 200
50 4.5 -- 25 200
50 4.5 white / natural colour 25 200
60 4.5 -- 35 200
Table 12
Panel thickness (mm) 15 25 35
Screw dimensions according to DIN 7997, ÖNORM M5027 4.5/35 4.5/45 4.5/60
Fastening onto CD metal sections
Fast
enin
g on
to C
D m
etal
sec
tions
23

Heradesign® produces, develops and distributes
high-class acoustic systems based on wood wool
for ceiling and wall installations. The main areas of
application of the Heradesign® acoustic systems
are: education, sports, offi ce, infrastructure,
entertainment and recreational facilities.
room atmospheresustainable acoustic solutions
for well-being

www.heradesign.com

26
Suspended ceiling with visible T-sections
1
2C
D
A
Hanging system:Richter System 11.2
Main section
spacing
C
Hanger spacing
max.300 mm
am
aE
E E
c E
E
27
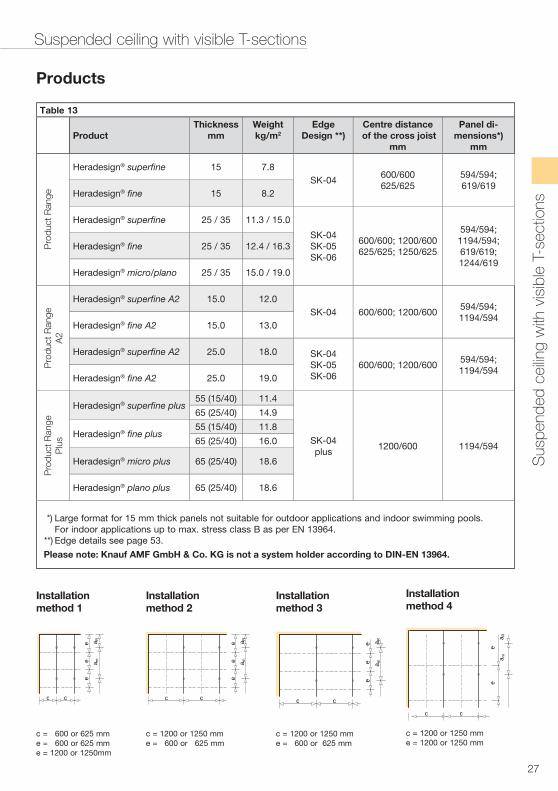
Installation method 1
c = 600 or 625 mme = 600 or 625 mme = 1200 or 1250mm
ee
e
c c
a Ra m
Installation method 2
c = 1200 or 1250 mme = 600 or 625 mm
c c
ee
e a Ra m
Installation method 3
Installation method 4
c = 1200 or 1250 mme = 600 or 625 mm
c c
ee
e a Ra m
c = 1200 or 1250 mme = 1200 or 1250 mm
c c
ee
a Ra m
Table 13
ProductThickness
mmWeight kg/m2
EdgeDesign **)
Centre distance of the cross joist
mm
Panel di-mensions*)
mm
Pro
duct
Ran
ge
Heradesign® superfi ne 15 7.8SK-04
600/600625/625
594/594; 619/619
Heradesign® fi ne 15 8.2
Heradesign® superfi ne 25 / 35 11.3 / 15.0
SK-04SK-05SK-06
600/600; 1200/600625/625; 1250/625
594/594;1194/594;619/619; 1244/619
Heradesign® fi ne 25 / 35 12.4 / 16.3
Heradesign® micro 25 / 35 15.0 / 19.0
Pro
duct
Ran
geA
2
Heradesign® superfi ne A2 15.0 12.0SK-04 600/600; 1200/600
594/594; 1194/594
Heradesign® fi ne A2 15.0 13.0
Heradesign® superfi ne A2 25.0 18.0 SK-04 SK-05 SK-06
600/600; 1200/600594/594; 1194/594
Heradesign® fi ne A2 25.0 19.0
Pro
duct
Ran
geP
lus
Heradesign® superfi ne plus55 (15/40) 11.4
SK-04 plus
1200/600 1194/594
65 (25/40) 14.9
Heradesign® fi ne plus55 (15/40) 11.8
65 (25/40) 16.0
Heradesign® micro plus 65 (25/40) 18.6
Heradesign® plano plus 65 (25/40) 18.6
*) Large format for 15 mm thick panels not suitable for outdoor applications and indoor swimming pools.
**) Edge details see page 53.Please note: Knauf Insulation GmbH is not a system holder according to DIN-EN 13964.
Products
Sus
pend
ed c
eilin
g w
ith v
isib
le T
-sec
tions
Suspended ceiling with visible T-sections
micro/plano
Please note: Knauf AMF GmbH & Co. KG is not a system holder according to DIN-EN 13964.
28
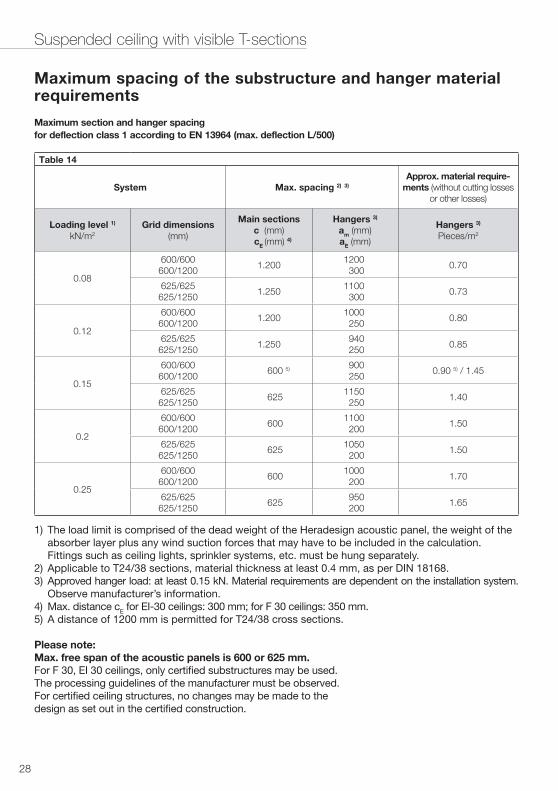
Table 14
System Max. spacing 2) 3)Approx. material require-
ments (without cutting losses or other losses)
Loading level 1) kN/m2
Grid dimensions(mm)
Main sections c (mm)
cE (mm) 4)
Hangers 3) am (mm)aE (mm)
Hangers 3)
Pieces/m2
0.08
600/600600/1200
1.2001200300
0.70
625/625625/1250
1.2501100300
0.73
0.12
600/600600/1200
1.2001000250
0.80
625/625625/1250
1.250940250
0.85
0.15
600/600600/1200
600 5) 900250
0.90 5) / 1.45
625/625625/1250
6251150250
1.40
0.2
600/600600/1200
6001100200
1.50
625/625625/1250
6251050200
1.50
0.25
600/600600/1200
6001000200
1.70
625/625625/1250
625950200
1.65
Maximum spacing of the substructure and hanger material requirements
Maximum section and hanger spacing for deflection class 1 according to EN 13964 (max. deflection L/500)
1) The load limit is comprised of the dead weight of the Heradesign acoustic panel, the weight of the absorber layer plus any wind suction forces that may have to be included in the calculation. Fittings such as ceiling lights, sprinkler systems, etc. must be hung separately.2) Applicable to T24/38 sections, material thickness at least 0.4 mm, as per DIN 18168.3) Approved hanger load: at least 0.15 kN. Material requirements are dependent on the installation system. Observe manufacturer’s information.4) Max. distance cE for EI-30 ceilings: 300 mm; for F 30 ceilings: 350 mm. 5) A distance of 1200 mm is permitted for T24/38 cross sections.
Please note: Max. free span of the acoustic panels is 600 or 625 mm.For F 30, EI 30 ceilings, only certified substructures may be used.The processing guidelines of the manufacturer must be observed.For certified ceiling structures, no changes may be made to the design as set out in the certified construction.
Suspended ceiling with visible T-sections

29
Table 15
Assembly component
Approx. material requirements / m² ceiling area 1) Comment
600/600 1200/600 625/625 1250/625
A Main section 2)
T24/38r.m. 1.70
0.851.700.85
1.600.80
1.600.80
Installation scheme 1:c = 600; 625 mmInst. scheme: 2+3+4:c = 1200; 1250 mm
Cross section 3)
T24/38,T24/32 orT24/28 r.m.
1.70 0.85 1.60 0.80 Inst. scheme 1:c = 600; 625 mm
1.700.85
1.70---
1.600.80
1.60---
Inst. scheme 2: c = 1200; 1250 mm e = 600; 625 mm
--- 1.70 --- 1.60 Inst. scheme 3: c = 1200; 1250 mm
--- 1.70 --- 1.60Inst. scheme 4: c = 1200; 1225 mm e = 1200; 1250 mm
C Wall angle r.m. 0.40 0.40 0.40 0.40 Requirements are dependent on floor plan
D Panel clamp 4) approx. pieces 6 3 6 3 Only for panel thickness of 15 mm
E Wall spring approx. pieces 0.80 0.40 0.80 0.40 Requirements are dependent on floor plan
Hangers: see Table 14, page 28
1) The material requirements are dependent on the installation system. Observe information from manufacturer. The specified values are non-binding guide values without cutting losses or other losses.2) Stagger the section joints and place an additional hanger beside each joint.3) Cross section must not lie on the lower flange of the main section. Only use cross sections with a disengaged lower flange. Max. span for T24/28 sections: 625 mm.4) Panel clamps are recommended to hold down the panels if high wind pressure loads occur. Attention: limited access possibility to the ceiling cavity.
Please note: Special corrosion protection is needed for all metallic parts in indoor swimming pools, outdoor applications, or applications with an increased risk of corrosion.
For F 30, EI 30 ceilings, only certified substructures may be used. Ceiling structures as per certificate: no changes may be made to the design as set out in the certified construction.
Material requirements
Minimum hanging heights:
In order to be able to insert the acoustic panels in preinstalled hanging systems, the following minimum hanging heights (HH = lower edge of T-section to lower edge of bare ceiling) must be maintained.
Panel thickness 15 mm min. HH approx. 180 mm Panel thickness 25 mm min. HH approx. 200 mm Panel thickness 35 mm min. HH approx. 220 mm Increased installation complexity! Vernier hanging: min. HH approx. 190 mm
Suspended ceiling with visible T-sections
Sus
pend
ed c
eilin
g w
ith v
isib
le T
-sec
tions

30
1 Heradesign acoustic panel, 25 or 35 mm2 T-24/38 Profil 3 Contact angle 24 x 24 x 0.5 mm Screws 6 x 50 in metal expansion plugs
4 KI DP-5 lining, 2 x 50 mm Alternative: KI DP-4 lining, 2 x 60 mm5 Quick hanger with tension spring or vernier hanger max. spacing aE see the table on page 28
1 Heradesign superfine, 25 mm2 Main section T-24/38 mm Cross section T-24/38 mm, T-24/323 Contact angle 21 x 21 x 0.5 mm with metal expanding nail 6/35, spacing 600 mm
Ceiling in an F 30 design with Heradesign® fine or Heradesign® micro acoustic panels
Thickness 25 mm, insertion installation in visible T24-sectionsCertificate: iBMB 3564/905/08 / Test Institute: iBMB Braunschweig(max. deflection L/500 4 mm)
Ceiling in an F 30 design withHeradesign® superfine acoustic panels
Thickness 25 mm, insertion installation in visible T24-sectionsCertificate: iBMB 3564/905/08 / Test Institute: iBMB Braunschweig
4 KI-DP-5 rock wool, thickness 50 mm, 2-layer5 Quick hanger with tension spring, hanging wire Ø 4 mm max. spacing aE see Technical Manual, Table 14, page 286 Wall spring as a spacer
aEam
12
4
4
5
3
max. 700 mm
Detail C1 Detail C2
amaE
13 2 4
5
6
1 32 4
5
6
Detail C3 Detail C4
Attention: the classifications only apply to the tested structures. A change in the ceiling structure is not permitted. The exact test assemblies can be found in the indicated certificates or data sheet of the respective design.
700 mmmin. 300 mm
Suspended ceiling with visible T-sections

31
Attention: for these installation heights, the panels must slide in from the side using T-sections. The hanging system and the panels can only be installed section for section. Increased installation complexity!
Short hangers
Short hangers for Clix T-sectionsRichter System
Type 21,1 HH = 100 mm CMC-Clips
Type 21,8 HH = 80 mm CMC-Clips
Type 21,5 HH = 50 mm CMC-Clips only for 15/25 mm panel thickness
HH = hanging height
AH
Table 16
Type Height Max. load
CMC-Clips 21.5 HH = 50 mm
45 kgCMC-Clips 21.8 HH = 80 mm
CMC-Clips 21.1 HH = 100 mm
Short hangers for Clix T-sections HH = 82 bis 113 mm 15 kg
Suspended ceiling with visible T-sections
Sus
pend
ed c
eilin
g w
ith v
isib
le T
-sec
tions

3232
Installation photos
Lift the Heradesign acoustic panels by tilting the acoustic panels and using the ceiling cavity. Take into consideration the minimum hanging heights. Observe the installation direction marked on the back when installing square panels.
Press down the Heradesign acoustic panels. The panels are cut exactly to size; therefore they have to be pressed past the hangers.
Edge panels must be secured with wall springs to avoid displacement.
Install Heradesign acoustic lining piece by piece along with the Heradesign acoustic panels.
Construction of ceiling grid, making sure of equally sized end fields. Stagger the section joints. An addi-tional hanger must be placed beside each joint. Max. spacing see table on page 28.
Only use cross sections with a disengaged lower flange. Set all securing pegs of vernier hangers in the same direction and pinch hooks of hanging wires. This simplifies the insertion of the panels.
Suspended ceiling with visible T-sections

33
Mounting information
For the implementation requirements, see DIN 18168 T.1 “Lightweight ceiling linings and suspended ceilings”, or alternativelyDIN-EN 13964 “Suspended ceilings – requirements and test methods”.
sufficient load-bearing capacity.
Mount the wall angle section C at the desired height.
Distribute the main load-bearing axes while making sure of equal edge fields. Minimum width of the edge fields: 300 mm.
Mount the quick hangers with tension spring 1 and hook/slider or Twist hanger 2; hang and adjust the main sections A. Hanging wire: 4 mm minimum diameter. Pinch hook with pliers after hanging in. Set all securing pegs of vernier han-gers to the same direction. This simplifies the insertion of the panels.
Stagger and place the track joints and hangers; one additional hanger must be placed beside each joint.
main sections A for each field, making sure of equally sized end fields.
Insert the Heradesign acoustic panels section for section starting in the centre of the room and then moving out. Observe the installation direc-tion marked on the back when installing square panels. Panels with the edge design GK – straight edge must not be installed. The panel dimensi-ons are too big for the grid dimensions SK-04.
Insert the edge panels into the wall angle section C with approx. 10 mm of airspace and fasten with wall spring E. Minimum support width for Heradesign panels on the contact angle: 10 mm.
15 mm thick panels must be fastened from above with panel clamps.
Diagonal hanging and vernier hanger
Please note: for suspended ceilings that are subject to swaying and for large suspension heights, or where the hangers are fastened to steel or wood structures, an adequate number of hangers must be set diagonally in both direc-tions in order to minimise the swaying of the ceiling. Ceiling statics are necessary.
For F 30/EI 30 constructions: only use appro-ved hanging systems.
Mineral wool is inserted piece by piece with the installation of the acoustic panels.
The corrosion protection of all metal parts must be matched to the conditions prevailing in the room.
Ceiling grids of T24/38 or T35/39 rails may not be walked on.
Damaged or soiled panels or panels with colour deviations may not be installed.
Wall mounting 34Light installation details 58Processing 68
Please request expert opinion if required.
Suspended ceiling with visible T-sections
Sus
pend
ed c
eilin
g w
ith v
isib
le T
-sec
tions

34
Wall mounting with holding profile
AB Main profi leC Edge profi leD Wall spacerE Heradesign acoustic panel
DAB
c Centre distance of basic section(see table)
Edge distancemax. 250 mm
EShadow gap ~15 mm
a C
entre
dis
tanc
e of
spa
cer
(see
tabl
e)
max
. 600
mm
or
625
mm
max
. 250
mm
Centre distance of basic profile
A
B
C
D
Cm
CR
max
. 600
mm
or
625
mm

35
Table 17
ProductThick-ness mm
Weight kg/m2
Edge design
Distance between main
profi les
Paneldimensions
mm
Remaining dimensions of panels
Heradesign® superfi ne 25 11.3
SY-02 600; 625
600/600625/625
1200/6001250/625
600; 625Heradesign® fi ne 25 12.4
Heradesign® micro 25 15.0
Heradesign® superfi ne A2 25 18.0
SY-02 600600/600
1200/600600
Heradesign® fi ne A2 25 19.0
Heradesign® plano 25 15.0
Please note: Heradesign is not a system holder according to DIN-EN 13964. The system has not been tested for EI 30 fi re resistance and safety against ball throwing.
Wall mounting with holding profile
Table 18
Basic profi leAngle 60/40/1.8 mm
Max. spacing c in mm 1)
Max. spacing a of the spacers for load class 0.25 kN/m² 1)Max. additional horizontal loads (AL) in kN/m²
a = 800 mm a = 1000 mm a = 1200 mm
cm = 600 mm (middle fi eld)cR = 600 mm (edge fi eld)
AL = 0.70 kN/m2 AL = 0.65 kN/m2 AL = 0.50 kN/m2
cm = 800 mm (middle fi eld)cR = 600 mm (edge fi eld)
AL = 0.60 kN/m2 AL = 0.50 kN/m2 AL = 0.30 kN/m2
cm = 1000 mm (middle fi eld)cR = 800 mm (edge fi eld)
AL = 0.30 kN/m2 AL = 0.25 kN/m2 AL = 0.20 kN/m2 2)
Required load bearing capacity Fperm of the dowels:Spacing a up to 800 mm: dowel min. 10 x 60 mm, with screw 7 x 69; with Fperm = 0.80 kNSpacing a up to 1000 mm: dowel min. 10 x 80 mm, with screw 7 x 89; with Fperm = 1.00 kNSpacing a up to 1200 mm: dowel min. 10 x 80 mm, with screw 7 x 89; with Fperm = 1.20 kNAnchoring of the structure in a load-bearing base only with approved dowels.
Please note1) Higher loads or spacing of the profiles and spacers are to be confirmed through structural analysis by the agent before starting with the mounting.2) Dead load
cE : max. permissible spacing for edge fields with multi-span beamsBasic Profile L 60/40/1.8 mm with 40 mm statically effective height taken into considerationMax. free overhang of basic and main profile: 250 mmMax. spacing for single-span beams on requestPer joint at least two drilling screws 4.8 x 20 mm
Maximum spacer and profile spacing for wall mounting
Products
Calculated for two-span beams and deflection class 1 according to DIN-EN 13964 (max. deflection: L/500)
Wal
l mou
ntin
g w
ith h
oldi
ng p
rofil
e
Pitch

36
System parts
C - Edge profile
D - Spacer F - Drilling screw
Table 19
Assembly component SpacingApprox. material requirements / m² wall area*)
600/600
Aprofile
L 60/40/1.8
C = 600 mm 1.7
C = 800 mm 1.25
C = 1000 mm 1
Main profile600 mm 1.7
625 mm 1.6
C Edge profile*)
1200 mm 0.84
3000 mm 0.70
6000 mm 0.35
9000 mm 0.25
larger as required
D Spacer ***)
Spacing C = 600 mm C = 800 mm C = 1000 mm
a = 800 mm 2.80 2.00 1.70
a = 1000 mm 2.20 1.60 1.30
a = 1200 mm 1.70 1.25 1.00
F Drilling screw
a = 800 mm 7.50 6.50 6.00
a = 1000 mm 7.00 6.00 5.00
a = 1200 mm 6.50 5.50 5.00
*) The specified values are non-binding guide values without cutting losses or other losses.**) For a height of the acoustic area of 1200, 2400, 3000, 6000, 9000 mm and taking into consideration the permissible spacing a of the spacers.***) For a length of the basic profile of 3000 mm.
E - Heradesign® acoustic panel
Wall mounting with holding profile
1,7 lfm
1,25 lfm
1 lfm
1,7 lfm
1,6 lfm
0,84 lfm
0,70 lfm
0,35 lfm
0,25 lfm

37
25 mm
max
. 600
mm
/ 62
5 m
mm
ax. 6
00 m
m /
625
mm
Levelling up to 15 mmmin. 70 mmmax.100 mm
A
F
E
B
A Basic profile L 60/40/1.8 mm
B Main profile
E Heradesign® acoustic panelThickness max. 25 mmEdge design SY-02
F Drilling screw 4.8 x 20 mm
25 mm
max
. 10
mm
a C
entre
dis
tanc
e of
spa
cer
see
tabl
eEd
ge d
ista
nce
max
. 250
mm
Levellingup to 15 mm
min. 75 mmmax. 100 mm
A
Dowel
D
F
E
C
G
A Basic profile L 60/40/1.8 mm
C Edge profile
D SpacerE Heradesign® acoustic panel
Thickness max. 25 mmEdge design SY-02
FG Base structure according to
the planner’s specifications
Drilling screw 4.8 x 20 mm
Vertical section middle
Horizontal section of edge connection with drywall frieze
Horizontal section of edge connection with shadow gap
Vertical section at the base
Dow
el
A
A Basic profile L 60/40/1.8 mm
B Main profile
C Edge profile
D Spacer
E Heradesign® acoustic panelThickness max. 25 mmEdge design SY-02
F Drilling screw 4.8 x 20 mm
C BD EF HJ IK L
H Plasterboard 12.5 mm
I CD-section 60/27/0.6 mm
J Adjustable direct hanger
K Drywall screw
L Contact angle 21/21 mm
A Basic profile L 60/40/1.8 mm
B Main profile
C Edge profile
D Spacer
E Heradesign® acoustic panelThickness max. 25 mmEdge design SY-02
L Contact angle 21/21 mm
5 mm
Shadow gap 12 mm
A BCD E L
Wal
l mou
ntin
g w
ith h
oldi
ng p
rofil
e
Wall mounting with holding profile

3838
Installation of maintenance openings
When installing maintenance openings with dimensions of 400 x 400 mm or 400 x 600 mm in panels with sizes of 1200 x 600 mm or 1250 x 625 mm, the middle section must be left out over a length of 500 mm so that it is possible to access the ceiling cavity. Additional spacers may possibly be required at the connection points of the basic profile.
additional spacer
Installation photos
Distribute the profiled section distances from the centre of the room taking into account equally sized end fields and the maximum permissible distances. For distances, see Table 18, page 35.
Installation of spacers with permissible dowels (10 mm diameter) and screws with washers.
Wall mounting with holding profile

3939
Attach the basic profile L 60/40/1.8 mm with two dril-ling screws, 4.8 x 20 mm, each. The second spacer from the top of each basic section is designated as a fixed bearing. The drilling screws are set into the two round holes. All other spacers are designated as slide bearings. Height adjustment of up to 15 mm is possible by moving the basic profile in the spacer.
Install the edge profile by means of two drilling screws, 4.8 x 20 mm, per basic section. Then insert the Heradesign acoustic panels.
Align the panels and the main profile before fixing it with the drilling screws.
Fix the main profile by means of two drilling screws, 4.8 x 20 mm, per basic profile. Set the first drilling screw near the corner of the basic profile.
Pressure join the panels and align them in each row longitudinally and transversely. Only install the panels with clean hands.
Fix the main profile at the end with only one screw first so that the other end remains adjustable. This makes inserting further panels easier.
Wal
l mou
ntin
g w
ith h
oldi
ng p
rofil
e

40
Installation of the upper edge profile. Space required from the ceiling approx. 40 mm. The first panel is moved approx. 10 cm towards the middle, the screws are set and then the panel is finallyaligned in the grid.
Slide in the panels at the side. The edge profile of the last field is only installed after that.
Align the panels before fixing the edge profile with drilling screws.
If there is no space to move the panel laterally, fix the last panel by means of a screw. Cover unpainted screw heads with paint in the colour of the panel and a fine brush.
Mounting information
For general requirements on mounting, see DIN-EN 13946 „Suspended ceilings – require-ments and test methods“.Mounting of the spacers D: before you start mounting, check the base for sufficient load-bearing capacity. Allocate the spacing from the centre of the room, taking into account equally sized end fields and the maximum permissible dis-tances. For maximum distances, see Table 18.Mount the spacers to the base with approved screws with washers and dowels according to static requirements. The dowels have to be adjusted to the load-bearing capacity of the base.
Mounting of the basic profiles A: depen-ding on the required wall distances of the Heradesign acoustic panels, insert the basic profile (angle 60/40/1.8 mm) into the spacer with either the 40 mm leg or the 60 mm leg, and align it. Height adjustment of up to 15 mm is possible. Screw the basic profile with two stainless steel drilling screws, 4.8 x 20 mm each, to the spacers, and make sure that the second spacer from the top of each basic profile is designated as a fixed bearing, i.e. the two screws are set into the round holes, all other screws are set into the slots in order to enable a length adjustment of the sections.

41
Attention: at least three spacers have to be set per basic profile of 3000 mm length. If the basic profile is mounted with only two spacers, the maximum distance between these must not exceed 800 mm.Mounting of the edge profiles C: attach the edge profiles C at the specified distance from the floor, align them and screw each with two stainless steel drilling screws of the dimension 4.8 x 20 mm to the basic profiles. Put the drilling screws in the groove which can be seen on the section. The upper edging is also formed with an edge profile; only pressure join the panels after setting the drilling screws. If the last panel is not movable, secure the outer corner of the panel by means of a screw. The screw head has to be covered by using a fine brush and the supplied paint.Mounting of the Heradesign acoustic panels and main profiles B: the Heradesign acoustic panels with edge design SY-02 and the main
installed piece by piece while paying attention to the grid dimension and equally sized end fields. Start mounting the Heradesign acoustic panels at the edge of the wall in smaller areas; in the centre of the wall in large areas. Insert the first Heradesign acoustic panel into the edge profile, then slide in the main profile and finally fix it with a drilling screw so that the structure still remains movable in height. Then insert the other Heradesign acoustic panels, align the panels and main profile and fix the main profile with two stainless steel drilling screws, 4.8 x 20 mm each, to the basic profile. The screws are set into the pre-cut groove in the main profile. When installing, pressure join the panel joints with the help of an installation block and hammer. Take note of the installation directions marked on the back of the panel.Installation patterns in cross joints require moreeffort to mount
Damaged or soiled panels may not be installed. Small mechanical damages may be mended by means of the supplied paint.Mineral wool backfilling: a requisite mineral wool backfilling is installed step by step with the Heradesign panels. If necessary, the lowest layer should be secured against downward movement. If trickle protection is required, we recommend to shrinkwrap the mineral wool in PE film. Thickness approx. 30 μm.Linear expansion with temperature changes of up to 30°C: To compensate for this, there has to be a free distance of at least 5 mm at the longi-tudinal joints of basic sections or main profiles for lengths of over 6 m. With temperature chan-ges of over 30°C, position the expansion joints according to static requirements.Corrosion protection requirements: the dowels and screws have to be chosen accor-ding to the existing corrosion load. In order to avoid contact corrosion, stainless steel screws have to be used to connect the aluminium sec-tions with each other. Only use anodised sec-tions and spacers for indoor swimming pools and outdoor applications.Installation of lights: grid lights cannot be installed; other built-in light fixtures, surface-mounting lights, etc. require a special base. For the installation of spotlights, see the Heradesign Technical Manual: application and handling.
Light installation details 58Processing 68
Wall mounting with holding profile
Wal
l mou
ntin
g w
ith h
oldi
ng p
rofil
e
Stainless steel drilling screw, 4.8 x 20 mm, with button head and square socket. For the attachment of basic and main profiles on an aluminium base. Requirement: approx. six screws per m², or two screws per joint.
Drilling screw
Table 20
Dimension (mm) For section thickness Packaging unit
length diameter mm pieces / box
20 4.8 1-3 200

42
Heradesign® facing panel

43
Angularly flexible facing panels for walls and ceilings
Wall covering - mounting on laths and resilient brackets.Special construction to achieve shorter reverberation time with high sound insulation. This can improve
on the existing construction and the assembly that has been selected.
3
42
1 5
5
Resilient bracket on elastic base Wood lath 60/40 Heradesign acoustic panel, screwed KI rock wool, gross density approx. 50 kg/m³ Elastic base strips
12
3
45
Ceiling covering - installation on hanging lath frame / hanging CD-sections.
U-hanger with vibration damping Wood lath 60/40 Heradesign acoustic panel KI rock wool, gross density approx. 50 kg/m³ Vibration hanger with hanging wire, tension spring with CD-hanger Gypsum fibre board, thickness 12.5 mm Resilient bracket on elastic base CD-section 60/27/0.7
12
34
5
8
7
6
Note: it is not permissible to glue Heradesign acoustic panels with gypsum or gypsum fibre boards. The Heradesign acoustic panels must be anchored in the supporting substructure of the gypsum boards.
7
Facing panel
Faci
ng p
anel

44
Attention: for increased demands on sound insu-lation, a layer of gypsum fibre board / gypsum
substructure and the Heradesign acoustic panel. Nevertheless, the substructure must be implemen-ted such that the Heradesign acoustic panels can be screwed into the wood laths, or CD-sections, and the increased load can be borne safely. The spacing of the main and cross sections as well as the resilient brackets or the hangers must be matched.
Mounting information
For the implementation requirements, see DIN 18168 T.1 “Lightweight ceiling linings and suspen-ded ceilings”.Install wood laths or CD-sections 60/27/0.6 with the required centre distance on resilient bracket with elastic base or with U-hangers with vibration dam-ping. Distribute laths or CD-sections symmetrically; make sure the end fields are the same size.
Press the panels in and align them longi-tudinally in the bracing, transversely to the direction of the laths and fasten them with rust-protected screws (head diameter 9 mm) to the supporting structure. Depending on the width of the panel and the centre distance, at least 3 screws are necessary.
Square panels: observe the installation direc-
tion marked on the back when installing the panels.
Cross joints: four panel corners meet at one point, which means increased accuracy is required when installing.
For F 30 / EI 30 ceilings do not use any elastic damping elements – only metal resilient brackets alone. Set the screws skewed by approx. 10º.
Screws: wood or drywall screws (with special tips for CD-sections) with partial thread and countersunk heads are suitable. Head diameter 9 mm. The necessary corrosion protection must be matched to the conditions prevailing in the room. The screw heads must be set to be flush with the panel surface and after installation they must be covered with a paint supplied by the manufacturer by request or an equivalent.
with the installation of the acoustic panels. Film joints and connections must be taped up. A PE film with a thickness of up to 30 μm does not degrade the sound absorption of the under lying absorbers and is recommended for mineral wool lining.
Damaged, or soiled panels or panels with colour deviations may not be installed.
It is not permissible to fasten Heradesign acoustic panels using glue or glue in combination with screws
Screw mounting, see page 7.
Resilient bracket Hanger with elastic spring element
U-hanger withvibration damping
Facing panel

45
Notes
Faci
ng p
anel

46
Table 21
Product System part Size L x W x H mm Thickness mm
Edge design Weight kg/piece
Heradesign® superfine 1 Corner Piece 600 x 600 x 125
25 AK-01
5.82 Side Piece 600 600 x 600 x 125 4.93 Side Piece 1200 1200 x 600 x 125 9.84 Standard 600 600 x 600 4.15 Standard 1200 1200 x 600 8.1
Heradesign® fine 1 Corner Piece 600 x 600 x 125 6.32 Side Piece 600 600 x 600 x 125 5.43 Side Piece 1200 1200 x 600 x 125 10.84 Standard 600 600 x 600 4.55 Standard 1200 1200 x 600 8.9
Heradesign® ceiling raft

47
Ceiling raft
Cei
ling
raft
1) Corner piece 2) Side piece 600 3) Side piece 1200
Ceiling raft cross section

48
Mounting information: For the implementation requirements, also see DIN 18168 T.1 “Lightweight ceiling linings and suspended ceilings”, or alternatively DIN-EN 13964 “Sus-pended ceilings – requirements and test methods”. Installation of the basic sections, distances according to Table 8, page 18. Longitudinally, set one basic section each into the corner of the upturned edges of the ceiling raft. Distribute cross sections symmetrically in the grid dimensions. Set one cross section each into the corner of the upturned edge.
. Start panel installation from the centre of the ceiling raft. Press the acoustic panels in and align them longitudinally in the bracing, transversely to the direction of the section and fasten them with rust-protected drywall screws (head diameter 9 mm) and suitable drill point to the load-bearing
tracks. For each panel width and centre distance, two drywall screws are required. For indoor swim-ming pools and vibrating constructions, three drywall screws are required. Please note: observe the necessary corrosion protection requirements. Square acoustic panels: observe the installati-on direction marked on the back when installing the panels.
Cross joints: four panel corners meet at one point, which means increased accuracy is required when installing. Screws: drywall screws with special tips, fine thread, partial thread and bugle head screws with milled ribs on the underside are suitable. Head diameter 9 mm. The necessary corrosion protection must be matched to the conditions prevailing in the room. The screw heads must be set to be flush with the panel surface and after installation they must be covered with a paint supplied by the manufacturer or an equivalent. Film or mineral wool is inserted piece by piece with the installation of the acoustic panels. A PE film with a thickness of up to 30 μm does not degrade the sound absorption of the underlying absorbers and is recommended as trickle pro-tection for mineral wool lining. Damaged or soiled panels or panels with colour deviations may not be installed. Panels with edge design SK-04 may not be installed because the panel size is smaller than the grid dimensions.
Light installation details 58Processing 68
Please request expert opinion if required.
Heradesign® screwRust-protected, universal drywall screw for attaching Heradesign acoustic panels to laths and CD-sections 60/27/0.6 mm. Partial thread, screw head with Torx T20.Screws required: see accessories, page 63.
Maximum spacing: 600 or 300 mm / 625 or 312 mmPlease note: not suitable for indoor swimming pools and outdoor applications.
Table 22 - Delivery form of Heradesign® screws
Dimensions mm Colour of screw head
For panel thickness mm
Packaging unit pieces/boxLength Ø
50 4.5 -- 25 200
50 4.5 white / natural colour 25 200
60 4.5 -- 35 200
Table 23
Panel thickness (mm) 15 25 35
Screw dimensions according to DIN 7997, ÖNORM M5027 (mm) 4.5/35 4.5/45 4.5/60
Ceiling raft

www.heradesign.com

Heradesign® baffles
Heradesign® Baffl e aluDesign3-layer baffl e (nominal thickness: 58 mm) with Heradesign® top layers and mineral wool absorber
core. Frame with anodised aluminium profi le closed on all sides (colour A6/C0) with integrated
notchings for Heradesign® hangers. Standard colouring of Heradesign® cover layers in white,
similar to RAL 9010 or beige, natural tone 13.
50
Please note:
Further colours for baffl e aluminium profi le in accordance with RAL chart on request (powder-coated).
For technical details and further information, see the product data sheet.
ColoursExtra charge for coloured aluminium frame
Including transparent connecting cable 3 x 0.75 mm²
Accessories for Baffl e aluDesign
AccessoryFor baffl e size
mm
LED light set single 10 W Uplight or Downlight 1200 x 300, 1200 x 600
LED light set single 20 W Uplight and Downlight 1200 x 300, 1200 x 600
Colour
Eloxal A6/C0 unpainted Standard
Eloxal A6/C2 light gold
Eloxal A6/C3 mid gold
Eloxal A6/C4 dark gold
Colour
Eloxal A6/C31 slight bronze
Eloxal A6/C32 light bronze
Eloxal A6/C33 mid bronze
Eloxal A6/C34 dark bronze
Eloxal A6/C35 black
Heradesign® fi ne Heradesign® superfi ne
Baffl e size mm
Weightapprox. kg/pc.
Packaging unit pieces with pallet
600 x 300 4,5 60
1200 x 300 8,7 30
1800 x 300 12,9 30
600 x 600 8,3 30
1200 x 600 15,9 15
1800 x 600 23,4 15
Baffl e size mm
Weightapprox. kg/pc.
Packaging unit pieces with pallet
600 x 300 4,4 60
1200 x 300 8,4 30
1800 x 300 12,5 30
600 x 600 8,0 30
1200 x 600 15,3 15
1800 x 600 22,6 15
Heradesign® fi ne A2 Heradesign® superfi ne A2
Delivery dates and other baffl e sizes on request.
Baffl e size mm
Weightapprox. kg/pc.
Packaging unit pieces with pallet
600 x 300 6,1 60
1200 x 300 12,0 30
1800 x 300 17,8 30
600 x 600 11,6 30
1200 x 600 22,5 15
1800 x 600 33,5 15
Baffl e size mm
Weightapprox. kg/pc.
Packaging unit pieces with pallet
600 x 300 5,8 60
1200 x 300 11,3 30
1800 x 300 16,8 30
600 x 600 10,9 30
1200 x 600 21,1 15
1800 x 600 31,4 15

51
Baffels
Baf
fels
Heradesign® Baffl e basic2-layer baffl e (nominal thickness: 30 mm) with Heradesign® cover layers with anodised aluminium
profi le on the top side. Standard colouring of Heradesign® layers in white, similar to RAL 9010 or beige,
natural tone 13. Edge colouring of the visible side and bottom edges (straight edge) corresponding to
the colour of the Heradesign® layers.
Heradesign® Hanging System for Baffl e basic and Baffl e aluDesign
Liefertermine und weitere Baffelformate auf Anfrage.
Hanger per baffl e: baffl e length 600 and 1200 mm - 2 hangers per baffl e; baffl e length 1800 mm - 3 hangers per baffl e;
if inclined hangers are used - 4 hangers per baffl e
System partsLength
mm
Packaging unit pieces
Fastening and guide profi le 3000 2
System partsLength
mm
Packaging unit pieces
Rail connector 100 100
System partsHanging height
mm
Packaging unit pieces
Short hanger 45 12
Wire hanger < 500 12
Inclined hanger (only for Baffl e aluDesign) < 500 12
Single hanger (application WITHOUT ceiling fastening rail) < 500 12
Short hanger
Guide profi le Guide profi le Guide profi le
Wire hanger Inclined wire hanger Single wire hanger
Delivery dates and other baffl e sizes on request.
Heradesign® fi ne Heradesign® superfi ne
Baffl e size mm
Weightapprox. kg/pc.
Packaging unit pieces with pallet
600 x 300 3,1 60
1200 x 300 6,3 30
1800 x 300 9,4 30
600 x 600 6,1 30
1200 x 600 12,2 15
1800 x 600 18,3 15
Baffl e size mm
Weightapprox. kg/pc.
Packaging unit pieces with pallet
600 x 300 3,0 60
1200 x 300 6,0 30
1800 x 300 9,0 30
600 x 600 5,8 30
1200 x 600 11,6 15
1800 x 600 17,4 15
Heradesign® fi ne A2 Heradesign® superfi ne A2
Baffl e size mm
Weightapprox. kg/pc.
Packaging unit pieces with pallet
600 x 300 4,8 60
1200 x 300 9,7 30
1800 x 300 14,5 30
600 x 600 9,5 30
1200 x 600 19,0 15
1800 x 600 28,5 15
Baffl e size mm
Weightapprox. kg/pc.
Packaging unit pieces with pallet
600 x 300 4,5 60
1200 x 300 8,9 30
1800 x 300 13,4 30
600 x 600 8,8 30
1200 x 600 17,6 15
1800 x 600 26,4 15
Special lengths on request

52
Details

Overview of edge designs
Details
53
Edge
des
igns
System edges: screw mounting
GK straight edge on all sides 601)
3)
600/600
1200/600no extra charge
AK-00bevelled on long sides, 5 mm bevel,
straight edge on the face side60 3)
600/600 625/625
1200/600 1250/625no extra charge
AK-01 edge bevelled on all sides, 5 mm bevel 60 3)600/600 625/625
1200/600 1250/625
no extra
charge
AK-02 /5
straight edge with shiplap on all sides,
5 mm joint width60 3)
600/600 625/625
1200/600 1250/6252,50
AK-02 /10
straight edge with shiplap on all sides,
10 mm joint width60 3)
600/600 625/625
1200/600 1250/6252,50
AK-02 /20
straight edge with shiplap on all sides,
20 mm joint width60 3)
600/600 625/625
1200/600 1250/6252,50
AK-03shiplap on all sides with bevelled edge,
5 mm bevel, 20 mm joint width60 3)
600/600 625/625
1200/600 1250/6252,50
VK-12shiplap all round on alternating sides
with bevelled edge, 5 mm bevel60 3) 1190/590 1240/615 2,60
System edges: Heradesign Exposed Grid System 24/38, insertion installation
SK-04 straight edge on all sides 242)
4)
6)
600/600 625/625
1200/600 1250/625
no extra
charge
SK-05 straight edge with shiplap on all sides 242)
4)
600/600 625/625
1200/600 1250/6252,50
SK-06shiplap on all sides with bevelled edge,
5 mm bevel24
2)
4)
600/600 625/625
1200/600 1250/6252,50
System edges: Heradesign Concealed Grid System 35/38, slide-in installation
VK-09
grooved and bevelled on all sides,
5 mm bevel
Achtung: System nicht demontierbar!
353)
5)
600/600
1200/6002,60
VK-10
längseitig genutet und allseitig gefast,
Fase 5 mm. Note: The system cannot
be disassembled.
352)
3)
5)
600/600
1200/6002,60
VK-10 /5
grooved on long sides and bevelled
on all sides, 5 mm bevel. Note: The
system can be disassembled.
352)
3)
5)
600/600
1200/6002,60
System edges: special installation (special sections)
SY-02
for Heradesign retaining claw holding
grooved on long sides and bevelled on
all sides, 5 mm bevel
35 3)600/600
1200/6002,60
SY-03for concealed top hat sections, Kante
grooved on long side, with 5 mm bevel12
2)
4)
600/600 625/625
1200/600 1250/6252,60
SK-08
for visible top hat sections, straight
edges on long sides, bevelled edges
on the face side
202)
4)620 645 2,60
He
rad
esig
n fi
ne
A2 7
)
He
rad
esig
n s
up
erfi
ne
A2
7)
Re
c.
se
cti
on
wid
th 7
)
Co
mm
en
ts
Gri
d d
ime
nsio
ns 2
)
Extr
a c
ha
rge
L / B (mm) EUR / m2
Ab
bre
via
tio
n
De
sig
n
Description of the edge
He
rad
esig
n m
acro
7)
25 15 25 35 15 25 35 25 35 25 15 25 15 25
He
rad
esig
n fi
ne
He
rad
esig
n s
up
erfi
ne
He
rad
esig
n m
icro
He
rad
esig
n p
lan
o 7
) 9)
mm mm
1) The straight edge is not an exposed edge. Straight edge only produced at
the request of the customer (max. panel width 600 mm).
2) The billing dimensions or alternatively the ordering dimensions
are always the grid dimensions.
3) Installation pattern in cross joints requires careful installation, because four
panel edges have to meet at one point.
4) The panel dimensions are smaller than the grid dimensions.
5) Custom formats only on request. For lengths of over 1800 mm,
please contact customer services.
6) Products of 15 mm thickness are only available in the formats
600/600 or 625/625.
7) Panel width max. 600 mm.
8) For screw mounting, the section width also applies to
the wooden substructure.
9) For Heradesign plano, the bevel of the edges AK-01, SK-06,
VK-09, SY-02 is only 3 mm.

54
d = 35 mmd = 25 mmd = 15 mm
15
25
35
Panel dimensions
Grid dimensions
Panel thickness
AK-00
GK
AK-01
AK-02/5
AK-03
VK-12
straight edge on all sides for screw mounting
bevelled on long sides (5 mm bevel) for screw mounting
shiplap all round on alternating sides with 5 mm bevel
shiplap on all sides with 5 mm bevel for screw mounting
shiplap on all sides (5 mm joint) for screw mounting
bevelled on all sides(5 mm bevel) for screw mounting
5 5 5
10
20
30
Panel dimensions
Grid dimensions
5 5 5
10
20
30
Panel dimensions
Grid dimensions
15 17,5
10
17,5 2,5
2,5
Panel dimensions
Grid dimensions
1010
5
17,5
12,5
5
10
10
Panel dimensions
Grid dimensions
17,5
17,5 10
Grid dimensions
Panel dimensions
Edge design – details for screw mounting
Details

55
Edge design – details for insertion/slide-in installation
SK-05
shiplap on all sides for visible T24/38 section
17.5
12.5
17.5
12.5
66
Panel dimensions
Grid dimensions
SK-06
shiplap on all sideswith 5 mm bevel for T24/38 section
12.5
10
55
17.5
10
6 6
Panel dimensions
Grid dimensions
SK-04
straight edges for visible T24/38 section, panel undercut above a thickness of 25 mm
Panel thickness: d = 15 mm d = 25 mm d = 35 mm
6,0
15,0
Grid dimensions
Panel dimensions
6,06,0
6,0
15,0
10,0
Grid dimensions
Panel dimensions
12,0 6,0 12,0
20,0
15,0
Grid dimensions
Panel dimensions
SY-02 for special installation
for Heradesign retaining claw and installation on supporting rails,grooved on long sides and bevelled on all sides, 5 mm bevel
Panel thickness: d = 25 mm d = 35 mm
11,0
3,0
11,0
8,0
5,0 5,018,0 18,0
3,0 3,0
25,033
,0
Grid dimensions
Panel dimensions
5,0 5,018,0 18,0
3,0 3,0
35,0
38,5
Grid dimensions
Panel dimensions
21,0
3,011
,03,5
Det
ails
Details

56
Edge design – details for Heradesign® plus panels
AK-01 plus
SK-04 plus
edges bevelled on all sides, 5 mm bevel, rock wool lining undercut;for screw mounting of Heradesign plus panels
straight edge for visible T24/38 sections, rock wool lining undercut
25,0
25,0
5,0 5,0
50,0 50,0
Grid dimensions
Panel dimensions
Mineral wool Mineral wool
6,06,0
6,0
15,0
10,0
9,0 9,0
25,0
40,0
Grid dimensions
Panel dimensions
Mineral woolMineral wool
Panel thickness: 25 mm
Panel thickness: 25 mm
Details

57
Shadow gap End cover
Wall angle Wall angle with shadow gap
Wall angle with shadow gap and back ventilation
Wall connection details
Details
Det
ails

58
Light installation details
Lath frame Mounting outside the grid
Visible T-section
Light installation CD-section
Ceiling-mounted radiator max. permissible temperature of the Heradesign panel: 60°C
Spotlight and Downlight see page 60
Indirect lighting (edge) CD-section
Fire grid construction
max. 200 mm
30 30Deckenheizkörper
Details

5959
Installation photos – Light installation
Exchange of the ceiling grid for the installation of grid lights: place additional cross joists and hangers in the area of the exchange.
Mounting of the edge strips.
Hang in the ceiling light. Fasten by means of the supplied side wings to the T-sections, CD-sections or wood laths. Adjust the mounting height of the light to the existing suspension height.
Alternative: fastening of the ceiling light by means of screws into the wood laths on the sides, CD-sections or direct attachment into the ceiling.
Installed grid light. The panel joint is covered by the frame.
The joint between the Heradesign acoustic panel and the light covered by a frame.
Details
Det
ails

6060
Installation photos – Spotlights and downlights
Drilling of a round opening for spotlights, with the exposed surface of the panels up.
Cutting out an opening with a jigsaw, with the exposed surface of the panels down.
Cover cut edges with paint if these are not con-cealed by a cover.
Insertion of the housing of a spotlight.
Position cutouts in the panel centrally. Lights with a higher weight must be anchored into the ceiling or hanging construction.
Maximum permissible temperature of the Heradesign acoustic panel 60 °C
Spotlights up to diameter = 150 mm frompanel thickness 15 mm, max. weight 0,60 kgDownlights up to diameter = 200 mm from panel thickness 25 mm, max. weight 1,50 kgDownlights up to diameter = 300 mm frompanel thickness 35 mm, max. weight 2,50 kg
Details

61
U-connection section1
Installation on CD-sections A Installation on wood construction
Installation on CD-sectionsC
Ceiling
Hanging system: Richter D112
1
42
3
1
1
2
3
4
Quick hanger with slider
Vernier hanger
Cross quick connector
C-ceiling section
Details
Det
ails

62
Accessories
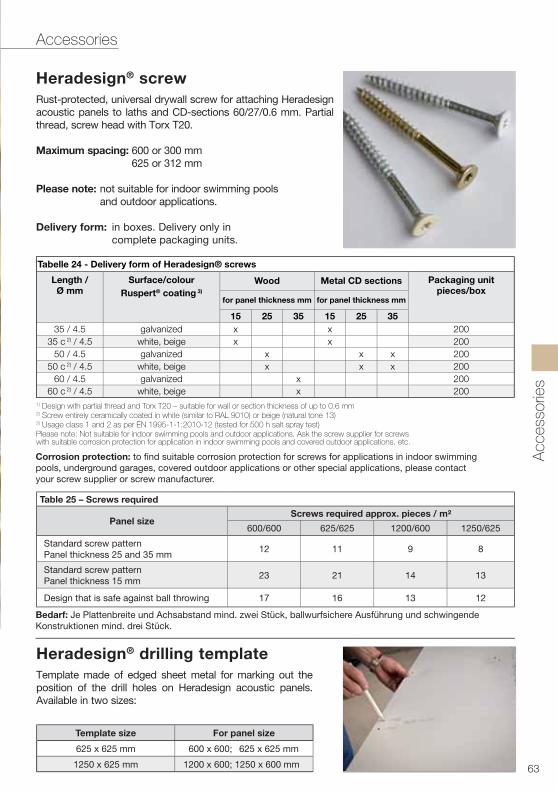
Rust-protected, universal drywall screw for attaching Heradesign acoustic panels to laths and CD-sections 60/27/0.6 mm. Partial thread, screw head with Torx T20.
Maximum spacing: 600 or 300 mm625 or 312 mm
Please note: not suitable for indoor swimming pools and outdoor applications.
Delivery form: in boxes. Delivery only in complete packaging units.
Heradesign® screw
Corrosion protection: to find suitable corrosion protection for screws for applications in indoor swimming pools, underground garages, covered outdoor applications or other special applications, please contact your screw supplier or screw manufacturer.
Table 25 – Screws required
Panel sizeScrews required approx. pieces / m²
600/600 625/625 1200/600 1250/625
Table 24 – Delivery form of Heradesign® screws
Dimensions mm Colour of screw head
For panel thickness mm
Packaging unitpieces/boxLength Ø
35 4.5 -- 15 200
50 4.5 -- 25 200
50 4.5 white / natural colour 25 200
60 4.5 -- 35 200
Accessories
Acc
esso
ries
Tabelle 24 - Delivery form of Heradesign® screws
Length / Ø mm
Surface/colour
Ruspert® coating 3)
Wood Metal CD sections Packaging unitpieces/box
for panel thickness mm for panel thickness mm
15 25 35 15 25 35
35 / 4.5 galvanized x x 200
35 c 2) / 4.5 white, beige x x 200
50 / 4.5 galvanized x x x 200
50 c 2) / 4.5 white, beige x x x 200
60 / 4.5 galvanized x 200
60 c 2) / 4.5 white, beige x 200
Corrosion protection: to fi nd suitable corrosion protection for screws for applications in indoor swimming
pools, underground garages, covered outdoor applications or other special applications, please contact
your screw supplier or screw manufacturer.
1) Design with partial thread and Torx T20 – suitable for wall or section thickness of up to 0.6 mm 2) Screw entirely ceramically coated in white (similar to RAL 9010) or beige (natural tone 13) 3) Usage class 1 and 2 as per EN 1995-1-1:2010-12 (tested for 500 h salt spray test)Please note: Not suitable for indoor swimming pools and outdoor applications. Ask the screw supplier for screws with suitable corrosion protection for application in indoor swimming pools and covered outdoor applications, etc.
Table 25 – Screws required
Panel sizeScrews required approx. pieces / m²
600/600 625/625 1200/600 1250/625
Standard screw patternPanel thickness 25 and 35 mm
12 11 9 8
Standard screw patternPanel thickness 15 mm
23 21 14 13
Design that is safe against ball throwing 17 16 13 12
Template size For panel size
625 x 625 mm 600 x 600; 625 x 625 mm
1250 x 625 mm 1200 x 600; 1250 x 600 mm
Template made of edged sheet metal for marking out the position of the drill holes on Heradesign acoustic panels. Available in two sizes:
Heradesign® drilling template
Bedarf: Je Plattenbreite und Achsabstand mind. zwei Stück, ballwurfsichere Ausführung und schwingende
Konstruktionen mind. drei Stück.
63

64
Heradesign® acoustic lining DP-5“Low density” mineral wool absorbers that are used as a lining or backfilling in wall and ceiling constructions for increased sound absorption requirements with approx. 50 kg/m³ gross density.
Heradesign® acoustic lining DP-9“High density” mineral wool absorbers that are used as a lining or backfilling in wall and ceiling constructions for increased sound absorption and fire protection requirements with approx. 90 kg/m³ gross density and non-woven glass-fibre covering on one side.
Heradesign® acoustic linings
Heradesign® acoustic linings
Panel thicknessmm
Weightapprox. kg/m2
Panel sizemm
Packaging unitm2/package
30 1.5 1200 x 625 10.540 2.0 1200 x 625 9.050 2.5 1200 x 625 7.5
Panel thicknessmm
Weightapprox. kg/m2
Panel sizemm
Packaging unitm2/package
25 2.3 1200 x 625 7.050 4.5 1200 x 625 4.5
Design elementHeradesign® ceiling angleHeradesign ceiling angles are used for the formation of edges in ceiling and wall designs. As individually fabricated design elements, they are suitable both for covering statically required structural elements as well as for creative ceiling and wall design (3D ceiling design).
Thickness: 25, 35 mmSizes: max. length AL 1250 mm, max. width LL 600 mmEdge design: GK, AK-01Colours:
Please note: for F 30/EI 30 ceilings with screw installation, the panels must be additionally connected on the inside angle side by a scantling 50/50 mm or alternatively by a CD-section.
AL – Angle lengthLL – Leg length (max. 600 mm)
Leg length + leg length = max. width
LL
LL
AL
Accessories

65
Heradesign® maintenance openingMaintenance opening especially for Heradesign acou-stic panels for installation in ceilings and wall structures.Design: consists of two aluminium frames with a pres-sure lock and safety catch.Section thickness: approx. 2 mmArea of application: for suspended ceiling construc-tions and wall installations without any fire exposure where permanent access to the wall or ceiling cavity is required (e.g.: service work).Delivery form: in boxes.
Dimensionsmm
For panel thicknessmm
Weightkg
Packaging unitpieces/box
400 x 400 25 1.1 1*)
400 x 600 25 1.2 1*)
*) Packaging units can be defi ned individually depending on the quantity ordered.
Heradesign® maintenance openingDesign: maintenance opening consisting of two alumini-um frames that cannot be disassembled with a pressure lock and safety catch built into a Heradesign acoustic panel. The maintenance opening is centred in the panel by default.High-quality solution through assembly at the plant.Section thickness: approx. 2 mmArea of application: for suspended ceiling constructions and wall installations without any fire exposure where per-manent access to the wall or ceiling cavity is required (e.g.: service work).Delivery form: in boxes.
Detailed information is available from our technical customer service, the internet or our special documents.
Please note: not suitable for indoor swimming pools and outdoor applications.
Dimensionsmm
For panel thicknessmm
Weightkg
Packaging unitpieces/box
600 x 600 400 x 400 25 1*)
625 x 625 400 x 400 25 1*)
1200 x 600 400 x 600 25 1*)
1250 x 625 400 x 600 25 1*)
*) Packaging units can be defi ned individually depending on the quantity ordered.
Please note: not suitable for indoor swimming pools and outdoor applications.
Maintenance openings for 35 mm thick panels and a design that is safe against ball throwing on request.
Accessories
Acc
esso
ries

6666
Cutting out of the opening/cover plate from the back of the panel.
Sanding of the edges.
Insertion of the cover plate. Screwing of the cover plate with at least 2 x 4 screws (4.5 x 20 mm) per frame (40 x 40 cm) or
or polymer glue on the inner frame.
Painting of the edges. Drilling of the frame.
Heradesign® maintenance opening
Accessories

6767
PE trickle protection film bags, thickness approx. 30 μm, as a trickle protection for Heradesign acoustic linings.
Heradesign® trickle protection film bags
Tearing off the bags from the roll. Sliding in the acoustic lining.
Folding over the film edges. Taping up the film end.
Accessories
Acc
esso
ries
Stainless steel drilling screw, 4.8 x 20 mm, with button head and square socket; for the attachment of basic and load-bearing sections on an aluminium base. Requirement: approx. 6 screws per m², or two screws per joint.
Heradesign® drilling screw
Dimensions (mm) For section thickness Packaging unit
length diameter mm pieces / box
20 4.8 1-3 200

68
Application and handling

69
Durability
Medium, attack Comments
1) Water and water vapour
Not resistant to direct, long-term effects of water (rain, condensation, moisture from soil, capillary action). This results in the panels swelling as well as reduced mechanical stability and efflorescence of magnesi-um sulphate. Likewise, permanent exposure to water vapour (rel. humi-dity > 90%) leads to swelling and a reduction of mechanical stability.
2) Organic solvents *) (e.g. acetone, alcohol, ether, petrol, benzene, halogenated hydrocar bons, oils, etc.)
Contact with organic solvents in liquid form (local exposures spots) causes them to be partly absorbed by the panel and released as vapour. No adverse effects to the mechanical stability of the panels have been observed (except for flammability after exposure to flam-mable solvents, as well as dirtying of the visible surface).Solvent vapours in concentrations that are allowed by hygienic regu-lations for the workplace have no effect on the building biological properties of the magnesite bonded Heradesign acoustic panels according to findings so far.
3) Acids and alkalis a) Acids: magnesite bonded Heradesign acoustic panels are not resi-stant to the direct effects of acids. Depending on the concentration and strength of the acid, direct contact to an acid will cause localised dissolving of the bonding agent in the panel. Generally, harmless salts are formed (party with a violent reaction). In some cases acid vapours occur, which are within the workplace hygienic regulations (e.g. com-mon in chemical laboratories or similar facilities), and which do not damage the products.
b) Alkalis: the effect of alkalis on the panels causes the bonding agent to soften and is comparable to the effects of water.
4) Colours The surface of magnesite bonded Heradesign acoustic panels can be treated with commercial colours on the basis of polyvinyl acetate or acrylates, silicates, distempers, etc. The type of already existing paints must be taken into consideration.
*) Questions about applications regarding contact to specific solvents/solvent mixtures or exposure to high concentrations of solvents must be discussed individually with Heradesign Ceiling System’s techni- cal customer service.
App
licat
ion
and
hand
ling
Application and handling

70
Areas of application of Heradesign® acoustic panelsIn indoor areas
0
10
20
30
40
50
60
70
80
90
95
100
5 6 8 10 12 14 16 18 20 22 24 26 28 30
(max
. dai
ly a
vera
ge)
(°C temperature)(max. daily average)
Application limit
Range limit
too dry
dry range
ideal
humidity range
1
3
2
too humid
Heradesign superfine, Heradesign fine, Heradesign fine A2, Heradesign superfine A2, Heradesign micro, Heradesign plano
Ideal, all constructions and products.
Dry range, all products. The installation humidity of the panels must be lower than 15 percent by weight.
Humid range, stress class B according to DIN-EN 13964. Only specific constructions and products. Colouring with outdoor silicate paint or paint with additions – constructional consultation required.
3
2
1
Application and handling

71
Transport and storageTransport Heradesign acoustic panels are delivered on pallets with a protective cardboard cover. They may only be transported in closed trucks or freight cars and must be protected against moi-sture during the entire journey. Only stack a maximum of two pallets. Pallets and boxes must be secured against tipping, slipping and physical damage.
Material deliveryHeradesign acoustic panels are produced, checked and transported to the construction site with great care.
Nevertheless, during material acceptance, you should always check the delivery slip:
according to the delivery slip with the labels on the packaging
dowels, screws, spare paint, profiled sections or other additional items
If there are any transport damages, insufficient quantities, or other discrepancies to the delivery slip and waybill, have this certified by the driver. Also, immediately inform the dealer that shipped the goods. Flawed panels must not be used.
Panel storageAs the processor, you are responsible for the proper storage of the goods at the construc-tion site and for their transport to the installa-tion point.
And this is how to do it correctly:panels must be stored flat and stably in a dry, clean, swept-out room to protect them from moisture, soiling and dust.the existing packaging is no protection against rain.only stack a maximum of two pallets of magnesite bonded wood wool acoustic panels (max. height 250 cm) on top of each other.
following storage conditions are ensured, depending on the climate conditions of the designated installation site. For subsequent installation in heated or air-conditioned rooms: max. relative air humidity of 75% and the temperature must not drop below +7ºC or rise above +30ºC. For unheated rooms such as underground garages, etc. the following applies: max. relative air humidity of 85% and minimum temperature of +5ºC.
App
licat
ion
and
hand
ling
Application and handling

72
ProcessingThe work should be a compliment to the master.Heradesign acoustic panels are high-quality visual panels that are carefully packed and chek-ked and delivered to the construction site. The second important factor for a beautiful ceiling, however, is exact processing and suitable work conditions. This is because only careful work and high product quality ensure a satisfactory result.
Material and air humidityDue to the organic component of wood, in the Heradesign panels, slight deviations in the size cannot be excluded. Likewise, the panels also contract and expand if there is strongly fluctua-ting air humidity.
Final shrinkage in a standard climate of 23ºC / 50% r.h. is max. ± 1‰ for length changes and max. 3‰ for width changes.
Therefore, special attention must be given to the temperature and air humidity during installation (if necessary heat, ventilate, back-ventilate the ceiling or dehumidify the air under constant monitoring) in order to ensure constant installation conditions.Production tolerance for the nominal dimensi-ons is ± 1 mm; for lengths over 1250 mm ± 2 mm.
Colour and structureAs a consequence of the natural raw materials of magnesite and wood, differences to the colour and structure may occur. Especially for white coloured acoustic panels, there may be changes to the degree of brightness due to the wood wool structure as well as due to the influence of light sources and the viewpoint of the observer. Only the same type of panels may be installed in a ceiling. Therefore, constantly check the panels before installation as well as the overall impres-sion of the ceiling from the floor. The installation direction must be observed for square panels. This is identified by an arrow on the panel back-side. Always install with the arrow in the same direction. Coloured panels (except RAL 9010) can only be ordered on commission. No liability can be assumed for colour deviations in the event of partial deliveries or deviations from the colour chart.
Colour qualitySilicate paint based on potassium silicate and organic bonding agents is used for colouring Heradesign acoustic panels in white, pastel and solid colours. The building biology properties of the panels are retained as a result. Heradesign superfine, Heradesign fine, Heradesign fine A2 und Heradesign superfine A2 can also be colou-red multiple times without losing the outstanding sound absorption properties. The coat of paint must always be applied to the panel with a spray gun in a longitudinal and transverse direction.
Installation and system conditions
panels, also see page 70.The installation of Heradesign acoustic ceilings is part of interior decorating and must only be carried out under controlled humidity and temperature conditions. All dust-causing construction measures must be completed before starting the installation.
moisture or rain water to penetrate through walls, ceilings and openings.Only install panels in rooms, where the following conditions are ensured: for heated or air-conditioned rooms, the maximum rela-tive air humidity must not exceed 75% and the temperatures must not be below +7ºC or above +30ºC. For unheated rooms such as underground garages, etc. the following applies: max. relative air humidity of 85% and minimum temperature of +5ºC.
-sequently installed in rooms with central heating, we recommend acclimatising the panels for at least three days in a room with the same conditions.Suitable working conditions are:
- Dry and clean rooms - At least two weeks after plastering and
screed work have been completed - With installed and glazed windows and
doors for controlled temperatures and venti lation
- The maximum installation humidity of the Heradesign acoustic panels must be lower than 15 percent by weight
Application and handling

73
Before you start mounting, check the base for sufficient load-bearing capacity.Hanging systems must be installed in accor-dance with the manufacturer‘s guidelines, according to DIN 18168 “Lightweight ceiling linings and suspended ceilings”, as well as according to EN 13964 “Suspended ceilings – requirements and test methods”.Evenness: the greatest deviation from the evenness of the substructure may only be a maximum of 2 mm per metre of length; howe-ver, it must not exceed 5 mm over a length of 5.0 m. DIN-EN 13964, Section A.5.
installation direction for square panels. The installation directions are marked on the back with an imprinted arrow.After installing the Heradesign acoustic panels, other tradesmen may only perform finishing work on the ceiling.Expansion joint: for large ceiling areas that are installed with screw mounting in a covered outside area or in rooms with strongly chan-ging high air humidity (rel. air hum. > 80%), we recommend placing an expansion joint at least every 15 m. The expansion joint must be formed between the substructure and the Heradesign acoustic panel. When connecting these ceilings to fixed limiting structural ele-ments, care must also be given to sufficient expansion possibilities. Here, the free edge distance should be at least 10 mm.Vibrating structural elements: suspended ceilings with insertion or screw mounting in which angularly flexible hangers are fastened to structures that tend to have vibrations such as trapezoidal sheet metal roofs, steel or wood binders/trusses, must be secured by hangers placed on an angle (at least 10% of them) to counter horizontal displacement. For screw installation, at least three screws must be used per panel width and support.Resistance to wind loads:
If it is to be expected that suspended ceilings in a covered outdoor area or in the inside of a building will be subject to wind loads (e.g. by open windows, doors), then the appropriate measures must be taken to ensure that the top layer and the substructure can withstand suction and/or pressure wind loads.
Maximum span of the panel: 625 mm. Film (thickness < approx. 25 μm) is recommen-ded as trickle protection for mineral wool lining.Please note: Heradesign acoustic panels are generally not suitable for glue mounting. A combination of gluing and screwing must also not be used.
Processing For cutting wood wool acoustic panels at the construction site, we recommend using a fast running circular saw with a carbide-tipped saw blade (diameter approx. 400 mm) and dust
with a saw blade set on an angle, by sanding with coarse sand paper or by using a belt sander. Cut the panels such that the visual sur-faces are not dirtied by saw dust. See page 78.
finishing work should be carried out outdoors. Always work with clean hands and clean tools.The cutting must not be done using the stack of panels as a base.Carefully cover minor damages and screw heads, edges and panel surfaces with paint after installation. Only apply a small amount of paint to avoid colour differences. Installation methods with cross joints are difficult to use (Four panel corners at one point is laborious).
Please note:Observe the employee protection provisions and safety regulations.
Observe the manufacturers‘ safety instruc-tions for use of the tools and always wear your personal protective equipment such as safety goggles, helmet, etc.
App
licat
ion
and
hand
ling
Application and handling
30

74
For subsequent painting of Heradesign acoustic panels, it is decisive whether you are dealing with unpainted surfaces or standard surfaces that
-tant is the choice of paint and colour that you want to apply. For panels that were painted at the factory, a water-soluble silicate paint with potas-sium silicate and copolymerisates as bonding agents is used. Therefore, the composition of the new paint must be compatible with the existing paint and be of the same quality as the specified and tested reference paints. Only use “harmful substance tested” paints.
The following cases must be differentiated:1) Indoor application up to 80% rel. air humidity White paint on a white surface (restoration)
Recommended paint: StoColor Rapid, appli cation quantity approx. 0.20 litres/m², one coat
Other paint colours on surfaces painted in the factory or surfaces in natural tone 13 when restoring with the same colour Recommended paint: StoColorIn, application quantity approx. 0.20 to 0.25 litres/m², one coat. In case of a new colour, a greater application quantity may be necessary.
painted in the factory (raw goods) Recommended paint: StoColor Rapid, appli cation quantity approx. 0.25 to 0.3 litres/m² per coat, apply two coats.
not painted in the factory (raw goods) : Recommended paint: StoColorIn, application quantity approx. 0.25 to 0.3 litres/m² per coat, at least two coats.
Heradesign fine A2 and Heradesign superfine A2 acoustic panels are always coloured with StoColorIn. App- lication quantity approx. 0.25 to 0.3 litres/m² per coat.
Metallic colour shades on surfaces painted in the factory, small-area touching up: Sto Prefa Loock 500 LMT metallic.
2) Indoor application for rooms with 80 to 90% rel. air humidity, such as indoor swim
sealing are to be used.
3) Sheltered outdoor application: generally, StoSilColor exterior façade paint is used
General information:Equipment for applying paint: The paint is basically applied with an airless paint sprayer, whereby each coat of paint must be applied in two different directions at different angles to the surface of the panel so that the paint can pene-trate into all pores and openings in the surface. If you apply two coats, the first coat must be dry before applying the second coat.
Basically, only enough paint should be applied, so that the panel is perfectly covered. Too much paint causes excessive moisture to be added and can cause the panels to warp and swell as well as causing a reduction of the sound absorption of the panels. The application of the paint and the coverage must be checked constantly from the floor. The manufacturers’ regulations and instruction manuals must be observed when wor-king with the paint and operating the equipment.
Protective measures for bordering surfaces, floors, etc.: bordering surfaces, windows, floors, etc. must be covered. Water can be used to clean surfaces that have been dirtied with paint, while they are still wet. Dried paint can only be removed with a paint stripper and that may cause damage to the subsurface.
Safety information: Pay attention to the information regarding pro-tective measures in the safety data sheets from the paint manufacturer. If necessary, protect your head, eyes, respiratory system and skin by wearing protective masks, goggles, gloves and work clothing.
Other information:A repeated, proper colouring of Heradesign super-fine and Heradesign fine, as well as Heradesign superfine A2 and fine A2 panels, does not signi-ficantly deteriorate sound absorption.
Subsequent colouring of Heradesign® acoustic panels
Application and handling

75
Bending of Heradesign® acoustic panels
Heradesign acoustic panels can be well adjusted to curved substructures on site. For this, the panels are cut into on the back by means of a saw (e.g. circular saw; see page 78, Cutting and Drilling) and curved through a mould. They are fixed to the wooden substructure by means of Heradesign screws.
Per support and panel width (600 mm or 625 mm)at least three screws, head diameter approx. 9 mm, must be used. Heradesign micro and Heradesign plano acoustic panels cannot be bent. Panels must not be moistened for bending.
Curved constructions withHeradesign® acoustic panels
Heradesign® fine, Heradesign® superfine: Thickness 25 mmMax. spacing of the support: 625 mm
Radius (m)
Spacing of the cuts(mm)
Cutting depth(mm)
Cutting width (mm)
> 20 – – –
> 10 – – –
> 5 400 10 3
Heradesign® fine, Heradesign® superfine: Thickness 35 mmMax. spacing of the support: 625 mm
Radius (m) Spacing of the cuts( mm )
Cutting depth(mm)
Cutting width (mm)
> 20 – – –
> 10 400 10 3
> 5 300 15 3
App
licat
ion
and
hand
ling
Application and handling

7676
Instructions
Positioning the screws or the acoustic panels with auxiliary lath. Make sure that there is enough space at the end of the panel to prevent the edge from displa-cing. Make sure the screw head is flush to the surface of the panel. The auxiliary lath is removed after instal-ling the first row of panels. Screw pattern, see page 7.
When lifting the acoustic panels from the stack, only carry them on edge. When lifting panels from the stack, never drag them over the edge of the stack in order to prevent damage to the visual side.
Never lean the acoustic panels on an angle against the wall during installation and subsequent painting. This causes the panels to warp – warped panels can no longer be installed.
Wrong!
Carefully remove the separating paper layer from the panels and dispose of it immediately. Dust lying on it must not fall onto the panel below.
Installing the first row of panels: always start instal-ling from the centre of the room, which has been pre-marked. Exactly align the panels in longitudinal and transverse direction.
Check panel for damages. Remove any remaining dust with a soft brush. See page 77, picture 2.
Application and handling
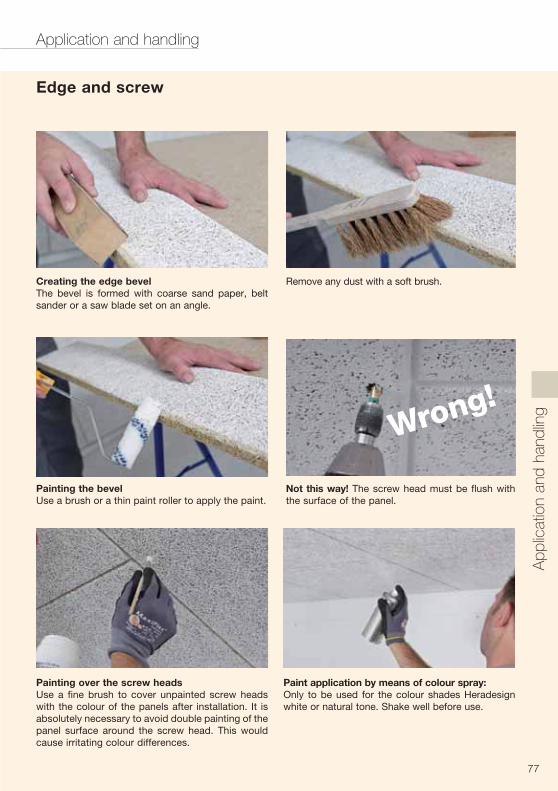
7777
Edge and screw
Paint application by means of colour spray:Only to be used for the colour shades Heradesign white or natural tone. Shake well before use.
Painting over the screw headsUse a fine brush to cover unpainted screw heads with the colour of the panels after installation. It is absolutely necessary to avoid double painting of the panel surface around the screw head. This would cause irritating colour differences.
Remove any dust with a soft brush.Creating the edge bevelThe bevel is formed with coarse sand paper, belt sander or a saw blade set on an angle.
Not this way! The screw head must be flush with the surface of the panel.
Painting the bevelUse a brush or a thin paint roller to apply the paint.
Wrong!
App
licat
ion
and
hand
ling
Application and handling

7878
Cutting and drilling
Table sawLay the acoustic panel down with the exposed side up. Always work with a safety guard, guide and an extraction system.
Jack sawLay the acoustic panel down with the exposed side up. Always work with a guide. Support the free end of the panel.
Cutting openings by means of a supercutterOnly cut at a right angle to the panel surface.
JigsawLay the acoustic panel down with the exposed side down. Always make longitudinal cuts with a guide.
Circular sawLay the acoustic panel down with the exposed side down. Always work with a guide and an extraction system. Support the free end of the panel.
Not this way!Never cut acoustic panels on a stack.
Wrong!
Application and handling

7979
Touching-up
Dangling fibresCarefully remove individual loose fibres with a knife.
Chipped fibreCover chipped fibre with a fine brush or a spray gun using the supplied paint or an equivalent.
BrushingEfflorescence, dust, etc. can be removed with a soft brush. Set loose fibres with StoPrim Plex primer.
Touching-up chipped fibre or small, unclean areas of the panelsThe paint is sprayed on carefully with a spray gun using various spraying angles.
Touching-up small imperfections of Heradesign micro or Heradesign plano acoustic panelsFill up the imperfection/chipped edge with acrylate or wood filler, scrape off excess with a trowel and cover it with the same paint as the panel when dried out.
Heradesign micro acoustic panel joints can be filled up with Knauf acrylic sealer and can be painted over with silicate paint.
App
licat
ion
and
hand
ling
Application and handling

80
Certificates
On request, we will be pleased to send you certificates on the following topics:
0751 / 030750707507500750757075077777777707507507507075777777770707077777777070077777770770075777707707007577777777707777770077770707700775000700000700000700000000000000000000000000000 1 /1 /1 /1 /1 /11 /11 / /1 /1 /1 /1 /1 /1 /1 /1 /1 /1 11 /1 /11 /1 /1 ////1 /1 ///11 //1 /1 //1 ////////1 //////////////////////////////// 000000000303030000000000000000000000000000000000000000000000000000000000

81
Warranty declarationfor sustainable function and security
Requirements for warranty claims:
wall structures have to conform to the recog- nised technical regulations.
observing the required Heradesign installation conditions or processing guidelines and the recognised standards and rules.
inspected by the installer for visible defects.
rage, installation and after installation that are mentioned in the Heradesign installation conditions or processing guidelines have to be demonstrably maintained.
diligence, the warranty claimant has to report these damages immediately and in writing to Heradesign for verification.
and check it, unhindered, on site. On request, Heradesign must be allowed to take samples of the products, whether they have already been installed or not.
Warranty is excluded in cases of:
products during storage, transport & installation.
majeure, such as storms, floods, earthquakes.
ences as well as changes to the structure.
cal effects.
third parties.
Extent of warranty:In a case covered by warranty, Heradesign will provide the replacement material that is required to repair the damage free of charge, free delivery to the construction site, and will pay the costs that are incurred for repairing the damage based on the local construction site wages; claims for reductions in price and consequential costs excluded.
Handling:A cost estimate for carrying out the work in the warranty case has to be presented to Heradesign. Heradesign reserves the right to also carry out the repairs on its own or to ent-rust a third party company with the repair of the damage at its own cost.
Liability clause:Heradesign shall only be liable for gross faults, in particular by auxiliary personnel.
Court of jurisdiction is Klagenfurt/Austria.
Matthias FranckeGeneral Manager of Heradesign
Heradesign, a registered trademark of Knauf Insulation GmbH, guaran-tees that, in accordance with the manufacturer’s declaration, the products have been manufactured free from defects and that, in compliance with the stipulated installation conditions or processing guidelines, they will remain fully functional for 15 years from the date of delivery. Solely warranty claims as defi ned by the Austrian Civil Law shall be applicable, excluding the provi-sions of the UN Convention on Contracts for the International Sale of Goods. (This warranty declaration does not cover the following countries: USA, Canada, France.)
15YearW
arranty Declaratio
n
Cer
tific
ates
Certificates
By using high-quality raw materials and innovative
production technologies, Heradesign® acoustic
panels offer a multitude of design possibilities
and functionality.
0751 / 03

82
I. General – scope of application1. Deliveries and performances shall be exclusively subject to the following standard terms of sale. The latter shall also apply to all future transactions between the contracting parties without separate further reference. They shall also apply if we do not expressly refer to such in subsequent contracts, in particular even if we unconditionally provide deliveries or performances to the purchaser in awareness of the purchaser‘s conflicting terms of business or terms deviating from our standard terms of sale.2. We do not recognise any conflicting terms of business of the purchaser or terms deviating from our standard terms of sale, not even by means of the unconditional performance of the contract.3. Our standard terms of business are known to the purchaser by means of pricelists, invoices, e-mails and Internet publications.
II. Quotations and conclusion of contract, content of performance1. Our quotations to the purchaser shall be without obligation. The order alone shall be deemed to be a binding offer. This offer shall be accepted, at our choice, by the sending of a confirmation of order or the unconditional provision of the ordered deliveries or performances.2. The technical data and descriptions in our product information or advertising materials and technical datasheets, and details provided by the manufacturer or its vicarious agents within the meaning of Section 1313 a of the Austrian General Civil Code
goods to be supplied by us unless the details are agreed in the individual contract. Identified uses relevant for the goods accor-ding to the European Chemicals Regulation REACH shall consti-tute neither an agreement of a corresponding contractual quality of the goods nor a use presupposed according to the contract.3. In the case of sales according to model or sample, the latter shall merely describe adequate correspondence with the sample, but shall not constitute a guarantee of the quality or the durability of the goods to be supplied by us.4. We shall provide technical advice as to use according to our best knowledge. All details and information about the suitability and application of our products shall not release the purchaser from making its own inspections and trials with respect to the products‘ suitability for the intended purposes.
III. Prices, terms of payment, payment default1. The prices agreed at the time of the conclusion of the relevant contract shall apply, in particular the prices specified in the order form or the confirmation of the order. If the price has not been expressly specified, the prices applicable at the time of conclusion of the contract according to our pricelist shall apply. The calculation of the prices shall be based on our calculation of the volumes, weights and quantities unless the purchaser objects immediately after receipt of the goods. To these prices (net contract value) must be added the value added tax at the
statutory rate applicable on the date of delivery, and – to the extent agreed – the costs for transport insurance. In the case of deliveries abroad, other country-specific levies may also apply. The resulting amount shall be the final invoice amount (including value added tax).2. We reserve the right to adjust our prices appropriately if after conclusion of the contract changes in costs occur as a result of the conclusion of collective agreements, price increases of sub-suppliers or fluctuations in exchange rates. These price changes shall be notified in writing at the latest four weeks before entry into effect of the new prices. If the purchaser fails to object to the new prices within 14 days after notification, they shall be deemed to be accepted. This shall not apply if a fixed price has been agreed.3. Unless a different payment deadline has been agreed, invoices shall be payable 30 days after the date of invoice without de-duction. After expiry of the due date notified on the invoice, the purchaser shall be in default. If we grant our customers a discount, the discount amount shall be based on the final invoice amount (including value added tax) less a lump-sum amount of 8% for freight costs, any costs for transport insurance and, in the case of deliveries abroad, other country-specific levies.4. The purchaser shall only be entitled to a right to offset if its counter-claims have been determined with final legal effect, are undisputed or have been acknowledged by us. Moreover, it shall be entitled to exercise a right of retention to the extent that its counterclaim is based on the same contractual relationship.5. If the purchaser fails to pay due invoices or exceeds the payment deadline granted, or if after conclusion of the con-tract the purchaser‘s financial situation deteriorates, or if after conclusion of the contract we receive unfavourable information concerning the purchaser that casts doubt on the solvency or creditworthiness of the purchaser, we shall be entitled to call in the purchaser‘s entire outstanding debts and, in amendment of the agreements concluded, demand payment in advance or collateral or, after delivery has been made, immediate payment of all receivables that are based on the same legal relationship. This shall apply in particular if the purchaser ceases making payments, if a cheque from the purchaser is not honoured, insolvency proceedings are applied for or commenced with respect to the purchaser‘s assets or if insolvency proceedings are not commen-ced for lack of sufficient assets.
IV. Delivery and performance time, performance default1. Delivery deadlines shall be deemed to be approximate unless a fixed transaction has been expressly agreed in writing. The details of the delivery date shall as a matter of principle be subject to the contractual participation of the purchaser.If agreed delivery times are nevertheless exceeded for reasons for which we are responsible, the purchaser, after unsuccessful expiry of a reasonable grace period set by the purchaser, which shall amount to at least 15 working days, shall be entitled to with-
Provision of this Technical Manual does not constitute an offer, nor does using the Technical Manual constitute a conclusion of contract, an information contract or a consultancy contract. This Technical Manual solely serves to provide support. The respective processing and installation is to be carried out by a specialist considering the state of the art and the specific rules of technology to be applied. The processor bears the sole responsibility for a proper and professional installation. This Technical Manual has been compiled with utmost care.
Despite careful checking of all contents, errors cannot be ruled out. No responsibility is assumed for the correctness of this information. Modifications for technical reasons are expressly reserved.
We, and the companies for whose products the Technical Manual is used, can therefore not be liable for damages and damages subsequent to defects as a result of the use of the Technical Manual.
General Information
Standard terms of sale and delivery

83
draw from the contract. Withdrawal shall be effected in writing. Deliveries on Saturdays are only possible by special agreement and in return for a surcharge.2. We shall only be in default after expiry of a reasonable grace period set by the purchaser, which shall be of at least 15 wor-king days. In the event of force majeure and other unforeseeable extraordinary circumstances for which we are not responsible, e.g. interruption to operations by fire, water and similar circum-stances, failure of production facilities and machinery, delivery dates not met or delivery failures by our suppliers, or business interruptions resulting from shortages of raw materials, energy or labour, strike, lockout, difficulties in procuring transport, traf-fic interruptions, official interventions, we shall, to the extent that we are prevented by the said circumstances without fault on our part from the timely performance of our performance obligati-ons, be entitled to postpone the delivery or performance for the duration of the impediment plus a reasonable start-up time. If as a result the delivery or performance is delayed by more than one month, both we and the purchaser shall be entitled, subject to the exclusion of any claims for damages whatsoever, to withdraw in writing from the contract with respect to the quantity affected by the delivery impediment, subject to the conditions pursuant to Section VIII. 1-5 of these terms of sale.3. In any event of default, our liability for damages shall be limited in accordance with the provisions in Section VIII. 1-5.4. We shall be entitled to effect part-deliveries and part-perfor-mances within the agreed times for delivery and performance if such can be reasonably expected of the purchaser.5. Compliance with our obligations to supply and perform shall be subject to timely and proper performance of the purchaser‘s obligations. We reserve the right to raise the defence of non-performance of the contract.6. Any claims for standing time or handling costs shall, if valid, in any event only be refunded up to the amount of the freight costs of the delivery in question.7. If the purchaser is in default with call-off, acceptance or coll-ection or if a shipment or delivery delay is due to circumstances for which it is responsible, we shall be entitled, without preju-dice to more extensive claims, to charge a flat rate payment to the amount of the usual local storage costs, irrespective of whether we store the goods ourselves or with a third party. The purchaser shall be entitled to prove that no loss or a smaller loss has been incurred.
V. Transfer of risk, transport and packaging costs1. Shipment shall always be at the risk of the purchaser or the recipient, hence even if the price is agreed as carriage-paid destination station or carriage-paid site. We shall not be obliged to insure the goods. If the purchaser is in acceptance or payment default, the risk of any accidental loss or accidental deterioration of the goods shall transfer to it. The same shall apply in the event of an infringement of obligations to partici-pate. If we carry out loading and/or unloading and/or transport on the basis of individual contractual provisions, such shall be
Agents (AÖSp) or the carriers applicable to the relevant loading or transport. Claims for damages can only be filed against us in the event of gross fault (intent, gross negligence). The prices shall be deemed to be with standard packaging, carriage-paid destination, not unloaded, in complete unit load devices, unless a different type of transport is expressly agreed.2. If packaging other than standard is provided at the purchaser‘s request, this shall be charged at cost.3. If the goods are shipped on Euro-pallets, these shall be charged; in the event of prepaid return of the Euro-pallets
in undamaged condition to one of our works/delivery ware-houses, they shall be refunded by means of credit note, after deduction of a handling fee that shall be agreed individually.4. If the goods are unloaded using the truck‘s own crane, such shall be at the cost and risk of the purchaser.
VI. Purchaser‘s obligations/securing of reservation of title1. The goods supplied shall remain our property until the purchase price has been paid in full. The inclusion of the purchase price claim against the purchaser in a current account and the recognition of a balance shall not affect the reservation of title.2. The purchaser shall be obliged to treat the purchased goods carefully until complete acquisition of title.3. The purchaser shall be entitled neither to pledge nor to assign as collateral the goods subject to our title. However, subject to the following provisions, the purchaser shall be entitled to re-sell the goods supplied in the ordinary course of business. The aforementioned entitlement shall not apply if the purchaser has – validly – assigned or pledged the claim against its contractual partner resulting from the resale of the goods in advance to a third party, or agreed a prohibition of assignment with it.4. As collateral for the satisfaction of all our claims specified in Section VI. 1, the purchaser now hereby assigns to us all – including future and conditional – receivables resulting from a resale of the goods supplied by us with all collateral rights to the amount of 110% gross of the value of the goods supplied, ranking before the remainder of its receivables. We hereby accept this assignment.5. As long as and to the extent that the purchaser complies with its payment obligations to us, it shall be entitled to collect its customer receivables assigned to us within the framework of the ordinary course of business. It shall not, however, be entitled to agree a current account relationship or prohibition of assignment with its customers with respect to these receivab-les, or to assign or pledge them to third parties. If in conflict with sentence two a current account relationship applies between the purchaser and the acquirer of our goods subject to reserva-tion of title, the receivable assigned in advance shall also relate to the recognised balance and, in the event of the acquirer‘s insolvency, the then available balance.6. Upon our demand, the purchaser shall provide individual evi-dence of the receivables assigned to us and notify its creditors of the assignment, requesting them to effect payment to us up to the amount of our claims against the purchaser. We shall be entitled ourselves to notify the purchaser‘s creditors about the assignment and collect the receivables. However, we shall not make use of these rights as long as the purchaser duly complies with its payment obligations without default, and as long as an application for the commencement of insolvency proceedings with respect to the purchaser has not been filed and as long as the purchaser has not ceased to make payments. If one of the aforementioned cases arises, on the other hand, we can require the purchaser to notify us of the assigned receivables and the corresponding creditors, to provide all details necessary for the collection of the receivables and to deliver the corresponding documentation.7. The purchaser shall notify us immediately in writing of any attachments or other interventions by third parties.8. If goods supplied by us subject to reservation of title are processed or mixed or combined with other objects not belonging to us – with the exception of immovables – we shall acquire co-ownership of the new item in the proportion between the value of the goods supplied by us (final invoice amount including value added tax) and the other objects at the time
Sta
ndar
d te
rms
of s
ale
and
deliv
ery
Standard terms of sale and delivery

84
of processing/mixing or combining. The item resulting from the processing shall for the rest be subject to the same conditions as the purchased item delivered subject to reservation of title. If the processing, mixing or combining takes place in such a way that the purchaser‘s item is regarded as the main object, it shall be deemed to be agreed that the purchaser transfers to us pro-rata co-ownership. The purchaser shall be entitled to dispose of the new products resulting from the working or processing or con-version or combining or mixing in the ordinary course of business without pledging or assignment, as long as it fulfils its obligations resulting from the business relationship with us in good time. The purchaser shall as security assign to us in advance its receivab-les from the sale of these new products, to which we shall have rights of title, to the extent of our share of title to the goods sold. If the purchaser combines or mixes the goods supplied with a principal object, it hereby in advance assigns to us its claims against the third party up to the value of our goods. We hereby accept these assignments.9. As security for our receivables, the purchaser shall also assign to us, up to the value of our goods, the receivables against a third party that arise as a result of a combination of our goods with a piece of land.10. We undertake to release the collateral to which we are entitled at our choice upon demand by the purchaser to the extent that the marketable value of our collateral exceeds the purchaser receivables by more than 20%.11. In the event of conduct by the purchaser in breach of con-tract, in particular in the event of payment default by more than 10% of the invoice amount for a not insignificant period of time, we shall – notwithstanding our further claims (to damages) – be entitled to withdraw from the contract and to demand the return of the goods supplied by us. After the return of the goods supply by us, we shall be entitled to realise them. The realisation pro-ceeds shall be offset against the purchaser‘s liabilities to us, less reasonable realisation costs.
VII. Warranty and notification of defects1. Obvious material defects, incorrect deliveries and quantity discrepancies shall be notified to us in writing by the purchaser immediately, but at the latest 3 days after receipt of the goods by the purchaser. Concealed defects shall be notified to us in writing within a period of eight days following their discovery. The purchaser shall be obliged to verify, if necessary by processing a sample, whether the goods supplied are free of defects and suitable for the intended use. This shall also apply if they are processed in systems that have not been acquired from us. If any defects are only identified during processing, the work shall be suspended immediately and the unopened unprocessed original containers shall be secured. They shall be made available to us for inspection upon demand. In the event of a notification of a defect made late or not duly according to Section VII. sentences 1 to 6, the purchaser shall forfeit its claims to warranty, damages on the grounds of the defect itself, reimbursement of the con-sequential losses resulting from the defect and claims resulting from a mistake concerning freedom from defects of the goods supplied, subject to the provision of Section VIII. 1 to 5 of these terms of sale, unless the purchaser proves that we deliberately or with gross negligence caused or concealed the defect.2. In the event of defects in the goods supplied by us, we shall at our choice be obliged only to remedy or to supply fault-free goods (subsequent performance). If we are not willing or not able to effect subsequent performance, in particular if this is delayed beyond a reasonable deadline for reasons for which we are responsible, or if the subsequent performance fails in another manner, the purchaser shall at its choice be entitled to withdraw
from the contract or to demand a reduction of the purchase price. A remedy shall be deemed to have failed after the second attempt unless the contrary follows from the type of object or other circumstances. If the purchaser has suffered a loss as a result of defects in the goods supplied by us, our liability for such shall be determined according to Section VII. 1, Section VIII. 1 to 5 and Section IX.
VIII. Damages1. Our enterprise shall only be liable for losses – for whatever legal reason – if the loss is due to a grossly negligent or deliberate breach of duty by us or one of our vicarious agents. This shall also apply to loss that has been caused by advice or information not separately charged.2. Our liability for damages is restricted to the foreseeable typical damage. We shall not be liable for the purchaser‘s lost profits and other purely financial losses and for foreseeable consequen-tial losses, including for losses incurred to the purchaser as a result of the assertion of contractual penalty claims by third par-ties. The above limits on liability pursuant to sentences 1 and 2 shall apply similarly to losses that are caused as a result of gross negligence or intent by our employees or authorised agents.3. The limits on liability as specified above in Section VIII. 1 to 2 shall not apply if our liability is binding as a result of the provisi-ons of the Product Liability Act or if claims are asserted against us on the basis of an injury to life, body or health, or for damage to property of which we have taken custody for safekeeping.4. We shall not be subject to a more extensive liability for dama-ges than that provided for in Section VIII. 1-3, irrespective of the legal nature of the claim asserted.5. We shall not be liable in the event of impossibility or delay of fulfilment of delivery obligations if the impossibility or delay is based on the due compliance, arranged by the purchaser, with public law obligations in connection with the European Chemicals Regulation REACH.6. Where liability for damages is excluded or limited pursuant to Section VIII. 1-4, this shall also apply with respect to the personal liability for damages of our employees, workers, staff, represen-tatives, vicarious agents and independent contractors.
IX. Expiry of claims1. The purchaser‘s warranty claims on the grounds of defects in goods supplied by us shall expire one year after delivery of the goods. The purchaser‘s claims for damages on the grounds of a performance provided by us in breach of duty shall expire one year after acquisition by the purchaser of knowledge of the loss and the person causing the loss.2. If the purchaser is an entrepreneur and if it or another pur-chaser in the chain of supply as an entrepreneur satisfies consu-mer warranty claims as a result of defects in newly manufactured products supplied by us that are also supplied to the consumer as newly manufactured products, the purchaser‘s warranty claims against us shall expire at the earliest two months after the time when the purchaser or another purchaser in the supply chain as entrepreneur satisfies the consumer‘s warranty claims, unless the purchaser could successfully have relied on the defence of time limitation as against its customer/contracting partner. The purchaser‘s warranty claims against us on the grounds of defective goods supplied by us shall in any event expire if the warranty claims of the purchaser‘s customer/con-tracting partner against the purchaser based on goods supplied by us to the purchaser have expired, at the latest however five years after the time at which we supplied the goods in question to our purchaser.3. The provisions concluded in Sections 1 and 2 shall not apply
Standard terms of sale and delivery

85
to the expiry of claims based on an injury to life, body or health and to damage to property that we have taken into custody for safekeeping, or to the expiry of claims under the Product Liability Act and or claims to legal defects in the goods sup-plied by us that consist of a third party‘s in-rem right by virtue of which the surrender of the goods supplied by us can be demanded. Nor shall they apply to the expiry of claims by our purchaser/customer based on the fact that we deliberately or with gross negligence concealed defects in the goods supplied by us or on the fact that we deliberately or with gross negligence infringed a duty. In the cases specified in this present Section IX. 5, such claims shall be governed by the statutory expiry period.
X. ReturnsThe return of fault-free goods supplied by us shall not be per-mitted. If in exceptional cases we agree to the return of fault-free goods, a credit note shall only be provided to the extent that we determine that the goods can be reused without restriction. The actual costs, at least 20% of the invoice amount or at least €30, shall be deducted for the cost of inspection, processing, rewor-king and repackaging. Such credit notes shall not be paid out but shall instead serve only to be offset against future deliveries.
XI. Place of performance, legal venue, applicable law, com-mercial clauses1. Place of performance and exclusive legal venue for all claims between us and the purchaser shall be our registered office. Unless in conflict with binding statutory provisions, we shall however also be entitled to file an action against the purchaser at its statutory legal venue.2. The legal relationship between us and the purchaser shall be subject exclusively to the law of the Republic of Austria as applies between Austrian entrepreneurs and as can be validly agreed in the specific countries of supply (see I. of these terms of sale). The application of the provisions concerning the inter-national sale of goods (CSIG – Vienna UN law on sales) and of Austrian international private law are expressly excluded.3. Where commercial terms are agreed according to the International Commercial Terms (INCOTERMS), INCOTERMS shall apply in the latest version at the time (currently INCOTERMS 2000).
XII. Concluding provisions1. If individual provisions of the above provisions shall be invalid, partially invalid or excluded by a special agreement, this shall not affect the validity of the remaining provisions.2. We store the data of our purchasers within the framework of our reciprocal business relationships in accordance with the Data Protection Act 2000.
As of 15.11.2010
Standard terms of sale and delivery
Sta
ndar
d te
rms
of s
ale
and
deliv
ery

86
Technischer KundenserviceDeutschland, Österreich, Schweiz
Tel.: +43 (0) 4245 2001 3332Fax: +43 (0) 4245 2001 [email protected]
MarketingserviceDeutschland, Österreich, Schweiz
Tel.: +43 (0) 4245 2001 3003Fax: +43 (0) 4245 2001 [email protected]
Weitere Informationen auf www.heradesign.com
Verarbeiter-Videos auf DVD
Die DVD, die in den Formaten PAL und NTSC erhältlich ist, beinhaltet alle fünf Filme in den Sprachen
Deutsch, Englisch, Französisch, Niederländisch, Polnisch und Spanisch. Darüber hinaus sind die Ver-
arbeiterfilme auch auf www.heradesign.com im Bereich Service & FAQ zu finden.
Die DVD mit den Verarbeitervideos kann natürlich auch bestellt werden - einfach eine E-mail senden an
[email protected] oder anrufen unter +43 (0) 4245 2001 3003.
Service
Product Management
Technical Customer Service:
+43 4245 2001-3289, Fax +43 4245 2001-3056
E-Mail Service:
Further information at www.heradesign.com
Installation videos on DVD
The DVD, available in the formats PAL and NTSC, contains all five videos in German, English, French,
Dutch, Polish and Spanish. The installation videos can also be found at www.heradesign.com under
Service & FAQs.
The DVD with the installation videos can of course also be ordered – simply send an e-mail to
[email protected] or call +43 (0) 4245 2001 3003.

87
Creative solutions made of the natural materials wood and magnesite provide for excellent values as regards building biology and combine comfort and outstanding acoustic effects. Heradesign® acoustic panels – a symbiosis between functionality, nature and design.
the sound of natureSeeinSeeing,
www.heradesign.com

With its strong brands, THERMATEX®, HERADESIGN®, VENTATEC® and DONN®, the ceiling specialist
Knauf AMF offers a sophisticated product range, as well as an excellent worldwide distribution and
consultancy service for architects, trade specialists, building owners and builders’ merchants.
With us you’re always one ceiling solution ahead!
Technical changes, misprints
and errors are reserved.
V 09/2013
HERADESIGN® –
Business unit of Knauf AMF
Deckensysteme GmbH
GERMANY:
Elsenthal 15
D-94481 Grafenau
AUSTRIA:
A-9702 Ferndorf 29
Tel.: +43 4245 2001 3003
Fax: +43 4245 2001 3499
offi [email protected]
www.heradesign.com