farmhouse ‘x-door’ vanity i - affordable diy projects ... · shanty-2-chic.com farmhouse...
TRANSCRIPT

Farmhouse ‘X-Door’ Vanity nspired by simpler days of the past, this vanity is built with sophisticated
charm and character. Cozy and freestanding, this base can be paired with any number of vanity tops.
I
Copyright © 2015 Shanty-2-Chic.com

Farmhouse ‘X-Door’ Vanity - Page | 2SHanty-2-Chic.com
Materials needed Qty¾” x 48” x 48” plywood 1¾” x 24” x 24” plywood 1¼” x 24” x 24” pine board 12” x 3” x 96” pine board 21” x 6” x 72” pine board 11” x 3” x 96” pine board 3½” x 3” x 36” pine craft board 61-1/4” pocket screws1” brad nails3/4” stapleswood gluehinges 2Hand hardware 2Sink top vanity 25-1/4” x 22”
CUT LIST
Part Qty Part Name DimensionA 4 Legs 2” x 3” x 34”B 2 Side panels ¾” x 16-½” x 31-½” • •C 1 Front false drawer front 1” x 6” x 21-¼”D 3 Bottom front & back rails,
top back rail1” x 3” x 21-¼”
E 1 Vanity bottom ¾” x 20” x 2-¼” F 2 Door rails 1” x 3” x 21-⅛” •G 2 Door stiles 1” x 3” x 18-⅜” •H 1 Back of door panel ¼” x 20-⅛” x 22-⅜” •I 2 Door ‘X’ pieces 1” x 3” x 24-½” •J 4 Side ‘X’ pieces ½” x 3” x 31-¼” •K 4 Side decorative rails ½” x 3” x 16-½” •
• • Make sure to cut the plywood so the grain is going vertical for a better look• Don’t cut to final length; hold in place and mark for length, width and/or angle
2” x 3” x 96”
2” x 3” x 96”
¾” x 48” x 48”
1” x 6” x 72”
1” x 3” x 96”
1” x 3” x 96”
1” x 3” x 96”
½” x 3” x 36”
½” x 3” x 36”
½” x 3” x 36”
½” x 3” x 36”
½” x 3” x 36”
½” x 3” x 36”
¾” x 24” x 24”
¼” x 24” x 24”
A
A
A
A
BE
H
B
C
D D D F
F G G I
I
J
J
J
J
K
K
K
K
Note: 1/2” thick material isn’t available everywhere. You can use 1” material instead.
Farmhouse ‘X-Door’ Vanity - Page | 3SHanty-2-Chic.com
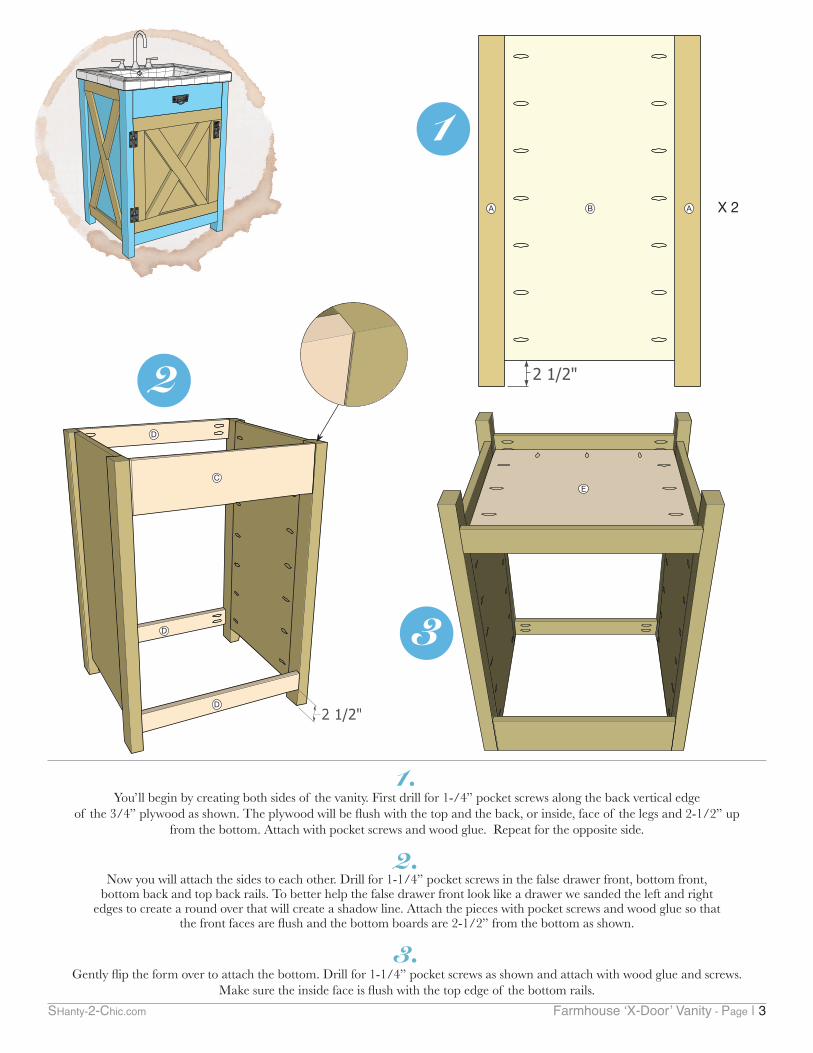
1.You’ll begin by creating both sides of the vanity. First drill for 1-/4” pocket screws along the back vertical edge
of the 3/4” plywood as shown. The plywood will be fl ush with the top and the back, or inside, face of the legs and 2-1/2” up from the bottom. Attach with pocket screws and wood glue. Repeat for the opposite side.
2.Now you will attach the sides to each other. Drill for 1-1/4” pocket screws in the false drawer front, bottom front,
bottom back and top back rails. To better help the false drawer front look like a drawer we sanded the left and right edges to create a round over that will create a shadow line. Attach the pieces with pocket screws and wood glue so that
the front faces are fl ush and the bottom boards are 2-1/2” from the bottom as shown.
3.Gently fl ip the form over to attach the bottom. Drill for 1-1/4” pocket screws as shown and attach with wood glue and screws.
Make sure the inside face is fl ush with the top edge of the bottom rails.
1X 2
3
2
A
A AB
C
D
D
D
E
Farmhouse ‘X-Door’ Vanity - Page | 4SHanty-2-Chic.com
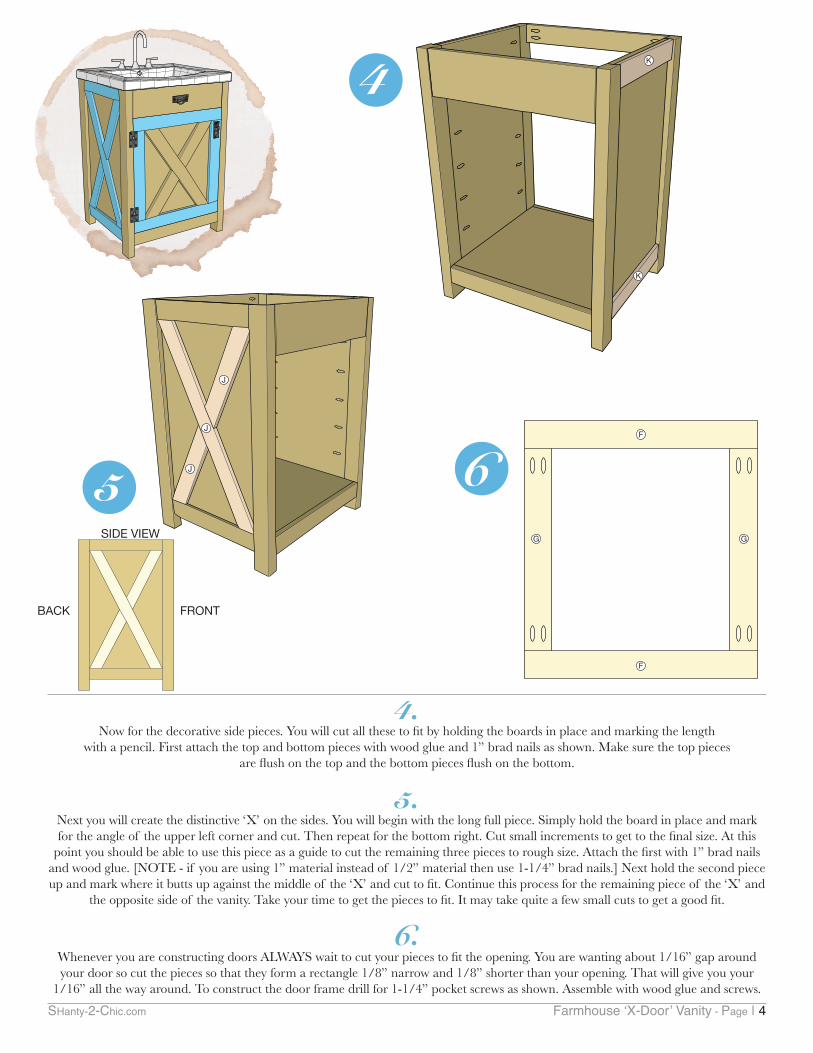
4.Now for the decorative side pieces. You will cut all these to fi t by holding the boards in place and marking the length
with a pencil. First attach the top and bottom pieces with wood glue and 1” brad nails as shown. Make sure the top pieces are fl ush on the top and the bottom pieces fl ush on the bottom.
5.Next you will create the distinctive ‘X’ on the sides. You will begin with the long full piece. Simply hold the board in place and mark for the angle of the upper left corner and cut. Then repeat for the bottom right. Cut small increments to get to the fi nal size. At this
point you should be able to use this piece as a guide to cut the remaining three pieces to rough size. Attach the fi rst with 1” brad nails and wood glue. [NOTE - if you are using 1” material instead of 1/2” material then use 1-1/4” brad nails.] Next hold the second piece up and mark where it butts up against the middle of the ‘X’ and cut to fi t. Continue this process for the remaining piece of the ‘X’ and
the opposite side of the vanity. Take your time to get the pieces to fi t. It may take quite a few small cuts to get a good fi t.
6.Whenever you are constructing doors ALWAYS wait to cut your pieces to fi t the opening. You are wanting about 1/16” gap around your door so cut the pieces so that they form a rectangle 1/8” narrow and 1/8” shorter than your opening. That will give you your
1/16” all the way around. To construct the door frame drill for 1-1/4” pocket screws as shown. Assemble with wood glue and screws.
5
4
6
K
K
J
J
J
FRONTBACK
SIDE VIEW
F
F
GG

Farmhouse ‘X-Door’ Vanity - Page | 5SHanty-2-Chic.com
7.Attach the 1/4” panel to the back of the door. It should be cut to size to just cover the pocket screw holes.
Attach with wood glue and 3/4” staples.
8.You will create the ‘X’ in the door using the same method described in step 5. Attach with wood glue and 1-1/4” brad nails.
9.To attach the door to the vanity fi rst attach the hinges to the door. Then, using shims, set your door in place so that there is an
approximately 1/16” gap all the way around. Mark where the hinge holes are on the vanity leg. Drill pilot holes and attach the door.
10.Finally you are ready to attach the sink basin. Make sure you carefully read installation material that came with your sink fi rst.
When you are ready, place a bead of silicone adhesive around the top of your vanity base and carefully set the sink in place. You may want to have someone help you with this step. The vanity should sit fl ush on back and about 1/2” all around.
7 8
9
H
BACK SIDE OF DOOR FRONT SIDE OF DOOR
10
I
I
I