faculty tutorial: create an assignment
TRANSCRIPT

©Indian Hills Community College | www.indianhills.edu | Page 1 of 12
Faculty Tutorial: Create an Assignment Purpose: To show instructors how to create an “Assignment” in MyHills. From within a course content area, hover your cursor over “Assessments.” Note: This tutorial shows instructors how to add an assignment to the “Learning Unit 1” folder, which is located in the “Learning Units” area of the course. Assignments that repeat or span several learning units should be added using the same process shown here, but should added to the “Assignments” area of the course.
In the sub‐menu that opens, click “Assignment.”
©Indian Hills Community College | www.indianhills.edu | Page 2 of 12
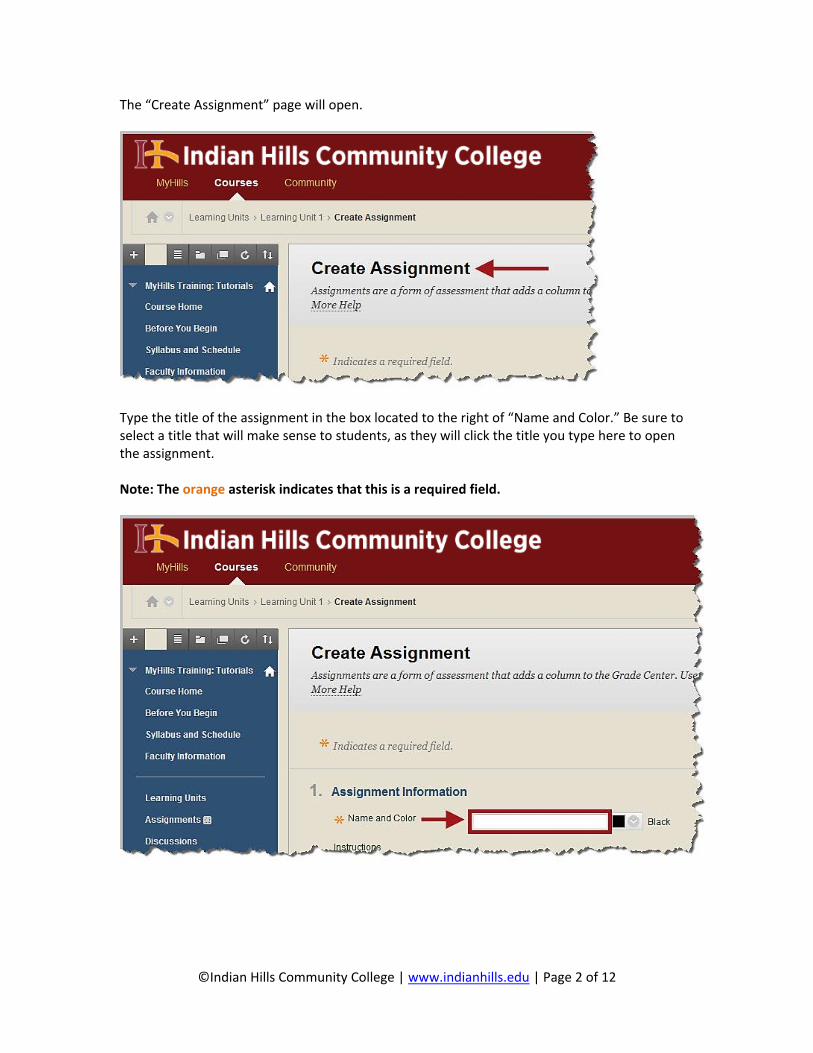
The “Create Assignment” page will open.
Type the title of the assignment in the box located to the right of “Name and Color.” Be sure to select a title that will make sense to students, as they will click the title you type here to open the assignment. Note: The orange asterisk indicates that this is a required field.

©Indian Hills Community College | www.indianhills.edu | Page 3 of 12
If you would like the title color of the assignment to be consistent with the color palette set for Indian Hills Community College, you may change the color by clicking the drop‐down arrow next to “Black.” Note: Please use the Indian Hills color palette or leave the color black.
In the window that opens, type “741213” in the “Color value” box. Then, click “Apply.”
©Indian Hills Community College | www.indianhills.edu | Page 4 of 12
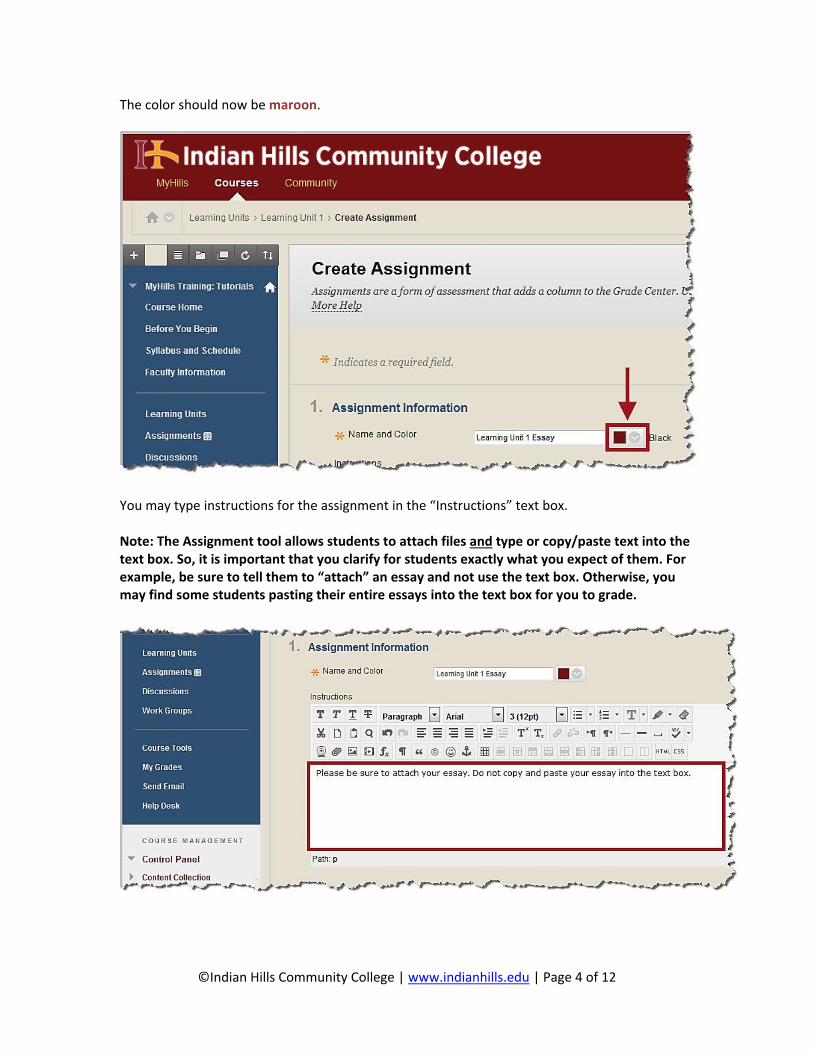
The color should now be maroon.
You may type instructions for the assignment in the “Instructions” text box. Note: The Assignment tool allows students to attach files and type or copy/paste text into the text box. So, it is important that you clarify for students exactly what you expect of them. For example, be sure to tell them to “attach” an essay and not use the text box. Otherwise, you may find some students pasting their entire essays into the text box for you to grade.

©Indian Hills Community College | www.indianhills.edu | Page 5 of 12
You can edit your instructions using the WYSIWYG (what you see is what you get) editor, above the text box. You may change the font, add images, create a bulleted or numbered list, use spell check, etc. Hover your cursor over a button to view its function.
If you would like to attach a file to the assignment, (instructions, for example) click “Browse My Computer,” which is located under “Assignment Files.”

©Indian Hills Community College | www.indianhills.edu | Page 6 of 12
Locate the file you would like to upload on your computer. Then, click “Open.”
The attached file will appear under “Assignment Files.”

©Indian Hills Community College | www.indianhills.edu | Page 7 of 12
Enter the number of points possible for the assignment under “Grading.” Note: This is a required field.
Under “Availability,” keep the box checked next to “Make the Assignment Available.” Also, select one of the options for “Number of Attempts.” The first option allows a student to submit the assignment one time, the second option allows a student to submit the assignment an unlimited number of times, and the third option allows the instructor to type the number of times a student can submit the assignment in the box. Note: The message “This assignment cannot be made available until it is assigned to an individual or group of students” is referring to the “Recipients” section of this page, which is described later in this tutorial. Also, “Allow single attempt” will be selected by default.

©Indian Hills Community College | www.indianhills.edu | Page 8 of 12
Instructors may also limit access to an assignment using “Limit Availability.” A “Display After” date and time, a “Display Until” date and time, or both may be entered. Students will only be able to access an assignment during the dates it is available.
If you would like to know how many times an assignment has been viewed, click the box next to “Track Number of Views.” Then, later, you can run a report to view usage statistics. See the appropriate tutorial for details on how to run a report for “Track Number of Views.”

©Indian Hills Community College | www.indianhills.edu | Page 9 of 12
Check the box next to “Due Date” and enter the date and time by which the assignment should be submitted. It is recommended that instructors always assign a “Due Date” because assignments will then appear for students in their “To Do” module on the “Course Home” page. Note: The system will accept submissions after this date, but they are marked late. To keep this from happening, also set the “Display Until” date and time, as described earlier.
If late work will not be accepted, it is recommended that the “Display Until” date and time match the “Due Date” date and time. Note: Be sure to indicate “Central Time” in your Course Schedule, so that online students in other time zones aren’t confused/surprised when tests close earlier or later in their various locations.

©Indian Hills Community College | www.indianhills.edu | Page 10 of 12
Choose the recipients for the assignment. Only use the “Groups of Students” option if you have assigned “Groups” in your course, and you want the assignment submitted by groups, not each individual student. Note: “All Students Individually” is the default option.
After setting up your assignment, click “Submit.”

©Indian Hills Community College | www.indianhills.edu | Page 11 of 12
You will be taken back to the course content area. A green “Success” message will be at the top of the page and the assignment you created will appear on the page.
If you would like to edit or delete the assignment, hover your cursor over the assignment (which will highlight it) and click the drop‐down arrow that appears.

©Indian Hills Community College | www.indianhills.edu | Page 12 of 12
In the sub‐menu that opens, select “Edit” to edit the assignment. Select “Delete” to delete the assignment from the course. Note: “Delete” permanently removes the assignment from the course. However, if you uploaded a file to the assignment, the file will still remain in your course, taking up unnecessary server space. Please be sure to permanently delete files you are not using in your course from your course “Content Collection.” For instructions on how to do this, please see the tutorial “Bulk Delete.”
Congratulations! You now know how to create an assignment!
Office of Online Learning
Looking for more computer tutorials? Please visit: www.indianhills.edu/tutorials.
For further assistance on this topic or other technical issues, please contact the IT Help Desk Phone: (641) 683‐5333 | Email: [email protected] | Web: www.indianhills.edu/helpdesk