facultative application console (fac)
TRANSCRIPT

Facultative Application Console 3.6.1 User Guide Page 1 Reinsurance Group of America, Inc. 1/19/04
User Guide Version 3.6.1
Developed by
Confidential and Proprietary: This document contains information, which is confidential and proprietary to Reinsurance Group of America Re. It is submitted in trust and is not to be disseminated to any person or organization outside without the prior written permission of RGA. Updated: January 16, 2004

Facultative Application Console 3.6.1 User Guide Page 2 Reinsurance Group of America, Inc. 1/19/04
Facultative Application Console Table of Contents
Main Screen ................................................................................................................................ 3 Case Management .................................................................................................................... 3 Reporting.................................................................................................................................. 3 Administrative Services ........................................................................................................... 3
Privileges ..................................................................................................................................... 4 Administrator ........................................................................................................................... 4 Case Administrator................................................................................................................... 4 Case Manager........................................................................................................................... 4 Reporter.................................................................................................................................... 4
Case Management ...................................................................................................................... 5 Top Menu................................................................................................................................. 5 Pertinent Case Information ...................................................................................................... 7 Application Management Tools............................................................................................... 8
Case Management Tabs............................................................................................................. 8 Applicant Tab........................................................................................................................... 8 Benefit Tab (Optional) ........................................................................................................... 10 Contacts Tab .......................................................................................................................... 11 Response ................................................................................................................................ 13 My Cases................................................................................................................................ 15
Reporting .................................................................................................................................. 17
Administrative Services ........................................................................................................... 20 Top Menu............................................................................................................................... 20 Database ................................................................................................................................. 21 Sender Service........................................................................................................................ 23 Reinsurance Company ........................................................................................................... 24 Extranets................................................................................................................................. 25 Reinsurer Contacts ................................................................................................................. 26 Ceding Company.................................................................................................................... 28 FAC Console Users................................................................................................................ 30 Dynamic Settings ................................................................................................................... 32 Cover Letter/Email (Optional) ............................................................................................... 34 Response Service ................................................................................................................... 35
Appendix ................................................................................................................................... 36 A. Digital Certificates ............................................................................................................ 36
Creating Personal Certificates .................................................................................................................................................... 36 Installing Digital Certificates ..................................................................................................................................................... 40 Backing up Certificates .............................................................................................................................................................. 42
B. AlternaTIFF Imaging Viewer............................................................................................ 43 Installing a TIFF Image Viewer ................................................................................................................................................. 43
C. Customizing Reference Tables.......................................................................................... 45 D. Uninstall Instructions ........................................................................................................ 46 E. Saving the Database........................................................................................................... 48

Facultative Application Console 3.6.1 User Guide Page 3 Reinsurance Group of America, Inc. 1/19/04
Main Screen Functionality of the main menu buttons is described below and the following sections explain each in detail.
Figure 1: Main FAC Console screen.
Case Management First step in adding cases to the system. Once the case is entered, choose this button at any time to modify case information, including reinsurer responses. This section of FAC Console also contains reinsurer and ceding company personnel contact names, addresses and phone numbers. System privileges defined at installation allow all FAC Console users to proceed into this section.
Reporting FAC Console comes with a handful of standard popular reports that are designed to aid in case management. FAC Console places no restrictions on the creation of reports using the MS Access database. Users with either the Administrator or Reporter privilege can preview and print reports.
Administrative Services Primarily used at the time of installation to initialize system settings for the specific machine. You must have Administrator privileges to modify these values.

Facultative Application Console 3.6.1 User Guide Page 4 Reinsurance Group of America, Inc. 1/19/04
Privileges A FAC Console administrator at your company enters your name and user privilege into the system. Your privilege level establishes your access in the system and is obtained from your network information. You will always get the message in Figure 2 if your machine is not connected or logged into a network.
If you have problems logging into the system and see a message box similar to the following, contact the FAC Console installation person.
Figure 2: Message box that appears when FAC Console does not recognize your user privilege.
FAC Console has four privilege levels – Administrator, Case Administrator, Case Manager, and Reporter.
Administrator Administrator can add or modify facultative cases, enter reinsurer responses, add, change or delete reinsurer or ceding companies and contacts. The user can also preview and print reports and enters the information for the delivery methods via the Administrative Services button.
Case Administrator The Case Administrator can add, modify and review all the information concerning any case that is in the system. They may send any case queued by any user, but may only send one case at a time.
Case Manager The Case Manager can add, modify and review all the information concerning any case that is in the system. The user can only send cases where they are the administrator.
Reporter As the Reporter the user can review all the information concerning any case that is in the system. The user can also preview and print reports.

Facultative Application Console 3.6.1 User Guide Page 5 Reinsurance Group of America, Inc. 1/19/04
Case Management ** Make sure you have configured Administrative Services before continuing.
Figure 3: Case Management screen displaying the File menu.
Clicking the Case Management button on the main screen (Figure 1) will display the above Case Management screen. This screen can be divided into three sections—top menu, pertinent case information, and case management tabs. Each section is fully explained on the following pages.
Short cut menu keys allow navigation through use of the keyboard instead of the mouse. Hold down the “Alt” key and press the underlined letter to quickly navigate to that screen. For example, pressing the “Alt” and “B” while on the Application tab will bring the Benefit tab forward.
Top Menu Top menu of this screen contains these options:
• File/Submit Case
Starts and delivers the current case that is displayed on screen to the Submit Utility.
• File/Queue Case Sends the current case that is displayed on the screen to the Submit Utility.
• File/Print Cover Letter Prints a cover letter to default printer containing generic case information.
• File/Restore Tab
Refreshes the information in the Applicant, Benefit or Contacts tab to the data currently stored in the database. For example, this menu item may be used to refresh data if information was inadvertently deleted or if the Additional Applicants button on Figure 3 was mistakenly clicked.
Facultative Application Console 3.6.1 User Guide Page 6 Reinsurance Group of America, Inc. 1/19/04
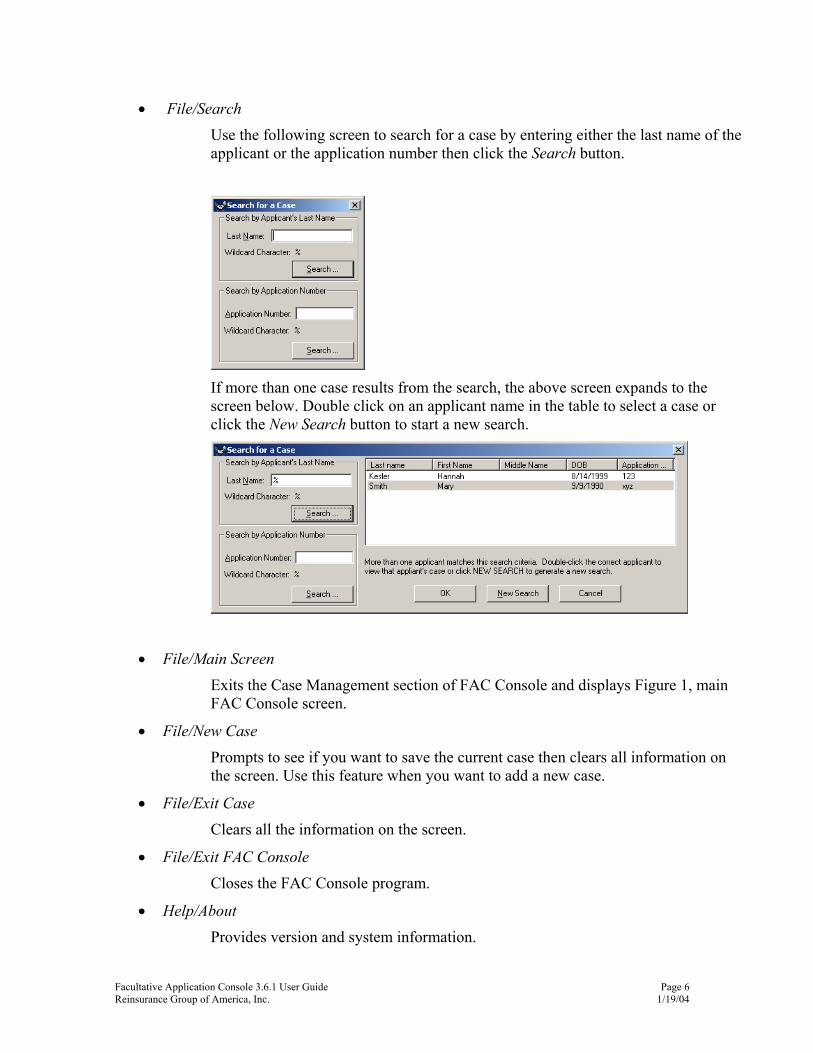
• File/Search Use the following screen to search for a case by entering either the last name of the applicant or the application number then click the Search button.
If more than one case results from the search, the above screen expands to the screen below. Double click on an applicant name in the table to select a case or click the New Search button to start a new search.
• File/Main Screen
Exits the Case Management section of FAC Console and displays Figure 1, main FAC Console screen.
• File/New Case
Prompts to see if you want to save the current case then clears all information on the screen. Use this feature when you want to add a new case.
• File/Exit Case Clears all the information on the screen.
• File/Exit FAC Console Closes the FAC Console program.
• Help/About
Provides version and system information.

Facultative Application Console 3.6.1 User Guide Page 7 Reinsurance Group of America, Inc. 1/19/04
Pertinent Case Information
Figure 4: Case Management screen displaying the Applicant tab.
General case information is the next section. Figure 4 shows that these fields are visible no matter which tab is opened. The following table defines each field, their possible values, and definition.
Field Name Value Comments
Application # Any number or
character combination
Enter reference number for the case—two cases can have the same value.
Type in an application number then click the Get button to search for a case. A grid will appear if more than one case matches this Application number. For a wildcard search insert a ‘%’ into the application # field and click the Get button.
Total Face Amt Any positive number Enter total face value for this case.
Case Status • Retained
• Declined
• Terminated
• Placed
• Open
Administrator updates the status of the case. A closed case (Retained, Declined, Terminated, or Placed) cannot be sent to the Submit Utility.
A ceding company can customize these values to correspond to their business but the Open value must be kept in the list.

Facultative Application Console 3.6.1 User Guide Page 8 Reinsurance Group of America, Inc. 1/19/04
Application Management Tools Case Management Get App Button ·Retrieves case after either the application number or wildcard (%) is entered into the Application # field. Case Management New App Button
·Closes the current case being modified and allows for entry of a New Application. Case Management Change App # Button
·In the event that an application number needs to be changed, the Change App # button allows for the modification of existing Application numbers.
Case Management Delete App Button
·Once a case is open the Delete App Button may be used to remove a case from the database. This can be used to remove old or unwanted cases.
Case Management Tabs
The following outlines each of the case management tabs. Sequentially proceed through these tabs starting with the Applicant tab on the far left when entering new case information. Move to the next tab on the right (Benefit) after all the required information is entered. If required information on the Applicant tab was not entered or invalid, the program will not proceed to the next tab and a prompt will instruct you on what information is missing.
Applicant Tab Figure 4 displays the Applicant tab, which gathers images, associations with other cases, and all applicant information for a specific case.
Step 1—Gather images:
• Click the Browse button to navigate to an image of a document that you want to include with this case then select the file. The image will appear in the window plus the path and file name will populate the table. Contact the FAC Console installation person if the image you are viewing appears outside the FAC Console application.
o Double click on another file name in the table to view other images.
o Remove an image from the case by highlighting the row in the table then press the Delete key.
• The Ok to Send? box is checked as a default when an image is added. Uncheck this box if you do not wish to send the image to the reinsurer at this time. This will change the Status to Hold.
• First time an image is added to a case, the Original box, a system only editable field, will be checked.

Facultative Application Console 3.6.1 User Guide Page 9 Reinsurance Group of America, Inc. 1/19/04
• Scroll right to view image Status; a value that the system updates. This value depends upon the state of the image in the delivery process. An image can be in a Pending or Hold state. If a delivery method fails, the image will remain in the Pending state.
Step 2—Associations with other cases:
• Enter comments in the Refer To box to connect this case with another. It is strictly a comment field that allows a person reading the comments to know what other cases are associated with this specific one.
Step 3—Remaining fields describe each applicant for this case:
• Primary applicant information is entered first; therefore the Primary box is checked.
• All required fields on the screens are denoted with an asterisk (*). Required fields are First and Last Name, Date of Birth, Birth Country, Birth State (only if birth country is US or Canada), product/plan, gender, and smoking status.
• SSN (Social Security Number) does not require dashes.
• It is required that the birth date not be later than the current date.
• Birth Country and State as well as Residence Country and State have drop down menus that allow for the proper selection.
• Product/Plan will be set as your Default (which you can set up under Administrative Services).
• Select the impairment type for the applicant. It is possible to select more than one impairment per applicant.
• Each time the Additional Applicants button is clicked; these values will be cleared for the new applicant then their information can be entered.
• The system updates the value in the Number of Applicants box when you save the applicant information by clicking the Additional Applicants button, moving to another tab, or scrolling to another applicant’s information.
• Scroll through the list of applicants by clicking the “<” and “>” buttons. These buttons are located above the Additional Applicants tab.
• User Def Text and User Def Number are fields that are available for the ceding company to define and use at their own discretion. These Labels may be modified in Administrative Services on page 20 under the Dynamic Settings Tab. (Figure 19)

Facultative Application Console 3.6.1 User Guide Page 10 Reinsurance Group of America, Inc. 1/19/04
Benefit Tab (Optional)
Figure 5: Case Management screen displaying the Benefit tab. Enter benefit information for each applicant by scrolling through the list of applicants using the “<” and “>” buttons. The Name of each applicant was entered on the Applicant tab and cannot be modified on this screen.
Total Reinsurance Amt is the only required field that must contain a value for each applicant. Use the drop down menu to select the proper Ceding Co. Rating. W/P Amt, ADB Amt, and Internal Ceding Company Comments for Entire Case are entered on an as needed basis.
This screen provides error checking which ensures that the Total Reinsurance Amt cannot be more than the Total Face Amt.

Facultative Application Console 3.6.1 User Guide Page 11 Reinsurance Group of America, Inc. 1/19/04
Contacts Tab
Figure 6: Case Management screen displaying the Contacts tab.
Step 1--Use the Contacts tab to select the reinsurance contacts that will receive this case.
• Scroll to the desired row. • Check the Send To box to send it to this contact.
Step 2—Administrator defaulted. Administrator for this case automatically defaults to the person who is initially entering this case information. The default is derived from the current FAC Console user name. Note that it is possible to transfer this case to another Administrator by using the drop down list to select a different person. Step 3—Ceding Company defaulted. Ceding company defaults to the administrator’s ceding company, which is defined on the Ceding Company tab. (page 28)

Facultative Application Console 3.6.1 User Guide Page 12 Reinsurance Group of America, Inc. 1/19/04
Step 4—Select Underwriter. Use the drop down list to select an underwriter for the case. Step 5--Comments can be sent to all selected reinsurers or use the specific comment box to give private information to a reinsurer contact. The comment fields can be used to inform reinsurance companies that the case being sent to them is not a new case, or that the reason this case is being sent is because additional papers are now available and included.
• Select the Reinsurer Contact from the drop down list. • Enter the correspondence. • The Save button must be clicked to save the comment. • To clear a comment, select the reinsurer contact from the drop down list then erase the
comment and click save. Step 6—Case finished. You may now Queue the case to the Sender Service by clicking the Save (Queue) Case button. This will queue the case to send at a predetermined time which you can set up under the Administrative Services or Queue the case and open the Sender Service for case submission by clicking the Submit button. This will send the case immediately. The following options are available now that all the case information is entered.
• Exit this case until it is ready to be sent to a reinsurer. o Select File/Exit Case from the Top Menu to remain in the FAC Console
application. o Select File/Exit FAC Console to close the FAC Console application.
• Send case to Submit Utility.
o Select Save(Queue)Case button to send case to the Sender Service queue. OR o Select File/Queue Case to send case to the Sender Service queue. o Select Submit button to immediately transmit the case with the Sender Service OR o Select File/Submit Case to immediately transmit the case with the Sender Service.

Facultative Application Console 3.6.1 User Guide Page 13 Reinsurance Group of America, Inc. 1/19/04
Response
Figure 7: Case Management screen displaying the Response tab.
This tab organizes the reinsurer contacts response for each applicant and benefit. It is available anytime after the successful creation of a case. Each applicant and benefit must be underwritten for joint cases. • The first column in the table contains a “+” or “-“ and it corresponds to a reinsurer contact. A
case can be sent to more than one contact at the same reinsurance company. Click on the “+” or “-“ to expand or contract the benefit information.
• The next column defines the Name of the Reinsurance Company and contact. • Following columns (Surname and FirstName) identify the applicant. Each applicant can have multiple benefits. This information is displayed in a row format under the applicant. • Reins Status is a drop down menu that contains the following values-- accepted, declined,
tentative, accepted partial, preliminary, and tiebreaker. State of each benefit is manually tracked by using this field.
• Approved Amt is the amount of risk this reinsurer contact is willing to accept for this benefit. • Enter the Placed Amt. Note that there is no check to insure that the placed amount does not
exceed the total face amount. A case will programmatically change status from Open to Closed if all placed amounts are equal to or greater than the reinsurance amounts for each benefit in the case.
• Select the Initial and Final Rates from the drop down lists. • Reinsurer Comments box is available to capture any extra information for each benefit. The
message in the reinsurer comments will change according to the benefit row selected in the grid.

Facultative Application Console 3.6.1 User Guide Page 14 Reinsurance Group of America, Inc. 1/19/04
Add another applicant benefit, from a reinsurer, by selecting the Add Benefit button. This feature may be used when a reinsurer responds to a case with a benefit that was not originally sought when the case was created. This button causes the following screen to appear.
• Use the “<” and “>” to select the applicant.
• Enter the additional benefit information.
• Click the OK button when finished.
Figure 8: Case Management screen displaying the Response tab shows the results of adding an Accidental Death Benefit to the primary applicant.
Use the Collapse All button to condense and hide all the benefit row information for each reinsurance contact. Once selected, this button changes it name to Expand All. Expand All provides details for each benefit.

Facultative Application Console 3.6.1 User Guide Page 15 Reinsurance Group of America, Inc. 1/19/04
My Cases
Figure 9: Case Management screen displaying “Submissions”. (note: This Tab will only be useful for cases that have been submitted using the Sender Service and/or the Response Polling Service) The Submission tab organizes the cases for each user so that they may view the current status of their cases. From this tab cases may be resent or deleted from the queue. The Resend All and Delete All buttons only affect those cases which have failed. Case Managers will only see their own cases, Case Administrators and Administrators will be able to see all users cases thus this tab helps them micromanage the cases sent by other users. You may click the column headers to resort your cases to your desired view. Each time you reenter this tab the view will reset to show the failed cases first. Step 1—Resending a Case Make your selection from the table of cases that you would like to have resent. Click on the Resend Button which will retransmit your case. Any case may be resent in this way, but the Resend All only effects the cases which have failed previously. Step 2—Deleting a Case (This is only useful for cases which are Pending or have Failed.) Make your selection from the table and click on the Delete Button. The status of that case will now be set to sent. The Delete process only sets the status on cases which have modified the status of the failed cases to “sent”. This is useful to remove cases from the queue which have been transmitted to the reinsurer through other methods.

Facultative Application Console 3.6.1 User Guide Page 16 Reinsurance Group of America, Inc. 1/19/04
Figure 9a: Case Management screen displaying the “Replies”. The Replies tab organizes the cases for each user so that they may view the current status of Reinsurers regarding their cases. From this tab cases may be resent or cleared from the queue. Case Managers will only see their own cases, Case Administrators and Administrators will be able to see all users cases thus this tab helps them micromanage the Reinsurer Responses sent by other users. You may click the column headers to resort the cases to your desired view. Each time you reenter this tab the view will reset to show the failed cases first.

Facultative Application Console 3.6.1 User Guide Page 17 Reinsurance Group of America, Inc. 1/19/04
Reporting A list of reports is displayed by clicking on the reporting button on the main screen (Figure 1). This screen is available for users with administrator or reporting privileges.
To view a report, double click on a report name and enter any input information. Some reports limit the amount of output information through a date range input value. These reports are denoted by the words “—Date Range” added to the report name. Input the required date in the format mm/dd/yyyy. The table below describes all the standard reports, input parameters and output information.
If you are having difficulties in understanding the relationships in the database, contact the RGA Help Desk at 888-436-2655 or [email protected].
Figure 10: Reporting screen.

Facultative Application Console 3.6.1 User Guide Page 18 Reinsurance Group of America, Inc. 1/19/04
Report Name Description Input Parameters Output Values
All Cases With Sent Status
List all cases that have been sent to reinsurers.
Can limit report according to when the case was entered into the FAC Console system by specifying the opening and closing date range.
• Ceding company name
• Contract number
• Case Started--date case entered into FAC Console system
• Reinsurance company name
• Request sent date—date case was actually sent.
All Open Cases Lists cases by reinsurers where the case status is open.
Can limit report according to when the case was entered into the FAC Console system by specifying the opening and closing date range.
• Reinsurer name
• Contract number
• Case entered date
• Last date delivered
All Placed Cases All cases where the system assigned status is closed and the placed amount is greater than zero.
Ability to limit the report according to when the case was placed by specifying the opening and closing date range.
• Reinsurer name
• Contract number
• Delivered date—date case was sent.
• Placed date
• Amount placed
Average Reply Time for each Reinsurer
This report lists, for each reinsurer contact, time between the date the case was sent and their response.
• Reinsurer name
• Reinsurer contact name
• Time in days
• Contract number

Facultative Application Console 3.6.1 User Guide Page 19 Reinsurance Group of America, Inc. 1/19/04
Report Name Description Input Parameters Output Values
Cases for a Reinsurer
Summarizes case information for a reinsurer.
• Reinsurer name
• Opening and closing date range when the case was entered into the FAC Console system
• Reinsurer name
• Contract number
• Total face amount
• Applicant name
• Applicant impairment
• Initial rating
• Reinsurance placed amount
• Final rating
Queued/Pending Cases
Lists all cases where the status of the delivery method is not equal to sent. Only the UPS Online method will have a status of queued.
• Reinsurer name
• Contract number
• Status of delivery method
• Total face amount
• Applicant name
• Impairment name
• Initial rating
• Reinsurance placed amount
• Final rating
Response Check Lists responses received for a selected user.
User name selected from the drop-down list.
• Reinsurer name
• Policy number
• Applicant’s first name
• Applicant’s last name
• Applicant’s date of birth
• Reinsurer contact’s first name
• Reinsurer contact’s last name
• Date submitted

Facultative Application Console 3.6.1 User Guide Page 20 Reinsurance Group of America, Inc. 1/19/04
Administrative Services Administrative Services button is the last option on the main screen (Figure 1). Information found on these tabs is accessible only to a user with administrator privileges. This area is usually setup immediately after the installation of the application. These tabs allow you to set the database location, cover letter font, image viewer location, values for the reinsurance delivery methods and user privileges.
Top Menu Top menu of this screen contains the following option:
• Help/About RGA FAC Console
On this screen you will see a source of system and versioning information. A technician may ask for this information if you are experiencing problems.
Figure 11: Administrative Services screen displaying the Help tab.

Facultative Application Console 3.6.1 User Guide Page 21 Reinsurance Group of America, Inc. 1/19/04
Database This tab defines the location of the Database FAC Console will use. Copy and paste the appropriate connection string into the provided field. You then need to fill in the appropriate fields for database location and name. Once the string is completed click the Verify button to ensure that the connection string is valid. Once validated the database is ready for use.
Figure 12: Administrative Services screen displaying the Database tab.

Facultative Application Console 3.6.1 User Guide Page 22 Reinsurance Group of America, Inc. 1/19/04
Figure 12a: This following displays the Backup Database screen.
When you select the Backup Database icon you will be able to store the database anywhere on your system that is convenient for you. Figure 12b: Displays the Restore Database screen.
When you select the Restore Database icon you will be able to retrieve your stored information from the network.

Facultative Application Console 3.6.1 User Guide Page 23 Reinsurance Group of America, Inc. 1/19/04
Sender Service Administrators use this screen to set the Sender Services options. The Send Time Dropdown Box is used to choose the time for the Sender Service to start sending the cases each day from your designated Sender location. The Send Interval field is used to set the amount of time that will pass between transmission attempts. This setting may not be used in conjunction with the Send Time option. (Recommended Default Value is 20 seconds) The Number of Threads field is used to specify the number of threads to be spawned when sending cases. (Recommended Maximum is 4 but if your sufficient bandwidth is available you may exceed this value.) The Printer Path field is used to specify the network path of the printer you wish to use for Printing cases to a local printer so cases may be mailed. The Pause Sending All Cases button is used to start or stop the service from sending any further transmissions outside of the ones it is currently sending. Thus the sender service will complete the current batch of cases and then stop sending. The Pause Sending All Cases button will now read Resume Sending All Cases. To resume sending, click the Resume Sending All Cases button.
Figure 13: Administrative Services Screen displaying the Sender Service tab.

Facultative Application Console 3.6.1 User Guide Page 24 Reinsurance Group of America, Inc. 1/19/04
Reinsurance Company
Figure 14: Administrative Services Screen displaying the Reinsurance Company tab.
Adding a Reinsurance Company:
• To add a reinsurance company to the system, click the New button to erase any values in the Company, Reinsurer Co. Name, and User Def. Text boxes.
• Enter the company name in the Reinsurer Co. Name box. • Click the Save button. • To modify or delete a company, select the company from the drop down list then click the
Delete or Save button.

Facultative Application Console 3.6.1 User Guide Page 25 Reinsurance Group of America, Inc. 1/19/04
Extranets This tab defines the Extranet service. Enter the information in the boxes below. Values for Site Address and Submit Path will be provided by each Reinsurer. Contact your Reinsurance representative for your User Name and Password.
Figure 15: Administrative Services screen displaying the Extranets tab.

Facultative Application Console 3.6.1 User Guide Page 26 Reinsurance Group of America, Inc. 1/19/04
Reinsurer Contacts
Figure 16: Case Management screen displaying the Reinsurer Contacts tab.
This tab defines the reinsurer contact information. Step 1—Adding a reinsurance contacts:
• Click the New button on Figure 16 to remove any information in the reinsurance contacts fields.
• Select the company name from the drop down list, supply the contact information, and then click Save.
• A drop down list for the State is provided. • Current available Receive Methods are Email, Extranet, and Paper. All methods that have
been set up in Administrative Services are displayed in the drop down box. If a method is not defined, it will not appear in the drop down box.
o Selecting Email as the receive method results in the Certificate button becoming
active. Click Certificate then navigate to the certificate file location. See the
Appendix (page 36) for instructions on how to obtain a certificate.
o A XML(Extensible Markup Language) data file will be sent if the delivery method is email, or a extranet. Data in this file contains all the FAC Console required fields plus other pertinent information. This format makes it easy for the reinsurance company to electronically process the case, which provides the ceding company with a quick response.
Facultative Application Console 3.6.1 User Guide Page 27 Reinsurance Group of America, Inc. 1/19/04
o The following fields are required on Figure 16 depending upon the delivery method.
Delivery Method Required Information on Figure 16 Email Certificate path and email address Fax Fax number Paper Address, city, state, and zip code
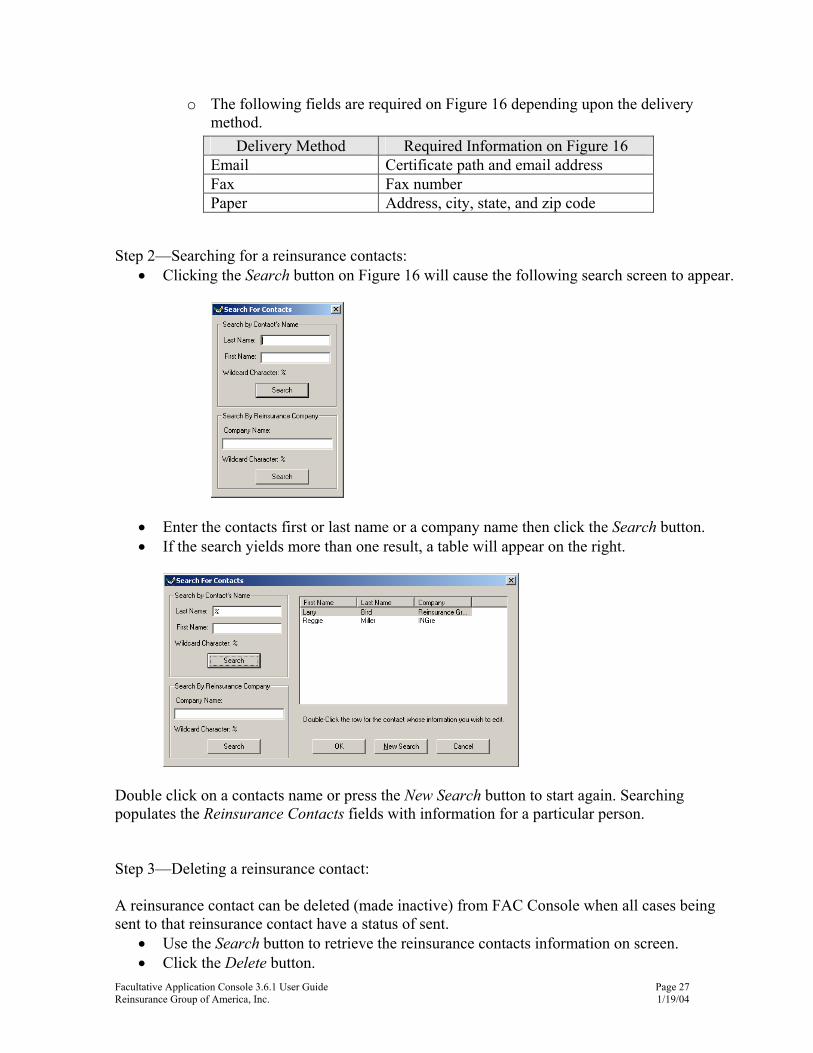
Step 2—Searching for a reinsurance contacts:
• Clicking the Search button on Figure 16 will cause the following search screen to appear.
• Enter the contacts first or last name or a company name then click the Search button. • If the search yields more than one result, a table will appear on the right.
Double click on a contacts name or press the New Search button to start again. Searching populates the Reinsurance Contacts fields with information for a particular person. Step 3—Deleting a reinsurance contact: A reinsurance contact can be deleted (made inactive) from FAC Console when all cases being sent to that reinsurance contact have a status of sent.
• Use the Search button to retrieve the reinsurance contacts information on screen. • Click the Delete button.

Facultative Application Console 3.6.1 User Guide Page 28 Reinsurance Group of America, Inc. 1/19/04
Ceding Company
Figure 17: Administrative Services screen displaying the Ceding Company tab.
Ceding companies are defined on this tab. Select a Company from the drop down list. If only one ceding company is present then “Select a Company” drop down list will not appear on the screen. Step 1—Adding a ceding company:
• Use the New button to erase any values in the Ceding Company fields then enter the company’s name, address, city, state and zip code.
• Click the Save button to create a new ceding company for the system. • A drop down list is provided for State values.
Step 2—Deleting a ceding company:
• Select a company from the drop down list. • Click Delete to remove the company from the system. There must always be one ceding
company in the system. o If the company you want to delete has administrators and underwriters associated
with it then the following screen will appear. The underwriters and administrators need to be moved to a different company.

Facultative Application Console 3.6.1 User Guide Page 29 Reinsurance Group of America, Inc. 1/19/04
o Select the rows in the table to reassign the ceding company contact with a new
company. o Double click a company name from the company list. o Click the Save button when finished and the company will be deleted.

Facultative Application Console 3.6.1 User Guide Page 30 Reinsurance Group of America, Inc. 1/19/04
FAC Console Users FAC Console will try to match the users network userID to people allowed into the FAC Console system when it is implemented as a network solution. Use their network userID as their Username when adding a new person to the FAC Console system. Select a username from either the Ceding Contact Name drop down list then modify their Access Level and click Save or click the Delete button to remove them from the system.
Figure 18: Administrative Services screen displaying the FAC Console Users tab. Adding a User: Administrators use this screen to add a new person or reassign a person’s access level. Click the New button to erase information in the boxes. Enter the Username, Access Level, FirstName, LastName, E-mail address then select the Save button to add a person to the FAC Console system. Deleting ceding contacts: An administrator or underwriter must not have a case associated with them if they are to be deleted from the system.
• Use the Search button to populate their information on the screen.
• Click the Delete button and the following screen will appear for their cases. (Note that if they are not associated with a case, they are removed from the system.)

Facultative Application Console 3.6.1 User Guide Page 31 Reinsurance Group of America, Inc. 1/19/04
• Highlight the rows you want to assign to a specific person.
• Click the persons name in the box on the right.
• Once all the cases have been reassigned, click the Exit button to remove this person from the system and return to the FAC Console Users tab.
Facultative Application Console 3.6.1 User Guide Page 32 Reinsurance Group of America, Inc. 1/19/04
Dynamic Settings
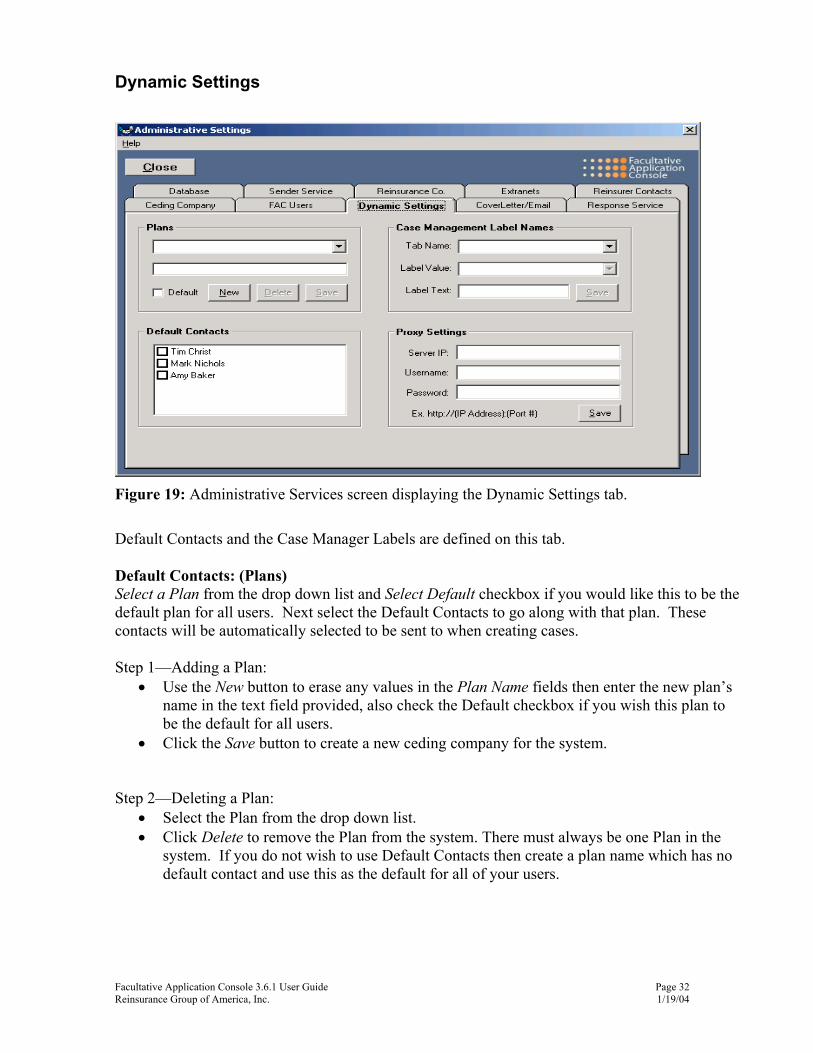
Figure 19: Administrative Services screen displaying the Dynamic Settings tab.
Default Contacts and the Case Manager Labels are defined on this tab. Default Contacts: (Plans) Select a Plan from the drop down list and Select Default checkbox if you would like this to be the default plan for all users. Next select the Default Contacts to go along with that plan. These contacts will be automatically selected to be sent to when creating cases. Step 1—Adding a Plan:
• Use the New button to erase any values in the Plan Name fields then enter the new plan’s name in the text field provided, also check the Default checkbox if you wish this plan to be the default for all users.
• Click the Save button to create a new ceding company for the system. Step 2—Deleting a Plan:
• Select the Plan from the drop down list. • Click Delete to remove the Plan from the system. There must always be one Plan in the
system. If you do not wish to use Default Contacts then create a plan name which has no default contact and use this as the default for all of your users.

Facultative Application Console 3.6.1 User Guide Page 33 Reinsurance Group of America, Inc. 1/19/04
Case Management Labels: Select a Tab from the drop down list “Tab Name” then choose the desired label to change from the “Label Value” drop down list. You may now modify the label in the Label Text field. Click the save button for the changes to take effect. The label will now be displayed in Case Manager as the name you have chosen. Proxy Settings: (Optional) In order to use a proxy server you must fill in the Proxy field with the format (HTTP://[ServerName or IP]:[Port#]). Your Network support personnel should provide this information. You may also fill in a username and password if necessary but this is not required. Some systems may not need to fill in the proxy information as is may be retrieved automatically by the system.

Facultative Application Console 3.6.1 User Guide Page 34 Reinsurance Group of America, Inc. 1/19/04
Cover Letter/Email (Optional) A cover letter that includes applicant and contact information is sent to the reinsurer recipient when faxing, printing and e-mail delivery methods are chosen. This tab sets the font and size for the letter. The default is Times New Roman with a font size of 12. One method that FAC Console uses to send a case to a reinsurer is by Email. This tab defines the address of your SMTP Email Server. You will also need to select the location of Winzip located on your computer in order to send Zipped Email.
Figure 20: Administrative Services screen displaying the Cover Letter tab.
Facultative Application Console 3.6.1 User Guide Page 35 Reinsurance Group of America, Inc. 1/19/04
Response Service
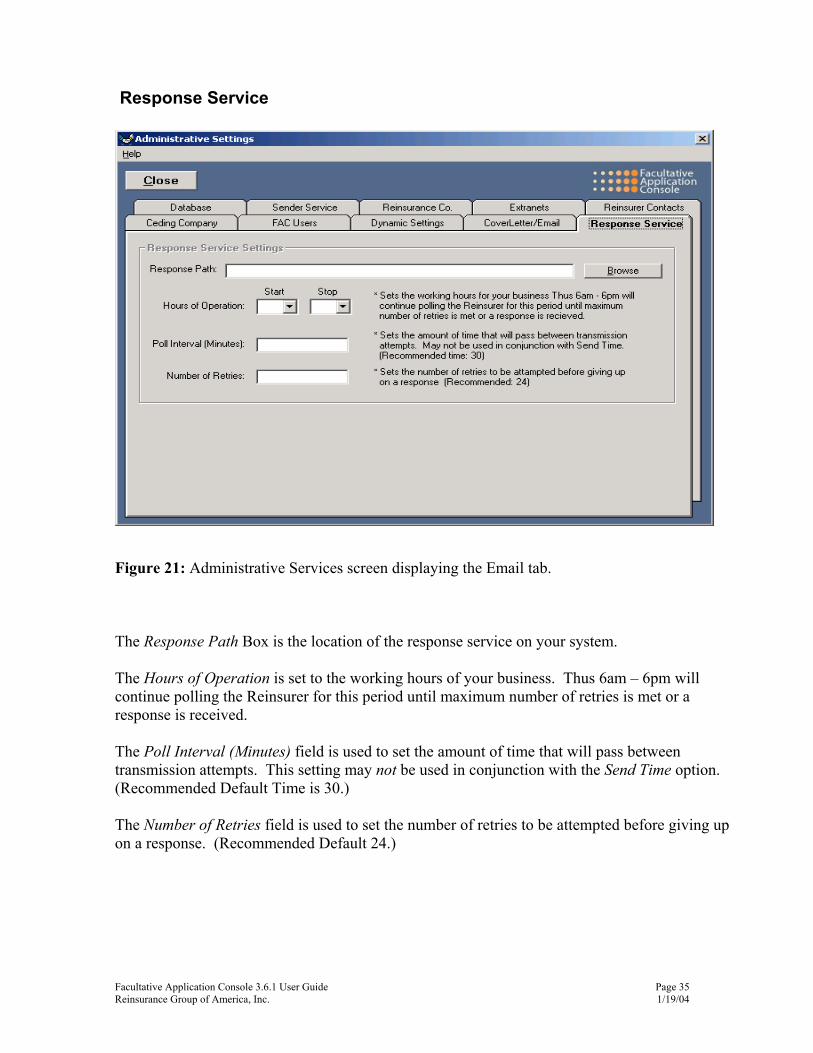
Figure 21: Administrative Services screen displaying the Email tab. The Response Path Box is the location of the response service on your system. The Hours of Operation is set to the working hours of your business. Thus 6am – 6pm will continue polling the Reinsurer for this period until maximum number of retries is met or a response is received. The Poll Interval (Minutes) field is used to set the amount of time that will pass between transmission attempts. This setting may not be used in conjunction with the Send Time option. (Recommended Default Time is 30.) The Number of Retries field is used to set the number of retries to be attempted before giving up on a response. (Recommended Default 24.)

Facultative Application Console 3.6.1 User Guide Page 36 Reinsurance Group of America, Inc. 1/19/04
Appendix
A. Digital Certificates
Creating Personal Certificates A personal certificate will enable the secured transmission of data from the ceding company to a reinsurer through an email address. The reinsurer can follow the process below, which outlines the steps necessary to create a public and private key.
Once the keys are created, the public key can be e-mailed to the ceding company to use with FAC Console.
FAC Console requires that the personal certificate key be Microsoft X.509 compliant. There are many companies available through the Internet that creates personal certificates; we have outlined the process for Thawte as of July 2001.
Using Internet Explorer, go to: https://www.thawte.com/cgi/personal/cert/x509.key.exe and click the Cancel button when it asks for your Thawte User Name and Password.
It will be necessary for you to enroll as a member to receive your personal certificate.
Click on New Customer Registration.
After reviewing the Terms and Conditions of the Personal Certification, and if you accept, scroll to the bottom of this screen and click Next>.
Continue through the following screens, adding the information requested, to complete the application process.

Facultative Application Console 3.6.1 User Guide Page 37 Reinsurance Group of America, Inc. 1/19/04
When are you asked to select the CSP, select Microsoft Enhanced Cryptographic Provider v1.0. Click Next> to proceed.
To set the security level, click Set Security Level button.
Choose Medium security level and click the Next> button.

Facultative Application Console 3.6.1 User Guide Page 38 Reinsurance Group of America, Inc. 1/19/04
Click Finish to complete the process.
Click OK button to create a key.
Click OK button to sign data with your key.
Facultative Application Console 3.6.1 User Guide Page 39 Reinsurance Group of America, Inc. 1/19/04
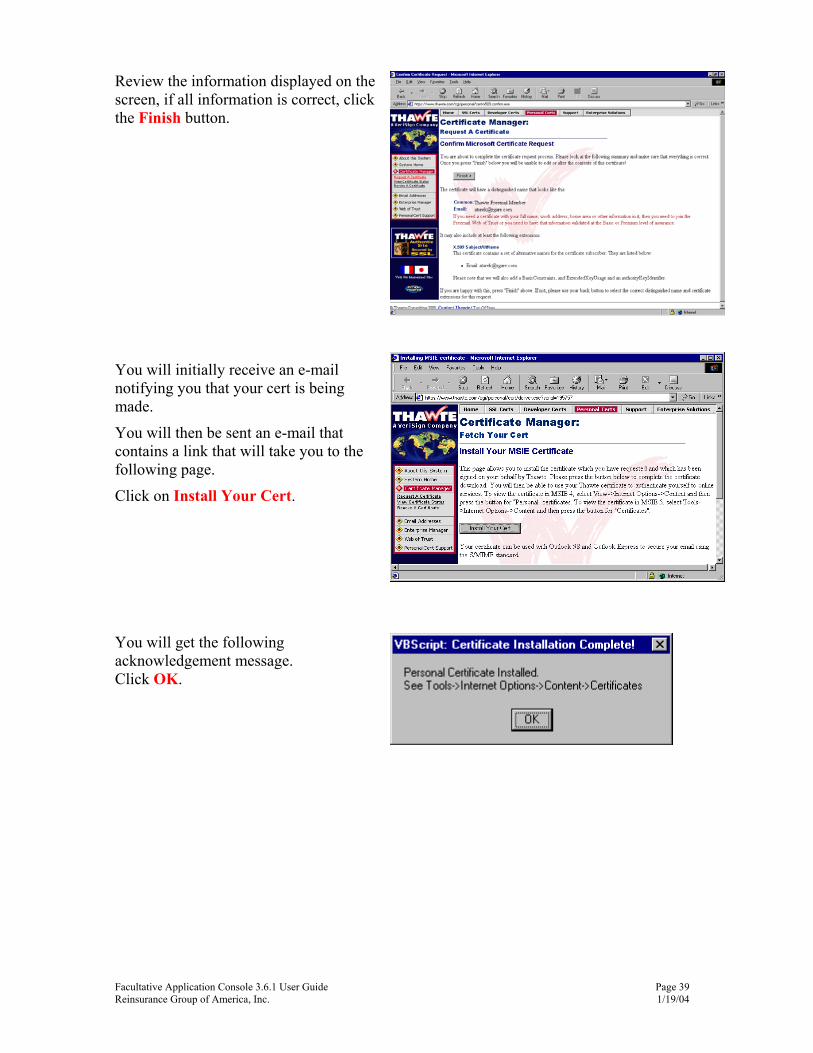
Review the information displayed on the screen, if all information is correct, click the Finish button.
You will initially receive an e-mail notifying you that your cert is being made.
You will then be sent an e-mail that contains a link that will take you to the following page.
Click on Install Your Cert.
You will get the following acknowledgement message. Click OK.

Facultative Application Console 3.6.1 User Guide Page 40 Reinsurance Group of America, Inc. 1/19/04
Installing Digital Certificates The certificate must be exported after receiving digitally signed e-mail.
In MS Outlook, Double-click on the lock icon in your lower toolbar.
The Digital Signature window will appear, click View Certificate button.
Click the Details tab then the Copy to File button.

Facultative Application Console 3.6.1 User Guide Page 41 Reinsurance Group of America, Inc. 1/19/04
The Export Wizard screen will be displayed, click the Next> button.
Choose the DER encoded binary X.509(.CER) radio button, then the Next> button.
Click Browser to specify the location for the export to be stored and type a name for the file, then click Next>.

Facultative Application Console 3.6.1 User Guide Page 42 Reinsurance Group of America, Inc. 1/19/04
Click the Finish button to complete the Export Wizard.
Click OK to close the acknowledgement message.
Backing up Certificates As a safeguard against the possibility of losing any certificate, it is suggested that a backup of the certificates is regularly done. A simple process of copying the certificates onto a diskette or into another drive is all that is needed.

Facultative Application Console 3.6.1 User Guide Page 43 Reinsurance Group of America, Inc. 1/19/04
B. AlternaTIFF Imaging Viewer
Installing a TIFF Image Viewer If you do not already have a tool to view tiff images or the tiff view you presently use causes the images to appear outside FAC Console, you can down load AlternaTIFF over the internet. AlternaTIFF is a free application; however, you will be required to register it before it can be used to view images. Visit their website at http://www.mieweb.com/alternatiff for more information.
The following screens show the installation steps at the time this manual was written. Download the file named alternatiff.exe from the website. Choose Start, Run and click Browse to navigate to where the newly downloaded file is stored. Once located, click OK. Click Setup to proceed with the installation

Facultative Application Console 3.6.1 User Guide Page 44 Reinsurance Group of America, Inc. 1/19/04
Follow the instructions by completing the required fields and then click Next>.
Click Send Registration
Click OK.

Facultative Application Console 3.6.1 User Guide Page 45 Reinsurance Group of America, Inc. 1/19/04
Select the Install into Microsoft Internet Explorer, Modify my Windows registry, and Automatically check for new versions check boxes. Click the Install button.
Click OK and to complete the installation and close the message window.
C. Customizing Reference Tables Reference table values in the Microsoft Access database can be changed without effecting the FAC Console application. Reference tables are denoted by the key word “Ref”, which is added to the end of the table name. ImpairmentRef is an example of a reference table where the values for specific fields can change or new rows can be added to the table. For example, you could change the “Abbreviation” of “ImpairmentID” 110, “Name” Diabetes Mellitus to DMT.

Facultative Application Console 3.6.1 User Guide Page 46 Reinsurance Group of America, Inc. 1/19/04
D. Uninstall Instructions The following procedure was developed on the Windows 2000 operating system. Other operating system may have screens with a different appearance but the functionality will be the same. Click on Start\Setting\Control Panel, choose “Add/Remove Programs” and the following box will appear. Click on FAC Console as shown above then click on the Change/Remove button.
The InstallShield Wizard will appear.
When the Welcome screen appears, select Remove radio button, then click the Next> button.
Click OK to confirm file deletion.

Facultative Application Console 3.6.1 User Guide Page 47 Reinsurance Group of America, Inc. 1/19/04
This will begin the process of removing FAC Console from your system. A Setup Status box will appear, showing the progression of the requested process.
You may also see a series of detected shared, read only, or locked file alerts. By checking the “Don’t display” box, additional ones will not display.
Click Yes to proceed.
The Maintenance Complete screen will appear once all files have been removed.
Click Finish to complete the process.

Facultative Application Console 3.6.1 User Guide Page 48 Reinsurance Group of America, Inc. 1/19/04
The following screen will be re-displayed but without the FAC Console application listed. Click the Close button. FAC Console Application has now been successfully removed from your system.
E. Saving the Database It is always a good idea to frequently make copies of the database and store it on a different drive or disk. The copies can be priceless if for some reason the data becomes corrupt or data entry errors occur. FAC Console does not have an automated backup program, we suggest you either copy the file by using your Windows Explorer or with Microsoft Access’ Replication program.