face painting
TRANSCRIPT
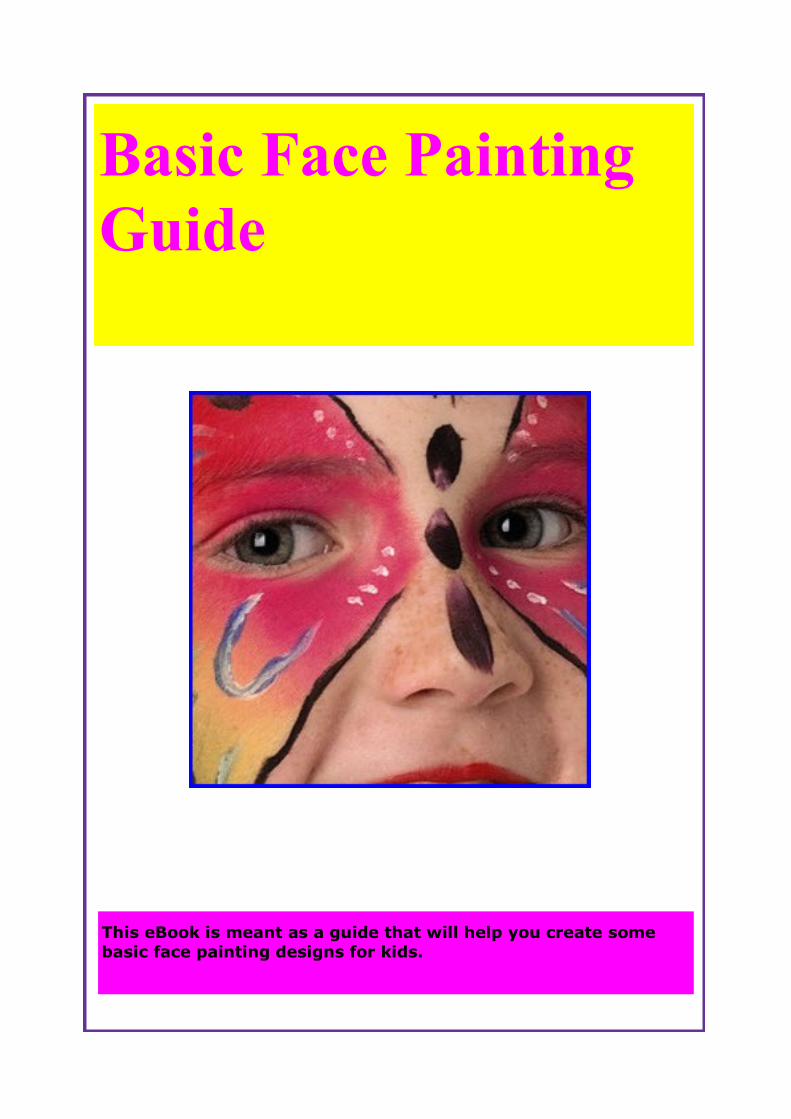
Basic Face Painting
Guide
This eBook is meant as a guide that will help you create some
basic face painting designs for kids.

Face Painting
You are not allowed to resell this eBook
Face painting was first used by warriors who painted their faces do declare
war to other tribes' . We all watch the old westerns where the warriors paint
their face to go to war.
Bu now we just want to have some fun .
It is normal to see face painting artist at fairs, markets and other locations
where children and adolescents are.
Face painting is now very popular among children
The majority of face painting is for children but many teenagers and adults
enjoy being painted for special events like Carnival and Halloween.
There are very popular designs.
Designs with emblems of favourite sports teams, animals, cartoon or fairy tale
characters.
Designs to colour the face to indicate solidarity with a cause or membership
in a group. You'll find many fans at football games and other sporting events
with faces painted to show support for their team.
Superman , princess, flowers, butterflies, pirates and clown noses are popular
designs that are accomplished with a few strokes of the brush, using water-
based face paint .

Sit your customer or friend in a chair and place a towel around they
shoulders.
Tie back long hair to keep it out of the way.
Before applying face paint, wipe subject's face with a moist wipe or tissue.
If you know a subject is prone to allergies, place a small amount of paint
on the cheek to see if there is a reaction.
Apply light colours first with a broad brush, then use smaller brushes fo
finer details.
If you're new to face painting, start out with simple designs like stars,
half moons and diamond shapes.
To remove face paint, simply use mild soap and water.

Learn how to face paint but
Safety
FACE PAINTING:
Face painting is great fun to do and so easy to learn. Anyone can enjoy
face painting you don’t need to be an artist. Before you start, have a good
understanding of face painting safety, please read below.
FACE PAINTING SAFETY:
FAS Professional Face Paint is a cosmetic pig-
mented paint (STD COLOURS) that have been formu-
lated specially for use on skin, they are non-toxic and have been carefully tested. FAS use cosmetic pigments in the manufac-
turer of the FAS Professional Face Paint. However, if you suspect that your
skin or your models skin may have sensitive skin you could test the paint
on the inside of your wrist before you begin. If there is no reaction after a
few minutes will be safe to proceed.
Just as some people have an allergic reaction to bee stings and other do
not, everyone is different! So, keep and eye on your models skin as you
paint. If your models skin becomes itchy or irritated, you will need to in-
stantly remove the face paint and apply a barrier cream. Even then a few
people have still have a reaction to the barrier cream and it is best not to
apply the face paint in this case.
If you are intending to wear face paint for long periods of time, you may need to reapply your colours and use a barrier cream or moisturiser to as-
sist with removal and protection of your skin.
Keep paint away from eyes, mouth and nose. Always be very careful when
painting in these areas. It is a good idea to have your model close their
eyes until you have finished painting.
Don’t use paints or glitter paints that are intended for paint-
ing on paper. As these products are not likely to be cosmetic
grade.
FAS Professional Face Paint will wash off with soap and water. Avoid getting face paint on clothes as it will wash off skin but it could stain some fabrics. Keep all brushes and utensils wet while working
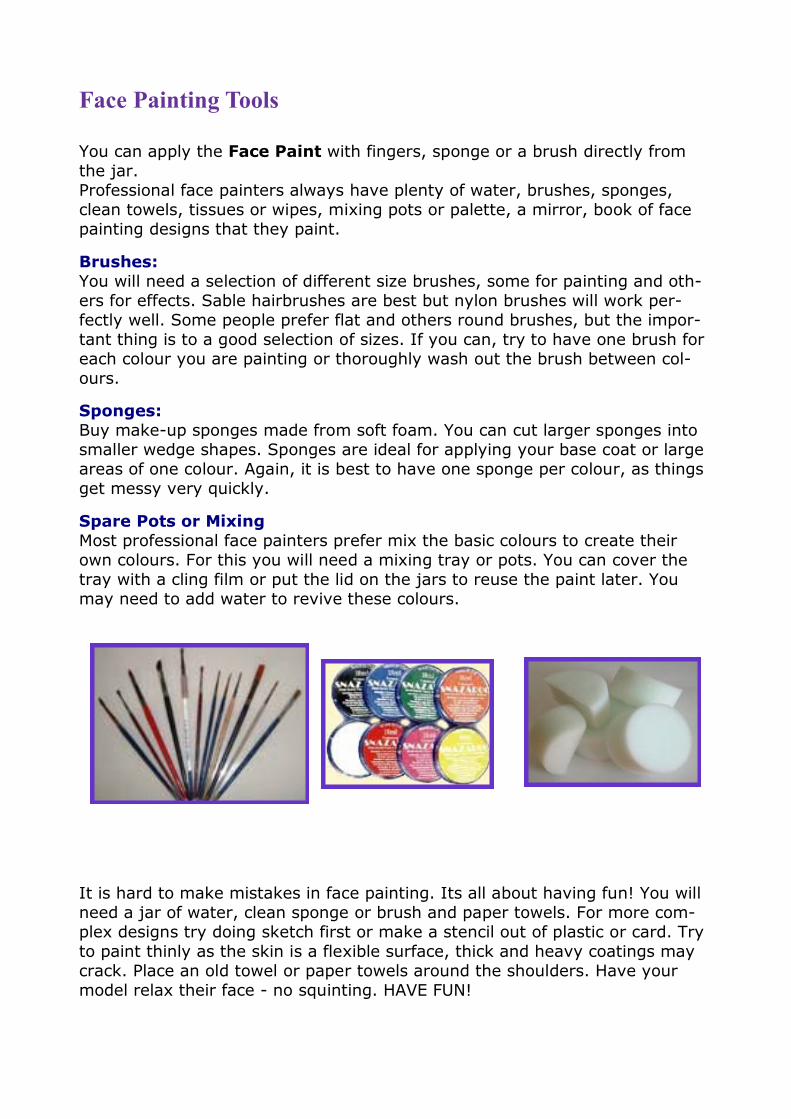
Face Painting Tools
You can apply the Face Paint with fingers, sponge or a brush directly from
the jar.
Professional face painters always have plenty of water, brushes, sponges,
clean towels, tissues or wipes, mixing pots or palette, a mirror, book of face
painting designs that they paint.
Brushes:
You will need a selection of different size brushes, some for painting and oth-
ers for effects. Sable hairbrushes are best but nylon brushes will work per-
fectly well. Some people prefer flat and others round brushes, but the impor-
tant thing is to a good selection of sizes. If you can, try to have one brush for
each colour you are painting or thoroughly wash out the brush between col-
ours.
Sponges:
Buy make-up sponges made from soft foam. You can cut larger sponges into
smaller wedge shapes. Sponges are ideal for applying your base coat or large
areas of one colour. Again, it is best to have one sponge per colour, as things
get messy very quickly.
Spare Pots or Mixing Palette:
Most professional face painters prefer mix the basic colours to create their
own colours. For this you will need a mixing tray or pots. You can cover the
tray with a cling film or put the lid on the jars to reuse the paint later. You
may need to add water to revive these colours.
It is hard to make mistakes in face painting. Its all about having fun! You will
need a jar of water, clean sponge or brush and paper towels. For more com-
plex designs try doing sketch first or make a stencil out of plastic or card. Try
to paint thinly as the skin is a flexible surface, thick and heavy coatings may
crack. Place an old towel or paper towels around the shoulders. Have your
model relax their face - no squinting. HAVE FUN!
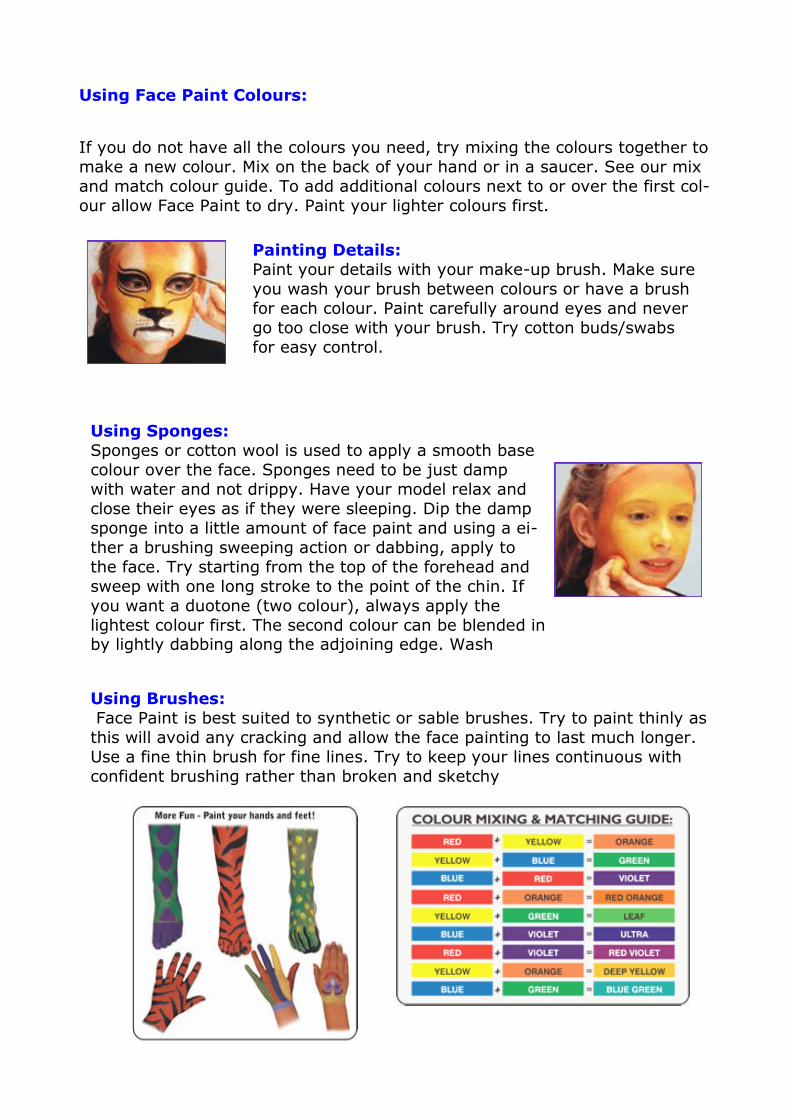
Using Face Paint Colours:
If you do not have all the colours you need, try mixing the colours together to
make a new colour. Mix on the back of your hand or in a saucer. See our mix
and match colour guide. To add additional colours next to or over the first col-
our allow Face Paint to dry. Paint your lighter colours first.
Painting Details:
Paint your details with your make-up brush. Make sure
you wash your brush between colours or have a brush
for each colour. Paint carefully around eyes and never
go too close with your brush. Try cotton buds/swabs
for easy control.
Using Sponges:
Sponges or cotton wool is used to apply a smooth base
colour over the face. Sponges need to be just damp
with water and not drippy. Have your model relax and
close their eyes as if they were sleeping. Dip the damp
sponge into a little amount of face paint and using a ei-
ther a brushing sweeping action or dabbing, apply to
the face. Try starting from the top of the forehead and
sweep with one long stroke to the point of the chin. If
you want a duotone (two colour), always apply the
lightest colour first. The second colour can be blended in by lightly dabbing along the adjoining edge. Wash
Using Brushes:
Face Paint is best suited to synthetic or sable brushes. Try to paint thinly as
this will avoid any cracking and allow the face painting to last much longer.
Use a fine thin brush for fine lines. Try to keep your lines continuous with
confident brushing rather than broken and sketchy

Here are a few useful application tips and ideas
Before you start, wrap a towel around the models head
Have plenty of tissues or moisture wipes ready.
Have a mirror.
Try to paint thinly as thick heavy painting will crack easier when dry
Have plenty of water on hand for cleaning your brushed and sponges.
Have a waste bin handy
Use hair bands and clips to hold your models hair back and out of the way
while you paint.
Have you model sitting high enough for you to work comfortably.
Always start with a clean dry face.
Make sure you have a good idea of what you are painting before you start.
Have all your equipment laid out on front of you for easy access.
Change your water for cleaning often.
Try applying your lighter tone colours first and progress to the darker tones.
When using sponges try to have one for each colour, as this quickly gets very
messy.
Wait to the first colour is dry before applying your next colour. Wet paint on
wet paint will smudge.
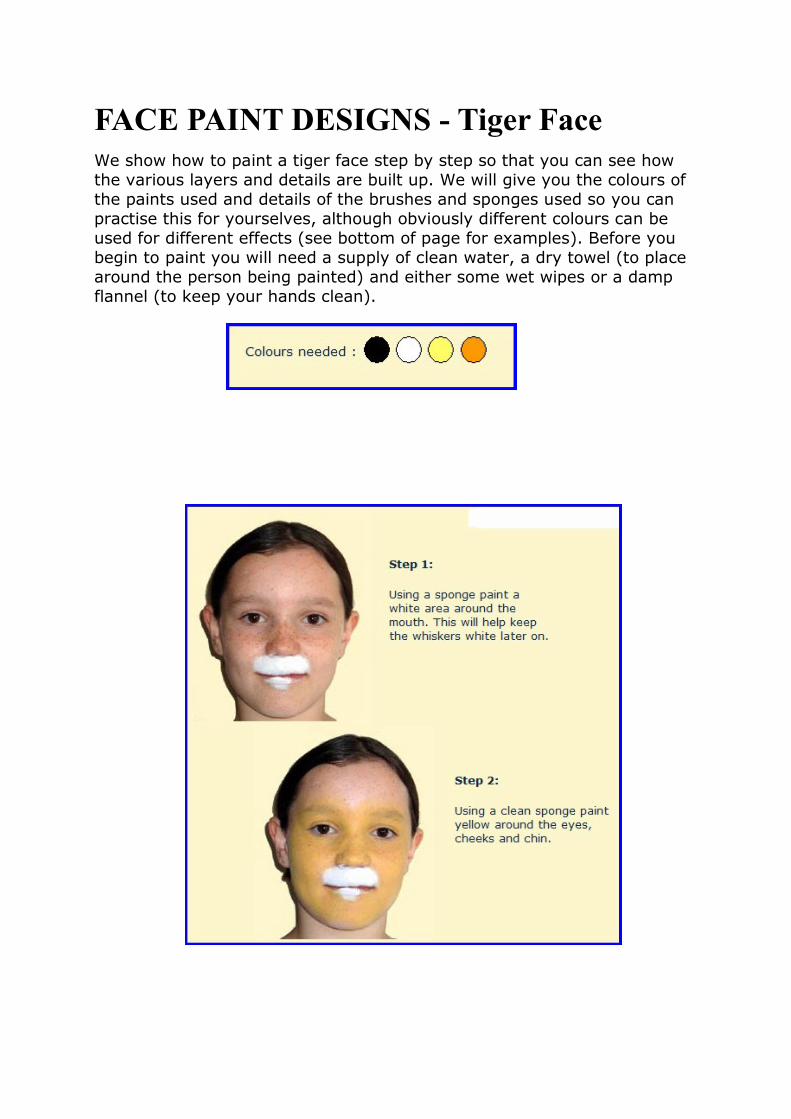
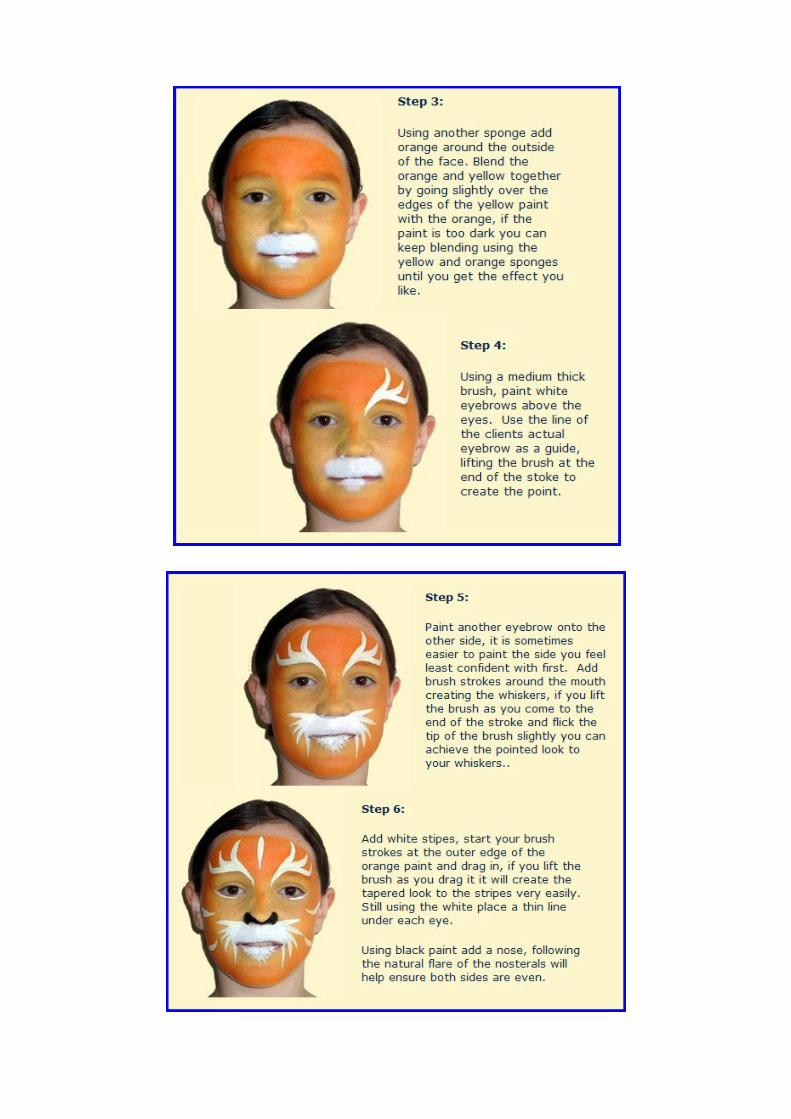
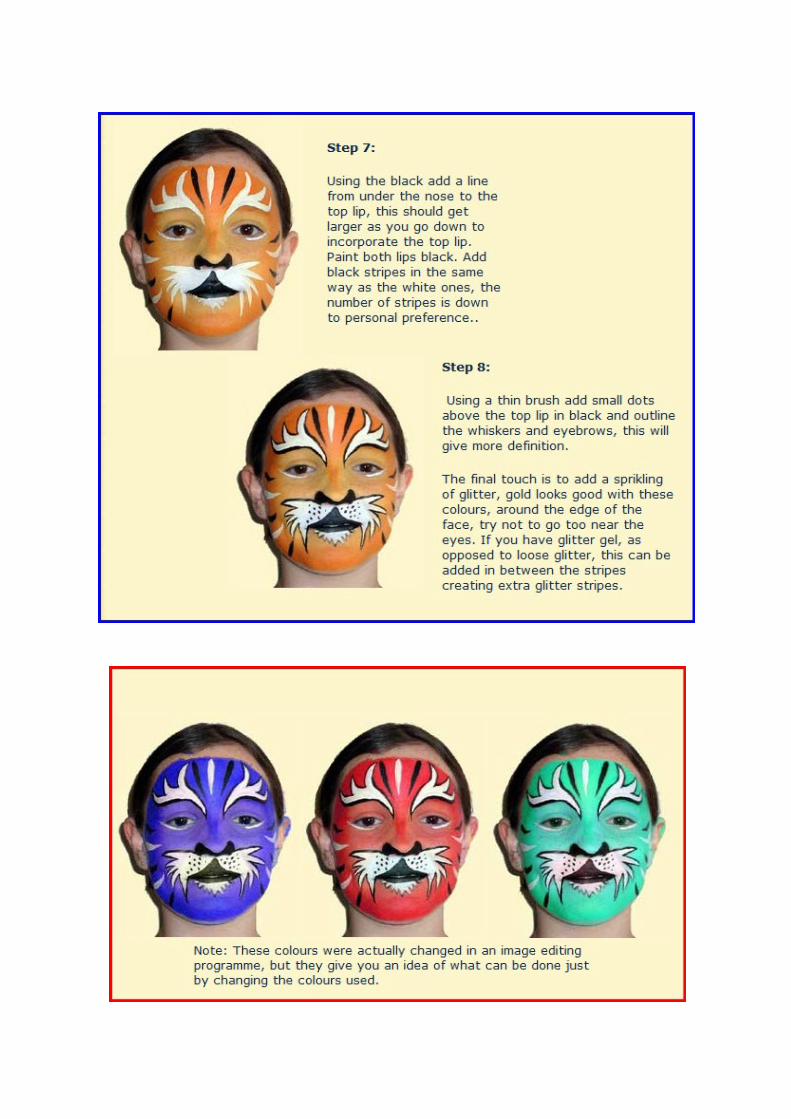
FACE PAINT DESIGNS - Tiger Face
We show how to paint a tiger face step by step so that you can see how
the various layers and details are built up. We will give you the colours of
the paints used and details of the brushes and sponges used so you can
practise this for yourselves, although obviously different colours can be
used for different effects (see bottom of page for examples). Before you
begin to paint you will need a supply of clean water, a dry towel (to place
around the person being painted) and either some wet wipes or a damp
flannel (to keep your hands clean).

FACE PAINTING DESIGNS - Butterfly Face Paint Colours needed:
Bright Pink, Yellow, Purple, various for decoration (pale pink, electric gold, lilac) iridescent pow-
der purple.

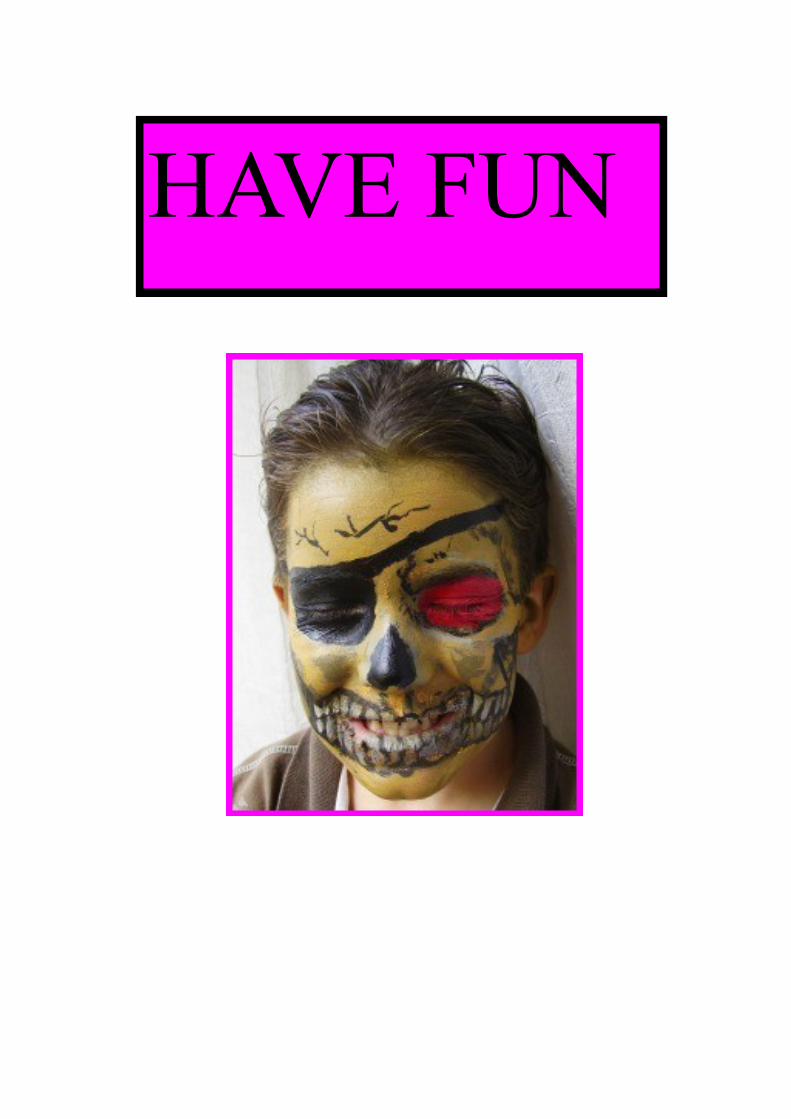
FACE PAINT DESIGNS - Skull
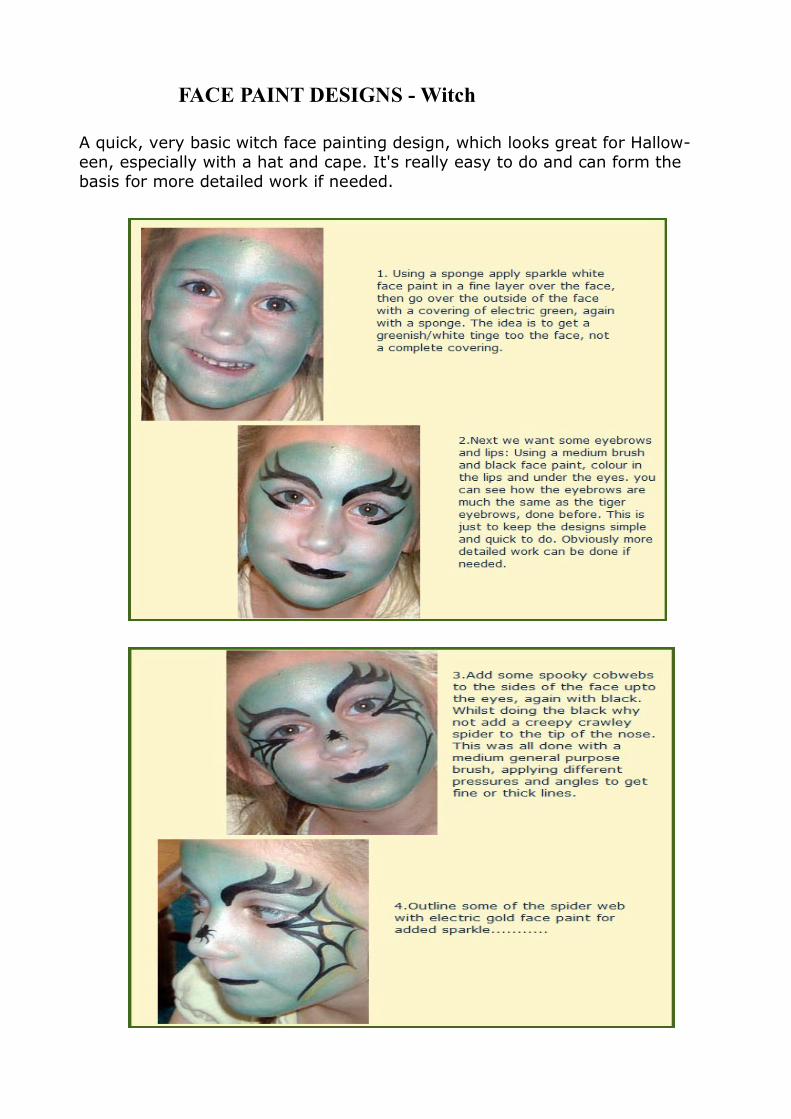
A quick, very basic witch face painting design, which looks great for Hallow-
een, especially with a hat and cape. It's really easy to do and can form the
basis for more detailed work if needed.
FACE PAINT DESIGNS - Witch
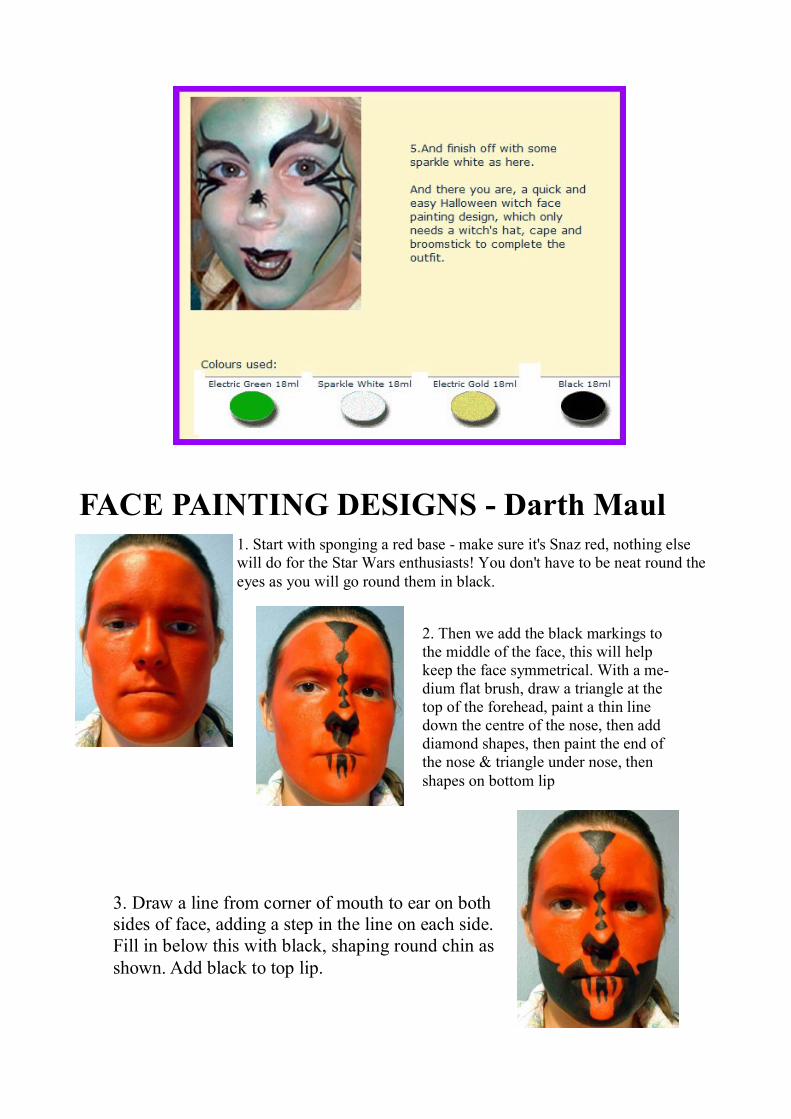
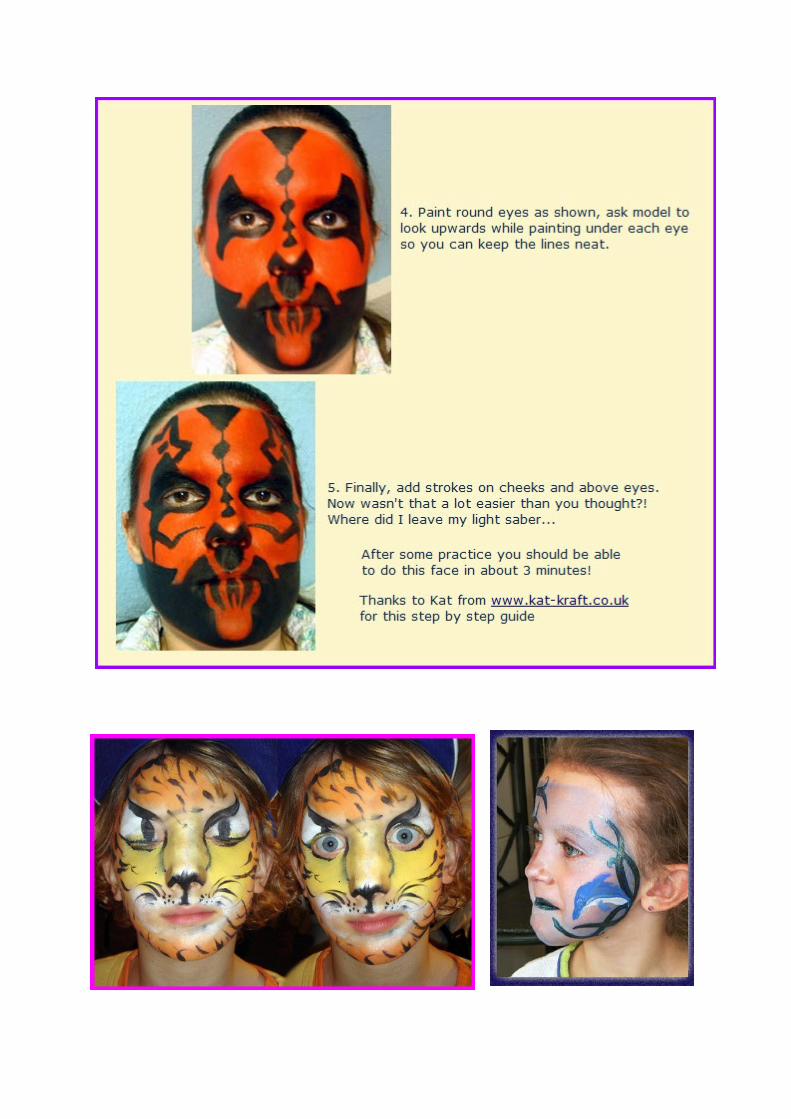
FACE PAINTING DESIGNS - Darth Maul 1. Start with sponging a red base - make sure it's Snaz red, nothing else
will do for the Star Wars enthusiasts! You don't have to be neat round the
eyes as you will go round them in black.
2. Then we add the black markings to
the middle of the face, this will help
keep the face symmetrical. With a me-
dium flat brush, draw a triangle at the
top of the forehead, paint a thin line
down the centre of the nose, then add
diamond shapes, then paint the end of
the nose & triangle under nose, then
shapes on bottom lip
3. Draw a line from corner of mouth to ear on both
sides of face, adding a step in the line on each side.
Fill in below this with black, shaping round chin as
shown. Add black to top lip.
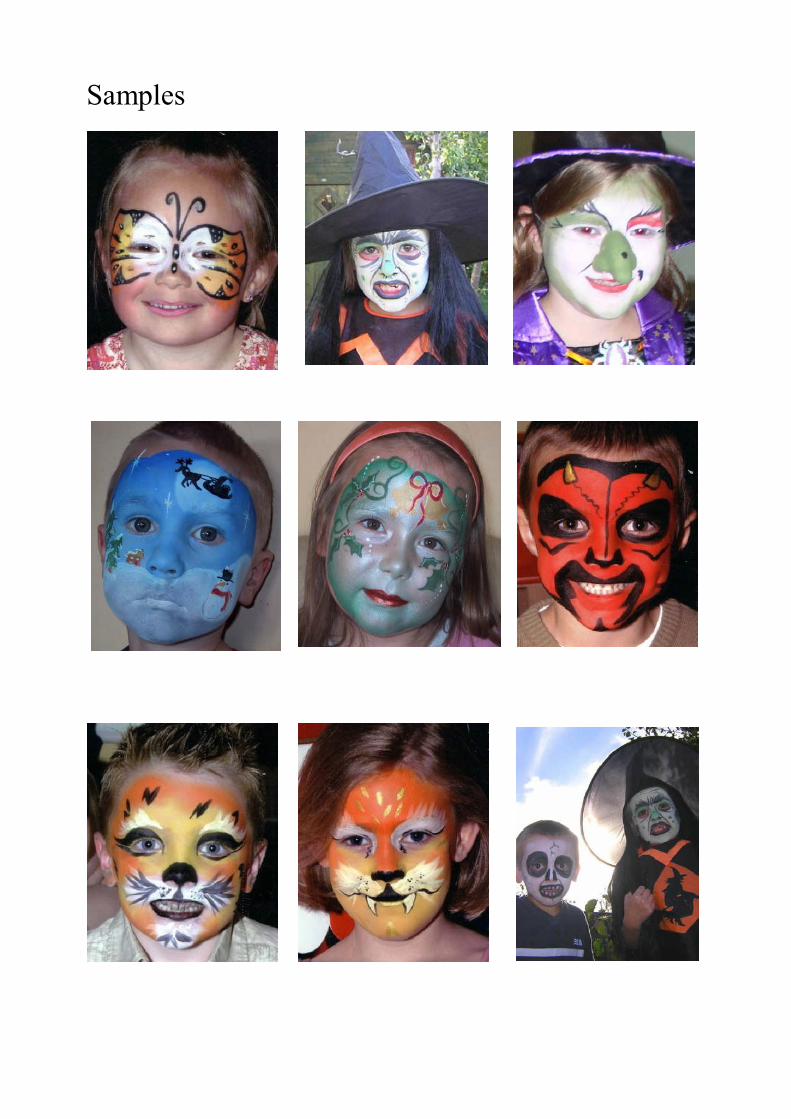
Samples

http://www.facepaintingdesigns.co.uk/
Butterflies, cats, dogs, fairies, ghosts, witches, wizards ... kids of all ages
love having their faces painted.
Never forget the basics
Value Your Paints
Professional face paint and stage makeup can be expensive, particularly if
you're painting a whole kids party's worth of faces. Don't leave them
around where people can get hold of them and try them out for them-
selves. Try out different types of paint to see which you find the best for
working with, such as paint in tubs or paint in stick form.
Sponge Don't Brush
If you're wanting to cover a large area or put on a base color, use a
sponge to apply the paint rather than a brush, it'll be quicker. Having a
different sponge for different colors eliminates the necessity of washing
out the sponge during a painting session (the same applies to brushes).
Be Patient and Think Thin
Let the first colour dry before applying a second. If you don't, they'll mix
and you'll probably have to wipe it off and start again. Also, rather than
applying one thick layer of paint, which may crack, apply a thin layer, let it
dry, then apply another.
Visualize the Finished Face
Know what you're going to paint before you start, don't make it up as you go
along. Kids aren't known for their patience and won't be able to sit still why
you ponder what to do next. Have a basic face design fixed in your mind; you
can always add special touches to this once you're finished.
Special Effects
The paint you're using will work as a basic glue. To create bumpy noses or big
eyebrows, soak a bit of cotton wool in the paint, place on face, cover with a
piece of tissue, and paint. Puffed rice or wheat make ideal warts; simply cover
with a bit of tissue and paint. For an extra-ghostly effect, apply a light dusting of flour once you've finished painting the face (be sure to get your subject to
close their eyes tightly).
Use Stencils
If you're not confident painting freehand, or are short of time, why not use a
stencil? Stars, hearts, flowers will all stencil onto a cheek. Have stencils in a
few sizes to hand, to allow for small and larger faces.
Temporary Tattoos
Even faster than stencils are temporary tattoos. But some people's skin reacts
badly to them and they take longer to remove. Glitter is also great for a
quick, dramatic effect, but it gets everywhere and is very hard to get rid of!
(Also check that the glitter is suitable, see Safety Tips for Face Painting.)
Getting a Decision If you've got a row of kids lined up to have their faces painted, ask the next
kid in line what they'd like a few minutes before you've finished the face
you're currently painting. This way they've a little time to try to decide and
you don't lose painting time. You may suggest a few faces, to try to limit the
choice to one you're confident painting. Consider creating a chart of designs
for kids to choose from; it makes it much easier for the kids to make up their
minds. Include simple things such as hearts or balloons, as many kids love
these.
Mirror, Mirror on the Wall, Who's the Most Beautiful of All?
Remember to take a mirror so the person who's face you've just painted can
see the result. Also bring a high stool for kids to sit on; not having to bend
over for so long will save you from back ache.
Stock Up on Tissues You'll probably use more tissues or wipes than you think for wiping your
hands, brushes, etc. Face painting can be messy, but it's fun! Baby wipes
work fast and easy for 'mistakes'; you can also be assured they are safe to
use on faces.

Samples

Face Painting Designs Step by Step
A simple clown face is an relatively easy and fast design to
paint, if you stick to the basic, key elements. Whether or not
you paint the whole face a color – traditionally white for a
clown – before you start creating a face is up to you and how
much time you have. If you're at a party, it'll help speed up
your 'production line' to have an assistant who can do the 'under layer'.
So, where to start? Think of a clown and what do you think of
first? A bright, prominent nose. But don’t limit yourself to red;
using other colors for the nose will immediately make the
faces you’ve painted different.
And what's the second thing you think of with clowns? A huge,
wide smile. Make it much larger than the actual mouth, going
above and below the lips and out onto the cheeks.
For variation, change the way the smile ends, for example us-
ing a round circle (like here), small curve, or sharp point (or
one of each).
Paint the eyebrows in a colour that will stand out, exaggerat-
ing the size (length and width) a bit, to make them more
prominent. And don’t limit yourself to following the natural
curve of an eyebrow -- make the angle sharper, or the two
eyebrows different.
Now ‘colour in’ the area between the eyebrows you’ve painted
and the eyes. For variation, paint down onto the cheek on the
sides of the eyes, as shown here.
Once again, varying the shape you paint here will create dif-
ferences between the faces you’ve painted. Also consider add-
ing another color.
Add a small splash of color, such as a star to a cheek,
and you’ve finished.
Tips:
--There's no reason for the eyes to be the same color.
--Ask the child whose face you're about to paint to se-
lect the colours for their eyes.

Easy Butterfly Paint the outline of the butterfly wings,
trying to get both wings more or less
symmetrical (this will get easier with
practise). Paint from the side of the
ridge of the nose, up and across the
forehead, above the eyebrows. Then
down from the nose past the mouth al-
most to the end of the jaw. Now 'join
up' the two lines using as much of the
cheek as possible. Don't worry too much
about how much space you leave for the butterfly's body at the nose; you can al-
ways paint over part of the wings if nec-
essary.
Colour in the outlines of the wings. This
is where your imagination can be let
loose: fade from one colour to another,
make the top and bottom of the wings
different, add a color outline (or two) to
the edge, add circles or droplets of deco-
ration on the wings.
Add the body of the butterfly (basically
and oblong with a circle for a head), then
two long feelers stretching out into the
forehead (or two short ones if your sub-
ject has a fringe).
Tips: Choose a basic wing colour that will
show up well, for example a strong blue
for a pale skin tone or an intense orange
for a darker skin tone. Outline the wings
in the complementary color, as comple-
mentary colours make each other seem
brighter.
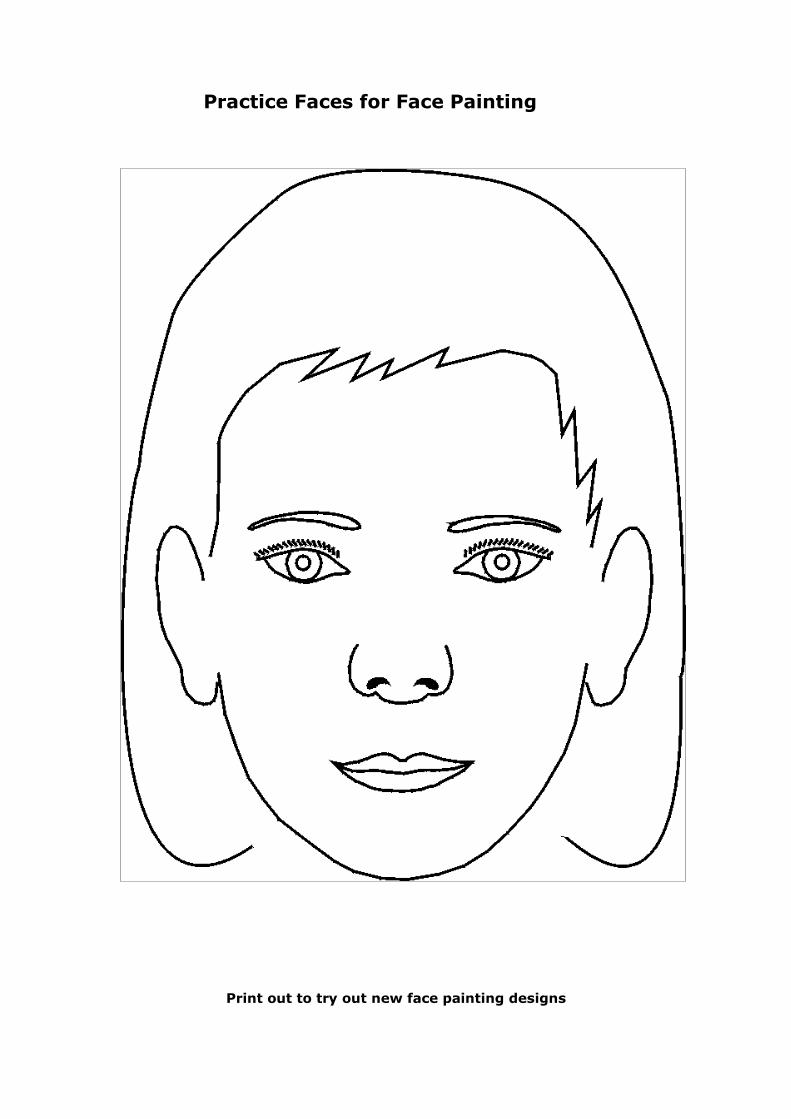
Print out to try out new face painting designs
Practice Faces for Face Painting
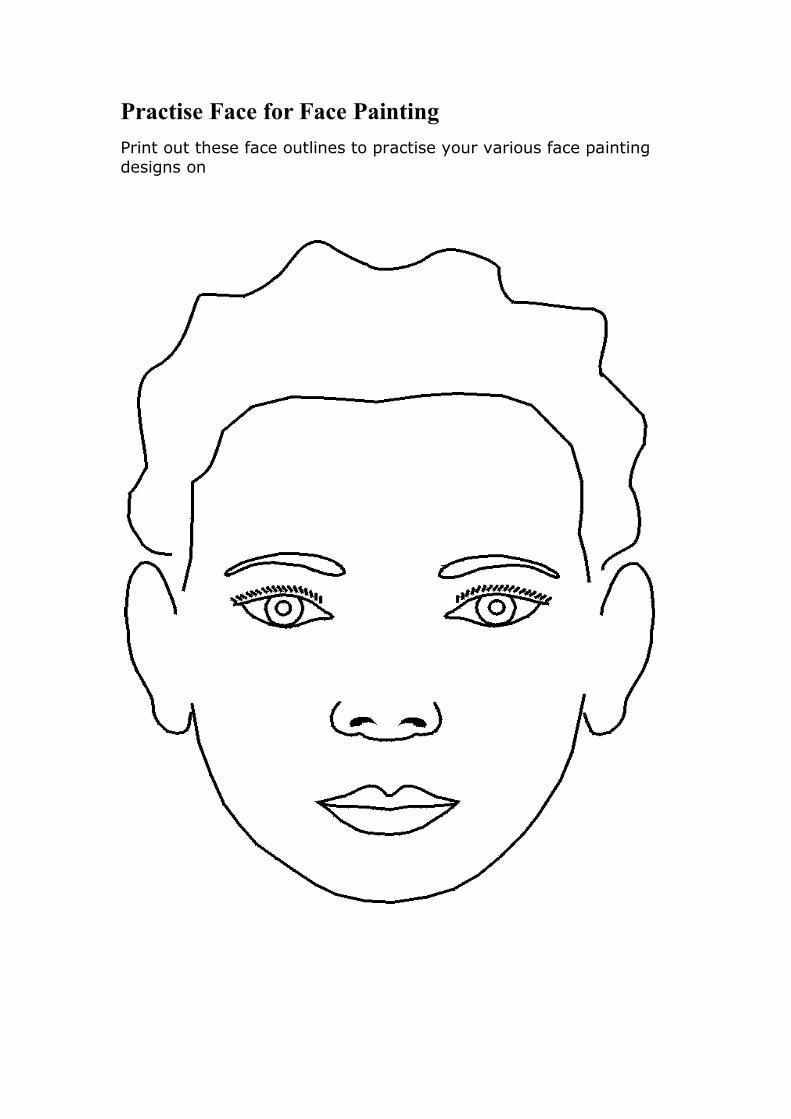
Practise Face for Face Painting
Print out these face outlines to practise your various face painting
designs on
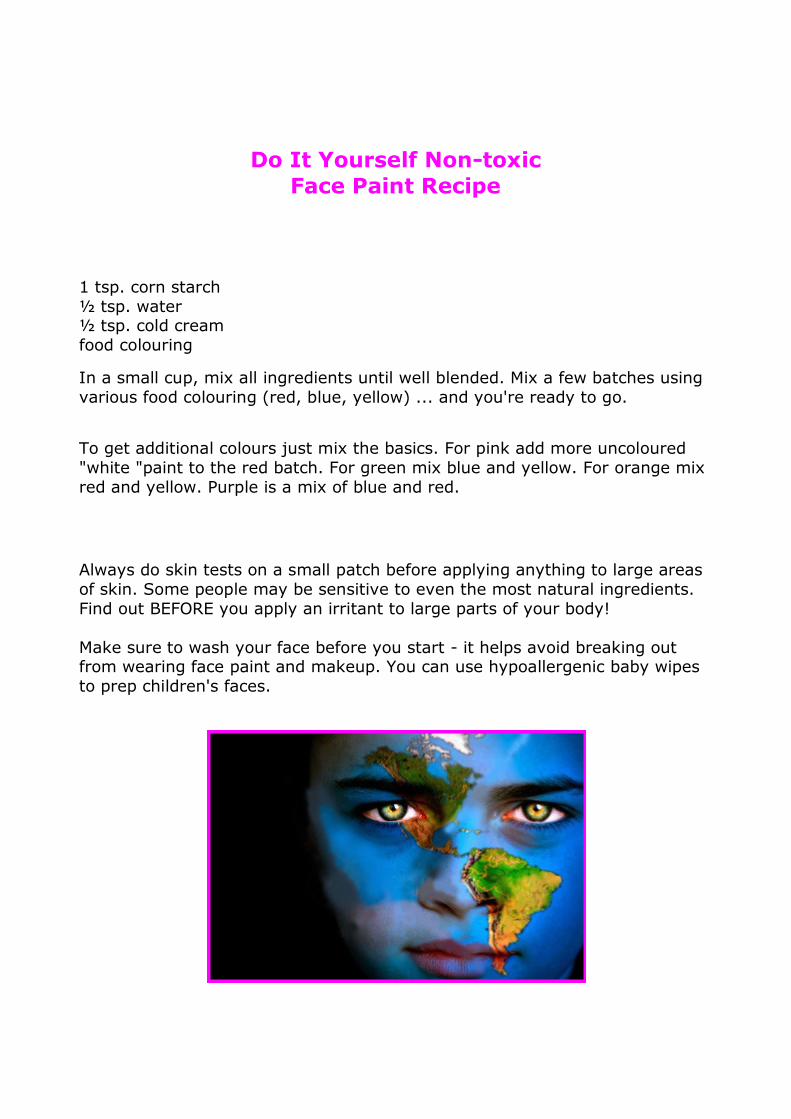
Do It Yourself Non-toxic
Face Paint Recipe
1 tsp. corn starch
½ tsp. water ½ tsp. cold cream
food colouring
In a small cup, mix all ingredients until well blended. Mix a few batches using
various food colouring (red, blue, yellow) ... and you're ready to go.
To get additional colours just mix the basics. For pink add more uncoloured
"white "paint to the red batch. For green mix blue and yellow. For orange mix
red and yellow. Purple is a mix of blue and red.
Always do skin tests on a small patch before applying anything to large areas
of skin. Some people may be sensitive to even the most natural ingredients.
Find out BEFORE you apply an irritant to large parts of your body!
Make sure to wash your face before you start - it helps avoid breaking out from wearing face paint and makeup. You can use hypoallergenic baby wipes
to prep children's faces.
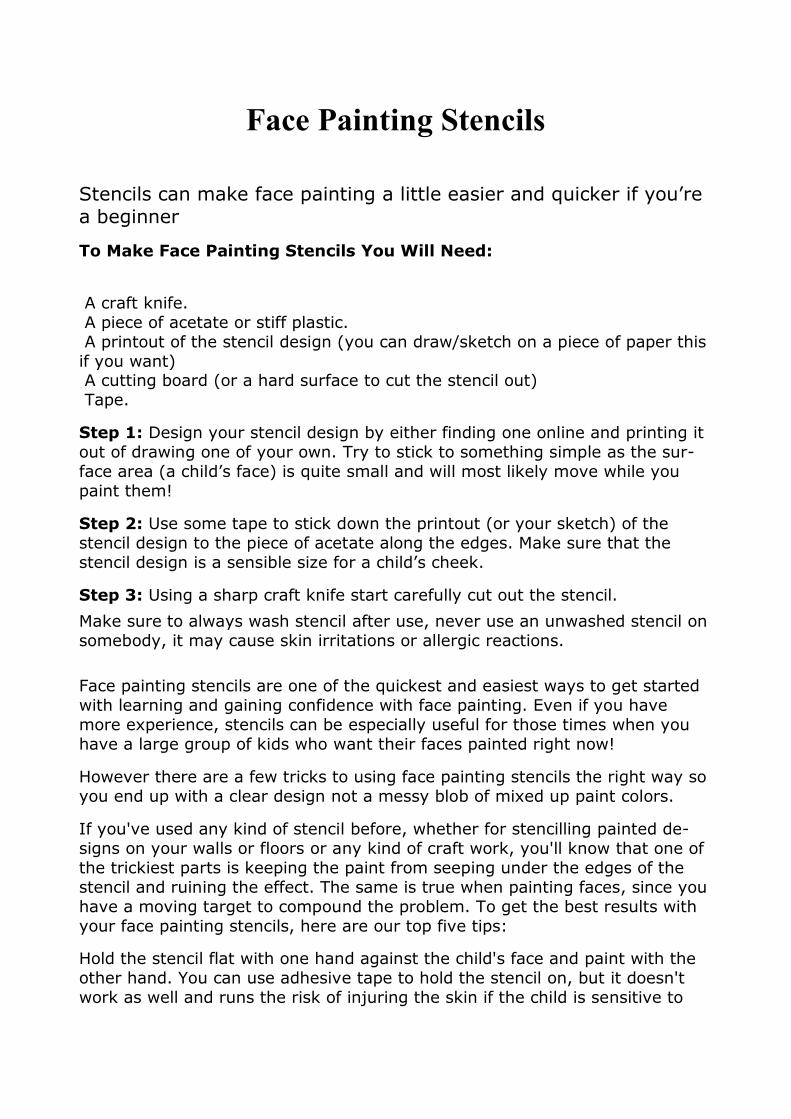
Face Painting Stencils
Stencils can make face painting a little easier and quicker if you’re a beginner
To Make Face Painting Stencils You Will Need:
A craft knife.
A piece of acetate or stiff plastic.
A printout of the stencil design (you can draw/sketch on a piece of paper this
if you want) A cutting board (or a hard surface to cut the stencil out)
Tape.
Step 1: Design your stencil design by either finding one online and printing it
out of drawing one of your own. Try to stick to something simple as the sur-
face area (a child’s face) is quite small and will most likely move while you
paint them!
Step 2: Use some tape to stick down the printout (or your sketch) of the
stencil design to the piece of acetate along the edges. Make sure that the
stencil design is a sensible size for a child’s cheek.
Step 3: Using a sharp craft knife start carefully cut out the stencil.
Make sure to always wash stencil after use, never use an unwashed stencil on
somebody, it may cause skin irritations or allergic reactions.
Face painting stencils are one of the quickest and easiest ways to get started
with learning and gaining confidence with face painting. Even if you have
more experience, stencils can be especially useful for those times when you
have a large group of kids who want their faces painted right now!
However there are a few tricks to using face painting stencils the right way so
you end up with a clear design not a messy blob of mixed up paint colors.
If you've used any kind of stencil before, whether for stencilling painted de-
signs on your walls or floors or any kind of craft work, you'll know that one of
the trickiest parts is keeping the paint from seeping under the edges of the
stencil and ruining the effect. The same is true when painting faces, since you
have a moving target to compound the problem. To get the best results with
your face painting stencils, here are our top five tips:
Hold the stencil flat with one hand against the child's face and paint with the
other hand. You can use adhesive tape to hold the stencil on, but it doesn't
work as well and runs the risk of injuring the skin if the child is sensitive to
the adhesive. If you want to use adhesive tape as well as holding the stencil
flat with your hand, check with the child's parent first and only use the type of
tape suitable for applying bandages, as these are suitable for use on skin.
Apply the paint very thinly using a sponge rather than a brush. Use only a
tiny amount of paint on the sponge at a time or it will ooze under the edges of
the stencil. Alternatively, there are special face painting inks available for use
with stencils, which give more of a tattoo-like effect and can last longer than
face paint, although they are removable at any time.
If your design uses more than one colour, ensure you apply the darkest col-
ours first and then the next darkest, finishing with the lightest colour.
Make sure each colour is dry before applying the next.
Don't move the stencil until you have completely finished!
Have fun and happy face painting!
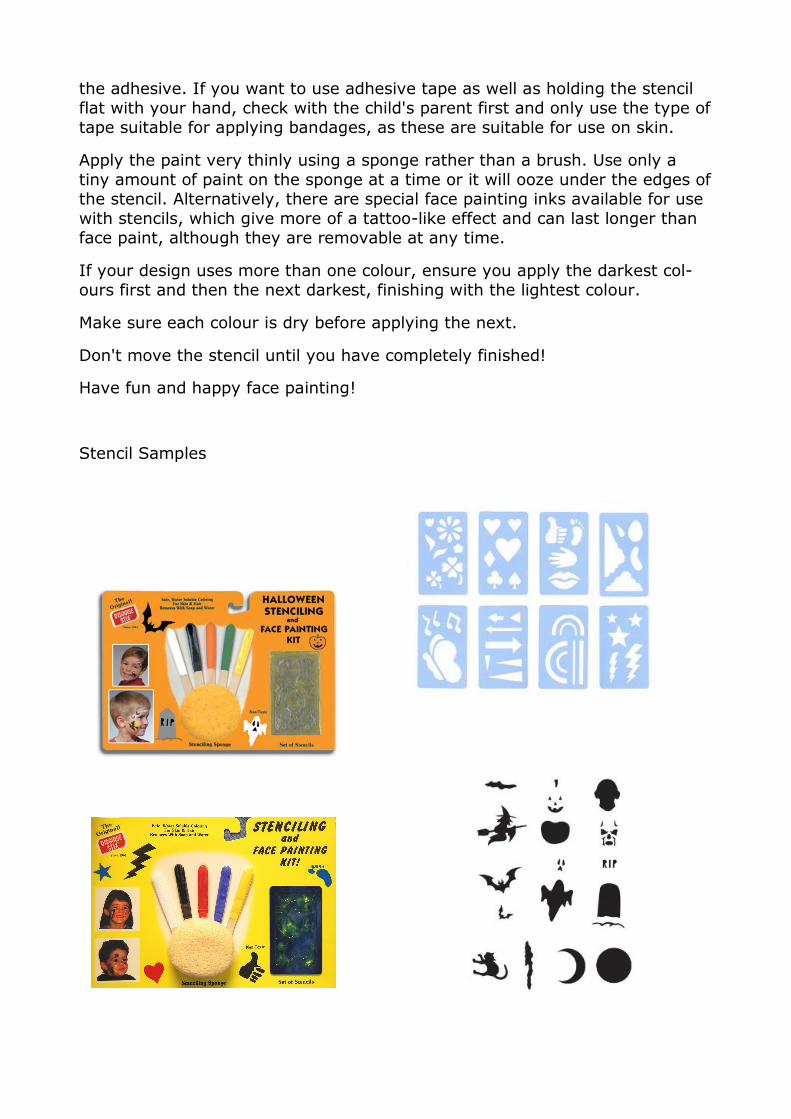
Stencil Samples

Face Painting With Stencil Mask
These masks are easy to use for airbrushing or sponge.
This system was developed so your hands are free to create
a beautiful face in just a few minutes..
Step 1
Place the first layer mask stencil and secure
with cord lock.
Airbrush a base of white and shade in a
lighter shade green, edge with a darker
shade.
Step 2
Airbrush the designs starting at
the top center and working one
side of the face and going to the
other side.
You don’t have to secure the sec-
ond layer for easy placement.
Step 3
Add white accents to finish off
your mask.
Add glitter, maybe a few jewels,
lip colour and your ready to go
party
Contact Party Faces by phone 310-453-9002 or toll free (877) FCE-MASK or
( 877) 323-6275
or email at [email protected] http://www.partyfaces.com/face.htm

Applying Glitter
USING STENCILS
Here are some instructions.
1.Clean the skin with rubbing alcohol.
2. Dry with a paper tower.
3. Remove backing from stencil.
4. Press onto skin.
5. Carefully remove clear transfer from front.
6. Apply glue thinly over the stencil area and let dry.
7. It there are any small pieces of the stencil that can be removed, do so now.
(example would be the eyes and nose on the skull)
8. "Paint" on glitter with a dry, soft brush.
9. Using a large cosmetic brush "punch" the glitter into the glue.
10. Remove stencil!
Tiger
Here's a quick sample
of a little tiger. You
can see from the pic-
ture that you build the
colours one at a time.
HAVE FUN