fabric manager vmware integrator user guide - oracle · fabric manager vmware integrator user guide...
TRANSCRIPT
Fabric Manager VMwareIntegrator User Guide
Release 1.0.0Tel:
Xsigo Systems70 West Plumeria DriveSan Jose, CA 95134 USA
http://www.xsigo.comTel: +1.408.329.5600Part number: 650-30011-01 Rev APublished: January 2013
EMI Statement, United States of America (Class A)
“NOTE: This equipment has been tested and found to comply with the limits for a Class A digital device pursuant to part 15 of the FCC Rules. These limits are designed to provide reasonable protection against harmful interference when the equipment is operated in a commercial environment. This equipment generates, uses, and can radiate radio frequency energy and, if not installed and used in accordance with the instruction manual, may cause harmful interference to radio communications. Operation of this equipment in a residential area is likely to cause harmful interference in which case the user will be required to correct the interference at his own expense.”
EMI Statement, Canada (Class A)
This Class A digital apparatus complies with Canadian ICES-003.
Cet appareil numérique de la classe A est conforme à la norme NMB-003 du Canada.
EMI Statement, Europe and Australia (Class A)
“Warning - This is a Class A product. In a domestic environment this product may cause radio interference in which case the user may be required to take adequate measures.”
EMI Statement, Japan (Class A)
“This is a Class A product based on the standard of the Voluntary Control Council For Interference by Information Technology Equipment (VCCI). If this equipment is used in a domestic environment, radio disturbance may arise. When such trouble occurs, the user may be required to take corrective actions.”
Lithium Battery - Replacement and Disposal
CAUTION!
Danger of explosion if the lithium battery is incorrectly replaced. Replace only with the same or equivalent type recommended by the manufacturer. Dispose of used batteries according to the manufacturer's instructions.
Laser Caution for I/O Cards (CDRH-US)
USE OF CONTROLS OR ADJUSTMENTS OR PERFORMANCE OF PROCEDURES OTHER THAN THOSE SPECIFIED HEREIN MAY RESULT IN HAZARDOUS RADIATION EXPOSURE.
Complies with 21 CFR Chapter 1, Subchapter J, Part 1040.10.
IEC 60825-1: 1993, A1: 1997, A2: 2001; IEC 60825-2: 2000

Replacement Laser Transceiver Modules
For continued compliance with the above laser safety Standards, only approved Class 1 modules from our approved vendors should be installed in the product. Contact Xsigo Customer Support (see Technical Support Contact Information) for approved-vendor contact information.
Power Cord Set Requirements – General
The requirements listed below are applicable to all countries:
The length of the power cord set must be at least 6.00 feet (1.8 m) and a maximum of 9.75 feet (3.0 m).
All power cord sets must be approved by an acceptable accredited agency responsible for evaluation in the country where the power cord set will be used.
The power cord set must have a minimum current capacity of 13A and a nominal voltage rating of 125 or 250 V ac~, as required by each country's power system.
The appliance coupler on the power cord must meet the mechanical configuration of an EN 60320 / IEC 60320 Standard Sheet C20 connector, which is the connector on the Fabric Manager. The C20 connector supports a C19 plug as the mating part on the power cord that connects to the Fabric Manager.
Power Cord Set Requirements – Specifics By Country
United States (UL), Canada (CSA)
The flexible power cord set must be UL Listed and CSA Certified, minimum Type SVT or equivalent, minimum No. 18 AWG, with 3-conductors that includes a ground conductor. The wall plug must be a three-pin grounding type, such as a NEMA Type 5-15P (rated 15A, 120V) or Type 6-15P (rated 15A, 250V).
Europe (Austria (OVE), Belgium (CEBEC), Denmark (DEMKO), Finland (SETI), France (UTE), Germany (VDE), Italy (IMQ), Netherlands (KEMA), Norway (NEMKO), Sweden (SEMKO), Switzerland (SEV), U.K. (BSI/ASTA)
The flexible power cord set must be <HAR> Type H03VV-F, 3-conductor, minimum 0.75mm2 conductor size. Power cord set fittings, particularly the wall plug, must bear the certification mark of the agency responsible for evaluation in the country where it is being used, with examples listed above.
Australia (DFT/SAA)
Cord is as described under “Japan (PSE)” immediately below. Pins in the power plug must be with the sheathed, insulated type, in accordance with AS/NZS 3112:2000.
Japan (PSE)
The appliance coupler, flexible cord, and wall plug must bear a “PSE” Mark in accordance with the Japanese Denan Law.
The flexible cord must be Type VCT or VCTF, 3-conductor, 0.75 mm2 conductor size. The wall plug must be a grounding type with a Japanese Industrial Standard C8303 (15A, 125V) configuration.
Software Compliance – GPL (GPL v2) Licenses and Notices
Xsigo Systems, a wholly owned subsidiary of Oracle, uses certain elements of GNU Public License (GPLv2) code. Under the conditions of the GPL licensing agreement, you are entitled to request a copy of the open source/freeware code. For questions about Xsigo’s use of the GPL code, or to request a copy of the code, you can contact Xsigo by completing the web form at http://pages.xsigo.com/compliance.html. Afterward, Xsigo will contact you to assist you with your request.
Xsigo Systems, eine ganz besessene Tochtergesellschaft von Oracle, gewisse Elemente des GNU Public License (GPLv2) Code. Unter den Bedingungen von der GPL Lizenzvertrag werden Sie berechtigt, eine Kopie der offenen Quelle/Freewarecodes zu erbitten. Für Fragen um den Gebrauch von Xsigo des GPL Codes oder eine Kopie des Codes zu erbitten, können Sie Xsigo durch Vollenden der Gewebesform an http://pages.xsigo.com/compliance.html kontaktieren. Nachher wird Xsigo Sie kontaktieren, Ihnen mit Ihrer Bitte zu helfen.

Xsigo Systens, une filiale entièrement possédée d'Oracle, utilisent de certains éléments de GNU Public License (GPLv2) le code. Sous les conditions du GPL autorise l'accord, vous êtes autorisé à demander une copie du code de code source libre/graticiel. Pour les questions de l'usage de Xsigo du code de GPL, ou demander une copie du code, vous pouvez contacter Xsigo en complétant la forme Web à http://pages.xsigo.com/compliance.html. Après, Xsigo vous contactera pour vous aider avec votre demande.
Copyright © 2013 Oracle and/or its affiliates. All rights reserved.
iPreface
Documentation Purpose and AudienceThe purpose of this document is to describe what you need to get started and use Fabric Manager VMware Integrator. This document is intended for anyone interested in learning how to install, set up, and use Fabric Manager VMware Integrator.
Document OverviewThis guide is divided into the following chapters:
• Chapter 1, “Overview,” which describes how you can use Fabric Manager VMware Integrator to extend your network and storage cloud capabilities to the Hypervisor. This chapter describes how VMware Integrator provides the ability to create multiple paths for your vSphere network traffic and manage that traffic through Fabric Manager.
• Chapter 2, “Installing Fabric Manager VMware Integrator,” which describes how to install VMware Integrator on both Windows and Linux systems and how to add the application to the Fabric Manager GUI.
• Chapter 3, “Adding a vSphere Server to Fabric Manager,” which describes how to add a vSphere host to Fabric Manager and to display the server information once it is added.
• Chapter 4, “Creating and Configuring vSwitches,” which provides step by step instructions for creating distributed virtual switches, port groups, and vNIC uplinks in Fabric Manager
• Chapter 5, “Assigning Physical Resources,” which describes how to assign your vSwitch Template to physical resources and how to apply the vSwitch Template to a vSphere host. It also describes how to display the vSphere host details in Fabric Manager.
• Chapter 6, “Viewing Discovered Information,” which describes how you can view all existing virtual machines across all attached ESX hosts in the Fabric Manager environment as well as in the VMware vSphere Client software.
• Chapter 7, “Working with Domains,” which describes how you can configure a new Fabric Manager Domain to enable non-default users to view specific vSphere instances and ESX servers as part of that Domain.
Oracle Xsigo Fabric Manager Fabric Manager VMware Integrator User Guide
Preface
ii
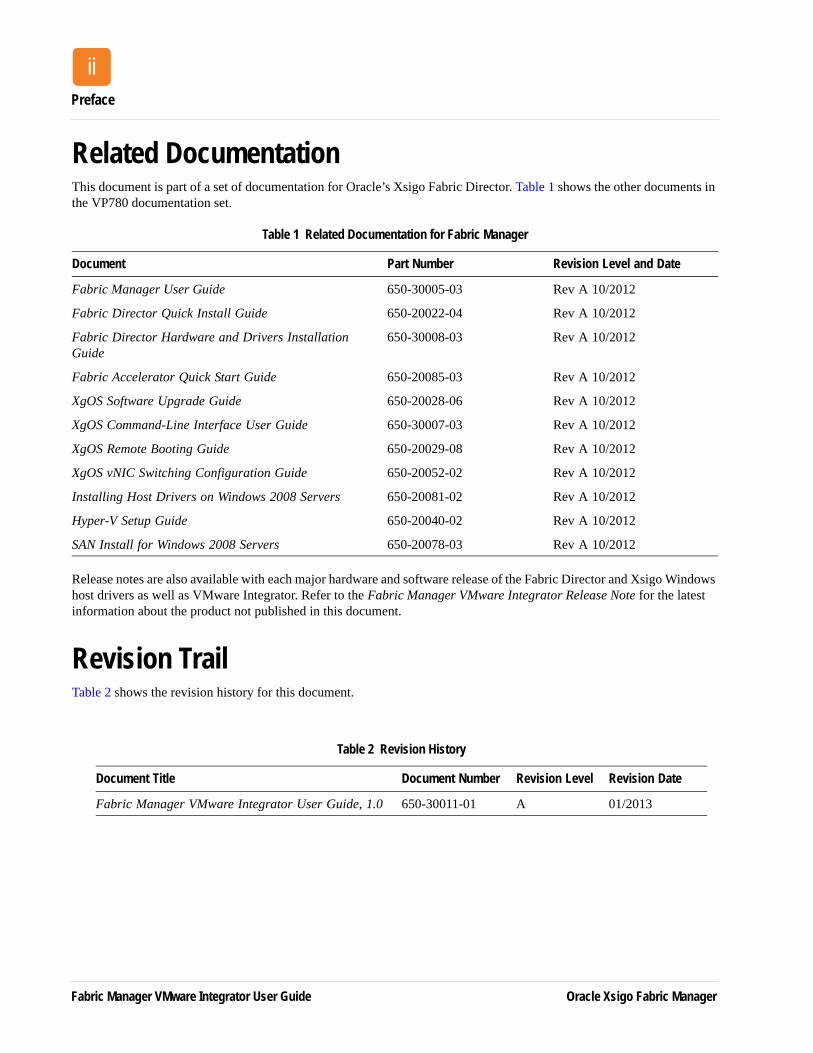
Related DocumentationThis document is part of a set of documentation for Oracle’s Xsigo Fabric Director. Table 1 shows the other documents in the VP780 documentation set.
Release notes are also available with each major hardware and software release of the Fabric Director and Xsigo Windows host drivers as well as VMware Integrator. Refer to the Fabric Manager VMware Integrator Release Note for the latest information about the product not published in this document.
Revision TrailTable 2 shows the revision history for this document.
Table 1 Related Documentation for Fabric Manager
Document Part Number Revision Level and Date
Fabric Manager User Guide 650-30005-03 Rev A 10/2012
Fabric Director Quick Install Guide 650-20022-04 Rev A 10/2012
Fabric Director Hardware and Drivers Installation Guide
650-30008-03 Rev A 10/2012
Fabric Accelerator Quick Start Guide 650-20085-03 Rev A 10/2012
XgOS Software Upgrade Guide 650-20028-06 Rev A 10/2012
XgOS Command-Line Interface User Guide 650-30007-03 Rev A 10/2012
XgOS Remote Booting Guide 650-20029-08 Rev A 10/2012
XgOS vNIC Switching Configuration Guide 650-20052-02 Rev A 10/2012
Installing Host Drivers on Windows 2008 Servers 650-20081-02 Rev A 10/2012
Hyper-V Setup Guide 650-20040-02 Rev A 10/2012
SAN Install for Windows 2008 Servers 650-20078-03 Rev A 10/2012
Table 2 Revision History
Document Title Document Number Revision Level Revision Date
Fabric Manager VMware Integrator User Guide, 1.0 650-30011-01 A 01/2013
Fabric Manager VMware Integrator User Guide Oracle Xsigo Fabric Manager

Syntax Usage
iii
Syntax UsageTable 3 shows the typographical conventions used in this document.
Table 3 Syntax Usage
Syntax Marker Means... Example
bold text, courier font a command help
blank space a delimiter for commands and arguments system show version
- (dash) you are specifying an argument set ethernet-card 1 -type
= (equals sign) you are specifying a parameters for an argument
set ethernet-card 1-type=nwEthernet4Port1GbCard
bold, italics dialog buttons, toolbar buttons, keyboard keys
Press the Edit button
Press Ctrl + Q to quit
blue text a cross reference link http://support.xsigo.com
plain italic text-entry fields on dialogs, menu maps, dropdown menus, and checkboxes
Choose Network Resource Manager->Network Cloud to view...
In the Name field, enter the name you wish to give the Network Cloud
Oracle Xsigo Fabric Manager Fabric Manager VMware Integrator User Guide

Preface
iv
Technical Support Contact InformationXsigo customers may contact support through the Xsigo website, telephone, or e-mail. In order to expedite troubleshooting, submit all new support requests via the Xsigo self-service portal at: http://support.xsigo.com. In addition to opening cases, the Xsigo Support Portal allows you to update your support cases, download software, search for and view knowledge-base articles, and access technical documentation.
In order to access the customer support portal, you need a Xsigo Support Portal login. Your account team will provide you with the necessary login information to access the support portal. If you need additional log in IDs for your staff, contact your account team for assistance.
For all critical (P1) cases, call the Xsigo support center at 866-974-4647 (toll free) or 1 408-736-3013 (international). Alternatively, you can email [email protected]. You will receive a response within 30 minutes.
Fabric Manager VMware Integrator User Guide Oracle Xsigo Fabric Manager
vContents
Chapter 1 Overview . . . . . . . . . . . . . . . . . . . . . . . . . . . . . . . . . . . . . . . . . . . . . . . . . . . . . . . . .1
VMware Integrator Overview . . . . . . . . . . . . . . . . . . . . . . . . . . . . . . . . . . . . . . . . . . . .2About Fabric Manager . . . . . . . . . . . . . . . . . . . . . . . . . . . . . . . . . . . . . . . . . . . . . .2About VMware Integrator . . . . . . . . . . . . . . . . . . . . . . . . . . . . . . . . . . . . . . . . . . . .2
Understanding VMware Integrator . . . . . . . . . . . . . . . . . . . . . . . . . . . . . . . . . . . . . . . .3Navigating the VMware Integrator Main Window . . . . . . . . . . . . . . . . . . . . . . . . . .3Understanding the Window’s Basic Functions . . . . . . . . . . . . . . . . . . . . . . . . . . . .7
Main Features in VMware Integrator . . . . . . . . . . . . . . . . . . . . . . . . . . . . . . . . . . . . . .8Configuring vSwitches . . . . . . . . . . . . . . . . . . . . . . . . . . . . . . . . . . . . . . . . . . . . . .8Applying vSwitches to vSphere/ESX Hosts . . . . . . . . . . . . . . . . . . . . . . . . . . . . . .9Viewing vSphere Hosts in the Fabric Manager Topology Page. . . . . . . . . . . . . . .10
Chapter 2 Installing Fabric Manager VMware Integrator . . . . . . . . . . . . . . . . . . . . .11
Document Assumptions . . . . . . . . . . . . . . . . . . . . . . . . . . . . . . . . . . . . . . . . . . . . . . . .12VMware Integrator Requirements. . . . . . . . . . . . . . . . . . . . . . . . . . . . . . . . . . . . . . . . .12Obtaining VMware Integrator Plug-In . . . . . . . . . . . . . . . . . . . . . . . . . . . . . . . . . . . . . .13Installing VMware Integrator on a Windows System . . . . . . . . . . . . . . . . . . . . . . . . . .14Installing VMware Integrator on a Linux System . . . . . . . . . . . . . . . . . . . . . . . . . . . . .19Configuring VMware Integrator. . . . . . . . . . . . . . . . . . . . . . . . . . . . . . . . . . . . . . . . . . .19
Chapter 3 Adding a vSphere Server to Fabric Manager . . . . . . . . . . . . . . . . . . . . . .23
Adding a vSphere Server to Fabric Manager . . . . . . . . . . . . . . . . . . . . . . . . . . . . . . . .24Displaying vSphere Server Information . . . . . . . . . . . . . . . . . . . . . . . . . . . . . . . . . . . .27
Chapter 4 Creating and Configuring vSwitches . . . . . . . . . . . . . . . . . . . . . . . . . . . . .31
Working with vSwitches in the I/O Template Editor . . . . . . . . . . . . . . . . . . . . . . . . . . .32Creating the I/O Template . . . . . . . . . . . . . . . . . . . . . . . . . . . . . . . . . . . . . . . . . . .32Creating the Network I/O Clouds . . . . . . . . . . . . . . . . . . . . . . . . . . . . . . . . . . . . . .34Creating a Distributed vSwitch . . . . . . . . . . . . . . . . . . . . . . . . . . . . . . . . . . . . . . . .37Adding and Configuring HA vNICs for the vSwitch . . . . . . . . . . . . . . . . . . . . . . . .42
Adding Another vSwitch to the Template . . . . . . . . . . . . . . . . . . . . . . . . . . . . . . . . . . .46Creating a New HA vNIC for the vSwitch. . . . . . . . . . . . . . . . . . . . . . . . . . . . . . . .46Creating the New vSwitch . . . . . . . . . . . . . . . . . . . . . . . . . . . . . . . . . . . . . . . . . . .49Creating a Port Group on the vSwitch . . . . . . . . . . . . . . . . . . . . . . . . . . . . . . . . . .51Displaying the New vSwitch in the I/O Template Editor . . . . . . . . . . . . . . . . . . . . .54
Working with vSphere Port Groups . . . . . . . . . . . . . . . . . . . . . . . . . . . . . . . . . . . . . . .55Understanding Port Groups . . . . . . . . . . . . . . . . . . . . . . . . . . . . . . . . . . . . . . . . . .55Viewing and Adding Port Groups to a vSwitch. . . . . . . . . . . . . . . . . . . . . . . . . . . .55Adding a Port Group . . . . . . . . . . . . . . . . . . . . . . . . . . . . . . . . . . . . . . . . . . . . . . .57Changing vSphere Port Groups . . . . . . . . . . . . . . . . . . . . . . . . . . . . . . . . . . . . . . .59Removing vSphere Port Groups . . . . . . . . . . . . . . . . . . . . . . . . . . . . . . . . . . . . . .61
Working with vNIC Uplinks . . . . . . . . . . . . . . . . . . . . . . . . . . . . . . . . . . . . . . . . . . . . . .62Viewing a vNIC Uplink . . . . . . . . . . . . . . . . . . . . . . . . . . . . . . . . . . . . . . . . . . . . . .62Adding a New vNIC Uplink. . . . . . . . . . . . . . . . . . . . . . . . . . . . . . . . . . . . . . . . . . .64Deleting a vNIC Uplink . . . . . . . . . . . . . . . . . . . . . . . . . . . . . . . . . . . . . . . . . . . . . .68
Oracle Xsigo Fabric Manager Fabric Manager VMware Integrator User Guide
viContents
Chapter 5 Assigning Physical Resources . . . . . . . . . . . . . . . . . . . . . . . . . . . . . . . . . . .69
Assigning the Template to Physical Resources . . . . . . . . . . . . . . . . . . . . . . . . . . . . . .70Providing Physical Resources to the vSwitch Template . . . . . . . . . . . . . . . . . . . . . . .73Applying the vSwitch Template to the Host . . . . . . . . . . . . . . . . . . . . . . . . . . . . . . . . .78Displaying vSphere Host Details . . . . . . . . . . . . . . . . . . . . . . . . . . . . . . . . . . . . . . . . .80Viewing the vSwitch vNICs on the Physical Server . . . . . . . . . . . . . . . . . . . . . . . . . . .82
Chapter 6 Viewing Discovered Information . . . . . . . . . . . . . . . . . . . . . . . . . . . . . . . . .85
Viewing all Virtual Machines Visible on the Xsigo-Attached Hosts . . . . . . . . . . . . . . .86Viewing the Virtual Machines Connected in the vSphere Console . . . . . . . . . . . . . . .90
Adding a Virtual Machine to the Port Group. . . . . . . . . . . . . . . . . . . . . . . . . . . . . .92
Chapter 7 Working with Domains . . . . . . . . . . . . . . . . . . . . . . . . . . . . . . . . . . . . . . . . . . .99
Understanding Domains for vSphere Instances. . . . . . . . . . . . . . . . . . . . . . . . . . . . . .100Adding a vSphere Instance to a Domain for Default Users . . . . . . . . . . . . . . . . . .100Adding an ESX Server to the New Domain . . . . . . . . . . . . . . . . . . . . . . . . . . . . . .104
Allowing Non-Default Users Access to Domain Resources . . . . . . . . . . . . . . . . . . . . .108Creating the Security Role for the Domain. . . . . . . . . . . . . . . . . . . . . . . . . . . . . . .108Viewing the Domain as the New User . . . . . . . . . . . . . . . . . . . . . . . . . . . . . . . . . .110
Chapter 8 Glossary . . . . . . . . . . . . . . . . . . . . . . . . . . . . . . . . . . . . . . . . . . . . . . . . . . . . . . . . .115
Fabric Manager VMware Integrator User Guide Oracle Xsigo Fabric Manager
1
OverviewThis chapter provides an overview about the VMware Integrator plug in and how it interacts with Fabric Manager and the ESX management tools to allow for easy configuration and management of your VMware deployment. This chapter includes the following sections:
• VMware Integrator Overview
• Understanding VMware Integrator
• Main Features in VMware Integrator
Oracle Xsigo Fabric Manager Fabric Manager VMware Integrator User Guide
Chapter 1: Overview
2
VMware Integrator OverviewVMware Integrator is a plug-in application for the Fabric Manager, a multi-director management system created by Oracle’s Xsigo Systems to inventory and manage Fabric Directors, Xsigo virtual I/O, and now, with the addition of VMware Integrator, VMware ESX Hypervisors. You can now configure virtual switches as part of a Fabric Manager I/O Template and push that configuration to the host in the same way that you configure network and storage.
About Fabric ManagerFabric Manager is a browser-based management system that runs on a remote server. The remote Fabric Manager server translates configuration and management tasks from the Fabric Manager web interface, and relays that information to the Fabric Directors that are managed by Fabric Manager.
Fabric Manager can:
• run as a stand-alone application
• be accessed as an extension to VMware Virtual Center
The Fabric Manager configuration and management capabilities are the same regardless of whether Fabric Manager is running in stand-alone mode or as an extension to VMware. For more information about Fabric Manager, see the Fabric Manager User Guide.
About VMware IntegratorVMware Integrator is a plug-in application for Fabric Manager that extends its Network and Storage Cloud capabilities to the Hypervisor. VMware Integrator allows you to map Network Clouds to Hypervisor resources, including:
• Console Distributed vSwitch (dvSwitch)
• iSCSI soft initiator distributed vSwitches
• vMotion distributed vSwitches
• FT distributed vSwitches
• Standard virtual machine distributed vSwitches
VMware Integrator provides the ability to create multiple paths for your vSphere network traffic and manage that traffic through Fabric Manager. By creating virtual switches (vSwitches) along with vNICs and vHBAs, and controlling how that network traffic flows through these resources, there is no need for expanding the HBA port count or increasing the physical NICs until the bandwidth requires it.
You can create I/O Templates that define network traffic for your virtual machines. For example, you can dedicate one network path for kernel traffic such as vMotion, another for console traffic, and third for standard VM traffic. You no longer need to manually configure distributed vSwitches in vSphere before adding the Ethernet Adapter device to a virtual machine. Instead, you provide the vSwitch and port group information in a Fabric Manager I/O Template on the I/O Template page so that the distributed switch is automatically added to the ESX host. Using Fabric Manager, you can push all the vNICs to the ESX hosts and connect the vSwitches to the correct uplinks. Once you create a vSwitch and assign vNIC resources to the switch, that switch advertises its switching capabilities through port groups. VMware can then push traffic through those port groups.
Fabric Manager “discovers” your ESX vSphere environment and displays the details in Fabric Manager's Topology View as well as in the Physical Server and I/O Template pages.
Fabric Manager VMware Integrator User Guide Oracle Xsigo Fabric Manager
Understanding VMware Integrator
3
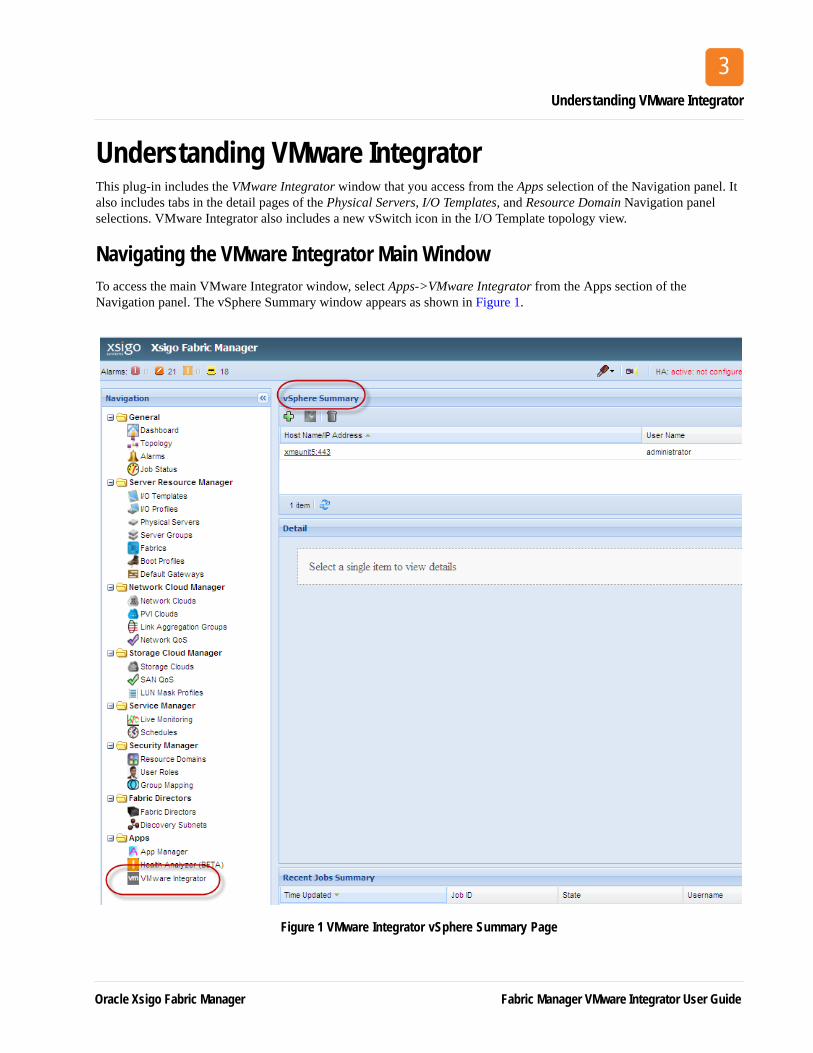
Understanding VMware IntegratorThis plug-in includes the VMware Integrator window that you access from the Apps selection of the Navigation panel. It also includes tabs in the detail pages of the Physical Servers, I/O Templates, and Resource Domain Navigation panel selections. VMware Integrator also includes a new vSwitch icon in the I/O Template topology view.
Navigating the VMware Integrator Main WindowTo access the main VMware Integrator window, select Apps->VMware Integrator from the Apps section of the Navigation panel. The vSphere Summary window appears as shown in Figure 1.
Figure 1 VMware Integrator vSphere Summary Page
Oracle Xsigo Fabric Manager Fabric Manager VMware Integrator User Guide

Chapter 1: Overview
4
Click in the line of one of the ESX hosts in the vSphere Summary window to display general information in the vSphere panel below it, as shown in Figure 2.
Figure 2 Displaying General Information
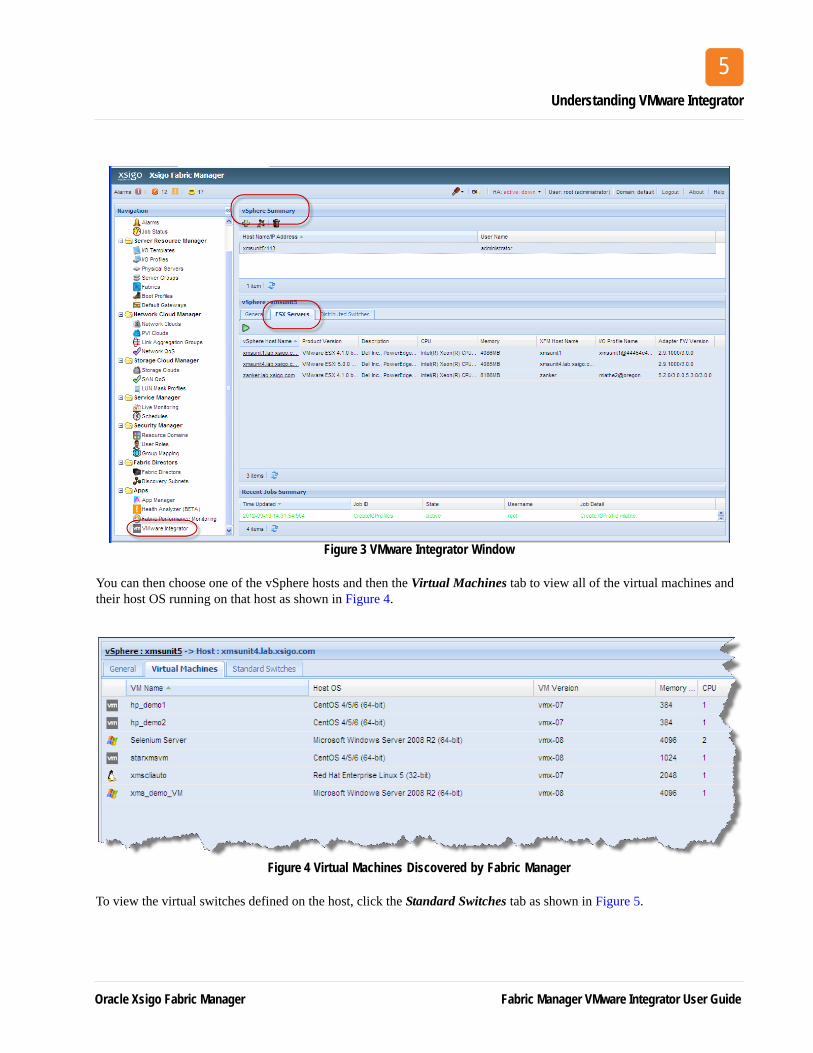
Click on the ESX Servers tab to display a list of vSphere hosts being managed by Fabric Manager shown in Figure 3.
Fabric Manager VMware Integrator User Guide Oracle Xsigo Fabric Manager
Understanding VMware Integrator
5
Figure 3 VMware Integrator Window
You can then choose one of the vSphere hosts and then the Virtual Machines tab to view all of the virtual machines and their host OS running on that host as shown in Figure 4.
Figure 4 Virtual Machines Discovered by Fabric Manager
To view the virtual switches defined on the host, click the Standard Switches tab as shown in Figure 5.
Oracle Xsigo Fabric Manager Fabric Manager VMware Integrator User Guide

Chapter 1: Overview
6
Figure 5 Viewing Virtual Switches
Fabric Manager VMware Integrator User Guide Oracle Xsigo Fabric Manager
Understanding VMware Integrator
7
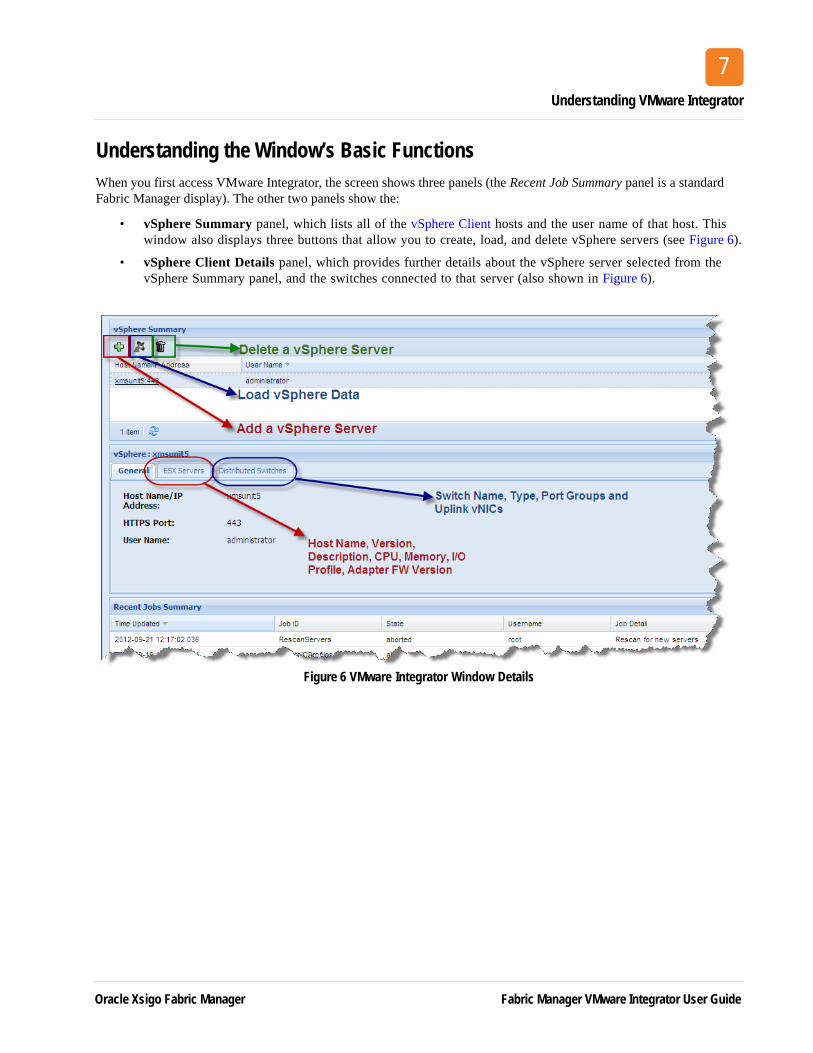
Understanding the Window’s Basic FunctionsWhen you first access VMware Integrator, the screen shows three panels (the Recent Job Summary panel is a standard Fabric Manager display). The other two panels show the:
• vSphere Summary panel, which lists all of the vSphere Client hosts and the user name of that host. This window also displays three buttons that allow you to create, load, and delete vSphere servers (see Figure 6).
• vSphere Client Details panel, which provides further details about the vSphere server selected from the vSphere Summary panel, and the switches connected to that server (also shown in Figure 6).
Figure 6 VMware Integrator Window Details
Oracle Xsigo Fabric Manager Fabric Manager VMware Integrator User Guide

Chapter 1: Overview
8
Main Features in VMware IntegratorWith virtual networking, you can network virtual machines in the same way that you do physical machines and can build complex networks within a single ESX Server host or across multiple ESX Server hosts for production deployments or development and testing purposes.
Virtual switches allow virtual machines on the same ESX Server host to communicate with each other using the same protocols that would be used over physical switches, without the need for additional networking hardware. ESX Server virtual switches also support VLANs that are compatible with standard VLAN implementations from other vendors.
With VMware Integrator, you can configure one or more Fabric Manager vNICs to automatically connect as uplinks to a new or existing Distributed vSwitch. That makes it possible to quickly configure virtual machines to send traffic over the Fabric Director. Without this plugin you would need to manually create the Distributed vSwitches and manually configure the uplinks. This can be especially onerous if you segregate your traffic at the per-vnic level, for example, one HA vNIC for management, another for production traffic, and another for vMotion.
Configuring vSwitchesYou can configure a vSwitch through Fabric Manager’s I/O Template editor, by adding a distributed vSwitch, specifying its I/O resources through vNICs, and then connecting the vNIC (either HA or standard) to the I/O Cloud as shown in Figure 7.
Figure 7 vSwitch Topology View
Fabric Manager VMware Integrator User Guide Oracle Xsigo Fabric Manager
Main Features in VMware Integrator
9
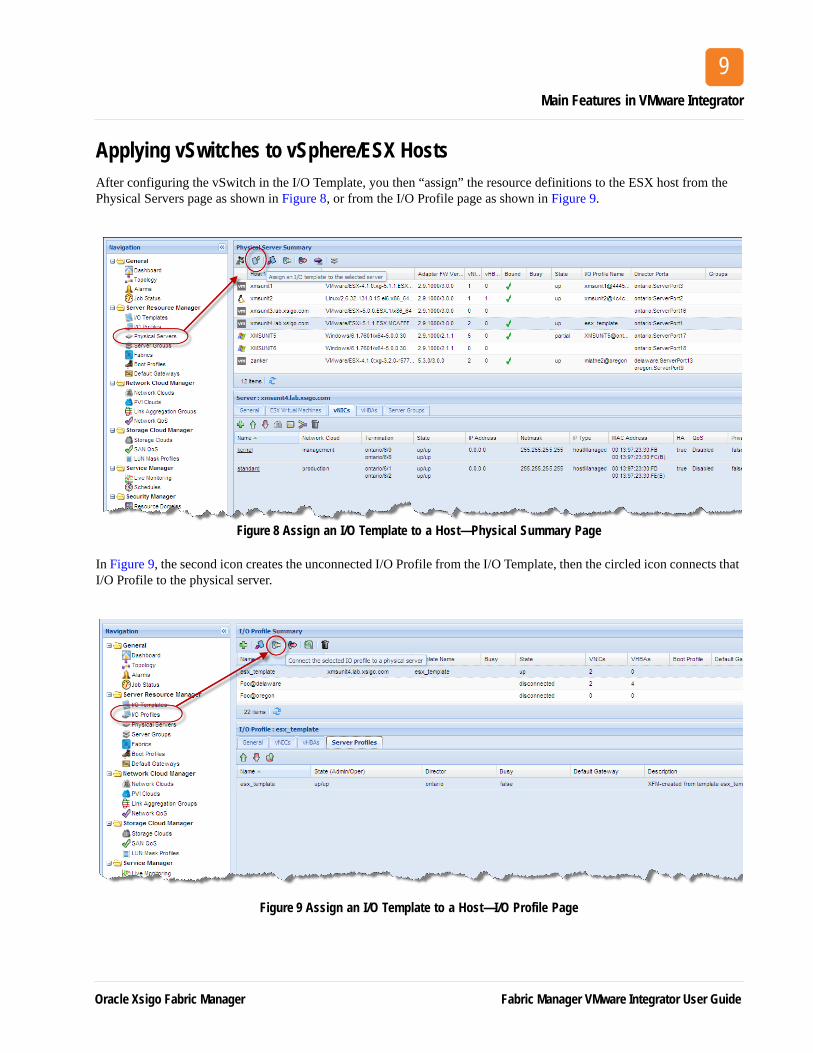
Applying vSwitches to vSphere/ESX HostsAfter configuring the vSwitch in the I/O Template, you then “assign” the resource definitions to the ESX host from the Physical Servers page as shown in Figure 8, or from the I/O Profile page as shown in Figure 9.
Figure 8 Assign an I/O Template to a Host—Physical Summary Page
In Figure 9, the second icon creates the unconnected I/O Profile from the I/O Template, then the circled icon connects that I/O Profile to the physical server.
Figure 9 Assign an I/O Template to a Host—I/O Profile Page
Oracle Xsigo Fabric Manager Fabric Manager VMware Integrator User Guide
Chapter 1: Overview
10
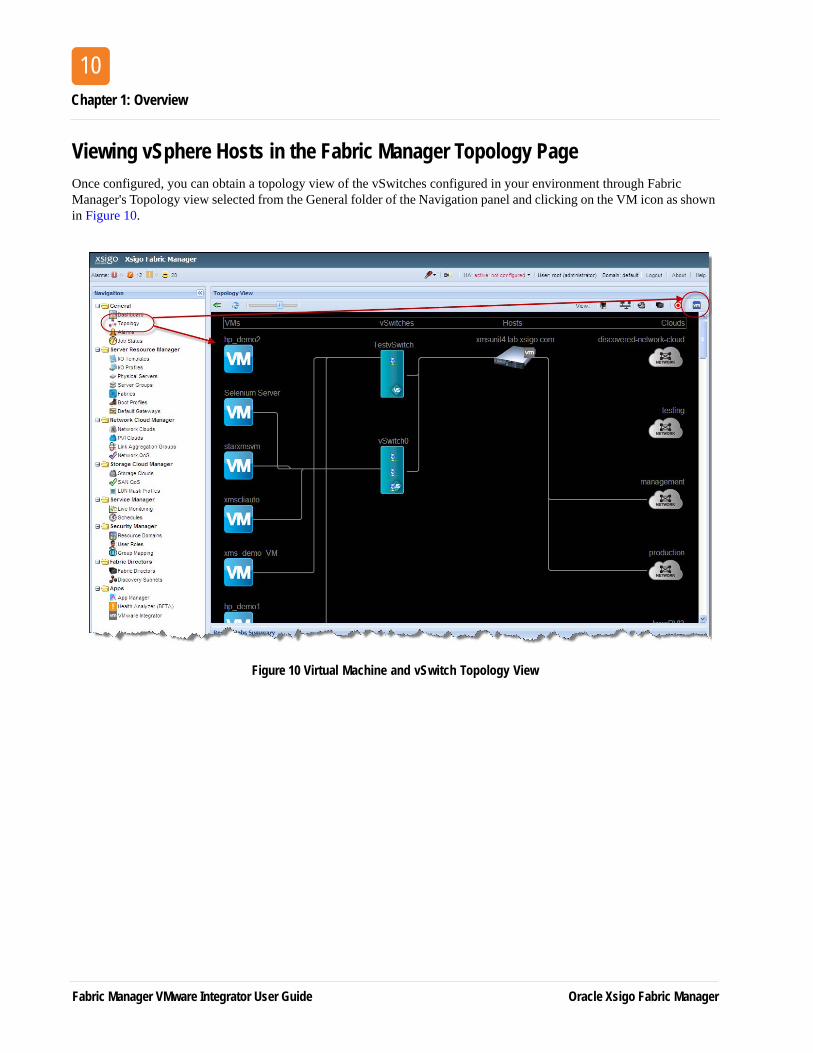
Viewing vSphere Hosts in the Fabric Manager Topology Page Once configured, you can obtain a topology view of the vSwitches configured in your environment through Fabric Manager's Topology view selected from the General folder of the Navigation panel and clicking on the VM icon as shown in Figure 10.
Figure 10 Virtual Machine and vSwitch Topology View
Fabric Manager VMware Integrator User Guide Oracle Xsigo Fabric Manager
O
1
1Installing Fabric Manager VMware IntegratorThis chapter provides instructions for installing VMware Integrator on both Windows and Linux Fabric Manager Servers. To install VMware Integrator, you need to ensure that you already have Fabric Manager installed in your environment, your environment meets the requirements for the plug-in, and you have the admin system authentication privileges required for the installation.
This chapter and includes the following sections:
• Document Assumptions
• VMware Integrator Requirements
• Obtaining VMware Integrator Plug-In
• Installing VMware Integrator on a Windows System
• Installing VMware Integrator on a Linux System
• Configuring VMware Integrator
racle Xsigo Fabric Manager Fabric Manager VMware Integrator User Guide
Chapter 2: Installing Fabric Manager VMware Integrator
12
Document AssumptionsThis document assumes that the core Fabric Manager product is already installed in your environment, and Xsigo virtual I/O is already connected and running traffic and vSphere is installed and running with the required hardware in place. The purpose of this document is to provide information about installing and using VMware Integrator and the related functions that benefit from this application. The remaining chapters in this document describe all work flows such as creating I/O Templates that include vSwitches and connecting them to the application resources as well as how vSphere information is captured by Fabric Manager and displays that information in the management tool. For all other work flows (such as discovering Fabric Directors and creating I/O Templates, I/O Profiles, and related domain information), refer to the Fabric Manager User's Guide.
VMware Integrator RequirementsIn order to install and use VMware Integrator, you need the following:
• Fabric Manager version 4.1.0 or higher installed in your environment
• The Fabric Manager VMware Integrator application package
• For Linux, Red Hat Enterprise Linux 5.4 or higher (update 0) installed
• For Windows, this plug-in is supported on all systems supported by Fabric Manager
• Browser (these are the same browser requirements as those published for Fabric Manager)
— Mozilla® Firefox 2.0 and higher
— Microsoft® Internet Explorer 7.0 and later, with all cumulative security updates. Any version of Internet Explorer less than 7.0 is not supported.
— Apple Safari 5
— Google Chrome 8
• Display—1280 x 1024 resolution, 16-bit medium color mode
• JavaScript with cookies enabled
• VMware Integrator fully supports vSphere 4.1 and vSphere 5 and partially supports vSphere 5.1. With vSphere 5.1 you will need to explicitly discover the new data by clicking on the satellite dish. Also, the MAC Based QoS ACL will not be automatically created when a VM vNIC is created since this relies on the discovery system.
Note
See the Requirements section of the Fabric Manager User Guide for more details about Windows and Linux requirements.
Note
For some clients running Internet Explorer 7.0, a browser pop-up sometimes recurrently displays. For information about controlling the pop-up, see Appendix B in the Fabric Manager User Guide.
Fabric Manager VMware Integrator User Guide Oracle Xsigo Fabric Manager
Obtaining VMware Integrator Plug-In
13
Obtaining VMware Integrator Plug-InYou can download the Fabric Manager VMware Integrator software from the Xsigo Technical Support portal. To download the application, access the Xsigo support site using a user name and password. To request a user name and password for the Xsigo Support Portal, contact Xsigo Technical Assistance through any of the methods documented in the section entitled Technical Support Contact Information in the Preface of this manual.
To obtain VMware Integrator:
Step 1 Log in to the support portal (http://support.xsigo.com/support/) with a user name and password.
Step 2 From the tabs at the top of the page, select SOFTWARE->CURRENT RELEASE.
Step 3 Download the “xsigo-xms-vmwareintegrator-1.x.x_VSXX.tar” file.
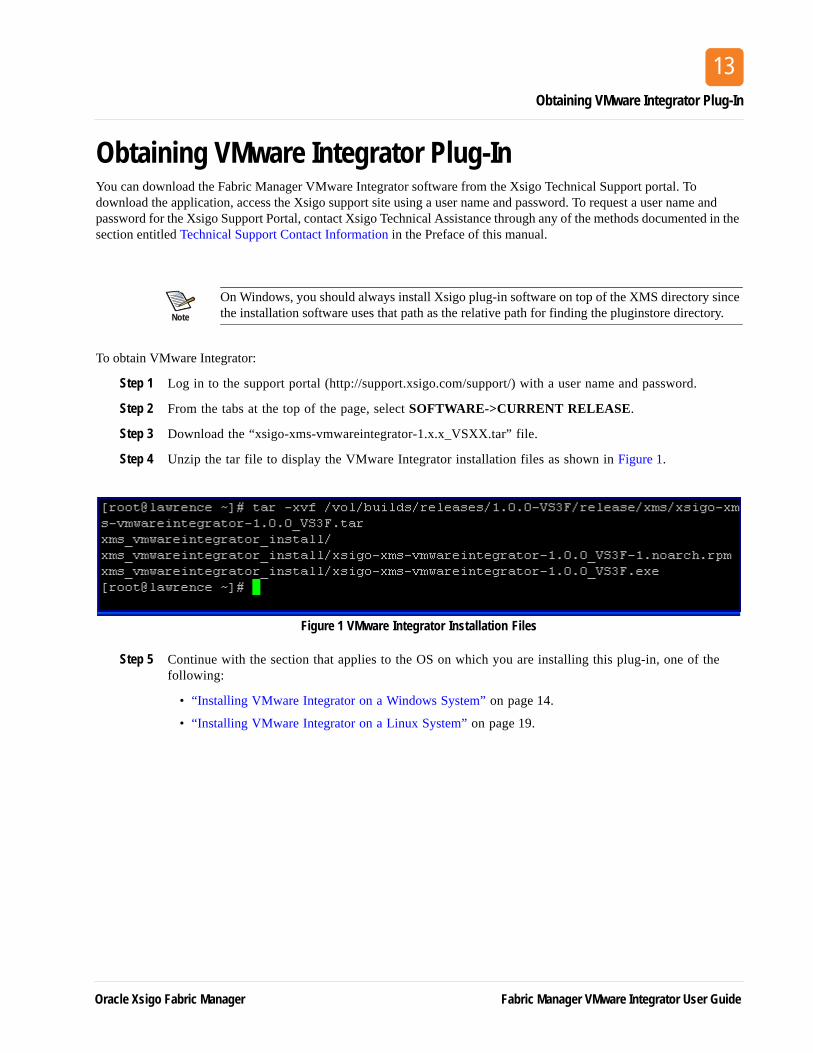
Step 4 Unzip the tar file to display the VMware Integrator installation files as shown in Figure 1.
Figure 1 VMware Integrator Installation Files
Step 5 Continue with the section that applies to the OS on which you are installing this plug-in, one of the following:
• “Installing VMware Integrator on a Windows System” on page 14.
• “Installing VMware Integrator on a Linux System” on page 19.
Note
On Windows, you should always install Xsigo plug-in software on top of the XMS directory since the installation software uses that path as the relative path for finding the pluginstore directory.
Oracle Xsigo Fabric Manager Fabric Manager VMware Integrator User Guide
Chapter 2: Installing Fabric Manager VMware Integrator
14
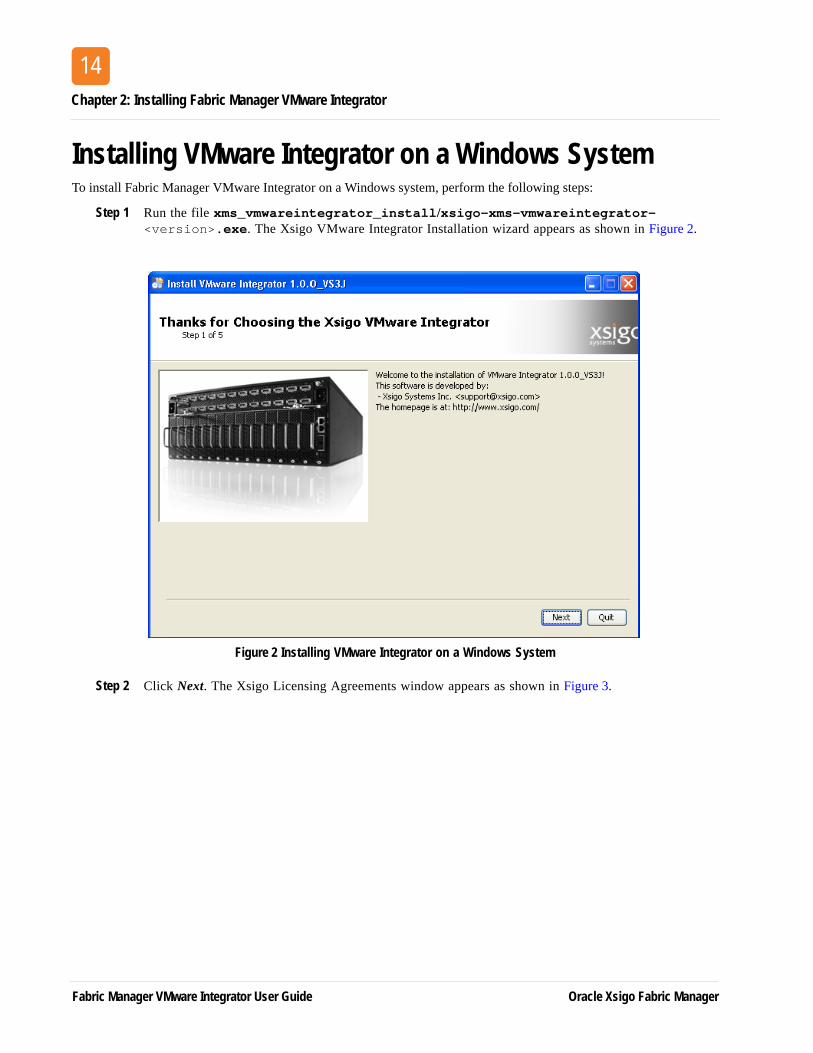
Installing VMware Integrator on a Windows SystemTo install Fabric Manager VMware Integrator on a Windows system, perform the following steps:
Step 1 Run the file xms_vmwareintegrator_install/xsigo-xms-vmwareintegrator-<version>.exe. The Xsigo VMware Integrator Installation wizard appears as shown in Figure 2.
Figure 2 Installing VMware Integrator on a Windows System
Step 2 Click Next. The Xsigo Licensing Agreements window appears as shown in Figure 3.
Fabric Manager VMware Integrator User Guide Oracle Xsigo Fabric Manager

Installing VMware Integrator on a Windows System
15
Figure 3 Accepting the License Agreement
Step 3 Read the License Agreement and click on the radio button to accept the agreements as circle above, and click Next. The Installation Path dialog box appears as shown in Figure 4.
Oracle Xsigo Fabric Manager Fabric Manager VMware Integrator User Guide
Chapter 2: Installing Fabric Manager VMware Integrator
16
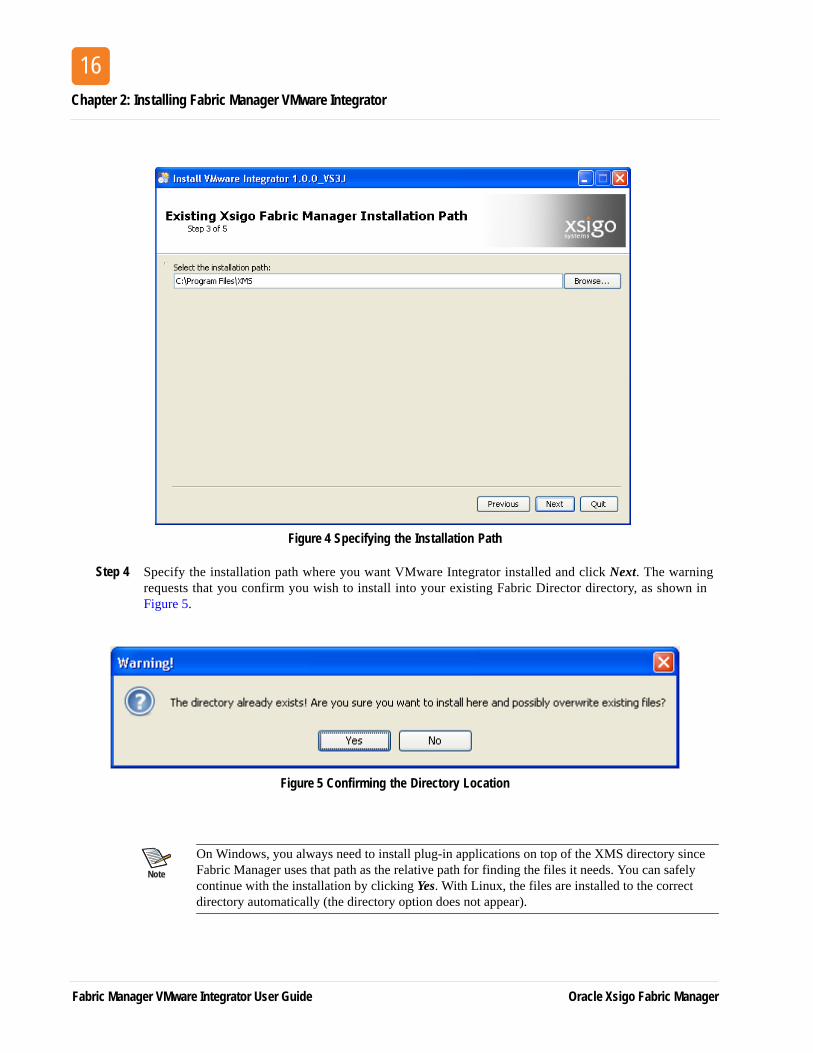
Figure 4 Specifying the Installation Path
Step 4 Specify the installation path where you want VMware Integrator installed and click Next. The warning requests that you confirm you wish to install into your existing Fabric Director directory, as shown in Figure 5.
Figure 5 Confirming the Directory Location
Note
On Windows, you always need to install plug-in applications on top of the XMS directory since Fabric Manager uses that path as the relative path for finding the files it needs. You can safely continue with the installation by clicking Yes. With Linux, the files are installed to the correct directory automatically (the directory option does not appear).
Fabric Manager VMware Integrator User Guide Oracle Xsigo Fabric Manager
Installing VMware Integrator on a Windows System
17
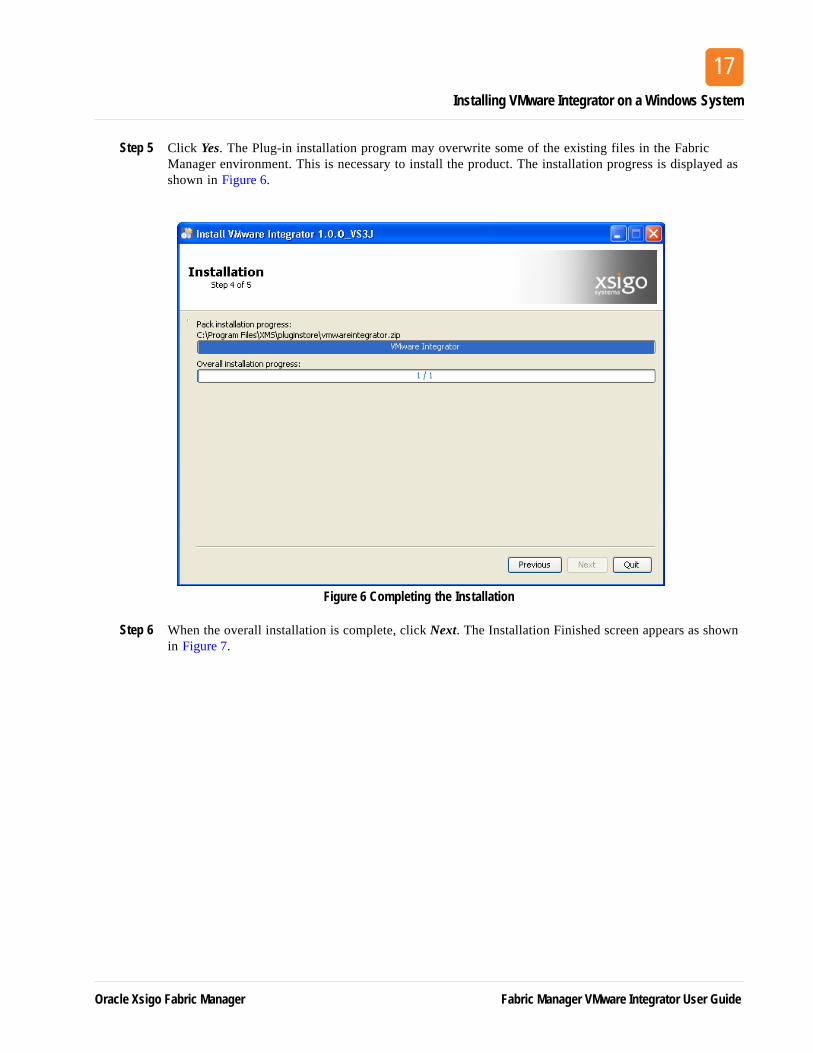
Step 5 Click Yes. The Plug-in installation program may overwrite some of the existing files in the Fabric Manager environment. This is necessary to install the product. The installation progress is displayed as shown in Figure 6.
Figure 6 Completing the Installation
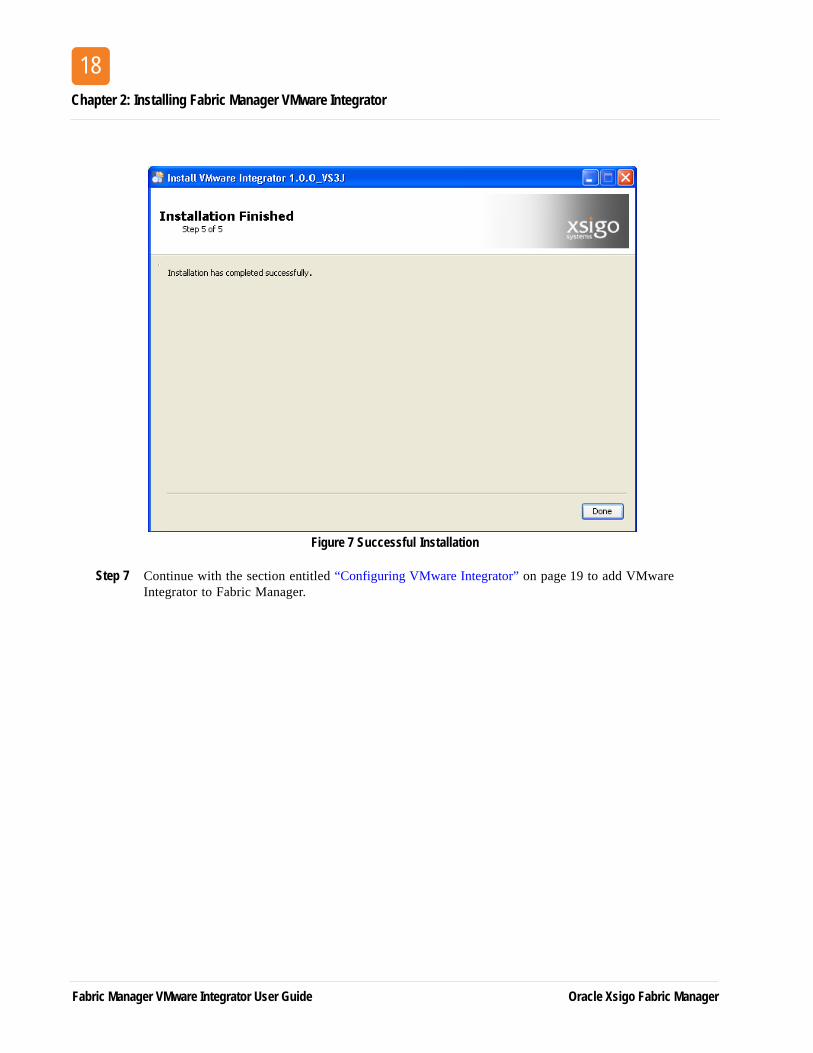
Step 6 When the overall installation is complete, click Next. The Installation Finished screen appears as shown in Figure 7.
Oracle Xsigo Fabric Manager Fabric Manager VMware Integrator User Guide
Chapter 2: Installing Fabric Manager VMware Integrator
18
Figure 7 Successful Installation
Step 7 Continue with the section entitled “Configuring VMware Integrator” on page 19 to add VMware Integrator to Fabric Manager.
Fabric Manager VMware Integrator User Guide Oracle Xsigo Fabric Manager
Installing VMware Integrator on a Linux System
19
Installing VMware Integrator on a Linux SystemTo install VMware Integrator on a Linux system, issue the command rpm -ivh xms_vmwareintegrator_install/xsigo-xms-vmwareintegrator-<version>.noarch.rpm.The software installs on your system. Continue with the next section to configure the software for Fabric Manager.
Configuring VMware Integrator To configure VMware Integrator, perform the following steps:
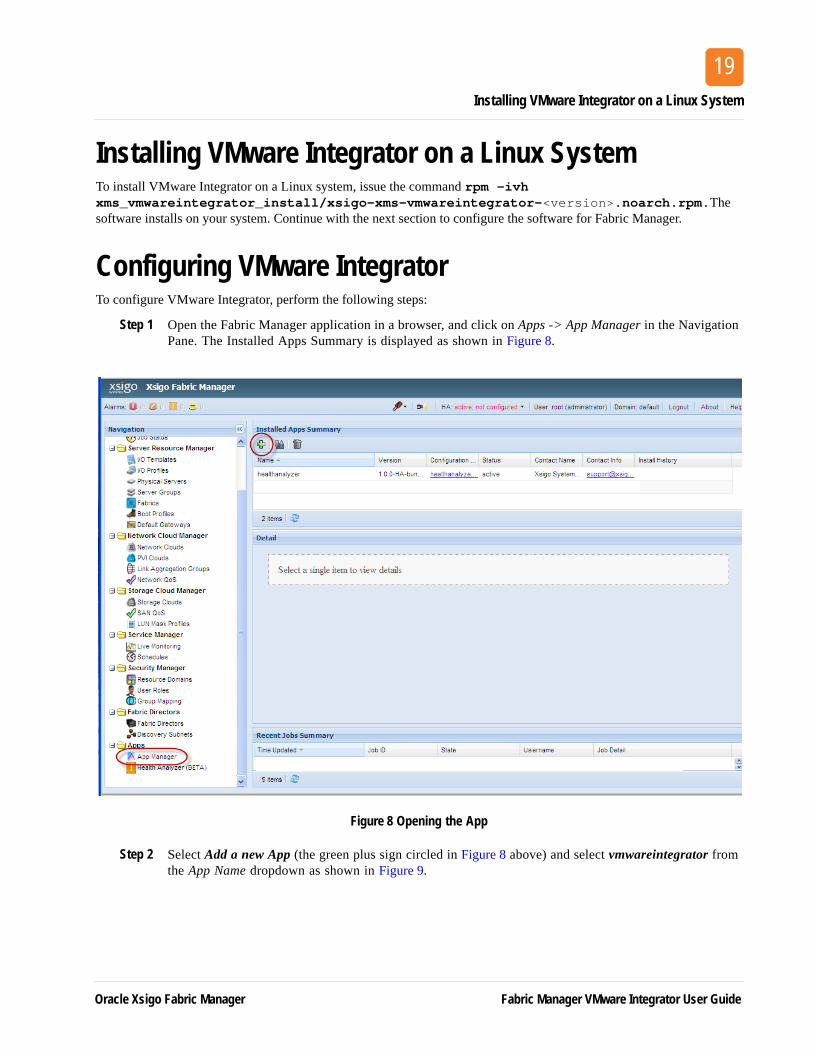
Step 1 Open the Fabric Manager application in a browser, and click on Apps -> App Manager in the Navigation Pane. The Installed Apps Summary is displayed as shown in Figure 8.
Figure 8 Opening the App
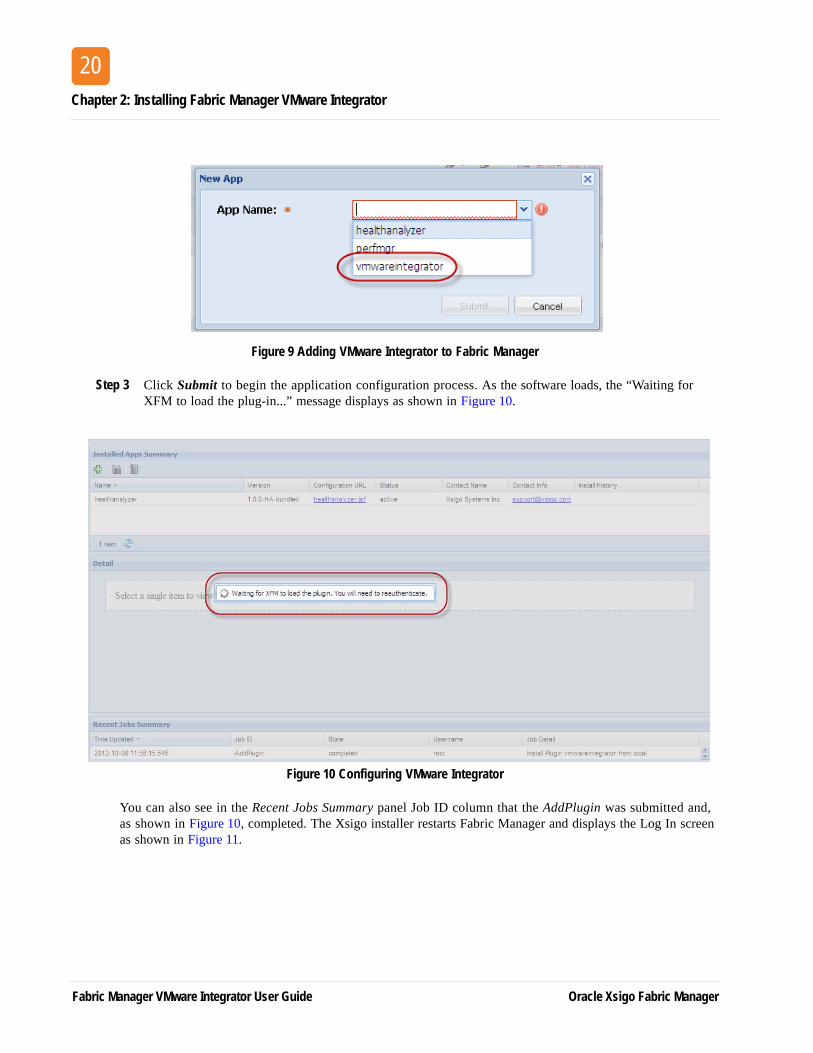
Step 2 Select Add a new App (the green plus sign circled in Figure 8 above) and select vmwareintegrator from the App Name dropdown as shown in Figure 9.
Oracle Xsigo Fabric Manager Fabric Manager VMware Integrator User Guide
Chapter 2: Installing Fabric Manager VMware Integrator
20
Figure 9 Adding VMware Integrator to Fabric Manager
Step 3 Click Submit to begin the application configuration process. As the software loads, the “Waiting for XFM to load the plug-in...” message displays as shown in Figure 10.
Figure 10 Configuring VMware Integrator
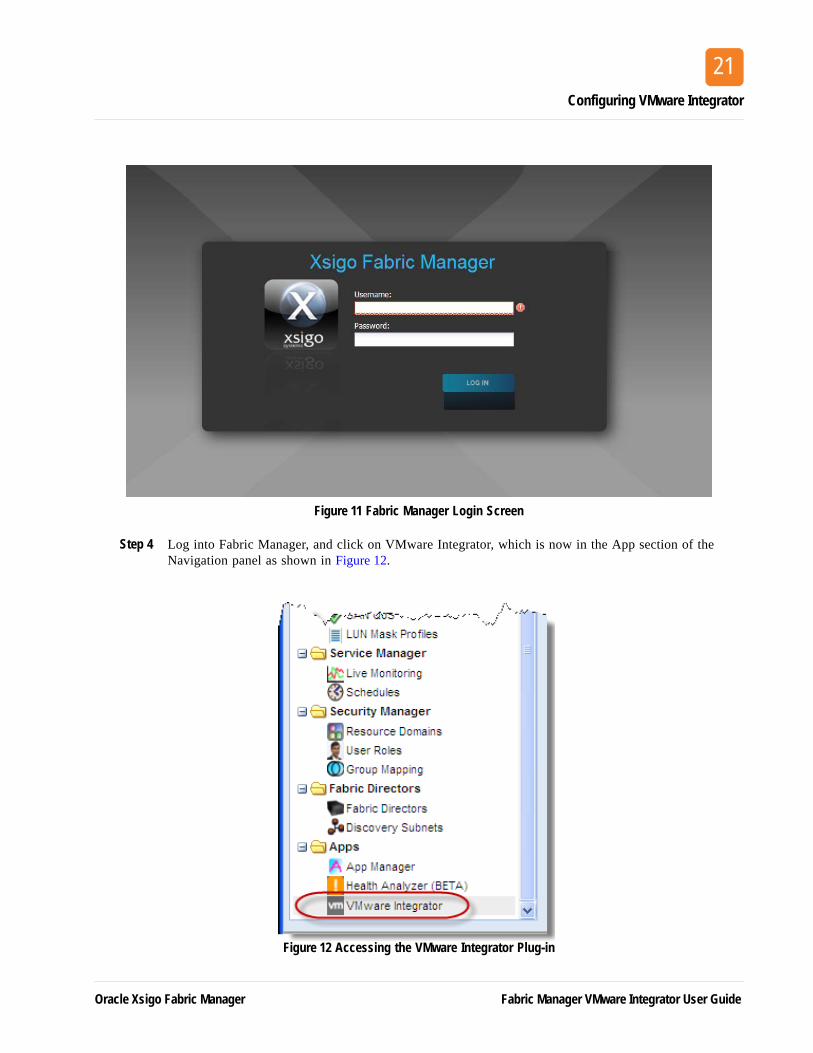
You can also see in the Recent Jobs Summary panel Job ID column that the AddPlugin was submitted and, as shown in Figure 10, completed. The Xsigo installer restarts Fabric Manager and displays the Log In screen as shown in Figure 11.
Fabric Manager VMware Integrator User Guide Oracle Xsigo Fabric Manager
Configuring VMware Integrator
21
Figure 11 Fabric Manager Login Screen
Step 4 Log into Fabric Manager, and click on VMware Integrator, which is now in the App section of the Navigation panel as shown in Figure 12.
Figure 12 Accessing the VMware Integrator Plug-in
Oracle Xsigo Fabric Manager Fabric Manager VMware Integrator User Guide
Chapter 2: Installing Fabric Manager VMware Integrator
22
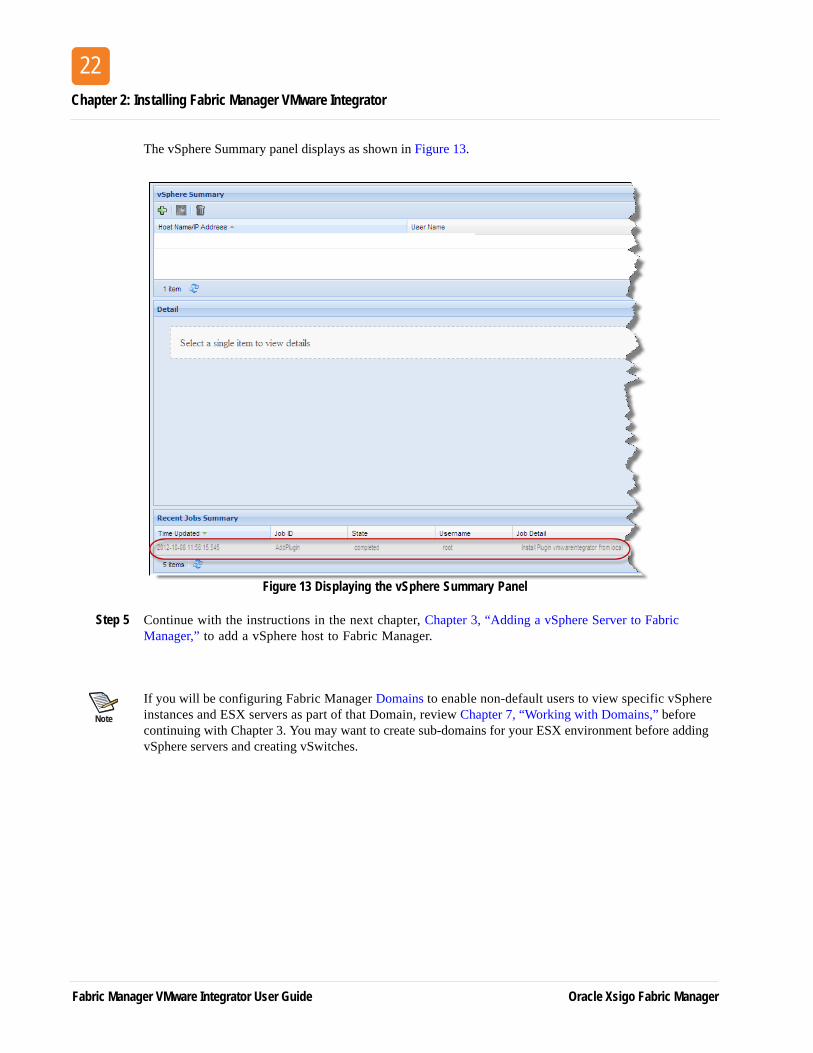
The vSphere Summary panel displays as shown in Figure 13.
Figure 13 Displaying the vSphere Summary Panel
Step 5 Continue with the instructions in the next chapter, Chapter 3, “Adding a vSphere Server to Fabric Manager,” to add a vSphere host to Fabric Manager.
Note
If you will be configuring Fabric Manager Domains to enable non-default users to view specific vSphere instances and ESX servers as part of that Domain, review Chapter 7, “Working with Domains,” before continuing with Chapter 3. You may want to create sub-domains for your ESX environment before adding vSphere servers and creating vSwitches.
Fabric Manager VMware Integrator User Guide Oracle Xsigo Fabric Manager

3
2Adding a vSphere Server to Fabric ManagerAdding your vSphere server or servers to Fabric Manager is the first logical task involved in setting up VMware Integrator in your environment (and you can always configure servers in the future as you add them to your environment). You simply enter the host name or IP address of any server you wish to add, a port number, and the user name and password for that server and you will be able to manager that server within Fabric Manager.
The previous chapter described how to install VMware Integrator and add the application to Fabric Manager. The next step is to add a vSphere server to Fabric Manager. This chapter describes how to add an existing VMware vSphere server to Fabric Manager and includes the following sections:
• Adding a vSphere Server to Fabric Manager
• Displaying vSphere Server Information
Xsigo Systems Xsigo Fabric Manager VMware Integrator User Guide
Chapter 3: Adding a vSphere Server to Fabric Manager
24
Adding a vSphere Server to Fabric ManagerTo add a vSphere server to Fabric Manager, perform the following steps:
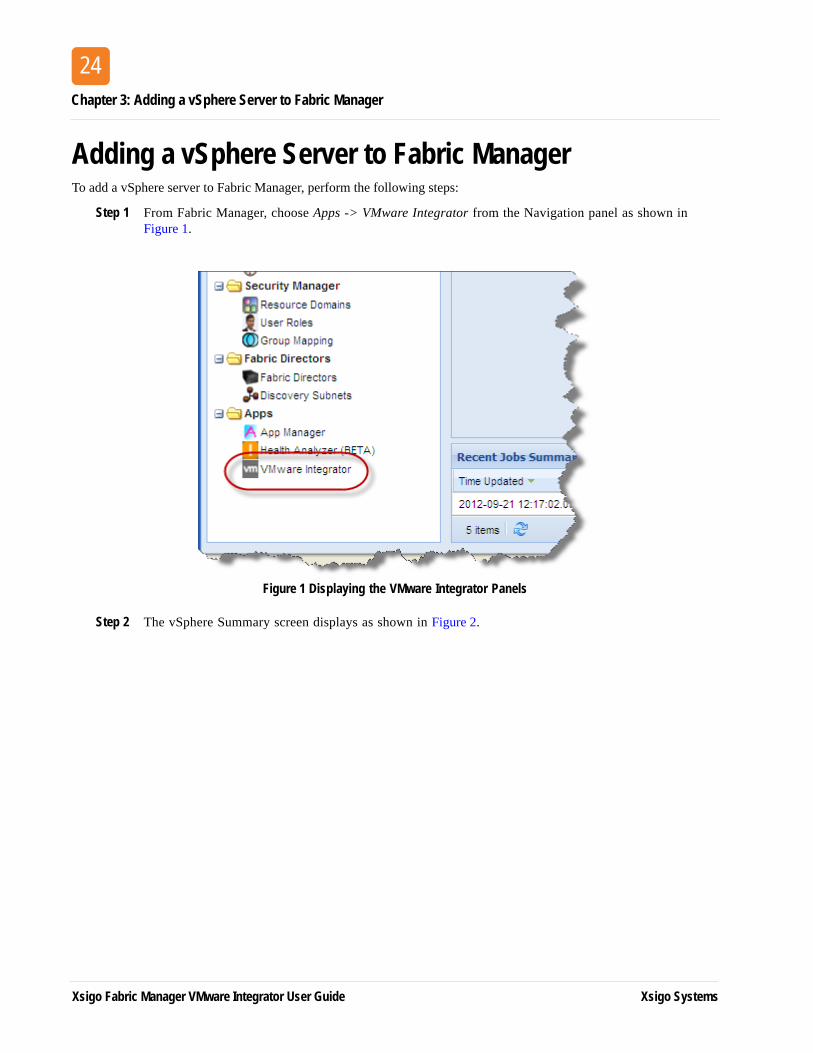
Step 1 From Fabric Manager, choose Apps -> VMware Integrator from the Navigation panel as shown in Figure 1.
Figure 1 Displaying the VMware Integrator Panels
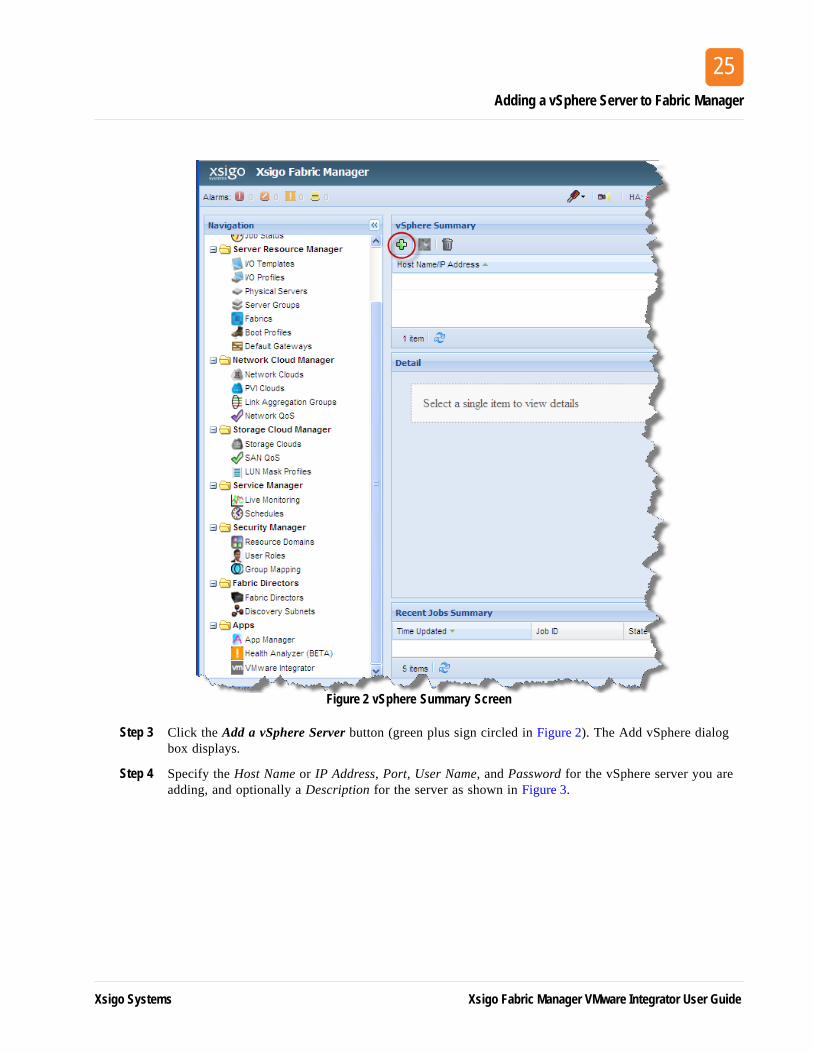
Step 2 The vSphere Summary screen displays as shown in Figure 2.
Xsigo Fabric Manager VMware Integrator User Guide Xsigo Systems
Adding a vSphere Server to Fabric Manager
25
Figure 2 vSphere Summary Screen
Step 3 Click the Add a vSphere Server button (green plus sign circled in Figure 2). The Add vSphere dialog box displays.
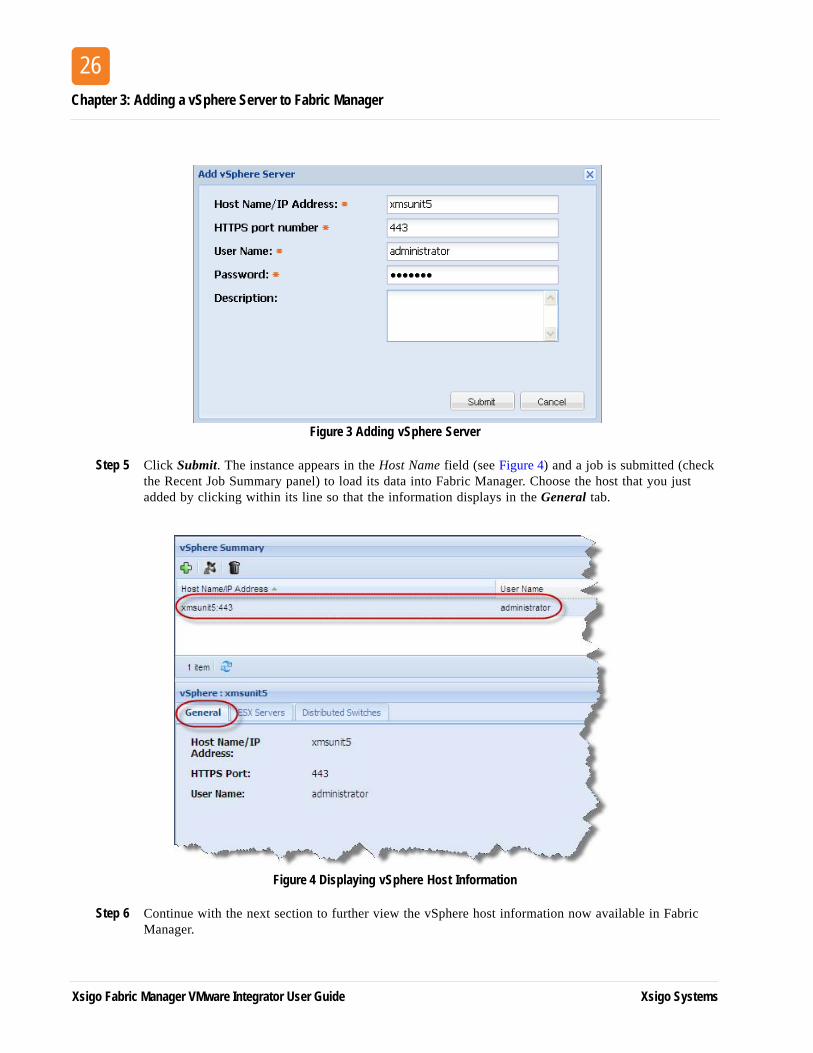
Step 4 Specify the Host Name or IP Address, Port, User Name, and Password for the vSphere server you are adding, and optionally a Description for the server as shown in Figure 3.
Xsigo Systems Xsigo Fabric Manager VMware Integrator User Guide
Chapter 3: Adding a vSphere Server to Fabric Manager
26
Figure 3 Adding vSphere Server
Step 5 Click Submit. The instance appears in the Host Name field (see Figure 4) and a job is submitted (check the Recent Job Summary panel) to load its data into Fabric Manager. Choose the host that you just added by clicking within its line so that the information displays in the General tab.
Figure 4 Displaying vSphere Host Information
Step 6 Continue with the next section to further view the vSphere host information now available in Fabric Manager.
Xsigo Fabric Manager VMware Integrator User Guide Xsigo Systems
Displaying vSphere Server Information
27
Displaying vSphere Server InformationThis section describes how to display information about the VMware vSphere server you added to Fabric Manager. To retrieve information about the host you just added, perform the following steps:
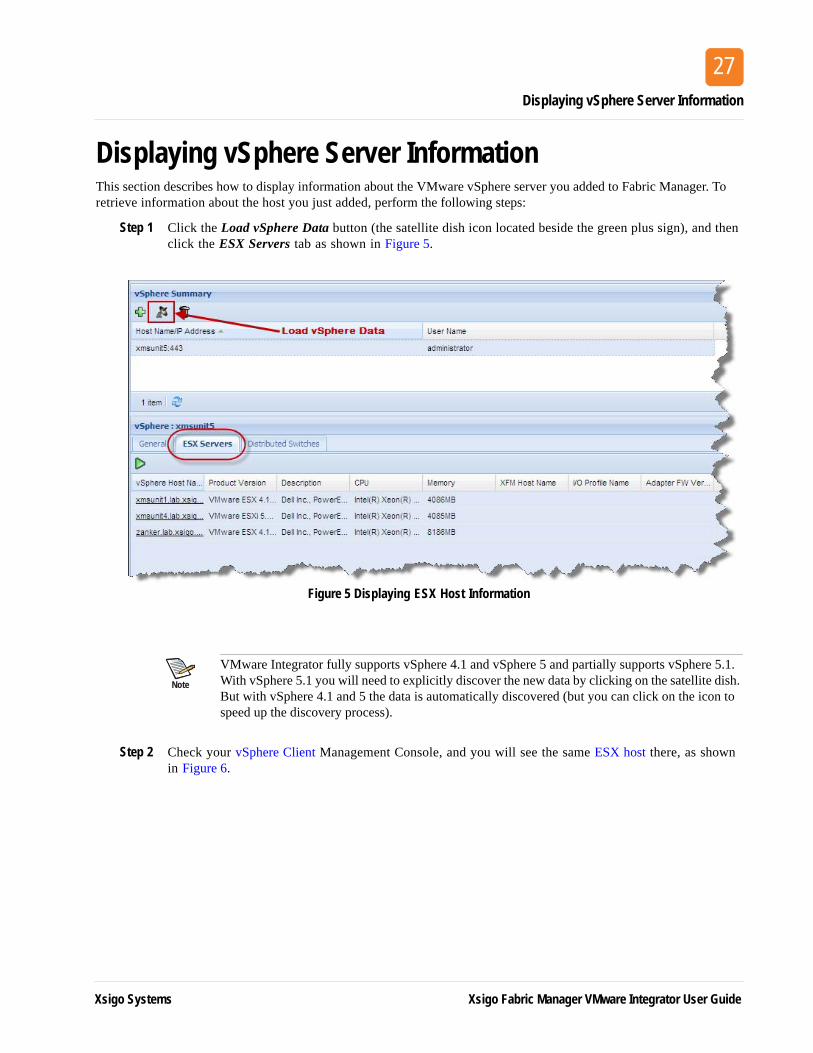
Step 1 Click the Load vSphere Data button (the satellite dish icon located beside the green plus sign), and then click the ESX Servers tab as shown in Figure 5.
Figure 5 Displaying ESX Host Information
Step 2 Check your vSphere Client Management Console, and you will see the same ESX host there, as shown in Figure 6.
Note
VMware Integrator fully supports vSphere 4.1 and vSphere 5 and partially supports vSphere 5.1. With vSphere 5.1 you will need to explicitly discover the new data by clicking on the satellite dish. But with vSphere 4.1 and 5 the data is automatically discovered (but you can click on the icon to speed up the discovery process).
Xsigo Systems Xsigo Fabric Manager VMware Integrator User Guide
Chapter 3: Adding a vSphere Server to Fabric Manager
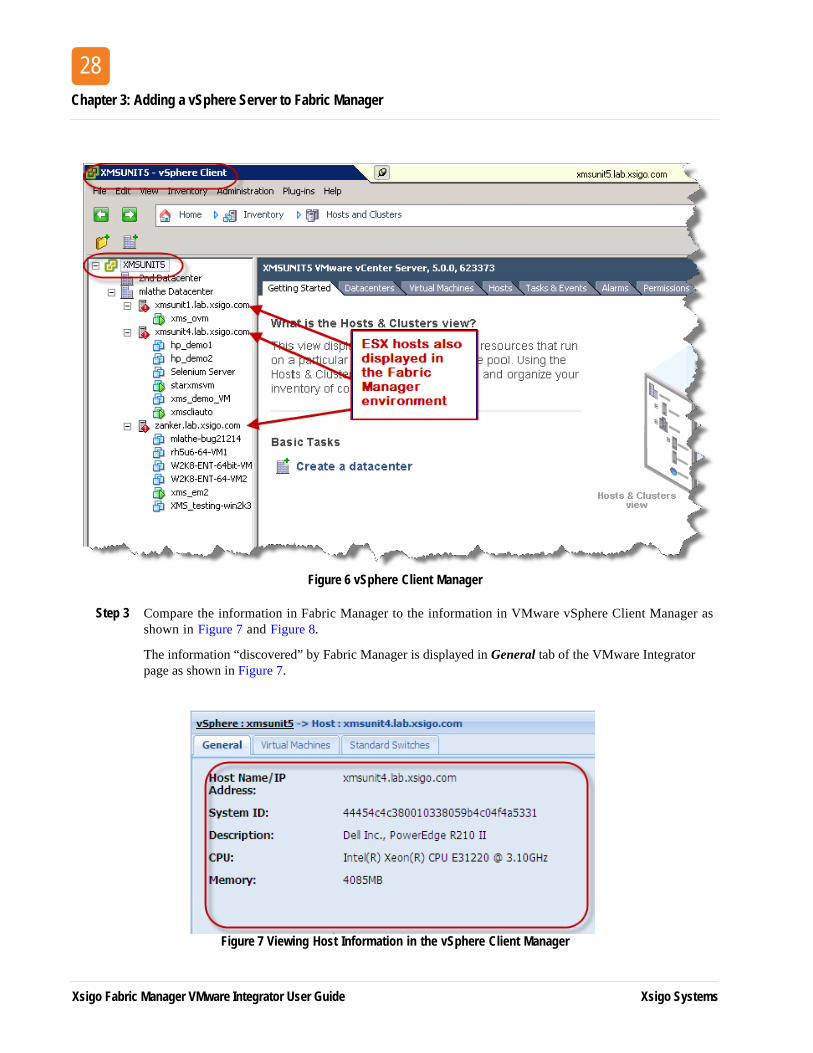
28
Figure 6 vSphere Client Manager
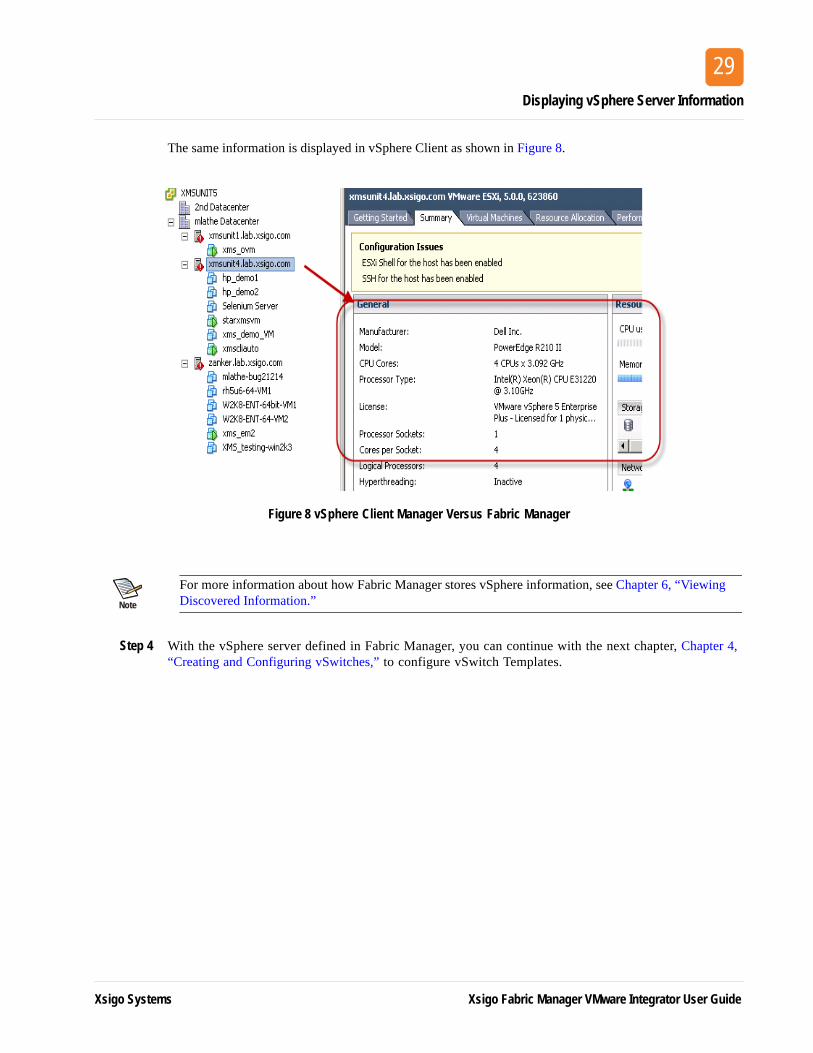
Step 3 Compare the information in Fabric Manager to the information in VMware vSphere Client Manager as shown in Figure 7 and Figure 8.
The information “discovered” by Fabric Manager is displayed in General tab of the VMware Integrator page as shown in Figure 7.
Figure 7 Viewing Host Information in the vSphere Client Manager
Xsigo Fabric Manager VMware Integrator User Guide Xsigo Systems
Displaying vSphere Server Information
29
The same information is displayed in vSphere Client as shown in Figure 8.
Figure 8 vSphere Client Manager Versus Fabric Manager
Step 4 With the vSphere server defined in Fabric Manager, you can continue with the next chapter, Chapter 4, “Creating and Configuring vSwitches,” to configure vSwitch Templates.
Note
For more information about how Fabric Manager stores vSphere information, see Chapter 6, “Viewing Discovered Information.”
Xsigo Systems Xsigo Fabric Manager VMware Integrator User Guide

Chapter 3: Adding a vSphere Server to Fabric Manager
30
Xsigo Fabric Manager VMware Integrator User Guide Xsigo Systems
31
Creating and Configuring vSwitchesVMware Integrator provides the ability to create multiple paths for your vSphere network traffic and manage that traffic through Fabric Manager. By creating virtual switches (vSwitches) along with vNICs and vHBAs, and controlling how that network traffic flows through these resources, there is no need for expanding the HBA port count or increasing the physical NICs until the bandwidth requires it.
You can create I/O Templates that define network traffic for your virtual machines. For example, you can dedicate one network path for kernel traffic such as vMotion, another for console traffic, and third for standard VM traffic. You no longer need to manually configure distributed vSwitches in vSphere before adding the Ethernet Adapter device to a virtual machine. Instead, you provide the vSwitch and port group information in a Fabric Manager I/O Template on the I/O Template page so that the distributed switch is automatically added to the ESX host. Using Fabric Manager, you can push all the vNICs to the ESX hosts and connect the vSwitches to the correct uplinks. Once you create a vSwitch and assign vNIC resources to the switch, that switch advertises its switching capabilities through port groups. VMware can then push traffic through those port groups.
Physical Ethernet adapters and vNICs serve a bridges between virtual and physical networks. In a VMware infrastructure, they are called uplinks (vNIC uplinks in Fabric Manager), and the virtual ports connected to them are called uplink ports.
This chapter provides step-by-step instructions for creating Distributed vSwitches, port groups, and vNIC uplinks, and includes the following sections:
• Working with vSwitches in the I/O Template Editor
• Adding Another vSwitch to the Template
• Working with vSphere Port Groups
• Working with vNIC Uplinks
Oracle Xsigo Fabric Manager Fabric Manager VMware Integrator User Guide

Chapter 4: Creating and Configuring vSwitches
32
Working with vSwitches in the I/O Template EditorYou can now add virtual switches (vSwitches) as part of an I/O Template just like you do with vNICs and vHBAs. This section describes how to create and configure a vSwitch in an I/O Template, add vNICs to provide the vSwitches with network resources, and connect those resources to Clouds within that I/O Template.
This section describes how to create vSwitch Template using the I/O Template Editor, including:
• One HA I/O Network Cloud for virtual machine production traffic
• One HA PVI Cloud for kernel vMotion traffic
• A vSwitch for the production traffic
Creating the I/O TemplateTo create a vSwitch in your I/O Template, perform the following steps:
Step 1 From the Fabric Manager main window, choose Server Resource Manager->I/O Templates. The I/O Template Summary screen appears as shown in Figure 1.
Figure 1 I/O Templates Summary
Step 2 Click the green plus sign to add a new I/O Template as shown in Figure 2.
Fabric Manager VMware Integrator User Guide Oracle Xsigo Fabric Manager
Working with vSwitches in the I/O Template Editor
33
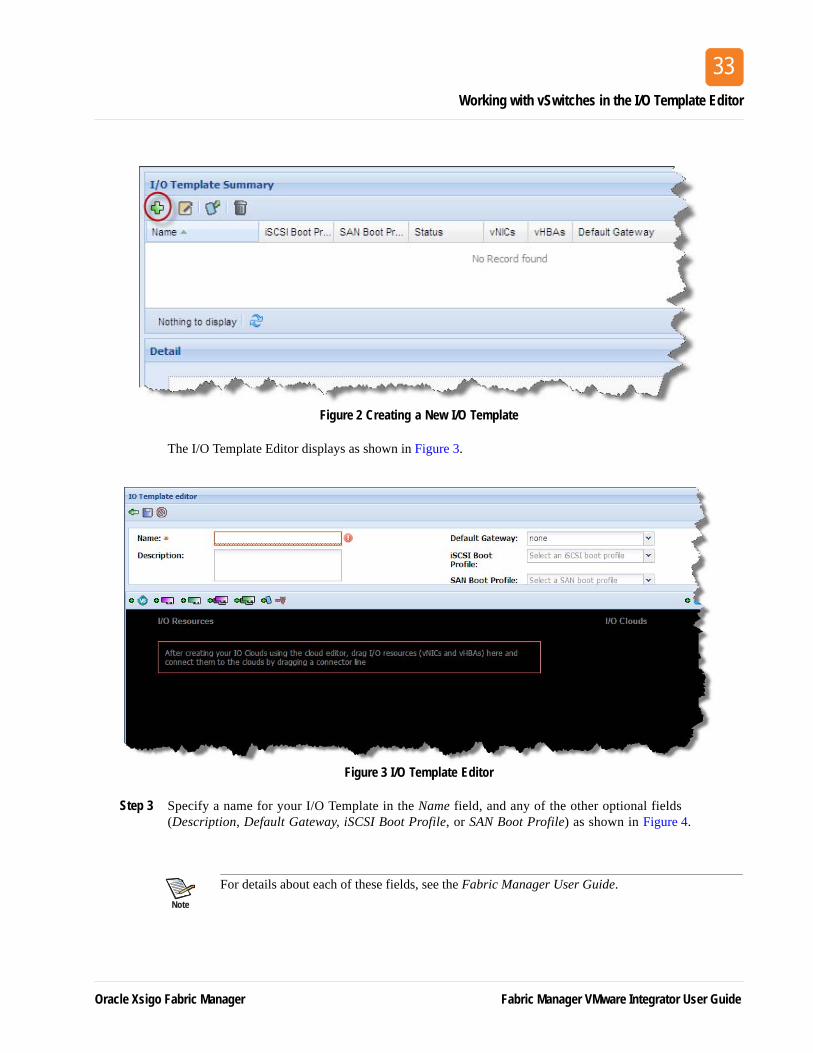
Figure 2 Creating a New I/O Template
The I/O Template Editor displays as shown in Figure 3.
Figure 3 I/O Template Editor
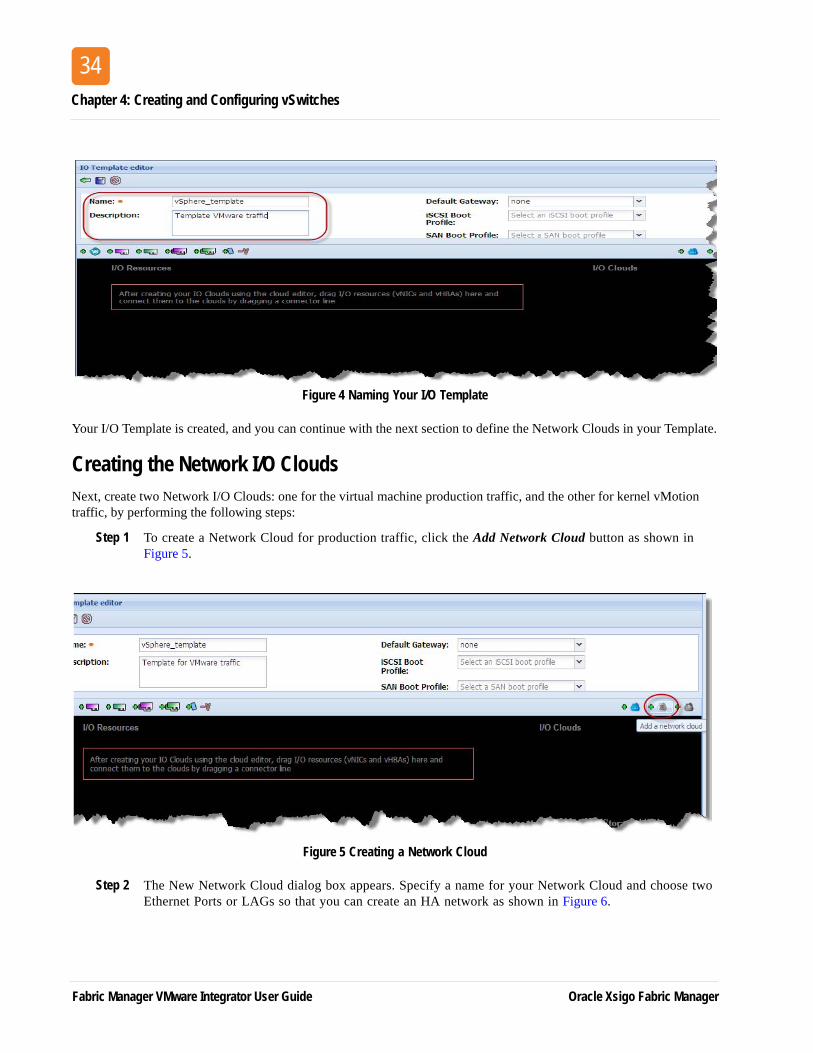
Step 3 Specify a name for your I/O Template in the Name field, and any of the other optional fields (Description, Default Gateway, iSCSI Boot Profile, or SAN Boot Profile) as shown in Figure 4.
Note
For details about each of these fields, see the Fabric Manager User Guide.
Oracle Xsigo Fabric Manager Fabric Manager VMware Integrator User Guide
Chapter 4: Creating and Configuring vSwitches
34
Figure 4 Naming Your I/O Template
Your I/O Template is created, and you can continue with the next section to define the Network Clouds in your Template.
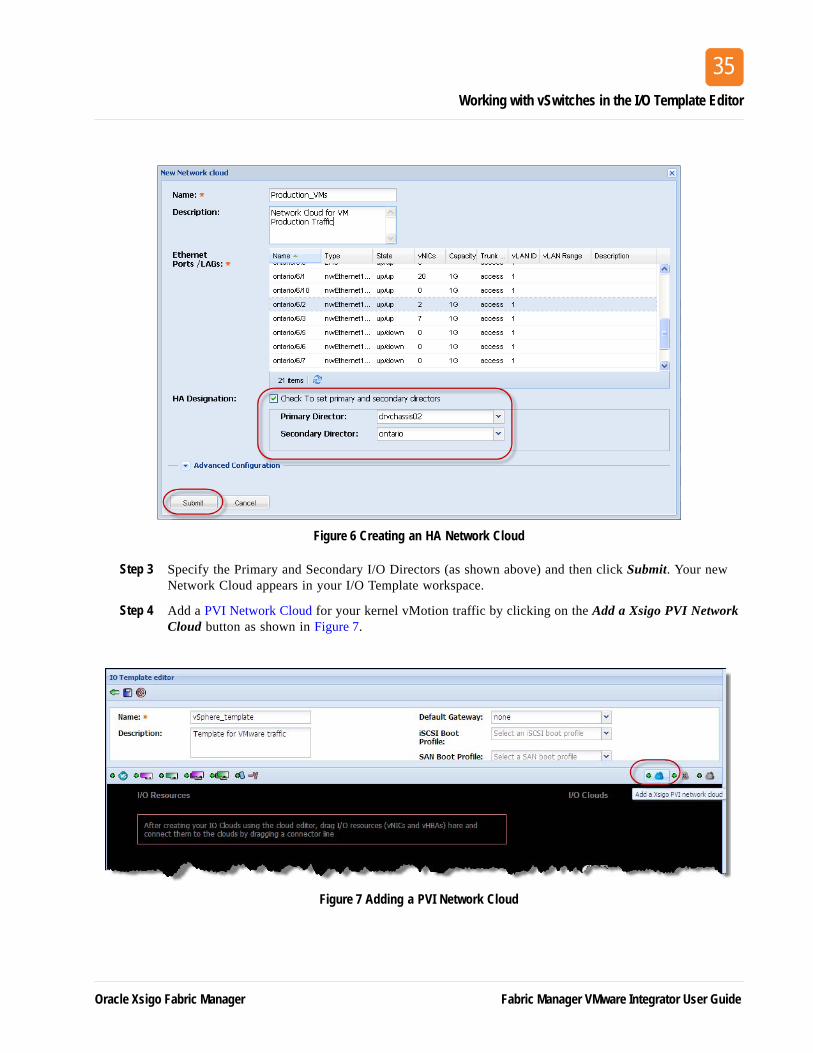
Creating the Network I/O CloudsNext, create two Network I/O Clouds: one for the virtual machine production traffic, and the other for kernel vMotion traffic, by performing the following steps:
Step 1 To create a Network Cloud for production traffic, click the Add Network Cloud button as shown in Figure 5.
Figure 5 Creating a Network Cloud
Step 2 The New Network Cloud dialog box appears. Specify a name for your Network Cloud and choose two Ethernet Ports or LAGs so that you can create an HA network as shown in Figure 6.
Fabric Manager VMware Integrator User Guide Oracle Xsigo Fabric Manager
Working with vSwitches in the I/O Template Editor
35
Figure 6 Creating an HA Network Cloud
Step 3 Specify the Primary and Secondary I/O Directors (as shown above) and then click Submit. Your new Network Cloud appears in your I/O Template workspace.
Step 4 Add a PVI Network Cloud for your kernel vMotion traffic by clicking on the Add a Xsigo PVI Network Cloud button as shown in Figure 7.
Figure 7 Adding a PVI Network Cloud
Oracle Xsigo Fabric Manager Fabric Manager VMware Integrator User Guide
Chapter 4: Creating and Configuring vSwitches
36
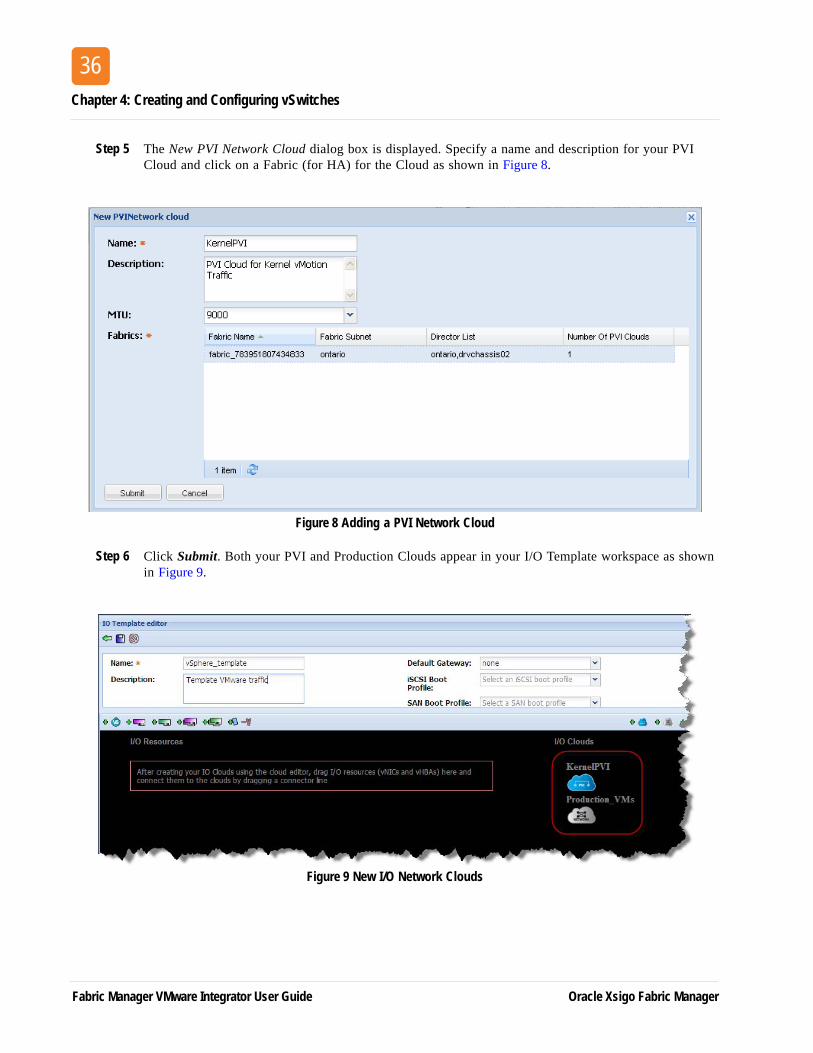
Step 5 The New PVI Network Cloud dialog box is displayed. Specify a name and description for your PVI Cloud and click on a Fabric (for HA) for the Cloud as shown in Figure 8.
Figure 8 Adding a PVI Network Cloud
Step 6 Click Submit. Both your PVI and Production Clouds appear in your I/O Template workspace as shown in Figure 9.
Figure 9 New I/O Network Clouds
Fabric Manager VMware Integrator User Guide Oracle Xsigo Fabric Manager
Working with vSwitches in the I/O Template Editor
37
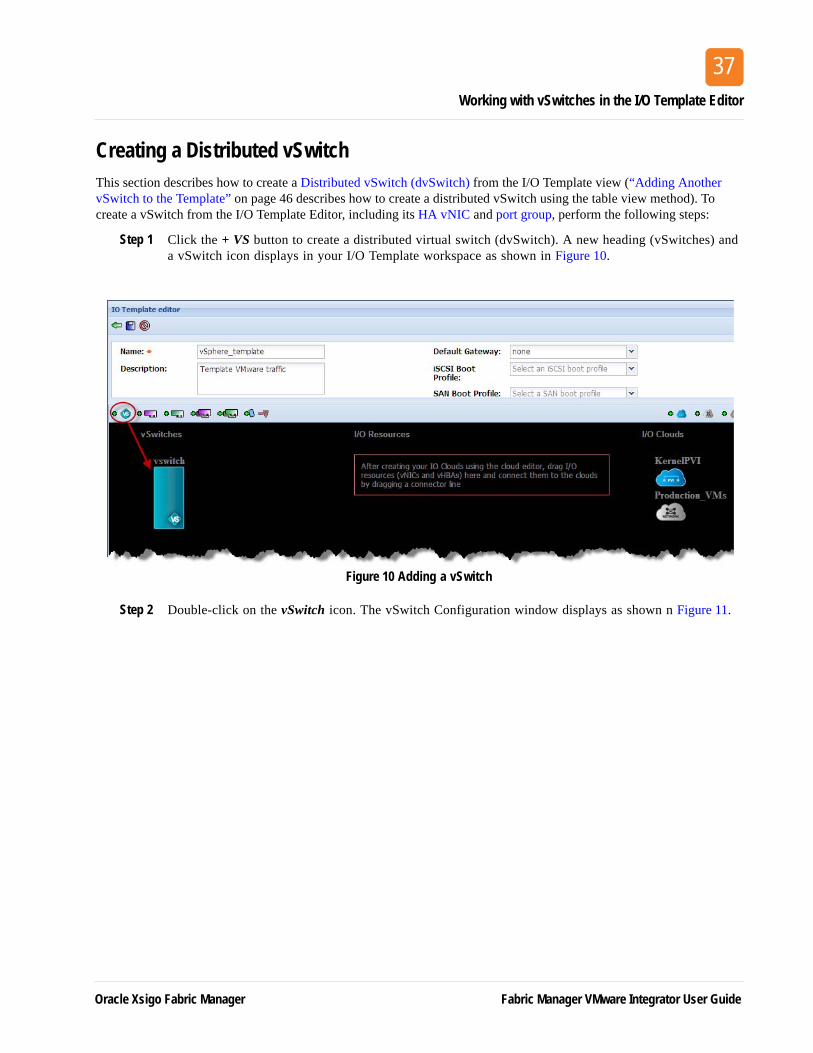
Creating a Distributed vSwitchThis section describes how to create a Distributed vSwitch (dvSwitch) from the I/O Template view (“Adding Another vSwitch to the Template” on page 46 describes how to create a distributed vSwitch using the table view method). To create a vSwitch from the I/O Template Editor, including its HA vNIC and port group, perform the following steps:
Step 1 Click the + VS button to create a distributed virtual switch (dvSwitch). A new heading (vSwitches) and a vSwitch icon displays in your I/O Template workspace as shown in Figure 10.
Figure 10 Adding a vSwitch
Step 2 Double-click on the vSwitch icon. The vSwitch Configuration window displays as shown n Figure 11.
Oracle Xsigo Fabric Manager Fabric Manager VMware Integrator User Guide

Chapter 4: Creating and Configuring vSwitches
38
Figure 11 Configuring the vSwitch
Step 3 Specify a name for your vSwitch as shown above.
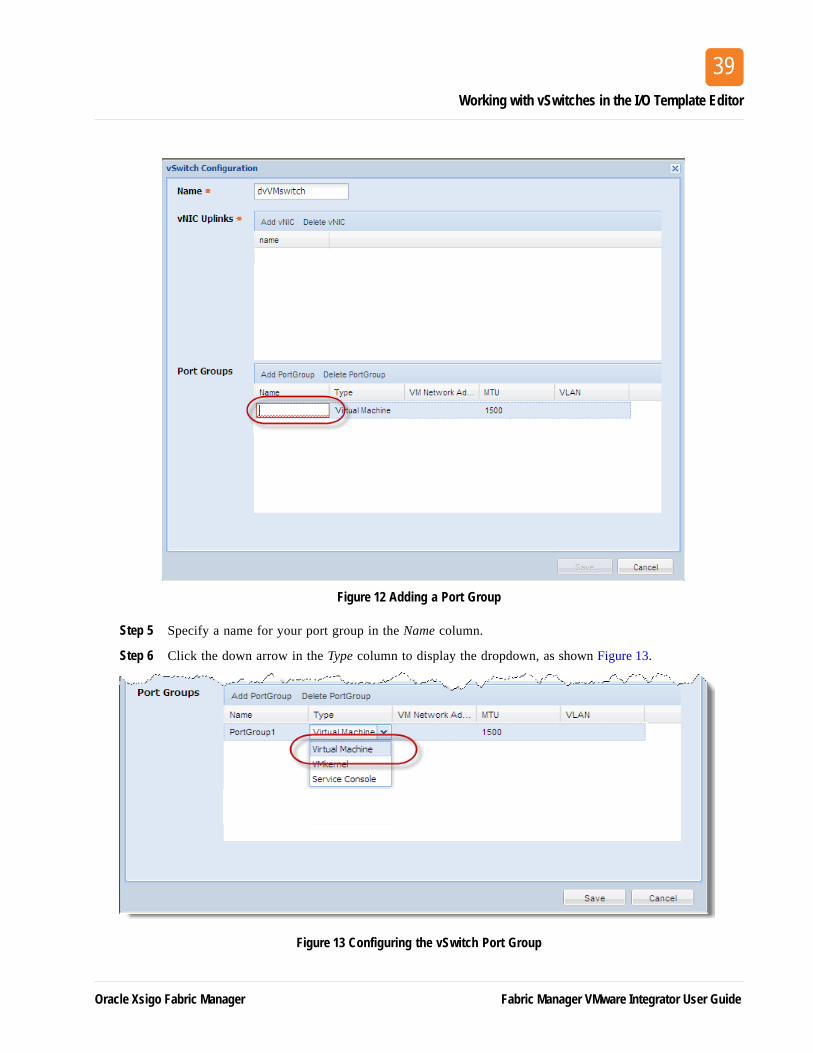
Step 4 Add a port group to your vSwitch so that you can connect those port groups to virtual machines in your network by clicking the Add PortGroup button. A new space is provided in the port group table as shown in Figure 12.
Note
The recommended naming convention for vSwitches is to name all standard switches with vSwitch in its name and all distributed Switches as dvSwitch (dvVMswitch as in this example).
Fabric Manager VMware Integrator User Guide Oracle Xsigo Fabric Manager
Working with vSwitches in the I/O Template Editor
39
Figure 12 Adding a Port Group
Step 5 Specify a name for your port group in the Name column.
Step 6 Click the down arrow in the Type column to display the dropdown, as shown Figure 13.
Figure 13 Configuring the vSwitch Port Group
Oracle Xsigo Fabric Manager Fabric Manager VMware Integrator User Guide
Chapter 4: Creating and Configuring vSwitches
40
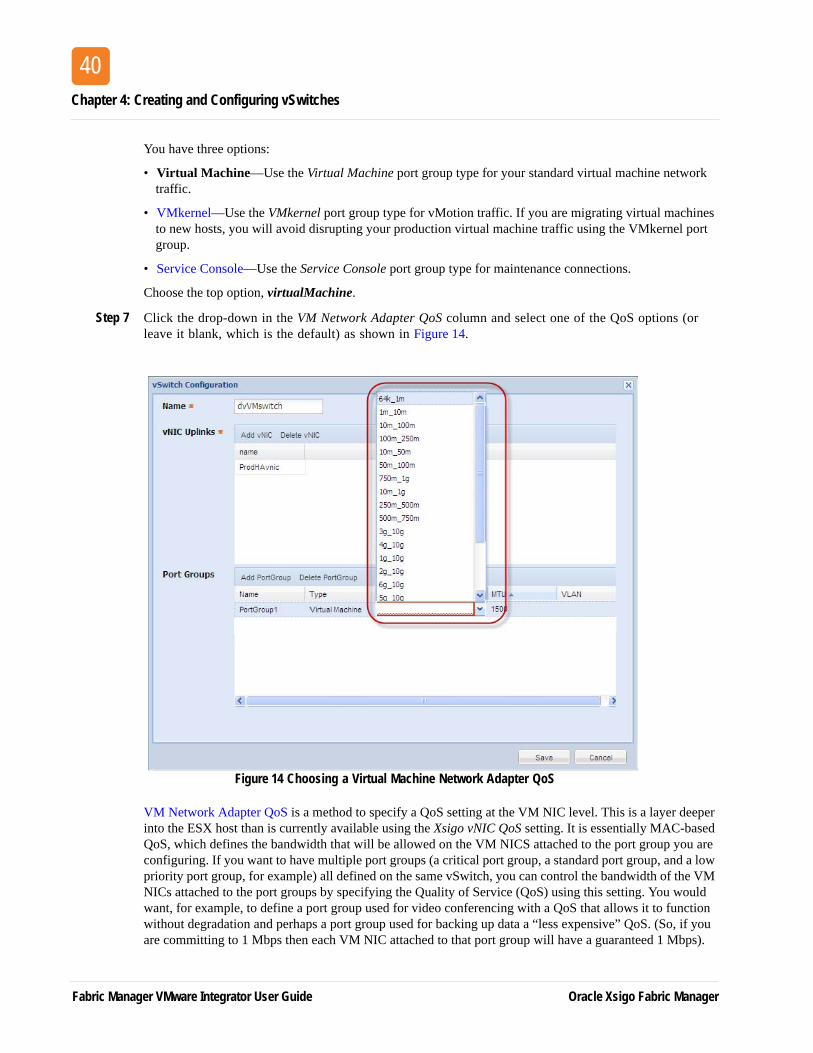
You have three options:
• Virtual Machine—Use the Virtual Machine port group type for your standard virtual machine network traffic.
• VMkernel—Use the VMkernel port group type for vMotion traffic. If you are migrating virtual machines to new hosts, you will avoid disrupting your production virtual machine traffic using the VMkernel port group.
• Service Console—Use the Service Console port group type for maintenance connections.
Choose the top option, virtualMachine.
Step 7 Click the drop-down in the VM Network Adapter QoS column and select one of the QoS options (or leave it blank, which is the default) as shown in Figure 14.
Figure 14 Choosing a Virtual Machine Network Adapter QoS
VM Network Adapter QoS is a method to specify a QoS setting at the VM NIC level. This is a layer deeper into the ESX host than is currently available using the Xsigo vNIC QoS setting. It is essentially MAC-based QoS, which defines the bandwidth that will be allowed on the VM NICS attached to the port group you are configuring. If you want to have multiple port groups (a critical port group, a standard port group, and a low priority port group, for example) all defined on the same vSwitch, you can control the bandwidth of the VM NICs attached to the port groups by specifying the Quality of Service (QoS) using this setting. You would want, for example, to define a port group used for video conferencing with a QoS that allows it to function without degradation and perhaps a port group used for backing up data a “less expensive” QoS. (So, if you are committing to 1 Mbps then each VM NIC attached to that port group will have a guaranteed 1 Mbps).
Fabric Manager VMware Integrator User Guide Oracle Xsigo Fabric Manager
Working with vSwitches in the I/O Template Editor
41
Fabric Manager then “shapes” the traffic to always allow for the defined network quality to that port group. When you choose this setting, Fabric Manager retrieves the MAC address for the VM NIC used for this port group, regardless of the Fabric Manager vNIC defined for the virtual switch. The traffic flowing through these port groups would each have different MAC addresses and thus can be “shaped” even though they are going over the same Xsigo vNIC.
You can still set the QoS for the vNIC itself so that the ESX host as a total does not use too much bandwidth of the same Director, but this setting in Figure 14 allows you to control bandwidth “deeper” in the system and “shape” traffic at the virtual machine level, giving you greater control of how traffic flows in your environment.
To accomplish this from the vSphere Client, first make the virtual machine NIC, then attach the NIC to the port group defined here, which triggers a job to be submitted in Fabric Manager (you should see that job in the Job Summary Window) that creates a new record in the MAC based QoS view in Fabric Manager. For more information about MAC based QoS in Fabric Manager, refer to the Fabric Manager User Guide.
Step 8 Click in the MTU column field and specify a MTU (or leave the default, 1500).
Step 9 Click on the VLAN column field and specify the VLAN ID. Then click Save. You return to the I/O Template Editor.
Step 10 Continue with the next section, Adding and Configuring HA vNICs for the vSwitch.
Oracle Xsigo Fabric Manager Fabric Manager VMware Integrator User Guide
Chapter 4: Creating and Configuring vSwitches
42
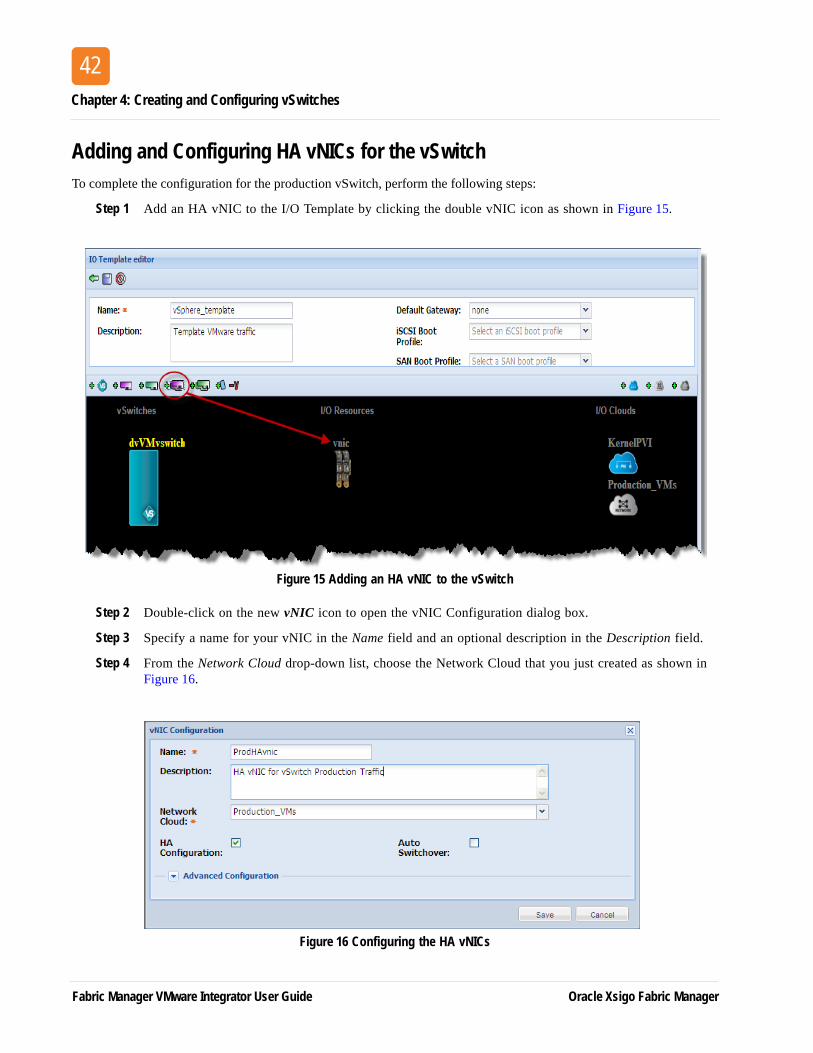
Adding and Configuring HA vNICs for the vSwitchTo complete the configuration for the production vSwitch, perform the following steps:
Step 1 Add an HA vNIC to the I/O Template by clicking the double vNIC icon as shown in Figure 15.
Figure 15 Adding an HA vNIC to the vSwitch
Step 2 Double-click on the new vNIC icon to open the vNIC Configuration dialog box.
Step 3 Specify a name for your vNIC in the Name field and an optional description in the Description field.
Step 4 From the Network Cloud drop-down list, choose the Network Cloud that you just created as shown in Figure 16.
Figure 16 Configuring the HA vNICs
Fabric Manager VMware Integrator User Guide Oracle Xsigo Fabric Manager
Working with vSwitches in the I/O Template Editor
43
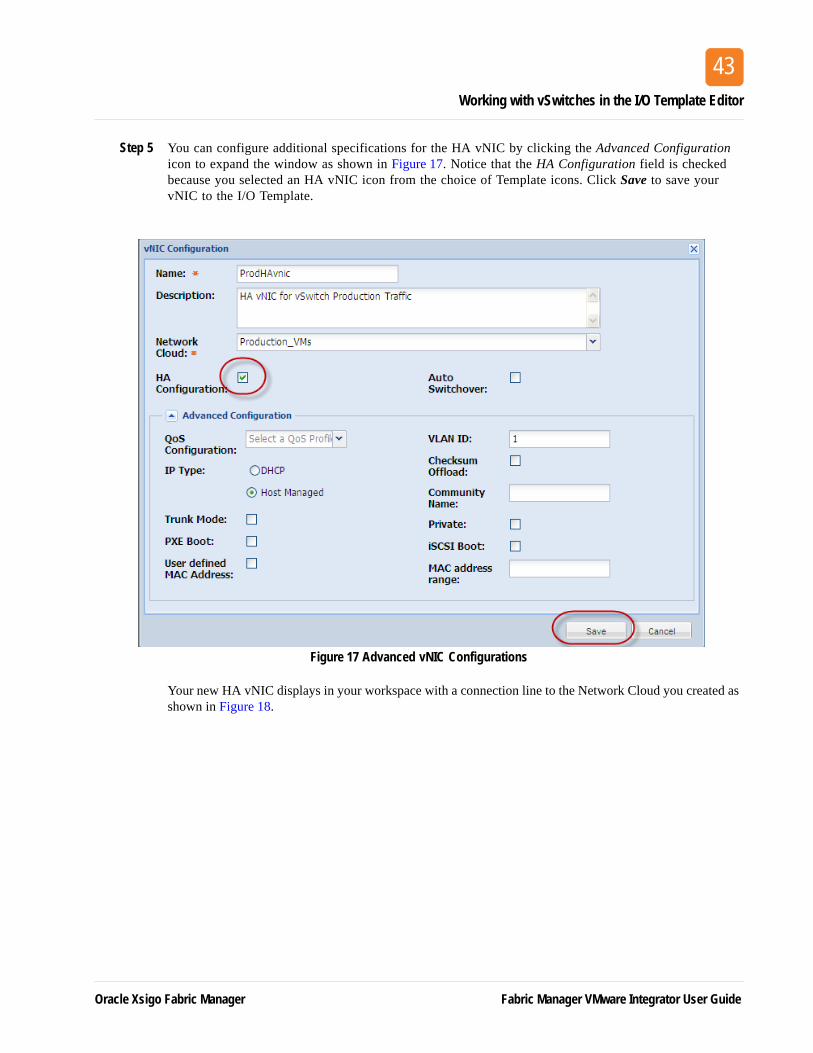
Step 5 You can configure additional specifications for the HA vNIC by clicking the Advanced Configuration icon to expand the window as shown in Figure 17. Notice that the HA Configuration field is checked because you selected an HA vNIC icon from the choice of Template icons. Click Save to save your vNIC to the I/O Template.
Figure 17 Advanced vNIC Configurations
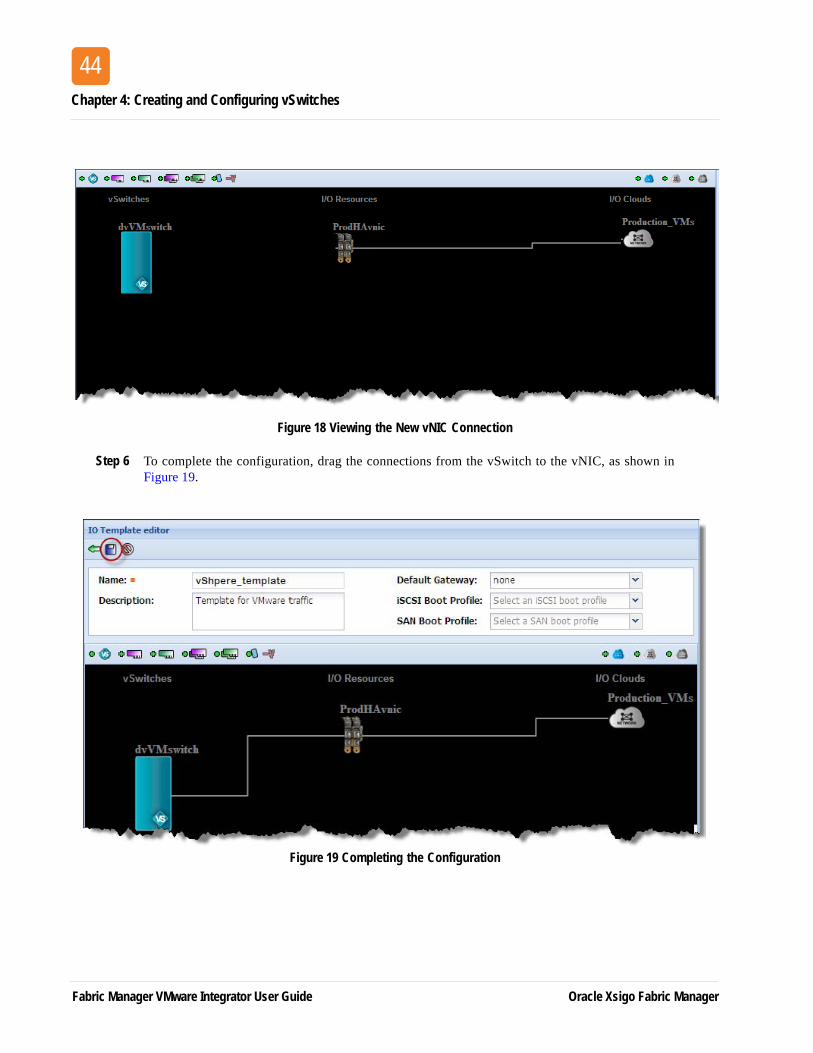
Your new HA vNIC displays in your workspace with a connection line to the Network Cloud you created as shown in Figure 18.
Oracle Xsigo Fabric Manager Fabric Manager VMware Integrator User Guide
Chapter 4: Creating and Configuring vSwitches
44
Figure 18 Viewing the New vNIC Connection
Step 6 To complete the configuration, drag the connections from the vSwitch to the vNIC, as shown in Figure 19.
Figure 19 Completing the Configuration
Fabric Manager VMware Integrator User Guide Oracle Xsigo Fabric Manager
Working with vSwitches in the I/O Template Editor
45
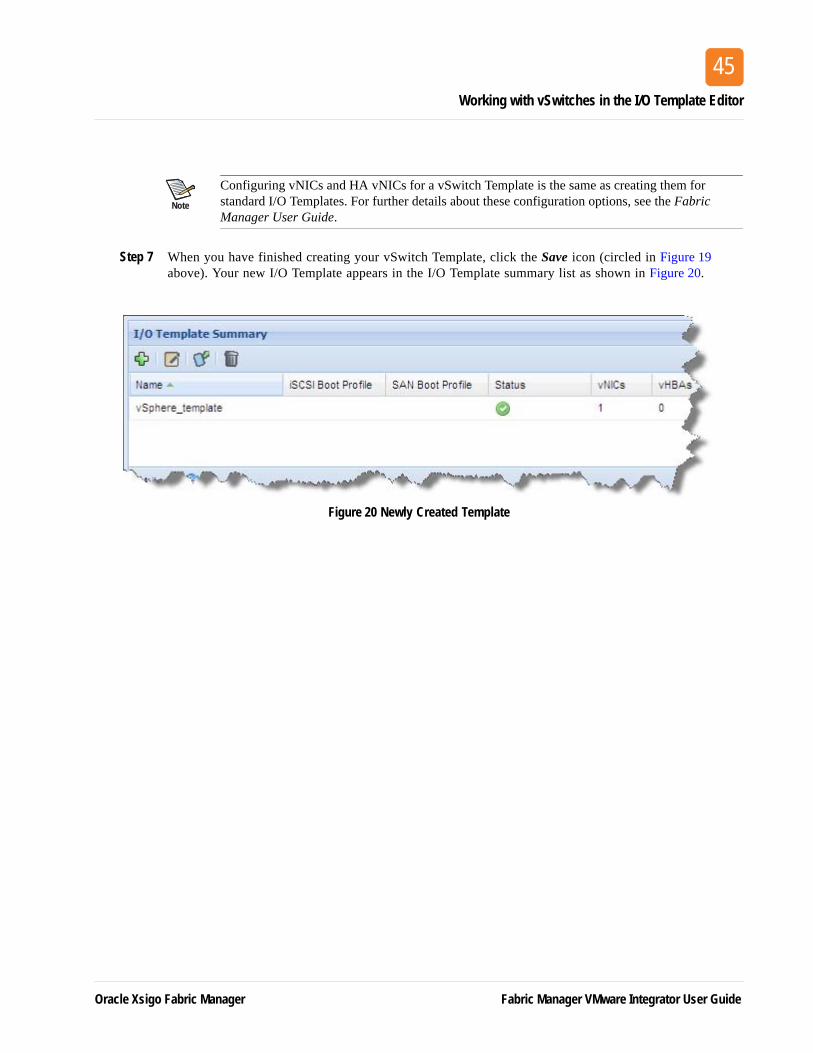
Step 7 When you have finished creating your vSwitch Template, click the Save icon (circled in Figure 19 above). Your new I/O Template appears in the I/O Template summary list as shown in Figure 20.
Figure 20 Newly Created Template
Note
Configuring vNICs and HA vNICs for a vSwitch Template is the same as creating them for standard I/O Templates. For further details about these configuration options, see the Fabric Manager User Guide.
Oracle Xsigo Fabric Manager Fabric Manager VMware Integrator User Guide
Chapter 4: Creating and Configuring vSwitches
46
Adding Another vSwitch to the TemplateThe instructions above describe how to add a vSwitch to your I/O Template using the Template Editor. This section describes how to add another vSwitch using the “table view” method. To add a new vSwitch this way, you will do the following:
• Create a new HA vNIC
• Create the vSwitch
• Create a Port Group on the vSwitch
• Viewing the new vSwitch in the Template View
Creating a New HA vNIC for the vSwitchTo create a new HA vNIC for the vMotion traffic, perform the following steps:
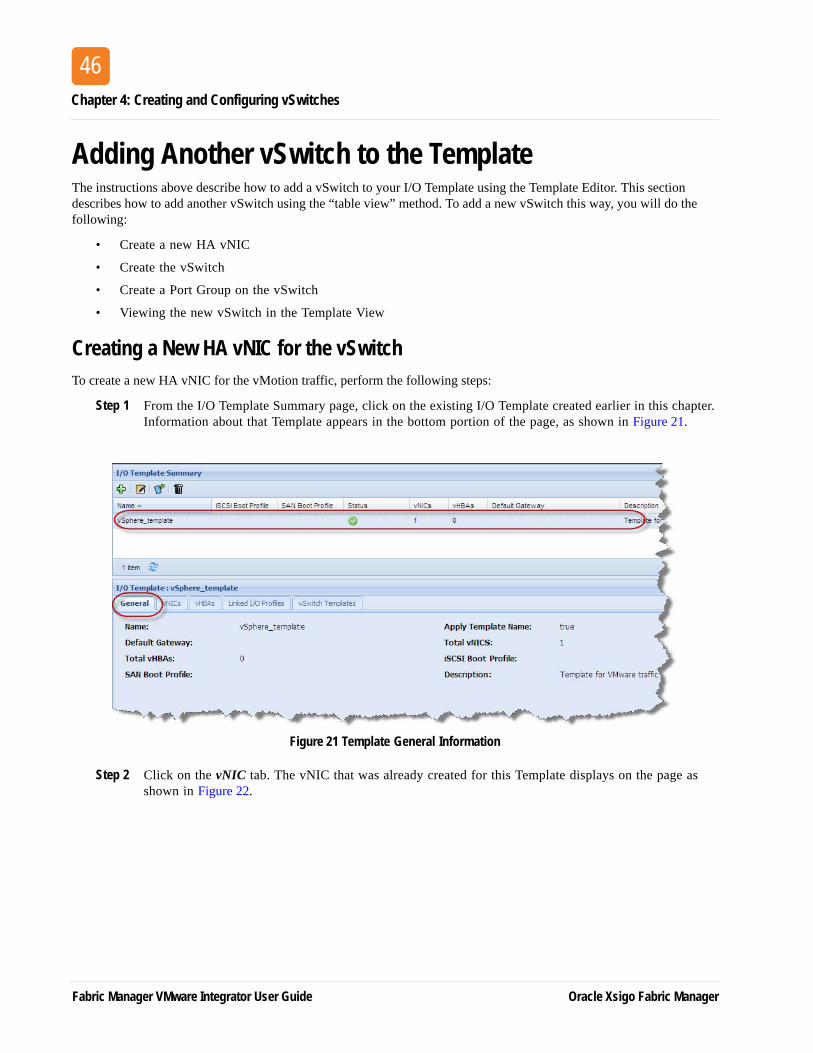
Step 1 From the I/O Template Summary page, click on the existing I/O Template created earlier in this chapter. Information about that Template appears in the bottom portion of the page, as shown in Figure 21.
Figure 21 Template General Information
Step 2 Click on the vNIC tab. The vNIC that was already created for this Template displays on the page as shown in Figure 22.
Fabric Manager VMware Integrator User Guide Oracle Xsigo Fabric Manager
Adding Another vSwitch to the Template
47
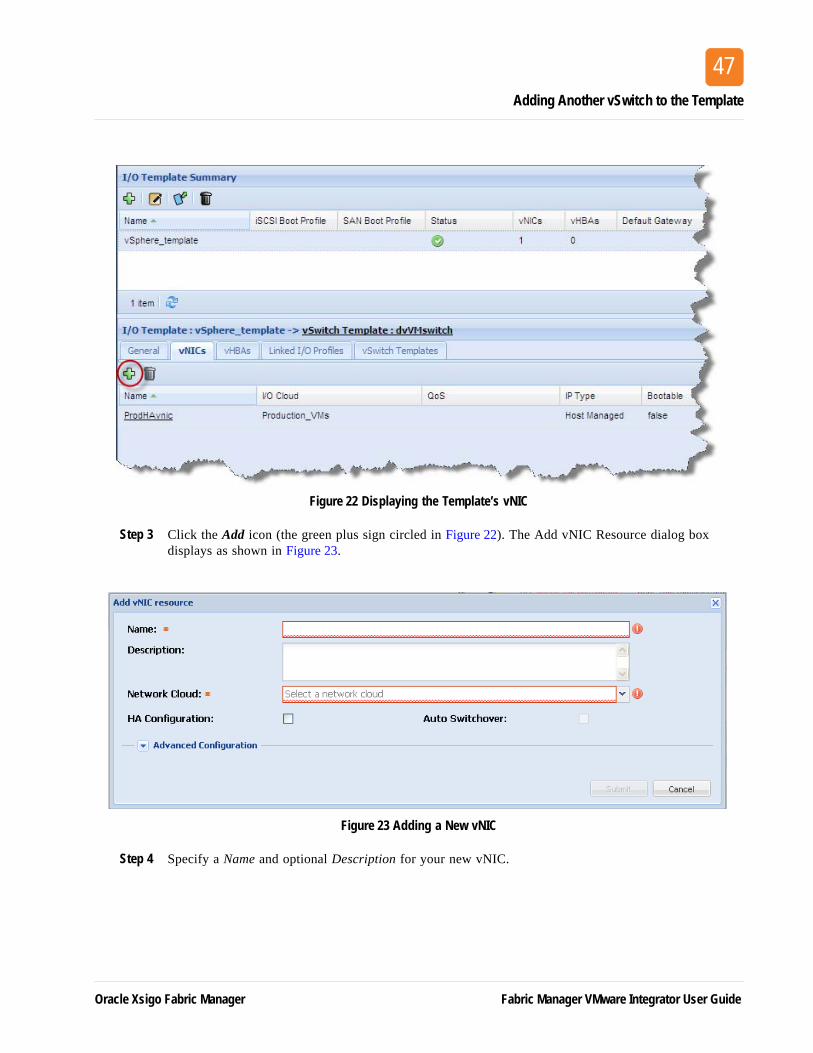
Figure 22 Displaying the Template’s vNIC
Step 3 Click the Add icon (the green plus sign circled in Figure 22). The Add vNIC Resource dialog box displays as shown in Figure 23.
Figure 23 Adding a New vNIC
Step 4 Specify a Name and optional Description for your new vNIC.
Oracle Xsigo Fabric Manager Fabric Manager VMware Integrator User Guide
Chapter 4: Creating and Configuring vSwitches
48
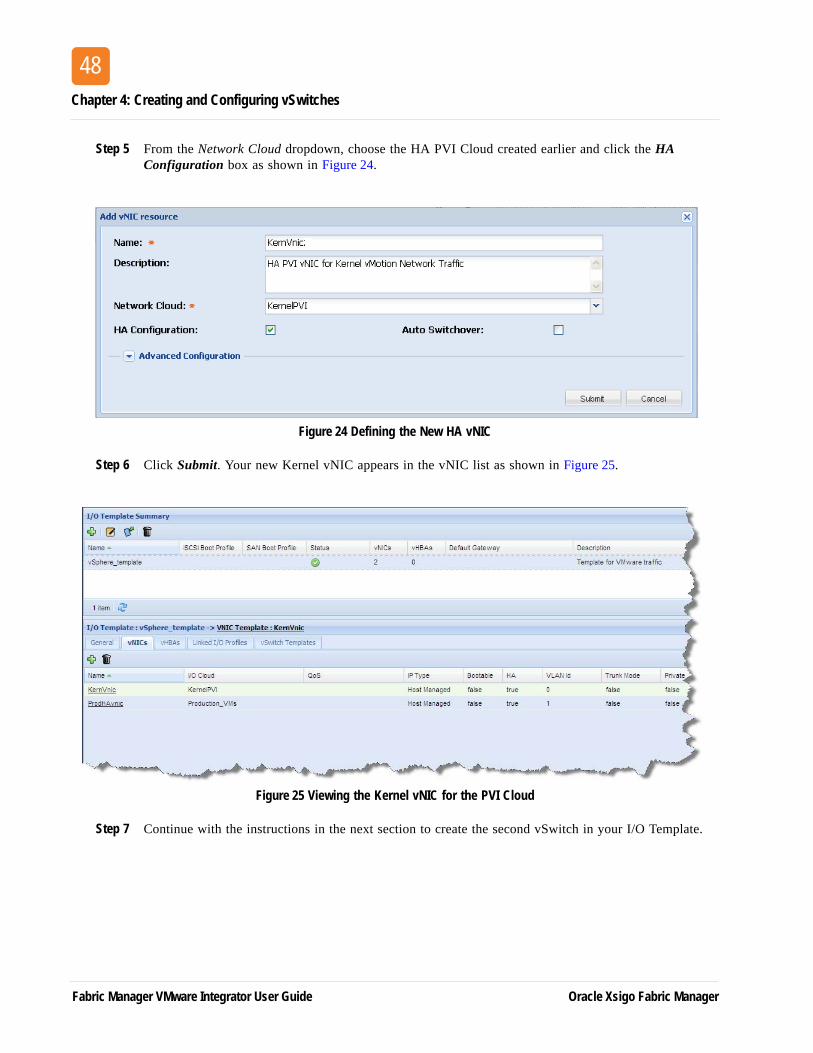
Step 5 From the Network Cloud dropdown, choose the HA PVI Cloud created earlier and click the HA Configuration box as shown in Figure 24.
Figure 24 Defining the New HA vNIC
Step 6 Click Submit. Your new Kernel vNIC appears in the vNIC list as shown in Figure 25.
Figure 25 Viewing the Kernel vNIC for the PVI Cloud
Step 7 Continue with the instructions in the next section to create the second vSwitch in your I/O Template.
Fabric Manager VMware Integrator User Guide Oracle Xsigo Fabric Manager
Adding Another vSwitch to the Template
49
Creating the New vSwitchTo add another vSwitch for the Kernel vMotion traffic, perform the following steps:
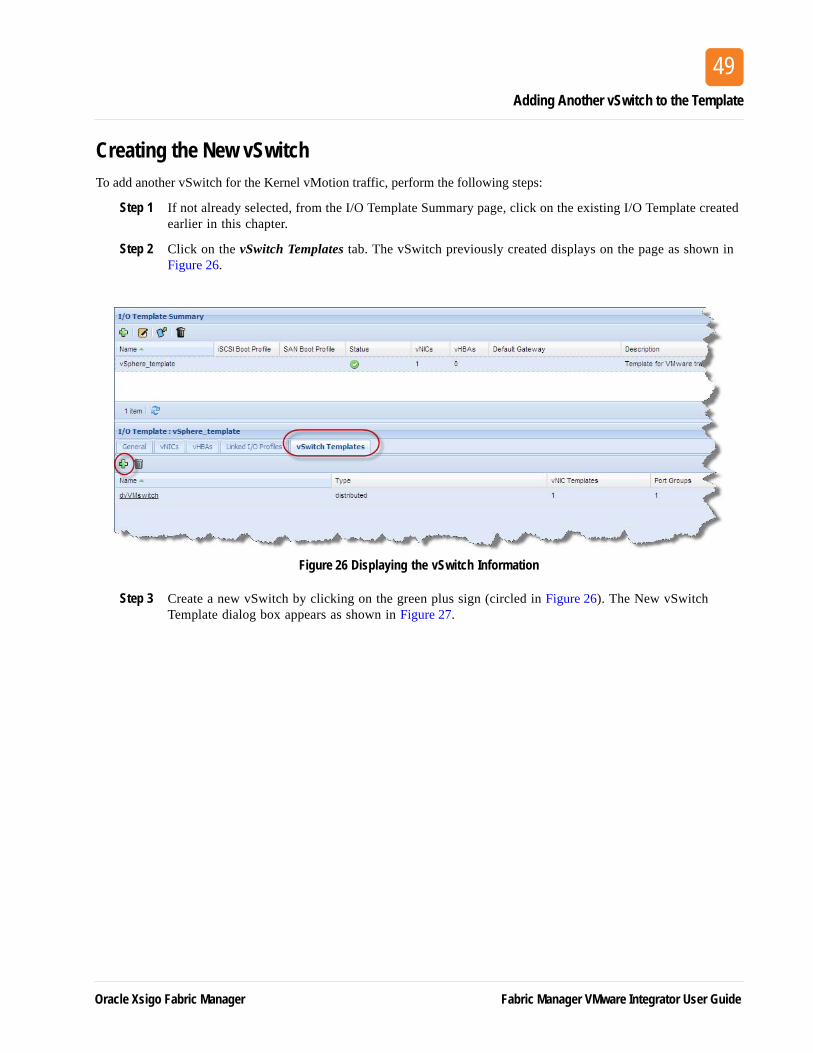
Step 1 If not already selected, from the I/O Template Summary page, click on the existing I/O Template created earlier in this chapter.
Step 2 Click on the vSwitch Templates tab. The vSwitch previously created displays on the page as shown in Figure 26.
Figure 26 Displaying the vSwitch Information
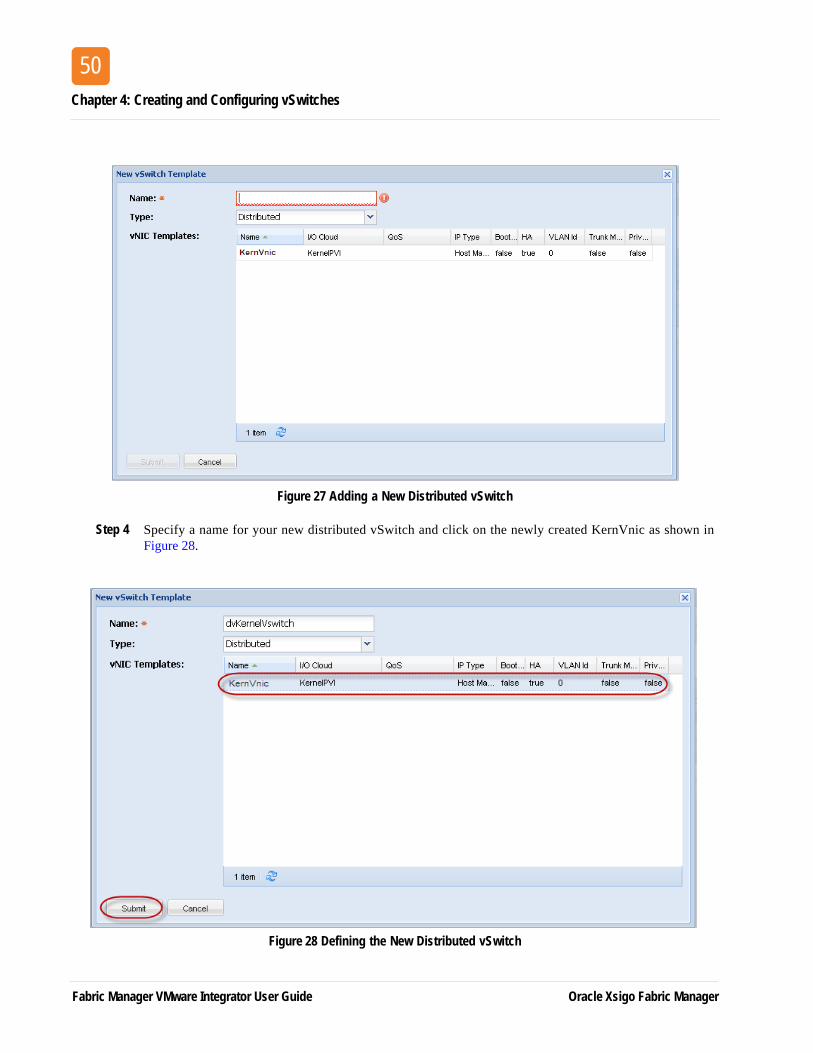
Step 3 Create a new vSwitch by clicking on the green plus sign (circled in Figure 26). The New vSwitch Template dialog box appears as shown in Figure 27.
Oracle Xsigo Fabric Manager Fabric Manager VMware Integrator User Guide
Chapter 4: Creating and Configuring vSwitches
50
Figure 27 Adding a New Distributed vSwitch
Step 4 Specify a name for your new distributed vSwitch and click on the newly created KernVnic as shown in Figure 28.
Figure 28 Defining the New Distributed vSwitch
Fabric Manager VMware Integrator User Guide Oracle Xsigo Fabric Manager
Adding Another vSwitch to the Template
51
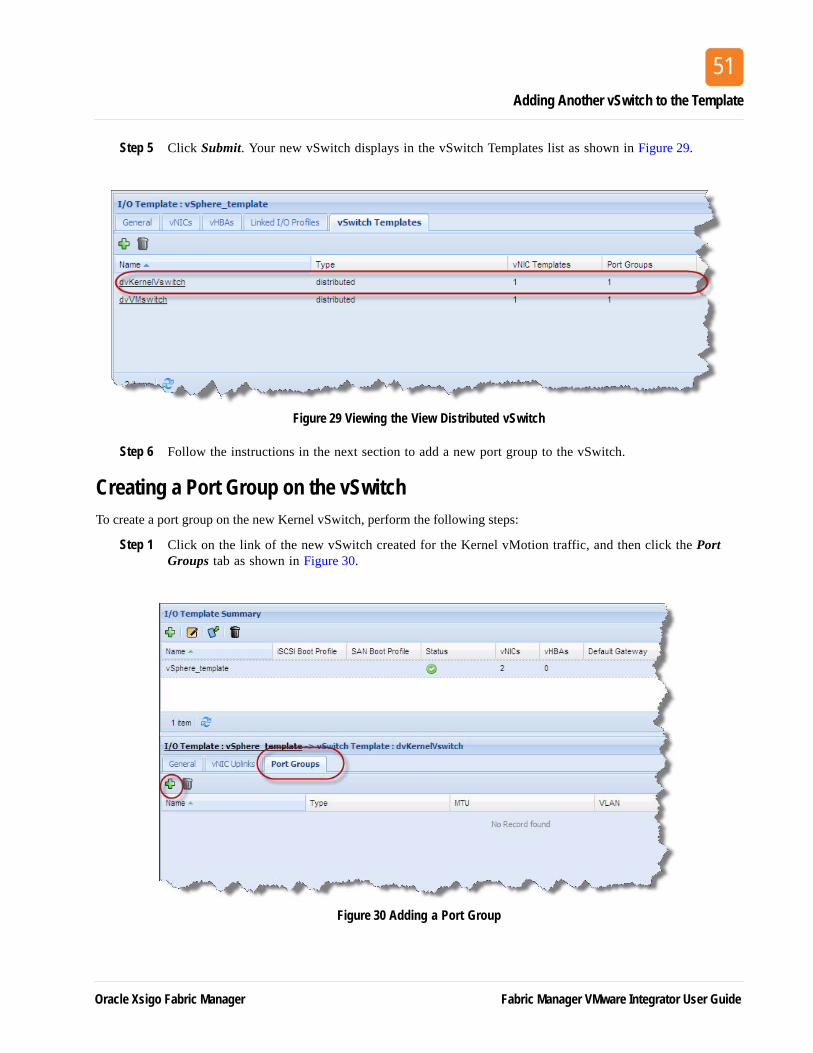
Step 5 Click Submit. Your new vSwitch displays in the vSwitch Templates list as shown in Figure 29.
Figure 29 Viewing the View Distributed vSwitch
Step 6 Follow the instructions in the next section to add a new port group to the vSwitch.
Creating a Port Group on the vSwitchTo create a port group on the new Kernel vSwitch, perform the following steps:
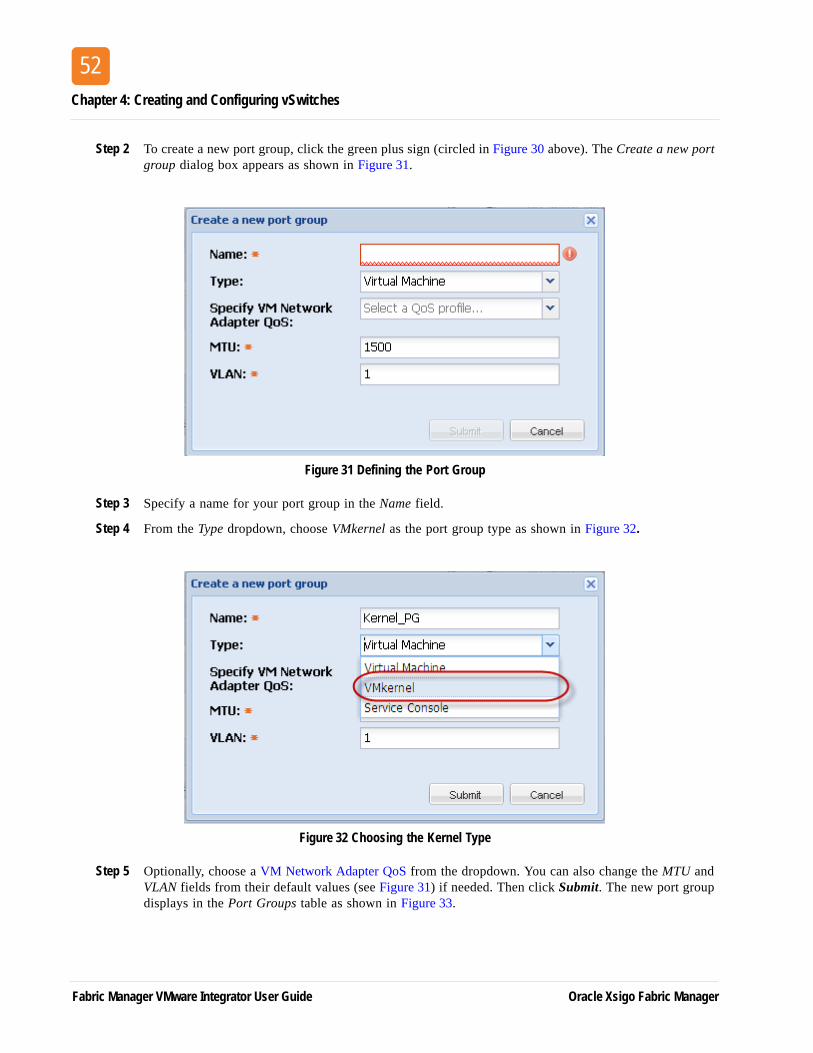
Step 1 Click on the link of the new vSwitch created for the Kernel vMotion traffic, and then click the Port Groups tab as shown in Figure 30.
Figure 30 Adding a Port Group
Oracle Xsigo Fabric Manager Fabric Manager VMware Integrator User Guide
Chapter 4: Creating and Configuring vSwitches
52
Step 2 To create a new port group, click the green plus sign (circled in Figure 30 above). The Create a new port group dialog box appears as shown in Figure 31.
Figure 31 Defining the Port Group
Step 3 Specify a name for your port group in the Name field.
Step 4 From the Type dropdown, choose VMkernel as the port group type as shown in Figure 32.
Figure 32 Choosing the Kernel Type
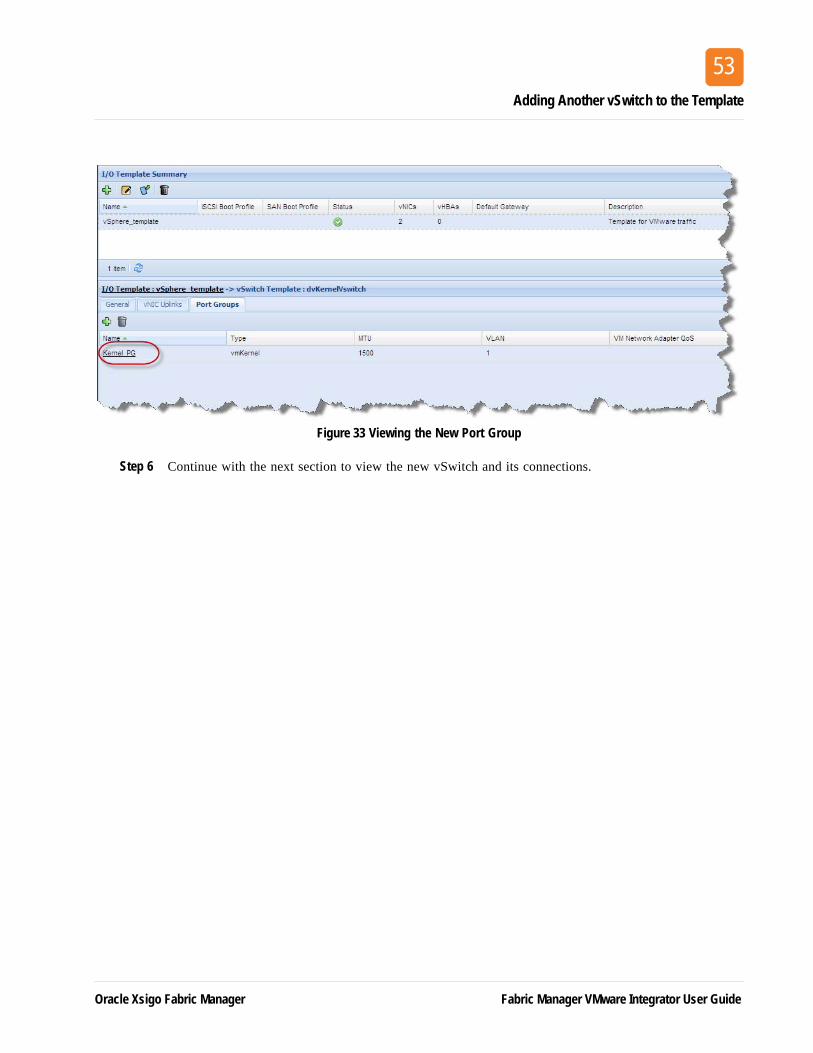
Step 5 Optionally, choose a VM Network Adapter QoS from the dropdown. You can also change the MTU and VLAN fields from their default values (see Figure 31) if needed. Then click Submit. The new port group displays in the Port Groups table as shown in Figure 33.
Fabric Manager VMware Integrator User Guide Oracle Xsigo Fabric Manager
Adding Another vSwitch to the Template
53
Figure 33 Viewing the New Port Group
Step 6 Continue with the next section to view the new vSwitch and its connections.
Oracle Xsigo Fabric Manager Fabric Manager VMware Integrator User Guide
Chapter 4: Creating and Configuring vSwitches
54
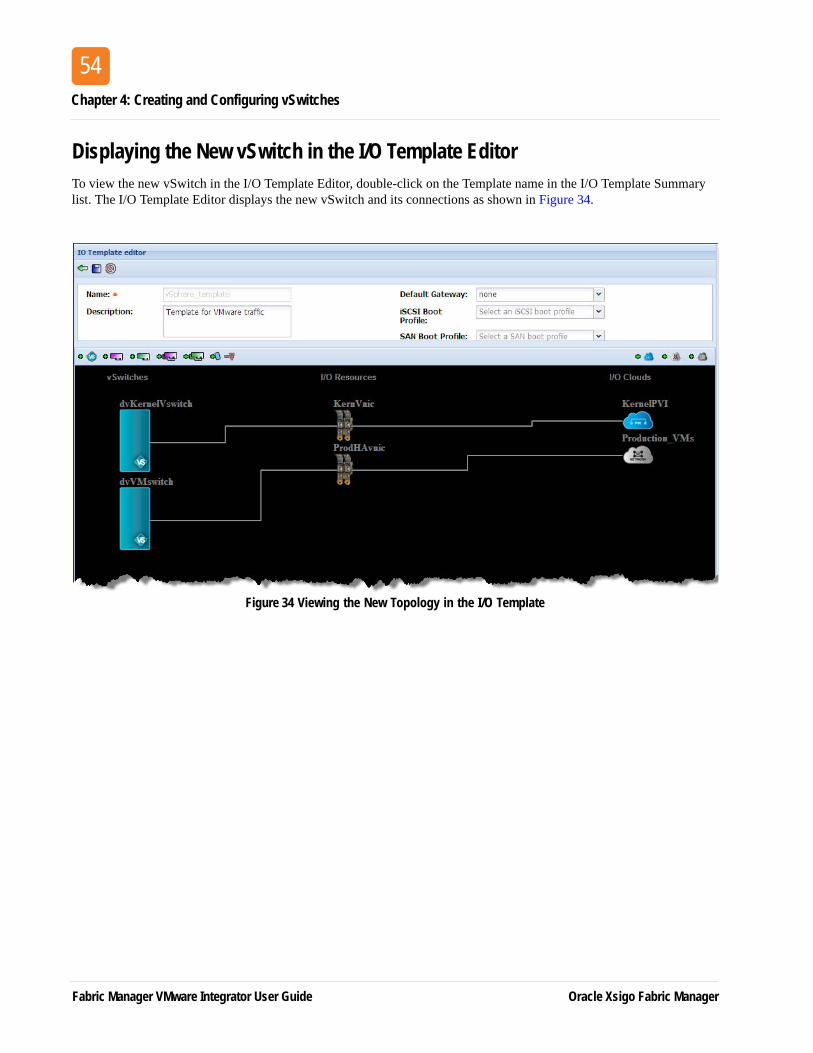
Displaying the New vSwitch in the I/O Template EditorTo view the new vSwitch in the I/O Template Editor, double-click on the Template name in the I/O Template Summary list. The I/O Template Editor displays the new vSwitch and its connections as shown in Figure 34.
Figure 34 Viewing the New Topology in the I/O Template
Fabric Manager VMware Integrator User Guide Oracle Xsigo Fabric Manager
Working with vSphere Port Groups
55
Working with vSphere Port GroupsOnce you have created and saved the vSwitches, their port groups, vNICs, and Clouds in the I/O Template, you can view that information, add more port groups to a vSwitch, change a port group, or delete a port, if necessary, using the “table” view. This section describes how to view an existing port group on a vSwitch, add a new port group to a vSwitch, and edit or delete a port group using the “table” view.
Understanding Port Groups Port groups make it possible to specify that a given virtual machine should have a particular type of connectivity on every host on which it might run. Port groups contain enough configuration information to provide persistent and consistent network access for vNICs, and contain the following information:
• vSwitch Name
• Type (Virtual Machine, VMkernel, or Service Console)
• VM Network Adapter QoS
• VLAN IDs
• MTU
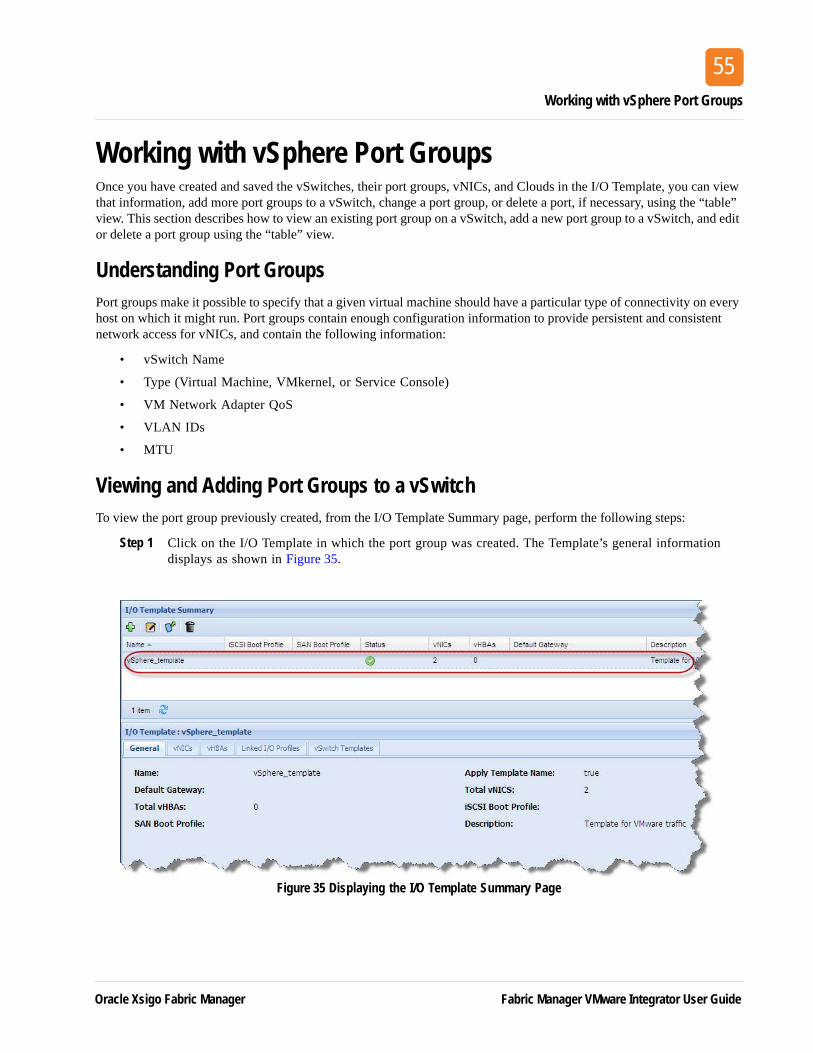
Viewing and Adding Port Groups to a vSwitchTo view the port group previously created, from the I/O Template Summary page, perform the following steps:
Step 1 Click on the I/O Template in which the port group was created. The Template’s general information displays as shown in Figure 35.
Figure 35 Displaying the I/O Template Summary Page
Oracle Xsigo Fabric Manager Fabric Manager VMware Integrator User Guide
Chapter 4: Creating and Configuring vSwitches
56
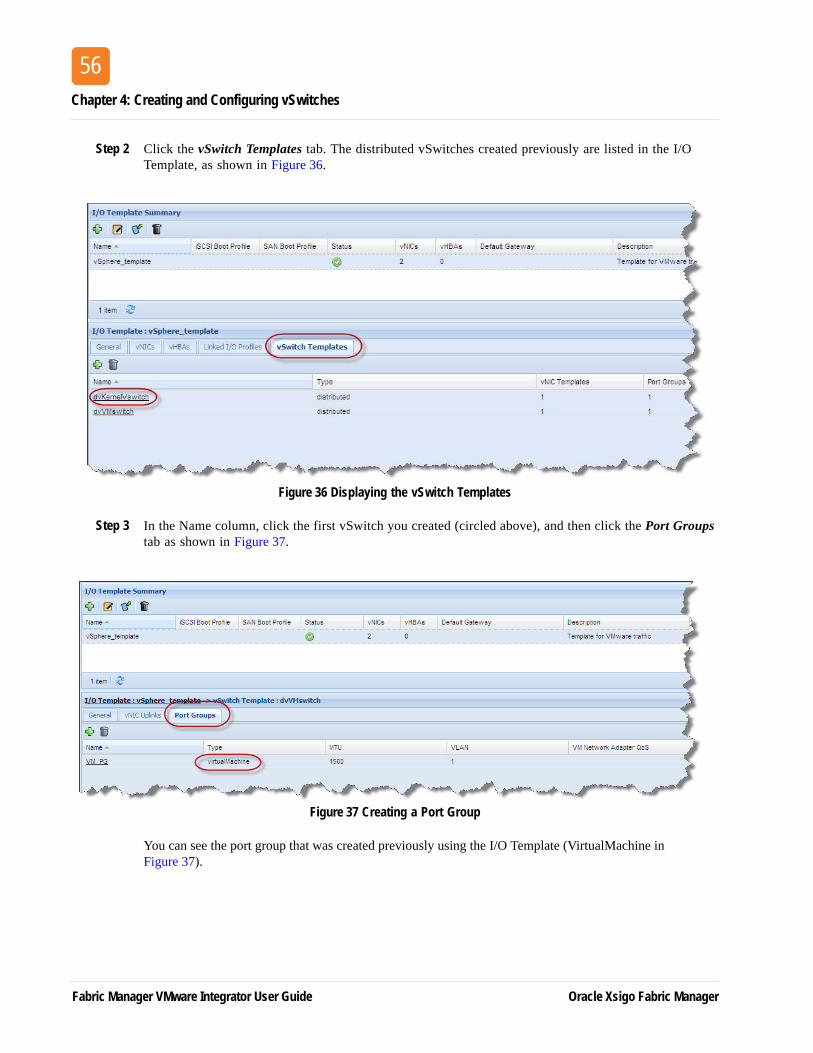
Step 2 Click the vSwitch Templates tab. The distributed vSwitches created previously are listed in the I/O Template, as shown in Figure 36.
Figure 36 Displaying the vSwitch Templates
Step 3 In the Name column, click the first vSwitch you created (circled above), and then click the Port Groups tab as shown in Figure 37.
Figure 37 Creating a Port Group
You can see the port group that was created previously using the I/O Template (VirtualMachine in Figure 37).
Fabric Manager VMware Integrator User Guide Oracle Xsigo Fabric Manager
Working with vSphere Port Groups
57
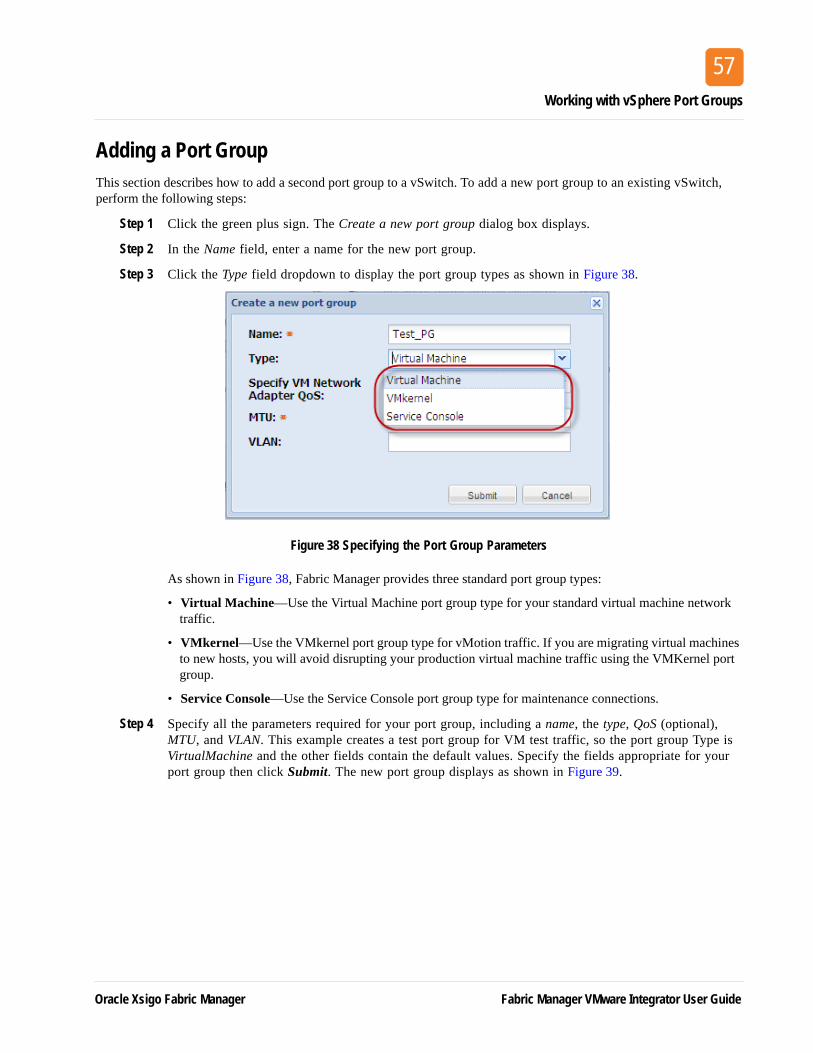
Adding a Port GroupThis section describes how to add a second port group to a vSwitch. To add a new port group to an existing vSwitch, perform the following steps:
Step 1 Click the green plus sign. The Create a new port group dialog box displays.
Step 2 In the Name field, enter a name for the new port group.
Step 3 Click the Type field dropdown to display the port group types as shown in Figure 38.
Figure 38 Specifying the Port Group Parameters
As shown in Figure 38, Fabric Manager provides three standard port group types:
• Virtual Machine—Use the Virtual Machine port group type for your standard virtual machine network traffic.
• VMkernel—Use the VMkernel port group type for vMotion traffic. If you are migrating virtual machines to new hosts, you will avoid disrupting your production virtual machine traffic using the VMKernel port group.
• Service Console—Use the Service Console port group type for maintenance connections.
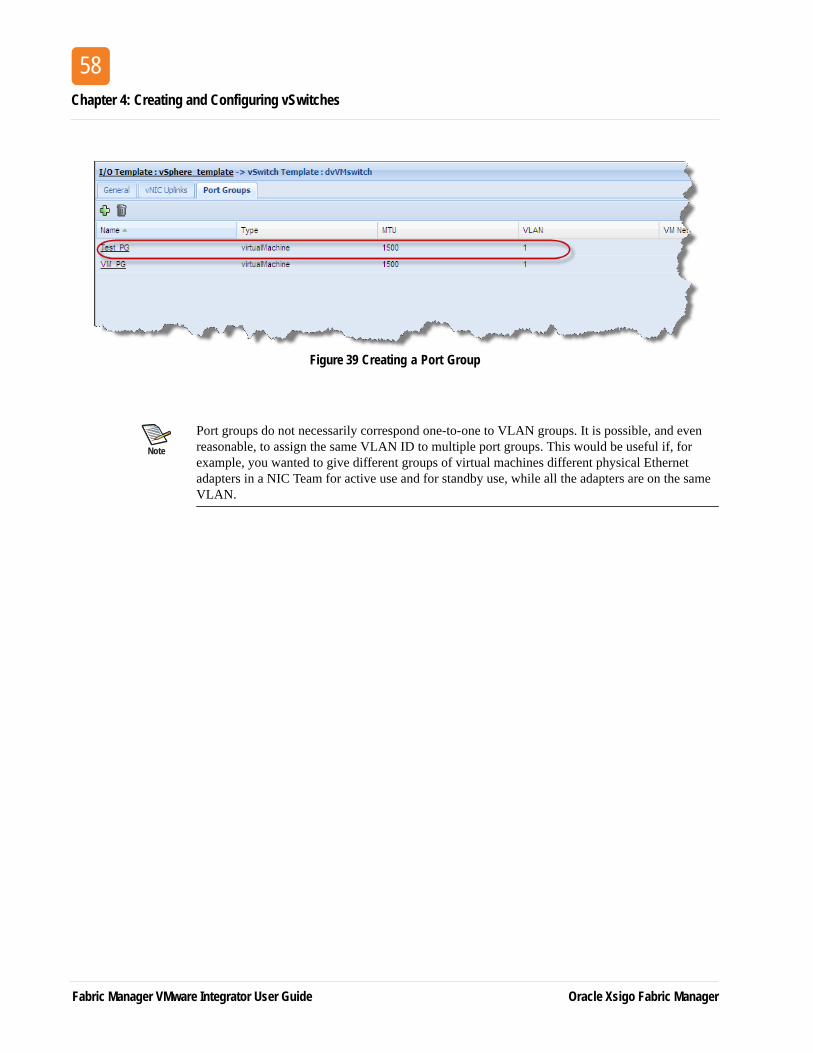
Step 4 Specify all the parameters required for your port group, including a name, the type, QoS (optional), MTU, and VLAN. This example creates a test port group for VM test traffic, so the port group Type is VirtualMachine and the other fields contain the default values. Specify the fields appropriate for your port group then click Submit. The new port group displays as shown in Figure 39.
Oracle Xsigo Fabric Manager Fabric Manager VMware Integrator User Guide
Chapter 4: Creating and Configuring vSwitches
58
Figure 39 Creating a Port Group
Note
Port groups do not necessarily correspond one-to-one to VLAN groups. It is possible, and even reasonable, to assign the same VLAN ID to multiple port groups. This would be useful if, for example, you wanted to give different groups of virtual machines different physical Ethernet adapters in a NIC Team for active use and for standby use, while all the adapters are on the same VLAN.
Fabric Manager VMware Integrator User Guide Oracle Xsigo Fabric Manager
Working with vSphere Port Groups
59
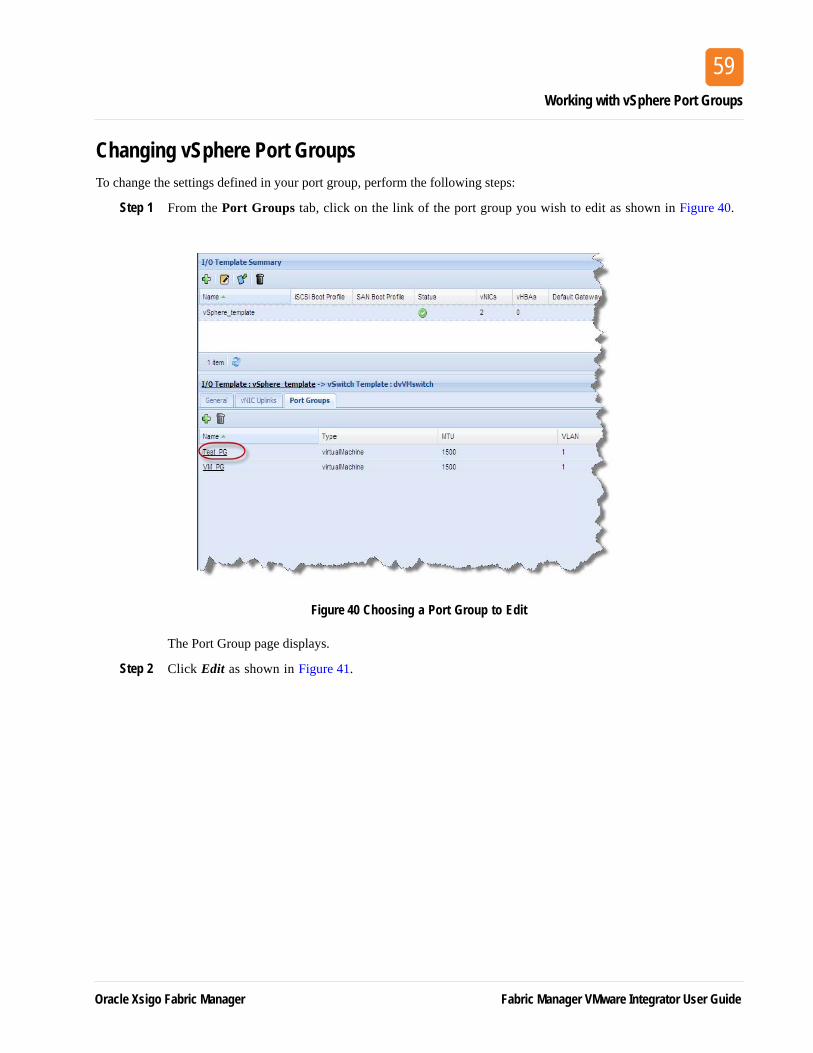
Changing vSphere Port Groups To change the settings defined in your port group, perform the following steps:
Step 1 From the Port Groups tab, click on the link of the port group you wish to edit as shown in Figure 40.
Figure 40 Choosing a Port Group to Edit
The Port Group page displays.
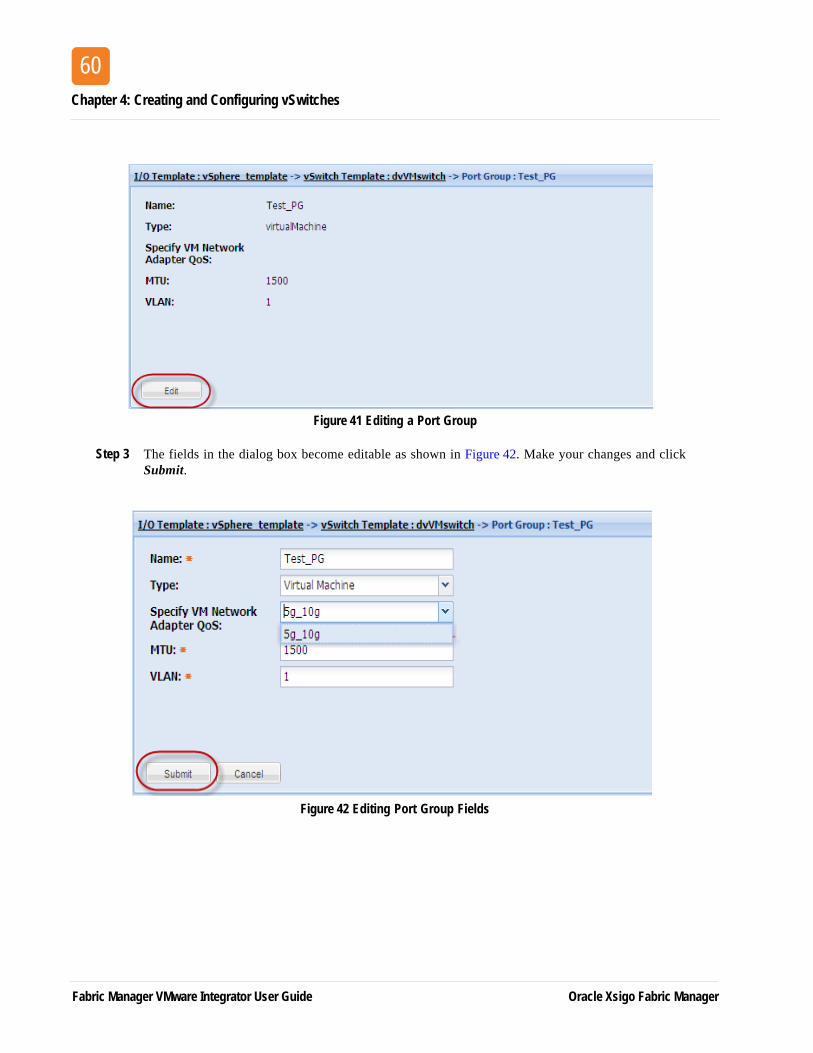
Step 2 Click Edit as shown in Figure 41.
Oracle Xsigo Fabric Manager Fabric Manager VMware Integrator User Guide
Chapter 4: Creating and Configuring vSwitches
60
Figure 41 Editing a Port Group
Step 3 The fields in the dialog box become editable as shown in Figure 42. Make your changes and click Submit.
Figure 42 Editing Port Group Fields
Fabric Manager VMware Integrator User Guide Oracle Xsigo Fabric Manager
Working with vSphere Port Groups
61
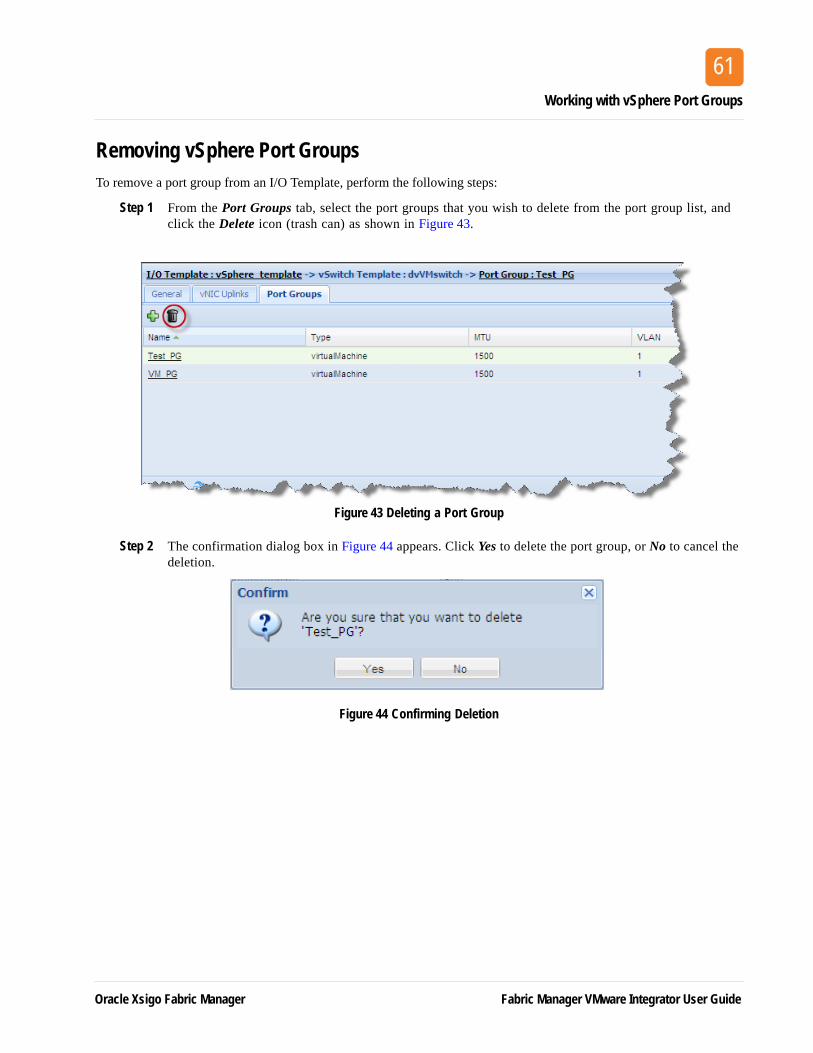
Removing vSphere Port GroupsTo remove a port group from an I/O Template, perform the following steps:
Step 1 From the Port Groups tab, select the port groups that you wish to delete from the port group list, and click the Delete icon (trash can) as shown in Figure 43.
Figure 43 Deleting a Port Group
Step 2 The confirmation dialog box in Figure 44 appears. Click Yes to delete the port group, or No to cancel the deletion.
Figure 44 Confirming Deletion
Oracle Xsigo Fabric Manager Fabric Manager VMware Integrator User Guide

Chapter 4: Creating and Configuring vSwitches
62
Working with vNIC UplinksPhysical Ethernet adapters and vNICs serve as bridges between virtual and physical networks. In a VMware infrastructure, they are called uplinks (vNIC uplink in Fabric Manager), and the virtual ports connected to them are called uplink ports. A single host may have a maximum of 32 uplinks, which may be on one switch or distributed among a number of switches.
This section describes how to view the vNIC uplinks that are automatically created for a port group that you created (see the previous section entitled “Working with vSphere Port Groups” on page 55).
Viewing a vNIC UplinkTo view one of the vNIC uplinks that were automatically created for the port group added previously, perform the following steps:
Step 1 Choose Server Resource Manager->I/O Templates to display the I/O Template Summary page and click on the vSphere Template as shown Figure 45.
Figure 45 Accessing the vSphere Template
Fabric Manager VMware Integrator User Guide Oracle Xsigo Fabric Manager
Working with vNIC Uplinks
63
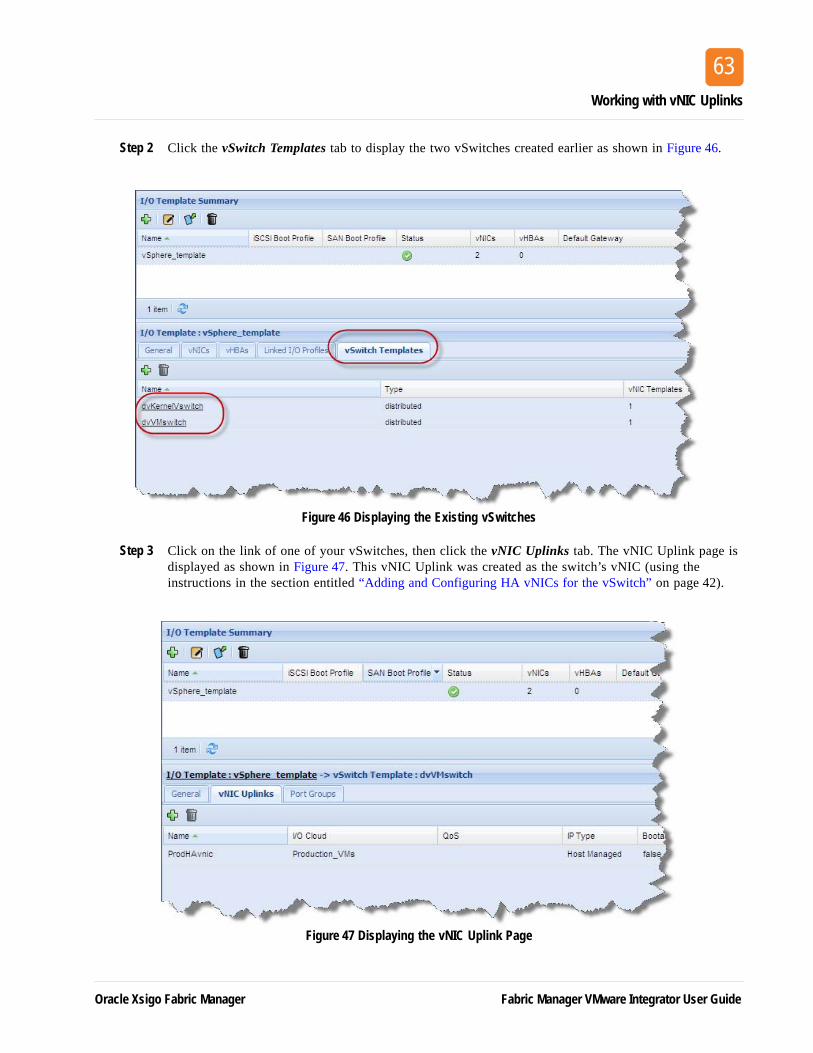
Step 2 Click the vSwitch Templates tab to display the two vSwitches created earlier as shown in Figure 46.
Figure 46 Displaying the Existing vSwitches
Step 3 Click on the link of one of your vSwitches, then click the vNIC Uplinks tab. The vNIC Uplink page is displayed as shown in Figure 47. This vNIC Uplink was created as the switch’s vNIC (using the instructions in the section entitled “Adding and Configuring HA vNICs for the vSwitch” on page 42).
Figure 47 Displaying the vNIC Uplink Page
Oracle Xsigo Fabric Manager Fabric Manager VMware Integrator User Guide

Chapter 4: Creating and Configuring vSwitches
64
Adding a New vNIC UplinkTo create a new a vNIC Uplink you must first create a new vNIC, and then associate that vNIC with the vSwitch. To do so, perform the following steps:
Step 1 Choose Server Resource Manager->I/O Templates to display the I/O Template Summary page and click on the vSphere Template as shown in Figure 48.
Figure 48 Displaying the I/O Templates Summary Page
Step 2 Highlight the Template that contains your vSwitch and click the vNICs tab to display the vNICs defined for the Template as shown in Figure 49.
Figure 49 Creating a New vNIC
Fabric Manager VMware Integrator User Guide Oracle Xsigo Fabric Manager
Working with vNIC Uplinks
65
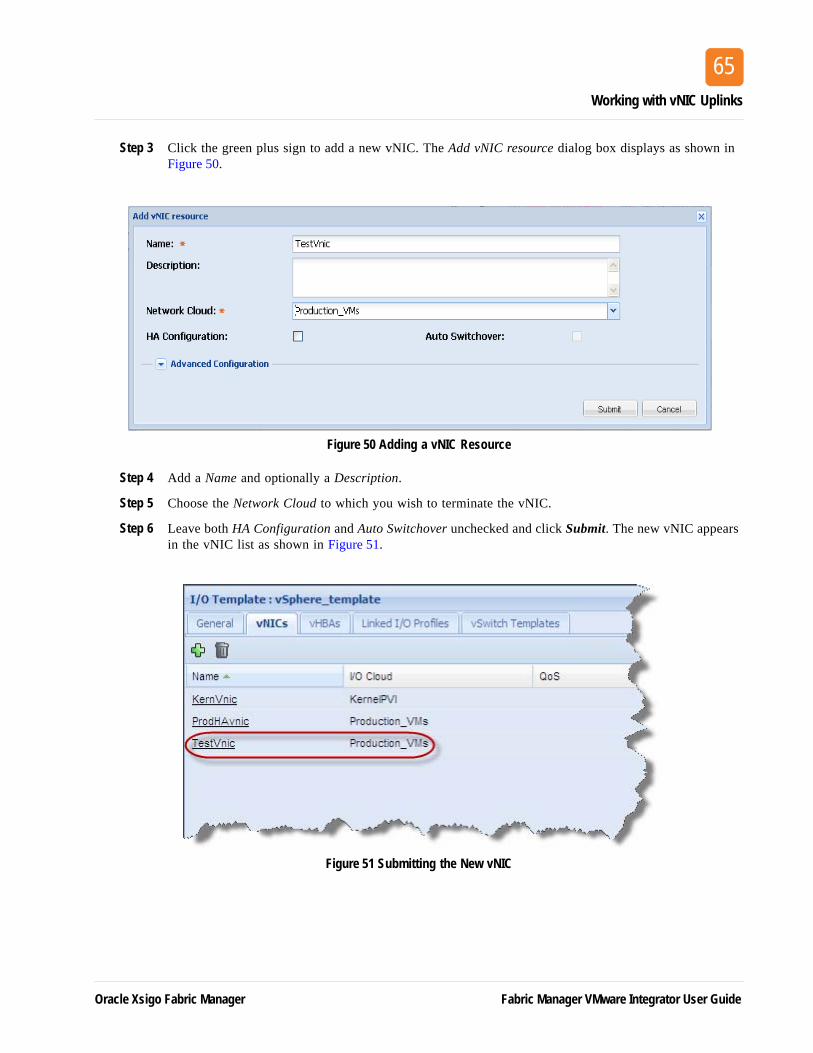
Step 3 Click the green plus sign to add a new vNIC. The Add vNIC resource dialog box displays as shown in Figure 50.
Figure 50 Adding a vNIC Resource
Step 4 Add a Name and optionally a Description.
Step 5 Choose the Network Cloud to which you wish to terminate the vNIC.
Step 6 Leave both HA Configuration and Auto Switchover unchecked and click Submit. The new vNIC appears in the vNIC list as shown in Figure 51.
Figure 51 Submitting the New vNIC
Oracle Xsigo Fabric Manager Fabric Manager VMware Integrator User Guide
Chapter 4: Creating and Configuring vSwitches
66
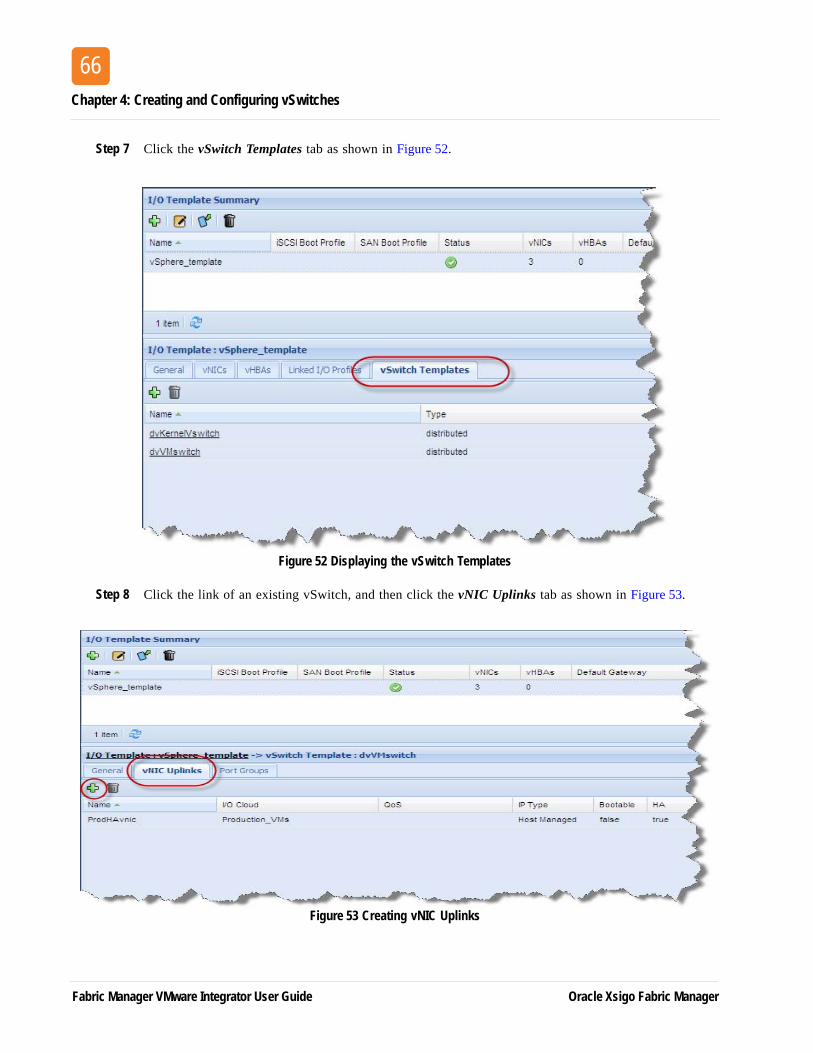
Step 7 Click the vSwitch Templates tab as shown in Figure 52.
Figure 52 Displaying the vSwitch Templates
Step 8 Click the link of an existing vSwitch, and then click the vNIC Uplinks tab as shown in Figure 53.
Figure 53 Creating vNIC Uplinks
Fabric Manager VMware Integrator User Guide Oracle Xsigo Fabric Manager
Working with vNIC Uplinks
67
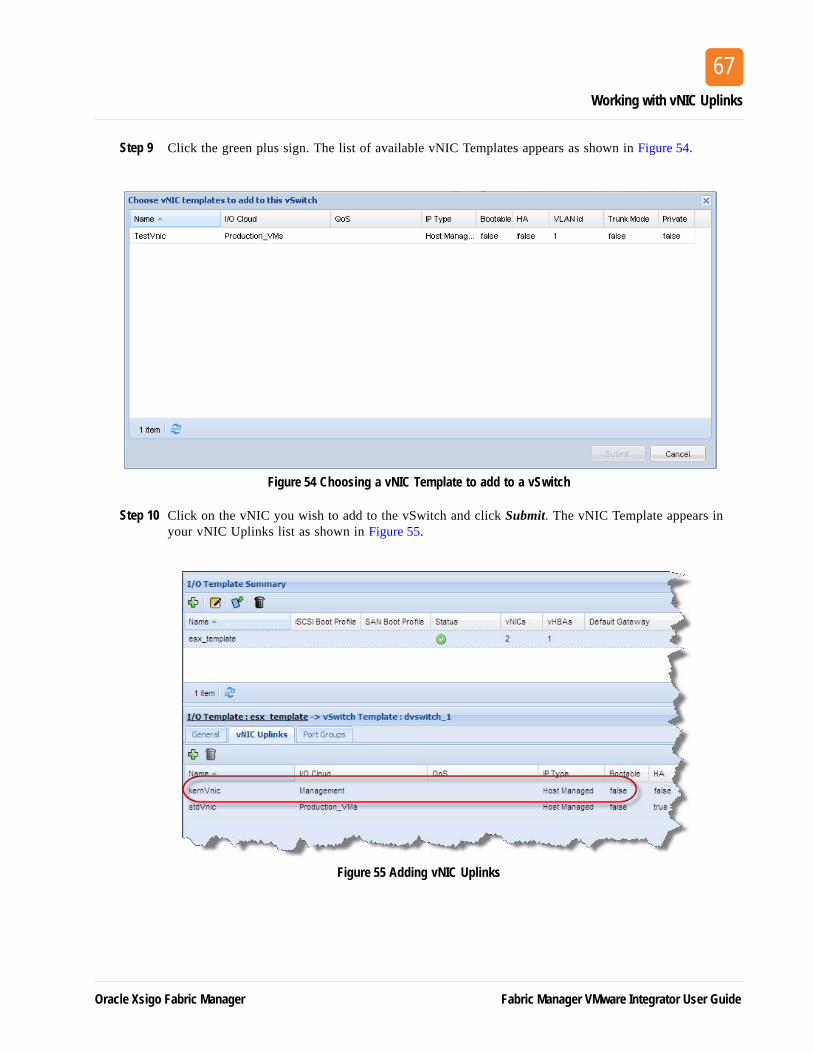
Step 9 Click the green plus sign. The list of available vNIC Templates appears as shown in Figure 54.
Figure 54 Choosing a vNIC Template to add to a vSwitch
Step 10 Click on the vNIC you wish to add to the vSwitch and click Submit. The vNIC Template appears in your vNIC Uplinks list as shown in Figure 55.
Figure 55 Adding vNIC Uplinks
Oracle Xsigo Fabric Manager Fabric Manager VMware Integrator User Guide

Chapter 4: Creating and Configuring vSwitches
68
Deleting a vNIC UplinkTo delete a vNIC Uplink, from the vNIC Uplink tab, perform the following steps:
Step 1 Click on the uplink you wish to delete and click the delete icon (garbage can), as shown in Figure 56.
Figure 56 Deleting a vNIC Uplink
The Confirmation dialog box displays as shown in Figure 57.
Step 2 Click Yes to confirm the deletion, or No to cancel.
Figure 57 Confirming the Deletion
Your vNIC is removed from Fabric Manager.
Fabric Manager VMware Integrator User Guide Oracle Xsigo Fabric Manager

69
Assigning Physical ResourcesAn I/O Template contains the definition of your vNICs, vHBAs and vSwitches, but it does not actually provide connectivity to the servers until you connect the I/O Template (or I/O Profile) to a physical server. If the server is not already connected to an I/O Template or I/O Profile and the host is not bound to another I/O Profile, you can connect it as long as it is in a “disconnected” state. Once you connect the I/O Template or Profile to a server, it takes a short time for Fabric Manager to push the network and storage connectivity to the host. Once established, the I/O Profile transitions from a “disconnected” state to the “up” state.
Once you have defined the I/O Template, you can assign the I/O Template to the physical resources in one of several ways:
• By assigning the I/O Template to a set of servers from the I/O Template page
• By connecting an I/O Profile to a selected physical server from the Physical Server Summary page
• By connecting a selected I/O Profile to a server from the I/O Profile Summary page
The previous chapter describes how to add an existing VMware vSphere host to Fabric Manager. This chapter describes how to connect your vSwitch Template to a physical server and includes the following sections:
• Assigning the Template to Physical Resources
• Providing Physical Resources to the vSwitch Template
• Applying the vSwitch Template to the Host
• Displaying vSphere Host Details
• Viewing the vSwitch vNICs on the Physical Server
Oracle Xsigo Fabric Manager Fabric Manager VMware Integrator User Guide
Chapter 5: Assigning Physical Resources
70
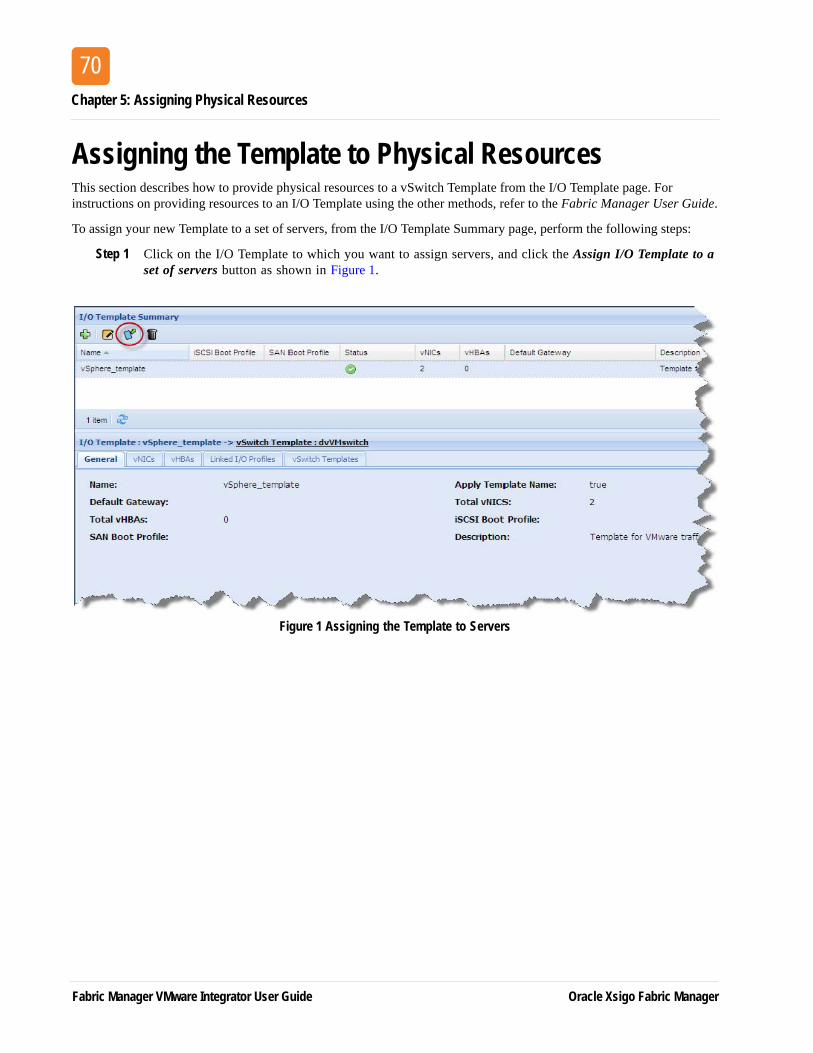
Assigning the Template to Physical ResourcesThis section describes how to provide physical resources to a vSwitch Template from the I/O Template page. For instructions on providing resources to an I/O Template using the other methods, refer to the Fabric Manager User Guide.
To assign your new Template to a set of servers, from the I/O Template Summary page, perform the following steps:
Step 1 Click on the I/O Template to which you want to assign servers, and click the Assign I/O Template to a set of servers button as shown in Figure 1.
Figure 1 Assigning the Template to Servers
Fabric Manager VMware Integrator User Guide Oracle Xsigo Fabric Manager
Assigning the Template to Physical Resources
71
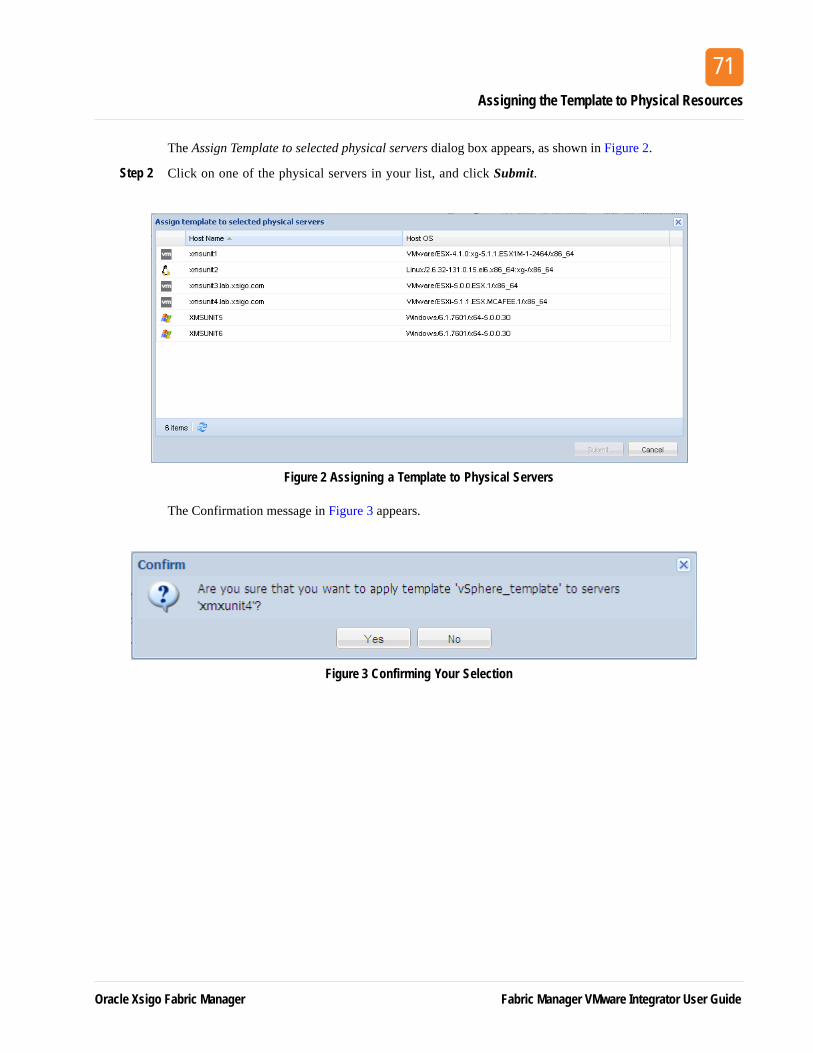
The Assign Template to selected physical servers dialog box appears, as shown in Figure 2.
Step 2 Click on one of the physical servers in your list, and click Submit.
Figure 2 Assigning a Template to Physical Servers
The Confirmation message in Figure 3 appears.
Figure 3 Confirming Your Selection
Oracle Xsigo Fabric Manager Fabric Manager VMware Integrator User Guide
Chapter 5: Assigning Physical Resources
72
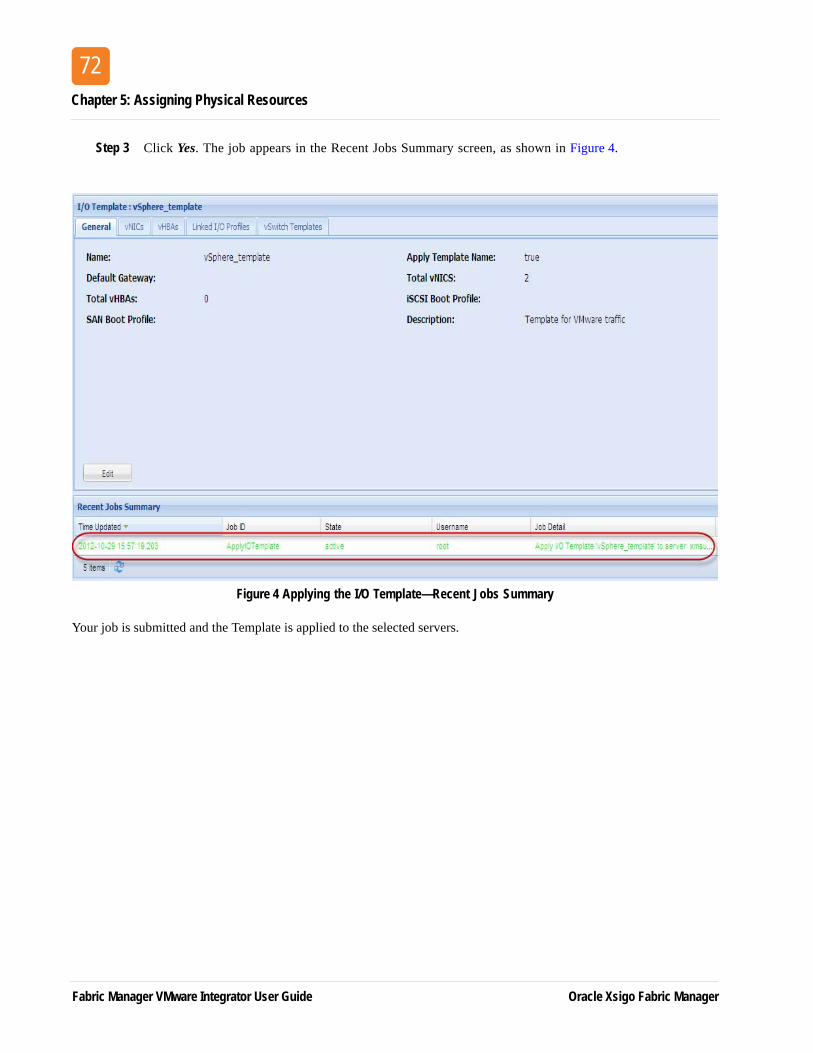
Step 3 Click Yes. The job appears in the Recent Jobs Summary screen, as shown in Figure 4.
Figure 4 Applying the I/O Template—Recent Jobs Summary
Your job is submitted and the Template is applied to the selected servers.
Fabric Manager VMware Integrator User Guide Oracle Xsigo Fabric Manager
Providing Physical Resources to the vSwitch Template
73
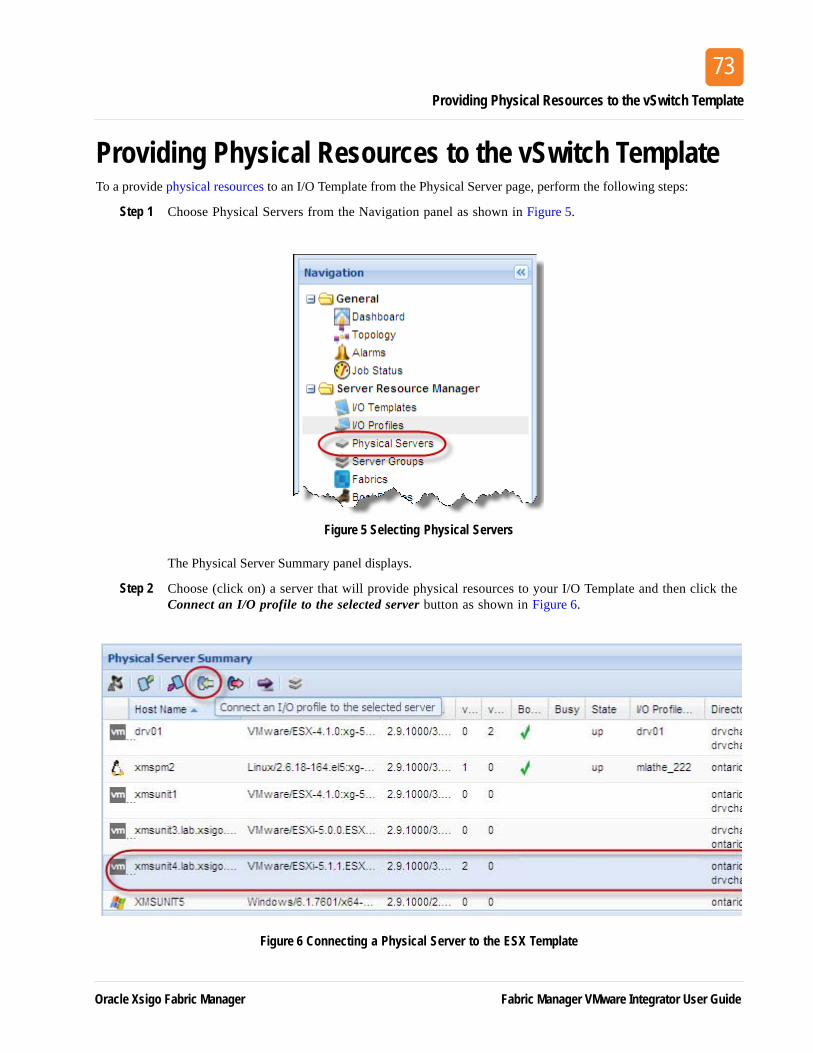
Providing Physical Resources to the vSwitch TemplateTo a provide physical resources to an I/O Template from the Physical Server page, perform the following steps:
Step 1 Choose Physical Servers from the Navigation panel as shown in Figure 5.
Figure 5 Selecting Physical Servers
The Physical Server Summary panel displays.
Step 2 Choose (click on) a server that will provide physical resources to your I/O Template and then click the Connect an I/O profile to the selected server button as shown in Figure 6.
Figure 6 Connecting a Physical Server to the ESX Template
Oracle Xsigo Fabric Manager Fabric Manager VMware Integrator User Guide

Chapter 5: Assigning Physical Resources
74
The Choose a Template to assign dialog box appears as shown in Figure 7.
Step 3 Click on the ESX Template that you created in the I/O Template using the instructions in the section entitled "Creating the I/O Template" on page 32, then click Submit.
Figure 7 Choosing the ESX Template
The confirmation dialog box displays.
Step 4 Click Yes to confirm the connections as shown in Figure 8.
Figure 8 Confirming the Server Connection
Fabric Manager VMware Integrator User Guide Oracle Xsigo Fabric Manager
Providing Physical Resources to the vSwitch Template
75
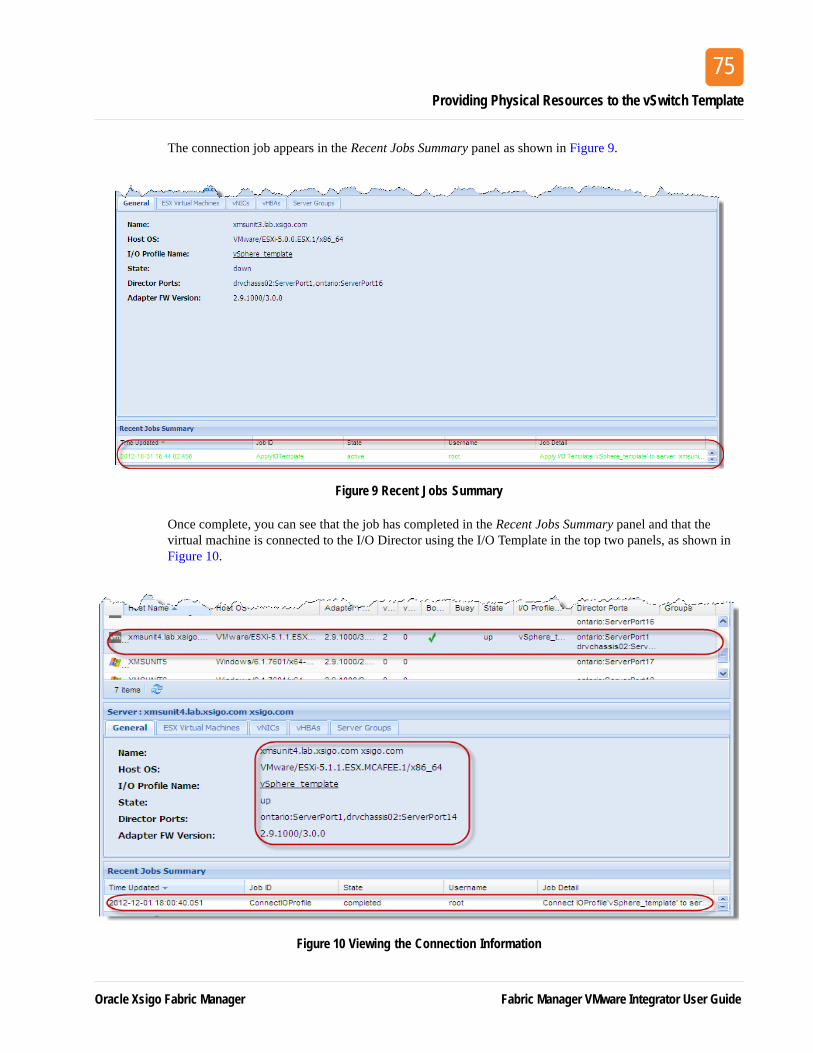
The connection job appears in the Recent Jobs Summary panel as shown in Figure 9.
Figure 9 Recent Jobs Summary
Once complete, you can see that the job has completed in the Recent Jobs Summary panel and that the virtual machine is connected to the I/O Director using the I/O Template in the top two panels, as shown in Figure 10.
Figure 10 Viewing the Connection Information
Oracle Xsigo Fabric Manager Fabric Manager VMware Integrator User Guide
Chapter 5: Assigning Physical Resources
76
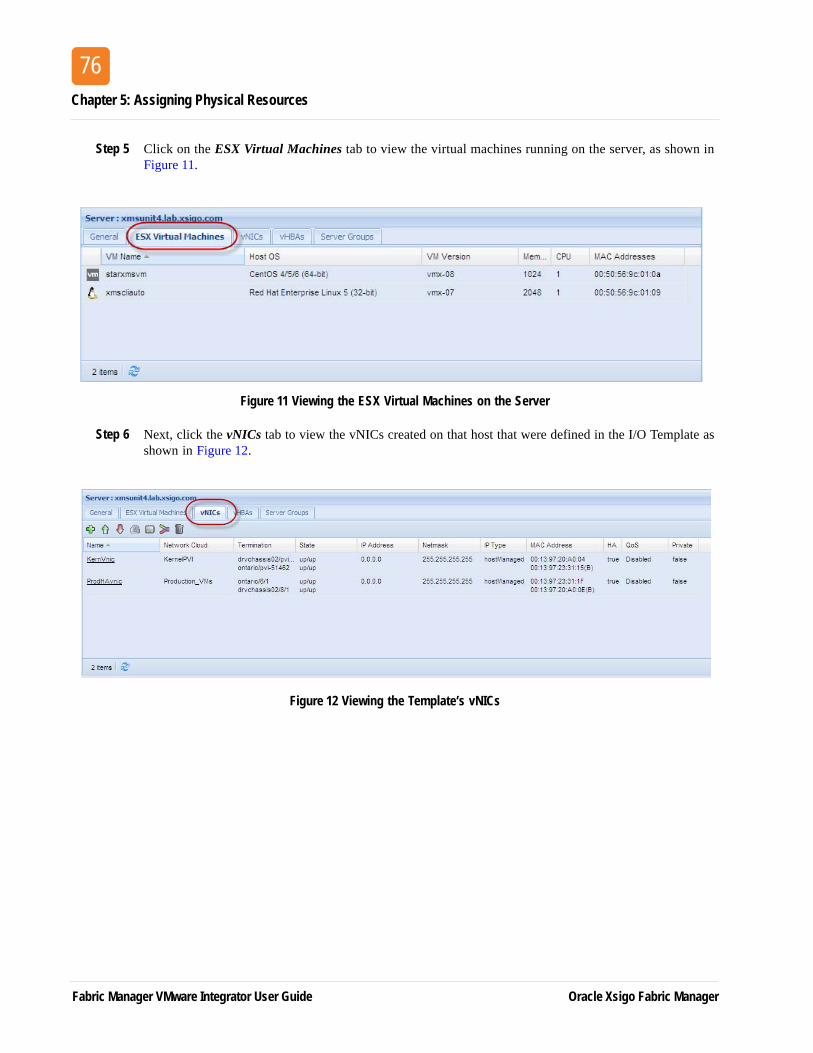
Step 5 Click on the ESX Virtual Machines tab to view the virtual machines running on the server, as shown in Figure 11.
Figure 11 Viewing the ESX Virtual Machines on the Server
Step 6 Next, click the vNICs tab to view the vNICs created on that host that were defined in the I/O Template as shown in Figure 12.
Figure 12 Viewing the Template’s vNICs
Fabric Manager VMware Integrator User Guide Oracle Xsigo Fabric Manager

Providing Physical Resources to the vSwitch Template
77
Step 7 Follow the instructions in the next section to apply the vSwitch Template to the host.
Note
From this screen, you perform several actions using, including:
• Create a new vNIC
• Turn on a vNIC
• Shut down a vNIC
• Update the vNIC to terminate on another cloud
• Update the vNIC to terminate to change its termination to a different port or LAG
• Convert a pair of vNIC to an HA vNIC
• Delete a vNIC
For more information about these options, see the Fabric Manager User Guide.
Oracle Xsigo Fabric Manager Fabric Manager VMware Integrator User Guide

Chapter 5: Assigning Physical Resources
78
Applying the vSwitch Template to the HostTo apply the vSwitch Template to the vSphere Host, perform the following steps:
Step 1 Click VMware Integrator in the Navigation panel as shown in Figure 13.
Figure 13 Viewing VMware Integrator Details
Step 2 The vSphere Summary screen displays. Click on the host that you added to Fabric Manager (anywhere in the row) and then click the ESX Servers tab as shown in Figure 14.
Figure 14 Applying a vSwitch Template to a Server
Step 3 Click on the host to which you connected the I/O Template (in this example, it is the middle host in the figure above, xmsunit 4.lab.xsigo.com), then click on green arrow (shown above in the blue box). The job to create the vSwitches based on the ESX Template appears in the Recent Jobs Summary panel as shown in Figure 15.
Fabric Manager VMware Integrator User Guide Oracle Xsigo Fabric Manager
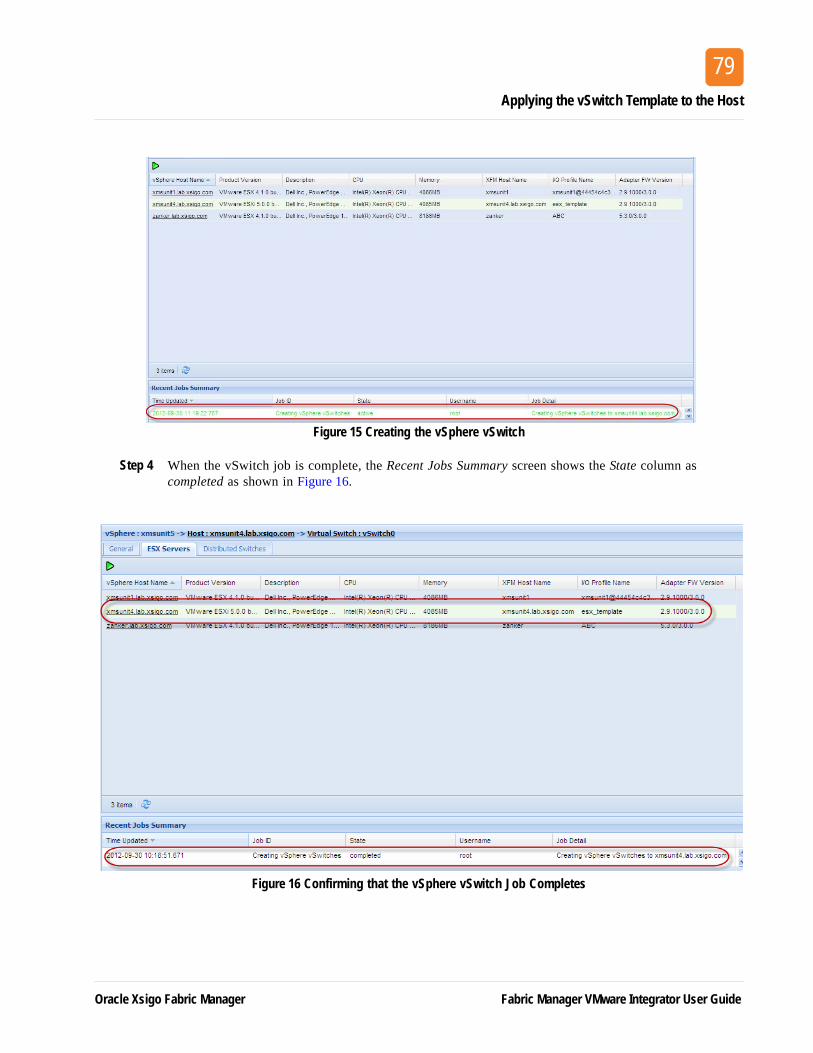
Applying the vSwitch Template to the Host
79
Figure 15 Creating the vSphere vSwitch
Step 4 When the vSwitch job is complete, the Recent Jobs Summary screen shows the State column as completed as shown in Figure 16.
Figure 16 Confirming that the vSphere vSwitch Job Completes
Oracle Xsigo Fabric Manager Fabric Manager VMware Integrator User Guide

Chapter 5: Assigning Physical Resources
80
Displaying vSphere Host DetailsTo display the details of the vSphere host to which the vSwitch Template applies, perform the following steps:
Step 1 Click on the Distributed Switches tab to display the vSwitches created for that Host as shown in Figure 17.
Figure 17 Viewing the vSwitches
Step 2 Click on the link for one of the vSwitches that you created, then click the Port Groups tab. The port group that you previously created in your vSphere Template displays as shown in Figure 18.
Figure 18 Displaying the vSwitch Port Groups
Fabric Manager VMware Integrator User Guide Oracle Xsigo Fabric Manager
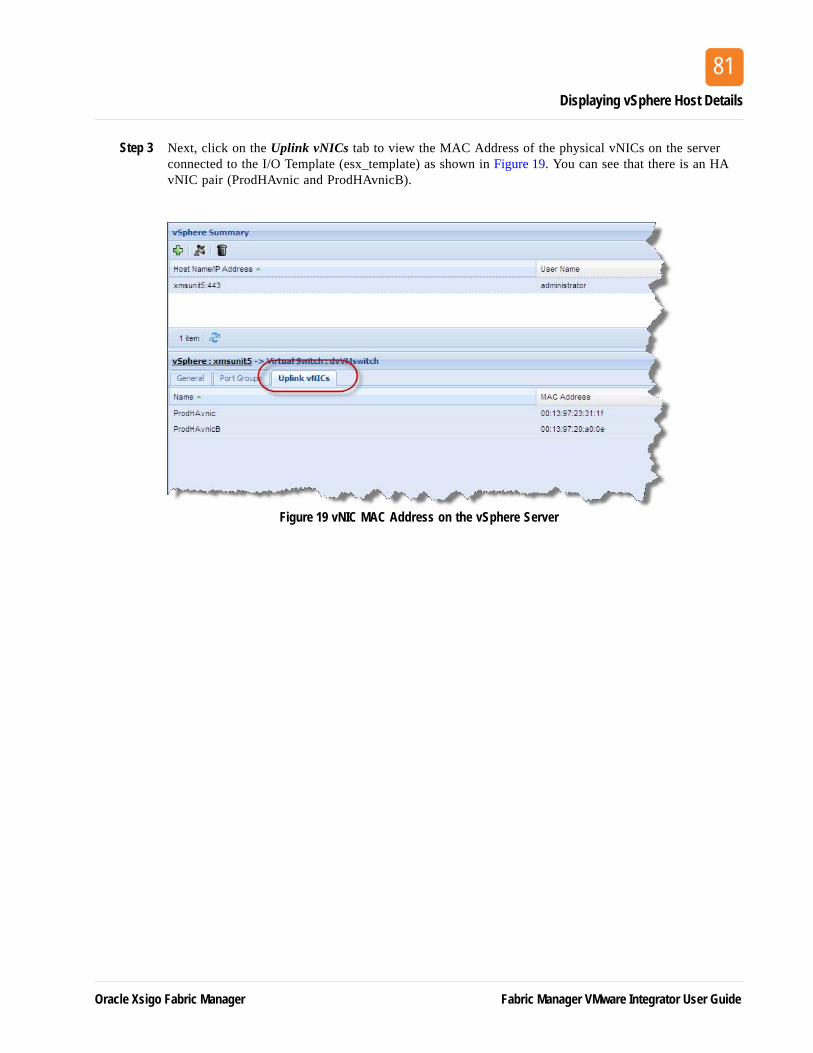
Displaying vSphere Host Details
81
Step 3 Next, click on the Uplink vNICs tab to view the MAC Address of the physical vNICs on the server connected to the I/O Template (esx_template) as shown in Figure 19. You can see that there is an HA vNIC pair (ProdHAvnic and ProdHAvnicB).
Figure 19 vNIC MAC Address on the vSphere Server
Oracle Xsigo Fabric Manager Fabric Manager VMware Integrator User Guide
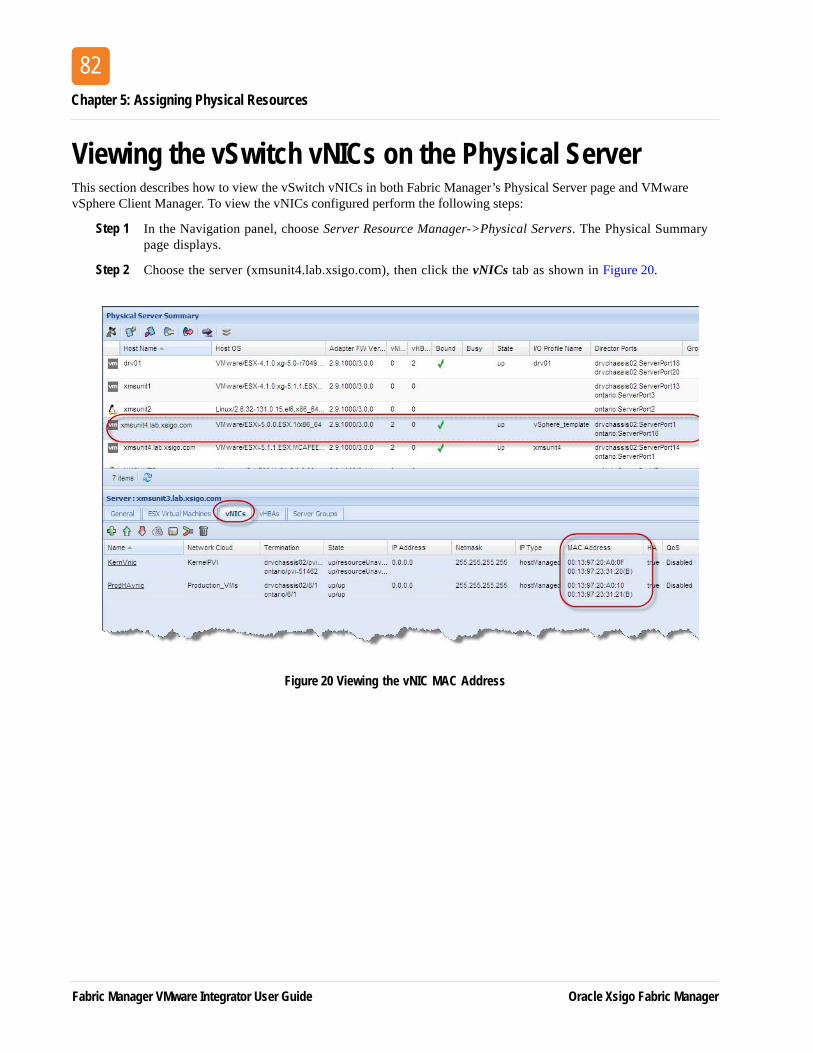
Chapter 5: Assigning Physical Resources
82
Viewing the vSwitch vNICs on the Physical ServerThis section describes how to view the vSwitch vNICs in both Fabric Manager’s Physical Server page and VMware vSphere Client Manager. To view the vNICs configured perform the following steps:
Step 1 In the Navigation panel, choose Server Resource Manager->Physical Servers. The Physical Summary page displays.
Step 2 Choose the server (xmsunit4.lab.xsigo.com), then click the vNICs tab as shown in Figure 20.
Figure 20 Viewing the vNIC MAC Address
Fabric Manager VMware Integrator User Guide Oracle Xsigo Fabric Manager
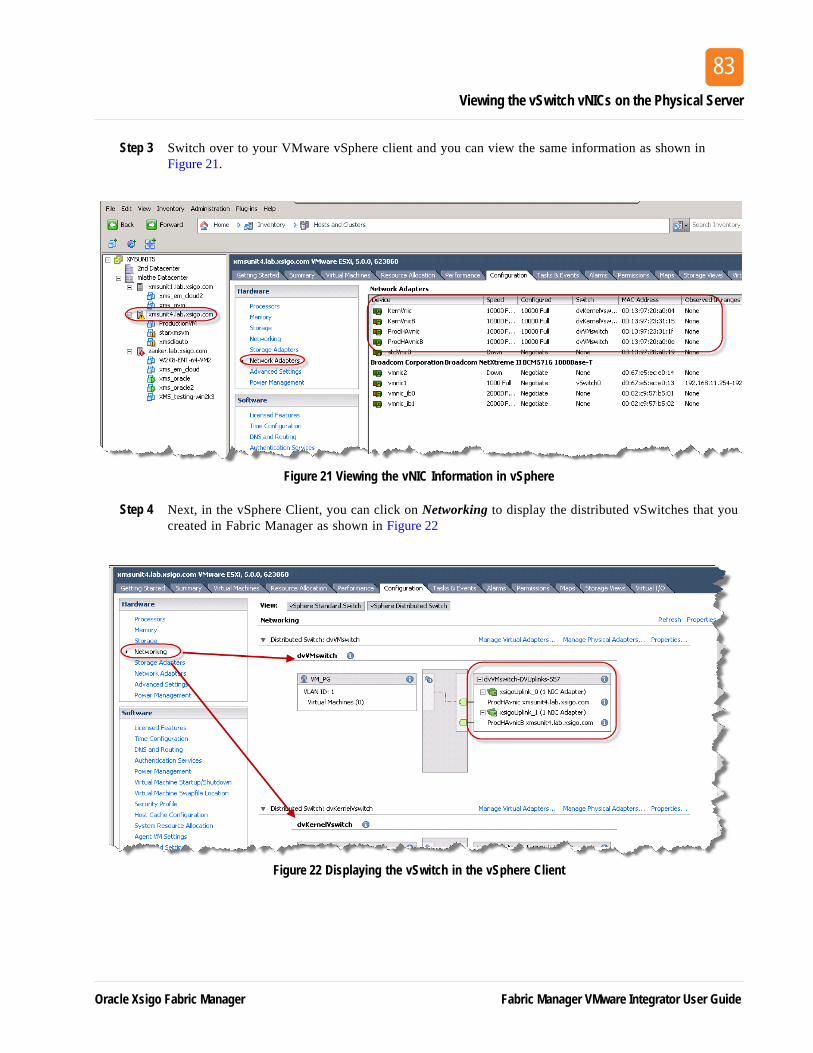
Viewing the vSwitch vNICs on the Physical Server
83
Step 3 Switch over to your VMware vSphere client and you can view the same information as shown in Figure 21.
Figure 21 Viewing the vNIC Information in vSphere
Step 4 Next, in the vSphere Client, you can click on Networking to display the distributed vSwitches that you created in Fabric Manager as shown in Figure 22
Figure 22 Displaying the vSwitch in the vSphere Client
Oracle Xsigo Fabric Manager Fabric Manager VMware Integrator User Guide

Chapter 5: Assigning Physical Resources
84
Fabric Manager VMware Integrator User Guide Oracle Xsigo Fabric Manager

85
Viewing Discovered InformationAt this point, you have added your vSphere server to Fabric Manager, configured your virtual switch I/O Template, defined the vSwitch port groups and vNIC uplinks, and assigned physical resources to your vSwitch Template. Fabric Manager can now “discover” all of the existing virtual machines across all attached ESX hots in the Fabric Manager environment as well as in the VMware vSphere Client software.
This chapter describes how you can view all existing virtual machines across all attached ESX hosts (also called a Hypervisor Host machine) in the Fabric Manager environment, and contains the following sections:
• Viewing all Virtual Machines Visible on the Xsigo-Attached Hosts
• Viewing the Virtual Machines Connected in the vSphere Console
Oracle Xsigo Fabric Manager Fabric Manager VMware Integrator User Guide
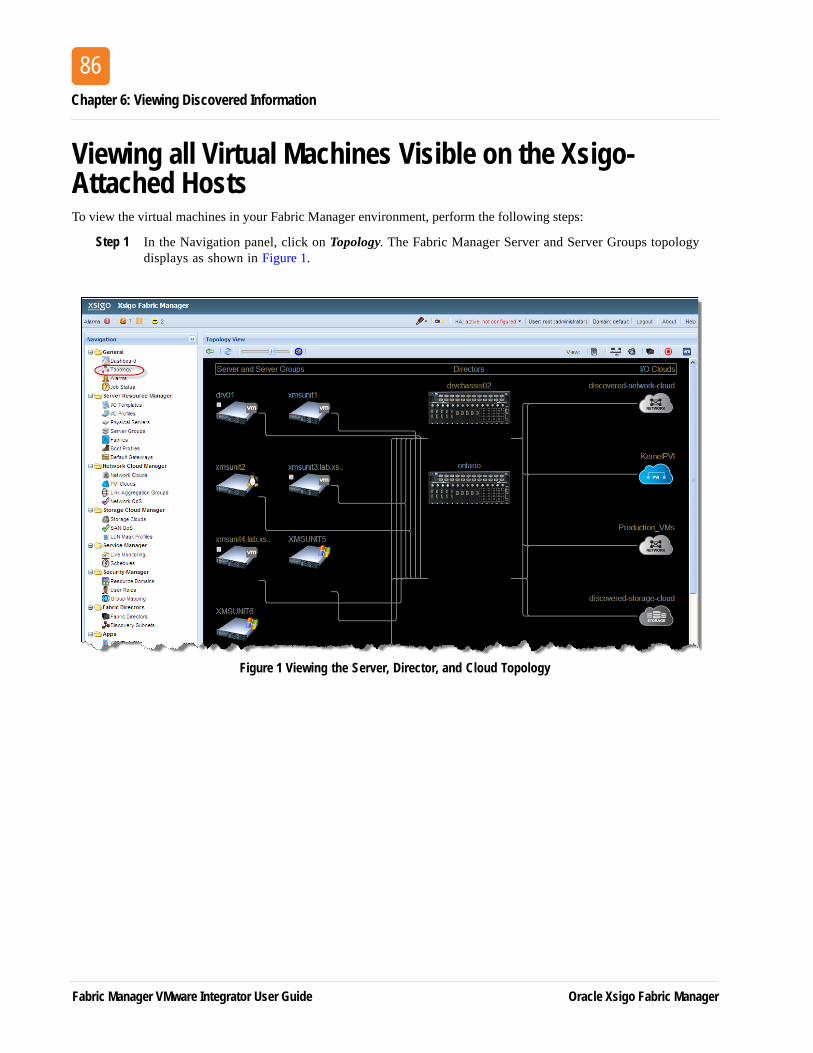
Chapter 6: Viewing Discovered Information
86
Viewing all Virtual Machines Visible on the Xsigo-Attached HostsTo view the virtual machines in your Fabric Manager environment, perform the following steps:
Step 1 In the Navigation panel, click on Topology. The Fabric Manager Server and Server Groups topology displays as shown in Figure 1.
Figure 1 Viewing the Server, Director, and Cloud Topology
Fabric Manager VMware Integrator User Guide Oracle Xsigo Fabric Manager

Viewing all Virtual Machines Visible on the Xsigo-Attached Hosts
87
Step 2 Click the Virtual Machines Topology view button in the top right corner of the window to display the virtual machines in the Fabric Manager environment as shown in Figure 2.
Figure 2 Viewing the Virtual Machines in the Topology View
Oracle Xsigo Fabric Manager Fabric Manager VMware Integrator User Guide

Chapter 6: Viewing Discovered Information
88
Step 3 Hover your mouse over the port group icons on the vSwitch to view the port groups defined on the vSwitches as shown in Figure 3. You can see how the virtual machines, vSwitches, hosts, and Clouds connect to each other from this view. This screen shows port groups defined on both distributed vSwitches: VM_PG on vSwitch dvVMswitch and Kernel_PG on vSwitch dvKernelVswitch.
Figure 3 Viewing Port Groups in the Topology View
Fabric Manager VMware Integrator User Guide Oracle Xsigo Fabric Manager
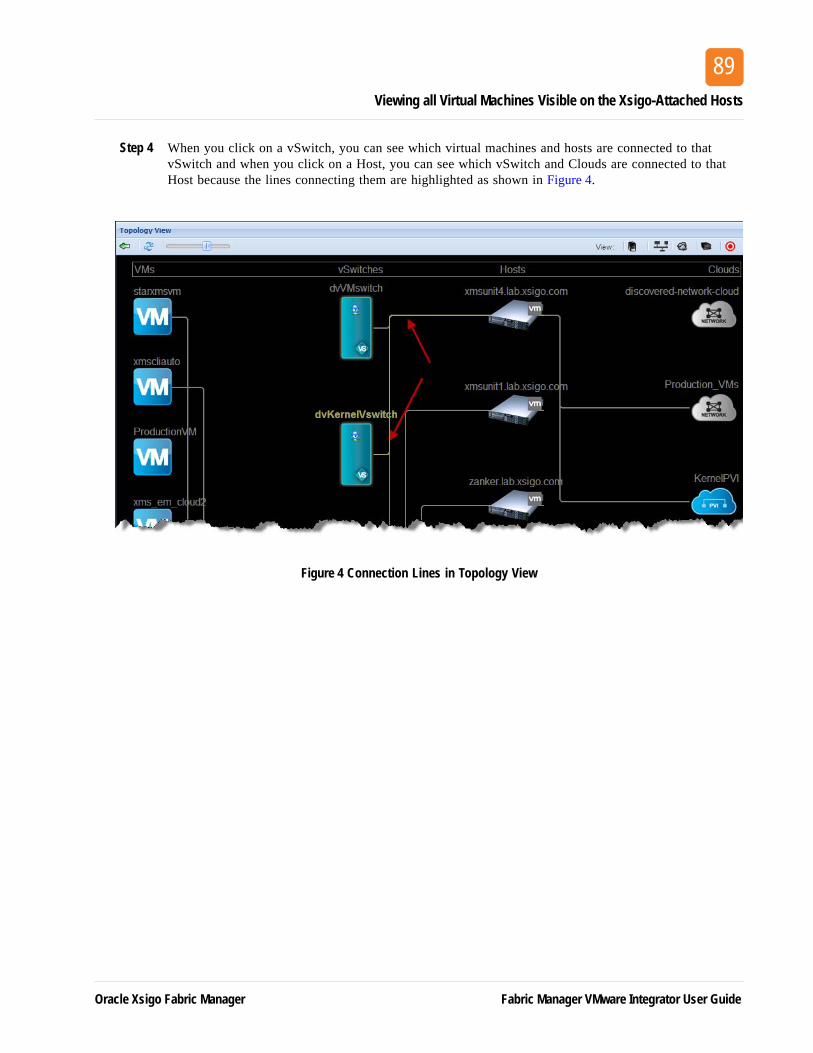
Viewing all Virtual Machines Visible on the Xsigo-Attached Hosts
89
Step 4 When you click on a vSwitch, you can see which virtual machines and hosts are connected to that vSwitch and when you click on a Host, you can see which vSwitch and Clouds are connected to that Host because the lines connecting them are highlighted as shown in Figure 4.
Figure 4 Connection Lines in Topology View
Oracle Xsigo Fabric Manager Fabric Manager VMware Integrator User Guide
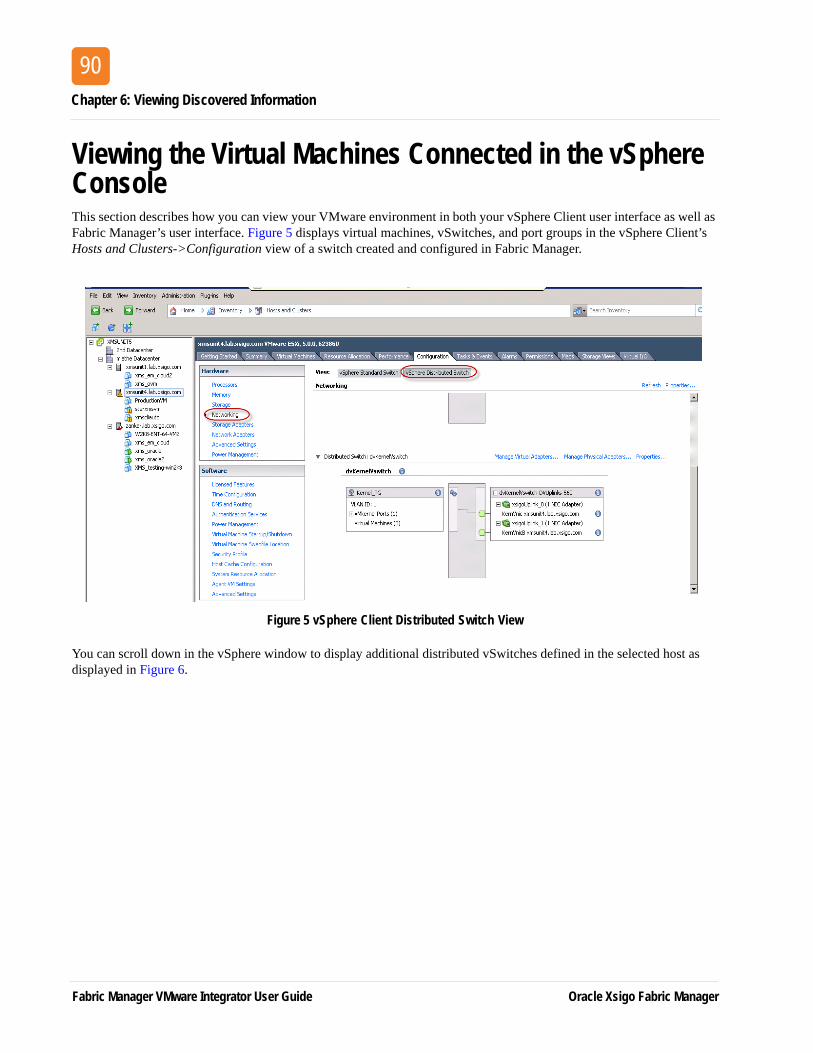
Chapter 6: Viewing Discovered Information
90
Viewing the Virtual Machines Connected in the vSphere ConsoleThis section describes how you can view your VMware environment in both your vSphere Client user interface as well as Fabric Manager’s user interface. Figure 5 displays virtual machines, vSwitches, and port groups in the vSphere Client’s Hosts and Clusters->Configuration view of a switch created and configured in Fabric Manager.
Figure 5 vSphere Client Distributed Switch View
You can scroll down in the vSphere window to display additional distributed vSwitches defined in the selected host as displayed in Figure 6.
Fabric Manager VMware Integrator User Guide Oracle Xsigo Fabric Manager

Viewing the Virtual Machines Connected in the vSphere Console
91
Figure 6 vSphere Networking View
Oracle Xsigo Fabric Manager Fabric Manager VMware Integrator User Guide

Chapter 6: Viewing Discovered Information
92
Adding a Virtual Machine to the Port GroupYou can add a new virtual machine to that datacenter and connect it to the existing port group using the vSphere Client and then view it in Fabric Manager. To do this, perform the following steps:
Step 1 From within the vSphere Client Networking view, right-click on the datacenter in which you wish to create the virtual machine, and choose New Virtual Machines as shown in Figure 7.
Figure 7 Creating a New Virtual Machine
Step 2 Choose Typical and click Next as shown in Figure 8.
Fabric Manager VMware Integrator User Guide Oracle Xsigo Fabric Manager
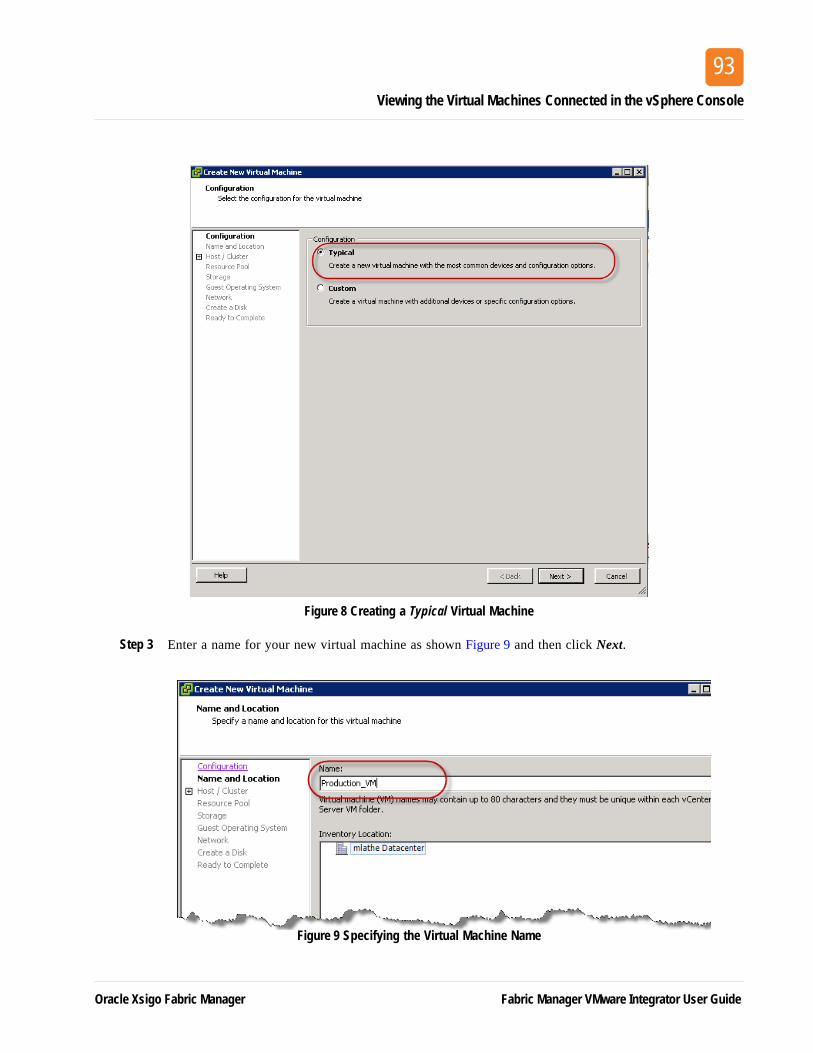
Viewing the Virtual Machines Connected in the vSphere Console
93
Figure 8 Creating a Typical Virtual Machine
Step 3 Enter a name for your new virtual machine as shown Figure 9 and then click Next.
Figure 9 Specifying the Virtual Machine Name
Oracle Xsigo Fabric Manager Fabric Manager VMware Integrator User Guide
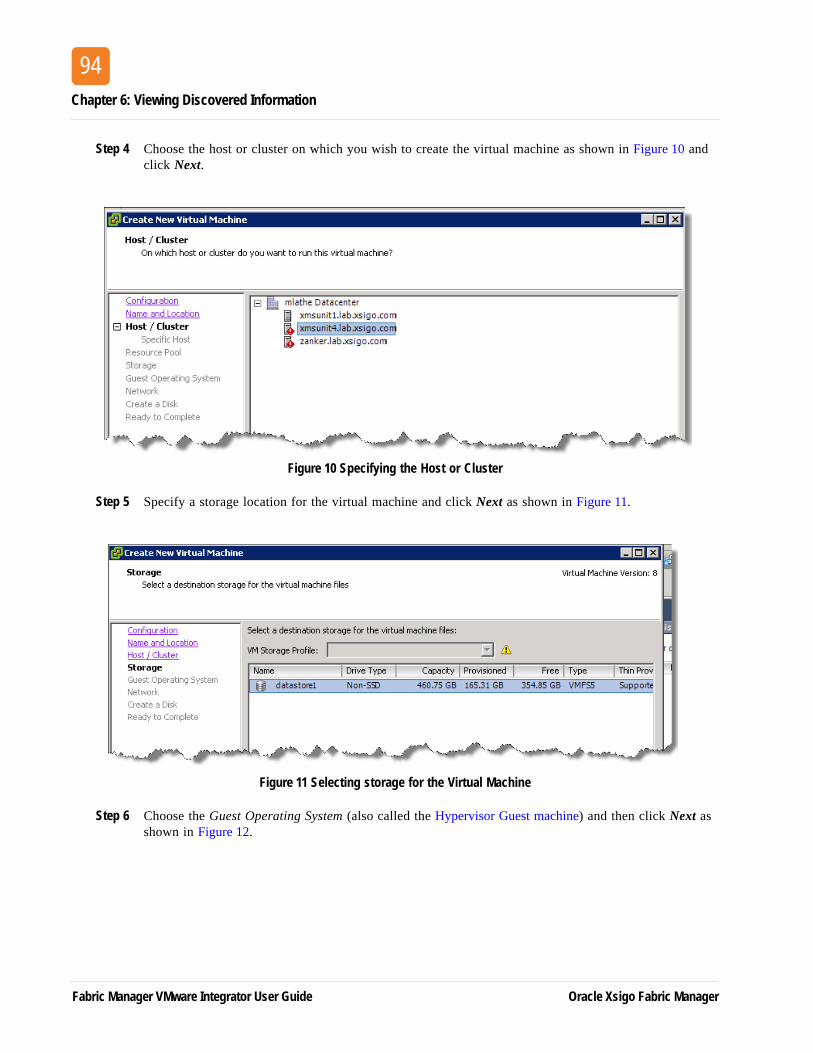
Chapter 6: Viewing Discovered Information
94
Step 4 Choose the host or cluster on which you wish to create the virtual machine as shown in Figure 10 and click Next.
Figure 10 Specifying the Host or Cluster
Step 5 Specify a storage location for the virtual machine and click Next as shown in Figure 11.
Figure 11 Selecting storage for the Virtual Machine
Step 6 Choose the Guest Operating System (also called the Hypervisor Guest machine) and then click Next as shown in Figure 12.
Fabric Manager VMware Integrator User Guide Oracle Xsigo Fabric Manager
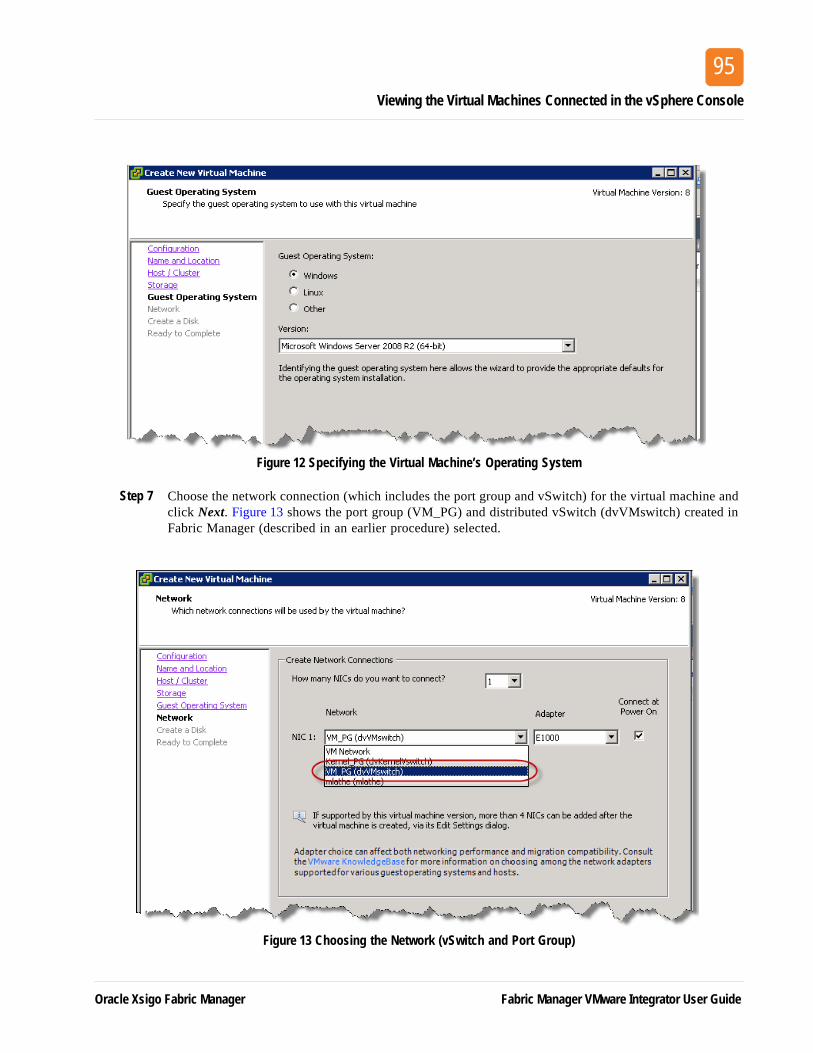
Viewing the Virtual Machines Connected in the vSphere Console
95
Figure 12 Specifying the Virtual Machine’s Operating System
Step 7 Choose the network connection (which includes the port group and vSwitch) for the virtual machine and click Next. Figure 13 shows the port group (VM_PG) and distributed vSwitch (dvVMswitch) created in Fabric Manager (described in an earlier procedure) selected.
Figure 13 Choosing the Network (vSwitch and Port Group)
Oracle Xsigo Fabric Manager Fabric Manager VMware Integrator User Guide

Chapter 6: Viewing Discovered Information
96
Step 8 Enter the virtual disk size and how the storage should be provisioned (see Figure 14) and then click Next.
Figure 14 Specifying the Virtual Machine’s Size
Step 9 Review the virtual machine settings and click Finish. The job to create the virtual machine appears in the bottom window (see Figure 15). When the virtual machine is complete, Completed appears in the Status column.
Figure 15 Viewing the Task Window
Fabric Manager VMware Integrator User Guide Oracle Xsigo Fabric Manager
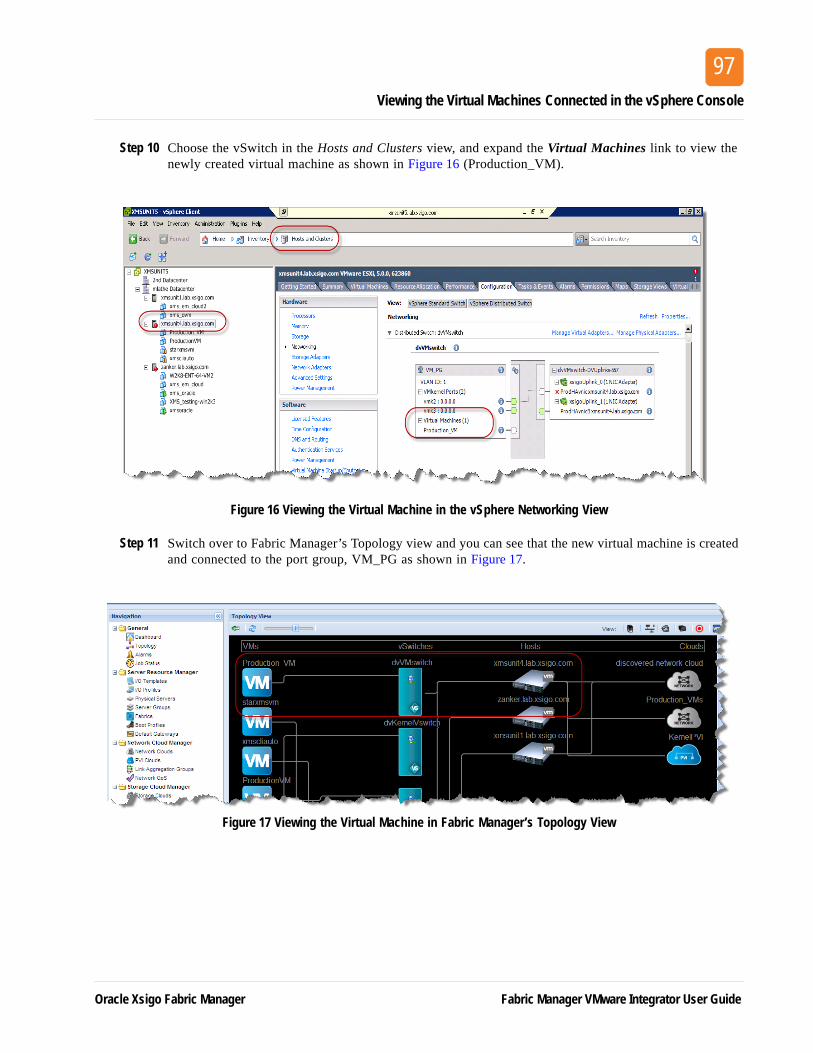
Viewing the Virtual Machines Connected in the vSphere Console
97
Step 10 Choose the vSwitch in the Hosts and Clusters view, and expand the Virtual Machines link to view the newly created virtual machine as shown in Figure 16 (Production_VM).
Figure 16 Viewing the Virtual Machine in the vSphere Networking View
Step 11 Switch over to Fabric Manager’s Topology view and you can see that the new virtual machine is created and connected to the port group, VM_PG as shown in Figure 17.
Figure 17 Viewing the Virtual Machine in Fabric Manager’s Topology View
Oracle Xsigo Fabric Manager Fabric Manager VMware Integrator User Guide

Chapter 6: Viewing Discovered Information
98
Fabric Manager VMware Integrator User Guide Oracle Xsigo Fabric Manager
99
Working with DomainsThe Fabric Director, Fabric Manager Server, the ESX server, as well as other physical servers, reside in domains, which define logically grouped resources in the network. Typically, domains are arranged by a functional group, such as a business unit or department, but domains can be created with virtually any theme—a lab domain, a production domain, a domain of top-quality hardware, and in this chapter a vSphere domain that includes ESX servers. Fabric Manager’s Domain Manager enables you to create the individual domains within your network, by carving out the resources required and grouping them into that domain. Domain boundaries are strictly enforced, so the Fabric Manager Server, the Fabric Directors it is managing, and the ESX server must be in the same domain.
By default, all resources discovered and managed by Fabric Manager reside in the default domain, which exists without any need to configure it. However, when you create additional domains, you are pulling resources out of the default domain and adding them to the specific domain that you are creating. In the default domain, users that have an administrator role can create, update, or remove non-default domains. These users can also add Fabric Directors, Modules, and ESX servers to the non-default domains, as well as delete them from the non-default domains.
Non-default domains allow you to create logical partitions in order to subdivide physical environments from a configuration and management perspective. For example, the default domain’s administrator can create a sub-domain for finance, engineering, customer support, and vSphere requirements. Within each of these non-default domains the administrator can then assign host servers, ESX servers, Fabric Directors or modules, and Network and Storage Clouds as needed to provide the connections required for each domain.
This chapter describes how to configure new Fabric Manager Domains to enable non-default users to view specific vSphere instances and ESX servers as part of that Domain, and contains the following sections:
• Understanding Domains for vSphere Instances
• Allowing Non-Default Users Access to Domain Resources
For more information about Fabric Manager Domains and default versus non-default users, refer to the Fabric Manager User Guide.
Oracle Xsigo Fabric Manager Fabric Manager VMware Integrator User Guide
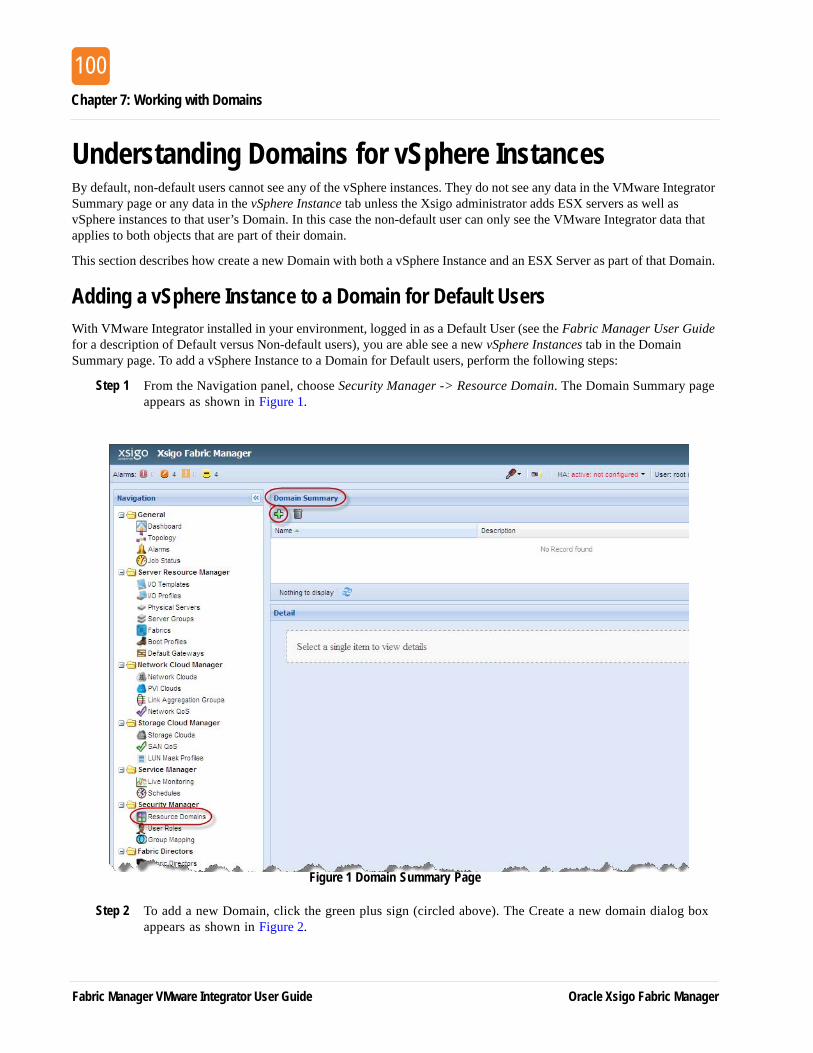
Chapter 7: Working with Domains
100
Understanding Domains for vSphere InstancesBy default, non-default users cannot see any of the vSphere instances. They do not see any data in the VMware Integrator Summary page or any data in the vSphere Instance tab unless the Xsigo administrator adds ESX servers as well as vSphere instances to that user’s Domain. In this case the non-default user can only see the VMware Integrator data that applies to both objects that are part of their domain.
This section describes how create a new Domain with both a vSphere Instance and an ESX Server as part of that Domain.
Adding a vSphere Instance to a Domain for Default UsersWith VMware Integrator installed in your environment, logged in as a Default User (see the Fabric Manager User Guide for a description of Default versus Non-default users), you are able see a new vSphere Instances tab in the Domain Summary page. To add a vSphere Instance to a Domain for Default users, perform the following steps:
Step 1 From the Navigation panel, choose Security Manager -> Resource Domain. The Domain Summary page appears as shown in Figure 1.
Figure 1 Domain Summary Page
Step 2 To add a new Domain, click the green plus sign (circled above). The Create a new domain dialog box appears as shown in Figure 2.
Fabric Manager VMware Integrator User Guide Oracle Xsigo Fabric Manager
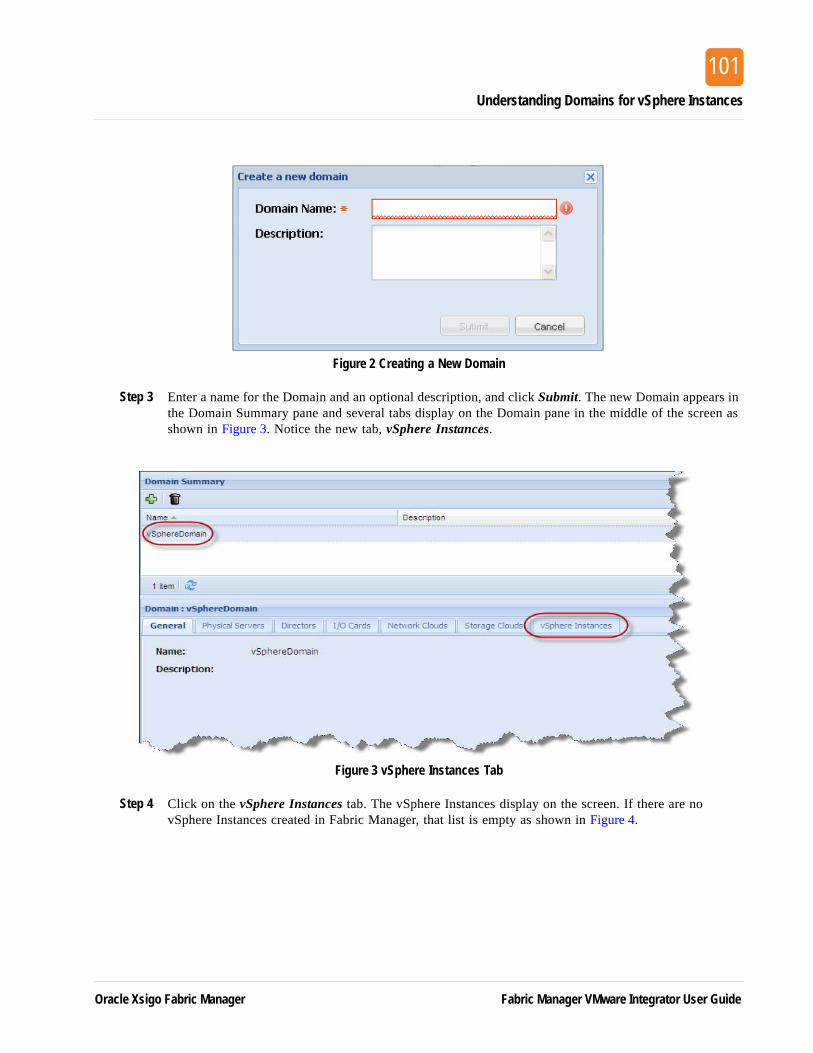
Understanding Domains for vSphere Instances
101
Figure 2 Creating a New Domain
Step 3 Enter a name for the Domain and an optional description, and click Submit. The new Domain appears in the Domain Summary pane and several tabs display on the Domain pane in the middle of the screen as shown in Figure 3. Notice the new tab, vSphere Instances.
Figure 3 vSphere Instances Tab
Step 4 Click on the vSphere Instances tab. The vSphere Instances display on the screen. If there are no vSphere Instances created in Fabric Manager, that list is empty as shown in Figure 4.
Oracle Xsigo Fabric Manager Fabric Manager VMware Integrator User Guide

Chapter 7: Working with Domains
102
Figure 4 Displaying vSphere Instances
Step 5 Click the green plus sign to add a vSphere instance. A list of available vSphere Instances appears as shown in Figure 5.
Figure 5 Choosing a vSphere Instance
Fabric Manager VMware Integrator User Guide Oracle Xsigo Fabric Manager
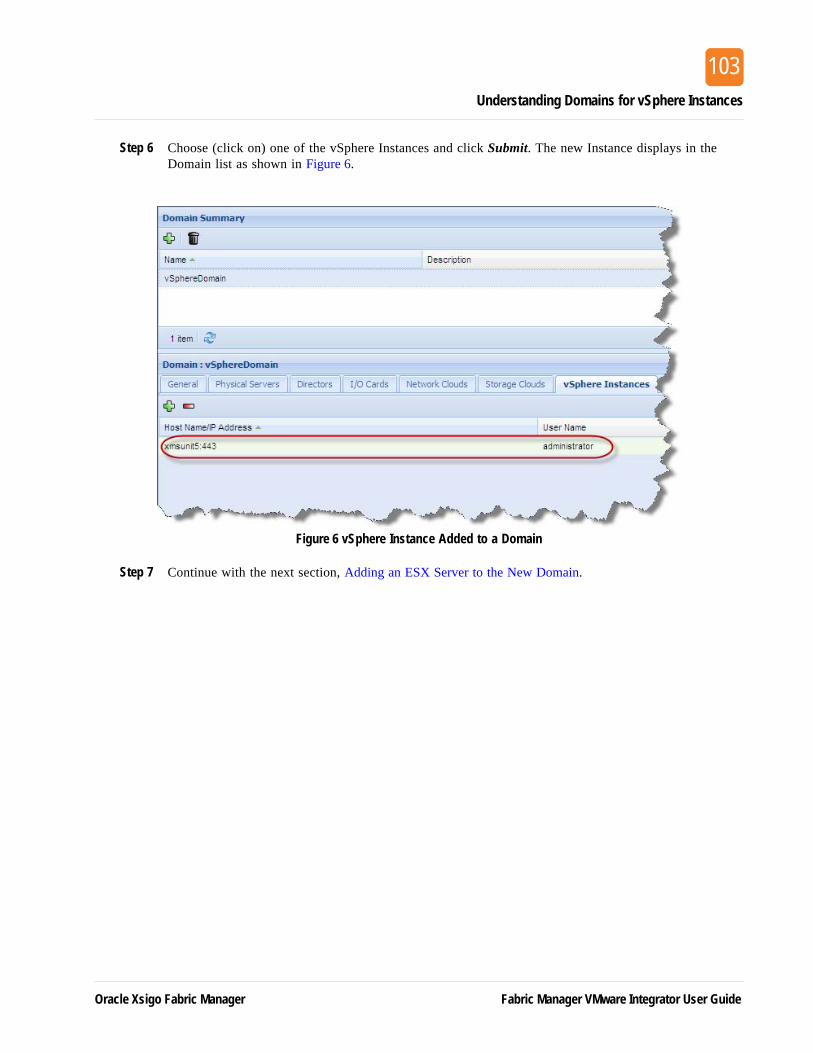
Understanding Domains for vSphere Instances
103
Step 6 Choose (click on) one of the vSphere Instances and click Submit. The new Instance displays in the Domain list as shown in Figure 6.
Figure 6 vSphere Instance Added to a Domain
Step 7 Continue with the next section, Adding an ESX Server to the New Domain.
Oracle Xsigo Fabric Manager Fabric Manager VMware Integrator User Guide
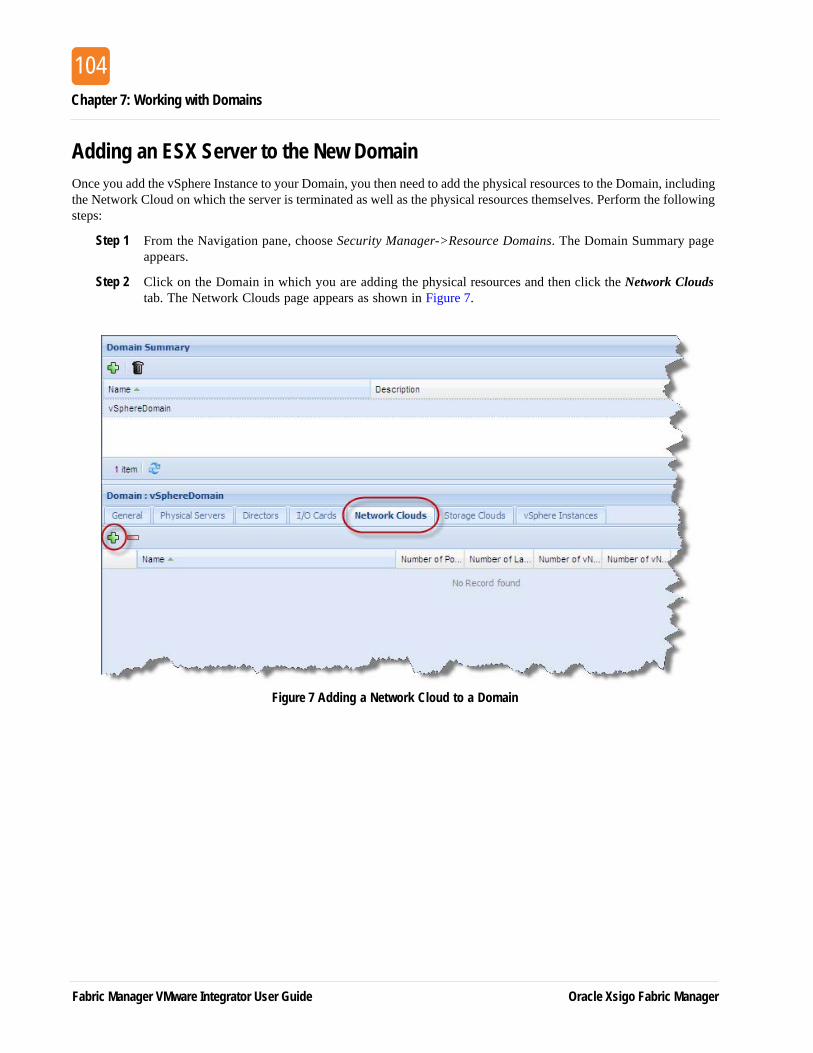
Chapter 7: Working with Domains
104
Adding an ESX Server to the New DomainOnce you add the vSphere Instance to your Domain, you then need to add the physical resources to the Domain, including the Network Cloud on which the server is terminated as well as the physical resources themselves. Perform the following steps:
Step 1 From the Navigation pane, choose Security Manager->Resource Domains. The Domain Summary page appears.
Step 2 Click on the Domain in which you are adding the physical resources and then click the Network Clouds tab. The Network Clouds page appears as shown in Figure 7.
Figure 7 Adding a Network Cloud to a Domain
Fabric Manager VMware Integrator User Guide Oracle Xsigo Fabric Manager
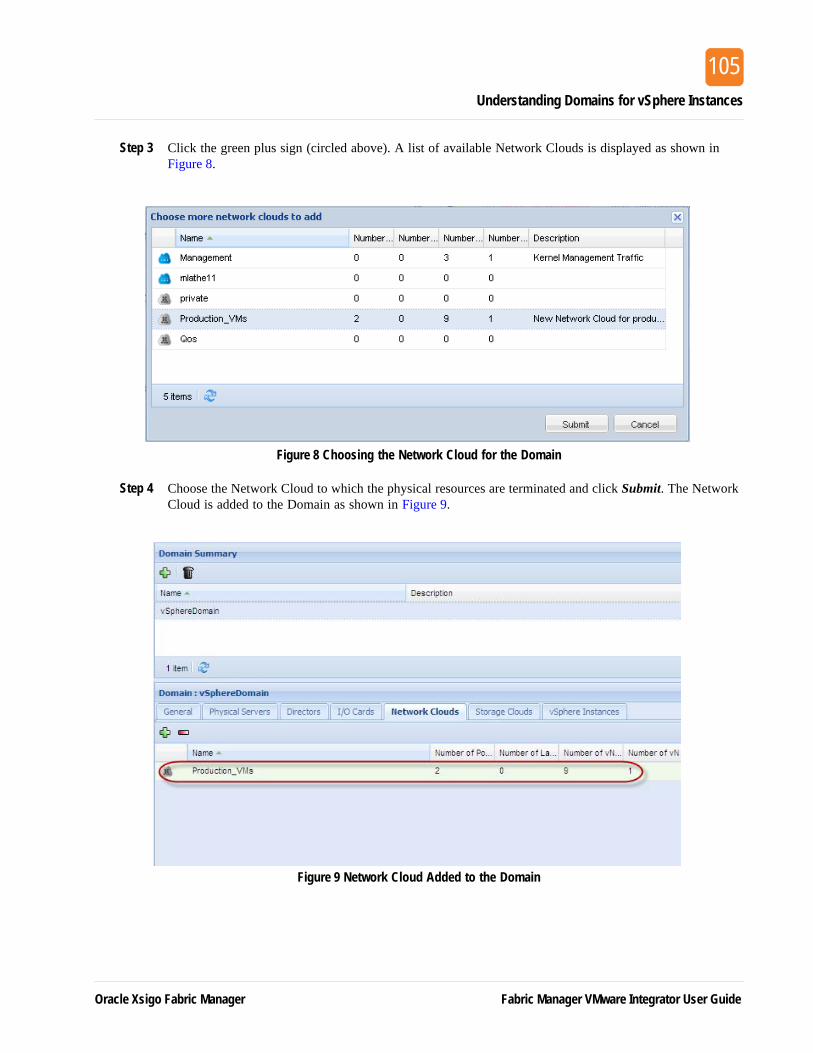
Understanding Domains for vSphere Instances
105
Step 3 Click the green plus sign (circled above). A list of available Network Clouds is displayed as shown in Figure 8.
Figure 8 Choosing the Network Cloud for the Domain
Step 4 Choose the Network Cloud to which the physical resources are terminated and click Submit. The Network Cloud is added to the Domain as shown in Figure 9.
Figure 9 Network Cloud Added to the Domain
Oracle Xsigo Fabric Manager Fabric Manager VMware Integrator User Guide
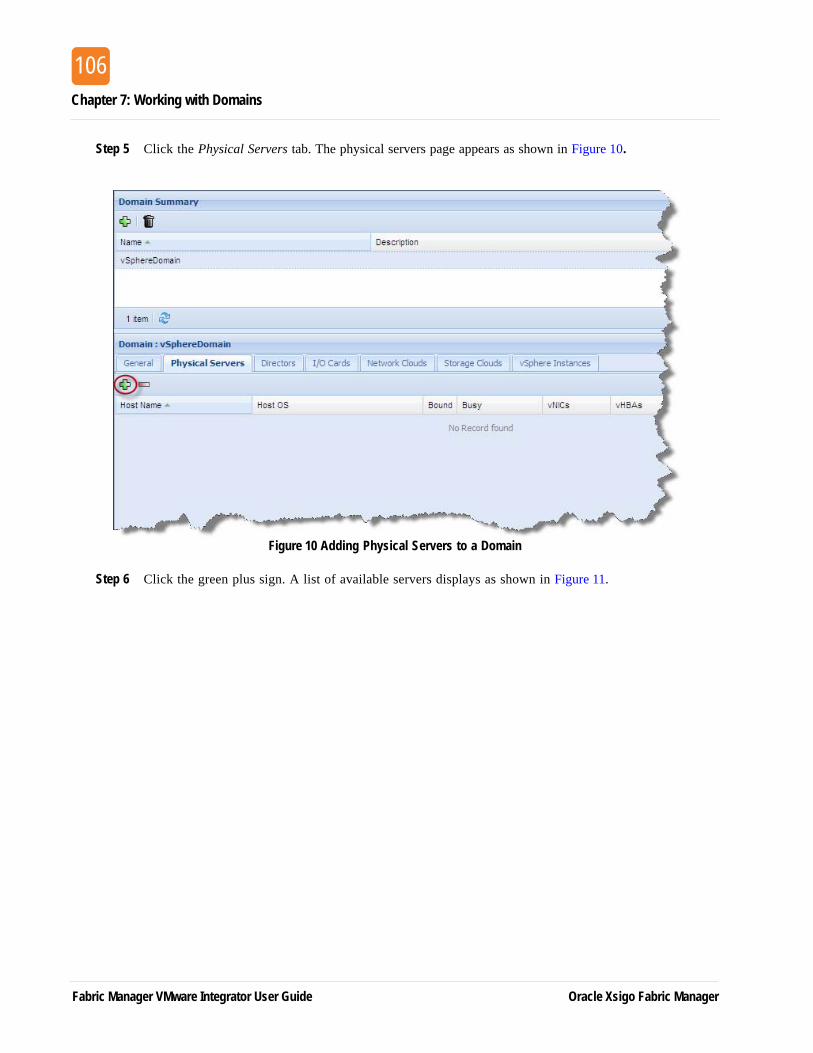
Chapter 7: Working with Domains
106
Step 5 Click the Physical Servers tab. The physical servers page appears as shown in Figure 10.
Figure 10 Adding Physical Servers to a Domain
Step 6 Click the green plus sign. A list of available servers displays as shown in Figure 11.
Fabric Manager VMware Integrator User Guide Oracle Xsigo Fabric Manager
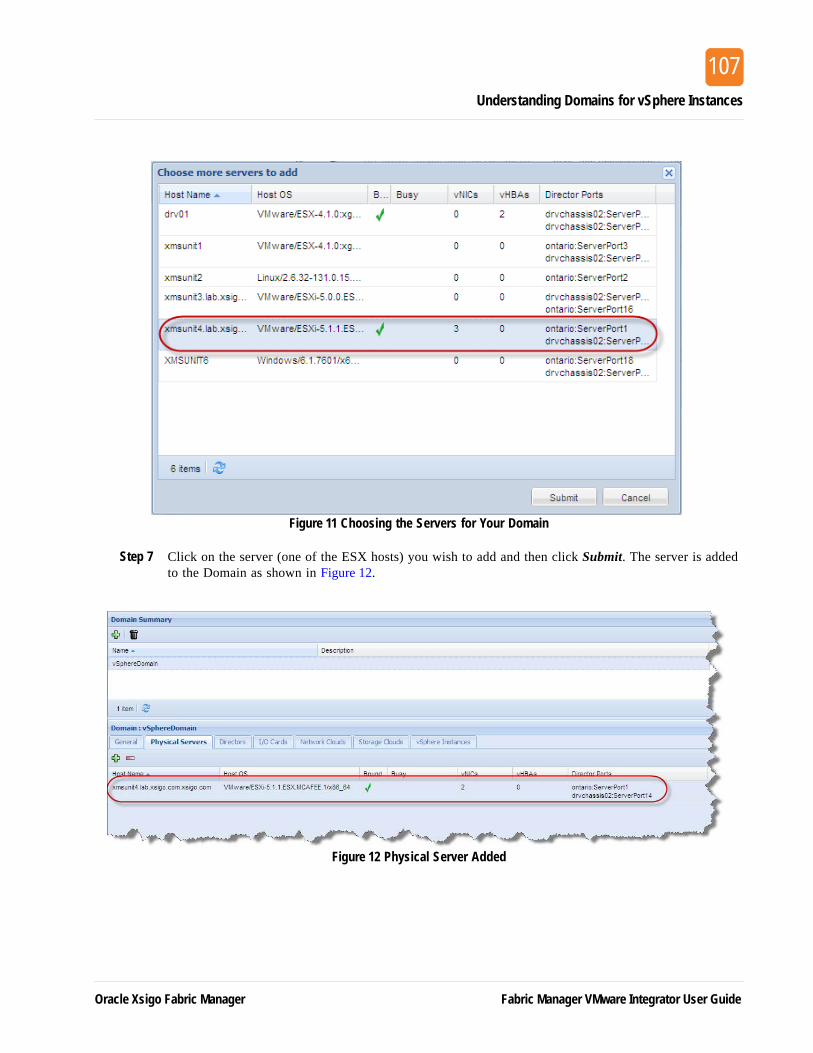
Understanding Domains for vSphere Instances
107
Figure 11 Choosing the Servers for Your Domain
Step 7 Click on the server (one of the ESX hosts) you wish to add and then click Submit. The server is added to the Domain as shown in Figure 12.
Figure 12 Physical Server Added
Oracle Xsigo Fabric Manager Fabric Manager VMware Integrator User Guide
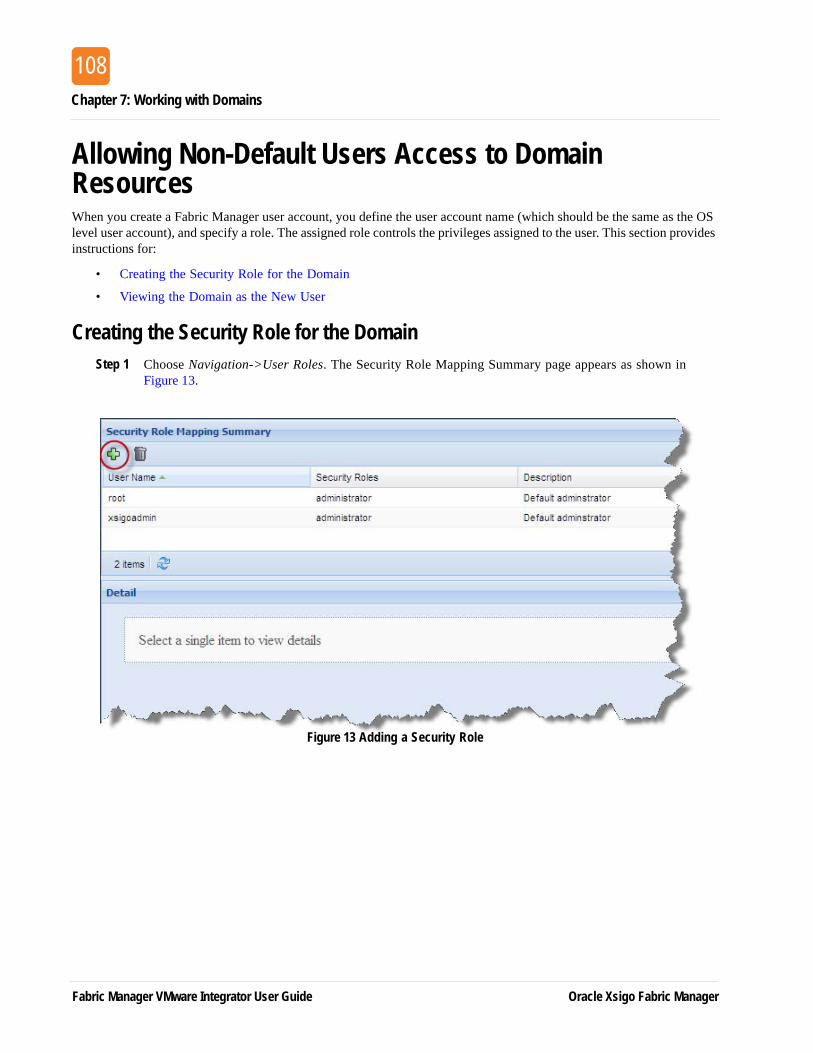
Chapter 7: Working with Domains
108
Allowing Non-Default Users Access to Domain ResourcesWhen you create a Fabric Manager user account, you define the user account name (which should be the same as the OS level user account), and specify a role. The assigned role controls the privileges assigned to the user. This section provides instructions for:
• Creating the Security Role for the Domain
• Viewing the Domain as the New User
Creating the Security Role for the DomainStep 1 Choose Navigation->User Roles. The Security Role Mapping Summary page appears as shown in
Figure 13.
Figure 13 Adding a Security Role
Fabric Manager VMware Integrator User Guide Oracle Xsigo Fabric Manager
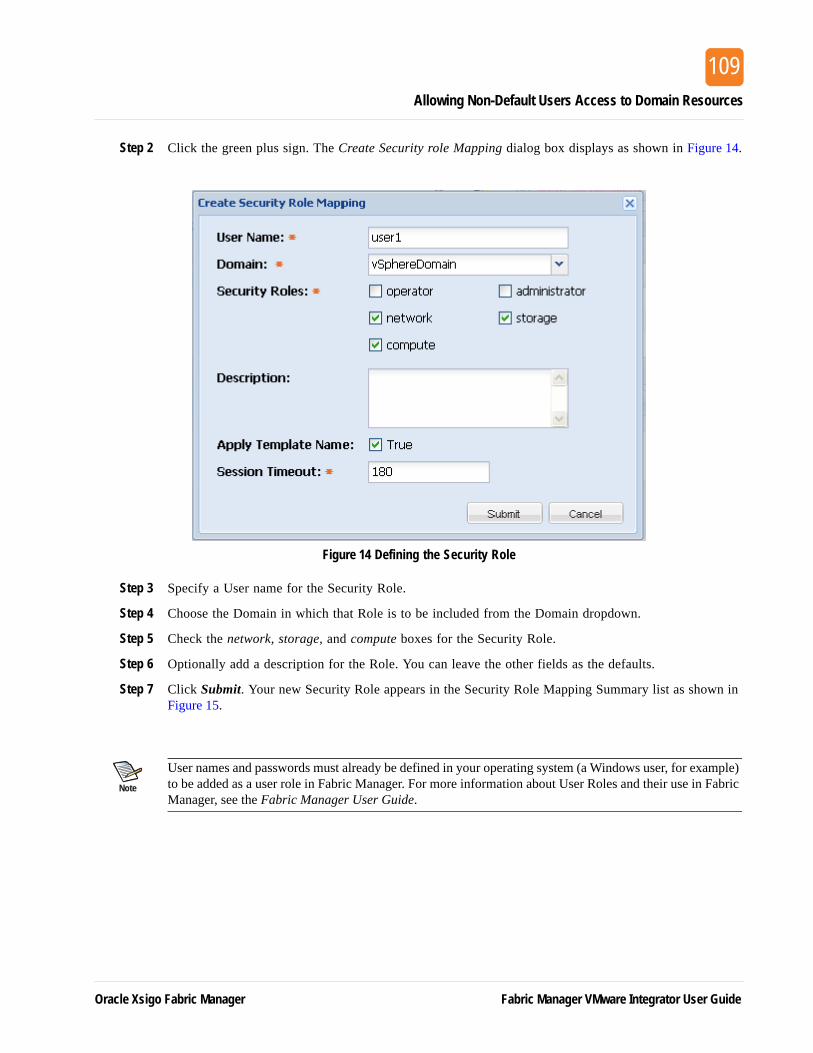
Allowing Non-Default Users Access to Domain Resources
109
Step 2 Click the green plus sign. The Create Security role Mapping dialog box displays as shown in Figure 14.
Figure 14 Defining the Security Role
Step 3 Specify a User name for the Security Role.
Step 4 Choose the Domain in which that Role is to be included from the Domain dropdown.
Step 5 Check the network, storage, and compute boxes for the Security Role.
Step 6 Optionally add a description for the Role. You can leave the other fields as the defaults.
Step 7 Click Submit. Your new Security Role appears in the Security Role Mapping Summary list as shown in Figure 15.
Note
User names and passwords must already be defined in your operating system (a Windows user, for example) to be added as a user role in Fabric Manager. For more information about User Roles and their use in Fabric Manager, see the Fabric Manager User Guide.
Oracle Xsigo Fabric Manager Fabric Manager VMware Integrator User Guide
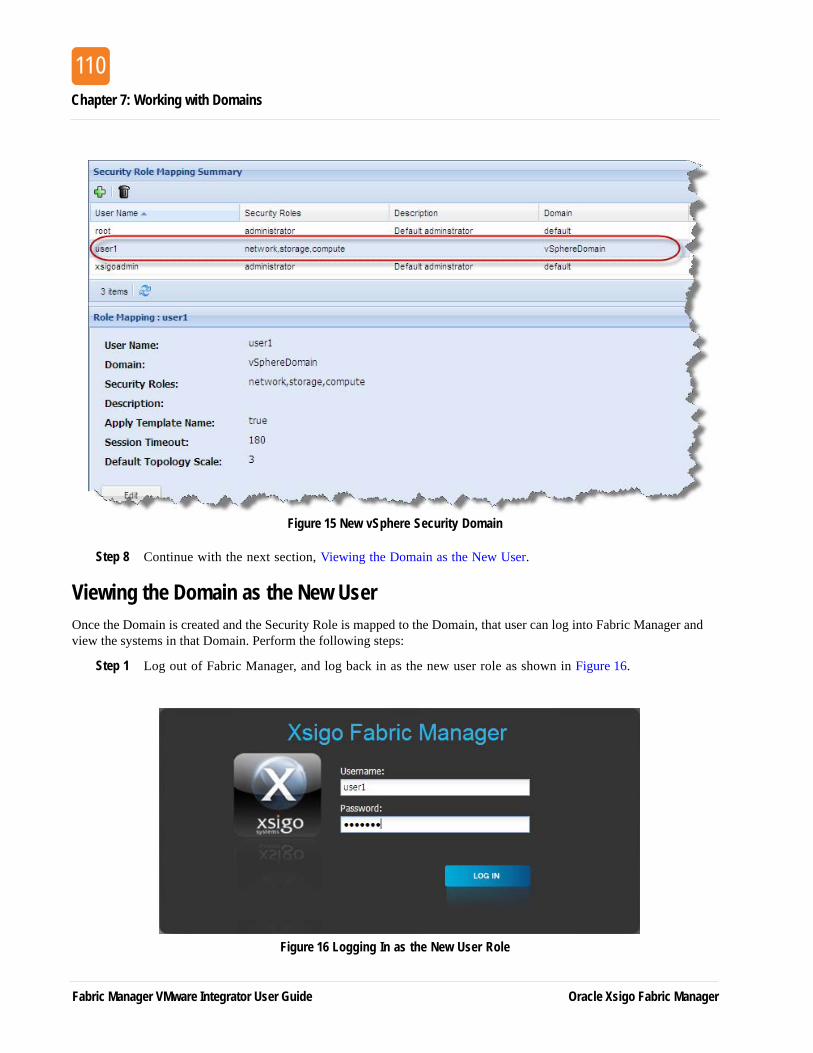
Chapter 7: Working with Domains
110
Figure 15 New vSphere Security Domain
Step 8 Continue with the next section, Viewing the Domain as the New User.
Viewing the Domain as the New UserOnce the Domain is created and the Security Role is mapped to the Domain, that user can log into Fabric Manager and view the systems in that Domain. Perform the following steps:
Step 1 Log out of Fabric Manager, and log back in as the new user role as shown in Figure 16.
Figure 16 Logging In as the New User Role
Fabric Manager VMware Integrator User Guide Oracle Xsigo Fabric Manager
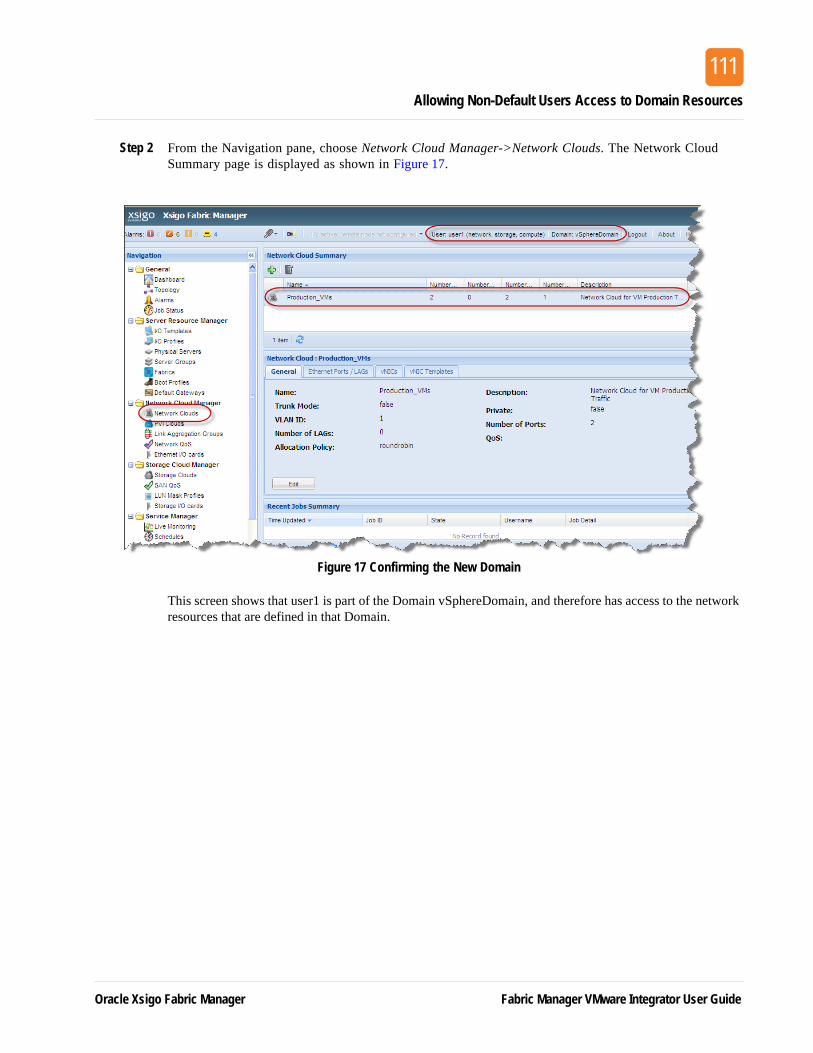
Allowing Non-Default Users Access to Domain Resources
111
Step 2 From the Navigation pane, choose Network Cloud Manager->Network Clouds. The Network Cloud Summary page is displayed as shown in Figure 17.
Figure 17 Confirming the New Domain
This screen shows that user1 is part of the Domain vSphereDomain, and therefore has access to the network resources that are defined in that Domain.
Oracle Xsigo Fabric Manager Fabric Manager VMware Integrator User Guide
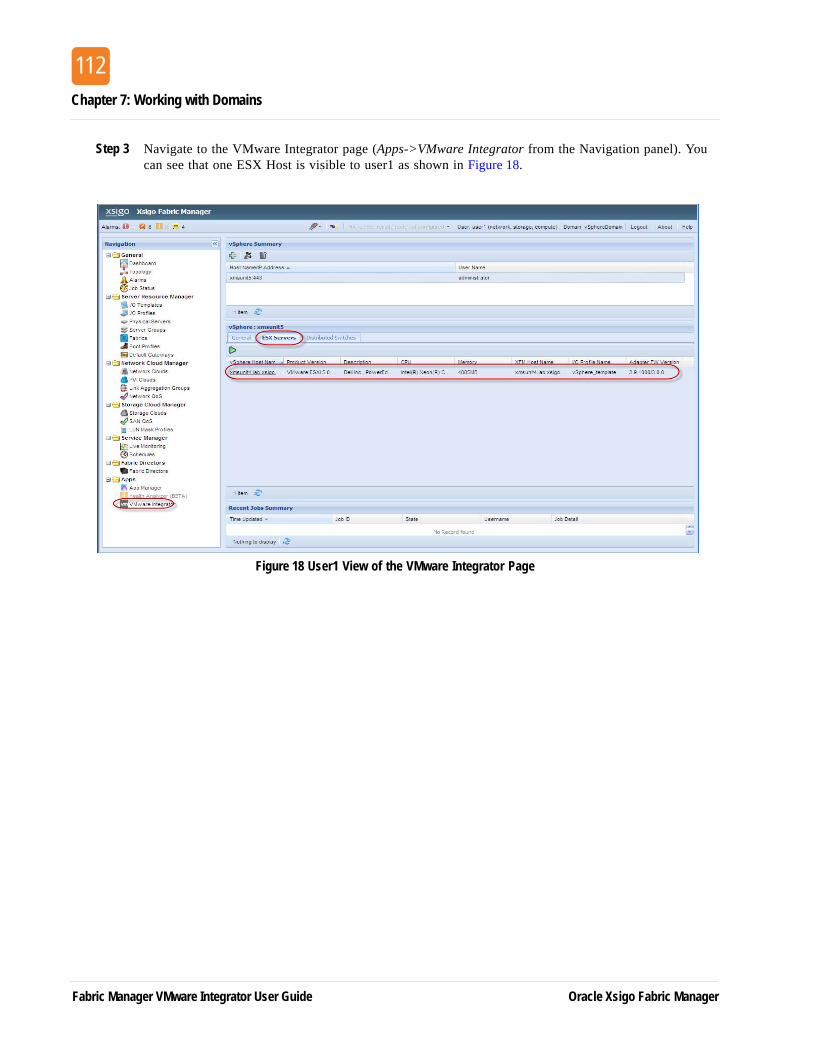
Chapter 7: Working with Domains
112
Step 3 Navigate to the VMware Integrator page (Apps->VMware Integrator from the Navigation panel). You can see that one ESX Host is visible to user1 as shown in Figure 18.
Figure 18 User1 View of the VMware Integrator Page
Fabric Manager VMware Integrator User Guide Oracle Xsigo Fabric Manager

Allowing Non-Default Users Access to Domain Resources
113
Step 4 Next, navigate to the Topology page. The Topology View displays the one host, two Directors, and I/O Clouds that are part of the vSphereDomain as shown in Figure 19.
Figure 19 Viewing the Domain’s Topology
Oracle Xsigo Fabric Manager Fabric Manager VMware Integrator User Guide
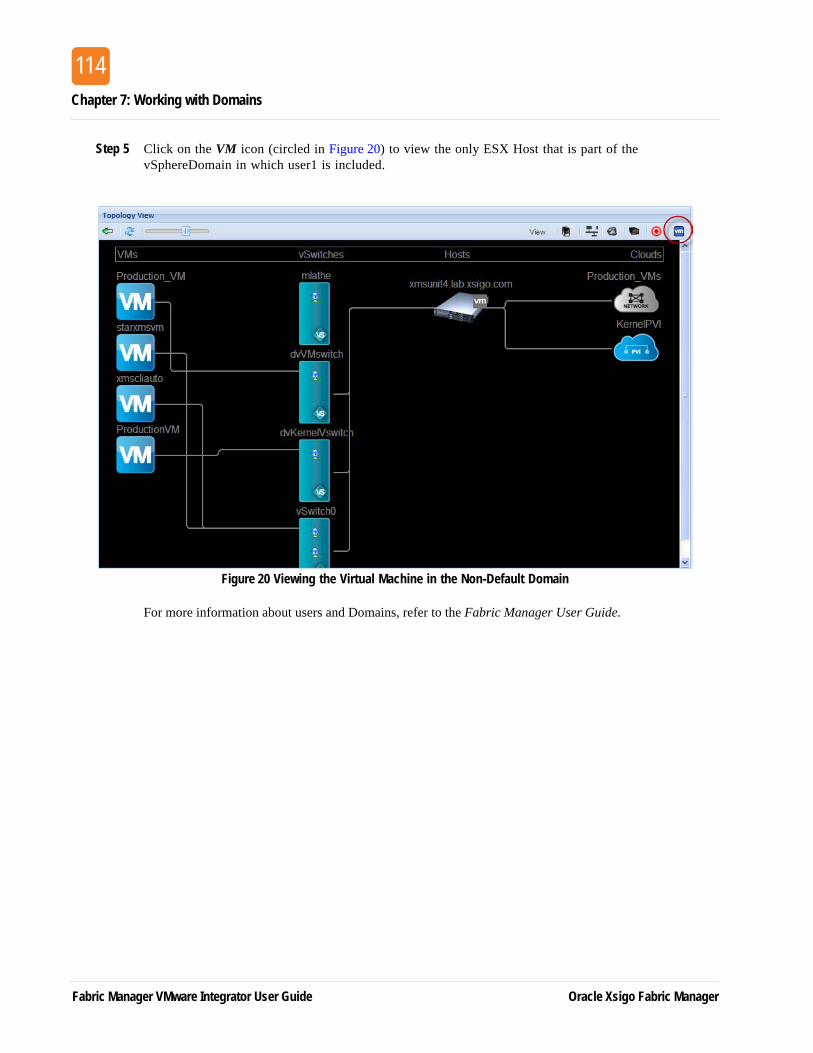
Chapter 7: Working with Domains
114
Step 5 Click on the VM icon (circled in Figure 20) to view the only ESX Host that is part of the vSphereDomain in which user1 is included.
Figure 20 Viewing the Virtual Machine in the Non-Default Domain
For more information about users and Domains, refer to the Fabric Manager User Guide.
Fabric Manager VMware Integrator User Guide Oracle Xsigo Fabric Manager

15
1GlossaryTable 1 provides a glossary of terms used in this document.
Table 1 Terms and Definitions
Term Definition
Distributed vSwitch (dvSwitch) Distributed virtual switch—A virtual networking feature that helps build a flexible Network Cloud. You can now create distributed vSwitches in a Fabric Manager I/O Template using VMware Integrator as described in Chapter 4, “Creating and Configuring vSwitches.”
Domains A feature that enables administrators to restrict which I/O resources appear visible for a user. If a user is part of a Non-default Domain, that user can only see the I/O resources defined for that Domain. You can configure specific ESX hosts to be part of a Domain and visible to a Non-default user as described in Chapter 7, “Working with Domains.”
ESX host An enterprise-level computer virtualization product offered by VMware, Inc. ESX is a component of the VMware infrastructure that adds management and reliability services to the core product. VMware is replacing the original ESX with ESXi.
HA vNIC High availability virtual network interface card.
Hypervisor A hypervisor or virtual machine manager (VMM) is a piece of computer software, firmware, or hardware that creates and runs virtual machines. Multiple instances of a variety of operating systems may share the virtualized hardware resources.
Hypervisor Host machine A computer on which a hypervisor is running one or more virtual machines.
Hypervisor Guest machine Each virtual machine running on a host computer is called a guest machine. The hypervisor presents to the guest operating systems a virtual operating platform and manages the execution of the guest operating systems.
I/O Module Hot-swappable module that provides connectivity to traditional Ethernet and Fibre Channel infrastructures, putting traffic from vNICs and vHBAs on the wire.
physical resources After creating a vSwitch I/O Template, you provide the physical resources to that Template in one of several ways. The various ways you can provide physical resources to your I/O Template are described in Chapter 5, “Assigning Physical Resources.”
port group Port groups make it possible to specify that a given virtual machine should have a particular type of connectivity on every host on which it might run. Port groups contain enough configuration information to provide persistent and consistent network access for vNICs. You can establish traffic-shaping policies for each port group as described in the section entitled "Working with vSphere Port Groups".
PVI Network Cloud Private Virtual Interface Network Cloud used by Oracle Software Defined Networking.
Oracle Xsigo Fabric Manager Fabric Manager VMware Integrator User Guide
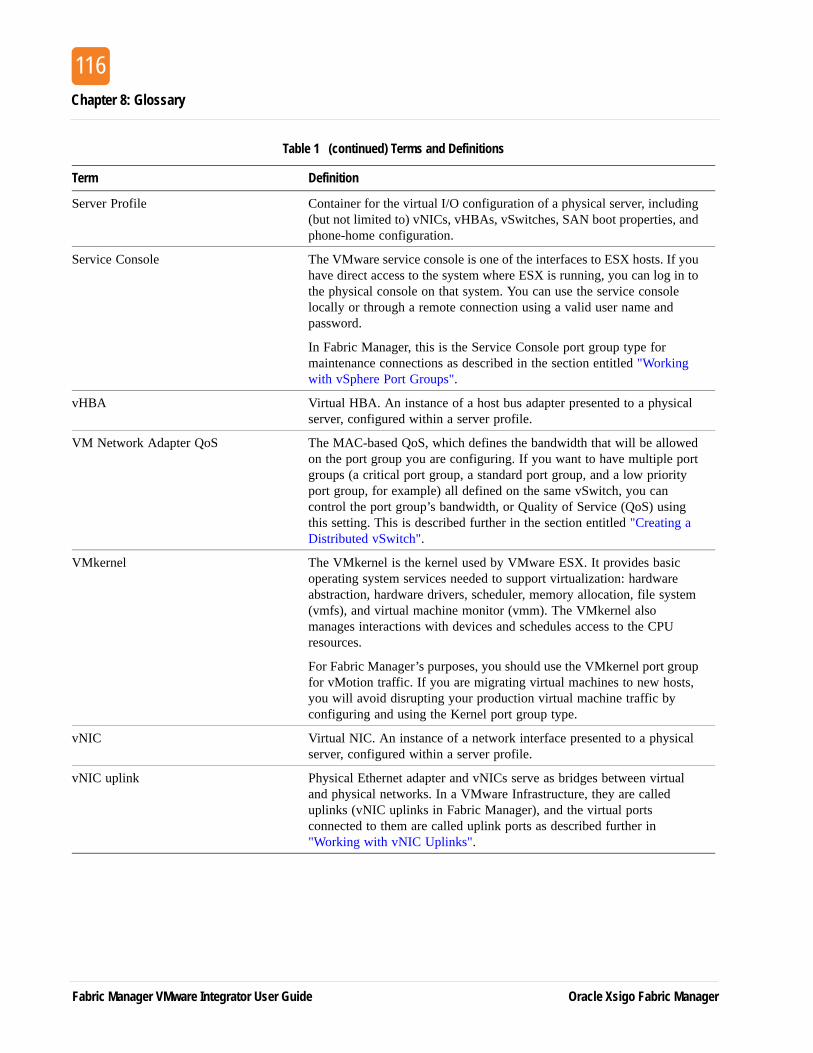
Chapter 8: Glossary
116
Server Profile Container for the virtual I/O configuration of a physical server, including (but not limited to) vNICs, vHBAs, vSwitches, SAN boot properties, and phone-home configuration.
Service Console The VMware service console is one of the interfaces to ESX hosts. If you have direct access to the system where ESX is running, you can log in to the physical console on that system. You can use the service console locally or through a remote connection using a valid user name and password.
In Fabric Manager, this is the Service Console port group type for maintenance connections as described in the section entitled "Working with vSphere Port Groups".
vHBA Virtual HBA. An instance of a host bus adapter presented to a physical server, configured within a server profile.
VM Network Adapter QoS The MAC-based QoS, which defines the bandwidth that will be allowed on the port group you are configuring. If you want to have multiple port groups (a critical port group, a standard port group, and a low priority port group, for example) all defined on the same vSwitch, you can control the port group’s bandwidth, or Quality of Service (QoS) using this setting. This is described further in the section entitled "Creating a Distributed vSwitch".
VMkernel The VMkernel is the kernel used by VMware ESX. It provides basic operating system services needed to support virtualization: hardware abstraction, hardware drivers, scheduler, memory allocation, file system (vmfs), and virtual machine monitor (vmm). The VMkernel also manages interactions with devices and schedules access to the CPU resources.
For Fabric Manager’s purposes, you should use the VMkernel port group for vMotion traffic. If you are migrating virtual machines to new hosts, you will avoid disrupting your production virtual machine traffic by configuring and using the Kernel port group type.
vNIC Virtual NIC. An instance of a network interface presented to a physical server, configured within a server profile.
vNIC uplink Physical Ethernet adapter and vNICs serve as bridges between virtual and physical networks. In a VMware Infrastructure, they are called uplinks (vNIC uplinks in Fabric Manager), and the virtual ports connected to them are called uplink ports as described further in "Working with vNIC Uplinks".
Table 1 (continued) Terms and Definitions
Term Definition
Fabric Manager VMware Integrator User Guide Oracle Xsigo Fabric Manager
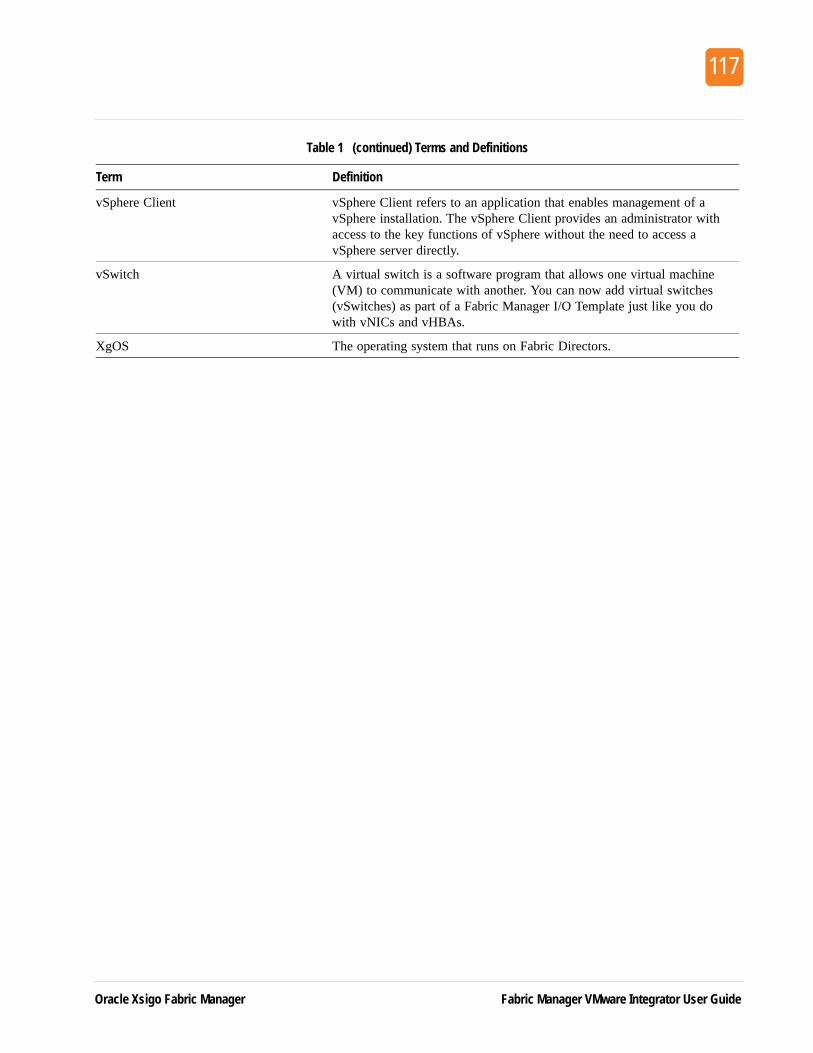
117
vSphere Client vSphere Client refers to an application that enables management of a vSphere installation. The vSphere Client provides an administrator with access to the key functions of vSphere without the need to access a vSphere server directly.
vSwitch A virtual switch is a software program that allows one virtual machine (VM) to communicate with another. You can now add virtual switches (vSwitches) as part of a Fabric Manager I/O Template just like you do with vNICs and vHBAs.
XgOS The operating system that runs on Fabric Directors.
Table 1 (continued) Terms and Definitions
Term Definition
Oracle Xsigo Fabric Manager Fabric Manager VMware Integrator User Guide

Chapter 8: Glossary
118
Fabric Manager VMware Integrator User Guide Oracle Xsigo Fabric Manager
119Index
A
Adding a vSphere host to Fabric Manager 23Adding a vSphere Server 25Adding virtual switches 32Adding vNICs 47Apple Safari, supported version 12Assigning Templates to physical servers 71
B
Bandwidth, specifying for vNICs 40Browser requirements 12Browsers, supported 12
C
Configuring VMware Integrator 19Configuring vNICs 42Connecting a Physical Server to the ESX Template 73Creating Network Clouds 34Creating Templates 32Creating vNICs 47Creating vSwitches 37
D
Default User Domain 100Display, resolutions supported 12Distributed Switches tab 80Distributed vSwitch
creating 50definition (dvSwitch) 115displaying 83
Distributed vSwitch tab 50Distributed vSwitch, Topology view 88Distributed vSwitch, viewing in the vSphere Client 95Domain
adding a vSphere instance to 100Default User type 100providing access for non-default users 108
Domain-restricted 115Domains for vSphere Instances 100
E
ESX Hostdefinition 115viewing in a Non-default Domain 112
ESX Servers tab 4, 27, 78ESX Servers, adding to a Domain 104ESX virtual machines 76ESX Virtual Machines tab 76
F
Fabric Managerdefinition 2overview 2
G
Google Chrome, supported version 12
H
HA Network Cloud 35HA network, creating 34HA PVI Cloud, creating 48HA vNIC 115
configuring for vSwitch 42creating for vSwitch 46
Hypervisor 115
I
I/O Module, definition 115I/O Template, naming 33Installation
files 13overview 11requirements 12
Installed Apps Summary page 19
J
JavaScript requirements 12
Oracle Xsigo Fabric Manager Fabric Manager VMware Integrator User Guide
Index
120
L
License Agreement 15Linux requirements 12Linux, installing VMware Integrator on 19
M
MAC Address, physical vNICs 81MAC-based QoS 40, 116Mapping Summary for Security Roles 109Microsoft Internet Explorer, supported versions 12Mozilla Firefox, supported versions 12
N
Network Cloudadding to a Domain 105HA 35naming 34PVI 115
Network I/O Clouds, creating 34Non-Default Users
providing access to a Domain 108viewing topology 113
P
Physical resourcesassigning to an I/O Template 73definition 115
Physical servers, adding to a Domain 106Port group 115
adding 51adding a VM using vSphere Client 92adding to a vSwitch 55creating 38, 51deleting 61editing 59
Port group types 40, 57Port Groups tab 80PVI Network Cloud
creating 35definition 115
Q
Quality of Service (QoS) for VM NIC 40
R
Red Hat Enterprise, supported version 12Requirements 12
for browsers 12for JavaScript 12for Linux 19for VMware Integrator 12for Windows 12
Resolution, supported display 12
S
Security Roledefining for a user 109Mapping Summary 109
Server Profile, definition 116Service Console
definition 116port group type 40, 57
Standard Switches tab 5State column 79Supported browsers 12
T
Topology pageviewing all virtual machines 86viewing as a Non-default user 113viewing connection lines 89viewing vSwitches and port groups 88
U
Uplink vNICs tab 81User Domain
Default 100for vSphere Instances 100
user roles in Fabric Manager 109Users (non-default), providing access to a Domain 108
Fabric Manager VMware Integrator User Guide Oracle Xsigo Fabric Manager
Index
121
V
vHBA, definition 116Virtual machine port group type 40, 57Virtual machine topology, viewing Non-Default Domains
114Virtual Machines tab 5Virtual Machines Topology view 87Virtual switches, adding 32VLAN groups and port group 58VM Network Adapter QoS 40, 116VM NIC Quality of Service (QoS) 40VM NICS, specifying bandwidth 40VMkernel 116VMkernel port group type 40, 52, 57vMotion traffic, configuring for 51VMware Integrator
accessing 21adding to Fabric Manager 19installing on Linux OS 19installing on Windows OS 14main window 3Navigation panel selection 78system requirements 12
VMware Integrator panels 24VMware Integrator Window, understanding 3VMware vSphere client, viewing MAC address informa-
tion 83VMware vSphere host, adding to Fabric Manager 23vNIC
adding resource 47Advanced Configuration 43Configuration 42definition 116
vNIC uplinkadding 64creating 63definition 116deleting 68working with 62
vNIC HA 42vSphere Client
creating a virtual machine 92definition 117Details panel 7Distributed Switch View 90networking view 92viewing distributed vSwitches 83
vSphere Client Management Console 27vSphere Client Manager 28
vSphere Host, viewing details 26, 80vSphere instance, adding to a Domain 100, 102vSphere Networking View 91vSphere port groups 55vSphere Server
adding to Fabric Manager 23vNIC MAC address 81
vSphere Server Information 27vSphere Summary panel 4, 7, 22, 24, 78
General tab 25vSphere, supported versions 12vSwitch 117
creating 49creating distributed 50displaying in I/O Template Editor 54
vSwitch Configuration window 37vSwitch Port Group, configuring 39vSwitch Template
applying to a host 78connecting to a physical server 69saving 45
vSwitch Templates 49, 56vSwitch Templates tab 56vSwitch vNICs, viewing on a physical server 82vSwitches
applying to host 9configuring 8naming conventions 38
W
Windows, installing VMware Integrator on 14Windows, supported versions 12
X
XgOS 117
Fabric Manager VMware Integrator User Guide Oracle Xsigo Fabric Manager

Index
122
Fabric Manager VMware Integrator User Guide Oracle Xsigo Fabric Manager