extended search installation
TRANSCRIPT

IBM Lotus Extended Search
Extended Search InstallationVersion 3 Release 7 (updated July 23, 2002)
GC27-1403-00
���

IBM Lotus Extended Search
Extended Search InstallationVersion 3 Release 7 (updated July 23, 2002)
GC27-1403-00
���

Note!Before using this information and the product it supports, read the general information under “Notices” on page 53.
Eighth Edition, May 2002
This edition applies to Version 3 Release 7 of the IBM® Lotus® Extended Search product and to all subsequentreleases and modifications until otherwise indicated by new editions.
© Copyright International Business Machines Corporation 1997, 2002. All rights reserved.US Government Users Restricted Rights — Use, duplication, or disclosure restricted by GSA ADP Schedule Contractwith IBM Corporation.

Contents
Getting Started. . . . . . . . . . . . 1
System prerequisites . . . . . . . . . 3Server hardware requirements . . . . . . . . 3Server software requirements . . . . . . . . . 4Applet requirements . . . . . . . . . . . . 5Client requirements . . . . . . . . . . . . 5Application development requirements . . . . . 5Data source requirements . . . . . . . . . . 6Using Java . . . . . . . . . . . . . . . 6Using Domino . . . . . . . . . . . . . . 7Using DB2 . . . . . . . . . . . . . . . 8Using WebSphere Application Server 4.0.2 . . . . 8
Set up the Advanced Single Server edition . . . 8Set up the Advanced or Enterprise edition . . . 10Start and stop the Extended Search applicationserver . . . . . . . . . . . . . . . 11Delete Extended Search from WebSphere . . . 11
Pre-installation checklist . . . . . . . . . . 12
Installing on UNIX . . . . . . . . . . 13Set the locale on AIX . . . . . . . . . . . 13Set the locale on Solaris . . . . . . . . . . 14Set up a DB2 instance on AIX . . . . . . . . 15Set up a DB2 instance on Solaris . . . . . . . 16Run the installation wizard on UNIX . . . . . . 18
Typical installation on UNIX. . . . . . . . 20Custom installation on UNIX . . . . . . . 22Post-installation steps on UNIX. . . . . . . 23
Command line installation on UNIX . . . . . . 24Set up WebSphere Application Server 3.x on UNIX 25Verify the installation on UNIX . . . . . . . . 27
NLS considerations for UNIX . . . . . . . . 28
Installing on Windows . . . . . . . . 31Run the installation wizard on Windows . . . . 31
Typical installation on Windows . . . . . . 32Custom installation on Windows . . . . . . 34Post-installation steps on Windows . . . . . 35
Set up the proxy server on Windows . . . . . . 36Set up WebSphere Application Server 3.x onWindows . . . . . . . . . . . . . . . 37Verify the installation on Windows . . . . . . 38Server-only installation on Windows . . . . . . 38NLS considerations for Windows . . . . . . . 39
Starting and stopping the servers . . . 41Start the server on UNIX . . . . . . . . . . 41Shut down the server on UNIX. . . . . . . . 42Start the server on Windows. . . . . . . . . 43Shut down the server on Windows . . . . . . 44
Migrating to the latest release. . . . . 45Upgrading from version 3.5x . . . . . . . . 45Migrating from version 3.0 . . . . . . . . . 45
Uninstalling from UNIX . . . . . . . . 49
Uninstalling from Windows . . . . . . 51
Notices . . . . . . . . . . . . . . 53Copyright . . . . . . . . . . . . . . . 54Trademarks . . . . . . . . . . . . . . 55
iii

iv Extended Search Installation

Getting Started
AttentionBefore you begin to install IBM® Lotus® Extended Search, be sure to read thelatest version of the product Readme file. The Readme file may containinformation about the product, system requirements, and procedures thathave changed since the product documentation was produced. To obtain themost recent Readme file, access the Downloads link at the Extended SearchWeb site:http://www.lotus.com/extendedsearch
Before installing Extended Search, be sure that you are familiar with the ExtendedSearch components and the system requirements.
Quick Start ApproachThe first time you install Extended Search, you may want to install all theserver components on a single machine and accept the typical installationoptions. This out-of-the-box approach enables you to get your system upand running as fast as possible. This approach is recommended for newcustomers as a way to get familiar with the product. It is also a reasonableapproach for product demonstration purposes or for use with smallworkgroups that search across a limited set of resources.
To run the Extended Search system out-of-the-box, you should install theExtended Search server components on the same machine where youinstall your Web server and database software.
Production System ApproachAfter you are familiar with Extended Search, you should consider a morecomplex installation and configuration approach. For large-scaleenterprises, with many users and a large number of data sources, you willprobably want to distribute the workload among multiple machines.
For optimum performance and scalability, you should separate the Webserver from the Extended Search server. You may also want to install someExtended Search components on remote machines. For example, you canenable multiple brokers to process requests or allow agents to co-residewith the sources and search engines to which they connect.
See Extended Search Administration for guidelines on how you might wantto install and configure Extended Search to enhance performance andaccommodate future growth.
Note that for the Windows environment, the product CD-ROM provides aninstallation image that allows you to install only the Extended SearchServer component. This feature enables you to easily set up multiplebrokers and agents on various machines. See “Server-only installation onWindows” on page 38 for details.
MigrationIf you are currently running Extended Search version 3.0, and want topreserve your existing configuration data, follow the procedures in“Migrating to the latest release” on page 45. If you are running version 3.5or later, the installation program for version 3.7 prompts you to upgradethe software. Be sure to clear the browser’s cache before attempting to startthe new version of the Administration interface.
1

2 Extended Search Installation

System prerequisites
Before installing Extended Search, be sure that the machines where you plan toinstall the product meet the system requirements.v “Server hardware requirements”v “Server software requirements” on page 4v “Applet requirements” on page 5v “Client requirements” on page 5v “Application development requirements” on page 5v “Data source requirements” on page 6
You may want to review guidelines for using certain prerequisite products. See“Using Java” on page 6, “Using DB2” on page 8, and “Using Domino” on page 7for information that can help you use these products with Extended Search.
If you plan to use WebSphere Application Server version 4.0.2, you must set it upfor use with Extended Search before you install the Extended Search software. See“Using WebSphere Application Server 4.0.2” on page 8 for instructions.
After installing the prerequisite software, you should review the “Pre-installationchecklist” on page 12 to ensure that you are ready to begin the Extended Searchinstallation process.
Server hardware requirementsThe following tables describe the hardware configuration that is required to installand run Extended Search on IBM AIX, Sun Solaris, Microsoft Windows NT, orMicrosoft Windows 2000 platforms.
Hardware Requirements for UNIX:
Item Minimum Recommended
AIX CPU F40 F50 with 4 processors
Solaris CPU Sun Sparc E250 2x400Mhz
RAM 1 GB 2GB
Virtual Memory 1 GB
Disk Space 100 MB (not includingprerequisite software)
Hardware Requirements for Windows:
Item Minimum Recommended
CPU Intel Pentium 350 MHz Intel Pentium 550 MHz orhigher
RAM 256 MB 512 MB or higher
Virtual Memory 500 MB
Disk Space 100 MB (not includingprerequisite software)
3
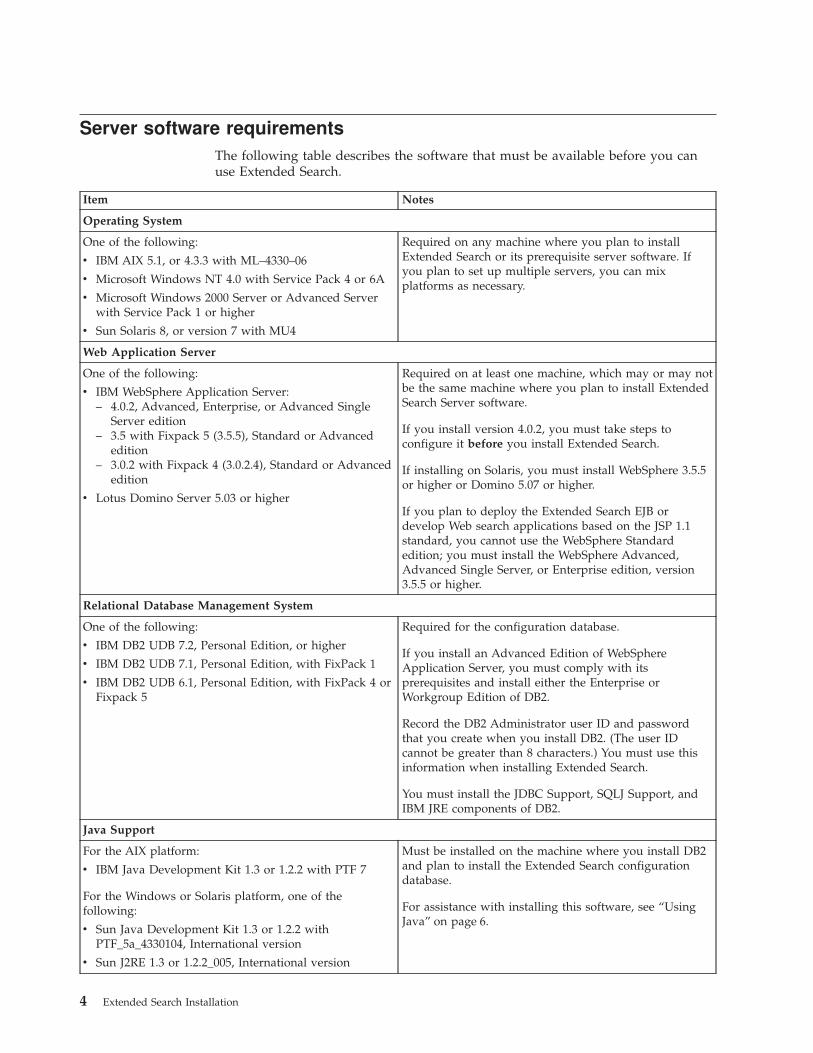
Server software requirementsThe following table describes the software that must be available before you canuse Extended Search.
Item Notes
Operating System
One of the following:
v IBM AIX 5.1, or 4.3.3 with ML–4330–06
v Microsoft Windows NT 4.0 with Service Pack 4 or 6A
v Microsoft Windows 2000 Server or Advanced Serverwith Service Pack 1 or higher
v Sun Solaris 8, or version 7 with MU4
Required on any machine where you plan to installExtended Search or its prerequisite server software. Ifyou plan to set up multiple servers, you can mixplatforms as necessary.
Web Application Server
One of the following:
v IBM WebSphere Application Server:– 4.0.2, Advanced, Enterprise, or Advanced Single
Server edition– 3.5 with Fixpack 5 (3.5.5), Standard or Advanced
edition– 3.0.2 with Fixpack 4 (3.0.2.4), Standard or Advanced
edition
v Lotus Domino Server 5.03 or higher
Required on at least one machine, which may or may notbe the same machine where you plan to install ExtendedSearch Server software.
If you install version 4.0.2, you must take steps toconfigure it before you install Extended Search.
If installing on Solaris, you must install WebSphere 3.5.5or higher or Domino 5.07 or higher.
If you plan to deploy the Extended Search EJB ordevelop Web search applications based on the JSP 1.1standard, you cannot use the WebSphere Standardedition; you must install the WebSphere Advanced,Advanced Single Server, or Enterprise edition, version3.5.5 or higher.
Relational Database Management System
One of the following:
v IBM DB2 UDB 7.2, Personal Edition, or higher
v IBM DB2 UDB 7.1, Personal Edition, with FixPack 1
v IBM DB2 UDB 6.1, Personal Edition, with FixPack 4 orFixpack 5
Required for the configuration database.
If you install an Advanced Edition of WebSphereApplication Server, you must comply with itsprerequisites and install either the Enterprise orWorkgroup Edition of DB2.
Record the DB2 Administrator user ID and passwordthat you create when you install DB2. (The user IDcannot be greater than 8 characters.) You must use thisinformation when installing Extended Search.
You must install the JDBC Support, SQLJ Support, andIBM JRE components of DB2.
Java Support
For the AIX platform:
v IBM Java Development Kit 1.3 or 1.2.2 with PTF 7
For the Windows or Solaris platform, one of thefollowing:
v Sun Java Development Kit 1.3 or 1.2.2 withPTF_5a_4330104, International version
v Sun J2RE 1.3 or 1.2.2_005, International version
Must be installed on the machine where you install DB2and plan to install the Extended Search configurationdatabase.
For assistance with installing this software, see “UsingJava” on page 6.
4 Extended Search Installation

Applet requirementsTo run the Administration applet or Saved Queries applet, or to run data sourcediscovery outside the control of the Administration applet, the following softwareproducts must exist on the machine from which the process is being launched.v One of the following Web browsers:
– Microsoft Internet Explorer (IE) 5.01 with Service Pack 2, IE 5.5 with ServicePack 2, or IE 6
– Netscape Navigator 4.6 or higherv Java 2 Runtime Environment Plug-In for J2RE 1.2.2_005 or J2RE 1.3.0 or higher
You can download this plug-in from the Sun Source for Java Technology Website:http://www.javasoft.com/products/plugin/
Select the Java 2 Runtime Environment link, and follow the online instructionsto download and install the plug-in software for your platform.
Client requirementsTo search with Extended Search, the following software products must exist on theuser’s workstation.
To run the Web Client application:
One of the following Web browsers:v Microsoft Internet Explorer (IE) 5.01 with Service Pack 2, IE 5.5 with Service
Pack 2, or IE 6v Netscape Navigator 4.6 or higher
To run the Notes Client application:
v Microsoft Windows 95, Windows 98, Windows NT Workstation 4.0 with ServicePack 4 or 6A, or Windows 2000 with Service Pack 1
v Lotus Notes Client version 4.6 or higher (If you plan to support Hebrew orJapanese data sources, you must use Lotus Notes Client version 5.0 or higher.)
Application development requirementsThe Extended Search Developer’s Toolkit enables you to develop customdiscoverers, links, and C++ user exits. Certain compilers were used to create thesample code provided in the toolkit. You may want to use these same productswhen setting up your own projects and developing your custom shared libraries.v On Windows: Microsoft Visual C++ 6.0 with Service Pack 3 or higherv On AIX: IBM VisualAge C++ Professional for AIX version 5.0, plus GNU make
utility 3.70v On Solaris: Sun C/C++ compiler version 5.0, plus GNU make utility 3.79 or
higher
System prerequisites 5

Data source requirementsTo add a data source to the Extended Search search domain, you need to ensurethat the software that hosts the data source is installed on the target server; that is,the server that is being discovered and that will be searched.
Listed below are the release levels of the software programs that support the datasource types for which Extended Search provides built-in discoverers and links.
Lotus products
v Lotus Domino.Doc version 2.5a or 3.0, with Desktop Enablerv Lotus Domino 5.0 Domain Indexv Lotus Enterprise Integrator (LEI) version 3.0v Lotus Notes version 4.6, 4.6.2, 4.6.4, or 5.x
Microsoft products
v Microsoft Data Access Components (MDAC 2.5)v Microsoft Access 97 and 2000v Microsoft Exchange Server 2000v Microsoft Index Server version 3.0v Microsoft Indexing Services in Windows 2000v Microsoft Site Server version 3.0v Microsoft SQL Server 7.0 and 2000
Other products
v IBM Enterprise Information Portal (EIP) version 7.x or 8.xv Lightweight Directory Access Protocol (LDAP) version 3.0–compliant
directoriesv Open Database Connectivity (ODBC) version 3.0–compliant databases
such as IBM DB2 and Oracle.
Using JavaThis section provides tips on using Java with Extended Search. Make sure that theJDK or JRE that you install is included in the system path (on Windows) or .profilefile (on UNIX).
Download Java softwareTake the following steps if you plan to install the Extended Searchconfiguration database on an AIX machine.1. Access the following URL to download the Java software required by
Extended Search from the IBM developerWorks for Java technologysite:http://www-106.ibm.com/developerworks/java
2. Click Tools and Products in the left-side menu.3. Scroll down and select the IBM Developer Kit link for your platform.4. Click Download, and then follow the online instructions to register
with IBM and download the developer kit or JRE.
Take the following steps if you plan to install the Extended Searchconfiguration database on a Windows or Solaris machine.1. Access the following URL to download the Java software required by
Extended Search from the Source for Java Technology site:
6 Extended Search Installation

http://www.javasoft.com/j2se/
2. Select the Java 2 SDK link, and follow the online instructions todownload and install the Windows or Solaris SPARC version of thesoftware. Be sure to install the international version of the developer kitor JRE.
Increase Java plug-in memoryFor optimum performance when working with the Administration interfacein a production environment, you should increase the memory parametersfor the Java 2 Runtime Environment plug-in on desktop machines thataccess the applet.1. Open the Java Plug-in control panel:
v For J2RE 1.2, use the Start → Programs menu.v For J2RE 1.3, open the Windows Control Panel.
2. In Java Run Time Parameters, type values similar to the followingexample to specify, in megabytes, how much memory is on themachine and how much the plug-in is allowed to use. You should setthese values to fit the needs of your production environment and thehardware present on each machine. For example, if the machine doesnot have 256 MB of memory, set these values to a lower amount.-Xmx256m -Xms128m
Adjust the JavaMaxHeapSize parameterWhen running Extended Search in a production environment, and usingDomino as your Web Application Server, you may want to add theJavaMaxHeapSize parameter to the notes.ini file on the Domino server.
The Java Virtual Machine maintains its own memory heap. It may run outof memory, especially if the garbage collector does not run often. Thedefault value is 64 MB, but you can increase it as needed. The value of thevariable is in bytes.
In the following example, the JavaMaxHeapSize is equal to 256 MB. Thisvalue was calculated by multiplying 256 x 1024 x 1000.JavaMaxHeapSize=262144000
Using DominoFor optimum performance, you should install the Extended Search server on aseparate machine from your Domino server. Extended Search should also beseparate from the Lotus K-station server.
If you choose to install these products on the same machine, be aware that theDomino Java classpath is limited to 256 characters. You may need to move theExtended Search JAR files to a different location in order to achieve a shorterclasspath. You must then update the JavaUserClasses entry in the notes.ini file toreflect the new location of the Extended Search JAR files.
The following example shows a classpath that measures 254 characters:JavaUserClasses=C:\SQLLIB\java\db2java.zip;d:\data\domino\html\lotuskms\lotuskms.jar;d:\data\domino\html\lotuskms\essrv.jar;d:\data\domino\html\lotuskms\esclisrv.jar;d:\data\domino\html\lotuskms\escli.jar;d:\data\domino\html\lotuskms\ESAdmin.jar;d:\data\domino\notes.jar
System prerequisites 7

Using DB2This section provides tips on running DB2 with Extended Search.
Running only the core DB2 serviceBecause Extended Search needs only the core DB2 service, you may wantto shut down unneeded DB2 services to avoid using up memory. CertainDB2 tools require certain services, such as the DB2 control center, and youcan easily enable and disable these services as needed.
Running DB2 on a dedicated serverWhen initially installed, the Extended Search RMI database server anddatabase session Enterprise JavaBeans (EJB) are co-located with the DB2relational database server. If you prefer to run DB2 as a separate anddedicated server, you can unhook it from the Extended Search serverfollowing installation.
To implement this architecture, edit the Extended Search admin.propertiesfile and make the following changes to the JDBC and DNS properties:
Old: desserver.driver=COM.ibm.db2.jdbc.app.DB2DriverNew: desserver.driver=COM.ibm.db2.jdbc.net.DB2Driver
Old: desserver.dns=jdbc:db2:ibmesNew: desserver.dns=jdbc:db2://DB2_server.com:7777/ibmes
Where:v DB2_server.com is the fully qualified host name of the DB2 server.v 7777 is the TCP port number for the DB2 server. For example, if you
started the DB2 JDBC server process by typing db2jstrt 7777, specify7777 as the TCP port number.
Using WebSphere Application Server 4.0.2If you are using IBM WebSphere Application Server version 4.0.2, you must run aconfiguration program to set it up for use with Extended Search. You must followthese instructions before you install the Extended Search software. If you installmultiple Extended Search servers, you must repeat these steps for each server.
The procedures vary according to the edition of WebSphere Application Server youuse:v WebSphere 4.0.2 Advanced Single Server edition (page 8).v WebSphere 4.0.2 Advanced edition or Enterprise edition (page 10).
To facilitate the administration of Extended Search within WebSphere ApplicationServer version 4.0.2, Extended Search provides scripts for the following tasks:v Start and stop the Extended Search application server (page 11).v Delete Extended Search from WebSphere (page 11).
Set up the Advanced Single Server editionBefore configuring WebSphere Application Server 4.0.2 Advanced Single Server foruse by the Extended Search server, you must decide how you want to handledatabase communications. You can either use the Extended Search RMI Server ordeploy the Extended Search EJB.
8 Extended Search Installation

Use RMI:
Take the following steps if you plan to use the RMI Server:1. Make sure that WebSphere Application Server has been started.2. Change to the WS40 directory on the Extended Search product CD-ROM.3. Enter the following case-sensitive command, where webspherePath is where you
installed WebSphere Application Server, such as c:/websphere/appserver or/usr/WebSphere/Appserver.
Windows: es_ws40ss_create webspherePathUNIX: ./es_ws40ss_create.sh webspherePath
This script adds the extendedSearch.ear file into WebSphere. The unzippedcontents are placed in the webspherePath/installedApps/ExtendedSearch.earsubdirectory.
4. If you are running Windows, restart the system to ensure that the environmentvariables are set.
5. Install the Extended Search software.The installation program updates several files in the ExtendedSearch.earsubdirectory and copies the product documentation to the appropriatelocations.
6. Following the installation of Extended Search, you must stop WebSphereApplication Server (if you previously started it), start the Extended Search RMIServer, and restart WebSphere Application Server. (For assistance with startingthe RMI Server, see “Starting and stopping the servers” on page 41.)If you are running Windows, it is recommended that you restart the system,not just the server processes.
Use EJB:
Take the following steps if you plan to use the Extended Search EJB:1. Make sure that WebSphere Application Server has been started.2. Change to the WS40 directory on the Extended Search product CD-ROM.3. Enter the following case-sensitive command, where webspherePath is where you
installed WebSphere Application Server, such as c:/websphere/appserver or/usr/WebSphere/Appserver.
Windows: es_ws40ss_createEJB webspherePathUNIX: ./es_ws40ss_createEJB.sh webspherePath
This script adds the extendedSearchEJB.ear file into WebSphere. The unzippedcontents are placed in the webspherePath/installedApps/ExtendedSearch.earsubdirectory. It also deploys the EJB that is within the extendedSearchEJB.ear(this process may take some time to complete).
4. If you are running Windows, restart the system to ensure that the environmentvariables are set.
5. Install the Extended Search software.The installation program updates several files in the ExtendedSearch.earsubdirectory and copies the product documentation to the appropriatelocations.
System prerequisites 9

6. Following the installation of Extended Search, you must stop WebSphereApplication Server (if you previously started it) and restart it. If you arerunning Windows, it is recommended that you restart the system, not justWebSphere Application Server.
Set up the Advanced or Enterprise editionBefore configuring WebSphere Application Server 4.0.2 Advanced or Enterpriseedition for use by the Extended Search server, you must decide how you want tohandle database communications. You can either use the Extended Search RMIServer or deploy the Extended Search EJB.
Use RMI:
Take the following steps if you plan to use the RMI Server:1. Make sure that WebSphere Application Server has been started.2. Change to the WS40 directory on the Extended Search product CD-ROM.3. Enter the following case-sensitive command:
Windows: es_ws40_create webspherePath nodeName currentPathUNIX: ./es_ws40_create.sh webspherePath nodeName currentPath
Where:v webspherePath is where you installed WebSphere Application Server, such as
c:/websphere/appserver or /usr/WebSphere/Appserver.v nodeName is your WebSphere node name (the node name is typically the
computer’s short host name).v currentPath is the fully qualified path to the script’s location, such as the
path to the WS40 directory on the CD-ROM.
This script creates an application server named IBM_ES_Server. It also unzipsthe contents of the extendedSearch.ear file into thewebspherePath/installedApps/ExtendedSearch.ear subdirectory.
4. Install the Extended Search software.The installation program updates several files in the ExtendedSearch.earsubdirectory and copies the product documentation to the appropriatelocations.
5. Following the installation of Extended Search, you must start the ExtendedSearch RMI Server and start the Extended Search application server.If you are running Windows, it is recommended that you restart the system,not just the server processes.
Use EJB:
Take the following steps if you plan to use the Extended Search EJB:1. Make sure that WebSphere Application Server has been started.2. Change to the WS40 directory on the Extended Search product CD-ROM.3. Enter the following case-sensitive command:
Windows: es_ws40_createEJB webspherePath nodeName currentPathUNIX: ./es_ws40_createEJB.sh webspherePath nodeName currentPath
Where:
10 Extended Search Installation
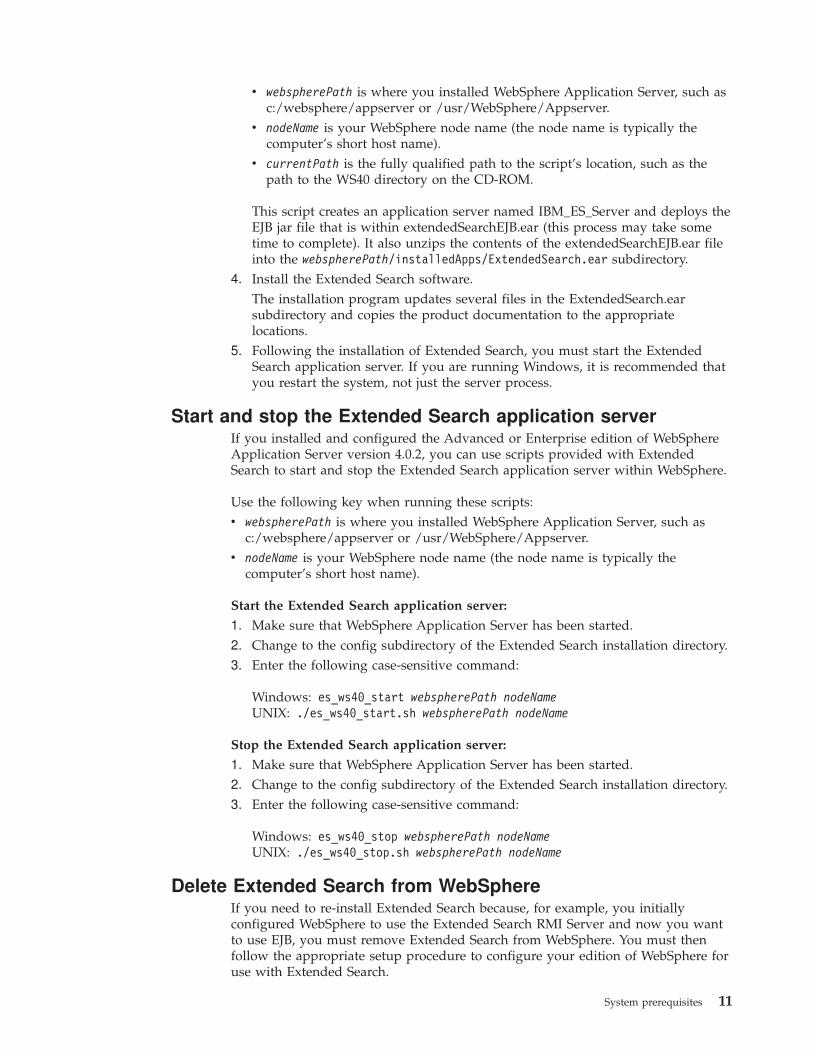
v webspherePath is where you installed WebSphere Application Server, such asc:/websphere/appserver or /usr/WebSphere/Appserver.
v nodeName is your WebSphere node name (the node name is typically thecomputer’s short host name).
v currentPath is the fully qualified path to the script’s location, such as thepath to the WS40 directory on the CD-ROM.
This script creates an application server named IBM_ES_Server and deploys theEJB jar file that is within extendedSearchEJB.ear (this process may take sometime to complete). It also unzips the contents of the extendedSearchEJB.ear fileinto the webspherePath/installedApps/ExtendedSearch.ear subdirectory.
4. Install the Extended Search software.The installation program updates several files in the ExtendedSearch.earsubdirectory and copies the product documentation to the appropriatelocations.
5. Following the installation of Extended Search, you must start the ExtendedSearch application server. If you are running Windows, it is recommended thatyou restart the system, not just the server process.
Start and stop the Extended Search application serverIf you installed and configured the Advanced or Enterprise edition of WebSphereApplication Server version 4.0.2, you can use scripts provided with ExtendedSearch to start and stop the Extended Search application server within WebSphere.
Use the following key when running these scripts:v webspherePath is where you installed WebSphere Application Server, such as
c:/websphere/appserver or /usr/WebSphere/Appserver.v nodeName is your WebSphere node name (the node name is typically the
computer’s short host name).
Start the Extended Search application server:
1. Make sure that WebSphere Application Server has been started.2. Change to the config subdirectory of the Extended Search installation directory.3. Enter the following case-sensitive command:
Windows: es_ws40_start webspherePath nodeNameUNIX: ./es_ws40_start.sh webspherePath nodeName
Stop the Extended Search application server:
1. Make sure that WebSphere Application Server has been started.2. Change to the config subdirectory of the Extended Search installation directory.3. Enter the following case-sensitive command:
Windows: es_ws40_stop webspherePath nodeNameUNIX: ./es_ws40_stop.sh webspherePath nodeName
Delete Extended Search from WebSphereIf you need to re-install Extended Search because, for example, you initiallyconfigured WebSphere to use the Extended Search RMI Server and now you wantto use EJB, you must remove Extended Search from WebSphere. You must thenfollow the appropriate setup procedure to configure your edition of WebSphere foruse with Extended Search.
System prerequisites 11

You can use scripts provided with Extended Search to delete the Extended SearchEnterprise Application (ear file). The procedures vary according to the edition ofWebSphere Application Server you use.
Use the following key when running these scripts:v webspherePath is where you installed WebSphere Application Server, such as
c:/websphere/appserver or /usr/WebSphere/Appserver.v nodeName is your WebSphere node name (the node name is typically the
computer’s short host name).
Delete from Advanced Single Server edition:
1. Change to the config subdirectory of the Extended Search installation directory.2. Enter the following case-sensitive command:
Windows: es_ws40ss_delete webspherePathUNIX: ./es_ws40ss_delete.sh webspherePath
Delete from Advanced or Enterprise edition:
1. Change to the config subdirectory of the Extended Search installation directory.2. Enter the following case-sensitive command:
Windows: es_ws40_delete webspherePath nodeNameUNIX: ./es_ws40_delete.sh webspherePath nodeName
Pre-installation checklistAfter installing the prerequisite software products, use the following checklist tomake sure that you are ready to install Extended Search.__ 1. Decide whether you want to install all components on a single machine
(recommended for first time users), or separate the Web server andconfiguration database from the Extended Search server.
__ 2. Install DB2. Ensure that it functions correctly on its own and that youinstalled the Java Enablement and ODBC components.When configuring a DB2 Administrator, ensure that the user ID is 8characters or fewer. Be sure to retain the user ID and password. You mustspecify this information as part of installing Extended Search.You should also ensure that db2java.zip is in the system classpath. This fileis located in the java subdirectory of the DB2 installation directory.
__ 3. Install the Web Server and Application Server software. You must ensurethat these products function correctly on their own before you installExtended Search. If you use WebSphere version 4.0.2, be sure to configure itfor use with Extended Search before installing Extended Search.
__ 4. If you are installing on UNIX, ensure that you have a fair amount of freespace in the root, /usr, and /tmp file systems. During installation, ExtendedSearch requires at least 100 MB of free space in the /tmp file system.
__ 5. If you plan to use Secure Sockets Layer (SSL) security when searching datasources, make sure that the Web server has been properly configured tohandle HTTPS requests. Consult the documentation for your Web serverproduct for instructions.
__ 6. Use PING or another network connectivity tool to verify that the host namesand IP addresses of the machines you plan to use for Extended Search arevalid and known to your network’s DNS server.
12 Extended Search Installation

Installing on UNIX
Before you install Extended Search software, you need to review thepre-installation checklist to ensure that you are ready to begin installation. Thefollowing steps summarize the installation process:__ 1. If you are installing a non-U.S. English version of Extended Search,
configure the machine’s locale. Separate guidelines exist for setting theoptimum locale on AIX and Solaris.
__ 2. Set up the DB2 instance for the Extended Search configuration database.Separate guidelines exist for setting up DB2 on AIX and Solaris.
__ 3. If you are using WebSphere version 4.0.2, set up the WebSphere ApplicationServer before you install Extended Search. (This step is not required if youuse Domino as your Web application server.)
__ 4. Choose an installation method:v Run the installation wizard. In this approach, which requires an
X-Windows environment, you choose typical or custom installationoptions in a graphical user interface.
v Run the installation command. In this approach, you set up a responsefile that enables you to run a silent installation from the command line.
__ 5. If you are using WebSphere 3.x, set up the WebSphere Application Serverafter you install Extended Search. (This step is not required if you useDomino as your Web application server.)
__ 6. Verify the installation.__ 7. Optionally configure the system to run DB2 on a dedicated server.
If you plan to run Extended Search applications in a language other than U.S.English, you should also review “NLS considerations for UNIX” on page 28.
Set the locale on AIXThe Extended Search installation wizard is a Java application that must run in anX-Windows environment. To ensure that the window title text, panel text, andbutton text are displayed correctly, you must set the locale of the CommonDesktop Environment (CDE) that you use to log in to the AIX system to match thelocale that is configured for the user account that you are installing under. If thelocales are different, text may appear corrupted or may not appear at all.
For the best character resolution when installing a non-U.S. English version ofExtended Search, it is recommended that you set the locale as follows (thesesettings reflect results from using J2RE 1.3.0 IBM build ca130-20020504 to test theinstallation):Simplified Chinese Zh_CN.GBKTraditional Chinese zh_TW.IBM-eucTW or Zh_TW.big5Czech cs_CZ.ISO8859-2Danish da_DK.8859-15German de_DE.8859-15Spanish es_ES.8859-15 or es_ES.IBM-1252Finnish fi_FI.8859-15 or fi_FI.IBM-1252French fr_FR.8859-15 or fr_FR.IBM-1252Hungarian hu_HU.ISO8859-2Italian it_IT.8859-15 or it_IT.IBM-1252Japanese ja_JP.IBM-eucJP or Ja_JP.IBM-943
13

Korean ko_KR.IBM-eucKRDutch nl_NL.8859-15 or nl_NL.IBM-1252Norwegian (Bokmal) no_NO.8859-15Polish pl_PL.ISO8859-2Brazilian Portuguese pt_BR.8859-15Portuguese pt_PT.8859-15 or pt_PT.IBM-1252Russian ru_RU.ISO8859-5Swedish sv_SE.8859-15
Note: If you install the Traditional Chinese version on AIX and experienceproblems with text being corrupted when using the IBM-eucTW(zh_TW.IBM-eucTW) locale or big5 (Zh_TW.big5) locale, use the TraditionalChinese UTF-8 locale (ZH_TW.UTF-8).
For double-byte character set (DBCS) locales, you may experience text corruptionwhen installing from the Windows environment. This generally occurs because of amismatch in the fonts the UNIX JVM is using and what your Windowsenvironment supports. Therefore, it is recommended that you use one of thefollowing configurations to install the product on an AIX system:v Install directly from the AIX machine where you want Extended Search to be
installed.v Log in to another AIX machine and then telnet into the AIX machine where you
want Extended Search to be installed.
Set the locale on SolarisThe Extended Search installation wizard is a Java application that must run in anX-Windows environment. To ensure that the window title text, panel text, andbutton text are displayed correctly, you must set the locale of the CommonDesktop Environment (CDE) that you use to log in to the Solaris system to matchthe locale that is configured for the user account that you are installing under. Ifthe locales are different, text may appear corrupted or may not appear at all.
For the best character resolution when installing a non-U.S. English version ofExtended Search, it is recommended that you set the locale as follows (thesesettings reflect results from using Solaris_JDK_1.2.2_05a to test the installation):Simplified Chinese zh.GBKTraditional Chinese zh_TW.EUC or zh_TW.BIG5Czech cz or cs_CZ.ISO8859-2Danish da.ISO8859-15German de.ISO8859-15Spanish es.ISO8859-15Finnish fi.ISO8859-15French fr.ISO8859-15Hungarian hu or hu_HU.ISO8859-2Italian it.ISO8859-15Japanese ja, ja_JP.eucJP, or ja_JP.PCKKorean ko or ko_KR.EUCDutch nl.ISO8859-15Norwegian (Bokmal) no or no_NO.ISO8859-1@bokmalPolish pl or pl_PL.ISO8859-2Brazilian Portuguese pt_BR or pt_BR.ISO8859-1Portuguese pt.ISO8859-15Russian ru or ru_RU.ISO8859-5Swedish sv.ISO8859-15
For double-byte character set (DBCS) locales, you may experience text corruptionwhen installing from the Windows environment. This generally occurs because of amismatch in the fonts that the UNIX JVM is using and what your Windows
14 Extended Search Installation

environment supports. Therefore, it is recommended that you use one of thefollowing configurations to install the product on a Solaris system.v Install directly from the Solaris machine where you want Extended Search to be
installed.v Log in to another Solaris machine and then telnet into the Solaris machine where
you want Extended Search to be installed.
Set up a DB2 instance on AIXBefore starting the Extended Search installation program, you need to create a DB2UDB instance for the Extended Search configuration database (CDB).1. Log in to the operating system as root.2. Create a DB2 administrative group.
a. Enter the following command:smit mkgroup
b. In the Group NAME field on the Add a Group screen, type a name, such asesadm, and then click OK.
c. When the process is complete, exit SMIT.3. Create a user to administer the Extended Search database instance.
a. Enter the following command:smit mkuser
b. In the User NAME field on the Add a User screen, type a name for thedatabase instance owner, such as esinst. Note that this name cannot begreater than 8 characters in length.When you install Extended Search, you must specify this name as theExtended Search DB2 Administrator user ID (step 6 on page 21).
c. In the Primary Group field, type the name of the group that you created instep 2.
d. In the HOME directory field, type a path for the home directory of thisinstance, such as /home/esinst.
e. Click OK.f. When the process is complete, exit SMIT.
4. Assign an initial password for the database instance owner.a. Enter the following command:
smit passwd
b. In the User NAME field on the Change a User’s Password screen, type thename of the instance owner you created in step 3 and click OK.
c. In the Change a User’s Password pop-up window, type a password for thisuser and press Enter. The password must be eight or fewer characters.
d. When prompted, type the same password again and press Enter.e. When the process is complete, exit SMIT.
5. Ensure that the root user is a member of the administrative group you created.a. Enter the following command:
smit user
b. Select Users → Change / Show Characteristics of a User.c. In the pop-up window, type root in the User NAME field and click OK.d. Select the Group SET field on the Change / Show Characteristics of a User
screen and scroll to the end of the entries. If the group you created in step 2is not listed, add it to the list.
Installing on UNIX 15

e. Click OK.f. When the process is complete, exit SMIT.
6. Create the database instance. Enter the following command:/usr/lpp/db2_07_01/instance/db2icrt -u FencedID InstName
Where:v db2_07_01 is the version of DB2 that you installed for use with Extended
Search.v FencedID is the ID you created in step 3 on page 17, such as esinst.v InstName is a name for the Extended Search database instance. The instance
name should match the instance owner’s ID, such as esinst.If you receive a message about your machine being out of space during thisprocess, increase the free space in the /home/esinst directory.
7. Create a symbolic link to the database instance. Enter the following commands:cd /home/esinst/usr/lpp/db2_07_01/cfg/db2ln
Where:v esinst is the home directory you specified for the database instance in step 3
on page 15.8. Configure the instance owner to run db2profile on startup.
v For the Korn shell (ksh), add the following line to the .profile file of theinstance owner you created in step 3 on page 15. Note the space between theperiod (.) and first slash (/).. /home/esinst/sqllib/db2profile
v For the C shell (csh), add the following line to the .cshrc file of the instanceowner you created in step 3 on page 15.source /home/esinst/sqllib/db2cshrc
9. Configure root to run db2profile on startup.a. Add the following lines to the root .profile file:
if [ -f /home/esinst/sqllib/db2profile ]; then. /home/esinst/sqllib/db2profile
fi
b. Run the profile to effect the changes:. /.profile
At this point, you are ready to begin installing the Extended Search serversoftware. Choose one of the following procedures:v Run the installation wizardv Install from the command line
Set up a DB2 instance on SolarisBefore starting the Extended Search installation program, you need to create a DB2UDB instance for the Extended Search configuration database (CDB).1. Log in to the operating system as root.2. Create a DB2 administrative group.
a. Start the Solaris GUI Admintool. You can either invoke it by command (thedefault installation path is /usr/bin/admintool), or you can selectApplication Manager → System Admin → Admintool.
16 Extended Search Installation

b. Select Browse → Groups.c. Select Edit → Add.d. In the Group Name field, type a name, such as esadm.e. In the Member List field, type root.f. Click OK.
3. Create a user to administer the Extended Search database instance.a. Using the Admintool, select Browse → Users.b. In the User Name field of the User Identity area, type a name for the
database instance owner, such as esinst. Note that this name cannot begreater than 8 characters in length.When you install Extended Search, you must specify this name as theExtended Search DB2 Administrator user ID (step 6 on page 21).
c. In the Primary Groups field, type the name of the group that you created instep 2 on page 16. In the Secondary Groups field, type the group namestaff.
d. Select the appropriate Login Shell for your environment.e. In the Account Security area, select Normal Password, and then type the
same password in both the Enter Password and Verify Password fields. Thepassword must be eight or fewer characters.
f. In the Path field of the Home Directory area, type a path for the homedirectory of this instance, such as /home/esinst.
g. Click OK.h. Use telnet to log in as the user you just created to verify that the user ID
was created correctly.4. Create the database instance. Enter the following command:
/opt/IBMdb2/V7.1/instance/db2icrt -u FencedID InstName
Where:v V7.1 is the version of DB2 that you installed for use with Extended Search.v FencedID is the ID you created in step 3, such as esinst.v InstName is a name for the Extended Search database instance. The instance
name should match the instance owner’s ID, such as esinst.If you receive a message about your machine being out of space during thisprocess, increase the free space in the /home/esinst directory.
5. Create a symbolic link to the database instance. Enter the following commands:cd /home/esinst/opt/IBMdb2/V7.1/cfg/db2ln
Where:v esinst is the home directory you specified for the database instance in step
3.6. Configure the instance owner to run db2profile on startup.
v For the Korn shell (ksh), add the following line to the .profile file of theinstance owner you created in step 3. Note the space between the period (.)and first slash (/).. /home/esinst/sqllib/db2profile
v For the C shell (csh), add the following line to the .cshrc file of the instanceowner you created in step 3.source /home/esinst/sqllib/db2cshrc
Installing on UNIX 17
7. Configure root to run db2profile on startup.a. Add the following lines to the root .profile file:
if [ -f /home/esinst/sqllib/db2profile ]; then. /home/esinst/sqllib/db2profile
fi
b. Run the profile to effect the changes:. /.profile
8. If the Web Application Server is Domino, ensure that the Domino administratoruser ID has access to the group you created in step 2 on page 16. You must alsoadd the following lines to this user ID’s profile to configure it to run db2profileon startup:if [ -f /home/esinst/sqllib/db2profile ]; then
. /home/esinst/sqllib/db2profilefi
At this point, you are ready to begin installing the Extended Search serversoftware. Choose one of the following procedures:v Run the installation wizardv Install from the command line
Run the installation wizard on UNIXUse the following procedure to install an Extended Search system on an IBM AIXor Sun Solaris platform. If you are installing software on more than one machine,you must repeat this procedure on each machine.1. Ensure that you have followed the procedures to set up DB2 for Extended
Search. Also ensure that the DB2 server has been started.If you are re-installing Extended Search 3.7 (for example, if you installed asystem for test purposes but are now moving to production mode), and youwant to preserve configuration changes, use the DESBackup utility to create abackup copy of the configuration database, ibmes. See Extended SearchAdministration for instructions on using this utility.
2. If you use WebSphere Application Server version 4.0.2, follow the proceduresin “Using WebSphere Application Server 4.0.2” on page 8. You must set upthis version of WebSphere before installing Extended Search. (If you use anolder version of WebSphere, you must follow a procedure to configure it afteryou install Extended Search.)
3. Ensure that db2java.zip is in the system classpath. The path should have beenset for you as part of running the db2profile during the installation of DB2.
4. Log in to the operating system as root.5. Ensure that a CD-ROM drive is installed and configured on the machine.6. Place the Extended Search product CD in the CD-ROM drive.7. On AIX, if you do not already have a CD mount point, use the mkdir
command to create one. You can mount the CD at any location in themachine’s local file system. The following example sets the CD mount point at/cdrom:mkdir /cdrom
8. On AIX, enter the following command to mount the CD:mount -o ro -v cdrfs /dev/cd0 /cdrom
9. Log in with a user ID that has DB2 SYSADM privileges. To determine anappropriate ID, enter the following command:db2 get dbm cfg
18 Extended Search Installation

When results are returned, locate the SYSADM entry. The user ID you use tolog in must be listed here, or be a member or a group name that is listed here.
Note: If you are installing Extended Search on a Solaris platform and plan touse Domino as the Web server, the user ID that you use to log in mustalso be the Domino administrator ID (such as server). This Dominoadministrator ID must have DB2 SYSADM privileges.
10. Enter one of the following commands to navigate to the appropriate directoryon the CD:
On AIX: cd /cdrom/aixOn Solaris: cd /cdrom/solaris
11. Enter one of the following commands to start the Extended Search installationwizard:
On AIX: ./setupaixOn Solaris: ./setupsol
12. Review the Welcome page and click Next to continue.13. To install into the default location, click Next. The default path is
/opt/ExtendedSearch3.7. If you are installing Extended Search on a Solarisplatform and use Domino as the Web server, the recommended path is/home/server/ExtendedSearch3.7.To install into a different location, type the pathname or click Browse to selectthe destination file system. Before clicking Next, ensure that the location youchoose is separate from the root file system and that it has ample free space.Also ensure that the installation path you specify does not end in a forwardslash (/).
14. Choose the type of configuration you want to install and click Next:v If you select Typical, the program installs the components listed in the
following table. “Typical installation on UNIX” on page 20 describes thisprocess.
v If you select Custom, the program prompts you to select individualcomponents. It may take several seconds for the list of components to becreated; be patient. Select the check boxes for components you want toinstall, and clear the check boxes for components you do not want to install.“Custom installation on UNIX” on page 22 describes this process.
Installing on UNIX 19
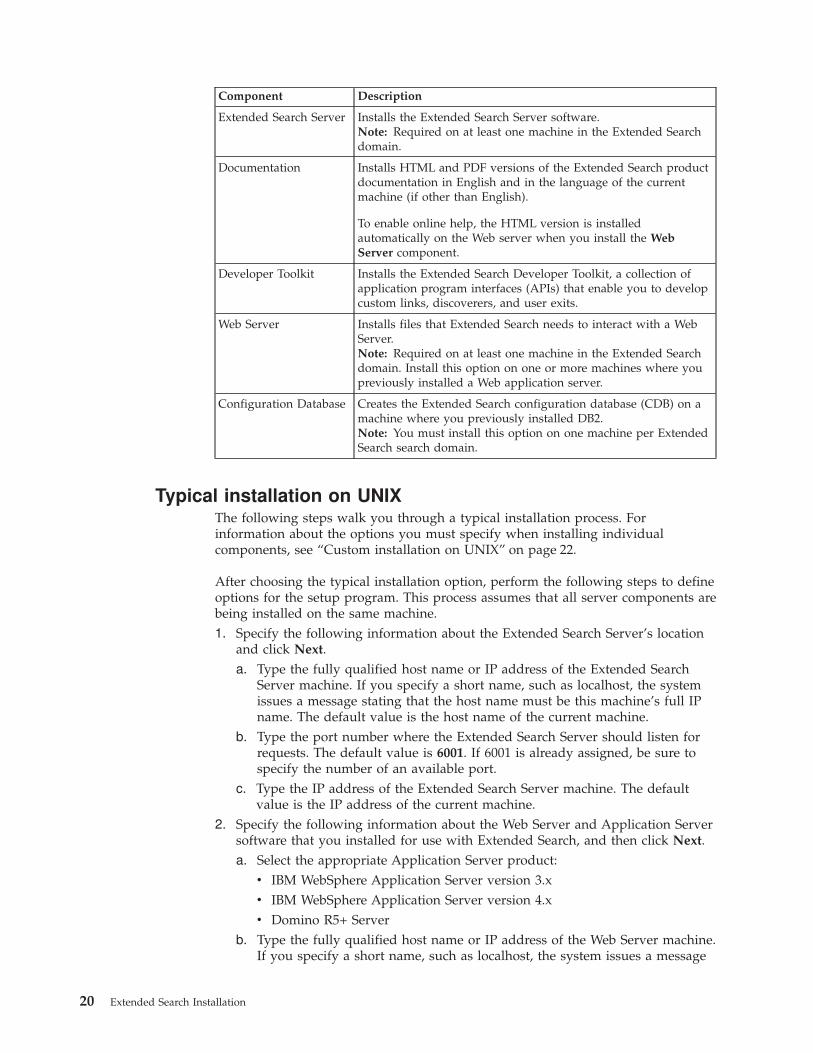
Component Description
Extended Search Server Installs the Extended Search Server software.Note: Required on at least one machine in the Extended Searchdomain.
Documentation Installs HTML and PDF versions of the Extended Search productdocumentation in English and in the language of the currentmachine (if other than English).
To enable online help, the HTML version is installedautomatically on the Web server when you install the WebServer component.
Developer Toolkit Installs the Extended Search Developer Toolkit, a collection ofapplication program interfaces (APIs) that enable you to developcustom links, discoverers, and user exits.
Web Server Installs files that Extended Search needs to interact with a WebServer.Note: Required on at least one machine in the Extended Searchdomain. Install this option on one or more machines where youpreviously installed a Web application server.
Configuration Database Creates the Extended Search configuration database (CDB) on amachine where you previously installed DB2.Note: You must install this option on one machine per ExtendedSearch search domain.
Typical installation on UNIXThe following steps walk you through a typical installation process. Forinformation about the options you must specify when installing individualcomponents, see “Custom installation on UNIX” on page 22.
After choosing the typical installation option, perform the following steps to defineoptions for the setup program. This process assumes that all server components arebeing installed on the same machine.1. Specify the following information about the Extended Search Server’s location
and click Next.a. Type the fully qualified host name or IP address of the Extended Search
Server machine. If you specify a short name, such as localhost, the systemissues a message stating that the host name must be this machine’s full IPname. The default value is the host name of the current machine.
b. Type the port number where the Extended Search Server should listen forrequests. The default value is 6001. If 6001 is already assigned, be sure tospecify the number of an available port.
c. Type the IP address of the Extended Search Server machine. The defaultvalue is the IP address of the current machine.
2. Specify the following information about the Web Server and Application Serversoftware that you installed for use with Extended Search, and then click Next.a. Select the appropriate Application Server product:
v IBM WebSphere Application Server version 3.xv IBM WebSphere Application Server version 4.xv Domino R5+ Server
b. Type the fully qualified host name or IP address of the Web Server machine.If you specify a short name, such as localhost, the system issues a message
20 Extended Search Installation
stating that the host name must be this machine’s full IP name. The defaultvalue is the host name of the current machine.
c. Type the port number where the Web Server should listen for requests. Thedefault value is 80.
3. If you selected Domino as your Web Server, correct or confirm informationabout the Domino Server, and then click Next.a. Type the fully qualified path for the Domino Server’s root directory.
Typically, this value is /opt/lotus (on AIX) or /home/server (on Solaris).b. Type the fully qualified path for the Domino Server’s data directory, such as
/opt/lotus/data (on AIX) or /home/server/data (on Solaris).c. Type the fully qualified path for the directory that holds the Domino
Server’s notes.ini file, such as /opt/lotus/data (on AIX) or/home/server/data (on Solaris).
4. For both WebSphere and Domino servers, specify the root directory for theApplication Server and click Next. This is a directory on the Web ApplicationServer where Extended Search will install application-specific software. In mostcases, you should accept the default value.v For WebSphere 3.x, the base path is typically /usr/IBMWebAS or
/usr/WebSphere/AppServer on AIX, or /opt/IBMWebAS or/opt/WebSphere/AppServer on Solaris. Extended Search will create a/lotuskms directory off this path. For example:/usr/WebSphere/AppServer/hosts/default_host/lotuskms. The /lotuskmsdirectory in turn contains two directories: /servlets and /web.
v For WebSphere 4.x, the base path is typically /usr/WebSphere/AppServer onAIX, or /opt/WebSphere/AppServer on Solaris. An ExtendedSearch.earsubdirectory was created when you set up WebSphere for use with ExtendedSearch.
v For Domino, the base path is typically /opt/lotus/data on AIX, or/home/server/data on Solaris. Extended Search will create /lotuskms and/servlet directories off this path. For example:/opt/lotus/data/domino/html/lotuskms and/opt/lotus/data/domino/servlet.
5. Type the fully qualified path for the sqllib subdirectory of the home directoryyou specified when you set up a DB2 instance for Extended Search. Forexample: /home/esinst/sqllib.
6. Specify the following information for the Extended Search DB2 Administratorand click Next. This user ID enables Extended Search to access DB2 and createand update the configuration database.a. Type the 1– to 8–character user ID of the DB2 Administrator who owns the
DB2 instance that you created for the Extended Search configurationdatabase (such as esinst).
b. Type the password that you created for this user.c. Type the same password again to confirm it.
7. Review the installation selections you made. Click Next if you are ready toproceed with installation or click Back to return to a selection you want tochange. Click Cancel if you want to exit the setup program without installingExtended Search.
8. Advance to “Post-installation steps on UNIX” on page 23 to complete theinstallation of Extended Search.
Installing on UNIX 21

Custom installation on UNIXThe following steps walk you through a custom installation process.1. After choosing the custom installation option (step 14 on page 19), refer to the
following table for guidelines about the setup options you must specify. Notethat after you click Next, it may take several seconds for the list of componentsto be created; be patient.
If you install thiscomponent... You must provide this information...
Extended Search Server v Extended Search Server location (step 1 on page 20)
v Web Server and Application Server type and location (step 2on page 20)
Note: If you install more than one server on the same machine,be sure to assign different port numbers to each.
Documentation Choose the languages in which you want to install HTML andPDF versions of the product documentation.
Each language version will be stored in a locale-specificsubdirectory of the Extended Search Docs directory.
Note that not all documentation is available in all languages, andExtended Search Programming is available only in English.
Developer Toolkit None. The toolkit is installed in the specified location.
Web Server v Extended Search Server location (step 1 on page 20)
v Web Server and Application Server type and location (step 2on page 20)
v If Domino, Domino server configuration data (step 3 onpage 21)
v Web Application Server root directory (step 4 on page 21)
v Host name of the DB2 server that hosts the configurationdatabase (this step is not required in a typical installation)
v DB2 Administrator user ID and password (step 6 on page 21)
Configuration Database v Extended Search Server location (step 1 on page 20)
v Web Server and Application Server type and location (step 2on page 20)
v Path to the sqllib subdirectory of the DB2 instance you createdfor Extended Search (step 5 on page 21)
v DB2 Administrator user ID and password (step 6 on page 21)
Reflector v Extended Search Server location (step 1 on page 20)
v The location of the cgi-bin directory on the Web server (thisstep is not required in a typical installation)
This option installs support for IBM Enterprise InformationPortal and for queries that originate through an Extended SearchNotes Client application that is installed on a Windows machine.Note: If selected, you must install this option on a machinewhere you also install the Web Server component.
2. After defining options, review the installation selections you made. Click Nextif you are ready to proceed with installation or click Back to return to aselection you want to change. Click Cancel if you want to exit the setupprogram without installing Extended Search.
22 Extended Search Installation

3. Advance to “Post-installation steps on UNIX” to complete the installation ofExtended Search.
Post-installation steps on UNIXAfter specifying options for the setup program and starting the installation process,you must perform the following steps to complete the installation of ExtendedSearch.1. When installation begins, the setup program copies files to your hard drive. If
you are installing the Configuration Database, the program also creates andpopulates the CDB with default data. This process may take several minutes.
Processing Tips
v If it detects that a back-level version of DB2 exists, the program stops.You must upgrade to the required software level and run the setupprogram again.
v If you are re-installing Extended Search, you will be prompted tochoose whether you want to preserve or overwrite the existingconfiguration database (ibmes).
v You may see a message about replacing read-only files in the Dominodirectory. If so, select the Don’t display this message again check boxand then click Yes.
2. Review the product Readme file, click Next, and then click Finish. To view themost current version of the Readme at any time, access the Downloads link atthe following URL:http://www.lotus.com/home.nsf/welcome/domsearch
3. You must append the installation path for the Extended Search /lib directory tothe end of your LIBPATH (on AIX) or LD_LIBRARY_PATH (on Solaris).a. To ensure that the Extended Search libraries are loaded each time the
system starts, add the following line to your .profile file. Note that theseexamples show the default installation paths; your path may be different.
On AIX:export LIBPATH=$LIBPATH:/opt/ExtendedSearch3.7/libOn Solaris:export LD_LIBRARY_PATH=$LD_LIBRARY_PATH:/home/server/ExtendedSearch3.7/lib
b. Log on again to apply or reload the .profile file.c. To have the changes take effect, stop and restart the Web server
4. If you are using a WebSphere application server, take one of the followingactions according to the version of WebSphere that you are running:v If you are using version 3.x, you must take steps to set it up for use with
Extended Search. See “Set up WebSphere Application Server 3.x on UNIX” onpage 25 for instructions.
v If you are using the Advanced Single Server edition of version 4.0.2, youmust stop WebSphere Application Server (if you previously started it), startthe Extended Search RMI Server (if used), and restart WebSphere ApplicationServer.
v If you are using the Advanced or Enterprise edition of version 4.0.2, youmust start the Extended Search RMI Server (if used) and start the ExtendedSearch application server.
Installing on UNIX 23

For assistance with starting the RMI Server, see “Start the server on UNIX”on page 41. For information about a script you can use to start the Extended
Search application server, see page 11.
Command line installation on UNIXUse the following procedure if you prefer to install the product from the commandline instead of using the installation wizard, or if you do not have a windowenvironment.
Before you begin installation, you must define a response file. A response filedefines installation options for Extended Search and enables you to install theproduct silently as opposed to running a graphical user interface. A sampleresponse file, example.rsp, is available in the /aix and /solaris directories on theproduct CD-ROM. Copy this file and use the comments in it to create your ownresponse file. You can give any name you like to this file (such as/tmp/MyResponseFile.txt).
Follow the procedure below when you are ready to silently install ExtendedSearch. If you are installing software on more than one machine, you must definemultiple response files and repeat the procedure until all required components areinstalled on the various machines.1. Ensure that you have followed the procedures to set up DB2 for Extended
Search. Also ensure that the DB2 server has been started.If you are re-installing Extended Search (for example, if you installed a systemfor test purposes but are now moving to production mode), and you want topreserve configuration changes, use the DESBackup utility to create a backupcopy of the configuration database, ibmes. See Extended Search Administrationfor instructions on using this utility.
2. If you plan to use WebSphere Application Server version 4.0.2, follow theprocedures in “Using WebSphere Application Server 4.0.2” on page 8. Youmust set up this version of WebSphere before installing Extended Search. (Ifyou use an older version of WebSphere, you must follow a procedure toconfigure it after you install Extended Search.)
3. Ensure that db2java.zip is in the system classpath. The path should have beenset for you as part of running the db2profile during the installation of DB2.
4. Log in to the operating system as root.5. If you plan to use the WebSphere Application Server, ensure that it has been
started.6. Ensure that a CD-ROM drive is installed and configured on the machine.7. Place the Extended Search product CD in the CD-ROM drive.8. If you do not already have a CD mount point, use the mkdir command to
create one. You can mount the CD at any location in the machine’s local filesystem. The following example sets the CD mount point at /cdrom:mkdir /cdrom
9. Enter the following command to mount the CD:mount -o ro -v cdrfs /dev/cd0 /cdrom
10. Log in with a user ID that has DB2 SYSADM privileges. To determine anappropriate ID, enter the following command:db2 get dbm cfg
When results are returned, locate the SYSADM entry. The user ID you use tolog in must be listed here, or be a member or a group name that is listed here.
24 Extended Search Installation
Note: If you are installing Extended Search on a Solaris platform and plan touse Domino as the Web server, the user ID that you use to log in mustalso be the Domino administrator ID (such as server). This Dominoadministrator ID must have DB2 SYSADM privileges.
11. Enter one of the following commands to navigate to the appropriate directoryon the CD:
On AIX: cd /cdrom/aixOn Solaris: cd /cdrom/solaris
12. Enter the following command to begin the installation process, where/tmp/MyResponseFile.txt identifies the fully qualified pathname of theresponse file you want to use for this installation of Extended Search:./esinstal /tmp/MyResponseFile.txt
13. You must append the installation path for the Extended Search /lib directoryto the end of your LIBPATH (on AIX) or LD_LIBRARY_PATH (on Solaris).a. To ensure that the Extended Search libraries are loaded each time the
system starts, add the following line to your .profile file. Note that theseexamples show the default installation paths; your path may be different.
On AIX:export LIBPATH=$LIBPATH:/opt/ExtendedSearch3.7/libOn Solaris:export LD_LIBRARY_PATH=$LD_LIBRARY_PATH:/home/server/ExtendedSearch3.7/lib
b. Log on again to apply or reload the .profile file.c. To have the changes take effect, stop and restart the Web server
14. If you are using a WebSphere application server, take one of the followingactions (after the installation program has finished) according to the version ofWebSphere that you are running:v If you are using version 3.x, you must take steps to set it up for use with
Extended Search. See “Set up WebSphere Application Server 3.x on UNIX”for instructions.
v If you are using the Advanced Single Server edition of version 4.0.2, youmust stop WebSphere Application Server (if you previously started it), startthe Extended Search RMI Server (if used), and restart WebSphereApplication Server.
v If you are using the Advanced or Enterprise edition of version 4.0.2, youmust start the Extended Search RMI Server (if used) and start the ExtendedSearch application server.For assistance with starting the RMI Server, see “Start the server on UNIX”on page 41. For information about a script you can use to start the
Extended Search application server, see page 11.
Set up WebSphere Application Server 3.x on UNIXIf you are using IBM WebSphere Application Server version 3.5 or older, you mustrun a configuration program to set it up for use with Extended Search. If youinstall multiple Extended Search servers, you must repeat these steps for eachserver after you install the Extended Search software.
In the default configuration, WebSphere is configured to use the Extended SearchRMI Server for database communications. If you prefer to deploy the ExtendedSearch EJB for database communications instead, you must edit the configuration
Installing on UNIX 25

program before running it. Deploying the EJB requires you to install the advancededition of WebSphere Application Server (see “System prerequisites” on page 3 fordetails).1. Take the following steps if you plan to run Extended Search with the RMI
server:a. Log in to the machine that hosts the Extended Search configuration
database.b. Change to the Extended Search binaries directory. The default path is
/opt/ExtendedSearch3.7/bin. (On a Solaris platform that uses Domino asthe Web server, the recommended path is/home/server/ExtendedSearch3.7/bin.)
c. Enter the following case-sensitive command to start the RMI server:./desrmiStart
2. Take the following steps if you plan to deploy the Extended Search EJB:a. Open one of the following files with a text editor:
v es_ws35.xml, if you installed WebSphere Application Server 3.5.x.v es_ws302.xml, if you installed WebSphere Application Server 3.0.2.
b. Locate the block that begins with ″<! –– This deploys the EJB (START)″, andremove all comment characters from each subsequent line until you reachthe ″(END) ––>″ notation.
3. Make sure that WebSphere is in the system path and that the WebSphereApplication Server has been started.
4. Within the WebSphere Application Server Administrative Console, be sure todefine all host alias names for this server.v Alias entries should exist for localhost, the server’s IP address, the server’s
short host name, and the server’s fully qualified host name .v If the Web server is running on a port other than 80, the host alias entries
must also specify the port number. The following example shows samplealias definitions for a system than uses port number 81 (note that in someversions of WebSphere, there is a separate field for defining the portnumber).localhost:819.99.99.99:81myhost:81myhost.dev.ibm.com:81
5. Change to the Extended Search binaries directory. The default path is/opt/ExtendedSearch3.7/bin. (On a Solaris platform that uses Domino as theWeb server, the recommended path is /home/server/ExtendedSearch3.7/bin.)
6. Enter the following case-sensitive command:WAS_bin_path/XMLConfig.sh -import es_wsXX.xml
-adminNodeName my_nodename -substitute "nodeName=my_nodename"
Where:v WAS_bin_path is the installation path for the WebSphere Application Server
/bin directory, such as /usr/IBMWebAS/bin or/opt/WebSphere/AppServer/bin.
v es_wsXX is the name of the XML file that corresponds to your version ofWebSphere Application Server (es_ws35or es_ws302).
v my_nodename is the WebSphere node name as displayed in the WebSphereApplication Server Administrative Console (the node name is typically thecomputer’s short host name).
26 Extended Search Installation

If you receive errors that state that the script was unable to find the servlet,you can ignore them.
If you receive errors that state that the script was unable to find the servlet, youcan ignore them.
The following sample output shows messages that you may see during asuccessful configuration on a WebSphere 3.5 system:Importing JDBCDriver : desImporting DataSource : desDSImporting Node : "my_nodename"Importing ApplicationServer : IBM ES ServerImporting Container : IBM ES ContainerImporting ServletEngine : IBM ES Servlet EngineImporting WebApplication : IBM ES Web ApplicationImporting Servlet : ESAdminImporting Servlet : JKMBatchManagerImporting Servlet : JKMSearchControllerImporting Servlet : JKMFetchMgrImporting Servlet : File Serving EnablerImporting Servlet : Error Reporting FacilityImporting Servlet : JSP 1.1 ProcessorImporting SessionManager : Session ManagerImporting ApplicationServer : IBM ES ServersImporting Node : "my_nodename"
After configuring WebSphere, start the Extended Search Administration interface(see Extended Search Administration for startup instructions). If it starts successfully,it means that WebSphere Application Server was successfully set up for use withExtended Search.
If the WebSphere Administrative Console is running, you will see entries like IBMES Server; desDS, and des (note that you may have to stop and restart theWebSphere Administrative client to see this change).
Verify the installation on UNIXTake the following steps to verify that the server installation was successful. Referto Extended Search Administration as necessary to complete the following tasks.1. Start Extended Search. Be sure to first start the prerequisite products and
services such as DB2, the RMI server (if used), and the Web application server,as discussed in “Start the server on UNIX” on page 41.
2. Start the Administration interface, and take the following steps:v Run the Extended Search Monitor.
The Monitor lists each instance of the Extended Search server components byusing a color-coded icon to denote status. If all of the components switch toIdle mode (gray icon), the installation of the basic server software wassuccessful. If the status icons do not turn gray, review the discussion aboutmonitoring server activity for guidelines on how to interpret the statistics.
v Navigate through various administration options to confirm your ability toaccess and use the configuration database.
v Select the Demo search template provided by Extended Search, and run asample query against the predefined Extended Search documentationcategory.
3. Test your ability to access the Demo sample application and submit a queryfrom a remote Web browser.
Installing on UNIX 27
NLS considerations for UNIXBe sure to read about national language support (NLS) in Extended SearchAdministration before reading this section so that you are familiar with the NLSconfiguration file (esNLS.ini).
On the UNIX machines where you install the Extended Search Server component,you must also install locale definition source files for all the locales that you planto support. For a complete list of all locales that the Extended Search systemsupports, refer to the esNLS.ini file. This file is located in the /config subdirectoryof the Extended Search installation directory.
For a given locale, several locale definition source files may be available. Theselocale definition files vary by which code page was used to build them.v On AIX, locale definition files are broken up into three different code page
groups: ISO/EUC, PC, and UTF-8.The locale definition files are identified by a two-character ISO-639 languagecode, followed by an underscore, followed by a two-character ISO-3166 countrycode. To determine which code page the locale definition file is using, you needto evaluate the case of the language code. If both characters are lower case, thelocale definition file is using the ISO/EUC code page. If the first character isupper case and the second character is lower case, the PC code page is beingused. If both characters are upper case, the UTF-8 code page is being used.
v On Solaris, the locale definition files are divided into two different code pagegroups: ISO/EUC and UTF-8. However, not all locales have a UTF-8 localedefinition file on Solaris.The way that the server determines which code page group a locale definitionfile belongs to is to query the locale definition file name for the ″UTF″ charactersequence. If the character sequence is found, it assumes that the locale definitionfile belongs to the UTF-8 code page group. If the ″UTF″ character sequence isnot found, it assumes that the locale definition file belongs to the ISO/EUC codepage group.
When switching locale definition files, the Extended Search system will query theserver’s default locale to see which code page group it should use. The desStartand desStop shell scripts have logic in them to ensure that the LC_ALLenvironment variable is set to the server’s default locale. These scripts use thefollowing logic to determine the server’s default locale:1. If the LC_ALL environment variable is set, use that value.2. If the LANG environment variable is set, set the LC_ALL environment variable
to the LANG value.3. On AIX, search the /etc/environment environment file for the LANG entry. If
found, use its value to set the LC_ALL environment variable.4. Default the LC_ALL environment variable to en_US (the United States English
ISO locale definition file).
On AIX, for example, if the LC_ALL environment variable is set to de_DE.8859-15prior to calling the desStart script, the Extended Search server will use theGermany German ISO locale definition file (which was built with the ISO8859-15code page) as the server’s default locale. If the Extended Search server received arequest to search a Japanese database from a Japanese client, the Extended Searchserver would use the ja_JP locale definition file to process the request (ja_JP is theJapan Japanese EUC locale definition file built with the IBM-eucJP code page).
28 Extended Search Installation

For each supported locale, the esNLS.ini file contains the following locale-specificentries for the AIX platform:v An ISO/EUC locale definition file entry (locale.AIXSetlocale1) with its associated
code page entry (locale.AIXCodePage1).v A PC locale definition file entry (locale.AIXSetlocale2) with its associated code
page entry (locale.AIXCodePage2).v A UTF-8 locale definition file entry (locale.AIXSetlocale3). Because the code page
is always UTF-8, there are no associated code page entries for the UTF-8 localedefinition file entries in the esNLS.ini file.
For each supported locale, the esNLS.ini file contains the following locale-specificentries for the Solaris platform:v An ISO/EUC locale definition file entry (locale.SunSetlocale1) with its associated
code page entry (locale.SunCodePage1).v A UTF-8 locale definition file entry (locale.SunSetlocale2) with its associated code
page entry (locale.SunCodePage2). Not all locales have a UTF-8 locale definitionfile. For the ones that do not, their ISO/EUC locale definition file will be usedinstead.
To determine which locale definition files to install on your UNIX server machines,use the following check list:__ 1. Determine your server’s default locale and the code page group it is using.__ 2. Determine which locales your Extended Search system will be supporting.__ 3. For each supported locale, install the locale definition file as indicated in the
esNLS.ini file for the appropriate code page group.
Installing on UNIX 29

30 Extended Search Installation
Installing on Windows
Before you install Extended Search software, you need to review thepre-installation checklist to ensure that you are ready to begin installation. Thefollowing steps summarize the installation process:__ 1. If you are using WebSphere version 4.0.2, set up the WebSphere Application
Server before you install Extended Search. (This step is not required if youuse Domino as your Web application server.)
__ 2. Run the installation wizard. In this approach, you can choose whether youwant to install a typical setup or specify custom installation options.
__ 3. To access the Internet, set up the proxy server for Extended Search.__ 4. If you are using WebSphere 3.x, set up the WebSphere Application Server
after you install Extended Search. (This step is not required if you useDomino for your Web application server.)
__ 5. Verify the installation.__ 6. Optionally configure the system to run DB2 on a dedicated server.
If you plan to configure multiple brokers on multiple machines, see “Server-onlyinstallation on Windows” on page 38 for information about an installation imagethat can facilitate this process.
If you plan to run Extended Search applications in a language other than U.S.English, you should also review “NLS considerations for Windows” on page 39.
Run the installation wizard on WindowsUse the following procedure to install an Extended Search system on a MicrosoftWindows NT or Windows 2000 platform. If you are installing software on morethan one machine, you must repeat this procedure on each machine.1. If you are re-installing Extended Search 3.7 (for example, if you installed a
system for test purposes but are now moving to production mode), and youwant to preserve configuration changes, use the DESBackup utility to create abackup copy of the configuration database, ibmes. See Extended SearchAdministration for instructions on using this utility.
2. If you use WebSphere Application Server version 4.0.2, follow the proceduresin “Using WebSphere Application Server 4.0.2” on page 8. You must set upthis version of WebSphere before installing Extended Search. (If you use anolder version of WebSphere, you must follow a procedure to configure it afteryou install Extended Search.)
3. Ensure that db2java.zip is in the system classpath. The path (typicallyc:\Program Files\sqllib\java) should have been set for you as part ofinstalling DB2.
4. Log in to Windows using the DB2 Administrator user ID that you created aspart of installing DB2. This ID must also have advanced administrative userrights that enable it to Act as part of the operating system on this localmachine.Keep in mind that this user ID cannot be greater than 8 characters in length.
5. Ensure that a TEMP environment variable exists and that it points to anexisting directory that has at least 100 MB of free space (such as c:\temp). Bydefault, the setup program will use this directory to process temporary files.
31
6. Place the Extended Search product CD in the CD-ROM drive.7. If the CD does not autostart, select Start → Run, click Browse to change to the
\windows directory on the CD-ROM drive, and run setup.exe.If you prefer to use a directory other than the system temp directory forprocessing temporary files, enter the following command to run the setupprogram, where c:\es_inst\temp identifies the path to an existing directoryyou want to use. Make sure that this directory has at least 100 MB of freespace. (If the directory you name does not exist, setup uses the system-definedtemp directory.)setup.exe -is:tempdir c:\es_inst\temp
8. Review the Welcome page and click Next to continue.9. To install into the default location (c:\Program Files\IBM\Extended Search),
click Next.To install into a different location, type the pathname or click Browse to selectthe destination directory, and then click Next.
10. Choose the type of configuration you want to install and click Next:v If you select Typical, the program installs the components listed in the
following table. “Typical installation on Windows” describes this process.v If you select Custom, the program prompts you to select individual
components. It may take several seconds for the list of components to becreated; be patient. Select the check boxes for components you want toinstall, and clear the check boxes for components you do not want to install.“Custom installation on Windows” on page 34 describes this process.
Component Description
Extended Search Server Installs the Extended Search Server software.Note: Required on at least one machine in the Extended Searchdomain.
Documentation Installs HTML and PDF versions of the Extended Search productdocumentation in English and in the language of the currentmachine (if other than English).
To enable online help, the HTML version is installedautomatically on the Web server when you install the WebServer component.
Developer Toolkit Installs the Extended Search Developer Toolkit, a collection ofapplication program interfaces (APIs) that enable you to developcustom links, discoverers, and user exits.
Web Server Installs files that Extended Search needs to interact with a WebServer.Note: Required on at least one machine in the Extended Searchdomain. Install this option on one or more machines where youpreviously installed a Web application server.
Configuration Database Creates the Extended Search configuration database (CDB) on amachine where you previously installed DB2.Note: You must install this option on one machine per ExtendedSearch search domain.
Typical installation on WindowsThe following steps walk you through a typical installation process. Forinformation about the options you must specify when installing individualcomponents, see “Custom installation on Windows” on page 34s.
32 Extended Search Installation

After choosing the typical installation option, perform the following steps to defineoptions for the setup program. This process assumes that all server components arebeing installed on the same machine.1. Specify the following information about the Extended Search Server’s location
and click Next.a. Type the fully qualified host name or IP address of the Extended Search
Server machine. If you specify a short name, such as localhost, the systemissues a message stating that the host name must be this machine’s full IPname. The default value is the host name of the current machine.
b. Type the port number where the Extended Search Server should listen forrequests. The default value is 6001.
c. Type the IP address of the Extended Search Server machine. The defaultvalue is the IP address of the current machine.
2. Specify the following information about the Web Server and Application Serversoftware that you installed for use with Extended Search, and then click Next.a. Select the appropriate Application Server product:
v IBM WebSphere Application Server version 3.xv IBM WebSphere Application Server version 4.xv Domino R5+ Server
b. Type the fully qualified host name or IP address of the Web Server machine.If you specify a short name, such as localhost, the system issues a messagestating that the host name must be this machine’s full IP name. The defaultvalue is the host name of the current machine.
c. Type the port number where the Web Server should listen for requests. Thedefault value is 80.
3. If you selected Domino as your Web Server, correct or confirm informationabout the Domino Server, and then click Next.a. Type the fully qualified path for the Domino Server’s installation directory.b. Type the fully qualified path for the Domino Server’s data directory.c. Type the fully qualified path for the directory that holds the Domino
Server’s notes.ini file.4. For both WebSphere and Domino servers, specify the root directory for the
Application Server and click Next. This is a directory on the Web ApplicationServer where Extended Search will install application-specific software. In mostcases, you should accept the default value.v For WebSphere 3.x, the base path is typically \WebSphere\AppServer.
Extended Search will create a \lotuskms directory off this path (for example,c:\WebSphere\AppServer\hosts\default_host\lotuskms). The \lotuskmsdirectory in turn contains two directories: \servlets and \web.
v For WebSphere 4.x, the base path is typically \WebSphere\AppServer. An\installedApps\ExtendedSearch.ear directory was created off this path whenyou set up WebSphere for use with Extended Search.
v For Domino, the base path is typically \lotus\data\domino. Extended Searchwill create \data\html\lotuskms and \data\servlet directories off this path.
5. Type the fully qualified path for the DB2 sqllib directory and click Next.6. Specify the following information for the Extended Search DB2 Administrator
and click Next. This user ID enables Extended Search to access DB2 and createand update the configuration database.a. Type the 1– to 8–character DB2 Administrator user ID that you created as
part of installing DB2.
Installing on Windows 33

b. Type the password for this user.c. Type the same password again to confirm it.
7. Review the installation selections you made. Click Next if you are ready toproceed with installation or click Back to return to a selection you want tochange. Click Cancel if you want to exit the setup program without installingExtended Search.
8. Advance to “Post-installation steps on Windows” on page 35 to complete theinstallation of Extended Search.
Custom installation on WindowsThe following steps walk you through a custom installation process.1. After choosing the custom installation option (step 10 on page 32), refer to the
following table for guidelines about the setup options you must specify. Notethat after you click Next, it may take several seconds for the list of componentsto be created; be patient.
If you install thiscomponent... You must provide this information...
Extended Search Server v Extended Search Server location (step 1 on page 33)
v Web Server and Application Server type and location (step 2on page 33)
Note: If you install more than one server on the same machine,be sure to assign different port numbers to each.
Documentation Choose the languages in which you want to install HTML andPDF versions of the product documentation.
Each language version will be stored in a locale-specificsubdirectory of the Extended Search Docs directory, and aseparate entry will be created in the Start → Programs menu.
Note that not all documentation is available in all languages, andExtended Search Programming is available only in English.
Developer Toolkit None. The toolkit is installed in the specified location.
Web Server v Extended Search Server location (step 1 on page 33)
v Web Server and Application Server type and location (step 2on page 33)
v If Domino, Domino Server configuration data (step 3 onpage 33)
v Web Application Server root directory (step 4 on page 33)
v Host name of the DB2 server that hosts the configurationdatabase (this step is not required in a typical installation)
v DB2 Administrator user ID and password (step 6 on page 33)
Configuration Database v Extended Search Server location (step 1 on page 33)
v Web Server and Application Server type and location (step 2on page 33)
v DB2 installation directory (step 5 on page 33)
v DB2 Administrator user ID and password (step 6 on page 33)
34 Extended Search Installation
If you install thiscomponent... You must provide this information...
Reflector v Extended Search Server location (step 1 on page 33)
v The location of the cgi-bin directory on the Web server (thisstep is not required in a typical installation)
This option installs support for IBM Enterprise InformationPortal and for queries that originate through an Extended SearchNotes Client application.Note: If selected, you must install this option on a machinewhere you also install the Web Server component.
Notes Client Support v Domino Server configuration data (step 3 on page 33)
This option installs the Notes Client application software. Toenable users to search Extended Search with a Lotus Notes client,install this option on one or more Domino servers.Note: If you choose this option, you should also install theReflector.
2. After defining options, review the installation selections you made. Click Nextif you are ready to proceed with installation or click Back to return to aselection you want to change. Click Cancel if you want to exit the setupprogram without installing Extended Search.
3. Advance to “Post-installation steps on Windows” to complete the installation ofExtended Search.
Post-installation steps on WindowsAfter specifying options for the setup program and starting the installation process,you must perform the following steps to complete the installation of ExtendedSearch.1. When installation begins, the setup program copies files to your hard drive. If
you are installing the Configuration Database, the program also creates andpopulates the CDB with default data. This process may take several minutes.
Processing Tips
v If it detects that a back-level version of DB2 exists, the program stops.You must upgrade to the required software level and run the setupprogram again.
v If you are re-installing Extended Search 3.7, you will be prompted tochoose whether you want to preserve or overwrite the existingconfiguration database (ibmes).
v You may see a message about replacing read-only files in the Dominodirectory. If so, select the Don’t display this message again check boxand then click Yes.
v If you receive a message indicating that setup failed to create a servicefor Extended Search or the Extended Search RMI Server, ensure that theuser ID you specified as the DB2 Administrator has WindowsAdministrator privileges on this machine and that the user ID is lessthan or equal to 8 characters.
2. Review the product Readme file, click Next, and then click Finish. To view themost current version of the Readme at any time, access the Downloads link atthe following URL:
Installing on Windows 35

http://www.lotus.com/home.nsf/welcome/domsearch
3. If you installed the Configuration Database or Extended Search Servercomponents, you will be prompted to restart the system. If you do not restartthe system now, you must do so before you start the Extended Search server.
Note: To ensure that the environment variables are set correctly, it isrecommended that you restart the system even if you are not promptedto do so.
4. To access the Internet, you must take steps before running Extended Search toensure that it is properly configured for Internet Explorer. See “Set up theproxy server on Windows” for instructions.
5. If you are using a WebSphere application server, take one of the followingactions according to the version of WebSphere that you are running:v If you are using version 3.x, you must take steps to set it up for use with
Extended Search. See “Set up WebSphere Application Server 3.x onWindows” on page 37 for instructions.
v If you are using the Advanced Single Server edition of version 4.0.2, youmust stop WebSphere Application Server (if you previously started it), startthe Extended Search RMI server (if used), and restart WebSphere ApplicationServer.
v If you are using the Advanced or Enterprise edition of version 4.0.2, youmust start the Extended Search RMI Server (if used) and start the ExtendedSearch application server.For assistance with starting the RMI Server, see “Start the server onWindows” on page 43. For information about a script you can use to start theExtended Search application server, see page 11.
Set up the proxy server on WindowsExtended Search relies on the WinInet API, which is part of Microsoft InternetExplorer, to access Web sources. To be able to access the Internet, you must takesteps to ensure that the Extended Search Server is able to connect through yourproxy server. How you make these changes depends on how you plan to start theExtended Search server.
If you intend to start Extended Search by using the Windows Start → Programsmenu, make sure that the user ID and password you use to log in to Windowsmatch an ID and password for which proxy server connection properties havebeen configured in Internet Explorer. You can do either of the following actions:v Log in to the Windows machine by using a user ID that has been properly
configured in Internet Explorer, and use that user ID when you start theExtended Search Server.
v Create a domain account that matches the login ID and password, log in to thedomain, access Internet Explorer, and define the appropriate proxy serversettings.For example, you may want to set up the DB2 Administrator user ID that youconfigured as part of installing Extended Search, and let all administrators usethat ID to start the Extended Search Server.
If you intend to start Extended Search as a Windows service, take the followingsteps:1. Open the Windows Control Panel and double-click Services.2. On the Services window, double-click the IBM Extended Search Server service.
36 Extended Search Installation

3. Select the Log On tab and, in This Account, make sure that the user ID andpassword match an ID and password for which proxy server connectionproperties have been configured in Internet Explorer. You can do either of thefollowing actions:v Change the This Account settings on the Services window to an appropriate
ID and password, and then click OK.v Create a domain account that matches the service account’s ID and
password, log in to the domain, access Internet Explorer, and define theappropriate proxy server settings.
Set up WebSphere Application Server 3.x on WindowsIf you are using IBM WebSphere Application Server version 3.5 or older, you mustrun a configuration program to set it up for use with Extended Search. If youinstall multiple Extended Search servers, you must repeat these steps for eachserver after you install the Extended Search software.
In the default configuration, WebSphere is configured to use the Extended SearchRMI Server for database communications. If you prefer to deploy the ExtendedSearch EJB for database communications instead, you must edit the configurationprogram before running it. Deploying the EJB requires you to install the advancededition of WebSphere Application Server (see “System prerequisites” on page 3 fordetails).1. Take the following steps if you plan to run Extended Search with the RMI
server:a. On the machine that hosts the configuration database, open the Windows
Control Panel, and then double-click Services. Ensure that the DB2 servicehas been started.
b. If DB2 is running on a machine that is a member of a domain, select DB2Security Server and click Startup. Select Autostart as the Startup Type andclick OK.
c. Select Extended Search RMI Server and click Startup.d. Select Autostart as the Startup Type and click OK. Whenever you restart the
machine, the RMI Server service will check to see whether DB2 has beenstarted and, if necessary, start it before starting itself.
2. Take the following steps if you plan to deploy the Extended Search EJB:a. Open one of the following files with a text editor:
v es_ws35.xml, if you installed WebSphere Application Server 3.5.x.v es_ws302.xml, if you installed WebSphere Application Server 3.0.2.
b. Locate the block that begins with ″<! –– This deploys the EJB (START)″, andremove all comment characters from each subsequent line until you reachthe ″(END) ––>″ notation.
3. Make sure that WebSphere is in the system path and that the WebSphereApplication Server has been started.
4. Within the WebSphere Application Server Administrative Console, be sure todefine all host alias names for this server.v Alias entries should exist for localhost, the server’s IP address, the server’s
short host name, and the server’s fully qualified host name .v If the Web server is running on a port other than 80, the host alias entries
must also specify the port number. The following example shows sample
Installing on Windows 37

alias definitions for a system than uses port number 81 (note that in someversions of WebSphere, there is a separate field for defining the portnumber).localhost:819.99.99.99:81myhost:81myhost.dev.ibm.com:81
5. Open a command window, and change to the Extended Search installationdirectory. The default path is c:\Program Files\IBM\Extended Search.
6. Enter the following case-sensitive command, where my_nodename is theWebSphere node name as displayed in the WebSphere Application ServerAdministrative Console (the node name is typically the computer’s short hostname).Be sure to specify the name of the XML file you enabled for your version ofWebSphere Application Server (es_ws35 or es_ws302).XMLConfig -import es_wsXX.xml -adminNodeName my_nodename
-substitute "nodeName=my_nodename"
Verify the installation on WindowsTake the following steps to verify that the server installation was successful. Referto Extended Search Administration as necessary to complete the following tasks.1. Start Extended Search. Be sure to first start the prerequisite products and
services such as DB2, the RMI server (if used), and the Web application server,as discussed in “Start the server on Windows” on page 43.
2. Start the Extended Search Monitor.The Monitor lists each instance of the Extended Search server components byusing a color-coded icon to denote status. If all of the components switch toIdle mode (gray icon), the installation of the basic server software wassuccessful. If the status icons do not turn gray, review the discussion aboutmonitoring server activity for guidelines on how to interpret the statistics.
3. Start the Administration interface, and take the following steps:v Navigate through various options to confirm your ability to access and use
the configuration database.v Select the Demo search template provided by Extended Search, and run a
sample query against the predefined Web sources and Extended Searchdocumentation categories.
4. Test your ability to access the Demo sample application and submit a queryfrom a remote Web browser.
Server-only installation on WindowsTo facilitate your ability to set up multiple brokers and agents in a distributedenvironment, Extended Search provides an independent installation image thatinstalls only the Extended Search Server component. You can copy this image,which is smaller than the full product image, to a network drive and make itavailable to administrators in your organization.
This server-only installation image is provided only for the Windows platform. Theimage for installing Extended Search on UNIX is small to begin with because itdoes not include the Notes Client component.
38 Extended Search Installation
Note that you should run this program only after you have run the standard setupwizard to install Extended Search initially, including the Web Server andConfiguration Database components.
Use the following procedure if you want to use this server-only installation image:1. Access the \windows\server directory on the Extended Search product
CD-ROM.2. Copy the installation image, setup_so.exe, to a directory on a network drive.3. If necessary, configure access permissions for the users or groups who should
be authorized to access this network location and run the installation program.4. To run the installation program, select Start → Run, click Browse to change to
the appropriate network drive and location, and run setup_so_nt.exe.5. As with running the standard setup wizard, you will be prompted to select an
installation directory, specify information about the Extended Search Serverlocation, and specify information about the Web Server that is used with thisinstallation of Extended Search. See “Typical installation on Windows” onpage 32 if you need assistance with these steps.
Note: When specifying the location of the Extended Search Server, be sure tospecify the location of the current machine on which you are runningthis installation program, not the location of an Extended Search Serveryou previously installed.
NLS considerations for WindowsBe sure to read about national language support (NLS) in Extended SearchAdministration before reading this section so that you are familiar with the NLSconfiguration file (esNLS.ini).
When installing the Extended Search Server, Reflector component, or ConfigurationDatabase on a Windows machine, several environment variables are added to theclient machine. Three of these variables have national language implications:
NLSPATHThis variable contains the directory search path used to search for messagecatalog files. The Extended Search installation program updates thisenvironment to add the Extended Search message catalog directory.
LOCPATHThis variable contains the location of the X/Open Portability Guide Issue 4(XPG4) locale definition and conversion files that are used by the ExtendedSearch system. These files are installed along with the other ExtendedSearch programs and files.
LC_ALLThis variable is set to the XPG4 locale definition file that should be usedby the Extended Search server code. It is set by querying the Windowsenvironment to see which regional setting is being used.
Installing on Windows 39

40 Extended Search Installation

Starting and stopping the servers
If you installed Extended Search on IBM AIX or Sun Solaris, use the followingprocedures to start and stop the Extended Search server:v “Start the server on UNIX” on page 41v “Shut down the server on UNIX” on page 42
If you installed Extended Search on Microsoft Windows NT or Windows 2000, usethe following procedures to start and stop the Extended Search server:v “Start the server on Windows” on page 43v “Shut down the server on Windows” on page 44
Start the server on UNIXUse the following procedure to start an Extended Search system. The order ofthese steps is critical.
Note that if you use Domino as your Web server and Web application server,Domino requires you to start both the Domino and Extended Search servers withthe same user ID. You must also set certain environment variables in Dominobefore discovering or searching data sources. For details, see Extended SearchTroubleshooting, which is available on the Resources page of the Extended Searchweb site (http://www.lotus.com/home.nsf/welcome/domsearch).1. On the machine that hosts DB2 and the Extended Search configuration
database:a. Ensure that the JDK or JRE that you installed is included in the .profile file.b. Ensure that the DB2 server has been started and is running.
2. If you use the Extended Search RMI Server, follow the steps below to start it.v If you are using a Domino Web server, you must start the RMI Server.v If you are using WebSphere Application Server and you did not deploy the
Extended Search Enterprise JavaBeans (EJB) when installing Extended Search,you must start the RMI Server.
v If you are using WebSphere Application Server and the Extended Search EJB,skip these steps.
a. Log in to the machine that hosts the Extended Search configurationdatabase.
b. Change to the Extended Search /bin directory. The default path is/opt/ExtendedSearch3.7/bin. (On a Solaris platform that uses Domino asthe Web Application Server, the recommended path is/home/server/ExtendedSearch3.7/bin.)
c. Enter the following command:./desrmiStart
If you prefer, you can enter the following command to start the RMI serverin the background. This feature allows you to exit out of the telnet sessionwithout shutting down the server../desrmiStart -bg
3. Start the Web Server and Web Application Server on each machine where youinstalled the Extended Search Web Server component. If you need assistance,
41
consult the Domino or WebSphere product documentation. Note that it maytake some time to start WebSphere Application Server, especially if you enabledthe option to load servlets at startup.
4. Start the Administration interface. This action helps validate your ability tocommunicate with the Web server and provides event information that canhelp resolve potential startup problems.
Using AuthenticationIf you installed the Extended Search Web Server component on a WebServer where authentication has been enabled (or anonymous access hasbeen disabled), you must update the following environment variables inthe desStart script to identify the Extended Search administrator user IDand password before starting the Extended Search Server:v ESAdminUseridv ESAdminPassword
5. On each machine that hosts an Extended Search Server, log in by using a userID that has write access to the Extended Search bin directory.If you are running Extended Search with a Domino Web server, you shouldstart both the Extended Search server and Domino server under the same userID, and this user ID must be the Domino administrator user ID.
6. Make sure you are in the Extended Search /bin directory, and enter thefollowing command to start Extended Search:./desStart
If you prefer, you can enter the following command to start Extended Search inthe background. This feature allows you to exit out of the telnet sessionwithout shutting down the Extended Search server../desStart -bg
Shut down the server on UNIXHow you shut down the Extended Search system depends on whether you arecurrently running the Monitor to track server activity.v If you started the Extended Search Monitor for this server, select Server →
Shutdown. You will be prompted to specify the ES Administrator user ID andpassword to complete this task.Note that if you started Extended Search as a background process, you must usethe Monitor to shut down the server.
v If you are not currently running the Monitor:1. Change to the Extended Search /bin directory. The default path is
/opt/ExtendedSearch3.7/bin. (On a Solaris platform that uses Domino as theWeb Application Server, the recommended path is/home/server/ExtendedSearch3.7/bin.).
2. Enter the following command to shut down the Extended Search server:./desStop
v If you use the RMI server and started it as a background process, enter thefollowing command to shut it down:./desrmiStop
42 Extended Search Installation
Start the server on WindowsUse the following procedure to start an Extended Search system. The order ofthese steps is critical.
Keep in mind that proxy settings are different for each Windows user. You mustensure that the user ID that you use to start the Extended Search server is able toaccess the Internet. If necessary, review the installation instructions for informationon how to set up the proxy server for use with the Extended Search server.1. On the machine that hosts DB2 and the Extended Search configuration
database:a. Ensure that the JDK or JRE that you installed is included in the system
path.b. Open the Windows Control Panel and then double-click Services. Ensure
that the DB2 service has been started.2. If DB2 is running on a machine that is a member of a domain, select DB2
Security Server and click Startup. Select Autostart as the Startup Type andclick OK.
3. If you use the Extended Search RMI Server, follow the steps below to start it.v If you are using a Domino Web server, you must start the RMI Server.v If you are using WebSphere Application Server and you did not deploy the
Extended Search Enterprise JavaBeans (EJB) when installing Extended Search,you must start the RMI Server.
v If you are using WebSphere Application Server and the Extended Search EJB,skip these steps.
a. Select Extended Search RMI Server and click Startup.b. Select Autostart as the Startup Type and click OK. Whenever you restart the
machine, the RMI Server service will check to see whether DB2 has beenstarted and, if necessary, start it before starting itself.
4. Start the Web server and Web application server on each machine where youinstalled Extended Search Web server support. (Typically these programs areautostarted.) If you need assistance, consult the Domino or WebSphere productdocumentation. Note that it may take some time to start a WebSphere server,especially if you enabled the option to load servlets at startup.
5. Start the Administration interface. This action helps validate your ability tocommunicate with the Web server and provides event information that canhelp resolve potential startup problems.
Using AuthenticationIf you installed the Extended Search Web Server component on a WebServer where authentication has been enabled (or anonymous access hasbeen disabled), you must update the following entries in the WindowsRegistry to identify the Extended Search administrator user ID andpassword before you start the Extended Search Server:HKEY_LOCAL_MACHINE → SOFTWARE → IBM → Extended Search → 3.7
AdminUseridAdminPassword
Starting and stopping the servers 43

6. On each machine that hosts an Extended Search Server, take one of thefollowing actions to start the Extended Search Server:v Use the Windows Start menu to select Programs → IBM Extended Search →
Extended Search Server.v Open the Windows Control Panel and then double-click Services. Select
Extended Search Service, and then click Start.
Note: If you are running Extended Search with a Domino Web server, youcannot autostart the Extended Search server service unless they are ona separate machines and the Web server is always running. If bothservers are on the same machine, Extended Search may attempt tostart before all the Web server components have started, and thestartup attempt will fail.
Shut down the server on WindowsIt is recommended that you use the Extended Search Monitor to shut down anExtended Search server. To do so:1. Select Server → Shutdown in the Monitor.
You can shut down the server while running the Monitor as a stand-aloneprogram or while you are monitoring server activity from within theAdministration interface. You will be prompted to specify the ES Administratoruser ID and password to complete this task.
If you started Extended Search by using the Windows Start → Programs menu, youcan use the following procedure to shut it down.1. Open the console window on the Extended Search Server.2. Enter one of the following commands:
QuitExit
If you started Extended Search as a service, you can use the following procedure toshut it down. Note, however, that if you use this approach, Windows is not awareof related tasks that may also need to be shut down.1. On each machine where you installed Extended Search Server software, open
the Windows Control Panel and then double-click Services.2. On the Services window, select Extended Search Service and then click Stop.3. Take the following steps only if you started the RMI Server service:
a. On the machine where you installed the configuration database, open theWindows Control Panel and then double-click Services.
b. On the Services window, select Extended Search RMI Server and clickStop.
CAUTION:You should never stop Extended Search from the Windows Task Manager. If youstop Extended Search in this manner, the program stops, but the executables thatare launched during startup do not. When this occurs, use the DESAbort utilityto remove the unwanted tasks. Note that you should use DESAbort only incritical situations.
44 Extended Search Installation
Migrating to the latest release
If you are using a previous version of Extended Search, the steps you must followto begin using version 3.7 depend on your current release level:v Upgrading from version 3.5x summarizes the steps you must take to upgrade
the software to version 3.7.v Migrating from version 3.0 provides detailed instructions on how to upgrade the
software to version 3.7, migrate the configuration database, and manuallyupdate certain Administration settings before using the new system.
Upgrading from version 3.5xAn Extended Search version 3.5 server can communicate with version 3.7 serversas well as with a version 3.7 configuration database. Likewise, a version 3.7 servercan communicate with a version 3.5 server and database. This flexibility meansthat you can upgrade your existing 3.5 servers one at a time. For smoothestoperation, you should upgrade your Web servers and the configuration databaseserver, and then start upgrading your Extended Search servers.
If you are currently running Extended Search version 3.5x, the installation programdetects this fact and prompts you to migrate the existing database. Follow the stepsbelow to upgrade to version 3.7.1. Use the DESBackup utility to back up the version 3.5x configuration database
(named ibmes). See Extended Search Administration for instructions on using thisutility.
2. Follow the procedures in Extended Search Administration to shut down allExtended Search processes, including the RMI Server (if used), the Web Server,the Web Application Server, and all Extended Search Servers.
3. Uninstall Extended Search.v If you are removing the product from a Windows system, either follow the
procedures in your version 3.5 installation documentation, or use“Uninstalling from Windows” on page 51 as a guideline. Be sure to rebootthe system before attempting to install version 3.7.
v If you are removing the product from a UNIX system, either follow theprocedures in your version 3.5 installation documentation, or use“Uninstalling from UNIX” on page 49 as a guideline.
4. Follow the instructions appropriate for your platform (“Installing on Windows”on page 31, or “Installing on UNIX” on page 13) to install Extended Searchversion 3.7. When the installation program asks whether you want to migratethe configuration database or overwrite it, select Migrate.If you installed the product on a Windows system, be sure to reboot after theinstallation program has finished.
5. Clear the browser’s cache before attempting to start the new version of theExtended Search Administration interface.
Migrating from version 3.0If you are currently running Extended Search version 3.0, you must follow theprocedures below to migrate the configuration database to version 3.7.
45
The migration utility, esMigrate.bat, copies data from your version 3.0configuration database to appropriate locations in a version 3.7 system. Dependingon how much you customized Extended Search for version 3.0, there are steps youmay need to take to prepare for and finalize the migration process.
Note: The following procedures are sufficient for migrating a small production orsingle server environment. If you have a number of Extended Search serversand want to migrate to version 3.7 on a gradual basis, consult your technicalsupport representative for guidance.
Prepare for Migration:
1. For your protection, back up the version 3.0 system:v Use the DESBackup utility to back up the version 3.0 configuration database
(named des). See Extended Search Administration for instructions on using thisutility.
v Back up everything in the Extended Search installation directory; the defaultversion 3.0 installation path is c:\Program Files\Lotus\Domino ExtendedSearch.
v Back up the version 3.0 des.properties, admin.properties, andservlet.properties files. This step is particularly useful if you customized theoperation of Extended Search (for example, by creating custom DLLs forlinks, discoverers, or user exits).
2. If you plan to install Extended Search version 3.7 on a new machine, note thatthe new machine can run AIX, Solaris, Windows NT, or Windows 2000.
3. Install Extended Search version 3.7 and ensure that it is working correctly.
Note: When you install Extended Search version 3.7, the DB2 Administrator IDand password that you specify for the new configuration database(named ibmes) must match the ID and password you specified for theversion 3.0 configuration database.
Migrate the configuration database:
1. If you installed Extended Search version 3.7 on a new machine, copy theversion 3.0 configuration database that you backed up to the machine whereyou installed the version 3.7 configuration database. Use the DESRestore utilityto restore the version 3.0 database.
2. When you are ready to migrate configuration data, open a console window andenter the following command:esmigrate
3. Take the following steps when the ES Migration window is displayed:a. In DB2 admin user ID, type the DB2 Administrator ID for the configuration
database.b. In DB2 admin password, type the password for this DB2 Administrator.c. In Log file name, type the name of a file you want to use for logging error,
warning, and progress messages during the migration process. If youspecify only a file name, the file is created in the current directory. You canspecify a fully qualified path to create the files somewhere else.
d. Click Migrate. Messages are displayed as data conversion progresses. Theprocess is complete when you see a Migration Complete! message.
46 Extended Search Installation
Post-Migration Steps:
After the migration utility has finished, follow procedures in Extended SearchAdministration to start the Administration interface and perform the followingtasks. You should print a copy of your backed up version 3.0 des.properties,admin.properties, and servlet.properties files to use as a reference as you completethese steps.1. If a server in your version 3.0 system served as a Web server only (that is, you
installed only the Web Server component), you need to add it to your version3.7 configuration database. Follow the procedures to add a server. Whendefining Server Properties, ensure that the Extended Search is installed checkbox is clear and that the Web Server is installed check box is selected, andspecify other configuration choices as necessary to define this Web-only server.
2. If a server in your version 3.0 system included Extended Search server softwareand Web server support, an icon for this server already exists in your version3.7 system. Follow the procedures to modify Server Properties, ensure that theExtended Search is installed and Web Server is installed check boxes are bothselected, and confirm or modify other configuration choices as necessary todefine this Extended Search server.
3. For each Web server enabled in your version 3.7 system, update the servletalias properties. Follow the procedures to modify Server Properties and ensurethat the alias settings on the Web Server tab correctly identify yourenvironment.v If you are using a WebSphere application server, the servlet aliases are
typically /lotuskms/JKMSearchController, /lotuskms/JKMFetchMgr, and/lotuskms/JKMBatchManager.
v If you are using a Domino application server, the servlet aliases are typically/servlet/JKMSearchController, /servlet/JKMFetchMgr, and/servlet/JKMBatchManager.
4. If you defined any custom links for version 3.0, you need to follow theprocedures to modify the Link Properties and identify the Hit list URL exityou want to use with that link. This step is necessary to ensure that the URLreturned to the link and passed to the JKMFetchManager servlet for documentretrieval is formatted correctly for the type of data being fetched.For each of the predefined link types, Extended Search provides a Java class forhitlist URL creation. You can use one of these existing classes with your customlink or create one to support the needs of your data sources.v For descriptions of the predefined hitlist URL classes, see Extended Search
Administration.v For information about developing a custom hitlist URL class, see the
discussion about developing links in Extended Search Programming.5. For each predefined link type, Extended Search version 3.7 defines a category
of the same name. Because these categories did not exist in version 3.0, there isa chance that a category you created may have the same name as one of thenew system-defined categories. If the migration utility detects this situation, itrenames your category by appending ″_migrate″ to the category name. Forexample, if you had a category named Web Sources, it would be renamed WebSources_migrate.You do not need to take any actions to reconfigure such categories. However, ifyou prefer to have a different name, follow the procedures to modify CategoryProperties and assign a new name to your migrated categories. The change willbe reflected automatically in any applications that reference that category.
Migrating to the latest release 47

48 Extended Search Installation

Uninstalling from UNIX
Use the following procedure if you installed the Extended Search server on a UNIXsystem and you need to uninstall the software. For example, you may want toremove a version of Extended Search you set up for test purposes before installinga system you intend to use in production.
This procedure applies regardless of whether you used the installation wizard orthe command line approach to install the Extended Search server software.1. Follow the procedures in “Shut down the server on UNIX” on page 42 to stop
the system.2. If you installed WebSphere Application Server 4.0.2, follow the procedures in
“Delete Extended Search from WebSphere” on page 11 to remove ExtendedSearch from the application server.
3. On each machine where you installed the Extended Search server, open acommand window.
4. Change to the Extended Search uninstall directory. The default path is/opt/ExtendedSearch3.7/uninstall. If you installed Extended Search on aSolaris platform, and use Domino as the Web Server and Web ApplicationServer, the path recommended during installation is/home/server/ExtendedSearch3.7/uninstall.
5. Enter the following command to run the uninstall program:./uninst
6. When the Welcome window of the Extended Search Uninstall wizard isdisplayed, click Next to continue.
7. Select the check box for each component you want to remove, clear the checkbox for each component you want to retain, and click Next.
8. Review the summary of the selections you made. When you are ready touninstall the software, click Next.After the software has been removed, the Uninstall wizard will closeautomatically.
Notes:
v If you install additional Extended Search components on a machine where youpreviously installed Extended Search, you cannot use this procedure to removethe initially installed software. The uninstall program removes only thosecomponents you installed the last time that you ran the installation program.
v If you plan to re-install Extended Search, and you installed WebSphereApplication Server 4.0.2, follow the procedures in “Using WebSphere ApplicationServer 4.0.2” on page 8 to set up an Extended Search application appropriate foryour edition of WebSphere Application Server before running the installationprogram again.
v If you plan to re-install Extended Search and want to preserve the existingconfiguration database, make a backup copy of the database (named ibmes)before running the installation program again.
v If you no longer want to retain the configuration database, you must use theDB2 drop command to remove it manually:db2 drop db ibmes
49

50 Extended Search Installation

Uninstalling from Windows
Use the following procedure if you installed the Extended Search server on aWindows system and you need to uninstall the software. For example, you maywant to remove a version of Extended Search you set up for test purposes beforeinstalling the system you intend to use in production.1. Follow the procedures in “Shut down the server on Windows” on page 44 to
stop the system.2. On each machine where you installed the Extended Search server, select Start
→ Settings → Control Panel.3. Double-click Add/Remove Programs.4. Select IBM Extended Search and click the button to remove software.5. Click Next on the Welcome window.6. When the list of components being removed is displayed, click Next.7. When you see a message that indicates that the product has been successfully
uninstalled, click Next.8. To complete the process, you must restart the system. This step is mandatory
if you plan to reinstall Extended Search on this machine. Select Yes to restartyour system now, or select No to restart it later, and then click Finish.
9. If you installed WebSphere Application Server 4.0.2, follow the procedures in“Delete Extended Search from WebSphere” on page 11 to remove ExtendedSearch from the application server.
10. Ensure that all directories installed for Extended Search have been removed.The default installation path is c:\Program Files\IBM\Extended Search.Manually delete any directories that may remain in this path.
Notes:
v If you install additional Extended Search components on a machine where youpreviously installed Extended Search, you cannot use this procedure to removethe initially installed software. The uninstall program removes only thosecomponents you installed the last time that you ran the Extended Search setupprogram.
v If you plan to re-install Extended Search, and you installed WebSphereApplication Server 4.0.2, follow the procedures in “Using WebSphere ApplicationServer 4.0.2” on page 8 to set up an Extended Search application appropriate foryour edition of WebSphere Application Server before running the setup programagain.
v If you plan to re-install Extended Search and want to preserve the existingconfiguration database, make a backup copy of the database (named ibmes),before running the setup program again.
v If you no longer want to retain the configuration database, you must use theDB2 drop command to remove it manually:db2cmddb2 drop db ibmes
51

52 Extended Search Installation

Notices
This information was developed for products and services offered in the U.S.A.
IBM may not offer the products, services, or features discussed in this document inother countries. Consult your local IBM representative for information on theproducts and services currently available in your area. Any reference to an IBMproduct, program, or service is not intended to state or imply that only that IBMproduct, program, or service may be used. Any functionally equivalent product,program, or service that does not infringe any IBM intellectual property right maybe used instead. However, it is the user’s responsibility to evaluate and verify theoperation of any non-IBM product, program, or service.
IBM may have patents or pending patent applications covering subject matterdescribed in this document. The furnishing of this document does not give youany license to these patents. You can send license inquiries, in writing, to:
IBM Director of LicensingIBM CorporationNorth Castle DriveArmonk, NY 10504-1785U.S.A.
For license inquiries regarding double-byte (DBCS) information, contact the IBMIntellectual Property Department in your country or send inquiries, in writing, to:
IBM World Trade Asia CorporationLicensing2-31 Roppongi 3-chome, Minato-kuTokyo 106-0032, Japan
The following paragraph does not apply to the United Kingdom or any othercountry where such provisions are inconsistent with local law:INTERNATIONAL BUSINESS MACHINES CORPORATION PROVIDES THISPUBLICATION “AS IS” WITHOUT WARRANTY OF ANY KIND, EITHEREXPRESS OR IMPLIED, INCLUDING, BUT NOT LIMITED TO, THE IMPLIEDWARRANTIES OF NON-INFRINGEMENT, MERCHANTABILITY OR FITNESSFOR A PARTICULAR PURPOSE. Some states do not allow disclaimer of express orimplied warranties in certain transactions, therefore, this statement may not applyto you.
This information could include technical inaccuracies or typographical errors.Changes are periodically made to the information herein; these changes will beincorporated in new editions of the publication. IBM may make improvementsand/or changes in the product(s) and/or the program(s) described in thispublication at any time without notice.
Any references in this information to non-IBM Web sites are provided forconvenience only and do not in any manner serve as an endorsement of those Websites. The materials at those Web sites are not part of the materials for this IBMproduct and use of those Web sites is at your own risk.
IBM may use or distribute any of the information you supply in any way itbelieves appropriate without incurring any obligation to you.
53
Licensees of this program who wish to have information about it for the purposeof enabling: (i) the exchange of information between independently createdprograms and other programs (including this one) and (ii) the mutual use of theinformation which has been exchanged, should contact:IBM CorporationJ74/G4555 Bailey AvenueP.O. Box 49023San Jose, CA 95161-9023U.S.A.
Such information may be available, subject to appropriate terms and conditions,including in some cases, payment of a fee.
The licensed program described in this information and all licensed materialavailable for it are provided by IBM under terms of the IBM Customer Agreement,IBM International Program License Agreement, or any equivalent agreementbetween us.
Any performance data contained herein was determined in a controlledenvironment. Therefore, the results obtained in other operating environments mayvary significantly. Some measurements may have been made on development-levelsystems and there is no guarantee that these measurements will be the same ongenerally available systems. Furthermore, some measurements may have beenestimated through extrapolation. Actual results may vary. Users of this documentshould verify the applicable data for their specific environment.
Information concerning non-IBM products was obtained from the suppliers ofthose products, their published announcements or other publicly available sources.IBM has not tested those products and cannot confirm the accuracy ofperformance, compatibility or any other claims related to non-IBM products.Questions on the capabilities of non-IBM products should be addressed to thesuppliers of those products.
All statements regarding IBM’s future direction or intent are subject to change orwithdrawal without notice, and represent goals and objectives only.
CopyrightLicensed Materials - Property of IBMIBM Extended Search V3.7© Copyright International Business Machines Corporation 1997, 2002.All rights reserved.US Government Users Restricted Rights — Use, duplication, or disclosurerestricted by GSA ADP Schedule Contract with IBM Corporation.
This information contains sample application programs in source language, whichillustrate programming techniques on various operating platforms. You may copy,modify, and distribute these sample programs in any form without payment toIBM, for the purposes of developing, using, marketing or distributing applicationprograms that conform to the application programming interface for the operatingplatform for which the sample programs are written. These examples have notbeen thoroughly tested under all conditions. IBM, therefore, cannot guarantee orimply reliability, serviceability, or function of these programs. You may copy,modify, and distribute these sample programs in any form without payment toIBM for the purposes of developing, using, marketing, or distributing applicationprograms that conform to IBM’s application programming interfaces.
54 Extended Search Installation

TrademarksThe following terms are trademarks of International Business MachinesCorporation in the United States, other countries, or both:
IBMAIXDB2DB2 Universal DatabaseWebSphere
infoGIST is a registered trademark of Intelligent Algorithms Enterprises, Ltd., inthe United States, other countries, or both.
Intel is a registered trademark, and Pentium is a trademark of Intel Corporation inthe United States, other countries, or both.
Java and all Java-based trademarks and logos are trademarks or registeredtrademarks of Sun Microsystems, Inc. in the United States, other countries, or both.
Lotus, LotusScript, and Lotus Notes are registered trademarks, and DominoExtended Search, Lotus Notes Desktop, Domino, Notes, Lotus Connectors, LotusDiscovery Server, Lotus Enterprise Integrator, and K-station are trademarks ofLotus Development Corporation in the United States, other countries, or both.
Microsoft, Windows, Windows NT, Windows 2000, Microsoft Exchange Server,Microsoft Index Server, Microsoft Site Server, and the Windows logo aretrademarks of Microsoft Corporation in the United States, other countries, or both.
UNIX is a registered trademark of The Open Group in the United States, othercountries, or both.
Other company, product, and service names may be trademarks or service marksof others.
Notices 55

56 Extended Search Installation


����
Printed in U.S.A.
GC27-1403-00