expt. no: 2 date: determination of area of …files.kluceb.webnode.in/200000022-bb869bc80b/surveying...
TRANSCRIPT

Expt. No: 2 Date:
DETERMINATION OF AREA OF POLYGON BY CHAIN AND CROSS STAFF SURVEY 1. AIM:
To determine the area of a given field with define boundary by conducting cross staff survey.
2. INSTRUMENTS REQUIRED:
Metric Chain of 20m/30m - 1 no, Tape -1 no, Ranging rods - 4 nos., Arrows - 10 nos., and Cross staff - 1 no.
3. PROCEDURE: 1.Run a base line (main survey line) AB approximately through the middle/centre of the field
ABCDEFG to be surveyed.
2.Along the base line set perpendicular offsets by using cross staff to the points j, k, m, n and p.
3.Note the chainages at which the offsets are erected and measure the length of offsets by using
a tape.
4.Now the area is divided into a number of triangles, rectangles and trapeziums.
5.Calculate the area of triangles, rectangles and trapeziums.
Area of triangle = heightbase **21
Area of trapezium = (a+b)/2*h
A D
B
C
E
F
G
j k m n
p
Fig. Cross-Staff Survey

Where a, b = Parallel sides of the trapezium h = the perpendicular distance between them.
Sum of all the areas will give the total area of the given field ABCDEFG.
4. OBSERVATIONS: Measurements made in the field are entered in the field book with explanatory sketches.
Total area=
5. RESULT:
The area of the given land =
S. No. Part Designation
Chainage Base (m)
Offsets (m)
Mean (m)
Area ( )
Expt. No:3 Date:
MEASUREMENT OF DISTANCE BY INDIRECT RANGING AND CHAINING –
OBSTACLES FOR BOTH CHAINING AND RANGING
A chain line may be interrupted in the following situations:
I. When chaining and vision are both obstructed Example: Building
II. When chaining is free, but vision is obstructed
Example: Rising Ground or Jungle III. When chaining is obstructed, but vision is free
Example: Pond or a River When chaining and vision are both obstructed:
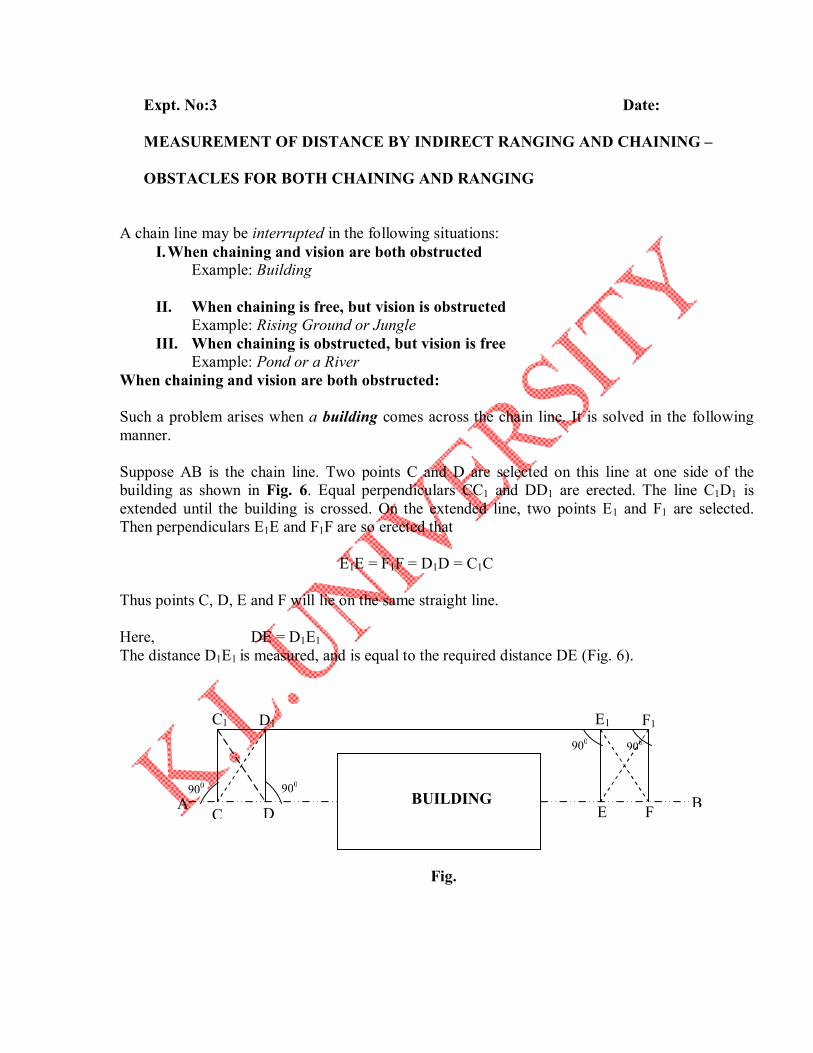
Such a problem arises when a building comes across the chain line. It is solved in the following manner. Suppose AB is the chain line. Two points C and D are selected on this line at one side of the building as shown in Fig. 6. Equal perpendiculars CC1 and DD1 are erected. The line C1D1 is extended until the building is crossed. On the extended line, two points E1 and F1 are selected. Then perpendiculars E1E and F1F are so erected that E1E = F1F = D1D = C1C Thus points C, D, E and F will lie on the same straight line. Here, DE = D1E1 The distance D1E1 is measured, and is equal to the required distance DE (Fig. 6).
BUILDING A B C D
C1 D1 E1 F1
E F
Fig.
900 900
900 900

Expt. No:4 Date:
MEASUREMENT OF DISTANCE BY INDIRECT RANGING AND CHAINING –
OBSTACLES FOR EITHER CHAINING OR RANGING
I. When chaining is free, but vision is obstructed:
Such a problem arises when a rising ground or a jungle interrupts the chain line. Here the end stations are not intervisible. There may be two cases:
Case (1): The end stations may be visible from some intermediate points on the rising
ground. In this case, Indirect/ Reciprocal Ranging is resorted to, and the chaining is done by stepping method.
Case (2): The end stations are not visible from intermediate points when a jungle area comes across the chain line. In this case, the obstacle may be crossed
over using a random line as explained below:
Let AB be the actual chain line which cannot be ranged and extended because of interruption by a jungle. Let the chain line be extended up to R. A point P is selected on the chain line and a random line PT is taken in a suitable direction. Points C, D and E are selected on the random line, and perpendiculars are projected from them.
The perpendicular at C meets the chain line at C1. Theoretically, the perpendiculars at D and E will meet the chain line at D1 and E1. Now, the distances Pc, PD, PE, and CC1 are measured (Fig. 1). From triangles PDD1 and PCC1,
A B
T
E1 D1 P
D E
900 900
900
C1 R
RANDOM LINE
Fig. 1
Forest
C

DD1 CC1
= PD PC CC1 DD1 = x PD (1)
PC Again, from triangles PEE1 and PCC1,
EE1 CC1
= PE PC CC1 EE1 = x PE (2)
PC From (1) and (2), the lengths DD1 and EE1 are calculated. These calculated distances are measured along the perpendiculars at D and E. Points D1 and E1 should lie in the chain line AB, which can be extended accordingly. Distance PE1 = PE2 + EE1
2
II. When chaining is obstructed, but vision is free:
Such a problem arises when a pond or a river comes across the chain line. The situation may be tacked in the following ways. There may be two cases:
Case (1): When a pond interrupts the chain line, it is possible to go around the obstacle.
Let AB be the chain line. Two points C and D are selected on it on opposite banks of the pond as shown in Fig. 2. Equal perpendiculars CE and DF are erected at C and D. The distance EF is measured.
Here, CD = EF
A B D 900 900
C
Fig. 2
E F
Pond

Alternatively, The pond may also be crossed by forming a triangle as shown in Fig. 3. A point C is selected on the chain line. The perpendicular CE is set out at C, and a line ED is suitably taken. The distances CE and ED are measured. So CD = ED2 - CE2
A B D 900
C
Fig. 3
E
Pond

Expt. No: 5 Date:
MEASUREMENT OF BEARINGS OF SIDES OF TRAVERSE WITH PRISMATIC COMPASS AND COMPUTATION OF CORRECT INCLUDED ANGLE
1. AIM: To perform the Compass survey in Closed Traverse formed by series of connected straight lines (traversing).
2. INSTRUMENTS REQUIRED: Prismatic Compass, Tripod, Tape, Chain, Arrows, and Ranging Rods. 3. SKETCH:
N
N
N A
B
C
D
E
Fig. Closed Traverse
N
N

4. FIELD APPLICATIONS: This type of surveying is useful for ponds, etc. 5. PROCEDURE:
TEMPORARY/ STATION ADJUSTMENTS: The following Temporary/ Station Adjustments are to be done at each station where the compass is set up.
i. CENTERING ii. LEVELLING
iii. FOCUSING
i. CENTERING: Normally, the compass is centered by dropping a piece of stone from the bottom of the compass box. Centering may also be done with aid of a plumb bob held centrally below the compass box.
ii. LEVELLING: Leveling is done with the help of a ball-and-socket arrangement
provided on the top of the tripod stand. This arrangement is loosened and the box is placed in such a way that the graduated ring rotates freely without touching either bottom of the box or glass cover on top.
iii. FOCUSING: The prism is moved up and down till the figures on the graduated
ring are seen sharp and clear. 6. OBSERVING BEARINGS:
i. Set the instrument at the starting station ‘A’ and perform all the necessary adjustments.
ii. Sight the next station ‘B’, take FB of line AB and measure the distance AB. iii. Sight the object at ‘E’ and note down the BB of line EA.
iv. Locate the details by observing bearings or lengths or both from the traverse stations
wherever necessary.
v. Shift the instrument to subsequent station ‘B’, perform all the temporary adjustments. After fixing the instrument, sight the next station ‘C’ and observe the reading which gives the fore bearing of BC and measure the distance BC. And now, sight the previous station ‘A’ and observe the reading which gives the back bearing of AB.
vi. Repeat the process at every station.
vii. It is to be noted that first and last stations have only fore bearing and back bearing
respectively.

viii. Enter the readings in a tabular form.
TABULAR FORM FOR CLOSED TRAVERSE:
7.CHECK ON CLOSED TRAVERSE:
The difference between fore bearing and back bearing of each line should be 1800, if no local attraction exists at either station. CHECK ON ANGULAR MEASUREMENTS:
i. The sum of the measured interior/included angles = (2n-4) x 900
where N= Number of sides of the traverse ii. The sum of the measured exterior/external angles = (2n+4) x 900
where N= Number of sides of the traverse iii. The algebraic sum of the deflection angles should be 3600.
(Right hand deflection is considered +ve and Left hand deflection is considered -ve)
CHECK ON LINEAR MEASUREMENTS:
i. The lines should be measured once on two different days (along opposite directions). Both measurements should tally.
ii. Linear measurement should also taken by Stadia method. The measurements by chaining and stadia method should tally.
8. PLOTTING AN OPEN TRAVERSE: (BY PARALLEL MERIDIAN METHOD) i. Draw a line indicating the magnetic meridian (North line) at ‘A’.
ii. Draw the line AB to a suitable scale from the measured distance and bearings. iii. Draw magnetic meridian at ‘B’ parallel to the North line which was drawn at ‘A’. iv. From ‘B’, knowing fore bearing and distance BC, draw a line BC. v. Similarly, draw all the remaining lines and complete the closed traverse.
vi. Check the accuracy by comparing the difference between fore bearing and back bearings taken from 1st and Last stations. If they differ by 1800, the plotting is correct. In case of closed traverse, there may be a closing error which should be adjusted graphically (Bowditch’s Rule).
S. No. LINE LENGTH
FORE BEARING (FB)
BACK BEARING (BB)
REMARKS
1 AB 2 BC 3 CD 4 DE 5 EA
Expt. No: 7 (a) Date:
PLANE TABLE SURVEYING METHODS (a) RADIATION METHOD
1. AIM: To locate objects from single station using Radiation Method.
2.INSTRUMENTS: Plane table, Drawing sheet, Alidade, Spirit level, Compass, U-fork or Plumbing fork with plumb Bob
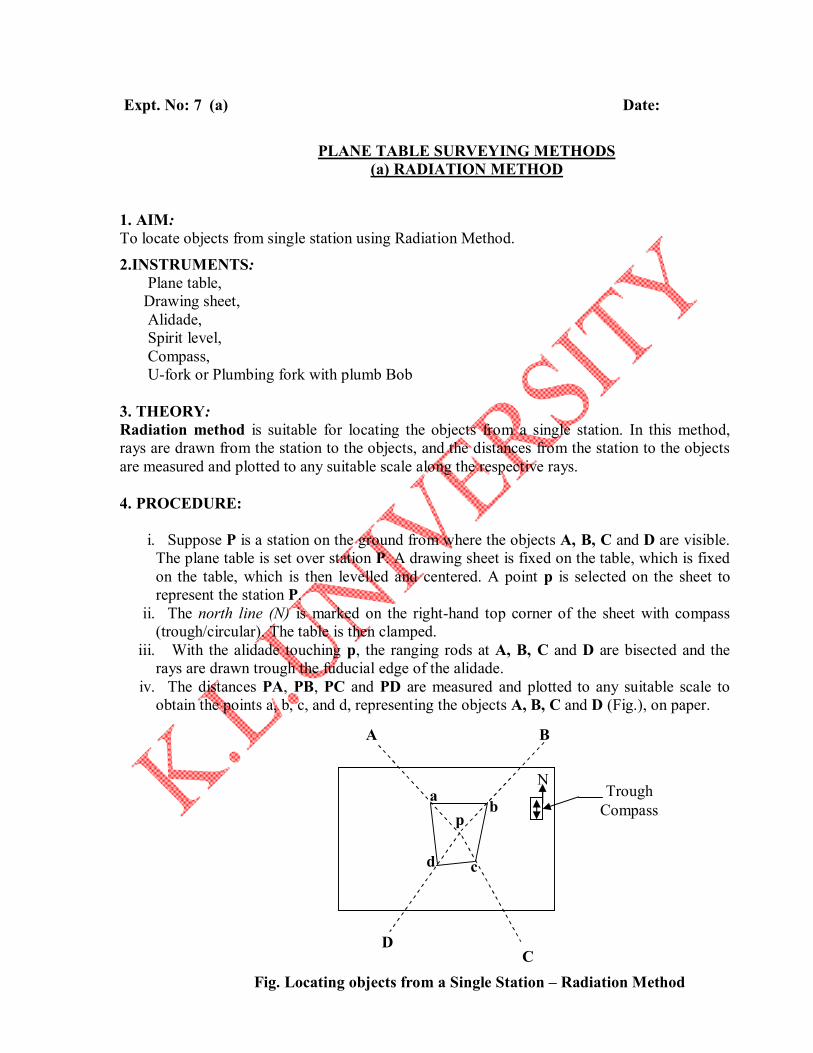
3. THEORY: Radiation method is suitable for locating the objects from a single station. In this method, rays are drawn from the station to the objects, and the distances from the station to the objects are measured and plotted to any suitable scale along the respective rays. 4. PROCEDURE:
i. Suppose P is a station on the ground from where the objects A, B, C and D are visible. The plane table is set over station P. A drawing sheet is fixed on the table, which is fixed on the table, which is then levelled and centered. A point p is selected on the sheet to represent the station P.
ii. The north line (N) is marked on the right-hand top corner of the sheet with compass (trough/circular). The table is then clamped.
iii. With the alidade touching p, the ranging rods at A, B, C and D are bisected and the rays are drawn trough the fuducial edge of the alidade.
iv. The distances PA, PB, PC and PD are measured and plotted to any suitable scale to obtain the points a, b, c, and d, representing the objects A, B, C and D (Fig.), on paper.
A
a b
C Fig. Locating objects from a Single Station – Radiation Method
p
B
D
c d
Trough Compass
N

Expt. No: 7(b) Date: PLANE TABLE SURVEYING METHODS
(b) INTERSECTION METHOD
1. AIM:
To locate inaccessible points by the intersection of the rays drawn from two stations
2. INSTRUMENTS:
Plane table, Drawing sheet, Alidade, Spirit level, Compass, U-fork or Plumbing fork with plumb Bob
3. THEORY:
Intersection method is suitable for locating inaccessible points by the intersection of the rays from two instrument stations.
4. PROCEDURE:
i. Suppose A and B are two stations P and Q are two inaccessible points. Now it is required to fix the positions of P and Q on the drawing sheet by the intersection of rays, drawn from A and B.
ii. The table is set up at A. It is levelled and centered so that a point ‘a’ on the sheet is just over station A. The north line (N) is marked on the right-hand top corner of the drawing sheet with compass (trough/circular). The table is then clamped.
iii. With the alidade touching a, the objects P and Q and the ranging rod at B are bisected and the rays are drawn trough the fuducial edge of the alidade.
iv. The distance AB is measured and plotted to any suitable scale to obtain the point ‘b’.
v. The table is shifted and centered over station B and levelled properly. Now the alidade is placed along the line ba and the orientation is done by back sighting. At this time it should be remembered that the centering, levelling and orientation must be perfect simultaneously.
vi. With the alidade touching b, the object P and Q are bisected and the rays are drawn. Suppose these rays intersect the previous rays at points ‘p’ and ‘q’. These points ‘p’ and ‘q’ are the required positions of two inaccessible points on drawing sheet. (Fig.)

P
Fig. Intersection Method of Plane Table Surveying
a b
A
a b
B
p Trough Compass
N N
Q
q

Expt. No: 8 Date: DETERMINATION OF ELEVATION O F VARIOUS POINTS WITH DUMPY LEVEL-
(a) COLLIMATION PLANE METHOD (b) RISE AND FALL METHOD
1. AIM: To determine the Reduced levels of various points.
2. INSTRUMENTS REQUIRED: Dumpy level, and Levelling Staff.
3. THEORY: TEMPORARY ADJUSTMENTS OF DUMPY LEVEL: The Temporary Adjustments/ Station Adjustments are: Setting over the station (Centering) Levelling up Elimination of Parallax 1.SETTING OVER THE STATION (CENTERING): Centering of the instrument over a station point can be done by using plumb bob. Approximate levelling can be done by moving tripod legs rapidly or circumferentially. 2. LEVELLING UP: After centering and approximate leveling of the instrument, accurate leveling is done with the help of foot screws with reference to the plate levels (bubble tubes), so that the vertical shall be truly vertical. To level the instrument the following operations have to be made:
i. Turn the upper plate until the longitudinal axis plate level is roughly parallel to a line joining any two (such as A and B) of the leveling/foot screws.
ii. Hold these two foot screws between the thumb and first finger of each hand and
turn them uniformly so that the thumbs move either towards each other or away from each other until the bubble becomes centre.
iii. Turn the upper plate through 900, i.e., until the axis of level passes over the
position of the third foot screw C. [Fig. (b)]. Turn this foot screw until the bubble comes to centre.

iv. Return to the upper plate through 900 to its original position [Fig. (a)] and repeat the step (ii) till the bubble comes centre.
v. Turn back again through 900 and repeat the step (iii).
vi. Repeat the steps (ii) and (iii) until the bubble is central in both the positions.
vii. Now rotate the instrument through 1800. The bubble should be remain in the
centre of its run, provided it is in correct adjustment. The vertical axis will be truly vertical. If not it needs permanent adjustment.
3.ELIMINATION OF PARALLAX: Parallax is a condition arising when the image formed by objective is not the plane of cross-hairs. Unless the parallax is eliminated accurate sighting is not possible. Parallax can be eliminated in two steps:
(i) By focusing the eye-piece (ii) By focusing the objective
(i) By focusing the eye-piece:
The aim of focusing eye-piece is to make the cross-hairs is to distinct and clear. Point the telescope towards the sky or hold a sheet of white paper in front of the objective and move the eye-piece in or out until the cross-hairs are seen very clearly and distinctly.
(ii) By focusing the objective: Telescope is now turned towards the object to be sighted and the focusing screw is turned until the image appears clear and sharp. The image is formed in the plane of cross-hairs.
4. PROCEDURE:
i. Set the instrument at a convenient point, and complete temporary adjustments.
Fig. Levelling
BS FS
1 3 TBM CP1 P
BS FS FS BS
2 CP2
ii. Take BS reading on Temporary Bench Mark (TBM).
iii. Keep the staff at change point and enter the staff reading in FS column.
iv. Shift the level and enter the staff reading in BS column.
v. Repeat the process to cover all the points.
vi. Apply arithmetical check. 4 OBSERVATIONS & CALCULATIONS: The staff readings are entered in levelling field book and the R.Ls are determined both by H.I. Method and Rise-and-Fall Method. NOTE:
The 1st staff reading from a set up is B.S and the last staff reading is F.S and all other readings are I.S.
In order to eliminate any error, level should be placed exactly mid-way between BS and FS.
If any point is above the line of sight the staff is held inverted and the reading is entered as –Ve.
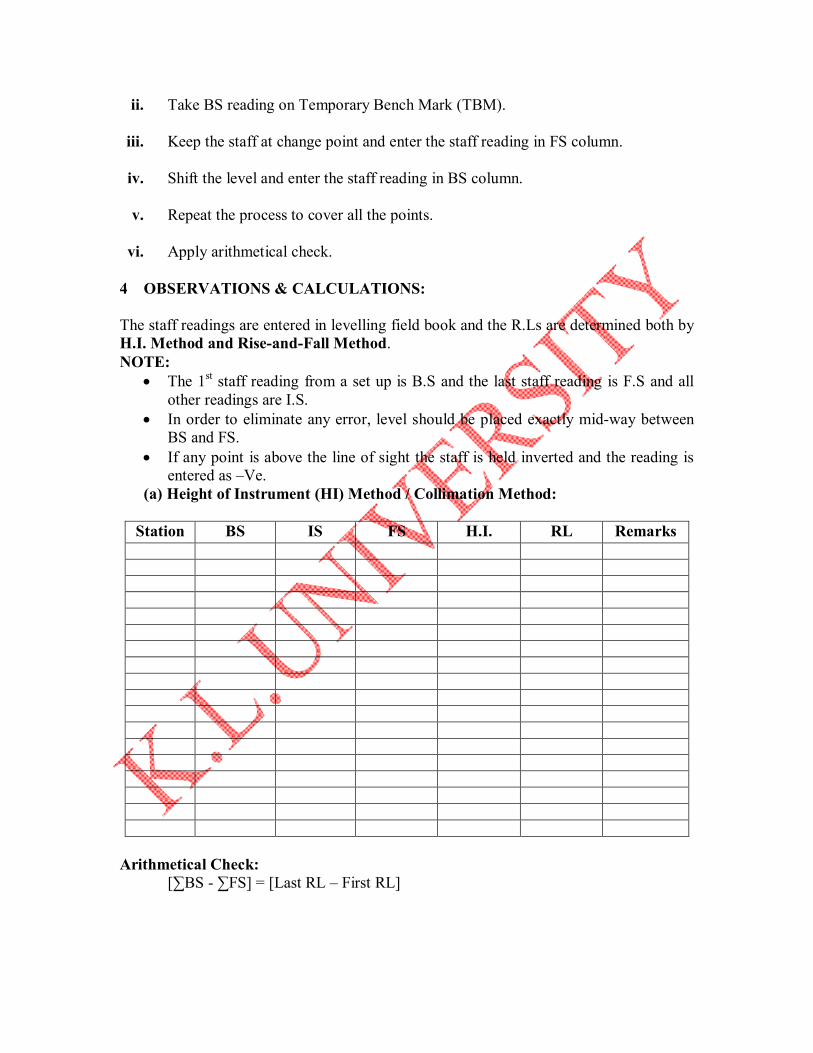
(a) Height of Instrument (HI) Method / Collimation Method:
Station BS IS FS H.I. RL Remarks
Arithmetical Check: [∑BS - ∑FS] = [Last RL – First RL]

(b) Rise and Fall Method: Station BS IS FS Rise Fall RL Remarks
Arithmetical Check: [∑BS - ∑FS] = [∑Rise - ∑Fall] = [Last RL – First RL] 5 RESULT: The Reduced levels of various points are determined.

Expt. No: 9 Date:
MEASUREMENT OF HORIZONTAL ANGLES BY METHOD OF REPETITION AND MEASUREMENT OF VERTICLE ANGLES WITH THEODOLITE
1. AIM: Measurement of the horizontal angle using theodolite (by general method). 2. INSTRUMENTS:
Theodolite, Tripod, and Ranging rods
3. THEORY: In this method, the angle is added a number of times. The total is divided by the number of readings to get the angle. The angle should be measured clockwise in the face left and face right positions, with three repetitions at each face.
DESCRIPTION OF THE ‘THEODOLITE’:
The following are essential parts of the Theodolite: Levelling Head: The leveling head usually consists of two parallel triangular plates known as upper triangular plate (tribach) and lower triangular plate (trivet). The foot screws (levelling screws) are provided between two parallel plates. Foot screws are used to level the instrument. A leveling head has three distinctive functions:
(i) To support the main part of the instrument (ii) To attach the theodolite to the tripod. (iii) To provide a mean for levelling the theodolite
Two Spindles (or Axes or Centres): The theodolite consists of two spindles/ axes- one inner and the other outer. The inner axis is solid and conical, and the outer axis is hollow. The two spindles are coaxial.
Lower Plate/ Scale Plate: The lower plate is attached to the outer axis. The lower plate carries a horizontal circle at its level edge and is therefore, also known as scale plate. This plate is circular in shape and bevelled at edges. It is graduated from 00 to 3600 in the clockwise direction. The lower plate carries lower clamp screw and lower tangent screw.

When the lower clamp is tightened, the lower plate is fixed to tribach of the leveling head. On turning the lower tangent screw, the lower plate can be rotted slightly. Usually the size of the theodolite is represented by the size of the scale plate.
Upper Plate/ Vernier Plate: The upper plate is attached to the inner axis and carries two verniers with magnifiers at extremities diametrically opposite. The upper plate supports the Standards/ A-frames. It carries an upper clamp screw and corresponding upper tangent screw for purpose of accurately fixing upper plate to lower plate. On clamping the upper clamp and unclamping the lower clamp, the lower plate and the instrument can rotate on its outer axis without any relative motion between the two plates. If, however, lower clamp is clamped and upper clamp is unclamped, the upper plate and instrument can rotate on its inner axis. Plate Bubble Tube: The Plate Bubble Tube is provided on the upper plate. It enables leveling the instrument. Telescope: The telescope is an integral part of a vernier theodolite. The telescope can rotated in a vertical plane about horizontal/tunnion axis. The telescope may be internal focusing type or external focusing type. In most of transits, internal focusing telescope is used. The telescope is pivoted between the standards at right angles to the horizontal/trunninon axis. Telescope consists of eyepiece, object glass and focusing screw and it is used to sight the object. The telescope is provided with focusing screw, clamping screw and tangent screw. Vertical Circle: Vertical Circle is a circular graduated arc attached to the trunnion axis of the telescope. Consequently, the graduated arc (vertical circle) rotates with the telescope when the telescope is turned about the horizontal axis in vertical plane. By means of vertical circle clamp and tangent screw, provided along with the telescope, the telescope can be set accurately at any desired position in Vertical plane. The vertical circle is either graduated continuously from 00 to 3600 in clock wise direction or it is divided into four quadrants. Each quadrant is graduated from 00 to 900 in opposite directions, with the “zero marks” at the ends of the horizontal diameter of the vertical circle. Standards: Two standards resemble the letter A and hence they sometimes known as “A-frames”. They are mounted on the upper plate/vernier plate. They support the horizontal/trunnion axis of the telescope. Compass: A magnetic needle is also attached to a theodolite. The compass will be attached to one of the standards. Plumb Bob: Plumb Bob is suspended from the hook fixed bottom of central vertical axis. Tripod: Tripod is the stand in which the whole instrument rests. At lower ends, the legs are provided with pointed steel shoes.
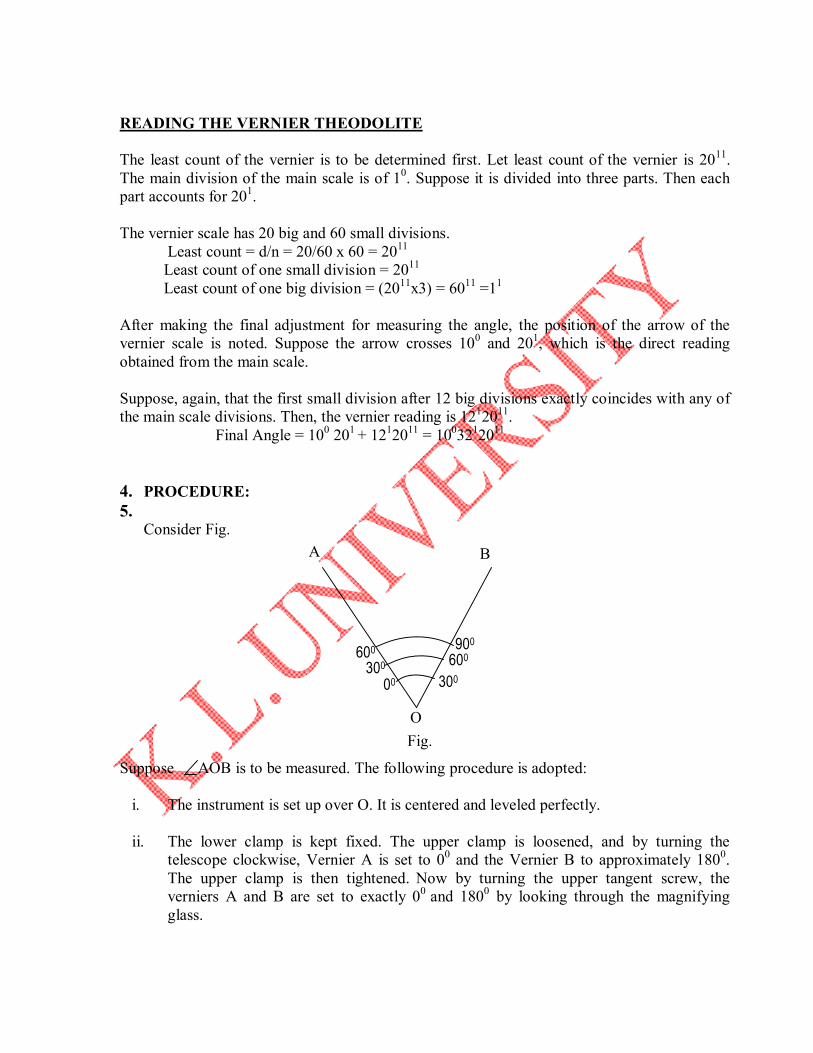
READING THE VERNIER THEODOLITE The least count of the vernier is to be determined first. Let least count of the vernier is 2011. The main division of the main scale is of 10. Suppose it is divided into three parts. Then each part accounts for 201. The vernier scale has 20 big and 60 small divisions. Least count = d/n = 20/60 x 60 = 2011 Least count of one small division = 2011
Least count of one big division = (2011x3) = 6011 =11
After making the final adjustment for measuring the angle, the position of the arrow of the vernier scale is noted. Suppose the arrow crosses 100 and 201, which is the direct reading obtained from the main scale. Suppose, again, that the first small division after 12 big divisions exactly coincides with any of the main scale divisions. Then, the vernier reading is 1212011. Final Angle = 100 201 + 1212011 = 1003212011
4. PROCEDURE: 5.
Consider Fig. Suppose AOB is to be measured. The following procedure is adopted:
i. The instrument is set up over O. It is centered and leveled perfectly. ii. The lower clamp is kept fixed. The upper clamp is loosened, and by turning the
telescope clockwise, Vernier A is set to 00 and the Vernier B to approximately 1800.
The upper clamp is then tightened. Now by turning the upper tangent screw, the verniers A and B are set to exactly 00 and 1800 by looking through the magnifying glass.
B A
O
00
Fig.
300 300 600
900 600
iii. The upper clamp is tightly fixed. The lower clamp is lossened and the telescope is directed to the left hand side. The ranging rod at A is bisected approximately by perfectly focusing the telescope and eliminating parallax. The upper clamp is tightened, and the ranging rod at A is bisected properly. Here the initial reading of Vernier A is 00.
iv. The upper clamp is loosened and the telescope turned anticlockwise to exactly bisect
the ranging rod at A. Here the initial reading is 300 for the second observation. v. The lower clamp is tightened. The upper is loosened and the telescope turned clockwise
to exactly bisect the ranging rod at B. Let the reading on Vernier A is 600. vi. The initial reading for the third observation is set to 600. Angle AOB is again measured.
Let the final reading on vernier A be 900, which is the accumulated angle.
Accumulated angle 900
Angle AOB = = = 300 Number of reading 3 vii. The face of the instrument is changed and previous procedure is followed.
viii. The mean of the observations (i.e., face left and face right) is the actual angle AOB.
The result is shown in Table.

Table: Measurement of Horizontal Angle
By Repetition Method
Object Angle observation
Number of
readings
Initial Angle on Vernier
Final Angle on Vernier
Angle on Vernier Mean Angle of Vernier
Mean Angle of
Observation
A B A B A B
A
B
AOB
Face Left
1 2 3
A
B
AOB
Face Right
1 2 3
Expt. No: 10 Date:
INTRODUCTION ON TOTAL STATION AND ITS VARIOUS PARTS
Purpose
To become familiar with the capabilities and general operation of a total station instrument; to become familiar with the procedure for setting up over a point and simple distance measurement.
Equipment
Total station with operator’s manual, tripod, prism pole with reflector, and plumb bob.
Field Notes
Field notes will not be taken during this exercise. Instead, use the form sheet provided at the end of this lab to compile the necessary information about the total station assigned to you for the practicum. Hand-in the completed data sheet at the end of the practicum period.
Procedure
1. Orientation to the Total Station
The instructor will start out the period by giving a general orientation to the total station, its parts and workings. Keep in mind that each instrument is slightly different and that each party is responsible for determining the correct operation procedure as it pertains to the instrument. Each party will set the instrument on top of the table in front of the group and identify parts as they are discussed. Be careful with the instrument at all times.
The following items will be discussed:
a. Leveling the instrument. b. Use of the optical plummet. c. Use of the clamp and tangent (slow motion) screws of the horizontal circle
motion (lower motion and upper motion if appropriate) and the vertical circle motion.
d. Focus of the telescope eyepiece lens, objective lens, and removal of parallax.
e. Initialization of the instrument in preparation of use. f. Entering the PPM and reflector offset constants. g. Placing the instrument in angular measurement mode (horizontal and
zenith).

h. Placing the instrument in distance measurement mode (horizontal, vertical and slope).
2. Setting Up over a Point
This procedure will be practiced in the field according to the instructions in item 3 below. Be sure the tribrach locking mechanism is clamped whenever the instrument is placed on the tripod.
a. Set the length of the tripod legs to a height approximately equal to your chin height.
b. Spread the tripod legs out. Using a plumb or by your best estimate, position the tripod approximately over the point, with the tripod base plate as horizontal as possible.
c. Firmly plant the tripod legs in the ground. d. Mount the total station to the middle of the tripod base-plate using the
centering screw on the tripod. If the tribrach of the total station has an optical plummet, remove the instrument from the tribrach and place it back in the case until step i.
e. Level the instrument using the three leveling screws. f. Look through the optical plummet of the instrument or tribrach (which
ever is appropriate) and center the reticule (cross-hair) on the point using the three leveling screws.
g. Center the bulls-eye bubble by adjusting the individual tripod legs. Note that the optical plummet has hardly moved off the point. If it moved significantly, then your tripod is not stable. Repeat step c.
h. Loosen the tripod base plate screw. i. Fine level using the three leveling screws. j. Fine center the instrument over the point, translating the instrument on the
tripod base plate. k. Iterate steps “f” and “g” until the instrument is fine leveled and fine
centered. l. Tighten the tripod base plate screw.
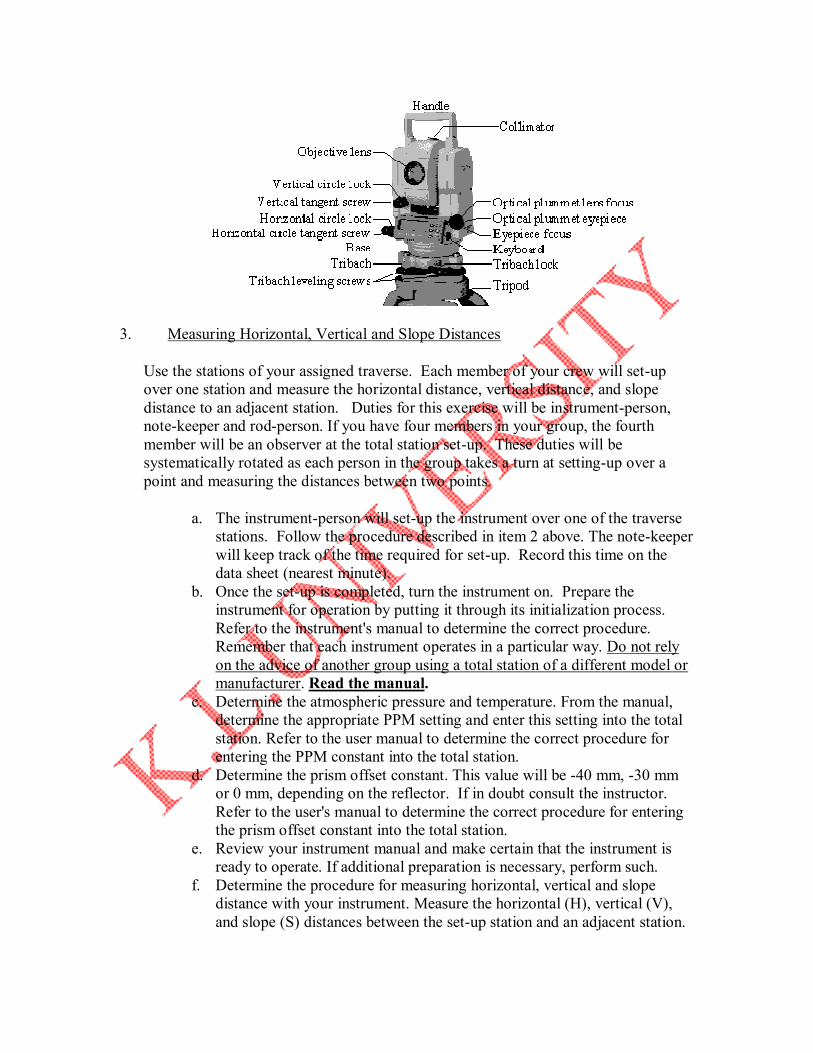
3. Measuring Horizontal, Vertical and Slope Distances
Use the stations of your assigned traverse. Each member of your crew will set-up over one station and measure the horizontal distance, vertical distance, and slope distance to an adjacent station. Duties for this exercise will be instrument-person, note-keeper and rod-person. If you have four members in your group, the fourth member will be an observer at the total station set-up. These duties will be systematically rotated as each person in the group takes a turn at setting-up over a point and measuring the distances between two points.
a. The instrument-person will set-up the instrument over one of the traverse stations. Follow the procedure described in item 2 above. The note-keeper will keep track of the time required for set-up. Record this time on the data sheet (nearest minute).
b. Once the set-up is completed, turn the instrument on. Prepare the instrument for operation by putting it through its initialization process. Refer to the instrument's manual to determine the correct procedure. Remember that each instrument operates in a particular way. Do not rely on the advice of another group using a total station of a different model or manufacturer. Read the manual.
c. Determine the atmospheric pressure and temperature. From the manual, determine the appropriate PPM setting and enter this setting into the total station. Refer to the user manual to determine the correct procedure for entering the PPM constant into the total station.
d. Determine the prism offset constant. This value will be -40 mm, -30 mm or 0 mm, depending on the reflector. If in doubt consult the instructor. Refer to the user's manual to determine the correct procedure for entering the prism offset constant into the total station.
e. Review your instrument manual and make certain that the instrument is ready to operate. If additional preparation is necessary, perform such.
f. Determine the procedure for measuring horizontal, vertical and slope distance with your instrument. Measure the horizontal (H), vertical (V), and slope (S) distances between the set-up station and an adjacent station.

Some instruments do all three measurements in one operation. Others require three separate operations. Consult the instrument manual.
g. Record these three measurements on the data sheet provided at the end of this practicum description. Report all measurements in feet and meters. The total station should be capable of providing both units.
h. Turn off the total station. Return the leveling screws to their neutral positions. Remove it from the tripod set-up and place it in the case.
i. Move to an adjacent station in the traverse. j. Rotate duties and repeat steps “a” through “i” until all party members
have the opportunity to set-up over a point, level the instrument, initialize the instrument and measure the H, V and S distances.
Things to Remember
1. Never transport the total station while attached to the tripod. Always remove the instrument and place it in the case when moving from one set-up point to the next. See figure to right for one acceptable method of carrying equipment.
2. Keep the instrument case closed when in the field to prevent dust and dirt from accumulating in the “home” of the instrument.
3. It is not a good idea to remove a battery from an instrument while the instrument is on. Such action may cause damage to the electronics of the instrument. Consult your instrument manual for specific instructions.
4. Always run batteries until they go dead. 5. At the end of the exercise, charge all dead batteries. The charging of batteries
is your responsibility. Ask for instructions on how to use the battery chargers in the equipment room.