exploring touch - storage.googleapis.com
TRANSCRIPT


Exploring Touch
Exploring TouchExplore Moving, Feeling and Thinking Through Touch
Practical touch exercises for you and your friends, including animals
Edward “Chip” Semplinski
Copyright 2018 Edward Semplinski
It is the responsibility of the individual to respect the limits of their training and physical condition when applying the explorations described in this book. Neither the publisher nor the author will be liable for any loss or damage of any nature occasioned to or suffered by any person or property in regard to product liability, negligence or otherwise, or through acting or refraining from acting as a result of adherence to the material contained in this book.
Cover: Human hands on a canine.
2

Exploring Touch
DedicationThis book is dedicated to all those who live well by touching lives, especially Trina.
PrefaceThe premise of this book is that there is already plenty of information available to help you craft a healthy and balanced lifestyle in the modern world. However, one primal ingredient is consistently ignored or glossed over – touch!
It is likely, that you experienced the touch of another human being before you took your first breath of air. Touch was critical to your early survival and development, but over time this miraculous experience became mundane. This book contains practical exercises to explore and rediscover your sense of touch.
AcknowledgmentsThe works of Dr. Moshe Feldenkrais inspired this book through his use of exploratory lessons to improve movement awareness.
Additionally, there are those that personally helped me develop as a bodyworker and human being: Dr. Jeff Rockwell, Julie Porter, Kristine TenBrink, Phil Okazaki, Lydia Carlisle, Gracia Arnold, Conrad Santos, Aurora Donnely, Miyah Buchannon, Brian Nocera, Nicki Scott, Heather Lee Richardson, Cynthia Ruberio, Ralph Dehner and especially, Trina Semplinski.
3
Exploring Touch
Short ContentsDedication.............................................................................................................................................................................................................3Preface...................................................................................................................................................................................................................3Acknowledgments................................................................................................................................................................................................3Introduction..........................................................................................................................................................................................................9Tips for the Journey...........................................................................................................................................................................................11Individual Explorations...................................................................................................................................................................................141Human Partner Explorations..........................................................................................................................................................................206Animal Partner Explorations..........................................................................................................................................................................230Touch Tips Summary.......................................................................................................................................................................................248Conclusion.........................................................................................................................................................................................................255Appendix 1: Simple Lifestyle Improvements................................................................................................................................................257Appendix 2: Resource Summary....................................................................................................................................................................258Appendix 3: Body Contact Tools....................................................................................................................................................................261Appendix 4: Mechanical Contact Tools.........................................................................................................................................................275
4

Exploring Touch
Full ContentsDedication.............................................................................................................................................................................................................3Preface...................................................................................................................................................................................................................3Acknowledgments................................................................................................................................................................................................3Introduction..........................................................................................................................................................................................................9Tips for the Journey...........................................................................................................................................................................................11
Touch Definition..............................................................................................................................................................................................12Short Exploration: Define Touch................................................................................................................................................................................12Short Exploration: Hands & Lips...............................................................................................................................................................................14A Word On Quality..................................................................................................................................................................................................... 15Short Exploration: Ponder Your Past Touch Experiences..........................................................................................................................................15
Safety...............................................................................................................................................................................................................17Safe Touch & Boundaries........................................................................................................................................................................................... 17Safe Touch Locations.................................................................................................................................................................................................. 18Safe Touch Practices.................................................................................................................................................................................................. 20Decision Making......................................................................................................................................................................................................... 21
Integrating.......................................................................................................................................................................................................21Short Exploration: Sense of Space..............................................................................................................................................................................21Individuals, Not Biological Systems...........................................................................................................................................................................22Primal Touch Perspective........................................................................................................................................................................................... 23Gravity, Grading & Learning..................................................................................................................................................................................... 23
Moving............................................................................................................................................................................................................24Breathing.................................................................................................................................................................................................................... 24Short Exploration: Grab Your Breath.........................................................................................................................................................................26Short Exploration: Monitor Breath Movement Quality..............................................................................................................................................27Short Exploration: Breath & Movement Coordination...............................................................................................................................................29Short Exploration: Relaxing the Jaw and Tongue.......................................................................................................................................................31Human Movement Basics........................................................................................................................................................................................... 34Short Exploration: Be a Baby.....................................................................................................................................................................................38Cultivating Improved Body Mechanics.......................................................................................................................................................................40Footwear, Or Not........................................................................................................................................................................................................ 41Short Exploration: Touching Earth, Finding Neutral.................................................................................................................................................42
5
Exploring Touch
Short Exploration: Sensing & Movement...................................................................................................................................................................45Short Exploration: Lunge with Weight Shift Forward and Backward.........................................................................................................................48Short Exploration: Straddle with Weight Shift Left and Right....................................................................................................................................49Short Exploration: Elasticity and Bounce..................................................................................................................................................................50Short Exploration: Stability vs Rigidity......................................................................................................................................................................51Short Exploration: Going to Ground – Kneeling & Sitting.........................................................................................................................................53Short Exploration: Use Your Feet...............................................................................................................................................................................57Short Exploration: Stool Basics..................................................................................................................................................................................59Short Exploration: The Pain Teacher.........................................................................................................................................................................61Body Mechanics Principles Summary........................................................................................................................................................................63Tai Chi Chuan Essentials – Another Viewpoint..........................................................................................................................................................66
Feeling.............................................................................................................................................................................................................68Sensory Highlights..................................................................................................................................................................................................... 68Short Exploration: Hairy vs. Non-Hairy Skin.............................................................................................................................................................69Short Exploration: Rub It Out.................................................................................................................................................................................... 70Temperature & Touch................................................................................................................................................................................................. 73Short Exploration: Cold Hands..................................................................................................................................................................................73Short Exploration: Hand Warming.............................................................................................................................................................................74Position & Touch........................................................................................................................................................................................................ 75Short Exploration: Sacral Bolsters.............................................................................................................................................................................78Contact – Physical Touch........................................................................................................................................................................................... 80Short Exploration: Arch of the Hand – Finding Neutral.............................................................................................................................................80Short Exploration: Contact Overview Using Palpation..............................................................................................................................................82Short Exploration: Compressing, Stretching, Lifting, Bending, Shearing, Rotating...................................................................................................86Contact Tools.............................................................................................................................................................................................................. 90Contact Parameters.................................................................................................................................................................................................... 90Short Exploration: Gauging Pressure or Intensity.....................................................................................................................................................92Pressure, Perception, Trust & Sensory Distortion......................................................................................................................................................92Short Exploration: Percussion - Exploring Provider Movement................................................................................................................................99Short Exploration: Pin & Stretch - Exploring Receiver Movement..........................................................................................................................102Short Exploration: Friction and Mediums................................................................................................................................................................105Tension & Touch....................................................................................................................................................................................................... 106
Thinking........................................................................................................................................................................................................107Dosage & Moderation.............................................................................................................................................................................................. 107
6
Exploring Touch
Healing Process........................................................................................................................................................................................................ 109Placebo-Nocebo Effects............................................................................................................................................................................................ 114Dumb Muscles, Smart Skin....................................................................................................................................................................................... 118Ability to Change...................................................................................................................................................................................................... 123Thoughts & Skill Development.................................................................................................................................................................................125Short Exploration: Touch Meditation for Awareness, Focus and Mindfulness.........................................................................................................126Short Exploration: Touch Meditation for Intention, Intuition and Visualization.......................................................................................................129Short Exploration: Toilet Ambidexterity...................................................................................................................................................................130Techniques & Non-Technique...................................................................................................................................................................................131Science, Touch & You............................................................................................................................................................................................... 133
Flowing..........................................................................................................................................................................................................135Explorations Overview..................................................................................................................................................................................138Exploration Checklist....................................................................................................................................................................................140
Individual Explorations...................................................................................................................................................................................141Touching a Wall.............................................................................................................................................................................................142Tapping Concerns Away................................................................................................................................................................................143Skin Stretch into Ease....................................................................................................................................................................................148Breathing Touch Exploration........................................................................................................................................................................152Fabric Store on Your Body............................................................................................................................................................................153Full Body Pat.................................................................................................................................................................................................155TTouch® Exploration.....................................................................................................................................................................................158Wake Up the Feet!.........................................................................................................................................................................................163Call of the Foam Roll....................................................................................................................................................................................167Have a Ball....................................................................................................................................................................................................172Cane Yourself................................................................................................................................................................................................176Brush it Off....................................................................................................................................................................................................179Face It!...........................................................................................................................................................................................................182Change Your Position....................................................................................................................................................................................189“Listening” with the Hands...........................................................................................................................................................................191Tour de Tissue Types.....................................................................................................................................................................................196Touched by the Sun.......................................................................................................................................................................................203More Individual Explorations.......................................................................................................................................................................205
7

Exploring Touch
Human Partner Explorations..........................................................................................................................................................................206Being with a Human Partner.........................................................................................................................................................................207Monitor Partner Breathing.............................................................................................................................................................................209One or Two Points?.......................................................................................................................................................................................214Move It!.........................................................................................................................................................................................................218More Human Partner Explorations................................................................................................................................................................229
Animal Partner Explorations..........................................................................................................................................................................230Being with an Animal Partner.......................................................................................................................................................................232Fur & Tail......................................................................................................................................................................................................235Temperature Scan..........................................................................................................................................................................................240Old & New Favorites....................................................................................................................................................................................242Fascia Play.....................................................................................................................................................................................................244More Animal Partner Explorations................................................................................................................................................................247
Touch Tips Summary.......................................................................................................................................................................................248Conclusion.........................................................................................................................................................................................................255
Contact Us.....................................................................................................................................................................................................256Appendix 1: Simple Lifestyle Improvements................................................................................................................................................257Appendix 2: Resource Summary....................................................................................................................................................................258Appendix 3: Body Contact Tools....................................................................................................................................................................261Appendix 4: Mechanical Contact Tools.........................................................................................................................................................275
8

Exploring Touch
IntroductionWelcome to Exploring Touch! I’m the idiot who almost wrote another book, Lessons In Touch, which was going to teach you about touch. It even included a definition, which you’ll get to see later. Fortunately, after writing hundreds of pages, it sunk in that you really can’t teach touch, you can only learn it.
If you are interested, my favorite way of learning is to explore with just a little guidance. So this book aims to lay out small adventures in touch for you to explore. Lengthy explanations are summarized with “Touch Tips”.
Touch Tip 1: If you read and understand the “Touch Tips”, you’ll be ready to start exploring safely!
The heart of the book are the short exercises which launch your explorations. There are also tables and diagrams included to help convey information with a minimal number of words.
9

Exploring Touch
There are several Eastern concepts that will serve us well as we proceed through this book. While this book provides simple explanations for these terms, keep in mind that they are deep concepts deserving further investigation and contemplation. These terms resurface in the section on flow.
Term Concept / Meaning Application to Explorations
Wu Wei Achievement through inaction, application of minimalaction at the correct time, spontaneous effortlessness, effortless action
Apply minimal physical effort, using great concentration and awareness. Note that wu wei is not an invitation to laziness,but rather a call to exercise discipline to apply the correct amount of action at the right place and at the right time.
Wabi Sabi Beautiful imperfection; wabi – appreciation of simplicity and impermanence, sabi – acceptance of the imperfect
Accept your current imperfections, but remember even they are impermanent. Improvement is based on impermanence.
Kintsugi Literally, to join with gold; damaged ceramic is respected by repairing it with gold which highlights the flaws; an appreciation for our flaws
Value and invest in fixing that which is broken and returning it to function.
Karumi Lightness; lack of pretense Approach each exploration as a child.
Muga Loss of self awareness Lose yourself in each exploration, suspend your ego.
Kaizen Application of continual small improvements Improve in small, natural increments.
Kei Respect Respect yourself, others and nature, remembering all is impermanent, imperfect and incomplete.
The explorations in this book are best experienced without having to constantly refer to the book, for this reason there is an abridged audio book available. The audio book allows you to listen to the text while actively exploring touch.
10
Exploring Touch
Touch Tip 2: Slow down to get the most from these touch explorations.
Touch Tip 3: Explore in short sessions and revisit the book often.
Touch Tip 4: Don’t try too hard, relax and let the knowledge come to you through the experience.
Touch Tip 5: Don’t get discouraged, just keep trying and celebrate the small victories.
Tips for the Journey"In order to sense—see, hear, or touch—a person must be interested, startled, or aware of some happening that involves him. That is,he must move, feel, and think."
Moshe Feldenkrais, Awareness Through Movement
The genius of Feldenkrais in the quote above succinctly lays out the road map for us to improve our quality of touch. Improving how we "move, feel and think" will improve our ability to touch. This book is written for those who derive satisfaction from exploring and discovering more about themselves and their potential.
Touch Tip 6: Touch is a complex sense which is often ignored, feared or taken for granted.
Touch Tip 7: The mind experiences touch through the whole body.
11
Exploring Touch
Touch Tip 8: Touch requires moving, feeling and thinking.
Touch Tip 9: Touch quality improves through education, experience, exploration and time on tissue.
Touch Tip 10: Touch engages our body, mind and emotions. Everyone can benefit from improving their touch quality.
Touch Tip 11: Touch can be uncomfortable due to personal or social issues. Respect everyone’s comfort zones.
Touch Tip 12: Communication is key to quality touch.
Touch DefinitionWhat the hell do we mean by “touch”?
A major challenge for this book is to put a boundary around touch and provide appropriate explorations. Limiting touch to only physical contact would unnecessarily bound our explorations and ignore some long existing touch practices. On the other hand, too vague a concept of touch could lead to confusion and a loss of focus.
Below is my definition of touch, but first, what is your definition of touch?
Short Exploration: Define Touch
Assume a comfortable position and think about how you define touch. Is it only physical contact? Have you been touched by a song? Or somebody’s words? Or a gesture? What are the key elements that make up this experience?
Touch Tip 13: This book approaches touch with a simple, generic, non-sexual attitude.
12
Exploring Touch
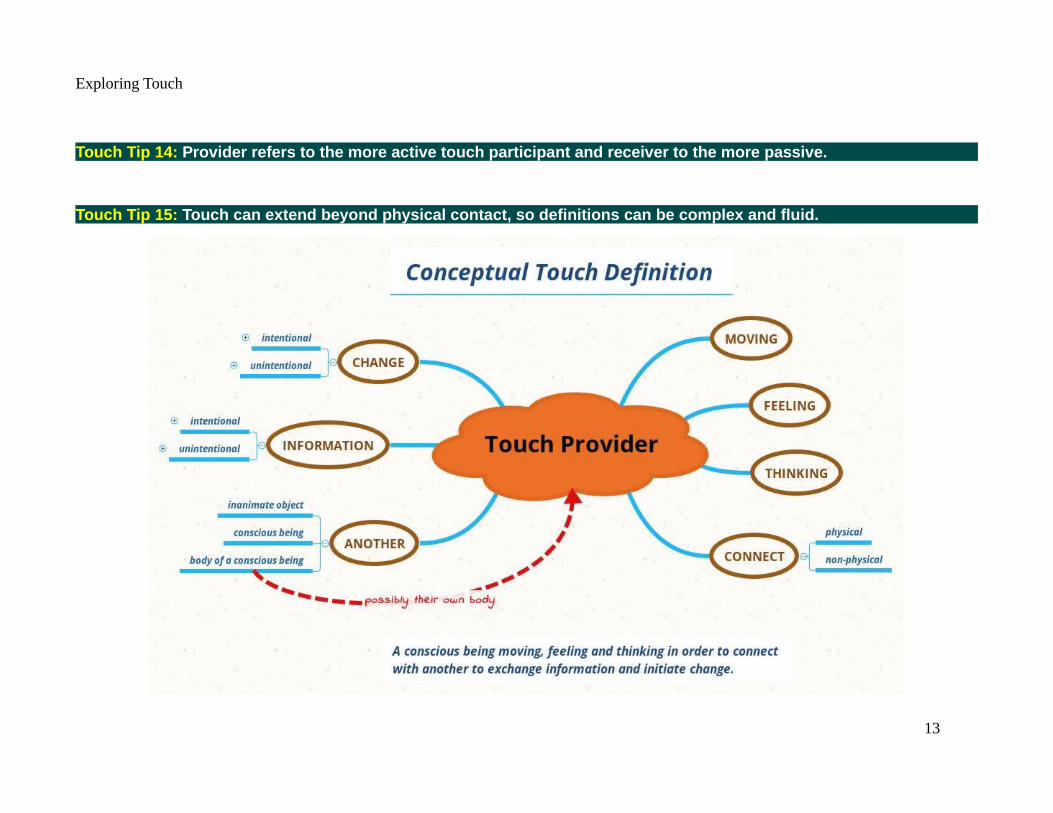
Touch Tip 14: Provider refers to the more active touch participant and receiver to the more passive.
Touch Tip 15: Touch can extend beyond physical contact, so definitions can be complex and fluid.
13

Exploring Touch
Short Exploration: Hands & Lips
Softly place your index finger horizontally across your lips, your finger shouldbe right between the lips. Note that your lips have many different touchsensors, as does your finger. The contact should be soft and comfortable, butsolid. Now slowly move your hand left and right to just move the tissue, but notslide across it.
How do you think about this contact? Are you touching your lips? Is yourfinger touching your lips? Are your lips touching your finger? Can you changethe focus at will?
Now, become still again, take a deep breath and hold your hand and finger still.Slowly move your lips and head against your still hand. Is this contact different? How?
You may be able to experience all the different potential perspectives, or you may only feel your finger touching your lips. If youhad difficulty, try the same movements, but now move enough that the finger and lips slip across each other. Any different?
One more variation, use the back of your index finger for the above explorations.
Any changes in perception when using the side of your finger with fewer touchsensors?
This exploration exposes interesting perspectives between touch provider andreceiver when moving different body parts with different touch sensitivities.
Touch Tip 16: Our focus and intent changes our touch experience.
14

Exploring Touch
A Word On Quality
Who am I to define "quality of touch"?
I can define quality of touch in only one situation, when I am being touched. Ultimately, only the touch receiver can define the quality and this quality may change based on circumstances. A touch that might normally be welcomed could be considered terrible with a sunburn. Quality touch on the back, might be inappropriate on the abdomen.
So our task of improving quality of touch will not be easy, in general, we are aiming for a moving target subjectively determined by others. In other words, quality of touch is complicated and to a great degree out of our control. That is why we begin working with ourselves, keeping communication issues to a minimum. As we move to working with others, our most important skill will be asking and listening. Listening goes beyond hearing and incorporates what we see and feel. Check in with your partner by asking if anything should be changed and listening to their reply. Sometimes their tissues communicate better than their voice.
Short Exploration: Ponder Your Past Touch Experiences
Assume a comfortable position and take some time to ponder your touch experience throughout the course of your life. Were there indications that might help inform what you consider to be high quality touch today? Did you have a favorite toy or
15
Exploring Touch
blanket when you were young that had interesting touch characteristics? ( I had a fluffy stuffed lamb with a wind-up music box, that I just fondly remembered as I wrote this section.)
Do you remember how touch figured into your early family life? (A lucky client received massages with mustard oil every night before bed, throughout his childhood to help him sleep.) Did your family cuddle? Or hug? Or wrestle? Did your family use touch to communicate? Was grabbing or hitting or spanking, part of your parental relationship? What touch did you experience with siblings or friends?
When you were young, was touch an overall good or a bad experience? Do you think these early experiences have shaped your current attitudes towards touch?
How did your touch experience evolve through the various relationships that have brought you to this point?
We often develop an amnesia when it comes to touch, an inability to remember what we really enjoy and need. When I first entered massage school I valued high pressure, deep tissue work, but after several months of receiving daily work, my body became more attuned to more subtle levels of touch. Sensory amnesia often prevents us from appreciating more gentle and subtle approaches to touch, anything different than what we “think we need”.
You can expect your definition of quality touch to change as you work through the explorations in this book.
Touch Tip 17: Only the receiver can evaluate quality of touch.
Touch Tip 18: Quality of touch perception can vary widely based on context, don’t assume, communicate.
Touch Tip 19: Assessing with all our senses allows us to decide how best to proceed.
16
Exploring Touch
SafetyTouch Tip 20: Touch can be dangerous because it requires being close, so we are constantly assessing our safety.
Touch Tip 21: Assessment and decision making are continuously occurring for both participants in a touch exchange.
Unfortunately, all our best intentions and actions also have at least the potential for unintended consequences. The goal of safetouch practices are to insure both the provider and receiver remain free of injury, pain and undesired discomfort.
Safe Touch & Boundaries
Our nervous systems place our safety as our highest priority, but we need to listen for them to be effective. Using the terminology of Butler and Moseley, the nervous system is a protective device that is constantly balancing the “safeties in me” (SIMs) with the “dangers in me” (DIMs) to determine how to respond to situations.1 These thresholds and categories are very dynamic and can change consciously or unconsciously over time and circumstances.
Part of safe touch is listening to your nervous system giving you signals and evaluating if what you are doing is not safe. Pain isan immediate signal to stop what you are doing and none of these explorations should evoke pain. If you or your partner has any safety concerns during an exploration: Stop. Breathe. Think. Discuss.
Touch can be uncomfortable due to many different factors: immediate sensations, psychological or emotional cues, cultural expectations, location on the body, skill level, relationship, trust, etc. It is critical to understand that either the provider or receiver can set boundaries and the first boundary encountered must be honored.
My experience is that ultimately the best way to learn and practice safe touch is with animals. They are not going to endure poor quality touch because they don’t want to hurt your feelings. If they don’t feel you are respecting a boundary they will pull away, leave, growl, bite or kick. You need to devote your complete attention to “listening” when touching an animal or you may pay a high price for ignoring a boundary.
1 Explain Pain Supercharged, G. Lorimer Mosely & David S. Butler, Noigroup Publications, pp. 17-18
17
Exploring Touch
Boundaries can be moved through education, experience, discussion, trust, negotiation and creativity. As an example, a receiver uncomfortable with having their abdomen touched because they are ticklish might try self-touch. They could also try placing their hand on their abdomen and letting the provider move it or placing their hand on the provider’s hand during movement.
Touch Tip 22: Boundaries keep the provider and receiver safe – establish and respect them!
Touch Tip 23: Stop if there is pain or discomfort for either the provider or receiver.
Touch Tip 24: Animals are excellent at providing, communicating and enforcing touch boundaries.
Safe Touch Locations
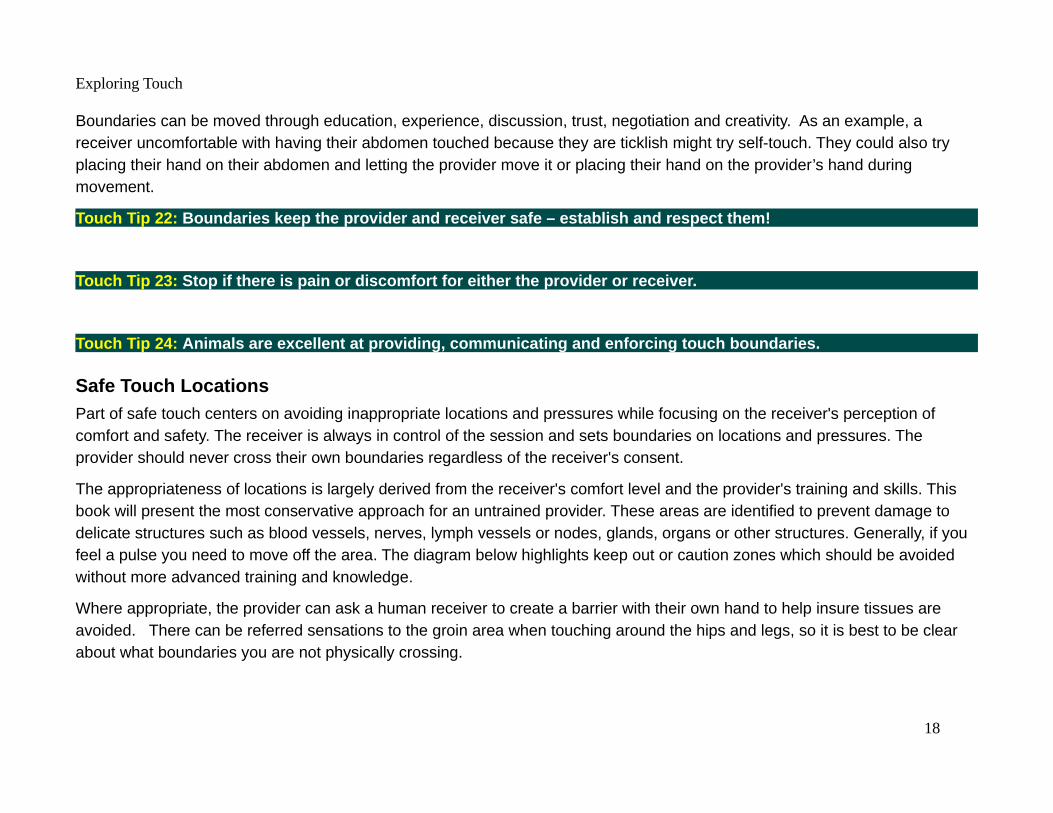
Part of safe touch centers on avoiding inappropriate locations and pressures while focusing on the receiver's perception of comfort and safety. The receiver is always in control of the session and sets boundaries on locations and pressures. The provider should never cross their own boundaries regardless of the receiver's consent.
The appropriateness of locations is largely derived from the receiver's comfort level and the provider's training and skills. This book will present the most conservative approach for an untrained provider. These areas are identified to prevent damage to delicate structures such as blood vessels, nerves, lymph vessels or nodes, glands, organs or other structures. Generally, if you feel a pulse you need to move off the area. The diagram below highlights keep out or caution zones which should be avoided without more advanced training and knowledge.
Where appropriate, the provider can ask a human receiver to create a barrier with their own hand to help insure tissues are avoided. There can be referred sensations to the groin area when touching around the hips and legs, so it is best to be clear about what boundaries you are not physically crossing.
18

Exploring Touch
19
Exploring Touch
Touch Tip 25: Stay away from the keep out zones unless you have the appropriate training, license or certification.
Touch Tip 26: Do not work with an individual healing from an injury or illness without consulting a medical professional.
Safe Touch Practices
Touch can be dangerous, as previously discussed, so how can we protect ourselves and others? One way is to establish and follow a protocol that we use with everybody, including when we work on ourselves. Luckily, such protocols are in common practice among medical professionals and they are generally referred to as “Universal Precautions”, meaning precautions to always follow.
The precautions below derive from universal precautions employed in the medical community which are reasonable actions followed to help prevent the transmission of disease. These practices should be employed when working with yourself or a partner.
1. Wash your hands before and after each exploration with soap and warm water. Generally, lathering long enough to repeat the alphabet song three times should be adequate.
2. Do not do an exploration if you or your partner are sick or have an active infection. Coughing, sneezing, fever, etc. should be assumed contagious unless cleared by a medical professional.
3. Do not do an exploration if there are any suspected or known parasites such as fleas, scabies, lice, etc. on you or a partner.
4. Do not work on any open skin, rash or active injury site. Do not rub open sores on your body anywhere – cover sores with a waterproof bandage and/or use gloves or other protection.
5. Avoid direct contact with bodily fluids. Use gloves to clean up any bodily fluids, washing your hands before and after.
20

Exploring Touch
6. Don’t touch your face, eyes, nose or any other mucous membrane during an exploration with a partner.
7. Change linens on mats, tables, pillows, bolsters, chairs or other items after working with a partner.
8. If you have any doubts or concerns about conditions, consult a medical professional.
Touch Tip 27: Wash your hands, use clean linens, avoid contact with bodily fluids, stay away from open wounds, don’t touch your face, eyes, nose or other mucous membranes. If you have concerns, consult a medical professional.
Decision Making
Touch Tip 28: Integrate thoughts, emotions, sensations and intuitions into decisions which result in quality touch experiences.
IntegratingIntegrating means adding together. We integrate multiple senses when we use touch, such as balance and vision. Because touch integrates many features one should cultivate good breathing, movement, sensation, thoughts, nutrition and relationships along with pursuing improving touch. See Appendix 1 for tips on general lifestyle improvements.
Short Exploration: Sense of Space
Integrated senses can be explored by simply taking in your surroundings, then closing your eyes and exploring your vicinity. As an example, if you are sitting at your desk and close your eyes, try reaching for an item, like your phone or mouse. You will probably be quite successful at retaining a map of your surroundings and navigating your touch with it. We tend to retain such amap of our home and other familiar places, which can allow us to navigate relatively competently even in complete darkness. This ability integrates multiple senses to allow us to still move well with limited vision.
Touch Tip 29: Develop and integrate your unique balance of senses to create your own sense of touch.
21

Exploring Touch
Touch Tip 30: Quality touch emerges from good sense integration, exploration, training and practice.
Individuals, Not Biological Systems
We are not just touching skin, fascia, muscle or bones, we are touching an individual, often a human, but sometimes not. For the purposes of this book, professionals should avoid deconstructing the individual they are touching into a collection of isolated biological systems they can name and reference.
If you become curious about underlying structures during an exploration, consider them deeper with an appropriate resource after experiencing the exploration. Alfred Korzbyski reminds us that “the word is not the thing” and “the map is not the territory”.While it can be helpful to have a map, sometimes the best way to learn an area is to wander and experience it. The map is always incomplete, sometimes it is just plain incorrect, and often it is used incorrectly.
Maps Territory
Anatomy Physiology KinesiologyNeuroscienceTheoriesCadaversTechniques
YouLiving HumansLiving Animals
Our goal in this book is not to fix or improve anything, it is to explore and witness. If you truly focus on the experience, it is likelythat you will improve your understanding and skills, but these are by-products of the simple process of awareness.
Touch Tip 31: Focus on the individual in each touch interaction and avoid deconstructing them into systems or diseases.
22

Exploring Touch
Primal Touch Perspective
While touch is important for well being, it is by no means a priority compared to safety, nutrition and relationships. These other elements all contribute to creating an environment where touch becomes possible and meaningful. However, touch is intertwined with our well being, as it can be a valuable tool in supporting our quest for safety, nutrition and relationships.
Diane Jacobs refers to purposeful touch as “social grooming”, which is a natural behavior in all primates and most mammals. This label refers us back to the primal nature of touch within the social hierarchies in which we evolved.
Touch evolved from the primal need at the level of the cell to separate self from opportunity and threat, into a part of our social fabric as human beings. We are one of the few animals that requires an incredible amount of touch interaction just to survive from infancy to adulthood.
Touch Tip 32: Recognize that touch is an important part of our complex social fabric and is required to thrive.
Gravity, Grading & Learning
Moshe Feldenkrais beautifully explained why many of his lessons begin laying down and end standing up with the following description. You can easily feel the weight of a tea bag in your palm. You also can feel the weight of a gallon of milk, however ifyou add the tea bag to the gallon of milk you will not notice the difference. The gallon of milk is like gravity, when we are resisting it, such as when standing, we cannot notice small changes in our body. When we surrender to gravity and lay down on the ground, gravity has a much smaller impact on us. Removing the impact of gravity (the gallon of milk) allows us to sense subtle changes in the body (the tea bag). This situation greatly reduces the demands on the nervous system, freeing them to be used for improved awareness and learning.
However, ultimately we function in a world where we must accept the challenges that gravity presents. As we wish to add challenge to explorations, we will add increasing difficulty, often through the addition of gravity. This approach of gradually increasing difficulty to increase the challenge is often referred to as grading. Many explorations in this book will take advantage of grading the activity to an appropriate level in some manner.
Touch Tip 33: Reducing stressors, like gravity, increases our ability to focus and notice small changes.
23

Exploring Touch
Touch Tip 34: Learning occurs when we provide enough challenge to be interesting, but not so much as to overwhelm.
Touch Tip 35: Learn skills in isolation, then integrate them into the environment where they become useful.
MovingMovement is the basis of life. The sections below investigate how movement relates to touch, starting with the movements known as breathing.
Breathing
Breath may be the single best "secret" to improving quality of touch, or the quality of any activity. If you control your breath, you can control your nervous system. This section is not an in-depth review of breathing practices, but more of a reminder of how you can use this tool effectively.
Breathing is important because it delivers our most important nutrient, oxygen, and is our most rapid way to get rid of wastes, while balancing carbon dioxide2. The only thing more important than breathing is movement, because you need to move to breathe. The better you move the better you will breathe, and the better you breathe, the better you will move.
2 Appropriate levels of CO2 determine the ability of hemoglobin to release O2 for use by other cells.
24

Exploring Touch
While we normally breathe automatically, we can consciously control our breath to stimulate or sedate our nervous system. Increased stimulation (activating the sympathetic nervous system) is generally accomplished by breathing through the mouth in short rapid breaths. Sedation (activating the parasympathetic nervous system) is generally induced by breathing through the nose and concentrating on a longer exhalation time.
There are four components or phases to the breathing cycle: inhalation, inhalation hold, exhalation and exhalation hold.
This book uses a simplenotation to suggestbreathing patterns, withall times in seconds:
Inhale time : Inhale hold time : Exhale time : Exhale hold time
An example sedating pattern might be 5:5:10:0, but in general the ratios are more important than actual times. One person may be more comfortable with a 3 second inhalation while another with a 6 second. We can represent the above pattern with
25

Exploring Touch
x:x:2x:0, so the 3 second breather would use 3:3:6:0 and the 6 second breather would use 6:6:12:0. Please don't get out the stopwatch, it is more important to feel natural and breathe easy than precisely follow any pattern. I generally start a new pattern using internal counts, but find I can soon release to "auto-pilot". I find the exhale hold (or exhale if exhale hold is 0) to be the most challenging aspect to maintain, so I focus on monitoring that period to determine if I need to reestablish or alter my pattern.
Mark Divine, a former United States Navy SEAL & SEAL Trainer, suggests in his Kokoro Yoga training what he calls "box" breathing to maintain control in tense situations or prepare for conscious action.3 It is super simple to remember as the pattern is x:x:x:x with a typical person maybe using 5:5:5:5, which will slow you down to about 3 breaths per minute, but keep you focused and oxygenated. Box breathing tends to calm you if you are over excited or stimulate you if you are too subdued.
The challenge to maintaining any pattern is typically the exhale hold time (or exhale if exhale hold is 0). Breathing a specific pattern is best monitored by how you feel maintaining the exhale or exhale hold time. But BEFORE you decrease your times, insure you are getting a full inhalation and full exhalation. Often, shallow breathing will force you into faster breathing rates. Focusing on forcefully exhaling can totally change the breathing experience, as the inhalation will naturally follow.
Short Exploration: Grab Your Breath
Find a quiet place where you can lay on your back in a comfortable position, it is typically best to have your feet flat on the ground and your knees pointing upward to relieve back strain. Practice the calming breathing pattern of x:x:2x:0. A good starting place for most people is a 3s inhale, a 3s hold, a 6s exhale and repeating the pattern. You will likely need to adjust thispattern to feel the most comfortable and as you relax, you may naturally slip into slower breathing with longer counts.
Does this disciplined breathing come easy to you, or do you find yourself struggling? Do you relax more with practice or perhaps not? Did you naturally close your eyes? Did your mind wander? Did you have to adjust the count much? Did you have to breathe faster than a 3s count?
3 Kokoro Yoga: Maximize Your Human Potential and Develop the Spirit of a Warrior, Mark Divine, St. Martin’s Press, p.45
26

Exploring Touch
Bring yourself back to a ready state using Devine’s box breathing technique of x:x:x:x. You should have a good idea of the count you should use based on the first part of this exploration.
Did you find box breathing natural? Was the exhalation hold a new sensation?
There are many approaches to improving your breathing quality. A good guideline is that the first two thirds of a relaxed full breath should cause belly area expansion and the last third should expand the chest area, especially the lower ribs. The chest should ideally expand across its width (circumference), rather than raise up (be pulled up towards the head by muscles attaching to the neck or cervical spine). Increasing rib and thoracic spine mobility is key to improved breathing. The exhalation should proceed in the reverse order, chest first abdomen last. A complete exhalation requires contraction of the abdominal muscles, so your lower ribs taper towards your center. Think of pulling your navel (belly button) towards your spine to exhale forcefully. When you inhale your navel should move away from your spine. Note that you may need to work on mechanical body issues before you can comfortably breathe in this manner. Or you may have a physical limitation that will change what a good breath means for your body. Most importantly, the breath should be efficient and easy, with minimal side effects like muscle soreness or tension.
Breathing under stressful circumstances may be significantly altered to meet the needs of the situation. Martial artists often practice “breathing behind the shield” for combat situations. This breathing technique emphasizes pelvic ground, rib and diaphragm coordination, while keeping the abdominal cylinder rigid and protected.
Short Exploration: Monitor Breath Movement Quality
Return to your quiet place where you can lay on your back in a comfortable position, with feet flat and knees pointed upward. Place one hand on your navel and the other at the top of your chest. Take in several deep, natural breaths and monitor the movement in these two areas?
Which moves first, abdomen or chest? Which moves more? Are your exhalations passive or does your abdomen tighten?
Now try to breathe the first 2/3 of your breath into the abdominal area and the last 1/3 into the chest. Forcefully exhale by tightening your abdomen and reversing the process. If you focus on the exhale, the inhale often takes care of itself.
27

Exploring Touch
Was this pattern natural or even possible for you? Where was the difficulty?
It may not be possible to breathe in this way until you work on getting some areas to move better and develop an ability to stabilize your spine or core while breathing.
Now let us focus on how the abdomen and chest are moving in more detail. Place your hands on the sides of your abdomen, above your hip bones (iliac crests) so that your thumbs are on your back, the web of your palm is on your sides and your fingersare on the front of the abdomen. Take some deep breaths and monitor how your abdomen moves your hands.
Is there nice movement on the front, sides and back? Or maybe only the front? Is the left side different than the right side?
Repeat the exercise with your hands on the sides of your chest.
Ideally, our abdomen and chest should expand on all sides as we breathe, however restrictions can arise due to our structure and habits. You can work on areas that don’t move by placing a hand on them as a cue and working on relaxing the tight tissues under the hands while breathing. If this approach does not work after a few weeks of practice several times a day, you may want to work with a professional to release these tissues and improve your breathing.
The next progression if your tissues are moving well while laying is to perform the same tests while sitting, standing and moving.
The most important aspect of breath control is awareness, your greatest challenge will likely be to stay aware of how your breath is impacting your touch and movement. Coordinating your breath with your movement is often more important than maintaining a set pattern.
Moving the trunk into flexion (think fetal position or closing down) the body naturally wants to exhale as the abdomen and chest are compressed. Moving into extension (think standing tall or opening up) the body naturally wants to inhale. The body tends to want to hold the breath when bracing for an impact or dealing with the unknown or while being threatened or challenged in any way.4 Holding the breath helps stabilize the trunk through increased internal abdominal pressure (think "waiting to exhale").
4 Interestingly, what you consciously assess as safe may still be considered challenging by lower level functions in the nervous system. This situation often presents itself most obviously through unconsciously holding the breath.
28

Exploring Touch
Challenging muscular exertion is typically best accomplished through a forceful controlled exhale which further increases intra-abdominal pressures and helps stabilize the trunk. As the body is challenged more, it abandons the natural flexion-extension movement-breath relationship in favor of exhaling during exertion.
Short Exploration: Breath & Movement Coordination
Stand up and monitor your breath as you slowly raise your arms above your head.
Do you naturally breathe in or out as you raise your arms?
Now slowly lower your arms, monitoring your breath.
Do you naturally inhale or exhale as you lower your arms?
Try the same movement, but now as you raise your hands bend back just a bit at the hips. Then lower your arms as you hinge forward at the hips.
Do you inhale as you raise your hands and hinge the trunk back? Do you exhale as you lower your arms and hinge the trunk forward?
If you don’t naturally use your breath as described above, consciously try inhaling as you raise your arms and hinge the trunk back and exhaling as you lower the arms and hinge the trunk forward.
If you naturally breathe “correctly” with movement, you might purposely try breathing “incorrectly” to see how unnatural it feels.
Does the suggested pattern make movement easier?
If you are working with a human or animal partner, remember to monitor their breathing as you begin the session and occasionally monitor breathing throughout the session. Observing how your partner breathes can provide many clues about thecurrent state of their nervous system. Chest breathing is a sign of a guarded nervous system (possible biological, psychological or social trauma) and typically opens the door to neck and shoulder issues due to dysfunctional overuse of these muscles when
29

Exploring Touch
breathing. Chest breathing can almost be considered a form of breath holding, intended to help protect the abdomen against a threat.
Besides explicit education, you can help this situation by setting an example. Receivers, even animals, will often respond well toa long, audible calming breath with an x:0:4x:0 pattern. Human receivers can be coached to breathe in a manner that will help them release tension, improve their oxygenation and promote relaxation. Later explorations will help you with these skills, but again, awareness and recognition of the receiver's breathing (and your own) can often be the key to success.
So how might we integrate this information? First, I suggest incorporating conscious breathing sessions at the beginning and end of your day. When I wake up, I like to do a session of box breathing to start the day. In the evening, in bed just before sleeping, I typically do a more sedating breathing session typically with a x:x:4x:0 pattern.
I like to use a calming breathing pattern as part of my grounding process before a solo self-care session, maybe x:0:2x:0. If I'm doing a solo session of somatic movement, I'll periodically focus on breathing and insure my movement and breathing are working together as described above. This breathing check-in is especially important for new or improvised moves as the body likes to hold the breath in the face of novelty, challenge or perceived threat. These solo sessions typically result in a breathing pattern closer to x:0:3-4x:0 as my body relaxes further into more stationary poses or patterns. I like to come out of the session with Wim Hof style breathing5 which is approximately 30 deep breaths with maybe a 2:0:2:0 pattern, followed by an "as long as comfortable" breath hold on the last exhale, followed by a 3:10:3:0 breathing cycle before repeating the cycle or resuming normal breathing. This cycle is great for oxygenation of the tissues and preparing for the next activity.
It is not uncommon that I will work with a client for an hour on exploring breath, but such a session is beyond the scope of our current efforts. More applicable here is that you might employ any of the following simple techniques to help improve perceived quality of touch:
1. Ask your partner to take a deep breath through the nose to evoke change and/or observe breathing
2. Increase touch pressure on exhale (partner and/or you)
5 The Way of the Iceman, Wim Hof & Koen De Jong, Dragondoor Publishing, 2017, ebook location 866
30
Exploring Touch
3. Decrease touch pressure on inhale (partner and/or you)
4. Synchronize your breathing with your partner, leading or following
If you find yourself lacking energy or focus during a session, adjust your breathing appropriately. You may do a couple of 5:0:10:0 breathes before 4 second box breathing, depending on your fitness, current exertion level and other factors. The goal is to pursue breathing that brings you back to this moment with focus, clarity and an appropriate amount of energy. The more you practice these skills on your own, the more naturally they will emerge when you really need them.
There can be some interesting connections between breathing, the jaw, the tongue and other muscles controlled by cranial nerves which tend to carry tension (especially the upper trapezius and sternocleidomastoid). The following exploration investigates how we might use breathing, tongue and jaw position to reduce overall tension.
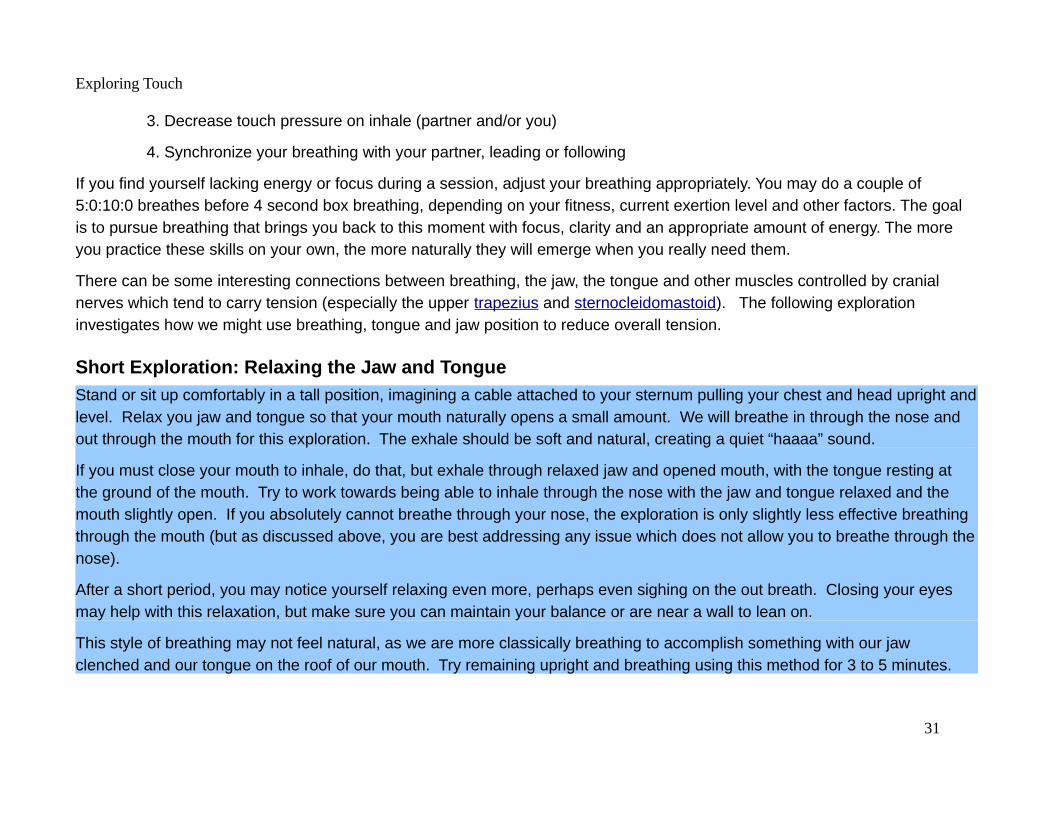
Short Exploration: Relaxing the Jaw and Tongue
Stand or sit up comfortably in a tall position, imagining a cable attached to your sternum pulling your chest and head upright andlevel. Relax you jaw and tongue so that your mouth naturally opens a small amount. We will breathe in through the nose and out through the mouth for this exploration. The exhale should be soft and natural, creating a quiet “haaaa” sound.
If you must close your mouth to inhale, do that, but exhale through relaxed jaw and opened mouth, with the tongue resting at the ground of the mouth. Try to work towards being able to inhale through the nose with the jaw and tongue relaxed and the mouth slightly open. If you absolutely cannot breathe through your nose, the exploration is only slightly less effective breathing through the mouth (but as discussed above, you are best addressing any issue which does not allow you to breathe through thenose).
After a short period, you may notice yourself relaxing even more, perhaps even sighing on the out breath. Closing your eyes may help with this relaxation, but make sure you can maintain your balance or are near a wall to lean on.
This style of breathing may not feel natural, as we are more classically breathing to accomplish something with our jaw clenched and our tongue on the roof of our mouth. Try remaining upright and breathing using this method for 3 to 5 minutes.
31

Exploring Touch
Do you notice an overall reduction in tension? Are your shoulder muscles less tense? Can you keep this relaxed state breathing through the nose?
We performed this exploration upright to use the forces of gravity to help us relax. Some people can do this exercise laying down flat or on an incline, while others will feel their breathing becomes restricted in these positions. Experiment to see if this exploration is more effective upright or laying down.
Generally, the tongue should be positioned on the roof of the mouth behind the teeth during exertions (find this position by noting where your tongue is located during swallowing). During exertion, the jaw and other upper body muscles also hold somedegree of tension. However, relaxing the jaw and tongue while breathing through the nose, can have a dramatic impact on the overall ability of the body to relax.
Breathing is our most critical movement and making it more efficient can have a large impact on our lives. Often quoted numbers for average breathing rates for a healthy resting adult are 12 – 20 breaths per minute, which results in about an average of 25,000 breaths per day – that can be a lot of wear and tear if you are not doing it well. The table below compares different breathing patterns to emphasize how longer breathing cycles can reduce the overall number of breaths and fatigue of the breathing mechanism.
Time in Seconds Breaths Inhale Inhale Hold Exhale Exhale Hold Total Per Minute Per Hour Per Day Notes
2.5 0.0 2.5 0.0 5.0 12.0 720 17280 Low Average Resting Adult1.5 0.0 1.5 0.0 3.0 20.0 1200 28800 High Average Resting Adult4.0 4.0 4.0 4.0 16.0 3.8 225 5400 4s Box Breathing5.0 0.0 10.0 0.0 15.0 4.0 240 5760 5-0-10-0 Pattern4.0 0.0 4.0 0.0 8.0 7.5 450 10800 4-0-4-0 Pattern
Putting aside the definition of “healthy resting adult”6, it is interesting to note the impacts and benefits of slower breathing patterns which promote full range of motion for respiratory muscles, increase gas exchange times in the lungs and calm the nervous system. Your breathing should be so silent that not even you hear it (unless you are trying to help someone to change their breathing pattern or exerting yourself).
6 It can be important to recognize we may be a “sick” society compared to our ancestors and the current “average” may not necessarily be “healthy”.
32
Exploring Touch
Our modern society tends to breathe too often and too much, which can impact the balance of carbon dioxide or CO2. The level of CO2 in the blood determines the efficiency of transferring O2 from the blood into the tissues. If there is too little CO2, caused by over breathing, this transfer becomes less efficient. A simple remedy is to exclusively breathe through the nose, possibly including taping your mouth shut at night as you sleep, as proposed by Patrick McKeown in his book, The Oxygen Advantage:The simple, scientifically proven breathing techniques for a healthier, slimmer, faster and fitter you. 7 The topics covered in this excellent book are more advanced than warranted in this short section and can help take your breathing to the next level.
If you can only focus on one thing to improve the quality of your touch and life, put your time into breathing.
Touch Tip 36: Breath is your best investment in improving touch and movement quality.
Touch Tip 37: Breathe through the nose to calm your nervous system, through the mouth to stimulate it.
Touch Tip 38: Breathing consists of four actions: inhaling, holding the inhale, exhaling and holding the exhale.
Touch Tip 39: Calming breathing patterns emphasize the exhalation.
Touch Tip 40: Try to recognize when you are unconsciously holding your breath due to stress!
Touch Tip 41: We can improve breathing inefficiencies through awareness, practice and patience.
7 “I can’t breathe through my nose, it is always stuffed up!” - You need to get this book, as there is a protocol to adapt back to being a nasal breather. Noses are for breathing and mouths are for eating, drinking and talking. As always, a consultation with your medical provider is a great place to start with any such changes, especially if you have been diagnosed with asthma, sleep apnea, etc.
33

Exploring Touch
Touch Tip 42: The first 2/3 of a relaxed inhalation should have abdominal expansion and the last 1/3 chest expansion. The abdomen and chest should ideally expand like a cylinder in all directions together.
Touch Tip 43: Breath and movement are intertwined. When unloaded, we naturally inhale as we extend or open up our body. We naturally exhale as we flex or close our body down closer to the fetal position.
Touch Tip 44: Loading the body with extra stresses, like weight, might change your best breathing pattern.
Touch Tip 45: You can use your breathing pattern to help others around you to breathe better.
Touch Tip: 46 You can also use your breathing pattern to “time” activities, like stretching, by counting breath cycles.
Touch Tip 47: Relaxing your jaw and tongue, while breathing through the nose, can reduce overall body tension.
Touch Tip 48: Avoid mouth breathing, focus on breathing through the nose for all but the most strenuous activities.
Human Movement Basics
While there are many different ways to look at human movement, most systems define basic or primitive movements that can stand alone, yet can be combined to perform more complex movements. Since movement can be such an integral aspect of physical touch, it is worth pursuing movement development.
34

Exploring Touch
The heart beat is the most fundamental human movement, however it remains out of voluntary control for all but the most skilled. The steady contraction and relaxation of the heart serves to move nutrients and wastes throughout the multiple systemskeeping us alive. The heart starts beating in the fetus long before the lungs are ready to process air.
The most important first move you made as an infant was an inhalation, followed by an exhalation, the cycle of which will repeatuntil your last exhalation. It is difficult to think of a movement which is more primitive or essential than breathing, but there is actually another movement we need to include as part of breathing, which is relaxation.
If we were to just inhale, all we have accomplished is holding our breath. We must also be capable of relaxing the inhalation muscles, to begin the exhalation process. Actually, relaxation must precede the first successful inhalation, since a simultaneous inhalation and exhalation would result in an inability to breathe. So in the first movements of a newborn we can immediately extract two key points: relax and breathe.
At this point, it is worth exploring how human movement arises via the dynamic balancing of tensions around movable tissues, such as joints. Our nervous systems control tension by contracting and relaxing muscle tissues. If all our muscles were fully contracted we would be frozen in a single position. If all our muscles were relaxed we would collapse under the force of gravity. Tension control by the nervous system is the precursor to all effective movement. Additionally, generating tension requires energy, so the most efficient movements use just the minimal amount of tension to overcome resistance. Excess tension unnecessarily uses additional energy, so a primary goal of efficiency is to relax as much as possible when moving to minimize tension. Infants become experts at both relaxation and energy efficiency, with some movements being reflexively controlled in the nervous system.
Newborns exhibit interesting movement reflexes at birth, which may provide clues into both movement and touch. Among the most interesting is the startle or Moro reflex. When stimulated by a loud noise, a rapid temperature change or significant head movement an infant will essentially perform a hug maneuver, complete with grasping hands, followed by a loud cry. Infants will also automatically grip when the palms of the hands are stimulated (palmar grasp reflex). While both these reflexes have a verypractical use in the wild, clinging to a care giver, they possibly point to the social hug and handshake being rooted in infant reflexes and movements. Our hands and how we use them are a large part of what defines us as human.
35

Exploring Touch
Another reflex movement is the twist or rotation, fundamental to breastfeeding. The rooting reflex occurs when the cheek or mouth of an infant is rubbed, they automatically rotate their head in order to place the object in their mouth. Once in the infant’smouth, the sucking reflex engages to support breastfeeding. Sucking is an incredibly complex movement that requires coordinating breathing, jaw movements, mouth movements, tongue movements and swallowing. When actually breastfeeding,the ingestion of breast milk then stimulates the autonomic digestive and elimination processes to proceed, through a series of complex movements that turn breast milk into nutrition, energy and wastes.
We begin to see another basic movement pattern in the infant stepping or walking reflex. Although not developed enough to actually walk, when the infant’s feet touch a surface they will step one foot in front of another, imitating the lower body motor pattern for walking. Infants will also explore the squatting pattern while laying on their backs. This common posture is the inspiration for the yoga pose often referred to as “happy baby” and hints at the natural fascination we have with our feet. Squatting and walking are complicated movement patterns that require much more skill than an infant possesses, but these early practice sessions while on their backs identify how rooted these movements are in the human experience.
Paradoxically, the next “movement” in our development is resisting movement. Stabilization is generating tension in a way that we do not move against a force, such as gravity, by just meeting it. Sometimes the key to moving well is not moving certain areas (stabilizing) while other areas move from this stable base. When you are quietly standing upright you are stabilizing your body against the forces of gravity in order to remain upright. Stabilization is the key to transferring forces throughout the body and interacting with other objects. It allows us to transfer forces from big muscles in the legs to other body parts, such as the hands. An infant must be able to stabilize their body movements and eye movements in order to be able to see well. Stabilization is a key capability required for most all movements from something as simple as lifting the head to as complex as carrying a toy.
Eye movement, while not necessary, can be a key motivator for moving through the rest of the development sequence. We tend to go where our vision is focused. The drive to get to something, often for the sole purpose of grabbing it and putting it in their mouth, is a key motivator for movement through the rest of the infant movement development process.
The above discussion should help cement a few ideas regarding movement and touch that babies can teach us:
36

Exploring Touch
1. Relaxing and breathing are fundamental to all movement, we must master them to develop further.
2. Babies have an incredible repertoire of movement by the time they are two years old. Hugging, gripping, rocking, rolling, pushing, pulling, rotating and most everything else discussed above are basic baby moves mastered through the developmental process. How many of the movements above do you use daily? How many could you do better? Regularly practicing the movements which you are not currently doing on a daily basis is a great way to stay young.
3. Babies are very flexible and mobile right out of the womb, allowing them to exercise a full range of motion (ROM) for theirjoints. It is important to work on ROM to be capable of correct and full movement throughout a lifetime. Reduced ROM is correlated with poor movement and injury.
4. Babies need to develop stability to move well. Stability is the base upon which all good movement rests. Eliminating incorrect or inefficient movement through proper stabilization (especially the spine) is a key to good movement and quality touch. Stability needs to be developed in conjunction with ROM, one without the other is a disaster.
5. Babies learn movements through both natural reflexes and imitating others. The largest baby motivators for improving movement are food, toys, curiosity and social activity. Keep yourself motivated!
37
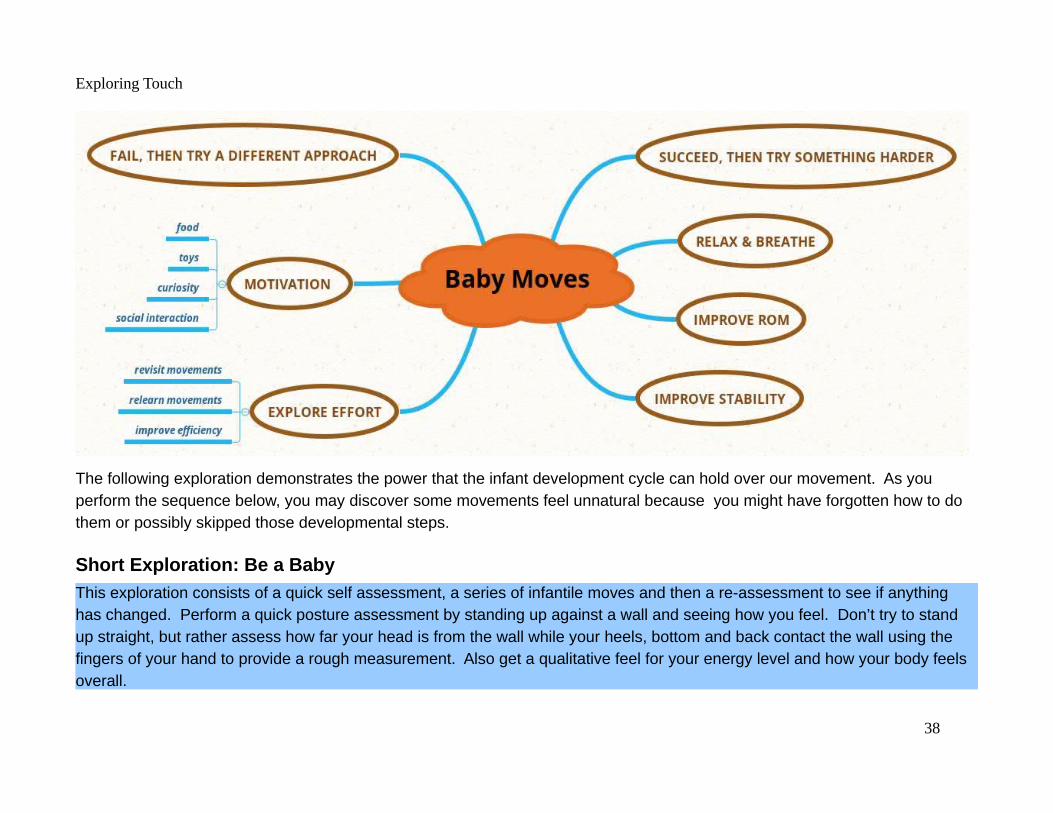
Exploring Touch
The following exploration demonstrates the power that the infant development cycle can hold over our movement. As you perform the sequence below, you may discover some movements feel unnatural because you might have forgotten how to do them or possibly skipped those developmental steps.
Short Exploration: Be a Baby
This exploration consists of a quick self assessment, a series of infantile moves and then a re-assessment to see if anything has changed. Perform a quick posture assessment by standing up against a wall and seeing how you feel. Don’t try to stand up straight, but rather assess how far your head is from the wall while your heels, bottom and back contact the wall using the fingers of your hand to provide a rough measurement. Also get a qualitative feel for your energy level and how your body feels overall.
38
Exploring Touch
Now, we are going to get on the ground, starting on our backs, and go through some of the movements that a baby will do as part of their development. First, relax into the ground and take three good deep breaths while you slowly and easily rotate your head from side-to-side with minimal effort.
Next, roll from your back to your stomach and back on one side and then the other. Try this several times, but try to do it slowerand easier each time. You might choose to try just using your legs and/or arms without pressing against the ground to roll –- use the weight of your limb(s) to pull you over. Remember to use your eyes to help your body go where you want it to go. Provide a stable base to roll over by pushing the arm and leg, on the side you will be rolling, away from each other before rolling.
Next, roll onto your stomach and curl up so your knees are under you and your elbows are on the ground. Now with minimal effort, slowly rock forward and backward on your elbows and knees. Rock about 5 times and then try taking your hips in a big clockwise circle 5 times and then a counter clockwise circle 5 times.
Now we will get onto our hands and knees to crawl forward and backwards several times (you can do all this crawling in place ifyou do not have enough space). You may want to use your fists if your wrists give you problems when supporting your upper body using your hands. Notice if you are a reciprocal crawler (opposite side hand and knee move together) or a same-side crawler (same side hand and knee move together). Try this movement for about 5 crawls forward and 5 crawls back. Next try crawling side-to-side in both directions for about 5 cycles.
Next, get those knees off the ground and begin with rocking forward and back in the bear crawl position about 5 times. Can youmove your bottom in a clockwise and then counter-clockwise circle from this position. Try lifting the opposite side hand and footwhile maintaining your balance, then repeat with the other hand and foot.
Get up and slowly walk around the room a bit, exaggerating your arm and hip movements like a runway model.
Finally, check yourself against the wall again. Did this little session change the position of your head and how you feel overall? That’s the power of being a baby again.
39
Exploring Touch
Regardless of your current condition, there is no reason keeping you from moving. Movement can be done while you are bed ridden, in a wheelchair or even stuck on an airplane. Get out there, become aware and move!
Touch Tip 49: Follow these movement cues from infants: 1. Relax and Breathe, 2. Explore and improve your movement repertoire, 3. Work on your ROM, 4. Train stability, 5. Keep yourself motivated with food, toys, curiosity and social activity.
Touch Tip 50: We move differently every day, so stay within the limits of that day. Avoid pain, but slight discomfort is OK.
Touch Tip 51: Regressing to our most primitive movements can help our ability to move. Train like a baby!
Cultivating Improved Body Mechanics
Proper body mechanics for touch is the application of safe, efficient movement through the use of sound mechanical and biological principles. Body mechanics must be cultivated both through understanding principles and applying them. The practice of good body mechanics requires both external physical work and internal mental work, an opportunity to apply control over our thoughts and visualizations. The primary benefits of good body mechanics, in addition to improving quality of touch, are to make all of life easier and less prone to injury.
Since this topic keeps us from injury, it is important enough that we will begin all the way back with a simple verse from the Tao Te Ching:
The unmoved is the source of all movement.8
Those are some pretty simple words, but what do they mean?
8 Lao Tzu, Tao Te Ching, Verse 26, translation by Stephen Bachelor, Harper Collins, 1988
40

Exploring Touch
Your contact with something that does not move, like the earth or the ground of a building, is the ultimate source of your movement. Any movement. Lean your hands against the wall and push away, performing a wall push up. You should have been able to move your body. Now step away so your arms can push only into the air in front of you. No matter how hard you try you cannot move yourself with this motion. The unmoved wall was the source of your movement, but the moving air will not allow you to move yourself to any significant degree.
Physical touch requires movement, so it is important that we consider our connection with the unmoved further.
NOTE: If you can’t breathe well, you can’t move well. Please insure you are comfortable with the breathing explorations beforecontinuing with these explorations. Most importantly, monitor yourself for holding your breath during any movement explorationand breathe through the nose in the best manner possible for your condition and the exploration. It is normal to hold our breath while learning new, challenging movements, but movement quality will be greatly improved when we exercise control of our breath, including eliminating over breathing. These explorations should all be done at a pace that allows easy breathing through the nose.
Footwear, Or Not
My goal is not to tell you how or if you should cover your feet, but rather to get you thinking about the importance of the connection between your body and the earth when it comes to movement. Full disclaimer, I am a barefoot runner, but that route is not for everybody in our modern society. While barefoot is our most natural state, most of us developed in a society of shoes (foot coffins?), which has negatively impacted the function and strength of our feet. It took me approximately 10 years to transition to being barefoot on most natural surfaces in gaits ranging from a stroll to a sprint. Developing the necessary strength, sensing and conditioning for extensive barefoot excursions takes a long time to transition for those of us who developed wearing shoes. That being said, our feet evolved specifically to feel the earth and support us in our movement. Going barefoot has eliminated twisted ankles, which previously were a regular occurrence, plantar fasciitis pain in my feet whichpreviously required injections and has helped extend my joint life through improved gait form and reduced strain.
I still wear shoes where warranted by activity (backpacking, construction, etc.) and society (work, weddings, etc.). I find my newly awakened feet are best served by minimal footwear with:
41

Exploring Touch
• thin, flat soles that allow me to feel the surface beneath me
• great ventilation (think sandals)
• wide toe boxes to allow my much more muscular feet to fit and spread out
Characteristics I now reject in my footwear include:
• raised heels
• narrow toe boxes
• cushioning
• soles that extend beyond the foot outline
• non-breathable uppers
• tight uppers that restrict movement and circulation.
Remember, it took time for me to adapt to these preferences but I now find myself moving better because my feet are stronger, they have better circulation, they sense the ground better and adapt to what is underneath them. If any of these benefits sound appealing, there are many resources available to help with any level of desired transition. The best way to begin is short periods of being barefoot in safe environments, such as when exploring touch.
However, barefoot is NOT for everyone. If your feet have existing risk factors such as poor circulation or reduced sensation (peripheral neuropathy, etc.), consult with your medical professional to determine how best to proceed. All the following explorations can be done with shoes.
Short Exploration: Touching Earth, Finding Neutral
Although we could progress through the infant development sequence (rolling, rocking, creeping, crawling, etc.) to reinforce the importance of the “unmoved”, this exploration will be done standing. This exploration can be done anywhere but is best done barefoot, touching the earth (grass, sand, etc.). Assume a comfortable shoulder width stance. It is important to have your feet
42

Exploring Touch
facing straight forward as shown in the crude drawings below. If your feet point in or out so much that you cannot achieve this position, you can continue with this exploration, but you should considering working with a professional to correct this situation before you experience problems.
Feel how you are balanced over your feet and what parts of the feet are contacting the ground. Insure you have a slight bend to the knees, that your lower abdominal muscles are engaged and you are using your bottom (tighten your butt) to help hold youup. Envision a string attached at your sternum pulling you taller. Visualize your shoulder blades pulling together and sinking towards your back pockets.
Once you feel centered, begin to slowly, and with very minimal movement, shift your weight in a small figure eight as shown in the diagram below. Shift just enough weight that you notice it, keeping the movements as small as possible. It may help to just visualize the movement without actually moving.
Play with both directions. One direction pushes from toe to heel between opposite feet and the other from heel to toe. Don’t get too caught up with this exact movement, but concentrate more on your connection to the ground. This connection is the basis of all movement.
Now work on keeping a quiet, upright upper body and limit the movement to your hips, knees, ankles and feet. Imagine a stringat your sternum or head pulling you upward into your tallest, most upright position. You might feel your tail bone tuck under you
43
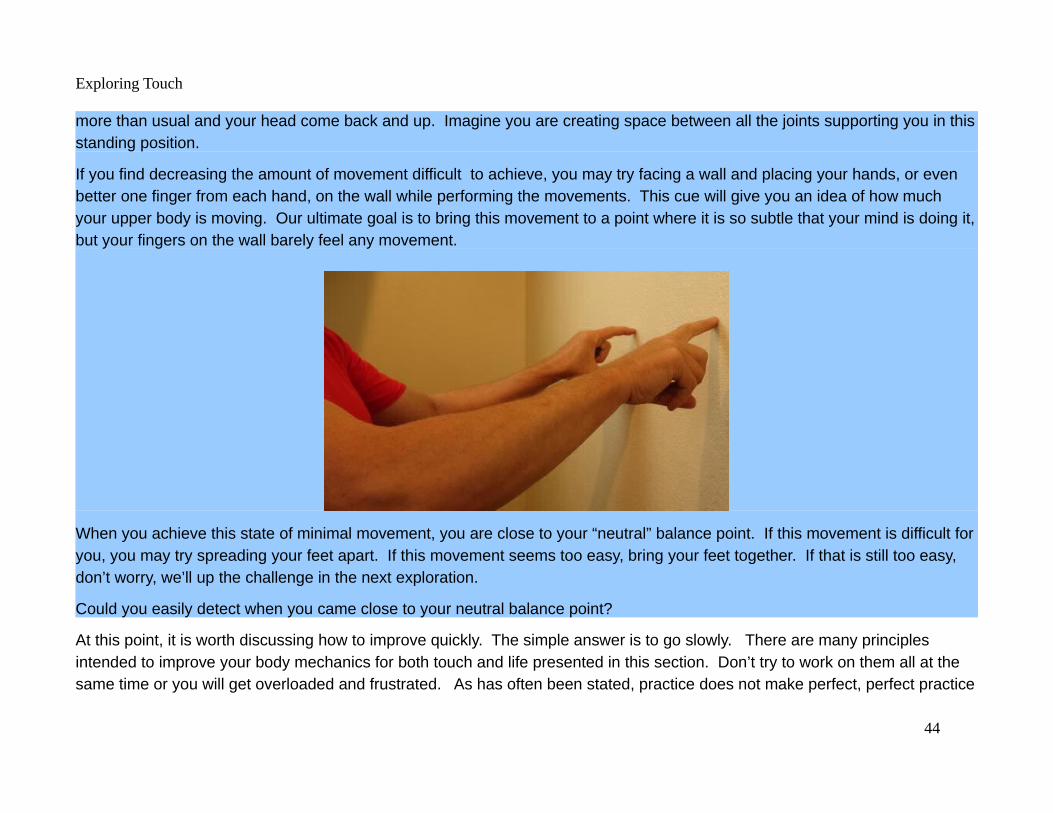
Exploring Touch
more than usual and your head come back and up. Imagine you are creating space between all the joints supporting you in thisstanding position.
If you find decreasing the amount of movement difficult to achieve, you may try facing a wall and placing your hands, or even better one finger from each hand, on the wall while performing the movements. This cue will give you an idea of how much your upper body is moving. Our ultimate goal is to bring this movement to a point where it is so subtle that your mind is doing it,but your fingers on the wall barely feel any movement.
When you achieve this state of minimal movement, you are close to your “neutral” balance point. If this movement is difficult foryou, you may try spreading your feet apart. If this movement seems too easy, bring your feet together. If that is still too easy, don’t worry, we’ll up the challenge in the next exploration.
Could you easily detect when you came close to your neutral balance point?
At this point, it is worth discussing how to improve quickly. The simple answer is to go slowly. There are many principles intended to improve your body mechanics for both touch and life presented in this section. Don’t try to work on them all at the same time or you will get overloaded and frustrated. As has often been stated, practice does not make perfect, perfect practice
44

Exploring Touch
makes perfect. Select a single principle to work on and concentrate on improving it until it becomes second nature. Reference the skill development diagram in a later section, as we want to become unconsciously competent at applying the skill. Perhaps the only overlapping skill to be practiced at all times is breath awareness.
The explorations in this section follow an order that might help you screen where you most need help. The exploration which gave you the most difficulty is likely where you should spend time. However, there is also a logic to the order of presentation and this order does represent a loose hierarchy of skills. Ultimately, you decide how and when to practice and when and if you revisit each of the presented principles.
Short Exploration: Sensing & Movement
This exploration is very similar to the previous one, except we will not try to control our movement, only sense it and name it.
Stand with your feet touching together in a safe location and carefully monitor how your body is connecting through the earth to keep you upright. If you pay very close attention, you will likely notice that the weight in your feet shifts left and right, forward and backward. Consciously name the location of greatest pressure or weight, such as left-back or right-forward.
45
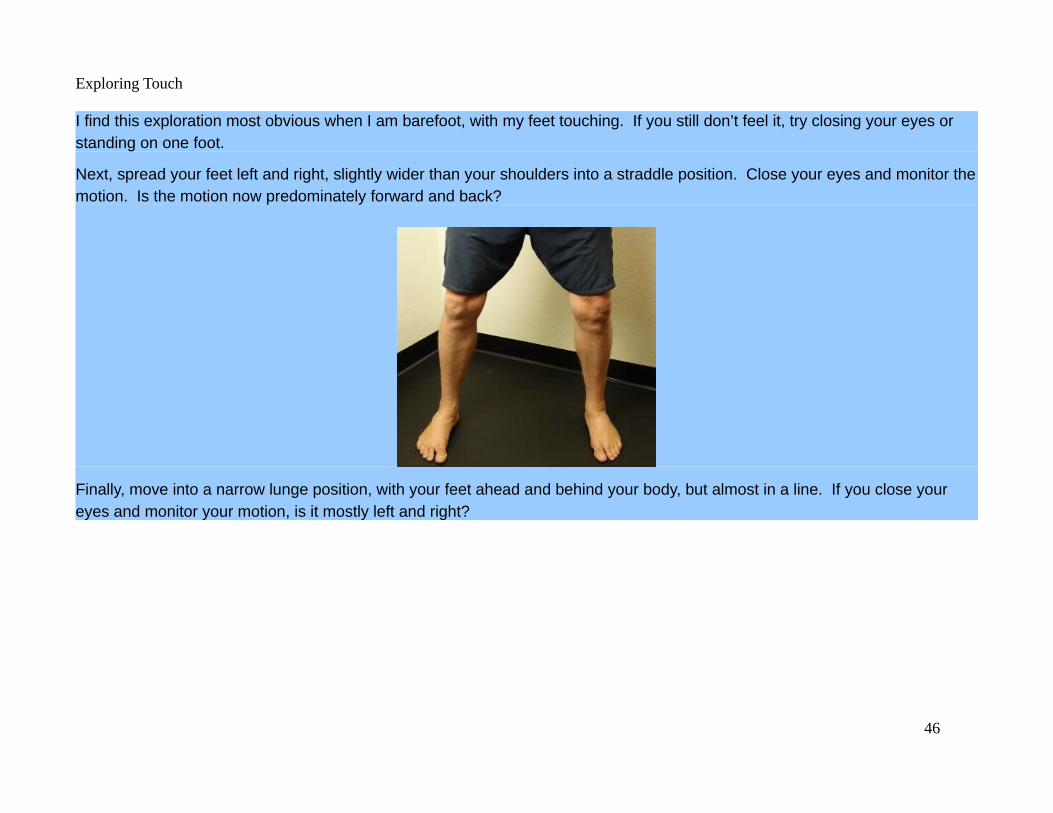
Exploring Touch
I find this exploration most obvious when I am barefoot, with my feet touching. If you still don’t feel it, try closing your eyes or standing on one foot.
Next, spread your feet left and right, slightly wider than your shoulders into a straddle position. Close your eyes and monitor themotion. Is the motion now predominately forward and back?
Finally, move into a narrow lunge position, with your feet ahead and behind your body, but almost in a line. If you close your eyes and monitor your motion, is it mostly left and right?
46
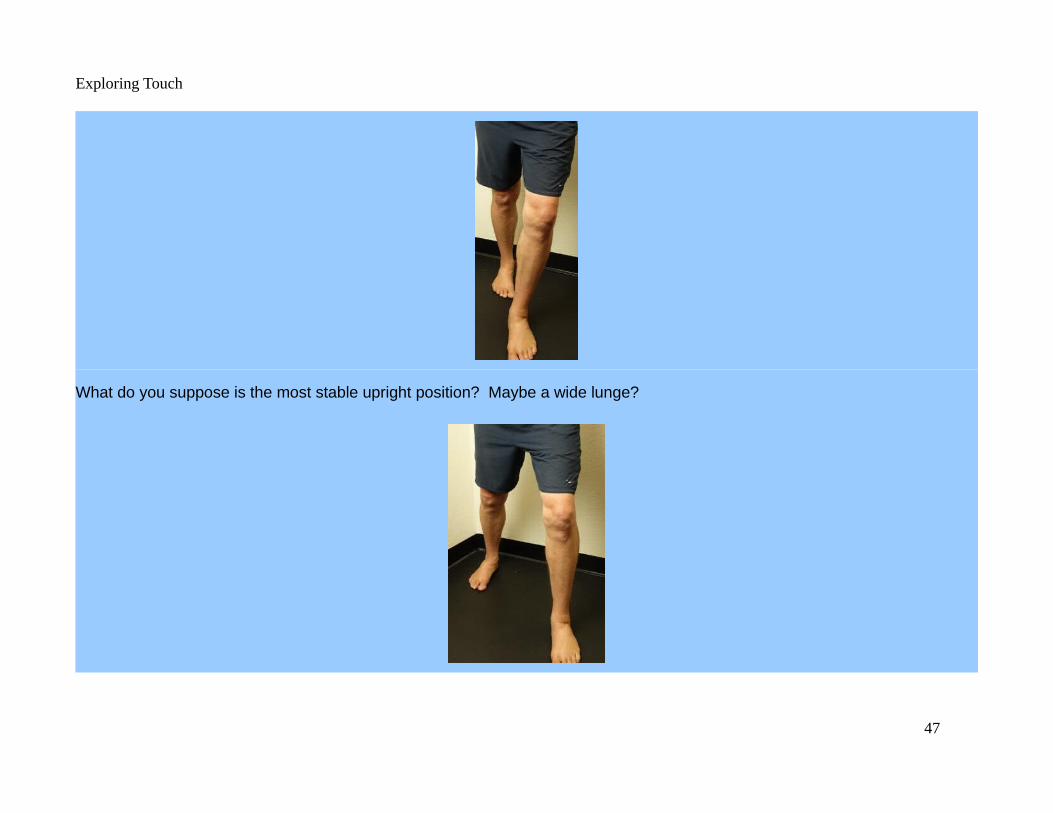
Exploring Touch
What do you suppose is the most stable upright position? Maybe a wide lunge?
47

Exploring Touch
Most athletic ready positions incorporate some component of the lunge pattern. Consider the ready position of a boxer, wrestleror other combatant – most are in a wider lunge position because of the stability it provides and efficient movement in many different directions.
Short Exploration: Lunge with Weight Shift Forward and Backward
Assume the standing wide lunge position, imagining your feet at opposite corners of a rectangle, with your torso and head upright. Your feet should be about shoulder width apart and separated front to back just enough that you can comfortably shift your weight front to back while bending your knees without lifting your feet off the ground.
Hold your hands together in front of you at about waist height, with your elbows slightly bent, but locked. Remember to keep your torso and head upright, while sinking your elbows and shoulder blades down towards the ground. As you shift your weightforward and backwards, what do your hands do? They should be moving with your body. This technique delivers a strong movement into your hands through the movement of your body. It is very efficient and effective for delivering strong touch.
Now exchange which leg is forward and which leg is back. Does one position feel more comfortable or natural than another?
48
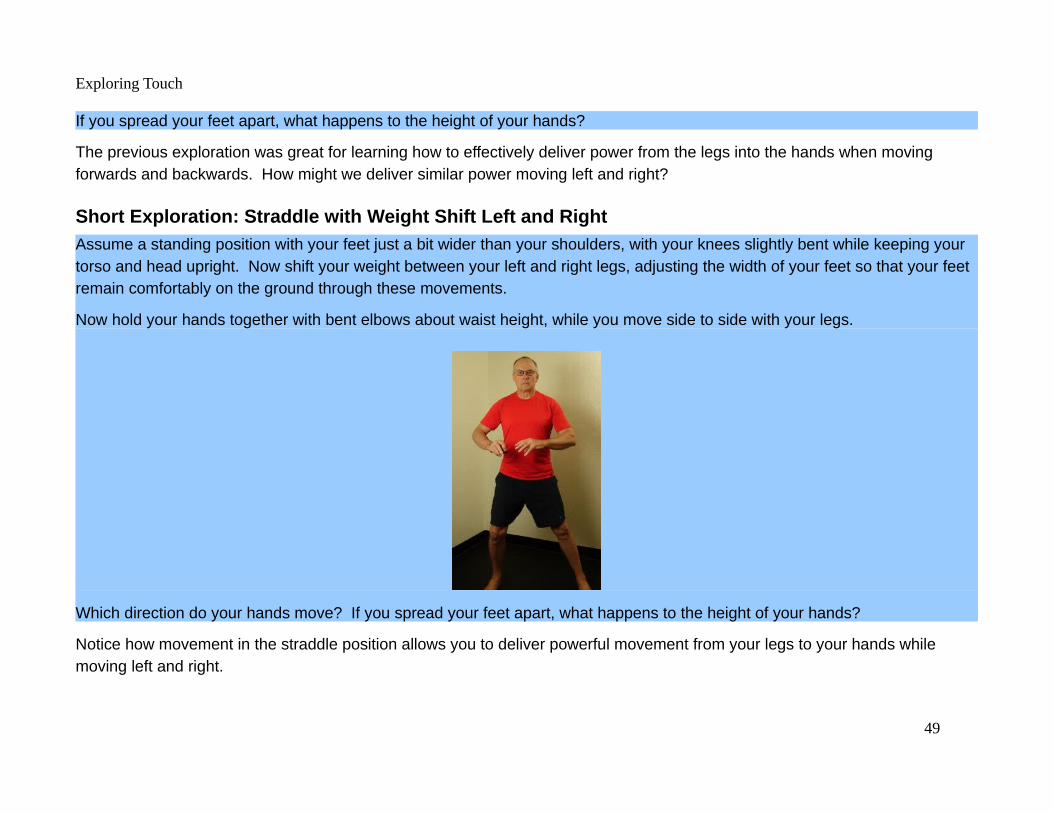
Exploring Touch
If you spread your feet apart, what happens to the height of your hands?
The previous exploration was great for learning how to effectively deliver power from the legs into the hands when moving forwards and backwards. How might we deliver similar power moving left and right?
Short Exploration: Straddle with Weight Shift Left and Right
Assume a standing position with your feet just a bit wider than your shoulders, with your knees slightly bent while keeping your torso and head upright. Now shift your weight between your left and right legs, adjusting the width of your feet so that your feet remain comfortably on the ground through these movements.
Now hold your hands together with bent elbows about waist height, while you move side to side with your legs.
Which direction do your hands move? If you spread your feet apart, what happens to the height of your hands?
Notice how movement in the straddle position allows you to deliver powerful movement from your legs to your hands while moving left and right.
49

Exploring Touch
While we concentrated on the lunge (forward-back) and straddle (left-right) positions, there are many variations on the theme that allow us to deliver force in virtually any direction. You can think of having one stable leg and the ability to move the other leg around that stable leg to cover movement over 180 degrees, or half a circle. Switching legs allows us to cover the full 360 degrees of a circle. Selecting appropriate leg positions is the key to great body mechanics.
Our legs are much stronger than our arms and are designed to move much better than our torsos. Injuries often happen when we try to use our backs to move in ways they weren’t intended to move, or when we try to use our arm strength in situations thatare better suited to our legs. Remember to stabilize backs and arms while the legs do their thing!
Short Exploration: Elasticity and Bounce
Our bodies are designed to move, while taking advantage of elasticity and bounce. Energy is stored in our tissues in a way that we can reclaim much of the energy put into a movement if we pay attention to the rhythm of our movement.
Slowly come up onto your toes, balance against a wall if it is helpful, and without letting your heels touch the ground slowly raise yourself up and lower yourself down five times. How did that feel?
Shake out your legs and now, do the same movement rapidly five times (but you’ll probably do it more times because it is both easy and fun). Which of the two movements was easier?
The faster movement was easier because your muscles were working less due to the elasticity stored and returned by your tissues. However, you don’t need to move fast to take advantage of elasticity and bounce.
Remember our lunges and straddles above? Now try them while rocking on the foot, letting heels and toes come off the groundas you shift your weight. Can you sense that this movement is now more efficient?
The foot, ankle, knee and hip are all extraordinary in their ability to store and return energy. You can explore elasticity and bounce further while ascending or descending a set of stairs. Try going up and down just a few steps in super slow motion and you will experience the loss of elasticity, but be sure and use a handrail as you might be a bit less stable than usual. Now try bounding up the stairs at your normal pace and you will feel how efficient your body is at storing and returning energy.
50
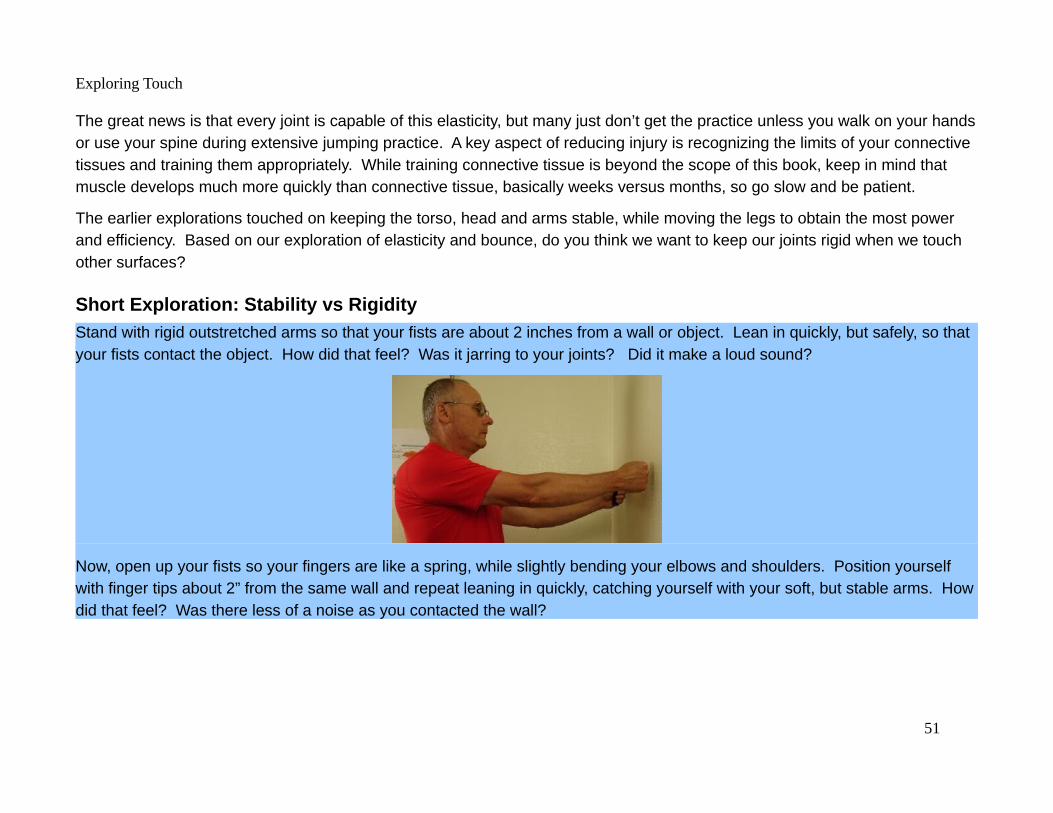
Exploring Touch
The great news is that every joint is capable of this elasticity, but many just don’t get the practice unless you walk on your handsor use your spine during extensive jumping practice. A key aspect of reducing injury is recognizing the limits of your connective tissues and training them appropriately. While training connective tissue is beyond the scope of this book, keep in mind that muscle develops much more quickly than connective tissue, basically weeks versus months, so go slow and be patient.
The earlier explorations touched on keeping the torso, head and arms stable, while moving the legs to obtain the most power and efficiency. Based on our exploration of elasticity and bounce, do you think we want to keep our joints rigid when we touch other surfaces?
Short Exploration: Stability vs Rigidity
Stand with rigid outstretched arms so that your fists are about 2 inches from a wall or object. Lean in quickly, but safely, so that your fists contact the object. How did that feel? Was it jarring to your joints? Did it make a loud sound?
Now, open up your fists so your fingers are like a spring, while slightly bending your elbows and shoulders. Position yourself with finger tips about 2” from the same wall and repeat leaning in quickly, catching yourself with your soft, but stable arms. Howdid that feel? Was there less of a noise as you contacted the wall?
51

Exploring Touch
A lesson often performed with new runners to demonstrate the superiority of a toe strike over a heel strike in preventing injury isrunning in place barefoot. If you run in place barefoot, do you land on your toes or your heels? CAREFULLY, on a padded surface like carpeting, try running in place while landing on your heels. If you have a healthy nervous system that loves you, your body will outright prevent you from even trying to run in place barefoot on your heels. Your body knows heels are rigid, while the forefoot is elastic and bouncy.
Ironically, the most touch sensitive parts of our bodies are also most vulnerable to injury. The capabilities of our hands, especially our thumbs, set us apart as a species. While our hands can tolerate much abuse, there is much to lose if our hands should get injured. There are also no better instruments to use than our hands in the potentially risky business of touching something. “Hands move last” is a common principle employed in disciplines from movement to martial arts to body work for many different reasons.
1. Movement begins in the mind, you need to know what you want to do before doing it or you will be making mistakes and possibly getting injured. Start by visualizing a movement.
2. Effective movement should begin with larger, more central muscles moving before smaller, more peripheral muscles move. A punch or a throw begins in the large hip and trunk muscles, radiating down into the legs before reaching up to the shoulder and arm, so the last thing to start moving is the fist or hand with the ball.
52
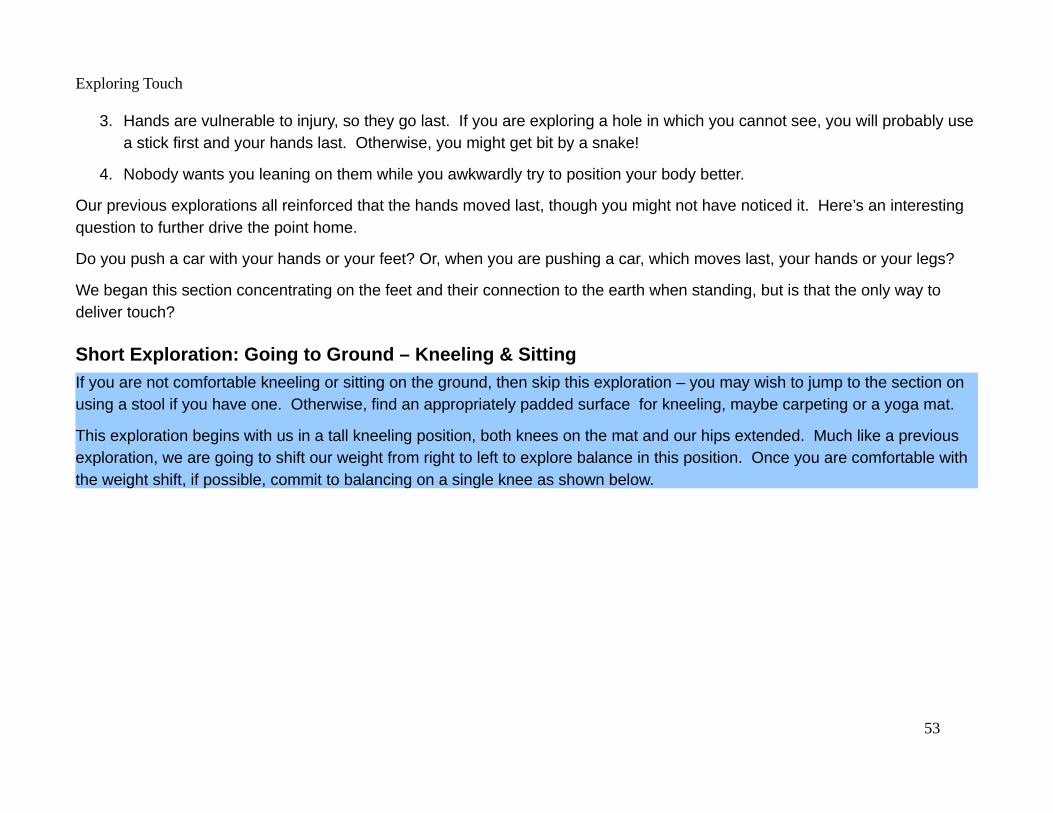
Exploring Touch
3. Hands are vulnerable to injury, so they go last. If you are exploring a hole in which you cannot see, you will probably usea stick first and your hands last. Otherwise, you might get bit by a snake!
4. Nobody wants you leaning on them while you awkwardly try to position your body better.
Our previous explorations all reinforced that the hands moved last, though you might not have noticed it. Here’s an interesting question to further drive the point home.
Do you push a car with your hands or your feet? Or, when you are pushing a car, which moves last, your hands or your legs?
We began this section concentrating on the feet and their connection to the earth when standing, but is that the only way to deliver touch?
Short Exploration: Going to Ground – Kneeling & Sitting
If you are not comfortable kneeling or sitting on the ground, then skip this exploration – you may wish to jump to the section on using a stool if you have one. Otherwise, find an appropriately padded surface for kneeling, maybe carpeting or a yoga mat.
This exploration begins with us in a tall kneeling position, both knees on the mat and our hips extended. Much like a previous exploration, we are going to shift our weight from right to left to explore balance in this position. Once you are comfortable with the weight shift, if possible, commit to balancing on a single knee as shown below.
53
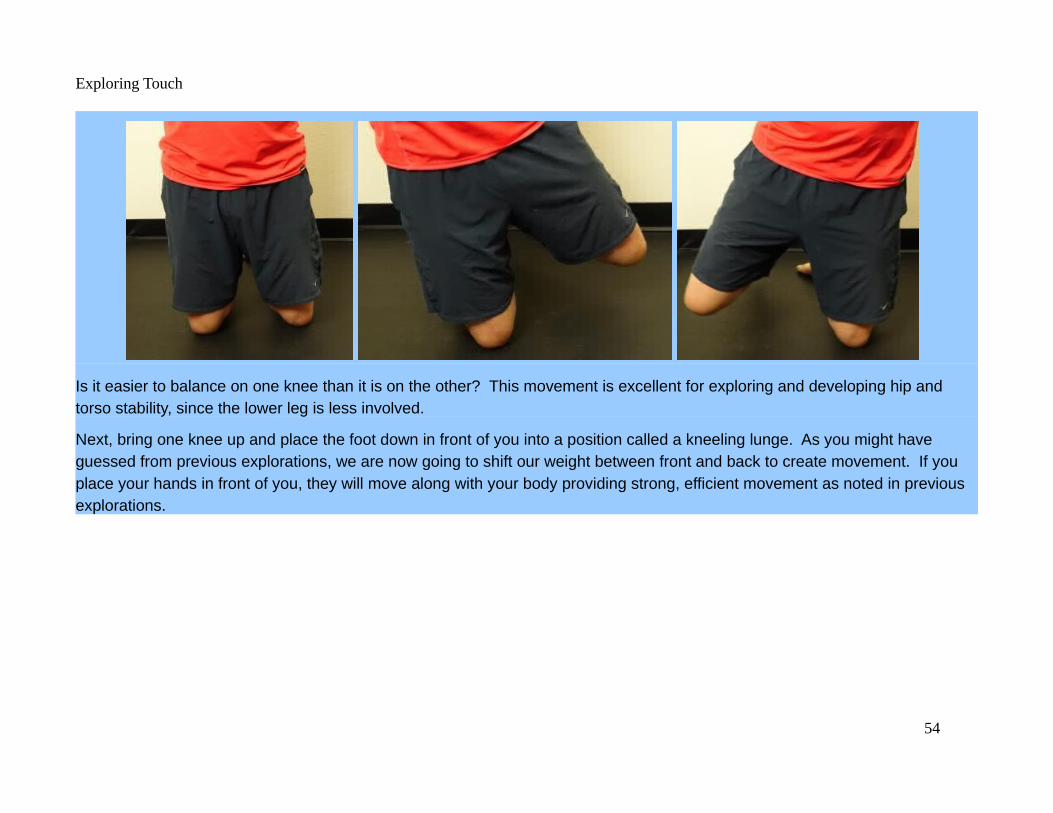
Exploring Touch
Is it easier to balance on one knee than it is on the other? This movement is excellent for exploring and developing hip and torso stability, since the lower leg is less involved.
Next, bring one knee up and place the foot down in front of you into a position called a kneeling lunge. As you might have guessed from previous explorations, we are now going to shift our weight between front and back to create movement. If you place your hands in front of you, they will move along with your body providing strong, efficient movement as noted in previous explorations.
54
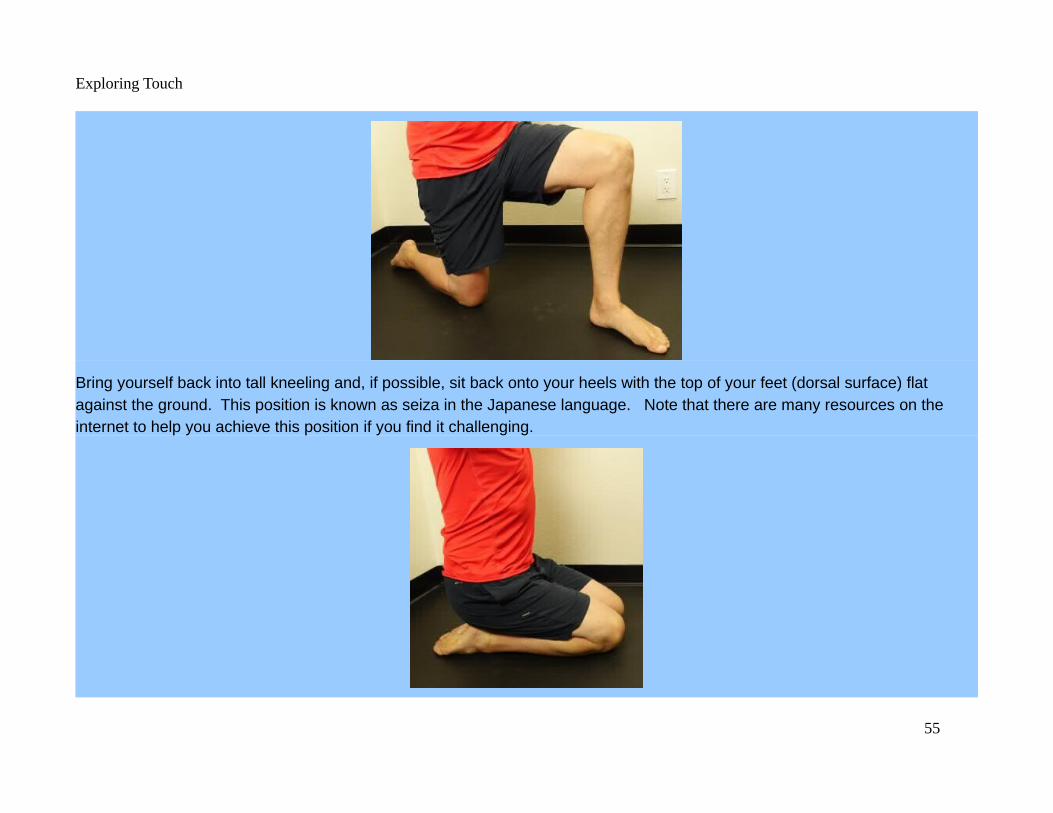
Exploring Touch
Bring yourself back into tall kneeling and, if possible, sit back onto your heels with the top of your feet (dorsal surface) flat against the ground. This position is known as seiza in the Japanese language. Note that there are many resources on the internet to help you achieve this position if you find it challenging.
55

Exploring Touch
Experiment with different widths between your knees which will change both comfort and mobility. You may choose to put a bolster between your thigh and lower leg. Again note that a slight rocking movement at the hips translates to forward and backward movement of the trunk and hands. While a slight twisting movement results in moving the hands left and right. Somepeople naturally tuck their toes underneath them in seiza, but note that this position raises your center of gravity and is more prone to fatigue.
If we carefully rotate one knee forward and slowly sit to that side, we can transition from seiza to a Thai sitting position as shown below.
Explore movement from this position to understand how it can best be used with touch. Again the two primary moves are rocking forward and backward at the hips or rotating side to side.
Carefully bringing your trailing leg forward allows you to transform from Thai sitting position to a crossed leg position. Note the difference in mobility between Thai sitting and a crossed leg position. Which do you find more comfortable?
56

Exploring Touch
All these positions are asymmetric, so also experiment with alternative sides to see if there are areas where you have difficulty, as those limitations may point to areas you may benefit from practicing more often.
Comfort moving on the ground into multiple different positions has many benefits throughout life, such as when playing with children, but this skill is especially important when working with touch on animals. Since animals generally do not respond well to positioning commands, you must adapt your position to match their positions while remaining comfortable, safe and efficient.
Up to this point we have been positioning ourselves to use our hands and upper body for touch, but that is not a complete picture. As discussed extensively in a future section, our feet and knees are excellent tools for touch. This next exploration provides a short introduction to the basic body mechanics using our feet.
Short Exploration: Use Your Feet
If possible, remove your shoes and assume a seated position on the ground with your feet in front of you, your knees pointing upward and your hands behind you for support. You may choose to move to your elbows if that is more comfortable.
57

Exploring Touch
Choose a leg you wish to work on, let that knee drop out and twist to that side until that leg is completely on the ground.
Now, using the foot of the standing knee, gently knead the calf of the leg on the ground, moving to different locations and adjusting pressure as desired. The arch of your foot provides a broad contact, while the heel is more directed.
58

Exploring Touch
If the previous explorations proved challenging or uncomfortable, or you simple cannot do them, then perhaps using a stool is a great option for you. Using a stool is no excuse for abandoning the body mechanic principles we have been exploring to this point, but it does provide an improved ability to efficiently support us in a very adjustable way.
Short Exploration: Stool Basics
If you have access to an adjustable stool, you can apply the following basics to integrate the previous explorations into working with a stool.
1. When moving, don’t pull yourself, turn around and push with your legs to position the stool.
2. Only the ischial tuberosities (butt bones, sit bones, etc.) should contact the stool.
3. Lunge with the leading leg ischial tuberosity on the stool.
4. Straddle with both ischial tuberosities on the very edge of the stool.
5. All movement still comes through contact with the ground.
6. The stool seat should swivel with the movement from your legs.
7. Adjust the stool height to match your work.
8. Keep track of the location of the height adjustment knob – don’t use it between your legs, it looks bad when adjusting.
9. Do NOT run over your own toes with the stool! Or anybody’s toes!
59

Exploring Touch
60
Exploring Touch
While we primarily looked at movements using the lunge (forward-back) and straddle (left-right), it is important to keep in mind that life occurs in multiple dimensions, not one. We briefly discussed adjusting height using wider or narrower stances, but the best solution to height issues is to adjust the height of the table, chair or stool you are using so you maintain the previously discussed principles of good body mechanics.
If you choose to ignore the principles presented in this section, another way to learn better body mechanics is from the pain teacher. If you are hurting after a touch session, it could be an indication that you are doing something incorrectly. While it is most likely to be corrected through improved body mechanics, it could also be due to poor mobility, inadequate stability, insufficient strength, poor conditioning or any number of other things for which you could prepare and train better. The pain teacher is not the best way to learn about such issues, but he is always available to teach you.
Short Exploration: The Pain Teacher
Inhale deeply and bend your finger back until you hear a snap – JUST KIDDING! You can take a deep breath as there is no physical pain associated with this exploration, other than reading my writing.
No matter how diligent you are at practicing good body mechanics, you will eventually meet the pain teacher. This meeting maycome about from disuse, misuse, abuse, overuse or just plain bad luck. While there are volumes of great information on pain, we will focus on what pain has to teach us in this exploration.
1. Pain is an invitation to change, listen to it, understand it better, do NOT ignore it! As Mosely and Butler advise, “Know pain, know gain!”
2. Pain can help us avoid interfering with our own healing process. Pain is there to protect us, typically from ourselves, our bad habits and our egos.
3. Pain is often informing us how to move better, eat better, recover better and/or think better. It is especially good at helping us heal better.
4. If the pain teacher is visiting you regularly, seek the help of an appropriate professional to understand and correct the underlying issues.
61

Exploring Touch
If you are in pain, you cannot deliver your best touch and are risking further damage to yourself. Pain is natural and normal, it is how our nervous system communicates that something is not correct and needs to be addressed. The location of the pain and the underlying cause may be widely disconnected. The ultimate solution to your muscular pain may in part come from eating a healthier diet that allows the gut to heal. Additionally, it should be obvious at this point that suppressing pain with drugs, especially for long periods of time, is a dangerous proposition. Chronic pain should be addressed with the help of appropriate medical professionals.
Effective movement and touch rests on a foundation of healthy diet, effective rest, healthy thoughts and healthy emotions. On the flip side, appropriately graded movement contributes to an overall foundation of health. The key words are, “appropriately graded”, if you struggle with this concept and continuously injure yourself, find a professional who can help you understand what is going wrong and help you correct it. While you are the only person that can correct your movement, sometimes a live consultation with an appropriate professional is required to identify the source of dysfunction and investigate potential causes.
62

Exploring Touch
Body Mechanics Principles Summary
The following is a list of the basic body mechanics principles which we have explored above. The list is not complete, but is provided as a starting point for your own investigations and discoveries.
Body Mechanics Tip 1: If you cannot breathe well, you cannot move well. Monitor and improve your breathing.
Body Mechanics Tip 2: Perfect practice! Improve one skill at a time, until you do it well without thinking.
Body Mechanics Tip 3: Find a stable position for both your body and mind before moving.
Body Mechanics Tip 4: If you cannot sense well, you cannot move well. Be aware of what you feel.
Body Mechanics Tip 5: Start movements with the larger muscles of your body.
Body Mechanics Tip 6: Adjust the position of your feet to find a stable position.
Body Mechanics Tip 7: Adjust your line of force to make your touch more efficient and effective.
Body Mechanics Tip 8: Speed kills: move slowly using strength and control.
63

Exploring Touch
Body Mechanics Tip 9: Use the natural springs in your body to make movement easier.
Body Mechanics Tip 10: Keep your upper body “quiet” to reduce injury risk and better transmit force.
Body Mechanics Tip 11: Keep your shoulder blades in your back pockets, meaning pull them together and down.
Body Mechanics Tip 12: Push into the ground first and your hands last.
Body Mechanics Tip 13: These principles can be adapted for every situation and position.
64

Exploring Touch
65

Exploring Touch
Tai Chi Chuan Essentials – Another Viewpoint
The movement arts are another great source of principles that can be applied directly to touch to improve body mechanics. Yang Chen Fu is a famous Tai Chi Chuan (or Tai Chi) master from the late 19th and early 20th century. He wrote a classic text called, The Ten Essentials of Tai Chi Chuan, which lists and explains the most important principles of Tai Chi. These same principles can be applied to touch as outlined in the table below. Note that the translations and cultural coloring make some of these essentials open to interpretation, but overall they provide a solid set of movement principles.
The Ten Essentials of Tai Chi Chuan Application to Touch
1. Head Upright, Spirit Rising Yang Chen Fu explains that an upright head allows shen, a Chinese concept meaning spirit or awareness, to function more fully, keeping us alert. When we are alert, our heads our upright, while when we are tired or depressed ourheads hang down. Keeping an upright head supports improved breathing and circulation to the brain, further promoting alertness and ease of movement.
2. Sink the Chest, Raise the Back Yang Chen Fu cautions against expanding the chest, as it can result in “top heavy, bottom light”. Expanding the chest encourages bringing the shouldersup by the ears and raising the center of mass. Stability is gained by lowering our center of mass, by parking our shoulder blades down and back, as though we were putting them in our back pockets.
3. Loosen the Waist Rotation at the “waist” is the basis of most every athletic movement from throwing to walking and running. The waist means the hips,and pelvis, as ourpower comes from the large muscles of the hips.
4. Differentiate Between Empty and Solid Yang Chen Fu’s explanation of this essential emphasizes the importance of weight transfer between a solid leg (stance leg) and empty leg (unweighted leg). He states that agility emerges from conscious differentiation of these two states during movement.
66

Exploring Touch
The Ten Essentials of Tai Chi Chuan Application to Touch
5. Sink the Shoulders, Drop the Elbows Again, Yang Chen Fu is emphasizing the importance of lowering the center ofmass for improved stability. If the elbows are raised, then the shoulders naturally follow and the center of mass is raised, reducing stability. Additionally, this essential emphasizes the importance of relaxation to reduce tension in the body during movement.
6. Use Will, Not Strength This essential may be a victim of translation difficulty, as the word “strength” might be better replaced with “tension”. Yang Chen Fu calls for relaxation and part of the text is translated as “There must not be even one ounce of strength in the sinews, bones and blood vessels, or it will result in self-restriction”. This sentence sounds more correct replacing the word strength with tension. The word “will” can be translated as “intent”, which brings the statement into clearer focus for us. Use intent, not tension, to achieve. Tension results in self-restriction and wasted energy. Intention, especially for touch, will produce better results without excess tension.
7. Coordinate Top and Bottom Yang Chen Fu states, “The root is in the feet, released through the legs, controlled by the waist, and materialized in the hands and fingers.” This statement perfectly captures the use of the entire body, with hands last, when practicing the art of touch. Another view, leading to the next point, is the mind (top) and body (bottom) must coordinate. Wherever you draw the line, the two parts must continuously coordinate and move in harmony.
8. Harmonize Internal and External “The shen is the commander, the body is the agent.” Harmony between spirit, mind and body is a key component to touch success. If your intent is toreduce tension in another, can you accomplish that by holding tension in yourown body?
9. Move with Continuity This essential speaks to the concept of flow, the continuous flow between thoughts and actions. I see continuity developing by working with the moment, rather than opposing it.
67

Exploring Touch
The Ten Essentials of Tai Chi Chuan Application to Touch
10.Seek Stillness in Movement Wow! I love this one, as it is at the heart of success in everything from the chaos of combat to the monotony of everyday life. It speaks to the efficiency of effort addressed throughout the Tao Te Ching. Stillness represents a neutrality from which all moves are possible.
If you want to learn more about these ten Tai Chi essentials, I suggest visiting the website of Sifu Anthony Korahais to read his blog post, “Tai Chi Students – Don’t Make These 10 Mistakes” ( https://flowingzen.com/?s=10+mistakes ).
No matter what someone tells you, or writes in a book, you must discover, or re-discover, the principles of movement and body mechanics through doing. Although you have finished this section on body mechanics, you will never be done with the application of the contents. Like Tai Chi, there is no perfection in body mechanics, but there is always room for improvement.
Practice, practice, practice. More correctly, practice perfectly! It is best to focus on one principle during each session and do it well before moving to the next. Good luck and move well!
Touch Tip 52: Practice movement awareness and explore different approaches to understand what works best for you.
FeelingThis section addresses sensations associated with touch, along with information on physical contact.
Sensory Highlights
It is inevitable that we must touch on some anatomy and physiology, so we will begin with simple information about touch and sensation. Sensation has many different components: vibration, texture, temperature, stretch, pressure, chemical irritation and more. The anatomy and physiology behind these sensations can impact the touch experience in interesting ways. We will focus more on the effects and less on the details throughout this book, but a good resource for more information is the book,
68
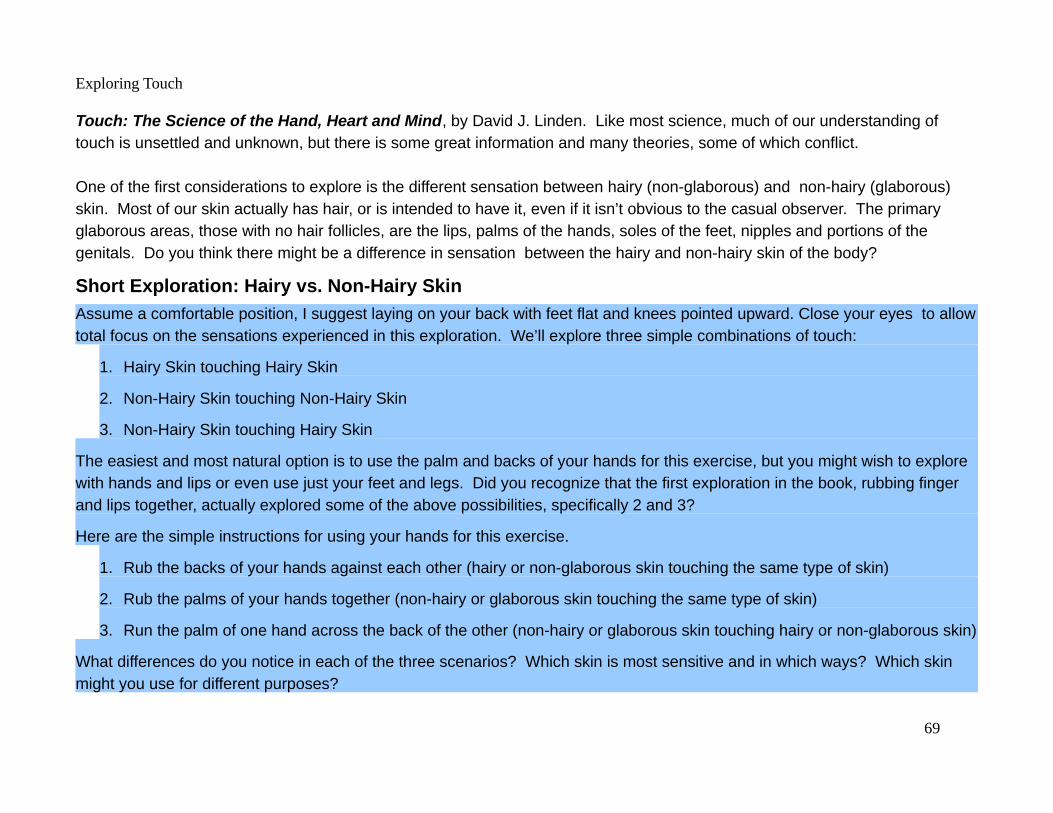
Exploring Touch
Touch: The Science of the Hand, Heart and Mind, by David J. Linden. Like most science, much of our understanding of touch is unsettled and unknown, but there is some great information and many theories, some of which conflict.
One of the first considerations to explore is the different sensation between hairy (non-glaborous) and non-hairy (glaborous) skin. Most of our skin actually has hair, or is intended to have it, even if it isn’t obvious to the casual observer. The primary glaborous areas, those with no hair follicles, are the lips, palms of the hands, soles of the feet, nipples and portions of the genitals. Do you think there might be a difference in sensation between the hairy and non-hairy skin of the body?
Short Exploration: Hairy vs. Non-Hairy Skin
Assume a comfortable position, I suggest laying on your back with feet flat and knees pointed upward. Close your eyes to allowtotal focus on the sensations experienced in this exploration. We’ll explore three simple combinations of touch:
1. Hairy Skin touching Hairy Skin
2. Non-Hairy Skin touching Non-Hairy Skin
3. Non-Hairy Skin touching Hairy Skin
The easiest and most natural option is to use the palm and backs of your hands for this exercise, but you might wish to explore with hands and lips or even use just your feet and legs. Did you recognize that the first exploration in the book, rubbing finger and lips together, actually explored some of the above possibilities, specifically 2 and 3?
Here are the simple instructions for using your hands for this exercise.
1. Rub the backs of your hands against each other (hairy or non-glaborous skin touching the same type of skin)
2. Rub the palms of your hands together (non-hairy or glaborous skin touching the same type of skin)
3. Run the palm of one hand across the back of the other (non-hairy or glaborous skin touching hairy or non-glaborous skin)
What differences do you notice in each of the three scenarios? Which skin is most sensitive and in which ways? Which skin might you use for different purposes?
69

Exploring Touch
When would you choose to touch something with the back of your hand? When might you want to use the palm?
Explore the other glaborous areas and consider why they are without hair.
The nervous system has many different fibers and receptors that contribute to our sensations. Some fibers transmit informationquickly and others more slowly. Some receptors are buried deep and others are more shallow. Some receptors constantly emit a signal and others emit brief pieces of information intermittently. Some receptor information is acted upon in the spinal cord and never goes further, some requires different parts of the brain to form sensation. Receptors are distributed differently indifferent body areas. Do you think there might be fewer receptors on the skin of your back than in your finger tips?
Some sensations, like grip control, act like a reflex so you don’t need to think much about them if you don’t want, but like breathing you can consciously control your grip if you wish. Other sensations, like pain, are completely created by the brain by integrating many different pieces of information in a complex way to decide if we should experience pain.
Short Exploration: Rub It Out
Assume a comfortable position, again I suggest laying on your back with feet flat and knees pointing upward. Close your eyes to allow total focus on the sensations experienced in this exploration. We’ll investigate something you probably figured out a long time ago through instinct, or perhaps your parents taught you.
Now pinch yourself, probably on the forearm, for a few seconds, just hard enough to cause discomfort. Release the pinch, notethe sensation and pay attention to how long it takes for the sensation to dissipate.
Repeat the above step at another location on your body, maybe the opposite forearm, but after you release the pinch, rub the pinched area.
70

Exploring Touch
Did rubbing help the discomfort dissipate faster? Have you ever had an actual injury where rubbing the injury site helped? Do you have a theory why rubbing the skin helps?
If you can prove your theory why rubbing helps dissipate discomfort, book your flight to Stockholm to claim your Nobel Prize in medicine. There are many theories about the phenomena, none proven. A popular theory, the gate theory, states that the rubbing creates faster, higher priority signals that block or gate the sensations interpreted as discomfort, thus reducing it. Another theory, discussed below, might just blow your mind. However, these are all just theories and the science is always evolving.
There is no such thing as a pain receptor, despite what many dated anatomy and physiology books might tell you. There are receptors, called nociceptors, which indicate danger of potential damage by sensing the chemical environment, but there is no sensor that creates pain locally. How do we know?
There are two peculiar circumstances that point us in this direction:1. Situations where we expect pain, but it is absent because it would not serve to protect the organism2. Situations where pain exists without physical receptors
Most everyone has heard some story about somebody in a horrific situation that performs heroic acts, but during the event they felt no pain. This may happen as the result of an accident, athletics, combat or anytime pain would be a detriment to your survival.
Protection of the organism is the primary job of the brain. Pain is just one of the tools used by the brain. The brain uses pain toprotect the organism when it is the best mechanism available to insure the organism survives. The brain will not create pain if itdoes not believe that pain will help the situation, such as when being attacked with a machete, pulling your children from a car wreck with a broken arm or playing through a football game with a significant injury. Yes, if the cases described above survive, they will eventually experience pain commensurate with their injuries. The brain creates pain primarily to slow us down so we
71
Exploring Touch
can heal, but will not create the sensation of pain if it is not in the interest of the survival of the organism. The brain creates painwhen it feels it is safe to do so.
The second situation that points to the absence of pain receptors is where pain exists without physical receptors, which is displayed in several situations. An unfortunately common situation due to the diabetes epidemic and global conflicts are the phantom limb pains often experienced by amputees. The brain keeps sensory and motor maps of the body which remain present, although possibly distorted, after the physical removal of the limb. Amputees can experience sensations in these absent limbs, including pain and movement, long after the limb has been physically removed and all the receptors are gone. Still not convinced?
Here’s an interesting situation that might convince you. Have you ever felt someone else’s pain? Maybe watching an action movie or sporting mishap? How about feeling the “pain” of an inanimate object? There are several different experiments where the brain is tricked to believing a fake arm or other body part is part of the body and when the inanimate object is hit with a hammer or stabbed with a knife the subject feels bodily pain. Obviously, no receptors are involved in this situation, but the brain can produce pain. The neuroscience behind these situations are discussed well and humorously in Lorimer Moseley’s TEDxAdelaide talk, Why Things Hurt ( https://youtu.be/gwd-wLdIHjs ).
Touch Tip 53: Sensation is created by the brain using information from special receptors spread throughout the body, but primarily in the skin.
Touch Tip 54: The non-hairy skin of the lips, palms, soles of the feet, nipples and genitalia are rich in sensory receptors.
Touch Tip 55: Pain is a sensation generated by the brain for protection.
72

Exploring Touch
Temperature & Touch
Many people are concerned by the temperature of their hands, especially when working with a partner. Are they too cold? Are they clammy? While there are some simple solutions suggested below, first consider that hand temperature is a preference and that it will change as the work proceeds. I personally enjoy receiving a massage that starts with cold hands, working towards warmer hands. Coolness provides greater contrast for improved identification, using both temperature and pressure sensors to identify the area being touched.
Short Exploration: Cold Hands
Run your hands under cold water and dry them off. Assume a comfortable position, again I suggest laying on your back with feet flat on the ground and knees pointing upward. Close your eyes to allow total focus on the sensations experienced in this exploration.
Slowly place your hands under your shirt and onto your belly, noting the sensations that arise. How do you feel about colder hands? Could you see how they would be welcomed on an irritated area, much like ice?
While this contrast of cold hands on warm body parts can result in an improved therapeutic session, many people prefer a warmer touch throughout the session. Your hands will naturally warm as you work, but you can also increase the temperature through friction by rubbing them together, even placing them between your thighs as you rub. Rolling the wrists, pressing the body weight onto the hands and grip exercises (squeeze and release ball, spring gripper, etc.) can all help bring blood into the hands to warm them. The real secret is to use movement AND relaxation to bring warmth.
There are many tools for warming the hands externally, including hot packs that can be battery powered or placed in a microwave. If you feel your hands are too warm, raising them over your head and lightly waving them can help dissipate heat. The bottom line is to not get too wrapped up about what you feel, but ask your partner about preferences and warn them if you feel your hands are too hot or too cold.
73
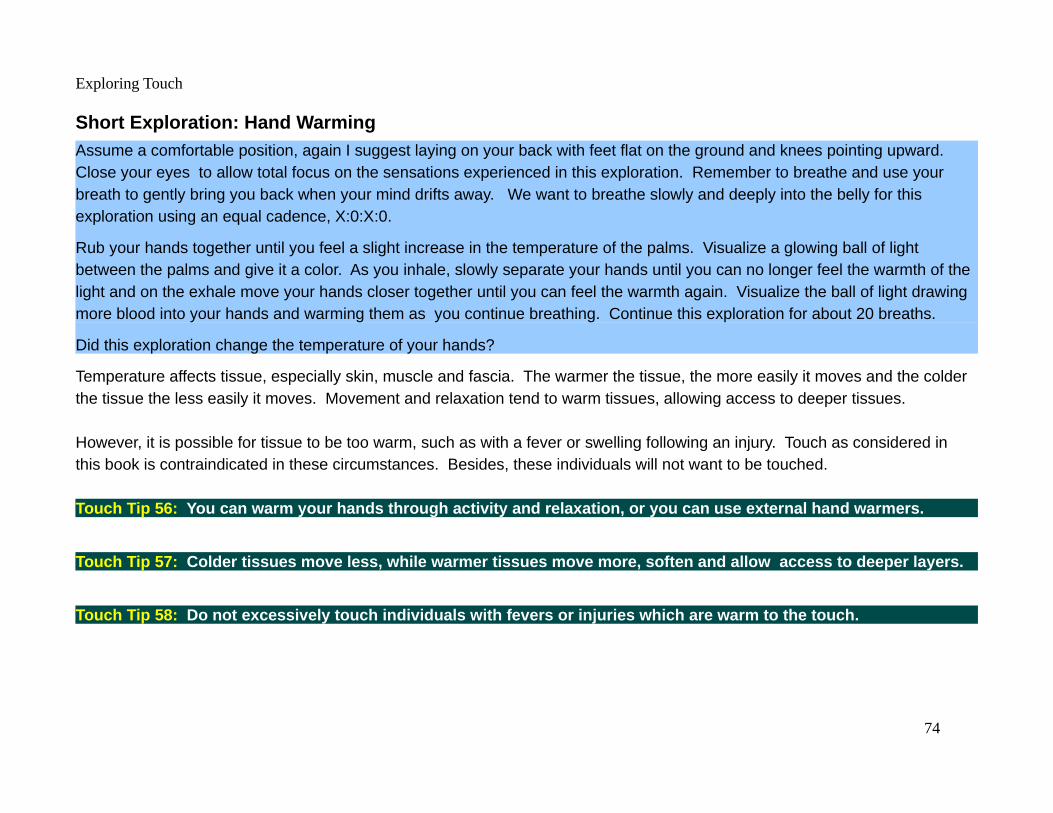
Exploring Touch
Short Exploration: Hand Warming
Assume a comfortable position, again I suggest laying on your back with feet flat on the ground and knees pointing upward. Close your eyes to allow total focus on the sensations experienced in this exploration. Remember to breathe and use your breath to gently bring you back when your mind drifts away. We want to breathe slowly and deeply into the belly for this exploration using an equal cadence, X:0:X:0.
Rub your hands together until you feel a slight increase in the temperature of the palms. Visualize a glowing ball of light between the palms and give it a color. As you inhale, slowly separate your hands until you can no longer feel the warmth of the light and on the exhale move your hands closer together until you can feel the warmth again. Visualize the ball of light drawing more blood into your hands and warming them as you continue breathing. Continue this exploration for about 20 breaths.
Did this exploration change the temperature of your hands?
Temperature affects tissue, especially skin, muscle and fascia. The warmer the tissue, the more easily it moves and the colder the tissue the less easily it moves. Movement and relaxation tend to warm tissues, allowing access to deeper tissues.
However, it is possible for tissue to be too warm, such as with a fever or swelling following an injury. Touch as considered in this book is contraindicated in these circumstances. Besides, these individuals will not want to be touched.
Touch Tip 56: You can warm your hands through activity and relaxation, or you can use external hand warmers.
Touch Tip 57: Colder tissues move less, while warmer tissues move more, soften and allow access to deeper layers.
Touch Tip 58: Do not excessively touch individuals with fevers or injuries which are warm to the touch.
74
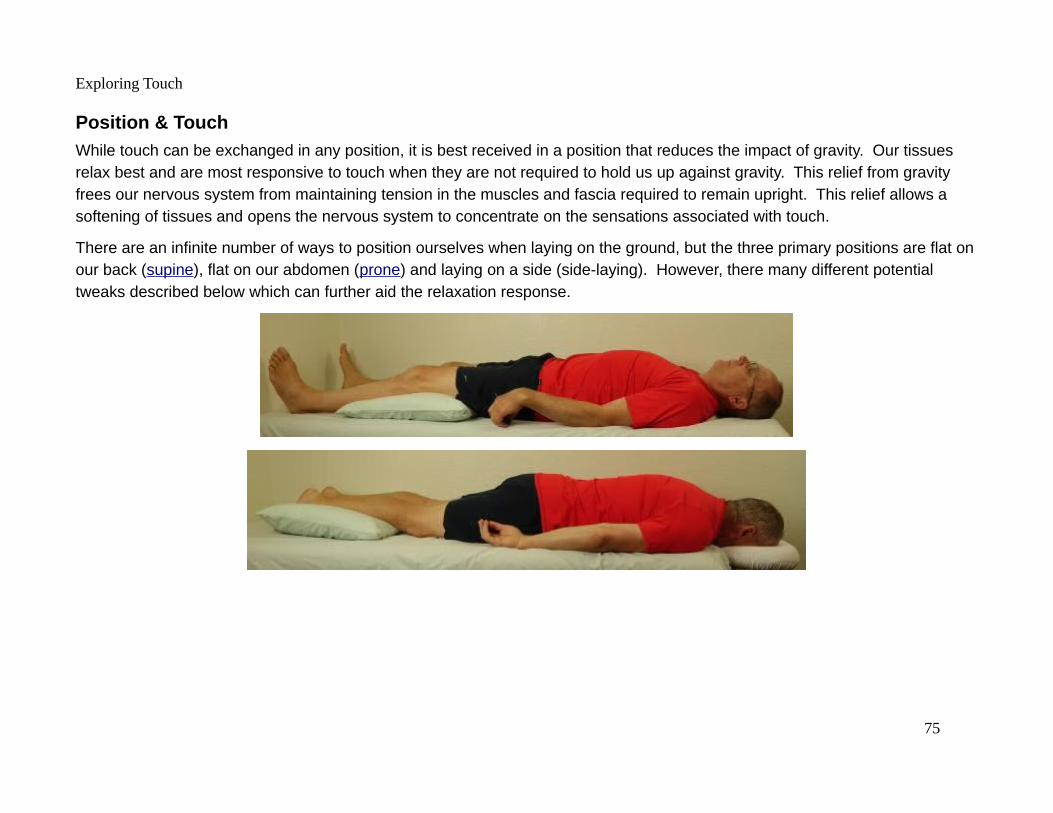
Exploring Touch
Position & Touch
While touch can be exchanged in any position, it is best received in a position that reduces the impact of gravity. Our tissues relax best and are most responsive to touch when they are not required to hold us up against gravity. This relief from gravity frees our nervous system from maintaining tension in the muscles and fascia required to remain upright. This relief allows a softening of tissues and opens the nervous system to concentrate on the sensations associated with touch.
There are an infinite number of ways to position ourselves when laying on the ground, but the three primary positions are flat onour back (supine), flat on our abdomen (prone) and laying on a side (side-laying). However, there many different potential tweaks described below which can further aid the relaxation response.
75
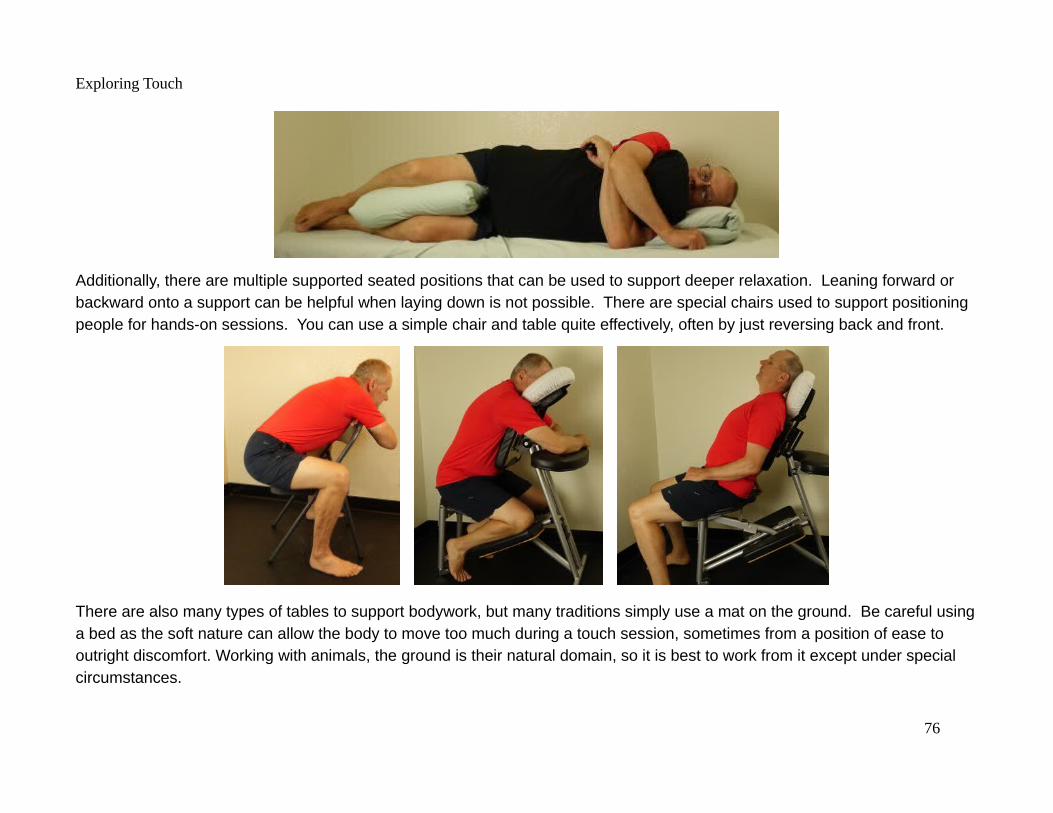
Exploring Touch
Additionally, there are multiple supported seated positions that can be used to support deeper relaxation. Leaning forward or backward onto a support can be helpful when laying down is not possible. There are special chairs used to support positioning people for hands-on sessions. You can use a simple chair and table quite effectively, often by just reversing back and front.
There are also many types of tables to support bodywork, but many traditions simply use a mat on the ground. Be careful usinga bed as the soft nature can allow the body to move too much during a touch session, sometimes from a position of ease to outright discomfort. Working with animals, the ground is their natural domain, so it is best to work from it except under special circumstances.
76
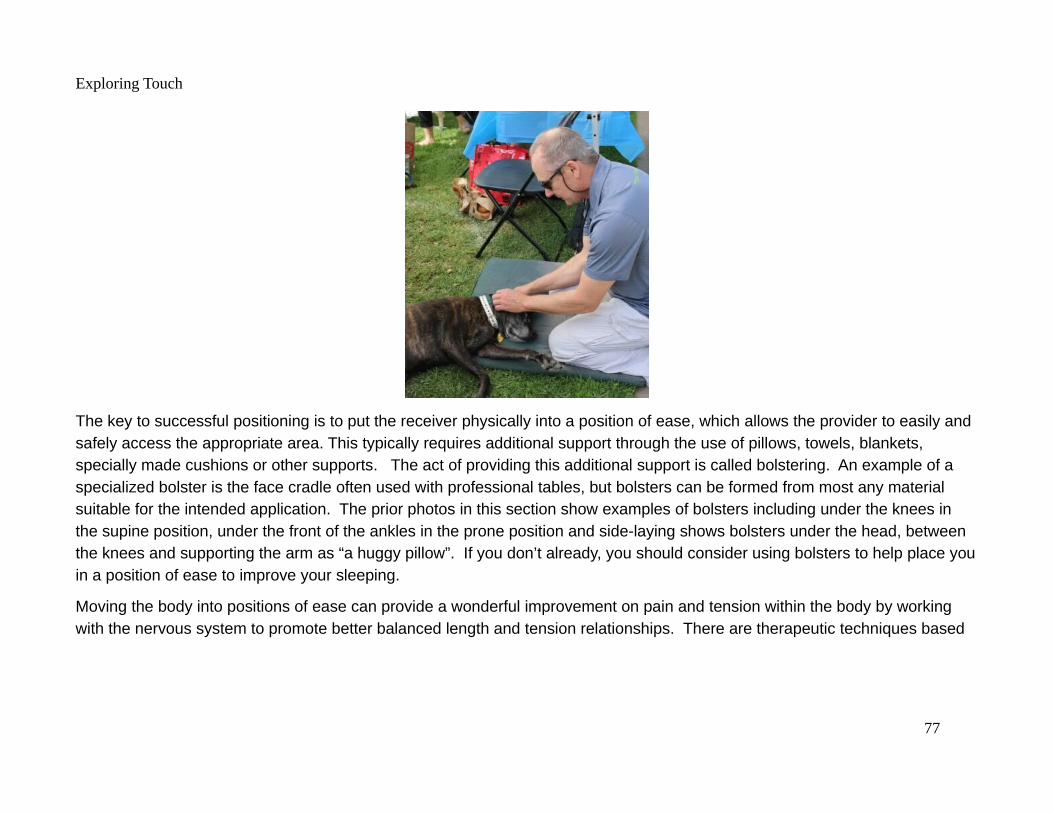
Exploring Touch
The key to successful positioning is to put the receiver physically into a position of ease, which allows the provider to easily and safely access the appropriate area. This typically requires additional support through the use of pillows, towels, blankets, specially made cushions or other supports. The act of providing this additional support is called bolstering. An example of a specialized bolster is the face cradle often used with professional tables, but bolsters can be formed from most any material suitable for the intended application. The prior photos in this section show examples of bolsters including under the knees in the supine position, under the front of the ankles in the prone position and side-laying shows bolsters under the head, between the knees and supporting the arm as “a huggy pillow”. If you don’t already, you should consider using bolsters to help place youin a position of ease to improve your sleeping.
Moving the body into positions of ease can provide a wonderful improvement on pain and tension within the body by working with the nervous system to promote better balanced length and tension relationships. There are therapeutic techniques based
77

Exploring Touch
on this premise that use movement into positions of ease or a “neutral” position to provide relief.9 The short exploration below uses an interesting self-bolster that you have likely never experienced, or perhaps you intuitively discovered?
Short Exploration: Sacral Bolsters
You will need two hand towels rolled along the short edge as shown below, from which we’ll form a “V” to cradle our low back area.
9 Positional release and strain-counterstrain both use this principle. See Positional Release Techniques by Leon Chaitow for more information.
78

Exploring Touch
Assume a comfortable position laying on your back with feet flat on the ground and knees pointing upward. Close your eyes to allow total focus on the sensations experienced in this exploration. Remember to breathe and use your breath to gently bring you back when your mind drifts away.
Check in with how your low back and hips contact the ground or table. We are especially interested with your sacrum, the middle bone in the back of your pelvis that sits between what we might think of as your hip bones (innominate bones or hemi-pelvis, composed of the fused illium, ischium and pubis bones ). How does the lower back contact the ground? Is there discomfort or tension as a result of this contact?
Now, we are going to form a “V” using the two towels under the area of our sacrum. Gently lift one butt cheek off the ground and place a rolled towel on that side angled from your upper outer back hip area to your tail bone (coccyx) area in the middle of your butt. Place the other towel on the other side so that they form a “V” shape between your hips, meeting in the tail bone area. Adjust the towels and your bottom in a way that results in a sense of ease or comfort in the sacral area.
You may have to unroll the towels to make them thinner or double them over to make them thicker. The goal is to take the time and make the effort to discover how you can use a bolster to make the area feel better. You may find that after a few minutes you need to make adjustments and that is perfect and expected. Bolstering is an art that requires finesse, as even slight movements can result in large improvements or degradations.
Take the time to settle into the bolster and enjoy being in a position of ease. You may discover that you feel best with a small liftunder your head using a pillow or even a book. You might enjoy having pillows under your arms, Explore the possibilities of how to best make yourself comfortable.
After a few minutes, remove the bolsters and evaluate how your contact feels, then replace them. Were you able to find a bolster arrangement which was more comfortable than others?
Remember that besides finding positions of ease for the receiver, it is important that the position is safe for both provider and receiver.
79
Exploring Touch
Touch Tip 59: Touch is best received in a position that reduces the effects of gravity, unloading both the nervous system and physical tissues.
Touch Tip 60: Create safe positions of ease for both provider and receiver using pillows, blankets, towels and other supports.
Contact – Physical Touch
Contact is where most people consider touch to occur, but as we have seen, there is much more to touch than just the physical contact. Contact should provide both quality and safety for all parties.
While we often think of touching with our hands, this section will explore many different alternatives including forearms, elbows, knees and feet.
Short Exploration: Arch of the Hand – Finding Neutral
We all most likely know the concept of our foot having an arch, the curved area between the balls of our toes and the heel that provides structure and elasticity to our feet. Are you aware your hand also has an arch?
80

Exploring Touch
Place your hands on a flat surface, like a table, with straight or neutral wrists. Let them relaxand observe what you see? Do your hands look similar to the photo?
Most of our hands will assume a natural arch, between our thumb and little finger, the peak ofwhich typically occurs with the index finger. It would take additional effort to flatten your handagainst the surface, but give it a try. When you relax do your hands return to the position with aslight arch?
This position is the neutral position of our hand and as you have learned from previousexplorations, the neutral position is the stable starting point from which all possibilities begin.
Like most our explorations, contact has both a physical and mental component. The first physical contact we have with another,or ourselves, is the basis for an incredible exchange of information. Professional body workers typically make this first contact central to a process called grounding or grounding in. A primary purpose of this process is to insure an optimal information exchange with an overall positive beginning to a session.
The preparation begins prior to contact and generally incorporates activities that help focus the participants, like breathing, visualization or repeating meaningful words or a mantra. The location and style of initial contact is generally selected based onthe existing relationship to the receiver, the intent of the work and other factors. Most body workers use this initial contact as a time to gain knowledge through touch before “doing” anything. The word palpation is used to describe the process of touching to gain knowledge.
Palpation is a great place to begin exploring some of the mechanical aspects connected with contact, these range from understanding basic forces to contact variables such as surface area. Palpation also gathers other information you might wish to gain such as temperature, texture, sensitivity and reaction to touch or movement. Let’s begin our investigation with a short palpation exploration.
81
Exploring Touch
Short Exploration: Contact Overview Using Palpation
This exploration will use palpation to explore several contact parameters and how they interact. We will investigate how surface area, pressure and movement speed interact while palpating. We will explore the tissue on the side of our upper legs with our palpation, so you can lay or sit in any manner that allows you to relax the tension in these tissues. I prefer laying on myback with my feet flat on the ground and my knees bent in the air. Closing your eyes may help with your ability to sense the small differences we will be exploring.
Begin by placing your entire palm on the side of your leg and keeping it in one place. Keeping the hand stationary may be moredifficult than you imagine, because your natural instinct will be to move the palm to get a better sense of the tissue under your hand. Can you get a very good sense of the tissue under your palm without moving it? You should be able to get an initial sense of tension and monitor temperature using your stationary palm.
Now press as hard as you can without pain or injury into your leg with that stationary palm. Did that give you any more information? Remember how the contact of your palm felt on your leg with full pressure applied. Now, brace your thumb as shown in the photo below to protect your thumb and press the tip of your thumb into the side of your thigh as hard as you can without pain or injury.
82
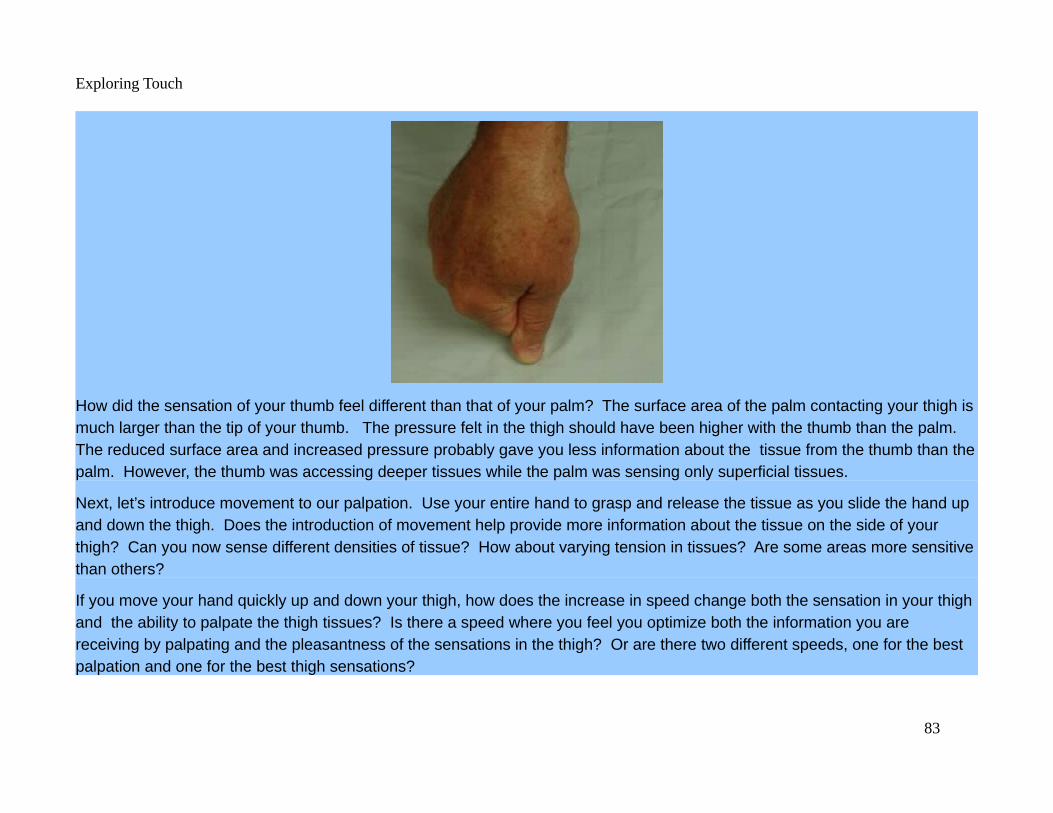
Exploring Touch
How did the sensation of your thumb feel different than that of your palm? The surface area of the palm contacting your thigh ismuch larger than the tip of your thumb. The pressure felt in the thigh should have been higher with the thumb than the palm. The reduced surface area and increased pressure probably gave you less information about the tissue from the thumb than thepalm. However, the thumb was accessing deeper tissues while the palm was sensing only superficial tissues.
Next, let’s introduce movement to our palpation. Use your entire hand to grasp and release the tissue as you slide the hand up and down the thigh. Does the introduction of movement help provide more information about the tissue on the side of your thigh? Can you now sense different densities of tissue? How about varying tension in tissues? Are some areas more sensitivethan others?
If you move your hand quickly up and down your thigh, how does the increase in speed change both the sensation in your thigh and the ability to palpate the thigh tissues? Is there a speed where you feel you optimize both the information you are receiving by palpating and the pleasantness of the sensations in the thigh? Or are there two different speeds, one for the best palpation and one for the best thigh sensations?
83

Exploring Touch
Our bodies are amazingly well adapted to optimizing our touch without too much conscious thought. Although professional body workers may employ many different palpation techniques, they will generally use the tips of a few fingers moving at a speed and with pressure that allows them to gather the information they need. The larger the surface area the more information you can get, the smaller the surface area the deeper in the tissue you can explore. The less pressure the more information you can get, the more pressure you use the deeper in the tissue you can explore. If the hand is moving too slow or too fast it is missing information since different touch receptors work in different ways – some receptors detect changes at different speeds to evaluate different characteristics.
In general, palpation and all touch should proceed from a broad surface area using light pressure at a moderate speed, to less surface area using higher pressures at a slower speed to understand deeper structures. When exploring tissue, think of yourself as an oceanographer exploring the sea. First, sail over the surface at a moderate pace to understand the size and nature of the waves. Over time, you will begin to see there are deeper currents, giving clues to deeper structures. You might occasionally slow down to probe even more deeply.
We will begin our more formal exploration of contact by looking at the primary actions we can employ with touch on tissue: compressing it, stretching it, lifting it, bending it, shearing it and rotating it. The diagram below outlines these actions with force diagrams to help with visualization.
84
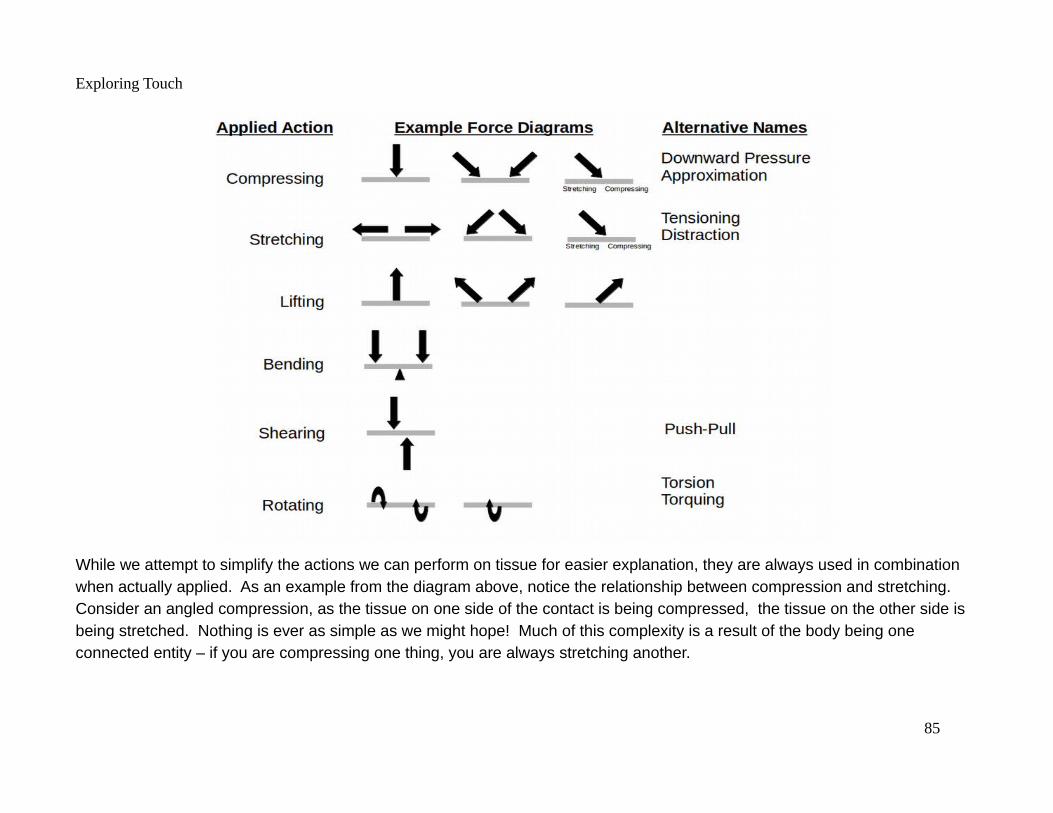
Exploring Touch
While we attempt to simplify the actions we can perform on tissue for easier explanation, they are always used in combination when actually applied. As an example from the diagram above, notice the relationship between compression and stretching. Consider an angled compression, as the tissue on one side of the contact is being compressed, the tissue on the other side is being stretched. Nothing is ever as simple as we might hope! Much of this complexity is a result of the body being one connected entity – if you are compressing one thing, you are always stretching another.
85

Exploring Touch
Short Exploration: Compressing, Stretching, Lifting, Bending, Shearing, Rotating
We will now explore applying forces to tissue, specifically the skin on the front of our thigh. Please lay or sit in any manner that allows you to access the tissue on the front of your thigh comfortably and safely. I prefer laying on my back with my feet flat on the ground and my knees bent in the air. Even better is if you can lay on your back and put your feet up on a bed or table, as that slacks the tissue on the front of the thigh. Closing your eyes may help with your ability to sense the small differences we willbe exploring.
Our first contact will explore compression of the thigh tissues. Use your fists to press straight into your thigh, then try compressing the tissue between your two fists.
86

Exploring Touch
Next we will explore stretching the tissues of thethigh. Use your fists and push the tissuetowards your knee.
The next move will explore lifting tissue. Using apincer grip, engage the tissue of your front thigh andthen lift the tissue away from your thigh.
87
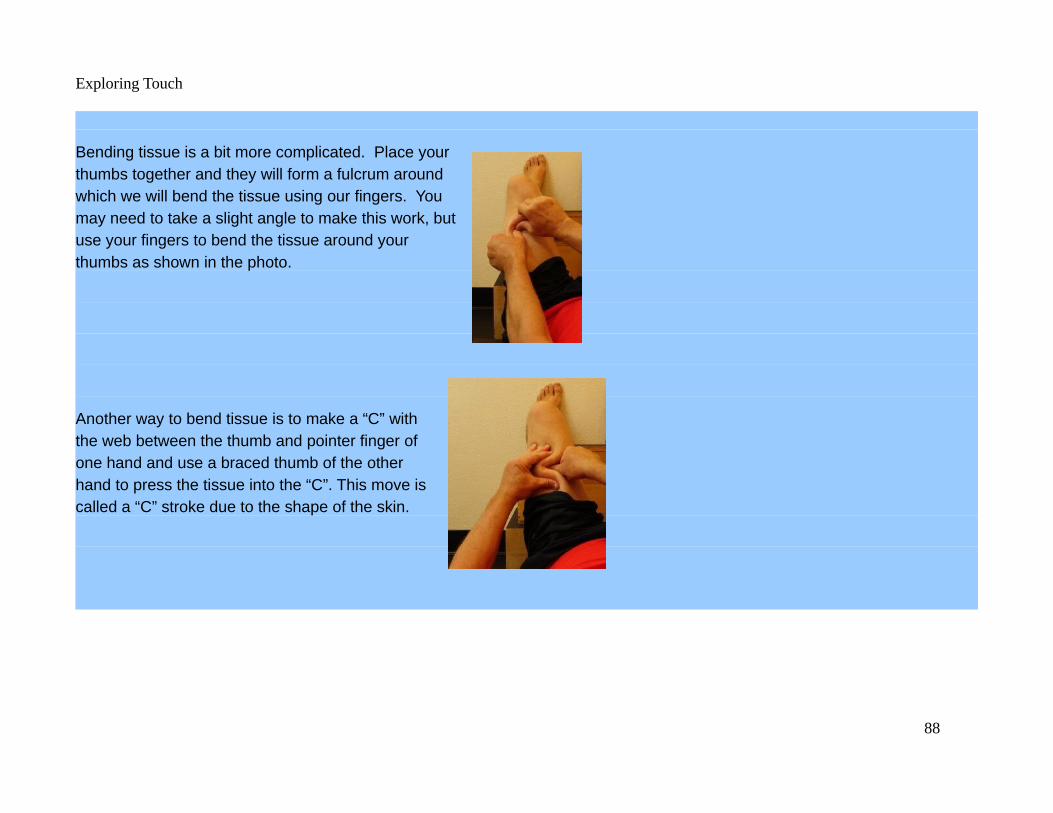
Exploring Touch
Bending tissue is a bit more complicated. Place yourthumbs together and they will form a fulcrum aroundwhich we will bend the tissue using our fingers. Youmay need to take a slight angle to make this work, butuse your fingers to bend the tissue around yourthumbs as shown in the photo.
Another way to bend tissue is to make a “C” withthe web between the thumb and pointer finger ofone hand and use a braced thumb of the otherhand to press the tissue into the “C”. This move iscalled a “C” stroke due to the shape of the skin.
88
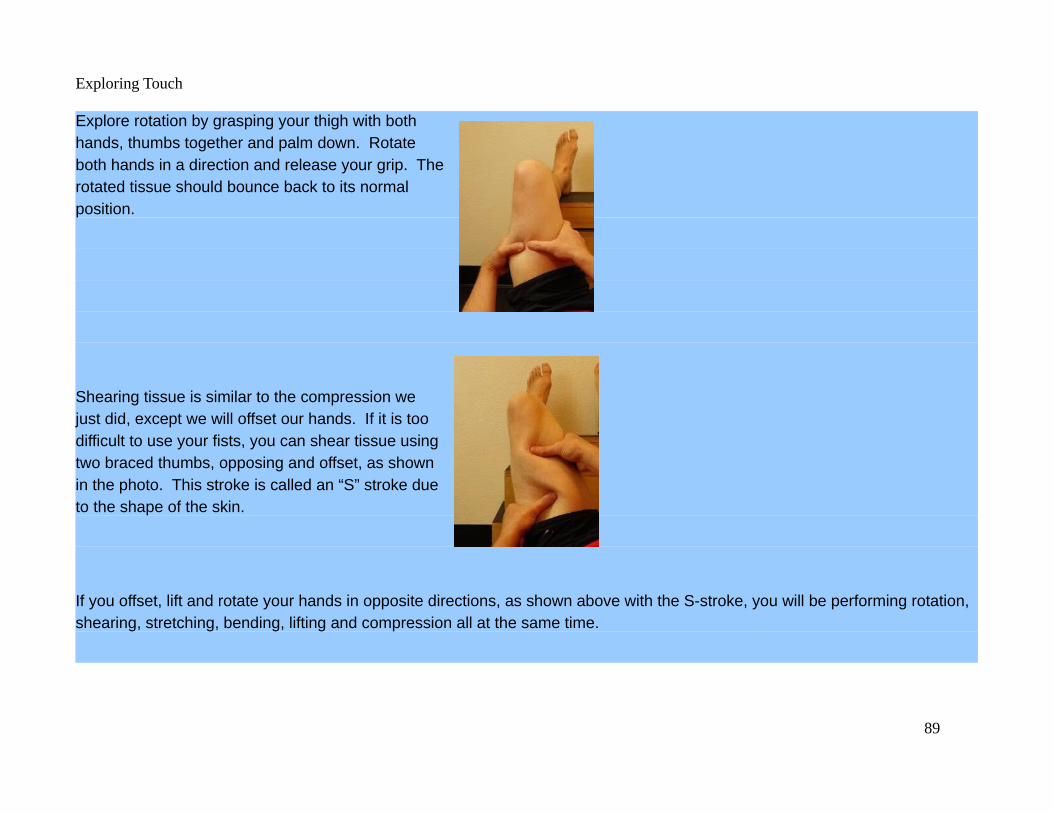
Exploring Touch
Explore rotation by grasping your thigh with bothhands, thumbs together and palm down. Rotateboth hands in a direction and release your grip. Therotated tissue should bounce back to its normalposition.
Shearing tissue is similar to the compression wejust did, except we will offset our hands. If it is toodifficult to use your fists, you can shear tissue usingtwo braced thumbs, opposing and offset, as shownin the photo. This stroke is called an “S” stroke dueto the shape of the skin.
If you offset, lift and rotate your hands in opposite directions, as shown above with the S-stroke, you will be performing rotation, shearing, stretching, bending, lifting and compression all at the same time.
89

Exploring Touch
Contact Tools
Besides the actions explored above, our contact required using specific tools (fist, braced thumbs, web between thumb and forefinger, etc.). The number and variety of available tools is essentially infinite, especially if we take advantage of our innate human drive to create tools from other objects. A complete explanation of potential tools is beyond the scope of this book, but the table in Appendix 3 looks at some basic tools available using your body and Appendix 4 some mechanical tools you can make or purchase.
When using mechanical tools for self care, it is important to understand that you can control the intensity in several different ways. While the most pressure can be generated by laying on a ball or roller on the ground, the pressure can be much better controlled by using the tool up against a wall or in a seated position.
There is also an entire class of electrical massage tools and professional tools that are outside the scope of this book.
Contact Parameters
We have now identified two key components of a touch technique: actions and tools. Previous explorations also touched on a few basic parameters such as surface area, pressure and movement speed. The table below summarizes many, but not all, of the parameters behind contact. Later we’ll explore some of the more interesting parameters further.
Contact Parameter Description
Applied Actions See above. Typically some combination of compression, stretching, lifting, bending, shearing and/or rotation.
Contact Tool See above. Typically some combination of body parts and/or mechanical tools.
Contact Surface Area Amount of tool that contacts tissue.
Tool Tension Amount of tension maintained in the tool
Pressure Vector of force applied to tissue with both a direction and magnitude.
90
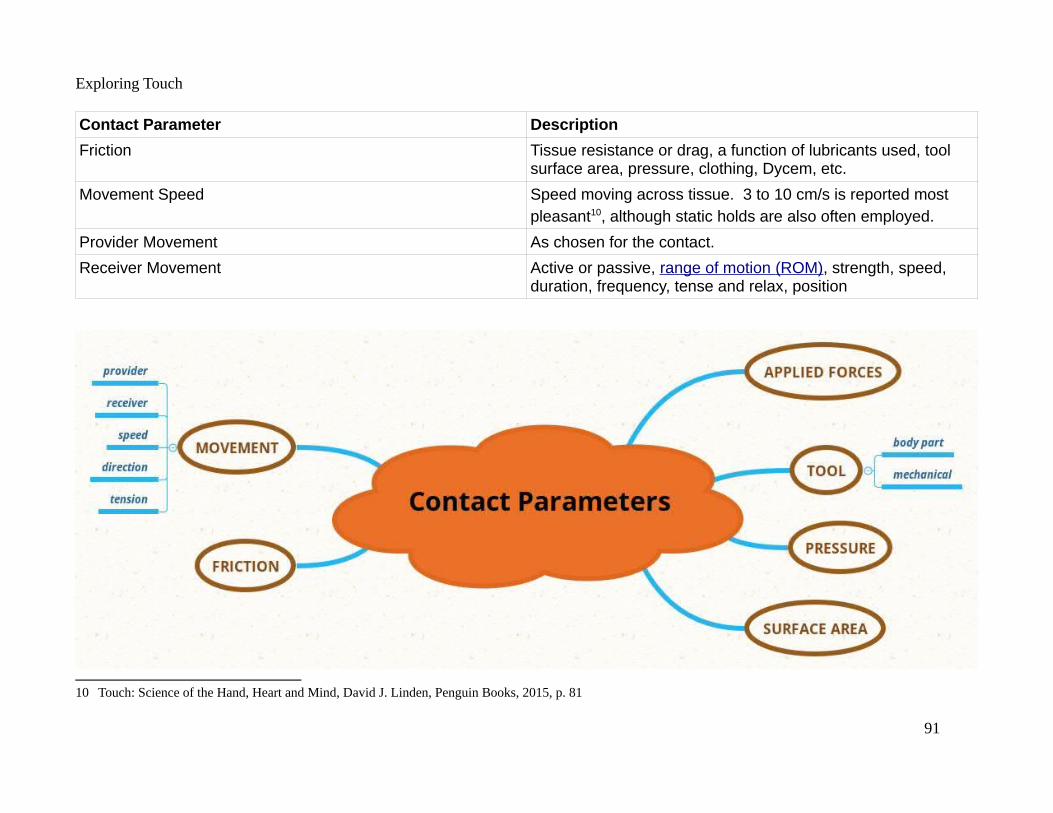
Exploring Touch
Contact Parameter Description
Friction Tissue resistance or drag, a function of lubricants used, tool surface area, pressure, clothing, Dycem, etc.
Movement Speed Speed moving across tissue. 3 to 10 cm/s is reported most pleasant10, although static holds are also often employed.
Provider Movement As chosen for the contact.
Receiver Movement Active or passive, ra nge of motion (ROM) , strength, speed, duration, frequency, tense and relax, position
10 Touch: Science of the Hand, Heart and Mind, David J. Linden, Penguin Books, 2015, p. 81
91

Exploring Touch
Short Exploration: Gauging Pressure or Intensity
This exploration considers an approach for gauging or quantifying the intensity of touch. While we typically think of this intensitybeing created by pressure, there are very many other characteristics that could contribute to the receiver’s perception of intensity. A common mechanism for accomplishing this task is to use a scale ranging from 0 to 10 (or 5, which can be shown ona single hand) with 0 being no touch sensation and 10 (or 5) being an intensity that causes withdrawal. Some touch systems specify working at an intensity less than a certain number, maybe 3 or 7. Other systems provide ranges such as 4 to 6.
Ultimately, these systems really provide a simple way for a touch provider and receiver to communicate. The receiver always sets the number scale and the provider must respect the information they receive. We will explore different touch intensities at different locations to experience how this scale might change.
Use a braced thumb from one hand to press into the palm of the other hand, never exceeding a 7 out of 10 intensity. If you change locations in the palm, can you find an area that is less sensitive than the original (more pressure for same intensity)? Can you find an area that is more sensitive (less pressure for the same intensity)?
Try a pincer grip between the thumb and forefinger to experience an area that is likely more sensitive than any area of the palm.
Pressure, Perception, Trust & Sensory Distortion
Pressure deserves special attention, which could easily become a book of its own, because of several prominent biological, psychological and societal distortions. It is not uncommon to hear touch receivers say the following:
“You can press harder.” “I need more pressure.” “Make it hurt so good!”
While others receiving the same, or even a lighter touch may say:
“You are killing me!” “Tooo hard!” “15 on a scale of 10!”
Why do you think touch receivers want or need more pressure? Or less pressure? Why the mismatch?
92
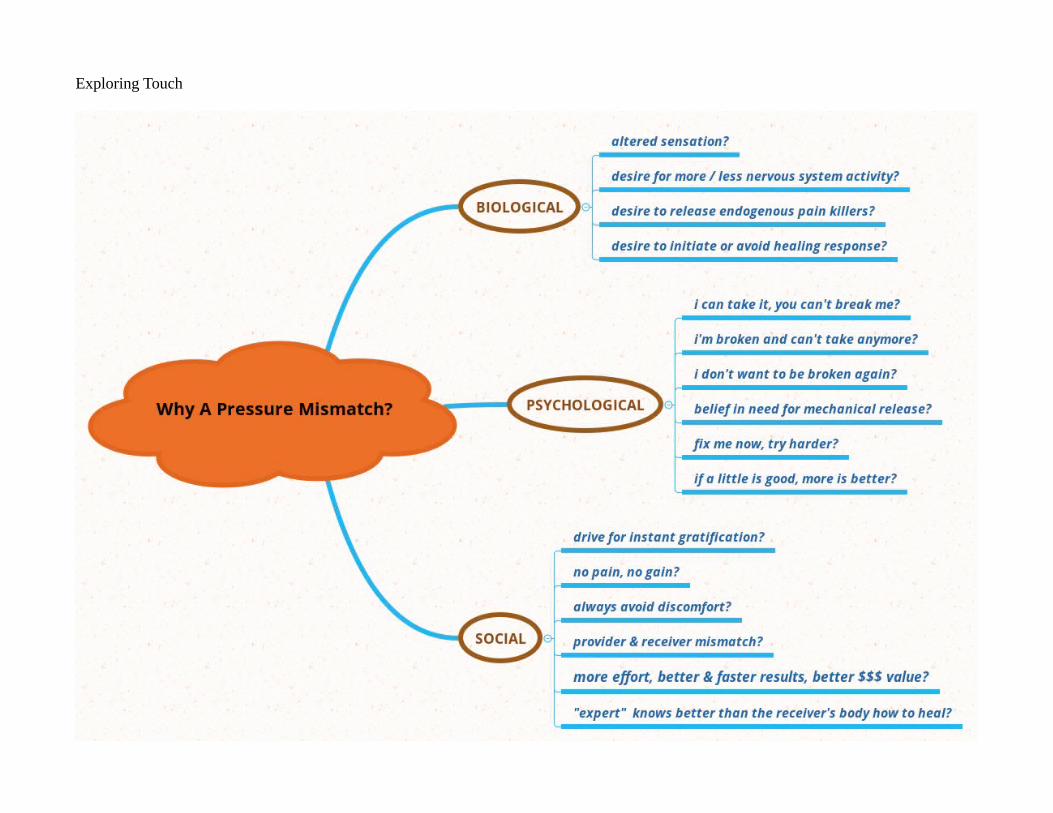
Exploring Touch
93

Exploring Touch
There are many potential reasons for pressure mismatches and every answer will be both complex and individual. There is no right or wrong answer, as this issue is based on subjective perceptions. The science surrounding this topic is terribly unsettled,we all have deeply rooted beliefs about pressure, and while experience is a great guide, it seems there is no set of simple rules to communicate how to achieve an optimal pressure balance. The simplest and safest rule is “less is more”, but too often we find out that at least a little “more” might be warranted.
It might prove instructive to think of pressure as a commodity that is traded in the market of touch with associated risks, rewardsand other factors. Thanks to Gordon Gekko11 many of us already know that there are are two primary market forces: fear and greed. Those who want or use morepressure are often motivated bygreed, while those who want or useless pressure are more oftenmotivated by fear. Like any market,the pressure market is much morecomplex than fear and greed, butthis simple model allows us toexamine and discuss the most basicaspects of pressure transactions,and their associated negotiations.
Greed is neither good nor bad andthe same is true of fear. Extremes offear or greed create dangeroussituations, so our goal is to achievean appropriate balance for all parties
11 The fictional character from the Wall Street movies who acts on the belief that “greed is good”.
94

Exploring Touch
involved in the transactions. Too much pressure carries the hazards of injury and/or increasing muscular stress and tension. Too little pressure carries risks such as irritating the nervous system (like a fly on the skin) or perceived ineffectiveness.
The concept of minimum effective dosage discussed in a later section applies to pressure. Pressure behaves dramatically different for different techniques, locations on the body, situations and individuals. It is key that the encounter occur in the overlap, if any, between the provider’s and receiver’s pressure perceptions. Given this complexity, the plot above shows potential areas surrounding pressure versus results where this intersection may reside. Note that the results pertain to both provider and receiver – the provider can be injured perhaps more easily than the receiver. Also note that the drop from excellent results to injury or increased tension may occur very rapidly, even instantly. Too much greed surrounding too much pressure carries serious risks.
The fear side of this plot is quite interesting, as it is primarily driven by perceptions of both the provider and receiver. Extremely light touch, skillfully applied, can be tremendously effective and yield excellent results. However, achieving these results generally requires both the provider and receiver to trust that such results are possible. The great news about fear surroundingtoo little pressure is that the risks are minimal, more about perceived effectiveness than reality.
The exciting part is that there is probably more to be discovered for both provider and receiver by exploring the territory around less pressure, as long as they both trust in the adventure and are open to experiencing more subtle sensations. Unfortunately, many individuals are simply not ready to explore in this way and you either need to meet them where they are or decide if it is best not to work with them at this point. This situation is always subject to change as both provider and receiver evolve.
So what does your intuition tell you about the challenges surrounding pressure? Do you see the interesting interplay between results, risks, fear, greed and trust when it comes to negotiating pressure?
When tissues are healthy, there is generally much resiliency with respect to the use of pressure. This resiliency often results from an overall balance of muscle tension and a well developed ability to sense touch, both good signs of a healthy nervous system. Under these circumstances, the receiver welcomes, tolerates and is responsive to a wide variety of different reasonable touch pressures. You may press extremely hard, eventually contacting underlying bone through the tissue, without
95

Exploring Touch
evoking discomfort. However you might also see tissue become more tense as you press harder as a protective reaction. You can also very lightly contact tissue and it will be perceived as pleasant and typically evoke a relaxation response in the receiver.
Less healthy tissue tends to react in one of two ways: it over protects resulting in increased tension (possibly including a tickling sensation) with even the slightest touch (fear) or it under protects, reducing sensation, which requires a very heavy touch (greed) for the receiver to feel anything. The body, particularly the nervous system, is pretty good at knowing what it needs, so the basic idea is to match the needs of the receiver, if you can. Once their needs are met, change will likely occur over time, trust will develop and changes to a more appropriate pressure can be explored.
Trust is the key aspect to establish between the provider and receiver, before attempting to explore changes in pressure which might be more “normal”, at least to the provider. Good communication and follow through is important to help establish trust. We also must understand that the greatest risk emerges from providing too much pressure.
Before we go further, let’s look at some things increased pressure might accomplish to understand why it might be desirable:
• Increases fluid flow (blood, lymph, interstitial) by increasing fluid pressures at the application area, initially forcing fluids away from the contact area and promoting an in rush of fluids as pressure is released
• Increases sensation by activating more, different and deeper sensory receptors, creating more overall nervous system activity
• Damages tissue, initiating a healing response, including invoking the body’s natural pain suppression mechanisms
• Physically stresses tissues, possibly getting them to move better, but also potentially increasing overall tension
Additionally, there is often an impression in our modern society that more pressure is better or that it will achieve results faster. This logic follows from a belief that the issues are in the muscles themselves and that we can literally pressure the muscle into behaving better. Hopefully, at this point in the book, you see a potential error in this approach – muscle is dumb, it is controlled by the nervous system and muscle tension imbalance is more often a symptom not a root cause. Muscle tension imbalance is created by the nervous system and patterns of tension can result in changes over time to the circulatory, fascial, skeletal and other systems that support movement and life. So how might this all work together?
96

Exploring Touch
Unhealthy tissue and overloaded nervoussystems result in a reduced ability to sensetouch appropriately. Increased nervoustension, which leads to muscular tension,reduces circulation which further reducesthe ability to correctly sense touch in thearea. This whole cycle is exaggeratedfurther when range of motion is lost and theability to move is compromised.
One explanation for the distorted pressurerequirement is that many individuals havelost the ability to sense well. Often underthese circumstances, touch must beapplied in a manner that helps break thecycle which reinforces distorted sensation. Appropriate pressure generally results in areduced tension in the tissues resulting inan eventual improvement in sensation andimproved pressure requirements.Sometimes the tissue change underpressure, directly controlled by the nervoussystem, is a better indicator of appropriate pressure than the individual’s perception. Often the increased pressure one receiverdesires only makes their tissue more tense, while slightly more pressure than another individual desires causes their tissue to relax. These situations require careful consideration, education and communication to resolve efficiently and safely.
So what do you do when someone asks for more pressure?
97
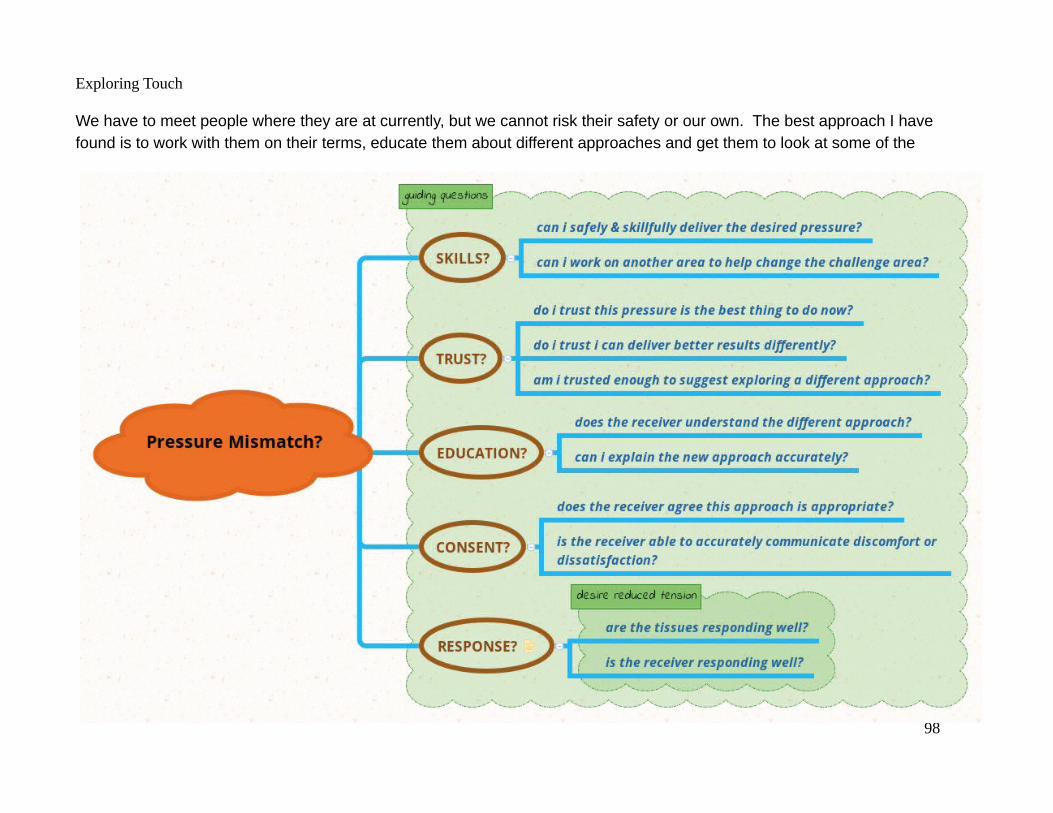
Exploring Touch
We have to meet people where they are at currently, but we cannot risk their safety or our own. The best approach I have found is to work with them on their terms, educate them about different approaches and get them to look at some of the
98
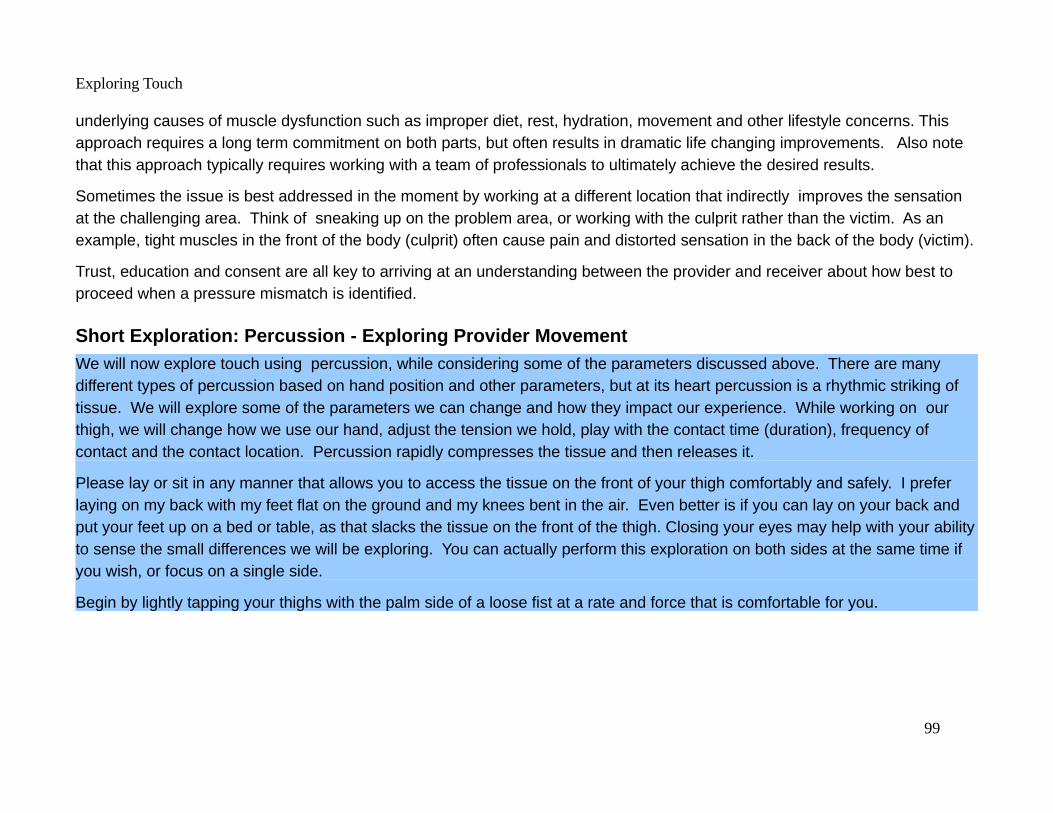
Exploring Touch
underlying causes of muscle dysfunction such as improper diet, rest, hydration, movement and other lifestyle concerns. This approach requires a long term commitment on both parts, but often results in dramatic life changing improvements. Also note that this approach typically requires working with a team of professionals to ultimately achieve the desired results.
Sometimes the issue is best addressed in the moment by working at a different location that indirectly improves the sensation at the challenging area. Think of sneaking up on the problem area, or working with the culprit rather than the victim. As an example, tight muscles in the front of the body (culprit) often cause pain and distorted sensation in the back of the body (victim).
Trust, education and consent are all key to arriving at an understanding between the provider and receiver about how best to proceed when a pressure mismatch is identified.
Short Exploration: Percussion - Exploring Provider Movement
We will now explore touch using percussion, while considering some of the parameters discussed above. There are many different types of percussion based on hand position and other parameters, but at its heart percussion is a rhythmic striking of tissue. We will explore some of the parameters we can change and how they impact our experience. While working on our thigh, we will change how we use our hand, adjust the tension we hold, play with the contact time (duration), frequency of contact and the contact location. Percussion rapidly compresses the tissue and then releases it.
Please lay or sit in any manner that allows you to access the tissue on the front of your thigh comfortably and safely. I prefer laying on my back with my feet flat on the ground and my knees bent in the air. Even better is if you can lay on your back and put your feet up on a bed or table, as that slacks the tissue on the front of the thigh. Closing your eyes may help with your abilityto sense the small differences we will be exploring. You can actually perform this exploration on both sides at the same time if you wish, or focus on a single side.
Begin by lightly tapping your thighs with the palm side of a loose fist at a rate and force that is comfortable for you.
99

Exploring Touch
Now, tighten and loosen the fist as you continue percussing your thighs. Do they feel different when tight versus loose? Which do you prefer?
Next, we’ll reduce the surface area by rotating our fists so we are striking with the little finger (ulnar) side of the fist as shown below.
100

Exploring Touch
Alternate between the palm and little finger side of your fist striking your thigh. What is the difference?Which creates more sensation? Which feels better? Explore the area around the thigh to see if you mightfind locations where each hand position feels better than the other. The softer palm side might feel betteralong the side, while the firmer little finger side might feel better on the front.
Continue exploring with the little finger side of the fist by adjusting the tension that you hold in your hands asyou strike. Notice the sound of each percussion and how they change as you change location and tensionin your hand. Sound provides striking feedback during percussion. (Yes, bad pun intended!)
Next, choose your favorite hand position of the two explored above, adjustingthe amount of time you contact the tissue and the time between strikes orfrequency. Begin with a super slow cadence of about one strike every two orthree seconds. Slowly speed this up until you are going as fast as you can.What is your favorite speed?
Now let’s experiment with a few more hand positions. You are probablyfamiliar with a karate chop, so we’ll go there next. Hold your hands open andgently strike with the little finger (ulnar) side of the hand on your thighs. Tuneinto the sound this style of percussion is making. If you are holding a lot oftension in your hand, you’ll likely hear a short, hard “thud”, but if you loosenup and spread your fingers while your hand is in the air, you should hear amuch longer, softer sound as each loose finger contacts the next on impact.Besides the sound, do you notice a difference in how this feels?
101
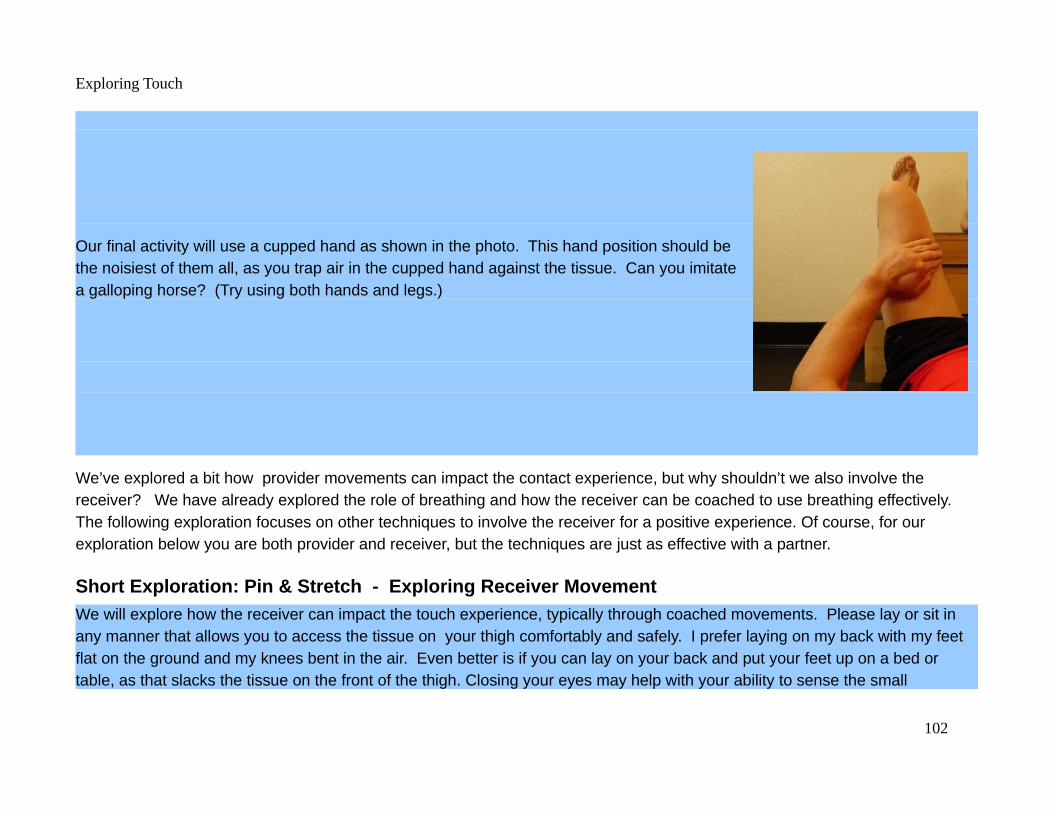
Exploring Touch
Our final activity will use a cupped hand as shown in the photo. This hand position should bethe noisiest of them all, as you trap air in the cupped hand against the tissue. Can you imitatea galloping horse? (Try using both hands and legs.)
We’ve explored a bit how provider movements can impact the contact experience, but why shouldn’t we also involve the receiver? We have already explored the role of breathing and how the receiver can be coached to use breathing effectively. The following exploration focuses on other techniques to involve the receiver for a positive experience. Of course, for our exploration below you are both provider and receiver, but the techniques are just as effective with a partner.
Short Exploration: Pin & Stretch - Exploring Receiver Movement
We will explore how the receiver can impact the touch experience, typically through coached movements. Please lay or sit in any manner that allows you to access the tissue on your thigh comfortably and safely. I prefer laying on my back with my feet flat on the ground and my knees bent in the air. Even better is if you can lay on your back and put your feet up on a bed or table, as that slacks the tissue on the front of the thigh. Closing your eyes may help with your ability to sense the small
102
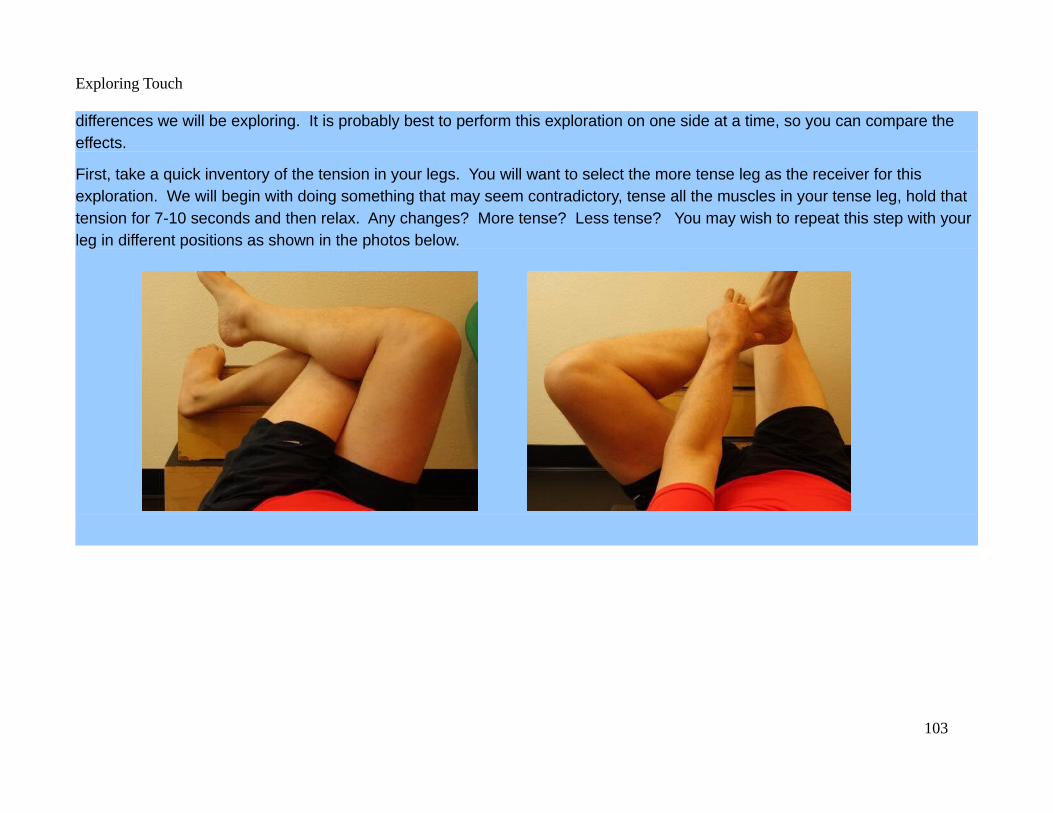
Exploring Touch
differences we will be exploring. It is probably best to perform this exploration on one side at a time, so you can compare the effects.
First, take a quick inventory of the tension in your legs. You will want to select the more tense leg as the receiver for this exploration. We will begin with doing something that may seem contradictory, tense all the muscles in your tense leg, hold that tension for 7-10 seconds and then relax. Any changes? More tense? Less tense? You may wish to repeat this step with your leg in different positions as shown in the photos below.
103

Exploring Touch
Next with a straight (extended) knee, we will use our hands to “pin” the muscles that bend(flex) the knee by wrapping our hands around our thighs about 3-4” above the knee. You willneed to squeeze pretty tight with your hands, but also monitor what is going on under yourfingers as you slowly bend (flex) your knee. Repeat that movement several times, releasingthe hands as you straighten the knee, tightening before slowly bending the knee. What doyou feel happening?
Reassess the tension in this leg, has it changed?
So far we have been working on ourselves through clothes or on bare skin. The contacts we have been investigating benefited from the friction that was in place. If you have ever had a Swedish style massage you have likely experienced the difference when lubricating medium is placed on your skin. The medium itself typically consists of an oil, lotion or cream which allows skinto glide over skin with less friction. The best mediums use simple, natural, high quality ingredients as your skin can easily absorb any chemicals placed on it. Avoiding contaminants is a key consideration when choosing a medium.
Keep in mind that often, higher friction is central to achieving the goals of touch. Medium can also be used to increase friction through the addition of natural particulates such as salt or sugar. These mixes scrub the skin and are used for exfoliating the skin (removing dead skin cells).
104

Exploring Touch
Short Exploration: Friction and Mediums
This exploration investigates applying a lubricating medium to tissue to alter contact friction. Do NOT perform this exploration if you have sensitive skin, have a wound or any skin infection. STOP if you notice any irritation of the skin due to any of the mediums.
You will need to prepare two medium mixtures before proceeding and should have a damp towel and dry towel on hand for cleanup. If you do not have a commercial medium, you can use a high quality olive oil. One bowl will contain a small amount ofthe medium you have chosen, while the other bowl will contain a small amount of medium and an amount of medium grain sea salt or coarse sugar to form a fluid paste. There are advantages and disadvantages of each material, as salt can sting, while sugar can be sticky. Feel free to experiment and abandon any situation which does not feel right to you. This should definitely feel good.
Be sure to wash and dry your hands of any medium left on them from the previous preparations. I’d suggest working from a seated position with your non-dominant arm on a table in front of you, ready to receive touch. Close your eyes and palpate the
105
Exploring Touch
tissue of your bare receiving forearm, skin on skin. Notice how with a certain pressure, your fingers move the skin to a point where it just stops. Move around in a circle through the stopping points and notice how this contact feels.
Next, dip the fingers of your working hand into the bowl with only medium, get a small amount on your fingertips and perform the same circle on your receiving forearm with about the same pressure. Does the tissue stop moving anymore? Or do you continue to glide over the tissue? Notice how the more you work the tissue with the medium, the more medium is absorbed by the skin and the friction slowly increases. Clean your skin with your damp towel and dry.
Now dip you fingers into the medium mixed with the crystals of sea salt or sugar. Slowly and softly rub it into the receiving forearm using small circles. Do you notice the friction introduced by the crystals? There is typically a tendency to still glide, but you can feel the crystals moving under your fingers and on your skin. Do not spend too much time in one area, but after 30-60 seconds remove the medium with a damp wash cloth and dry with a towel.
Compare how the two forearms feel? Does the receiving forearm feel like it can now breathe?
There is much more to explore with respect to the contact aspect of touch and we will do just that in the explorations in later sections. This section served as an introduction to the attributes and parameters associated with contact during touch. It is less important to understand the details of these characteristics than it is to experience them and practice them.
While a great painter may know the ingredients of his paints, or even mix them himself, ultimately that is not his primary focus as he creates his art.
Touch Tip 61: Explore and experience different touch contacts.
Touch Tip 62: Touch pressure mismatches are often an indicator of distorted sensation. Time, trust, education and communication are key to solving a pressure mismatch. If ever in doubt, less is best.
Tension & Touch
Although we discussed tension earlier, it deserves a special section as it can be your friend or foe.
106
Exploring Touch
Tension can be contagious! If your touch conveys tension, especially uncontrolled tension, it is likely to be less effective at relieving tension when it is applied. Insuring we are in control of our breath, relaxing our body as much as possible and maintaining a low state of anxiety can make a huge difference in the quality of our touch.
Tension can also be purposely used as a tool. As experienced in a previous exploration, tightening an area and then consciously relaxing it can work wonders, especially in conjunction with touch. While there is a lot of neuroscience behind it, this technique can be easily used to both release tension and wake up or bring awareness to areas of the body that are “asleep”.
Touch Tip 63: Continuously monitor if you are holding unnecessary tension in your touch, tension can be contagious.
ThinkingThis section presents touch topics which should be consciously considered through active thinking.
Dosage & Moderation
Our modern society thrives on the concept that if a little of something is good, then more of it will be better. We often ignore the law of diminishing returns and turn a good thing into a less good or even bad thing. While there is much written in exercise and pharmacology on the effects of different dosages, there is a simple description that captures the “ideal” dosage concept nicely. The Arndt-Schulz rule states that for any stimuli to an organism, like us:
• sufficiently small doses enhance or stimulate the physiological response
• more moderate doses eventually reduce or depress the physiological response
• excessively large doses inhibit or halt the physiological response totally, potentially killing the organism.
107

Exploring Touch
The following plot models the relationship of dosageand health for an organism using this rule. Differentsituations will change the shape of the curve butgenerally not the pattern.12
Let us consider a simple swimming session using thiscurve. Depending on ability and intensity, the firstminutes to hours will likely provide a positive overallimpact to our health. If we keep pushing, out of thegreen zone in our plot and into the yellow, we will beginto have accumulating negative responses. Ourmetabolism will begin to suffer, delivering less oxygenand nutrition to our muscles. Our muscles will not work as well as a result and start accumulating wastes. Our nervous system will begin to degrade and we’ll likely experience trouble maintaining our body temperature. If we continue pushing, without an opportunity to escape this fictitious situation, we would ultimately shut down and experience a horrible drowning death. We don’t want that to happen!
It is always important to consider dosage effects for both the receiver and provider. At this point you may be pondering, dosages of what? Here is an incomplete accounting of various touch parameters for which dosing should be moderated: session time, time between sessions or recovery time, number of sessions, time spent in a body area, pressure used, speed, intensity, discomfort (physical, emotional, mental), nervous system stimulation, etc. More important than memorizing such a list,is developing the practice of periodically assessing your current situation considering this law of diminishing returns.
Our touch explorations provide a great opportunity for us to consider and practice quality over quantity or intensity. Like many life situations, these explorations are best considered in the light of the maxim, less is more. The greatest benefits are to be gained practicing moderation and consistency, but even moderation should be practiced moderately.
Touch Tip 64: Too much of any activity, including touch, can have negative impacts for both provider and receiver.
12 Like all rules, there are exceptions, but most the phenomena discussed in this book will follow this general pattern.
108
Exploring Touch
Touch Tip 65: Constantly evaluate if you are doing too much in a touch session, less is better.
Healing Process
The process of healing is familiar, yet fascinating. We have all had wounds of varying severity that eventually heal, leaving scars. Scar tissues are never quite the same as the tissues they replace, but they are the outcome of an amazing process of adaptation. We are fundamentally self-healing organisms, given appropriate time and resources. This capability to heal and adapt reaches from our lowest cellular levels to our very psyche. These levels each endure and heal from different trauma andwounds. Healing is a necessary trait of life at every level, as are scars and adaptation. This process spans the scale from imperceptible to permanently debilitating, to ultimately fatal, where observable healing stops. We are all “healers”, but current conservative evidence shows we can only heal ourselves.13 However, we can all help to create circumstances that promote others to heal themselves more effectively.
So how can touch impact the healing process?
This naive question is deceptively deep and possibly at the heart of the reason you are reading this book. Ultimately, I will leave you to answer this question for yourself, as it is worthy of a lifetime of investigation and exploration. My purpose in this section is to get you to think more deeply and broadly about the healing process, which we will explore through the common example ofsoft tissue healing. However, the simple soft tissue healing model below can be applied to healing at all levels of being human.
When considering touch and healing, it is always best to follow the Hippocratic ideal, “First, do no harm”. Information is key to successfully following this directive, as is good judgment and humility.
13 There is extraordinary evidence that healing support might extend beyond ourselves through yet to be understood mechanisms, an example text to begin exploring this concept further would be Mind to Matter: The Astonishing Science of How Your Brain Creates Material Reality by Dawson Church.
109

Exploring Touch
The details of soft tissue healing are quite complex and beyond the scope of this book, but the overall process is straight forward and commonly experienced. Immediately after a trauma, the body acts to stop bleeding and begins to deliver resources to the area for cleaning up cellular damage, protects the area against infection and begins to create an emergency tissue patch, commonly called a scab. Getting all these resources to the immediate area of trauma results in local inflammationor swelling, reduced range of pain free motion, redness and heat, all due to increased metabolic activity. As the inflammation subsides, the tissues under the scab continue to be rebuilt with lower quality tissue to restore minimal integrity and get blood vessels established for more permanent reconstruction. Once this proliferation of tissue subsides, the repair builds tissue moreslowly with higher quality tissue to remodel the initial patch. This last stage of the process results in more mature scar tissue formation. Many different factors contribute to the quality of the final result and how it impacts the organism, including injury severity, age, health, nutrition, environment, stressors and more.
The first thing to consider about the healing process is that it is a continuum of overlapping processes of varying degrees goingon throughout the body at all times. We are always healing! Almost every time we move, some level of soft tissue damage occurs which must be repaired through the healing process. A major concept behind working out or training is to create trauma in a specific way that invokes the healing process to improve the structures and systems of our body. There is wear and tear with every breath and every step we take. The healing process allows us to repair damage, both trivial and catastrophic.
Another consideration is that the flow through the process is seldom linear, but typically experiences stalling and setbacks. We often traumatize the injury, knocking off a scab, increasing inflammation, causing infection or any of many other setbacks. We can unwittingly self sabotage the healing process with inappropriate nutrition, hydration or activity. Our body’s two primary mechanisms for communicating a need for change and protecting the wound are inflammation and pain. Both these mechanisms reduce the likelihood of further injury by reducing the ability to move well and generating increased pain as the danger increases.
There are many different models to describe soft tissue healing, but we will consider a simple model. We will use three basic stages to describe the soft tissue healing process: acute, sub-acute and rebuilding. The acute stage of soft tissue healing is
110
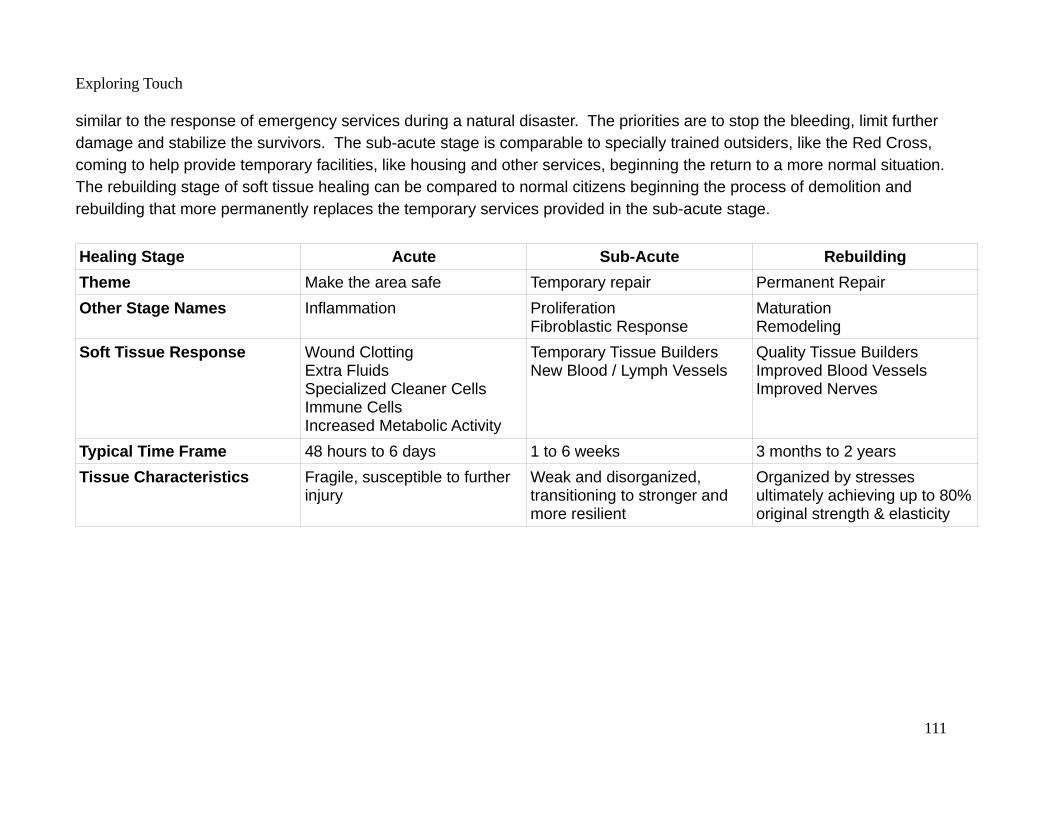
Exploring Touch
similar to the response of emergency services during a natural disaster. The priorities are to stop the bleeding, limit further damage and stabilize the survivors. The sub-acute stage is comparable to specially trained outsiders, like the Red Cross, coming to help provide temporary facilities, like housing and other services, beginning the return to a more normal situation. The rebuilding stage of soft tissue healing can be compared to normal citizens beginning the process of demolition and rebuilding that more permanently replaces the temporary services provided in the sub-acute stage.
Healing Stage Acute Sub-Acute Rebuilding
Theme Make the area safe Temporary repair Permanent Repair
Other Stage Names Inflammation ProliferationFibroblastic Response
MaturationRemodeling
Soft Tissue Response Wound Clotting Extra FluidsSpecialized Cleaner CellsImmune CellsIncreased Metabolic Activity
Temporary Tissue BuildersNew Blood / Lymph Vessels
Quality Tissue BuildersImproved Blood VesselsImproved Nerves
Typical Time Frame 48 hours to 6 days 1 to 6 weeks 3 months to 2 years
Tissue Characteristics Fragile, susceptible to further injury
Weak and disorganized, transitioning to stronger and more resilient
Organized by stresses ultimately achieving up to 80%original strength & elasticity
111

Exploring Touch
This basic progression through the acute, sub-acute and rebuilding stages can be easily applied to other healing processes. Consider the trauma induced by the death of a loved one. A primary concern in the acute phase is to feel safe again after such a devastating loss. As we enter the sub-acute phase, temporary repairs such as friends and relatives bringing food or gatheringbegin to help repair the damage. During the rebuilding phase, we slowly resume life without our loved one and return to a new
112
Exploring Touch
normal. This new normal is never the same as when we had our loved one in our lives, but it is typically fully functional. This basic healing progression model can be applied to romantic break-ups, sprained ankles and most every other trauma.
Perhaps the most interesting question becomes when do we need a professional to help support the healing process? The answer to this question is highly situational and dependent on multiple factors. The largest determinants are severity of the trauma, duration of the healing stages, recurrence of injury and many other factors. If we look at the soft tissue healing model, the most benefit occurs when health professionals can be involved at the acute stage and their role typically diminishes by the rebuilding stage for all except the most traumatic situations. Many situations, such as a bruise or scrape, will not benefit from medical intervention, although even these situations can result in complications if the healing process is not properly supported. As an example, a serious systemic infection can develop in the most minor of scrapes if not properly treated. Our most severe traumas can require health professional support well into and past the rebuilding stage, possibly for the rest of our lives. The point to be made is to always consider if the best option is to consult a health care professional to support the healing process.
Discussing the professional goals of touch during the healing process is outside the scope of this book, but realize that touch can contribute to better inflammation management, improved pain management, reduced spasm, improved range of motion, facilitate formation of robust repair tissue and improve overall tissue remodeling. However, the most important contributions maynot be physical.
Let us consider how touch can support the healing process at all stages. Think of the most trivial case of a small bump to our knee or elbow, what is the immediate response? Rub it. Simple touch is highly effective at reducing stress and pain during all stages of this process. Considering someone with even a severe lower body trauma, holding their hand in support and reassuring them through eye contact and words can contribute to improving the healing process immediately. Animals respond especially well to having their ears rubbed during traumatic incidences ranging from a simple vet visit to being hit by a car. Touch can be both safe and powerful as long as you understand how to first do no harm. Touch that supports healing can involve physical contact, but may also be effective without physical contact. It would be unwise to underestimate the power of intent in the healing process.
113
Exploring Touch
Touch Tip 66: We are amazingly well adapted self-healing organisms.
Touch Tip 67: We are all “healers”, primarily healing ourselves, while supporting healing in others.
Touch Tip 68: Since the body will eventually heal without intervention, it is best to “First do no harm!”.
Touch Tip 69: Always evaluate if professional help is needed to support the healing process.
Touch Tip 70: Touch, even without direct contact, can be a powerful support tool in the healing process.
Placebo-Nocebo Effects
It is important to remember that not all trauma and healing is physical, and neither is all touch. Our nervous systems exercise a greater deal of control over the healing process than we generally acknowledge. As an organism, we support four major functions, in the approximate order presented below:
• Surviving• Healing / Repairing• Growing• Reproducing / Creating
114
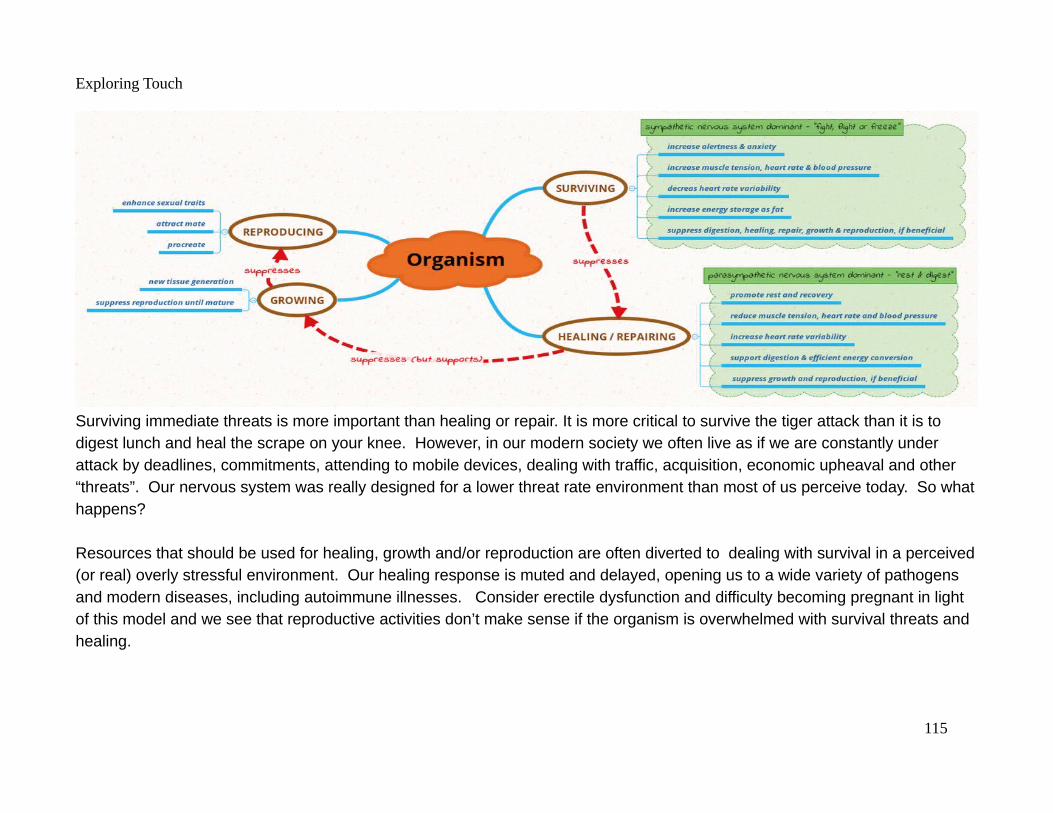
Exploring Touch
Surviving immediate threats is more important than healing or repair. It is more critical to survive the tiger attack than it is to digest lunch and heal the scrape on your knee. However, in our modern society we often live as if we are constantly under attack by deadlines, commitments, attending to mobile devices, dealing with traffic, acquisition, economic upheaval and other “threats”. Our nervous system was really designed for a lower threat rate environment than most of us perceive today. So whathappens?
Resources that should be used for healing, growth and/or reproduction are often diverted to dealing with survival in a perceived(or real) overly stressful environment. Our healing response is muted and delayed, opening us to a wide variety of pathogens and modern diseases, including autoimmune illnesses. Consider erectile dysfunction and difficulty becoming pregnant in light of this model and we see that reproductive activities don’t make sense if the organism is overwhelmed with survival threats and healing.
115

Exploring Touch
Operating in our modern environment requires us to understand two very real phenomena, the placebo and nocebo effects. Most of us have heard of the placebo effect, which when given an inert treatment, such as a sugar pill, the recipient believes thetreatment is real and their body responds with improved healing. Clinical trials need to take this effect into account to ascertain the true effectiveness of new drugs or other treatments. The placebo response rate varies with situation, but can be as high as 50% or more! There is growing evidence that expectations impact physical responses related to healing including neurological, hormonal and immune responses.
The nocebo effect is just as real as the placebo effect, but represents the negative side of expectations. While this often is described as a recipient experiencing the known negative effects of an inert treatment, more common examples involve careless use of words, metaphors and images that can hinder healing.
Consider the common diagnosis of a “slipped disc” in the back or neck, which conjures a very definitive and traumatic image. This image is typically reinforced by the big red, throbbing disc bulge on the skeletal model the medical professional shows us to explain the issue. The reality is that discs are so firmly integrated into the spinal structure that they simply cannot physically “slip”. When we repeatedly tell ourselves that we have a “slipped” disc, remembering all the images associated with it, we reinforce a permanent call to protect this fragile structure through limited movement. Further more, one never hears “my disc slipped back”, so this unfortunate description holds little hope for recovery . Yet, most disc injuries offer an opportunity for healing, recovery and restoration of normal movement if the correct environment for healing is fostered.
The Neuro Orthopedic Institute or noigroup in Australia have gone so far as to propose replacing the word “disc” with LAFT or Living Adaptable Force Transducer.14 This replacement term more accurately reflects the tissue and reinforces the ability to adapt after injury.
Did you know it is not just the recipient’s beliefs that contribute to the placebo / nocebo effect, but also the provider’s? 15 Studies show provider beliefs can impact the effectiveness of inert treatments on recipients. No matter how you choose to
14 Explain Pain, G. Lorimer Moseley & David S. Butler, Noigroup, p. 5415 Explain Pain Supercharged, G. Lorimer Moseley & David S. Butler, Noigroup, p. 89
116

Exploring Touch
explain this phenomena, as yet to be discovered communication mechanisms or an integration of physical senses, it is a real phenomena that impacts our study of touch.
The placebo and nocebo effects cut directly to a truth about our bodies, that when we feel safe from survival threats and supported, we heal better than when we feel we are in danger. Threats are not just physical, they come from the words we use and what we believe to be true about our situation. Our words provide an opportunity to impact our own and others health and healing. Foster affirmative, but realistic, thoughts and speech about yourself and others. Simple corrections, such as not referring to an injured arm as “my bad arm”, can have an impact. Perhaps “my healing arm” is a better reference?
The beauty of touch, physical or non-physical, is that for most of us it appears more real and immediate than those more vague survival threats that we tend to escalate if a real connection is absent. Many of our modern health issues are rooted in unfounded fears. A popular acronym for FEAR is False Events Appearing Real, which is a common modern state, consciously or unconsciously. Michel de Montaigne captured our mental occupation with fear, suffering and tragedy succinctly, “My life has been full of terrible misfortunes, most of which never happened.” 16 The bad news is that our physiology reacts the same for both real and imagined threats. There is no solid proof for this statement, but touch is as real as connections get in the human realm and I believe that this reality serves to ground the nervous system into a better understanding of what is real. Touch serves as a touchstone for us, a veritable standard by which to judge the reality of an experience. The common touchstone for assessing if we are in the dream state is to pinch ourselves. Touch can bring us back to a reality of safety and support us, so that the healing wisdom of the body can perform better.
Touch Tip 71: What you think and say can impact your health and ability to heal. Foster affirmative, but realistic, thoughts and speech about yourself and others.
Touch Tip 72: Encourage the inner healing ability in yourself and others.
16 Essais, Book III, Michel de Montaigne, 1595. Mark Twain is attributed a similar quote, but no reliable reference is available, likely he adapted Montaigne’s.
117

Exploring Touch
Touch Tip 73: Touch serves as our touchstone for assessing the reality of an experience.
Touch Tip 74: Touch can help the nervous system shift from a survival state into a state of healing and repair.
Dumb Muscles, Smart Skin
Always remember, muscle is dumb, all it does is shorten or lengthen under command. Yet as a society, we are obsessed with muscles. Some of us spend time building specific muscle groups to look better and all of us have experienced “muscle” pain (please remember that pain is ALWAYS generated by the brain to protect you). Muscles, muscles, muscles! Marcia, Marcia, Marcia!17
Muscle diagrams commonly seen in a gym or at a medical professional’s office have stripped away all the other “stuff” to bare the muscles we worship. Please don’t be fooled by this obsession with muscle, as the impact of touch is primarily through the parts that are not muscle. Skin, connective tissues (like fascia), nerves, lymph atic , circulatory, respiratory and digestive systems are the keys to muscles that work correctly. Muscles are dumb, they just shorten and lengthen when given the correct electrochemical environment provided by other physiological systems; they misbehave when they are abused or lack requirements provided by these other systems.
Muscles are composed of relatively simple cells that adjust their length and tension based on inputs from the nervous system. As long as the other systems provide an appropriate environment providing nutrients for energy, removing wastes and supporting connections to bones and other parts of the body, muscles are pretty much just actuators that shorten and lengthen on command. Not to say that muscles don’t cause troubles, like painful trigger or tender points, but when they do it generally starts with trouble in other systems. Muscles are typically the poor victims that scream in pain, while the real culprits hide.18
17 Homage to Jan’s plight as the often ignored middle child on the TV situation comedy, The Brady Bunch.18 You will see this concept often and I unfortunately do not remember who to credit with this metaphor. The basic idea is that where you feel pain is typically the area
that is suffering an insult, not the area that is the cause of the insult. A typical example is back pain caused by tension in the front of the body overpowering and overworking the poor back muscles.
118

Exploring Touch
We often think of rubbing ourmuscles to feel better, butunless you are a surgeon, youhave likely never rubbed livingmuscle in isolation. However,we have all rubbed skin to getto underlying muscles and thatis where our journey begins.Early in embryo developmentthe dividing cells form threeprimary layers that eventuallyform the basis for skin (outermost layer or ectoderm),muscle (middle layer or mesoderm) and organs (innermost layer or endoderm).
Obviously, there is significantlymore complexity, but ultimately these three layers are joined and formed through multiple folds and developing connective tissues, resulting in a complete body. The connective tissues take many forms including bones, cartilage, ligaments, fascia, tendons and blood.19
The outermost layer, or ectoderm, not only forms the skin, but also the nervous system, most critically the brain. So a key point to remember is that when you touch the skin, you are essentially touching the outside of the brain. Even more critically, you have connected your nervous system to that of those whom you are touching. At this physical level, touch is the direct physical
19 Note the extent of defining fascia can be variable. As an example, fascia wraps the muscles through several layers (epimysium, perimysium, endomysium, etc.), continuing on when muscle cells diminish to become the tendons that connect muscles to bones. I consider tendons a specific instance of fascia, but some might be concerned if tendons were not in this list separately, while others will be concerned it is listed.
119
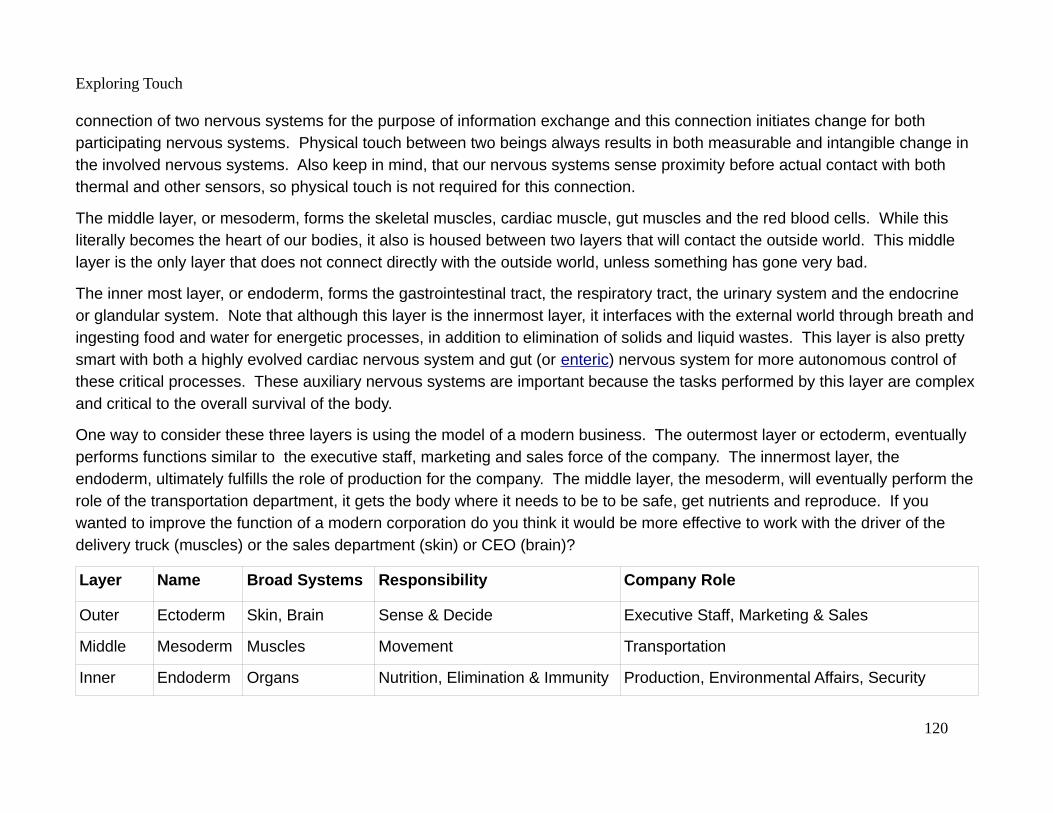
Exploring Touch
connection of two nervous systems for the purpose of information exchange and this connection initiates change for both participating nervous systems. Physical touch between two beings always results in both measurable and intangible change in the involved nervous systems. Also keep in mind, that our nervous systems sense proximity before actual contact with both thermal and other sensors, so physical touch is not required for this connection.
The middle layer, or mesoderm, forms the skeletal muscles, cardiac muscle, gut muscles and the red blood cells. While this literally becomes the heart of our bodies, it also is housed between two layers that will contact the outside world. This middle layer is the only layer that does not connect directly with the outside world, unless something has gone very bad.
The inner most layer, or endoderm, forms the gastrointestinal tract, the respiratory tract, the urinary system and the endocrine or glandular system. Note that although this layer is the innermost layer, it interfaces with the external world through breath andingesting food and water for energetic processes, in addition to elimination of solids and liquid wastes. This layer is also pretty smart with both a highly evolved cardiac nervous system and gut (or enteric) nervous system for more autonomous control of these critical processes. These auxiliary nervous systems are important because the tasks performed by this layer are complexand critical to the overall survival of the body.
One way to consider these three layers is using the model of a modern business. The outermost layer or ectoderm, eventually performs functions similar to the executive staff, marketing and sales force of the company. The innermost layer, the endoderm, ultimately fulfills the role of production for the company. The middle layer, the mesoderm, will eventually perform therole of the transportation department, it gets the body where it needs to be to be safe, get nutrients and reproduce. If you wanted to improve the function of a modern corporation do you think it would be more effective to work with the driver of the delivery truck (muscles) or the sales department (skin) or CEO (brain)?
Layer Name Broad Systems Responsibility Company Role
Outer Ectoderm Skin, Brain Sense & Decide Executive Staff, Marketing & Sales
Middle Mesoderm Muscles Movement Transportation
Inner Endoderm Organs Nutrition, Elimination & Immunity Production, Environmental Affairs, Security
120

Exploring Touch
Ultimately, these three layers are joined and formed through developing connective tissues, resulting in a complete body. The connective tissues take many forms including bones, cartilage, ligaments, fascia and blood. The connective tissue provides form through a wet scaffolding of living tissue that functions through tensions and pressures between various rigid elements to provide structural integrity during functional movements. Additionally, the mechanical tension in these connective tissues communicates through the body faster than the nervous system alone. The connective tissue, especially fascia, is what helps make the body “one piece”. Considering the body as one piece integrates all the parts into a living body, while most approaches to anatomy dissect the body into different pieces, including over 600 muscles. It is helpful to know the names of muscles, but it is not how we experience them through touch or movement.
Tom Myers, author of Anatomy Trains, proposes an interesting way to view the balance between integration and dissection of the body through a reconsideration of the connective tissue called fascia.
“There really is only one muscle; it just hangs around in 600 or more fascial pockets. … All too easily, however, we are seduced into the convenient mechanical picture that a muscle ‘begins’ here and ‘ends’ there, and therefore its function is to approximate these two points, as if the muscle really operated in such a vacuum. Useful, yes. Definitive, no. Muscles attach to other musclesby their sides, muscles are in series with ligaments, and muscles attach to nearby neurovascular bundles – ‘these attachments’ getlittle consideration in modern anatomy.”20
Knowledge of the muscles is a useful thing, but all that knowledge is based on some model that creates a map of current knowledge. Once again we see, the map is not the territory. The map can be useful, but it will always be incomplete. Myers references a mechanical model based on conceiving the body as composed of a stacked structure of levers (bones) and hinges(joints) animated by muscle movements. This model can be useful, but is woefully inadequate for several reasons. The first is that our bones do not stack, but just as importantly as Myers points out above,there are other attachments, primarily through contiguous, multiple layers of a single sheet of fascia that provides form to the body.
Ultimately, we get back to the body is one piece. What single system provides the best representation of the human form? Theskeletal system provides a good rough approximation. The nervous, cardiovascular and lymphatic systems all better capture the human form, but are still highly granular. The muscular system comes very close, but is missing large amounts of content.
20 Anatomy Trains, Churchill Livingstone Elsivier, Tom Myers, p. 41.
121

Exploring Touch
As an example, consider the buttocks of a muscle model compared to a living human. If you could remove everything in the body that is not fascia and then put each individual fascial pocket under the correct pressure and tension using a fluid like water, you could perfectly duplicate the human form. If you could dynamically control the pressure and tension of the pockets you could also duplicate movement and different postures. Fascia is the key to form.
Myers promotes an improved anatomical model, based on Buckminster Fuller’s concept of tensegrity. Elastic tension (muscles & connective tissue) balanced with rigid structures (bones) provides mobility and integrity. The tensegrity model is vastly improved in that it captures the spirit of the body being one piece. Changing length and tension relationships in a tensegrity model in one place, impacts the overall form.
However, the tensegrity model fails to capture the hydraulic nature of the body where pressure inside compartments adds to structural integrity using fluid pressure and flow. Consider how important breath can be to contributing to structural integrity, holding our breath to maintain intra-abdominal pressure is one way to see this principle in use. Every muscle contraction is contained within a fixed fascial bag, creating pressure. Fundamentally, all our systems including circulation, respiration and digestion are balanced through fluid pressure and flow. I suspect this hydraulic model can ultimately provide improved insights into function and dysfunction in body movements. The basic parameters of this model are pressure, flow and their rhythms or cycles.
Touch Tip 75: Muscle is dumb, it shortens and lengthens under command of the nervous system.
Touch Tip 76: When you touch the skin, you are effectively touching the brain.
Touch Tip 77: Touching another individual connects your two nervous systems.
Touch Tip 78: A living body is one piece, touching anywhere impacts everywhere.
122

Exploring Touch
Touch Tip 79: Fascia shapes the body, supporting movement through tension, pressure, flow and rhythm.
Ability to Change
The ability for tissue to change is called plasticity. As discussed in the section on healing, our bodies are constantly changing, sometimes for the better and sometimes for the worse. There are several formal laws that govern the adaptability of tissue. Wolff’s law addresses bone adaptation to stress, Davis’ s law applies to soft tissue. There are surely other laws and they all boildown to the following:
Tissue will either adapt to the loads to which it is subjected, or fail if the loads are too great or the recovery time too short.
This behavior is great news and is the basis for virtually all physical training of the body. Loading tissue provides a stress and the tissue adapts by restructuring in a way to better handle the new load, given enough rest and resources to accomplish the remodeling. Training is essentially stressing the tissue in a particular way with the goal of getting it to adapt. This goal could beto recruit more muscle fibers to become stronger, damage muscle fibers so they rebuild larger or stretch fascia so it eventually lengthens increasing some range of motion. Obviously, all this adaptation is best metered out in appropriate doses, as discussed in the section on dosage and moderation.
The great news is that we can also stress neurological tissues in a way that they rewire to better handle a task. We call such neurological stress learning, which you hopefully are doing as you read this book. The technical name for these changes is neuroplasticity, and it can happen quite quickly, like when you instantly change your mind or learn something new.
The following graph is a visual representation for the time scales on which various tissues remodel.
123

Exploring Touch
The nervous system can change nearly immediately,muscles take weeks to adapt, fascia can take monthsto adapt and bone adaptation can take years. So howdoes this information apply to touch? We know thatthe skin is the outside of the brain, so the mostimmediate thing we can impact, with even the lightesttouch, is the nervous system. Keep in mind that thisplot represents the body remodeling tissue. Fasterchanges can be introduced through interventions thatinterrupt ongoing issues in muscles, fascia or jointsthrough manipulation, or most drastically surgery.Touch can be used to encourage more physicaladaptations, but consider the underlying issues andrequired time frames.
The other system that can undergo rapid change fromtouch, is the circulatory system. This becomes especially interesting for neurovascular bundles which have become compromised as they transit through different tissues. Even a slight stretch to skin can improve circulation to these bundles.
Additionally, the lymphatic system, which filters debris between cells (interstitial or extracellular fluid) before returning fluids to cardiac circulation, can be supported by light touch with a hand or even a brush. The lymphatic system has no central pump and instead uses movement of the body, including arterial pressure changes, to move lymphatic fluid back to the locations near the clavicles where it is returned into the veins. Although physical movement is the primary mechanism, touch can support the system when joints can’t move due to injury.
The downside of our ability to change is that it takes appropriate stimulation (stress, load) just to keep what we have. This reality of course is captured in the old adage:
Use it, or lose it!
124
Exploring Touch
Touch Tip 80: Tissue remodels to adapt to the stresses to which it is subjected, failing if it cannot adapt.
Touch Tip 81: The nervous system remodels faster than muscle, which remodels faster than fascia, which remodels faster than bone.
Touch Tip 82: Touch primarily acts on the nervous system. The nervous system requires good circulation to keep it healthy and touch helps improve circulation also.
Touch Tip 83: If tissue is not subject to adequate stresses, those resources will be used in another way. Use it or lose it!
Thoughts & Skill Development
The section covering placebo effects introduced us to the importance of thoughts on the healing process. What we think, is important. Our thoughts are a huge part of our inner diet over time, but they also impact the current moment. Besides the impact on our health and other aspects of our life, what we tell ourselves during touch impacts the quality of touch. If we are unsure about what we are doing, it will impact our touch. If we are thinking about our shopping list, it will come through in our touch. If we are emotionally imbalanced, it will color our touch session.
So how should we manage our thoughts during touch?
I can’t tell you what to think, but I can guide you in how you might better manage your thoughts. There are many practices that can help you develop the following skills which can be applied to your touch sessions:
• Awareness
• Focus
• Mindfulness
125

Exploring Touch
• Holding Intention
• Intuition
• Visualization
My experience is that meditation is the fastest and easiest way to access and develop these skills. My recommendation is simple - practice thinking about touch while working on yourself. Literally, performing touch meditation. This practice will naturally carry over to your work with a partner.
Short Exploration: Touch Meditation for Awareness, Focus and Mindfulness
Assume a comfortable position, again I suggest laying on your back with feet flat and knees pointed upward. Close your eyes to allow total focus on the sensations experienced in this exploration. Remember to breathe and use your breath to gently bringyou back when your mind drifts away. YOUR MIND WILL DRIFT AWAY! But that is not what is important, the ability to recognize that you have drifted and gently coming back to the moment is what is important. The most important skill to develop is the ability to return to a state of awareness, focus and mindfulness. Over time, this process will naturally become part of your process without much effort.
So you might be asking, “what’s the difference between awareness, focus and mindfulness?” Awareness and focus are direct competitors for your mind share. If you are totally aware of your surroundings you will have very little focus on one thing. If youare totally focused on something, you are much less aware. Mindfulness is tending to the state of your mind, which for our exercise should be the balance between focus on our task and awareness of the environment. Mindfulness is the skill we develop in bringing ourselves back to the appropriate balance, even if we have lost both focus and awareness because we have drifted away to a daydream or task list or something else. If you can only remember one thing here, let it be to strive for balance.
The following exercises will have you practice mindfulness as we experience different combinations of focus and awareness.
Select a small, about 1 inch square, area of your clothing that you will explore with touch throughout this exploration. Make it interesting and accessible, maybe a shirt or pants pocket corner, an interesting seam or a logo.
126
Exploring Touch
Let’s begin by slowly rubbing your selected area with your fingertips, with a low focus on the area, but a high awareness of your surroundings. What do you hear? Can you hear birds or planes or children playing or maybe a distant lawn mower? Is there anything interesting to watch? Is there an insect in the area, or a pet, or interesting shadows? Is the temperature too hot or too cold or tolerable or perfect? Spend about 3 minutes getting familiar with the surroundings, while continuing to rub the selected area. You can use a breath count, maybe 12 breaths, to approximate your three minutes.
Now sharpen your focus on the area you are touching. Reduce your awareness by blocking out what garnered your attention inthe first part of this exploration. Place your focus at your fingertips, perhaps closing your eyes. What do you feel? Can you visualize what is under your fingertips? Do you feel layers of cloth? Can you feel the threads in a seam? Can you feel the tissue underlying the clothing? How is the underlying tissue reacting to your touch? Spend about 3 minutes exploring the selected area in detail. Remember you can use your breath to approximate the time spent.
As you finish this exploration, reflect on times when your mind drifted from the assigned task. If your mind never drifted, you may choose to increase the time spent on each segment and try again. Or define each segment by when you catch your mind drifting. Most of us will have had to use our mindfulness, our awareness of what our mind was doing, to pull ourselves back to the task.
Hopefully, this exploration clarified how we will use the terms focus, awareness and mindfulness. However, it is very easy to confuse them as deep focus on an object, can be considered being highly aware of only that object. We have chosen to consider that situation to reflect low awareness of the overall environment, due to high focus on a single object.
Did this exploration help you understand how you might better balance your focus and awareness using mindfulness?
So can you pursue both high focus and high awareness? Through the miracle of learning, neuroplasticity and lots of practice we can improve the balance between focus and awareness.
As we develop a skill, there are four distinct stages classically described by the variables of competence and consciousness. Although we think of a very linear progression through these stages, the reality is that we tend to be always moving through the space they create, seldom at a single stage. Paying attention to where you are in this space requires mindfulness of your situation.
127
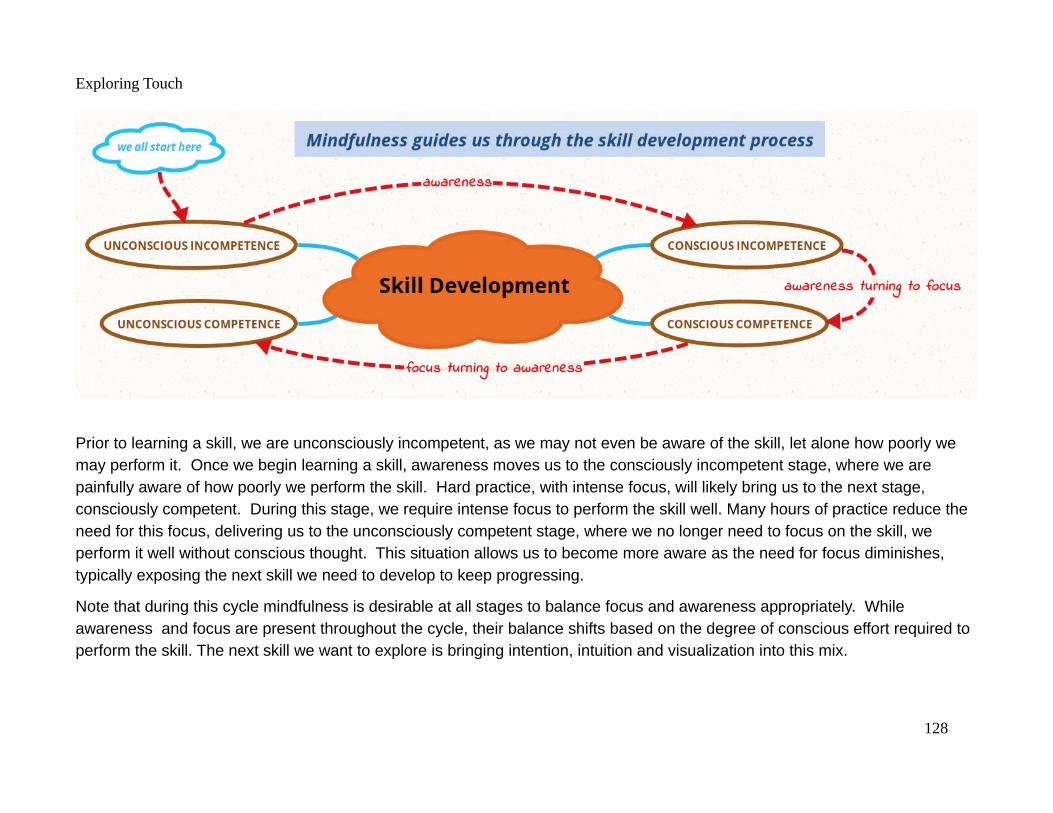
Exploring Touch
Prior to learning a skill, we are unconsciously incompetent, as we may not even be aware of the skill, let alone how poorly we may perform it. Once we begin learning a skill, awareness moves us to the consciously incompetent stage, where we are painfully aware of how poorly we perform the skill. Hard practice, with intense focus, will likely bring us to the next stage, consciously competent. During this stage, we require intense focus to perform the skill well. Many hours of practice reduce the need for this focus, delivering us to the unconsciously competent stage, where we no longer need to focus on the skill, we perform it well without conscious thought. This situation allows us to become more aware as the need for focus diminishes, typically exposing the next skill we need to develop to keep progressing.
Note that during this cycle mindfulness is desirable at all stages to balance focus and awareness appropriately. While awareness and focus are present throughout the cycle, their balance shifts based on the degree of conscious effort required to perform the skill. The next skill we want to explore is bringing intention, intuition and visualization into this mix.
128
Exploring Touch
Short Exploration: Touch Meditation for Intention, Intuition and Visualization
Assume a comfortable position, again I suggest laying on your back with feet flat and knees pointed upward. However, you maywish to sit to access different body areas for the exploration. The key is to position yourself comfortably, using pillows or bolsters as required. Close your eyes to allow total focus on the sensations experienced in this exploration. Remember to breathe and use your breath to gently bring you back when your mind drifts away.
The challenge in this exploration is to touch without labeling anything, without using words in your thoughts. This limitation requires us to hold a wordless intention, use our intuition without thought and visualize our intended outcome. If you find yourself using words, mindfully return to a wordless state and continue. You may need to explore what a “wordless state” means for you.
Select an area of bare skin that is easily accessible to both sight and touch, a forearm works well, but a thigh or lower leg can also be accessed easily from a seated position. You may also be able to access your abdomen or chest while laying on your back. Without using words, assess the color and temperature of the area of tissue you intend to work.
We will set our intent to warm this area using our touch. Starting with the image of the area from the above assessment, visualize what the area will look and feel like when it is warmer. Use this visualization to set your intention and follow your intuition as to how you use your hand or hands to warm the area.
Stop the touch session when you believe your actual tissue matches your visualized tissue. Examine the tissue for changes. Did your visualization match the actual tissue? What techniques did you use to warm the tissue? Did you use new techniques you have never used before?
This exploration can become even richer as our touch skills expand, by placing limits on the techniques you use. Can you achieve the same results only working with light pressure? How about without touching the skin? (Hint: Try warming your working hand using physical techniques, or even intention and visualization.
Do you remember how difficult it was to learn to tie your shoes? Or perhaps teach a sibling or another child to tie their own shoes? Through diligent practice tying shoes becomes nearly automatic, to the point of not even remembering the act. Most
129

Exploring Touch
skills are like tying our shoes, but have you ever noticed how many different ways there are to tie a shoe? Or seen someone use a different technique than you use and try to imitate it?
It takes much more effort to re-learn a skill using a different, typically improved, technique. Eliminating bad habits, like inefficient posture or incorrect grammar, can take much more effort than learning the skills correctly as early as possible. If you don’t believe me, try learning and using a new shoe tying technique for the next week. Visit http:wikihow.com/Tie-Your-Shoes for a new technique or search the web and commit to changing how you tie your shoes.
If changing how you tie your shoes sounds like too much effort, let’s get more basic with a quicker exploration.
Short Exploration: Toilet Ambidexterity
Assume a comfortable seated or squatted position, this time on the toilet. Warm up by interlacing the fingers of your hands into a prayer position. Now try interlacing them the “other” way, which will feel unnatural, but things are about to get worse.
You probably wipe your bottom consistently with the same hand, so try using the other hand to wipe this time.
Did you just transition from “unconsciously incompetent” to “consciously incompetent”? If you still feel competent on this dry run, try your less skilled wiping hand for the real deal!
If this exploration puts you off, try using a spoon to eat soup with your non-dominant hand.
Developing ambidexterity for any touch skill, but especially wiping, is a great practice. Remember, sometimes greatness can bethrust upon you by a cast or other injury that prevents using that hand. Forewarned is forearmed!
Touch Tip 84: Cultivate thinking that improves the quality of your touch.
Touch Tip 85: Meditation practices can be integrated with movement and touch.
Touch Tip 86: Use your breath to bring you back to the moment when you drift away.
130

Exploring Touch
Touch Tip 87: Balance focus and awareness during practice to successfully improve skills.
Touch Tip 88: It takes more effort to correct a poorly learned skill than to learn it correctly.
Techniques & Non-Technique
We have purposely avoided exploring specific touch techniques in this book, in favor of focusing more purely on the experience.However, we have touched on some of the components that define and identify techniques, such as contact attributes or body mechanics. The major point behind most techniques, which we have avoided, is the explanation behind the technique – the why.
There are varying explanations as to why certain touch techniques work ranging from hard science to evidence based investigations to philosophy to religion to belief and hope. There are many resources available to investigate different touch techniques and you should explore, but beware, there be dragons out there!
Here are some thoughts to keep in mind as you explore:
• Yesterday’s hard science can become today’s quackery
• Yesterday’s quackery can become today’s hard science
• Most touch techniques that have been around are around because they work, sometimes and for some people
• There is no one technique that works in all circumstances, or it would be the only technique you need
• Not every technique is for everybody
• Touch, independent of technique, is a miracle to be experienced
• It works best when provider and receiver both understand the technique and trust it will work
131
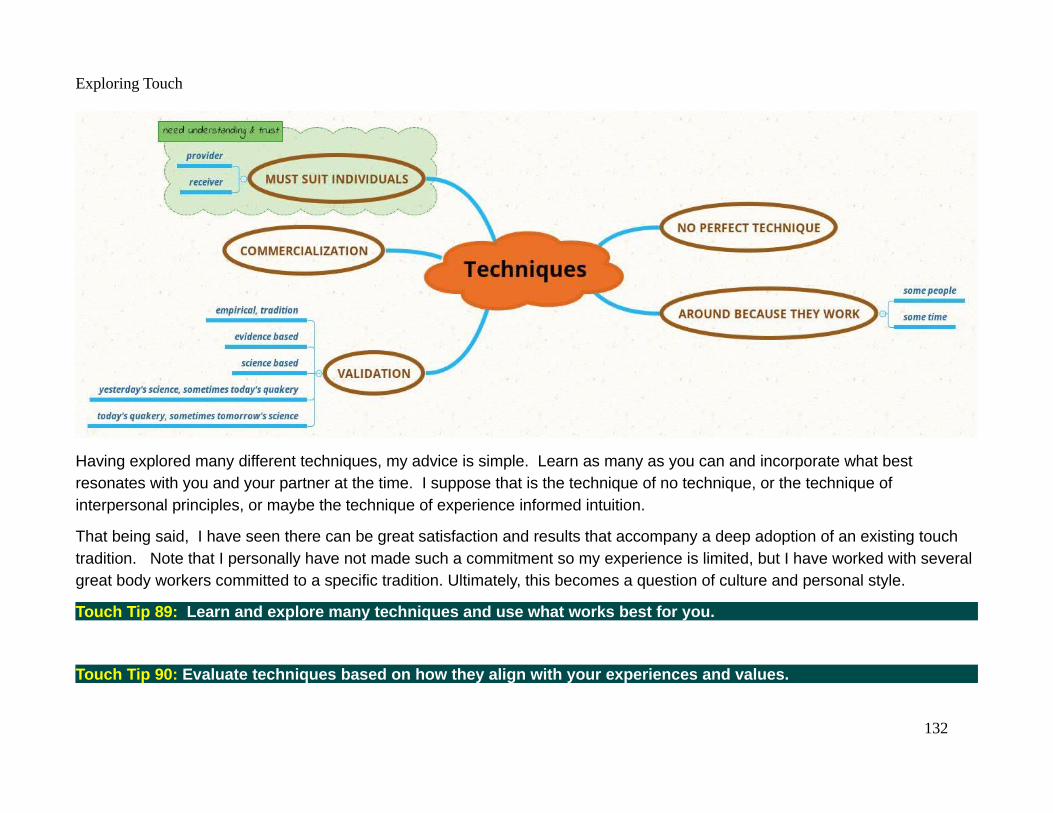
Exploring Touch
Having explored many different techniques, my advice is simple. Learn as many as you can and incorporate what best resonates with you and your partner at the time. I suppose that is the technique of no technique, or the technique of interpersonal principles, or maybe the technique of experience informed intuition.
That being said, I have seen there can be great satisfaction and results that accompany a deep adoption of an existing touch tradition. Note that I personally have not made such a commitment so my experience is limited, but I have worked with several great body workers committed to a specific tradition. Ultimately, this becomes a question of culture and personal style.
Touch Tip 89: Learn and explore many techniques and use what works best for you.
Touch Tip 90: Evaluate techniques based on how they align with your experiences and values.
132

Exploring Touch
Touch Tip 91: Consider deeply studying an existing touch tradition.
Science, Touch & You
“Life is the great experiment. Each of us is an experiment of one – observer and subject – making choices, living with them, recording the effects.”
Dr. George Sheehan MD, Running and Being: The Total Experience, 1978
Science is an impressive human development that has improved our understanding of existence, the materials about us and how they interact. True science understands it always falls short of describing reality, is always incomplete and possibly incorrect. Science is limited as a creation of humans with limited capabilities stuck in a very small part of a very large and complex web of space, matter, energy and their relationships. Let's not even delve into the unknown (yet), as the amount we know we don't know grows much more rapidly than what we know. Science strives to constantly become better, like we all should. Science was developed in a manner that if you follow the scientific process, your understanding should improve. Every human being should understand the basic tenets of science and apply them to their own life where applicable, which ultimately has limited scope. Science should always get better, but does it?
Science got a great start early in its life with improved understanding of many aspects of our world that resulted in many great accompanying technological developments that "improved" our lives. My purpose is not to recount scientific history despite it being an interesting journey. Let's jump to the current time where the major flaw of science, human limitations, has resulted in us demonstrating that we are much more intelligent than wise.
Despite us living in a complex, interconnected environment of space, matter, energy, their relationships and the unknown, science tends to improve our knowledge through a process of deconstruction. We simplify things by breaking their relationships to other things and breaking the isolated thing down until they are simple enough to test, understand and describe. We then put the simple things back together and have them interact in a simplified manner isolated from their original environment. We then
133
Exploring Touch
develop a technology around this limited scientific understanding and deploy it into the original complex web that is largely not understood. What could go wrong?
This approach has proved valuable in some aspects, but troublesome in others. Atomic explorations provided a much better understanding of nature at its smallest scales resulting in our amazing current day electronic devices, nuclear energy, nuclear medicine, nanotechnology and much more. The dark sides of this one include threat of nuclear war, nuclear disasters releasing nuclear waste into the environment, requirement to manage nuclear waste over multiple human lifetimes and much more. A more subtle outcome is the information boom, which while it has positive benefits, overwhelms us with unnecessary information,targets our biology to increase needless consumption, isolates us socially and generally utilizes the darker side of humanity to drive it forward (pornography, consumerism, etc.). We can run through the same drills with chemistry and the long term impacts of antibiotics, fertilizers, pesticides, herbicides, fungicides, profit driven genetic manipulation and others. So what does any of this have to do with touch?
Science relates to touch in two interesting ways. The first area is scientific study of all of touch (both mechanisms and effects onhumans) and the other is applying the scientific principle to your personal practice.
The first area is multiple books and far out of our scope. I encourage you to investigate the science behind any topic that interests you to get a better understanding of our current understanding. I think Paul Ingraham's work reviewing the science of touch with respect to pain, provides a nice context.21 My summary of his work would be: no one manual therapy technique dominates in treating, but it appears any safe touch helps the natural healing process and never ignore possible placebo/nocebo effects. A key word is "safe" in the previous sentence and we have explored that above in the section on safe touch. We also touched on the placebo and nocebo effects in the section on touching the mind.
The second aspect of applying science to your touch practice derives from Dr. George Sheehan's quote at the beginning of this section, we are each an experiment of size one. A major flaw hidden in much of the technology derived from science is that it looks at behaviors across a large group of individuals or samples and applies an algorithm to create a one size fits all approach.The flaw here emerges most prominently from the commercial drug industry where even after much scientific validation serious
21 https://www.painscience.com/
134
Exploring Touch
side effects, including death, are encountered. Often to the point of pulling the drug from the market with accompanying law suits. Particularly when it comes to touch, one size does not fit all! So how should you run your experiment?
The scientific method is an iterative process of exploration based on observation, data gathering, analysis, testable ideas, experimentation and continual refinement. Although you can draw very nice diagrams showing the cycle, the reality is that it canbe a messy process fraught with distractions, biases, inaccuracies and corrections. The application of objectivity and reason is often overcome by our more base motivations typically based in greed and power, as discussed above.
So my advice on science, is don’t become lazy. It is your body and your life – do the best research you can, make timely choices with the information at hand, live with your choices, record their effects and make changes as necessary. Don’t become lazy, keep searching and learning through experience, don’t just rely on the latest paper or trend!
This book is a call to simplicity, evaluating the empirical evidence you personally gather, independent of the more complicated requirements to explore and validate explanations. The science behind the explanations is important and interesting, but don’t lose site of the miracle of touch and the experience of its benefits.
Touch Tip 92: Science is great, but always incomplete and often incorrect. Don’t be lazy, conduct your own experiment well! Do the research, make good choices, live with your choices, record their effects and make changes as necessary.
FlowingSo far, we have spent most of our efforts dissecting and exploring touch through its different mental and physical components. As we have previously considered, although the body can also be dissected into components, ultimately the body is one piece. Touch is ultimately an integrated experience.
We each will have a different mix and style regarding our focus and approach to touch. Some will be very analytical and rational, while others will fly by the seat of their pants. How we actually make decisions, as opposed to how we think we make decisions, is a fascinating study of our complex nervous system. The most rational of us are probably more influenced by
135
Exploring Touch
emotion and intuition than we would admit, while the most intuitive of us are probably more influenced by information than we realize.
Our nervous systems have evolved over millions of years to provide an efficient and effective information processor that makes decisions to keep us safe, efficient and effective. It rapidly processes information of which we are not even aware, such as blood pH, to make critical decisions such as when to take the next breath. This information is processed by our brain, heart, stomach and spinal cord as previously discussed, before being integrated into action. If we trust our nervous system to make these critical decisions, shouldn’t we put some faith in its ability to guide our hands during touch?
Do you remember the diagram outlining the skill learning process? The hardest step, the one which cannot be forced, is the transition to an unconscious flow of competence. Sometimes it is because we do not trust ourselves, sometimes it is because we have not put in enough practice and sometimes it is simply the fear of letting go.
There is no simple exploration to introduce you to flow, only the advice to integrate what you know and practice as perfectly as you can. Oh yeah, and remember to breathe, always remember to breathe. Note the Eastern terms in the diagram below, which can be found in the table in the introduction.
136
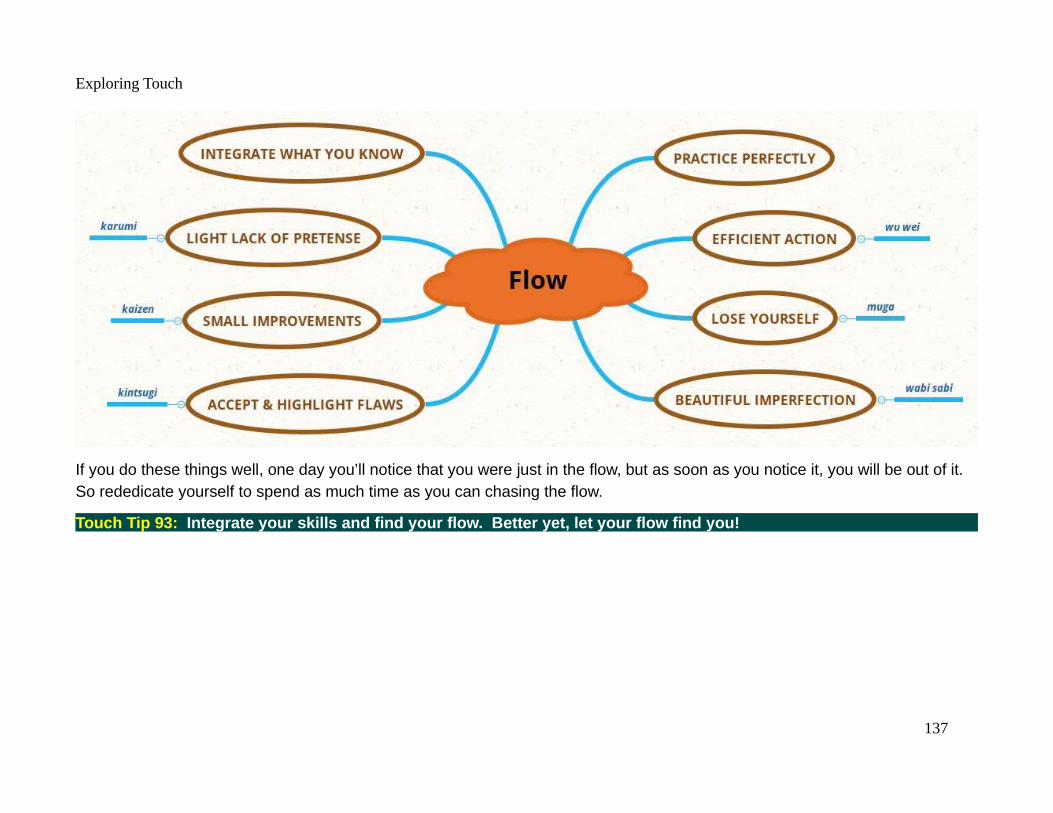
Exploring Touch
If you do these things well, one day you’ll notice that you were just in the flow, but as soon as you notice it, you will be out of it. So rededicate yourself to spend as much time as you can chasing the flow.
Touch Tip 93: Integrate your skills and find your flow. Better yet, let your flow find you!
137
Exploring Touch
Explorations Overview“Now the correction of this quack practice is to import into education the wisdom of life. Leave this military hurry and adopt the pace of nature. Her secret is patience.”
Ralph Waldo Emerson, The Complete Works, Volume X Lectures and Biographical Sketches, 1904
The more complex explorations in the following sections provide an opportunity for you to learn new skills, integrate your currentskills, practice and look at touch from many different vantage points. Hopefully, you will also find your flow! Another integral part of this path is adopting nature’s pace and practicing patience.
Keep in mind there are many variables which you can control to alter these explorations to help you become better at touch, some thoughts include:
• Control Your Eyes – open/closed/novel positions (look up, look down at work, look into space, etc.)
• Change your position – try laying vs. sitting vs. standing
• Use alternative hand positions
• Try Different Tools – use a ball, foam roll, stick, vibrating ball, etc.
• Change Your Breathing
• Use Assessment Before and After
• Work on Your Presence – explore grounding
• Monitor your Balance – investigate weight shift
138
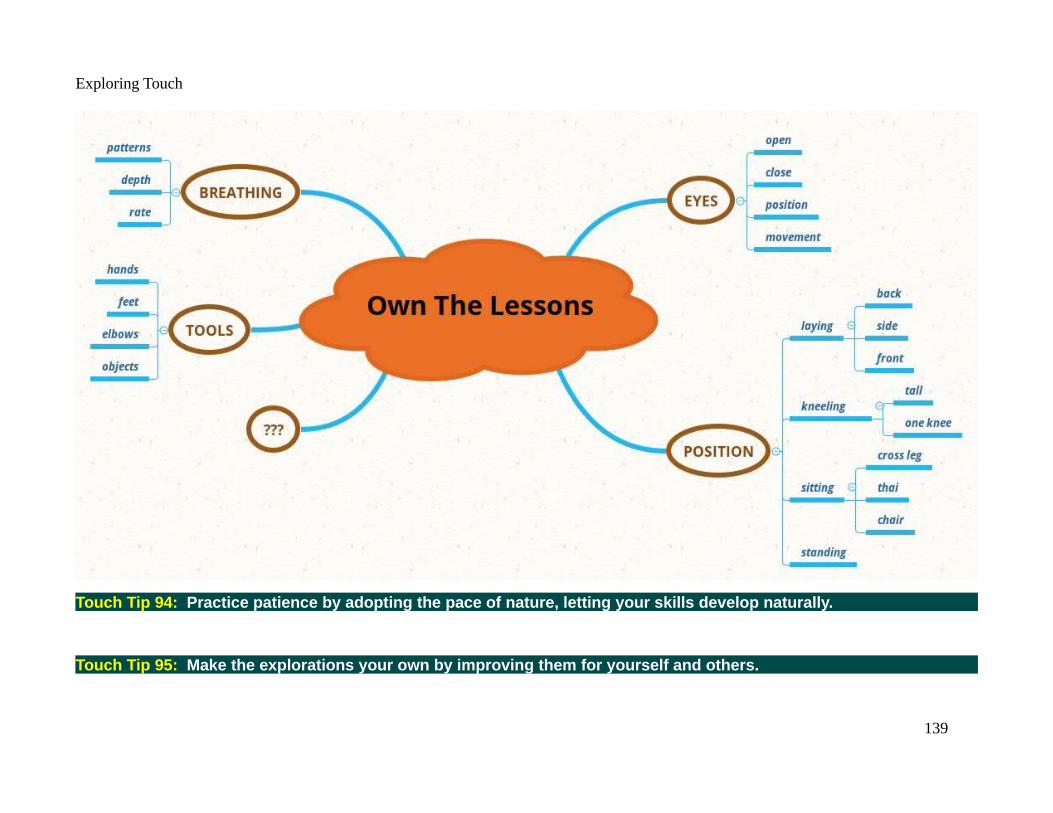
Exploring Touch
Touch Tip 94: Practice patience by adopting the pace of nature, letting your skills develop naturally.
Touch Tip 95: Make the explorations your own by improving them for yourself and others.
139
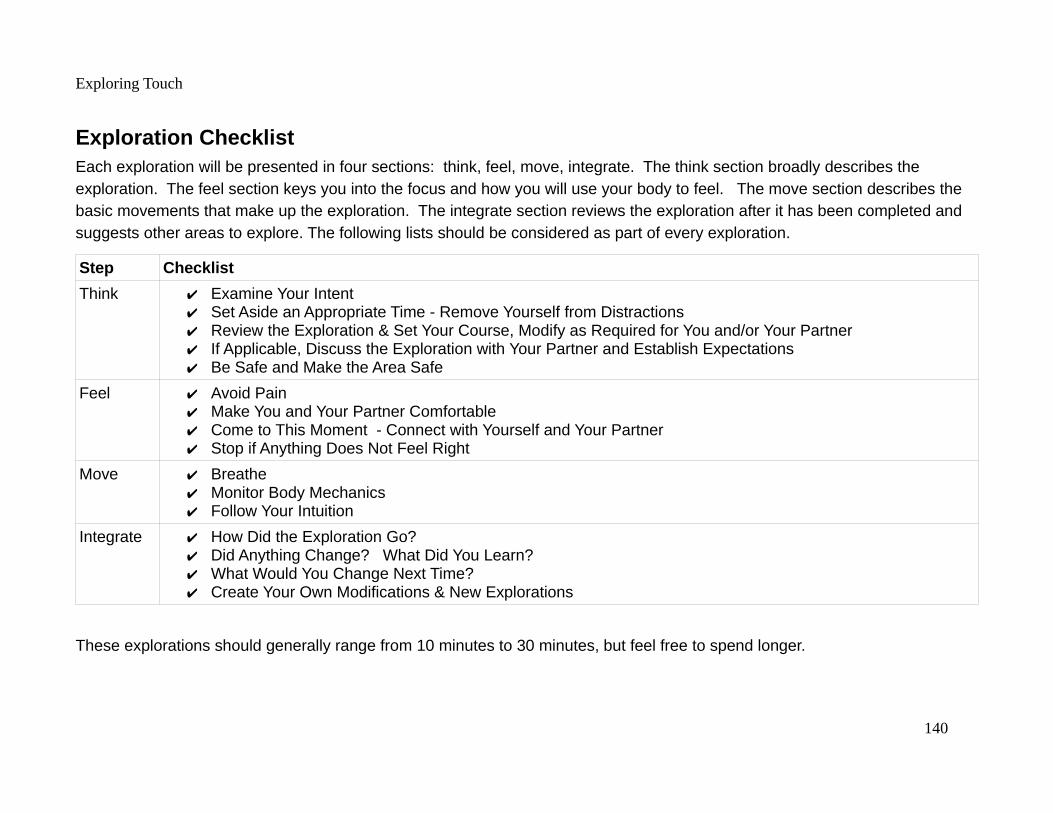
Exploring Touch
Exploration ChecklistEach exploration will be presented in four sections: think, feel, move, integrate. The think section broadly describes the exploration. The feel section keys you into the focus and how you will use your body to feel. The move section describes the basic movements that make up the exploration. The integrate section reviews the exploration after it has been completed and suggests other areas to explore. The following lists should be considered as part of every exploration.
Step Checklist
Think ✔ Examine Your Intent✔ Set Aside an Appropriate Time - Remove Yourself from Distractions✔ Review the Exploration & Set Your Course, Modify as Required for You and/or Your Partner✔ If Applicable, Discuss the Exploration with Your Partner and Establish Expectations✔ Be Safe and Make the Area Safe
Feel ✔ Avoid Pain✔ Make You and Your Partner Comfortable✔ Come to This Moment - Connect with Yourself and Your Partner✔ Stop if Anything Does Not Feel Right
Move ✔ Breathe✔ Monitor Body Mechanics ✔ Follow Your Intuition
Integrate ✔ How Did the Exploration Go? ✔ Did Anything Change? What Did You Learn?✔ What Would You Change Next Time?✔ Create Your Own Modifications & New Explorations
These explorations should generally range from 10 minutes to 30 minutes, but feel free to spend longer.
140
Exploring Touch
Individual Explorations“The primary indication of a well-ordered mind is a man’s ability to remain in one place and linger in his own company.” Seneca22
Individual explorations prepare us to work with others by focusing on fundamentals. Self work eliminates communication issuesbetween provider and receiver.
List of Individual ExplorationsIndividual Explorations...................................................................................................................................................................................141
Touching a Wall.............................................................................................................................................................................................142Tapping Concerns Away................................................................................................................................................................................143Skin Stretch into Ease....................................................................................................................................................................................148Breathing Touch Exploration........................................................................................................................................................................152Fabric Store on Your Body............................................................................................................................................................................153Full Body Pat.................................................................................................................................................................................................155TTouch® Exploration.....................................................................................................................................................................................158Wake Up the Feet!.........................................................................................................................................................................................163Call of the Foam Roll....................................................................................................................................................................................167Have a Ball....................................................................................................................................................................................................172Cane Yourself................................................................................................................................................................................................176Brush it Off....................................................................................................................................................................................................179Face It!...........................................................................................................................................................................................................182Change Your Position....................................................................................................................................................................................189“Listening” with the Hands...........................................................................................................................................................................191Tour de Tissue Types.....................................................................................................................................................................................196Touched by the Sun.......................................................................................................................................................................................203More Individual Explorations.......................................................................................................................................................................205
22 The Tao of Seneca, Volume 1, Based on the Moral Letters to Lucilius by Seneca, translated by Richard Mott Gummere, Loeb Classical Library edition, 1917, Letter 2, On Discursiveness in Reading. A great free source for the wisdom of Seneca is provided by Tim Ferris at https://tim.blog/2017/07/06/tao-of-seneca/
141
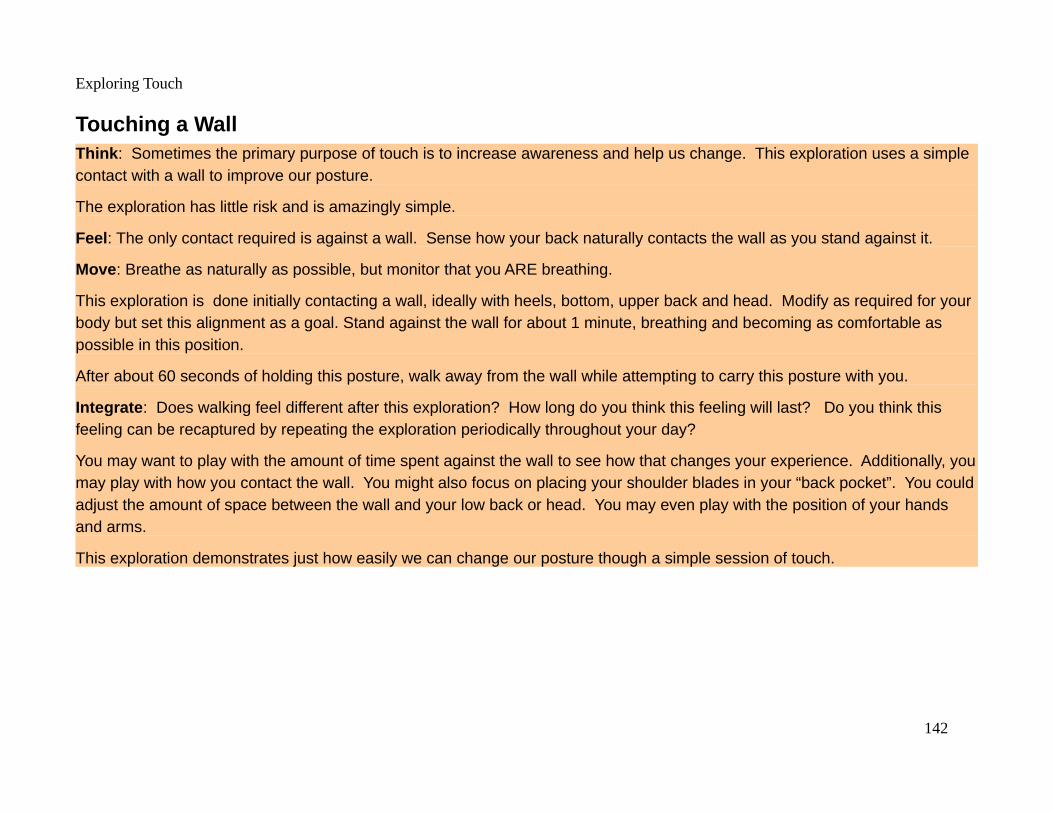
Exploring Touch
Touching a WallThink: Sometimes the primary purpose of touch is to increase awareness and help us change. This exploration uses a simple contact with a wall to improve our posture.
The exploration has little risk and is amazingly simple.
Feel: The only contact required is against a wall. Sense how your back naturally contacts the wall as you stand against it.
Move: Breathe as naturally as possible, but monitor that you ARE breathing.
This exploration is done initially contacting a wall, ideally with heels, bottom, upper back and head. Modify as required for your body but set this alignment as a goal. Stand against the wall for about 1 minute, breathing and becoming as comfortable as possible in this position.
After about 60 seconds of holding this posture, walk away from the wall while attempting to carry this posture with you.
Integrate: Does walking feel different after this exploration? How long do you think this feeling will last? Do you think this feeling can be recaptured by repeating the exploration periodically throughout your day?
You may want to play with the amount of time spent against the wall to see how that changes your experience. Additionally, youmay play with how you contact the wall. You might also focus on placing your shoulder blades in your “back pocket”. You couldadjust the amount of space between the wall and your low back or head. You may even play with the position of your hands and arms.
This exploration demonstrates just how easily we can change our posture though a simple session of touch.
142
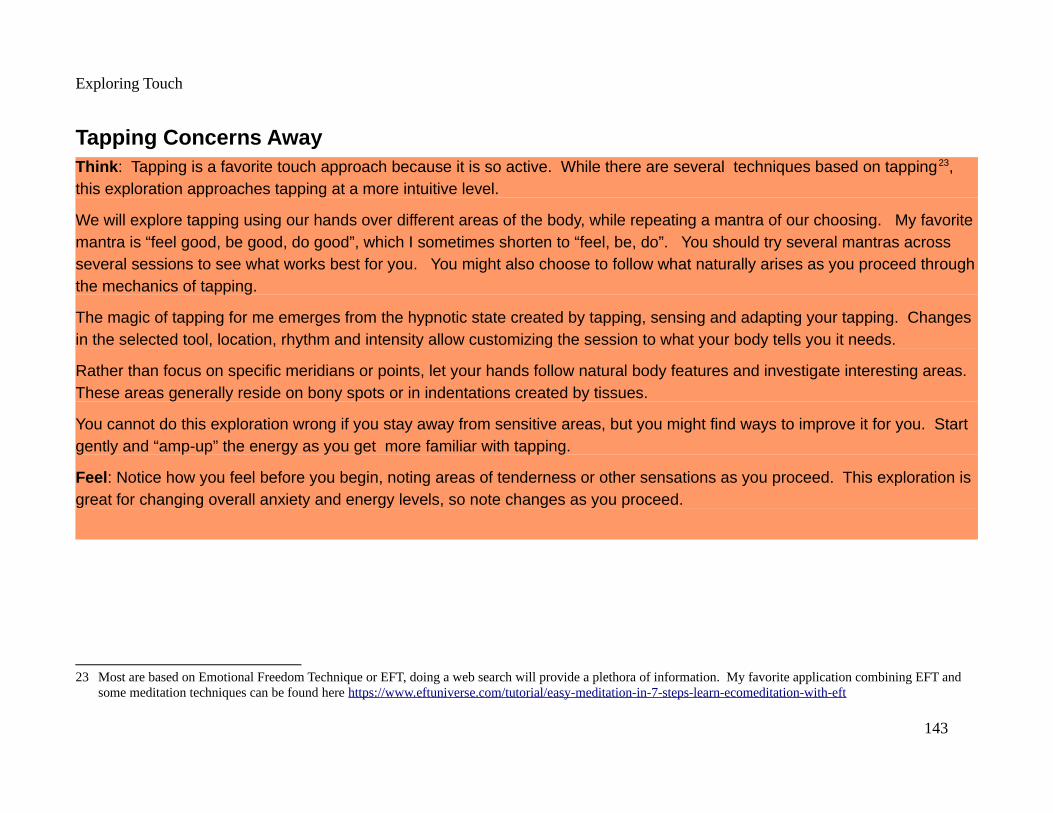
Exploring Touch
Tapping Concerns AwayThink: Tapping is a favorite touch approach because it is so active. While there are several techniques based on tapping23, this exploration approaches tapping at a more intuitive level.
We will explore tapping using our hands over different areas of the body, while repeating a mantra of our choosing. My favoritemantra is “feel good, be good, do good”, which I sometimes shorten to “feel, be, do”. You should try several mantras across several sessions to see what works best for you. You might also choose to follow what naturally arises as you proceed throughthe mechanics of tapping.
The magic of tapping for me emerges from the hypnotic state created by tapping, sensing and adapting your tapping. Changes in the selected tool, location, rhythm and intensity allow customizing the session to what your body tells you it needs.
Rather than focus on specific meridians or points, let your hands follow natural body features and investigate interesting areas. These areas generally reside on bony spots or in indentations created by tissues.
You cannot do this exploration wrong if you stay away from sensitive areas, but you might find ways to improve it for you. Start gently and “amp-up” the energy as you get more familiar with tapping.
Feel: Notice how you feel before you begin, noting areas of tenderness or other sensations as you proceed. This exploration is great for changing overall anxiety and energy levels, so note changes as you proceed.
23 Most are based on Emotional Freedom Technique or EFT, doing a web search will provide a plethora of information. My favorite application combining EFT and some meditation techniques can be found here https://www.eftuniverse.com/tutorial/easy-meditation-in-7-steps-learn-ecomeditation-with-eft
143
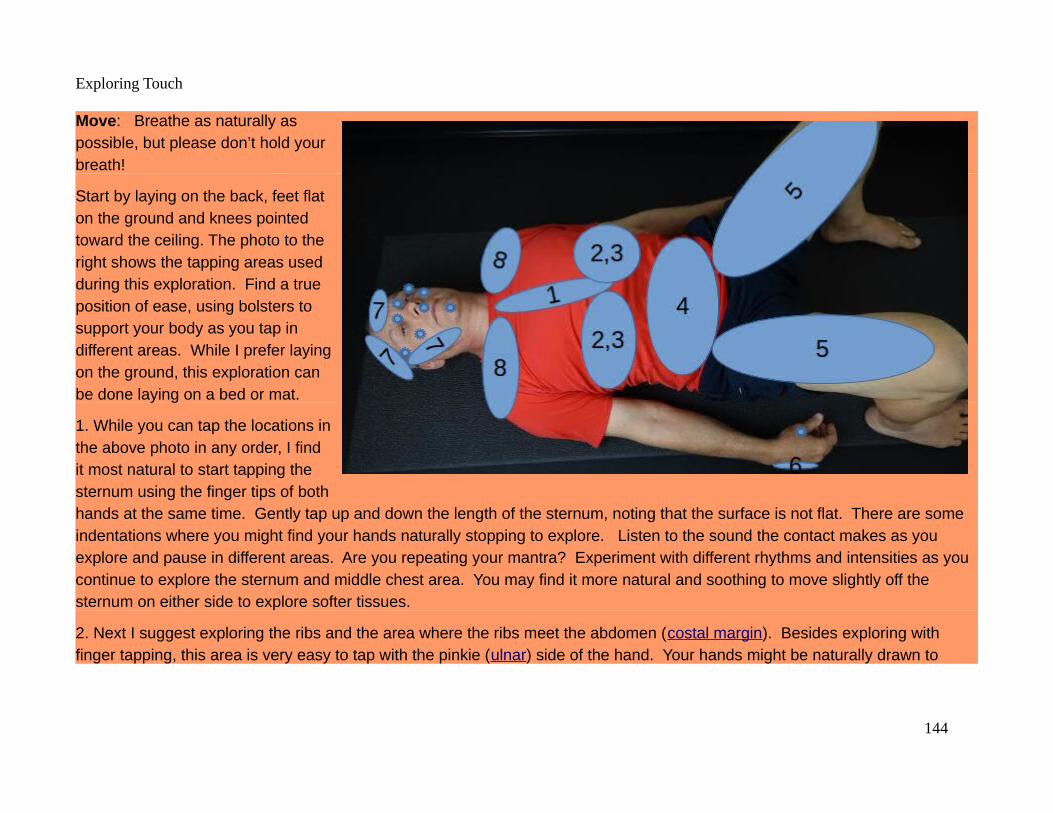
Exploring Touch
Move: Breathe as naturally aspossible, but please don’t hold yourbreath!
Start by laying on the back, feet flaton the ground and knees pointedtoward the ceiling. The photo to theright shows the tapping areas usedduring this exploration. Find a trueposition of ease, using bolsters tosupport your body as you tap indifferent areas. While I prefer layingon the ground, this exploration canbe done laying on a bed or mat.
1. While you can tap the locations inthe above photo in any order, I findit most natural to start tapping thesternum using the finger tips of bothhands at the same time. Gently tap up and down the length of the sternum, noting that the surface is not flat. There are some indentations where you might find your hands naturally stopping to explore. Listen to the sound the contact makes as you explore and pause in different areas. Are you repeating your mantra? Experiment with different rhythms and intensities as you continue to explore the sternum and middle chest area. You may find it more natural and soothing to move slightly off the sternum on either side to explore softer tissues.
2. Next I suggest exploring the ribs and the area where the ribs meet the abdomen (costal margin). Besides exploring with finger tapping, this area is very easy to tap with the pinkie (ulnar) side of the hand. Your hands might be naturally drawn to
144
Exploring Touch
linger in certain areas. Do you find yourself lingering longer in bony areas or softer tissues? Do you notice any difference between the left and right sides of the body?
3. So far we have been tapping the right side of the body with the right hand and the left side with the left hand. Now try crossing your hands over the middle of your body to tap the other side and notice any changes. You can use both hands at the same time or each hand individually. The left hand should be tapping the right side of the body and the right hand should be tapping the left. If you use both hands at the same time, try changing how you cross your arms to compare what you feel. Do you notice anything different when tapping with the opposite hand?
Remember to breathe and continue repeating your mantra. When you cross sides some wonderful things are happening that require both sides of your nervous system to pay attention. If you have a “tight” side, you may want to take some time to experiment with working on one side at a time with the opposite hand to see if you notice any changes.
Now would be a great time to rest a bit before proceeding to the next step. Just lay in a comfortable position and assess any changes that you notice. You should feel free to pause and rest anytime during this exploration.
4. Ever so lightly, move your tapping onto your abdomen and explore this area. Avoid discomfort by using light tapping in this area. If you feel any pain, please stop and seek the help of a medical professional. This area can produce some interesting sensations, with possibly dramatic differences on the left side versus the right. You may also experience how tapping on one side alone causes sensations on the other side. Perhaps the most dramatic impact is the effect the tapping can have on your breathing. Tapping adds a slight rhythm on top of each breath, causing small exhalations and inhalations with each tap. This effect will be most noticeable if you speak, sing or chant while tapping.
5. The next area to explore is between the hips and knees, on the thighs. The bony bumps on the front of the pelvis (anterior superior iliac spine or ASIS) are a wonderful landmark for these explorations, as is the bony bump on the side of the femur bone(greater trochanter), often mistaken for our hips. While fingers work fine in these large areas, the side of the hand or a soft fist are perhaps more appropriate for the size and texture of this tissue. Again, working the opposite side of the body can produce some interesting results. Note that using the opposite hand to work the opposite side leg is very natural as that is how we walk,
145

Exploring Touch
moving the opposite arm and leg forward and backwards together. Tapping can occur all around the upper thigh: front, back, inside and outside. It is even possible to use both hands on a single leg, each working different areas.
6. Once you are finished exploring the upper leg, it is worth paying attention to the hands themselves. Tap the pinkie (ulnar) edges of the two hands together. Another area to explore is the back of the hand, where the thumb and first finger come together. This TCM meridian point is called “the great eliminator” (Large Intestine (LI) 4) and extensive tapping should be avoided if you are pregnant. How are the breathing and mantra going?
7. Next lightly tap the head and face. Begin on the top of the head, tapping with both hands. The experience becomes more interesting if you use the opposite hand, the left hand as an example, to tap on the right side of the head. If desired, you can continue tapping onto the face itself, around the orbits of the eyes, the cheekbones, under the nose, along the jaw, on the chin and most anywhere that is comfortable. There is much to explore in this area and it is likely that you will once again discover places where your hands naturally linger.
8. The final areas we will explore are around your collar bones (clavicles) and onto the shoulders. These are best explored one side at a time, use the opposite hand to tap on, above and below the collarbone from the sternum to the sides of the shoulder. How is your breathing? Are you sticking with your mantra?
Integrate: How do you feel after the exploration? Do you feel more energized or less? Did any areas have unexpected sensations?
You might choose to review the TCM meridians to see if any of the points align with areas you found interesting or effective.
Play with the speed and intensity of the taps, along with the part of the hand used to tap.
Did you notice we stayed away from the chest itself? Odd as it sounds, the chest is not a great place to start with tapping because it can occasionally cause some of us to experience strong emotions. There is nothing wrong or dangerous with this situation, it is just a less than ideal place to start. So when you feel up to it, exploring the chest with tapping could prove interesting, just ask Tarzan!
146

Exploring Touch
You can always change your position. Side laying is an excellent way to access the hips, low back, side of the neck, upper back and more. The most difficult area to tap is the middle back, but I like to do that either sitting or side-laying with a long handled brush or other tool to extend my reach.
Finally, consider the mantra you are using. Maybe words are the wrong approach, perhaps using a visual image will work betterfor you? The key is to develop the ability to use breath, thought and movement in a way that proves beneficial.
This exploration is a great introduction to the power of self-care, since your body and mind must work together to find a pleasantpattern. Repetition with variation is the key to making the most of this exploration.
147

Exploring Touch
Skin Stretch into EaseThink: Positions of ease are powerful for helping us heal. They can be effective within just a few seconds, or they can require several minutes or more. This exploration searches for a feeling of ease by just lightly stretching the skin. This stretch creates neurovascular changes that often result in reduced tension and pain. The effect is best when you are experiencing minor pain or tension, but improvements can be felt almost anytime if you pay close attention. The techniques behind this exploration werepioneered by Diane Jacobs and she calls this work dermoneuromodulating or DNM.24
I will present this exploration using the inside of the knee (medial knee) as a target, as I have a lingering overuse injury in this area.25 However, you can use the principles presented in this guided exploration to explore relieving pain and tension almost anywhere with the lightest of touch. The intent is to find a slight movement in the skin that results in positive changes to the target area. Finding this improvement requires gently exploring one or more slight stretches in the skin that result in reduced discomfort, reduced tension, a feeling of warmth or other positive sensations. There are no wrong sensations to be experienced, but it is likely that your body will have preferences for certain positions and experience relief.
As a technique, knowledge of what to try is garnered from detailed neurovascular anatomy and theory coupled with communication skills and experience, which requires training and practice to become efficient. However, as an exploration for this book, it is easy to experience the results as the process primarily consists of making yourself feel better through positioning and skin stretch. While we may take longer to find an appropriate skin stretch than an experienced professional, we have an advantage in that communication on results is near instant as we are working just with ourselves.
There is no fear factor in this exploration, it is extremely gentle, but requires high awareness. If you are not working on an area with discomfort, the changes you notice may be very subtle, so you should be prepared to spend some time, up to several minutes, holding a slight skin stretch to determine if you notice a difference.
24 DermoNeuroModulating: Manual Treatment for Peripheral Nerves and Especially Cutaneous Nerves, Diane Jacobs, Tellwell Talent, 201625 It would be naive to believe treating just the area of discomfort, the “screaming victim”, would be successful as the “hiding culprit” in this tale most likely resides in
minor hip and foot dysfunctions. However, working the knee is a very nice exploration for this book.
148
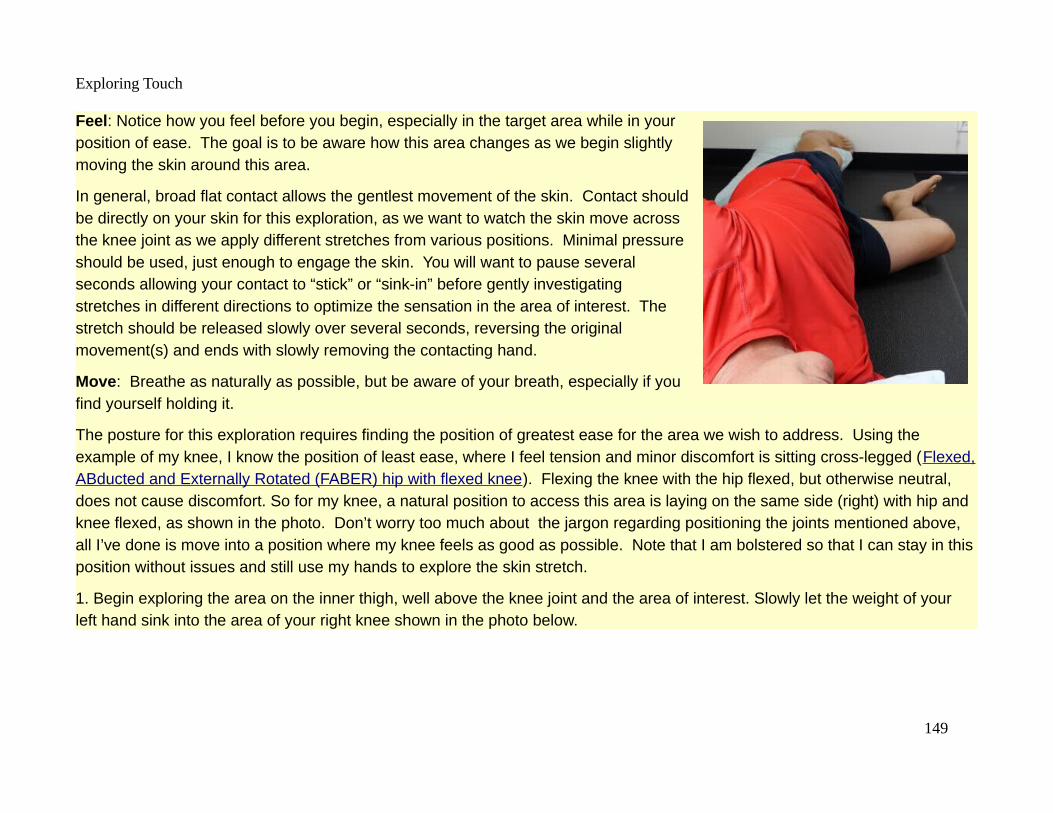
Exploring Touch
Feel: Notice how you feel before you begin, especially in the target area while in yourposition of ease. The goal is to be aware how this area changes as we begin slightlymoving the skin around this area.
In general, broad flat contact allows the gentlest movement of the skin. Contact shouldbe directly on your skin for this exploration, as we want to watch the skin move acrossthe knee joint as we apply different stretches from various positions. Minimal pressureshould be used, just enough to engage the skin. You will want to pause severalseconds allowing your contact to “stick” or “sink-in” before gently investigatingstretches in different directions to optimize the sensation in the area of interest. Thestretch should be released slowly over several seconds, reversing the originalmovement(s) and ends with slowly removing the contacting hand.
Move: Breathe as naturally as possible, but be aware of your breath, especially if youfind yourself holding it.
The posture for this exploration requires finding the position of greatest ease for the area we wish to address. Using the example of my knee, I know the position of least ease, where I feel tension and minor discomfort is sitting cross-legged (Flexed,ABducted and Externally Rotated (FABER) hip with flexed knee). Flexing the knee with the hip flexed, but otherwise neutral, does not cause discomfort. So for my knee, a natural position to access this area is laying on the same side (right) with hip and knee flexed, as shown in the photo. Don’t worry too much about the jargon regarding positioning the joints mentioned above, all I’ve done is move into a position where my knee feels as good as possible. Note that I am bolstered so that I can stay in thisposition without issues and still use my hands to explore the skin stretch.
1. Begin exploring the area on the inner thigh, well above the knee joint and the area of interest. Slowly let the weight of your left hand sink into the area of your right knee shown in the photo below.
149

Exploring Touch
After a few seconds, slowly explore pulling the tissue towardsyour head. Using even the slightest of pulls I notice tissuemovement well down into my calf. Explore moving the tissue indifferent directions, including rotation. What sensations do youfeel about the area of the inner knee we are focused upon? Ifeel the best when tissue is tractioned towards the head asshown by the arrow in the photo.
Hold your best position of ease between 30 seconds and twominutes to monitor changes. When you notice that the changeshave stopped occurring, slowly reverse the process, returningthe tissue to its normal resting position before removing yourhand.
2. Let’s try a slightly different contact, using either hand make contact around the knee cap (patella) as shown in the photo below. Note that the photo shows me using the right hand for clarity, but I actually felt better using the left hand. Slowly sink into the tissue and explore small movements by gathering tissue around the knee cap.
Do you notice any tissue movement in the target area? Arethere any new sensations? I felt best with a slight counter-clockwise rotation after gathering the tissue, as shown by thearrows on the photo.
You might explore using two hands to manipulate the tissue overand around the knee cap. Again, hold your best position of easefor up to two minutes before returning the tissue to its restingposition and removing the contact.
150

Exploring Touch
3. Finally, let us explore manipulating the tissue on the opposite side of the kneecap using the right hand as shown in the photo below.
Can you see the tissue move in the area of interest? Haveyou sensed any changes in the target area? I experienceda rush of warmth in the target area with a slight traction ofskin up the thigh as shown by the arrow on the photo.
Upon finding a good position of ease, hold the tissue untilno further changes are noted, then slowly return the tissueand release the contact.
Integrate: Does the target area feel different? Did anyareas have unexpected sensations? This explorationrequires acute awareness of sensation in the target area, which can be challenging. Did you notice any twitching or other interesting observable features during the exploration? Could you sense anything happening under your contact?
Play with different locations, contacts, angles and times. Sometimes less is more. When you find the best position while you have true discomfort, your body will let you know quickly. This approach is all about experimentation and feedback with the ultimate goal being improved sensations.
I love this approach to touch because it is both effective and safe. The primary point of the exploration is to demonstrate how the body responds most positively when it senses ease and safety. High quality touch conveys safety to the body and this approach to touch requires respecting how the body responds to each small movement.
This exploration also demonstrates the value of patience and awareness. Ultimately, the exploration teaches humility, in that the body can do amazing things without super human efforts or even our awareness of what is happening. Just a slight nudge towards ease can work wonders.
151

Exploring Touch
Breathing Touch ExplorationThink: This will be an easy exploration to learn more about how you breathe and possibly help you breathe easier. If you feel a strong rhythmic pulse in your abdomen, that means you are alive, but move off that spot by an inch or so.
Feel: Close your eyes and notice your breath, but don’t alter it. Monitor your connection to the breath through your hands. Use a relaxed hand with the heel of the palm contacting the body. Contact can be over clothing or directly on skin. Initially we will monitor how we breathe, later we will use our touch as a cue to change our breathing.
Move: Breathe as naturally as possible, although you may choose to breathe deeper and slower to make this exercise easier.
Start by laying on your back with your feet flat on the ground and knees pointed up or out. Find a comfortable position that doesnot require much effort, you may wish to place a small pillow or book behind your head for comfort.
1. Place both hands on your abdomen, near your navel. Notice how the action of your breath moves the hands apart while moving them up and down. Or does it? If you don’t feel your hands moving in this position, try consciously pushing the abdomen out all around on the inhale, letting it relax and return on the exhale. Your hands are “riding” your breath in this exercise.
2. Now hold the pads of your fingers steady as your abdomen rises around them. Your fingers are now “meeting” the breath. Experiment with meeting the breath in different locations on the abdomen, how does this feel? Try this technique in different places from the lower abdomen to the underside of the rib cage. Do these contacts give you a different impression of where your abdomen moves easily and where it might be stuck?
3. Next move your hands up onto your lower ribs, below the chest. Do you notice movement in your ribs? Are they moving up and down? How about the sides, are they moving?
Integrate: Do you feel more energized or less after this exploration? Did any areas have unexpected sensations?
Play with locations, pressures and hand configurations.
This exploration helps to establish the connection between breath and touch.
152

Exploring Touch
Fabric Store on Your BodyThink: This exploration assumes you are currently wearing clothes, so if you aren’t please get dressed. Layers and differing fabrics will make the exploration even better. Athletic clothes are nice due to the variety of fabrics and the ability to easily layer. We will explore the clothes you are wearing with your eyes closed, to emphasize a few points about touch. Try this blind touch exploration both to develop your sensation and to experience how touch can change tension in your own body.
We’ll explore how movement, speed, pressure, contact area, visualization and other variables impact our ability to gather information. Can you feel different layers, seams, pockets, snags or other information about what you are wearing? A real challenge is keeping your eyes closed.
Feel: Assess how you feel before you begin. While the primary focus is your clothes, note any areas of tenderness or other sensations as you proceed, always avoiding pain or discomfort. As you explore your clothing, note if your touch is comfortable to your body or if it feels awkward.
Contact should be over clothing, preferably layers. The contact should be firm, but controlled and gentle to begin. Modify your contact as desired as you proceed to explore your clothing and touch skills.
Move: Breathe as naturally as possible, but remain aware of your breath, especially if you find yourself holding it.
Any comfortable and safe posture with your eyes closed is appropriate. Laying on the ground and closing your eyes provides a great first experience. Being on the ground removes balance challenges, allowing you to focus more completely on touch.
1. Begin with your hands on your hip area, which is a great place to start because we typically have multiple layers of clothing, such as your shirt, pants, pockets, underwear, etc. laying over each other.
2. Holding your hands still, what can you feel? Do you feel different layers? Or a crinkle in fabric?
3. Does adjusting the pressure of your hands help you feel better? Try both more and less pressure.
4. Slowly move your hands a few inches in each direction. Do you get more information by moving your hands?
153
Exploring Touch
5. Adjust the pace at which you move your hands. Is there a speed that is too fast? Or too slow? Is there a speed that you feelis “best” to give you information about your clothing in this area? Does your breathing change as you change hand speeds?
6. Using a speed you feel is best, adjust the pressure you are using from a grazing light touch to a firm, deep contact. Which pressure is best for sensing the pattern and texture of the surface fabric? Can you sense different layers or features in the fabrics?
7. Repeat the exercise with a different contact such as a single finger. How does this change the experience? Is one finger better than others at sensing different features of your clothing? Is it better to use multiple fingers?
8. Continue the exercise using the back of your hand and fingers, rather than the palm and finger pads. How does the experience differ?
9. Now notice your right hand versus your left hand, are there differences? Is one better at sensing small surface features and the other deeper layers?
10. End the sequence with three breaths consisting of a quick inhale through the nose, followed by a long slow exhale through pursed lips.
Integrate: Open your eyes and compare your impressions obtained through touch with what you see. Any surprises? How doyou feel after the exploration? Did any areas have unexpected sensations?
Play with changing locations, different clothing and explore different contacts. Shift your focus from your clothing to the underlying tissue and explore how this differs compared to exploring bare skin.
This exploration helps us develop palpation skills using clothing.
154
Exploring Touch
Full Body PatThink: We will explore an easy pat down the entire body. Do not strain, this should be easy, but mindful. Each pat should be firm and controlled. Be sure to protect your back by hinging at the hips with a neutral back – DO NOT CURL YOUR BACK FORWARD, move your butt back and bend at your hips. This sequence can be modified to be done from a seated position if you cannot stand.
You cannot do this exploration wrong if you stay away from the eyes and groin, but you might find ways to make it better for you. Start gentle and “amp-up” the energy as you get more familiar with it.
Feel: Notice how you feel before you begin. Note any areas of tenderness or other sensations as you proceed.
Use loose, cupped hands with all your fingers together for patting the body. Use finger tips only to gently pat the face, head andneck.
Contact can be over clothing or directly on skin. The pats should be firm, but controlled.
Move: Breathe as naturally as possible, typically exhaling when hinging down and inhaling when coming back upright.
Start by standing with a “hands-up” position, like a scare crow. A seated posture can work with slight modifications.
1. Use your right hand to firmly pat from your left front shoulder / chest area to the palm of your hand.
2. The right hand should return patting the back of the left arm from the hand to the shoulder, then up the neck to the side of thehead at about eye level.
3. Repeat steps 1 & 2 using your left hand to pat the right arm.
4. Lightly, using fingers from both hands, begin tapping gently below the eyes and continue down the neck to the collar bone (clavicle).
155

Exploring Touch
5. Use cupped hands to pat down the front of the body from the clavicles to the tops of the feet. Hinge at the hips, try not to bend the back, as you move down the body, keeping a soft bend in the knees. It’s okay if you can’t reach your feet, go as far as is comfortable.
6. Come back up the inside of the legs and the front of the body to just under the collar bone (clavicle).
7. Lightly using the fingers from both hands, begin tapping just above the eyes, up and over the head and down the neck.
8. Bring your hands down and behind you to continue patting the back of the body. Pat from as high as you can reach to the back of the leg, around the outside ankle and foot.
9. Come back up the inside of the legs and the front of the body to just under the collar bone (clavicle).
10. Using the finger tips of both hands, lightly tap from the top of your head down the side to your neck and then to your shoulders.
11. Using cupped hands, continue down the side of your body to the outside of the feet. Remember to hinge at the hips as youdescend.
11. Come back up the inside of the legs and the front of the body to just under the collar bone (clavicle).
12. End the sequence with three breaths consisting of a quick inhale through the nose, followed by a long slow exhale through pursed lips.
Integrate: How do you feel after the exploration? How is your energy level? Did any areas have unexpected sensations?
Play with the speed and intensity of pats. Consider doing it with eyes closed. This exploration can be done with a soft closed fist. The exploration can also be done on a passive partner, my dogs love it.
This exploration is a great way to wake up and assess the entire body.
The exploration is based on roughly following the Traditional Chinese Medicine meridian pairs. The following list matches the steps above to the meridians being followed:
156
Exploring Touch
Steps 1-3. Lung-Heart-Pericardium
Steps 4-5. Stomach
Steps 6,9,11. Spleen-Kidney-Liver
Steps 7-8. Urinary Bladder
Steps 10-11. Gall Bladder
There are many diagrams of the TCM meridians available on the web.
While science still struggles to understand the meridians it is important to consider several things about them. First, they evolved from patterns noted over long periods of time. Second, they tend to follow between major superficial and deep muscles, which is also where lymph, nerves and blood vessels are routed. Finally, this space between muscles is created by fascia and fascial restrictions can be large contributors to poor movement and health.
157

Exploring Touch
TTouch® ExplorationThink: Linda Tellington-Jones discovered and popularized a special style of touch called TTouch®, initially used with animals but great for people also. The first “t” in the name stands for trust, so think of it as trust touch. TTouch® uses a specific physical contact to communicate trust and intention.
Although Tellington-Jones’ system incorporates many different components such as garments, obstacle courses and leads, touch is central to the system. TTouch® is based on moving the skin in about a one and one quarter (1.25) circle with various hand contacts, which are named after animals (leopard touch, chimp touch, etc.). While the movement and hand contacts are easy to learn, the true secret lies with directing your intention to “Remember your potential for perfect function; remember your perfection...”
We’ll be exploring TTouch® on our own arms and we will pay close attention to how this “circle” really works.
This technique is very safe if you pay attention and keep the correct intent. Let go of precision, in favor of intuition. Do not worry if you are doing it “right”, your skin and nervous system will let you know when you get it “right”, the move will feel “complete” - not too little and not too much.
Feel: Notice how your arm feels before you begin, as we will be working on this body part. Also, notice the overall state of your nervous system as this technique often has full body effects.
You will just be moving the skin, so very little pressure is required. You can use the technique through light clothing, but directly on skin is best. You will contact the skin and “sink in” for a moment, before doing a TTouch® circle. You will feel the circle is complete when you come back past the point of contact and feel slight resistance. As you remove the contact to move to the next location, the skin will lightly “snap” back into place. You can do your circles clockwise (CW) or counter-clockwise (CCW).
We’ll begin making contact with just the pad of the middle finger of the hand that is working to explore how the skin moves.
Later we’ll use cupped hands with fingers lightly together, only your finger pads and thumb pad will make contact. This hand position is called “Clouded Leopard” in the TTouch® system. Feel free to adapt as required to include more or less of the palm,
158
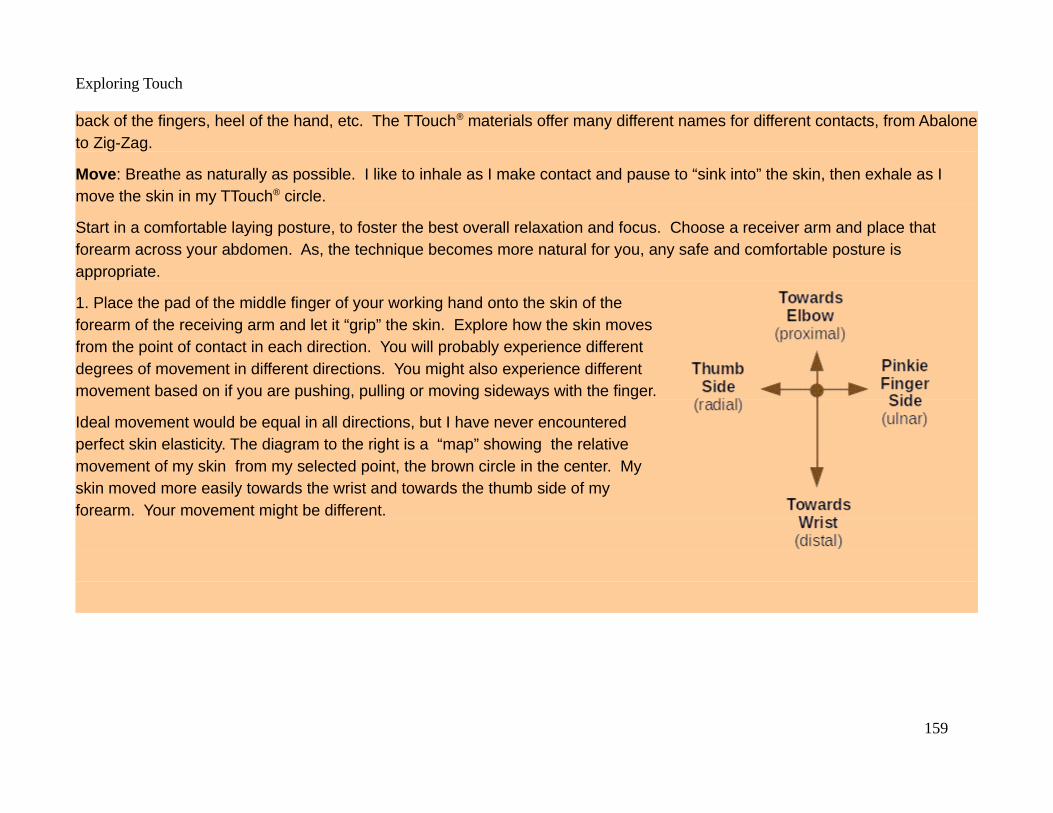
Exploring Touch
back of the fingers, heel of the hand, etc. The TTouch® materials offer many different names for different contacts, from Abaloneto Zig-Zag.
Move: Breathe as naturally as possible. I like to inhale as I make contact and pause to “sink into” the skin, then exhale as I move the skin in my TTouch® circle.
Start in a comfortable laying posture, to foster the best overall relaxation and focus. Choose a receiver arm and place that forearm across your abdomen. As, the technique becomes more natural for you, any safe and comfortable posture is appropriate.
1. Place the pad of the middle finger of your working hand onto the skin of theforearm of the receiving arm and let it “grip” the skin. Explore how the skin movesfrom the point of contact in each direction. You will probably experience differentdegrees of movement in different directions. You might also experience differentmovement based on if you are pushing, pulling or moving sideways with the finger.
Ideal movement would be equal in all directions, but I have never encounteredperfect skin elasticity. The diagram to the right is a “map” showing the relativemovement of my skin from my selected point, the brown circle in the center. Myskin moved more easily towards the wrist and towards the thumb side of myforearm. Your movement might be different.
159

Exploring Touch
2. Now try making a one and one quarter “circle” from this point and at the end removeyour finger from you skin. When you removed your finger, did your skin snap back tothe center where you started? Note how this movement felt on your skin and feel freeto try it several more times.
The diagram to the right connects the ends of the arrows of the diagram above withblue curves showing an approximate path of a one and one quarter “circle” from thesame point as shown above. The path starts at the point of contact, the brown circlein the center, and goes in a clockwise direction until the end, the blue arrow.
Our “circle” has turned into an irregular spiral due to the different degrees of skinelasticity in each direction. Note how the skin will snap back to the center of thisdiagram, where we first made contact, when we remove our finger at the end of thestroke (moving from the blue arrow to the brown dot).
You can do your own circle in many different ways, but try to insure that you
a) contact the skin with your middle finger pad and lightly sink in to grip the skin
b) move the skin to the comfortable end of its range of motion in all directions
c) complete a one and one quarter “circle” and
d) lift the finger off at the end.
Practice your TTouch® circles several times and get a feel for the movement. It is best to start slow, but you may find that speeding up helps you
160

Exploring Touch
3. Now let’s try a simple “circle” where we only go around once. The path mightlook something like the diagram to the right.
How does this simple circle feel compared to the TTouch® circle? Some peopledescribe the simple circle as “incomplete” or “wrong”, when compared to theTTouch® circle. Why do you think that might be?
4. Next, we’ll use all the fingers to get a better feel for TTouch®. Place the fingerpads and thumb pad of your working hand onto the upper arm of the receiving armand deliver several TTouch® in this area. If this feels odd, you might move back toyour forearm with this contact to practice the TTouch®. This touch can feel verygood on the shoulders!
5. Play with different contacts, pressures, directions, speeds and locations.Remember you are just moving the skin on top of the muscles and bones, so thepressure should be very light. The lightest pressure should be just enough to moveyour closed eyelid across your eyeball and the hardest pressure should allow you to engage and move the skin on your scalp.
6. As you become more competent with the mechanics of TTouch®, incorporate the true secret of the technique, the intent to “remember your potential for perfect function; remember your perfection...” I suggest personalizing this intention, as an example, I’m more comfortable with expressing gratitude for the body’s amazing ability to heal and asking it to let me know whatI can do to help it. I try to open up to the intuition of my body and use TTouch® to understand how to support the healing process.
Integrate: How do you feel after the exploration? Are the changes only local on the area you worked or are they more widespread?
Explore different contacts, pressures, speeds, locations and clockwise versus counter-clockwise circles.
161

Exploring Touch
This exploration introduced you to a wonderful technique, TTouch®. The beauty of this technique is that it is well studied, well documented, safe and simple, yet opens the door to complexities which can be investigated for a lifetime.
This exploration exposed us to using sensation, intent and intuition, in addition to our hands and a “formal” technique. This exploration requires us to balance following a technique versus following intuition. Applying a technique involves so much more than just following the mechanics, it requires using knowledge, sensation, touch, experience and intuition to adapt as best we can to communicate between ourselves and another.
The world owes a debt to Linda Tellington-Jones and I can highly recommend learning more about her and her work at www.ttouch.com.
162

Exploring Touch
Wake Up the Feet!Think: Our poor feet! Most of the time we keep them in mummy wraps called shoes, yet they evolved to touch the earth and be free. Feet used to be strong and flexible, responsible for maintaining a stable contact with ever changing terrain. There area large number of touch sensors in our feet, classically used for evaluating the earth under them.
Placing our feet into shoes for most the day dulls their ability to sense and weakens their ability to truly support us. Imagine how your hands would degenerate should they be placed in restraints for most the day. While I’m personally passionate about moving outside barefoot or in minimalist footwear, this route is not for everyone. It took me a decade of dedication to arrive at the point where I prefer to walk or run most terrain barefoot, or in huarache sandals. While there are definite places for shoes inour society, they exact a toll on our feet, knees and hips that is difficult to understate.
However, there is a great technique anybody can use to help wake up their feet! Waking up and strengthening the feet, can also impact the health of the knees and hips as shoes tend to cause these marvelous joints to lose capabilities over time. This technique consists of using a ball, typically a golf ball, to stimulate and strengthen the feet.
Do not over do this one, it is easy to end up hurting the next day if you are not careful. The key is consistency, not intensity. If you are being treated by a podiatrist or doctor for any foot related issues like a heel spur or nerve damage, consult with your medical professional about the suitability of this exploration.
Feel: Notice how you feel before you begin, especially the foot, ankle, knee and hip. The focus will primarily be moving the ball over positions where you can apply pressure so as to experience therapeutic discomfort. Note this will not be pain, this sensation will be at a controlled level where you feel changes occurring. In general, as you park on a small sensitive area, it should begin to become less sensitive in about 30 seconds. If it stays the same or gets worse, try backing off the pressure.
Contact is between one of your feet and the ball as shown in the photos below. You need to select an appropriate ball for whereyour feet are currently at with respect to sensitivity and strength. You may even discover that a golf ball is great for everywhere except the heel, where a softer ball is a better alternative. This should feel great...especially when you stop!
163
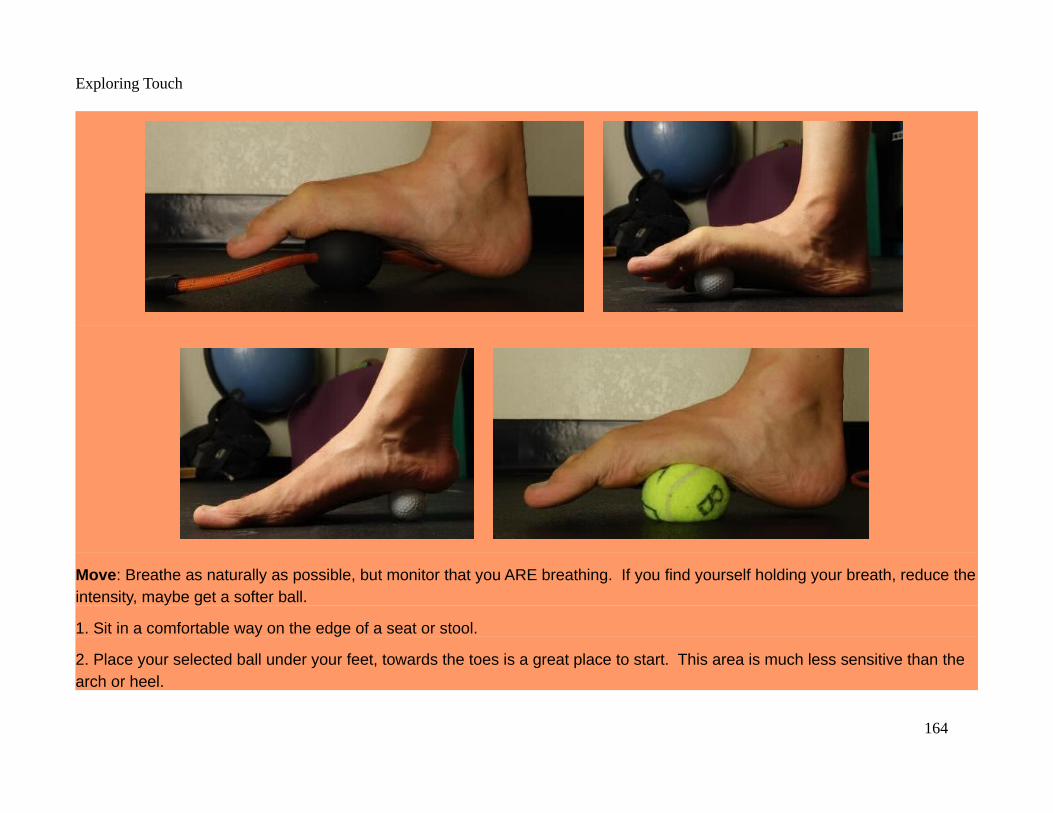
Exploring Touch
Move: Breathe as naturally as possible, but monitor that you ARE breathing. If you find yourself holding your breath, reduce theintensity, maybe get a softer ball.
1. Sit in a comfortable way on the edge of a seat or stool.
2. Place your selected ball under your feet, towards the toes is a great place to start. This area is much less sensitive than the arch or heel.
164
Exploring Touch
3. Move your foot side to side and up & down searching for areas of interesting sensations. You may need to either decrease orincrease the pressure. Note that even small movements can dramatically change the sensation you encounter, so remain aware and in control.
4. I like to move my foot across the ball in this position by pivoting on my heel, generally working a spot for 30 seconds up to about three minutes.
5. Investigate moving the ball into the arch of the foot, which will likely be more sensitive to pressure. You might try moving your foot in small circles over the ball as you work from inside to outside. There really is no area of the foot that is off limits, but there should be no pain.
6. The heel is generally the most sensitive area of the foot for me to work. While seated, I will keep the whole foot off the groundwhen looking for a spot to work, bringing the ball of my foot to the ground as a pivot while I work an interesting area. I have used the techniques in this exploration to manage my own plantar fasciitis (PF), which has healed since I stopped running in shoes.
7. Continue working the entire sole of the foot and remember to work both feet.
Integrate: How do you feel after the exploration? Stand up and evaluate your “new” feet. Don’t be surprised if you experiencesome clicks or pops as tissue moves into new positions.
I like to do this exploration every night as I watch TV or read in a seated position, where it is mindless and relaxing. Standing toperform the exploration is much more challenging and should not be done unless you have good balance or you can lean against a wall for support.
Another exercise I like to do is picking the ball up with my foot. As your foot becomes more mobile and stronger you can work on picking up different size balls as shown in the photos below. Note that this movement can initiate cramping in the foot or calf, so proceed gently.
165

Exploring Touch
Our feet are the basis of our connection with the earth and are often ignored and abused in modern life. I find releasing tension in the feet, getting them to move better and become stronger, helps the entire body feel better. If I could only provide self care to one part of my body, I’d probably choose my feet as they are the literal basis of every step of my life.
166

Exploring Touch
Call of the Foam RollThink: The foam roll can be the basis for a life long practice of self care and at the same time it provides an opportunity to easily stay connected with our body through touch. My favorite aspect of the foam roll is that it always seems to call me back, even if I forget about it for a short period. It doesn’t hurt that if you keep it where you see it every day, it will eventually get your attention.
Do not over do this one, it is easy to end up hurting the next day if you are not careful. The key is consistency, not intensity. Remember that you control the intensity, if the ground is too much, use the wall. Move slowly as situations can change quickly and never move into pain.
Feel: Notice how you feel overall before you begin. The primary focus during rolling is safety, do not move into pain. You may experience discomfort that feels therapeutic, but keep the intensity at less than a 7 out of 10, more typically a 4 or 5. The secondary focus is to assess where you most need attention and spend the most time working these areas, but keep from overworking them (no simple task).
Generally, your hands are used only for support and to manipulate the roll.
Contact is between the roller, your body and the ground or wall. You should use an appropriate sized roller, with most people using a 4” (small to medium frame) to 6” (medium to large). There are larger and smaller rollers available depending on your needs. Always follow the manufacturer’s instructions.
Move: Breathe as naturally as possible, but monitor that you ARE breathing. If you find yourself holding your breath, reduce theintensity and focus more by taking three slow, deep breaths in a comfortable position.
This exploration is best done initially against a wall, but moving to the ground can increase the intensity and effectiveness.
167
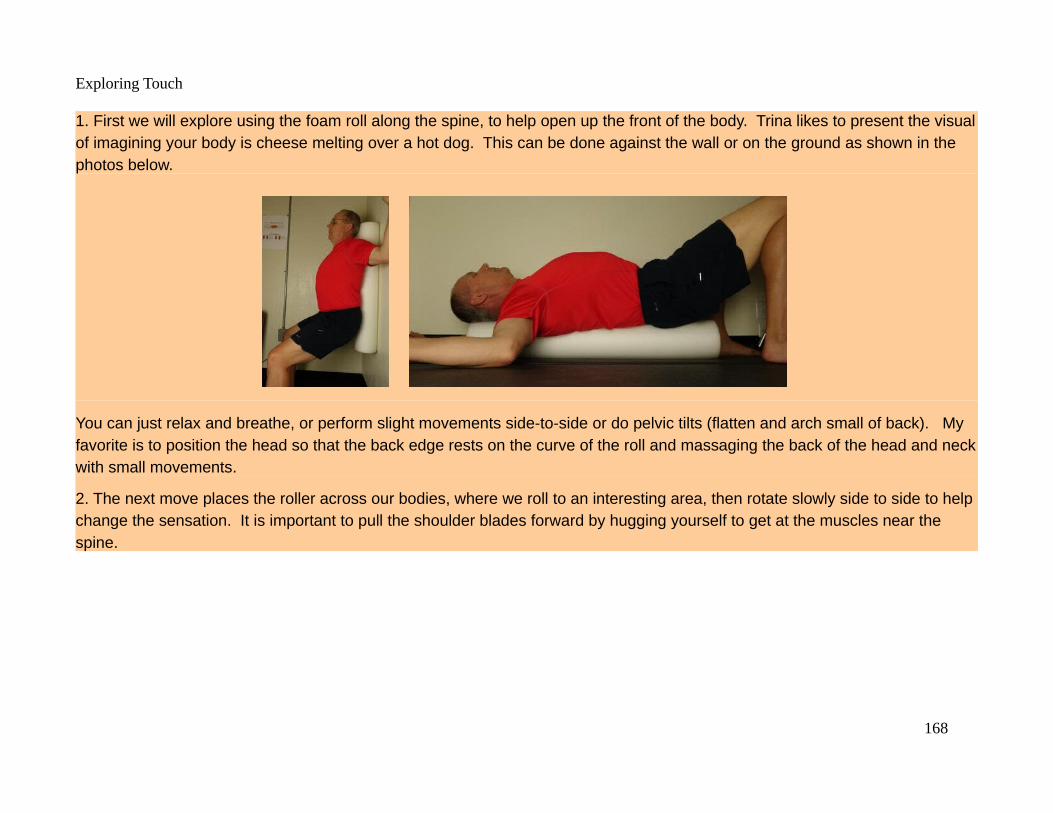
Exploring Touch
1. First we will explore using the foam roll along the spine, to help open up the front of the body. Trina likes to present the visualof imagining your body is cheese melting over a hot dog. This can be done against the wall or on the ground as shown in the photos below.
You can just relax and breathe, or perform slight movements side-to-side or do pelvic tilts (flatten and arch small of back). My favorite is to position the head so that the back edge rests on the curve of the roll and massaging the back of the head and neckwith small movements.
2. The next move places the roller across our bodies, where we roll to an interesting area, then rotate slowly side to side to helpchange the sensation. It is important to pull the shoulder blades forward by hugging yourself to get at the muscles near the spine.
168
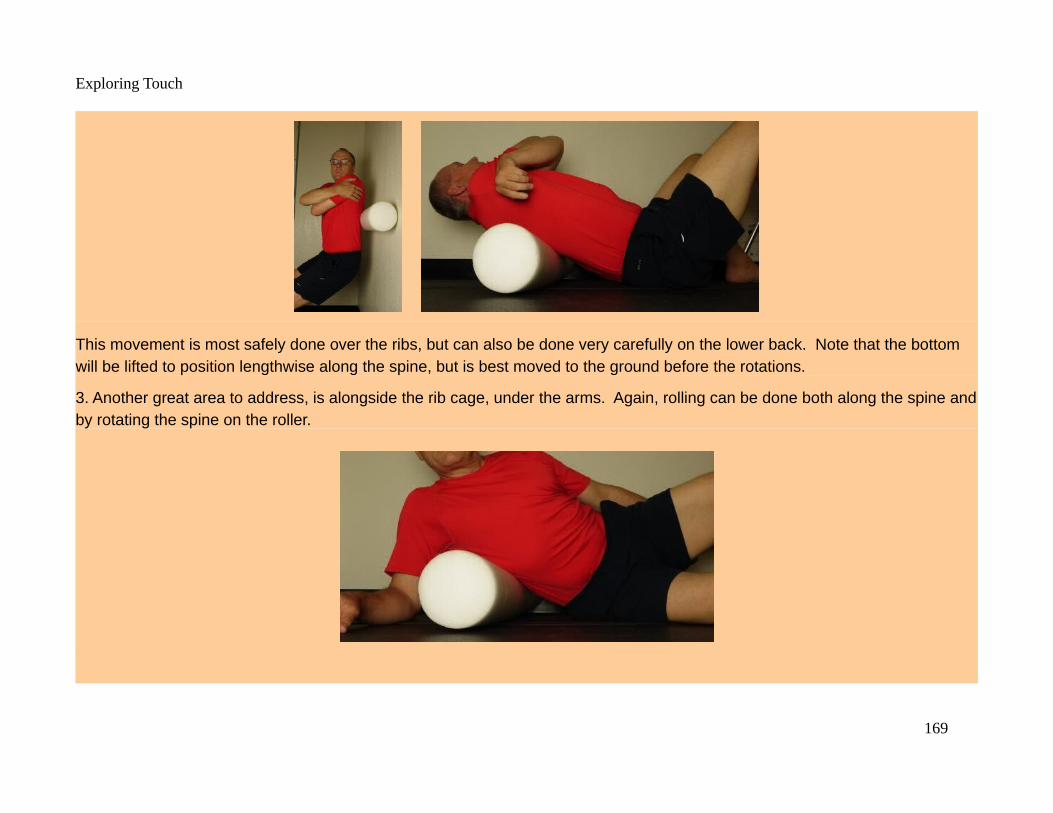
Exploring Touch
This movement is most safely done over the ribs, but can also be done very carefully on the lower back. Note that the bottom will be lifted to position lengthwise along the spine, but is best moved to the ground before the rotations.
3. Another great area to address, is alongside the rib cage, under the arms. Again, rolling can be done both along the spine andby rotating the spine on the roller.
169
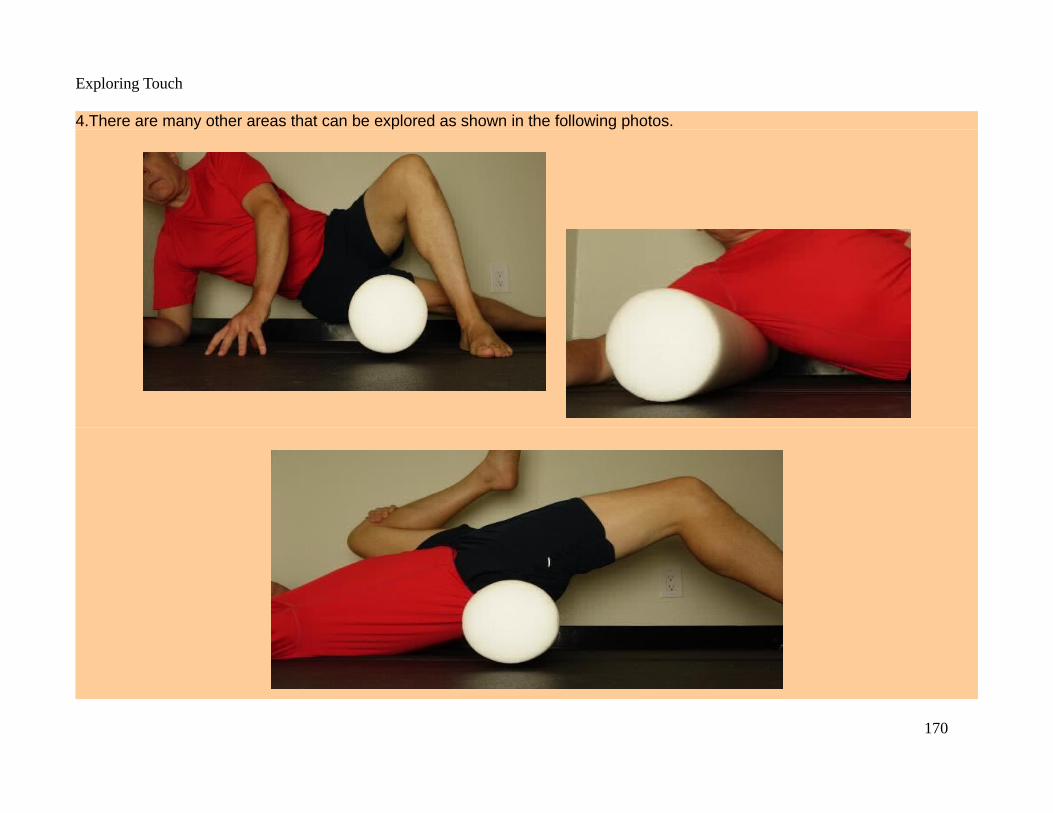
Exploring Touch
4.There are many other areas that can be explored as shown in the following photos.
170

Exploring Touch
Integrate: How do you feel after the exploration? Stand up and evaluate your “new” body. Don’t be surprised if you experience some clicks or pops as tissue moves into new positions.
I like to do this exploration every night as I watch TV or listen to pod casts, where it is mindless and relaxing. Remember that you control the pressure and you can roll out almost every area of your body with a little creativity. This exploration only touched on the most obvious body areas, but as an example, it works great on the inner thighs also.
Rolling is a great opportunity to get down on the ground and be a child again. It is easy to get lost and spend much more time than recommended, so be careful. Besides being a great exploration in controlling the intensity of touch, it also allows us to explore how certain areas (like most people’s underarm area) can be exquisitely sensitive without us knowing about it.
171
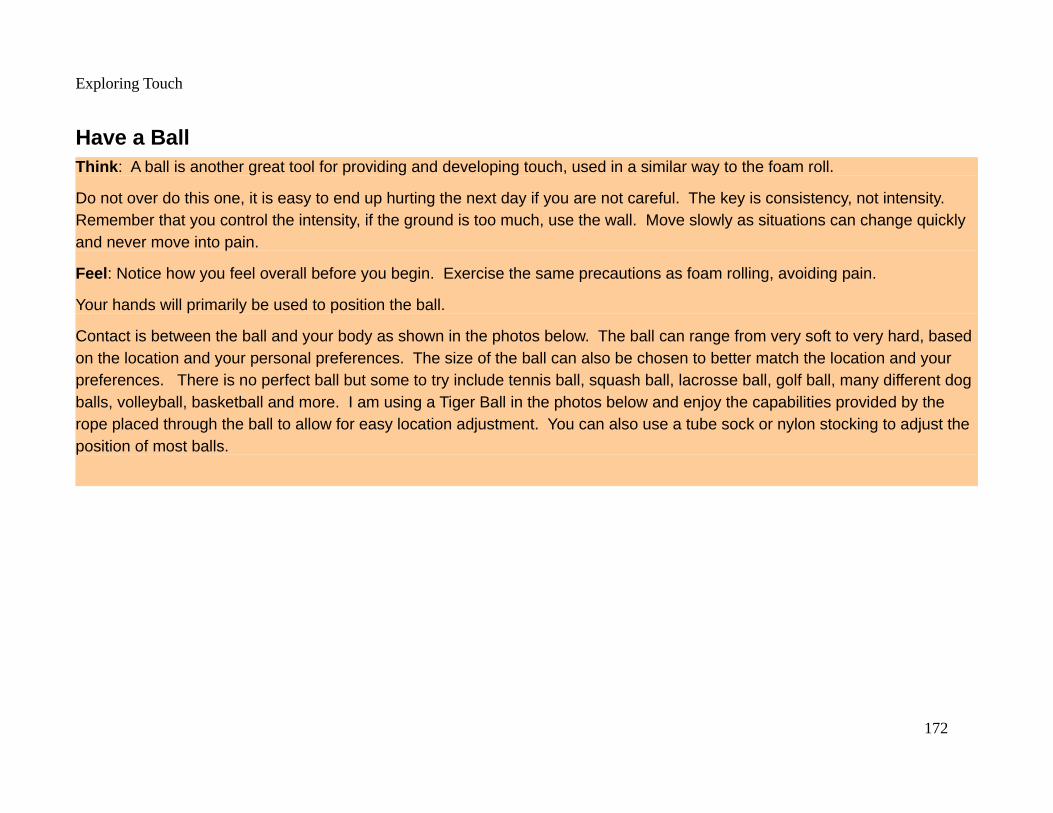
Exploring Touch
Have a BallThink: A ball is another great tool for providing and developing touch, used in a similar way to the foam roll.
Do not over do this one, it is easy to end up hurting the next day if you are not careful. The key is consistency, not intensity. Remember that you control the intensity, if the ground is too much, use the wall. Move slowly as situations can change quickly and never move into pain.
Feel: Notice how you feel overall before you begin. Exercise the same precautions as foam rolling, avoiding pain.
Your hands will primarily be used to position the ball.
Contact is between the ball and your body as shown in the photos below. The ball can range from very soft to very hard, based on the location and your personal preferences. The size of the ball can also be chosen to better match the location and your preferences. There is no perfect ball but some to try include tennis ball, squash ball, lacrosse ball, golf ball, many different dog balls, volleyball, basketball and more. I am using a Tiger Ball in the photos below and enjoy the capabilities provided by the rope placed through the ball to allow for easy location adjustment. You can also use a tube sock or nylon stocking to adjust the position of most balls.
172

Exploring Touch
Move: Breathe as naturally as possible, but monitor that you ARE breathing. If you find yourself holding your breath, reduce the intensity, maybe try a different ball.
173
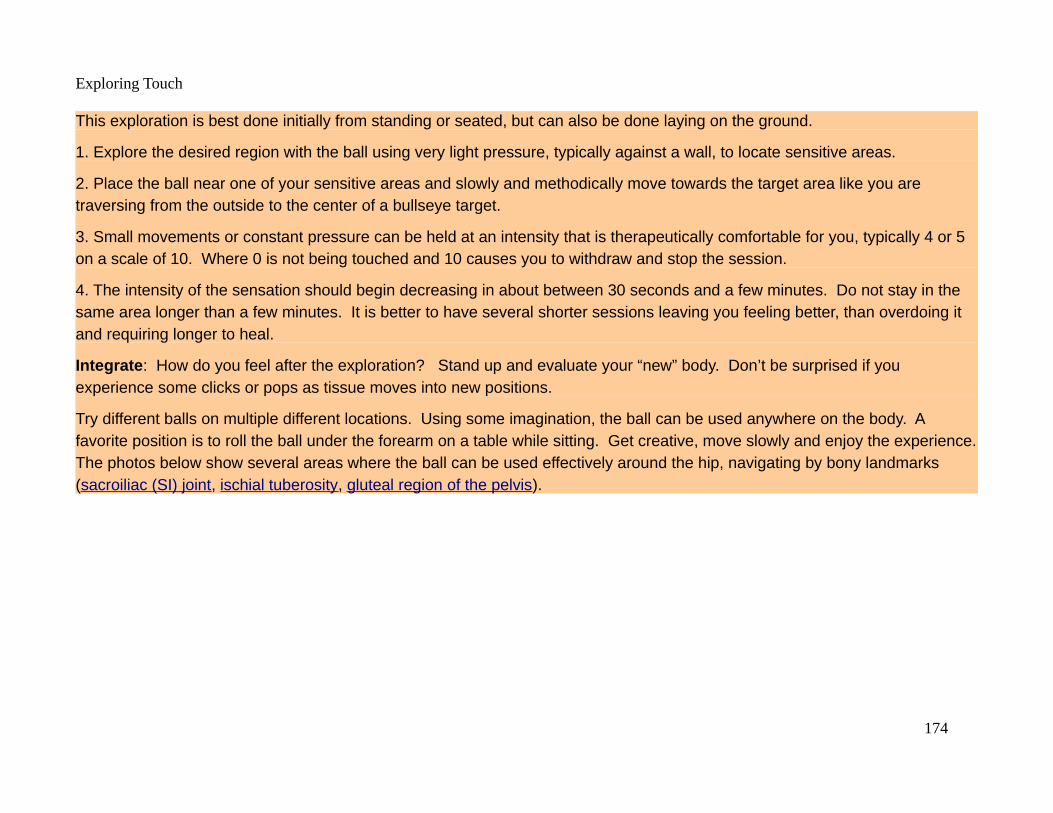
Exploring Touch
This exploration is best done initially from standing or seated, but can also be done laying on the ground.
1. Explore the desired region with the ball using very light pressure, typically against a wall, to locate sensitive areas.
2. Place the ball near one of your sensitive areas and slowly and methodically move towards the target area like you are traversing from the outside to the center of a bullseye target.
3. Small movements or constant pressure can be held at an intensity that is therapeutically comfortable for you, typically 4 or 5 on a scale of 10. Where 0 is not being touched and 10 causes you to withdraw and stop the session.
4. The intensity of the sensation should begin decreasing in about between 30 seconds and a few minutes. Do not stay in the same area longer than a few minutes. It is better to have several shorter sessions leaving you feeling better, than overdoing it and requiring longer to heal.
Integrate: How do you feel after the exploration? Stand up and evaluate your “new” body. Don’t be surprised if you experience some clicks or pops as tissue moves into new positions.
Try different balls on multiple different locations. Using some imagination, the ball can be used anywhere on the body. A favorite position is to roll the ball under the forearm on a table while sitting. Get creative, move slowly and enjoy the experience.The photos below show several areas where the ball can be used effectively around the hip, navigating by bony landmarks (sacroiliac (SI) joint, ischial tuberosity, gluteal region of the pelvis).
174

Exploring Touch
Using the ball is a great exploration to experience touch intensities with different sensitivities across multiple locations. The goal is to learn to control the intensity using the communication between your experience and movement.
175

Exploring Touch
Cane YourselfThink: Canes and other stick based tools can improve our reach and save ourhands.
Do not over do this one, it is easy to end up hurting the next day if you are notcareful. The key is consistency, not intensity. Remember that you control theintensity. Move slowly as situations can change quickly and never move intopain.
Feel: Notice how you feel before you begin, especially the area you plan to work.The focus will primarily be moving the cane over positions where you can applypressure so as to experience therapeutic discomfort. Note this will not be pain,where you want to stop, this pressure will be at a controlled level where you feelchanges occurring. In general, as you park on a small sensitive area, it shouldbegin to become less sensitive in about 30 seconds. If it stays the same or gets worse, try backing off the pressure.
The hands will be manipulating the cane. Generally, you want the hand on the side of the body you are working to be as relaxed as possible, so you are not fighting tension with more tension.
Contact is between your body and the selected portion of the cane. There are generally different portions of the cane that work better than others on various body parts. Study the photos below for ideas on how to use the cane or visit the website of the manufacturer for your cane. Always follow the instructions from the manufacturer of your cane.
176

Exploring Touch
177

Exploring Touch
Move: Breathe as naturally as possible, but monitor that you ARE breathing. If you find yourself holding your breath, reduce theintensity.
This exploration can be done from most any position.
1. Explore the desired region with the cane using very light pressure to locate sensitive areas.
2. Place the cane near one of your sensitive areas and slowly and methodically move towards the target area like you are traversing from the outside to the center of a bullseye target.
3. Small movements or constant pressure can be held at an intensity that is therapeutically comfortable for you, typically 4 or 5 on a scale of 10. Where 0 is not being touched and 10 causes you to withdraw and stop the session.
4. The intensity of the sensation should begin decreasing in about between 30 seconds and a few minutes. Do not stay in the same area longer than a few minutes. It is better to have several shorter sessions leaving you feeling better, than overdoing it and requiring longer to heal.
Integrate: How do you feel after the exploration? Stand up and evaluate your “new” body. Don’t be surprised if you experience some clicks or pops as tissue moves into new positions.
The type of cane and which tool on the cane you use can make a big difference. Everybody is different so if possible, try different canes. Also, position can make a big difference, I tend to like either laying, standing or sitting, but be creative.
The cane provides a great exploration in controlling intensity and body tension throughout the session. It is very easy to get tootense using the cane, defeating the entire session. Practice relaxed use of the cane to experience the best benefits.
178
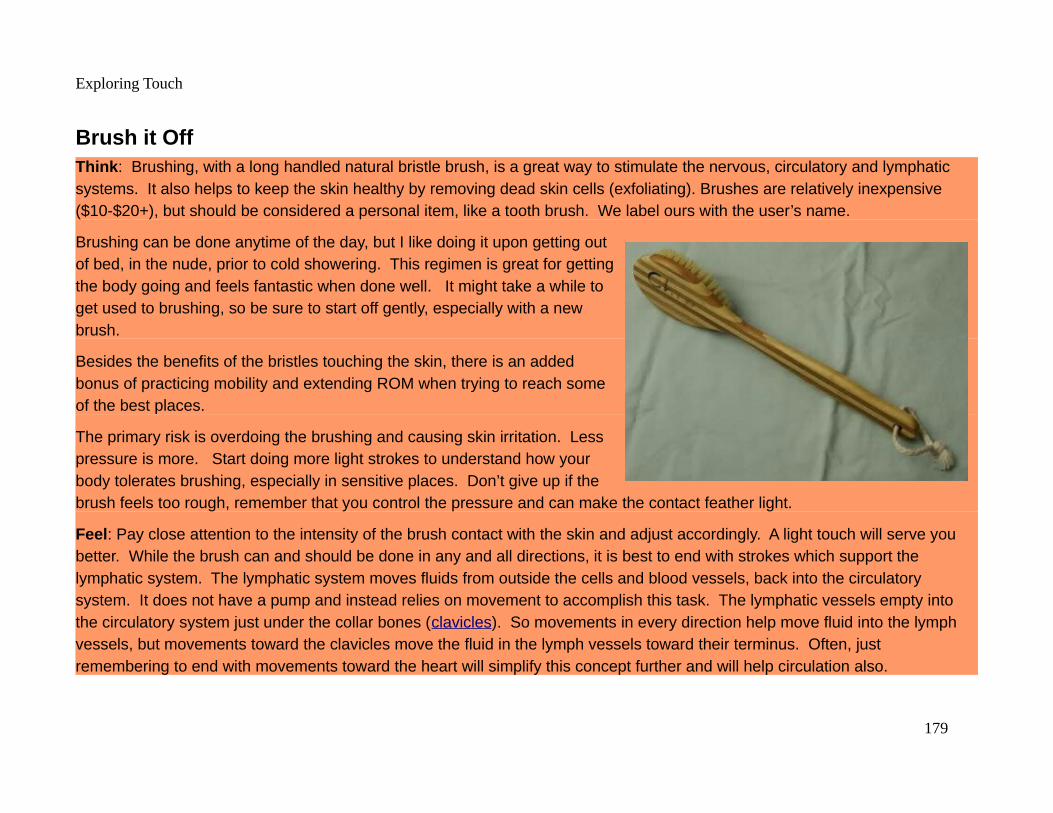
Exploring Touch
Brush it OffThink: Brushing, with a long handled natural bristle brush, is a great way to stimulate the nervous, circulatory and lymphatic systems. It also helps to keep the skin healthy by removing dead skin cells (exfoliating). Brushes are relatively inexpensive ($10-$20+), but should be considered a personal item, like a tooth brush. We label ours with the user’s name.
Brushing can be done anytime of the day, but I like doing it upon getting outof bed, in the nude, prior to cold showering. This regimen is great for gettingthe body going and feels fantastic when done well. It might take a while toget used to brushing, so be sure to start off gently, especially with a newbrush.
Besides the benefits of the bristles touching the skin, there is an addedbonus of practicing mobility and extending ROM when trying to reach someof the best places.
The primary risk is overdoing the brushing and causing skin irritation. Lesspressure is more. Start doing more light strokes to understand how yourbody tolerates brushing, especially in sensitive places. Don’t give up if thebrush feels too rough, remember that you control the pressure and can make the contact feather light.
Feel: Pay close attention to the intensity of the brush contact with the skin and adjust accordingly. A light touch will serve you better. While the brush can and should be done in any and all directions, it is best to end with strokes which support the lymphatic system. The lymphatic system moves fluids from outside the cells and blood vessels, back into the circulatory system. It does not have a pump and instead relies on movement to accomplish this task. The lymphatic vessels empty into the circulatory system just under the collar bones (clavicles). So movements in every direction help move fluid into the lymph vessels, but movements toward the clavicles move the fluid in the lymph vessels toward their terminus. Often, just remembering to end with movements toward the heart will simplify this concept further and will help circulation also.
179
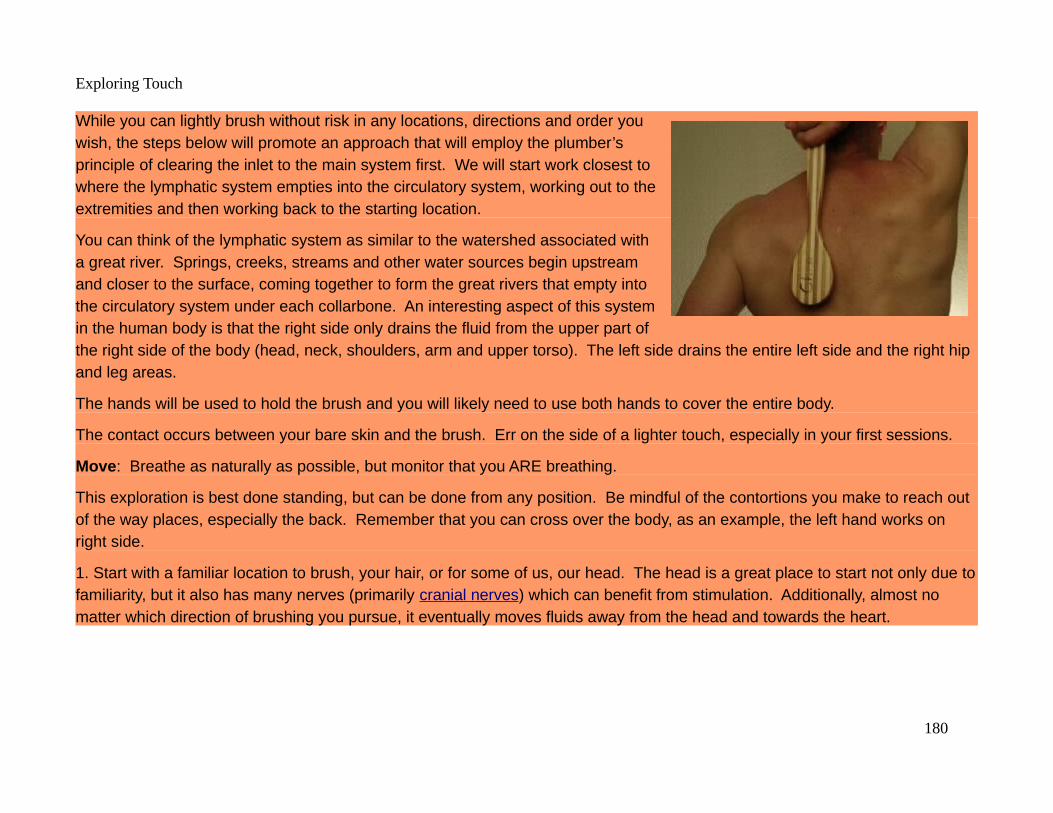
Exploring Touch
While you can lightly brush without risk in any locations, directions and order youwish, the steps below will promote an approach that will employ the plumber’sprinciple of clearing the inlet to the main system first. We will start work closest towhere the lymphatic system empties into the circulatory system, working out to theextremities and then working back to the starting location.
You can think of the lymphatic system as similar to the watershed associated witha great river. Springs, creeks, streams and other water sources begin upstreamand closer to the surface, coming together to form the great rivers that empty intothe circulatory system under each collarbone. An interesting aspect of this systemin the human body is that the right side only drains the fluid from the upper part ofthe right side of the body (head, neck, shoulders, arm and upper torso). The left side drains the entire left side and the right hip and leg areas.
The hands will be used to hold the brush and you will likely need to use both hands to cover the entire body.
The contact occurs between your bare skin and the brush. Err on the side of a lighter touch, especially in your first sessions.
Move: Breathe as naturally as possible, but monitor that you ARE breathing.
This exploration is best done standing, but can be done from any position. Be mindful of the contortions you make to reach out of the way places, especially the back. Remember that you can cross over the body, as an example, the left hand works on right side.
1. Start with a familiar location to brush, your hair, or for some of us, our head. The head is a great place to start not only due tofamiliarity, but it also has many nerves (primarily cranial nerves) which can benefit from stimulation. Additionally, almost no matter which direction of brushing you pursue, it eventually moves fluids away from the head and towards the heart.
180

Exploring Touch
You can skip the face, but I don’t recommend it. The ears, especially around them, provide a great location for brushing. The temples and jawline also provide a great brushing experience, if you are gentle. The eyebrows are a surprising location that areworth exploring, also.
2. Proceed down the neck toward the collar bones, don’t forget the sides and be extra light on the front.
3. The shoulders and arms are where we will first apply the plumber’s principle. We will stroke towards the body on the shoulders and arms as we proceed from the body out to the hands, and then return back to the body in the same manner. The idea is that we are clearing the way as we move from the body towards the hands, then we are coming back pushing fluids through clear lymphatic vessels.
4. Next, work on the torso, brushing upwards and around the torso in a similar manner, working down the torso front, sides and back.
5. Work proceeds to the legs working from the hips down to the feet, returning back up the legs, hips and torso. You might choose to linger on areas that are responding well or even feel a little “itchy”. The session should end brushing up towards the collarbones on both sides of the torso.
Integrate: Does your skin now feel it can “breathe” better? Take your brush to a surface you can easily clean, like a bathroom sink, and gently tap the bristles against the surface. You are likely to see some of the dead skin that the brush has collected in its travels. Performing this technique after each use is a good way to keep your brush clean.
While there are several obvious variables to alter (speed, intensity, brush type, etc.), one you might not have considered is using the brush for percussion or tapping. Light tapping with the brush can really wake up the area, especially palms of the hands and soles of the feet.
Brushing between fingers and toes, particularly the skin on the side of each finger and toe, provides a novel stimulation to the nervous system.
This exploration uses a new tool and follows a disciplined strategy through a complete session. Controlling and adapting intensity for different locations is a key concept to master.
181
Exploring Touch
Face It!Think: Working on our own face is an excellent way to improve our touch capabilities. The face and head provide excellent areas for developing palpation skills. The skull, ear, eye and jaw all have exquisitely fine details to explore, along with subtle structures beneath the skin.
There are also many Traditional Chinese Medicine (TCM) points on the face (tsubo or meridian or acupuncture or acupressure points), with several meridians beginning or ending on the head or face (see a TCM Meridians Image on the web).
You cannot do this exploration wrong as long as you relax and keep it gentle.
Feel: Our focus will be to explore our head and face in a gentle manner while mapping out some interesting features.
Please remember to wash your hands before and after every exploration, but especially for this one. Use relaxed hands, generally using the pads of the fingers. Contact will be directly on the head and scalp.
Move: Breathe as naturally as possible, but remember to not hold your breath.
Start by laying on your back with your feet flat on the ground and knees pointed up or out. Find a comfortable position that doesnot require much effort, you may wish to place a small pillow or book behind your head for comfort. Your eyes should naturally look towards the ceiling directly above if your head is positioned well.
182

Exploring Touch
1. Begin the exploration by rubbing your hands together to warm them. Then beginrubbing your head with both hands. The movement should imitate washing your faceand hair. Slowly increase the speed and intensity, then slow down, coming to restwith your hands covering your eyes. Let your hands rest comfortably over your eyesas you take about 5 nice slow breaths.
2. Slowly pull your hands down off your forehead so that the fingertips rest softly between your skulland your eyes. Apply a slight upward pressure, towards your forehead, until you engage the top ofthe eye socket. Do you feel a slight dip in the curve of the eye socket near the middle of your facewhere the nose begins? This slight dip is the location of a TCM point called “drilling bamboo” (orurinary bladder 2 or UB2 or B2 or …). Have you ever found yourself using these points toconcentrate or when you had a headache or were frustrated?
While we often pinch these points with an index and forefinger, today we will lightly engage them onboth sides at the same time using the middle finger of each hand. Press firmly enough that younotice the point, which might be a little tender, and then back off the pressure so that you can just feel the contact. This point has three characteristics common to the most important acupressure points: 1. it lies in a location or depression that our fingersnaturally find, 2. that location is often tender and 3. we often naturally find ourselves using these points for relief. Remain pressing on this point for about 5 breaths and then move your fingers below your eye, just outside the eye socket.
183
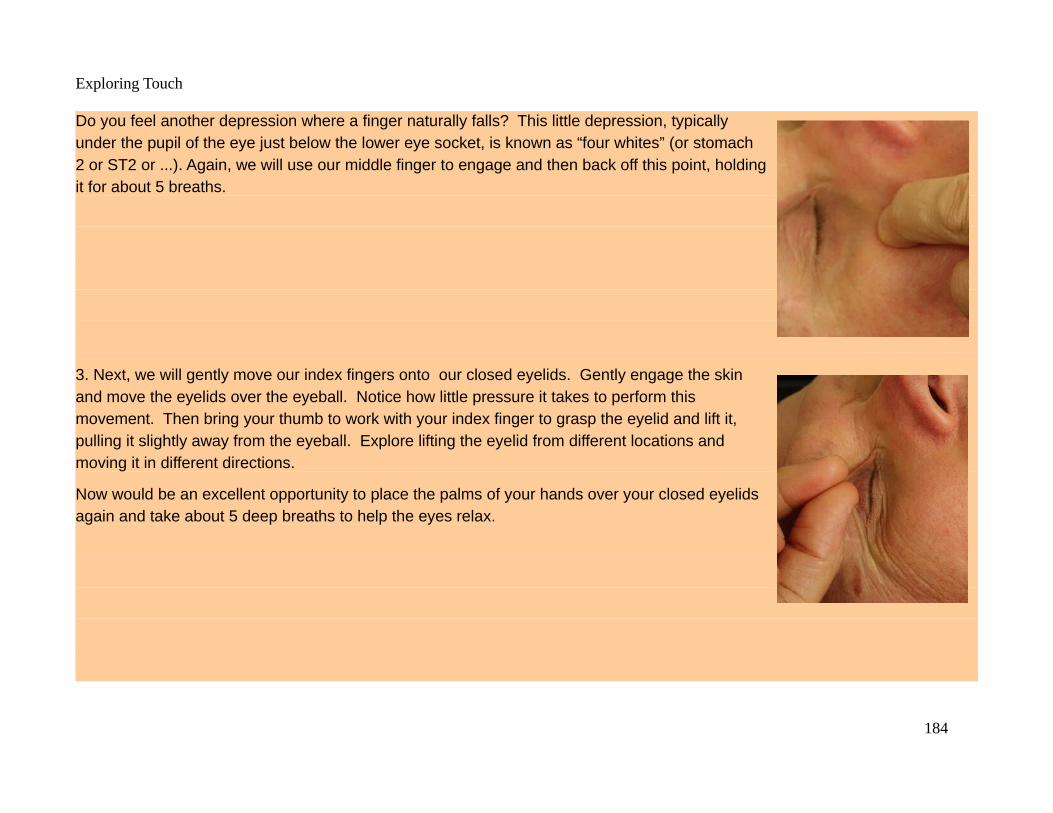
Exploring Touch
Do you feel another depression where a finger naturally falls? This little depression, typicallyunder the pupil of the eye just below the lower eye socket, is known as “four whites” (or stomach2 or ST2 or ...). Again, we will use our middle finger to engage and then back off this point, holdingit for about 5 breaths.
3. Next, we will gently move our index fingers onto our closed eyelids. Gently engage the skinand move the eyelids over the eyeball. Notice how little pressure it takes to perform thismovement. Then bring your thumb to work with your index finger to grasp the eyelid and lift it,pulling it slightly away from the eyeball. Explore lifting the eyelid from different locations andmoving it in different directions.
Now would be an excellent opportunity to place the palms of your hands over your closed eyelidsagain and take about 5 deep breaths to help the eyes relax.
184
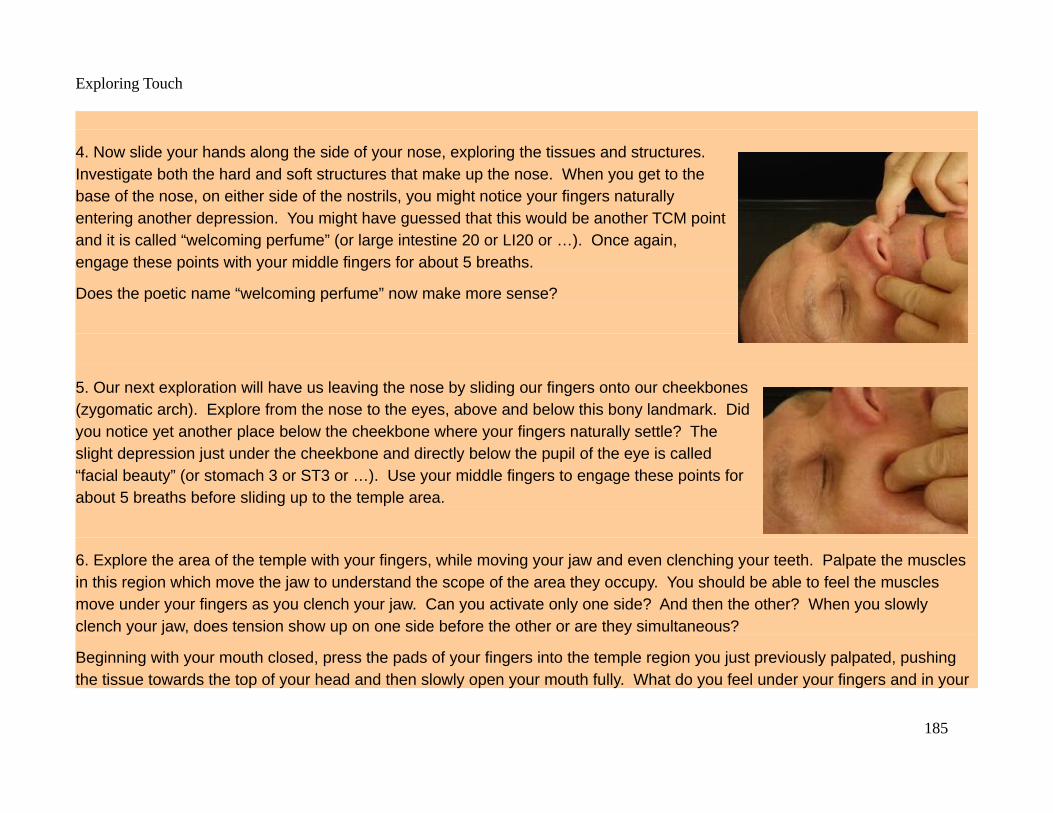
Exploring Touch
4. Now slide your hands along the side of your nose, exploring the tissues and structures.Investigate both the hard and soft structures that make up the nose. When you get to thebase of the nose, on either side of the nostrils, you might notice your fingers naturallyentering another depression. You might have guessed that this would be another TCM pointand it is called “welcoming perfume” (or large intestine 20 or LI20 or …). Once again,engage these points with your middle fingers for about 5 breaths.
Does the poetic name “welcoming perfume” now make more sense?
5. Our next exploration will have us leaving the nose by sliding our fingers onto our cheekbones(zygomatic arch). Explore from the nose to the eyes, above and below this bony landmark. Didyou notice yet another place below the cheekbone where your fingers naturally settle? Theslight depression just under the cheekbone and directly below the pupil of the eye is called“facial beauty” (or stomach 3 or ST3 or …). Use your middle fingers to engage these points forabout 5 breaths before sliding up to the temple area.
6. Explore the area of the temple with your fingers, while moving your jaw and even clenching your teeth. Palpate the muscles in this region which move the jaw to understand the scope of the area they occupy. You should be able to feel the muscles move under your fingers as you clench your jaw. Can you activate only one side? And then the other? When you slowly clench your jaw, does tension show up on one side before the other or are they simultaneous?
Beginning with your mouth closed, press the pads of your fingers into the temple region you just previously palpated, pushing the tissue towards the top of your head and then slowly open your mouth fully. What do you feel under your fingers and in your
185

Exploring Touch
jaw? What is different when you pin down this tissue? Explore using this technique on all the areas you first palpated in the temple area.
Now just use both hands to engage this area using circular motions. Do you ever recall naturally rubbing your temples?
During these explorations, did you find any location where your fingers naturally came to rest in adepression?
About one finger back from between the outer end of the eyebrow and the corner of the eye you mightfind a small depression in the temple called the “great sun” (or extraordinary point 2 or EX2 or …).Engage this point with your middle finger and then lighten your contact. Now slowly open and closeyour jaw several times. What do you feel?
7. Our attention will now move to the external ear tissue, where in addition to what you feel, you maywant to pay attention to how any of the following manipulations change your hearing. Gently contactthe tissue on the skull as you circumnavigate the external ear. The point just behind your earlobe,between your skull and jaw, is called “wind screen” (or triple heater 17 or triple warmer 17 or TH17 orTW17 or …). Lightly engage this point with your middle fingers and try slowly moving your jaw side-to-side to explore the change in space between the skull and the jaw.
Gently take your earlobe between your thumb and forefinger while tensioning the earlobe forward,down, back and up through a circle. Repeat this process as you move your hands up the back of the ear, towards the top of theear. Next, gently let a finger enter the channel at the top of the ear and trace it around the inside of the external ear until it meets the ear canal.
186

Exploring Touch
Finally, put a finger on the flap of skin in front of each ear canal (tragus), press inward to close off the earcanals with them and gently move your fingers in a slow circle in this area. Again, your fingers might finda natural place to rest in the depression just below and in front of this point. This location is called“auditory convergence” (or gall bladder 2 or GB2 or …). Engage the point with your middle finger andagain jaw movement will alter access to this location.
8. Slide onto the jaw itself to begin exploring these tissues, including the powerful muscles whichattach to it. Much like when exploring the temple area, moving and clenching the jaw providesexcellent feedback while palpating. Proceeding to the angle of the jaw, with the jaw relaxed, aboutone finger above and one finger forward of the angle, there should be a depression that almostseems to bisect the angle of the jaw. This point is called “jaw chariot” (or stomach 6 or ST6 or …). Ifyou have any doubts about the power of the jaw muscles, lightly place a finger on this point andclench your jaw. Did your finger get pushed out of the depression? Can you even feel thedepression with your jaw clenched?
9. Now slide back onto the skull near the bony protrusions just behind and below the ears (mastoidprocess). Slowly follow the ridge of bone where the skull and the neck meet further towards the backof the head (occiput and superior nuchal line). At this point, it may become easier to palpate by lettingyour head rest on your fingers and moving your head over your fixed fingers.
Some of the muscles in this area (suboccipital muscles) are critical to helping our nervous systemcorrectly position our head and have a high number of mechanical receptors to help with that job. Nowexploring this area should feel great, so I am not going to ruin it with a lot of information that will onlyconfuse your experience.
I suggest taking a few minutes, maybe ten, to just explore this area at the back of the head. Enjoy!
187

Exploring Touch
Integrate: How do you feel after the exploration? Do you feel more energized or less? Did any areas have unexpected sensations?
You can explore more by investigating under what conditions Traditional Chinese Medicine uses each of the points identified in this exploration. While there are many good web based sources of information (https://acupressure.com/, https://www.tcmworld.org/, https://yinyanghouse.com/, as examples), a good introductory book is Acupressure’s Potent Points: A Guide to Self-Care for Common Ailments by Michael Reed Gach.
Play with locations, pressures and hand configurations. If you enjoyed the work on the back of your head, you can make it easier using any of the several devices shown in the photos below.
This exploration helps to improve gentle palpation skills due to the sensitive nature of the face and the subtle features we are exploring. It also exposes the reader to some of the Traditional Chinese Medicine meridian points and shows how often our fingers naturally find these locations, often instinctively rubbing them.
188

Exploring Touch
Change Your PositionThink: This exploration is all about getting comfortable and observing changes in how we feel. While it would be best to do theexploration while in discomfort, we will target an area where most of us could use some care, our hips. Most our effort will be tofind a position which makes our hips, or sometimes low back, feel better.
You cannot do this exploration wrong as long as you relax, keep it gentle and stay away from pain.
Feel: The focus of this exploration will be to position ourselves in the best possible way to reduce discomfort. This task will require multiple rounds of moving, changing supports, relaxing and re-evaluating our target area, the hip and low back. Your primary focus should be relaxing into the current position and noticing changes in the hip and back. Additionally, you will be “guessing” at what positions might help reduce discomfort. While the initial changes in position may be large, please continue with minor adjustments, such as foot position, which can have interesting impacts on overall comfort.
The ultimate goal is to allow the body to relax and feel safe, so that the nervous system reduces long held tensions. Contact willbe with the support underneath you, which you will arrange as desired.
Start by assessing how your hip and back are feeling before we begin the exploration. Choose to work on one side, the one experiencing the most discomfort, otherwise flip a coin and choose right or left. We will focus on a side laying position in this exploration, so have plenty of blankets, pillows and/or bolsters to allow you to find the most comfortable side laying position possible.
Move: Breathe as naturally as possible, although you may choose to breathe deeper and slower to make this exploration more relaxing.
We will focus on the hip that is up, so if you chose to work on your right side, your right side will be up and your left side will be contacting the surface you are laying on. I would suggest not doing this exploration on a bed, but rather use a mat on the ground if a table is not available.
189

Exploring Touch
1. Arrange your body in a side-layingposition using as much support asrequired to feel comfortable. Anexample position is shown in the photo.You should be able to relax completelywithout changing position.
2. Take at least 10 breaths, thenevaluate changes you might make.Perhaps change the position of the leg,rotating the upper body forward orbackward or possibly even changingyour hand position.
3. Repeat step 2 as required until youfeel you have achieved your best position. Remain in this position breathing comfortably for about 3 to 5 minutes. Continue evaluating the body during this time and if discomfort starts to creep-in, return to step 2.
4. When you wish to move again, evaluate the best way to get up to avoid discomfort. Move slowly, do not just jump up. You may choose to roll onto your back and evaluate how you feel there. Or you may choose to roll onto your hands and knees. Do not move into pain and feel free to take as long as necessary to leave the session.
Integrate: Do you feel more energized or less? Did any areas have unexpected sensations?
This exploration can be done from most any position. If you have difficulty relaxing into a position there are two easy things to try: 1. tense and then relax or 2. try “breathing” into the body part.
This exploration establishes the importance of position on comfort and healing.
190

Exploring Touch
“Listening” with the Hands26
Think: This exploration uses our hands to “listen”27 to the body during movement. The body movements begin with larger gross movements related to the area of contact, but progress to more subtle movements such as moving the eyes or swallowing, seemingly unrelated to the position of our hands.
Listening well requires us to be quiet, so our listening hands need to be “quiet”, meaning they should be stationary, passive receptors. This goal can be difficult and may require some effort to achieve. Your listening hand is likely to want to move so you must guard against this tendency. While you may need to move your hand to “hear” better, the goal is to find a location where the hand can remain still and listen.
You cannot do this exploration wrong as long as you relax and keep it gentle. You may become a little frustrated by the passivity this exploration requires from the listening hand, in which case stop trying so hard and practice wabi sabi.
Feel: The focus of this exploration will be to monitor tissue changes under our hands under a variety of conditions. Each step below increases the difficulty, so don’t get frustrated. You can always return to a more difficult step later if you are not feeling it. My assessment of relative difficulty through the steps may not align with your experience, so skip to the next step if you encounter difficulty and you may be surprised.
Use a flat hand, primarily using the fingers, for sensing. You may find using the palm beneficial to quickly identify the best area from which to sense movement in the tissues, as it allows you to cover a larger area.
Contact will be very light, essentially the weight of the hand or less, although you may need to use different pressures to exploredifferent depths as highlighted later.
26 The astute reader might note that portions of these explorations were inspired and informed by Bowles’ functional self-assessment exercise, Johnston’s palpatory literacy exercises and Hoover’s functional exercises, as described by Chaitow. Chaitow, Leon, Positional Release Techniques, Elsevier, 2016, pp. 123-129.
27 While the word listen is typically associated with the sense of hearing, it derives from the Old English word with a Germanic origin, hlysnan., which means “pay attention to”. Listen connotes much more than just hearing, rather it is a call to attention reaching beyond a single sense.
191

Exploring Touch
Move: Breathe as naturally as possible, although you may choose to breathe deeper and slower to make this exploration more relaxing. Some of the steps may ask you to hold your inhale and/or hold your exhale to better sense what is happening in the tissue under your hand.
Start by laying on your back with your feet flat on the ground and knees pointed upwards. Find a comfortable position that doesnot require much effort. You may wish to place a small pillow or book behind your head for comfort. Your eyes should naturally look towards the ceiling directly above if your head is positioned well.
1. Lay your dominate hand on the outer forearm of the other arm,resting both across your body so that they are relaxed, as shown in thephoto. Slowly begin to wiggle the fingers of your non-dominant hand,while listening with your dominant hand. What do you “hear” or feel?
Slide your dominant hand to a new position on the outer forearm andlisten to the movement with different portions of the dominant hand.Try listening with the fingertips, palm, thumb and other parts of thehand. Note how different portions of the listening hand have differentsensitivities to the changes in the tissues beneath them.
Repeat this step, switching the moving and “listening” hands. Do younotice a difference between how the two hands “listen”? Or maybehow they move? How well are you able to describe or remember the differences when comparing them?
192

Exploring Touch
2. Now move your dominant hand onto the collarbone (clavicle) of your non-dominant arm. STOPif you experience any pain during this step. Move your non-dominant arm so that it is away fromyour side (abducted glenohumeral joint) with the hand pointed toward the ceiling. Slowly moveyour arm so the wrist moves toward your feet (internal or medial rotation of the glenohumeral joint)and toward your head (external or lateral rotation of the glenohumeral joint). Repeat thesemovements several times within your personal comfort zone, varying speed. Can you feel thecollarbone move?
Try sensing this movement by moving off the bone itself, into soft tissue above and below thebone. Can you still sense the movement of the collarbone through changes in the tissue tension?
Move your “listening” hand onto the area where the breastbone (sternum) meets the collarbone.Can you still sense the movement of the collarbone in the tissues on the sternum just adjacent tothe collarbone? You may need to carefully search this area to sense the movement or it may be quite obvious.
Return to an area where you could easily feel the movement and explore how your breath interacts both with the movement andyour ability to sense it. Try holding your breath on an inhale and compare it to holding your breath on an exhale. Is there a difference? Can you sense your collarbone moving as you breathe?
Try repeating this step on the other side. Is one hand better at “listening” than the other?
193

Exploring Touch
3. Cross the arms over the chest with each hand lightly resting on the opposite side collarbone (clavicle). “Listen” for movement in the clavicles while you rock the pelvis forward and backward. Can you sense your collarbones move as you perform these movements? Can you sense the movements around the tissues near thecollarbones? Does holding your breath on an inhale or on an exhale change your ability to feelthese movements?
As you rock your pelvis, note that if you are really relaxed, this motion should be transferredthrough the spine and you should be aware of small movements in your head and chest, while yourshoulder blades are likely pinned to the ground (they should at least move less than the head andribs). The shoulder blades and arms should remain relatively fixed to the ground, while the chestslides over them. You might sense two different motions in the collarbone: first, the grossmovement as they move with the chest while the shoulder blades move less and second, the subtletorsion as the chest moves independently of the shoulder blades (scapula e ). The secondmovement occurs because the collarbones connect the shoulder blades to the chest. Can youdifferentiate between these two different movements in the collarbone?
Stop the pelvic movements and try slightly rolling the head left and right as it rests on the ground. Can you sense movement inthe collarbones now? Alternate the pelvic rocking and the head rolls, comparing what you feel in the collarbones.
4. Move your hands with your fingers fanned between your temples and your ears, “listening” while youswallow. What do you feel? Are the left and right sides symmetric? Does one side move before theother? Does one side finish moving early?
Now try the same movement while tucking your chin. Does anything change?
194
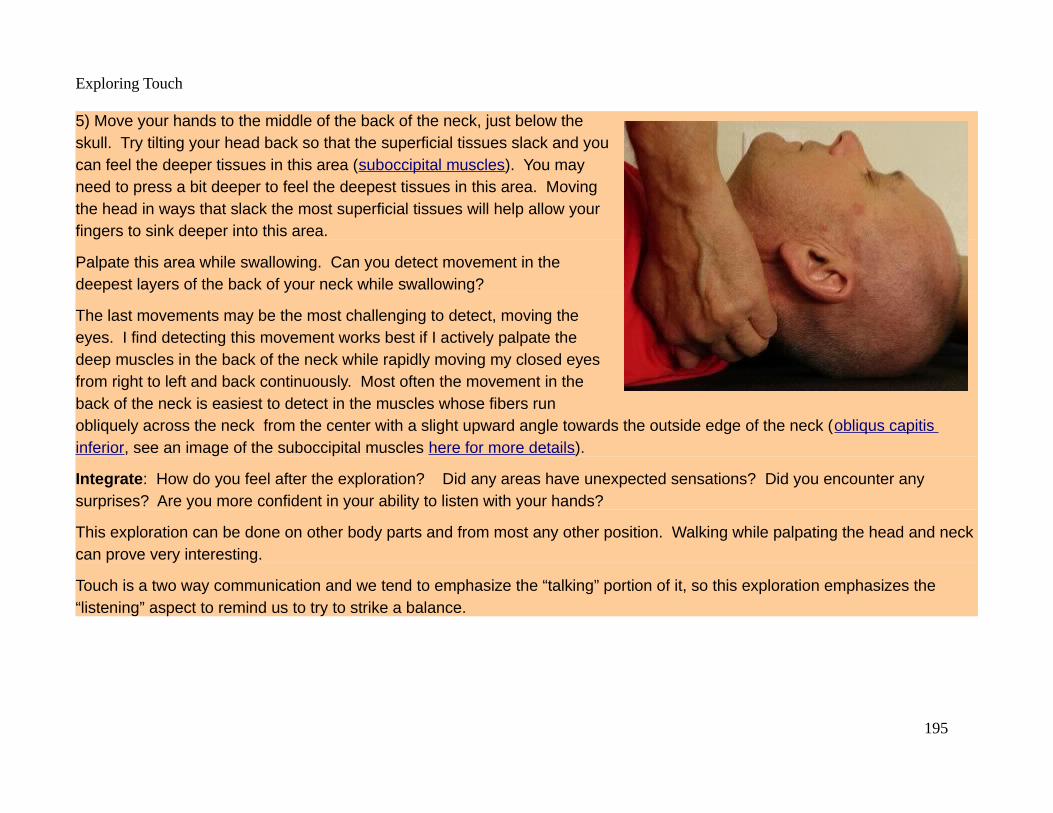
Exploring Touch
5) Move your hands to the middle of the back of the neck, just below theskull. Try tilting your head back so that the superficial tissues slack and youcan feel the deeper tissues in this area (suboccipital muscles). You mayneed to press a bit deeper to feel the deepest tissues in this area. Movingthe head in ways that slack the most superficial tissues will help allow yourfingers to sink deeper into this area.
Palpate this area while swallowing. Can you detect movement in thedeepest layers of the back of your neck while swallowing?
The last movements may be the most challenging to detect, moving theeyes. I find detecting this movement works best if I actively palpate thedeep muscles in the back of the neck while rapidly moving my closed eyesfrom right to left and back continuously. Most often the movement in theback of the neck is easiest to detect in the muscles whose fibers runobliquely across the neck from the center with a slight upward angle towards the outside edge of the neck (obliqus capitis inferior, see an image of the suboccipital muscles here for more details).
Integrate: How do you feel after the exploration? Did any areas have unexpected sensations? Did you encounter any surprises? Are you more confident in your ability to listen with your hands?
This exploration can be done on other body parts and from most any other position. Walking while palpating the head and neckcan prove very interesting.
Touch is a two way communication and we tend to emphasize the “talking” portion of it, so this exploration emphasizes the “listening” aspect to remind us to try to strike a balance.
195
Exploring Touch
Tour de Tissue TypesThink: While the only organ we can really touch without surgical intervention is the skin, we can experience many different underlying tissues through touch. Here we explore contacts which interact with tissues ranging from skin to bone and most everything in between.
This exploration covers many different tissue types over multiple locations. Explore gently and with awareness. There should be no pain experienced, but if there is, stop. If you are too forceful you can injure structures like nerves and kneecaps. Start with a light touch and use common sense.
Feel: The focus of this exploration will be to experience different tissue types including skin, fascia, muscle, nerve, ligament, tendon, bone and more. While we will be using names to describe the tissue, the focus is on experiencing both the feeling under our fingers and the feeling in our body as we explore different tissue types.
Different tissue types may require different hand positions, while a flat hand is a great place to start any palpation, you may need to use a pincer grip or other hand positions.
Contact will generally be firm enough to engage tissue, but still quite light. While it might seem obvious that deeper tissue requires more pressure, often you will be more successful using more subtle approaches such as allowing time to sink deeper as more superficial tissues relax or using different angles.
Move: Breathe as naturally as possible, although you may choose to breathe deeper and slower to make this exploration more relaxing.
Start by laying on your back with your feet flat on the ground and knees pointed upwards. Find a comfortable position that doesnot require much effort to maintain, you may wish to place a small pillow or book behind your head for comfort. Your eyes should naturally look towards the ceiling directly above if your head is positioned well. Some locations may require you to moveto side-laying or even sitting, but try to return to the supine position if possible when moving between steps, for short rests and to let your body “reset”.
196

Exploring Touch
1. Begin this exploration by lifting the skin off the back of one hand with the other hand, using a pincergrip as shown in the photo. You can actively “roll” this skin across the back of the hand from the thumbtowards the pinkie finger. Push with the thumb as the fingers “walk” ahead to pull up the leading edgeof the skin. This skin rolling technique can be used almost anywhere on the body where the skin canbe lifted. The skin actually rolls over the underlying fascia covering deeper structures.
2. Lifting tissue off the bone or other underlying tissue allows us to grasp many different tissue typessimultaneously. Place your hand around the front of the opposite side upper arm using a pincer grip to gentlylift tissue away from the arm (biceps brachii). Bend your elbow to make this tissue easier to grasp. We wantto engage tissue much deeper than the skin, so move your fingers towards the back of your arm until you feelbone and then gently grasp while sliding your fingers forward to engage a large amount of soft tissue. Beparticularly careful with the pressure applied by the thumb as there are sensitive neurovascular structureswhich pass on the inside of the upper arm.
Do you feel a pulse on the inner side of the arm (you may want to switch to using your fingers on the inner side of the arm so you are not fooled by the pulse in your thumb)? Do you experience any “twangy” feelings as you explore the inner arm, where nerves pass close to the surface?
Slide your grip towards the inner elbow until you feel the thin cord of tendon that attaches this muscle to a bone in the forearm (radius). Notice how the softer muscle tissues smoothly transition into the cable-like tendon (musculotendinous junction), before the tendon attaches into the bone. Compare the left andright sides to notice differences, if any. Open and close the elbow (flexion and extension) to feel the tissue move underneath your hand. Can you feel the tendon slide between your fingers as you move your elbow?
197
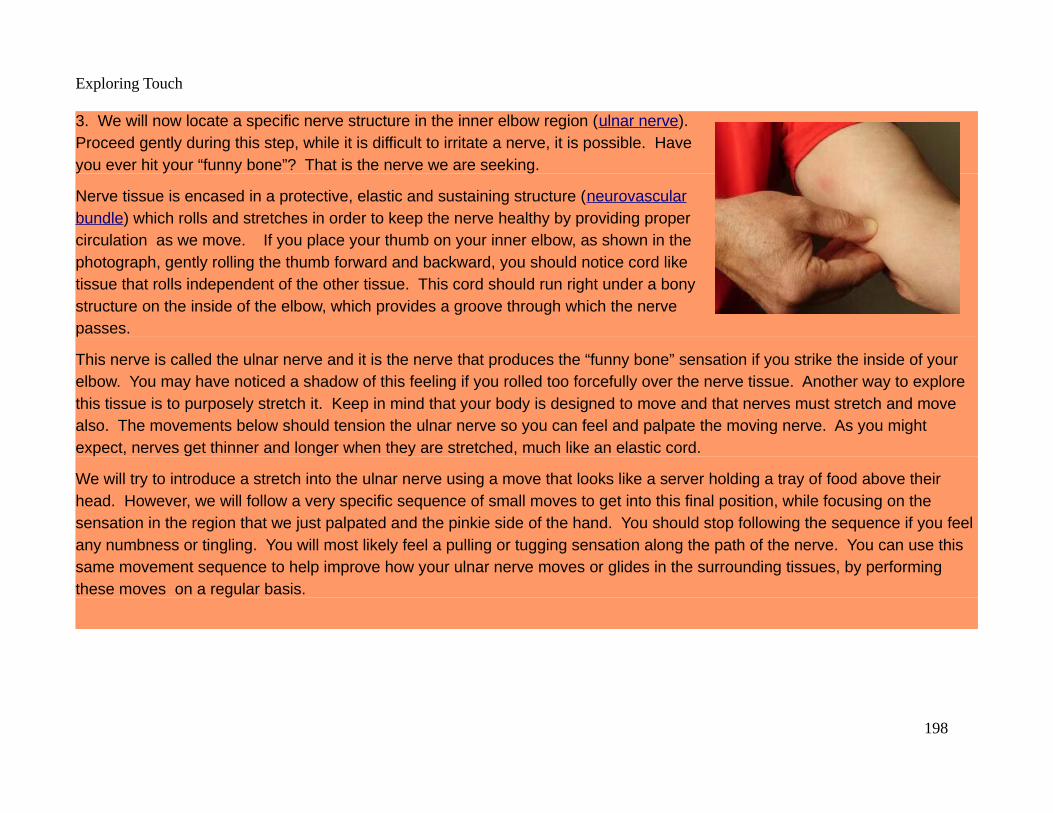
Exploring Touch
3. We will now locate a specific nerve structure in the inner elbow region (ulnar nerve).Proceed gently during this step, while it is difficult to irritate a nerve, it is possible. Haveyou ever hit your “funny bone”? That is the nerve we are seeking.
Nerve tissue is encased in a protective, elastic and sustaining structure (neurovascularbundle) which rolls and stretches in order to keep the nerve healthy by providing propercirculation as we move. If you place your thumb on your inner elbow, as shown in thephotograph, gently rolling the thumb forward and backward, you should notice cord liketissue that rolls independent of the other tissue. This cord should run right under a bonystructure on the inside of the elbow, which provides a groove through which the nervepasses.
This nerve is called the ulnar nerve and it is the nerve that produces the “funny bone” sensation if you strike the inside of your elbow. You may have noticed a shadow of this feeling if you rolled too forcefully over the nerve tissue. Another way to explore this tissue is to purposely stretch it. Keep in mind that your body is designed to move and that nerves must stretch and move also. The movements below should tension the ulnar nerve so you can feel and palpate the moving nerve. As you might expect, nerves get thinner and longer when they are stretched, much like an elastic cord.
We will try to introduce a stretch into the ulnar nerve using a move that looks like a server holding a tray of food above their head. However, we will follow a very specific sequence of small moves to get into this final position, while focusing on the sensation in the region that we just palpated and the pinkie side of the hand. You should stop following the sequence if you feelany numbness or tingling. You will most likely feel a pulling or tugging sensation along the path of the nerve. You can use this same movement sequence to help improve how your ulnar nerve moves or glides in the surrounding tissues, by performing these moves on a regular basis.
198
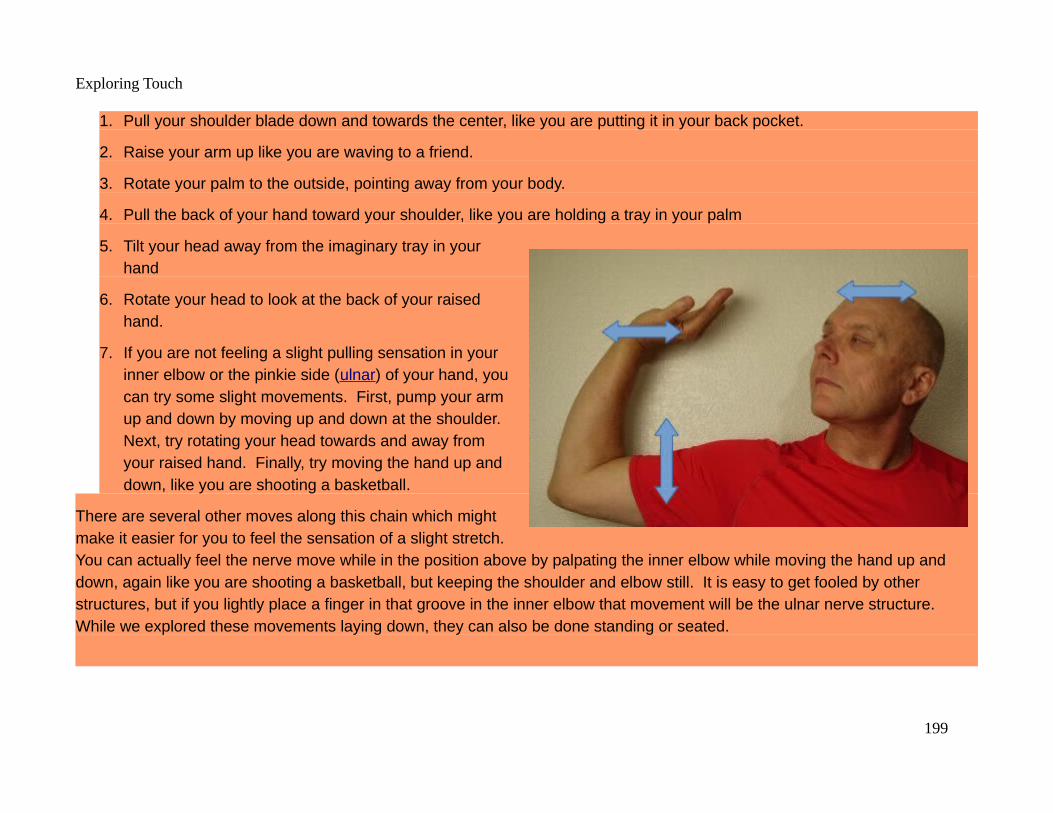
Exploring Touch
1. Pull your shoulder blade down and towards the center, like you are putting it in your back pocket.
2. Raise your arm up like you are waving to a friend.
3. Rotate your palm to the outside, pointing away from your body.
4. Pull the back of your hand toward your shoulder, like you are holding a tray in your palm
5. Tilt your head away from the imaginary tray in yourhand
6. Rotate your head to look at the back of your raisedhand.
7. If you are not feeling a slight pulling sensation in yourinner elbow or the pinkie side (ulnar) of your hand, youcan try some slight movements. First, pump your armup and down by moving up and down at the shoulder.Next, try rotating your head towards and away fromyour raised hand. Finally, try moving the hand up anddown, like you are shooting a basketball.
There are several other moves along this chain which mightmake it easier for you to feel the sensation of a slight stretch.You can actually feel the nerve move while in the position above by palpating the inner elbow while moving the hand up and down, again like you are shooting a basketball, but keeping the shoulder and elbow still. It is easy to get fooled by other structures, but if you lightly place a finger in that groove in the inner elbow that movement will be the ulnar nerve structure. While we explored these movements laying down, they can also be done standing or seated.
199
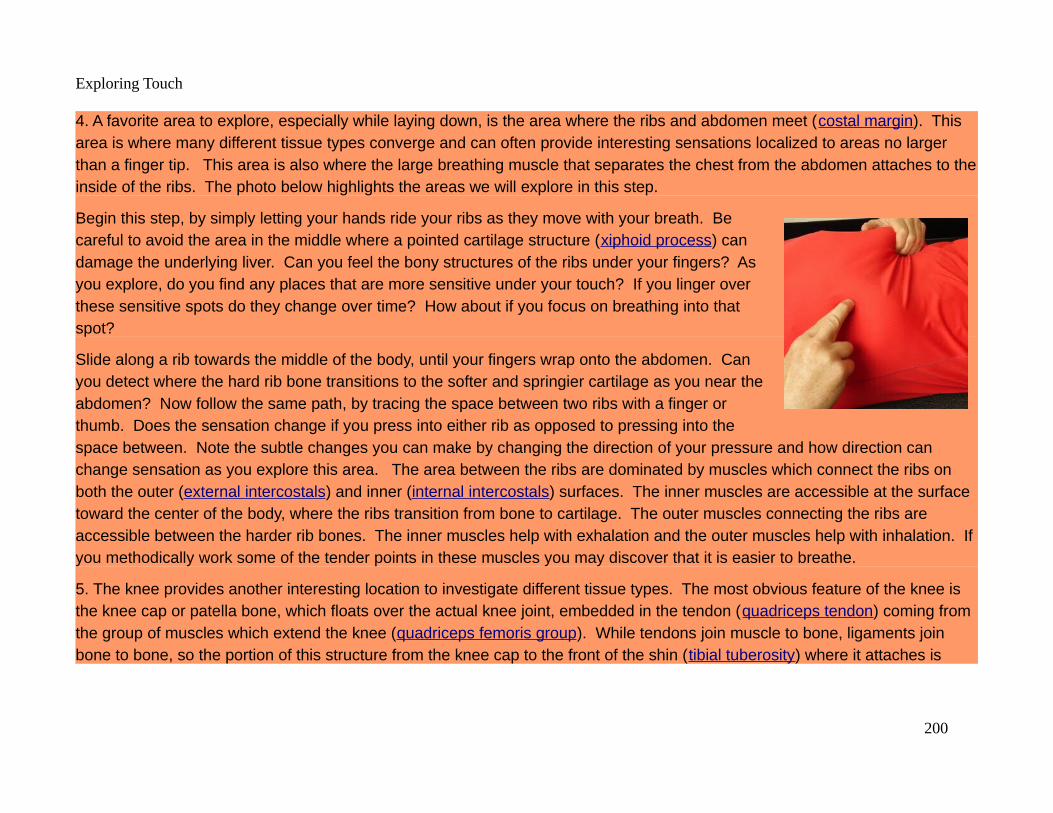
Exploring Touch
4. A favorite area to explore, especially while laying down, is the area where the ribs and abdomen meet (costal margin). This area is where many different tissue types converge and can often provide interesting sensations localized to areas no larger than a finger tip. This area is also where the large breathing muscle that separates the chest from the abdomen attaches to theinside of the ribs. The photo below highlights the areas we will explore in this step.
Begin this step, by simply letting your hands ride your ribs as they move with your breath. Becareful to avoid the area in the middle where a pointed cartilage structure (xiphoid process) candamage the underlying liver. Can you feel the bony structures of the ribs under your fingers? Asyou explore, do you find any places that are more sensitive under your touch? If you linger overthese sensitive spots do they change over time? How about if you focus on breathing into thatspot?
Slide along a rib towards the middle of the body, until your fingers wrap onto the abdomen. Canyou detect where the hard rib bone transitions to the softer and springier cartilage as you near theabdomen? Now follow the same path, by tracing the space between two ribs with a finger orthumb. Does the sensation change if you press into either rib as opposed to pressing into thespace between. Note the subtle changes you can make by changing the direction of your pressure and how direction can change sensation as you explore this area. The area between the ribs are dominated by muscles which connect the ribs on both the outer (external intercostals) and inner (internal intercostals) surfaces. The inner muscles are accessible at the surface toward the center of the body, where the ribs transition from bone to cartilage. The outer muscles connecting the ribs are accessible between the harder rib bones. The inner muscles help with exhalation and the outer muscles help with inhalation. Ifyou methodically work some of the tender points in these muscles you may discover that it is easier to breathe.
5. The knee provides another interesting location to investigate different tissue types. The most obvious feature of the knee is the knee cap or patella bone, which floats over the actual knee joint, embedded in the tendon (quadriceps tendon) coming from the group of muscles which extend the knee (quadriceps femoris group). While tendons join muscle to bone, ligaments join bone to bone, so the portion of this structure from the knee cap to the front of the shin (tibial tuberosity) where it attaches is
200
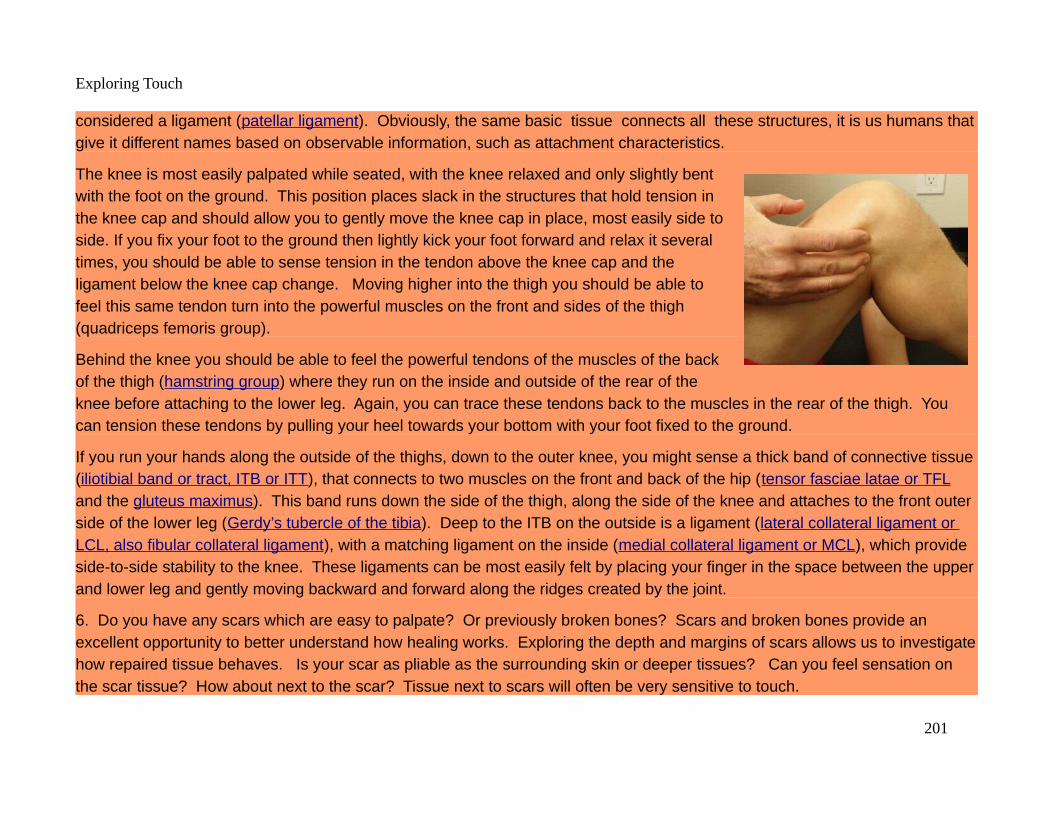
Exploring Touch
considered a ligament (patellar ligament). Obviously, the same basic tissue connects all these structures, it is us humans thatgive it different names based on observable information, such as attachment characteristics.
The knee is most easily palpated while seated, with the knee relaxed and only slightly bentwith the foot on the ground. This position places slack in the structures that hold tension inthe knee cap and should allow you to gently move the knee cap in place, most easily side toside. If you fix your foot to the ground then lightly kick your foot forward and relax it severaltimes, you should be able to sense tension in the tendon above the knee cap and theligament below the knee cap change. Moving higher into the thigh you should be able tofeel this same tendon turn into the powerful muscles on the front and sides of the thigh(quadriceps femoris group).
Behind the knee you should be able to feel the powerful tendons of the muscles of the backof the thigh (hamstring group) where they run on the inside and outside of the rear of theknee before attaching to the lower leg. Again, you can trace these tendons back to the muscles in the rear of the thigh. You can tension these tendons by pulling your heel towards your bottom with your foot fixed to the ground.
If you run your hands along the outside of the thighs, down to the outer knee, you might sense a thick band of connective tissue(iliotibial band or tract, ITB or ITT), that connects to two muscles on the front and back of the hip (tensor fasc i ae latae or TFL and the gluteus maximus). This band runs down the side of the thigh, along the side of the knee and attaches to the front outer side of the lower leg (Gerdy’s tubercle of the tibia). Deep to the ITB on the outside is a ligament (lateral collateral ligament or LCL, also fibular collateral ligament), with a matching ligament on the inside (medial collateral ligament or MCL), which provide side-to-side stability to the knee. These ligaments can be most easily felt by placing your finger in the space between the upperand lower leg and gently moving backward and forward along the ridges created by the joint.
6. Do you have any scars which are easy to palpate? Or previously broken bones? Scars and broken bones provide an excellent opportunity to better understand how healing works. Exploring the depth and margins of scars allows us to investigatehow repaired tissue behaves. Is your scar as pliable as the surrounding skin or deeper tissues? Can you feel sensation on the scar tissue? How about next to the scar? Tissue next to scars will often be very sensitive to touch.
201

Exploring Touch
Can you feel how deep your scar extends? How about attachments to deeper structures? Even a small amount of manual manipulation around a scar can result in large changes with respect to sensations or the ability of the tissue to move. However, consistent work is the key to longer lasting and longer reaching changes. Remember the acronym SAID? Tissue will create specific adaptations to imposed demands (SAID), so if you consistently challenge tissue to remodel, it generally will change. Asan example, I have a contracture in the connective tissue of the fourth digit of my left hand that if ignored will increase in size and hamper movement of that finger. However, by consistently working that tissue and moving my finger, I keep relatively normal function of the finger. While it will never be completely normal due to the original injury, if I ignore this finger it will get noticeably worse both in size and sensitivity of the area and loss of function in the finger. When I work the tissue consistently, the size of the scar tissue decreases and the function of the finger improves.
If you don’t have an easily accessible scar, another interesting area to investigate is the navel. Our navel is the healed tissue that once connected us to our mothers while we were in the womb. While different than most scars, they do sometimes exhibit sensitivity and reduced tissue pliability, which can be explored through touch. Besides palpating the actual “belly button”, it can be interesting to use two hands to explore tissue stretch in different directions across the navel. As an example, place one finger above the navel and one below, then stretch.
Integrate: How do you feel after the exploration? Do you feel more energized or less? Did any areas have unexpected sensations? What was your favorite tissue?
The ulnar nerve glide movements can be done from any position: laying standing or sitting. While there are many nerves that can be located through touch, this nerve is very accessible and the sensation of hitting our “funny bone” is nearly universal.
This exploration establishes some familiarity with different tissue types through touch and feel.
202

Exploring Touch
Touched by the Sun28
Think: This exploration provides a nice transition between the individual explorations and partner explorations in the book, since we allow ourselves to be touched by something else, namely the sun. While our society currently vilifies the potential damage the sun does, sometimes we forget that it is the source of all life on our planet. The 5 minutes we spend in the early morning or late afternoon sun here has minimal risk and multiple benefits.
If I could add one quality to my touch abilities, it would be to be capable of touching like the sun. Bringing energy, warmth and light for everyone to enjoy. I like to do this exploration whenever possible to remind myself to try to be more like the sun.
You can do this exploration wrong as the sun also possesses the power to damage your skin and eyes. Do not stay out too long, do not do the exercise during intense periods of sun (~10 AM – ~4 PM) and do not stare into the sun.
Feel: The focus of this exploration is to experience the warm touch of the sun on our bodies and face.
We will lightly cover the eyes with cupped hands for a portion of the exploration.
Contact will be very light, but enough to create a dark environment for the eyes.
Move: Breathe as naturally as possible, although you may choose to breathe deeper and slower to make this exploration more relaxing.
You get to choose the position! I like to duck out during the day and quickly do this exploration standing, but seated and laying down on the back will also work.
1. Ideally, this exploration is done in the early morning sun, but it can also be performed in the later afternoon. On cloudy days, it can be done almost anytime you can locate the direction of the sun. Begin by covering your eyes with the cupped palms of your hands so you cannot see any light with your eyes. Orient yourself towards the sun and slowly turn to experience the
28 This exploration is partially inspired by exercises contained in the Bates’ method of vision improvement.Bates, William, Better Eyesight without Glasses, 1920
203

Exploring Touch
warmth and energy. Try using the warmth on your face and the back of your hands to see if you can detect in which direction the sun is located. Which works better for locating the sun, sensations from your face or the back of your hands?
2. Next, look downward keeping your eyes closed and remove your hands from your face. Refrain from looking directly at the sun even with closed eyes, but try to orient yourself towards the sun. Does this feel different than when you covered your eyes?
3. Keeping your eyes closed while oriented towards the sun, slowly rotate your head, neck and trunk, enjoying the sensations this movement brings. Can you sense a pleasant line of warmth and light washing over your face as it moves in the sun?
Integrate: How do you feel after the exploration? Are you ready to attempt to touch your partners with these same qualities?
This exploration can be done on other body parts and from most any other position. Weather can be a huge factor in your experience, while bright sunny days make this exploration easy, there is much to be gained from experiencing the challenge during cloudy weather.
Much like touch, we really need sunlight to thrive. This exploration makes a great regular practice and it provides a pleasant example to bring to our touch practice.
204

Exploring Touch
More Individual ExplorationsExploring the impact of vibration using drums, bowls, tuning forks or musical instruments can provide an interesting individual exploration. Experimenting with actual contact versus just getting close can provide different, yet interesting experiences. You can use passive sound generation with a speaker as there are plenty of interesting tracks on the internet, including binaural beats. It is interesting to compare the difference between speakers and locally generated sounds and vibrations. Each has their own advantages and disadvantages.
Using music and fragrances with any of the individual explorations can change the overall experience profoundly.
Additionally, the impact of eye movements, in conjunction with touch and movement, provides a rich area of exploration. Eye movements should be explored both with the eyelids open and closed. While we are primarily interested in the muscular impact of eye movements on the nervous system, one should not underestimate the stimuli provided by the visual field itself.
Eye movements become especially interesting when they are contrary to movement. As an example, move the eyes to the left while turning the body to the right. The eye position is typically statically held, until there is a sensation of release or the position becomes comfortable and “safe”. Often there is a feeling of strain or discomfort, which subsides as the position is held for a short period.
As you will soon discover, most of these individual lessons can be adapted to work with a partner.
205

Exploring Touch
Human Partner Explorations“And if wisdom were given me under the express condition that it must be kept hidden and not uttered, I should refuse it. No good thing is pleasant to possess, without friends to share it.” Seneca29
The explorations become a bit more challenging here and a key to success is finding a great partner that can give appropriate guidance and feedback. Sometimes the best partner is a peer or mentor who is on the same quest to improve their touch experience.
List of Human Partner LessonsHuman Partner Explorations..........................................................................................................................................................................206
Being with a Human Partner.........................................................................................................................................................................207Monitor Partner Breathing.............................................................................................................................................................................209One or Two Points?.......................................................................................................................................................................................214Move It!.........................................................................................................................................................................................................218More Human Partner Explorations................................................................................................................................................................229
29 The Tao of Seneca, Volume 1, Based on the Moral Letters to Lucilius by Seneca, translated by Richard Mott Gummere, Loeb Classical Library edition, 1917, Letter 6, On Sharing Knowledge.
A great free source for the wisdom of Seneca is provided by Tim Ferris at https://tim.blog/2017/07/06/tao-of-seneca/
206

Exploring Touch
Being with a Human PartnerThink: Despite naming ourselves human “beings”, we are primarily human “doers”. This exploration invites us to reverse this situation, by feeling and being, while doing very little.
Set a goal for how long you want to spend on this exploration, but try to spend at least 5 minutes. You can set a timer, or note the time to finish and periodically check a clock. Make sure you communicate the intended exploration time to your partner. If you decide to extend the time during the session, let your partner know and give them an opportunity to terminate the session.
The lesson is safe, but can you sit in silence and experience your partner through still touch for an extended period?
Your partner should understand the duration of the session, that they should remain silent unless there is an issue and that you will be making a constant contact with their abdomen over their clothes during that time. They should also understand that they control the session and can terminate the exploration at any time.
Feel: Your focus is to silently monitor what is going on underneath the contact of your hands. This awareness should include your partner’s breath, muscle movements, digestive tract movements, temperature and anything else that you notice.
A flat hand palpation, conforming to your partner’s abdomen, with one or both hands would be best.
Take a deep breath and ground yourself before making contact. The abdomen is a sensitive area for many people. Make the initial contact with the back of just one of your hands, so if your partner reacts you can quickly remove your hand. Once the back of the hand lightly makes contact, you can rotate it to the palm and introduce the second hand. Contact should be light, your partner should just feel the weight of your hands against their abdomen. Your hands should “ride” with their breathing and other movements.
Move: Have your partner lay on their back on the ground, bed or table, in a comfortable position. Use supports to insure your partner will be relaxed through the entire session. You should position yourself either standing, kneeling or sitting next to your partner in a position that allows you to place one or both hands onto their abdomen. You also should select a position in which
207
Exploring Touch
you can remain comfortable for the duration of the session. This configuration can be more difficult than you imagine and it is okay for you and/or your partner to move during the session to get more comfortable.
A large part of this exploration is breath related, so please remain aware and don’t hold your breath!
1. Begin the exploration focused on monitoring your partner’s breathing with both your hands and eyes. Notice any characteristics which seem interesting. How does their abdomen move relative to their chest? Are there long pauses between inhalation or exhalation? Can you determine their breathing cadence? Has it changed during the session?
2. When you feel comfortable with your partner’s breathing, check-in with your own breathing. Are you breathing using the same pattern as your partner?
Now attempt to synchronize your breathing with your partner’s and just be for several minutes or until this breathing cadence is uncomfortable. This portion of the exploration is just about feeling and being.
3. This last step is extremely simple. When you feel the exploration is finished, whether your time is up or you just feel it is over,slowly remove your hands and take a deep cleansing breath. Thank your partner for their participation and seek their feedback.
Integrate: How do you feel after the exploration? Did you feel uncomfortable in any way? Were there any unexpected sensations? How did your partner feel about the session?
This exploration can be done on different body parts and with different contacts, but the abdomen is a great place to connect with another individual. If you can’t find a partner who is willing to have their abdomen touched, you may alter the exploration tomake contact with their back from a side-laying position or while they lay on their chest and abdomen.
You may also try the exploration while talking with your partner to develop the ability to sense while still interacting.
This exploration is a great introduction to touch and trust. Your partner must trust you and you must trust yourself. The simple act of being with someone, and silently processing the feelings which arise, is rare in our society.
208
Exploring Touch
Monitor Partner BreathingThink: While a portion of the previous session focused on your partner’s breathing, this exploration will investigate it more fully.Your partner may find this exploration challenging, since we will be inviting them to breathe in ways that they may not be accustomed. You may find it beneficial to repeat this exploration with multiple different partners, as each may have their own limitations related to breathing.
Breathing is accomplished by the coordination of many different muscles. We want our breathing to be resilient and capable of functioning well under a wide variety of circumstances. Our primary goal is guiding our partner to explore, and potentially improve, their breathing using our touch. Constraining breathing movements can help identify breathing challenges for our partner to improve with additional work, which is a secondary goal of this exploration.
There are two primary breathing situations to evaluate: the default breathing pattern and the ability to comply with requested breathing patterns. While we initially introduced breathing patterns using the concept of respiration, “inhale: inhale hold: exhale:exhale hold”, there is much more complexity to explore.
There are patterns to how we inhale, exhale and hold which can be observed more deeply through observing the sequences of movements and tension throughout the body.
Set a goal for how long you want to spend on this exploration, but try to spend at least 10 minutes. You can set a timer, or note the time to finish and periodically check a clock. Make sure you communicate the intended exploration time to your partner. If you decide to extend the time during the session, let your partner know and give them an opportunity to terminate the session.
Insure you do not allow your partner to over exert themselves in an attempt to breathe in a way that they are currently incapableof doing safely.
Your partner should understand the duration of the session, that they should remain silent unless there is an issue and that you will be making contact with their torso over their clothes during that time. They should also understand that they control the session and can terminate the exploration at any time.
209

Exploring Touch
Have your partner breathe through their nose, although exhalation through the mouth is okay.
Feel: Your focus is to assess and encourage movement in different areas of the torso which are related to your partner’s breathing for each of several exercises. While there is no ideal movement, we would like to see the abdomen and chest expanding like a cylinder during inhalation, with the upper chest only moving for about the last third of the breath. The exhalation should proceed in reverse with the last two/thirds being a lightly active compression of the abdominal muscles. The activity should be symmetric on both sides of the body (left and right).
Note that we are looking for gross distortions to the movements described above, such as the upper chest moving first, the abdomen not moving, the sides of the abdomen or chest not moving, or one side of the abdomen or chest not moving. Keep in mind that this breathing dysfunction may be due to habit. Habits can typically be improved through awareness and practice. There may also be structural issues that prevent certain areas from moving correctly. Structural issues typically require more elaborate interventions to get tissues to move in a way that supports more efficient breathing.
The primary focus of this initial session is to bring awareness to both ourselves and our partner about potential issues.
A flat hand palpation with one or both hands is typically optimal. The hands should conform to your partner’s torso, while avoiding breast tissue. The hands will be used both for assessing movement and providing cues to your partner.
Take a deep breath and ground yourself before making contact. The contact should be light, your partner should just feel the weight of your hands against their abdomen. Your hands should “ride” with their breathing, not restrict it. Ideally, you should hold minimal tension in your body.
Move: Have your partner lay on their back on the ground, bed or table. Make sure they are comfortable so that they can relaxthroughout the session. You should position yourself either standing, kneeling or sitting next to your partner in a position that allows you to place one or both hands onto different areas of their torso AND remain comfortable. Change positions should either of you experience discomfort.
A large part of this exploration is breath related, so please remain aware and don’t hold your breath!
210
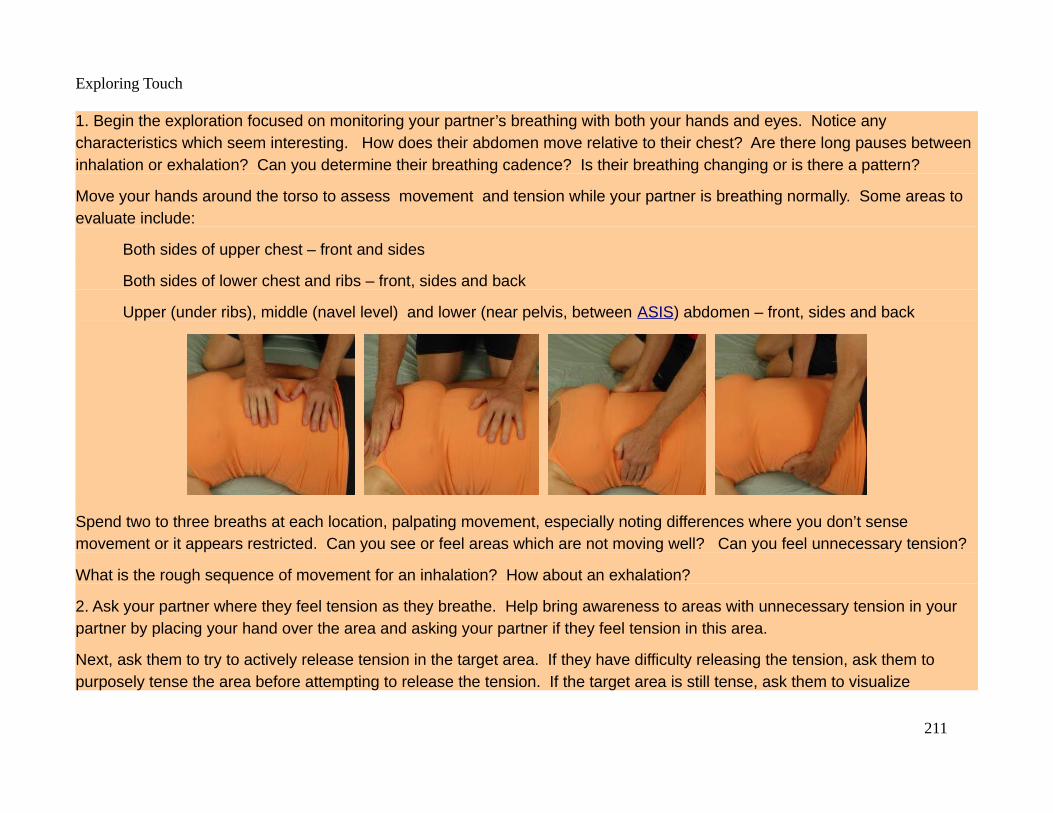
Exploring Touch
1. Begin the exploration focused on monitoring your partner’s breathing with both your hands and eyes. Notice any characteristics which seem interesting. How does their abdomen move relative to their chest? Are there long pauses between inhalation or exhalation? Can you determine their breathing cadence? Is their breathing changing or is there a pattern?
Move your hands around the torso to assess movement and tension while your partner is breathing normally. Some areas to evaluate include:
Both sides of upper chest – front and sides
Both sides of lower chest and ribs – front, sides and back
Upper (under ribs), middle (navel level) and lower (near pelvis, between ASIS) abdomen – front, sides and back
Spend two to three breaths at each location, palpating movement, especially noting differences where you don’t sense movement or it appears restricted. Can you see or feel areas which are not moving well? Can you feel unnecessary tension?
What is the rough sequence of movement for an inhalation? How about an exhalation?
2. Ask your partner where they feel tension as they breathe. Help bring awareness to areas with unnecessary tension in your partner by placing your hand over the area and asking your partner if they feel tension in this area.
Next, ask them to try to actively release tension in the target area. If they have difficulty releasing the tension, ask them to purposely tense the area before attempting to release the tension. If the target area is still tense, ask them to visualize
211

Exploring Touch
breathing into the area (or actually breathe into the area, if it is possible). Finally, have them place their own hand on the tense area to see if they are able to relax the area.
Visit the three most tense areas, spending no more than about two minutes in each area. Typical areas might include the jaw, temples, neck, shoulders, chest, abdomen, low back or hips. Your partner may not realize the degree of tension they are holding in some of these areas.
3. After working on areas with excess tension, reevaluate to see if your partner’s breathing has changed. Are some parts moving better?
Revisit areas of reduced movement, by placing a hand on the area and asking your partner to breathe into the area under your hand. There are several other ways to invite change to areas which are not moving: a) restrict the complementary areas which are moving through positioning, touch and/or your partner’s muscular control, b) changing positions, even a slight change in rotation of the spine can have an interesting impact on movement during breathing or c) getting other body parts involved in the movement. An example would be encouraging your partner to rock their pelvis forward on the inhale and back when they exhale. Another approach is to have your partner place their hand on the restricted area and attempt to move their hand using their breath.
4. Reevaluate your partner’s breathing and ask if they sense any imbalances while breathing? A simple way to work on a side-to-side imbalance is to have the person lay on their side which moves freely, promoting more movement on their more restrictedside. This can be augmented by having them breathe into more specific areas where your hand or their hand makes contact with the target area.
5. Have you noticed any breathing sequence issues in your partner during this session? A classic issue occurs when the upper chest lifts towards the head before there is any other breathing movement, which inhibits the large breathing muscles (thoracic diaphragm, external intercostals, etc.) while straining the smaller muscles of the neck (scalenes, SCM, etc.). Especially during breathing we want to see movement initiated by the large muscles first.
212
Exploring Touch
Among the most reliable approaches to altering the breathing sequence is to have your partner place one hand on their upper chest and the other on their abdomen. Instruct them that the hand on the abdomen should move first and most as they inhale, while the hand on the upper chest should move last and least.
Reverse the sequence on a forceful exhalation with the upper chest hand moving first and stopping first, while the lower abdominal hand moves last and stops moving last.
Integrate: How do you feel after this exploration? Did you feel uncomfortable in any way? Were there any unexpected sensations? How did your partner feel about the exploration? Did they become more aware of their breathing limitations or habits?
This exploration can be done from different positions, with laying on the stomach being especially interesting (crocodile breathing), as it restricts movement in the front while promoting movement on the sides and back. You can think of breathing from this position as resistance training for breathing.
This exploration is a nice introduction to observation, palpation and communication with a partner while focused on a very primitive movement.
213

Exploring Touch
One or Two Points?Think: This session explores our ability to distinguish between two contact points on different areas of our skin. There are different densities and types of sensors distributed through our skin, resulting in differing abilities toresolve the distance between two points in contact with the skin. The hand has a high sensordensity and a large map in the brain (somatosensory cortex), allowing identification of very shortdistances between two touch points. The back has a much lower sensor density, resulting in muchlarger distances being required to identify separate points of contact.
While this testing is commonly done with mechanical dividers, we will use easy to locate items,which also reduce the possibility of puncturing the skin. You will need two paper clips opened at theend to create blunt probes, stiff cardboard (a coaster works great), tape and scissors.
Assemble one opened paper clip parallel to an edge of the cardboard and towards one end, thenanchor it with a strong tape, such as duct tape. Wrap the tape so that it ends with the edge on thesame side as the anchored paper clip. Next cut the cardboard so that it comfortably fits between your thumb and fingers.
The other paper clip will slide on the side of the cardboard that issmooth, creating an adjustable two point probe. The distancebetween the probes can be increased by flipping over the slidingpaper clip so that the probe is on the opposite side of the body, asshown in the photos.
You should practice probing yourself using this probe both to gainsome skill using it and experience the sensations it creates. Start withthe two probes about a ¼ inch apart, close your eyes and probe thepalm side of your hand. Make the probing firm, but comfortable, whileexploring the minimum distance at which you can still identify twodistinct points.
214

Exploring Touch
You may want to try slightly rocking the probe to change the relative pressure between points to see if that helps your ability to identify separate points. Now take that minimum distance which you can identify in the palm of your hand and see if you can identify the two points with your eyes closed when they engage the outer surface of your forearm. You will likely be unable to differentiate the two points initially, so explore the limit at which you can identify the points by changing the distance. The distance between the points on your hands will probably be significantly closer than the point on your outer forearm.
This probe can also work through thin clothing like a T-shirt, but be careful about damaging more delicate fabrics.
Set a goal for how long you want to spend on this exploration, but try to spend at least 5 minutes. You can set a timer, or note the time to finish and periodically check a clock. Make sure you communicate the intended exploration time to your partner. If you decide to extend the time during the session, let your partner know and give them an opportunity to terminate the session.
Keep your probing comfortable and efficient, DO NOT BREAK THE SKIN. Don’t probe in the same area too many times and make large enough adjustments that this exploration does not become irritating to your partner. Abandon the exploration if yourpartner shows any sign of being allergic to the metal of the paper clip with signs of redness, swelling or a rash.
Clean the probes with rubbing alcohol or another sanitizer when using the probes between people.
Your partner should understand the duration of the session and that they will be probed with the paper clips. Demonstrate the probing on yourself and then on your partner where they can see it. Then let them know that they should keep their eyes closed while you are probing and that you will be asking if they can feel one or two probes. Explain that you may need to lift their shirt a bit to expose their low back for probing.
They should also understand that they control the session and can terminate the exploration at any time.
Feel: Your focus is to quickly find an approximate minimum distance for your partner to identify that there are two probes in contact with different body parts.
Grip the cardboard probing device in a manner that allows you to easily adjust the distance between the two probes by sliding the free paper clip against the cardboard.
215
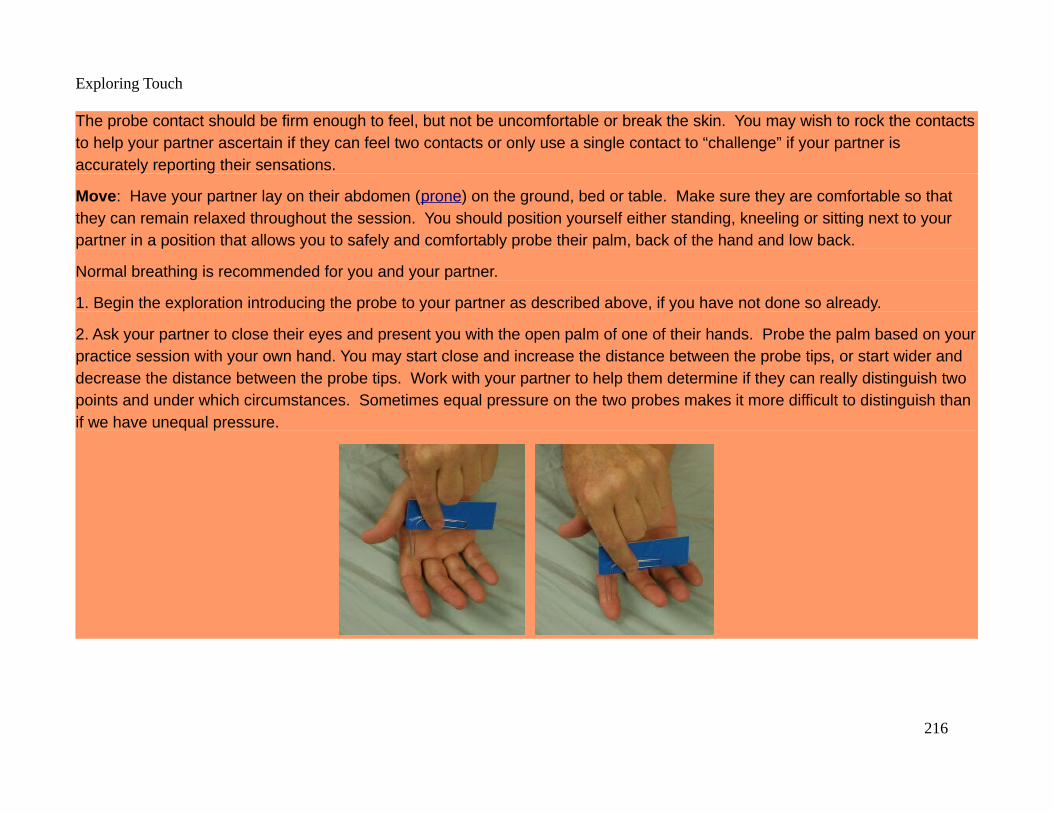
Exploring Touch
The probe contact should be firm enough to feel, but not be uncomfortable or break the skin. You may wish to rock the contactsto help your partner ascertain if they can feel two contacts or only use a single contact to “challenge” if your partner is accurately reporting their sensations.
Move: Have your partner lay on their abdomen (prone) on the ground, bed or table. Make sure they are comfortable so that they can remain relaxed throughout the session. You should position yourself either standing, kneeling or sitting next to your partner in a position that allows you to safely and comfortably probe their palm, back of the hand and low back.
Normal breathing is recommended for you and your partner.
1. Begin the exploration introducing the probe to your partner as described above, if you have not done so already.
2. Ask your partner to close their eyes and present you with the open palm of one of their hands. Probe the palm based on yourpractice session with your own hand. You may start close and increase the distance between the probe tips, or start wider and decrease the distance between the probe tips. Work with your partner to help them determine if they can really distinguish two points and under which circumstances. Sometimes equal pressure on the two probes makes it more difficult to distinguish than if we have unequal pressure.
216

Exploring Touch
3. Repeat the probing process on the back of the hand and on theupper back. Which area resulted in the closest probe tips? Which arearequired wider probe tips to identify the two points?
Integrate: Were there any unexpected results? How did your partnerfeel about the exploration?
Keep in mind that we are only stimulating a small subset of sensortypes with our simple device. You might choose to try a more bluntcontact, like pencil erasers, to see if there is a difference in touchsensitivity. Try putting one of the probes in the freezer for a short timeto see if temperature differences can help distinguish the two probes.
Try removing and adding the loose probe, while the fixed proberemains in contact to see if such changes can be detected by the receiver.
You might choose to try additional body parts like the scalp, around the mouth & lips, tongue (sanitize before and after), feet, shins, thighs, etc.
Swap with your partner so you get to experience how this feels when your eyes are closed and you are not controlling the probes. Identifying when you really feel two probes can be more ambiguous when you don’t know how many probes your partner is really using.
This exploration gives us an intuitive feel for the relative sensitivity and distribution of sensors throughout different areas of the body. As the receiver, it can be more difficult than expected.
217
Exploring Touch
Move It!Think: This exploration has you moving your partner’s joints through easy ranges of motion (ROM), while they relax. We will begin at the feet and work towards the head, moving the largest joints and then return from head to feet, visiting the smaller joints. This exploration should be very pleasant for the receiver, but will require the provider to pay close attention to proper body mechanics.
Set a goal for how long you want to spend on this exploration, but try to spend at least 15 minutes. You can set a timer, or note the time to finish and periodically check a clock. Make sure you communicate the intended exploration time to your partner. If you decide to extend the time during the session, let your partner know and give them an opportunity to terminate the session.
Some receivers may find it very difficult to relax enough to allow you to move their joints. Do NOT attempt to move joints through their full ROM or into a zone where the end feel of the joint begins to present itself. Stop if the receiver experiences anypain. It is not uncommon for pain-free snapping or popping to occur while moving joints, but that is not a goal of this exploration.
Your partner should understand the duration of the session, that they should remain relaxed as you manipulate their joints and that the exploration should remain pain free. Your partner should remove their shoes and socks for this exploration. They should also understand that they control the session and can terminate the exploration at any time.
Check in with your partner to insure that all their joints move freely and are pain free. Skip steps below which might irritate any condition which your partner identifies. Determine if there are any body parts, such as toes or feet, that your partner does not want touched and respect their wishes.
Feel: Your focus is to keep your partner’s joints safe, while moving them through easy ranges of motion.
The hands are primarily used to grip and guide the receiver’s body parts, while slowly moving them through an easy ROM.
A firm, but comfortable grip will help your partner to relax their muscles, allowing you to move their joints.
218
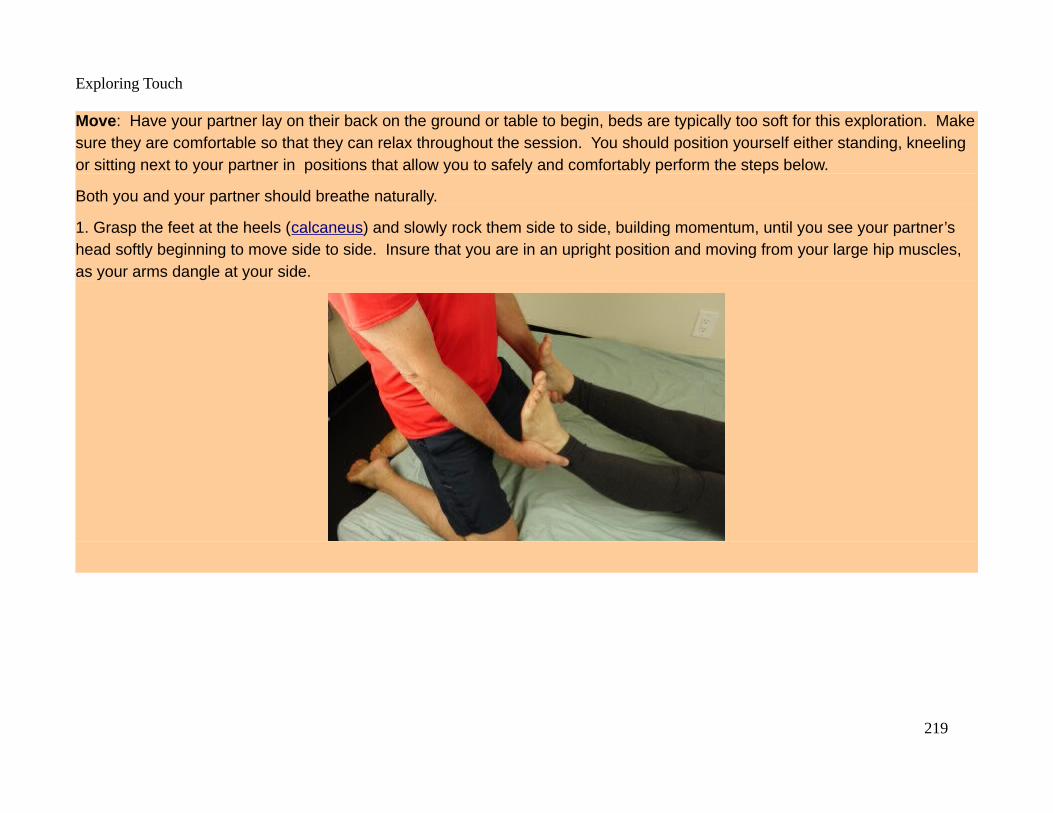
Exploring Touch
Move: Have your partner lay on their back on the ground or table to begin, beds are typically too soft for this exploration. Makesure they are comfortable so that they can relax throughout the session. You should position yourself either standing, kneeling or sitting next to your partner in positions that allow you to safely and comfortably perform the steps below.
Both you and your partner should breathe naturally.
1. Grasp the feet at the heels (calcaneus) and slowly rock them side to side, building momentum, until you see your partner’s head softly beginning to move side to side. Insure that you are in an upright position and moving from your large hip muscles, as your arms dangle at your side.
219
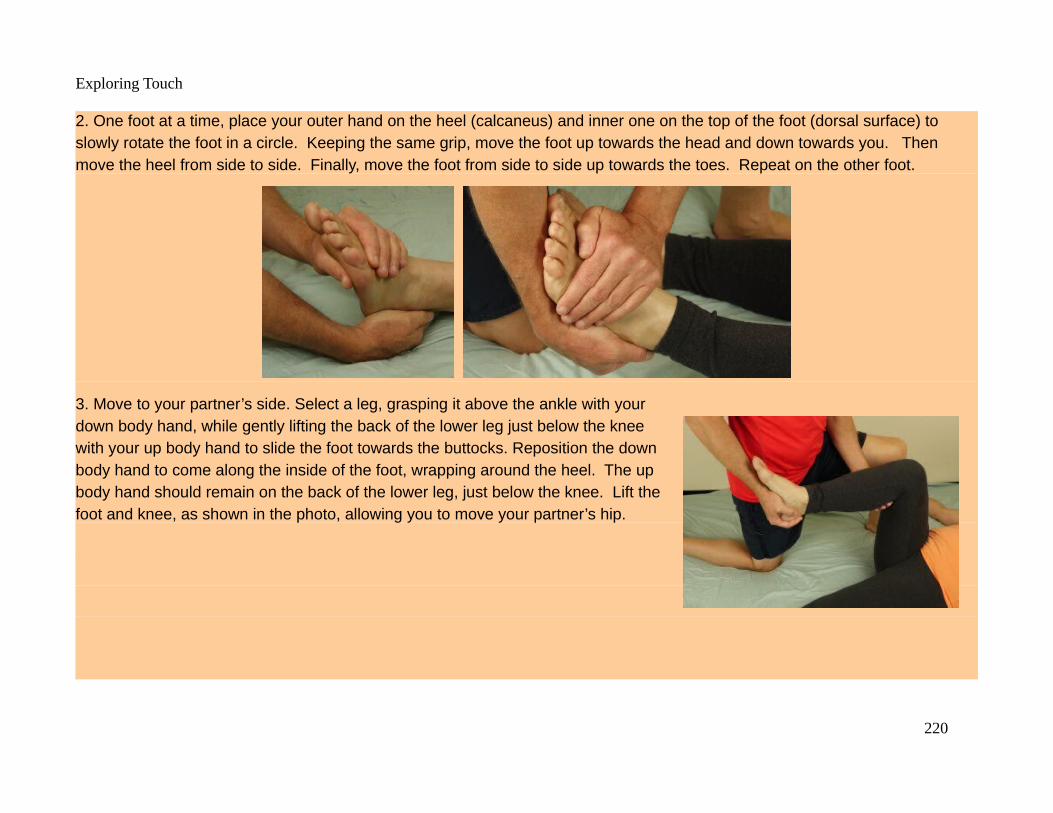
Exploring Touch
2. One foot at a time, place your outer hand on the heel (calcaneus) and inner one on the top of the foot (dorsal surface) to slowly rotate the foot in a circle. Keeping the same grip, move the foot up towards the head and down towards you. Then move the heel from side to side. Finally, move the foot from side to side up towards the toes. Repeat on the other foot.
3. Move to your partner’s side. Select a leg, grasping it above the ankle with yourdown body hand, while gently lifting the back of the lower leg just below the kneewith your up body hand to slide the foot towards the buttocks. Reposition the downbody hand to come along the inside of the foot, wrapping around the heel. The upbody hand should remain on the back of the lower leg, just below the knee. Lift thefoot and knee, as shown in the photo, allowing you to move your partner’s hip.
220

Exploring Touch
Use the control of your grip on the heel to move the knee towards and away from the chest (hip extension & flexion), move the foot towards and away from the mid-line (hip external/lateral rotation & internal/medial rotation) with the knee fixed and move the knee and lower leg towards and away from the mid-line ( hip adduction and abduction).
These movements can be combined into circles and figure 8’s for better flow while moving the hip joint. Repeat these movements on the other hip.
221

Exploring Touch
4. Have your partner move both feet towards their buttocks.
Move to the side of your partner, have them move closer to you for betterline of force if you are using a table, placing your hands on the front oftheir lower legs, under their kneecaps, as shown in the photo.
Get into a strong lunge position, stabilizing your upright spine and bracingyour arms. Use your hips and legs to lift both your partner’s feet from theground towards their chest, as shown in the photo.
Slowly move the knees in a small circle, moving the hips, pelvis and lowback.
222

Exploring Touch
5. Place your hands on either side of yourpartner’s hips, as shown in the photo, pulltowards the feet slightly and lightly movethe hips side to side (lateral translation ofpelvis and low back) a very small amount.
Next, induce a slight rotation in the hipsand low back by alternately pushing oneside of the hips (ASIS) towards the groundand pulling the other side towards theceiling.
Finally, introduce a slight forward andbackward (flexion & extension of low back,anterior & posterior pelvic tilt) movementby simultaneously rocking both hips (ASIS)towards and away from the ground. Allthese movements should be very smalland pain free.
223

Exploring Touch
6. Place the hands on either side of your partner’s lower rib cage, as shown in the photo, slightly shift the rib cage side-to-side and gently inducing a small rotation left and right.
224
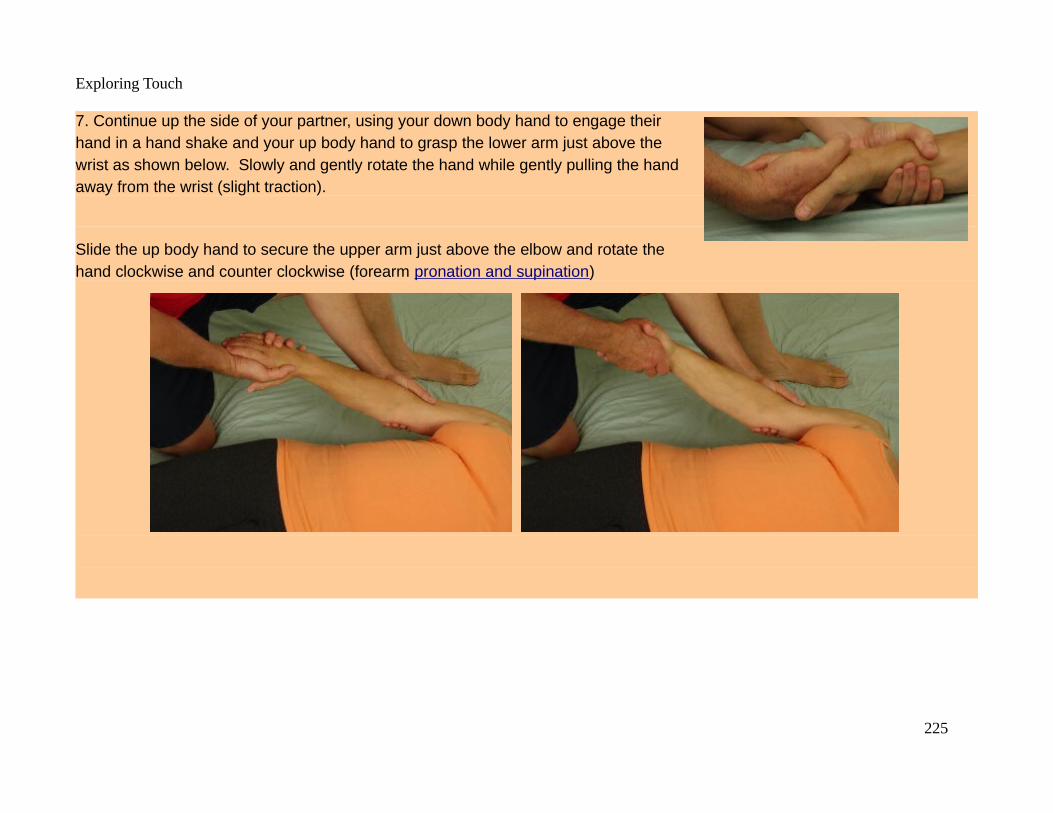
Exploring Touch
7. Continue up the side of your partner, using your down body hand to engage theirhand in a hand shake and your up body hand to grasp the lower arm just above thewrist as shown below. Slowly and gently rotate the hand while gently pulling the handaway from the wrist (slight traction).
Slide the up body hand to secure the upper arm just above the elbow and rotate thehand clockwise and counter clockwise (forearm pronation and supination)
225

Exploring Touch
Release the handshake with the down arm hand and move it to grasp the lower arm just above the wrist. Slightly pull the entire arm towards the feet, then release and carefully move the arm at the shoulder, in the plane of the body towards the head while maintaining a slight outward pull. STOP if your partner shows any signs of discomfort or when the arm is straight out from the body.
Repeat this step on the opposite arm.
8. Position yourself at your partner’s head, facing towards their feet. Place each hand on top ofand to the outside of their shoulders as shown in the photo. Slowly and gently press theirshoulders towards their feet, first together and then alternately press and release oppositeshoulders. Insure you have a good line of force and are using good body mechanics.
Rotate your hands, changing from pressing head towards feet, to pressing down into the table asshown in the photo. Again, gently press both shoulders into the table together, then alternatepressing and releasing opposite shoulders.
226

Exploring Touch
9. Get permission to contact your partner’s head and neck before proceeding. We are going to do a very simple and safe movement of the head and neck, moving it in a very slight nod and release (as in indicating “yes” for Americans) and a slight rotation (as in indicating “no” for Americans).
Position yourself above your partner’s head and place one hand under your partner’s neck, engaging the back of their skull withyour cupped hand. Place the other hand over their forehead as shown in the photo. Apply a very slight pull towards you to open up space in the spine, then slowly rotate the head 1”-2” left to right, then right to left. Bring the head back to neutral and pull up with the bottom hand while pushing slightly down with the top hand to induce a small nod of the head, then release. Youcan then combine these two movements with bending to either side to induce a small circular motion in both clockwise and counter-clockwise directions. Check-in often to make sure your partner is comfortable, as this can produce nausea if done too aggressively.
227

Exploring Touch
10. Proceed to the hands and feet to move each finger and toe. Support the hand or foot with one hand while grasping a digit with the other, pulling slightly to open up space and moving the digit in a small circle. It is perfectly normal that some digits might produce a sound, while others are silent.
11. End your session at the feet, grasping the feet at the heels (calcaneus) and slowly rocking them side to side, building momentum, until you see your partner’s head slowly beginning to move side to side. Insure that you are in an upright position and moving from your large hip muscles, as your arms dangle at your side.
Integrate: How do you feel after the exploration? Did you feel uncomfortable in any way? Were there any unexpected sensations? How did your partner feel about the session?
A similar exploration can be done from different positions. How might you gently move the joints in a comfortable way from side-laying or laying face down?
This exploration can also be rich to experience as the receiver, instead of the provider.
This exploration requires integrating many different skills including good body mechanics, effective client communications and most importantly, good judgment.
228
Exploring Touch
More Human Partner ExplorationsRather than duplicate explorations, consider pursuing some of the individual explorations with your partner. Some of the most interesting to do with a partner are Change Your Position, “Listening” with the Hands and Tour de Tissue Types. Additionally, revisit the section on More Individual Ideas for concepts to be incorporated into the partner explorations.
These individual explorations can be easily adapted as you gain skill working with a partner, primarily through clear communication and trust. You can actively change your partner’s position by moving them ever so slightly towards an improvedposition of ease, while they remain relaxed and passive. You can also ask your partner to move into a position and help them fine tune it.
Listening to the tissue under your hand becomes a very different exercise with a partner, as what you experience and what theyare experiencing may be two different things. Again, communication with your partner will help you continue to develop your palpation skills.
Tour de Tissue is another great opportunity to practice communication as you gently explore different tissue types on your partner’s body.
The ultimate free form touch exercise is to have your partner direct you to provide the touch that feels best to them, as always, within the boundaries of safe touch for both you and your partner. Like most training, it is a good idea to have one thing you want to focus on to improve during these sessions, it might be verbal communication, or palpation, or sensing non-verbal cues, or body mechanics, or any of the many other attributes we have previously discussed.
Another possible exploration to pursue is a “trust walk” where one partner is blindfolded while the sighted partner guides them to explore their environment using only touch cues. Removing your sense of sight is a wonderful way to train touch with a partner, but requires trust and extra guidance.
Exploring the effects of vibration from drums, bowls, tuning forks or other musical instruments provides an interesting exploration for both the provider and receiver.
229
Exploring Touch
Animal Partner Explorations“Now ‘man’ is a species, as Aristotle says; so is ‘horse’, or ‘dog’. We must therefore discover some common bond for all theseterms, one which embraces them and holds them subordinate to itself. And what is this? It is ‘animal’. And so there begins to be a genus ‘animal’, including all these terms, ‘man’, ‘horse’ and ‘dog’.” Seneca30
Despite the spirit of the above quote, that man, dog and horse are all animals, we will consider animal partners to be non-human partners for this set of explorations.
The challenge increases as we begin working with animals and again, the secret is finding the right partners. An animal with whom you already have a solid relationship is the best choice. Dogs are probably the easiest and safest as initial partners. Horses are great if you are comfortable around them, but the penalty for inattention can be high. Some cats respond well, whileothers are less open to touch. I don’t have much experience with other animals, so use your best judgment and proceed cautiously. While most the examples below are for canines, or even more broadly mammals, this book is about exploration so there is no reason not to extend the basic principles to other species. Hell, there is no reason not to work with your plants!
The most important thing to remember is that the animal sets the boundaries of the session, including location, duration, positions, etc. If they get up and walk away, consider potential reasons and try again at another time.
List of Animal Partner LessonsAnimal Partner Explorations..........................................................................................................................................................................230
Being with an Animal Partner.......................................................................................................................................................................232Fur & Tail......................................................................................................................................................................................................235Temperature Scan..........................................................................................................................................................................................240Old & New Favorites....................................................................................................................................................................................242
30 The Tao of Seneca, Volume 1, Based on the Moral Letters to Lucilius by Seneca, translated by Richard Mott Gummere, Loeb Classical Library edition, 1917, Letter 58, On Being.
A great free source for the wisdom of Seneca is provided by Tim Ferris at https://tim.blog/2017/07/06/tao-of-seneca/
230

Exploring Touch
Fascia Play.....................................................................................................................................................................................................244More Animal Partner Explorations................................................................................................................................................................247
Canine Companions for Independence (CCI) graduates swap touch sessions after a hard day on the job!31
31 Learn more about CCI at http://www.cci.org/ and please consider supporting this great organization which trains dogs as helpful companions for the disabled.
231
Exploring Touch
Being with an Animal PartnerThink: Animals, especially dogs, are experts at being. They live in the moment and often have no pending tasks to pursue, or past to brood over. Presumably, you have done the exploration on Being with a Human Partner in the previous section, so you have some experience with just being while making physical contact. The primary difference when working with your animal partner is that they might not have exactly the same goals as you do for the session.
Set a goal for how long you want to spend on this exploration, but try to spend at least 5 minutes. You can set a timer, or note the time to finish and periodically check a clock. If your animal partner shifts around it is fine to continue, but if they leave the area or otherwise communicate that they are done with the session, it is over.
Can you sit in silence and experience your animal partner through still touch for an extended period? This might be more difficult since there can be a tendency to pet our animal partner, and they won’t complain! Also, it might be beneficial to use the sound of your voice to help calm the animal.
Hopefully, you are familiar with your animal partner’s habits and communication styles. Try to plan your session for a time whenthey will be most cooperative. My experience is animals are most open to this exploration as they are just waking from sleep, after a meal or after a vigorous play session. Key to success is minimizing distractions, especially from other animals or people.
You may also notice that your animal partner often goes out of their way to perform this exploration with you. They simply just want to be with you and share the experience together, even if you are distracted with something else. This exploration gives us the opportunity to turn the tables.
Feel: Your focus is to silently monitor what is going on underneath the contact of your hands. This awareness should include your animal partner’s breath, muscle movements, digestive tract movements, temperature and anything else that you notice.
A flat hand palpation with one or both hands would be optimal. The hands should conform to your partner’s body.
232

Exploring Touch
You will need to select an appropriate contact site, the most natural is the animal’s back or side, over the ribs. Contact should be light and slow, your partner should just feel the weight of your hand or hands against their body. Your hands should “ride” with their breathing and other movements.
Move: Negotiate a position for both you and your animal partner that you will be able to maintain for your target time. It is highly likely that you will shift around in this exploration and that is normal. Please remain aware and don’t hold your breath!
1. Begin the exploration focused on monitoring your partner’s breathing with both your hands and eyes. Notice any characteristics which seem interesting. Are there long pauses between inhalation or exhalation? Can you determine their breathing cadence? Does their breathing change during the session?
2. When you feel connected with your animal partner’s breathing, check-in with your own breathing. Are you breathing using the same pattern as your animal partner?
Now attempt to purposely synchronize your breathing with your partner’s and just be for several minutes or until this breathing cadence is uncomfortable. This portion of the exploration is just about feeling and being.
3. This last step is extremely simple. When you feel the exploration is finished, whether your time is up or you just feel it is over,slowly remove your hands and take a deep cleansing breath. Reward your animal partner for their participation as you see fit.
233

Exploring Touch
Integrate: How do you feel after the exploration? Did you feel uncomfortable in any way? Were there any unexpected sensations? How did your partner react to this session?
Try different body parts and different contacts, even the abdomen if the animal trusts you.
This exploration is a great introduction to touch and trust with an animal partner. Your partner must trust you and you must trustyourself, animals will know if you are faking this trust in yourself. The simple act of being with an animal, and silently processingthe feelings which arise during touch, is rare in our modern society.
234
Exploring Touch
Fur & TailThink: There are several easy to identify differences between ourselves and our canine friends: the external ear, fur and tail. This exploration looks at these three differences further.
Abandon the exploration if your partner shows any signs of discomfort or annoyance. You may need to accomplish this exploration in several sessions, so be patient.
Hopefully, you are familiar with your animal partner’s habits and communication styles. Try to plan your session for a time whenthey will be most cooperative. My experience is animals are most open to this exploration as they are just waking from sleep, after a meal or after a vigorous play session. Key to success is minimizing distractions, especially from other animals or people.The tail exploration may be short if your partner has a docked tail.
Feel: The primary focus is to explore three fundamental differences found in canines, using touch.
Take a deep breath and ground yourself before making contact. The contact should be light and pleasing to your partner. Ideally, you should hold little tension in your body.
Move: Negotiate a position for both you and your animal partner that you will be able to maintain for your target time. It is highlylikely that you will shift around in this exploration and that is normal.
Breathe normally, but remember to breathe through the nose.
1. Most animals, including humans, enjoy contact with the external ear. Contact with the external ear helps to balance activity level, calming overactive behaviors and stimulating lethargic behaviors. I find it best to begin contact behind the actual external ear to establish if the animal is receptive to this work and then move forward. I generally avoid pulling across the actual ear canal opening, preferring to tension away from the ear canal.
You can experiment with your own ears to get a feel for the sensations. Begin behind the ear and engage the external ear between your thumb and fingers, as if rubbing a coin. Experiment with different directions of pull and you will likely agree that tension away from the ear canal is pleasurable while pulling across the ear canal is uncomfortable.
235
Exploring Touch
There are three basic canine external ear types:
erect or pricked ears (most German Shepherds or Huskies),
semi-erect or semi-pricked ears (most Terriers and Herders) and
pendulous or drop ears (Beagles or Spaniels).
Which external ear type description best fits your animal partner?
Canine external ears have extensive muscular control to help shape the ear to better direct sound into the ear canal. While we have similar muscles in our external ears, they create minimal movement, seldom being employed to help with hearing better. The extended external ear control exercised by canines adds to the variety of their expressions.
Softly engage your partner’s external ear, while monitoring them for any discomfort signaling you to stop the exploration. Noticeif there is any inflammation, irritation, sores, scars or unexpected tissue textures. While the external ears are normally soft and supple, they are intended to protect the ear and are susceptible to damage from the environment or other trauma. While most animals enjoy contact with the external ear, there can be discomfort associated with damaged external ears.
You may choose to contact both ears simultaneously or each ear independently. Some ear types, especially the pendulous ears, are best addressed individually using one hand to support the ear while the other hand makes a more active contact. You will generally want to work with the grain of the fur, following with it as opposed to ruffling it by going against the grain.
236

Exploring Touch
Ear contact is often a great early portion of our animal sessions as it helps to bring our animal partner to an appropriate level of awareness for follow-on activities.
2. The canine fur coat is more complex than most of us realize. There are two different hair types that form this coat, with most breeds having a double coat. Guard hairs provide the outermost protective layer of the cover coat, while finer woolly hairs make up the undercoat. The cover coat protects the undercoat which primarily provides insulation for the skin. Some breeds, such as Pointers or Greyhounds, have a single coat, consisting only of guard hairs. Finally, some breeds are hairless, having traded hair for active sweat glands. Most dogs don’t have active sweat glands on their body, just their paws, the primary glands on their bodies mostly release pheromones and secretions to lubricate and waterproof the skin.
Dogs also have tactile hairs on their muzzle, jaw and often on the side of their faces near their eyes. Thesetactile hairs provide sensory feedback allowing them to feel when something is near their head. Locateand gently touch one of these tactile hairs. How did your dog react?
Canine coats are densest on the back and side of the body. There is generally less hair on the abdomen,inside the ear and on the underside of the tail.
Examine your partner’s coat carefully. Can you identify different hair characteristics on different parts oftheir bodies?
237
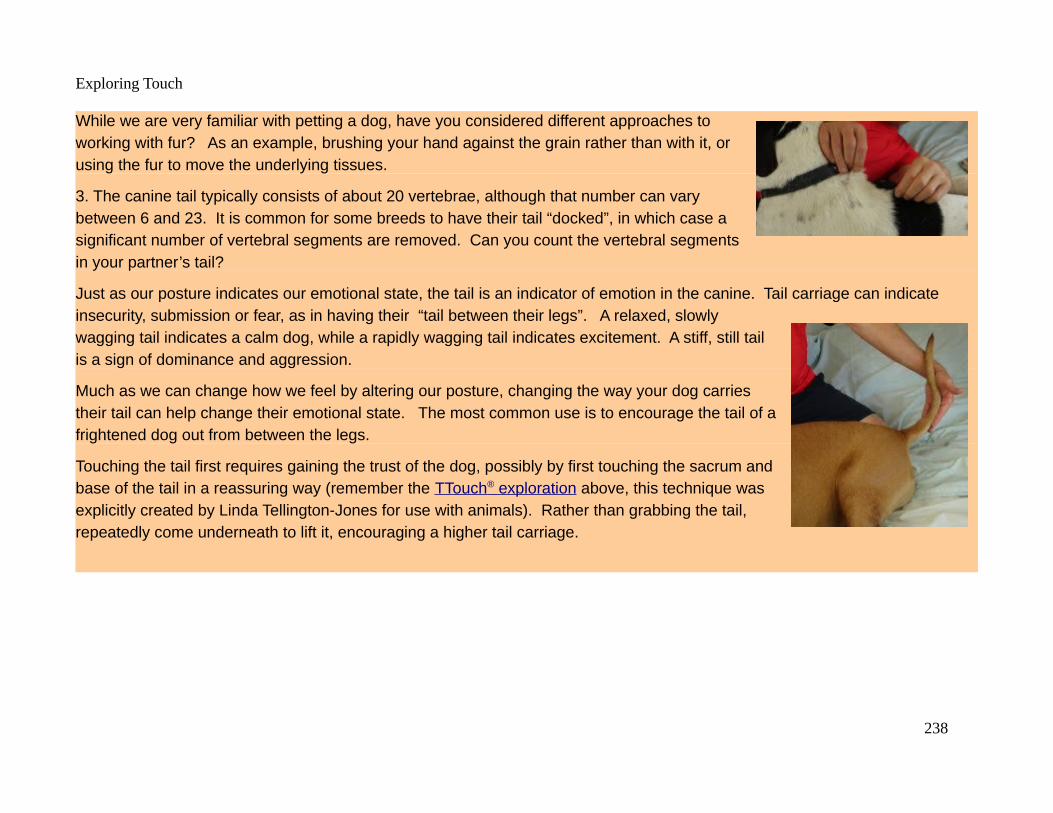
Exploring Touch
While we are very familiar with petting a dog, have you considered different approaches toworking with fur? As an example, brushing your hand against the grain rather than with it, orusing the fur to move the underlying tissues.
3. The canine tail typically consists of about 20 vertebrae, although that number can varybetween 6 and 23. It is common for some breeds to have their tail “docked”, in which case asignificant number of vertebral segments are removed. Can you count the vertebral segmentsin your partner’s tail?
Just as our posture indicates our emotional state, the tail is an indicator of emotion in the canine. Tail carriage can indicate insecurity, submission or fear, as in having their “tail between their legs”. A relaxed, slowlywagging tail indicates a calm dog, while a rapidly wagging tail indicates excitement. A stiff, still tailis a sign of dominance and aggression.
Much as we can change how we feel by altering our posture, changing the way your dog carriestheir tail can help change their emotional state. The most common use is to encourage the tail of afrightened dog out from between the legs.
Touching the tail first requires gaining the trust of the dog, possibly by first touching the sacrum andbase of the tail in a reassuring way (remember the TTouch ® exploration above, this technique wasexplicitly created by Linda Tellington-Jones for use with animals). Rather than grabbing the tail,repeatedly come underneath to lift it, encouraging a higher tail carriage.
238

Exploring Touch
Finally, as shown below, you can engage the tail to apply light traction from the base, and even explore movement between individual segments using both hands. One hand will stabilize the base segment while the other hand moves the segment further out on the tail.
Integrate: What did this exploration teach you about your animal? Did you discover anything new which you would like to investigate further? Did the animal end the exploration? Or did you?
There are very many interesting aspects of animals to explore. A commonly encountered reflex in dogs occurs when the skin along the upper side of the animal is stimulated, you may see the animal twitch the skin, such as when shooing a fly. Canines have a muscle to move their skin (cutaneous trunci muscle) and an associated reflex to move this muscle when the overlying skin is stimulated.
Another interesting exercise is to palpate for your dog’s collar bones or clavicles. Go ahead and try that, I’ll wait. Did you find a clavicle? If you did find one, you may not have a dog, as canines do not have clavicles. They do have a tendinous junction where a clavicle would be located, in a muscle that extends from their fore limb to their head (brachiocephalic muscle). Maybe you felt that tendon?
Performing this exploration on many different dogs and other animals, will provide a new experience with each encounter.
This exploration is a nice introduction to some of the many differences between humans and canines. It also encourages exploration of more sensitive areas on the animal, promoting a greater connection and communication with your partner.
239

Exploring Touch
Temperature ScanThink: Animals generally have a faster metabolism than we do, resulting in a higher basal temperature. Dogs have a normal body temperature of around 101 – 102.5 F. Cats are just a bit lower with normal from 99.5 – 102.5 F, while birds typically average around 105 F. Horse temperature ranges from 99 - 101 F .
These higher temperatures make animals a great partner for scanning temperature, since the temperature difference is easier to notice.
Set a goal for how long you want to spend on this exploration, but try to spend at least 5 minutes. You can set a timer, or note the time to finish and periodically check a clock. If your animal partner shifts around it is fine to continue, but if they leave the area or otherwise communicate that they are done with the session, the session is over. Remain aware of your animal partner’stolerance for the exploration.
Hopefully, you are familiar with your animal partner’s habits and communication styles. Try to plan your session for a time whenthey will be most cooperative. My experience is animals are most open to this exploration as they are just waking from sleep, after a meal or after a vigorous play session. Key to success is minimizing distractions, especially from other animals or people.
Feel: Your focus is to monitor body temperature in various regions.
A flat hand palpation with one or both hands is optimal, with the hands conforming to your partner’s body.
Move: Negotiate a position for both you and your animal partner that can be maintained comfortably and safely. It is highly likely that you will shift around in this exploration and that is OK.
Normal, spontaneous, nasal breathing is perfect. Please remain aware and don’t hold your breath or breathe through your mouth!
240

Exploring Touch
1. Place your hands just above your animal partner, can you feel the heat they emit into thesurrounding air? Is it easier to feel this heat in different areas like the nose, head or belly?
2. Make contact with the animal and move your hands to where you feel they are warmest, thenidentify where they feel most cool.
3. Explore the heat pattern in the animal’s legs and paws.
Integrate: What was your animal’s hottest spot? Coolest? Did you have to contact the animal to ascertain these locations or could you locate them without contact?
This exploration can be done with different animals and at different times of the year. A summer coat lets more heat escape than a winter coat.
The ability to sense different temperatures easily can help locate trouble areas. Injured sites or areas of infection generally canbe located through the increased temperature that accompanies the increased metabolic activity.
241
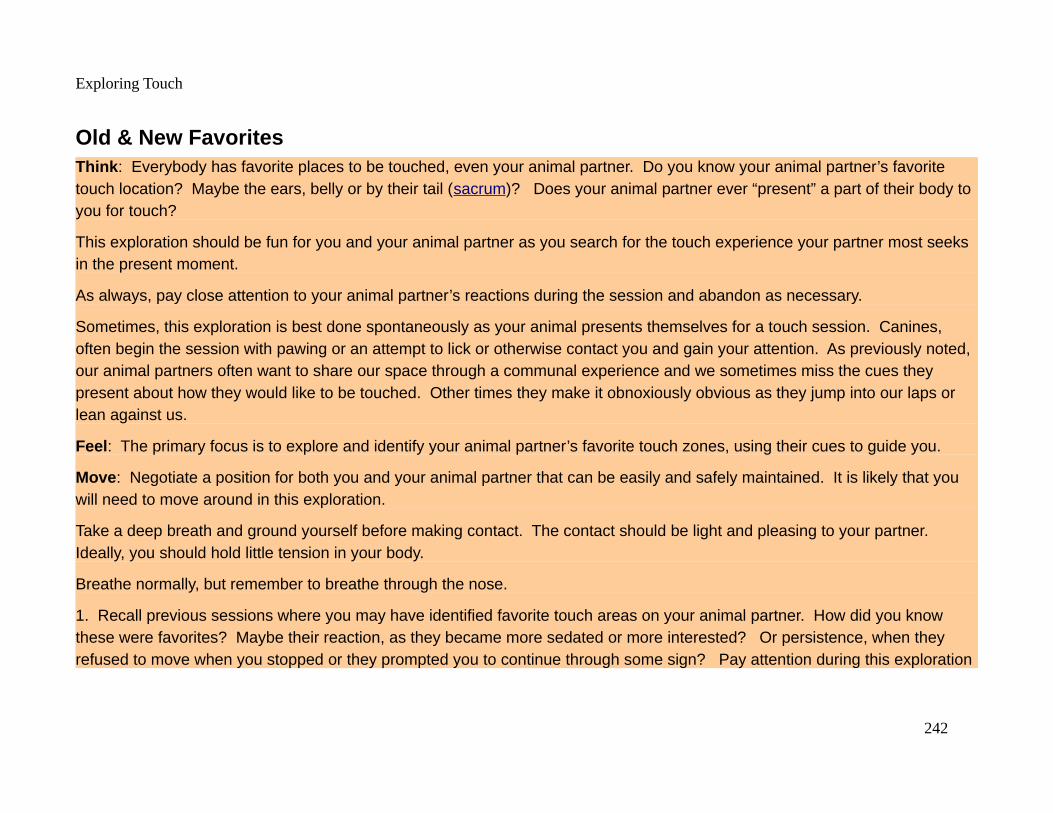
Exploring Touch
Old & New FavoritesThink: Everybody has favorite places to be touched, even your animal partner. Do you know your animal partner’s favorite touch location? Maybe the ears, belly or by their tail (sacrum)? Does your animal partner ever “present” a part of their body to you for touch?
This exploration should be fun for you and your animal partner as you search for the touch experience your partner most seeks in the present moment.
As always, pay close attention to your animal partner’s reactions during the session and abandon as necessary.
Sometimes, this exploration is best done spontaneously as your animal presents themselves for a touch session. Canines, often begin the session with pawing or an attempt to lick or otherwise contact you and gain your attention. As previously noted, our animal partners often want to share our space through a communal experience and we sometimes miss the cues they present about how they would like to be touched. Other times they make it obnoxiously obvious as they jump into our laps or lean against us.
Feel: The primary focus is to explore and identify your animal partner’s favorite touch zones, using their cues to guide you.
Move: Negotiate a position for both you and your animal partner that can be easily and safely maintained. It is likely that you will need to move around in this exploration.
Take a deep breath and ground yourself before making contact. The contact should be light and pleasing to your partner. Ideally, you should hold little tension in your body.
Breathe normally, but remember to breathe through the nose.
1. Recall previous sessions where you may have identified favorite touch areas on your animal partner. How did you know these were favorites? Maybe their reaction, as they became more sedated or more interested? Or persistence, when they refused to move when you stopped or they prompted you to continue through some sign? Pay attention during this exploration
242
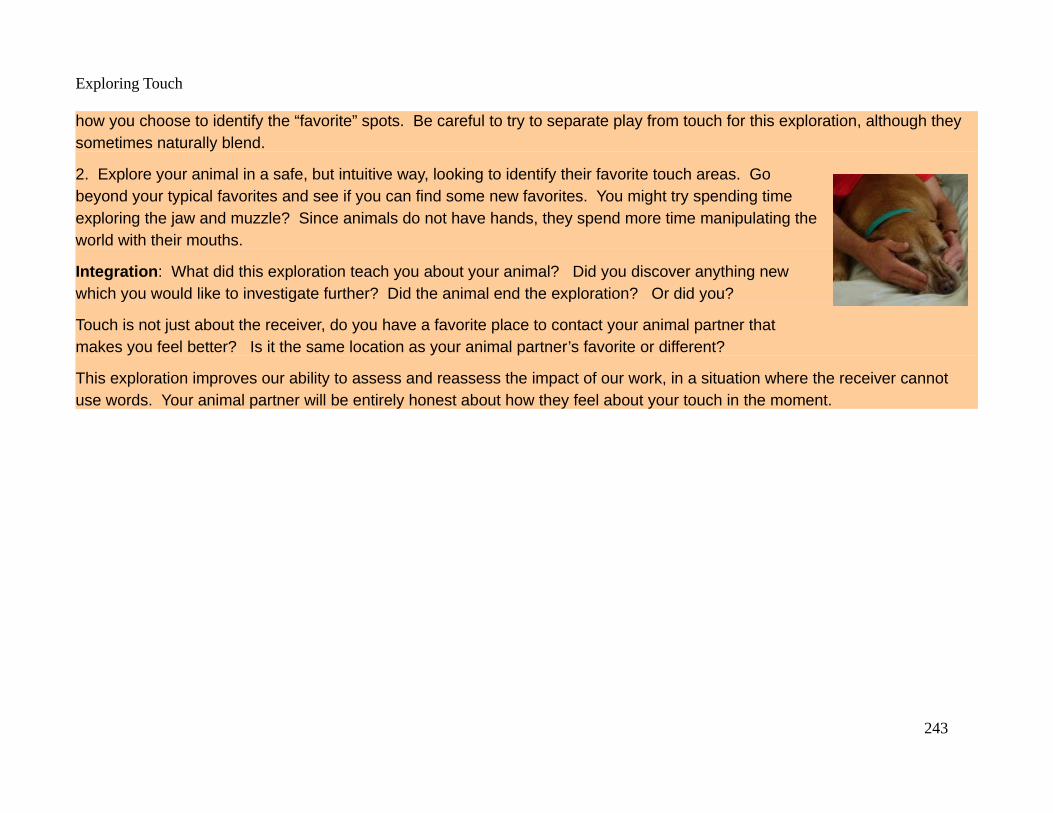
Exploring Touch
how you choose to identify the “favorite” spots. Be careful to try to separate play from touch for this exploration, although they sometimes naturally blend.
2. Explore your animal in a safe, but intuitive way, looking to identify their favorite touch areas. Gobeyond your typical favorites and see if you can find some new favorites. You might try spending timeexploring the jaw and muzzle? Since animals do not have hands, they spend more time manipulating theworld with their mouths.
Integration: What did this exploration teach you about your animal? Did you discover anything newwhich you would like to investigate further? Did the animal end the exploration? Or did you?
Touch is not just about the receiver, do you have a favorite place to contact your animal partner thatmakes you feel better? Is it the same location as your animal partner’s favorite or different?
This exploration improves our ability to assess and reassess the impact of our work, in a situation where the receiver cannot use words. Your animal partner will be entirely honest about how they feel about your touch in the moment.
243

Exploring Touch
Fascia PlayThink: Animals generally have very healthy fascia that moves well. Many animals even have muscles that attach to their superficial fascia, allowing them to move their skin, typically in response to a stimuli like a fly or flea ( the cutaneous trunci muscle in canines for example). These features make animals excellent partners for exploring fascia.
Set a goal for how long you want to spend on this exploration, but try to spend at least 5 minutes. You can set a timer, or just mentally note your target stop time and periodically check a clock. If your animal partner shifts around it is fine to continue, but if they leave the area or otherwise communicate that they are done with the session, the exploration is over. Remain aware of your animal partner’s tolerance for the exploration.
Hopefully, you are familiar with your animal partner’s habits and communication styles. Try to plan your session for a time whenthey will be most cooperative. My experience is animals are most open to this exploration as they are just waking from sleep, after a meal or after a vigorous play session. Key to success is minimizing distractions, especially from other animals or people.
Feel: Your focus is to monitor and manipulate the fascia in various locations. We will utilize a number of different fascial contact techniques outlined in the Contact Tools section.
Contact will utilize several different fascial contacts such as the S stroke, C stroke, J stroke and skin rolling.
Move: Negotiate a position for both you and your animal partner that is easily and safely maintained. It is likely that you will need to move around in this exploration.
Normal, spontaneous, nasal breathing is perfect. Please remain aware and don’t hold your breath or breathe through your mouth!
1. Explore the overall ability of the skin to move over the underlying tissues for your animal partner. Gently contact and slide theskin in various directions. Does it move the same amount in all directions? Do all areas of the body have similar amounts of skin movement? Generally, the further you move away from the center of the body the less skin movement is required.
244

Exploring Touch
2. This step can be quite fun if you have a canine, feline or equine partner. We will explore an interesting reflex(cutaneous trunci or panniculus reflex ) which allows the animal to move their skin to discourage parasites. Tryfirmly rolling or pinching the skin on your animal partner’s back about 1 inch to the side of the spine. Did you noticeanything odd? If not, you may want to try again at different spots from the hind legs up onto the rib area.
If you have provided the correct stimulus, you will see the skin over the animals side move or shiver, which is thereflex we are exploring in this step. This response can often be elicited using a lighter stimulus by gently displacingthe fur.
3. Animal fur provides an excellent opportunity to practice very light engagement of the skin. Try repeating the first step of this exploration by engaging the fur between the fingers to explore the movement of the skin.
4. Skin rolling, lifting and rolling the skin with the thumbs and fingers, is best done along or acrossthe grain of the fur on the back and sides. Using both hands, place the fingers in the direction ofthe roll with the thumbs behind the lifted skin. The thumbs will act almost like a plow, pushing theskin and the fingers lift it.
Try different locations and directions, noting that eventually the skin does not lift enough for thetechnique to be effective.
245
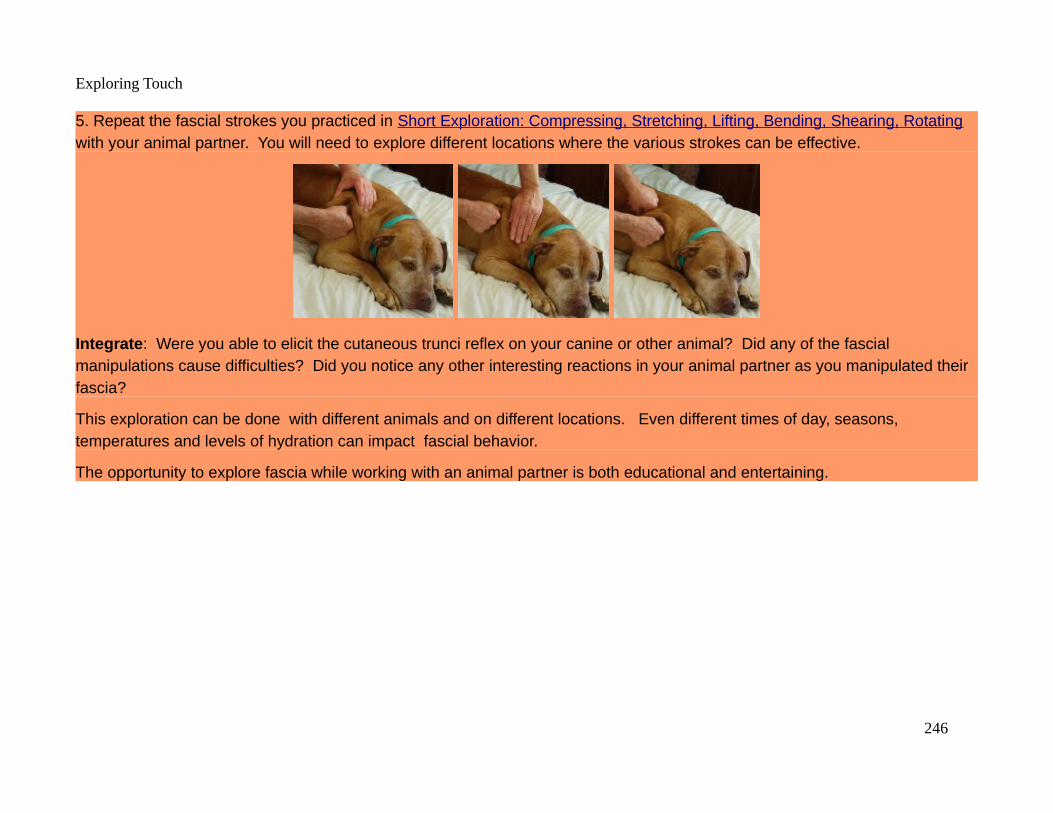
Exploring Touch
5. Repeat the fascial strokes you practiced in Short Exploration: Compressing, Stretching, Lifting, Bending, Shearing, Rotating with your animal partner. You will need to explore different locations where the various strokes can be effective.
Integrate: Were you able to elicit the cutaneous trunci reflex on your canine or other animal? Did any of the fascial manipulations cause difficulties? Did you notice any other interesting reactions in your animal partner as you manipulated their fascia?
This exploration can be done with different animals and on different locations. Even different times of day, seasons, temperatures and levels of hydration can impact fascial behavior.
The opportunity to explore fascia while working with an animal partner is both educational and entertaining.
246

Exploring Touch
More Animal Partner ExplorationsThere are many opportunities to further explore touch with your animal partner, including joint ROM, rocking & shaking and more. A great treat for you and your animal would be to take a TTouch® training exploration!
Revisit the individual and human partner explorations for more ideas that you can share with your animal partner.
247

Exploring Touch
Touch Tips Summary
List of Touch TipsTouch Tip 1: If you read and understand the “Touch Tips”, you’ll be ready to start exploring safely!...............................................9
Touch Tip 2: Slow down to get the most from these touch explorations.........................................................................................11
Touch Tip 3: Explore in short sessions and revisit the book often..................................................................................................11
Touch Tip 4: Don’t try too hard, relax and let the knowledge come to you through the experience...............................................11
Touch Tip 5: Don’t get discouraged, just keep trying and celebrate the small victories..................................................................11
Touch Tip 6: Touch is a complex sense which is often ignored, feared or taken for granted..........................................................11
Touch Tip 7: The mind experiences touch through the whole body................................................................................................11
Touch Tip 8: Touch requires moving, feeling and thinking...............................................................................................................12
Touch Tip 9: Touch quality improves through education, experience, exploration and time on tissue...........................................12
Touch Tip 10: Touch engages our body, mind and emotions. Everyone can benefit from improving their touch quality................12
Touch Tip 11: Touch can be uncomfortable due to personal or social issues. Respect everyone’s comfort zones.......................12
Touch Tip 12: Communication is key to quality touch.....................................................................................................................12
Touch Tip 13: This book approaches touch with a simple, generic, non-sexual attitude................................................................12
Touch Tip 14: Provider refers to the more active touch participant and receiver to the more passive...........................................13
Touch Tip 15: Touch can extend beyond physical contact, so definitions can be complex and fluid..............................................13
Touch Tip 16: Our focus and intent changes our touch experience................................................................................................14
248

Exploring Touch
Touch Tip 17: Only the receiver can evaluate quality of touch........................................................................................................16
Touch Tip 18: Quality of touch perception can vary widely based on context, don’t assume, communicate.................................16
Touch Tip 19: Assessing with all our senses allows us to decide how best to proceed..................................................................16
Touch Tip 20: Touch can be dangerous because it requires being close, so we are constantly assessing our safety..................17
Touch Tip 21: Assessment and decision making are continuously occurring for both participants in a touch exchange...............17
Touch Tip 22: Boundaries keep the provider and receiver safe – establish and respect them!......................................................18
Touch Tip 23: Stop if there is pain or discomfort for either the provider or receiver........................................................................18
Touch Tip 24: Animals are excellent at providing, communicating and enforcing touch boundaries..............................................18
Touch Tip 25: Stay away from the keep out zones unless you have the appropriate training, license or certification...................20
Touch Tip 26: Do not work with an individual healing from an injury or illness without consulting a medical professional............20
Touch Tip 27: Wash your hands, use clean linens, avoid contact with bodily fluids, stay away from open wounds, don’t touch your face, eyes, nose or other mucous membranes. If you have concerns, consult a medical professional.................................21
Touch Tip 28: Integrate thoughts, emotions, sensations and intuitions into decisions which result in quality touch experiences. 21
Touch Tip 29: Develop and integrate your unique balance of senses to create your own sense of touch.....................................21
Touch Tip 30: Quality touch emerges from good sense integration, exploration, training and practice.........................................22
Touch Tip 31: Focus on the individual in each touch interaction and avoid deconstructing them into systems or diseases.........22
Touch Tip 32: Recognize that touch is an important part of our complex social fabric and is required to thrive............................23
Touch Tip 33: Reducing stressors, like gravity, increases our ability to focus and notice small changes......................................23
Touch Tip 34: Learning occurs when we provide enough challenge to be interesting, but not so much as to overwhelm............24
249

Exploring Touch
Touch Tip 35: Learn skills in isolation, then integrate them into the environment where they become useful...............................24
Touch Tip 36: Breath is your best investment in improving touch and movement quality...............................................................33
Touch Tip 37: Breathe through the nose to calm your nervous system, through the mouth to stimulate it....................................33
Touch Tip 38: Breathing consists of four actions: inhaling, holding the inhale, exhaling and holding the exhale...........................33
Touch Tip 39: Calming breathing patterns emphasize the exhalation.............................................................................................33
Touch Tip 40: Try to recognize when you are unconsciously holding your breath due to stress!...................................................33
Touch Tip 41: We can improve breathing inefficiencies through awareness, practice and patience..............................................33
Touch Tip 42: The first 2/3 of a relaxed inhalation should have abdominal expansion and the last 1/3 chest expansion. The abdomen and chest should ideally expand like a cylinder in all directions together.......................................................................34
Touch Tip 43: Breath and movement are intertwined. When unloaded, we naturally inhale as we extend or open up our body. We naturally exhale as we flex or close our body down closer to the fetal position.......................................................................34
Touch Tip 44: Loading the body with extra stresses, like weight, might change your best breathing pattern................................34
Touch Tip 45: You can use your breathing pattern to help others around you to breathe better....................................................34
Touch Tip: 46 You can also use your breathing pattern to “time” activities, like stretching, by counting breath cycles..................34
Touch Tip 47: Relaxing your jaw and tongue, while breathing through the nose, can reduce overall body tension......................34
Touch Tip 48: Avoid mouth breathing, focus on breathing through the nose for all but the most strenuous activities...................34
Touch Tip 49: Follow these movement cues from infants: 1. Relax and Breathe, 2. Explore and improve your movement repertoire, 3. Work on your ROM, 4. Train stability, 5. Keep yourself motivated with food, toys, curiosity and social activity.......40
Touch Tip 50: We move differently every day, so stay within the limits of that day. Avoid pain, but slight discomfort is OK..........40
Touch Tip 51: Regressing to our most primitive movements can help our ability to move. Train like a baby!................................40
250
Exploring Touch
Body Mechanics Tip 1: If you cannot breathe well, you cannot move well. Monitor and improve your breathing..........................63
Body Mechanics Tip 2: Perfect practice! Improve one skill at a time, until you do it well without thinking.....................................63
Body Mechanics Tip 3: Find a stable position for both your body and mind before moving...........................................................63
Body Mechanics Tip 4: If you cannot sense well, you cannot move well. Be aware of what you feel............................................63
Body Mechanics Tip 5: Start movements with the larger muscles of your body.............................................................................63
Body Mechanics Tip 6: Adjust the position of your feet to find a stable position.............................................................................63
Body Mechanics Tip 7: Adjust your line of force to make your touch more efficient and effective.................................................63
Body Mechanics Tip 8: Speed kills: move slowly using strength and control.................................................................................63
Body Mechanics Tip 9: Use the natural springs in your body to make movement easier...............................................................64
Body Mechanics Tip 10: Keep your upper body “quiet” to reduce injury risk and better transmit force.........................................64
Body Mechanics Tip 11: Keep your shoulder blades in your back pockets, meaning pull them together and down.....................64
Body Mechanics Tip 12: Push into the ground first and your hands last........................................................................................64
Body Mechanics Tip 13: These principles can be adapted for every situation and position...........................................................64
Touch Tip 52: Practice movement awareness and explore different approaches to understand what works best for you............68
Touch Tip 53: Sensation is created by the brain using information from special receptors spread throughout the body, but primarily in the skin..........................................................................................................................................................................72
Touch Tip 54: The non-hairy skin of the lips, palms, soles of the feet, nipples and genitalia are rich in sensory receptors...........72
Touch Tip 55: Pain is a sensation generated by the brain for protection........................................................................................72
Touch Tip 56: You can warm your hands through activity and relaxation, or you can use external hand warmers.......................74
251
Exploring Touch
Touch Tip 57: Colder tissues move less, while warmer tissues move more, soften and allow access to deeper layers...............74
Touch Tip 58: Do not excessively touch individuals with fevers or injuries which are warm to the touch.......................................74
Touch Tip 59: Touch is best received in a position that reduces the effects of gravity, unloading both the nervous system and physical tissues................................................................................................................................................................................80
Touch Tip 60: Create safe positions of ease for both provider and receiver using pillows, blankets, towels and other supports.. 80
Touch Tip 61: Explore and experience different touch contacts....................................................................................................106
Touch Tip 62: Touch pressure mismatches are often an indicator of distorted sensation. Time, trust, education and communication are key to solving a pressure mismatch. If ever in doubt, less is best................................................................106
Touch Tip 63: Continuously monitor if you are holding unnecessary tension in your touch, tension can be contagious.............107
Touch Tip 64: Too much of any activity, including touch, can have negative impacts for both provider and receiver..................108
Touch Tip 65: Constantly evaluate if you are doing too much in a touch session, less is better..................................................109
Touch Tip 66: We are amazingly well adapted self-healing organisms.........................................................................................114
Touch Tip 67: We are all “healers”, primarily healing ourselves, while supporting healing in others............................................114
Touch Tip 68: Since the body will eventually heal without intervention, it is best to “First do no harm!”......................................114
Touch Tip 69: Always evaluate if professional help is needed to support the healing process....................................................114
Touch Tip 70: Touch, even without direct contact, can be a powerful support tool in the healing process...................................114
Touch Tip 71: What you think and say can impact your health and ability to heal. Foster affirmative, but realistic, thoughts and speech about yourself and others.................................................................................................................................................117
Touch Tip 72: Encourage the inner healing ability in yourself and others.....................................................................................117
Touch Tip 73: Touch serves as our touchstone for assessing the reality of an experience..........................................................118
252
Exploring Touch
Touch Tip 74: Touch can help the nervous system shift from a survival state into a state of healing and repair.........................118
Touch Tip 75: Muscle is dumb, it shortens and lengthens under command of the nervous system.............................................122
Touch Tip 76: When you touch the skin, you are effectively touching the brain...........................................................................122
Touch Tip 77: Touching another individual connects your two nervous systems..........................................................................122
Touch Tip 78: A living body is one piece, touching anywhere impacts everywhere......................................................................122
Touch Tip 79: Fascia shapes the body, supporting movement through tension, pressure, flow and rhythm...............................123
Touch Tip 80: Tissue remodels to adapt to the stresses to which it is subjected, failing if it cannot adapt...................................125
Touch Tip 81: The nervous system remodels faster than muscle, which remodels faster than fascia, which remodels faster than bone...............................................................................................................................................................................................125
Touch Tip 82: Touch primarily acts on the nervous system. The nervous system requires good circulation to keep it healthy and touch helps improve circulation also.............................................................................................................................................125
Touch Tip 83: If tissue is not subject to adequate stresses, those resources will be used in another way. Use it or lose it!........125
Touch Tip 84: Cultivate thinking that improves the quality of your touch......................................................................................130
Touch Tip 85: Meditation practices can be integrated with movement and touch.........................................................................130
Touch Tip 86: Use your breath to bring you back to the moment when you drift away.................................................................130
Touch Tip 87: Balance focus and awareness during practice to successfully improve skills........................................................131
Touch Tip 88: It takes more effort to correct a poorly learned skill than to learn it correctly.........................................................131
Touch Tip 89: Learn and explore many techniques and use what works best for you.................................................................132
Touch Tip 90: Evaluate techniques based on how they align with your experiences and values.................................................132
253

Exploring Touch
Touch Tip 91: Consider deeply studying an existing touch tradition.............................................................................................133
Touch Tip 92: Science is great, but always incomplete and often incorrect. Don’t be lazy, conduct your own experiment well! Do the research, make good choices, live with your choices, record their effects and make changes as necessary.......................135
Touch Tip 93: Integrate your skills and find your flow. Better yet, let your flow find you!..............................................................137
Touch Tip 94: Practice patience by adopting the pace of nature, letting your skills develop naturally.........................................139
Touch Tip 95: Make the explorations your own by improving them for yourself and others.........................................................139
254

Exploring Touch
ConclusionUltimately, this book represents an invitation to move, feel, think and explore in a way that improves your connection with yourself and others for the purpose of obtaining information and inviting change.
Among the most interesting ideas to emerge from touch exploration is that it is less about contact and more about connection. Not necessarily establishing new connections, but rather re-discovering already existing connections. The non-dual approach, Iam part of the world, not separate, fosters discovering that connection with anyone is always a connection with yourself.
If you are excited by the touch experiences contained in this book, consider learning more through college programs, seminars and other opportunities. There is much benefit to be gained through the first hand guidance of experienced educators, which simply cannot be conveyed in a book or video.
My hope is that this book has touched you, so that you can touch others!
255

Exploring Touch
Contact UsTrina and I would love to hearfrom you and the best contactmechanism for us is email.
Associated informationhosted at
www.escape-pain.com
You can learn more aboutTrina’s physical therapypractice in San Jose,California at
www.sjbcts.com
Above: Trina & Chip touched by nature in Antelope Slot Canyons outside Page,
256

Exploring Touch
Appendix 1: Simple Lifestyle Improvements1. Improve your ability to sense and monitor changes in your head, heart, gut, body and movements.
2. Improve your ability to control your breath, and breathe primarily through your nose.
3. Improve your sleep quality, primarily following the cycles of the sun.
4. Improve the quality of your water, drinking primarily water.
5. Improve the quality of your food, eating primarily real food you could recognize in nature.
6. Improve the quality of your movement, exploring like a child daily, moving at a natural pace.
7. Improve your relationships, focusing on yourself, others and nature.
8. Improve your touch experience, primarily through connection with yourself and others.
9. Improve your creativity, express what is deep inside you.
10. Actively run the experiment which is your life – do the research, try new things and evaluate the changes.
257

Exploring Touch
Appendix 2: Resource SummaryDescription Resources Contact / Information
Anatomy Exploration Software Visible Body Muscle Premium https://www.visiblebody.com/
Anatomy TrainsFascia
Tom MyersAnatomy Trains
https://www.anatomytrains.com/
Breathing Patrick McKeownThe Oxygen Advantage
http://oxygenadvantage.com/
BreathingCold Exposure
Wim Hof MethodWim HofThe Way of the Iceman
https://www.wimhofmethod.com/
Dermo Neuro Modulating Diane JacobsDermo Neuro Modulating
http://www.dermoneuromodulation.com/
Extraordinary Healing Dawson ChurchMind to Matter: The Astonishing Science of How Your Brain Creates Material Reality
https://dawsonchurch.com/
Feldenkrais Movement Moshe FeldenkraisAwareness Through Movement
Feldenkrais Movement Alfons GrabherMy Feldenkrais BookFeldenkrais with Alfons
http://www.myfeldenkraisbook.com/my-feldenkrais-book/
Functional Movement Functional Movement SystemsGray CookAthletic Body in BalanceMovement
https://www.functionalmovement.com/
258
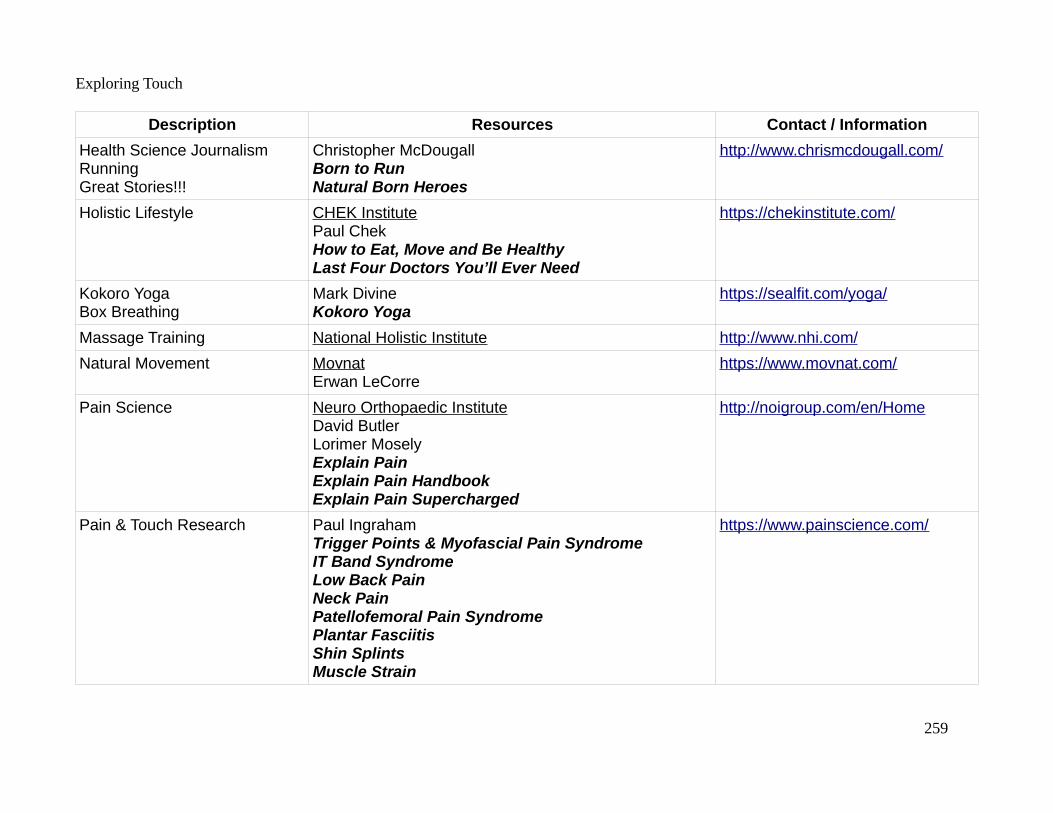
Exploring Touch
Description Resources Contact / Information
Health Science JournalismRunningGreat Stories!!!
Christopher McDougallBorn to RunNatural Born Heroes
http://www.chrismcdougall.com/
Holistic Lifestyle CHEK InstitutePaul ChekHow to Eat, Move and Be HealthyLast Four Doctors You’ll Ever Need
https://chekinstitute.com/
Kokoro YogaBox Breathing
Mark DivineKokoro Yoga
https://sealfit.com/yoga/
Massage Training National Holistic Institute http://www.nhi.com/
Natural Movement MovnatErwan LeCorre
https://www.movnat.com/
Pain Science Neuro Orthopaedic InstituteDavid ButlerLorimer MoselyExplain PainExplain Pain HandbookExplain Pain Supercharged
http://noigroup.com/en/Home
Pain & Touch Research Paul IngrahamTrigger Points & Myofascial Pain SyndromeIT Band SyndromeLow Back PainNeck PainPatellofemoral Pain SyndromePlantar FasciitisShin SplintsMuscle Strain
https://www.painscience.com/
259
Exploring Touch
Description Resources Contact / Information
Qigong Flowing ZenAnthony Korhais
https://flowingzen.com/
Strength Training Movement Dan John http://danjohn.net/
Touch Science & Biology David J. LindenTouch: The Science of the Heart, Hand and Mind
http://davidlinden.org/
260

Exploring Touch
Appendix 3: Body Contact Tools
Body Part Tool Name Examples Description
Flat Palm The palm and fingers conform to contact the surface being touched. Pressure can be downward and/or any direction along the surface of the contacted area. While the natural inclination isto push, it is good to remember that pulling is also a valid approach with this contact.
The opposite hand can be used to brace the hand making contact.
Flat Finger(s) Only the fingers contact the surface being touched. The fingers are often braced with the opposing hand. Again, force transmission is generally applied through pushing and pulling, along with an appropriate downward force.
The fingers of the opposite hand can be used to brace the fingers making contact.
261
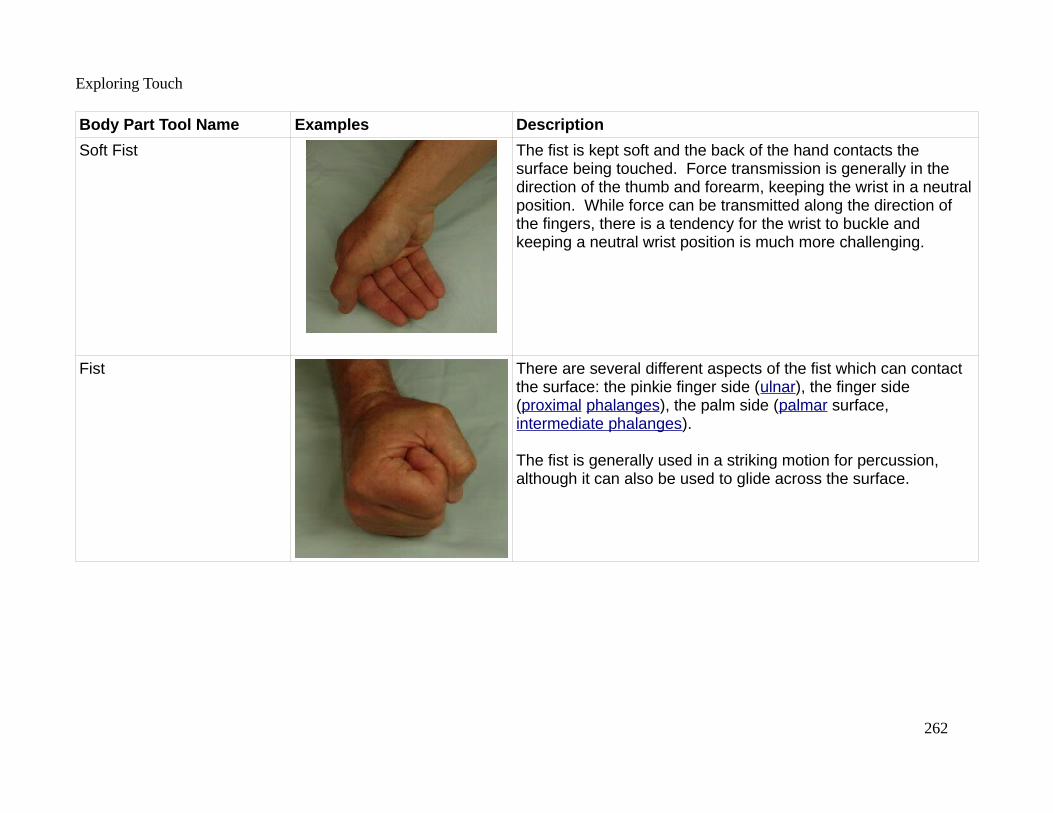
Exploring Touch
Body Part Tool Name Examples Description
Soft Fist The fist is kept soft and the back of the hand contacts the surface being touched. Force transmission is generally in the direction of the thumb and forearm, keeping the wrist in a neutralposition. While force can be transmitted along the direction of the fingers, there is a tendency for the wrist to buckle and keeping a neutral wrist position is much more challenging.
Fist There are several different aspects of the fist which can contact the surface: the pinkie finger side (ulnar), the finger side (proximal phalanges), the palm side (palmar surface, intermediate phalanges).
The fist is generally used in a striking motion for percussion, although it can also be used to glide across the surface.
262
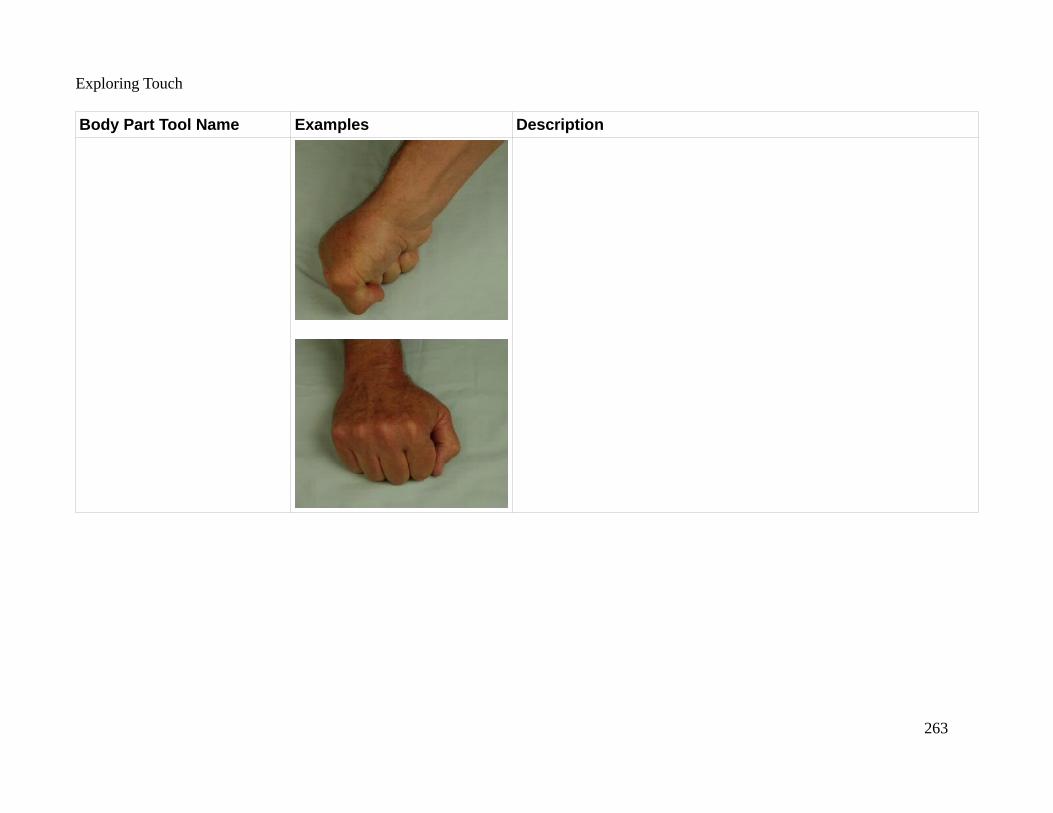
Exploring Touch
Body Part Tool Name Examples Description
263

Exploring Touch
Body Part Tool Name Examples Description
Cupped Hand Cupped hand maintains the neutral hand position, but brings the thumb close to the palm as though attempting to form a cup to hold a liquid. This position is generally used with percussion andcreates a distinct sound.
We typically used a cupped hand when clapping.
The cupped hand is also an excellent way to make contact with your finger tips for gliding across the surface.
Prayer Hands Prayer hands are created by pressing the fingers of each hand together. The fingers may be held firmly together or separated from each other, while pressing into their opposites on the other side. The pinkie (ulnar) sides of the hands are typically used for percussion.
While prayer hands are generally used for percussion, they may also be used to glide across the surface.
Braced Index Finger This position is also called piggy-back finger for obvious reasons. It provides a stable tool with a very small surface area for getting into small spaces, like between muscles, ribs, fingers or toes.
264
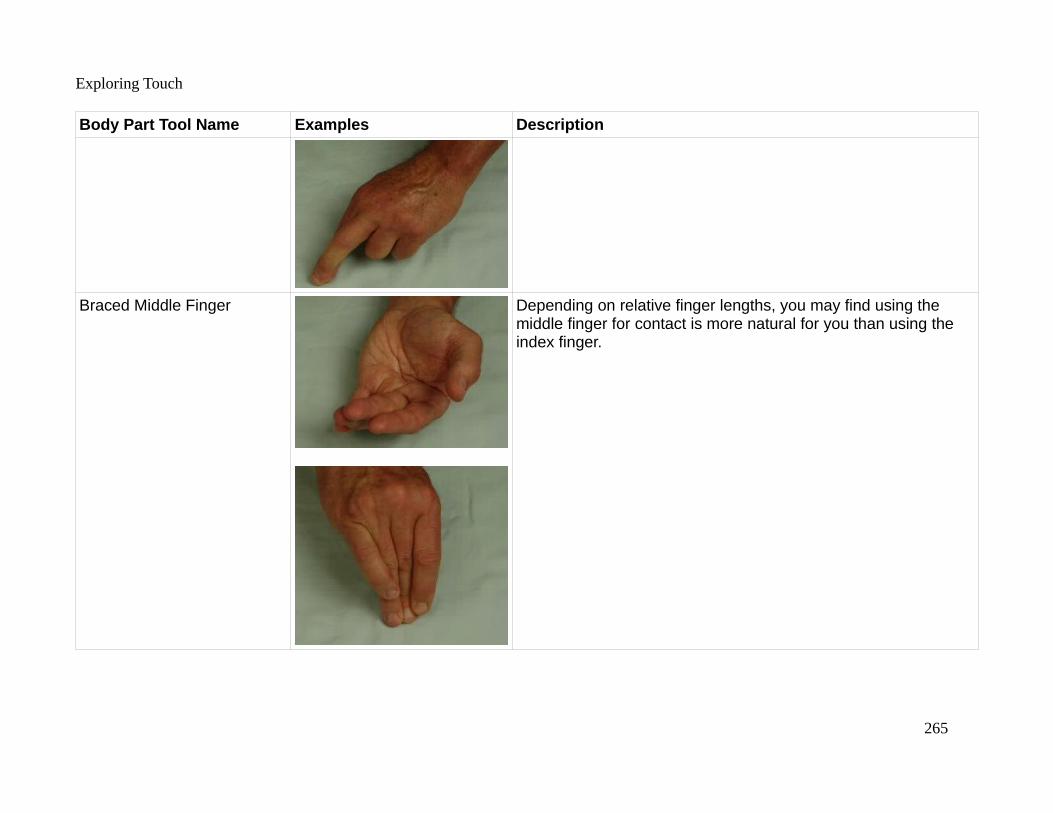
Exploring Touch
Body Part Tool Name Examples Description
Braced Middle Finger Depending on relative finger lengths, you may find using the middle finger for contact is more natural for you than using the index finger.
265

Exploring Touch
Body Part Tool Name Examples Description
Braced Fingertips Bracing all the fingertips together is sometimes called second thumb because it provides a fairly large surface area. The forces can combine downward pressure and/or movement in various surface directions.
266

Exploring Touch
Body Part Tool Name Examples Description
Side of Hand The pinkie (ulnar) side of the hand can be used to apply pressure and glide across the surface in the directions (push andpull) of the forearm. As always, maintaining a straight or neutral wrist position will help reduce the occurrence of injury.
A bit of mud from the technique swamp, rolling the hand from this position is the basis of a creative and effective Tuina massage technique called gun-fa.
Heel of Palm The heel of the palm is another approach to applying downward pressure and gliding in the direction of the forearm, but this position is much more vulnerable to a bent wrist. The more the wrist is bent, the more susceptible it is to injury.
267
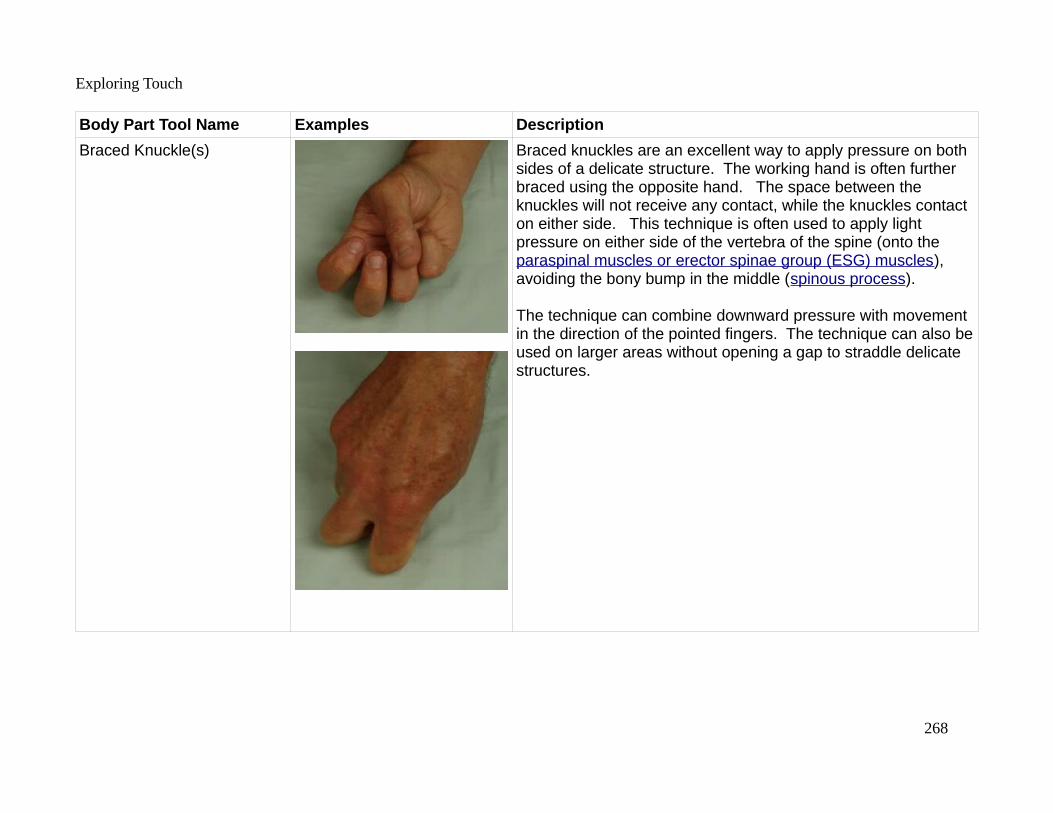
Exploring Touch
Body Part Tool Name Examples Description
Braced Knuckle(s) Braced knuckles are an excellent way to apply pressure on both sides of a delicate structure. The working hand is often further braced using the opposite hand. The space between the knuckles will not receive any contact, while the knuckles contact on either side. This technique is often used to apply light pressure on either side of the vertebra of the spine (onto the paraspinal muscles or erector spinae group (ESG) muscles), avoiding the bony bump in the middle (spinous process).
The technique can combine downward pressure with movement in the direction of the pointed fingers. The technique can also beused on larger areas without opening a gap to straddle delicate structures.
268

Exploring Touch
Body Part Tool Name Examples Description
Back of Fingers While the contact is similar to the soft fist, using the back of the fingers while gliding across the surface is generally done with much lighter pressure. Lighter pressure insures that the wrist is held in a neutral position throughout all the movements.
This style contact is common in techniques which want a broad contact with which to move the skin.
269

Exploring Touch
Body Part Tool Name Examples Description
Braced Thumb Braced thumb provides very direct and concentrated pressure into a very small area. The thumb is squeezed tightly into the hand to insure the joint is braced and stable before applying pressure along the line of the thumb bones (phalanges and first metacarpal).
It is easy to overuse the thumb and damage it. The thumb should be stacked and stable when applying any pressure, it should not move as pressure is applied.
Braced Thumbs (two hands) Two braced thumbs can be pressed together to form a more stable arrangement with greater surface area.
The thumbs can also be arranged behind the fingers as shown in the last two photos, but braced against each other. Since the fingers can cover the working thumbs, this position is also called hidden thumbs.
270
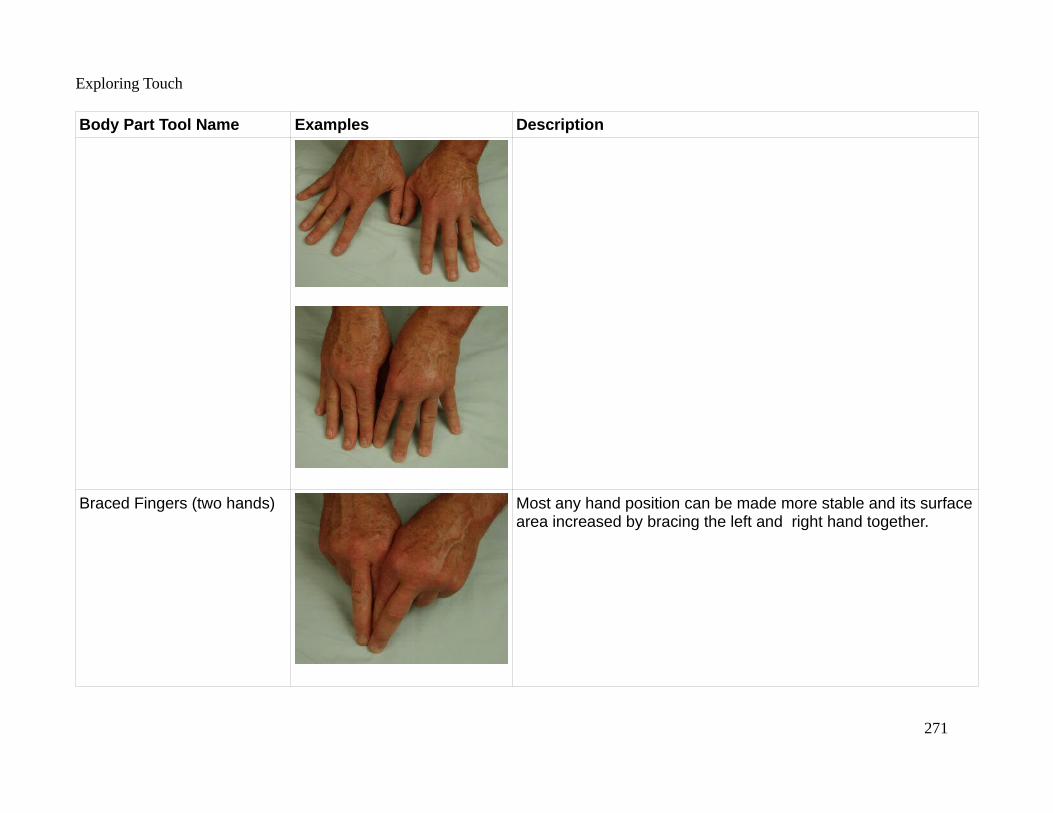
Exploring Touch
Body Part Tool Name Examples Description
Braced Fingers (two hands) Most any hand position can be made more stable and its surfacearea increased by bracing the left and right hand together.
271
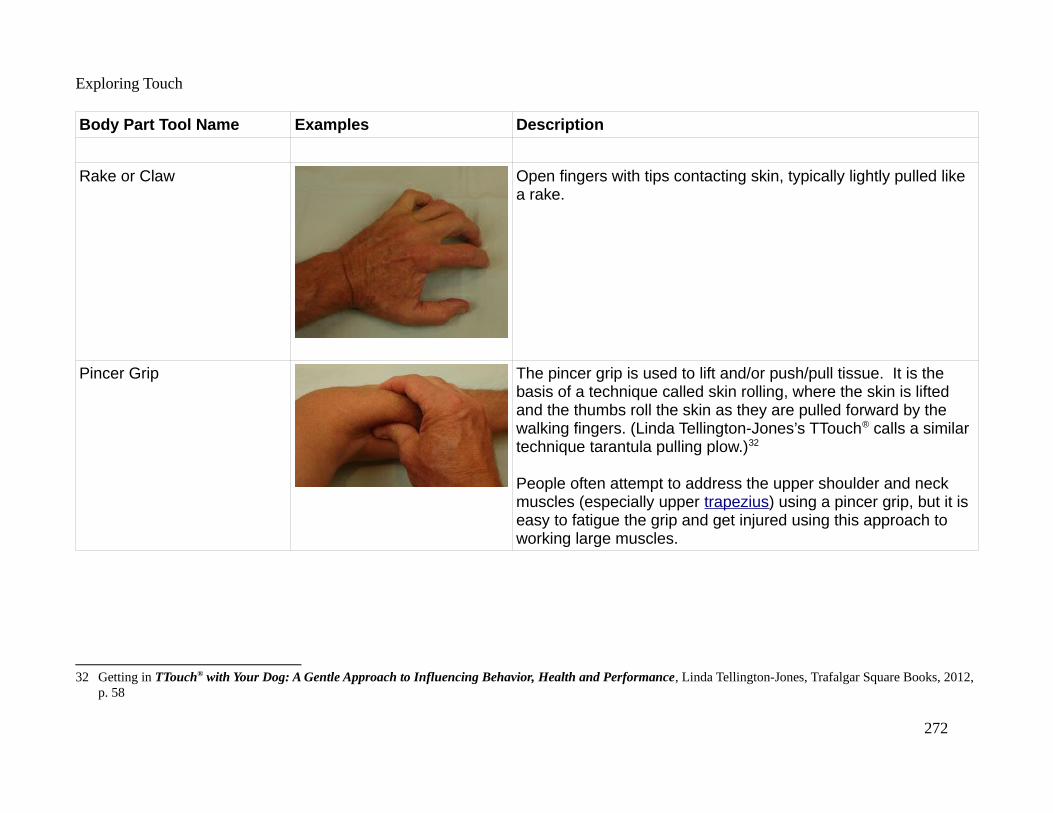
Exploring Touch
Body Part Tool Name Examples Description
Rake or Claw Open fingers with tips contacting skin, typically lightly pulled like a rake.
Pincer Grip The pincer grip is used to lift and/or push/pull tissue. It is the basis of a technique called skin rolling, where the skin is lifted and the thumbs roll the skin as they are pulled forward by the walking fingers. (Linda Tellington-Jones’s TTouch® calls a similar technique tarantula pulling plow.)32
People often attempt to address the upper shoulder and neck muscles (especially upper trapezius) using a pincer grip, but it is easy to fatigue the grip and get injured using this approach to working large muscles.
32 Getting in TTouch® with Your Dog: A Gentle Approach to Influencing Behavior, Health and Performance, Linda Tellington-Jones, Trafalgar Square Books, 2012, p. 58
272

Exploring Touch
Body Part Tool Name Examples Description
Balloon Gathering, lifting, shifting and possibly rotating skin above the underlying tissue, typically over a major bone landmark. On the scalp, this can be accomplished using the hair.
Forearms The forearms are another tool which can be used on tissue. Movement can be induced both by moving the static forearm across the surface and/or rolling the forearm in place (rolling thewrist, pronating/supinating of the forearm).
The amount of contact can generally be adjusted, until only the elbow contacts as shown in the next row.
Elbow The elbow can deliver very pointed pressure with adjustable surface area. The surface area is adjusted by opening (extension of the elbow, broader, more surface area) and closing(flexion of the elbow, pointed, less surface area) the elbow. This pressure can be static or changed by opening/closing the elbow and/or delivering changing pressure through movement.
273

Exploring Touch
Body Part Tool Name Examples Description
Foot (various) The foot can be used in most ways that the hands can be used, depending on the dexterity of the provider. Feet can be used with or without socks, but special attention should be paid to hygiene when using the feet as a contact tool.
274

Exploring Touch
Appendix 4: Mechanical Contact ToolsMechanical Tools & Aids Examples Description
Lubricants There are various commercial and home made oils, lotions, creams and specialty products that can support touch. While most are intended to improve glide across the skin, they can also be designed to exfoliate (remove dead skin), cool, warm, provide pain relief, stimulate the sense of smell and more.
Dycem Dycem is a sheet polymer which can be used to gainadditional traction or stick on skin. It is primarily used for techniques like dermoneuromodulating which rely on appropriate skin stretch.
275
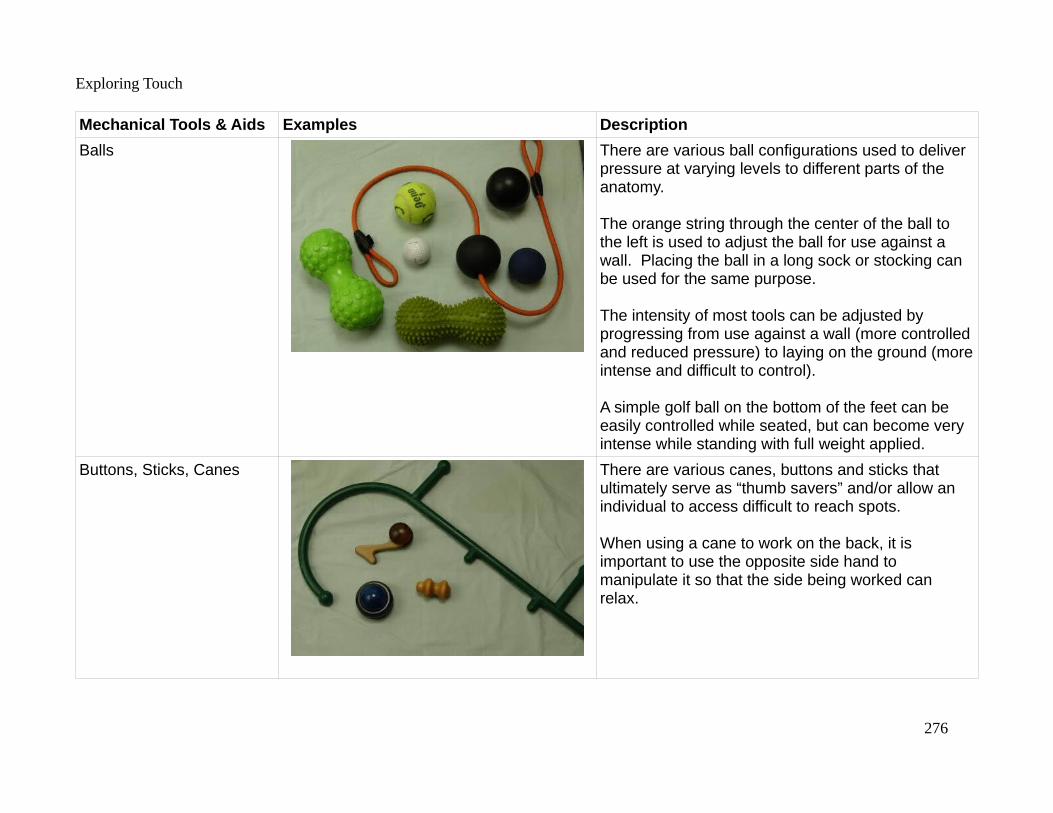
Exploring Touch
Mechanical Tools & Aids Examples Description
Balls There are various ball configurations used to deliver pressure at varying levels to different parts of the anatomy.
The orange string through the center of the ball to the left is used to adjust the ball for use against a wall. Placing the ball in a long sock or stocking can be used for the same purpose.
The intensity of most tools can be adjusted by progressing from use against a wall (more controlledand reduced pressure) to laying on the ground (moreintense and difficult to control).
A simple golf ball on the bottom of the feet can be easily controlled while seated, but can become very intense while standing with full weight applied.
Buttons, Sticks, Canes There are various canes, buttons and sticks that ultimately serve as “thumb savers” and/or allow an individual to access difficult to reach spots.
When using a cane to work on the back, it is important to use the opposite side hand to manipulate it so that the side being worked can relax.
276

Exploring Touch
Mechanical Tools & Aids Examples Description
Hand Rollers There are a variety of hand operated rollers to help with self work or working with a partner.
Tapes & Wraps Tapes and wraps can be used to both implement andextend touch. Voodoo floss bands work by wrappingtissue (black band) and then moving it provides broad friction to the moving tissues.33 While tape can be used to support tissues, it can also provide cues to the nervous system as to desired tissue positioning.
33 These specific bands are available from www.roguefitness.com, but the technique started using items such as bicycle inner tubes. There is much information on the web around using this useful technique.
277

Exploring Touch
Mechanical Tools & Aids Examples Description
Body Rollers There are a wide variety of different rollers to help work on yourself either against the wall or on the ground. These range from softer foam rolls in various diameters to rigid pipe or wood.
A key to successful use is to choose an appropriate diameter and material for your goals. None of these devices should cause pain (discomfort, possibly) andyou should always be able to easily control the pressure.
Typically, the smaller the diameter the lower the surface area (increased pressure), but also less possibility for movement around the roller.
Positioning Aids Besides bolsters, pillows and rolled towels, there arespecialized positioning aids such as those shown. The orange device is placed behind the head and neck while laying on the back to help relax the wholebody (via suboccipital muscles). The black wedge can be used to reposition body parts, such as a rotated pelvis, while relaxing.
278

Exploring Touch
Mechanical Tools & Aids Examples Description
Vibration Tools – Drums, Bowls, Tuning Forks &Speakers
Vibration, both through the air and direct contact withthe body, can provide interesting touch stimulus. Direct contact with the body can be used as a diagnostic for stress fractures to bone or testing for reduced sensation.
Note that this class of tool extends to virtually all musical instruments, especially drums, which can provide vibration stimuli both to the musician and to the listener.
The human voice can also be used to provide vibration through chanting, humming, singing, etc.
279