exploring horses - province of manitoba › agriculture › industry... · safety true or false...
TRANSCRIPT

4-H Equine Series
Exploring Horses Level 1
Introduction
Have you ever wanted to learn about horses and how to ride them? If so, this is the 4-H project for you!
There are seven parts called Skill Builders. Each Builder will focus on a specific topic. The Skill Builder has activities that will help you learn your mounted and dismounted skills. Once all the Skill Builders have been completed there is a Showcase Challenge that lets you share the skills you have gained.
There are three levels in Exploring Horses. A more experienced member may challenge the checklists to move through the levels more quickly. Meet with your leader to decide the correct speed for you.
No matter what age you are, or how much experience you have working with horses, you should work through all of the checklists in Exploring Horses so you are able to move on to the Discover level!
Do It
Dig It
Dream It
Learning is 3D!
To help you get the most out of your learning, each project
meeting has the following parts: Dream it! Plan for success Do it! Hands on learning
Dig it! What did you learn?
Meet Equus!
Equus is a smart, safe horse that will appear throughout your manual to give you useful facts and safety tips on working with your horse. Equus is the Latin word for horse. Equus is also the scientific name for the group of animals that includes horses, donkeys and zebras.
This symbol will appear throughout the manual. Check out the website ideas wherever you see it. These links will lead
you to online content to help with your 4-H horse project.
- Revised 2019 -
Table of Contents
Introduction 1
Skill Builder 1 Safety & Stable Management
3
Skill Builder 2 Groundwork
8
Skill Builder 3 Grooming
12
Skill Builder 4 Psychology
15
Skill Builder 5 Health
19
Skill Builder 6 Identification & Conformation
25
Skill Builder 7 Riding
28
Skills Checklists 32
Patterns 34
Showcase and Portfolio pages
36

What Skills Will You Learn?
Each section or Skill Builder (or Builder) in this project has activities that will help your project group learn to do by doing while learning new skills and having fun! To complete this project, you must: Complete the activities in each Builder OR a similar activity that focuses on the same skills, as you and your leader may plan other activities. Plan and complete the Showcase Challenge. Complete the Portfolio Page. Participate in your club’s Achievement (See the inside back cover for more in-
formation about 4-H Achievements).
How to use your Checklists
Keep your checklists up-to-date. Your leader will initial the grey area once you have completed a skill.
Review each level with your leader to determine which skills you have already mas-tered and highlight the ones you are working on.
Throughout the Skill Builders, you will see words in CAPITALS. These words are defined in the glossary section at the back of the resource book. 4-H Introduction
Take a look at the name of “4-H”. Have you ever thought about what 4-H stands for? Take a guess. _____________________________________________ _____________________________________________ _____________________________________________ _____________________________________________ 4-H members are 6 – 25 and must take some sort of project (beef, horse, rocketry, woodworking, cooking, etc). 4-H members learn how to have meetings and be leaders. 4-H exists around the world, in over 80 countries! 4-H has a pledge and motto which are said at the beginning of each meeting and other special events. 4-H PLEDGE “I pledge….. My HEAD to clearer thinking, My HEART to greater loyalty, My HANDS to larger service, My HEALTH to better living, For My Club, My Community, My Country, and my World.”
Equus says…
I’ll give you a hint: 4-H stands for four things that begin with the letter H.
The main focus of 4-H is for you to have hands on
experiences . The 4-H motto is
“Learn to do by Doing.”

3
Equus says…
Safety is everyone’s responsibility! Safety is the most important activity when handling horses. You must be careful around even the quietest horse. If you follow simple safety rules, you will have a much smaller chance of getting hurt.
Accidents are predictable and preventable!
Dream It!
Throughout this skill builder, you will learn a number of safety precautions and practices that every horseperson needs to know. Your leader will help you decide which activities, if any, you should do this year. Do you know of anyone who has been hurt while working with a horse? Do you think this could have been prevented? In this Skill Builder you will be taught some safety skills to help prevent future EQUINE accidents.
Do it!
Reference material for the following activities can be found in the Exploring Horse resource manual.
SKILLS CHECKLIST
Skill Builder 1: Safety & Stable Management
Level Members will be able to: Activities
L1 Give 3 safety rules to remember while riding your horse.
Safety True/False
Safe Rider Certificate
Brain Mold
Blind Spots
Hauling Your Horse
Tying Trap
General Safety
Sense and Safety
L1 Give 3 safety rules to remember when working with your horse on the ground.
All Describe 2 rules you should follow when dressing for riding.
L1 Explain where a horse’s blind spots are and why it is important to know this.
All Identify 3 loading/hauling safety rules

4
Safety True or False
Answer each question with a T or F for true of false. For any that are false, discuss why.
Safe Rider Certificate
Fill in three safe riding rules you have learned on this Safe Rider certificate.
__
1. When picking up your horse’s hind feet, it is safer to stand as far away as possible but still be able to clean the HOOF properly.
__ 2. Safety is everyone’s responsibility.
__ 3. It is a good idea to wrap the lead shank around your hand so that the horse can’t get away if it pulls.
__ 4. When leading a horse and you want to turn, pull it around you because it is easier than pushing it away from you.
__ 5. Do not mount your horse in a barn.
Safe Rider
This certificate is being awarded to _________________________________.
They have displayed safe horseback riding practices by
knowing the following three safety rules:
1. ____________________________________________________________
2. ____________________________________________________________
3. ____________________________________________________________

5
Brain Mold
Your leader will help you create two ‘brain molds’ from gelatin, to use in this experiment. When you are done, think about the results by answering these questions. 1. What happened when the ‘brain’ hit the ground in a
baseball cap? 2. What happened when the ‘brain’ hit the ground in the
helmet? 3. What does this show about helmet safety? 4. Would you be more likely to wear a helmet now? Note: Be very careful, on the step ladder and take turns.
Blind Spots
Using a soft medium sized ball play this game with a partner to learn more about blind spots. Start this activity by standing straight across from each other. And look straight forward. Toss the ball gently to your partner. After the first toss, one of you will move a few steps to the right or left, and continue looking straight forward. Toss the ball again. Repeat this several times.
Eventually after many tosses and moves to the side, you will no longer be able to catch the ball because you won’t be able to see it. This demonstrates the concept of a blind spot for your horse.
Hauling Your Horse Your leader will have you watch a demonstration or a video of loading a horse into a trailer. Watch for the following: How has the handler checked to see that the horse is safe?
Does the handler have an escape route?
What did the handler check on the trailer?
Has the handler loaded the horse so that the handler stays safe?
What things did the handler do properly once in the trailer?

6
Tying Trap
There are many things that are unsafe in this picture. Circle the things that are dangerous . With your project group, discuss why one of the items you circled is dangerous or doesn’t belong.

7
Sense and Safety
In this builder, you have learned a lot about how to be safe when working with horses. In your group talk about changes you have made to the way you handle your own horse.. Choose one of these skills and demonstrate it to your group. Demonstrate how to:
walk up to a horse position yourself when you lead a horse hold a lead shank or rope lead and turn a horse
After demonstrating it to your group, explain it to a family member or friend who does not own a horse so that they understand it.
What’s Next? In Skill Builder 2 you will learn about groundwork .
Dig it!
General Safety In your project group discuss:
A. What do you think is the safest way to walk behind a horse that may not know you are there?
B. How should you turn a horse loose in:
A box stall
A pasture
C. Is it safe to duck under the front of a tied horse to get to the other side? Why or why not?
D. Do you wear a helmet when you ride? q Never q Sometimes q Always Why or why not? Do you feel you are making the correct decision? Do you know anyone whose health has been affected by wearing or not wearing a helmet?

8
Skill Builder 2: Groundwork
SKILLS CHECKLIST
Dream it!
Much of what you do in this skill builder will take place outside, with your horse. The Do It! activities included here will help you remember what your instructor has taught you outside.
Do it!
Getting Started
Your leader will have your group watch a video or a live demonstration of how to catch and halter your horse. Now, using your own halter show your leader how to get it ready before you catch your horse. Catch your horse and halter it. Be sure to adjust the halter properly.
Knotty
Your leader will show you how to tie a quick release knot. Practice tying a quick release knot until you can do it correctly and quickly. What do you need to remember?
Describe a dangerous situation that you know of or imagine one in which it was a very good thing that a horse was tied with a quick-release knot. Describe what happened. What could have kept this from happening
Equus says...
Always approach a horse calmly, confidently, carefully and avoid sudden movements. Speak to them before approaching and never from behind as it may not see you and you may get kicked.
Level Required Skill Activities
L1 Catch and halter your horse safely. Getting Started
Knotty
Show Me
Practice Patterns
Animal Safety Tic Tac Toe
The Quarters
Safe Leading
L1 Explain how a halter should fit and why.
L1 Lead your horse safely at a WALK, turn right, stop and BACK up.
L1 Lead around in a large circle (20 m) using at least 4 markers.
L1 Lead your horse across 2 DIAGONAL lines of the riding area.
L1 Demonstrate and explain how and where to tie your horse using a quick release knot.
L1 Demonstrate how your horse moves sideways away from pressure by cueing with your hand while the horse is tied.

9
Show Me
Your leader will invite a senior member or experienced show person to demonstrate showmanship preparation and patterns. Be sure to watch how they move around the horse, how they set up the horse and where they stand. Now it’s your turn to work through a pattern. How did it go? What should you remember next time?
Practice Patterns
Ask your project leader or search on the Internet for practice showmanship patterns.
This website has many practice patterns for showmanship and riding events.
Try working through one of the patterns with your horse. Have someone watch you or video you to look for what you do well and what you need to work on.
Animal Safety Tic-Tac-Toe (Level 1)
At your project group meeting or club meeting, play a game of animal safety tic tac toe. Your leader has all the rules and the questions. How well did you do? Do you remember all of the animal safety rules?
When you set up in a group, it should look like this: You can also play this game with a partner using paper and pen on an x’s and o’s grid.
http://www.showhorsepromotions.com/

10
Dig it!
The Quarters
Discuss with your leader and your project group why knowing the quarter system is important even if you don’t show your horse.
Safe Leading
Your leader has an activity for your group to do that will let you discover whether or not you have soft hands and if you can communicate properly with your ‘horse’. When you are done the activity, answer the following questions.
What did you discover? Did your handler ask gently? Was your handler patient and give you time to respond before asking again? How did it feel to do this activity
What’s Next? In Skill Builder 3 you will learn about grooming and why it is important to keep your horse healthy..

11
Optional Craft:
Leather Decorated Halter
Here is a simple and fun project that you can do with a few tools. As you get more familiar with working with leather, you can become more creative. These also make excellent gifts for friends and family. You can get everything you need at a local or mail order leather store. Search the internet for contact information and an online catalog. Your leader can sign up as a 4-H club leader and you will receive the club discount and they will ship your order very quickly. Watch the sale flyers for project supplies. You can get very good deals in these flyers. Project Supplies 1 nylon halter Leather sewing awl remove store names Waxed leather thread Leather strip the same size as the noseband You can buy a large piece of 6-8 oz leather (6-8 sq feet) for under $25) Decorative leather rivets or conchos, if desired Leather stamps, if desired Leather protector
1. Cut the leather to match the noseband. You will hand sew this with the awl to the noseband AFTER decorating it.
2. If you are going to tool it with leather stamps or tools, you will need to ‘case’ the leather…get it wet enough to pound the tools into it. This means this project will take two evenings instead of one evening. You should search online or get some help from an experienced leather worker for this.
3. Decorate with tooling, rhinestone rivets and/or conchos. You may also use permanent markers to paint designs.
4. Once dry, you may stain the leather if desired. 5. Hand-sew the leather across the noseband with the awl. There should be directions with the
awl. The leather may need trimming if you had to case it since getting it wet often stretches the leather.
6. Coat the leather with a protector. 7. Enjoy!
Note: Once you are comfortable with this type of halter, perhaps you could try making a bronc halter noseband.

12
Skill Builder 3: Grooming
SKILLS CHECKLIST
Dream it!
Regular grooming helps to make sure your horse is healthy and comfortable. Horses are generally groomed before being worked, and are usually groomed and cleaned up after a workout as well. In this skill builder, you will learn the importance of grooming, grooming tools, and how to use them. In your project group talk about why you would groom your horse before you ride it .
Do it!
Grooming Kit (Level 1)
Your leader will bring a grooming kit to the meeting, containing many of the items used to GROOM a horse. Take turns with the other members in your project to pick a tool and tell what it is. Your leader will help you with the ones that are new to you or you can check the reference section about grooming in your resource book.
Equus says…
Remember to always GROOM your horse before you ride, and pay special attention to areas that will be covered by either sad-dle or GIRTH. Something could get stuck there and rub them the wrong way. That could result in your horse misbehaving from the discomfort.
Level Required Skill Activities
L1 Name 5 grooming tools and explain their use. Grooming Kit
TACK Store
No Foot? No Horse
How Well do You know Your Horse’s Foot?
How Pretty are You
L1 Show how to use a HOOF pick correctly by cleaning one of your horse’s feet (someone else may hold the foot).
L1 Name and label 6 parts of the HOOF

13
Tack Store
Cut pictures out of a TACK catalog to create your ideal grooming kit. Glue them on a sheet of paper and include it in your book.. Label the pictures with the name of the tool and its price. What kind of container would you use to store them? You can also make a poster to use in the showcase challenge at the end of your manual.
If you like, you could create this poster on the computer and copy and paste images from TACK store web sites.
When you have finished your poster, take turns with the other members in your group to identify how each item is used, what order it is used in, and why you would use it in that order.
Your leader will arrange for you to watch the 4-H HORSEMANSHIP DVD on cleaning a HOOF or for you to watch someone lift and clean their horse’s hooves. Be sure to pay close attention to how they handle the HOOF pick, the safety rules they follow and what to look for when cleaning the HOOF.
Now it’s your turn:
Level 1 – Demonstrate how to use a HOOF pick correctly while cleaning one of your horse’s feet.
No Foot? No Horse!

14
How Well do You know Your Horse’s Foot?
Label the parts of the hoof on the lines above. Using a green marker, color in the areas of the foot you would clean with a HOOF pick. With a Red marker, color the areas you would not use a HOOF pick on. Why would you not want to use the HOOF pick on the areas you colored red?
Dig it!
How Pretty You Are!
Think about all the reasons it is important to GROOM your horse regularly. Your leader will give you sticky notes—on each note write one reason for grooming. When everyone in your group has written as many reasons as they can remember — group the sticky notes on a wall or other flat surface. Take turns explaining why these are important reasons. Be sure to Include health concerns.
What’s Next? In Skill Builder 4 you will learn about horse psychology and how horses express their feelings.

15
Skill Builder 4: Psychology
SKILLS CHECKLIST
Dream it!
If you couldn’t speak, how would you communicate with a friend? When you understand horse language, it’s like breaking a secret code. Horses communicate with each other and with humans through sounds and body language. The flick of the ear, a snort or whinny, or a movement of the mouth can mean something. You have to watch horses very carefully to “read” them and the following activities will help you get started.
Get into groups of 2 and without speaking, try to get your partner to perform a task such as to get a glass of milk from the fridge or to get an apple from the cupboard. Now switch places with your partner and have them do the same to you. How hard was it to follow the directions?
Equus says…
Just as humans can understand how someone is feeling by their facial expressions, and body language, we can understand horses the same way. This Skill Builder will go over the different ways horses express their feelings.
Level Required Skill Activities
L1 Describe your horse’s first reaction when he is frightened. Describe what might happen if it is tied and what should you do.
Mood Match Picture Book The Mane Event What's Wrong?
L1 Describe 4 signs that a horse may be about to misbehave.
L1 Explain what you would do if someone else’s horse ran away while you were riding.

16
Do it!
Mood Match
Write the letter of the picture that matches each mood in the chart below.
A B
C
D
E
F
____ Uncomfortable ____ Bored
____ Alert
____ Angry ____ Concerned
____ Attentive

17
Picture Book
Collect pictures of at least 10 horses. Label what you believe each horse is communicating. Bring your labeled pictures to your next meeting and share them with the other members.
The Mane Event
Observe one horse for at least 10 minutes in its stall or tied up, and then let it out with other horses in a pasture.
Carefully observe these behaviors of the horse and record them below or on a separate piece of paper:
Body movements: How it eats: Sounds it makes: Mood: Response to insects: How it grooms itself: Anything else that you observe:

18
Now observe and record the behaviors you observe in a group of horses.
Who was the boss horse and what did it do? How was the horse was greeted by the other horses? Behavior in the group How they eat Which horse is at the bottom of the group? Other:
Dig it!
After observing a horse in two locations, think about the following questions and then discuss them with your leader and project group.
1. What did the horses say to each other through their body language? 2. What was most interesting? 3. How does a person who cannot speak communicate with a horse? 4. How can you use what you have learned about body language to better understand your horse?
What’s Wrong?
What do you think Horace is feeling? Would you approach this horse by yourself? Discuss with a partner or in a group, why you would or wouldn't approach Horace, and the different things me may do if you did approach him.
What’s Next? In Skill Builder 5 you will learn about horse health including where your horse lives and what it eats.

19
Skill Builder 5: Health
SKILLS CHECKLIST
Dream it!
The horse has evolved to be a grazing animal. Left alone, a horse will graze for about 16 hours a day. If a horse lives where it can’t graze all day, we need to provide the proper NUTRITION and other care for it. List a few things that your horse needs in order to be healthy. What would make you think a horse might not be healthy? The activities and information in this unit will help you provide basic health care for your horse. The next time you visit your EQUINE veterinarian or when your FAR-RIER comes out, ask for a magnet or a card with his/her name and phone number on it. Make sure you put it in a place where you can quickly find it or ask someone else to find it in order to make an emergency call. Remem-ber: emergencies happen when you least expect. Think of reasons why it important to have the phone number where you can easily find it.
Equus says…
In this skill builder, you will be learning proper NUTRITION, amounts to feed, what a horse’s body requires, and the different types of treatments for your horse’s health needs. Pay close atten-tion to the italicized words
Be sure that you check your horse regularly.
Level Required Skill Activities
L1 Describe where you keep your horse. What Does Your Horse Eat?
How Do I Look Today?
Health Trivia Game
My Horse’s Home
Health Record
3 Month Feed Records
L1 Describe what your horse regularly eats.
L1 Describe 3 signs that show a horse is healthy.

20
Do it!
How Do I Look Today?
If you need help, you will find the answers to this word search in the information in the Physical Appearance section of the reference manual. Across
1. A horse with these may have a dull, rough coat. 3. Ears should be ___ when your horse is healthy. 7. You must learn what this is for your horse so you can more easily tell when it is sick. 8. This condition will make your horse's hair stand up. 9. Eyes should be ___ when your horse is healthy.
11. This may change in your horse before you see signs of illness. Down
2. Skin should have this quality. 4. This makes the hair shiny 5. Eye membranes may become bright pink and inflamed if there is a lack of this. 6. This can leave a wrinkle that is slow to disappear. 10. Bright eyed and ___ tailed.

21
What Does Your Horse Eat?
Collect samples of the hay you usually feed your horse.. Then collect samples of the grains and supplements fed to your horse.
Bring the samples to your project meeting. Discuss with your group and leader what kinds of things your horses are fed. Does everyone feed the same things? What is different?
Health Trivia Game (All Levels)
Your leader has a health trivia game for you to play.
What new thing did you learn today about your horse’s health.?
Equus says… Remember, you should wash out your horse’s water trough at least once a week. Algae and other unwanted substances can build up around the inside of the trough, and if swallowed, your horse could become sick. Your horse always needs fresh water.

22
Dig it!
Keeping Records
Keeping records is an important part of a 4-H project. Good records will tell you and others about your 4-H project. Good records will tell you about your horse’s health and the costs involved in keeping your horse. Record keeping is a part of “learning to do by doing”.
Hints For Good Record Keeping 1. Make it a habit to fill out each section as soon as possible. 2. Do all calculations on scratch paper. When you are sure they are right, transfer them neatly to
your record page. 3. Be as neat as possible. Records are important so they must be easily read. 4. Pasture costs may be calculated using the current rate applied at PFRA pastures. Check with
your local ag. office. 5. If you need more space add extra pages.
My Horse’s Home
Describe to your group where you keep your horse.
Home
Sweet
Home
HEALTH RECORDS (all levels) List any routine practices for prevention of sickness and injury such as de-worming and vaccina-tions. Also include treatments for sickness or injury.
Year 1
DATE PROBLEM TREATMENT COST
23
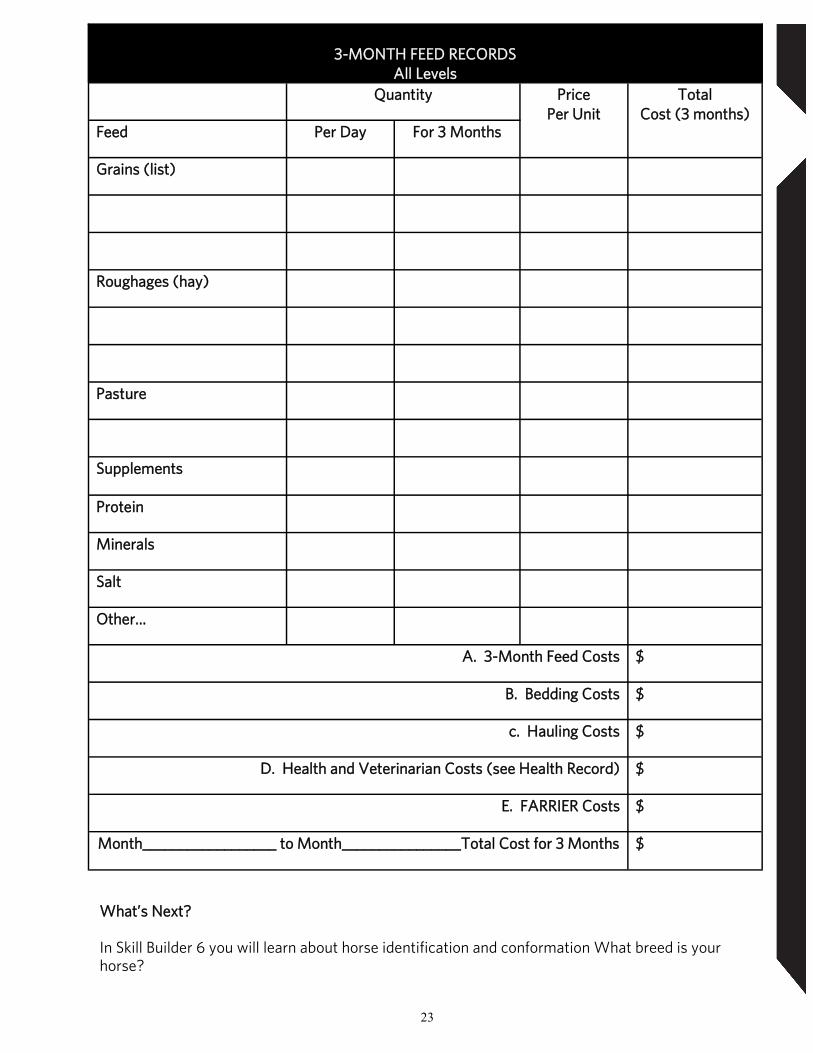
3-MONTH FEED RECORDS
All Levels
Quantity Price Per Unit
Total Cost (3 months)
Feed Per Day For 3 Months
Grains (list)
Roughages (hay)
Pasture
Supplements
Protein
Minerals
Salt
Other…
A. 3-Month Feed Costs $
B. Bedding Costs $
c. Hauling Costs $
D. Health and Veterinarian Costs (see Health Record) $
E. FARRIER Costs $
Month__________________ to Month________________Total Cost for 3 Months $
What’s Next? In Skill Builder 6 you will learn about horse identification and conformation What breed is your horse?
24
Skill Builder 6: Identification & Conformation
SKILLS CHECKLIST
Dream it!
Have you ever gotten two horses mixed up? If you wanted to buy a new horse, would you know which breed to look at? Identification uses a lot of new terms but you should be able to describe common horse markings, colors and breed characteristics.
Do it!
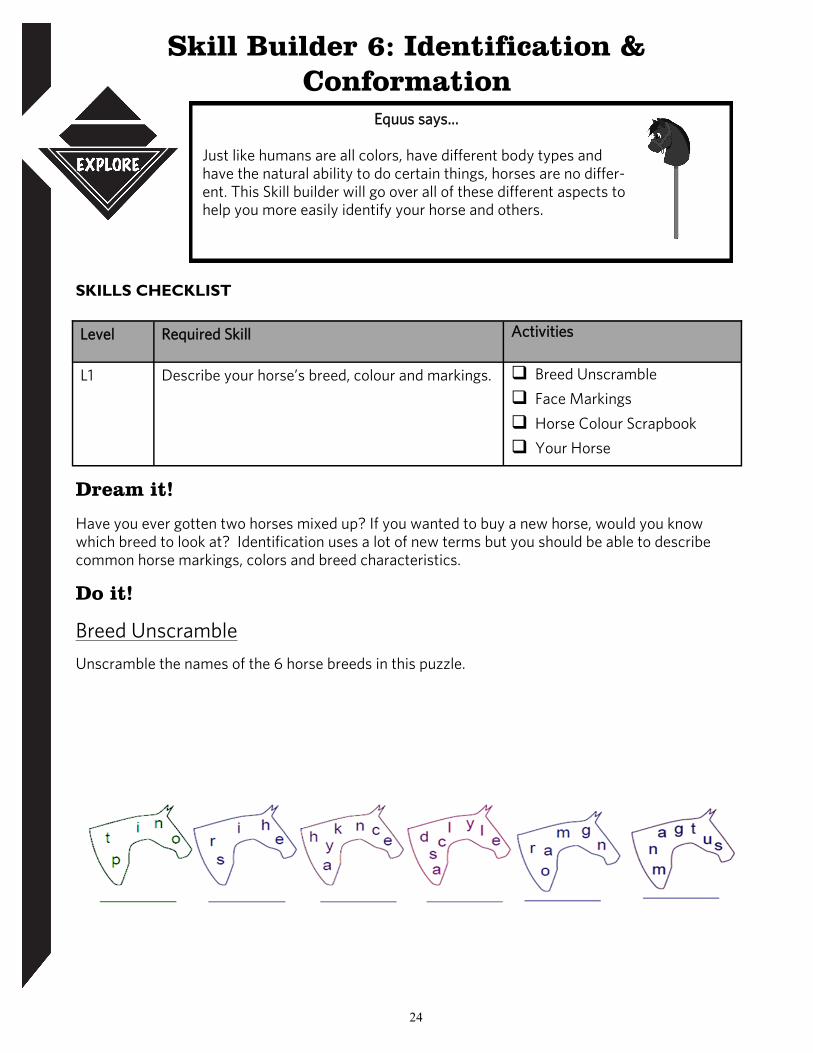
Breed Unscramble
Unscramble the names of the 6 horse breeds in this puzzle.
Equus says…
Just like humans are all colors, have different body types and have the natural ability to do certain things, horses are no differ-ent. This Skill builder will go over all of these different aspects to help you more easily identify your horse and others.
Level Required Skill Activities
L1 Describe your horse’s breed, colour and markings. Breed Unscramble
Face Markings
Horse Colour Scrapbook
Your Horse

25
Face Markings (Level 1)
Think about your horse’s face. Draw it’s markings onto this picture. Color it in the correct colors for your horse. When you fill out an ID form for your horse, you must be careful to get the markings very accurate (close to real)! Describe in words the breed, colour and markings of your horse.
_____________________________________________________
_____________________________________________________
A
B
C
D
E
_______ Blaze
_______ Star
_______ Bald
_______ Stripe
_______ SNIP
Match the face marking pictures to the correct description.

26
Horse Color Scrapbook (Level1)
Collect pictures from magazines or the internet of at least six of the colours of horses listed in the reference manual . Glue the pictures in a note book, scrapbook or on pages you can put in your manual. Label each of the pictures with the correct horse colour. You can make the scrapbook as colorful and fun as you wish,
Dig it!
Your Horse What BREED is your horse_____________________________________
What body TYPE does your horse have?____________________________
What riding events do you LIKE to do with your horse?
__________________________________________________________
When you think of these things, think about what your horse could be good at. Some are bred to run fast, some are bred to be quick and agile, some to jump, etc. What is your horse bred to be good at? (Hint: find your breed and type in the manual, and combine the two.) Do you let it try these things? Why or why not ?
___________________________________________________________________________
___________________________________________________________________________
___________________________________________________________________________
What’s Next? Skill Builder 7 will teach you about riding your horse including how to saddle up.

27
Skill Builder 7: Riding
SKILLS CHECKLIST
Dream it!
You have been wanting to ride a horse for as long as you can remember. Finally, someone tacks up a horse for you, you put on your helmet and boots and you are ready to ride. Now what? How do you get on? How do you make it go forward? Backward? Turn? Suddenly it is confusing and you realize that it is time to learn how to ride. Does this sound like you or someone you know? Have you had trouble getting your horse to understand what you want? What type of bit are you using and why? Explain the difference between a trot and a LOPE.
Equus says… One thing to remember before you start riding your horse, is to never kick and pull at the same time. This is a common mistake. Make sure your reins are short enough that you have good con-trol, but that you are not pulling at it’s mouth and hurting it.
Level Required Skill Activities
L1 Demonstrate with your own hands and feet the footfall sequence of a horse at the WALK and JOG/TROT.
Riding Class
Riding Wonders
TACK Relay Race
Patterns L1 Unsaddle and unbridle your horse. (Smaller members
should be able to explain correct methods even if they are not able to do it entirely.)
L1 Demonstrate how to correctly put your TACK away after riding.

28
Do it!
Riding Class (All Levels)
As a group, go outside onto the lawn, or use a large room and space yourselves out in a large circle. Your leader will stand in the middle of your circle, and act as the judge. As they call out GAITS, you will demonstrate the correct footfall beats for the gait your leader is calling out.
If you have never seen a riding class, then watch the link below! It demon-strates an English Pleasure class were you can see that the judge stands in the middle, and the riders ride around in a circle at the different GAITS being called out.
Tack Relay Race (All Levels)
Review the parts of the western and English saddles and bridles. Divide into two teams, an English team and a Western team. Post sticky notes labeled with English saddle and bridle parts in a
group on a wall, and do the same for Western saddle and bridle parts.
Place a Western saddle and bridle under the Western sticky notes, and an English saddle and bridle under the English sticky notes.
This is a relay race so get into two lines a fair distance away from the wall. The first member in each line will run to the wall, grab a random sticky note, and place it on the correct part. They then run back and tag the next person who does the same until all of the sticky notes are placed correctly on the saddles and bridles.
After you're finished, switch teams so that each gets a chance to label both sets of equipment.
Rhythm Beads Craft (optional)
Rhythm beads are a fun, easy project to make! Some trainers claim that they are more than just pretty! They help your horse improve it’s cadence (steady rhythm) and keep it calm. You can make them short, to hang in the mane, or longer, to hang around the neck, or both. All the supplies can be found at your local dollar store. Old beads may be used. Supplies:
Alligator clips or some way to attach to the mane Thin wire or heavy cording Beads, bells, etc for decorating
It might be easier to attach the clips to an elastic band in the mane. Search the Internet for ‘rhythm beads’ for more descriptions. Click on ‘images’ in the search results to get more images.
http://www.youtube.com/watch?v=4QMbKmAFjSw

29
Dig it!
Riding Wonders
After completing this section of your manual, begin a riding journal in a notebook, on looseleaf that you add to this manual or on the computer.
Write in your journal every time you have a riding lesson to keep track of your riding times and what has gotten better and what still needs work.
Answer questions such as “What went well today?” and “What do I need to work on next time I ride?”.
Patterns
Set up a simple riding pattern using cones or empty milk cartons as markers. You can get ideas from www.showhorsepromotions.com or make up your own.
Below is a sample that you could start with. When reading a pattern, always follow the WRITTEN directions. In this pattern, try jogging for Step 2 instead of loping until your horse is good at it and willing to stop at each marker.
Before you begin, think about what you think your horse may have trouble with. Plan ahead and decide what you can do to try to help out. It might be to move the cones further apart or to take your time and just try part of the pattern at first before riding the whole pattern.
Once you have a plan, ride your pattern. Think about what happened. Did your horse have difficulty? Ride the same pattern several times. If it is getting easier for you and your horse, your plan must be working. If it is not, you need to change your plan and try a different approach.
What did you learn from this activity? Did you enjoy helping your horse through a pattern? Did you remain patient and help your horse when it was confused? 1. Begin at A. (Marker will be on your right). 2. LOPE on the left lead to B. Stop. 3. Turn on the haunches to the right until you are facing marker C. 4. JOG to C. Stop. 5. Back up 4 steps. What’s Next? Have you completed all the skills in Exploring Horses 1? Are you ready to move on to Exploring Horses 2?

30
MANITOBA 4-H DISMOUNTED SKILLS LEVELS 1 Skill Required Skill Description ü Initial
Safety & Stable Management
L1 Give 3 safety rules to remember while riding your horse. L1 Give 3 safety rules to remember when working with your horse on the ground. All Describe 2 rules you should follow when dressing for riding. L1 Explain where a horse’s blind spots are and why it is important to know this. All Identify 3 loading/hauling safety rules
Groundwork L1 Catch and halter your horse safely. L1 Explain how a halter should fit and why. L1 Lead your horse safely at a walk, turn right, stop and back up. L1 Lead around in a large circle (20 m) using at least 4 markers. L1 Lead your horse across 2 diagonal lines of the riding area. L1 Demonstrate and explain how and where to tie your horse using a quick release
knot.
L1 Demonstrate how your horse moves sideways away from pressure by cueing with your hand while the horse is tied.
Grooming L1 Identify 5 grooming tools and explain their use. L1 Demonstrate how to use a hoof pick correctly by cleaning one of your horse’s feet
(someone else may hold the foot).
L1 Name and label 6 parts of the HOOF Psychology
L1 Describe your horse’s first reaction when he is frightened. Describe what might happen if it is tied and what should you do.
L1 Describe 4 signs that your horse might misbehave.
L1 Explain what you would do if your horse ran away while you were riding.
L1 Explain what you would do if someone else’s horse ran away while you were riding.
Health
L1 Describe where you keep your horse.
L1 Describe what your horse regularly eats.
L1 Describe 3 signs that show a horse is healthy.
Identification
L1 Describe your horse’s breed, colour and markings.
Riding
L1 Demonstrate with your own hands and feet the footfall sequence of a horse at the walk and jog/trot.
L1 Unsaddle and unbridle your horse. (Smaller members should be able to explain correct methods even if they are not able to do it entirely.)
L1 Demonstrate how to correctly put your tack away after riding.

31
LEVEL 1 MANITOBA 4-H MOUNTED SKILLS Skill Required Skill Description ü Initial 1 Warm-up:
-Before mounting, with your hand either on the cheek piece of the bridle, or using the rein, quietly flex your horse’s neck by bringing his nose to 3 o’clock and then 9 o’clock. -Demonstrate a tack check. -Mount correctly while explaining what each hand must do (the horse may be held and a mounting block may be used).
2 While sitting in the saddle, demonstrate how and where to hold the reins with 2 hands.
3 Explain and demonstrate correct basic position, correct balance and focus.
4 Do 3 arm and 3 leg exercises while your horse is standing still and then while moving.
5 At a halt, demonstrate: -How to establish correct contact on horse’s mouth. -Hand and leg AIDS used to turn your horse with an open rein. -Use that open rein to flex his neck and turn his head to 3 and 9 o’clock.
6 At a walk, ride to at least 4 markers zig-zagging back and forth across the arena turning first one way and then the other. An open rein must be used at each turn and both of the rider’s legs will be doing their job.
7 Demonstrate how to do an emergency stop using an open rein to pull the horse’s nose towards his ribs and circling until the horse stops.
8 Ride a circle around at least 4 markers, demonstrating basic position, balance, correct focus and that you are not over-gripping with your hands or legs.
9 Demonstrate at least 10 steps of jog/trot without breaking stride, bolting or over-gripping with your hands and legs. Western riders may jog sitting or do a rising trot - English riders should post trot. Explain how many beats there are in this gait and what you can do to keep from bouncing.
10 Ride all the way around the arena at a walk in both directions.
11 Explain the 3 AIDS (weight, voice and hands – 2 direct reins) that are used to stop your horse. Demonstrate a stop using all 3 AIDS. Explain and demonstrate what you would do if your horse did not stop.
12 Explain and demonstrate how to use the correct AIDS (position, hands and legs) to back your horse 2 steps.
13 While riding in a small group (4 or less) demonstrate and explain how to keep a safe distance from other horses and how to pass safely.
14 Ride the pattern. Start the pattern with a tack check and correct mount. You may use a mounting block and a helper to hold your horse.
15 Safely DISMOUNT your horse. You must not use a mounting block but a helper may hold your horse. Explain what your hands and feet are doing, and where the horse’s head should be.
16 Demonstrate the attached riding patterns

32

33

34
Now that you have finished this project, it is time to think about how you will share your experiences and knowledge with others. You may put your new skills to work by helping at a community event or at your club Achievement or teach-ing others about your topic. The goal of the Showcase Challenge is to help high-light your new skills and help you understand how you can use them. It can be an opportunity to receive feedback from others on your project. So go back through your manual and find some highlights of your learning (what you are proud of) and think about how you will “showcase” it.
Showcase Challenge Bringing it all together!
Demonstrate something you may have or learned about
Make a poster or display
Make a pattern of your own Make a computer presentation (e.g. PowerPoint)
Give a speech Create a picture book
Use your new skills to help with the Club Achievement plans
Or come up with your own idea. It is up to you and your leader!
Dream it! Here are some Showcase Challenge Suggestions:
My Showcase Challenge Plan
My showcase idea: __________________________________________________________
________________________________________________________________________
What materials and resources do I need? _________________________________________
________________________________________________________________________
Who do I need to help me? ___________________________________________________
________________________________________________________________________
When do I need to have things done by? _________________________________________
________________________________________________________________________

35
Do it! Insert or attach your finished product or a photo of you sharing your skills in your Showcase Challenge.
Dig it!
Now that you have showcased your project skills; How did your Showcase Challenge go?
What would you do differently next time?
How will you use your new skills in the future? (in different situations?)

36
Name: __________________ Date: _____________ Year in 4-H: ____ Club: ______________ Hours Spent on 4-H: ____ (Project and Other 4-H Activities)
My 4-H Portfolio
Exploring Horses Level 1 Project Overview Chart - Dismounted Skills
Skill
Builder
Observations (Record observations, thoughts and information learned while completing your
activities. What did you like? What would you do different?)
Safety
Groundwork
Grooming
Psychology
Health
Identification
Riding

37
Member Level
Skill Observations (Record observations, thoughts and information obtained while completing your activities. What did you like? What would you
do different?)
Example: 2
3) Do 3 arm and 3 leg exercises while your horse is standing still and then while moving.
This skill helps me to warm up before riding, as well as helps me to gain balance.
Exploring Horses Level 1 Project Overview Chart - Mounted Skills
Leader Point of Praise! I am most impressed by…
I acknowledge that the member has completed the 4-H project requirements. Leader’s Signature: _______________________________

38
Member Point of Pride!
What I learned… What I need to improve on… What I want others to notice… Member’s Signature: _______________________________
Above and Beyond! In addition to project skills, 4-H also increases skills in meeting management, communications,
leadership, community involvement through participation in club, area, or provincial 4-H events or activities. List below any activities you participated in this year in 4-H.
(Some examples include Executive Positions Held, Workshops, Communication, Community Service, Rally, Bonspiels, Conferences, Judging, Camps, Trips, Awards, Representation to Area or Provincial Councils, etc)
_________________________________ __________________________________
_________________________________ ___________________________________
________________________________ __________________________________
________________________________ __________________________________
_________________________________ __________________________________
_________________________________ __________________________________
**Feel Free to add additional pages that include awards, certificates, new clippings, photos or other items that describe your 4-H involvement.
Point of Praise! Another’s perspective on your achievements in 4-H. (community professionals, 4-H club leaders, friends of 4-H)
I am most impressed by… I believe that you have learned… In the future I encourage you to… Signature: _______________________________

39
4-H Achievement
4-H Achievement is… a 4-H club celebration when members have completed their projects. Achievements are planned by the club to give recognition to members and leaders for their accomplishments in their 4-H projects and club activities.
A 4-H Achievement can take many different formats: from choosing a theme, to member project displays, to members using their new skills for the event (entertainment, food, decorating, photographer, etc.), to members presenting their project to the whole group, the options are endless and open to the creativity of the members and leaders in each club! Clubs may also plan their Achievement to promote 4-H to the community or to recognize sponsors and others who have helped the club. Members and leaders - be sure to check your project books for the project completion requirements, so you will be ready for your club’s Achievement celebration!
For more information about 4-H and the many 4-H opportunities available please visit
www.4h.mb.ca
If you have any questions, comments or suggestions for this or other 4-H projects contact:
Manitoba 4-H Council Phone: 204-726-6136
Fax: 204-728-9040 Email: [email protected]
www.4h.mb.ca
This manual is for educational use only and is not intended as professional advice.

40
4-H Motto
“Learn To Do by Doing”
4-H Pledge
I pledge, My HEAD to clearer thinking, My HEART to greater loyalty, My HANDS to larger service, My HEALTH to better living, For my club, my community, my country, and my world.
What is 4-H?
4-H is an international youth organization involving more than 7 million members in 80 countries around the world. In Canada, 4-H began in 1913 in Roland, Manitoba as a community-based organization dedicated to growth and development of rural youth. Today’s 4-H program reaches both farm and non-farm youth across Canada. The motto of “Learn to Do by Doing” is embodied in the program, as 4-H focuses on skill development as well as personal development of life skills such as communications, leadership and citizenship.
4-H Manitoba project material is developed by
Manitoba Agriculture
This manual is available in alternate format by request.