exploring engineering - tufts...
TRANSCRIPT

Types of Engineering
EEExxxppplllooorrriiinnnggg EEEnnngggiiinnneeeeeerrriiinnnggg
Design-Based Activities
Across All Fields
Created by:
5th Grade Curriculum
August 2009

Types of Engineering
Unit 1 Types of Engineering

Types of Engineering
Copyright 2009 Tufts University Center for Engineering Education and Outreach
1 - i
Unit 1
!
!
"#$%&!'(!)'*+&*+,!!
Curriculum Outline--------------------------------------------.//!
!
Civil Engineering!
! Bridges-------------------------------------------------..010!
!
Environmental Engineering!
! Water Filtration--------------------------------------------.210!
!
Aeronautical Engineering!
! Parachutes-----------------------------------------------310!
!
Mechanical Engineering!
! Ramp Roller----------------------------------------------.410!
!
Electrical Engineering!
! Insulators and Conductors------------------------------------..510!
!
Chemical Engineering!
! M&M Chromatography---------------------------------------610!
!
Glossary------------------------------------------------!---.710!
!
Worksheets-----------------------------------------------..-.713!
Types of Engineering
Copyright 2009 Tufts University Center for Engineering Education and Outreach
1 - ii
STOMP Curriculum Outline Unit 1: Types of Engineering These activities are intended for use in a STOMP 5th grade classroom, but can be modified at the instructor’s discretion for grades 3-7. This lesson focuses on exposing students to real-world examples of engineering in action, as many K-12 students are not familiar with the field of engineering. The first four activities in this unit focus on student-lead design, as this is the basis of most engineering. These activities incorporate creativity as they teach scientific concepts. The last two activities are more technical than the first four and must be more instruction-based for this age group of students. These activities can be treated more as a scientific experiment, focusing on hypotheses, following a procedure, and analyzing the results.
Activity 1:
Intro to Civil Engineering: Bridges Students will construct a bridge that spans the distance between two desks. They will then test its strength by hanging loads in the form of water bottles from the bridge.
Emphasized Engineering Skill(s): Building a Sturdy Structure that Supports a Load
Real World Importance: Before real-life bridges are built, performing tests on a model, or prototype to ensure that a design is safe. The 1940 Tacoma Narrows Bridge collapse is one of the most notable civil engineering failures in history. Because the engineers did not account for some of the effects of the wind, 40 mph winds caused the bridge to undulate violently and collapse only four months after its construction. Extension(s): Redesign the bridge and test it. Test the bridge with different kinds of loads.
Activity 2: Intro to Environmental Engineering: Water Filtration Students will be given the materials to create a slow sand filter and a structure to hold it. They will then use a turbidity test using an RCX or NXT light sensor to analyze the effectiveness of their filter.
Emphasized Engineering Skill(s): Building a Water Filter, Performing a Turbidity Test Real World Importance: Water filters exist in all shapes and sizes. Large water treatment plants remove all toxins and visible particles from dirty water so that when it reaches the tap, it is clean enough to drink. This water is regulated by the government and must pass a series of tests to make sure that it won’t be harmful. Additional filtering can be performed using small in-home filters that exist in the form of activated carbon filters on sinks or in pitchers. Extension(s): Collect the class’ turbidity test data and create a graph.

Types of Engineering
Copyright 2009 Tufts University Center for Engineering Education and Outreach
1 - iii
Activity 3
Introduction to Aeronautical Engineering: Parachutes Students will construct parachutes from various materials in an attempt to create the most effective (the slowest) parachute. They will also measure the time during which it falls a set distance and use these values to calculate velocity.
Emphasized Engineering Skill(s): Slowing a falling object, Calculating velocity Real World Importance: Today parachutes have many uses, such as deploying soldiers from airplanes and helping space capsules to land safely in the ocean. They are also used for recreation in the extreme sport of skydiving. The record for the longest parachute jump is held by Eugene Andreev who, in 1962, performed a freefall jump of 80,380 ft before deploying his parachute for the final 3000 ft of descent. Extension(s): Build and test a parachute using a new material. Redesign one of the parachutes with an already tested material to see how construction affects velocity.
Activity 4 Introduction to Mechanical Engineering: Ramp Roller Students will construct a device to roll as far as possible down a ramp.
Emphasized Engineering Skill(s): Using a Wheel and Axle, Minimizing Friction
Real World Importance: Mechanical engineers work in teams to design fast cars. As of 2007, the fastest car in the world is the SSC Ultimate Aero, which reaches a top speed of 237 mph and goes from 0-60 mph in just 2.7 seconds. Imagine what that kind of acceleration must feel like for the driver! The engineers that work on cars like this are very specialized because every detail needs to be carefully designed to contribute to the car’s maximum potential speed. For example, race car tires don’t have treads in order to reduce friction. Extension(s): Weigh the ramp roller and calculate its potential energy at the top of the ramp. Redesign the ramp rollers to see whose can travel the shortest distance.
Activity 5
Introduction to Electrical Engineering: Insulators and Conductors
Students will explore the qualities of insulators and conductors by constructing a simple circuit and testing various objects in it.
Emphasized Engineering Skill(s): Constructing a simple circuit, Identifying insulators and conductors
Real World Importance: As hybrid electric cars become more popular, electrical engineers are playing a more prominent role in the automobile industry. Combining electric circuits with traditional fuel engines allows hybrid cars to reach fuel efficiencies of up to 50 miles per gallon. Extension(s): Find more objects to test in the circuit. Discuss current and voltage in both a series and a parallel circuit. Discuss what is happening at an atomic level that differentiates insulators from conductors.

Types of Engineering
Copyright 2009 Tufts University Center for Engineering Education and Outreach
1 - iv
Activity 6
Introduction to Chemical Engineering: M&M Chromatography
Students will explore the makeup of food dyes by performing chromatography on M&Ms.
Emphasized Engineering Skill(s): Performing chromatography
Real World Connection: There are types of chromatography other than the liquid chromatography performed in this activity. Gas chromatography moves helium through a column of adsorbent material in order to analyze chemical samples. It is commonly used in airports to detect illegal substances, and in forensics to compare hair or skin cell samples found on victims. Chromatography is also used by chemists and chemical engineers to separate a substance in order to analyze its components or to purify one for further use. Extension(s): Use a different source of dye (e.g. markers, other candies); Discuss salt water as a solvent and how polarity comes into play in chromatography.
Types of Engineering
Copyright 2009 Tufts University Center for Engineering Education and Outreach
1 - 1
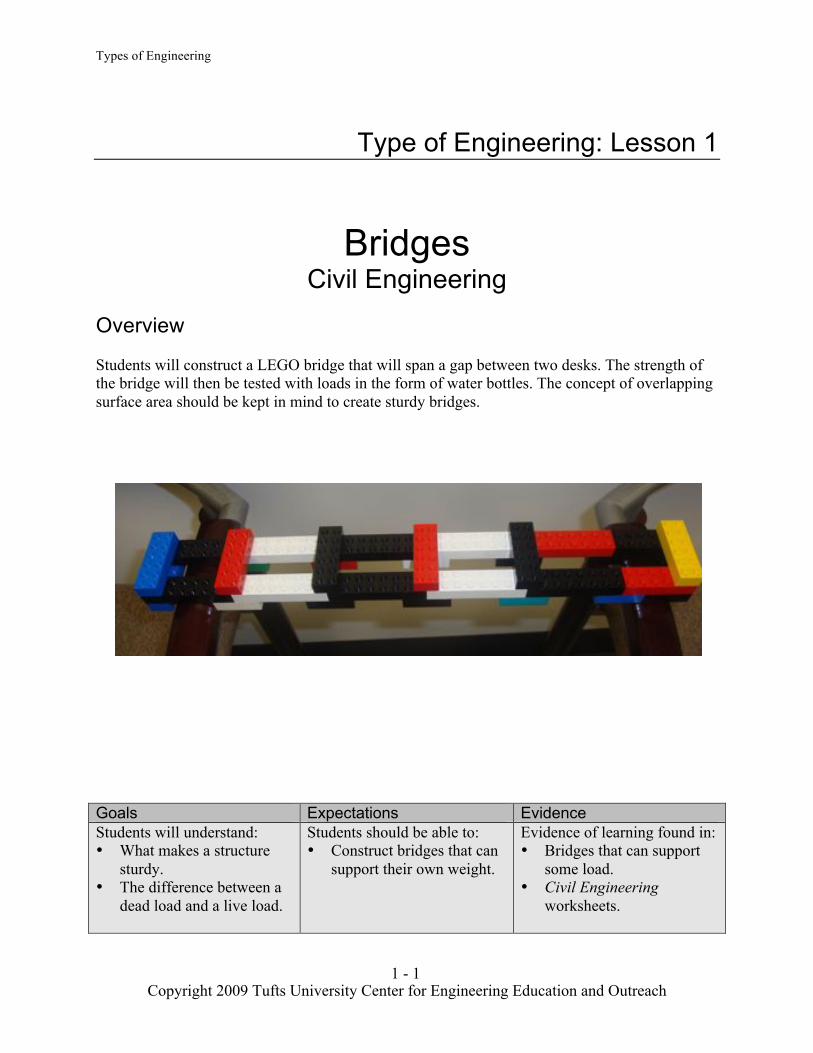
Type of Engineering: Lesson 1
Bridges
Civil Engineering
Overview Students will construct a LEGO bridge that will span a gap between two desks. The strength of the bridge will then be tested with loads in the form of water bottles. The concept of overlapping surface area should be kept in mind to create sturdy bridges.
Goals Expectations Evidence
Students will understand: • What makes a structure
sturdy. • The difference between a
dead load and a live load.
Students should be able to: • Construct bridges that can
support their own weight.
Evidence of learning found in: • Bridges that can support
some load. • Civil Engineering
worksheets.

Types of Engineering
Copyright 2009 Tufts University Center for Engineering Education and Outreach
1 - 2
Suggested Time
!!!!!!!!!!!!
One 45-60 minute
session
Vocabulary
!!!!!!!!!!!!
Dead Load
Live Load
Surface Area
Materials
!!!!!!!!!!!!
For each student:
• Civil Engineering
Worksheet
For each student pair:
• LEGO kit with assorted LEGO
pieces (e.g. 10 each
of 2x4, 2x6, & 2x8
bricks)
For classroom:
• Meter Stick or
Measuring Tape
• 5 water bottles
• String
Preparation
!!!!!!!!!!!!
• Arrange students in
groups of 2-3. • Create a testing area
by setting a pair of
desks ~ 1ft apart. • Distribute
worksheets and
construction
materials.
Background
!!!!!!!!!!!!!!!!!!!!!!!!!!!!!!!!!!!!!!!!!
Civil engineers deal with the construction of the non-moving parts of public. Examples of civil engineering projects include dams, roads, buildings, and bridges. Civil engineers must be very careful to build safe and sturdy structures because there is a large risk of injury to people if their design fails. There are many forces that must be taken into account when designing a safe structure. For example, engineers must consider both the dead load and the live load in the construction of a bridge. The dead load is the structure’s own weight while the live load includes all variable forces that are not a permanent part of the structure, such as traffic or wind. To overcome these forces, overlapping beams are used to make the bridge more stable. The more surface area that overlaps between beams, the sturdier the connection is.
Instructions
PART I: Introduction to Engineering Bridges 5 minutes
1. Brainstorm with the class what a civil engineer might do. Explain that that civil engineers design structures without moving parts.
2. One type of structure that civil engineers design is a bridge. Bridges often have to span great distances and support immense loads.
3. Explain the difference between a dead load and a live load. 4. Discuss how you might make a sturdy bridge using LEGOS:
• Pass out the LEGO kits to each group. • Talk about how more overlapping surface area between beams helps
to create a stronger connection. • Ask each student to take two 2x8 bricks out of their kit and to follow
you as you connect the bricks by overlapping only the first row of pegs. Show how easy it is to break the bricks apart. Now connect them by overlapping 6 rows of pegs. Show how much more difficult it is to break the bricks apart.
PART II: Bridge Construction 20 minutes
1. Explain to students that they will be constructing bridges using pieces from their LEGO kit. Write down the requirements: • The bridge must span the length of the designated desk gap. • The bridge must support a live load in the form of water bottles
hung from various points on their bridge.
Lesson 1
Bridges
Types of Engineering
Copyright 2009 Tufts University Center for Engineering Education and Outreach
1 - 3
!!!!!!!!!!!!
Note: In order to have
adequate support, the bridges should be at least 2 in longer than the gap that they have to span.
!!!!!!!!!!!!
Real World Connection
Real-life engineers have
to test their bridges too!
And even then, they still
fail sometimes. The 1940 Tacoma Narrows Bridge
collapse is one of the
most notable civil
engineering failures in
history. Because the
engineers did not account
for some of the effects of
the wind, 40 mph winds
caused the bridge to
undulate violently and
collapse only four
months after its construction.
2. Ask students to answer the first question on their worksheet and to design their bridge. Allow each student to begin constructing their bridge once an instructor has approved their design.
PART III: Testing the Bridges 15 minutes
1. When a group is ready to test, have students to place their bridge across the gap.
2. Test the bridges by adding water bottles to the bridges. Increase the weight by half a bottles worth of water each time. You may either add water to the bottles or have several half-filled and fully filled water bottles available for testing.
3. Once a group has completed their tests, have them fill out the rest of their worksheet and draw a redesign of their bridge that improves on their first design.
PART V: Discussion and Observation 5 minutes
1. Ask each group to briefly describe their bridge: Was it thin or wide? Short or tall?
2. Ask students to discuss the difficulties they encountered: Did the limited amount of materials make it difficult to complete their original design? What weak point caused their bridge to break?
3. Ask students to discuss how they would redesign their bridge.
Extensions and Modifications
1. Build a redesigned bridge and test it. 2. Test the bridge with different kinds of loads (e.g. more evenly
distributed loads, like books, etc).
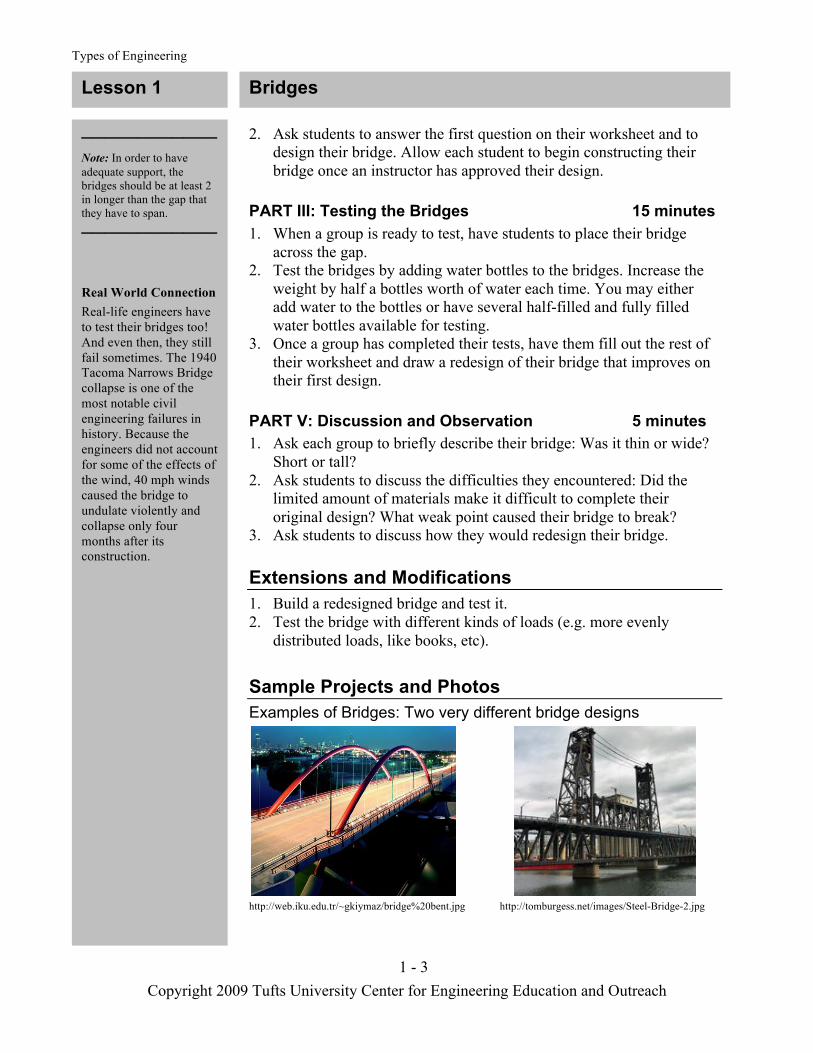
Sample Projects and Photos
Examples of Bridges: Two very different bridge designs
http://web.iku.edu.tr/~gkiymaz/bridge%20bent.jpg http://tomburgess.net/images/Steel-Bridge-2.jpg
Lesson 1 Bridges

Types of Engineering
2 – 1 Copyright 2009 Tufts University Center for Engineering Education and Outreach
Types of Engineering: Lesson 2
!
Water Filtration Environmental Engineering
Overview Students will construct a small slow sand water filter and evaluate its performance by conducting a turbidity test on the filtered water. Students will also have to build a LEGO structure to support their filter while holding it over a collection cup. A sample holder, filter and collection cup are shown below:
Goals Expectations Evidence
Students will understand: • What an environmental
engineer does. • Water filtration.
Students should be able to: • Build a sturdy water filter. • Explain how their filter
removed dirt particles.
Evidence of learning found in: • Water filters that result in
cleaner water. • A class discussion water
pollution and filtration. • Environmental
Engineering worksheet.

Types of Engineering
2 – 2
Copyright 2009 Tufts University Center for Engineering Education and Outreach
Suggested Time
!!!!!!!!!!!!
One 45-60 minute session
Vocabulary
!!!!!!!!!!!!
Light Sensor
Slow Sand Filter
Turbidity
Water Quality
Materials
!!!!!!!!!!!!
For each student:
• Environmental
Engineering
Worksheet
For each student pair:
• Small LEGO kit
(~20 beams, friction pegs, bushings)
• 2 clear plastic cups
(one with the bottom
cut off for filter)
• 1 sq ft cheese cloth
• 2 rubber bands
• " c. gravel
• 2 coffee filters
• 10 cotton balls
For classroom:
• Dirty & Clean Water
(for testing) • RCX/NXT light
sensor
• RCX/NXT
Background
!!!!!!!!!!!!!!!!!!!!!!!!!!!!!!!!!!!!!!!!!
Environmental engineers design water filters. In addition to designing systems that clean water, environmental engineers design systems that clean air and land so that the earth remains a habitable place for humans.
The type of water filter that students will construct in this lesson is known as a slow sand filter. In this type of filter dirty water is run through a column of gravel and sand and results in clean water. This kind of filter requires no chemicals or electricity; however, the filtration process is slow. Slow sand filters are designed so that the coarsest particles (e.g. rough gravel) are at the bottom of the filter while the smallest particles (e.g. fine sand) are at the top. See diagram below:
http://rael.berkeley.edu/old-site/workshops/disinf_SSF.bmp
Water quality is an assessment of how dirty or clean water is by the characteristics such as dissolved oxygen content or pH. In this activity, we will evaluate water quality based on turbidity: the cloudiness or haziness of a fluid caused by small suspended particles that are generally, though not always, invisible to the naked eye.
Students will conduct a turbidity test by placing their filtered water sample in a clear cup and measuring it with an NXT/RCX light sensor. Since the light sensors can detect reflected light, this box will measure the amount of light that is allowed to pass through the water. The suspended particles reflect light and do not let light pass through the sample. The more reflected light the sensor detects, the dirtier the water.
Lesson 2
Water Filtration

Types of Engineering
2-3
Preparation
!!!!!!!!!!!!
• Arrange students in
groups of 2-3. • Distribute
worksheets and
construction materials.
• Prepare a pitcher of
dirty water (e.g.
water w/dirt, mulch,
etc).
How do I use the RCX
light sensor?
Attach the light sensor to
Port 3 on the RCX and
turn the RCX on. Place
the cup about 1/8 inch
away from the light
sensor, and hit the
“View” button on the
RCX three times (i.e.
until the arrow is
pointing to Port 3). Read the value to the left of
the person on the RCX
screen.
!!!!!!!!!!!!
Note: The light sensor is
not very sensitive, therefore
the light sensors values will
not vary greatly. Dirty
water might have a value
around 40 while clean
water has a value around
48.
!!!!!!!!!!!!
Water Increasing in Turbidity:
http://www.fondriest.com/images/science_library/turbidity_sensors.jpg
Instructions
Preparation: Building a Turbidity Tester 5 Minutes
To build the turbidity tester, wire a light sensor to one of the ports on an NXT/RCX brick. On the RCX you can view light sensor values by pressing the view button until a small triangle is pointed at the port the light sensor is wired to. On the NXT use the key pad to scroll to the menu that shows sensor values. Select the light sensor and the port that it is wired to.
PART I: Introduction to Water Filtration 10 minutes
1. Ask students if they know what environmental engineer does. 2. After a brief discussion, explain that the job of an environmental
engineer is to design systems that clean air, land, and water. Give examples such as, cleaning an oil spill in the ocean, or figuring out what to do with nuclear waste.
3. Tell students that one way that environmental engineers design water filters to clean water.
4. Introduce the specific example of a slow sand filter as a means of improving water quality.
5. One way to test the quality of water is by measuring turbidity, the amount of suspended solid particles in the water.
6. Show students the turbidity tester they will be using for this activity. Explain that the light sensor is used to test for turbidity because it detects how much light is reflected from a surface. Place a clean water sample and a dirty water sample in the turbidity tester, run the NXT/RCX to read the light sensor reading and compare the results. This data should be the two extremes (i.e. the class’ values should lie between these two points).
PART II: Constructing the Filters 30 minutes
1. Explain to students that they will be constructing their own water filters and testing their filtered water using the RCX light sensor.
Lesson 2 Water Filtration

Types of Engineering
2-4
2. Tell students that they must also build a structure to support their filter so that water can be poured through the filter and be collected in a sample collection cup below.
3. Have students fill out the first question on their worksheets and design their filters. Have students label their designs
4. When an instructor has approved a design, allow students to begin building their filter and LEGO supportive structure.
PART III: Testing the Water 10 minutes
1. As students finish their construction, allow them to test their design: • Students should pour approx. 2/3 cup of dirty water through the
filter. • Students should test their clean water sample in the turbidity
tester and record their clean water value on their worksheets. 2. Keep track of each groups value on the board for comparison.
PART IV: Discussion and Observation 10 minutes
1. Ask students to share their filter designs. 2. Discuss differences in design and the resulting light sensor values. 3. Tell students about the typical design of slow sand filters in which the
largest filter particles (e.g. gravel) are on top and the finest filter particles (e.g. sand) are on the bottom. Why this might this make an effective filter?
Extensions and Modifications
Collect the class’ data and create a bar graph on the board. Plot the clean and dirty test values as well and see whether most of the filters are closer to the clean or the dirty water value.
Sample Projects and Photos The RCX light sensor (attached at Port 3) reads a value of 40 for the dirty water. A previously taken reading of 48 is displayed for the clean water.
Real World Connection
You may have seen
water filters in your own
home in the form of
activated carbon filters on sinks or in pitchers in
your refrigerator.
However, even before
you filter the water
yourself, all tap water is
first treated in a very
large “water filter”.
Water treatment plants
remove all toxins and
visible particles from
dirty water so that when it reaches your tap, it is
clean enough for you to
drink.
Lesson 2 Water Filtration

Types of Engineering
3-1
Types of Engineering: Lesson 3
Parachutes
Aeronautical Engineering Overview Students will create parachutes prototypes from different materials and time how long it takes the parachute to fall a set distance. Students will use the data they have collect to calculate the parachute’s velocity. The goal is to create a parachute with the slowest velocity. Shown below are several Sample Parachutes. Construction material from left to right: Paper Napkin, Platic Bag, and Coffee Filter.
Goals Expectations Evidence
Students will understand: • That the goal of a
parachute is to create a slower velocity.
• How surface area affects velocity.
Students should be able to: • Construct sturdy
parachutes. • Calculate velocity.
Evidence of learning found in: • Parachutes with a large
surface area. • Aeronautical Engineering
worksheet.
Types of Engineering
3-2
Suggested Time
!!!!!!!!!!!!
One 45-60 minute
session
Vocabulary
!!!!!!!!!!!!
Drag
Gravity
Surface Area
Velocity
Materials
!!!!!!!!!!!!
For each student:
• Aeronautical
Engineering
Worksheet
For each student pair:
• 2 meters of string • 1 coffee filter
• 1 paper napkin
• 1 plastic bag
• 1 LEGO person
For classroom:
• Meter Stick or
Measuring Tape • Stopwatch
Background
!!!!!!!!!!!!!!!!!!!!!!!!!!!!!!!!!!!!!!!!!
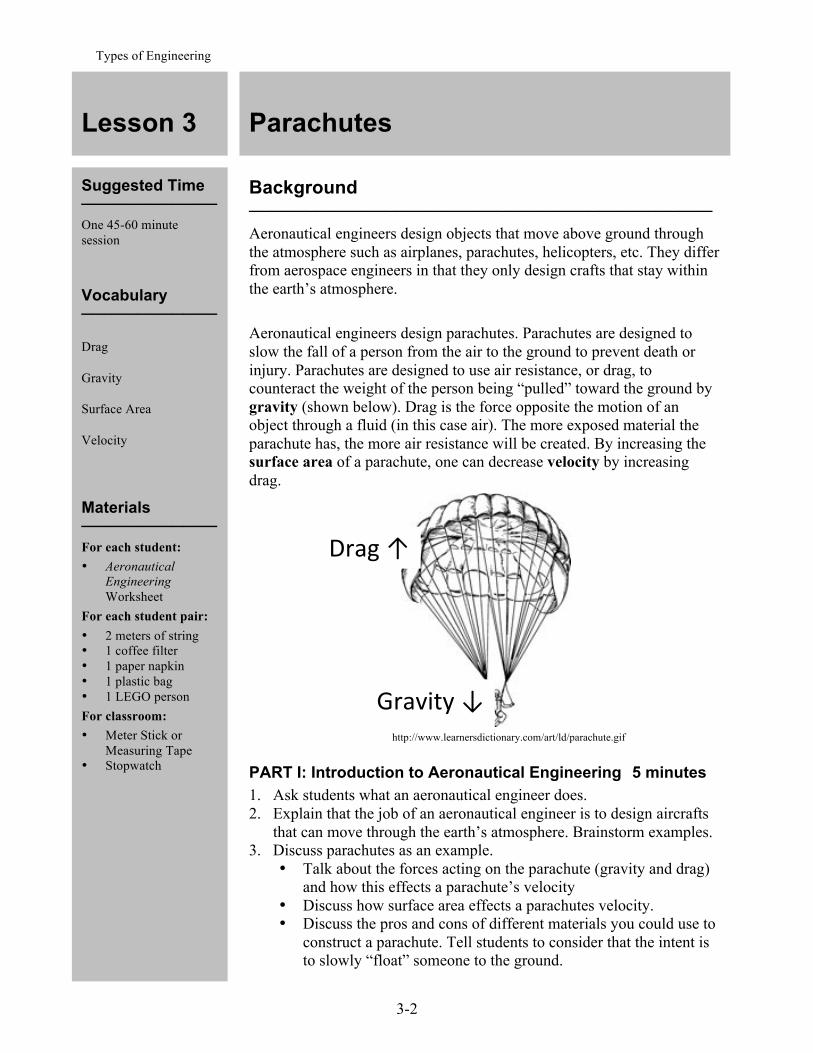
Aeronautical engineers design objects that move above ground through the atmosphere such as airplanes, parachutes, helicopters, etc. They differ from aerospace engineers in that they only design crafts that stay within the earth’s atmosphere.
Aeronautical engineers design parachutes. Parachutes are designed to slow the fall of a person from the air to the ground to prevent death or injury. Parachutes are designed to use air resistance, or drag, to counteract the weight of the person being “pulled” toward the ground by gravity (shown below). Drag is the force opposite the motion of an object through a fluid (in this case air). The more exposed material the parachute has, the more air resistance will be created. By increasing the surface area of a parachute, one can decrease velocity by increasing drag.
http://www.learnersdictionary.com/art/ld/parachute.gif
PART I: Introduction to Aeronautical Engineering 5 minutes
1. Ask students what an aeronautical engineer does. 2. Explain that the job of an aeronautical engineer is to design aircrafts
that can move through the earth’s atmosphere. Brainstorm examples. 3. Discuss parachutes as an example.
• Talk about the forces acting on the parachute (gravity and drag) and how this effects a parachute’s velocity
• Discuss how surface area effects a parachutes velocity. • Discuss the pros and cons of different materials you could use to
construct a parachute. Tell students to consider that the intent is to slowly “float” someone to the ground.
Lesson 3
Parachutes
89#:/+;!<!
=9#>!?!

Types of Engineering
3-3
Lesson 3 Parachutes
Preparation
!!!!!!!!!!!!
• Arrange students in
groups of 2-3. • Set up a testing area
with a drop point
that has a known distance to the
ground. • Distribute
worksheets and
construction materials.
Real World Connection
Today parachutes have many uses, such as
deploying soldiers from
airplanes and helping
space capsules to land
safely in the ocean. They
are also used for
recreation in the extreme sport of skydiving. The
record for the longest
parachute jump is held
by Eugene Andreev who,
in 1962, performed a
freefall jump of 80,380 ft
before deploying his
parachute for the final
3000 ft of descent.
PART II: Discussion of Velocity 10 minutes
1. Ask students if they know what velocity is. 2. Explain velocity in specifics term as the speed of an object. Explain
that velocity can be measured by knowing the distance an object travels in a certain amount of time.
3. Write the equation for velocity on the board:
"#$%&'()!*!+',(-.&#!/!('0#!
PART III: Parachute Construction 10 minutes
1. Explain to students that they will choose two materials to construct prototypes of parachutes that they will compare.
2. Allow each group to choose the two materials they believe will make the best parachutes (i.e. have the slowest velocity).
3. Ask the students to fill out all questions on their worksheets except for the trial tables.
4. Once the worksheets are filled out, allow students to construct their parachutes
PART IV: Testing and Calculating Velocity 5 minutes
1. An instructor should test each groups parachute in a designated area. 2. Perform three trial drops from a given height while timing the
descent. The height should be the same for each trial. 3. Students should record the test values on their worksheet and use
them to calculate velocity.
PART V: Discussion and Observation 5 minutes
1. Have each group share their data and completed parachutes with the class. For each group, write the following information on the board: • Names of the students • Their slowest velocity and what material was used.
2. Ask the class to evaluate the collective data on the board: • Which material was the most effective? • What other factors might have affected the parachutes’ velocity?
(Think about length of string, the cross sectional area of the chute, whether the parachute fell in straight or crooked path, etc.)
Extensions and Modifications
1. Build and test a third parachute with a different material. 2. Redesign one of the parachutes with an already tested material to see
how the construction affects velocity.

Types of Engineering
4-1
Types of Engineering: Lesson 4
Ramp Roller
Mechanical Engineering Overview
Students will design and construct a device rolls far as possible when it is rolled down a ramp. Students should try to create a device that is sturdy so that it stays together, but is minimally hindered by friction. Students will experiment with different designs to discover what design features are effective. Shown below is an example of three-wheel ramp roller:
Goals Expectations Evidence
Students will understand: • How friction slows down
a car. • The difference between
kinetic and potential energy.
Students should be able to: • Construct a sturdy ramp
roller. • Work with their partner.
Evidence of learning found in: • Redesigned ramp rollers
that go farther than the original.
• Mechanical Engineering worksheets.

Types of Engineering
4-2
Suggested Time
!!!!!!!!!!!!
One 45-60 minute
session
Vocabulary
!!!!!!!!!!!!
Axle
Friction
Gravity
Kinetic Energy
Potential Energy
Wheel
Materials
!!!!!!!!!!!!
For each student:
• Mechanical
Engineering
Worksheet
For each student pair:
• LEGO kit - 1 plate
- 6 wheels (3
different types)
- 6 axles
- 12 bushings
- 15 beams
For classroom:
• Ramp (e.g. flattened
cereal box)
• Measuring tape
Background
!!!!!!!!!!!!!!!!!!!!!!!!!!!!!!!!!!!!!!!!!
The job of a mechanical engineer is to design machines with moving parts. These machines range from air conditioners to wind turbines. However, mechanical engineers are most commonly thought of as designing vessels of transportation: cars, boats, airplanes, etc. They must be familiar with physics concepts to create designs efficient and safe.
Two of the many forces that act on a car are gravity and friction. Gravity
keeps a car on the ground and causes cars to roll down hills without fuel. Friction is the force between the tires and the road. Friction is the reason that cars slow down when the brakes are not applied. Wheels and axles are used to make it easier for the body of the car to roll by lifting the body off the ground and reducing friction. Friction also acts between moving parts on the car – such as the axles rubbing against the body of the car.
http://www.dkimages.com/discover/previews/785/536622.JPG
A car has energy, even when it’s not moving. For instance, a non-moving car at the top of a hill has all of its energy stored as potential energy. This energy is equal to the kinetic energy, or energy of movement that the car would have at the bottom of the hill after it has rolled down.
http://www.petervaldivia.com/technology/energy/image/potencial-and-kinetic.bmp
Lesson 4
Ramp Roller
Wheel
Axle
Gravity# Friction $

Types of Engineering
4-3
Preparation
!!!!!!!!!!!!
• Arrange students in
groups of 2-3. • Set up a cardboard
ramp by taping it to
a desk and to the
floor. • Distribute
worksheets.
Real World Connection
Mechanical engineers work in teams to design
fast cars. As of 2007, the
fastest car in the world is
the SSC Ultimate Aero,
which reaches a top
speed of 237 mph and goes from 0-60 mph in
just 2.7 seconds. Imagine
what that kind of
acceleration must feel
like for the driver! The
engineers that work on
cars like this are very
specialized because
every detail needs to be
carefully designed to
contribute to the car’s maximum potential
speed.
PART I: Introduction to Mechanics of Cars 10 minutes
1. Ask the class what they believe the job of a mechanical engineer is. Discuss the broad range of machines and machinery that mechanical engineers design.
2. Present a car as one example of what mechanical engineers build. Explain that the combination of a wheel and an axle allow a car to move. Demonstrate with a LEGO wheel and axle.
3. Discuss the external forces of friction and gravity that act on a car and affect its movement. Talk about how minimizing friction allows a car to go farther. Friction is present between the tires and the ground and between the axle and the body of the car.
4. Introduce potential and kinetic energy. For a car rolling down a hill, all of its energy is potential at the top and is converted to kinetic energy as it rolls down the hill, until it is finally all kinetic energy at the bottom.
PART II: Constructing the Ramp Rollers 20 minutes
1. Tell students that their design challenge is to build a “ramp roller” that will travel as far as possible when released from the top of a ramp. This does not restrict their design to a car. The only requirement is that the ramp roller must have at least three wheels and no more than six.
2. Ask students to answer the first two questions on their worksheet and to design and label their ramp roller.
3. Once an instructor has approved designs, hand students the LEGO kit and allow them to start building.
PART III: Testing the Ramp Rollers 15 minutes
1. Have students place their ramp roller at the top of the ramp and release it. Let it roll without interference until it stops. Measure the distance that it rolls and have students record this value on their worksheet.
2. If time allows, ask students to redesign their ramp roller and write down what they changed on their worksheet. Have students retest their redesigned ramp rollers.
PART IV: Discussion and Observation 5 minutes
3. Ask each group to briefly discuss their ramp roller. Whose went the furthest? Why? What would change if the ramp were steeper or shallower? Rougher or smoother? How did students redesign their ramp rollers and how did this affect their performance?
Lesson 4 Ramp Roller

Types of Engineering
4-4
Extensions and Modifications
1. Have students weigh their ramp roller and calculate how much potential energy it has at the top of the ramp.
2. Redesign the ramp rollers to see whose can travel the shortest distance.
Sample Projects and Photos
Potential Models for a Ramp Roller:
http://static.howstuffworks.com/gif/three-wheel- http://www.antiquehelper.com/auctionimages/ car1.jpg 37870t.jpg
Note: Some students’ ramp
rollers will not travel in a straight line. Measure only the distance traveled in the same direction as the ramp; don’t count any sideways travel as part of the total distance traveled.
Lesson 4 Ramp Roller

Types of Engineering
5-1
Types of Engineering: Lesson 5
Insulators and Conductors
Electrical Engineering Overview Students will explore the qualities of insulating and conductive materials. Students will hypothesize which materials are insulators and which are conductors. Students will construct a simple circuit using two batteries, wire, and an LED bulb. Students will test their hypotheses on the insulating properties of materials by inserting these materials into their circuits and testing whether or not the LED lights up. Shown below is an example of an insulator (the marker) and a conductor (scissors – which are metal):
Goals Expectations Evidence
Students will understand: • The components of an
electric circuit. • Properties and examples of
conductive materials • Properties and examples of
insulating materials.
Students should be able to: • Make hypotheses based on
physical properties. • Construct a complete
circuit.
Evidence of learning found in: • Circuits successfully
completed by a conductor (i.e. LED lights up).
• Class discussion about insulating and conductive properties.

Types of Engineering
5 - 2
Suggested Time
!!!!!!!!!!!!
One 45-60 minute
session
Vocabulary
!!!!!!!!!!!!
Conductor
Diode
Electric Circuit
Insulator
LED
Resistor
Voltage Source
Materials !!!!!!!!!!!!
For each student:
• Electrical
Engineering
Worksheet
For each student pair:
• 2 D-Batteries
• 2 ft wire
• 1 3-Volt LED bulb
• Scissors
• Tape
• Assortment of Insulators and
Conductors (See
Worksheet)
For classroom:
• Sample circuit (2 D-batteries and a 3V
LED)
Background
!!!!!!!!!!!!!!!!!!!!!!!!!!!!!!!!!!!!!!!!!
Electrical engineers are concerned with the design and application of electrical systems. These range from the very large (power supply systems) to the very small (microprocessors in computers). All electrical systems, whether simple or complex, are composed of circuits that follow the same basic rules.
An electric circuit is a closed loop that has, at the very least, a pathway between a voltage source and a resistor. A battery is a common voltage
source: it provides the work necessary to run electricity through a circuit. A simple circuit is shown below:
http://images.encarta.msn.com/xrefmedia/aencmed/targets/illus/ilt/000688e2.gif
A light bulb is a type of resistor that controls the flow of electricity through a circuit. An LED is a small, energy-efficient light bulb that is also a diode. In a diode, electricity can only flow in one direction, therefore, even if an LED appears to be correctly wired in a circuit, the bulb may not light up. To fix this, flip the LED’s connections.
The properties of a material that makes up a resistor affects how much resistance it provides. An insulator resists the flow of electricity, some even prevent the flow of electricity. Common insulators include glass, porcelain, and rubber. A conductor transmits electricity very well. The most common conductors are metallic, such as gold and copper.
Lesson 5
Insulators and Conductors

Types of Engineering
5-3
Preparation !!!!!!!!!!!!
• Arrange students in
groups of 2-3. • Assemble a simple
circuit with 2 D-
batteries and a 3-Volt LED with a gap
for inserting an
insulator/conductor.
What if my circuit
doesn’t work?
Don’t worry! Here are
some steps to help you
troubleshoot your
circuit:
1. Check to make sure that each component
is securely attached.
For example,
looping the wire
several times around
the LED terminal
helps to secure the connection.
2. Try switching the
wires on the LED
terminals.
3. Make sure that no
wires are touching
each other.
4. Check that one
battery’s positive
end is connected to
the other battery’s negative end.
5.
Instructions
PART I: Introduction to Electrical Circuits 10 minutes
1. Ask students if they know what the job of an electrical engineer is. 2. Tell students that electrical engineers design electrical circuits in
devices and give examples: GPS, electric power generation, household appliances, lighting in buildings.
3. Set up a sample circuit by connecting the components with wire and securing it with tape as shown below:
4. Explain to the class how a circuit works. Discuss the voltage source (battery), resistor (LED), and pathway (wire).
5. Explain how some materials slow down the flow of electricity, whereas others speed up the and are called insulators and conductors, respectively.
6. Ask the class for some examples of insulators and conductors. Complete the circuit with a conductor and show how the LED lights up. Change out the conductor for an insulator and show how the LED no longer lights up.
PART II: Circuit Construction 20 minutes
1. Tell students that they will construct a circuit in order to test whether various materials are insulators or conductors.
2. Distribute worksheets and ask students to consult with their groups and make a hypothesis as to how the materials will act in a circuit.
3. Once students have marked their guesses, distribute building materials and have students construct a circuit, following the model used in the demonstration.
PART III: Testing Materials 15 minutes
1. Have students test each object by connecting it to the gap in their circuit and record the results. If the LED lights up, the object is a conductor; if not, the object is an insulator.
Lesson 5 Insulators and Conductors
Types of Engineering
5 - 4
Real World Connection
As hybrid electric cars become more popular,
electrical engineers are
playing a more
prominent role in the
automobile industry.
Combining electric
circuits with traditional fuel engines allows
hybrid cars to reach fuel
efficiencies of up to 50
miles per gallon!
Lesson 5 Insulators and Conductors
PART V: Discussion and Observation 5 minutes
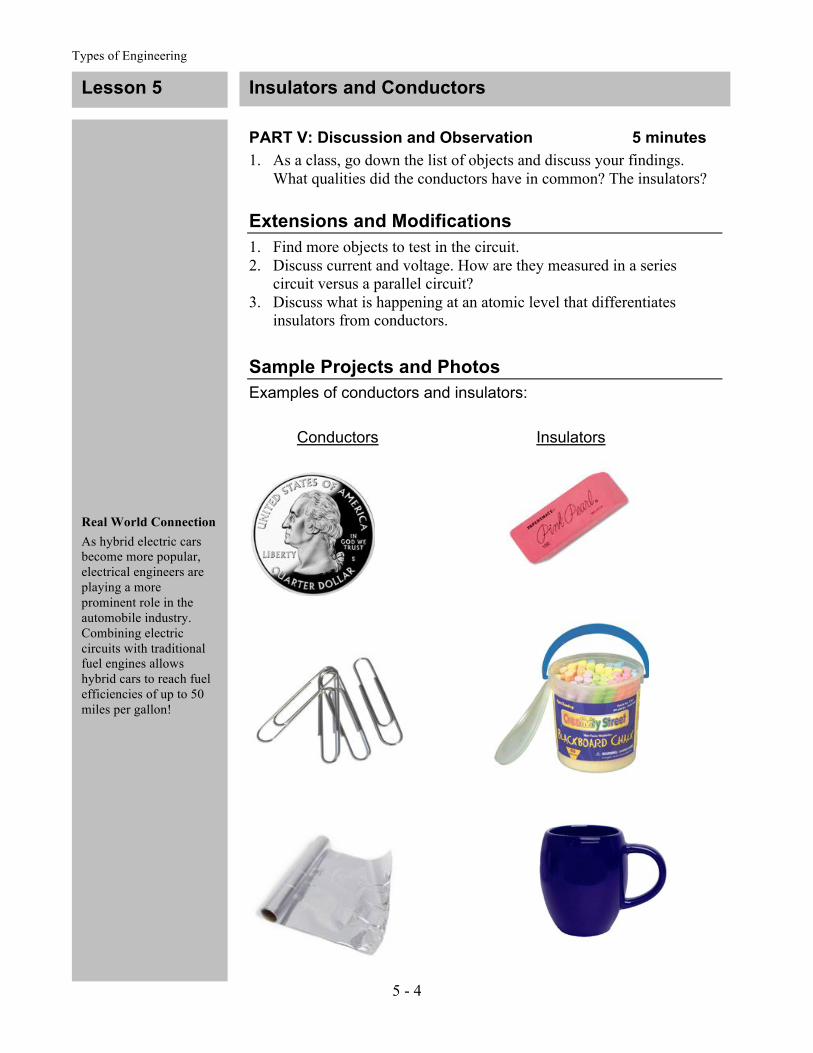
1. As a class, go down the list of objects and discuss your findings. What qualities did the conductors have in common? The insulators?
Extensions and Modifications
1. Find more objects to test in the circuit. 2. Discuss current and voltage. How are they measured in a series
circuit versus a parallel circuit? 3. Discuss what is happening at an atomic level that differentiates
insulators from conductors.
Sample Projects and Photos
Examples of conductors and insulators:
Conductors Insulators

Types of Engineering
5-4
Types of Engineering: Lesson 6
M&M Chromatography
Chemical Engineering
Overview Students will observe the makeup of various food dyes by performing a chromatography experiment on M&Ms. Chromatography is a method of separating dyes by taking advantage of the different rates of absorption of different chemicals. If they want, students can then compare these dyes to the dyes in other consumer products, such as Skittles or Gatorade.
Goals Expectations Evidence
Students will understand: • How to perform
chromatography. • The difference between
the mobile and the stationary phase.
Students should be able to: • Make hypotheses about
color separation based on common knowledge.
• Create a chromatogram.
Evidence of learning found in: • Chemical Engineering
worksheets • Chromatograms that show
differential migration. • Class discussion of error.

Types of Engineering
6-2
Suggested Time !!!!!!!!!!!!
One 45-60 minute session
Vocabulary !!!!!!!!!!!!
Capillary Action
Chromatography
Mobile Phase
Stationary Phase
Materials !!!!!!!!!!!!
For each student:
• Chemical
Engineering
Worksheet
For each student pair:
• 4” x 4” coffee filter
paper cut into a square.
• 6” x 6” piece of
aluminum foil
• 6 differently colored
M&Ms
• Small cup of clean
water (for extracting
dye)
• 6 toothpicks
• 1 pie tin
• Ruler
• Pencil
For classroom:
• 1% Salt Solution (enough for 1 cup
per group)
Background
!!!!!!!!!!!!!!!!!!!!!!!!!!!!!!!!!!!!!!!!!
The job of a chemical engineer is to use chemicals and chemical reactions to create products that improve quality of life. Some products that chemical engineers develop include plastics, explosives, fragrances and flavors, and fertilizers.
The chemicals that engineers work with must often be in a very pure form. One way to purify a chemical is to separate it from a mixture using a method called chromatography, which uses porous material to separate a solution into its chemical components by their absorbancies.
In liquid chromatography, chemicals are placed in small quantities on along the bottom of a porous paper, which is dipped in a solvent. Capillary action caused by surface tension in the solvent allows the solvent to travel up the paper. As the solvent moves up the paper, is in the mobile phase, while the paper is in the stationary phase. The chemicals in solution move to the stationary phase as they are deposted on the paper. Separation of the chemicals occurs because the smallest or most polar components travel the farthest up the paper and the largest or most non-polar components travel the shortest distance up the paper.
Instructions
PART I: Introduction to Chemical Engineering 10 minutes
1. Lead a class discussion about the possible products a chemical engineer designs. Chemical engineering, while similar to pure chemistry, often has more practical and large-scale applications whereas chemists more often focus on reactions at the atomic level.
2. Explain what chromatography is and how chemical engineers use it to separate components of a substance: • Chromatography allows engineers to either purify substances for
further use or to compare the contents of two or more substances. • Explain what capillary action is. • Discuss how capillary action is used in chromatography to move
chemicals through porous material. • Talk about why in chromatography you use a salt solution to
perform chromatography because it helps with capillary action. • Explain that small particles travel farther through porous
materials than large particles.
Lesson 6
M&M Chromatography

Types of Engineering
6-3
Preparation !!!!!!!!!!!!
• Arrange students in
groups of 2-3. • Cut a 6” x 6” piece
of aluminum foil
and a 4” x 4” piece of coffee filter for
each group. • Mix the salt solution
(1/8 tsp salt per 3 c.
water) • Distribute
worksheets.
Tips for a Successful
Chromatogram:
6. Only touch the edges of the paper so
that oils and dirt
from hands don’t
contaminate the
paths for the dye.
7. Hold the paper
steady; do not let the
dye sample dip into
the water. Students
can switch off
holding the paper so
that one student does not have to hold the
paper for the entire 5
minutes.
8. Place white paper
under the finished
product to see the
colors more clearly.
3. Draw a sketch on the board of how to set-up of a chromatography experiment (shown below):
4. Explain that the bottom % inch is dipped in a 1% salt solution that allows capillary action to disperse the substances up the paper.
5. Discuss how you place the samples on the baseline and then measure how far up the paper they eventually move.
PART II: Chromatography Preparation 15 minutes
1. Tell students that they will be performing a chromatography experiment on the dyes that color M&Ms.
2. Have students answer the pre-lab questions on their worksheet. 3. Pass out materials for the chromatography lab. 4. Have students prepare their chromatography paper:
• Have students measure " inch up from the bottom of the coffee filter paper on both sides and draw a horizontal line with pencil between the two points.
• Draw six evenly spaced dots on which to place the samples, leaving about " inch on each side from the edge of the paper.
• Designate which color will be on each dot by writing an “R’ for red, an “O” for orange, etc, beneath the dots.
5. Have students prepare the dyes by using the corner of the ruler to place six pea-sized drops of water on the aluminum foil. Make sure they are far enough apart so that they do not run together. Place a different colored M&M in each dot for one minute, then remove and eat or throw away. Prepared dye puddles are shown below:
Lesson 6 M&M Chromatography
" inch for water
Chemical
Samples
Base Line
1 2 3 4 5 6

Types of Engineering
6-4
6. Tell students to use a different tooth pick to pick up a small amount of each dye from the foil.
7. Have students place each color dye on the corresponding dot on the prepared filter paper. Tell students to keep the dots small so that the colors don’t run together.
8. Let the paper dry for ~2-3 minutes. Repeat steps 6 and 7 two more times so that there is an adequate amount of dye on each dot.
PART III: Chromatography 20 minutes
1. Pour approximately one cup of salt water into each group’s pie tin. 2. Once the dyes on the chromatography papers are reasonably dry,
have students submerge the bottom % inch of the paper into the salt water solution in the tin. Tell students not to let the dye touch the salt water. Tell student to hold the paper here for about five minutes - try to only touch the edges of the paper.
Capillary action pulls dyes up the paper when placed in salt water
3. Once the water line is ~1 inch below the top of the paper, remove the paper and lay it on a clean, flat surface to dry.
4. As the paper dries, have the students answer the post-lab questions on their worksheet. If students are having difficulty seeing their chromatogram, wait 5-10 minutes. The colors will become more pronounced as the paper dries.
PART V: Discussion and Observation 10 minutes
1. Discuss as a class what happened with each color: • Which color traveled the farthest and the least distance? • Is there a color that appeared in multiple dyes? • What potential errors may have occurred that could affect results? • How would you change this experiment to produce more accurate
results?
Real World Connection
There are types of
chromatography other
than the liquid chromatography
performed in this
activity. Gas
chromatography moves
helium through a column
of adsorbent material in
order to analyze
chemical samples. It is
commonly used in
airports to detect illegal
substances, and in
forensics to compare hair or skin cell samples
found on victims.
Lesson 6 M&M Chromatography

Types of Engineering
6-5
Extensions and Modifications
1. Try this experiment with markers, skittles, or food dye (see photo below).
2. How does salt water affect the rate at which the solvent travels up the filter paper? Because like attracts like, a polar solvent, like water, is able to move up the polar filter paper. Adding salt further increases the polarity of water, allowing it to travel even more quickly. Try adding more salt to the solvent and see how long it takes for it to travel up the filter paper. Try using other solvents, such as pure water or rubbing alcohol.
Sample Projects and Photos
A chromatogram of magic markers compared to an M&M chromatogram:
Lesson 6 M&M Chromatography
Types of Engineering
A-1
Unit 1 !
Glossary
Lesson 1
Dead Load - A constant load on a structure (e.g. a bridge) due to the weight of the supported structure itself. Live Load – A variable load on a structure (e.g. a bridge) such as moving traffic. Surface Area – The measure of how much exposed area a solid object has, expressed in square units.
Lesson 2
Light Sensor – A device that measures the amount of light in front of it (e.g. how much light passes through a sample obscured by a certain amount of particles or dirt).
http://www.active-robots.com/products/mindstorms4schools/lego-spares/legosensor-500.jpg
Slow Sand Filter – A water purification system that does not require chemicals or electricity. Typically 1 to 2 meters deep, they contain sand and gravel to slowly filter the water using gravity. Turbidity – The cloudiness or haziness of a fluid caused by individual particles (suspended solids) that are generally invisible to the naked eye.
Water Quality – The physical, chemical and biological characteristics of water; a set of standards that define the level of purity.
Lesson 3
Drag – The phenomenon of resistance to motion through a fluid, such as water or air.
Gravity – The force of attraction between all objects in the universe, commonly thought of as the force that pulls objects towards the earth’s surface.
Surface Area – (see Lesson 1)
Velocity – speed: distance travelled per unit time.

Types of Engineering
A - 2
Lesson 4
Axle – A central shaft on which a wheel rotates.
Friction – A force that resists motion whenever the surfaces of two objects rub against each other.
Gravity – (see Lesson 3)
Kinetic Energy – The energy possessed by an object because of its motion.
Potential Energy – The energy stored in an object due to its position.
Wheel – A simple machine consisting of a circular frame with spokes (or a solid disc) that can rotate on a shaft or axle.
Lesson 5
Conductor – A material which contains movable electric charges; it facilitates the flow of electricity.
Diode – An electronic device that allows current to flow in one direction only.
Electric Circuit – An electrical device that provides a path for electrical current to flow: contains at the bare minimum a voltage source and a resistor.
Insulator – A material, such as glass or porcelain, which resists the flow of electric current.
LED – Light-emitting diode: a small diode bulb that only supports a small voltage.
Resistor – An electrical device that resists the flow of electrical current.
Voltage Source – A device or system that produces an electric force, such as a battery.
Lesson 6
Capillary Action – The process by which liquid pulls itself against the force of gravity, thanks to the attraction between molecules. Chromatography – A method of separating a mixture of compounds by the use of a porous material. The compounds may separate based on size or polarity or both.
Mobile Phase – The liquid or gas that flows through a chromatography system (e.g. salt water). Stationary Phase – The solid phase of a chromatography system on which the materials to be separated are selectively adsorbed (e.g. filter paper).

Types of Engineering
A - 3
Unit 1
!
!
!
!
!
!
Worksheets

Types of Engineering
A - 4
Lesson 1 Worksheet: Civil Engineering
Name: _________________________ Give a few examples of structures that civil engineers design: Discuss the design for your bridge and draw it below:
How many water bottles did your bridge hold? __________________ What were the weak points in your bridge that caused it to fail? Draw how you will redesign your bridge to make it stronger in the box below:
If you rebuilt your bridge, How many water bottles did your bridge hold this time?

Types of Engineering
A - 5
Lesson 2 Worksheet: Environmental Engineering
Name: _________________________ Name the three areas of the environment where contamination can be found: Draw your filter design below and label the materials in the box below: What is your turbidity reading for your water filter? _________________
Types of Engineering
A - 6
Lesson 3 Worksheet: Aeronautical Engineering
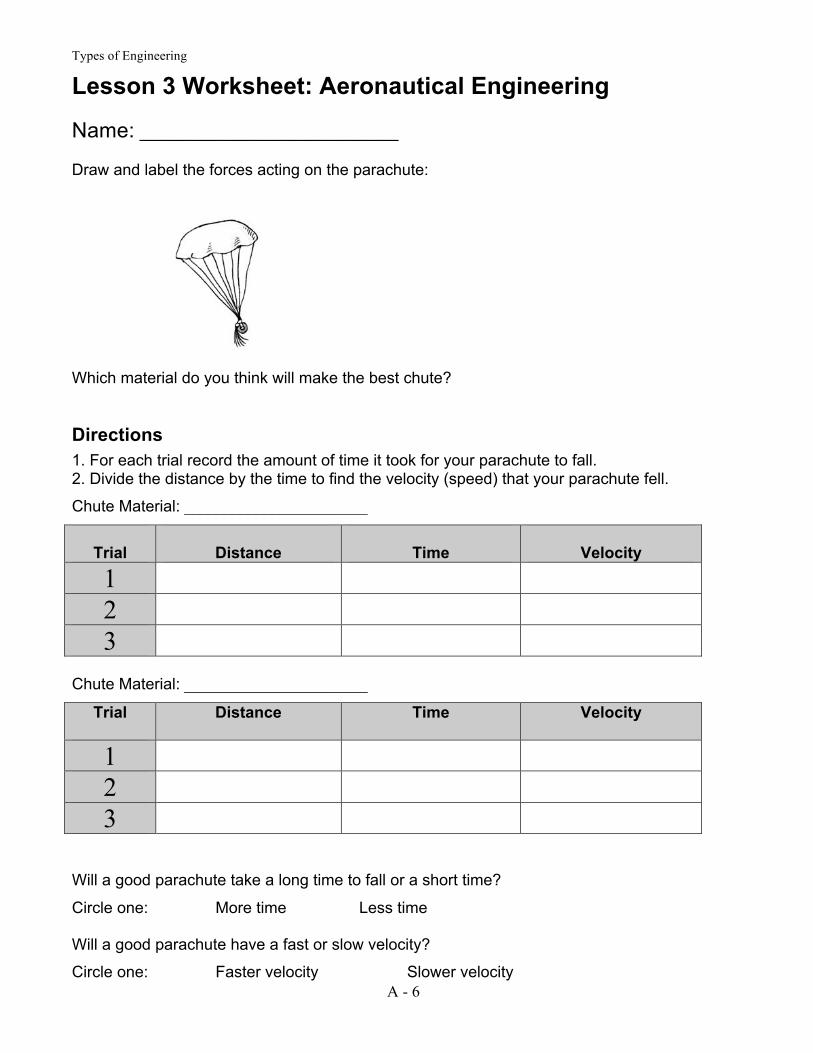
Name: _________________________ Draw and label the forces acting on the parachute:
Which material do you think will make the best chute?
Directions
1. For each trial record the amount of time it took for your parachute to fall. 2. Divide the distance by the time to find the velocity (speed) that your parachute fell.
Chute Material: _______________________
Trial
Distance
Time
Velocity
1
2
3 Chute Material: _______________________
Trial
Distance Time Velocity
1
2
3 Will a good parachute take a long time to fall or a short time?
Circle one: More time Less time Will a good parachute have a fast or slow velocity?
Circle one: Faster velocity Slower velocity

Types of Engineering
A - 7
Lesson 4 Worksheet: Mechanical Engineering
Name: _________________________ Where does the ramp roller have the most potential energy? Where does the ramp roller have the most kinetic energy? Draw the design of your ramp roller below. Label the pieces you plan to use: How far did your ramp roller travel? ___________________ How far did your ramp roller travel? ___________ How did you redesign your ramp roller? How far did your ramp roller travel the second time? ____________

Types of Engineering
A - 8
Lesson 5 Worksheet: Electrical Engineering !
Name:!@@@@@@@@@@@@@@@@@@@@@@@@@! !!
!
!
"&,+!&#AB!C#+&9/#%!+'!,&&!DB&+B&9!/+!/,!#!A'*EFA+'9!'9!#*!/*,F%#+'9.!G&A'9E!;'F9!9&,F%+,!
$;!AB&AH/*>!+B&!#II9'I9/#+&!A'%FC*.!!
!
! 1)2%(3#,',! 4#,5$(!6'+!)%57!7#,5$(!0-(&3!
)%57!3)2%(3#,',8!
9-(#7'-$! :.,5$-(%7! ;%.+5&(%7! :.,5$-(%7! ;%.+5&(%7! <#,! =%!
>-2#7!;$'2! ! ! ! ! ! !
?7-,#7! ! ! ! ! ! !
9#(-$!>#.! ! ! ! ! ! !
>#.&'$! ! ! ! ! ! !
4'@@%.! ! ! ! ! ! !
9-7@$#! ! ! ! ! ! !
>#..)! ! ! ! ! ! !

Introduction to Design
Lesson 6 Worksheet: Chemical Engineering
Name: _________________________
Pre-Lab Questions Which phase is the salt water in? (circle one): Mobile Stationary Which phase is the filter paper in? (circle one): Mobile Stationary
Which color do you predict will travel farthest up the paper? Which colors do you predict will separate into many colors?
Post-Lab Questions Which color traveled the farthest? Which color separated into the greatest number of colors? What were they?

Introduction to Design
10
Unit 2 Introduction to Design

Introduction to Design
11
Unit 2
!
Table of Contents
Curriculum Outline---------------------------------------!----.iii!
!
Activity 1!! Engineering Drawings------------------.---------------------010!
!
Activity 2!! Materials Testing------------------------------------------..2-1!
!
Activity 3!! Egg Drop---------------------------------------------..--.3-1!
!
Activity 4!! Paper Towers---------------------------------------------4-1!
!
Activity 5!! Engineering and Conservation---------.------------------------5-1!
!
Activity 6!! Spoon Catapults----------------------------------------.!--..610!
!
Glossary-----------------------------------------------.! -..--J10!!
Appendix ! Engineering Design Process---------!--.-----------------------.K10!
!
Worksheets-------------------------------.-----------------..L10!
STOMP Curriculum Outline

Introduction to Design
12
Unit 2: Introduction to Design These activities are intended for use in a STOMP 5th grade classroom, but can be modified at the instructor’s discretion for grades 3 – 7. They are based on the idea of student-driven design, as this is a common idea to all engineering. As students work through the activities, they will develop both their design and their building skills as the challenges become more difficult. Central to these activities is the concept of the Engineering Design Process, which is an iterative design process that encourages creativity, teamwork, and improving designs.
Activity 1
Engineering Drawings
Students will learn about multiview and 3D drawings, create guided 3D and multiview drawings, and then create their own 3D drawing.
Featured Engineering Skill(s): Communicating design ideas. Real World Connection: Engineers and architects use multiview and 3D drawings to communicate their design ideas. These drawings must be very detailed so that other people work on a project know exactly what the engineer was thinking when he or she created the design. Sometimes these drawings are done by hand, but more often they are drawn with CAD (Computer Aided Design), which uses computers to create very accurate 3D images. Extension(s): Measure the object and add the dimensions to your drawing. Create a multiview drawing of a new object.
Activity 2 Materials Testing
Students will research materials and what material factors influence an engineer’s decision to choose a certain one. They will then test these factors on the materials handed out in the classroom to decide which material they might build a bike out of.
Featured Engineering Skill(s): Identifying appropriate materials for a specific a design task
Real World Connection: Engineers must take many factors into consideration when choosing a material for a product. Strength is not the only important factor. Cost, appearance, and durability are three factors that engineers must also consider. One example is choosing materials for a bicycle. Engineers must consider not only how the bike will stand on its own, but how it will support the weight of a person while moving over bumps and jumps. A sturdy and strong material is needed, but the material should also be slightly elastic to absorb shock. The weight of the material should be taken into account so that people can transport their bikes. Extension(s): Give limitations, such as cost or weight, and have students choose the best material. Talk about which material would be best for a different item (i.e. cars, computers, desks). Add a new material to the list.
Activity 3 Egg Drop
Students will build a device to protect an egg that is dropped from the instructor’s shoulder.
Featured Engineering Skill(s): Designing for safety, Engineering design process Real World Connection: Engineers design protective devices, such as helmets. There are many types of helmets, each designed for a specific purpose: bike helmets are light and aerodynamic for

Introduction to Design
13
speed, construction helmets have hard tops to protect from falling objects, and hockey helmets have face masks to protect players from flying pucks. Engineers must construct and test prototypes of these helmets to be sure that they will protect people before selling them to the pubic. Extension(s): Drop the egg helmet from a greater height. Redesign the egg helmet using fewer materials.
Activity 4 Paper Towers
Students will construct a tower out of paper that will support a weight (e.g. a stack of books).
Featured Engineering Skill(s): Building sturdy structures that can support a load. Real World Connection: Engineers design everything from chairs to bridges to skyscrapers, and it is important that these designs are sturdy and can support loads. A chair must be able to hold a person without collapsing, a bridge must be able to hold a lot of people and their cars, and a skyscraper has to hold people, office equipment, and its own weight, so it is essentially a load on itself! The taller a skyscraper is, the more difficult it is for it to keep itself standing upright. These structures are also designed to respond to the changing environment around them, such as wind, lightning, and earthquakes. Extension(s): Increase the load. Redesign the tower.
Activity 5 Engineering and Conservation
Students will build a house unaware that after the construction of their first house they will be asked to construct a second house with the remaining materials.
Featured Engineering Skill(s): Building with sturdy shapes, Conservation and engineering
Real World Connection: Engineers choose what material(s) and how much of a material they will use for the construction of their design. For example, houses can be made of many different materials (wood, brick, stone, etc). Planet earth only provides us with a limited amount of these materials, and therefore we must be careful about how much we use. For example, construction of a wood house requires that trees are cut down. Trees grow back, but it takes a lot of time. People need hosues to live in, but cutting down as few trees as possible to build these houses will allow forests to regenerate and will prevent the depletion of wood as a resource. Engineers must think about the sustainable use of resources when creating designs so that we do not run out of materials. Extension: Build as many houses as possible with given materials
Activity 6 Spoon Catapult Students will construct a lever from a spoon to launch a cotton ball as far as possible.
Featured Engineering Skill(s): Using levers to do work. Real World Connection: Greeks and Romans used catapults as early as 400 BC, though most of us probably associate catapults with fortified castles in the Middle Ages. They were used to fling heavy objects into cities under siege. Catapults are an example of third class levers. Catapults work by applying a strong force on the short arm of a lever. The long arm covers a greater distance than the short arm in the same amount of time. As a result, a catapult can launch a load from the long arm of the lever farther and faster. Other examples of third class levers include hockey sticks and staplers. Extension: Set up a target and see if students can adjust their catapult’s aim to hit it.

Introduction to Design
14
!
!

Introduction to Design
1 - 1
Introduction to Design: Lesson 1
Engineering Drawings
M:&9:/&D! Guided by the teacher, students will create a three-dimensional drawing of a cube and multiview drawings of a simple everyday object. They will then create their own 3D drawings of the same object. They will need to focus on representing the object accurately and with detail so as to best communicate what the object actually looks like.
Goals Expectations Evidence
Students will understand: • The importance of
communicating designs through drawings.
Students should be able to: • Recognize different sides
of an object.
Evidence of learning found in: • Drawings that resemble
the shape.
Multiview (2D) Drawing
Real Object
3D Drawing

Introduction to Design
1 - 2
Suggested Time
One 60-minute session
Vocabulary
Drawing Template
Front View
Multiview (2D) Drawing
Top (Plan) View
Side View
Three-Dimensional (3D) Drawing
Materials
For each student:
• 4-grid drawing template (See
Appendix)
• 3 different colored
markers
• Ruler
For each student pair:
• Object with a simple
shape to draw
For classroom:
• Simple object for
guided multiview (2D) drawing
Preparation
• Collect simple, everyday objects
(one for each pair).
• Practice your own
2D & 3D drawings.
• Distribute drawing
template
Background
A multiview drawing is a 2D representation of a 3D object. It shows the front, side, and top (“plan”) views with parallel lines as if it is being looked at straight on. It can be more descriptive than a 3D drawing.
http://www.tpub.com/blueprintreading/14040_files/image042.jpg
A three-dimensional (3D) drawing uses length, width, and height to create the illusion of depth. The most descriptive 3D drawings show the top, front, and side of an object. This can be accomplished by rotating the object so that the point closest to you is a corner. Draw this corner as the lowest point in your drawing with a vertical line. Make sure that all lines going in the same direction are parallel.
Instructions
PART I: Introduction to 2D and 3D drawings 10 minutes
1. Explain to students what they will be creating multiview drawings of objects found in the classroom.
2. Lead a class discussion on how engineers create drawings to communicate their design ideas.
Lesson 1
Engineering Drawings

Introduction to Design
1-3
What object to draw?
Of the many objects in a
classroom, most are too
complicated for students
just learning to draw in
three dimensions.
Contoured or very
detailed objects are
difficult to draw, so try
selecting simpler ones with basic shapes. If
you’re worried about the
selections your students
might make, try
gathering a collection of
appropriate objects
beforehand that they can
choose from. These can
include tissue boxes,
erasers, chalk, a roll of
masking tape, etc.
!!!!!!!!!!!!
Note: Coloring the top,
side, and front view
surfaces of your object
different colors can help
students to distinguish the
different views (see
“Sample Objects and
Drawings”).
!!!!!!!!!!!!
3. Have students think of objects that an engineer would draw and who would use the drawing to create a final product (architectural drawings to build houses, toy/furniture assembly instructions, etc).
4. Choose a simple object in the classroom and use it to create a sample multiview (2D) and 3D
drawing on the blackboard. Alternatively, you may copy a drawing that you prepared to the blackboard:
• Carry the object around the classroom for students to examine.
• Show students what parts of the object are visible if you look a one side straight on. Show the top, side and front views.
• Draw each view out on the board for the students to see. • Show students how to create a 3D drawing of your object.
PART II: Guided 2D Multiview Drawing 10 minutes
1. Chose a new object to draw.
2. Starting with the side view of the shape, display this surface to the class and draw the outline of this side on the board.
3. Show that lines or circles are added where there are edges or holes in the object.
4. Have the students copy this drawing into the box labeled “side view”.
A:6?!B:?C!
5. Rotate the shape to display the front view and ask the students to first draw the outline of the surface themselves in the box labeled “front view”.
6. Have the students fill in the correct lines in their outlines.
7. Repeat steps 2 – 6 for the top view, and front view.
PART III: Guided 3D Cube Drawing 10 minutes
1. Next, introduce students to 3D drawing. Draw a cube on the board have students follow along in the box labeled “cube” on their drawing template.
2. As a class, draw a vertical line of equal length from the bottom corner using a straight edge (e.g. ruler). From there, follow the diagrams on the next page:
Lesson 1 Engineering Drawings
Introduction to Design
1-4
http://www.ider.herts.ac.uk/school/courseware/graphics/drawing_box_in_isometric.html
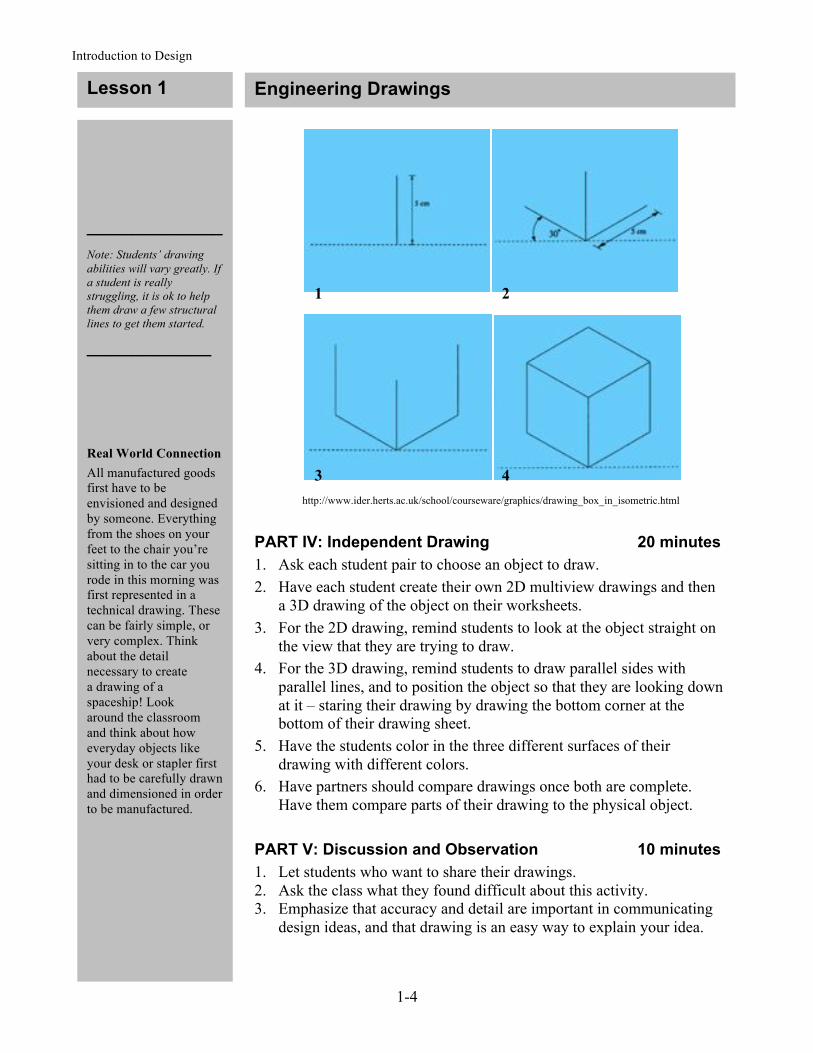
PART IV: Independent Drawing 20 minutes
1. Ask each student pair to choose an object to draw.
2. Have each student create their own 2D multiview drawings and then a 3D drawing of the object on their worksheets.
3. For the 2D drawing, remind students to look at the object straight on the view that they are trying to draw.
4. For the 3D drawing, remind students to draw parallel sides with parallel lines, and to position the object so that they are looking down at it – staring their drawing by drawing the bottom corner at the bottom of their drawing sheet.
5. Have the students color in the three different surfaces of their drawing with different colors.
6. Have partners should compare drawings once both are complete. Have them compare parts of their drawing to the physical object.
PART V: Discussion and Observation 10 minutes
1. Let students who want to share their drawings. 2. Ask the class what they found difficult about this activity. 3. Emphasize that accuracy and detail are important in communicating
design ideas, and that drawing is an easy way to explain your idea.
!!!!!!!!!!!!
Note: Students’ drawing
abilities will vary greatly. If
a student is really
struggling, it is ok to help
them draw a few structural
lines to get them started.
!!!!!!!!!!!
Real World Connection
All manufactured goods first have to be
envisioned and designed
by someone. Everything
from the shoes on your
feet to the chair you’re
sitting in to the car you
rode in this morning was first represented in a
technical drawing. These
can be fairly simple, or
very complex. Think
about the detail
necessary to create
a drawing of a
spaceship! Look
around the classroom
and think about how
everyday objects like
your desk or stapler first had to be carefully drawn
and dimensioned in order
to be manufactured.
Lesson 1 Engineering Drawings
2 1
4 3

Introduction to Design
A - 5
Introduction to Design: Lesson 2
Extensions and Modifications
1. Measure the dimensions of the object and label the sides on the drawings.
2. Create a multiview (2D) or 3D drawing of a new object.
Sample Projects and Photos
Real Object:
3D Drawing:
2D Multiview Drawing:
Lesson 1 Engineering Drawings
Do It Yourself!
This simple shape was created with a
cardboard box, a few
rolls of tape, and some
construction paper. The
blue represents the side
view, the yellow the
front view, and the red the plan view.

Introduction to Design
1-4
Material Testing
Overview Students will learn about different materials that bikes are made of. They will learn about the factors, such as weight, looks, cost, strength, etc, that influence an engineer’s decision to choose a certain material. Students will evaluate the bike materials based on a chart of information about them, and will then proceed to conduct their own research of materials handed out in the classroom. Students should think about the purpose of a bike and what kind of properties they would want their own bike to have.
http://uwadmnweb.uwyo.edu/oap/images/atlas%20bike.gif
Goals Expectations Evidence
Students will understand: • Why researching materials is
important. • Important factors to consider
for choosing an appropriate material.
Students should be able to: • Evaluate various properties
of materials. • Determine and justify which
material is best to use for bike construction.
Evidence of learning found in: • Evaluation of material
properties. • Justification for which
material is the best.

Introduction to Design
1-4
Suggested Time
One 60-minute session
Vocabulary
(see glossary)
Elasticity
Friction
Load
Strength
Trade-off
Materials
For each student: • “Materials Testing”
worksheet (See
Appendix)
For each student pair:
• Hot Glue Stick
• Popsicle Stick
• Plastic Spoon
• Wire (e.g. pipe
cleaner)
• Metal Rod (e.g.
thin nail)
• “Real Bike
Materials”
worksheet (See
Appendix)
Preparation
• Arrange students in pairs.
• Distribute
worksheets and
materials
Background
Engineers must consider many factors when choosing a material for their designs. Engineers must create strong, durable designs. Strength
quantifies an object’s ability to resist an applied force, whether that be the force of the object itself or an external force (the load).
Engineers must also consider friction, the force of resistance between two objects, in their designs. For example, on a bike, friction plays a role in tire design. Road bikes have thin, smooth tires to reduce friction for faster movement versus mountain bikes, which have wide, rough tread to increase friction in order to reduce falls when going over bumpy trails.
Finally, the engineer must consider the usability of their product. For a bike, engineers want to reduce the amount of shock the rider feels as he/she goes over bumps and jumps. Elasticity - the amount a material can be bent and come back to its original shape - helps reduce the shock felt by the rider. However, a material that is too elastic will not support a load.
Instructions
PART I: Introduction to Material Selection 10 minutes
1. Explain that part of an engineers job as the designer of a product is to choose the material that product will be made out of.
2. Using bicycles as an example, talk about the factors that engineers must keep in mind when choosing a material: • Discuss the different kinds of loads, or applied weights, a bike
might experience. • Talk about friction on tires and when you might want more
friction (mountain bikes) and when you might not (road bikes). • Talk about elasticity in relation to strength and how elasticity is
important so that a bike frame can give as it rides over bumps. Explain that too much elasticity can cause a bike frame to lose its shape.
• Brainstorm other factors that influence an engineer’s choice of materials. E.g. cost, looks, availability, durability, etc.
PART II: Discussion of Real Bike Materials 10 minutes
1. As a class go over the “Real Bike Materials” sheet and evaluate the pros and cons of aluminum, carbon, steel, and titanium.
Lesson 2
Materials Testing

Introduction to Design
1-4
What do students think
about elasticity?
Though students probably have an
intuitive sense of what
elasticity is, they most
likely have not heard it
used in a classroom
before. Help them think
of objects that are elastic,
like dodge balls or
rubber bands. In this activity the wire, though
bendy, is not elastic
because it does not return
to its original shape.
Real World Connection
Every object has a purpose, and the material
that the object is made
out of must be chosen
with that purpose in
mind. If not, you could
end up with some
ineffective products, like
paper roller blades or a
spaghetti house. In
addition to choosing the
right basic material, engineers enhance many
materials to make them
more safe or durable. For
example, most clothing
is enhanced with flame-
retardant, and outdoor
furniture is often covered
with resin to help protect
from the weather.
2. Introduce the idea of a trade-off: One material may have some very desirable qualities, but it sacrifices others. For example, steel is the strongest material, but it is also very heavy.
3. Discuss which factors are most important in designing a bike and which materials the student would choose to build their bike.
PART III: Materials Research and Evaluation 15 minutes
1. Tell students that their challenge is to research materials and determine which to use to build a bike frame.
2. Pass out the “Materials Testing” worksheet and explain each category and the rating system to the class. The relative cost of materials has already been filled out.
3. Have the students discuss the materials in pairs while filling out their own worksheets.
4. Have each student decide which material he/she would choose for his/her own bike.
PART IV: Discussion and Observation 10 minutes
1. Lead a class discussion about each material. Hold each material up as you talk about it for the students to see in order to better remind them of its properties.
2. Discuss the pros and cons of all the materials: • Which material did the best overall? • What were some of the trade-offs? • What are some other factors we could have considered?
Extensions and Modifications
1. Give limitations, such as cost or weight. 2. Talk about which material would be best for a different item. 3. Add a new material to the list.
Lesson 2 Materials Testing

Introduction to Design
1-4
Lesson 2 Materials Testing
Sample Projects and Photos
http://media.rei.com/media/u/1260672.jpg
8&%!N&#+!
GF$$&9!"/9&,!
7%FC/*FC!O9#C&!
N+&&%!NI'H&,!

Introduction to Design
1-4
Introduction to Design: Lesson 3
Egg Drop
Overview Students will design and build a structure to protect and egg that is dropped from shoulder height. Students will be given a set of materials and asked to draw out their design. Students should consider the purpose of their structure when designing. This lesson includes an introduction to the entire engineering design process as a process that students can use to accomplish this design task.
Goals Expectations Evidence
Students will understand: • The steps of the engineering
design process. • What a prototype is.
Students should be able to: • Design their structure on
paper before constructing it. • Construct a protective
device.
Evidence of learning found in: • Worksheets • Structures that protect eggs
from breaking. • Attempts to redesign original
structures.
Suggested Time
One 60-minute session
Vocabulary
Background
The Engineering Design Process is an 8-step guideline that engineers follow to ensure that their product is designed efficiently and effectively. Engineers often have to repeat the process until they come up with a
Lesson 3
Egg Drop

Introduction to Design
1-4
Real World Connection
Wonder how a real engineer thinks about
designing a helmet?
Most functional helmets
are comprised of a foam-
like liner and a shell. The
liner serves to absorb the
shock of the impact and
the shell prevents any foreign object from
penetrating the helmet.
Based on the activity,
some helmets have
additional protective
measures: a football
helmet has a caged front
for head-on collisions
and motorcycle helmet
has a visor for wind.
3. As a class, brainstorm other ideas of products that engineers design where safety is a concern (cars, toasters, dams, etc).
4. Present the students’ challenge of creating a “helmet” for an egg that will be dropped from shoulder height:
5. Show students the materials that will be available to them.
PART II: Using the Engineering Design Process 5 minutes
1. Introduce and briefly explain the eight steps of the EDP. Recall the previous two lessons and talk about what parts of the EDP were highlighted in them (Drawings – Step 3 Develop Possible Solutions, Materials – Step 2 Research the Need or Problem).
2. Highlight how the EDP will be followed in the lesson, especially the following steps:
• Step 5 – Construct a prototype: Student will build a egg helmet. • Step 6 – Test and Evaluate Solution(s): Students will perform a drop
test. • Step 8 – Redesign: Students will improve on their original design.
3. Explain the definition of a prototype – students constructions will be a prototype of a helmet.
4. Tell students that they will perform a drop test from the height of the instructors shoulder to evaluate their design.
5. The students will be able to take apart their helmet and redesign to improve on their design.
PART III: Building the Egg Helmet 20 minutes
1. Arrange students into pairs. Distribute kits and worksheets. 2. Have students discuss their design ideas with their partner and draw a
design of their helmet on their worksheets. 3. When an instructor has approved of a group’s design, allow students
to begin building. 4. Encourage groups to share ideas with each other.
PART V: Testing the Egg Helmet 15 minutes
5. Designate an area of the classroom for testing. You may want to lay down a trash bag or a plastic sheet to keep the floor clean.
6. As students complete their egg helmets, have them bring their prototype to the testing area and perform the test.
7. If a group’s egg breaks, give students another hard-boiled egg and allow them to redesign on a piece of paper, rebuild, and retest.
8. If a groups egg does not break, drop it from higher and higher until it does, then have students redesign and retest at that new height. You may also challenge the group to redesign their helmet using fewer materials.
PART VI: Discussion and Observation 10 minutes
Lesson 3 Egg Drop

Introduction to Design
1-4
Introduction to Design: Lesson 4
What Questions Might
Students Ask During
This Lesson?
• Why won’t my partner let me build
anything? Some
students are more
prone to taking a
leadership role than
others. This can
manifest itself
through one student
completely
controlling the
project. Try letting
one student add one
material, then
passing it to the next
student to add the
next material.
• Isn’t it cheating to
ask another group
for ideas? No! In
some instances it
is ok to ask your
classmate for help
or answers.
Engineering is all
about teamwork and
collaboration. If you
are stuck, it is much
better to brainstorm
with your classmate
or a teacher than to
sit by yourself
feeling stumped.
• Can I use a different
material? While
creativity is
encouraged, limit
students to the
materials in the kits.
Engineers always
have constraints on
projects, and
material choice and
availability is one of
those constraints.
1. As students finish their retest, have them fill out the remainder of their worksheets.
2. Have each group to give a brief presentation on their egg helmet. • What happened on your first test? • How did you redesign? • What happened on the retest? • What materials did you use, how did you use them, and why?
3. Ask students how they used the Engineering Design Process in the designing of their egg helmets.
Extensions and Modifications
1. Drop the egg helmet from a greater height. 2. Restrict materials available to build the egg helmet by assigning costs
to each one (e.g. 1 cotton ball = $0.10). Set a budget for the materials that the egg helmet is not allowed to exceed.
3. Design the egg helmet to be as light as possible.
Sample Projects and Photos
Lesson 3 Egg Drop

Introduction to Design
1-4
Paper Towers
Overview Students will construct towers to hold up a load (a stack of books) out of paper and other materials. Students will follow the steps of the engineering design process to completed this task. Students should consider using sturdy structures to construct their towers. Successful towers will most likely include, solid bases, the use of sturdy shapes, and the consideration of where the load is placed. The tower must be able to stand on its own before holding a weight.
Goals Expectations Evidence
Students will understand: • How to build a sturdy
structure. • How structures support a
load. • Compression and tension.
Students should be able to: • Use sturdy shapes in their
design.
Evidence of learning found in: • Towers that stand on their
own and can support a load. • Class discussion on sturdy
towers.
Suggested Time
One 60-minute session
Vocabulary
(see glossary)
Background
In this lesson students will learn about the previously mentioned “sturdy” structure in more depth. Qualities that make a structure sturdy include arches and triangles. A solid base is also necessary. Students will have to think about how to place their sturdy elements so that their
Lesson 4
Paper Towers

Introduction to Design
1-4
4. Introduce arches as another sturdy shape. Explain how arches distribute a load across the bridge. Either pass around pictures of arches (see Sample Pictures) or draw them on the board.
5. Explain the difference between compression and tension. 6. Show students a flat piece of paper and how it bends under
compression, but stays strong under tension. Ask students if they can think of a way to make the paper strong under compression. Help students come up with the idea of rolling up the paper into a tube.
7. Tell students that they will be designing and building a paper tower. • Show students the materials that they will be allowed to use. • Show the students the load that their towers will have to support. • Tell students the height requirement of their sky scraper
(suggested: between 4 – 12 inches)
PART II: Using the Engineering Design Process 10 minutes
1. Recall last week’s lesson and how students used the Engineering Design Process (EDP) to create an egg helmet.
2. Restate all steps of the EDP and draw a diagram on the board. 3. Emphasize the steps that will be used in this lesson:
• Step 3 – Develop Possible Solutions: Students will draw out their design on their worksheets before they begin building.
• Step 5 – Construct a Prototype: The paper tower that the students will build is their prototype.
• Step 6 – Test and Evaluate Solutions: Students will test their tower by placing a stack of books on it. They will then think about how to make it better or what caused it to fail.
PART III: Tower Building and Testing 25 minutes
1. Arrange students into pairs and distribute worksheets. 2. Have students plain their designs on their worksheets. 3. When an instructor has approved a group’s design, give students the
materials and allow them to construct their paper tower. 4. Test the towers by carefully stacking book on top of the towers. 5. Have students watch carefully to see which parts of their tower start
to buckle first to identify where their structure is weakest. 6. You may test all the towers at once in the front of the classroom so
that students can see the differences in design. 7. Have students fill out the remainder of their worksheet as they finish.
!!!!!!!!!!!!
Using the Engineering
Design Process
Researching a
Need/Problem is an
important step in the
Engineering Design
Process. Make sure students
have a clear picture of their
design with labeled
materials before they start
building.
!!!!!!!!!!!!
Real World Connection
The Sears Tower, located in Chicago, is the tallest
skyscraper in the United
States. To withstand the
mighty winds of the
Windy City, the Sears
Tower has the right combination of rigidity
to keep it upright and
flexibility to make sure it
doesn’t snap like a stick.
Lesson 4 Paper Towers

Introduction to Design
1-4
Introduction to Design: Lesson 5
Lesson 4 Paper Towers
What do Some
Students Think About
Sturdy Building?
• Stacking rectangles directly on top of
each other is the
sturdiest way to
build. Actually,
allowing rectangles
to overlap creates a
much sturdier
structure. Also, as
demonstrated with
the LEGO shapes,
triangles are an
even sturdier
structure. They can
support a greater
load and don’t
deform as easily.
• Leaving no empty space is the best
way to build a
tower. Leaving no
empty space may
create a sturdy
structure, but you
will run out of
materials before
your tower is tall
enough. Even if you
had infinite
materials, a
completely solid
tower will be very
heavy and won’t be
able to be as tall as
a tower with gaps.
PART IV: Discussion and Observation 10 minutes
1. After all towers have been tested, have students throw away/recycle all used materials
2. Have each group present and discuss their tower: • Which materials were the strongest? • Which sturdy shapes/structures did they use in their tower? • How did they build for the compression of the weight on the
tower? • What part of their tower gave way first?
Extensions and Modifications
1. Redesign and rebuild towers with a new set of materials. 2. Build the tower using fewer materials. 3. Build a sturdy tower out of LEGOs
Sample Projects and Photos Arches help bear the weight of this heavy, stone cathedral wall:
http://www.visitdunkeld.com/Tours%202001%20Album%201/images/
Dunkeld%20Cathedral%20Arches_jpg.jpg
A bridge over the Colorado River uses triangles to strengthen its structure:
http://psleow.blogspot.com/2007_10_01_archive.html

Introduction to Design
1-4
Engineering and Conservation
M:&9:/&D! Students will be asked to build a house. They should keep in mind the rules of sturdy building learned in the previous lesson. Students will not be aware that after the first house they will be asked to build a second house using the materials that they have left over. It should be much more difficult for the students to build the second house. This should lead to a discussion on resource use and engineering while being aware of conservation.
http://www.cityofmelrose.org/Interns%2007/Recycle.jpg
Goals Expectations Evidence
Students will understand: • The difference between
renewable and non-renewable resources.
• The need for conservation of resources
Students should be able to: • Use sturdy shapes in the
construction of their house. • Brainstorm how they can
personally conserve resources.
Evidence of learning found in: • Activity worksheets. • Sturdy houses that meet the
requirements. • Class discussion about
conservation.

Introduction to Design
1-4
Suggested Time
One 60-minute session
Vocabulary
(see glossary)
Conservation
Natural Resource
Non-Renewable
Renewable
Sustainable
Materials
For each student: • Engineer’s Journal
For each student pair:
• 20 popsicle sticks
• 10 pipe cleaners
• 1 ft of tape
• 2 note cards
• 1 pair of scissors
• 1 LEGO person
Note: Other combinations
of building materials are
acceptable as well.
Preparation
• Arrange students in
pairs. • Distribute
worksheets and
materials
Background
In this lesson students will focus on constructing prototypes for a house and will, in the process, learn that they do not have to use all of the materials given to them. Sturdiness is a concept that should be reinforced while building. Students should attempt to incorporate triangles, arches, and sturdy bases into their structures.
Conservation of materials is a new concept that students will become aware of when asked to build their second house. Instead of unnecessarily using all materials on one large structure, students will learn that the careful management of materials allows them to build multiple structures.
Unprocessed materials that have value to humans are called natural
resources. We use natural resources to build our homes, fuel our cars, and grow our food. There are two types of natural resources: renewable and non-renewable. Non-renewable resources are ones that take millions of years to form, and therefore cannot be replenished at the rate that they are being consumed. These include oil, coal, and natural gas. Renewable resources, such as fresh water, timber, and food, are ones that can be replenished as fast as humans consume them. However, renewable resources must be managed sustainably so that we do not run out of them as well.
Instructions
PART I: Introduction to Activity 20 minutes
1. Recall sturdy shapes from the last lesson (triangles and arches) and how a sturdy base helps to keep a structure upright.
2. Discuss what made the students’ towers sturdy and what designs were not sturdy.
3. Distributing a kit to each student pair, tell students that they will be asked to build a house with the materials they have been given.
4. Each house must have at least two walls, a roof, and be large enough for a LEGO person to fit inside.
5. Ask each student to draw a design of their house in their Engineer’s Journal. Once the teacher has approved a groups’ design, have students start building.
6. As groups finish their houses, put them on display in front of the class and highlight the sturdy elements of each house.
Lesson 5
Engineering and Conservation
Introduction to Design
1-4
Note: Some groups may not
have enough materials to
build a second house. Allow
these groups to combine
their resources with another
group.
Real World Connection
Oil is a non-renewable
natural resource that is used primarily for
gasoline, but is also used
to produce everyday
objects such as shoes,
plastic bottles, and toys.
Oil is being rapidly
depleted. In fact, experts
have estimated that it
will become too
expensive to produce oil
before the end of the
century. This means that we need to start looking
to alternative, more
sustainable forms of
energy and resources to
replace oil in the near
future. In the meantime,
we can try to conserve
our remaining oil by
driving less and drinking
from reusable water
bottles.
Part II: Surprise House Building 20 minutes
1. Keeping the finished houses on display in front of the classroom, return a LEGO person to each group.
2. Ask the students to build a second house that meets the previously mentioned requirements with their remaining materials.
3. If students still have plenty of materials left after building the second house, have them build a third house. Students should keep building until they are no longer able to build a house that meets the requirements.
4. When students finish building, have them fill out the remainder of their worksheets
PART III: Discussion and Observation 20 minutes
1. Have each group present both of their houses. Ask the students: • What sturdy structures did you use in your houses? • Did you run encounter problems with the limited materials?
2. Introduce the idea of conservation and relate it to this activity. If the students had conserved more of their resources, they would have been able to make more houses.
3. Explain that the requirements could be met using very few materials. The house did not need to be large or fancy, just big enough to house the LEGO person.
4. Ask students How many houses could they have built if they had better conserved their resources?
5. Related this to the real world: • What are a lot of resources that humans use? • Could we run out of these?
6. Compare the materials in the kits to natural resources: • Natural resources come from the environment around us. • Differentiate between non-renewable and renewable resources
as materials that can be regrown or regenerated and those that can’t
• Brainstorm examples of renewable and non-renewable resources. 7. Brainstorm with the class how they can conserve resources in their
day-to-day lives. This can include taking shorter showers, biking or walking instead of driving, and recycling.
Extensions and Modifications
1. Build as many houses that meet the requirements as possible with the given materials.
Lesson 5 Engineering and Conservation
5-3

Introduction to Design
1-4
Sample Projects and Photos
The picture at left shows a sample house built from all of the materials (wooden dowels, rubber bands, tape, note cards) given to a student:
There is more than enough room to house this small LEGO man. The picture below shows three houses that were built from the exact same set of materials as the house above:
Lesson 5 Engineering and Conservation

Introduction to Design
1-4
Introduction to Design: Lesson 6
!
NI''*!Catapults!!
Overview Students will design and construct a catapult to launch a cotton ball as far as possible using a plastic spoon and other material. A catapult is an example of a lever, which is a considered a simple machine. While constructing the frame for their catapult, students will need to recall elements of sturdy building so that the frame can withstand the force of the catapult as it moves. Students will learn about the three parts of a lever that can make a catapult more or less efficient at doing work.
http://acs.chem.ku.edu/carnival2000/Activities/spectrapult.asp
Goals Expectations Evidence
Students will understand: • The parts of a lever (fulcrum,
effort, load). • How the three parts of a lever
function in a catapult.
Students should be able to: • Build a sturdy frame for their
catapult. • Complete a catapult that can
launch a cotton ball.
Evidence of learning found in: • Activity worksheets. • Working catapults. • Discussion about how to
make catapults more efficient.

Introduction to Design
1-4
Suggested Time
One 60-minute session
Vocabulary
Catapult
Effort
Fulcrum
Lever
Load
Third-Class Lever
Materials
!!!!!!!!!!!! For each student:
• Engineer’s Journal
For each student pair:
• 1 plastic spoon
• 4 rubber bands
• 20 interlocking
wooden craft sticks
(See Sample
Picture)and tape
OR
• LEGO kit (10 1x12
beams, 6 1x10 beams, 6 1x8 beams,
2 12-stud axles, 8
friction pins, 4
extended pins, 6
bushings)
For the classroom:
• Sample photo(s) of
spoon catapults and
levers.
Background
In this lesson students will construct a catapult using a plastic spoon. A catapult is a type of lever, or simple machine that allows a bar to freely pivot about a fixed point when a force is applied. The fixed point is called a fulcrum and the applied force is called the effort. The advantage of the lever is that it can use a relatively small effort to move a larger load. Specifically, a catapult is a third-class lever because the effort is applied between the fulcrum and the load.
Instructions
Part I: Introduction to Levers and Catapults 15 minutes
1. Tell the class that a lever is a simple machine, or a basic tool that helps us do work more easily.
2. Draw a picture of a third-class lever on the board. Tell the students that this is a third-class lever: • The fulcrum is the fixed position about which the bar, or lever,
rotates when an effort is applied. • Staplers, tweezers, and brooms are examples of third-class levers. • For a stapler, the connected end is the fulcrum and the hand
pressing down on it is the effort used to staple the paper, or load. 3. Ask the class if they are familiar catapults as a weapon from the
Middle Ages. 4. Tell students that they will be creating a catapult from a plastic
spoon. Pass around a picture of a spoon catapult and discuss how it acts as a third-class lever (see Sample Photo). • The rubber band provides the effort. • The fulcrum is where the end of the spoon is attached. • The load is whatever is being launched from the catapult.
PART II: Introduction to LEGO pieces (if necessary)
1. Hold up beams, pins, axles, and bushings for the class to see.
Lesson 6
Spoon Catapults
6-2

Introduction to Design
1-4
Preparation
!!!!!!!!!!!!
• Arrange students in
pairs.
• Print out pictures of
sample spoon
catapults.
• Distribute worksheets and
materials
Note: Feel free to use
LEGOs, craft sticks, or
whatever materials are
available for the
construction of the
catapult frame. If using
LEGOs, some students
may have a lot of prior
experience while others
may have none. Try to
create groups so that each
one has at least one strong
builder.
Real World Connection
Catapults were first
invented in the Middle
Ages to fling heavy objects into cities under
siege. They were used
before the invention of
canons or guns because
they are a simple
machine, and were
therefore simple to
create. After the catapult
came the invention of the
trebuchet, which could
fire with more accuracy.
You might recognize catapults and trebuchets
from the movie The Lord
of the Rings: The Return
of the King.
2. Show students how the LEGO pieces can be connected on top of each other by pressing them together or side-by-side using friction pins.
3. Show how an axle inserted through a beam allows it to rotate and how the bean can be held in place by bushings.
4. Pass around a sample picture of a LEGO catapult and point out the locations of the fulcrum, effort (rubber band), and load (cotton ball).
PART III: Building and Testing the Catapult
1. Display the sample spoon catapult picture(s) in front of class. Remind students that this is only an example and that they are encouraged to create their own designs.
2. Split students into their groups and have them plain their designs on their worksheets.
3. When a group’s design has been approved, distribute materials and have students to build their catapults.
4. Designate one area for testing with a large area in front for measuring how far the cotton ball travels.
5. Have students test their designs one at a time in the test area. Allow students to hold their catapults down as they shot the ball.
6. Allow students to redesign and retest their catapults. Suggest that they adjust the length of their lever arm or the position of their rubber band.
PART IV: Discussion and Observation
1. When all groups have finished testing collect all cotton balls and catapults. Place them in front of the classroom.
2. Have each group present their catapult. • What made their structure sturdy and what parts were less sturdy? • Which position of their lever arm made their cotton ball go the
farthest? • Did their catapult always shoot in a straight line, or was its aim
inconsistent? 3. Discuss any observations students had on their catapults
• Observe how the effort and the load move in the same direction. • Discuss the movement of the cotton ball. How far did it go? What
was it’s trajectory? • Discuss lever arm creates a more affects the shot.
Extensions and Modifications
1. Set up a target and see if the students can adjust their catapult’s aim to hit it.
Lesson 6 Spoon Catapults

Introduction to Design
1-4
Sample Projects and Photos
An example of a LEGO frame spoon catapult:
The arm of the catapult is extended by attaching the spoon to a longer LEGO beam. The arm rotates around the axle secured with bushings at the bottom of the frame. Note that this is only an example. Other materials may be used for the frame, such as in the sample picture at the beginning of this lesson.
Lesson 6 Spoon Catapults
Fulcrum
Load
Effort

Introduction to Design
1-4
Unit 2 !
Glossary
Lesson 1
Drawing Template – A standard sheet formatted for a particular kind of drawing. Front View – A two-dimensional perspective showing just the face of an object. Multiview Drawing - A 2D representation of a 3D object. It shows the front, side, and top (“plan”) views with parallel lines as if it is being looked at straight on.
http://www.technologystudent.com/designpro/ortho1.htm
Top (Plan) View – A 2D perspective showing just the top of an object. Side View – A 2D perspective showing just the side of an object. Three-Dimensional (3D) Drawing – A lifelike representation of an object that uses length, width, and height to create the illusion of depth. Here is a 3D image of the object represented by the above multiview drawing:
http://www.technologystudent.com/designpro/ortho1.htm
Lesson 2

Introduction to Design
1-4
Elasticity - The tendency of a body to return to its original shape after it has been stretched or compressed. A body is not elastic if it either does not bend or if, when it does bend, it does not
return to its original shape.
Friction - The resistance encountered when one body is moved in contact with another.
Load – A weight imposed on an object. Strength – A material’s ability to resist an applied force (i.e. doesn’t break). Trade-off – A situation that involves losing one quality of something in return for gaining another quality.
Lesson 3
Drop Test – A test of the sturdiness of a structure, where the structure is dropped from the teacher’s shoulder height. Engineering Design Process – An iterative 8-step process used by engineers to develop a product. It emphasizes testing prototypes and redesigning.
Prototype – A part of engineering design that allows the engineer to test a product or part of a product on a smaller scale or using cheaper materials before the final product is manufactured. Redesign – To make alterations to an original design in order to improve upon it. Teamwork – A cooperative or coordinated effort put forth by a group of people in the interest of a common goal.
Lesson 4
Arch – A curved shape in a vertical plane that spans an opening and supports a weight.

Introduction to Design
1-4
Compression - A force related to adding a load on two sides of an object.
Load – The weight supported by a structure or part. Sturdy – Firmly built or constructed. Elements that make a structure sturdy include a solid base and the use of triangles. Resistant to some loading and other external forces. Tension – A force related to the stretching of an object.
Triangle – A three-sided polygon. A triangle is the strongest shape because it cannot be deformed without changing the length of one of its sides or breaking one of its joints.
Lesson 5
Conservation – The careful utilization of a natural resource in order to prevent depletion. Natural Resource – Any source of wealth that occurs naturally, especially minerals, fossil fuels, timber, etc. Non-Renewable Resource – A natural resource that cannot be produced, re-grown, regenerated, or reused on a scale which can sustain its consumption rate. This includes coal, petroleum, oil, and natural gas.
Renewable Resource – A natural resource that is replaced by natural processes at a rate comparable or faster than its rate of consumption by humans. This includes fresh water, plants, and wood if managed sustainably. Sustainable – Remaining diverse and productive over time.
Lesson 6
Catapult – A non-handheld mechanical devices used to throw a projectile a great distance without the aid of an explosive substance.
Effort – The force applied to a machine. Fulcrum – The fixed point about which a lever turns. Lever – A simple machine where a bar is free to pivot about a fixed point when a force is applied. Load – The weight or object being acted on by the lever; the result of the effort. Third-Class Lever – A lever where the effort is applied between the fulcrum and the load.

Introduction to Design
1-4
!
!
!
!
!
!
!
!
!
!
!
!
!
!
!
!
!
!
!
!
!
!
P*/+!2!!
7II&*E/Q!

Introduction to Design
1-4
Engineering Design Process:
P*/
+!2!
!
!
!
!
!
!
!
R
'9
H,
B&&+,!
Step 1 Identify the Need or
Problem
Step 2 Research the Need
or Problem
Step 3 Develop Possible
Solution(s)
Step 4 Select the Best
Possible Solution(s)
Step 5 Construct a Prototype
Step 6 Test and Evaluate
the Solution(s)
Step 7 Communicate the
Solution(s)
Step 8 Redesign
8-1

Introduction to Design
1-4
Lesson 1 Worksheet: Engineering Drawings
Name:____________________________________ Drawing Template:
Front View
Side View
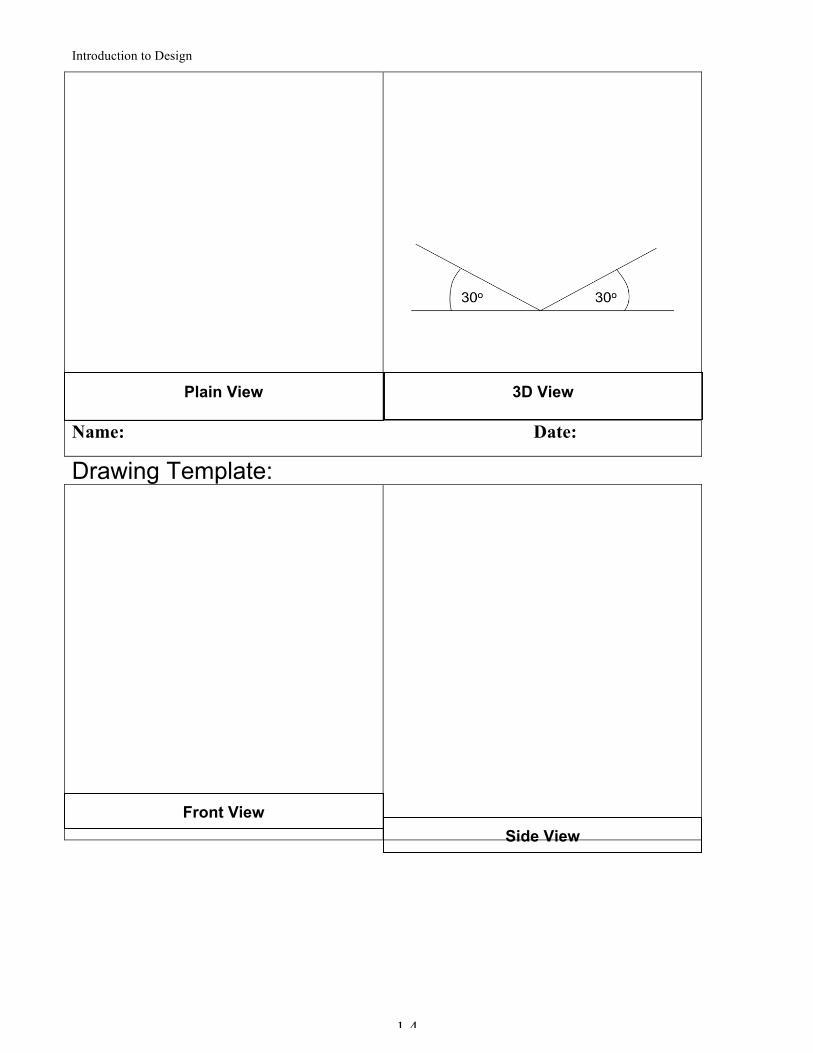
Introduction to Design
1-4
Name: Date:
Drawing Template:
Plain View 3D View
Front View
Side View

Introduction to Design
1-4
Name: Date:
Lesson 2 Worksheet: Material Testing
Name:____________________________________
REAL BIKE MATERIALS: Circle the material that you would most likely use to build a bike:
Looks Weight Cost Elasticity Strength Availability
Aluminum Must Paint
Pretty Light
$$$ Bends a lot Not as strong
Most plentiful material
Carbon Snazzy Very Light $$$$ Good shock absorption,
not too bendy
Can take lots of stress
Very popular
Steel Must Paint
Really Heavy
$$ Stiff Strongest Used for 50
years
Plain View 3D View

Introduction to Design
1-4
Titanium Very
Snazzy Ultra Light
$$$$$ Bends a lot Good Hard to work with, not very
popular
MATERIALS TESTING: Rate the materials on a scale of one to ten for each test: 1 2 3 4 5 6 7 8 9 10
!
!!
Did not do well! ! ! ! ! ! ! ! Did very well!!
!
! D%%E,! C#'F3(! ;%,(! ?$-,('&'()! A(7#.F(3!
!
0!S!F>%;!
!
0T!S!I9&++;!
0!S!B&#:;!
!
0T!S!%/>B+!
UUUUU!S!
&QI&*,/:&!
U!S!AB&#I!
0!S!*'+!:&9;!
&%#,+/A!
0T!S!:&9;!
&%#,+/A!
0!S!$9&#H,!
&#,/%;!
0T!S!+#H&,!#!
%'+!'(!('9A&!+'!
$9&#H!
1%(!G$5#!
A('&E!! ! UUUUU! ! !
>%2,'&$#!A('&E! ! ! U! ! !

Introduction to Design
1-4
>$-,('&!A2%%.! ! ! U! ! !
C'7#! ! ! UUU! ! !
4%+! ! ! UU! ! !
!
ElasticityH!The tendency of a body to return to its original shape after it has been stretched or
compressed. Even if a body is bendy, it is not elastic unless it returns to its original shape after you bend it.!
!
What material would you choose for your bike?______________________ Why?!
________________________________________________________________________________________________________________________________________________________________________ Lesson 3 Worksheet: Egg Drop! Name:__________________________________ !
=9#D!;'F9!E&,/>*!/E&#,!$&%'D!V%#$&%!/CI'9+#*+!(&#+F9&,WX!
!
!
!
!
!
!
!
!
!
!
!
!
!
!
0. RB#+!D&9&!+B&!$&,+!#,I&A+,!'(!;'F9!E!

Introduction to Design
1-4
=&,A9/$&!B'D!;'F9!E&,/>*!D/%%!I9'+&A+!;'F9!&>>!(9'C!#!E9'IX!
________________________________________________________________________________________________________________________________________________________________________________________
What was the result of your first test?
____________________________________________________________________________________
!
Draw your redesign ideas below (label important features):
!
!
!
!
!
!
!
!
!
!
!
!
!
!
Describe how your design will protect your egg from a drop:

Introduction to Design
1-4
________________________________________________________________________________________________________________________________________________________________________________________
What did you change from your first design?
____________________________________________________________________________________
What was the result of your redesign test?
____________________________________________________________________________________________
D#,,%.!I!C%7E,3##(H!>-2#7!J%K#7,!
Name:______________________________
Draw your design ideas below (label important features):
!
!
!
!
!
!
!
!
!
!
!
!
0. RB#+!D&9&!+B&!$&,+!#,I&A+,!'(!;'F9!E!

Introduction to Design
1-4
!
Describe how your design will protect your egg from a drop:
________________________________________________________________________________________________________________________________________________________________________________________
How much did your tower hold?__________________________________ Where did the structure break first?
____________________________________________________________________________________
Lesson 5 Worksheet: Engineering and Conservation Name:______________________ Draw out a design for your house. Label the important features:

Introduction to Design
1-4
Describe any important design features:
________________________________________________________________________________________________________________________________________________________________________ Did you have any difficulties with this activity?
______________________________________________________________________________________________________________________________
Lesson 6 Worksheet: Spoon Catapults Name:__________________________ Draw the design for your catapult. Label the effort, load, and fulcrum:
Catapult Testing:
Trial # Distance of Shot Redesign Ideas

Introduction to Design
1-4
Trial 1
Trail 2
Trial 3
Trial 4