explanatory note – commercial lighting … c/12/11919 page 1 of 48 explanatory note – commercial...
TRANSCRIPT

Reference: C/12/11919
Page 1 of 48
EXPLANATORY NOTE – COMMERCIAL LIGHTING UPGRADE
Version 4.13 – 16 April 2016
The Victorian Energy Efficiency Target (VEET) scheme is a Victorian Government initiative promoted as the Energy Saver Incentive.
TABLE OF CONTENTS
1 INTRODUCTION ............................................................................................................................ 3
2 HOW THIS DOCUMENT IS STRUCTURED ................................................................................. 3
3 BEFORE YOU BEGIN .................................................................................................................... 3
4 KEY CONCEPTS AND ISSUES .................................................................................................... 4
4.1 Product safety and OH&S ...................................................................................................................... 5
4.2 Eligible upgrades ................................................................................................................................... 6
4.3 Role of upgrade manager ...................................................................................................................... 7
4.4 Using subcontractors ............................................................................................................................. 7
4.5 J6 and non-J6 upgrades ........................................................................................................................ 7
4.6 VEEC calculation method ...................................................................................................................... 8
4.7 Upgrades, areas and calculation zones ............................................................................................... 10
4.8 Asset lifetime references ..................................................................................................................... 12
4.9 Annual operating hours........................................................................................................................ 26
4.10 Technology types – Conventional and emerging ................................................................................. 29
4.11 Compliance with AS/NZS 1680 ........................................................................................................... 30
4.12 Required training and qualifications ..................................................................................................... 33
4.13 Assignment of rights to VEECs ............................................................................................................ 33
5 END TO END PROCESS ............................................................................................................. 34
5.1 Understand VEET and Schedule 34 .................................................................................................... 35
5.2 Become accredited .............................................................................................................................. 35
5.3 VEET products .................................................................................................................................... 36
5.4 Engage clients ..................................................................................................................................... 36
5.5 Pre-calculate VEECs ........................................................................................................................... 37
5.6 Gather baseline information ................................................................................................................. 41
5.7 Undertake works .................................................................................................................................. 41
5.8 Gather upgrade information ................................................................................................................. 41
5.9 Obtain assignment of rights ................................................................................................................. 42
5.10 Decommission any removed lighting equipment ................................................................................. 42
5.11 Collate documentation pack ................................................................................................................ 42
5.12 Create VEECs using VEET online system ........................................................................................... 43
5.13 ESC assesses VEEC creation application ........................................................................................... 47
5.14 ESC registers VEECs .......................................................................................................................... 47
6 SEEKING ASSISTANCE .............................................................................................................. 48
7 LEGAL CONTEXT FOR THIS DOCUMENT ................................................................................ 48

Reference: C/12/11919
Page 2 of 48
TABLE OF FIGURES
Figure 1: Subdividing an upgrade project into calculation zones ...................................................................... 11
Figure 2: Asset lifetime scenarios – Installing new lighting components – Decision Matrix .............................. 14
Figure 3: Asset lifetime reference scenarios – Installing new lighting components – Regulation Wording ....... 15
Figure 4: Asset lifetime scenarios – Replacing lighting components – Decision Matrix .................................... 16
Figure 5: Asset lifetime reference scenarios – Replacing lighting components – Regulation Wording ............. 17
Figure 6: Asset lifetime scenarios – Removing or decommissioning lighting components – Decision Matrix ... 19
Figure 7: Asset lifetime reference scenarios – Removing or decommissioning lighting components –
Regulation Wording .......................................................................................................................................... 20
Figure 8: Asset lifetime scenarios – Any other case – Decision Matrix ............................................................ 22
Figure 9: Asset lifetime reference scenarios – Any other case – Regulation Wording ..................................... 23
Figure 10: Asset lifetime reference scenarios – J6 Summary ........................................................................... 24
Figure 11: Asset lifetime reference scenarios – Non-J6 Summary ................................................................... 25
Figure 12: Space type, annual operating hours and IPD .................................................................................. 26
Figure 13: Building (BCA) classification and relevant operating hours ............................................................. 28
Figure 14: Conventional (non-emerging) vs emerging technologies ................................................................ 30
Figure 15: Example workings to establish lumen depreciation ......................................................................... 31
Figure 16: End to end process map ................................................................................................................. 34
Figure 17: VEEC calculator – basic functionality .............................................................................................. 38
Figure 18: VEEC calculator – variable data requirements – J6 scenarios ........................................................ 39
Figure 19: VEEC calculator – variable data requirements – Non-J6 scenarios ................................................ 40
Figure 20: Documentation checklist ................................................................................................................. 43
Figure 21: Schedule 34 user interface .............................................................................................................. 44
Figure 22: VEEC creation - variable data requirements - J6 scenarios ............................................................ 45
Figure 23: VEEC creation – variable data requirements – Non-J6 scenarios ................................................... 46

Reference: C/12/11919
Page 3 of 48
1 INTRODUCTION
Undertaking a commercial lighting upgrade became an eligible prescribed activity under Schedule
34 of the Victorian Energy Efficiency Regulations 2008 (the Regulations) in 2012. The purpose of
this document is to help Accredited Persons (APs) understand the lighting upgrade activity, as well
as to provide important information about their obligations when undertaking this activity.
This explanatory note makes extensive reference to the Regulations, which are available for
download from the VEET website (www.veet.vic.gov.au).
2 HOW THIS DOCUMENT IS STRUCTURED
This document explains how to participate in the commercial lighting activity of the Victorian Energy
Efficiency Target (VEET) scheme. This activity is complex, both administratively and technically.
Participants typically need to dedicate considerable time to understanding how it works, even if they
have many years of experience in the lighting industry.
This document focuses on requirements to participate in commercial lighting activities as they relate
to building based upgrades. The Essential Services Commission (ESC) is developing further
guidance in relation to lighting upgrades to be undertaken on a road or in a public or outdoor space,
or involving the replacement of traffic signals (non-building based). For participants seeking to
engage in non-building based commercial lighting upgrades, please contact the ESC for further
information at: [email protected].
This explanatory note begins by explaining some of the key concepts and issues – see Section 4 of
this document. You will need a firm grasp of this section in order to review and comprehend the
other sections of this document.
Sections 5 to 7 of this document (in particular Section 5) explain the process for participating in this
activity. Section 5 details the end-to-end process of the activity, starting with getting accredited and
finishing with the registration of Victorian energy efficiency certificates (VEECs). It is only one
example of how you might structure your engagement with the scheme. Every business is different,
and you may find that the specifics of your arrangements differ, but Section 5 should provide an
easy way to find the information you need, when you need it.
3 BEFORE YOU BEGIN
This is not the only document you will need in order to understand how to participate in this activity.
Especially if you are new to the VEET scheme, you should access the following documents and
keep them handy. They will be referred to in this document and some (such as the Regulations) will
be important throughout your involvement in the scheme.

Reference: C/12/11919
Page 4 of 48
All the following documents can be accessed via the VEET website.
1. Victorian Energy Efficiency Target Act 2007 (the Act)
2. Victorian Energy Efficiency Target Regulations 2008 (the Regulations)
3. Victorian Energy Efficiency Target Guidelines 2013 (the Guidelines)
4. Either the Explanatory Note – Lodging an Application for Accreditation (if you are not yet
accredited) or Explanatory Note – Lodging an Application for Additional Activities (if you are
already an AP)
5. Explanatory Note – Lodging a Product Application
6. Explanatory Note – Creating VEECs from Prescribed Activities
7. Explanatory Note – Compliance Requirements for Accredited Persons by Prescribed Activity
8. Frequently Asked Questions (FAQ) – see the top right corner of the VEET website.
There is also some specific commercial lighting documentation that is not listed above but which will
be introduced as you step through the document. You should download a copy of each of these
documents below and keep them handy while reading this explanatory note. You can access them
from the Forms – Assignment – Business page of the VEET website.
1. Schedule 34 documentation pack coversheet template
2. Schedule 34 assignment form template
3. VEET upgrade data summary template
4. AS/NZS 1680 compliance declaration template
The ESC has prepared this document to help APs understand how to participate in the commercial
lighting upgrade activity under Schedule 34 of the Regulations. However, you should not rely on this
document to discharge your legal responsibility and this document should be read in conjunction
with the Act, the Regulations and the Guidelines. You should review and have a thorough
understanding of the Regulations, in particular Schedule 34.
4 KEY CONCEPTS AND ISSUES
There is a range of concepts and terminology that are specific to undertaking lighting upgrades in
the VEET scheme. Even if you’re an experienced lighting installer, to successfully participate in the
scheme you will need to take the time to familiarise yourself with the following key concepts and
issues.
These two templates are located in the same Excel file on the website.

Reference: C/12/11919
Page 5 of 48
4.1 PRODUCT SAFETY AND OH&S
For an installation to be eligible under the VEET scheme, it must comply with all relevant laws and
regulations, including those relating to Occupational Health & Safety (OH&S). This applies to all
installations – including in circumstances where you subcontract the actual installation work to a third
party.
4.1.1 Replacing a luminaire – Important information
One issue of particular relevance to the commercial lighting activity is that of replacing a linear
fluorescent lamp with a T5 adaptor or an LED tube.
If you are planning on installing these products, you should ensure that you thoroughly understand
the OH&S, compliance and warranty implications. As a starting point, you should refer to Information
Bulletin #0001- Safety of T8 Lamp Replacement Tubes and Modified Luminaires released by the
Electrical Regulatory Authorities Council (ERAC) in November 2011. You should also satisfy yourself
that the products you plan to install do not pose any unreasonable electrical risks to your installers or
to your client, either during the installation process or post-installation.
Importantly, you should understand that ‘modifying’ an existing luminaire may effectively create a
‘new’ luminaire from a legal viewpoint. This means that you will likely become responsible for that
luminaire’s compliance with relevant safety and electro-magnetic compatibility laws and standards.
Further, the upgrade may void the warranty provided by the original luminaire manufacturer,
meaning you may be considered liable should the product malfunction post-installation. From 16
May 2016 the assignment form must include this information as a tick box for the customer to sign,
and you should ensure that they are aware of the implications of the modification work prior to the
installation taking place.
The Certificate of Electrical Safety which Energy Safe Victoria requires for this work must be
retained on file by you should the ESC require an audit. From 16 May 2016, this document must
detail the modification work you performed on each type of linear fluorescent luminaire you modify,
as well as specify that the modification work includes electrical isolation of the legacy ballast (and
capacitor if one was present).
If you elect to retrofit linear LED lamps into linear fluorescent luminaires without removal of the
legacy ballast and/or capacitor, from 16 May 2016 you must measure and assess the power factor of
the upgraded lighting circuit, with the aim that the upgrade should not have a detrimental impact on
the customer’s compliance with section 4.3 of the Electricity Distribution Code (EDC).You must also
have obtained ESC approval for your proposed measurement and assessment methodology prior to
proceeding. The EDC can be found at http://www.esc.vic.gov.au/Energy/Distribution/Electricity-
distribution-code

Reference: C/12/11919
Page 6 of 48
If you feel unsure about the obligations and risks associated with installing T5 adaptors and LED
tubes, you should seek independent legal advice.
APs should also be aware of the decommissioning requirements associated with installations of T5
adaptors and LED tubes, as outlined in Section 5.10 of this document and the Schedule 34 section
of the Explanatory Note - Compliance Requirements for Accredited Persons by Prescribed Activity.
These requirements stipulate that any replaced control gear must be decommissioned (‘rendered
permanently unusable’).
4.2 ELIGIBLE UPGRADES
There are two facets of eligibility you must satisfy for a given upgrade:
whether the premises itself is eligible, and
whether you have the appropriate accreditations and approvals from the ESC at the time of
the upgrade.
4.2.1 Eligible premises
To be eligible, premises must fulfil two essential criteria:
1. It must not be a new building (VEET only applies to retrofits of existing buildings)
2. The premises must not be compulsorily listed on the EREP register under the Environment
and Resource Efficiency Plans Program formerly administered by the Environmental
Protection Authority.
4.2.2 Eligible upgrades
For an individual upgrade to be eligible, it must meet the following conditions:
1. The treatment of the works as part of the same upgrade must be reasonable and defensible
2. The upgrade must have begun after the commencement of the amended regulations (17 May
2012)
3. The upgrade must have been completed after the date on which you lodged your application
for accreditation or application for additional activity approval
4. All products installed as part of the upgrade must have been listed on the VEET product
register before being installed as part of the upgrade (i.e., the ‘Effective from’ date listed in the
product register must be before the date of installation)
5. You must be able to source all the documentation required to verify the pre-upgrade lighting
situation.

Reference: C/12/11919
Page 7 of 48
4.3 ROLE OF UPGRADE MANAGER
For each upgrade, you must nominate a single person to legally represent your business for the
purposes of verifying the documentation connected to the upgrade, including the assignment of
rights and the AS/NZS 1680 declaration associated with the upgrade. This person is referred to as
the ‘Upgrade Manager’.
It is not necessary for the Upgrade Manager to be directly employed by the AP but they must have
the authority to sign on the AP’s behalf. Additionally, the roles of the Upgrade Manager, as defined
by the assignment form and other scheme documentation, must be completed by a single person.
4.4 USING SUBCONTRACTORS
It is permissible as an AP to use subcontractors to undertake installations on your behalf. However,
for the purposes of VEET, all legal liability rests with you as the AP. This means that if a
subcontractor is found to have disregarded a relevant law or failed to properly record information
about the upgrade, you may be subject to compliance action.
Because the use of subcontractors represents a compliance risk, you will be required to provide
information about the contractual arrangements for each upgrade you undertake. This information is
recorded on the assignment form and must be provided at the time you create the VEECs
associated with each upgrade.
4.5 J6 AND NON-J6 UPGRADES
The calculations used to determine the energy savings of a given upgrade project vary depending on
whether the upgrade is part of a site refurbishment that requires a Building Permit, and as a result is
required to comply with Part J6 of the Building Code of Australia (BCA). The shorthand terminology
used to describe this distinction in this document is ‘J6’ and ‘Non-J6’ (or NJ6).
J6 and Non-J6 upgrades have different data and documentation requirements. Because of this,
separate versions of the upload form (which you use to create VEECs) and the VEEC calculator
have been developed. You will see the two options in the relevant drop down menus on the VEET
website.
You should exercise a high degree of care to ensure that you have a clear understanding of the
status of any upgrade project you are engaged in. Selecting the incorrect version of the user
interface or the upload form will result in the improper creation of certificates, which may lead to
compliance action being taken against you.

Reference: C/12/11919
Page 8 of 48
4.6 VEEC CALCULATION METHOD
The number of VEECs you receive for a given upgrade is based on the deemed abatement
associated with that upgrade. It is important to recognise that this deemed abatement may differ
considerably from the actual abatement caused by any particular upgrade. In some cases it will be
higher, in others, lower.
This is because the process of deeming abatement must make general assumptions about many
factors that affect the energy savings of an upgrade, such as the operating hours of a business,
mode of operation, or other specifics.
The VEEC calculation method is defined in Schedule 34 of the Regulations. You should take care to
ensure you fully understand the workings of this equation. An explanation of this method is provided
below.
4.6.1 VEEC calculation
VEECs are calculated using the following equation (‘Regulations Equation 1’):
VEECs = (energy savings x 1.095) x regional factor
Where;
Energy savings = baseline energy consumption – upgrade energy consumption
The regional factors that apply are 0.98 for upgrades undertaken in metropolitan Victoria and 1.04
for upgrades undertaken in regional Victoria. Energy savings are multiplied by the marginal
greenhouse gas intensity factor, 1.095.
4.6.2 Baseline calculation (‘before’)
There are two equations available to calculate baseline energy consumption. Whether the upgrade
is required to comply with Part J6 of the current edition of the BCA (as amended from time to time)
determines which equation is to be used.
If the upgrade is required to comply with Part J6 of the BCA, the following equation must be used
(‘Regulations Equation 2’ or ‘J6’)1:
Baseline energy consumption (MWh) = ∑each space (the maximum allowable illumination
power density (IPD) for the space x the area of the space x the relevant asset lifetime
x annual operating hours x a multiplier if a control device is installed (CM) x a
multiplier if the space is air-conditioned (AM)) ÷ 106
1 This baseline equation may be referred to as ‘Regulations Equation 2’ or ‘J6’

Reference: C/12/11919
Page 9 of 48
If the upgrade doesn’t need to comply with Part J6 of the BCA, then the following equation is used to
calculate the baseline (‘Regulations Equation 3’ or ‘Non-J6’)2:
Baseline energy consumption (MWh) = ∑each lamp (lamp circuit power (LCP) for the
replaced lamp x the relevant asset lifetime x annual operating hours x a multiplier if
a control device is installed (CM) x a multiplier if the space is air-conditioned (AM)) ÷
106
In both these equations, the annual operating hours is defined based on the space type/BCA
classification in which an upgrade occurs as set out in Tables 3 and 4 of Schedule 34 in the
Regulations. In Regulations Equation 3, the LCP value is taken from Table 1 of Schedule 34. If the
type of lamp being replaced is not listed in Table 1, then the applicant must apply to the ESC to have
a value approved. The values assigned to the control device multiplier (CM) (see Table 2) and air-
conditioning multiplier (AM) are both outlined in Schedule 34 of the Regulations.
The final variable is asset lifetime. The value for asset lifetime is obtained by first identifying what
type of lighting upgrade is being undertaken, then consulting the Regulations to identify which asset
lifetime value applies. The details of this process are set out in full in Section 4.8.
It should be noted that for lamps that contain an integrated ballast, the asset lifetime scenario
chosen needs to reflect as if both the lamp and the ballast are separately being replaced.
4.6.3 Upgrade calculation (‘after’)
The following equation is used to determine the upgrade energy consumption (‘Regulations Equation
4’ or ‘U’)3:
Upgrade energy consumption (MWh) = ∑each upgrade lamp (lamp circuit power (LCP) for the
installed lamp x the relevant asset lifetime x annual operating hours x a multiplier if a
control device is installed (CM) x a multiplier if the space is air-conditioned (AM)) ÷ 106
As in the baseline calculation, the annual operating hours is defined based on the space type/BCA
classification in which an upgrade occurs as set out in Tables 3 and 4 of Schedule 34 in the
Regulations. The LCP value is taken from Table 1 of Schedule 34. If the type of lamp being replaced
is not listed in Table 1, then the applicant must apply to the ESC to have a value approved. The
values assigned to the control device multiplier (CM) (see Table 2) and air-conditioning multiplier
(AM) are both outlined in Schedule 34 of the Regulations.
The value for asset lifetime is again obtained by first identifying what type of lighting upgrade is
being undertaken. Certain upgrade scenarios and an associated asset lifetime can only match
2 This baseline equation may be referred to as ‘Regulations Equation 3’ or ‘Non-J6’
3 This upgrade equation may be referred to as ‘Regulations Equation 4’ or ‘U’

Reference: C/12/11919
Page 10 of 48
certain baseline scenarios with the same asset lifetime. The details of this process are set out in full
in Section 4.8.
Please note that in certain situations (associated with fittings being removed) there may not be an
upgrade (i.e. ‘Regulations Equation 4’ or ‘U’) equation. In these situations, only the baseline asset
lifetime is required – see Section 4.8 for more details.
4.7 UPGRADES, AREAS AND CALCULATION ZONES
For the purposes of calculating the correct baseline and upgrade energy use for a given upgrade
project, it will usually be necessary to subdivide the upgrade into smaller components. The way this
subdivision occurs depends on the project.
For a J6 upgrade, the baseline calculation for the upgrade site must be divided into calculation
zones with a common space type, as this space type defines the illumination power density (IPD)
and annual operating hours requirements for the upgrade (see Figure 12 below). For the upgrade
calculation, the upgrade site must be divided into calculation zones. This is defined as a set of lamps
that are installed in a common space type with the same space type, asset lifetime, air-conditioning
environment, control device type and lamps subject to the same lamp circuit power (LCP).
If the upgrade is identified as a Non-J6 upgrade, the calculation zone is defined as a set of lamps
that are installed in a common space type with the same asset lifetime, air-conditioning environment,
control device type and lamps subject with the same lamp circuit power (LCP). This is for both
baseline and upgrade calculations.
This information, and the definition of a calculation zone, is represented in Figure 1 below. Even for
simple upgrades, there will normally be at least two calculation zones; one for baseline and one for
upgrade. Complex upgrades may require many more. The VEET online creation upload system can
accommodate up to 50 calculations zones; if users encounter an upgrade requiring more than 50
calculation zones, they should contact the ESC.

Reference: C/12/11919
Page 11 of 48
Figure 1: Subdividing an upgrade project into calculation zones
Upgrade (eg convention
centre)
Area 1 (eg foyer)
Area 2 (eg corridor)
Area 3 (eg auditorium)
Calculation Zone 1 - Baseline
Calculation Zone 2 - Upgrade
Calculation Zone 3 - Upgrade
Calculation Zone 4 - Baseline
Calculation Zone 5 - Upgrade
Calculation Zone 6 - Baseline
Calculation Zone 7 - Baseline
Calculation Zone 8 - Upgrade
Calculation Zone 9 - Upgrade
Calculation Zone 10 - Upgrade
Subdividing an Upgrade
Equation Equation variables
J6 Baseline
Illumination Power Density
(IPD)
Annual Operating
Hours
Asset Lifetime
Control Multiplier
A/C Multiplier
Non-J6 Baseline
Lamp Circuit Power (LCP)
Annual Operating
Hours
Asset Lifetime
Control Multiplier
A/C Multiplier
Upgrade Lamp Circuit Power (LCP)
Annual Operating
Hours
Asset Lifetime
Control Multiplier
A/C Multiplier
Defining a Calculation Zone
A Calculation Zone is a physical space (J6) or series of lamps (Non-J6) for which all of the variables of the relevant equation are common.
For instance, if two different types of lamps are installed in an area, there will be two Lamp Circuit Power (LCP) variables, and the area must be subdivided to account for this.
Note that this means some areas may have a different number of baseline and upgrade calculation zones.

Reference: C/12/11919
Page 12 of 48
4.8 ASSET LIFETIME REFERENCES
As outlined above, one factor in the abatement calculation is the ‘asset lifetime’. Determining the
correct asset lifetime is one of the more complicated aspects of undertaking this activity. You should
ensure that both you and any relevant staff fully understand how this aspect of how the calculation
works.
The asset lifetime varies depending on the nature of the upgrade. Typically, more permanent
upgrades (those which cannot be reversed without the services of an electrician) receive higher asset
lifetimes than those that are easily reversible by the client.
Importantly, within one upgrade project you may need to select different asset lifetimes. For instance,
where you undertake permanent upgrades in one area of the premises (such as installed new
luminaires in an office space) and then do reversible upgrades in another area (like replacing GLS
incandescent lamps with CFL lamps in a bathroom), then you will use different asset lifetimes for each
of the two areas.
Further, when recording your data, select the asset lifetimes for each area as outlined in Figure 3,
Figure 5, Figure 7 and Figure 9. Normally this means one asset lifetime for the baseline (‘before’)
energy calculation and another for the upgrade (‘after’) energy calculation (note this combination of a
‘before’ and ‘after’ asset lifetime forms an ‘asset lifetime reference’ as discussed below).
Lastly, the asset lifetimes you use will determine what other data you must collect about the upgrade.
Some asset lifetimes require you to record the rated lifetime hours of the pre-existing lamps or the
newly installed lamps, while others require no rated lifetime information at all.
The asset lifetimes are defined in Schedule 34 the Regulations. For ease of use, the ESC has
developed a shorthand reference to refer to the different asset lifetime matches. This shorthand is
called the ‘asset lifetime reference’4. The figures in the following sections set out the various asset
lifetime references, the situations in which they apply, and any data recording requirements. Keep
these figures handy when you are recording data about an upgrade or when using the online VEEC
calculator.
4 Using the same naming as in the Regulations, in the shorthand of these ‘asset lifetime references’ they are capitalised
and include: A, AB, B, C, D, E. They are then connected to a J6, Non-J6 or U scenario to provide a complete reference – i.e. ‘Non-J6-C’ means ‘Regulations Equation 3’ or ‘NJ6’, asset lifetime C.

Reference: C/12/11919
Page 13 of 48
The figures also provide asset lifetime scenario explanations and details, as well as decision matrices
to aid in identifying how lighting project changes relate to baseline (‘Regulations Equation 2’ or ‘J6’
and ‘Regulations Equation 3’ or ‘Non-J6’) and upgrade (‘Regulations Equation 4’ or ‘U’) equations.
Scenarios have been grouped into four kinds of upgrade:
Installing new lighting components;
Replacing lighting components;
Removing or decommissioning lighting components; or
Any other case.
Please note that where the fitting has been modified (i.e. fitting replaced or legacy lighting
components removed or decommissioned), the lamp life is not a limiting factor for the number of
VEECs claimed. This means that where the baseline and upgrade equation matches (i.e. asset
lifetime reference) allow for it, a lighting upgrade may create VEECs for the total space type annual
operating hours multiplied by the applicable asset lifetime.
If you are unsure about any of the following, please contact the VEET support team.

Reference: C/12/11919
Page 14 of 48
4.8.1 Installing new lighting components
When undertaking an upgrade that involves installing new lighting components, use the following
figures as a guide to identify the correct asset lifetime references to use. Please take note of the
following:
Use the decision matrix in Figure 2 to decide what an asset lifetime means in practical terms;
Take note of the asset lifetime that best suits your upgrade for J6 or Non-J6 and U;
Use Figure 3 to find the chosen asset lifetime references and make sure their match explains
your project scenario;
Matches in both figures have been colour coded to aid in ease of use;
Full scenario details are provided in Figure 3, including the Regulation wording;
The Case # is intended to assist in identifying and communicating particular asset lifetime
references. It does not need to be recorded or included as a data input.
Figure 2: Asset lifetime scenarios – Installing new lighting components – Decision Matrix
Asset Lifetime New fitting installed
New lamp installed in new fitting
New ballast installed
New transformer
installed
New control device
installed
J6-A
J6-AB
J6-B
J-C
Non-J6-A
Non-J6-AB
Non-J6-B
Non-J6-C
Non-J6-D
Non-J6-E
U-A
U-AB
U-B
U-C

Reference: C/12/11919
Page 15 of 48
Figure 3: Asset lifetime reference scenarios – Installing new lighting components – Regulation Wording
Case #
Scenario Asset Lifetime
Reference5
Equation 2 (J6) - Baseline Regulation Wording
Equation 3 (Non-J6) – Baseline Regulation Wording
Equation 4 (U) – Upgrade Regulation Wording
Asset lifetime – Regulation
Wording
Rated Lifetime Hours (RLH) data inputs required
2
New fittings, ballast or
transformer (and any
associated lamp or
reflector) installed, with
no other lighting
equipment (except
control devices)
J6-A and U-B
(A)
If, as part of the lighting upgrade-
(i) a light fitting, ballast or
transformer (and any
associated lamp or
reflector) is installed in
the space; and
(ii) no lighting equipment of
any other type (other
than a lighting control
device) is installed in the
space-
10 years
Fitting installed as part of upgrade – no equation for Non-J6 baseline
(B)
If the lamp is installed in a lighting fitting that was installed as part of the lighting upgrade,
10 years
10 years None
3 Lighting control device
installed
J6-AB and U-AB
OR
Non-J6-AB and U-AB
(AB)
If, as part of the lighting upgrade-
(i) a lighting control device
is installed in the space;
and
(ii) no lighting equipment of
any other type is
installed in the space-
5 years
(AB)
If, as part of the lighting upgrade-
(i) a lighting control device
is installed in the space;
and
(ii) no lighting equipment of
any other type is
installed in the space-
5 years
(AB)
If, as part of the lighting upgrade-
(i) a lighting control device
is installed in the space;
and
(ii) no lighting equipment of
any other type is
installed in the space-
5 years
5 years None
5 Remember, certain upgrades and an associated asset lifetime can only match certain baselines with the same asset lifetime – this column shows the applicable matches

Reference: C/12/11919
Page 16 of 48
4.8.2 Replacing lighting components
When undertaking an upgrade that involves replacing lighting components, use the following
figures as a guide to identify the correct asset lifetime references to use. Please take note of the
following:
Use the decision matrix in Figure 4 to decide what an asset lifetime means in practical terms;
Take note of the asset lifetime that best suits your upgrade for J6 or Non-J6 and U;
Use Figure 5 to find the chosen asset lifetime references and make sure their match explains
your project scenario;
Matches in both figures have been colour coded to aid in ease of use;
Full scenario details are provided in Figure 5, including the Regulation wording;
The Case # is intended to assist in identifying and communicating particular asset lifetime
references. It does not need to be recorded or included as a data input.
Figure 4: Asset lifetime scenarios – Replacing lighting components – Decision Matrix6
Asset Lifetime Lamp
replaced
Ballast replaced (with lamp removed and not replaced)
Transformer replaced (with lamp removed and not replaced)
J6-A
J6-AB
J6-B
J-C
Non-J6-A
Non-J6-AB
Non-J6-B
Non-J6-C
Non-J6-D
Non-J6-E
U-A
U-AB
U-B
U-C
6 Please see Figure 5 for further information and explanation concerning J6 or Non-J6 scenarios that don’t have a U
match

Reference: C/12/11919
Page 17 of 48
Figure 5: Asset lifetime reference scenarios – Replacing lighting components – Regulation Wording
Case #
Scenario Asset Lifetime
Reference Equation 2 (J6) - Baseline
Regulation Wording
Equation 3 (Non-J6) – Baseline Regulation Wording
Equation 4 (U) – Upgrade Regulation Wording
Asset lifetime –Regulation Wording
Rated Lifetime Hours (RLH) data inputs required
4
Lamp (only)
removed and
not replaced
while
associated
ballast or
transformer
are replaced
J6-A only
OR
Non-J6-B only
(A)
If, as part of the lighting upgrade-
(i) a light fitting, ballast or
transformer (and any
associated lamp or
reflector) is installed in
the space; and
(ii) no lighting equipment of
any other type (other
than a lighting control
device) is installed in the
space-
10 years
(B)
If, as part of the lighting upgrade, the lamp is removed and not replaced and-
(i) the ballast or
transformer associated
with the lamp is
replaced; or
(ii) the light fitting in which
the lamp was installed is
removed-
10 years
Lamp removed as part of upgrade – no equation for operating period
10 years None
6
Lamp replaced
– with ballast
or transformer
replaced
J6-A and U-A
OR
Non-J6-C and U-A
(A)
If, as part of the lighting upgrade-
(i) a light fitting, ballast or
transformer (and any
associated lamp or
reflector) is installed in
the space; and
(ii) no lighting equipment of
any other type (other
than a lighting control
device) is installed in the
space-
10 years
(C)
If, as part of the lighting upgrade, the lamp is replaced and any ballast or transformer associated with the lamp is also replaced-
10 years
(A)
If the ballast or transformer associated with the lamp is replaced as part of the lighting upgrade-
10 years
10 years None

Reference: C/12/11919
Page 18 of 48
Case #
Scenario Asset Lifetime
Reference Equation 2 (J6) - Baseline
Regulation Wording
Equation 3 (Non-J6) – Baseline Regulation Wording
Equation 4 (U) – Upgrade Regulation Wording
Asset lifetime –Regulation Wording
Rated Lifetime Hours (RLH) data inputs required
7
Lamp replaced
– but not
ballast or
transformer
J6-C and U-C
OR
Non-J6-D and U-C
(C)
In any other case, the lowest manufacturer’s rated lifetime (in hours and not exceeding 30,000 hours) for a lamp that is in the space after the lighting upgrade is undertaken divided by Annual Operating Hours, to a maximum of 10 years
(D)
If, as part of the lighting upgrade, the lamp is replaced and –
(i) the ballast or
transformer associated
with the lamp is not
replaced; or
(ii) there is no ballast or
transformer associated
with the lamp –
the manufacturer’s rated lifetime (in hours and not exceeding 30,000 hours) for the replacement lamp divided by the Annual Operating Hours, to a maximum of 10 years
(C)
In any other case, the manufacturer’s rated lifetime (in hours and not exceeding 30,000 hours) for the lamp divided by Annual Operating Hours, to a maximum of 10 years
The manufacturer’s rated lifetime (in hours and not exceeding 30,000 hours) for the lamp divided by Annual Operating Hours
Which means:
Lowest manufacturer’s rated lifetime hours of post-upgrade lamp (not exceeding 30,000)/AOH
RLH of upgrade lighting

Reference: C/12/11919
Page 19 of 48
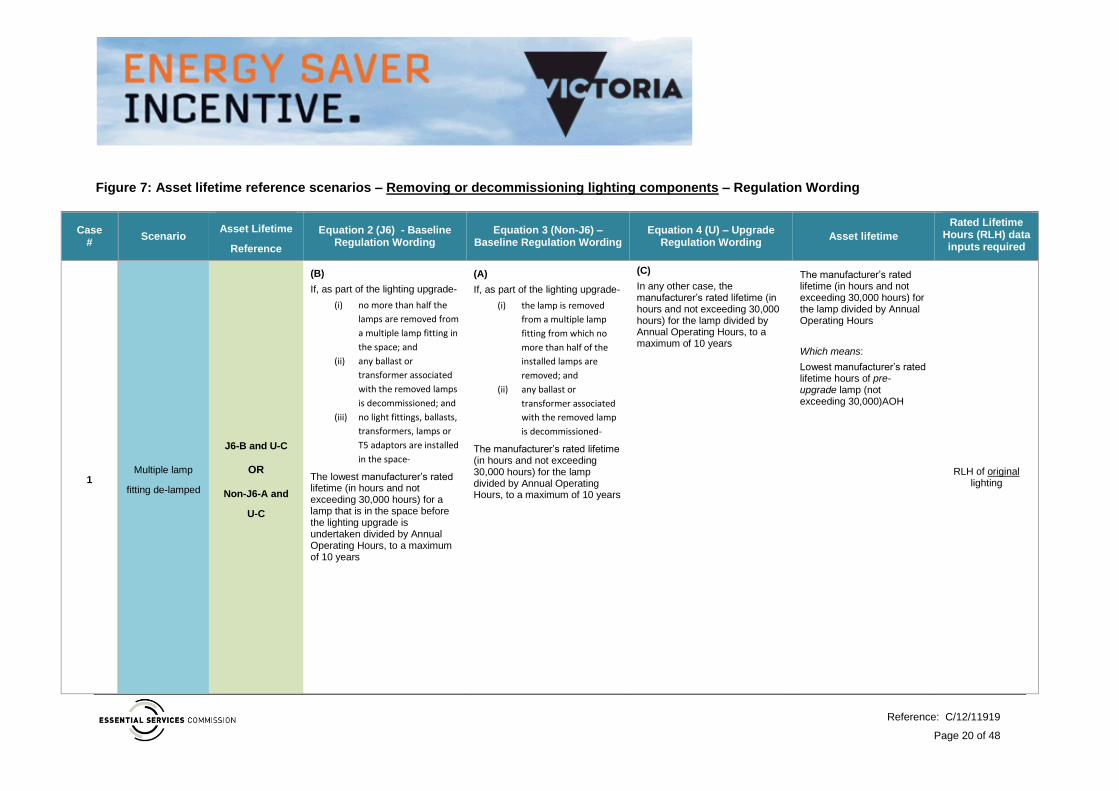
4.8.3 Removing or decommissioning lighting components
When undertaking an upgrade that involves removing or decommissioning lighting
components, use the following figures as a guide to identify the correct asset lifetime references to
use. Again, note the following:
Use the decision matrix in Figure 6 to decide what an asset lifetime means in practical terms;
Take note of the asset lifetime that best suits your upgrade for J6 or Non-J6 and U;
Use Figure 7 to find the chosen asset lifetime references and make sure their match explains
your project scenario;
Matches in both figures have been colour coded to aid in ease of use;
Full scenario details are provided in Figure 7, including the Regulation wording;
The Case # is intended to assist in identifying and communicating particular asset lifetime
references. It does not need to be recorded or included as a data input.
Figure 6: Asset lifetime scenarios – Removing or decommissioning lighting components – Decision Matrix
7
Asset Lifetime
Multiple lamp fitting de-lamped (assoc. ballasts
and transformers decommissioned)
Fitting removed
J6-A
J6-AB
J6-B
J-C
Non-J6-A
Non-J6-AB
Non-J6-B
Non-J6-C
Non-J6-D
Non-J6-E
U-A
U-AB
U-B
U-C
7 Please see Figure 7 for further information and explanation concerning J6 or Non-J6 scenarios that don’t have a U
match
Reference: C/12/11919
Page 20 of 48
Figure 7: Asset lifetime reference scenarios – Removing or decommissioning lighting components – Regulation Wording
Case #
Scenario Asset Lifetime
Reference
Equation 2 (J6) - Baseline Regulation Wording
Equation 3 (Non-J6) – Baseline Regulation Wording
Equation 4 (U) – Upgrade Regulation Wording
Asset lifetime
Rated Lifetime Hours (RLH) data inputs required
1 Multiple lamp
fitting de-lamped
J6-B and U-C
OR
Non-J6-A and
U-C
(B)
If, as part of the lighting upgrade-
(i) no more than half the
lamps are removed from
a multiple lamp fitting in
the space; and
(ii) any ballast or
transformer associated
with the removed lamps
is decommissioned; and
(iii) no light fittings, ballasts,
transformers, lamps or
T5 adaptors are installed
in the space-
The lowest manufacturer’s rated lifetime (in hours and not exceeding 30,000 hours) for a lamp that is in the space before the lighting upgrade is undertaken divided by Annual Operating Hours, to a maximum of 10 years
(A)
If, as part of the lighting upgrade-
(i) the lamp is removed
from a multiple lamp
fitting from which no
more than half of the
installed lamps are
removed; and
(ii) any ballast or
transformer associated
with the removed lamp
is decommissioned-
The manufacturer’s rated lifetime (in hours and not exceeding 30,000 hours) for the lamp divided by Annual Operating Hours, to a maximum of 10 years
(C)
In any other case, the manufacturer’s rated lifetime (in hours and not exceeding 30,000 hours) for the lamp divided by Annual Operating Hours, to a maximum of 10 years
The manufacturer’s rated lifetime (in hours and not exceeding 30,000 hours) for the lamp divided by Annual Operating Hours
Which means:
Lowest manufacturer’s rated lifetime hours of pre-upgrade lamp (not exceeding 30,000)AOH
RLH of original lighting

Reference: C/12/11919
Page 21 of 48
Case #
Scenario Asset Lifetime
Reference
Equation 2 (J6) - Baseline Regulation Wording
Equation 3 (Non-J6) – Baseline Regulation Wording
Equation 4 (U) – Upgrade Regulation Wording
Asset lifetime
Rated Lifetime Hours (RLH) data inputs required
5 J6
Lamp fitting
removed or
decommissioned
– J6
J6-C only
(C)
In any other case, the lowest manufacturer’s rated lifetime (in hours and not exceeding 30,000 hours) for a lamp that is in the space after the lighting upgrade is undertaken divided by Annual Operating Hours, to a maximum of 10 years
Not applicable Fitting removed as part of upgrade – no equation for operating period
The manufacturer’s rated lifetime (in hours and not exceeding 30,000 hours) for the replacement lamp divided by Annual Operating Hours
(Note – this would only occur if a new fitting, ballast or transformer is not installed after the fitting is removed)
Which means:
Lowest manufacturer’s rated lifetime hours of post-upgrade lamp (not exceeding 30,000)/AOH
RLH of upgrade lighting
5 Non-J6
Lamp fitting
removed or
decommissioned
– Non-J6
Non-J6-B only Not applicable
(B)
If, as part of the lighting upgrade, the lamp is removed and not replaced and-
(i) the ballast or
transformer associated
with the lamp is
replaced; or
(ii) the light fitting in which
the lamp was installed is
removed-
10 years
Fitting removed as part of upgrade – no equation for operating period
10 years None

Reference: C/12/11919
Page 22 of 48
4.8.4 ‘Any other case’
When undertaking an upgrade that can’t be defined using the previous tables, use the following
figures as a guide to identify the correct asset lifetime references to use ‘any other case’. Remember:
Use the decision matrix in Figure 8 to decide what an asset lifetime means in practical terms;
Take note of the asset lifetime that best suits your upgrade for J6 or Non-J6 and U;
Use Figure 9 to find the chosen asset lifetime references and make sure their match explains
your project scenario;
Matches in both figures have been colour coded to aid in ease of use;
Full scenario details are provided in Figure 9, including the Regulation wording;
The Case # is intended to assist in identifying and communicating particular asset lifetime
references. It does not need to be recorded or included as a data input.
Figure 8: Asset lifetime scenarios – Any other case – Decision Matrix
Asset Lifetime In any other
case
J6-A
J6-AB
J6-B
J-C
Non-J6-A
Non-J6-AB
Non-J6-B
Non-J6-C
Non-J6-D
Non-J6-E
U-A
U-AB
U-B
U-C

Reference: C/12/11919
Page 23 of 48
Figure 9: Asset lifetime reference scenarios – Any other case – Regulation Wording
Case #
Scenario Asset Lifetime
Reference Equation 2 (J6) - Baseline
Regulation Wording
Equation 3 (Non-J6) – Baseline Regulation Wording
Equation 4 (U) – Upgrade Regulation Wording
Asset lifetime – Regulation Wording
Rated Lifetime Hours (RLH) data inputs required
8 J6 Any other
case J6-C and U-C
(C)
in any other case, the lowest manufacturer’s rated lifetime (in hours and not exceeding 30,000 hours) for a lamp that is in the space after the lighting upgrade is undertaken divided by Annual Operating Hours, to a maximum of 10 years
Not applicable
(C)
in any other case, the manufacturer’s rated lifetime (in hours and not exceeding 30,000 hours) for the lamp divided by Annual Operating Hours, to a maximum of 10 years
the manufacturer’s rated lifetime (in hours and not exceeding 30,000 hours) for the lamp divided by Annual Operating Hours
Which means:
Lowest manufacturer’s rated lifetime hours of post-upgrade lamp (not exceeding 30,000)/AOH
RLH of upgrade lighting
8 Non-J6 Any other
case Non-J6-E and U-C Not applicable
(E)
in any other case, the manufacturer’s rated lifetime (in hours and not exceeding 30,000 hours) for the lamp divided by Annual Operating Hours, to a maximum of 10 years
(C)
in any other case, the manufacturer’s rated lifetime (in hours and not exceeding 30,000 hours) for the lamp divided by Annual Operating Hours, to a maximum of 10 years
the manufacturer’s rated lifetime (in hours and not exceeding 30,000 hours) for the lamp divided by Annual Operating Hours
Which means:
Lowest manufacturer’s rated lifetime hours of pre-upgrade lamp (not exceeding 30,000)AOH
RLH of original lighting

Reference: C/12/11919
Page 24 of 48
Figure 10: Asset lifetime reference scenarios – J6 Summary
Case #
Project Form Scenario Asset Lifetime
Reference
Equation 2 (J6) - Baseline Regulation Asset Lifetime
Equation 4 (U) – Upgrade Regulation Asset Lifetime
Asset lifetime
Rated Lifetime Hours (RLH) data inputs required
2 Installing new lighting components
New fittings, ballast or transformer (and any associated lamp or reflector) installed, with no other lighting equipment (except control devices)
J6-A and U-B (A) (B) 10 years None
3 Lighting control device installed J6-AB and U-AB (AB) (AB) 5 years None
4
Replacing lighting components
Lamp (only) removed and not replaced while associated ballast or transformer are replaced
J6-A only (A) Lamp removed as part of upgrade – no equation for
operating period 10 years None
6 Lamp replaced – with ballast or transformer replaced J6-A and U-A (A) (A) 10 years None
7 Lamp replaced – but not ballast or
transformer J6-C and U-C (C) (C)
Lowest manufacturer’s rated lifetime hours of post-upgrade lamp (not exceeding 30,000)AOH
RLH of upgrade lighting
1
Removing or decommissioning lighting components
Multiple lamp fitting de-lamped J6-B and U-C (B) (C)
Lowest manufacturer’s rated lifetime hours of pre-upgrade lamp (not exceeding 30,000)AOH
RLH of original lighting
5 Lamp fitting removed or decommissioned J6-C only (C) Fitting removed as part of upgrade – no equation for
operating period
Lowest manufacturer’s rated lifetime hours of post-upgrade lamp (not exceeding 30,000)AOH
RLH of upgrade lighting
8 Any other case Any other case J6-C and U-C (C) (C)
Lowest manufacturer’s rated lifetime hours of post-upgrade lamp (not exceeding 30,000)AOH
RLH of upgrade lighting

Reference: C/12/11919
Page 25 of 48
Figure 11: Asset lifetime reference scenarios – Non-J6 Summary
Case #
Project Form Scenario Asset Lifetime
Reference
Equation 3 (Non-J6) - Baseline Regulation Asset
Lifetime
Equation 4 (U) – Upgrade Regulation Asset Lifetime
Asset lifetime
Rated Lifetime Hours (RLH) data inputs required
3 Installing new lighting components Lighting control device installed Non-J6-AB and U-AB (AB) (AB) 5 years None
4
Replacing lighting components
Lamp (only) removed and not replaced while associated ballast or transformer are replaced
Non-J6-B only (B) Lamp removed as part of upgrade – no equation for
operating period 10 years None
6 Lamp replaced – with ballast or transformer replaced Non-J6-C and U-A (C) (A) 10 years None
7 Lamp replaced – but not ballast or
transformer Non-J6-D and U-C (D) (C)
Lowest manufacturer’s rated lifetime hours of post-upgrade lamp (not exceeding 30,000)AOH
RLH of upgrade lighting
1 Removing or decommissioning lighting components
Multiple lamp fitting de-lamped Non-J6-A and U-C (A) (C)
Lowest manufacturer’s rated lifetime hours of pre-upgrade lamp (not exceeding 30,000)AOH
RLH of original lighting
5 Lamp fitting removed or decommissioned Non-J6-B only (B) Fitting removed as part of upgrade – no equation for
operating period 10 years None
8 Any other case Any other case Non-J6-E and U-C (E) (C)
Lowest manufacturer’s rated lifetime hours of pre-upgrade lamp (not exceeding 30,000)AOH
RLH of original lighting

Reference: C/12/11919
Page 26 of 48
Reference: C/12/11919
Page 26 of 48
4.9 ANNUAL OPERATING HOURS
Another factor in the abatement calculation is the ‘annual operating hours’. Determining this correctly
is another important aspect of undertaking this activity. You should ensure that both you and any
relevant staff fully understand how this aspect of how the calculation works.
The annual operating hours are determined in Schedule 34 of the Regulations. Figure 12 and Figure
13 below set out the operating hours for different space types as defined in the Regulations. Note
that an Illuminated Power Density (IPD) is only applicable to J6 upgrade projects.
Please note when creating activities and using the online calculator that the options listed in Figure
13 are only relevant and needed should they be called upon in the Annual Operating Hours column
in Figure 12 (for example in space type “Corridor”). In all other instances, the Space Type option
selected will provide the annual operating hours for the abatement calculation; a BCA classification is
not required and is not used in the abatement calculation.
Figure 12: Space type, annual operating hours and IPD
Space Type Annual Operating Hours IPD
(Used for J6 Only)
Auditorium, church and public hall 2,000 10
Board room and conference room 3,000 10
Carpark - entry zone (first 20 m of travel) 7,000 25
Carpark – general (undercover) 7,000 6
Carpark – general (open air) 4,500 6
Common rooms, spaces and corridors8 in a Class 2 building 7,000 8
Control room, switch room, and the like Value based on BCA classification – see Figure 13
9
Corridors Value based on BCA classification – see Figure 13
8
Courtroom 2,000 12
Dormitory of a Class 3 building used for sleeping only 3,000 6
Dormitory of a Class 3 building used for sleeping and study 3,000 9
Entry lobby from outside the building Value based on BCA classification – see Figure 13
15
Health-care - children's ward & examination room 6,000 10
Health care - patient ward 6,000 7
Health care - all patient care areas including corridors where cyanosis lamps are used
6,000 13
Kitchen and food preparation area Value based on BCA classification – see Figure 13
8
8 The definition of common areas is as follows:
(i) For buildings owned under strata title, the common property as defined in the Owner Corporations Act 2006 (VIC); or
(ii) For buildings not owned under strata title (eg under company title), the non-residential property of BCA Class 2 buildings.

Reference: C/12/11919
Page 27 of 48
Reference: C/12/11919
Page 27 of 48
Space Type Annual Operating Hours IPD
(Used for J6 Only)
Laboratory - artificially lit to an ambient level of 400 lx or more 3,000 12
Library - reading room and general areas 3,000 10
Library - stack and shelving area 3,000 12
Lounge area for communal use in a Class 3 building or Class 9c aged care building
7,000 10
Maintained emergency lighting 8,500 1
Museum and gallery - circulation, cleaning and service lighting 2,000 8
Office - artificially lit to an ambient level of 200 lx or more 3,000 9
Office - artificially lit to an ambient level of less than 200 lx 3,000 7
Plant room Value based on BCA classification - see Figure 13
5
Restaurant, café, bar, hotel lounge and a space for the serving and consumption of food or drinks
5,000 18
Retail space including a museum and gallery whose purpose is the sale of objects
5,000 22
School - general purpose learning areas and tutorial rooms 3,000 8
Sole-occupancy unit of a Class 3 building 3,000 5
Sole-occupancy unit of a Class 9c aged care building 6,000 7
Storage with shelving no higher than 75% of the height of the aisle lighting
5,000 8
Storage with shelving higher than 75% of the height of the aisle lighting
5,000 10
Service area, cleaner's room and the like Value based on BCA classification – see Figure 13
5
Toilet, locker room, staff room, rest room and the like Value based on BCA classification – see Figure 13
6
Wholesale storage and display area 5,000 10
Unlisted space type (Non-J6 Projects Only)
Value based on BCA classification – see Figure 13
N/A
Unlisted space type with illuminance of not more than 80 lx (J6 Projects Only)
Value based on BCA classification – see Figure 13
7.5
Unlisted space type with illuminance between 81 lx and 160 lx (J6 Projects Only)
Value based on BCA classification – see Figure 13
9
Unlisted space type with illuminance between 161 lx and 240 lx (J6 Projects Only)
Value based on BCA classification – see Figure 13
10
Unlisted space type with illuminance between 241 lx and 320 lx (J6 Projects Only)
Value based on BCA classification – see Figure 13
11
Unlisted space type with illuminance between 321 lx and 400 lx (J6 Projects Only)
Value based on BCA classification – see Figure 13
12
Unlisted space type with illuminance between 401 lx and 480 lx (J6 Projects Only)
Value based on BCA classification – see Figure 13
13
Unlisted space type with illuminance between 481 lx and 540 lx (J6 Projects Only)
Value based on BCA classification – see Figure 13
14
Unlisted space type with illuminance between 541 lx and 620 lx (J6 Projects Only)
Value based on BCA classification – see Figure 13
15

Reference: C/12/11919
Page 28 of 48
Reference: C/12/11919
Page 28 of 48
Figure 13: Building (BCA) classification and relevant operating hours
Space Type Annual Operating
Hours
Class 2 (common areas) 7,000
Class 3 (common areas) 7,000
Class 3 (other than common areas) 3,000
Class 5 3,000
Class 6 5,000
Class 7a (open air carparks) 4,500
Class 7a (carparks other than open air) 7,000
Class 7b 5,000
Class 8 (Division C ANZSIC) 5,000
Class 8 (other than Division C ANZSIC) 3,000
Class 9a 6,000
Class 9b 2,000
Class 9c 6,000
Class 10b 1,000
4.9.1 Upgrades Occurring in Spaces/Buildings with Different or Multiple Classifications
When a building or space subject to a lighting upgrade can be classified under different or multiple
classifications, the principles as laid out below must be applied9.
Each part of the building which is the subject of the upgrade works must be classified separately. For
these classifications, the following definitions apply:
(a) where parts have different purposes (if not more than 10% of the floor area10
of a storey11
) and where the minor use is used for a purpose which is a different classification, the classification applying to the major use may apply to the whole storey;
9 These principles do not apply to external lighting that is affixed to an eligible building or structure. In this case, the
major classification of the building or structure applies. Please note that Building Code Class 10b structures are not eligible for forms of external lighting to be affixed to.
10 Floor Area means:
(a) In relation to a building – the total area of all storeys;
(b) In relation to a storey – the area of all floors of that storey measured over the enclosing walls, including:
i. the area of a mezzanine within the storey, measured within the finished surfaces of any external walls;
ii. the area occupied by any internal walls or partitions, any cupboard, or other built-in furniture, fixture or
fitting;
iii. if there is no enclosing wall, an area which has a use that:
contributes to the fire load; or
impacts on the safety, health or amenity of the occupants in relation to the provisions of the BCA;

Reference: C/12/11919
Page 29 of 48
Reference: C/12/11919
Page 29 of 48
(b) the provisions of (a) (above) do not apply when the minor use is a laboratory of Class 2,3 or 4;
(c) BCA classifications classes 1a, 1b, 7a, 7b, 9a, 9b, 9c, 10a, 10b and 10c are each regarded as separate classifications;
(d) A reference to:
Class 1 – refers to Class 1a and/or 1b;
Class 7 – refers to Class 7a and/or 7b;
Class 9 – refers to Class 9a, 9b and/or 9c;
Class 10 – refers to Class 10a, 10b and/or 10c;
(e) A plant room, machinery room, lift motor room, boiler room or the like must have the same
classification as the part of the building in which it is situated; and
(f) If a building or part of a building has more than one classification applying to the whole
building or part in accordance with (a) (above), that building or part much comply with all the
relevant provisions of the BCA for each classification.
If despite your best endeavours you are unable to confidently specify the space type classification,
please consider the circumstances, identify the most applicable classification and contact the ESC to
discuss the matter.
4.10 TECHNOLOGY TYPES – CONVENTIONAL AND EMERGING
Any product installed as part of a lighting upgrade must first be approved by the ESC. This is to
ensure that the product is awarded the correct wattage factor for the purposes of the VEEC
calculation, among other reasons.
One factor in the VEEC calculation is the Lamp Circuit Power (LCP), which refers to the combined
power draw of the lamp and control gear for each light fitting. For some well-established types of
technology, such as linear fluorescents, the LCP is determined by adding a default factor to the
(c) In relation to a room – the area of the room measured within the finished surfaces of the walls, and includes the
area occupied by any cupboard or other built-in furniture, fixture or fitting;
(d) In relation to a fire compartment – the total area of all floors within the fire compartment measured within the
finished surfaces of the bounding construction, and if there is no bounding construction, includes an area which
has a use which contributes to the fire load;
(e) In relation to an atrium – the total area of all floors within the atrium measured within the finished surfaces of the
bounding construction and if no bounding construction, within the external walls.
11 Storey means a space within a building which is situated between one floor level and the next floor level above, or if there is no floor above, the ceiling or roof above, but not:
(a) A space that contains only:
i. a lift shaft, stairway or meter room; or
ii. a bathroom, shower room, laundry, water closet, or other sanity compartment; or
iii. accommodation intended for more than 3 vehicles; or
iv. a combination of the above.
(b) A mezzanine.

Reference: C/12/11919
Page 30 of 48
Reference: C/12/11919
Page 30 of 48
Nominal Lamp Power (NLP) of the lamp. These are referred to as conventional or ‘non-emerging
technology’.
For less established types of technology, the LCP is determined using laboratory tests conducted on
the lamp and the control gear it will be installed with. An example is an MR16 LED downlight and its
associated driver – these types of products are referred to as ‘emerging technology’. The table in
Figure 14 lists both types of product.
Figure 14: Conventional (non-emerging) vs emerging technologies
Conventional (‘non-emerging’) technologies Emerging technologies
T12, T8 or T5 linear fluorescents T5 adaptor assemblies (kits)
Compact fluorescents (CFLs) LEDs
Tungsten or halogen incandescents Induction lamps
Metal halides Any other lighting not listed under ‘conventional’
Mercury vapour
High pressure sodium (HPS)
There are different documentary requirements depending on which category your product falls into.
The product approval Section 5.3 outlines these documentary requirements.
Note: lighting control devices, including VRUs, are separate to the ‘conventional vs emerging
technology’ distinction. These devices have their own documentary requirements, detailed in Section
5.3.
4.11 COMPLIANCE WITH AS/NZS 1680
To be considered a compliant installation, each upgrade must demonstrate compliance with the
relevant sections of AS/NZS 1680, which is the standard governing internal lighting. For VEET, the
upgrade must meet:
the minimum illuminance requirements of AS/NZS 1680:0:2009 (safe movement), and
the recommended maintained illuminance of AS/NZS 1680.1:2006 (task based lighting).
Anyone engaged in this activity should keep a copy of these standards. Appropriate methodologies
for ensuring compliance are contained within the standards’ appendices.
4.11.1 Maintained illuminance, relamping cycles and lumen depreciation
Table 3.1 of AS/NZS 1680.1 specifies the minimum maintained illuminance for the upgrade. This is a
separate measure from the amount of illuminance achieved on the day of the upgrade. Maintained

Reference: C/12/11919
Page 31 of 48
Reference: C/12/11919
Page 31 of 48
illuminance refers to the amount of illuminance the upgrade must achieve during the period of the
relamping cycle (sometimes called a maintenance cycle).
The relamping cycle is the period after which the lamps should be replaced in order to remain
compliant with the illuminance levels specific by Table 3.1 of AS/NZS 1680.1. You must recommend
a relamping cycle to the client, measured in hours. This figure is recorded on the AS/NZS 1680
compliance declaration associated with the upgrade (more information on this declaration below).
The relamping cycle is one of the factors you use to determine how much lumen depreciation to
expect.
The nominated relamping cycle gives you the period over which you must calculate the anticipated
lumen depreciation. Lumen depreciation refers to how much the amount of light emitted by the lamp
will reduce over time. Different types of technologies have different typical lumen depreciation
curves. Some deplete relatively quickly, some hardly deplete at all. Even different models of the
same type of technology can have dramatically different lumen depreciation curves, depending on
the quality of the componentry.
Figure 15 provides an example of how the lumen depreciation would be calculated for the installation
of a particular LED product.
Figure 15: Example workings to establish lumen depreciation
4.11.2 AS/NZS 1680 compliance declaration
The ESC has prepared a template to streamline your compliance with this requirement. This
template is called the AS/NZS 1680 compliance declaration. You must complete an AS/NZS 1680
0
20
40
60
80
100
120
1 2 3 4 5 6 7 8 9 10 11 12 13 14 15 16 17 18 19 20 21 22 23 24 25 26 27 28 29 30
% of original light output
Hours of Operation ('000s)
Mock LED lumen depreciation curve
1. A recommended relamping period of 20,000hrs operation is provided to the energy consumer.
2. The photometric data indicates that the light output till be at 86% of the original after 20,000hrs.
3. Therefore the lumen depreciation factor at the conculsion of the recommended relamping period is 0.86.

Reference: C/12/11919
Page 32 of 48
Reference: C/12/11919
Page 32 of 48
compliance declaration for each upgrade you undertake. The template can be downloaded from the
business sector assignment form page of the VEET website.
On the declaration, you are required to provide the following information:
whether you undertook computer based lighting design
the qualifications of the lighting designer (if you undertook lighting design)
further details about the qualifications of the lighting designer, if the lighting designer was not
affiliated with the Illuminating Engineering Society of Australia and New Zealand (IESANZ)
the light level verification method you used
the qualifications of the person who undertook the light level verification
further details about the qualifications of the person who undertook the light level verification, if
they were not affiliated with the IESANZ, and
various supporting evidence.
4.11.3 Maintained illuminance table
One component of the AS/NZS 1680 compliance declaration is the maintained illuminance table.
Explanatory material regarding the maintained illuminance table is contained in the template itself.
Before engaging in an upgrade, you should be very familiar with the data requirements of this table,
including the need to record a recommended relamping period (in hours). Consult the template for
more details.
4.11.4 Exemptions from AS/NZS 1680
The Regulations empower the ESC, for the purposes of VEET, to issue an exemption to either the
relevant requirements of AS/NZS 1680.0, AS/NZS 1680.1, or both. Importantly, such exemptions are
distinct from instances in which the maintained illuminance levels of AS/NZS 1680.1 do not need to
be met because of the function of the space, such as for mood lighting, display lighting or theatrical
lighting (these cases of non-applicability are defined in the standard itself).
In such instances, the minimum required maintained illuminance is effectively zero, meaning you do
not need to take any specific steps to demonstrate compliance, although you a still technically
‘applying the standard’.
An exemption issued by the ESC applies to situations in which you would not need to apply the
standard at all. For instance, AS/NZS 1680.0 (safe movement) would not apply if you are only
installing lighting inside a display cabinet in which no movement of people will occur, but only if that
cabinet’s lighting is not the primary source of illumination for the open spaces adjacent to it.

Reference: C/12/11919
Page 33 of 48
Reference: C/12/11919
Page 33 of 48
If you wish to seek an ESC exemption to AS/NZS 1680, send an email to the VEET inbox
([email protected]), marked to the attention of the Compliance Manager, explaining the specific
case. If approved, you will be advised of your exemption by an email from the Compliance Manager.
You must then keep a copy of this email on file as part of the documentation associated with the
upgrade.
4.12 REQUIRED TRAINING AND QUALIFICATIONS
4.12.1 Occupational Health & Safety
In 2013, the ESC implemented a Mandatory Safety Training (MST) regime for installers operating
under the VEET scheme.
This MST regime imposes obligations on installers which operate in addition to the conditions
imposed on installers by other OH&S legislation. In particular, the ESC requires all commercial
lighting upgrades to be undertaken by licensed electricians.
4.12.2 AS/NZS 1680
The ESC does not currently impose any minimum training or qualifications for conducting lighting
design or lux reports. However, in both instances you should satisfy yourself that the personnel you
engage are sufficiently skilled and experienced to ensure that your upgrades meet the requirements
of AS/NZS 1680 as they apply to VEET. If unsure, you should consult the lighting design peak body,
the Illuminating Engineering Society of Australia and New Zealand (IESANZ).
4.13 ASSIGNMENT OF RIGHTS TO VEECS
A consumer needs to complete and sign a VEEC assignment form when assigning their right to
create VEECs to a third-party AP. A VEEC assignment form needs to collect the information
necessary for APs to create certificates and demonstrate compliance with the legislation. VEEC
assignment form templates are available on the VEET website.
You may customise your own VEEC assignment form to incorporate additional explanatory text,
company logos and other features. When applying for accreditation, you will need to provide a copy
of the VEEC assignment form for review by the ESC as part of your accreditation application
process. The ESC requests that changes to VEEC assignment forms also be submitted to the ESC
for review.
You must give a copy of the VEEC assignment form, or another document containing the same
information, to consumers at the time of signing. Additionally, you must ensure that all personal
information collected in the VEEC assignment form is held in accordance with the Information
Privacy Principles (IPPs) under the Information Privacy Act 2000 (Vic). Details of how to comply can
be found at www.privacy.vic.gov.au.

Reference: C/12/11919
Page 34 of 48
Reference: C/12/11919
Page 34 of 48
5 END TO END PROCESS
This section steps through a notional VEET commercial lighting upgrade processes, in order to place
the explanatory material in context. A high level overview of this process is provided by Figure 16.
Actual business processes will vary considerably and you may find this notional process bears little
resemblance to your own systems. The structure is not prescriptive, but is designed for ease of
reference.
Figure 16: End to end process map
Become accredited
Get ESC approval to (i) Be an AP in the VEET scheme, and (ii) Undertake lighting upgrade
Engage clients
Find potential clients and scope upgrade
project
Have products approved
Get products
approved by the ESC
Calculate VEECs
Use the online calculator to estimate
VEEC value of the upgrade
Gather baseline information
Collect data about the existing lighting
configuration
Gather upgrade information
Collect data, AS/NZS
1680 compliance declaration (lux levels)
Documentation pack
Collate all info about the upgrade into a
documentation pack
ESC registers VEECs
Once ESC registers VEECs, they can be
traded
Create VEECs
Submit VEEC creation data to ESC using online system
Undertake works
Install ESC approved products in an
eligible premises
Assignment of rights
Authorised signatory of business assigns the VEEC creation
rights to AP
Understand VEET and Schedule 34
Get to know the scheme and the
activity rules

Reference: C/12/11919
Page 35 of 48
Reference: C/12/11919
Page 35 of 48
5.1 UNDERSTAND VEET AND SCHEDULE 34
Especially at the start, participating in the VEET scheme can be challenging. Before engaging in any
upgrade works, make sure you understand how the scheme works, including all facets of this end-to-
end process description.
5.2 BECOME ACCREDITED
In order to create Victorian energy efficiency certificates (VEECs) for your lighting upgrade activities
under VEET, you must be:
1. Approved by the ESC to become an Accredited Person (AP) under the VEET scheme, and
2. Approved by the ESC to undertake lighting upgrade activities under the VEET scheme.
You may apply for both approvals at the same time by completing and submitting an Accreditation
Pack. The ESC has prepared an Accreditation Pack to provide guidance on the accreditation and
activity approval process. You can download this document from the VEET website.
For organisations that have already received their approval to become an AP, you must apply for
approval to undertake the lighting upgrade activity by completing an Application for Additional
Activities form. The ESC has prepared an Additional Activity Pack, containing this form, to provide
guidance on this process. This document is also available from the VEET website.
As part of applying for approval to undertake this activity, you are required to submit copies of the
following documents based on the templates provided on the VEET website:
1. VEEC assignment form
2. VEET Upgrade data summary
3. AS/NZS 1680 compliance declaration (with maintained illuminance table)
More information about these documents and their purpose is included below.

Reference: C/12/11919
Page 36 of 48
Reference: C/12/11919
Page 36 of 48
5.3 VEET PRODUCTS
To create Victorian Energy Efficiency Certificates (VEECs) from any lighting upgrade, the product
installed must be listed on the VEET product register with a status of ‘Approved’.
For APs and VEET account holders (including manufacturers) seeking to add a new product to the
product register, an application must be submitted to the ESC using the online product application
tool via your VEET account so that the ESC can verify that the product is capable of meeting the
minimum criteria required by the Regulations.
For more information about the product application and assessment process, please refer to the
Explanatory Note – Lodging a Product Application, which contains a detailed step-by-step guide to
getting a product listed for each prescribed activity category on the VEET register of products.
5.4 ENGAGE CLIENTS
There are a number of important factors to consider when engaging clients for an upgrade that will
be used to create VEECs. In addition to the usual process of developing a business case, you
should ensure you give consideration to the following points.
5.4.1 Is the job eligible?
Is the upgrade eligible under the terms laid out in Section 4.2 of this document?
5.4.2 What will be the AS/NZS 1680 requirements?
Does the client understand the requirements of AS/NZS 1680 as they apply to VEET?
What are the AS/NZS 1680 requirements going to be for this project?
Will the intended lighting design meet those standards?
Do you have access to the relevant photometric data?
5.4.3 What additional products will need to be approved?
Will the upgrade require the installation of products for which you are not currently approved? If so,
you should collate the necessary documentary evidence and lodge the required product approvals
as soon as possible to avoid delays.

Reference: C/12/11919
Page 37 of 48
Reference: C/12/11919
Page 37 of 48
5.5 PRE-CALCULATE VEECS
In order to quote for a job, develop a business case, or in other scenarios, you may need to do a
forward estimate of the number of VEECs an upgrade will generate. The ESC provides a VEEC
calculator on the VEET website for this purpose.
The calculator is designed to accommodate all possible variations of upgrade permitted under the
Regulations and can therefore be quite complex to understand and use. The following section
provides a guide on how to determine the types of data required based on the various scenarios you
may be calculating VEECs for.
5.5.1 Guide to using the VEEC calculator
To use the calculator, you need information relating to both the baseline and the upgrade scenarios.
This can include the space type in which the upgrade is occurring, the relevant asset lifetime
reference and whether you’re installing conventional (non-emerging) technology or emerging
technology. You may also need the NLP or LCP of both the baseline and upgrade lamps, information
about any lightning control devices, and information about the lifetime of the lamps.
The type of upgrade you’re undertaking (based on Asset Lifetime Reference and technology type)
will determine the data you will need to enter. In any scenario, there will be some fields you must
leave blank. Figure 17 introduces the basic functionality of the calculator. Figure 18 and Figure 19
use a stylised representation of the calculator to show what data you’ll need to enter based on the
scenario of the upgrade.
APs are strongly recommended to develop their own calculators and corroborate their results against
the VEEC calculator on the VEET website.

Reference: C/12/11919
Page 38 of 48
Reference: C/12/11919
Page 38 of 48
Figure 17: VEEC calculator – basic functionality
VEET Website
Select the relevant Sch 34 calculator (either J6 or Non-J6) from the VEET website.
Workings
Deemed baseline and upgrade MWh figures, and deemed percentage energy savings, are displayed here to allow you to trouble shoot and sense test your results.
Baseline & Upgrade fields
The fields shaded blue in this diagram collect information about the baseline, while the orange shaded fields collect info about the upgrade
Basic troubleshooting
If you get a green tick and green shading after hitting the ‘calculate’ button, it means the data is ‘VALID’ and a valid VEEC value is displayed. If you get a red cross and red shading after hitting the ‘calculate’ button, it means the data is ‘INVALID’. Even if a VEEC value is displayed, this value is not valid. In this instance you must correct the data errors and recalculate until you get a green tick and shading before relying on the VEEC amount provided.

Reference: C/12/11919
Page 39 of 48
Reference: C/12/11919
Page 39 of 48
Figure 18: VEEC calculator – variable data requirements – J6 scenarios
Key
Do not enter data into this cell for this scenario
You must enter data in this cell for this scenario
Original Input inferred from scenario
Inputs dependent on lighting control device situation
Where this says 'upgrade', you
must enter the rated lifetime
hours of the lamps that you
install, even though the field is
part of the 'baseline' calculation.
(i.e. if you pick Non-J6-D and you
are replacing T8s with a rated
lifetime of 5,000hrs with LED
tubes with rated lifetime of
20,000hrs, you need to put
20,000 in this field.)

Reference: C/12/11919
Page 40 of 48
Reference: C/12/11919
Page 40 of 48
Figure 19: VEEC calculator – variable data requirements – Non-J6 scenarios
Key
Do not enter data into this cell for this scenario
You must enter data in this cell for this scenario
Original Input inferred from scenario
Inputs dependent on lighting control device situation
Where this says
'upgrade', you must
enter the rated lifetime
hours of the lamps that
you install, even though
the field is part of the
'baseline' calculation.
(ie if you pick Non-J6-D
and you are replacing
T8s with a rated lifetime
of 5,000hrs with LED
tubes with rated lifetime
of 20,000hrs, you need
to put 20,000 in this
field.)

Reference: C/12/11919
Page 41 of 48
Reference: C/12/11919
Page 41 of 48
5.6 GATHER BASELINE INFORMATION
In order to create VEECs for an upgrade, you must have collected all the relevant baseline
information. This includes the type of space, number, type and NLP of the pre-existing lamps, and
potentially their rated lifetime. Other relevant information includes the number and type of the control
gear, and the configuration of any existing lighting control devices.
You must also determine whether the area undergoing a lighting upgrade is air-conditioned or not
(air-conditioning, for the purposes of this activity, is a heating, ventilation and air-conditioning, or
‘HVAC’, system).
In the event you require more specific guidance about the data requirements for a given upgrade,
refer to the VEET upgrade data summary template on the VEET website, the upload form, or to the
Regulations themselves.
There are a number of other types of information you will need to gather for your records, beyond the
data you need to create VEECs using the online system. Ensure you consult the relevant section of
the Explanatory Note - Compliance Requirements for Accredited Persons by Prescribed Activity for
full details (available from the VEET website). Contact VEET Support if you are unsure of your
obligations.
5.7 UNDERTAKE WORKS
The highest priority while undertaking the upgrade is that all relevant OH&S laws, standards and
precautions are observed.
You will also need to ensure that your staff or subcontractors collect any relevant compliance
information about the upgrade progresses, including the EEI markings or types of any
ballasts/control gear and sample photos of the decommissioned equipment.
Under the Regulations, the upgrade is deemed to have occurred on the day the installation is
completed.
5.8 GATHER UPGRADE INFORMATION
In addition to the baseline information, you must take care to collect all relevant upgrade information.
This includes information about AS/NZS 1680 compliance, such as an AS/NZS 1680 compliance
declaration signed by your Upgrade Manager and the client, as well as the associated maintained
illuminance table and photometric data (if required).

Reference: C/12/11919
Page 42 of 48
Reference: C/12/11919
Page 42 of 48
In the case of very large upgrades (in major buildings such as universities or hospitals), there may be
some limited scope to ‘rationalise’ aspects of the data you collect about the upgrade (as opposed to
subdividing all data by calculation zone). The ESC will consider well thought out proposals in this
regard, provided (i) they do not undermine the auditability of the upgrade, (ii) the upgrade is
sufficiently large, and (iii) the AP has a good compliance record.
5.9 OBTAIN ASSIGNMENT OF RIGHTS
Before VEECs can be created, there must be an assignment of rights between the energy consumer
and the AP. You must ensure that the person signing on behalf of the client, the ‘authorised
signatory’, does indeed bear legal authority to sign on the behalf of that entity.
5.10 DECOMMISSION ANY REMOVED LIGHTING EQUIPMENT
Any lighting equipment you replace or remove must be decommissioned for the upgrade to be
eligible under VEET. This includes control gear such as ballasts or transformers. Details of an AP’s
decommissioning practices must be supplied to the ESC for review before being approved to
undertake the lighting upgrade activity.
Evidence of decommissioning must be retained by the AP and supplied to the ESC for inspection on
request. Please see the Explanatory Note – Compliance Requirements for Accredited Persons by
Prescribed Activity for more details on record keeping requirements.
Any existing lighting products that are being decommissioned as part of the lighting upgrade should
be disposed of in an environmentally responsible and verifiable manner. The ESC expects APs to
recycle the components of the decommissioned product wherever possible.
5.11 COLLATE DOCUMENTATION PACK
Having collected all the relevant baseline and upgrade information to support your claim for VEECs,
you must collate the required data into a ‘documentation pack’, with a completed ‘documentation
pack coversheet’ for the upgrade. You must use the template provided by the ESC for the
documentation pack coversheet, available from the VEET website. For reference, Figure 20
reproduces the documentation checklist form the documentation pack coversheet. The Explanatory
Note – Compliance Requirements for Accredited Persons by Prescribed Activity provides more
details about the ESC’s expectations of these items of documentation.

Reference: C/12/11919
Page 43 of 48
Reference: C/12/11919
Page 43 of 48
Figure 20: Documentation checklist
Documentation list – Please tick
1 Assignment form
2 VEET Upgrade Data Summary
3 AS/NZS 1680 Compliance Declaration Including any associated tables, photometric data and lux reports, if necessary.
4 VEET Upgrade Schematic & Legend (Baseline)
5 VEET Upgrade Schematic & Legend (Upgrade)
6 Geocoded photos
7 Invoice for works (copy)
8 Decommissioning evidence (copy)
9 Certificate of electrical safety (COES) (if required)
10 Building permit (if required)
11 Type of space evidence
5.12 CREATE VEECS USING VEET ONLINE SYSTEM
To create VEECs, an AP must submit certain information to the ESC. VEEC creation requests can
be made either through the use of a bulk upload form, or by making a single entry through the online
user interface (UI). APs that are approved to undertake the lighting upgrade activity are able to
access upload forms via their online account on the VEET website.
The Regulations establishing the commercial lighting upgrade activity contemplate a wide range of
scenarios, relative to other VEET activities. By ‘scenarios’ we mean types of upgrade that are
distinguished according to the nature of the work undertaken. Delamping, for instance, represents a
different scenario to replacing T8s with T5 adapters, even if both occur as part of a Non-J6 upgrade.
Each scenario has specific data input requirements. Because the user interface has been designed
to accommodate multiple scenarios, users must take care to ensure they have collected and input
the relevant data in each case. (This means you will always need to leave some fields blank.)
Figure 21 introduces the user interface with a series of screenshots, while Figure 22 and Figure 23
outline the data inputs required for the various J6 and Non-J6 scenarios.

Reference: C/12/11919
Page 44 of 48
Figure 21: Schedule 34 user interface
Tabs system
The UI has been divided into two tabs: detail and calculations. The former collects high level information about the upgrade, while the latter collects the data required to perform the abatement calculations.
Navigate between them using the tab names as marked below.
J6 Calculations Tab The calculations tab contains a grid designed to accommodate the data requirements of range of upgrade scenarios.
Non-J6 Calculations Tab
The calculation tabs for J6 and Non-J6 vary a little due to differences in the data requirements for each variation of the activity.
Maximum of 50 Calculation Zones
The UI and upload form can accommodate up to 50 calculation zones. If a user requires additional calculation zones they should contact the ESC.
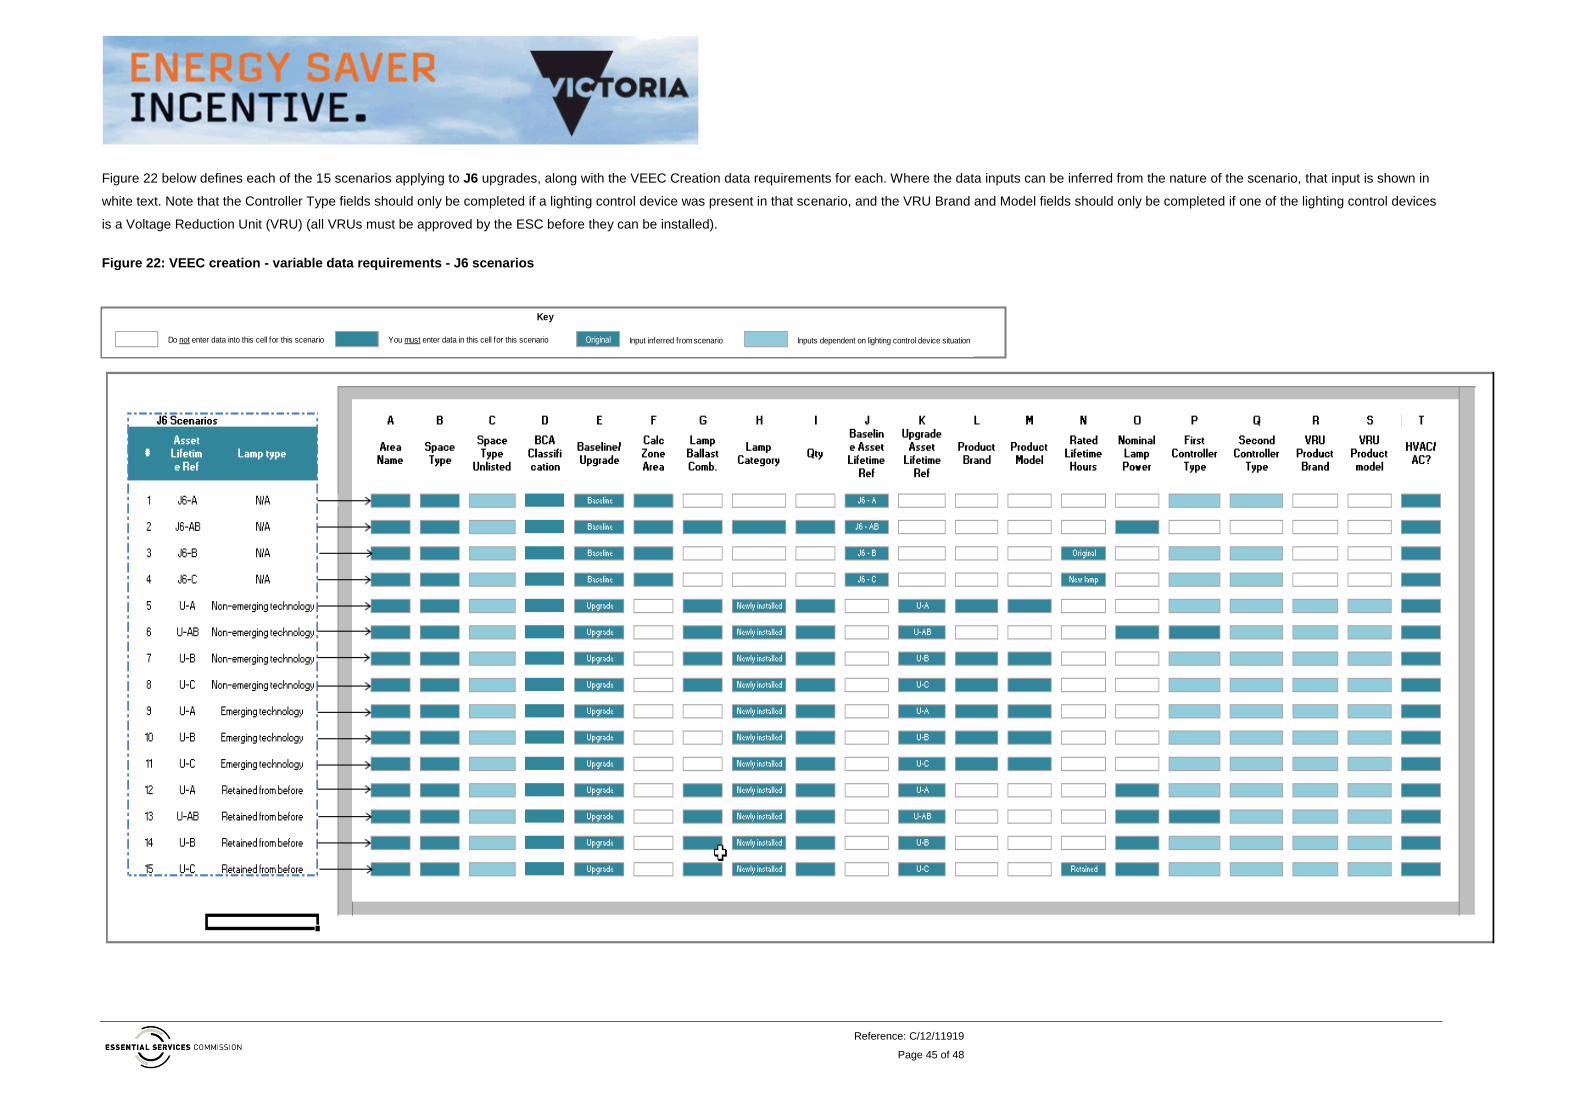
Reference: C/12/11919
Page 45 of 48
Figure 22 below defines each of the 15 scenarios applying to J6 upgrades, along with the VEEC Creation data requirements for each. Where the data inputs can be inferred from the nature of the scenario, that input is shown in
white text. Note that the Controller Type fields should only be completed if a lighting control device was present in that scenario, and the VRU Brand and Model fields should only be completed if one of the lighting control devices
is a Voltage Reduction Unit (VRU) (all VRUs must be approved by the ESC before they can be installed).
Figure 22: VEEC creation - variable data requirements - J6 scenarios
Do not enter data into this cell for this scenario You must enter data in this cell for this scenario Original Input inferred from scenario Inputs dependent on lighting control device situation
Key

Reference: C/12/11919
Page 46 of 48
Figure 23 below defines each of the 17 scenarios applying to Non-J6 upgrades, along with the data requirements for each. Information about lighting control devices and VRUs in respect of J6 upgrades applies equally in the
below scenarios.
Figure 23: VEEC creation – variable data requirements – Non-J6 scenarios
Do not enter data into this cell for this scenario You must enter data in this cell for this scenario Original Input inferred from scenario Inputs dependent on lighting control device situation
Key

Reference: C/12/11919
Page 47 of 48
5.13 ESC ASSESSES VEEC CREATION APPLICATION
To successfully create VEECs, the data uploaded for a particular activity must pass the
website’s validation and address verification checks. After you press the ‘Create’ button for
validated activities, the VEECs associated with that upgrade are created and are assigned
unique ID number. The ESC then assesses those certificates and will decide whether to register
them.
If you are new to the commercial lighting activity, your VEEC applications will begin in the ‘stage
1’ stream. In this stage, the ESC will request you submit the documentation pack associated
with your first few upgrades. Once the ESC is satisfied with the quality and reliability of your
documentation packs, your applications will move into the ‘stage 2’ stream and you will no
longer have to submit the documentation pack for each upgrade in order to have your
certificates registered.
In the stage 2 stream, instead of performing desk audits on every upgrade, the ESC utilises a
risk analytics tool to monitor and highlight any risk factors in your creation data. The ESC
constantly updates its risk analytics tool based on trends in the scheme, information about
individual APs and installers, data on specific types of product, and other factors. All stage 2
stream VEEC creations are subject to this process, allowing the ESC to focus its assessment
regime based on the risk profile of a particular upgrade. In this stage, the ESC may request you
submit the documentation pack associated with ‘high risk’ upgrades.
You should note that the ESC may require you to submit the documentation pack associated
with any given upgrade before deciding to register the certificates. You must always possess a
complete and accurate documentation pack for each upgrade you have undertaken.
5.14 ESC REGISTERS VEECS
The ESC will raise and forward an invoice in due course for VEECs accepted in order to
complete the registration process. Once payment is received, the ESC registers the certificates
and notifies the AP that the certificates are now valid and therefore available to be traded and/or
surrendered to the ESC.

Reference: C/12/11919
Page 48 of 48
6 SEEKING ASSISTANCE
If you encounter difficulties when participating in this activity, you should in the first instance
consult the explanatory material listed in Section 3 of this document. This includes the VEET
website FAQ section (see the top right hand corner of the page) which has a special section
dedicated to commercial lighting queries.
If you are unable to resolve your issue using the publicly available material, please contact
VEET Support on (03) 9032 1310 or [email protected].
7 LEGAL CONTEXT FOR THIS DOCUMENT
The ESC has prepared this explanatory note document as a general summary of relevant parts
of the:
Victorian Energy Efficiency Target Act 2007
Victorian Energy Efficiency Target Regulations 2008
Victorian Energy Efficiency Target Scheme Guidelines 2013
This document should not be relied upon as substitute for legal advice and should be read in
conjunction with the above source documents. In the event of inconsistency between this
explanatory note document and the above source documents, the content in the source
documents takes precedence.