expedium 5.5 titanium - synthes.vo.llnwd.netsynthes.vo.llnwd.net/o16/llnwmb8/int mobile/synthes...
TRANSCRIPT
Surgical Technique
EXPEDIUM® 5.5TITANIUM
DESIGNING SURGEONS
Darrel Brodke, M.D. University of Utah Medical Center Dept. of Orthopedic Surgery Salt Lake City, Utah
Iain Kalfas, M.D., F.A.C.S The Cleveland Clinic Foundation Dept. of Neurosurgery Cleveland, Ohio
Dr. med. Dezsö Jeszenszky Schulthess Klinik Lengghalde 2 8008 Zürich, Switzerland
Harry Shufflebarger, M.D. Miami Children’s Hospital Miami, Florida

EXPEDIUM 5.5 Titanium Surgical Technique DePuy Synthes 1
Contents
EXPEDIUM ® Polyaxial Screws 2
EXPEDIUM Reduction Screws 11
EXPEDIUM Hooks 13
EXPEDIUM Translation Hooks 18
EXPEDIUM Dual Innie Polyaxial Screws 20
DePuy Synthes EXPEDIUM 5.5 Titanium Surgical Technique2
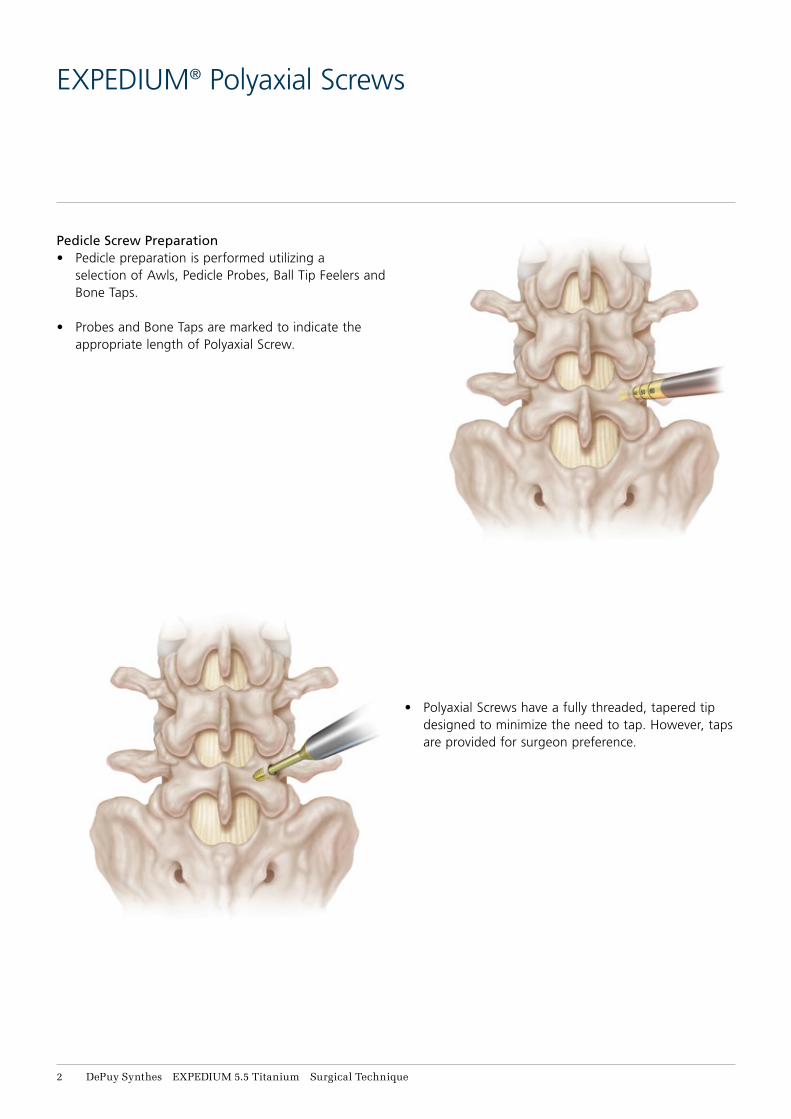
EXPEDIUM® Polyaxial Screws
Pedicle Screw Preparation • Pedicle preparation is performed utilizing a
selection of Awls, Pedicle Probes, Ball Tip Feelers and Bone Taps.
• Probes and Bone Taps are marked to indicate the appropriate length of Polyaxial Screw.
• Polyaxial Screws have a fully threaded, tapered tip designed to minimize the need to tap. However, taps are provided for surgeon preference.
EXPEDIUM 5.5 Titanium Surgical Technique DePuy Synthes 3
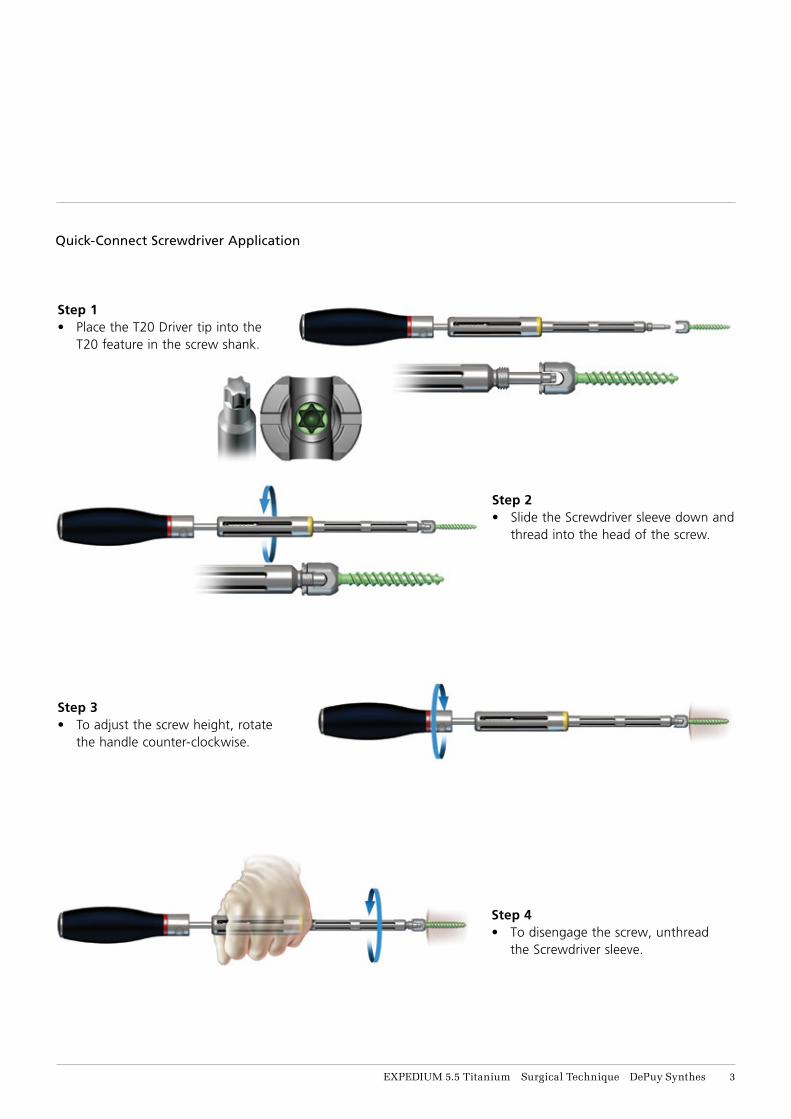
Quick-Connect Screwdriver Application
Step 1• Place the T20 Driver tip into the
T20 feature in the screw shank.
Step 2• Slide the Screwdriver sleeve down and
thread into the head of the screw.
Step 3• To adjust the screw height, rotate
the handle counter-clockwise.
Step 4• To disengage the screw, unthread
the Screwdriver sleeve.

DePuy Synthes EXPEDIUM 5.5 Titanium Surgical Technique4
EXPEDIUM Polyaxial Screws
Monoaxial Screws
Head Adjuster
Monoaxial Screws may be used according to surgeon preference.
Rod Insertion• Choose the appropriate length rod
with the desired lordosis. Place the rod into the Polyaxial Screw heads.
Polyaxial Screw Insertion• Polyaxial Screws are inserted using
the Polyaxial Screwdriver.
• The Polyaxial Screw head can be adjusted and positioned using the Head Adjuster.
NOTE: See Quick-Connect Screwdriver application (Page 3).

EXPEDIUM 5.5 Titanium Surgical Technique DePuy Synthes 5
Single Innie Insertions• Using the Single Innie Inserter,
pick up an Innie from the caddy.
• The Single Innie will self-retain on the inserter.
Alignment Guide
Rod Capture• Capture the rod into the implant by
inserting the Single Innie.
• The Alignment Guide can be used to help position the head and reduce the chance of cross-threading.
• Align with the screw head.
• Thread into the screw head to capture the rod.
DePuy Synthes EXPEDIUM 5.5 Titanium Surgical Technique6
EXPEDIUM Polyaxial Screws
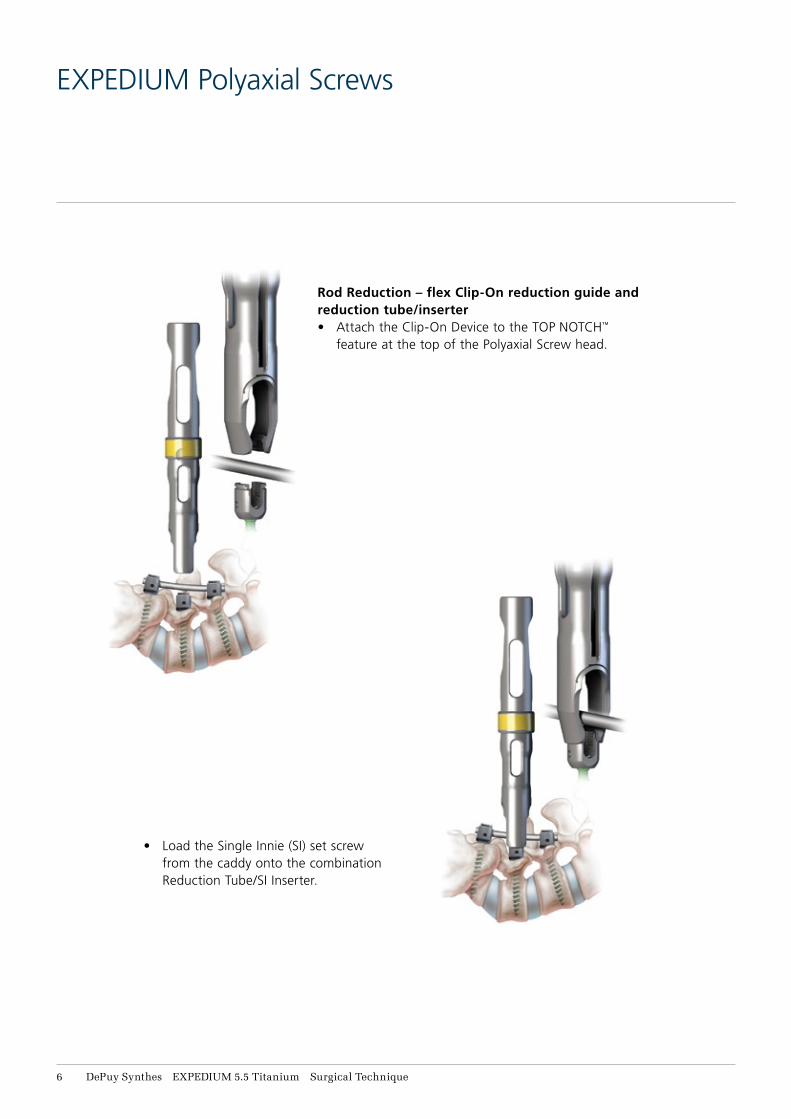
• Load the Single Innie (SI) set screw from the caddy onto the combination Reduction Tube/SI Inserter.
Rod Reduction – flex Clip-On reduction guide and reduction tube/inserter• Attach the Clip-On Device to the TOP NOTCH™
feature at the top of the Polyaxial Screw head.

EXPEDIUM 5.5 Titanium Surgical Technique DePuy Synthes 7
• Thread the Reduction Tube into the Clip-On Device.
• Turn the outer handle to fully seat the rod.
• Thread the Single Innie set screw into the implant head until tight. Remove the Reduction Tube and Clip-On Device.
DePuy Synthes EXPEDIUM 5.5 Titanium Surgical Technique8
EXPEDIUM Polyaxial Screws
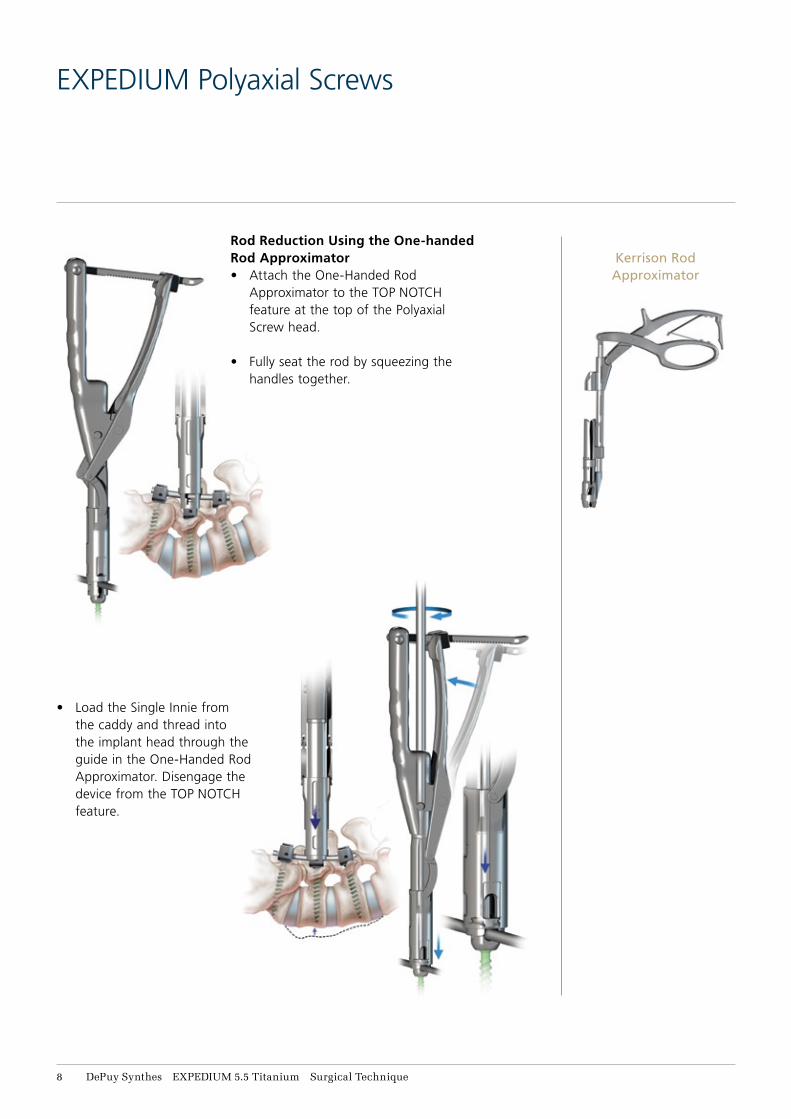
• Load the Single Innie from the caddy and thread into the implant head through the guide in the One-Handed Rod Approximator. Disengage the device from the TOP NOTCH feature.
Kerrison Rod Approximator
Rod Reduction Using the One-handed Rod Approximator• Attach the One-Handed Rod
Approximator to the TOP NOTCH feature at the top of the Polyaxial Screw head.
• Fully seat the rod by squeezing the handles together.

EXPEDIUM 5.5 Titanium Surgical Technique DePuy Synthes 9
Compression/Distraction• Once the rod has been captured into all of the
Polyaxial Screw heads, compression and distraction maneuvers can be accomplished by loosening and tightening the Single Innie.

DePuy Synthes EXPEDIUM 5.5 Titanium Surgical Technique10
EXPEDIUM Polyaxial Screws
Final Tightening• Final tightening is performed with
the Hexlobe Shaft inserted into the T-Handle Torque Wrench, set to 80 in-lb.
• The shaft is inserted through the Rod Stabilizer and into the Single Innie.
• The Stabilizer is then slid down over the head of the Polyaxial Screw and onto the rod. The Stabilizer handle can be held either perpendicular or parallel to the rod.
• The T-Handle is rotated clockwise until it clicks and resistance is no longer evident.
T-Handle Torque Wrench
T-Handle Torque Wrench set to 80 in-lb.
EXPEDIUM 5.5 Titanium Surgical Technique DePuy Synthes 11
EXPEDIUM Reduction Screws
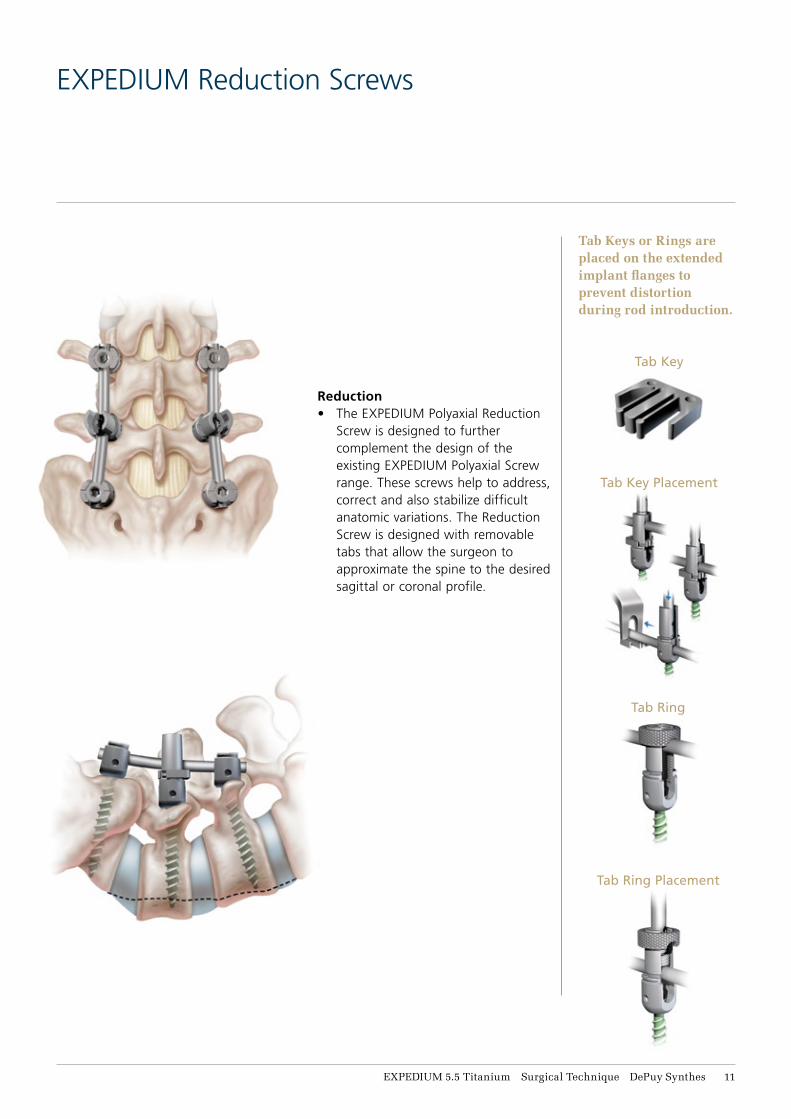
Reduction • The EXPEDIUM Polyaxial Reduction
Screw is designed to further complement the design of the existing EXPEDIUM Polyaxial Screw range. These screws help to address, correct and also stabilize difficult anatomic variations. The Reduction Screw is designed with removable tabs that allow the surgeon to approximate the spine to the desired sagittal or coronal profile.
Tab Key
Tab Key Placement
Tab Ring
Tab Ring Placement
Tab Keys or Rings are placed on the extended implant flanges to prevent distortion during rod introduction.

DePuy Synthes EXPEDIUM 5.5 Titanium Surgical Technique12
EXPEDIUM Reduction Screws
Reduction• Following the corrective reduction
maneuvers, a Structural Interbody Fusion Device may be inserted via a PLIF or TLIF procedure, if required.
Tab Remover
• After insertion of the Structural Interbody Fusion Device, Compression and final tightening of the Polyaxial Screws is performed. After final tightening, Extended Tabs may be removed using the Extended Tab Remover (see side panel).

EXPEDIUM 5.5 Titanium Surgical Technique DePuy Synthes 13
EXPEDIUM Hooks
There are four possible hook placement sites in the spine: pedicle, transverse process, supra-lamina and infra-lamina.
The first site is the pedicle. Pedicle Hooks are placed in the thoracic spine via the facet joint. The direction for the Pedicle Hooks is always cephalad.
The facet of the appropriate level is identified and the capsule is removed. The cartilage on the inferior articular process of the next distal level should be visualized.
• The facet is entered with the Pedicle Elevator.
Hook Preparation Instruments
A.
B.
C.
A. Thoracic Facet FinderB. Laminar FinderC. Pedicle Finder

DePuy Synthes EXPEDIUM 5.5 Titanium Surgical Technique14
EXPEDIUM Hooks
• The Pedicle Hook is inserted with either the Compact Hook Holder or the Hook Holding Forceps and seated flush against the facet and the pedicle.
• The second site is the transverse process. This is usually used in conjunction with a Pedicle Hook either at the same level or one level superior. A Wide Blade Lamina Hook or Angled Body Lamina Hook is recommended for this site.
• An Elevator is used to dissect around the superior surface of the transverse process.

EXPEDIUM 5.5 Titanium Surgical Technique DePuy Synthes 15
• The Wide Blade Lamina Hook or Angled Body Lamina Hook is then placed in the required position.
• The third possible site is the superior lamina. The Reduced Distance Lamina Hook or the Narrow Blade Lamina Hook is recommended for this site. The direction is always caudal. These hooks may be combined with other hooks to produce a claw construct.
• The ligamentum flavum is divided in the midline and excised.
DePuy Synthes EXPEDIUM 5.5 Titanium Surgical Technique16
EXPEDIUM Hooks
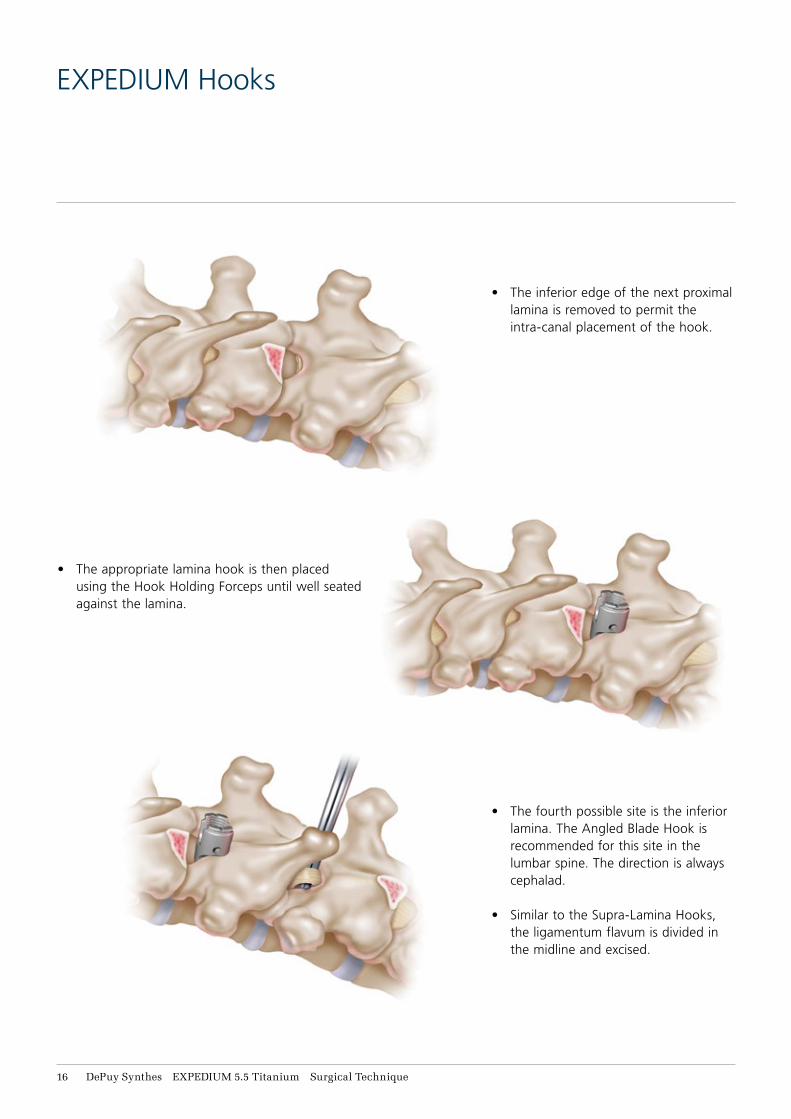
• The inferior edge of the next proximal lamina is removed to permit the intra-canal placement of the hook.
• The fourth possible site is the inferior lamina. The Angled Blade Hook is recommended for this site in the lumbar spine. The direction is always cephalad.
• Similar to the Supra-Lamina Hooks, the ligamentum flavum is divided in the midline and excised.
• The appropriate lamina hook is then placed using the Hook Holding Forceps until well seated against the lamina.
EXPEDIUM 5.5 Titanium Surgical Technique DePuy Synthes 17
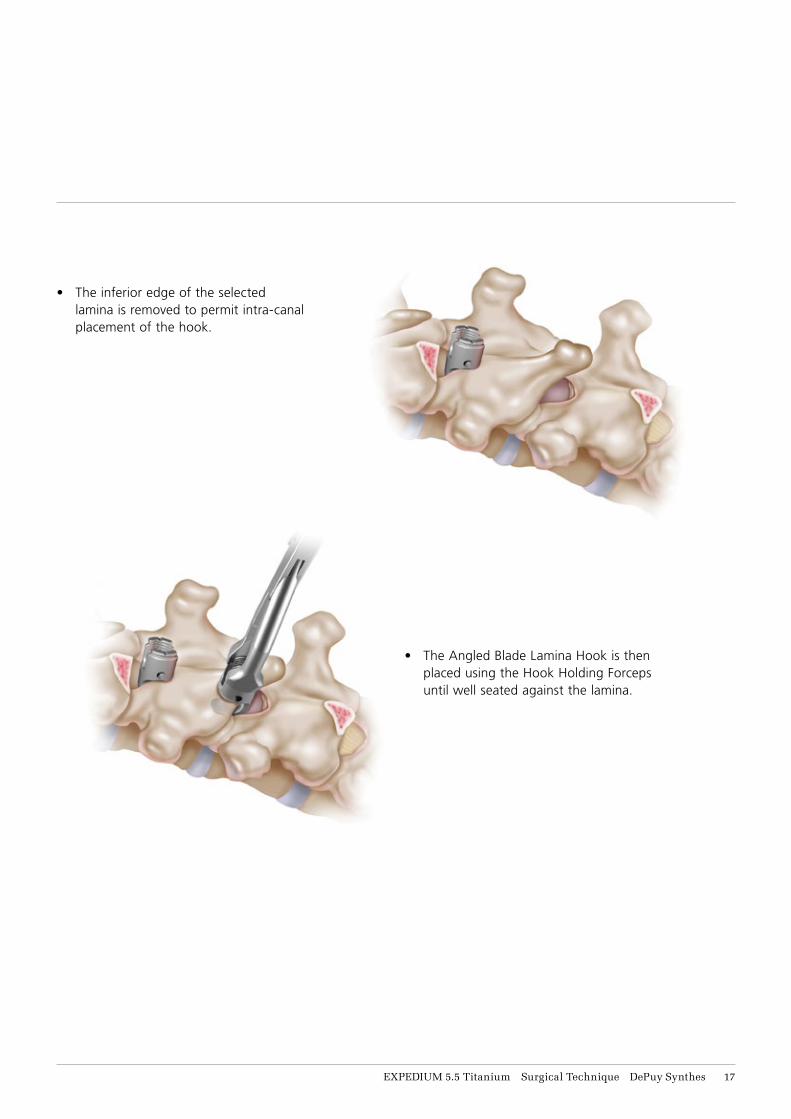
• The inferior edge of the selected lamina is removed to permit intra-canal placement of the hook.
• The Angled Blade Lamina Hook is then placed using the Hook Holding Forceps until well seated against the lamina.
DePuy Synthes EXPEDIUM 5.5 Titanium Surgical Technique18
EXPEDIUM Translation Hooks
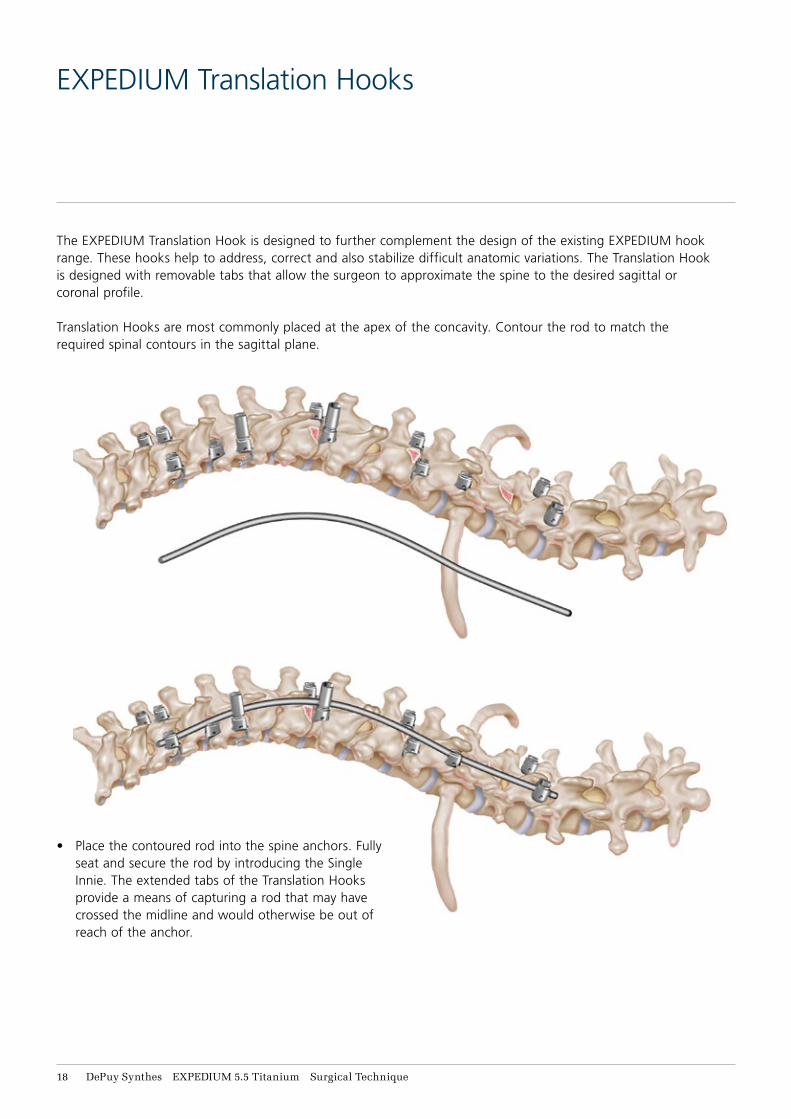
The EXPEDIUM Translation Hook is designed to further complement the design of the existing EXPEDIUM hook range. These hooks help to address, correct and also stabilize difficult anatomic variations. The Translation Hook is designed with removable tabs that allow the surgeon to approximate the spine to the desired sagittal or coronal profile.
Translation Hooks are most commonly placed at the apex of the concavity. Contour the rod to match the required spinal contours in the sagittal plane.
• Place the contoured rod into the spine anchors. Fully seat and secure the rod by introducing the Single Innie. The extended tabs of the Translation Hooks provide a means of capturing a rod that may have crossed the midline and would otherwise be out of reach of the anchor.

EXPEDIUM 5.5 Titanium Surgical Technique DePuy Synthes 19
• Advance the Single Innie within the flanged hook to bring the spinal anchors to the rod to correct the scoliosis.
• Once the rod is fully seated, the Approximation Tabs can be removed using the Tab Remover. Additionally, Cross Connectors can be used to add structural rigidity to the construct.
NOTE: Minimal distraction between Translation Hooks should be utilized during translation to prevent hook dislodgement.
• Distraction is applied as the rod is translated into the hooks using the Single Innie.
DePuy Synthes EXPEDIUM 5.5 Titanium Surgical Technique20
EXPEDIUM Dual Innie (DI) Polyaxial Screws
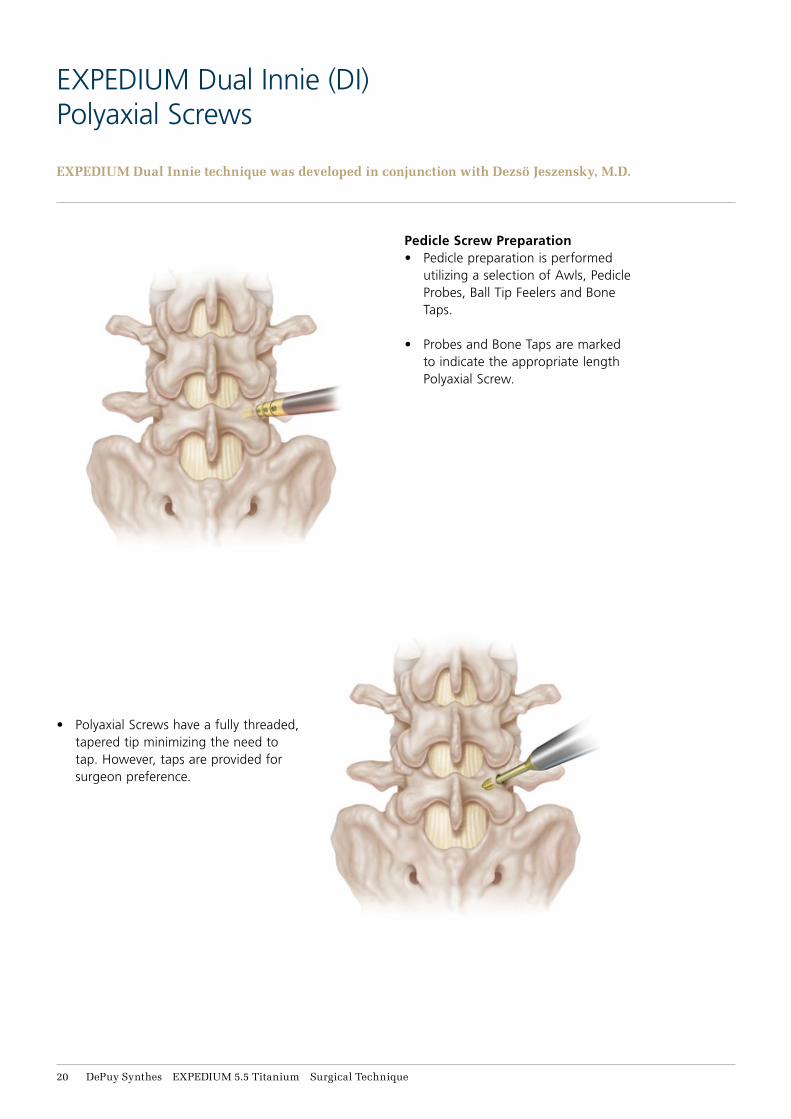
Pedicle Screw Preparation• Pedicle preparation is performed
utilizing a selection of Awls, Pedicle Probes, Ball Tip Feelers and Bone Taps.
• Probes and Bone Taps are marked to indicate the appropriate length Polyaxial Screw.
• Polyaxial Screws have a fully threaded, tapered tip minimizing the need to tap. However, taps are provided for surgeon preference.
EXPEDIUM Dual Innie technique was developed in conjunction with Dezsö Jeszensky, M.D.

EXPEDIUM 5.5 Titanium Surgical Technique DePuy Synthes 21
• The Polyaxial Screw head can be adjusted and positioned using the Head Adjuster.
Polyaxial Screw Insertion• Polyaxial Screws are inserted using the
DI Polyaxial Screwdriver.
NOTE: Polyaxial Screwdriver application is similar to the method described earlier (Page 3).

DePuy Synthes EXPEDIUM 5.5 Titanium Surgical Technique22
EXPEDIUM Dual Innie Polyaxial Screws
Dual Innie Insertions• Using the Dual Innie Inserter, pick up a Dual Innie Set
Screw from the caddy.
• The Dual Innie will self-retain on the inserter.
Rod Insertion• Choose the appropriate length rod with the desired lordosis.
Place the rod into the Polyaxial Screw heads.
• Align with the screw head.
• The Alignment Guide can be used to help position the head and reduce the chance of cross-threading (see Page 5).
• Thread into the screw head to capture the rod.
EXPEDIUM 5.5 Titanium Surgical Technique DePuy Synthes 23
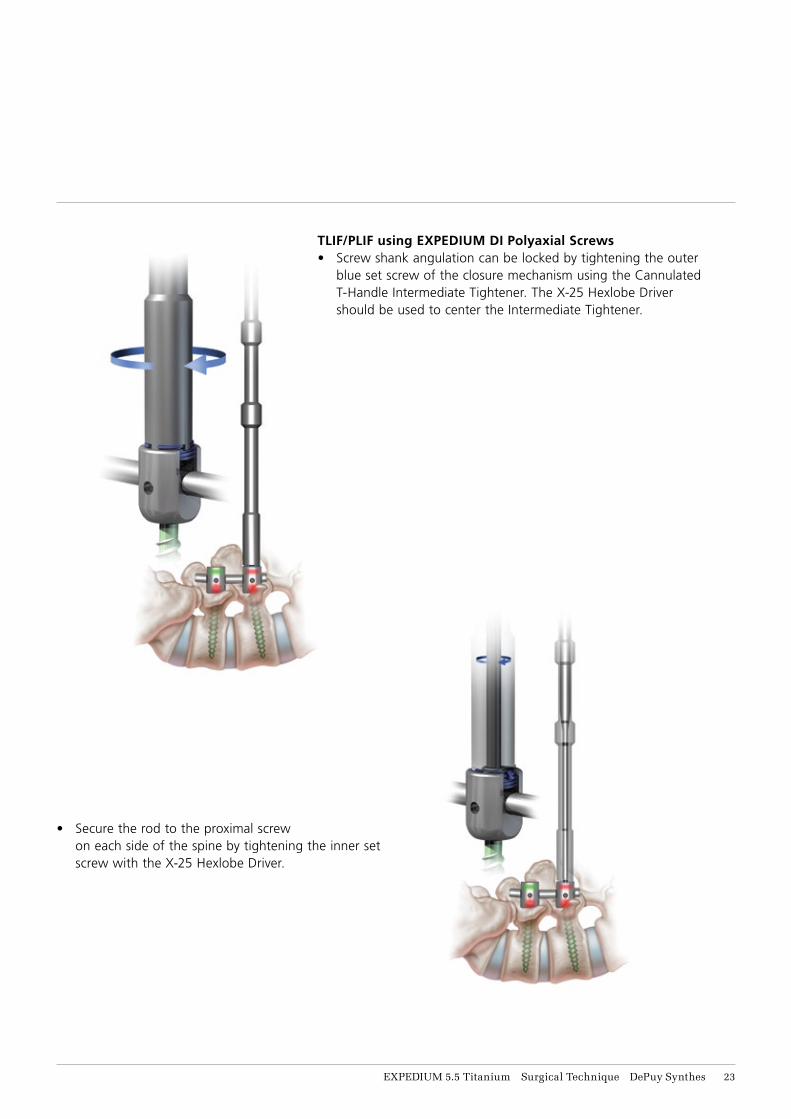
TLIF/PLIF using EXPEDIUM DI Polyaxial Screws• Screw shank angulation can be locked by tightening the outer
blue set screw of the closure mechanism using the Cannulated T-Handle Intermediate Tightener. The X-25 Hexlobe Driver should be used to center the Intermediate Tightener.
• Secure the rod to the proximal screw on each side of the spine by tightening the inner set screw with the X-25 Hexlobe Driver.

DePuy Synthes EXPEDIUM 5.5 Titanium Surgical Technique24
EXPEDIUM Dual Innie Polyaxial Screws
• Distraction along the entire vertebral body is achieved when the polyaxial mechanism is locked for all screws.
• Distraction is held by locking the remaining inner set screws with the X-25 Hexlobe Driver.

EXPEDIUM 5.5 Titanium Surgical Technique DePuy Synthes 25
• Placement of the bone graft can be checked visually.
• With the distracted disc space temporarily held open, the intervertebral disc can be safely removed.

DePuy Synthes EXPEDIUM 5.5 Titanium Surgical Technique26
EXPEDIUM Dual Innie Polyaxial Screws
• Parallel compressive forces can be applied to secure the bone graft. Loosen the appropriate inner set screw and tighten after compression is accomplished.
NOTE: The polyaxial mechanism can be released by loosening the blue outer set screw to ensure good opposition between the implant and the adjacent endplates.
EXPEDIUM 5.5 Titanium Surgical Technique DePuy Synthes 27
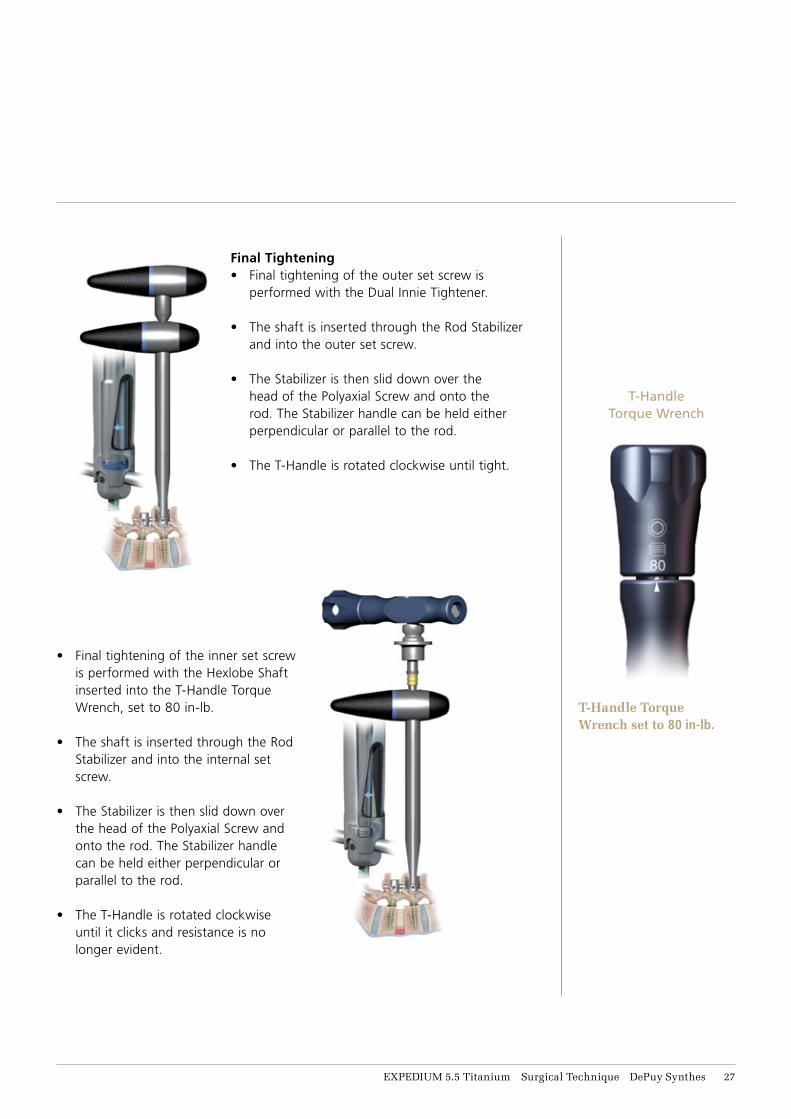
Final Tightening• Final tightening of the outer set screw is
performed with the Dual Innie Tightener.
• The shaft is inserted through the Rod Stabilizer and into the outer set screw.
• The Stabilizer is then slid down over the head of the Polyaxial Screw and onto the rod. The Stabilizer handle can be held either perpendicular or parallel to the rod.
• The T-Handle is rotated clockwise until tight.
T-Handle Torque Wrench
T-Handle Torque Wrench set to 80 in-lb.
• Final tightening of the inner set screw is performed with the Hexlobe Shaft inserted into the T-Handle Torque Wrench, set to 80 in-lb.
• The shaft is inserted through the Rod Stabilizer and into the internal set screw.
• The Stabilizer is then slid down over the head of the Polyaxial Screw and onto the rod. The Stabilizer handle can be held either perpendicular or parallel to the rod.
• The T-Handle is rotated clockwise until it clicks and resistance is no longer evident.

DePuy Synthes EXPEDIUM 5.5 Titanium Surgical Technique28
Removal Instructions
For screws with 5.5 DUAL Innie set screw:1) Clean debris/tissue from set screws.
2) Loosen inner set screw with the T-Handle Torque Wrench and the Hexlobe Shaft rotating it counter-clockwise. The 5.5 DI Rod Stabilizer should be used while loosening the set screw.
3) Loosen the outer blue set screw with the DI Final Tightener. The 5.5 DI Rod Stabilizer should be used while loosening the outer set screw.
4) Remove the Dual Innie set screw with the DI Inserter.
5) Once the set screws are removed, the rods can be removed.
6) Use the T20 Screw driver to back the screw out of the pedicle.
For screws with Single Innie set screw:1) Clean debris/tissue from set screws.
2) Loosen set screw with the T-Handle Torque Wrench and the Hexlobe Shaft rotating it counter-clockwise. The 5.5 SI Rod Stabilizer should be used while loosening the set screw.
3) Remove the Single Innie set screw with the X25 Set Screw Inserter.
4) Once the set screws are removed, the rods can be removed.
5) Use the T20 Screw Driver to back the screw out of the pedicle.
If a decision is made to remove the implants after solid fusion occurs, the following steps should be taken after the implant is exposed.
For hooks:1) Clean debris/tissue from set screws.
2) Loosen set screw with the T-Handle Torque Wrench and the Hexlobe Shaft rotating it counter-clockwise. The 5.5 SI Rod Stabilizer should be used while loosening the set screw with Open Hooks and the Closed Hook Stabilizer should be used while loosening the set screw in Closed Hooks.
3) For Open Hooks, remove the Single Innie set screw with the X25 Set Screw Inserter. For Closed Hooks, loosen the set screw with the X25 Set Screw Inserter, in this case the set screw does not need to be removed.
4) For Open Hooks, the rods can be removed once the set screws are removed. For Closed Hooks, the rods can be removed after the set screws are loosened.
5) Use the hook holder to remove the hook from the pedicle or the lamina.
EXPEDIUM 5.5 Titanium Surgical Technique DePuy Synthes 29
Indications
The EXPEDIUM® Spine System is intended to provide immobilisation and stabilisation of spinal segments in skeletally mature patients as an adjunct to fusion in the treatment of acute and chronic instabilities or deformities of the thoracic, lumbar and sacral spine. The EXPEDIUM® Spine System metallic components are intended for noncervical pedicle fixation and nonpedicle fixation for fusion for the following indications: degenerative disc disease (defined as back pain of discogenic origin with degeneration of the disc confirmed by history and radiographic studies); spondylolisthesis; trauma (i.e., fracture or dislocation); spinal stenosis; curvatures (i.e., scoliosis, kyphosis, and/or lordosis); tumour, pseudoarthrosis; and failed previous fusion in skeletally mature patients.
When used for posterior non-cervical pedicle screw fixation in pediatric patients, the EXPEDIUM (and VIPER) Spine System metallic implants are indicated as an adjunct to fusion to treat adolescent idiopathic scoliosis. The EXPEDIUM and VIPER Spine Systems are intended to be used with autograft and/or allograft. Pediatric pedicle screw fixation is limited to a posterior approach.
CONTRAINDICATIONSDisease conditions that have been shown to be safely and predictably managed without the use of internal fixation devices are relative contraindications to the use of these devices.
Active systemic infection or infection localized to the site of the proposed implantation are contraindications to implantation.
Severe osteoporosis is a relative contraindication because it may prevent adequate fixation of spinal anchors and thus preclude the use of this or any other spinal instrumentation system.
Any entity or condition that totally precludes the possibility of fusion, i.e., cancer, kidney dialysis, or osteopenia is a relative contraindication. Other relative contraindications include obesity, certain degenerative diseases, and foreign body sensitivity. In addition, the patient’s occupation or activity level or mental capacity may be relative contraindications to this surgery. Specifically, patients who because of their occupation or lifestyle, or because of conditions such as mental illness, alcoholism, or drug abuse, may place undue stresses on the implant during bony healing and may be at higher risk for implant failure.

DePuy Synthes EXPEDIUM 5.5 Titanium Surgical Technique30
Notes

EXPEDIUM 5.5 Titanium Surgical Technique DePuy Synthes IBC1
Notes

depuysynthes.com
Medos International SÀRLChemin Blanc 38CH-2400 Le LocleSwitzerlandTel: +41 32 934 80 00Fax: +41 32 934 89 73
© DePuy Synthes. 2019. All rights reserved.105717-190117
This publication is not intended for distribution in the USA.
The third-party trademarks used herein are the trademarks of their respective owners.
Johnson & Johnson Medical Limited. Baird House, 4 Lower Gilmore Bank, Edinburgh, EH3 9QP, United Kingdom.Incorporated and registered in Scotland under company number SC132162.
*For recognized manufacturer, refer to product label.
DePuy Spine, Inc.325 Paramount DriveRaynham, MA 02767-0350USATel: +1 (800) 227 6633Fax: +1 (800) 446 0234
0086