executive summary key findings
TRANSCRIPT
Virtualized messaging hypervisor analysis on Red Hat Kernel Virtual Machine running on the Dell PowerEdge R710 solution
TEST REPORTSEPTEMBER 2009
KEY FINDINGS While running one- and two-guest
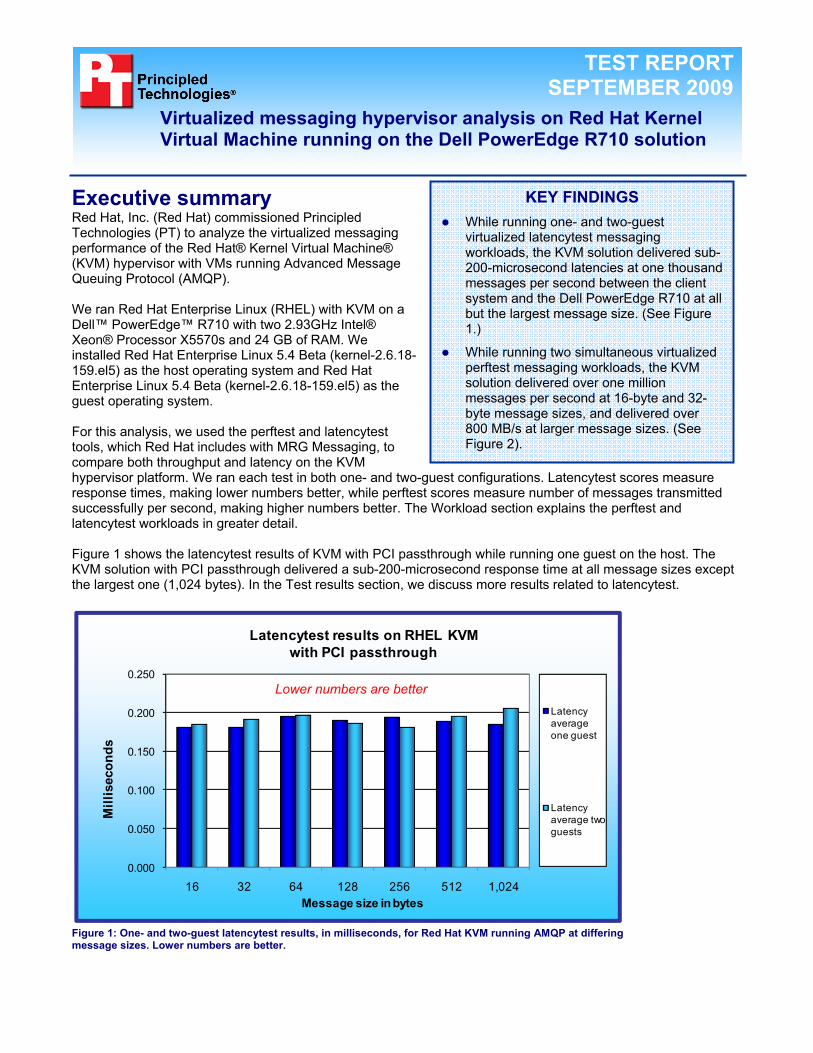
virtualized latencytest messaging workloads, the KVM solution delivered sub-200-microsecond latencies at one thousand messages per second between the client system and the Dell PowerEdge R710 at all but the largest message size. (See Figure 1.)
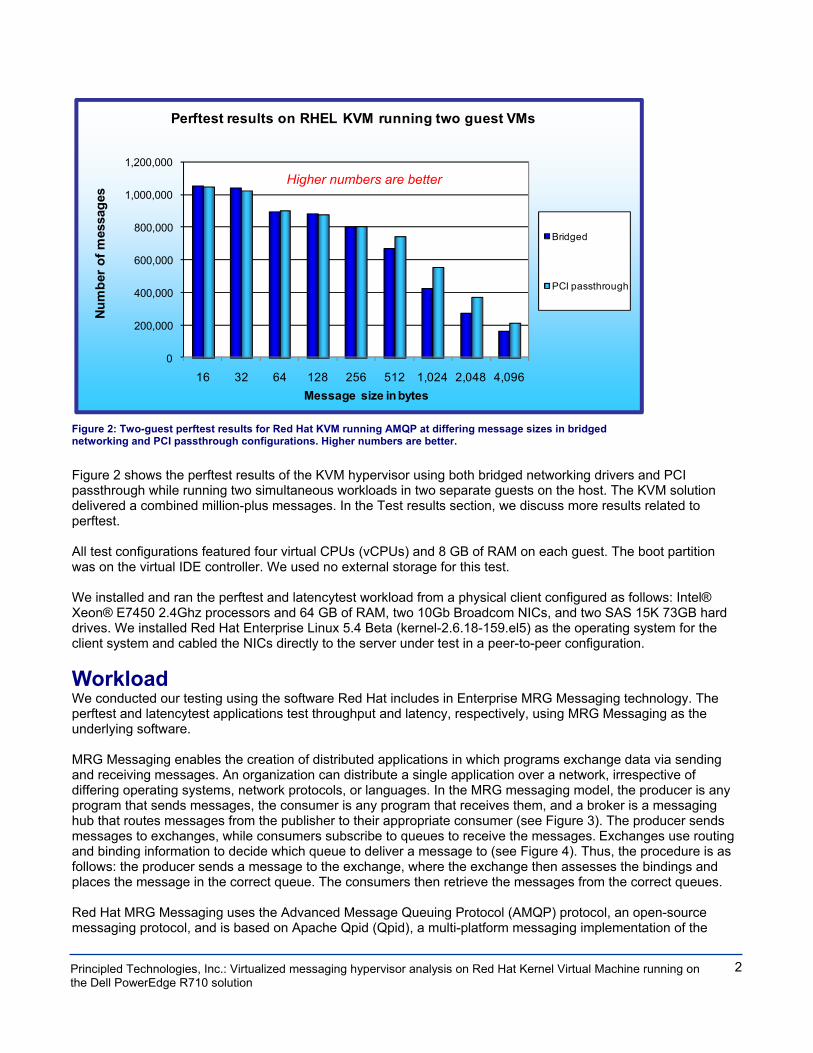
While running two simultaneous virtualized perftest messaging workloads, the KVM solution delivered over one million messages per second at 16-byte and 32-byte message sizes, and delivered over 800 MB/s at larger message sizes. (See Figure 2).
Executive summary Red Hat, Inc. (Red Hat) commissioned Principled Technologies (PT) to analyze the virtualized messaging performance of the Red Hat® Kernel Virtual Machine® (KVM) hypervisor with VMs running Advanced Message Queuing Protocol (AMQP).
We ran Red Hat Enterprise Linux (RHEL) with KVM on a Dell™ PowerEdge™ R710 with two 2.93GHz Intel® Xeon® Processor X5570s and 24 GB of RAM. We installed Red Hat Enterprise Linux 5.4 Beta (kernel-2.6.18-159.el5) as the host operating system and Red Hat Enterprise Linux 5.4 Beta (kernel-2.6.18-159.el5) as the guest operating system. For this analysis, we used the perftest and latencytest tools, which Red Hat includes with MRG Messaging, to compare both throughput and latency on the KVM hypervisor platform. We ran each test in both one- and two-guest configurations. Latencytest scores measure response times, making lower numbers better, while perftest scores measure number of messages transmitted successfully per second, making higher numbers better. The Workload section explains the perftest and latencytest workloads in greater detail. Figure 1 shows the latencytest results of KVM with PCI passthrough while running one guest on the host. The KVM solution with PCI passthrough delivered a sub-200-microsecond response time at all message sizes except the largest one (1,024 bytes). In the Test results section, we discuss more results related to latencytest.
0.000
0.050
0.100
0.150
0.200
0.250
16 32 64 128 256 512 1,024
Mill
isec
onds
Message size in bytes
Latencytest results on RHEL KVMwith PCI passthrough
Latency average one guest
Latency average two guests
Figure 1: One- and two-guest latencytest results, in milliseconds, for Red Hat KVM running AMQP at differing message sizes. Lower numbers are better.
Lower numbers are better
2
Principled Technologies, Inc.: Virtualized messaging hypervisor analysis on Red Hat Kernel Virtual Machine running on the Dell PowerEdge R710 solution
0
200,000
400,000
600,000
800,000
1,000,000
1,200,000
16 32 64 128 256 512 1,024 2,048 4,096
Num
ber
of m
essa
ges
Message size in bytes
Perftest results on RHEL KVM running two guest VMs
Bridged
PCI passthrough
Figure 2: Two-guest perftest results for Red Hat KVM running AMQP at differing message sizes in bridged networking and PCI passthrough configurations. Higher numbers are better.
Figure 2 shows the perftest results of the KVM hypervisor using both bridged networking drivers and PCI passthrough while running two simultaneous workloads in two separate guests on the host. The KVM solution delivered a combined million-plus messages. In the Test results section, we discuss more results related to perftest. All test configurations featured four virtual CPUs (vCPUs) and 8 GB of RAM on each guest. The boot partition was on the virtual IDE controller. We used no external storage for this test. We installed and ran the perftest and latencytest workload from a physical client configured as follows: Intel® Xeon® E7450 2.4Ghz processors and 64 GB of RAM, two 10Gb Broadcom NICs, and two SAS 15K 73GB hard drives. We installed Red Hat Enterprise Linux 5.4 Beta (kernel-2.6.18-159.el5) as the operating system for the client system and cabled the NICs directly to the server under test in a peer-to-peer configuration.
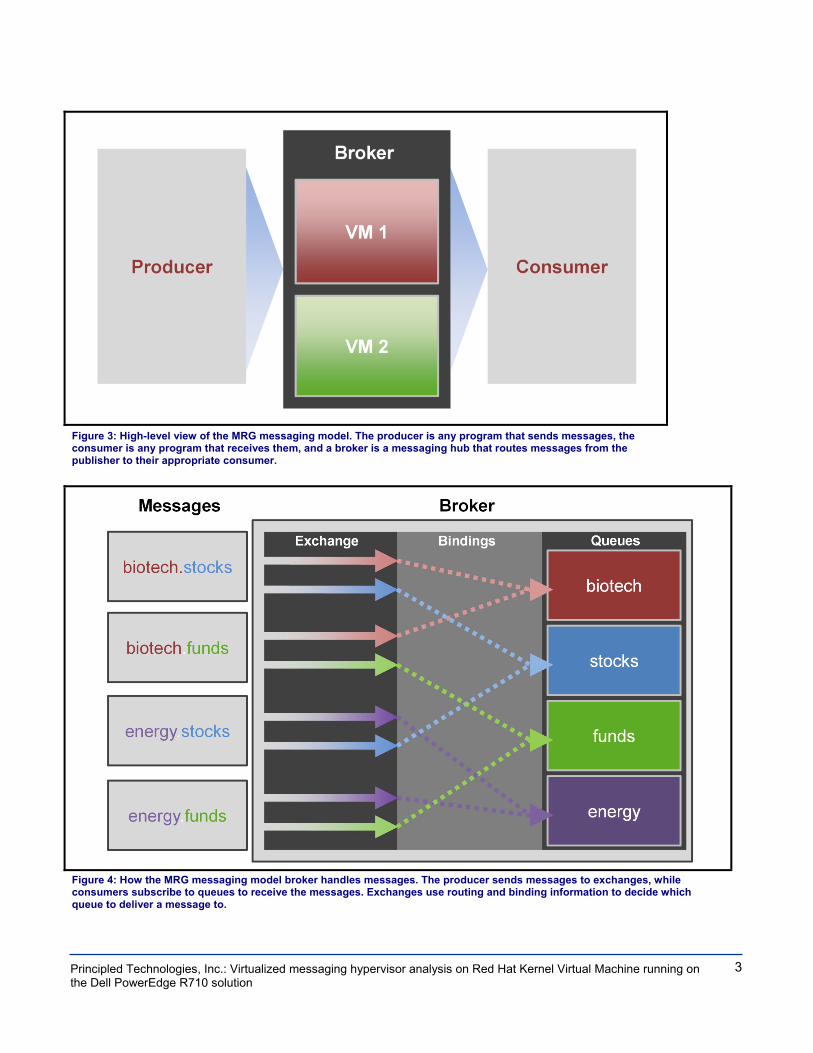
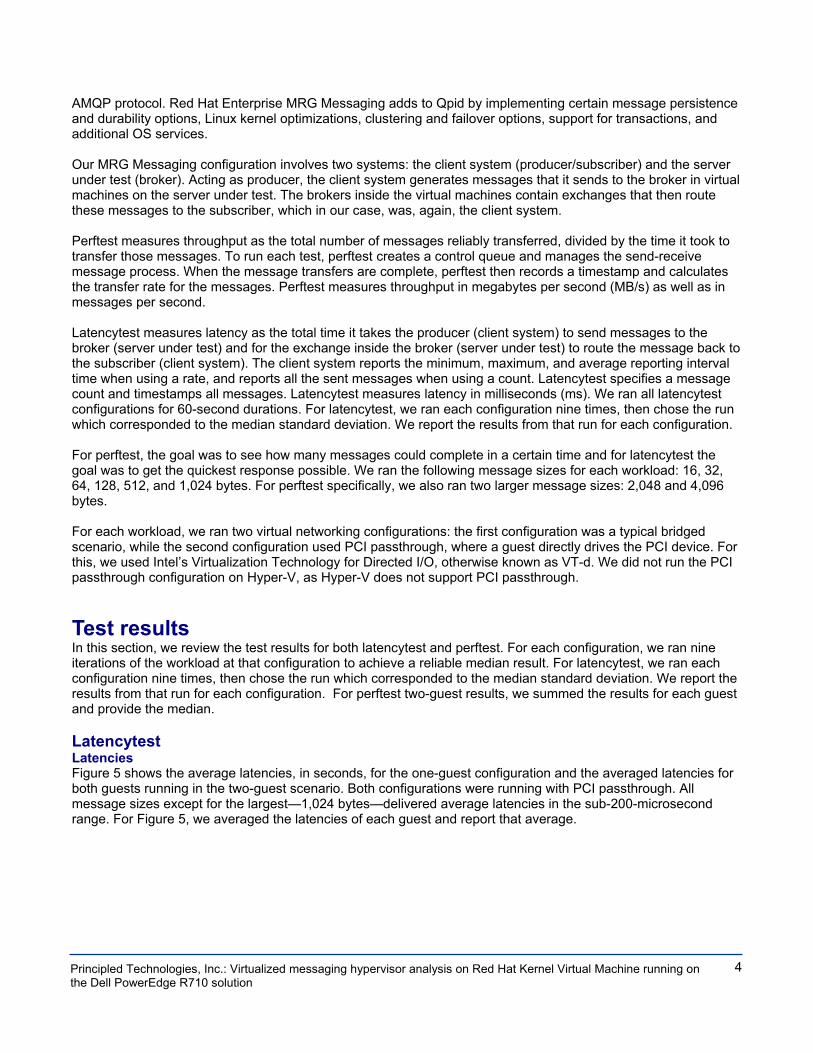
Workload We conducted our testing using the software Red Hat includes in Enterprise MRG Messaging technology. The perftest and latencytest applications test throughput and latency, respectively, using MRG Messaging as the underlying software. MRG Messaging enables the creation of distributed applications in which programs exchange data via sending and receiving messages. An organization can distribute a single application over a network, irrespective of differing operating systems, network protocols, or languages. In the MRG messaging model, the producer is any program that sends messages, the consumer is any program that receives them, and a broker is a messaging hub that routes messages from the publisher to their appropriate consumer (see Figure 3). The producer sends messages to exchanges, while consumers subscribe to queues to receive the messages. Exchanges use routing and binding information to decide which queue to deliver a message to (see Figure 4). Thus, the procedure is as follows: the producer sends a message to the exchange, where the exchange then assesses the bindings and places the message in the correct queue. The consumers then retrieve the messages from the correct queues. Red Hat MRG Messaging uses the Advanced Message Queuing Protocol (AMQP) protocol, an open-source messaging protocol, and is based on Apache Qpid (Qpid), a multi-platform messaging implementation of the
Higher numbers are better
3
Principled Technologies, Inc.: Virtualized messaging hypervisor analysis on Red Hat Kernel Virtual Machine running on the Dell PowerEdge R710 solution
Figure 3: High-level view of the MRG messaging model. The producer is any program that sends messages, the consumer is any program that receives them, and a broker is a messaging hub that routes messages from the publisher to their appropriate consumer.
Figure 4: How the MRG messaging model broker handles messages. The producer sends messages to exchanges, while consumers subscribe to queues to receive the messages. Exchanges use routing and binding information to decide which queue to deliver a message to.
4
Principled Technologies, Inc.: Virtualized messaging hypervisor analysis on Red Hat Kernel Virtual Machine running on the Dell PowerEdge R710 solution
AMQP protocol. Red Hat Enterprise MRG Messaging adds to Qpid by implementing certain message persistence and durability options, Linux kernel optimizations, clustering and failover options, support for transactions, and additional OS services. Our MRG Messaging configuration involves two systems: the client system (producer/subscriber) and the server under test (broker). Acting as producer, the client system generates messages that it sends to the broker in virtual machines on the server under test. The brokers inside the virtual machines contain exchanges that then route these messages to the subscriber, which in our case, was, again, the client system. Perftest measures throughput as the total number of messages reliably transferred, divided by the time it took to transfer those messages. To run each test, perftest creates a control queue and manages the send-receive message process. When the message transfers are complete, perftest then records a timestamp and calculates the transfer rate for the messages. Perftest measures throughput in megabytes per second (MB/s) as well as in messages per second. Latencytest measures latency as the total time it takes the producer (client system) to send messages to the broker (server under test) and for the exchange inside the broker (server under test) to route the message back to the subscriber (client system). The client system reports the minimum, maximum, and average reporting interval time when using a rate, and reports all the sent messages when using a count. Latencytest specifies a message count and timestamps all messages. Latencytest measures latency in milliseconds (ms). We ran all latencytest configurations for 60-second durations. For latencytest, we ran each configuration nine times, then chose the run which corresponded to the median standard deviation. We report the results from that run for each configuration. For perftest, the goal was to see how many messages could complete in a certain time and for latencytest the goal was to get the quickest response possible. We ran the following message sizes for each workload: 16, 32, 64, 128, 512, and 1,024 bytes. For perftest specifically, we also ran two larger message sizes: 2,048 and 4,096 bytes. For each workload, we ran two virtual networking configurations: the first configuration was a typical bridged scenario, while the second configuration used PCI passthrough, where a guest directly drives the PCI device. For this, we used Intel’s Virtualization Technology for Directed I/O, otherwise known as VT-d. We did not run the PCI passthrough configuration on Hyper-V, as Hyper-V does not support PCI passthrough.
Test results In this section, we review the test results for both latencytest and perftest. For each configuration, we ran nine iterations of the workload at that configuration to achieve a reliable median result. For latencytest, we ran each configuration nine times, then chose the run which corresponded to the median standard deviation. We report the results from that run for each configuration. For perftest two-guest results, we summed the results for each guest and provide the median. Latencytest Latencies Figure 5 shows the average latencies, in seconds, for the one-guest configuration and the averaged latencies for both guests running in the two-guest scenario. Both configurations were running with PCI passthrough. All message sizes except for the largest—1,024 bytes—delivered average latencies in the sub-200-microsecond range. For Figure 5, we averaged the latencies of each guest and report that average.

5
Principled Technologies, Inc.: Virtualized messaging hypervisor analysis on Red Hat Kernel Virtual Machine running on the Dell PowerEdge R710 solution
Message size in bytes Latency average
one guest Latency average
combined two guests 16 0.18101 0.18578 32 0.18150 0.19144 64 0.19575 0.19753 128 0.19082 0.18702 256 0.19420 0.18177 512 0.18906 0.19558 1,024 0.18520 0.20616
Figure 5: One- and two-guest latencytest results, in milliseconds, for Red Hat KVM running AMQP at differing message sizes. Lower numbers are better.
In Figure 6, we show the full 60 seconds of data for this particular test.
0.150
0.163
0.175
0.188
0.200
0.213
0.225
1 6 11 16 21 26 31 36 41 46 51 56
Late
ncy (
mill
isec
onds
)
Duration of testing (seconds)
Latencytest results over 1 minute on RHEL KVMrunning one guest
16 bytes
32 bytes
64 bytes
128 bytes256 bytes512 bytes1,024 bytes
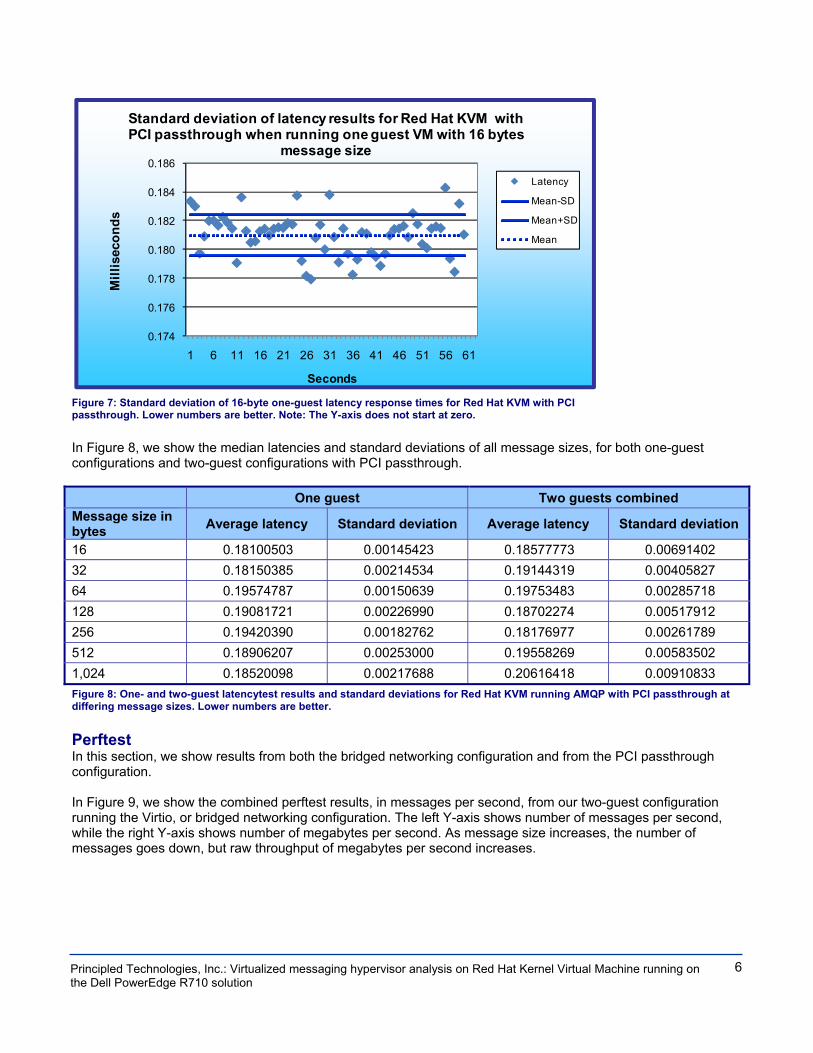
Figure 6: One-guest latencytest results for Red Hat KVM running AMQP at different message sizes. Lower numbers are better. Note: The Y-axis does not start at zero. Standard deviation When we ran with PCI passthrough on the KVM platform, all message sizes exhibited extremely stable latencies, with the standard deviation remaining below 0.0035 for all message sizes throughout the 60-second test. In Figure 7, we show the standard deviation plot of a one-guest 16-byte message latencytest running with PCI passthrough.
Lower numbers are better
6
Principled Technologies, Inc.: Virtualized messaging hypervisor analysis on Red Hat Kernel Virtual Machine running on the Dell PowerEdge R710 solution
0.174
0.176
0.178
0.180
0.182
0.184
0.186
1 6 11 16 21 26 31 36 41 46 51 56 61
Mill
isec
onds
Seconds
Standard deviation of latency results for Red Hat KVM with PCI passthrough when running one guest VM with 16 bytes
message size
Latency
Mean-SD
Mean+SD
Mean
Figure 7: Standard deviation of 16-byte one-guest latency response times for Red Hat KVM with PCI passthrough. Lower numbers are better. Note: The Y-axis does not start at zero. In Figure 8, we show the median latencies and standard deviations of all message sizes, for both one-guest configurations and two-guest configurations with PCI passthrough. One guest Two guests combined Message size in bytes Average latency Standard deviation Average latency Standard deviation
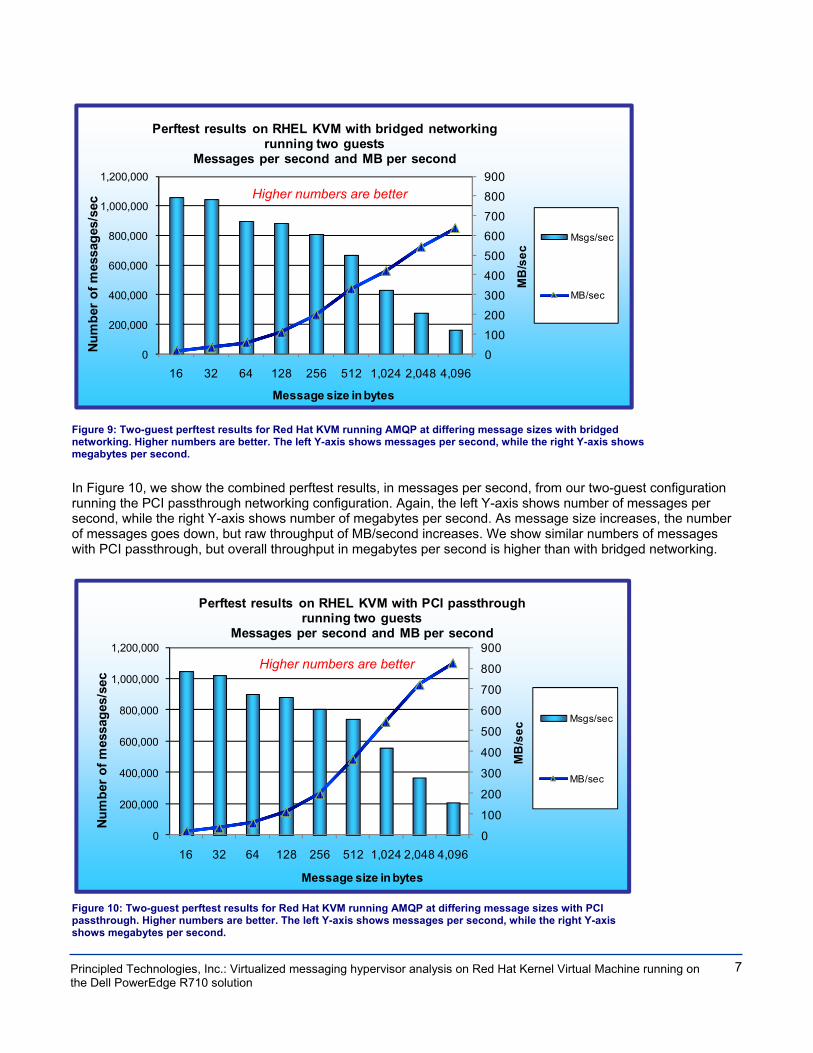
16 0.18100503 0.00145423 0.18577773 0.00691402 32 0.18150385 0.00214534 0.19144319 0.00405827 64 0.19574787 0.00150639 0.19753483 0.00285718 128 0.19081721 0.00226990 0.18702274 0.00517912 256 0.19420390 0.00182762 0.18176977 0.00261789 512 0.18906207 0.00253000 0.19558269 0.00583502 1,024 0.18520098 0.00217688 0.20616418 0.00910833 Figure 8: One- and two-guest latencytest results and standard deviations for Red Hat KVM running AMQP with PCI passthrough at differing message sizes. Lower numbers are better. Perftest In this section, we show results from both the bridged networking configuration and from the PCI passthrough configuration. In Figure 9, we show the combined perftest results, in messages per second, from our two-guest configuration running the Virtio, or bridged networking configuration. The left Y-axis shows number of messages per second, while the right Y-axis shows number of megabytes per second. As message size increases, the number of messages goes down, but raw throughput of megabytes per second increases.
7
Principled Technologies, Inc.: Virtualized messaging hypervisor analysis on Red Hat Kernel Virtual Machine running on the Dell PowerEdge R710 solution
0100200300400500600700800900
0
200,000
400,000
600,000
800,000
1,000,000
1,200,000
16 32 64 128 256 512 1,024 2,048 4,096
MB
/sec
Num
ber
of m
essa
ges/
sec
Message size in bytes
Perftest results on RHEL KVM with bridged networkingrunning two guests
Messages per second and MB per second
Msgs/sec
MB/sec
Figure 9: Two-guest perftest results for Red Hat KVM running AMQP at differing message sizes with bridged networking. Higher numbers are better. The left Y-axis shows messages per second, while the right Y-axis shows megabytes per second.
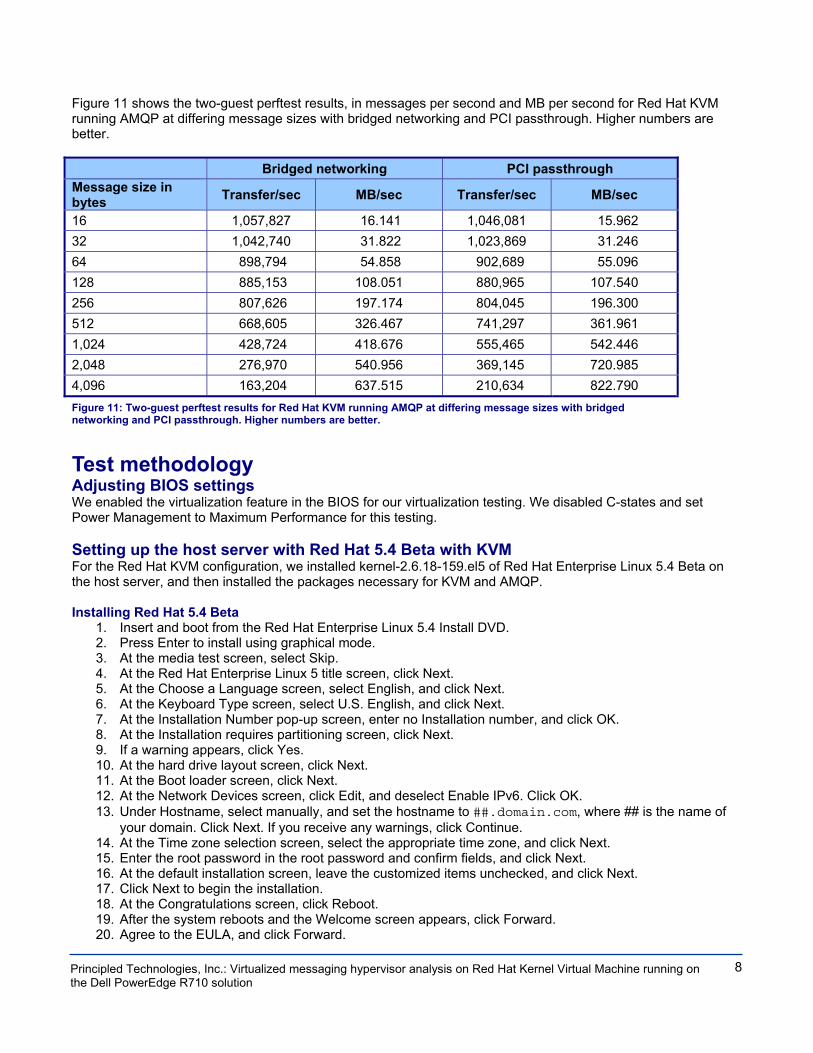
In Figure 10, we show the combined perftest results, in messages per second, from our two-guest configuration running the PCI passthrough networking configuration. Again, the left Y-axis shows number of messages per second, while the right Y-axis shows number of megabytes per second. As message size increases, the number of messages goes down, but raw throughput of MB/second increases. We show similar numbers of messages with PCI passthrough, but overall throughput in megabytes per second is higher than with bridged networking.
0
100
200
300
400
500
600
700
800
900
0
200,000
400,000
600,000
800,000
1,000,000
1,200,000
16 32 64 128 256 512 1,024 2,048 4,096
MB
/sec
Num
ber o
f mes
sage
s/se
c
Message size in bytes
Perftest results on RHEL KVM with PCI passthrough running two guests
Messages per second and MB per second
Msgs/sec
MB/sec
Figure 10: Two-guest perftest results for Red Hat KVM running AMQP at differing message sizes with PCI passthrough. Higher numbers are better. The left Y-axis shows messages per second, while the right Y-axis shows megabytes per second.
Higher numbers are better
Higher numbers are better
8
Principled Technologies, Inc.: Virtualized messaging hypervisor analysis on Red Hat Kernel Virtual Machine running on the Dell PowerEdge R710 solution
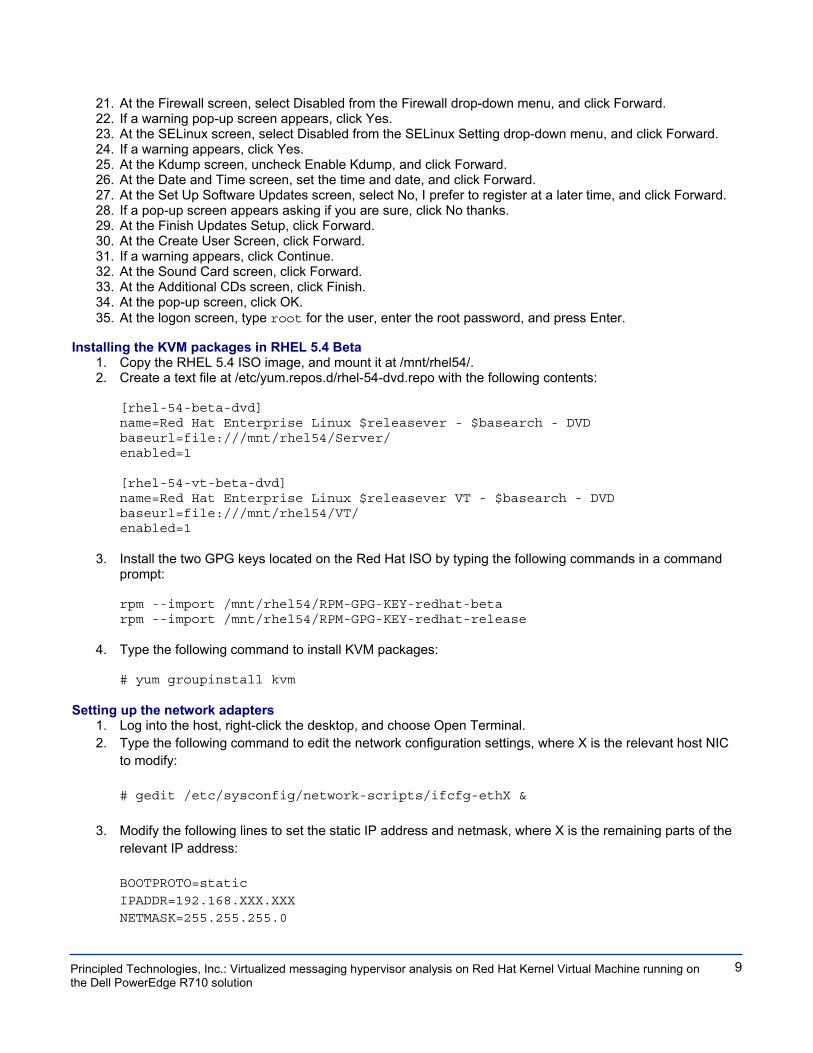
Figure 11 shows the two-guest perftest results, in messages per second and MB per second for Red Hat KVM running AMQP at differing message sizes with bridged networking and PCI passthrough. Higher numbers are better. Bridged networking PCI passthrough Message size in bytes Transfer/sec MB/sec Transfer/sec MB/sec
16 1,057,827 16.141 1,046,081 15.962 32 1,042,740 31.822 1,023,869 31.246 64 898,794 54.858 902,689 55.096 128 885,153 108.051 880,965 107.540 256 807,626 197.174 804,045 196.300 512 668,605 326.467 741,297 361.961 1,024 428,724 418.676 555,465 542.446 2,048 276,970 540.956 369,145 720.985 4,096 163,204 637.515 210,634 822.790 Figure 11: Two-guest perftest results for Red Hat KVM running AMQP at differing message sizes with bridged networking and PCI passthrough. Higher numbers are better.
Test methodology Adjusting BIOS settings We enabled the virtualization feature in the BIOS for our virtualization testing. We disabled C-states and set Power Management to Maximum Performance for this testing. Setting up the host server with Red Hat 5.4 Beta with KVM For the Red Hat KVM configuration, we installed kernel-2.6.18-159.el5 of Red Hat Enterprise Linux 5.4 Beta on the host server, and then installed the packages necessary for KVM and AMQP. Installing Red Hat 5.4 Beta
1. Insert and boot from the Red Hat Enterprise Linux 5.4 Install DVD. 2. Press Enter to install using graphical mode. 3. At the media test screen, select Skip. 4. At the Red Hat Enterprise Linux 5 title screen, click Next. 5. At the Choose a Language screen, select English, and click Next. 6. At the Keyboard Type screen, select U.S. English, and click Next. 7. At the Installation Number pop-up screen, enter no Installation number, and click OK. 8. At the Installation requires partitioning screen, click Next. 9. If a warning appears, click Yes. 10. At the hard drive layout screen, click Next. 11. At the Boot loader screen, click Next. 12. At the Network Devices screen, click Edit, and deselect Enable IPv6. Click OK. 13. Under Hostname, select manually, and set the hostname to ##.domain.com, where ## is the name of
your domain. Click Next. If you receive any warnings, click Continue. 14. At the Time zone selection screen, select the appropriate time zone, and click Next. 15. Enter the root password in the root password and confirm fields, and click Next. 16. At the default installation screen, leave the customized items unchecked, and click Next. 17. Click Next to begin the installation. 18. At the Congratulations screen, click Reboot. 19. After the system reboots and the Welcome screen appears, click Forward. 20. Agree to the EULA, and click Forward.
9
Principled Technologies, Inc.: Virtualized messaging hypervisor analysis on Red Hat Kernel Virtual Machine running on the Dell PowerEdge R710 solution
21. At the Firewall screen, select Disabled from the Firewall drop-down menu, and click Forward. 22. If a warning pop-up screen appears, click Yes. 23. At the SELinux screen, select Disabled from the SELinux Setting drop-down menu, and click Forward. 24. If a warning appears, click Yes. 25. At the Kdump screen, uncheck Enable Kdump, and click Forward. 26. At the Date and Time screen, set the time and date, and click Forward. 27. At the Set Up Software Updates screen, select No, I prefer to register at a later time, and click Forward. 28. If a pop-up screen appears asking if you are sure, click No thanks. 29. At the Finish Updates Setup, click Forward. 30. At the Create User Screen, click Forward. 31. If a warning appears, click Continue. 32. At the Sound Card screen, click Forward. 33. At the Additional CDs screen, click Finish. 34. At the pop-up screen, click OK. 35. At the logon screen, type root for the user, enter the root password, and press Enter.
Installing the KVM packages in RHEL 5.4 Beta 1. Copy the RHEL 5.4 ISO image, and mount it at /mnt/rhel54/. 2. Create a text file at /etc/yum.repos.d/rhel-54-dvd.repo with the following contents:
[rhel-54-beta-dvd] name=Red Hat Enterprise Linux $releasever - $basearch - DVD baseurl=file:///mnt/rhel54/Server/ enabled=1 [rhel-54-vt-beta-dvd] name=Red Hat Enterprise Linux $releasever VT - $basearch - DVD baseurl=file:///mnt/rhel54/VT/ enabled=1
3. Install the two GPG keys located on the Red Hat ISO by typing the following commands in a command prompt: rpm --import /mnt/rhel54/RPM-GPG-KEY-redhat-beta rpm --import /mnt/rhel54/RPM-GPG-KEY-redhat-release
4. Type the following command to install KVM packages: # yum groupinstall kvm
Setting up the network adapters 1. Log into the host, right-click the desktop, and choose Open Terminal. 2. Type the following command to edit the network configuration settings, where X is the relevant host NIC
to modify: # gedit /etc/sysconfig/network-scripts/ifcfg-ethX &
3. Modify the following lines to set the static IP address and netmask, where X is the remaining parts of the
relevant IP address: BOOTPROTO=static IPADDR=192.168.XXX.XXX NETMASK=255.255.255.0
10
Principled Technologies, Inc.: Virtualized messaging hypervisor analysis on Red Hat Kernel Virtual Machine running on the Dell PowerEdge R710 solution
4. Save the file, and exit gedit. 5. Type the following command to modify the remaining network settings:
# gedit /etc/sysconfig/network &
6. Modify the following lines to disable IPv6 and set the hostname, where “hostname” is the hostname of this
server: NETWORKING=yes NETWORKING_IPV6=no HOSTNAME=hostname.local.domain
7. Save the file, and exit gedit. 8. Repeat steps 2 through 7 for the remaining NICs. 9. Type the following command to restart the network services:
# service network restart
Installing tuna on the host 1. Log into the host, right-click the desktop, and choose Open Terminal. 2. Type the following command to install the tuna utility:
# yum install tuna Setting up the client with Red Hat 5.4 Beta with KVM For the Red Hat client to drive the workloads, we installed kernel-2.6.18-159.el5 of Red Hat Enterprise Linux 5.4 Beta on the server, and then installed the packages necessary for AMQP. Follow the identical steps above for installing Red Hat MRG Messaging on the client machine. Completing configurations in the Red Hat KVM host Disabling unneeded services
1. Disable the following services: chkconfig auditd off chkconfig avahi-daemon off chkconfig anacron off chkconfig qpidd off chkconfig smartd off chkconfig crond off chkconfig haldaemon off chkconfig opensmd off chkconfig openibd off chkconfig yum-updatesd off chkconfig collectd off chkconfig bluetooth off chkconfig cups off chkconfig isdn off chkconfig kudzu off chkconfig mcstrans off chkconfig mdmonitor off chkconfig messagebus off chkconfig restorecond off
11
Principled Technologies, Inc.: Virtualized messaging hypervisor analysis on Red Hat Kernel Virtual Machine running on the Dell PowerEdge R710 solution
chkconfig rhnsd off chkconfig rpcgssd off chkconfig setroubleshoot off
Installing the systat package for system monitoring
1. Insert the RHEL 5.4 DVD into the host machine. 2. At the command line, browse to the DVD drive. 3. Find the systat package under the Server directory by typing the following command (note the resulting
file in the list): # ls systat*
4. Install the package by typing the following command, where rpmpackage is the name we noted in Step 3 above:
# rpm –i rpmpackage
Enabling huge pages memory functionality in Red Hat KVM
1. Log into the host, right-click the desktop, and choose Open Terminal. 2. Type the following command to edit the system configuration settings:
# gedit /etc/sysctl.conf &
3. Add the following lines to the bottom of the file to reserve approximately 17GB for VM huge pages, with
each page at 2,048 KB: vm.nr_hugepages = 9000
4. Type the following command to edit the rc.local file:
# gedit /etc/rc.local &
5. Add the following lines to the bottom of the file:
mkdir –p /mnt/libhugetlbfs mount –t hugetlbfs hugetlbfs /mnt/libhugetlbfs chmod 777 /mnt/libhugetlbfs
Setting up the bridged network for Red Hat KVM 1. Log into the host, right-click the desktop, and choose Open Terminal. 2. Type the following command to create a configuration file for the bridged network device:
# gedit /etc/sysconfig/network-scripts/ifcfg-br0 &
3. Add the following lines to the file. Note that, in the below example, “X” signifies a placeholder:
# NIC details – copy from ifcfg-ethX file DEVICE=br0 BOOTPROTO=none IPADDR=192.168.XX.XXX NETMASK=255.255.255.0
12
Principled Technologies, Inc.: Virtualized messaging hypervisor analysis on Red Hat Kernel Virtual Machine running on the Dell PowerEdge R710 solution
ONBOOT=yes TYPE=Bridge USERCTL=no IPV6INIT=no DELAY=0
4. Save the file, and exit. 5. Type the following command to edit the ifcfg-ethX file, where “X” is the number of the NIC you are using
for your bridge: # gedit /etc/sysconfig/network-scripts/ifcfg-ethX &
6. Modify the file to point to the bridge device:
# NIC details DEVICE=eth0 HWADDR=00:1B:21:29:CE:74 BRIDGE=br0
7. Save the file, and exit. 8. Create the file /etc/qemu-ifup. 9. Modify the contents as follows:
#!/bin/sh /sbin/ifconfig $1 0.0.0.0 up /usr/sbin/brctl addif br0 $1
10. Save the file, and exit. 11. Repeat for each 10Gb NIC, and once for a management NIC. 12. Restart the network by typing the following:
# service network restart
Setting the elevator=deadline option in the grub.conf file 1. Log into the host, right-click the desktop, and choose Open Terminal. 2. Type the following command to edit the grub configuration settings:
# gedit /etc/grub.conf &
3. Add the following text to the end of kernel line:
elevator = deadline
4. Save the file, and exit.
Setting system start parameters in the /etc/sysctl.conf file 1. Log into the host, right-click the desktop, and choose Open Terminal. 2. Type the following command to edit the system configuration settings:
13
Principled Technologies, Inc.: Virtualized messaging hypervisor analysis on Red Hat Kernel Virtual Machine running on the Dell PowerEdge R710 solution
# gedit /etc/sysctl.conf &
3. Add or modify the following lines:
kernel.msgmni = 16384 kernel.sem = 250 32000 32 2048 kernel.msgmax = 65535 kernel.msgmnb = 1310724 fs.file-max = 65536 net.core.rmem_max = 8388608 net.core.wmem_max = 8388608 net.core.rmem_default = 262144 net.core.wmem_default = 262144 net.ipv4.tcp_rmem = 65536 4194304 8388608 net.ipv4.tcp_wmem = 65536 4194304 8388608 net.core.netdev_max_backlog = 10000 net.ipv4.tcp_mem = 262144 4194304 8388608 net.ipv4.conf.vnet3.arp_filter = 1 net.ipv4.conf.vnet2.arp_filter = 1 net.ipv4.conf.vnet1.arp_filter = 1 net.ipv4.conf.vnet0.arp_filter = 1 net.ipv4.conf.br6.arp_filter = 1 net.ipv4.conf.br5.arp_filter = 1 net.ipv4.conf.br4.arp_filter = 1 net.ipv4.conf.eth6.arp_filter = 1 net.ipv4.conf.eth5.arp_filter = 1 net.ipv4.conf.eth4.arp_filter = 1 net.ipv4.conf.lo.arp_filter = 0 net.ipv4.conf.default.arp_filter = 1 net.ipv4.conf.all.arp_filter = 0
4. Save the file, and exit.
Setting up VT-d in the Red Hat Host (VT-d configuration only) For all bridged NICs used in testing, perform the following steps.
1. Log into the host, right-click the desktop, and choose Open Terminal. 2. Type the following command to edit the network configuration settings, where X is the relevant host NIC
to modify: # gedit /etc/sysconfig/network-scripts/ifcfg-ethX &
3. Modify the following lines to change the boot behavior:
ONBOOT=no
4. Save the file, and exit gedit. 5. Repeat steps 2 through 4 for the remaining NICs you use for VMs.

14
Principled Technologies, Inc.: Virtualized messaging hypervisor analysis on Red Hat Kernel Virtual Machine running on the Dell PowerEdge R710 solution
6. Repeat steps 2 through 4 for the ifcfg-brX files, where X is the bridge number. 7. Type the following command:
# gedit /etc/modprobe &
8. Comment out the following lines, where X is the NIC number relevant to VT-d configuration.
# alias ethX ixgbe
9. Add the following lines:
blacklist ixgbe
10. Save the file, and exit. 11. Type the following command to edit the grub configuration settings:
# gedit /etc/grub.conf &
12. Add the following text to the end of the kernel line:
intel_iommu=on
13. Save the file, and exit. 14. Reboot the server. 15. Add the relevant parameter to the VM start script (see the below section).
Creating and configuring the VMs Creating the virtual machine using the Virtual Machine Manager
1. Log into the RHEL 5.4 host. 2. Click Applications, System Tools, Virtual Machine Manager. 3. Click New. 4. Click Forward. 5. Choose a name for the VM. Click Forward. 6. Keep the default of Fully virtualized, choose the CPU architecture, and choose kvm as the hypervisor. 7. Assuming you have copied the RHEL 5.4 beta media to the host machine, choose Local install media,
Linux as the OS Type, and Red Hat Enterprise 5 as the OS Variant. Click Forward. 8. Click Browse to browse to the ISO Linux location. 9. Locate the ISO file, select it, and click Open. Click Forward. 10. Choose File (disk image), and specify the location where you wish to store the IMG file. In our case, we
chose the default location. 11. Specify 8192MB for the size of the IMG file, and uncheck and recheck the Allocate entire virtual disk now
checkbox. Click Forward. 12. Choose Shared physical device, and select the management NIC. 13. Set Max memory size and Startup memory size to 8192MB, and set the number of Virtual CPUs to 4.
Click Forward. 14. Review the summary information, and click Finish.
Installing the guest operating system
1. Double-click the new VM to connect to the console. 2. On the Hardware tab in Virtual Machine Manager, specify the ISO image on the host machine as the CD
drive of the VM. Right-click the VM, and choose Run.
15
Principled Technologies, Inc.: Virtualized messaging hypervisor analysis on Red Hat Kernel Virtual Machine running on the Dell PowerEdge R710 solution
3. Power on the VM. 4. Click Enter to enter the graphical Red Hat installation. 5. At the media test screen, select Skip. 6. At the Red Hat Enterprise Linux 5 title screen, click Next. 7. At the Choose a Language screen, select English, and click Next. 8. At the Keyboard Type screen, select U.S. English, and click Next. 9. At the Installation Number pop-up screen, choose to skip Installation Numbers, and click OK. Click Yes to
proceed if the installer prompts you again. 10. At the Installation requires partitioning screen, click Next. 11. If a warning appears, click Yes. 12. At the hard drive layout screen, click Next. 13. At the Time zone selection screen, select the appropriate time zone, and click Next. 14. Type Password1 in the root password and confirm fields, and click Next. 15. At the default installation screen, choose Customize Now, and click Next. 16. Choose Servers, and select MySQL server. 17. Choose Development, select Development Libraries and Development tools, and click Next. 18. Click Next to begin the installation. 19. At the Congratulations screen, click Reboot. 20. After the system reboots and the Welcome screen appears, click Forward. 21. Agree to the EULA, and click Forward. 22. At the Firewall screen, select Disabled from the Firewall drop-down menu, and click Forward. 23. If a warning pop-up screen appears, click Yes. 24. At the SELinux screen, select Disabled from the SELinux Setting drop-down menu, and click Forward. 25. If a warning appears, click Yes. 26. At the Kdump screen, uncheck Enable Kdump, and click Forward. 27. At the Date and Time screen, set the date and time, and click Forward. 28. At the Set Up Software Updates screen, select No, I prefer to register at a later time, and click Forward. 29. If a pop-up screen appears asking if you are sure, click No thanks. 30. At the Finish Updates Setup, click Forward. 31. At the Create User Screen, click Forward. 32. If a warning appears, click Continue. 33. At the Sound Card screen, click Forward. 34. At the Additional CDs screen, click Finish. 35. At the pop-up screen, click OK. 36. At the logon screen, type root for the user and Password1 for the password, and press Enter. 37. Right-click the RHEL desktop, and choose Open Terminal. 38. Type the following command to edit the /etc/grub.conf file:
# gedit /etc/grub.conf &
39. Add the following to the end of the kernel line:
divider=10
40. Save the file, and exit gedit. 41. Restart the VM.
Configuring networking in the VM
1. Power on the VM, and open the console. 2. Log into the VM, right-click the desktop, and choose Open Terminal. 3. Type the following command to edit the network configuration settings:
# gedit /etc/sysconfig/network-scripts/ifcfg-eth0 &

16
Principled Technologies, Inc.: Virtualized messaging hypervisor analysis on Red Hat Kernel Virtual Machine running on the Dell PowerEdge R710 solution
4. Modify the following lines to set the static IP address and netmask, where XXX is the remaining portion of your IP Address: BOOTPROTO=static IPADDR=192.168.XXX.XXX NETMASK=255.255.255.0
5. Save the file, and exit gedit. 6. Type the following command to modify the remaining network settings:
# gedit /etc/sysconfig/network &
7. Modify the following lines to disable IPv6 and set the hostname:
NETWORKING=yes NETWORKING_IPV6=no HOSTNAME=VM1.local.domain
8. Save the file, and exit gedit. 9. Repeat steps 3 through 8 for eth1, the 10Gb NIC reserved for testing.
Installing the systat package for system monitoring Follow the procedures we describe above in the Installing the systat package for system monitoring section to install the systat monitoring package inside the VM. Configuring additional tuning options in the VM
1. Log into the VM using Virtual Machine Manager, or using an ssh client, such as Putty. 2. Modify the following lines to /etc/sysctl.conf:
kernel.msgmni = 16384 kernel.sem = 250 32000 32 2048 kernel.msgmax = 65535 kernel.msgmnb = 1310724 fs.file-max = 65536 net.core.rmem_max = 8388608 net.core.wmem_max = 8388608 net.core.rmem_default = 262144 net.core.wmem_default = 262144 net.ipv4.tcp_rmem = 65536 4194304 8388608 net.ipv4.tcp_wmem = 65536 4194304 8388608 net.core.netdev_max_backlog = 10000 net.ipv4.tcp_mem = 262144 4194304 8388608 net.ipv4.conf.vnet3.arp_filter = 1 net.ipv4.conf.vnet2.arp_filter = 1 net.ipv4.conf.vnet1.arp_filter = 1 net.ipv4.conf.vnet0.arp_filter = 1 net.ipv4.conf.br6.arp_filter = 1 net.ipv4.conf.br5.arp_filter = 1
17
Principled Technologies, Inc.: Virtualized messaging hypervisor analysis on Red Hat Kernel Virtual Machine running on the Dell PowerEdge R710 solution
net.ipv4.conf.br4.arp_filter = 1 net.ipv4.conf.eth6.arp_filter = 1 net.ipv4.conf.eth5.arp_filter = 1 net.ipv4.conf.eth4.arp_filter = 1 net.ipv4.conf.lo.arp_filter = 0 net.ipv4.conf.default.arp_filter = 1 net.ipv4.conf.all.arp_filter = 0
3. Save the file, and exit. 4. Disable the following services:
chkconfig auditd off chkconfig avahi-daemon off chkconfig anacron off chkconfig qpidd off chkconfig smartd off chkconfig crond off chkconfig haldaemon off chkconfig opensmd off chkconfig openibd off chkconfig yum-updatesd off chkconfig collectd off chkconfig bluetooth off chkconfig cups off chkconfig isdn off chkconfig kudzu off chkconfig mcstrans off chkconfig mdmonitor off chkconfig messagebus off chkconfig restorecond off chkconfig rhnsd off chkconfig rpcgssd off chkconfig setroubleshoot off
Creating VM Startup Shell scripts to use huge pages You must create shell scripts to start the VMs on the RHEL KVM platform in order to utilize the huge pages functionality.
1. Log into the host. 2. Start the Virtual Machine Manager. 3. Start the first VM by right-clicking and choosing Run. 4. Right-click the desktop, and choose Open Terminal. 5. Type the following command to show VM specific parameters:
# ps -ef | grep qemu
6. Using the parameters we showed in the output from Step 5 above, create the below scripts to start VM1
and VM2 under a bridged network scenario. You must modify the VM-specific items, such as uuid and MAC address. To run one VM, execute only the first script. To run two VMs, execute both scripts: #START OF VM1 START SCRIPT cp -f $0 start_VM1.sh
18
Principled Technologies, Inc.: Virtualized messaging hypervisor analysis on Red Hat Kernel Virtual Machine running on the Dell PowerEdge R710 solution
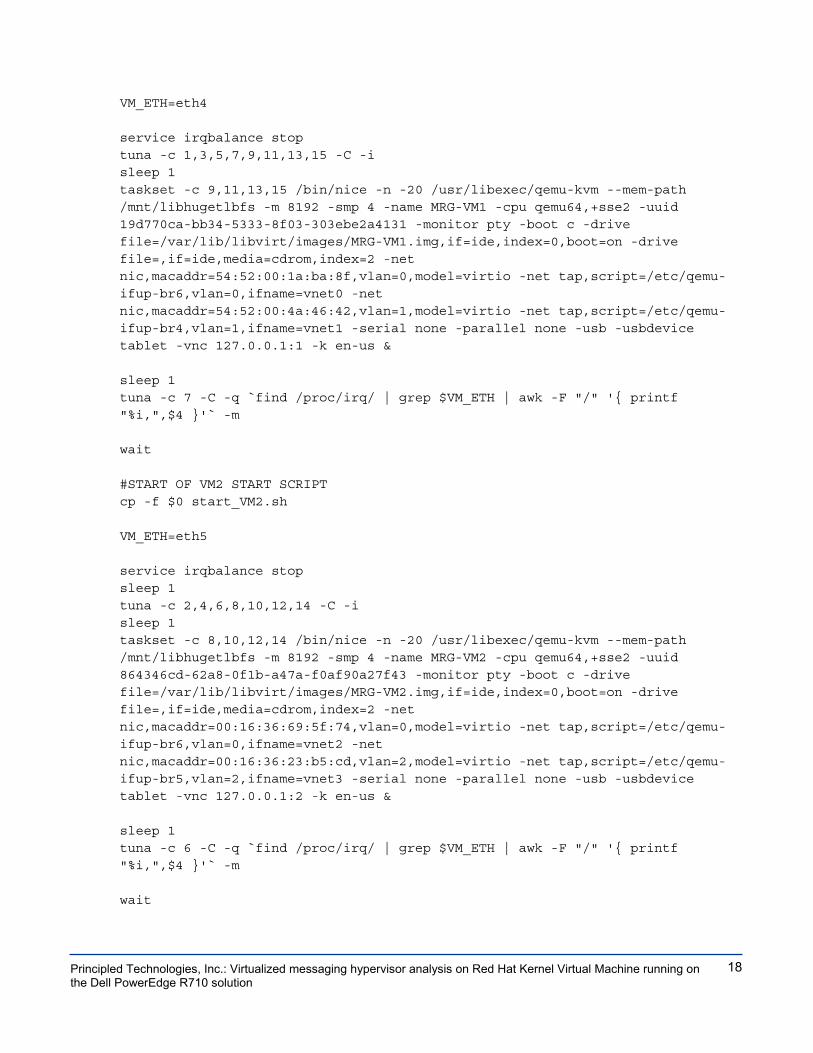
VM_ETH=eth4 service irqbalance stop tuna -c 1,3,5,7,9,11,13,15 -C -i sleep 1 taskset -c 9,11,13,15 /bin/nice -n -20 /usr/libexec/qemu-kvm --mem-path /mnt/libhugetlbfs -m 8192 -smp 4 -name MRG-VM1 -cpu qemu64,+sse2 -uuid 19d770ca-bb34-5333-8f03-303ebe2a4131 -monitor pty -boot c -drive file=/var/lib/libvirt/images/MRG-VM1.img,if=ide,index=0,boot=on -drive file=,if=ide,media=cdrom,index=2 -net nic,macaddr=54:52:00:1a:ba:8f,vlan=0,model=virtio -net tap,script=/etc/qemu-ifup-br6,vlan=0,ifname=vnet0 -net nic,macaddr=54:52:00:4a:46:42,vlan=1,model=virtio -net tap,script=/etc/qemu-ifup-br4,vlan=1,ifname=vnet1 -serial none -parallel none -usb -usbdevice tablet -vnc 127.0.0.1:1 -k en-us & sleep 1 tuna -c 7 -C -q `find /proc/irq/ | grep $VM_ETH | awk -F "/" '{ printf "%i,",$4 }'` -m wait #START OF VM2 START SCRIPT cp -f $0 start_VM2.sh VM_ETH=eth5 service irqbalance stop sleep 1 tuna -c 2,4,6,8,10,12,14 -C -i sleep 1 taskset -c 8,10,12,14 /bin/nice -n -20 /usr/libexec/qemu-kvm --mem-path /mnt/libhugetlbfs -m 8192 -smp 4 -name MRG-VM2 -cpu qemu64,+sse2 -uuid 864346cd-62a8-0f1b-a47a-f0af90a27f43 -monitor pty -boot c -drive file=/var/lib/libvirt/images/MRG-VM2.img,if=ide,index=0,boot=on -drive file=,if=ide,media=cdrom,index=2 -net nic,macaddr=00:16:36:69:5f:74,vlan=0,model=virtio -net tap,script=/etc/qemu-ifup-br6,vlan=0,ifname=vnet2 -net nic,macaddr=00:16:36:23:b5:cd,vlan=2,model=virtio -net tap,script=/etc/qemu-ifup-br5,vlan=2,ifname=vnet3 -serial none -parallel none -usb -usbdevice tablet -vnc 127.0.0.1:2 -k en-us & sleep 1 tuna -c 6 -C -q `find /proc/irq/ | grep $VM_ETH | awk -F "/" '{ printf "%i,",$4 }'` -m wait
19
Principled Technologies, Inc.: Virtualized messaging hypervisor analysis on Red Hat Kernel Virtual Machine running on the Dell PowerEdge R710 solution
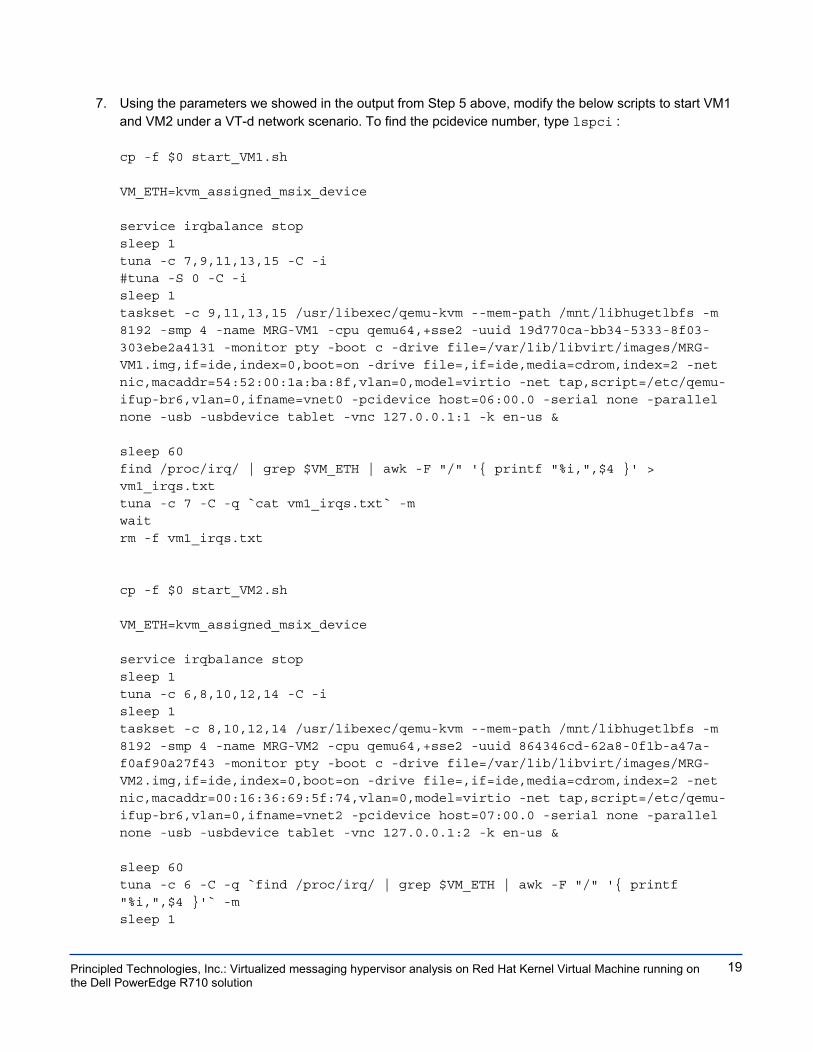
7. Using the parameters we showed in the output from Step 5 above, modify the below scripts to start VM1 and VM2 under a VT-d network scenario. To find the pcidevice number, type lspci : cp -f $0 start_VM1.sh VM_ETH=kvm_assigned_msix_device service irqbalance stop sleep 1 tuna -c 7,9,11,13,15 -C -i #tuna -S 0 -C -i sleep 1 taskset -c 9,11,13,15 /usr/libexec/qemu-kvm --mem-path /mnt/libhugetlbfs -m 8192 -smp 4 -name MRG-VM1 -cpu qemu64,+sse2 -uuid 19d770ca-bb34-5333-8f03-303ebe2a4131 -monitor pty -boot c -drive file=/var/lib/libvirt/images/MRG-VM1.img,if=ide,index=0,boot=on -drive file=,if=ide,media=cdrom,index=2 -net nic,macaddr=54:52:00:1a:ba:8f,vlan=0,model=virtio -net tap,script=/etc/qemu-ifup-br6,vlan=0,ifname=vnet0 -pcidevice host=06:00.0 -serial none -parallel none -usb -usbdevice tablet -vnc 127.0.0.1:1 -k en-us & sleep 60 find /proc/irq/ | grep $VM_ETH | awk -F "/" '{ printf "%i,",$4 }' > vm1_irqs.txt tuna -c 7 -C -q `cat vm1_irqs.txt` -m wait rm -f vm1_irqs.txt cp -f $0 start_VM2.sh VM_ETH=kvm_assigned_msix_device service irqbalance stop sleep 1 tuna -c 6,8,10,12,14 -C -i sleep 1 taskset -c 8,10,12,14 /usr/libexec/qemu-kvm --mem-path /mnt/libhugetlbfs -m 8192 -smp 4 -name MRG-VM2 -cpu qemu64,+sse2 -uuid 864346cd-62a8-0f1b-a47a-f0af90a27f43 -monitor pty -boot c -drive file=/var/lib/libvirt/images/MRG-VM2.img,if=ide,index=0,boot=on -drive file=,if=ide,media=cdrom,index=2 -net nic,macaddr=00:16:36:69:5f:74,vlan=0,model=virtio -net tap,script=/etc/qemu-ifup-br6,vlan=0,ifname=vnet2 -pcidevice host=07:00.0 -serial none -parallel none -usb -usbdevice tablet -vnc 127.0.0.1:2 -k en-us & sleep 60 tuna -c 6 -C -q `find /proc/irq/ | grep $VM_ETH | awk -F "/" '{ printf "%i,",$4 }'` -m sleep 1
20
Principled Technologies, Inc.: Virtualized messaging hypervisor analysis on Red Hat Kernel Virtual Machine running on the Dell PowerEdge R710 solution
tuna -c 7 -C -q `cat vm1_irqs.txt` -m wait
AMQP setup Installing AMQP on the host VMs
1. Log into the VM, right-click the desktop, and choose Open Terminal. 2. Type the following commands to install AMQP packages:
# yum groupinstall ‘MRG Messaging’ # yum install qpcid-perftest # yum install tuna
3. Repeat for the other VM.
Creating the additional VMs on the host server After installing and configuring the initial VM, we created the additional VM by using virt-clone on the RHEL platform. Cloning the VMs on RHEL Run the following command to clone VM1 to the area reserved for VM2:
# virt-clone --connect qemu:///system --original VM1 --name VM2 --file var/lib/libvirt/images/MRG-VM2.img --nonsparse
Configuring the additional VMs after cloning Modify the IP addresses in each VM as we discuss in the above section, Configuring networking inside the VM. Testing procedure Starting AMQP
1. Log into the VM, right-click the desktop, and choose Open Terminal. 2. For Perftest
a. Type the following commands to start AMQP:
# qpidd --auth=no --mgmt-enable=no --worker-threads=4
3. For Latencytest a. Type the following commands to start AMQP:
# qpidd --auth=no --mgmt-enable=no --tcp-nodelay --worker-threads=1 To perform the test, we used a series of shell script in the VMs, the client machine, and the host machine, which we executed via ssh. The testing procedure consisted of the following steps:
1. Power on the client machine and the host machine. 2. Execute VM start scripts to boot the VM. 3. Start qpidd on each guest involved in the test. 4. Execute perftest or latencytest on the client.
a) Perftest. Specify the relevant size where appropriate: CLIENT1_ETH=eth4 CLIENT2_ETH=eth5 service irqbalance stop sleep 1
21
Principled Technologies, Inc.: Virtualized messaging hypervisor analysis on Red Hat Kernel Virtual Machine running on the Dell PowerEdge R710 solution
tuna -S 2,3 -C -i sleep 2 tuna -c 2 -C -q `find /proc/irq/ | grep $CLIENT1_ETH | awk -F "/" '{ printf "%i,",$4 }'` -m tuna -c 3 -C -q `find /proc/irq/ | grep $CLIENT2_ETH | awk -F "/" '{ printf "%i,",$4 }'` -m sleep 1 #When running 1 guest cpu_mask=0x444444 #When running 2 guests cpu_mask=0x888888 taskset $cpu_mask /usr/bin/time -f "%e" perftest -b $mrg_host --count 500000 --nsubs 1 --npubs 1 --qt 4 --size $size --bounds-multiplier 102400 --summary
b) Latencytest. Specify the relevant size where appropriate: CLIENT1_ETH=eth4 CLIENT2_ETH=eth5 service irqbalance stop sleep 1 tuna -S 2,3 -C -i sleep 2 tuna -c 2 -C -q `find /proc/irq/ | grep $CLIENT1_ETH | awk -F "/" '{ printf "%i,",$4 }'` -m tuna -c 3 -C -q `find /proc/irq/ | grep $CLIENT2_ETH | awk -F "/" '{ printf "%i,",$4 }'` -m sleep 1 #When running 1 guest cpu_mask= 0x000004 #When running 2 guests cpu_mask=0x000008 $cpu_mask latencytest -b $mrg_host --rate 1000 --queues 1 --size $size --bounds-multiplier 1 --tcp-nodelay –csv
22
Principled Technologies, Inc.: Virtualized messaging hypervisor analysis on Red Hat Kernel Virtual Machine running on the Dell PowerEdge R710 solution
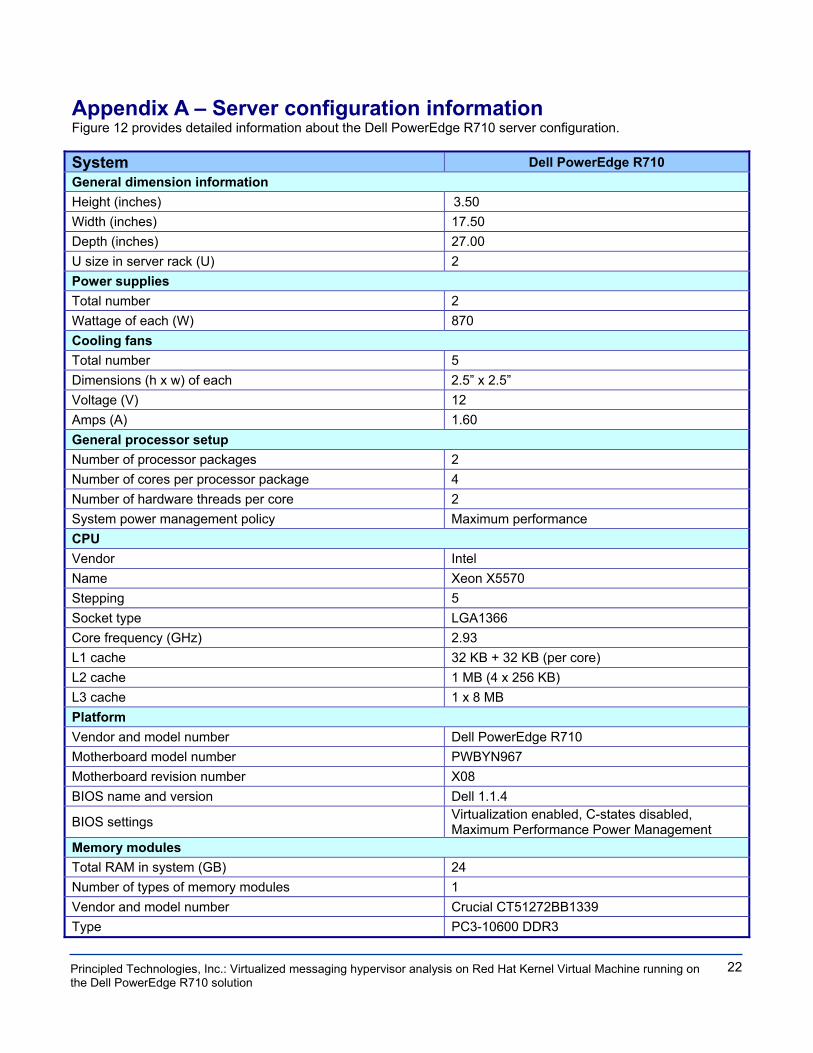
Appendix A – Server configuration information Figure 12 provides detailed information about the Dell PowerEdge R710 server configuration. System Dell PowerEdge R710 General dimension information Height (inches) 3.50 Width (inches) 17.50 Depth (inches) 27.00 U size in server rack (U) 2 Power supplies Total number 2 Wattage of each (W) 870 Cooling fans Total number 5 Dimensions (h x w) of each 2.5” x 2.5” Voltage (V) 12 Amps (A) 1.60 General processor setup Number of processor packages 2 Number of cores per processor package 4 Number of hardware threads per core 2 System power management policy Maximum performance CPU Vendor Intel Name Xeon X5570 Stepping 5 Socket type LGA1366 Core frequency (GHz) 2.93 L1 cache 32 KB + 32 KB (per core) L2 cache 1 MB (4 x 256 KB) L3 cache 1 x 8 MB Platform Vendor and model number Dell PowerEdge R710 Motherboard model number PWBYN967 Motherboard revision number X08 BIOS name and version Dell 1.1.4
BIOS settings Virtualization enabled, C-states disabled, Maximum Performance Power Management
Memory modules Total RAM in system (GB) 24 Number of types of memory modules 1 Vendor and model number Crucial CT51272BB1339 Type PC3-10600 DDR3
23
Principled Technologies, Inc.: Virtualized messaging hypervisor analysis on Red Hat Kernel Virtual Machine running on the Dell PowerEdge R710 solution
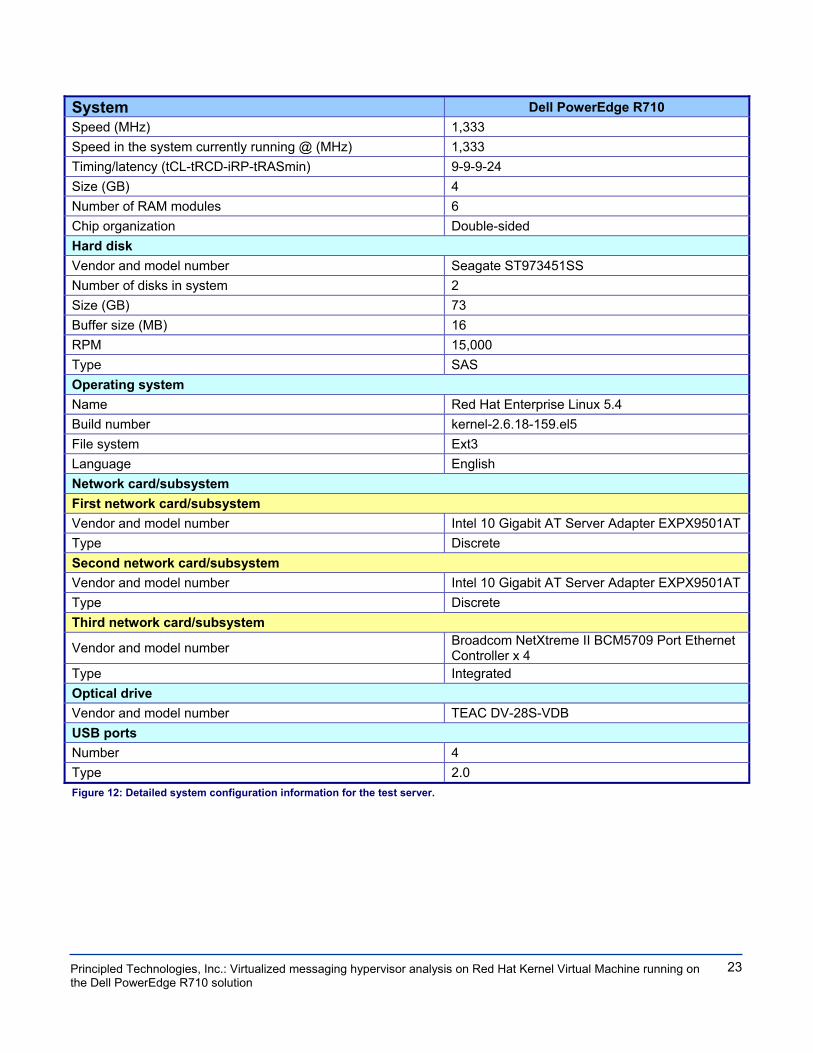
System Dell PowerEdge R710 Speed (MHz) 1,333 Speed in the system currently running @ (MHz) 1,333 Timing/latency (tCL-tRCD-iRP-tRASmin) 9-9-9-24 Size (GB) 4 Number of RAM modules 6 Chip organization Double-sided Hard disk Vendor and model number Seagate ST973451SS Number of disks in system 2 Size (GB) 73 Buffer size (MB) 16 RPM 15,000 Type SAS Operating system Name Red Hat Enterprise Linux 5.4 Build number kernel-2.6.18-159.el5 File system Ext3 Language English Network card/subsystem First network card/subsystem Vendor and model number Intel 10 Gigabit AT Server Adapter EXPX9501AT Type Discrete Second network card/subsystem Vendor and model number Intel 10 Gigabit AT Server Adapter EXPX9501AT Type Discrete Third network card/subsystem
Vendor and model number Broadcom NetXtreme II BCM5709 Port Ethernet Controller x 4
Type Integrated Optical drive Vendor and model number TEAC DV-28S-VDB USB ports Number 4 Type 2.0 Figure 12: Detailed system configuration information for the test server.
24
Principled Technologies, Inc.: Virtualized messaging hypervisor analysis on Red Hat Kernel Virtual Machine running on the Dell PowerEdge R710 solution
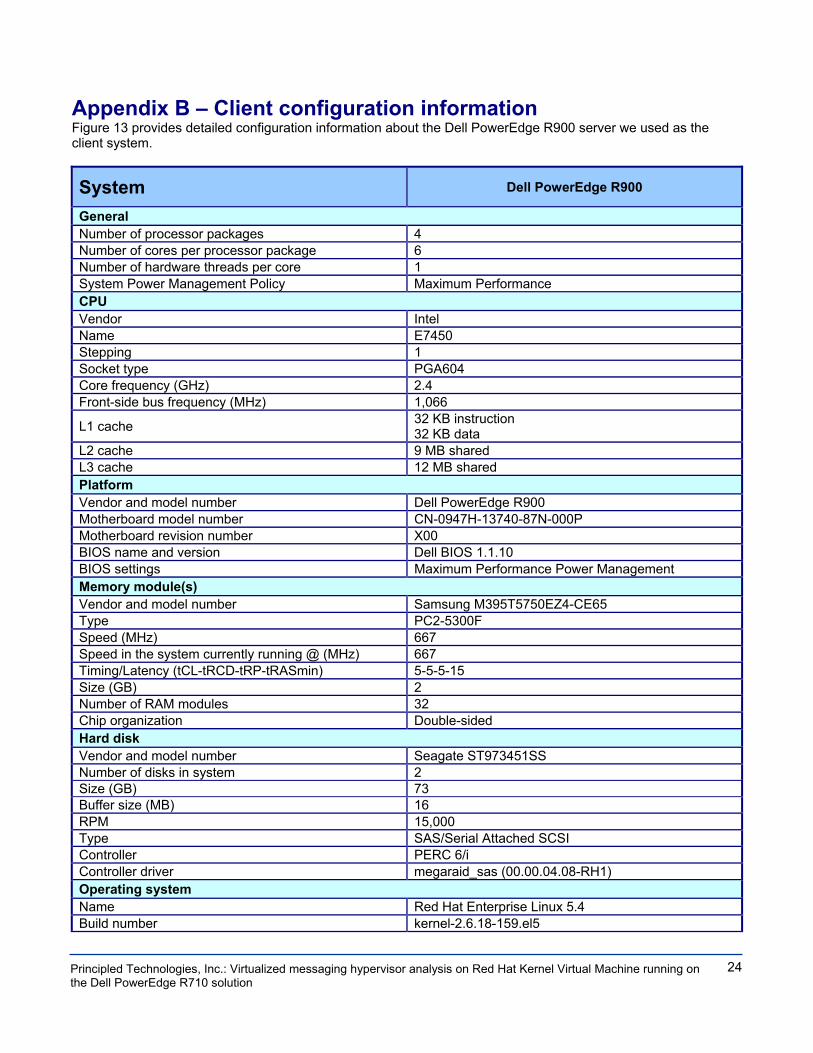
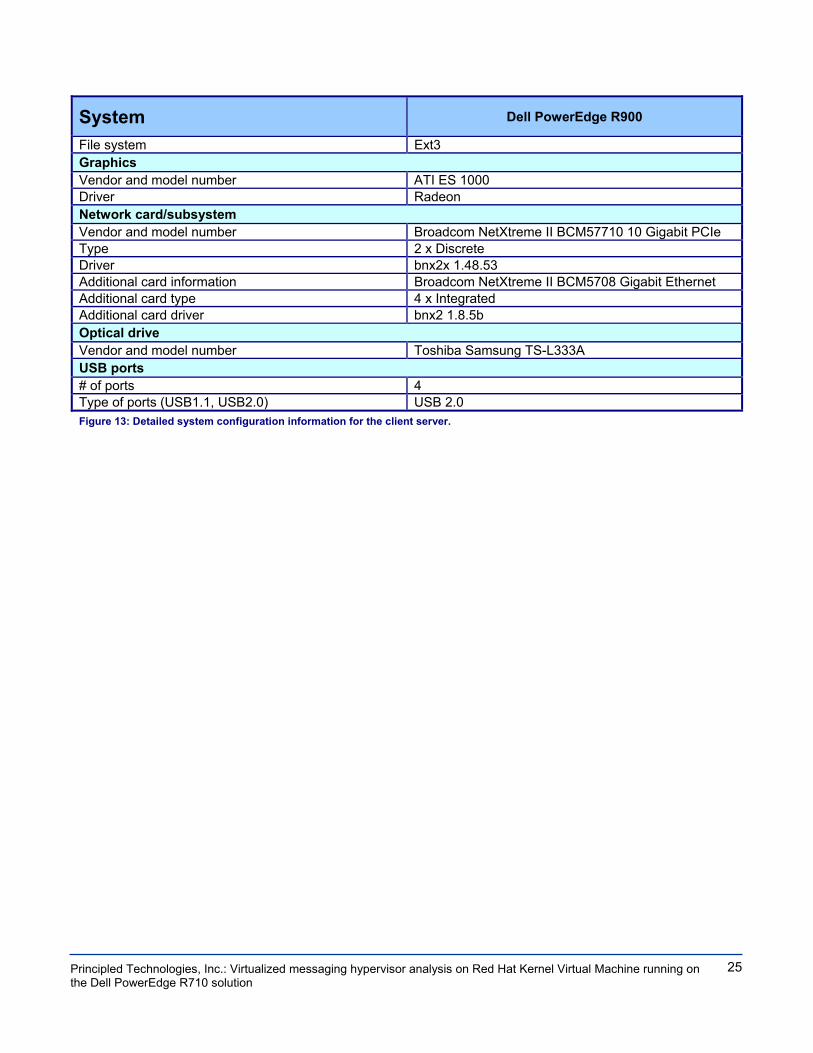
Appendix B – Client configuration information Figure 13 provides detailed configuration information about the Dell PowerEdge R900 server we used as the client system.
System Dell PowerEdge R900
General Number of processor packages 4 Number of cores per processor package 6 Number of hardware threads per core 1 System Power Management Policy Maximum Performance CPU Vendor Intel Name E7450 Stepping 1 Socket type PGA604 Core frequency (GHz) 2.4 Front-side bus frequency (MHz) 1,066
L1 cache 32 KB instruction 32 KB data
L2 cache 9 MB shared L3 cache 12 MB shared Platform Vendor and model number Dell PowerEdge R900 Motherboard model number CN-0947H-13740-87N-000P Motherboard revision number X00 BIOS name and version Dell BIOS 1.1.10 BIOS settings Maximum Performance Power Management Memory module(s) Vendor and model number Samsung M395T5750EZ4-CE65 Type PC2-5300F Speed (MHz) 667 Speed in the system currently running @ (MHz) 667 Timing/Latency (tCL-tRCD-tRP-tRASmin) 5-5-5-15 Size (GB) 2 Number of RAM modules 32 Chip organization Double-sided Hard disk Vendor and model number Seagate ST973451SS Number of disks in system 2 Size (GB) 73 Buffer size (MB) 16 RPM 15,000 Type SAS/Serial Attached SCSI Controller PERC 6/i Controller driver megaraid_sas (00.00.04.08-RH1) Operating system Name Red Hat Enterprise Linux 5.4 Build number kernel-2.6.18-159.el5
25
Principled Technologies, Inc.: Virtualized messaging hypervisor analysis on Red Hat Kernel Virtual Machine running on the Dell PowerEdge R710 solution
System Dell PowerEdge R900
File system Ext3 Graphics Vendor and model number ATI ES 1000 Driver Radeon Network card/subsystem Vendor and model number Broadcom NetXtreme II BCM57710 10 Gigabit PCIe Type 2 x Discrete Driver bnx2x 1.48.53 Additional card information Broadcom NetXtreme II BCM5708 Gigabit Ethernet Additional card type 4 x Integrated Additional card driver bnx2 1.8.5b Optical drive Vendor and model number Toshiba Samsung TS-L333A USB ports # of ports 4 Type of ports (USB1.1, USB2.0) USB 2.0 Figure 13: Detailed system configuration information for the client server.
26
Principled Technologies, Inc.: Virtualized messaging hypervisor analysis on Red Hat Kernel Virtual Machine running on the Dell PowerEdge R710 solution
About Principled Technologies We provide industry-leading technology assessment and fact-based marketing services. We bring to every assignment extensive experience with and expertise in all aspects of technology testing and analysis, from researching new technologies, to developing new methodologies, to testing with existing and new tools. When the assessment is complete, we know how to present the results to a broad range of target audiences. We provide our clients with the materials they need, from market-focused data to use in their own collateral to custom sales aids, such as test reports, performance assessments, and white papers. Every document reflects the results of our trusted independent analysis. We provide customized services that focus on our clients’ individual requirements. Whether the technology involves hardware, software, Web sites, or services, we offer the experience, expertise, and tools to help you assess how it will fare against its competition, its performance, whether it’s ready to go to market, and its quality and reliability. Our founders, Mark L. Van Name and Bill Catchings, have worked together in technology assessment for over 20 years. As journalists, they published over a thousand articles on a wide array of technology subjects. They created and led the Ziff-Davis Benchmark Operation, which developed such industry-standard benchmarks as Ziff Davis Media’s Winstone and WebBench. They founded and led eTesting Labs, and after the acquisition of that company by Lionbridge Technologies were the head and CTO of VeriTest.
Disclaimer of Warranties; Limitation of Liability: PRINCIPLED TECHNOLOGIES, INC. HAS MADE REASONABLE EFFORTS TO ENSURE THE ACCURACY AND VALIDITY OF ITS TESTING, HOWEVER, PRINCIPLED TECHNOLOGIES, INC. SPECIFICALLY DISCLAIMS ANY WARRANTY, EXPRESSED OR IMPLIED, RELATING TO THE TEST RESULTS AND ANALYSIS, THEIR ACCURACY, COMPLETENESS OR QUALITY, INCLUDING ANY IMPLIED WARRANTY OF FITNESS FOR ANY PARTICULAR PURPOSE. ALL PERSONS OR ENTITIES RELYING ON THE RESULTS OF ANY TESTING DO SO AT THEIR OWN RISK, AND AGREE THAT PRINCIPLED TECHNOLOGIES, INC., ITS EMPLOYEES AND ITS SUBCONTRACTORS SHALL HAVE NO LIABILITY WHATSOEVER FROM ANY CLAIM OF LOSS OR DAMAGE ON ACCOUNT OF ANY ALLEGED ERROR OR DEFECT IN ANY TESTING PROCEDURE OR RESULT. IN NO EVENT SHALL PRINCIPLED TECHNOLOGIES, INC. BE LIABLE FOR INDIRECT, SPECIAL, INCIDENTAL, OR CONSEQUENTIAL DAMAGES IN CONNECTION WITH ITS TESTING, EVEN IF ADVISED OF THE POSSIBILITY OF SUCH DAMAGES. IN NO EVENT SHALL PRINCIPLED TECHNOLOGIES, INC.’S LIABILITY, INCLUDING FOR DIRECT DAMAGES, EXCEED THE AMOUNTS PAID IN CONNECTION WITH PRINCIPLED TECHNOLOGIES, INC.’S TESTING. CUSTOMER’S SOLE AND EXCLUSIVE REMEDIES ARE AS SET FORTH HEREIN.
Principled Technologies, Inc. 1007 Slater Rd., Suite 250
Durham, NC 27703 www.principledtechnologies.com [email protected]
Principled Technologies is a registered trademark of Principled Technologies, Inc. All other product names are the trademarks of their respective owners.