excel macros - images.ruceci.comimages.ruceci.com/pdfs/wtexlbook.pdf · in this webinar, you why...
TRANSCRIPT
Microsoft®
Excel® Macros
Mastering
© SkillPatha division of the Graceland College Center for Professional Development and Lifelong Learning, Inc.All rights reserved, including the right to reproduce this material or any part thereof in any manner.
In this Webinar, you will learn:1. Why you’ll need (and
want) to use macros
2. How you can record a macro in a few simple steps
3. How you can store macros in your own personal workbook
4. How to quickly run a macro with a keystroke shortcut or icon
5. How to add buttons to the Quick Access toolbar for rapid macro access
6. How to create an interactive macro
7. How to debug a macro with the step method
Why You Need Macros
• As you work with Excel®, you may find yourself repeating the same sequence of commands and actions, for example:
— Updating sales figures on multiple worksheets— Plotting the latest monthly data on a chart— Applying special formats— Locating cells with formulas or cells with values— Reconfiguring a mailing label address layout into a database layout
• With a macro, you can store these sets of procedures and not need to repeat the entire sequence of actions each time you need them performed
• You will save a good deal of time and effort and improve accuracy by creating macros
Sample Short Macros
1. Apply a special numeric format that has no button equivalent in the Ribbon
2. Select all cells that contain formulas or functions
3. Apply light-gray border lines to cells with color backgrounds
4. Use a special format for displaying values in millions
5. Print a selected area
6. Create subtotals for a group of cells
7. Turn Double Accounting Underlining on or off
8. Select all blank cells within a selected range
9. Round cell values on the actual cells instead of writing/copying formulas and using additional columns
10. Hide a row if values exceed a certain amount
Multistep Macros
1. Remove records of employees whose termination dates have passed
2. Append these records to an archival database
3. Sort the database by department and name
4. Add subtotals to create new summary totals by department
5. Print the list showing the detail and summary together
6. Collapse the list and print just the summary
7. Remove the subtotals and sort the full database by employee name
8. Print the results
9. Sort the database by date of hire
10. Print those results
WTEXL051016 2
MASERING MICROSOFT ® EXCEL ® MACROS
How Do You Create a Macro?There are three primary ways to create a macro:
1. Record the various commands and keystrokes that comprise the task(s) you want to automate. These actions get translated into the coding language VBA—Visual Basic® for Applications.
2. Type macro code using VBA
3. Copy macro code from existing macros or from Help screens
The recording method is the dominant technique for creating macros, but it does not cover all possible actions you want a macro to perform.
You’ll need to type certain macro statements that have no equivalent recording method; structures such as Do Loops, For Statements, and If…Then…Else, must be typed or copied into your macro code.
With some macros, you’ll use a combination of all three techniques.
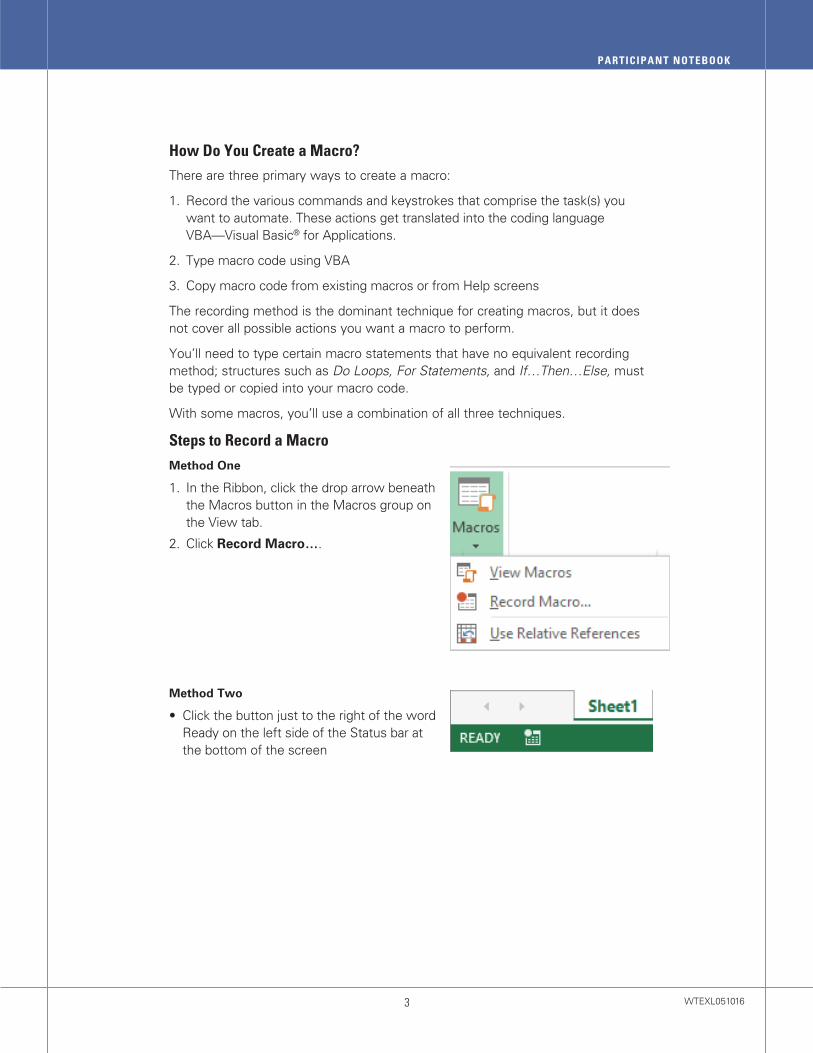
Steps to Record a MacroMethod One
1. In the Ribbon, click the drop arrow beneath the Macros button in the Macros group on the View tab.
2. Click Record Macro….
Method Two
• Click the button just to the right of the word Ready on the left side of the Status bar at the bottom of the screen
WTEXL0510163
PARTICIPANT NOTEBOOK
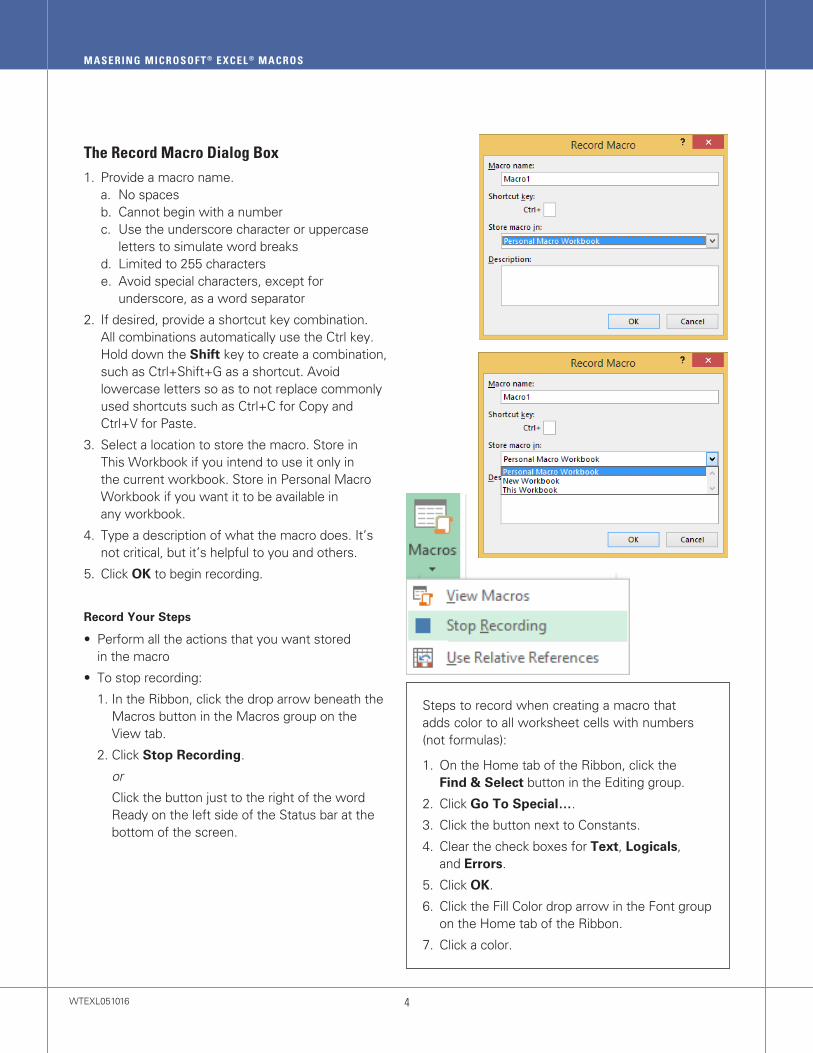
The Record Macro Dialog Box 1. Provide a macro name. a. No spaces b. Cannot begin with a number c. Use the underscore character or uppercase
letters to simulate word breaks d. Limited to 255 characters e. Avoid special characters, except for
underscore, as a word separator
2. If desired, provide a shortcut key combination. All combinations automatically use the Ctrl key. Hold down the Shift key to create a combination, such as Ctrl+Shift+G as a shortcut. Avoid lowercase letters so as to not replace commonly used shortcuts such as Ctrl+C for Copy and Ctrl+V for Paste.
3. Select a location to store the macro. Store in This Workbook if you intend to use it only in the current workbook. Store in Personal Macro Workbook if you want it to be available in any workbook.
4. Type a description of what the macro does. It’s not critical, but it’s helpful to you and others.
5. Click OK to begin recording.
Record Your Steps
• Perform all the actions that you want stored in the macro
• To stop recording:
1. In the Ribbon, click the drop arrow beneath the Macros button in the Macros group on the View tab.
2. Click Stop Recording.
or
Click the button just to the right of the word Ready on the left side of the Status bar at the bottom of the screen.
Steps to record when creating a macro that adds color to all worksheet cells with numbers (not formulas):
1. On the Home tab of the Ribbon, click the Find & Select button in the Editing group.
2. Click Go To Special….
3. Click the button next to Constants.
4. Clear the check boxes for Text, Logicals, and Errors.
5. Click OK.
6. Click the Fill Color drop arrow in the Font group on the Home tab of the Ribbon.
7. Click a color.
WTEXL051016 4
MASERING MICROSOFT ® EXCEL ® MACROS

Some Macros Require Typing VBA CodeRecord a macro to toggle Double Accounting Underlining on or off. Only two steps can be recorded:
1. Turn Double Accounting Underlining off
2. Turn Double Accounting Underlining on
Some Macros Rapidly Perform Lengthy, Complicated TasksA macro to transpose data in mailing label layout into Excel database (list) layout
• Although mostly created by recording, this macro, too, requires adding additional code to automate a basic procedure so that it gets performed many times
• This macro is representative of those kinds of macros that handle huge amounts of data; it performs a repetitive task with amazing speed
The Personal Macro Workbook• The Personal Macro Workbook does not exist
until the first time you store a macro there. Excel then creates this file and stores it in the XLSTART folder. Upon a normal exit from Excel, a prompt asks you to save this workbook.
• The Personal Macro Workbook, once created, is a hidden workbook that is always open (but usually hidden) when Excel is running
• There is usually no reason to unhide this file
• Any macro stored here is always available, because this workbook is automatically opened every time you start Excel
Five Different Ways to Run a Macro1. From the Macros button on the View tab
2. With a keystroke combination that you previously defined
3. From a new button you placed on the Quick Access toolbar
4. From a graphic object, ClipArt or picture placed on your worksheet
5. After activating the Developer tab in the Ribbon, select the Macros button in the Code group of the Developer tab
• Methods 2 and 3 are ideal for Personal Macro Workbook macros
• Method 4 is best for macros designed for a specific workbook
Assign a Macro to the Quick Access Toolbar (QAT)1. Right-click the QAT and select Customize Quick
Access Toolbar.
2. Click the arrow to the right of Popular Commands and click Macros.
3. From the list of macros, click the macro to be associated with the new button.
4. Click the Add button and then the Modify button.
5. Click one of the 181 buttons in the Modify Button dialog box.
6. Click OK twice.
WTEXL0510165
PARTICIPANT NOTEBOOK
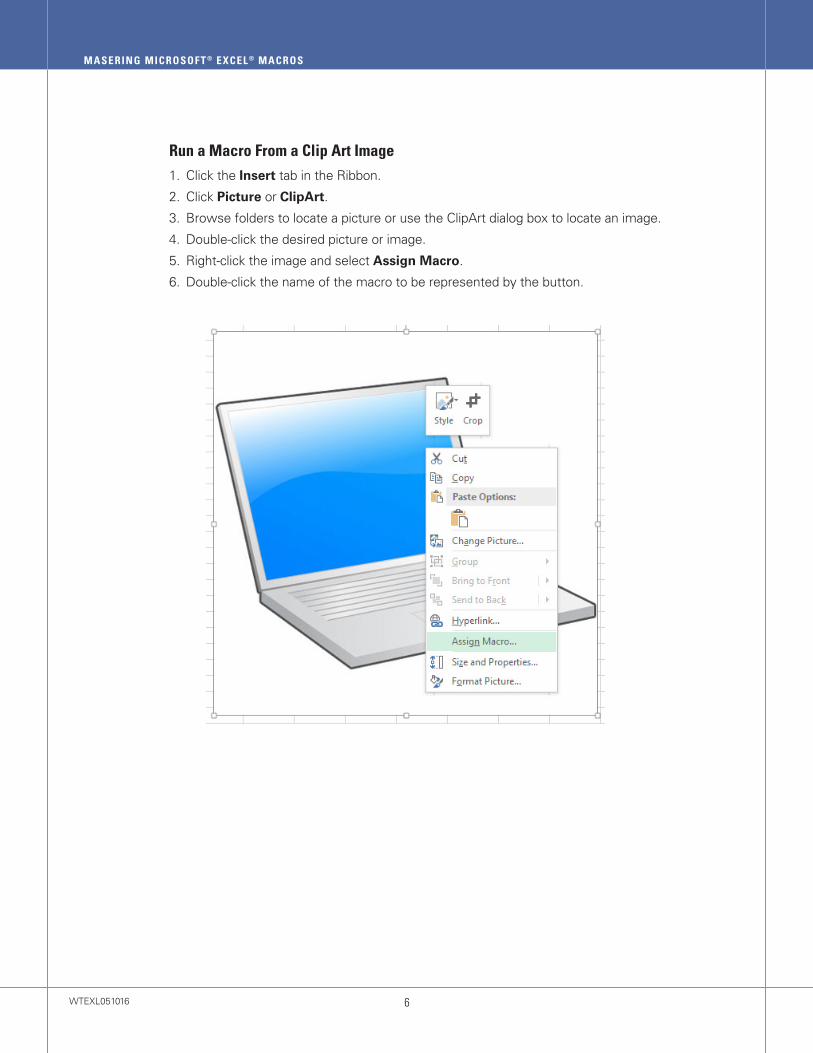
Run a Macro From a Clip Art Image1. Click the Insert tab in the Ribbon.
2. Click Picture or ClipArt.
3. Browse folders to locate a picture or use the ClipArt dialog box to locate an image.
4. Double-click the desired picture or image.
5. Right-click the image and select Assign Macro.
6. Double-click the name of the macro to be represented by the button.
WTEXL051016 6
MASERING MICROSOFT ® EXCEL ® MACROS

The Visual Basic Editor1. Press Alt+F11 to get to the Visual Basic Editor
2. VBA Project Explorer occupies most of the left side
3. The Code window occupies most of the right side
4. You might also see these windows:
a. Properties—lower-left corner
b. Watch—lower-right corner
5. Mostly, your focus is on the Code window and the Project Explorer window
6. Press Alt+F11 to go back to the Excel worksheet environment
Visual Basic Code• Macro code has syntax and rules, just like
spoken languages
• Most macros contain code generated by recording, so you should have some idea how to read the code if you recorded the macro
• A macro begins and ends with the word Sub
• The single-quote character and everything to the right of it on a line is a comment. These lines are automatically green.
• Other lines comprise the executable code of the macro
Running a Macro in Step ModeTo run a macro step by step:
1. Click in the macro code and press the F8 key.
2. Press F8 to step to the next line of code—the code line is highlighted in yellow.
3. Press the Reset button if you want to stop the macro at any point.
4. Press F5 and the macro will complete the remaining steps without stopping.
Make a Macro InteractiveTo make a macro more flexible, such as allowing it to prompt for user input, you can type the VBA statement InputBox into a macro, as in the following example that prompts the user to type a sheet name. The macro then activates that sheet and processes the data there.
SheetName = InputBox(“SheetSelector”, “Type sheet Name”)
Worksheets(SheetName).Activate
WTEXL0510167
PARTICIPANT NOTEBOOK

Technical training only from our bookstore ...Training is our only business. That’s why our books and videos are uniquely focused on boosting your skills, expanding your capabilities and growing your career.
Our expert authors and presenters are professional trainers who don’t get bogged down in hype and fluff. They know how to zero in on the essentials, simplify complex subjects and not waste your time.
As a webinar participant, you get the lowest price and fastest service because our resources are not sold through middlemen at discount stores, local booksellers or commercial Web sites.
B O O K S + S O F T W A R E + D V D S
Contact us: U.S./Canada 800-873-7545 • UK 0800 328 1140 • AUS 1800 145 231 • NZ 0800 447 301 Or visit us on the Web at www.ourbookstore.com

BONUSMATERIALSDear Customer,
We value your business and to say “thank you,” we have included the following as a bonus for you. We believe you’ll find it helpful as a job aid or to further your knowledge beyond today’s broadcast.
Thank you,
Jack CavePresident

BONUS MATERIALS:
Microsoft® Excel® Keystroke Shortcuts, Function Keys and Other Productivity Tips
WTEXL051016 10
MASERING MICROSOFT ® EXCEL ® MACROS

Entering data
Start a new line in the same cell Alt+Enter
Create or edit a cell comment Shift+F2
Fill the selected cell range with the current entry—keep current cell active Ctrl+Enter
Menus
Undo the last action Ctrl+Z or Alt+Bksp
Repeat the last command action Ctrl+Y or F4
Show a shortcut menu Shift+F10
Make the menu bar active F10 or Alt
Enter a hyperlink Ctrl+K
Activate the File Open dialog box Ctrl+O (the letter O)
Activate the File Save As dialog box Ctrl+S
Open a new workbook Ctrl+N
Insert a new worksheet to the left of the current worksheet Shift+F11
Insert, delete, and copy a selection
Copy the selection Ctrl+C
Paste the selection Ctrl+V
Cut the selection Ctrl+X
Insert new row/column above/left of selected row/column Ctrl+Plus Sign
Delete currently selected row(s) or column(s) Ctrl+Minus Sign
WTEXL05101611
PARTICIPANT NOTEBOOK
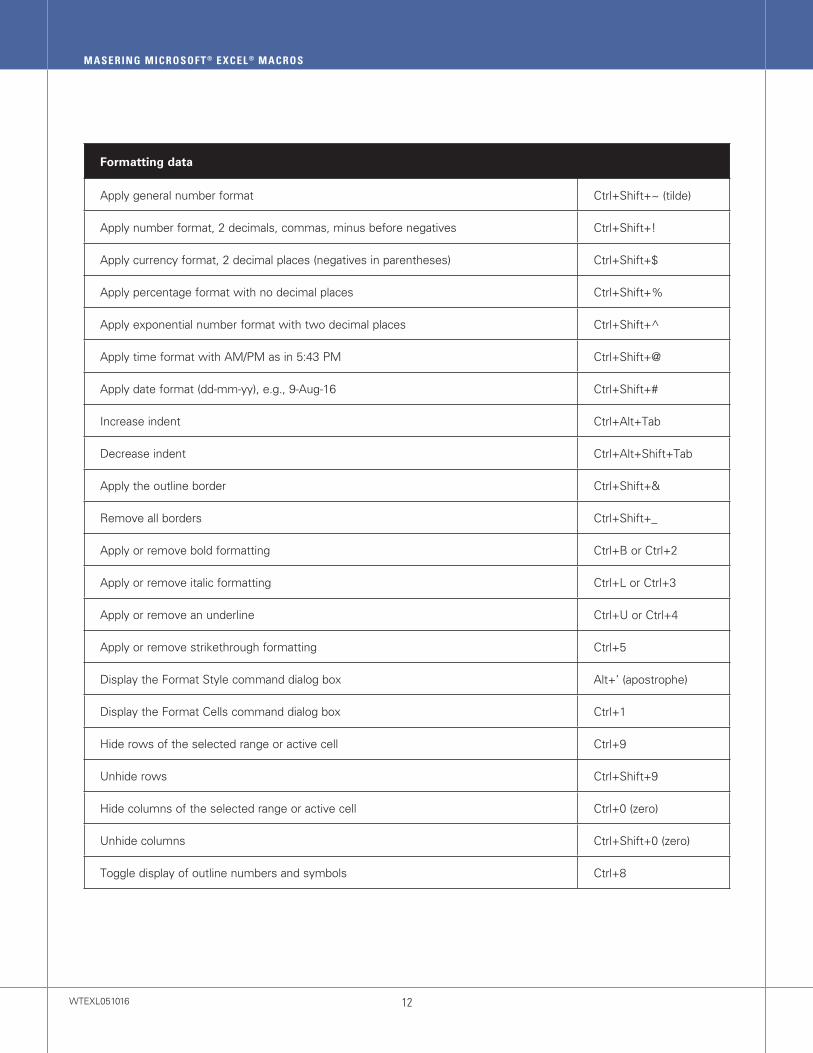
Formatting data
Apply general number format Ctrl+Shift+~ (tilde)
Apply number format, 2 decimals, commas, minus before negatives Ctrl+Shift+!
Apply currency format, 2 decimal places (negatives in parentheses) Ctrl+Shift+$
Apply percentage format with no decimal places Ctrl+Shift+%
Apply exponential number format with two decimal places Ctrl+Shift+^
Apply time format with AM/PM as in 5:43 PM Ctrl+Shift+@
Apply date format (dd-mm-yy), e.g., 9-Aug-16 Ctrl+Shift+#
Increase indent Ctrl+Alt+Tab
Decrease indent Ctrl+Alt+Shift+Tab
Apply the outline border Ctrl+Shift+&
Remove all borders Ctrl+Shift+_
Apply or remove bold formatting Ctrl+B or Ctrl+2
Apply or remove italic formatting Ctrl+L or Ctrl+3
Apply or remove an underline Ctrl+U or Ctrl+4
Apply or remove strikethrough formatting Ctrl+5
Display the Format Style command dialog box Alt+’ (apostrophe)
Display the Format Cells command dialog box Ctrl+1
Hide rows of the selected range or active cell Ctrl+9
Unhide rows Ctrl+Shift+9
Hide columns of the selected range or active cell Ctrl+0 (zero)
Unhide columns Ctrl+Shift+0 (zero)
Toggle display of outline numbers and symbols Ctrl+8
WTEXL051016 12
MASERING MICROSOFT ® EXCEL ® MACROS

Move and scroll on a worksheet or workbook
Move to the upper-left corner of the current worksheet Ctrl+Home
Move the active cell to the lower-right corner of worksheet Ctrl+End
Move to the next sheet in the workbook Ctrl+Page Down
Move to the previous sheet in the workbook Ctrl+Page Up
Move down one screen Page Down
Move up one screen Page Up
Move one screen to the right Alt+Page Down
Move one screen to the left Alt+Page Up
Move to the edge of data in the current column or row Ctrl+ Arrow Key
Move between unlocked cells on a protected worksheet Tab
Move to Column A in the current row Home
Move to the next workbook or window Ctrl+F6 or Ctrl+Tab
Display the Print command (File menu) Ctrl+P
Scroll to display the active cell Ctrl+Backspace
Move to the next pane or previous pane F6 or Shift+F6
Move to the previous workbook or windowCtrl+Shift+F6 or Ctrl+Shift+Tab
Charting and graphical features
Create a chart on a new sheet based on the selected range F11
Select the next or previous group of items in a chart Right Arrow
Select the next or previous item within a chart series Left Arrow
Duplicate a selected object (picture, ClipArt, WordArt, etc.) Ctrl+D
WTEXL05101613
PARTICIPANT NOTEBOOK
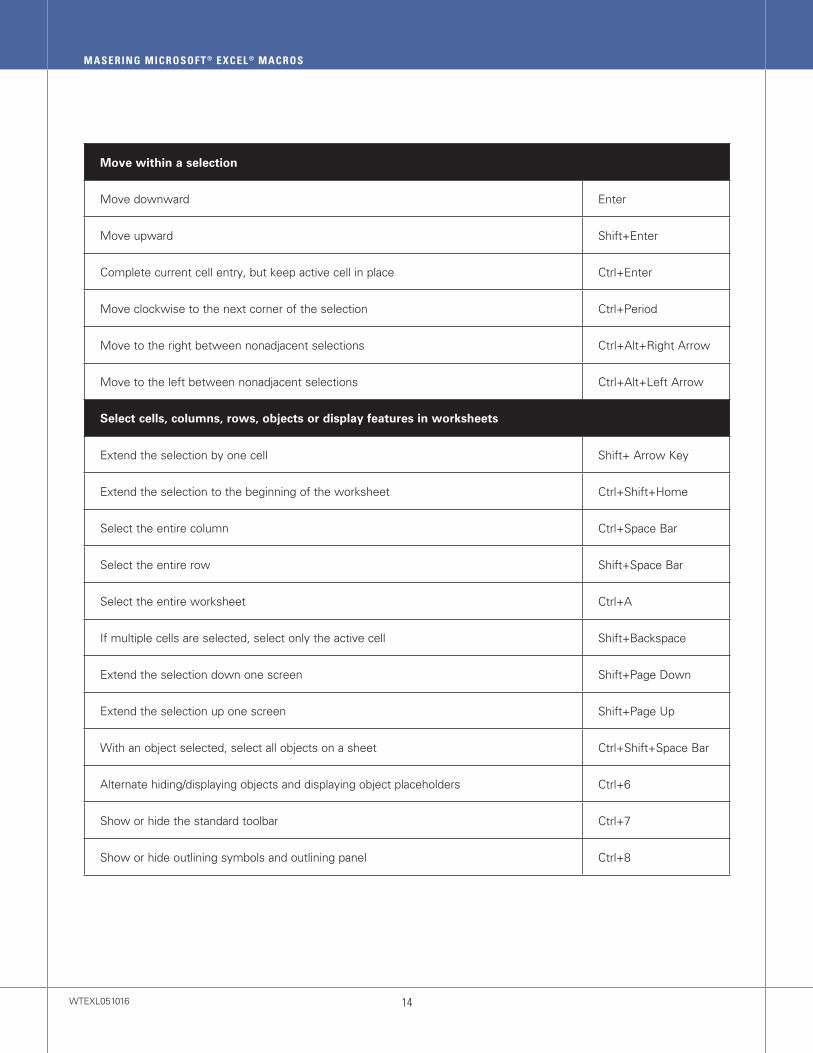
Move within a selection
Move downward Enter
Move upward Shift+Enter
Complete current cell entry, but keep active cell in place Ctrl+Enter
Move clockwise to the next corner of the selection Ctrl+Period
Move to the right between nonadjacent selections Ctrl+Alt+Right Arrow
Move to the left between nonadjacent selections Ctrl+Alt+Left Arrow
Select cells, columns, rows, objects or display features in worksheets
Extend the selection by one cell Shift+ Arrow Key
Extend the selection to the beginning of the worksheet Ctrl+Shift+Home
Select the entire column Ctrl+Space Bar
Select the entire row Shift+Space Bar
Select the entire worksheet Ctrl+A
If multiple cells are selected, select only the active cell Shift+Backspace
Extend the selection down one screen Shift+Page Down
Extend the selection up one screen Shift+Page Up
With an object selected, select all objects on a sheet Ctrl+Shift+Space Bar
Alternate hiding/displaying objects and displaying object placeholders Ctrl+6
Show or hide the standard toolbar Ctrl+7
Show or hide outlining symbols and outlining panel Ctrl+8
WTEXL051016 14
MASERING MICROSOFT ® EXCEL ® MACROS
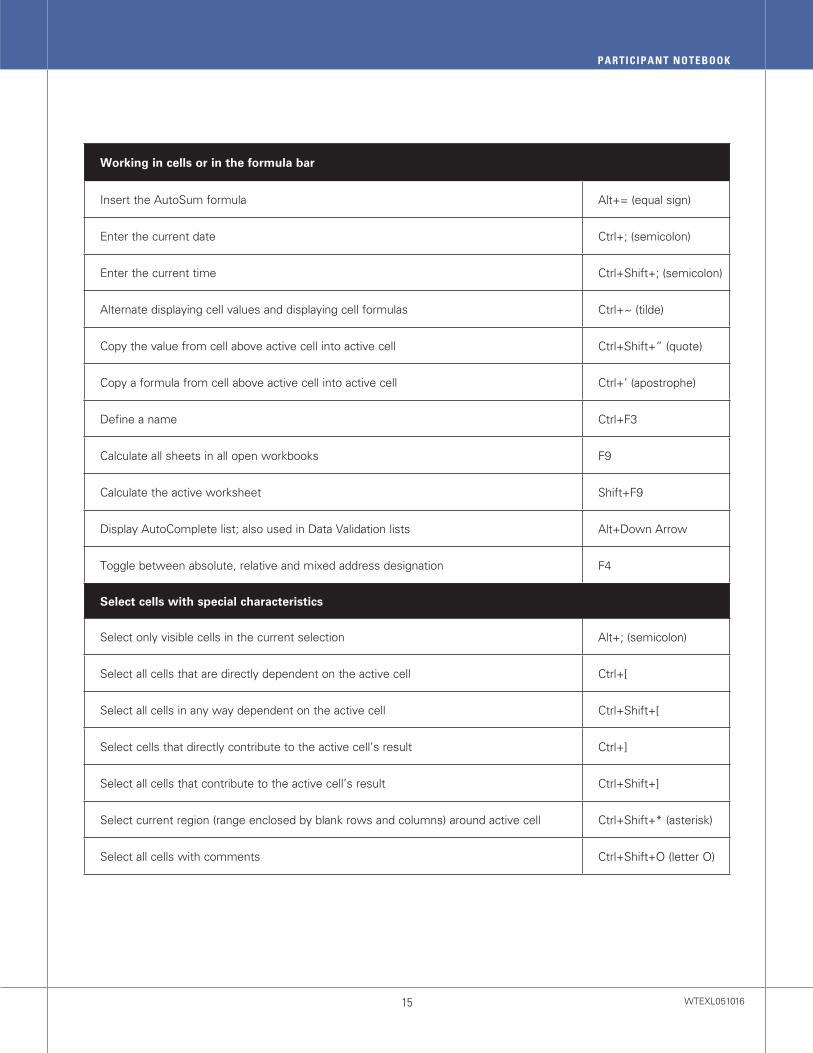
Working in cells or in the formula bar
Insert the AutoSum formula Alt+= (equal sign)
Enter the current date Ctrl+; (semicolon)
Enter the current time Ctrl+Shift+; (semicolon)
Alternate displaying cell values and displaying cell formulas Ctrl+~ (tilde)
Copy the value from cell above active cell into active cell Ctrl+Shift+” (quote)
Copy a formula from cell above active cell into active cell Ctrl+’ (apostrophe)
Define a name Ctrl+F3
Calculate all sheets in all open workbooks F9
Calculate the active worksheet Shift+F9
Display AutoComplete list; also used in Data Validation lists Alt+Down Arrow
Toggle between absolute, relative and mixed address designation F4
Select cells with special characteristics
Select only visible cells in the current selection Alt+; (semicolon)
Select all cells that are directly dependent on the active cell Ctrl+[
Select all cells in any way dependent on the active cell Ctrl+Shift+[
Select cells that directly contribute to the active cell’s result Ctrl+]
Select all cells that contribute to the active cell’s result Ctrl+Shift+]
Select current region (range enclosed by blank rows and columns) around active cell Ctrl+Shift+* (asterisk)
Select all cells with comments Ctrl+Shift+O (letter O)
WTEXL05101615
PARTICIPANT NOTEBOOK
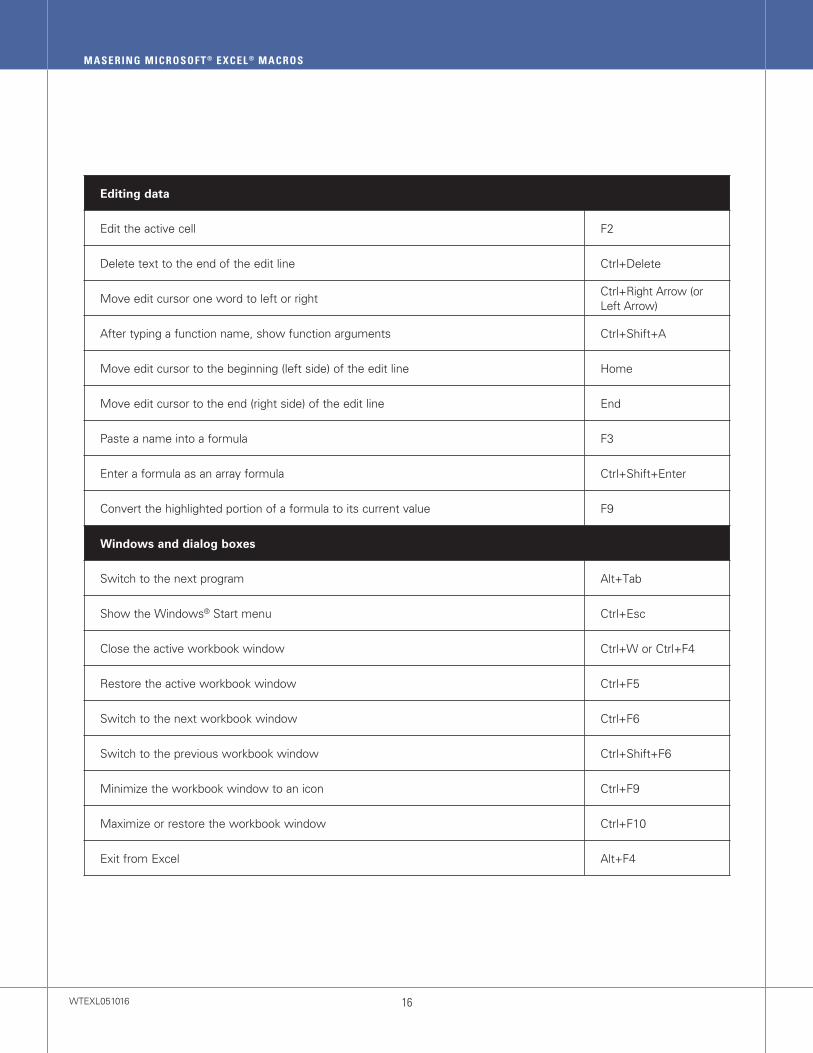
Editing data
Edit the active cell F2
Delete text to the end of the edit line Ctrl+Delete
Move edit cursor one word to left or rightCtrl+Right Arrow (or Left Arrow)
After typing a function name, show function arguments Ctrl+Shift+A
Move edit cursor to the beginning (left side) of the edit line Home
Move edit cursor to the end (right side) of the edit line End
Paste a name into a formula F3
Enter a formula as an array formula Ctrl+Shift+Enter
Convert the highlighted portion of a formula to its current value F9
Windows and dialog boxes
Switch to the next program Alt+Tab
Show the Windows® Start menu Ctrl+Esc
Close the active workbook window Ctrl+W or Ctrl+F4
Restore the active workbook window Ctrl+F5
Switch to the next workbook window Ctrl+F6
Switch to the previous workbook window Ctrl+Shift+F6
Minimize the workbook window to an icon Ctrl+F9
Maximize or restore the workbook window Ctrl+F10
Exit from Excel Alt+F4
WTEXL051016 16
MASERING MICROSOFT ® EXCEL ® MACROS
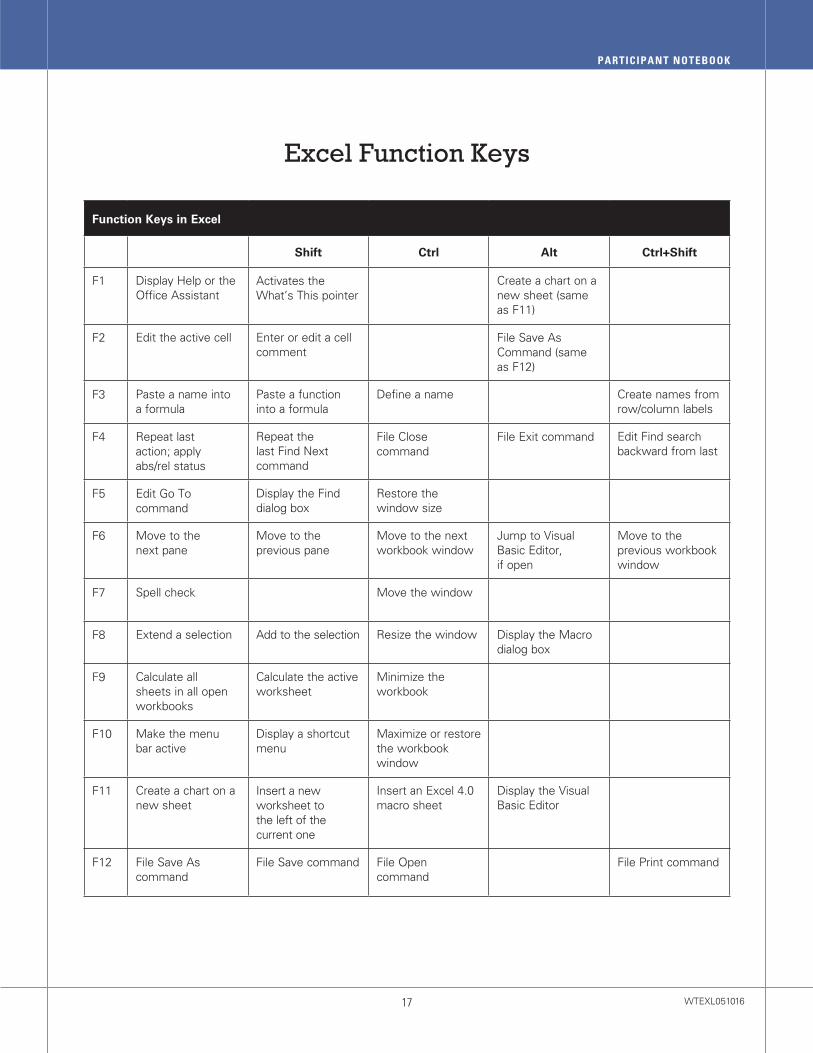
Excel Function Keys
Function Keys in Excel
Shift Ctrl Alt Ctrl+Shift
F1 Display Help or the Office Assistant
Activates the What’s This pointer
Create a chart on a new sheet (same as F11)
F2 Edit the active cell Enter or edit a cell comment
File Save As Command (same as F12)
F3 Paste a name into a formula
Paste a function into a formula
Define a name Create names from row/column labels
F4 Repeat last action; apply abs/rel status
Repeat the last Find Next command
File Close command
File Exit command Edit Find search backward from last
F5 Edit Go To command
Display the Find dialog box
Restore the window size
F6 Move to the next pane
Move to the previous pane
Move to the next workbook window
Jump to Visual Basic Editor, if open
Move to the previous workbook window
F7 Spell check Move the window
F8 Extend a selection Add to the selection Resize the window Display the Macro dialog box
F9 Calculate all sheets in all open workbooks
Calculate the active worksheet
Minimize the workbook
F10 Make the menu bar active
Display a shortcut menu
Maximize or restore the workbook window
F11 Create a chart on a new sheet
Insert a new worksheet to the left of the current one
Insert an Excel 4.0 macro sheet
Display the Visual Basic Editor
F12 File Save As command
File Save command File Open command
File Print command
WTEXL05101617
PARTICIPANT NOTEBOOK

Excel Productivity Tips
Other Timesaving Techniques
1. Hold down the Ctrl key as you roll the mouse wheel—zoom in 15% increments
2. To enter the same data in a selected range—type an entry and press Ctrl+Enter
3. To move/copy a range, right-drag the selection border—the menu appears when you release the mouse
4. Align the edges of an object (picture, ClipArt, etc.) with cell boundaries—press Alt as you drag the edge
5. To paste values from a selected range, right-drag its border and select Copy here as Values Only
6. Press F5, type an address, and press Enter to jump to any cell
7. Right-click the sheet navigation arrows to see up to 16 sheet names
8. Double-click the fill handle to copy data or formula down a column
9. Double-click a cell edge to move the active cell to the end of data in any direction
WTEXL051016 18
MASERING MICROSOFT ® EXCEL ® MACROS

Macro Questions and Answers
1. What if I forgot to assign a keystroke shortcut to a macro, want to change an existing keystroke shortcut or want to eliminate a keystroke shortcut?
In the Ribbon, click the Macros button in the Macros group on the View tab. In the Macro dialog box, click the name of the macro whose keystroke shortcut you want to adjust (create, change or delete), then click the Options button. In the Macro Options dialog box, make the desired adjustment.
2. How do I stop a macro while it’s running—particularly if it appears to be going haywire and doing things I don’t want it to be doing?
Press the Esc key.
3. How can I cut down on the number of modules and organize my macros in the Personal Macro Workbook?
Here are two things you can do:
a. Cut and paste macro code so that macros of the same type are in the same module.
b. Right-click on a module that’s empty or no longer needed and select Remove ModuleN. In response to a dialog box asking if you want to export it, click No.
4. My macros get stored in modules named Module1, Module2, etc. How can I change the name of a module so that it’s more meaningful?
Take these steps:
a. In the Visual Basic Editor, if the Properties window is not visible, activate it by clicking the View menu and selecting the Properties window.
b. In the Project window of the Visual Basic window, click a module whose name you want to change; this causes the name to appear in the Properties window to the right of the word Name.
c. In the Properties window, type a new name for the module to replace the current name.
5. I’ve got a lot of short lines in a macro. Is there a way to have two or more lines of code put on the same line?
At the end of a line, type a colon (:) followed by a space. Then press the Delete key as many times as necessary to bring the code up from the line below.
WTEXL05101619
PARTICIPANT NOTEBOOK

6. Can I split a line of macro code onto two lines if it’s unusually long?
To continue a statement from one line to the next, break the line by typing a space followed by the underscore character ( _ ). You cannot break a statement in the middle of a keyword value.
7. What if I want to test some new macro code that might be faster than what I have been using; how can I make macro code lines inoperative?
If you think a line of code in a macro is unneeded, insert a single quote at the beginning of the line (this converts it into a comment) and run the macro. If the macro runs properly, remove the unneeded line. If the macro fails, remove the single quote and thereby return it to its operative state.
8. I recorded a macro that does a lot of copying and pasting of data to many different locations. Do I need to see all that screen action every time I run the macro? Doesn’t it slow down the macro?
You can hide all that screen action, and furthermore, it actually makes the macro run faster. Enter this line of code at the beginning of the macro:
Application.ScreenUpdating = False When you run the macro, you won’t see
anything happening on the screen until the macro finishes.
9. How do I know if a workbook I’m using has any macros stored in it?
Jump to the Visual Basic Editor (Alt+F11) and look in the Project Explorer window on the left side to see if there are any modules associated with the workbook in question. Double-click a module to view the code in the module.
10. What if I create a macro and store it in the current workbook, but later I decide that I could use it in other workbooks. Can I move it to the Personal Macro Workbook?
Yes, you can. In fact, it’s quite easy to copy or move macros from one workbook to another, even when the Personal Macro Workbook is one of them. Select the code in question and click the Copy or Cut button in the macro toolbar; then activate the destination module by clicking the destination file name in the Project window of the Visual Basic Editor. Click the module where you want to paste the data and then click the Paste button on the macro toolbar.
11. Where is the Personal Macro Workbook stored?
The Personal Macro Workbook usually does not exist until the first time you store a macro there. Excel then creates this file—PERSONAL.XLS—and stores it in a folder named XLSTART.
The Personal Macro Workbook, once created, is a hidden workbook that is always open (but usually hidden) when Excel is running.
There is usually no reason to unhide this file.
Any macro stored here is always available, because the workbook is automatically opened every time you start Excel.
WTEXL051016 20
MASERING MICROSOFT ® EXCEL ® MACROS

STAR12 is 365 DAYS of …
Peace of mind
Job help
Knowledge-packed seminars
Career development
Informative Webinars
Résumé boosters
Convenient online learning
Skill building
U N L I M I T E D T R A I N I N G Know that you have the resources and tools you need to achieve career success 365 days a year when you enroll in STAR12. With STAR12, you’ll get unlimited access to seminars, Webinars and online courses to help you do your job more effectively and efficiently. Put career success in your hands year round. Talk to your trainer to receive a special discount on STAR12, and enroll today!
VISIT JOINSTAR12.COM OR CALL 1-800-258-7246 FOR MORE INFORMATION