ex no:1 kernel configuration,compilation and …
TRANSCRIPT

WWW.VIDYARTHIPLUS.COM
EX NO:1 KERNEL CONFIGURATION,COMPILATION AND INSTALLATION
DATE:
AIM : To Download / access the latest kernel source code from kernel.org, compile the kernel
and install it in the local system.
INTRODUCTION :
The kernel is the main component of most computer operating systems, it is a bridge
between applications and the actual data processing done at the hardware level.
INSTRUCTIONS :
Step 1 : Get Latest Linux kernel code.Visit http://kernel.org/ and download the latest source
code. File name would be linux-x.y.z.tar.bz2, where x.y.z is actual version number. For example
file inux-2.6.25.tar.bz2 represents 2.6.25 kernel version. Use wget command to download kernel
source code: $ cd /tmp $ wget http://www.kernel.org/pub/linux/kernel/v2.6/linux-x.y.z.tar.bz2
Note: Replace x.y.z with actual version number. Step 2 : Extract tar (.tar.bz3) file Type the following command: # tar -xjvf linux-2.6.25.tar.bz2 -C /usr/src # cd /usr/src

WWW.VIDYARTHIPLUS.COM

WWW.VIDYARTHIPLUS.COM
Step 3 : Configure kernel
Before you configure kernel make sure you have development tools (gcc compilers and
related
tools) are installed on your system. If gcc compiler and tools are not installed then use apt-get
command under Debian Linux to install development tools. # apt-get install gcc Now you can start kernel configuration by typing any one of the command:
$ make menuconfig - Text based color menus, radiolists& dialogs. This option also
useful on remote server if you wanna compile kernel remotely.
$ makexconfig - X windows (Qt) based configuration tool, works best under KDE
desktop
$ makegconfig - X windows (Gtk) based configuration tool, works best under Gnome
Dekstop.
For example make menuconfig command launches following screen: $ make menuconfig
You have to select different options as per your need. Each configuration option has HELP
button associated with it so select help button to get help.
Step 4 : Compile kernel
Start compiling to create a compressed kernel image, enter: $ make Start compiling to kernel modules: $ make modules

WWW.VIDYARTHIPLUS.COM
Install kernel modules (become a root user, use su command):
$ su - # make modules_install Step 5 :Install kernel
So far we have compiled kernel and installed kernel modules. It is time to install kernel itself.
# make install
It will install three files into /boot directory as well as modification to your kernel grub
configuration file:
System.map-2.6.25
config-2.6.25
vmlinuz-2.6.25
Step 6 : Create an initrd image
Type the following command at a shell prompt:
# cd /boot
# mkinitrd -o initrd.img-2.6.25 2.6.25
initrd images contains device driver which needed to load rest of the operating system later on.
Not all computer requires initrd, but it is safe to create one.
Step 7 :Modify Grub configuration file - /boot/grub/menu.lst
Open file using vi:
# vi /boot/grub/menu.lst
titleDebian GNU/Linux, kernel 2.6.25 Default
root (hd0,0)
kernel /boot/vmlinuz root=/dev/hdb1 ro
initrd /boot/initrd.img-2.6.25
savedefault
boot
Remember to setup correct root=/dev/hdXX device. Save and close the file. If you think editing
and writing all lines by hand is too much for you, try out update-grub command to update the
lines for each kernel in /boot/grub/menu.lst file. Just type the command:
# update-grub
WWW.VIDYARTHIPLUS.COM
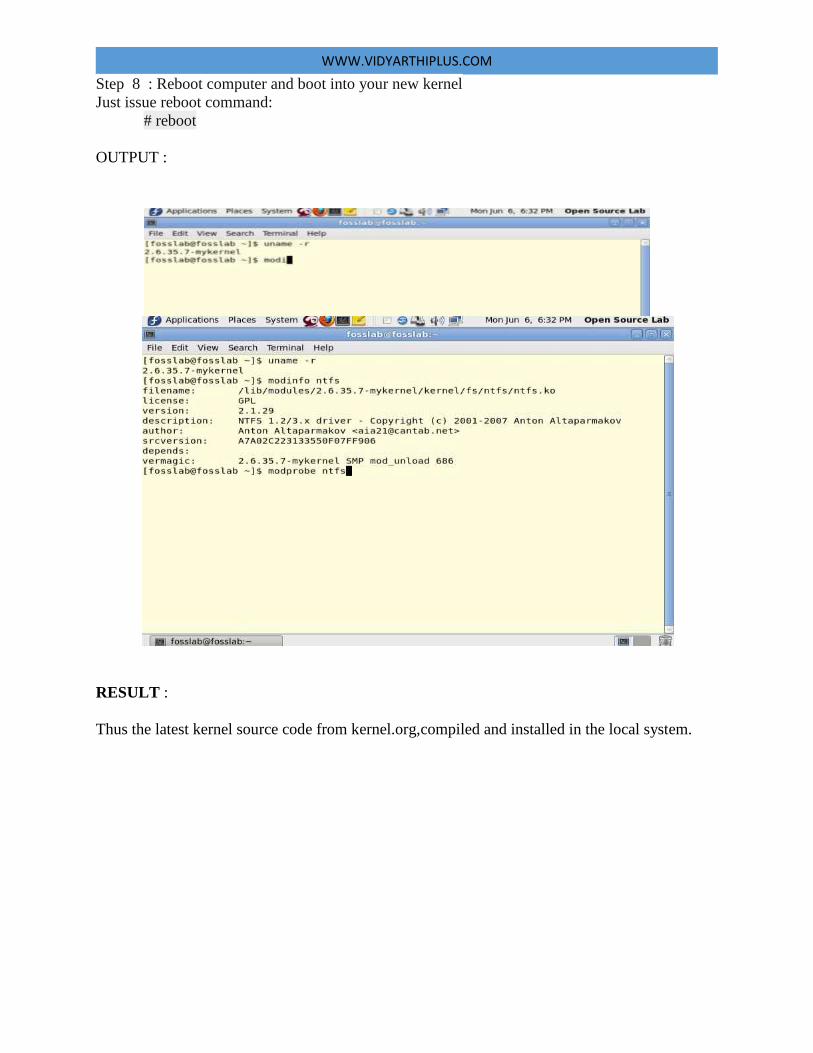
Step 8 : Reboot computer and boot into your new kernel
Just issue reboot command:
# reboot
OUTPUT :
RESULT :
Thus the latest kernel source code from kernel.org,compiled and installed in the local system.

WWW.VIDYARTHIPLUS.COM
EX NO:2 VIRTUALISATION
DATE:
AIM:
To develop Virtualization environment to test an applications, new kernels and isolate
applications.
INTRODUCTION:
Xen is a free open source software virtual machine monitor for Intel / PowerPC
architectures. It is software that runs on a host operating system and allows several guest
operating systems to be run on top of the host on the same computer hardware at the same time
Virtual machine monitors (also known as hypervisors) often operate on mainframes and
large servers running IBM,HP and other systems. Internet hosting service companies
increasingly use hypervisors to provide virtual private servers. Both Amazon EC2 and
Rackspace Cloud use Xen as the VM hypervisor. Types of virtualization
Paravirtualization, requiring porting of guest systems Hardwareassisted virtualization, allowing for unmodified guests
Step 1 Preparing the base system for virtualization
Install the required packages for virtualization using the following command
# yum install xenvirtmanagerkernelxenqemulibvirt confure
xend to start up on boot
# chkconfigxend on
Reboot the machine to boot into the new kernel
# reboot
Step 2 Creating a virtual machine
# virtmanager&
for ease in configuration please use GUI tool called virtmanager:

WWW.VIDYARTHIPLUS.COM
a) Click on file connect to connect to localhost
b) In the base menu, please rightclick on the localhost (QEMU) to create a new VM.
Please name the VM as per your choice

WWW.VIDYARTHIPLUS.COM
Once the name of the vm is entered, please click on “forward”

WWW.VIDYARTHIPLUS.COM
c ) In the next screen, select the Use ISO image option then click the Browse
option.
In the next screen click the Browse Local option on the bottomleft section of the
screen.

WWW.VIDYARTHIPLUS.COM
In the next screen please select the ISO image file of your own choice (Ubuntu,
centos, fedora etc)
After selecting the ISO file please select OS Type as Linux and Version as Generic
2.6.x kernel.
WWW.VIDYARTHIPLUS.COM
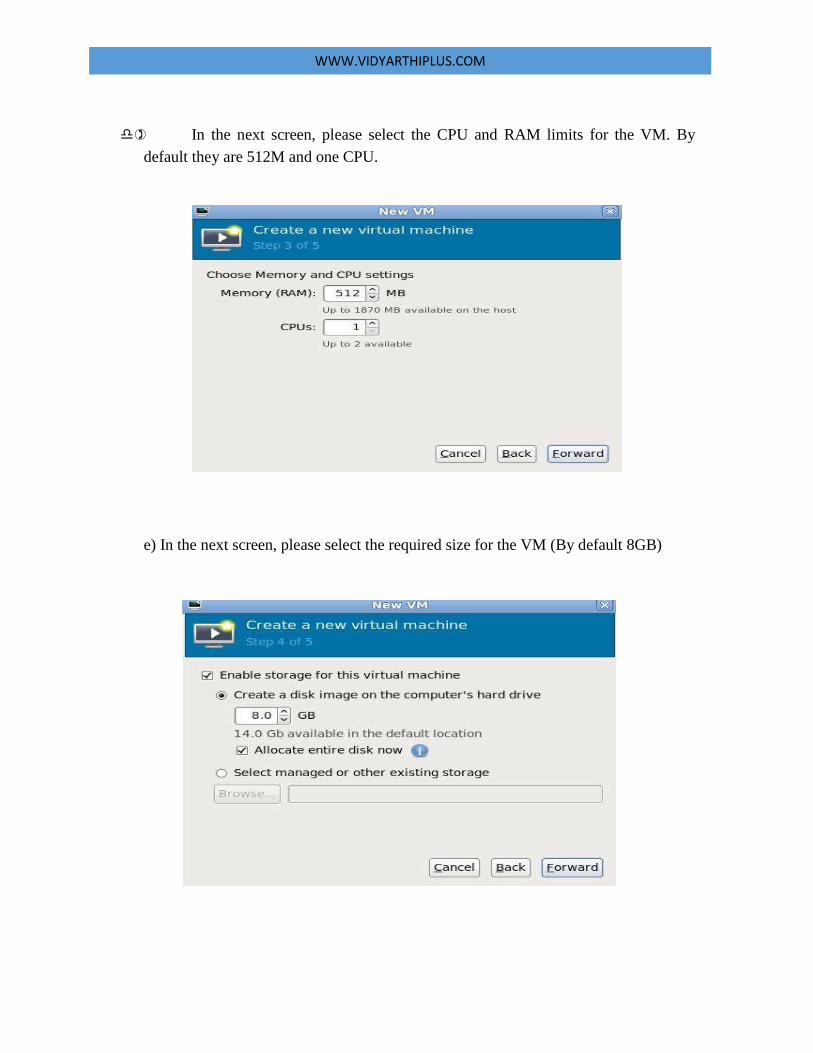
In the next screen, please select the CPU and RAM limits for the VM. By
default they are 512M and one CPU.
e) In the next screen, please select the required size for the VM (By default 8GB)
WWW.VIDYARTHIPLUS.COM
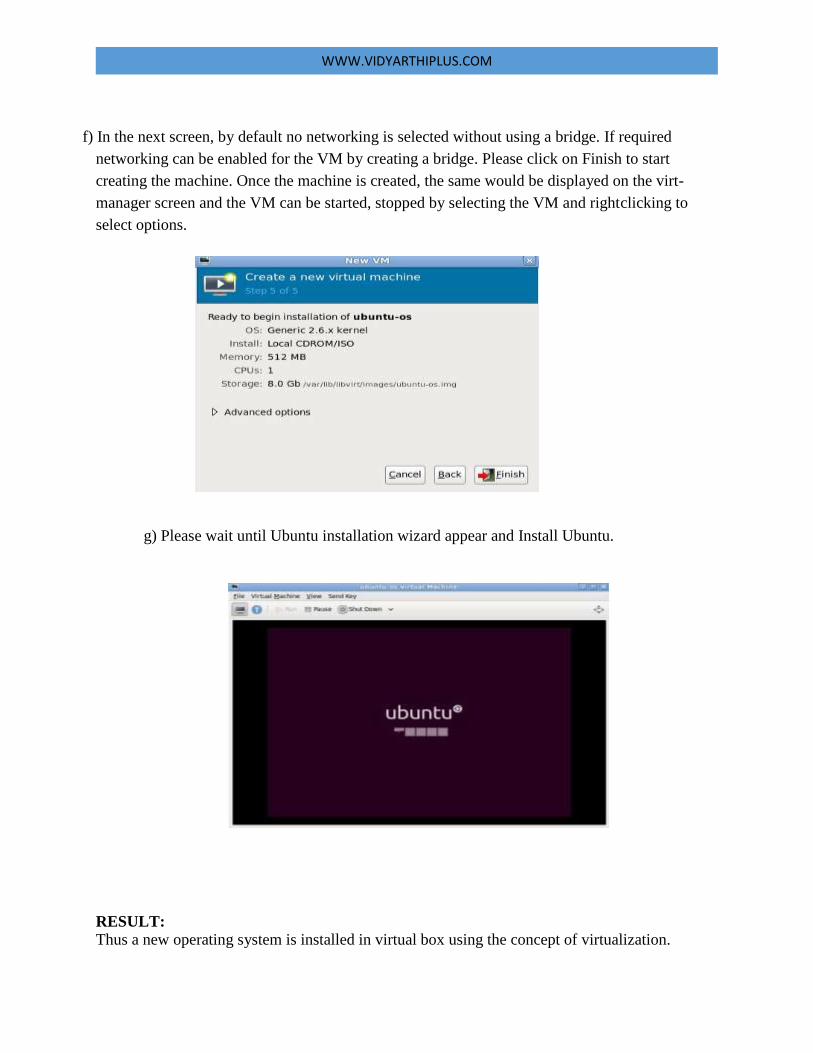
f) In the next screen, by default no networking is selected without using a bridge. If required
networking can be enabled for the VM by creating a bridge. Please click on Finish to start
creating the machine. Once the machine is created, the same would be displayed on the virt-
manager screen and the VM can be started, stopped by selecting the VM and rightclicking to
select options.
g) Please wait until Ubuntu installation wizard appear and Install Ubuntu.
RESULT:
Thus a new operating system is installed in virtual box using the concept of virtualization.

WWW.VIDYARTHIPLUS.COM
EX NO:3 PACKAGE MANAGEMENT SYSTEM(RPM)
DATE:
AIM:
To build,maintain and serve rpm package repository over http and to configure the client
machines to access this repository.
INTRODUCTION:
In software, a package management system, also called package manager, is a collection
of software tools to automate the process of installing, upgrading, configuring, and removing
software packages for a computer's operating system in a consistent manner. It typically
maintains a database of software dependencies and version information to prevent software
mismatches and missing prerequisites.
Packages are distributions of software, applications and data. Packages also contain metadata,
such as the software's name, description of its purpose, version number, vendor, checksum, and a
list of dependencies necessary for the software to run properly. Upon installation, metadata is
stored in a local package database.
Operating systems based on Linux and other Unix-like systems typically consist of hundreds or
even thousands of distinct software packages; in the former case, a package management system
is a convenience, in the latter case it becomes essential.
Description:
Students will build,maintain and serve rpm package repository to the client machines
Pre-requisites:
I) LAN setup
II) Fedora 12
III) Firewall should be disabled
STEPS:
To Create a repository for a given rpm packages . Please follow these steps
1) Create directory

WWW.VIDYARTHIPLUS.COM
$mkdir -p /var/www/html/RPMS
2) Create a temporary to download few rpm files from foss lab server
$mkd
irtmp
$cd
tmp
3) To download 20 MB of rpm files , execute the following command. This file limit can be
changed by increasing the value in the command
4) $wget -rnd -Q20m http://www.kernel.org/
5) $cp *.rpm /var/www/html/RPMS/
6) we have copied few rpm files to /var/www/html/RPMS from foss lab server instead of
that you can use your own rpms also to build a repository.
7) Install createrepo to generate the metadata of the software
packages $yum install createrepo
8) Now, we will have to create repo of the directory in which we have copied the RPMS.
Following is the command to create the repo
$createrepo /var/www/html/RPMS
Once the above command gets completed you will find repodata
directory in /var/www/html/RPMS folder
9) Setting up HTTP server to serve the content
$yum install httpd
service $httpd restart
10) configuring YUM in client machine to work with our repository. Create a
new file in /etc/yum.repo.d/
$vim /etc/yum.repo.d/test.repo
and enter the following text in the file and save it.

WWW.VIDYARTHIPLUS.COM
[repo]
name=Fedora $releasever -
$basearchfailovermethod=priority
baseurl=http://192.168.2.68/RPMS/ #give
your server IP here
enabled=1
gpgcheck=1
gpgkey=file:///etc/pki/rpm-gpg/RPM-GPG-KEY-fedora file:///etc/pki/rpm-gpg/RPM-
GPG-KEY
11) Now install any package using yum command or example:
$yum install 3proxy.i686
Result :
Thus successfully build, maintain and serve rpm package repository over http

WWW.VIDYARTHIPLUS.COM
EX NO: 4 COMPILING FROM SOURCE
DATE:
AIM:
To learn about the common build systems available in Linux and to use them.
INTRODUCTION:
Tools included in the GNU build system
The GNU build system comprises the GNU utility programs Autoconf, Automake, and
Libtool. Other related tools frequently used with the GNU buildsystem are GNU‘s make
program, GNU gettext, pkg-config, and the GNU Compiler Collection, also called GCC.
GNU Autoconf
Autoconf generates a configure script based on the contents of a configure.ac file which
characterizes a particular body of source code. The configure script, when run, scans the build
environment and generates a subordinate config.statusscript which, in turn, converts other input
files and most commonly Makefile.in into output files (Makefile) which are appropriate for that
build environment. Finally the make program uses Makefile to generate executable programs
from source code.The complexity of the GNU build system reflects the variety of circumstances
under which a body of source code may be built.If a source code file is changed then it suffices
to re-run make which only recompiles that part of the body of the source code affected by the
change.If a .in file has changed then it suffices to re-run config.status and make.If the body of
source code is copied to another computer then it is suffices to re-run configure (which runs
config.status) and make.
To process files, autoconf uses the GNU implementation of the m4 macro system.
Autoconf comes with several auxiliary programs such as Autoheader, which is used to help
manage C header files; Autoscan, which can create an initial input file for Autoconf; and
ifnames, which can list C preprocessor identifiers used in the program.GNUAutomakeAutomake
helps to create portable Makefiles, which are in turn processed with the make utility.It takes its
input as Makefile.am, and turns it into Makefile.in, which is used by the configure script to
generate the file Makefile output.
GNU Libtool
Libtool helps manage the creation of static and dynamic libraries on various Unix
like operatingsystems. Libtool accomplishes this by abstracting the librarycreation process,
hiding differencesbetween various systems (e.g. GNU/Linuxsystems vs. Solaris).
Gnulib
Gnulib simplifies the process of making software that uses Autoconf and Automake
portable to a wide range of systems.
Make
In software development, make is a utility that automatically builds executable programs
and libraries from source code by reading files called makefiles which specify how to derive

WWW.VIDYARTHIPLUS.COM
the target program. Make can decide where to start through topological sorting. Though
integrated development environments and languagespecific compiler features can also be used to
manage the build process in modern systems, make remains widely used, especially in Unix.
Make is typically used to build executable programs and libraries from source code. Generally
hough, any process that involves transforming a dependency file to a target result (by executing
some number of arbitrary commands) is applicable to make. To cite an example, make could be
used to detect a change made to an image file (the dependency) and the target actions that result
might be to convert the file to some specific format, copy the result into a content management
system, and then send e-mail to a predefined set of users that the above actions were performed.
Cmake
CMake is a unified, cross-platform, open-source build system that enables developers to
build, test and package software by specifying build parameters in simple, portable text files. It
works in a compilerindependent manner and the build process works in conjunction with native
build environments, such as make, Apple's Xcode and Microsoft Visual Studio. It also has
minimal dependencies, C++ only.
CMake is open source software. CMake can:
Create libraries
Generate wrappers
Compile source code
Make
We shall be using a simple program written in C and write a makefile to compile the program
Type the following Command
$geditadd.c
Type and Save the c program and compile.
$gccadd.c -o add – lm
$./add
The Added Value = 20
Write a Simple Makefile to compile program
Type the Following Command
$geditMakefile
# Commands start with TAB not spaces
CC= gcc
CFLAGS= -g
WWW.VIDYARTHIPLUS.COM
LDFLAGS = -lm
all: add
add: add.o
add.o: add.c
clean:
rm -f add add.o
Save and type following Command.
$make
gcc -g -c -o squareroot.osquareroot.c
gcc -lm squareroot.o -o squareroot
$./add
The Added Value = 20
CMAKE
Type Following Command
$gedit CmakeLists.txt
Type and save the following code
cmake_minimum_required (VERSION 2.6)
project (addt)
add_executable(add add.c)
TARGET_LINK_LIBRARIES(add m)
$cmake
Build Sucessful 100% dependencies.
RESULT:
Thus sucessfulybulid various systems using Make and Cmake.

WWW.VIDYARTHIPLUS.COM
EX NO:5 CUPS INSTALLATION
DATE:
AIM:
To install CUPS(Common Unix Printing Systems )in Fedora.
PROCEDURE:
Step1: Open the terminal
Step2: Login using root:
$ su root
Step3: To see the related files of cups:
$ rpm -qa | grep cups
bluez-cups-4.98-3.fc17.i686
cups-libs-1.5.2-12.fc17.i686
ghostscript-cups-9.05-1.fc17.i686
python-cups-1.9.61-2.fc17.i686
cups-1.5.2-12.fc17.i686
cups-pk-helper-0.2.2-1.fc17.i686
gutenprint-cups-5.2.7-11.fc17.i686
Step4: To see the entire details of cups:
$rpm -qi cups
Name : cups
Epoch : 1
Version : 1.5.2
Release : 12.fc17
Architecture: i686
Install Date: Tue 07 Aug 2012 06:50:01 PM IST
Group : System Environment/Daemons
Size : 9380410
License : GPLv2
Signature : RSA/SHA256, Fri 20 Apr 2012 02:20:33 AM IST, Key ID 50e94c991aca3465
Source RPM : cups-1.5.2-12.fc17.src.rpm
Build Date : Wed 18 Apr 2012 03:36:32 PM IST
Build Host : x86-17.phx2.fedoraproject.org
Relocations : (not relocatable)
Packager : Fedora Project
Vendor : Fedora Project
URL : http://www.cups.org/
Summary : Common Unix Printing System
Description :

WWW.VIDYARTHIPLUS.COM
The Common UNIX Printing System provides a portable printing layer for UNIX® operating
systems.It has been developed by Easy Software Products to promote a standard printing solution
for all UNIX vendors and users.CUPS provides the System V and Berkeley command-line
interfaces.
Step 5:
To see the status of cups:
$ service cups status
Redirecting to /bin/systemctl statuscups.service
cups.service - CUPS Printing Service
Loaded: loaded (/usr/lib/systemd/system/cups.service; enabled)
Active: inactive (dead)
CGroup: name=systemd:/system/cups.service
Step6: To change the status to active:
$ service cups start
Redirecting to /bin/systemctl startcups.service
$service cups status
Redirecting to /bin/systemctl statuscups.service
cups.service - CUPS Printing Service
Loaded: loaded (/usr/lib/systemd/system/cups.service; enabled)
Active: active (running) since Wed, 18 Sep 2013 11:31:13 +0530; 12s ago
Main PID: 2051 (cupsd)
CGroup: name=systemd:/system/cups.service
└ 2051 /usr/sbin/cupsd –f
Step 7: Open firefox and type the URL:
http://locolhost:631

WWW.VIDYARTHIPLUS.COM

WWW.VIDYARTHIPLUS.COM

WWW.VIDYARTHIPLUS.COM

WWW.VIDYARTHIPLUS.COM

WWW.VIDYARTHIPLUS.COM
RESULT:
Thus the printer was installed in Fedora using CUPS successfully.

WWW.VIDYARTHIPLUS.COM
EX NO:6 SAMBA INSTALLATION
DATE:
AIM:
To understand the installation of a Samba fileserver on Fedora and to configure it to share
files over the SMB protocol as well as to add users.
PROCEDURE: STEP 1: Open the terminal
STEP 2: Login using root:
[root] $ su root
STEP 3: Please make sure that SELinux is disabled:
[root]$ vi /etc/selinux/config
# This file controls the state of SELinux on the system.
# SELINUX= can take one of these three values:
# enforcing - SELinux security policy is enforced.
# permissive - SELinux prints warnings instead of enforcing.
# disabled - No SELinux policy is loaded.
SELINUX=disabled
# SELINUXTYPE= can take one of these two values:
# targeted - Targeted processes are protected,
# minimum - Modification of targeted policy. Only selected processes are protected.
# mls - Multi Level Security protection.
SELINUXTYPE=targeted
Afterwards we must reboot the system:
[root]$ reboot
STEP 4: Installing Samba
Connect to your server on the shell and install the Samba packages:
[root]$ yum install cups-libs samba samba-common
Edit the smb.conf file:
[root]$ vi /etc/samba/smb.conf
Make sure you see the following lines in the [global] section:
[...]
# ----------------------- Standalone Server Options ------------------------
#
# security = the mode Samba runs in. This can be set to user, share
# (deprecated), or server (deprecated).
#
# passdb backend = the backend used to store user information in. New
# installations should use either tdbsam or ldapsam. No additional configuration
# is required for tdbsam. The "smbpasswd" utility is available for backwards
# compatibility.
#
WWW.VIDYARTHIPLUS.COM
security = user
passdb backend = tdbsam
[...]
This enables Linux system users to log in to the Samba server.
Then create the system startup links for Samba and start it:
[root]$systemctl enable smb.service
[root]$systemctl start smb.service
STEP 5: Adding SAMBA shares
Now add a share that is accessible by all users.
Create the directory for sharing the files and change the group to the users group:
[root]$mkdir -p /home/shares/allusers
[root]$chown -R root:users /home/shares/allusers/
[root]$chmod -R ug+rwx,o+rx-w /home/shares/allusers/
At the end of the file /etc/samba/smb.conf add the following lines:
[...]
[allusers]
comment = All Users
path = /home/shares/allusers
valid users = @users
force group = users
create mask = 0660
directory mask = 0771
writable = yes
If you want all users to be able to read and write to their home directories via Samba, add the
following lines to /etc/samba/smb.conf (make sure you comment out or remove the
other [homes] section in the smb.conf file!):
[...]
[homes]
comment = Home Directories
browseable = no
valid users = %S
writable = yes
create mask = 0700
directory mask = 0700
Now we restart Samba:
[root]$systemctl restart smb.service
STEP 6: Adding and Managing Users
In this example, add a user named tom. You can add as many users as you need in the same way,
just replace the username tom with the desired username in the commands.
[root]$useradd tom -m -G users
Set a password for tom in the Linux system user database. If the user tom should not be able to
log into the Linux system, skip this step.
[root]$passwd tom
-> Enter the password for the new user.
Now add the user to the Samba user database:
[root]$smbpasswd -a tom

WWW.VIDYARTHIPLUS.COM
-> Enter the password for the new user.
Now you should be able to log in from your Windows workstation with the file explorer (address
is \\192.168.0.100 or \\192.168.0.100\tom for tom's home directory) using the username tom and
the chosen password and store files on the Linux server either in tom's home directory or in the
public shared directory.
Now you can access your samba server and transfer files:
RESULT:
Thus the SAMBA file server has been installed on Fedora and a user has been added to
it successfully.

WWW.VIDYARTHIPLUS.COM
EX NO:7 PERL & MYSQL CONNECTIVITY
DATE:
Aim: To demonstrate the Perl programs and connectivity with MySQL database.
Introduction: Perl was initially an efficient interpreted language optimized for processing text files.Perl
stands for Practical Extraction and Report Language. Perl is a high-level, general-purpose,
interpreted, dynamic programming language. Perl was originally developed by Larry Wall in
1987 as a general-purpose Unix scripting language to make report processing easier.Perl borrows
features from other programming languages including C, shell scripting(sh)AWK, and sed. The
language provides powerful text processing facilities without the arbitrary data length limits of
many contemporary Unix tools, facilitating easy manipulation of text files.Though originally
developed for text manipulation, Perl is used for a wide range of tasks including system
administration, web development, network programming, games, bioinformatics, and GUI
development. The language is intended to be practical (easy to use, efficient, complete) rather
thanbeautiful (tiny, elegant, minimal). Its major features include support for multiple
programming paradigms (procedural, object-oriented, and functional styles), reference counting
memory management , built-in support for text processing, and a large collection of third-party
modules.
Uses: Replace excessively complex shell/awk/sed scripts in Unix.
Web applications
System administration scripting.
Data Mining
Data Format Conversion
"Middle-tier" ware. (Socket-based servers that also talk to databases.)
Steps to execute perl prgrams : 1. Open the vi editor and write the program inside the following tag <?php ?>
2. Save the program with .pl as extension
3. Execute the program using perl filename.pl
Steps for MySQL
1. Go to terminal and perform the following : [root]$su -
Password: (favorites123)
2. To enter into mysql [root]$mysql
Welcome to the MySQL monitor. Commands end with ; or \g.
Your MySQL connection id is 7
Server version: 5.1.51 Source distribution
Copyright (c) 2000, 2010, Oracle and/or its affiliates. All rights reserved.
This software comes with ABSOLUTELY NO WARRANTY. This is free software,
and you are welcome to modify and redistribute it under the GPL v2 license

WWW.VIDYARTHIPLUS.COM
Type 'help;' or '\h' for help. Type '\c' to clear the current input statement.
3. To display the available databases: mysql> show databases;
+--------------------------+
| Database |
+--------------------------+
| information_schema |
| TESTDB |
| college |
| employee |
| mysql |
| sample |
| steel |
+--------------------------+
7 rows in set (0.00 sec)
4. To create the new Database : mysql> create database Student;
mysql> show databases;
+--------------------------+
| Database |
+--------------------------+
| information_schema |
| TESTDB |
| college |
| employee |
| mysql |
| sample |
| steel |
| student |
+--------------------------+
8 rows in set (0.00 sec)
5. To use the student Database mysql> use student;
Reading table information for completion of table and column names
You can turn off this feature to get a quicker startup with -A
Database changed
mysql> show tables;
+--------------------------+
| Tables_in_student |
+---------------------------+
| EMPLOYEE |
| courses |
| courses1 |
| veni |

WWW.VIDYARTHIPLUS.COM
| veni1 |
+---------------------------+
5 rows in set (0.00 sec)
6. To create table details in the student Database mysql> create table details (regno int, name varchar(20),age int);
mysql> desc details;
regno | name | age
int varchar(20) int
PERL PROGRAMS
Program 1: [root]$vi peal.pl
#usr/bin/perl
#Scalar program
$age=25;
$name= “xxx”;
$salary=1000.50;
print “age =$age\n”;
print “name =$name \n”;
print “salary =$salary \n”;
Output: [root]$perl peal.pl
age =25
name =xxx
salary =1000.50
Program 2: [root]$vi perl1.pl
#/usr/bin/perl
#Define an array
@age=(25,30,40);
@names=(“xxx”, “yyy”, “zzz”);
print “age =$age[0]\n”;
print “age =$age[1]\n”;
print “age =$age[2]\n”;
print “name =$names[0] \n”;
print “name =$names[1] \n”;
print “name =$names[2] \n”;
Output: [root]$perl perl1.pl
age =25
age =30
age =40
WWW.VIDYARTHIPLUS.COM
name =xxx
name =yyy
name =zzz
Program 3: [root]$vi one.pl
#/usr/bin/perl
#Hashes
%data={‘xxx’,20,’yyy’,30,’zzz’,40};
print “first data = $data{‘xxx’}\n”;
print “second data = $data{‘yyy’}\n”;
Output: [root]$perl one.pl
first data =20
second data =30
Program 4: [root]$vi one.pl
#/usr/bin/perl
#String concatenation
$str= “hello world”;
$sum=5+10;
$mul=3*5;
$m=$str.$sum;
print"str=$str\n";
print"sum=$sum\n";
print"m=$m\n";
Output: [root]$perl one.pl
str=hello world
sum=15
m=hello world15
Program 5: #/usr/bin/perl
#if program
print"Enter the value";
my$valu=<STDIN>;
if($value>=5)
{
print"value>5";
}
else
{
WWW.VIDYARTHIPLUS.COM
print"value<5";
}
Output :
[root]$perl if.pl
Enter the value 9
value>5
[root]$perl if.pl
Enter the value 3
Program 6: #!/usr/bin/perl
use warnings;
use strict;
use Switch;
print"1.choclate\n2.pepsi\n3.sweets\n4.fruits";
print"enter ur choice";
chomp(my$value=<STDIN>);
switch($value)
{
case(1)
{
print"i like chocki";
}
case(2)
{
print"i like pepsi";
}
case(3)
{
print"i like sweets";
}
case(4)
{
print"i like fruits";
}
}
Output: [root]$vi caseswitch.pl
[root]$perl caseswitch.pl
Switch will be removed from the Perl core distribution in the next major release. Please install it
from CPAN. It is being used at caseswitch.pl, line 22.
1.choclate
2.pepsi

WWW.VIDYARTHIPLUS.COM
3.sweets
4.fruitsenter
ur choice2
i like pepsi
Program 7: [root]$vi one.pl
#/usr/bin/perl
#for loop
print"Hello sample perl program";
print"Thats counts to Ten\n\n";
for(my$i=1;$i<10;$i++)
{
print"$i\n";
}
print"\n End\n";
Output: [root]$perl one.pl
Hello sample perl programThats counts to Ten
1 2 3 4 5 6 7 8 9End
Execution Steps: python filename.py
perl filename.pl
PERL &SQL CONNECTIVITY PROCEDURES
Steps for MySQL Go to terminal and perform the following :
[root]$su -
Password: (favorites123)
To enter into mysql
[root]$mysql Welcome to the MySQL monitor. Commands end with ; or \g.
Your MySQL connection id is 7
Server version: 5.1.51 Source distribution
Copyright (c) 2000, 2010, Oracle and/or its affiliates. All rights reserved.
This software comes with ABSOLUTELY NO WARRANTY. This is free software,
and you are welcome to modify and redistribute it under the GPL v2 license
Type 'help;' or '\h' for help. Type '\c' to clear the current input statement.
To display the available databases:
mysql> show databases; +--------------------------+
| Database |
+--------------------------+

WWW.VIDYARTHIPLUS.COM
| information_schema |
| TESTDB |
| college |
| employee |
| mysql |
| sample |
| steel |
+--------------------------+
7 rows in set (0.00 sec)
To create the new Database :
mysql> create database Student;
mysql> show databases; +--------------------------+
| Database |
+--------------------------+
| information_schema |
| TESTDB |
| college |
| employee |
| mysql |
| sample |
| steel |
| student |
+--------------------------+
8 rows in set (0.00 sec)
To use the student Database
mysql> use student; Reading table information for completion of table and column names
You can turn off this feature to get a quicker startup with -A
Database changed
mysql> show tables;
+--------------------------+
| Tables_in_student |
+--------------------------+
| EMPLOYEE |
| courses |
| courses1 |
| veni |
| veni1 |
+--------------------------+
5 rows in set (0.00 sec)
To create table details in the student Database
mysql> create table details (regno int, name varchar(20),age int);
WWW.VIDYARTHIPLUS.COM
mysql> desc details;
regno | name | age
int varchar(20) int
RESULT: Thus the program for perl is executed and verified successfully.
PERL MySQL CONNECTIVITY PROGRAMS
Program 6. Create the table in Perl that will be automatically updated in Database using
mysql # !usr/bin/perl
use DBI;
my $driver=”mysql”;
my $database=”student”;
my $dsn=”DBI:$driver:$database”;
my $userid=”root”;
my $password=”oslabic”;
my $dbh=DBI->connect($dsn,$userid,$password);
my $sth=$dbh->prepare("insert into student(firstname,lastname,age.salary) values(‘John’, ‘P’,
30, 8000)");
$sth->execute();
$sth->finish();
Output:
Run the Perl script [root]$perl connect.pl
now see the tables in database (“student”)
mysql> show tables; +--------------------------+
| Tables_in_student |
+--------------------------+
| student |
+--------------------------+
1 row in set (0.00 sec)
Output:
mysql> select * from students;
+-----------------+----------------+----------------+-----------------+
| firstname | lastname | age | salary |
+-----------------+----------------+----------------+-----------------+
| John | P | 30 | 8000 |
+-----------------+----------------+----------------+-----------------+
1 row in set (0.00 sec)
RESULT: Thus the program for perl using mysql connectivity is executed and verified

WWW.VIDYARTHIPLUS.COM
successfully.
EX NO:8 GUI PROGRAMS-GAMBAS
DATE:
AIM:
To build a GUI application using Gambas.
What is Gambas?
Gambas provides you with an IDE for easy development of GUI applications. Gambas com-
ponents provide you with extra syntax and functionality to code for things like database ac-
cess, networking access, CGI web applications, internationalisation and more.
PROCEDURE:
1. Starting a new project :
First you start Gambas from terminal or menu .

WWW.VIDYARTHIPLUS.COM
2. Create New Project:
Now click on New Project to make a new project. In the 'New project' screen you select
the type of application you wish to build.
Select Graphical application as that is what you are going to build, a GUI application. No
further options need to be selected.
Browse to the folder /Development/Gambas3 6 and select it.
Now right click and select Create directory in the menu.

WWW.VIDYARTHIPLUS.COM
3. In the 'New project' screen , you can name both the folder where the project will be located and the
name the actual application will have. They can be different if you like.Next click the button OK and you
get a message a new project has been created.
WWW.VIDYARTHIPLUS.COM
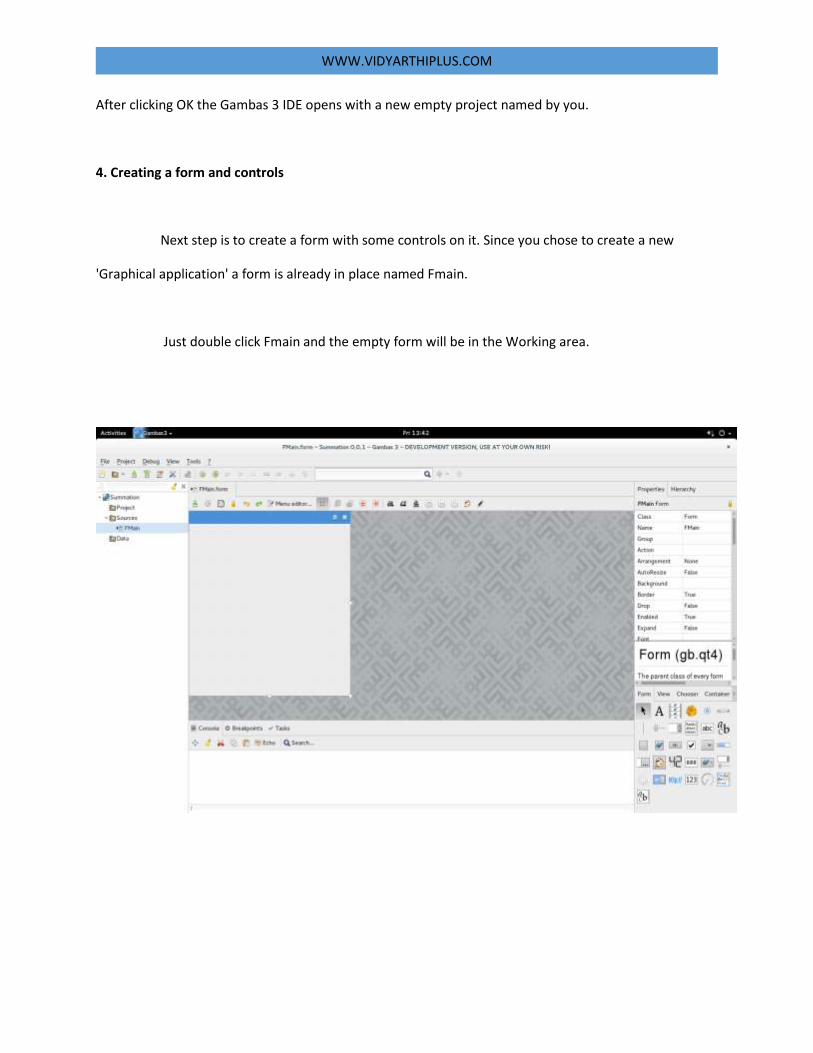
After clicking OK the Gambas 3 IDE opens with a new empty project named by you.
4. Creating a form and controls
Next step is to create a form with some controls on it. Since you chose to create a new
'Graphical application' a form is already in place named Fmain.
Just double click Fmain and the empty form will be in the Working area.

WWW.VIDYARTHIPLUS.COM
5. Placing controls on a form :
First you will place a Label on the form.
For that you go to the ToolBox and hover your mouse over each of the icons until you
find the 'Label' icon.
Click on the Label icon and next drag a rectangle on the form.
Similarly, place all the controls in vthe Work Area.
6.A
close
r
look
at
the
contr
ols :
First select the Label by clicking on it. The 'Properties/Hierarchy' Box will show
properties of the selected control, Label1.
Change the “name and text properties” of the control element.
7. CODE:

WWW.VIDYARTHIPLUS.COM
Double click the element to enter into the coding area.
Now, code the operations to be performed. After the required operations are
programmed, click on run.
8. OUTPUT:

WWW.VIDYARTHIPLUS.COM
RESULT:
Thus the program was executed successfully and the output was verified.
WWW.VIDYARTHIPLUS.COM
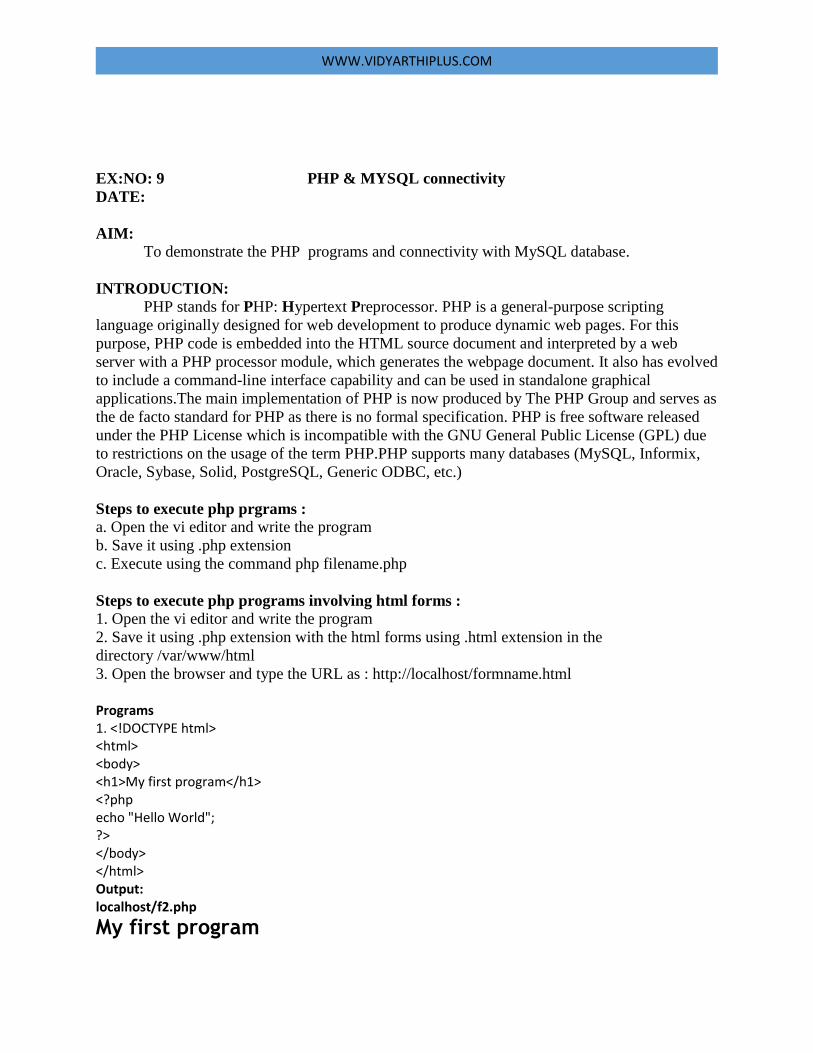
EX:NO: 9 PHP & MYSQL connectivity
DATE:
AIM: To demonstrate the PHP programs and connectivity with MySQL database.
INTRODUCTION: PHP stands for PHP: Hypertext Preprocessor. PHP is a general-purpose scripting
language originally designed for web development to produce dynamic web pages. For this
purpose, PHP code is embedded into the HTML source document and interpreted by a web
server with a PHP processor module, which generates the webpage document. It also has evolved
to include a command-line interface capability and can be used in standalone graphical
applications.The main implementation of PHP is now produced by The PHP Group and serves as
the de facto standard for PHP as there is no formal specification. PHP is free software released
under the PHP License which is incompatible with the GNU General Public License (GPL) due
to restrictions on the usage of the term PHP.PHP supports many databases (MySQL, Informix,
Oracle, Sybase, Solid, PostgreSQL, Generic ODBC, etc.)
Steps to execute php prgrams : a. Open the vi editor and write the program
b. Save it using .php extension
c. Execute using the command php filename.php
Steps to execute php programs involving html forms : 1. Open the vi editor and write the program
2. Save it using .php extension with the html forms using .html extension in the
directory /var/www/html
3. Open the browser and type the URL as : http://localhost/formname.html
Programs 1. <!DOCTYPE html> <html> <body> <h1>My first program</h1> <?php echo "Hello World"; ?> </body> </html> Output: localhost/f2.php
My first program

WWW.VIDYARTHIPLUS.COM
Hello World
2. <!DOCTYPE html>
<html>
<body>
<?php
$txt = "Hello world!";
$x = 5;
$y = 10.5;
echo $txt;
echo "<br>";
echo $x;
echo "<br>";
echo $y;
?>
</body>
</html>
Output:
localhost/f3.php
Hello world!
5
10.5
3. <!DOCTYPE html>
<html>
<body>
<?php
$x = 5;
$y = 4;
echo $x + $y;
?>
</body>
</html>
Output:
localhost/f4.php

WWW.VIDYARTHIPLUS.COM
9
4. <!DOCTYPE html>
<html>
<body>
<?php
$x = 5;
$y = 10;
function myTest() {
global $x, $y;
$y = $x + $y;
}
myTest(); // run function
echo $y; // output the new value for variable $y
?>
</body>
</html>
Output:
localhost/f4.php
15
5a. <!DOCTYPE html>
<html>
<body>
<?php
$t = date("H");
if ($t < "20") {
echo "Have a good day!";
}
?>
</body>
</html>
Output:
localhost/f5.php

WWW.VIDYARTHIPLUS.COM
Have a good day!
5b.
<!DOCTYPE html>
<html>
<body>
<?php
$t = date("H");
if ($t < "20") {
echo "Have a good day!";
} else {
echo "Have a good night!";
}
?>
</body>
</html>
Output:
localhost/f6.php
Have a good day!
5c.
<!DOCTYPE html>
<html>
<body>
<?php
$t = date("H");
echo "<p>The hour (of the server) is " . $t;
echo ", and will give the following message:</p>";
if ($t < "10") {
echo "Have a good morning!";
} elseif ($t < "20") {
echo "Have a good day!";
} else {
echo "Have a good night!";
}
?>

WWW.VIDYARTHIPLUS.COM
</body>
</html>
Output:
localhost/f6.php
The hour (of the server) is 01, and will give the following message:
Have a good morning!
6.<!DOCTYPE html>
<html>
<body>
<?php
$favcolor = "red";
switch ($favcolor) {
case "red":
echo "Your favorite color is red!";
break;
case "blue":
echo "Your favorite color is blue!";
break;
case "green":
echo "Your favorite color is green!";
break;
default:
echo "Your favorite color is neither red, blue, nor green!";
}
?>
</body>
</html>
Output:
localhost/f7.php
Your favorite color is red!
CREATING FORMS
1.
<!DOCTYPE HTML>
<html>
<body>
<form action="f7.php" method="post">
Name: <input type="text" name="name"><br>

WWW.VIDYARTHIPLUS.COM
E-mail: <input type="text" name="email"><br>
<input type="submit">
</form>
</body>
</html>
Output:
FORM VALIDATION
2.
<html>
<head>
WWW.VIDYARTHIPLUS.COM
<title>PHP Form Validation</title>
</head>
<body>
<?php
// define variables and set to empty values
$name = $email = $gender = $comment = $website = "";
if ($_SERVER["REQUEST_METHOD"] == "POST") {
$name = test_input($_POST["name"]);
$email = test_input($_POST["email"]);
$website = test_input($_POST["website"]);
$comment = test_input($_POST["comment"]);
$gender = test_input($_POST["gender"]);
}
function test_input($data) {
$data = trim($data);
$data = stripslashes($data);
$data = htmlspecialchars($data);
return $data;
}
?>
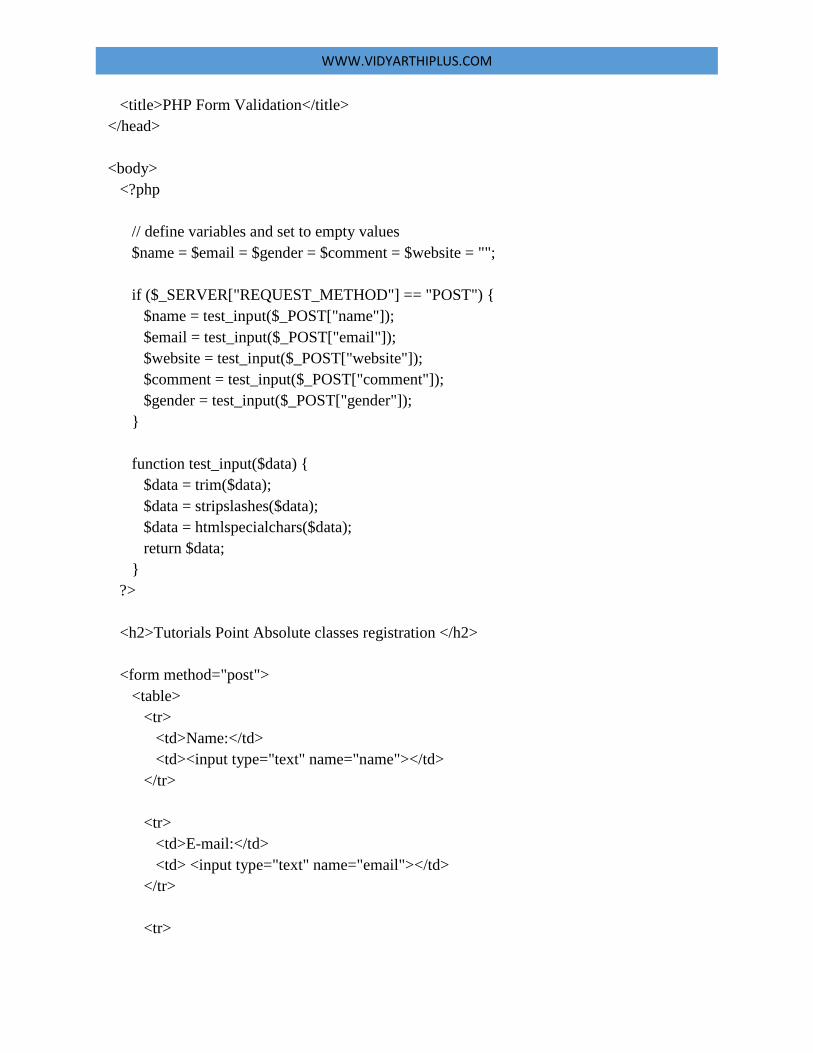
<h2>Tutorials Point Absolute classes registration </h2>
<form method="post">
<table>
<tr>
<td>Name:</td>
<td><input type="text" name="name"></td>
</tr>
<tr>
<td>E-mail:</td>
<td> <input type="text" name="email"></td>
</tr>
<tr>

WWW.VIDYARTHIPLUS.COM
<td>Specific Time:</td>
<td> <input type="text" name="website"></td>
</tr>
<tr>
<td>Class details:</td>
<td><textarea name="comment" rows="5" cols="40"></textarea></td>
</tr>
<tr>
<td>Gender:</td>
<td>
<input type="radio" name="gender" value="female">Female
<input type="radio" name="gender" value="male">Male
</td>
</tr>
<tr>
<td>
<input type="submit" name="submit" value="Submit">
</td>
</tr>
</table>
</form>
<?php
echo "<h2>Your Given details are as :</h2>";
echo $name;
echo "<br>";
echo $email;
echo "<br>";
echo $website;
echo "<br>";
echo $comment;
echo "<br>";
echo $gender;

WWW.VIDYARTHIPLUS.COM
?>
</body>
</html>
OUTPUT
localhost/validation.php

WWW.VIDYARTHIPLUS.COM

WWW.VIDYARTHIPLUS.COM
RESULT: Thus the program for php is executed and verified successfully.
Ex.No:10 FUSE
Date:
AIM:
To understand the concepts behind File systems in Userspace and to write a simple
userspace driver.
PROCEDURE:
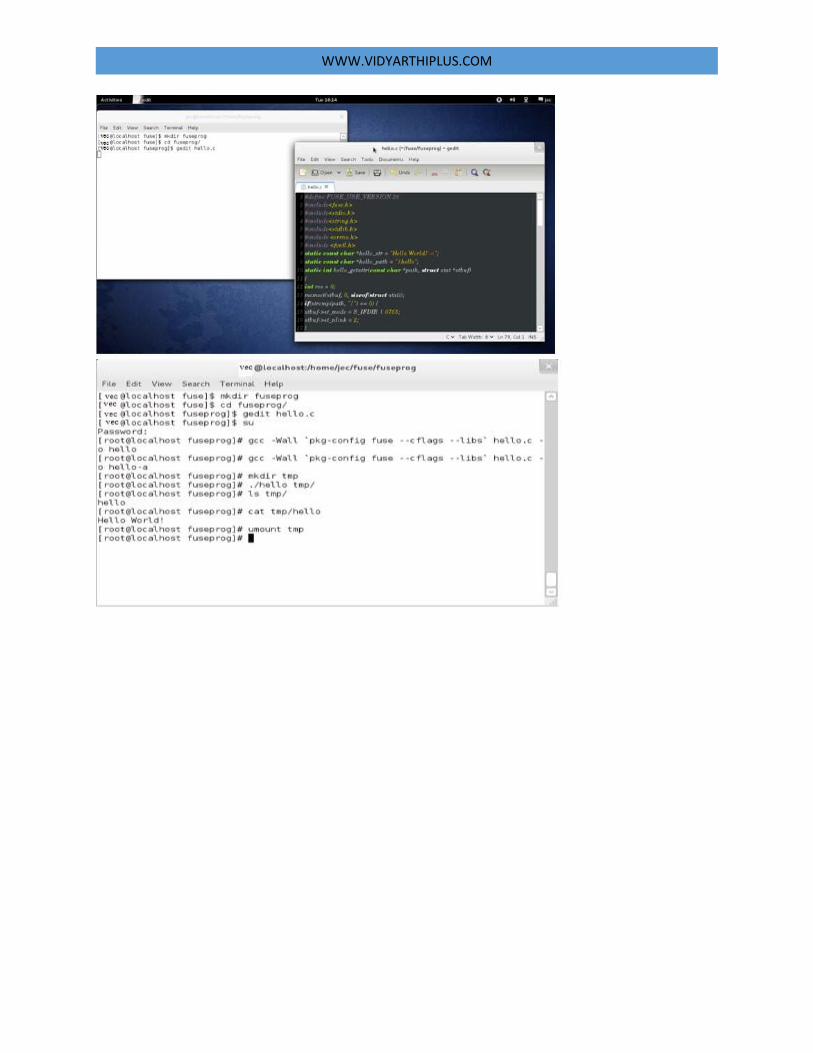
1.Install fuse package using following command
>yum install fuse-devel
2. create a new directory
>mkdirfuseprog
>cdfuseprog
>gedithello.c
3.Type the code and save the file.
4. To run the program, compile it with gcc:
>gcc -Wall `pkg-config fuse --cflags --libs` hello.c -o hello
Run the program as root user with a single parameter - a mount point:
>gcc -Wall `pkg-config fuse --cflags --libs` hello.c -o hello -a
>su
# mkdirtmp
# ./hello tmp/
After running the program you should have a single file in the tmp/ directory named hello,
its content should be Hello World!:
# lstmp/
# ./hello tmp/
# lstmp/
hello
# cattmp/hello
Hello World!
5.Unmount the file system.
# umounttmp/
CODE:
#define FUSE_USE_VERSION 26
#include <fuse.h>
#include <stdio.h>

WWW.VIDYARTHIPLUS.COM
#include <string.h>
#include <stdlib.h>
#include <errno.h>
#include <fcntl.h>
staticconst char *hello_str = "Hello World!\n";
staticconst char *hello_path = "/hello";
staticinthello_getattr(const char *path, struct stat *stbuf)
{
int res = 0;
memset(stbuf, 0, sizeof(struct stat));
if(strcmp(path, "/") == 0)
{
stbuf->st_mode = S_IFDIR | 0755;
stbuf->st_nlink = 2;
}
else if(strcmp(path, hello_path) == 0)
{
stbuf->st_mode = S_IFREG | 0444;
stbuf->st_nlink = 1;
stbuf->st_size = strlen(hello_str);
}
else
res = -ENOENT;
return res;
}
staticinthello_readdir(const char *path, void *buf, fuse_fill_dir_t filler, off_t offset,
structfuse_file_info *fi)
{
(void) offset;
(void) fi;
if(strcmp(path, "/") != 0)
return -ENOENT;
filler(buf, ".", NULL, 0);
filler(buf, "..", NULL, 0);
filler(buf, hello_path + 1, NULL, 0);
return 0;
}
staticinthello_open(const char *path, structfuse_file_info *fi)
{
if(strcmp(path, hello_path) != 0)
return -ENOENT;
if((fi->flags & 3) != O_RDONLY)
return -EACCES;
return 0;
}
staticinthello_read(const char *path, char *buf, size_t size, off_t offset, structfuse_file_info *fi)

WWW.VIDYARTHIPLUS.COM
{
(void) fi;
size_tlen;
if(strcmp(path, hello_path) != 0)
return -ENOENT;
len = strlen(hello_str);
if (offset <len)
{
if (offset + size >len)
size = len - offset;
memcpy(buf, hello_str + offset, size);
}
else
size = 0;
return size;
}
staticstructfuse_operationshello_oper =
{
.getattr
= hello_getattr,
.readdir
= hello_readdir,
.open
= hello_open,
.read
= hello_read,
};
int main(intargc, char *argv[])
{
returnfuse_main(argc, argv, &hello_oper, NULL);
}
OUTPUT
WWW.VIDYARTHIPLUS.COM

WWW.VIDYARTHIPLUS.COM
RESULT:
Thus the user space driver using fuse was performed successfully
EX:NO:11 PYTHON & MYSQL CONNECTIVITY
DATE:
Aim:
To demonstrate the Python programs and Python program connectivity with MYSQL
database.
Introduction Python is an easy to learn, powerful programming language. It has efficient high-level
data structures and a simple but effective approach to object-oriented programming. Python‘s
elegant syntax and dynamic typing, together with its interpreted nature, make it an ideal language
for scripting and rapid application development in many areas on most platforms. Python is a
high-level programming language.It is an easy to learn, powerful programming language. It has
efficient, high-level data structures and a simple yet effective approach to object oriented
programming. Python‘s elegant syntax and dynamic typing, together with it's interpreted nature,
makes it an ideal language for scripting and rapid application development in many areas and on
most platforms.
Steps to execute python programs:
1. Open the vi editor and write the program
2. Save the program with .py as extension
3. Execute the program using python filename.py
PYTHON PROGRAMS
Program 1:
#!/usr/bin/python
#program to select odd number from the list
a=[11,12,13,14,15,16,17,18,19,20,21,31,44,45,10];
print("List is:",a);
n=len(a);
print("length:",n);
i=0;

WWW.VIDYARTHIPLUS.COM
print("Odd number");
for i in range(len(a)):
if(a[i]%2==1):
print(a[i]);
Output:
[root@ html]# python odd.py
('List is:', [11, 12, 13, 14, 15, 16, 17, 18, 19, 20, 21, 31, 44, 45, 10])
('length:', 15)
Odd number
11 13 15 17 19 21 31 45
Program 2: Program to display the celsius value
#!/usr/bin/python
a=input("enter the celsius value:")
f=(a*1.8)
b=f+32;
print b
Output:
[root]$ python celsius.py
enter the celsius value:23
73.4
Program 3: Program to display the fibonacciseries values
#!/usr/bin/python
a, b = 0, 1
while b < 200:
print b,
a, b = b, a+b
Output:
[root]$ python fibanoo.py
1 1 2 3 5 8 13 21 34 55 89 144
Program 4:
#!/usr/bin/python
a = int(raw_input("Please enter an integer: "));
if (a % 2 == 1):
print 'a' + ' is odd.'
else:
print 'a' + ' is even.'
Output:
[root]$ python odd.py
Please enter an integer: 23

WWW.VIDYARTHIPLUS.COM
a is odd.
RESULT: Thus the program for python is executed and verified successfully.
PYTHON MYSQL CONNECTIVITY PROGRAMS
[root]$ su -
Password: favorites123
[root ~]# systemctl start mysqld.service
[root ~]# mysql –user= root -p
Welcome to the MySQL monitor. Commands end with ; or \g.
Your MySQL connection id is 26
Server version: 5.1.51 Source distribution
Copyright (c) 2000, 2010, Oracle and/or its affiliates. All rights reserved.
This software comes with ABSOLUTELY NO WARRANTY. This is free software,
and you are welcome to modify and redistribute it under the GPL v2 license
Type 'help;' or '\h' for help. Type '\c' to clear the current input statement.
mysql> show databases;
+--------------------------+
| Database |
+--------------------------+
| information_schema |
| TESTDB |
| college |
| employee |
| mysql |
| sample |
| steel |
| student |
| test |
+--------------------------+
9 rows in set (0.00 sec)
mysql> use student;
Reading table information for completion of table and column names
You can turn off this feature to get a quicker startup with -A
Database changed
mysql> connect;
Connection id: 27
Current database: student
mysql> show tables;
+--------------------------+
| Tables_in_student |
+--------------------------+
| EMPLOYEE |
| courses |
| student |
WWW.VIDYARTHIPLUS.COM
+--------------------------+
3 rows in set (0.00 sec)
Program 5: CREATE TABLE PROGRAM USING PYTHON
Note: Type in vi editor
File name : vi connectivity.py
#!/usr/bin/python
import MySQLdb
# Open database connection
db = MySQLdb.connect("localhost","root","oslabic","test")
# prepare a cursor object using cursor() method
cursor = db.cursor()
# Drop table if it already exist using execute() method.
cursor.execute("DROP TABLE IF EXISTS student ")
# Create table as per requirement
sql = “ “ “insert into student ( FIRST_NAME, INCOME) values (‘Pritto’, 40000) ” ” ”;
cursor.execute(sql)
db.commit()
# disconnect from server
db.close()

WWW.VIDYARTHIPLUS.COM
RESULT:
Thus the program for python and mysqlconnectivity is executed and verified successfully.
Ex.No:12 Setting Version Control using SVN
Date:
AIM:
To setup a version control system for managing files using svn.The system should be able to
track changes to the files/folders and a period of time and revert if necessary.
PROCEDURE:
Step 1 – To install svn packages:
yum install mod_dav_svn subversion
Step 2 - Configuration of the repository:
a. To create the necessary folder structure for the repository
# mkdir /svn
# mkdir /svn/repos
# cd /svn/repos
# chown -R apache.apache ../repos
b. To initialize the svn structure and create a repository
# svnadmin create svn-test
Step 3 - Creation of a local area for code:
a. Create the local folder structure
# mkdir /home/svn-test

WWW.VIDYARTHIPLUS.COM
# cd /home/svn-test
b. Create local directories as per requirement - This can be customized to suit our needs
# mkdir configurations options main
c. Edit any file as required
# vim configurations/test.cfg
Step 4 : Import of the code area onto svn:
a. Import the initial structure onto svn
# svn import /home/svn-test/ file:///svn/repos/svn-test/ -m "Initial Import"
Adding
/root/svn-test/main
Adding
/root/svn-test/configurations
Adding
/root/svn-test/configurations/test.cfg
Adding
/root/svn-test/options
Committed revision 1.
# chown -R apache.apache /svn/repos/
Step 5 : Configuring Apache:
a. Edit subversion.conf at /etc/httpd/conf.d/subversion.conf and add the following lines
<Location /repos>
DAV svn
SVNParentPath /svn/repos
AuthType Basic
AuthName "Subversion repos"
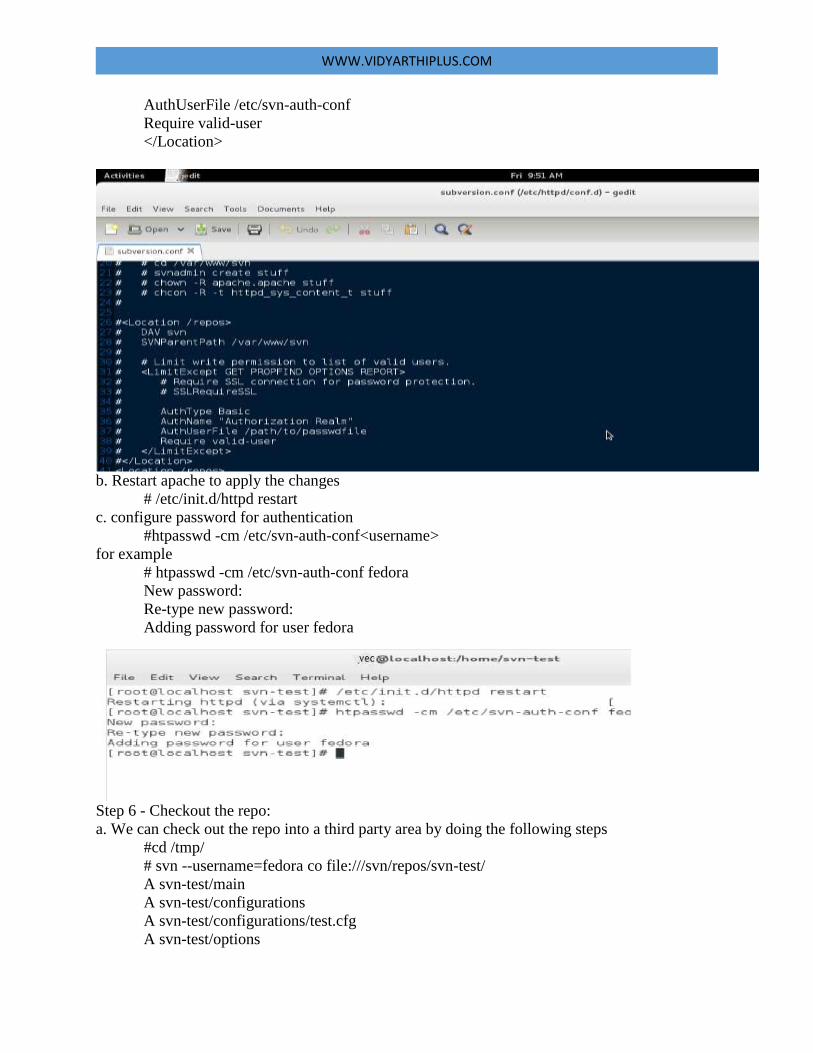
WWW.VIDYARTHIPLUS.COM
AuthUserFile /etc/svn-auth-conf
Require valid-user
</Location>
b. Restart apache to apply the changes
# /etc/init.d/httpd restart
c. configure password for authentication
#htpasswd -cm /etc/svn-auth-conf<username>
for example
# htpasswd -cm /etc/svn-auth-conf fedora
New password:
Re-type new password:
Adding password for user fedora
Step 6 - Checkout the repo:
a. We can check out the repo into a third party area by doing the following steps
#cd /tmp/
# svn --username=fedora co file:///svn/repos/svn-test/
A svn-test/main
A svn-test/configurations
A svn-test/configurations/test.cfg
A svn-test/options
WWW.VIDYARTHIPLUS.COM
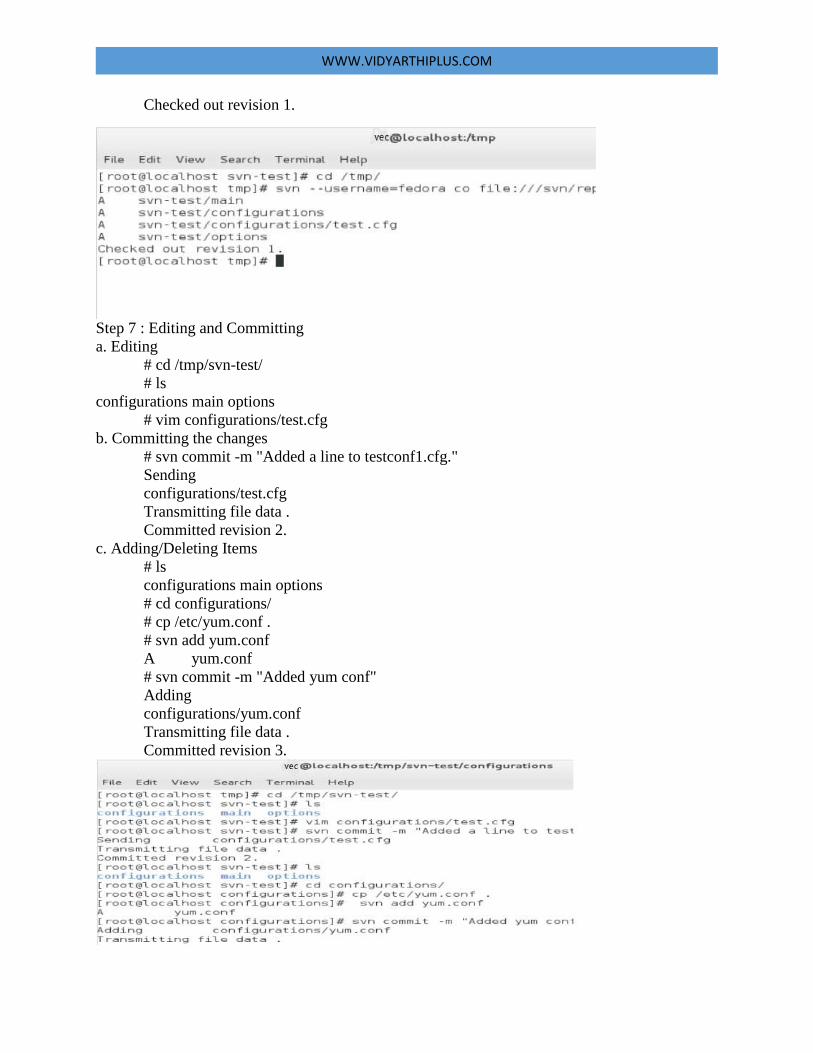
Checked out revision 1.
Step 7 : Editing and Committing
a. Editing
# cd /tmp/svn-test/
# ls
configurations main options
# vim configurations/test.cfg
b. Committing the changes
# svn commit -m "Added a line to testconf1.cfg."
Sending
configurations/test.cfg
Transmitting file data .
Committed revision 2.
c. Adding/Deleting Items
# ls
configurations main options
# cd configurations/
# cp /etc/yum.conf .
# svn add yum.conf
A yum.conf
# svn commit -m "Added yum conf"
Adding
configurations/yum.conf
Transmitting file data .
Committed revision 3.

WWW.VIDYARTHIPLUS.COM
d. Reverting Items
i. Listing out all revisions.
# svn log file:///svn/repos/svn-test/
Added the fedora repo
------------------------------------------------------------------------
r2 | fedora | 2011-07-21 20:30:22 +0530 (Thu, 21 Jul 2011) | 1 line
Added a line to testconf1.cfg.
------------------------------------------------------------------------
r1 | fedora | 2011-07-21 20:24:40 +0530 (Thu, 21 Jul 2011) | 1 line
Initial Import
------------------------------------------------------------------------
ii) reverting/checkout to revision 1 -
# svn co -r 1 file:///svn/repos/svn-test/
A svn-test/main
A svn-test/configurations
A svn-test/configurations/test.cfg
A svn-test/options
Checked out revision 1.
RESULT: Thus version control system for managing files using svn was created successfully.

WWW.VIDYARTHIPLUS.COM
CONTENT BEYOND SYLLABUS
NETWORK SIMULATOR – 2
Ns is a discrete event simulator targeted at networking research. Ns provides substantial support
for simulation of TCP, routing, and multicast protocols over wired and wireless (local and
satellite) networks.
Ns began as a variant of the REAL network simulator in 1989 and has evolved substantially over
the past few years. In 1995 ns development was supported by DARPA through the VINT project
at LBL, Xerox PARC, UCB, and USC/ISI. Currently ns development is support through DARPA
with SAMAN and through NSF with CONSER, both in collaboration with other researchers
including ACIRI. Ns has always included substantal contributions from other researchers,
including wireless code from the UCB Daedelus and CMU Monarch projects and Sun
Microsystems. For documentation on recent changes, see the version 2 change log.
Where to Start
What hardware is needed? To build ns you need a computer and a C++ compiler. We develop ns on
several kinds of Unix (FreeBSD, Linux, SunOS, Solaris), so it installs smoothest there, but it should run on
an Posix-like computer, possibly with some tweaking. Ns also builds and runs under Windows, see the
dedicated Windows / Cygwin page. Simple scenarios should run on any reasonable machine, but very
large scenarios benefit from large amounts of memory.
Ns is fairly large. The allinone package requires about 320MB of disk space to build. Building ns
from pieces can save some disk space. (If multiple people want to share files in the ns build tree
to save space, you may download a simple perl script, then follow the instruction in its
README. There is detailed instruction from CS599b class of USC. You may also find
discussions in the ns-users mailing list archive useful.)
In this simple example, there are two parallel TCP sessions sharing a single bottleneck link
between
node 1 and node 2 (of capacity 700kb).
# Create a dumbbell topology
$ns duplex-link $s(0) $n(0) 1Mb 5ms DropTail
$ns duplex-link $s(1) $n(0) 1Mb 5ms DropTail
$ns duplex-link $n(0) $n(1) 1Mb 20ms RED/myRIO
$ns duplex-link $n(1) $n(2) 700Kb 25ms RED/myRIO
$ns duplex-link $n(2) $r(0) 1Mb 5ms DropTail
$ns duplex-link $n(2) $r(1) 1Mb 5ms DropTail
One of the sessions runs from node 3 to node 5, periodically transmitting 1000 packets.
Therefore, all flows in this session are long according to our definition. On the contrary, in the

WWW.VIDYARTHIPLUS.COM
session from node 4 to node 6, only 4 packets are transmitted in each flow. The simulation script
is shown below:
# Create sessions
proc build-fore-tcp { idx size intv stime } {
global ns ftcp fsink
set ftcp($idx) [new Agent/TCP/Newreno]
set fsink($idx) [new Agent/TCPSink]
$ns at $stime "start-conn 1 $idx $intv $size"
}
proc start-conn { firsttime idx intv size } {
global ns ftcp fsink s r
set now [$ns now]
if { $firsttime == 0 } {
$ns detach-agent $s([expr $idx%2]) $ftcp($idx)
$ns detach-agent $r([expr $idx%2]) $fsink($idx)
$ftcp($idx) reset
$fsink($idx) reset
}
$ns attach-agent $s([expr $idx%2]) $ftcp($idx)
$ns attach-agent $r([expr $idx%2]) $fsink($idx)
$ns connect $ftcp($idx) $fsink($idx)
$ftcp($idx) set fid_ 0
$ftcp($idx) proc done {} "close-conn $idx $intv $size"
$ftcp($idx) advanceby $size
}
proc close-conn { idx intv size } {
global ns
set now [$ns now]
$ns at [expr $now + $intv] "start-conn 0 $idx $intv $size"
puts "at $now + $intv start next"
}
set forel_intv 1
set fores_intv 0.05
set ssize 4
set lsize 1000
build-fore-tcp 1 $ssize 1 0.1
build-fore-tcp 0 $lsize $forel_intv 0.5
for {set i 0} {$i < 5} { incr i} {
build-fore-tcp [expr 2*$i+3] $ssize $fores_intv [expr 1.2+$i*0.1]
}
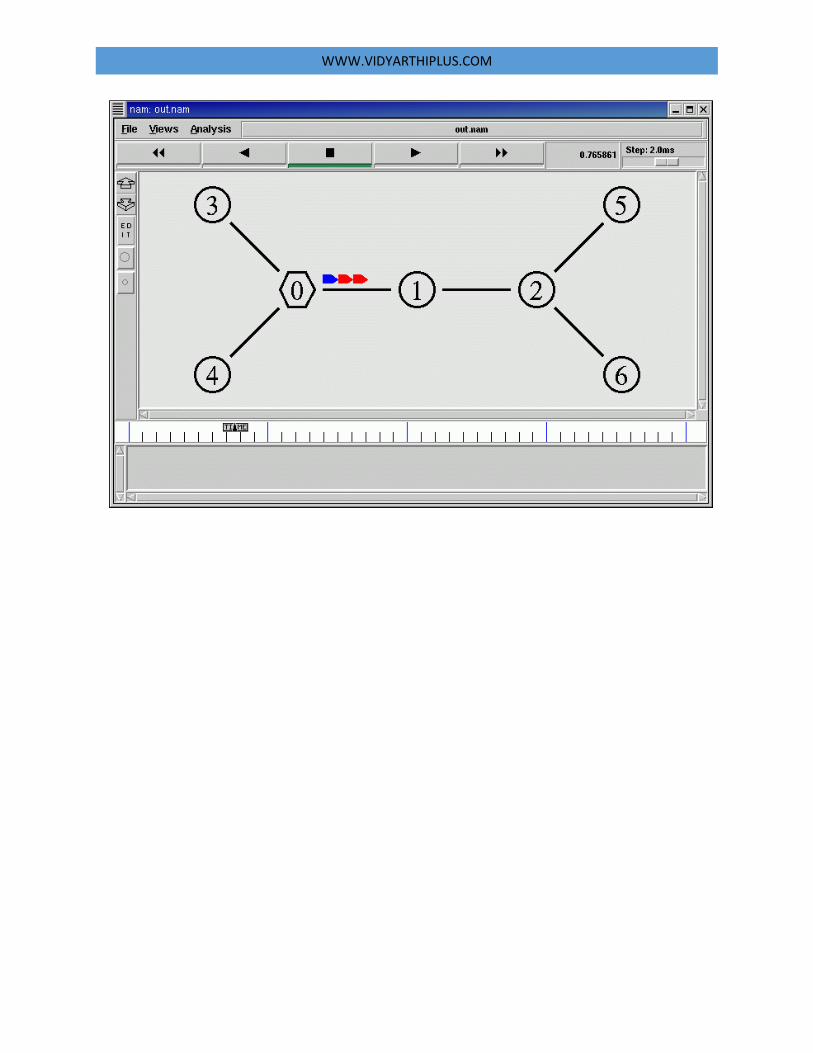
Node 0 is the "size-aware classifier", which counts the incoming packets from each flow. Once

WWW.VIDYARTHIPLUS.COM
the count exceeds a certain threshold (in this case 5), the remaining packets from the
corresponding flow are identified as long flow packets. In the simulation, long flow packets are
colored in blue. All the other packets, i.e., packets from flows of size less than 5, and the first 5
packets from a long flow, are all identified as short flow packets, and colored in red in the
simulation.
To upload a size-aware classifier with threshold set to 5 to node 0, do the following:
# Load a size-aware classifier to node 0
set cls [new Classifier/Hash/SizeAware 128]
$cls set default_ -1
$cls set flowlen_thr_ 5
$cls set refresh_intv_ 2
$cls set dynamic_update_ 0
set n(0) [node_with_classifier $cls]
OUTPUT:
As a result, all packets between node 4 and node 6 are colored in red:

WWW.VIDYARTHIPLUS.COM
For flows of size bigger than 5, the first 5 packets are colored in red, and the remaining packets are
colored in blue:
WWW.VIDYARTHIPLUS.COM