ewon flexy java j2se toolkit user guidejava j2se... · chapter 1 introduction 1.introduction java...
TRANSCRIPT

support.ewon.biz
eWON Flexy JAVA J2SE Toolkit User Guide
This document describes how to install the JAVA development environment on your PC, how to create and how to debug a JAVA application with eWON Flexy.
Application User Guide
AUG 076 / Rev. 1.1
Table of Contents
1. Introduction ....................................................................................................................... 3JAVA (J2SE) and eWON Flexy .............................................................................................................. 3eWON Flexy JAVA development Platform ........................................................................................ 3Typical development work flow .......................................................................................................... 4
2. JAVA J2SE environment Setup ........................................................................................ 4Eclipse Installation ................................................................................................................................... 4eWON JTK Installation ............................................................................................................................ 5
Install the JAVA ETK toolkit on your system ................................................................................... 5eWON Java ToolKit Configuration in Eclipse ................................................................................ 6
3. Develop your first JAVA application for eWON Flexy .................................................... 8Create the “Hello World” project ........................................................................................................ 8Add the project main class .................................................................................................................. 9
Build your project ............................................................................................................................. 10
4. Debug your JAVA application with Eclipse ................................................................. 15Eclipse tools ........................................................................................................................................... 15
Configure the Remote Java Debug ............................................................................................ 15Create the Launch group. ............................................................................................................. 16
Start your debug session ..................................................................................................................... 18
5. Transfer the JAVA application manually to the eWON Flexy ..................................... 20Execute the JAVA application manually using the Web Interface ........................................... 20Configure the JAVA application execution at eWON Flexy boot time .................................... 21
jvmrun syntax .................................................................................................................................... 21
6. JAVA Virtual Machine (JVM) arguments ...................................................................... 22
7. Open existing project in eClipse ................................................................................... 24Open someone else project in eClipse ........................................................................................... 24Open existing Netbeans project in eClipse .................................................................................... 25
Revision .............................................................................................................................. 26Revision History ...................................................................................................................................... 26
Page 2 / 26 eWON Flexy JAVA J2SE Toolkit User Guide | AUG 076
Chapter 1Introduction
1. Introduction
JAVA (J2SE) and eWON FlexyThe eWON JAVA J2SE toolkit is designed around the JVM version 1.4
The J2SE JVM is supported by the eWON Flexy family from the firmware 12.2.
Even though this compliance is interesting for using existing JAVA libraries, these libraries may require lots of resources to be executed and make this compatibility purely theoretical.
It will be nevertheless possible to use a large range of existing tools and libraries to work with a powerful high-level programming language on eWON Flexy.
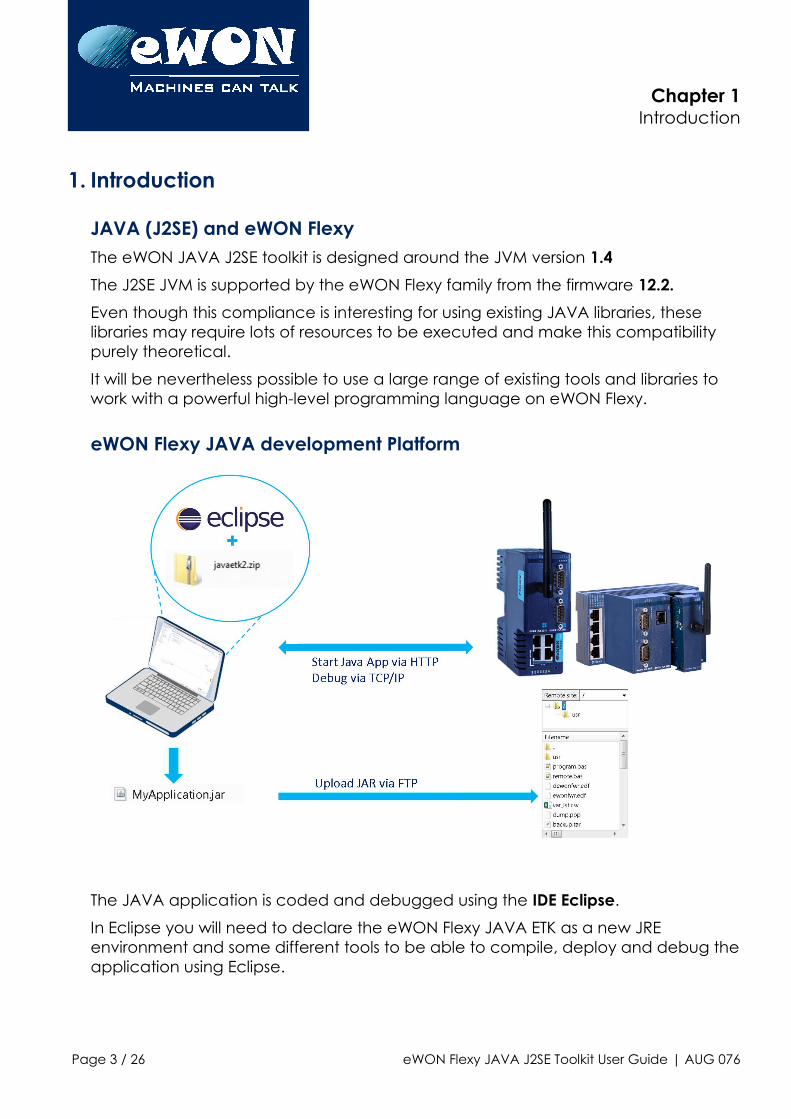
eWON Flexy JAVA development Platform
The JAVA application is coded and debugged using the IDE Eclipse.
In Eclipse you will need to declare the eWON Flexy JAVA ETK as a new JRE environment and some different tools to be able to compile, deploy and debug theapplication using Eclipse.
Page 3 / 26 eWON Flexy JAVA J2SE Toolkit User Guide | AUG 076
Chapter 1Introduction
Typical development work flow
• Develop and compile your application with Eclipse.
• Upload your application from Eclipse to your Flexy.
• Debug you application with Eclipse using :
◦ Breakpoints
◦ Watches
◦ Step-by-step
◦ Logs
◦ ...
• Upload your final JAR in the eWON /usr directory.
• Create a jvmrun text file in the Flexy /usr directory to autorun your JAVA application at the Flexy boot time.
2. JAVA J2SE environment Setup
Eclipse Installation
The JAVA IDE recommended and supported for developing J2SE JAVA applications for eWON Flexy is Eclipse.
In order to find all the features required to develop/deploy and debug the JAVA application, you will first need to install “Eclipse”.
You can download it from https://www.eclipse.org/downloads/
Select the Windows 64 bit version or the 32 bit version according to you computer. This manual was written with the version “NEON” of Eclipse but should apply to newer Eclipse versions.
Your download will contain an “exe” file. Run it and select “Eclipse IDE for Java Developers”
Once Eclipse is installed, run it and add the CDT support. This option is required to enable online debugging.
Page 4 / 26 eWON Flexy JAVA J2SE Toolkit User Guide | AUG 076
Chapter 2JAVA J2SE environment Setup
To do so, follow the next procedure :
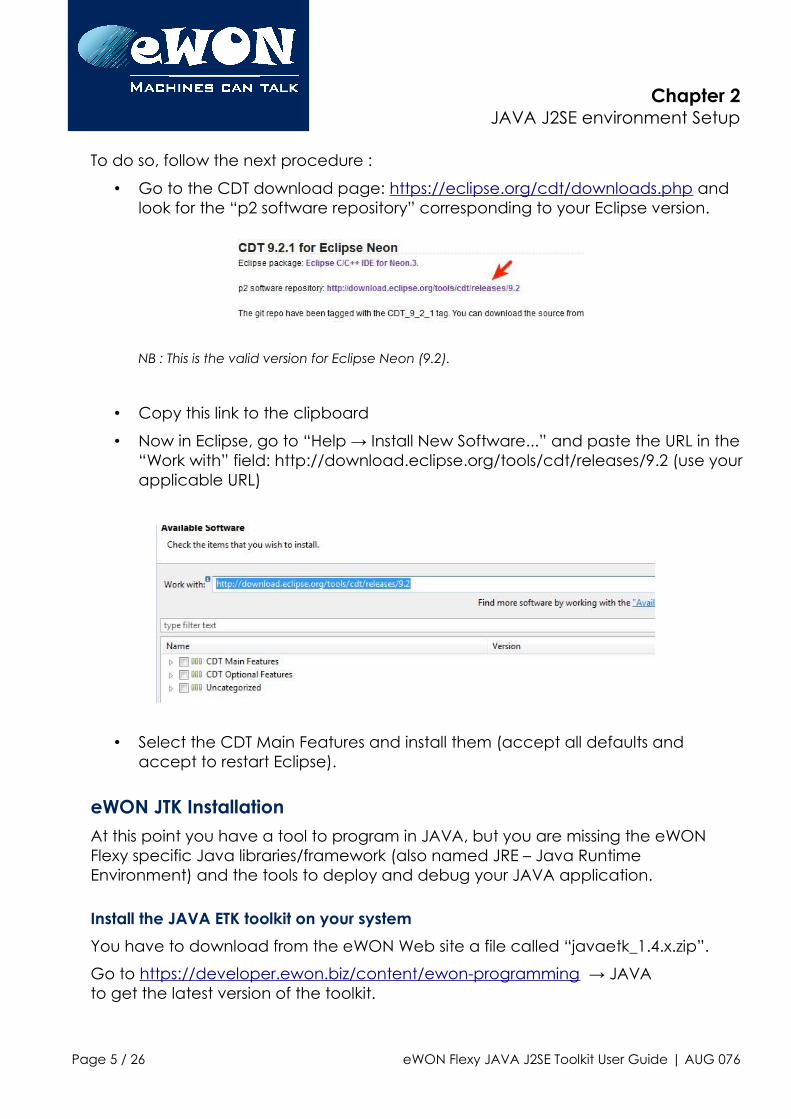
• Go to the CDT download page: https://eclipse.org/cdt/downloads.php and look for the “p2 software repository” corresponding to your Eclipse version.
NB : This is the valid version for Eclipse Neon (9.2).
• Copy this link to the clipboard
• Now in Eclipse, go to “Help → Install New Software...” and paste the URL in the“Work with” field: http://download.eclipse.org/tools/cdt/releases/9.2 (use yourapplicable URL)
• Select the CDT Main Features and install them (accept all defaults and accept to restart Eclipse).
eWON JTK InstallationAt this point you have a tool to program in JAVA, but you are missing the eWON Flexy specific Java libraries/framework (also named JRE – Java Runtime Environment) and the tools to deploy and debug your JAVA application.
Install the JAVA ETK toolkit on your system
You have to download from the eWON Web site a file called “javaetk_1.4.x.zip”.
Go to https://developer.ewon.biz/content/ewon-programming → JAVA to get the latest version of the toolkit.
Page 5 / 26 eWON Flexy JAVA J2SE Toolkit User Guide | AUG 076
Chapter 2JAVA J2SE environment Setup
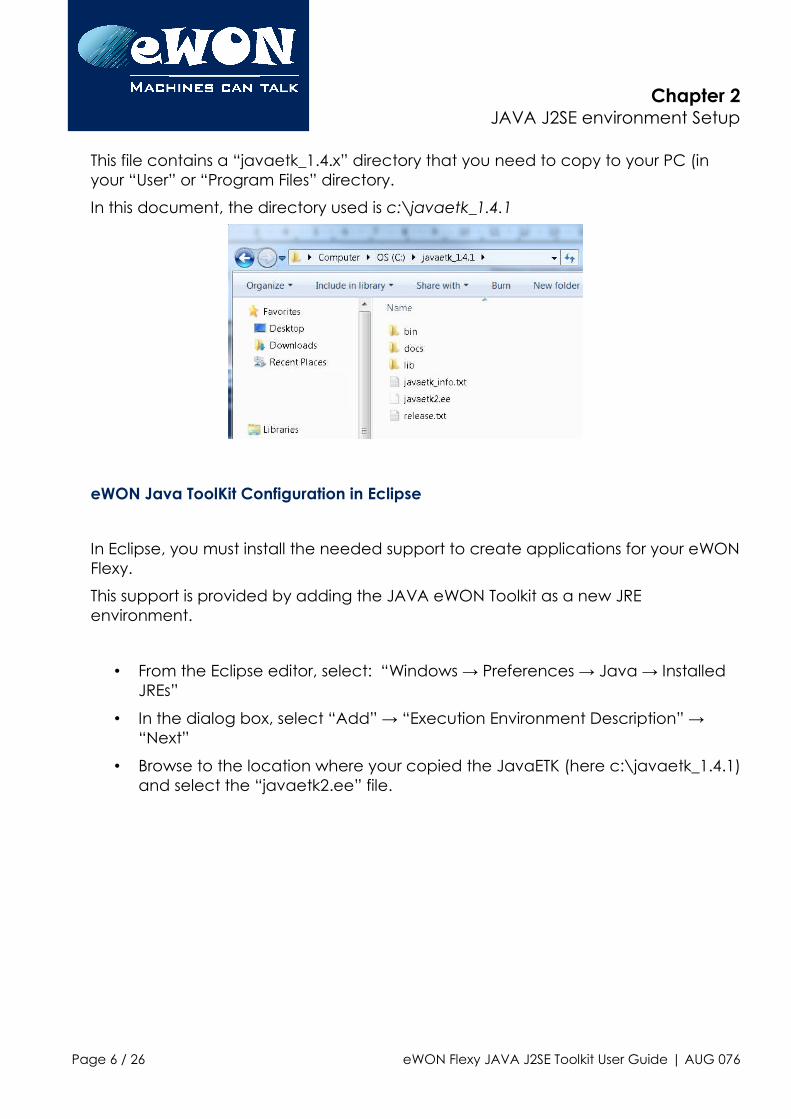
This file contains a “javaetk_1.4.x” directory that you need to copy to your PC (in your “User” or “Program Files” directory.
In this document, the directory used is c:\javaetk_1.4.1
eWON Java ToolKit Configuration in Eclipse
In Eclipse, you must install the needed support to create applications for your eWONFlexy.
This support is provided by adding the JAVA eWON Toolkit as a new JRE environment.
• From the Eclipse editor, select: “Windows → Preferences → Java → Installed JREs”
• In the dialog box, select “Add” → “Execution Environment Description” → “Next”
• Browse to the location where your copied the JavaETK (here c:\javaetk_1.4.1)and select the “javaetk2.ee” file.
Page 6 / 26 eWON Flexy JAVA J2SE Toolkit User Guide | AUG 076
Chapter 2JAVA J2SE environment Setup
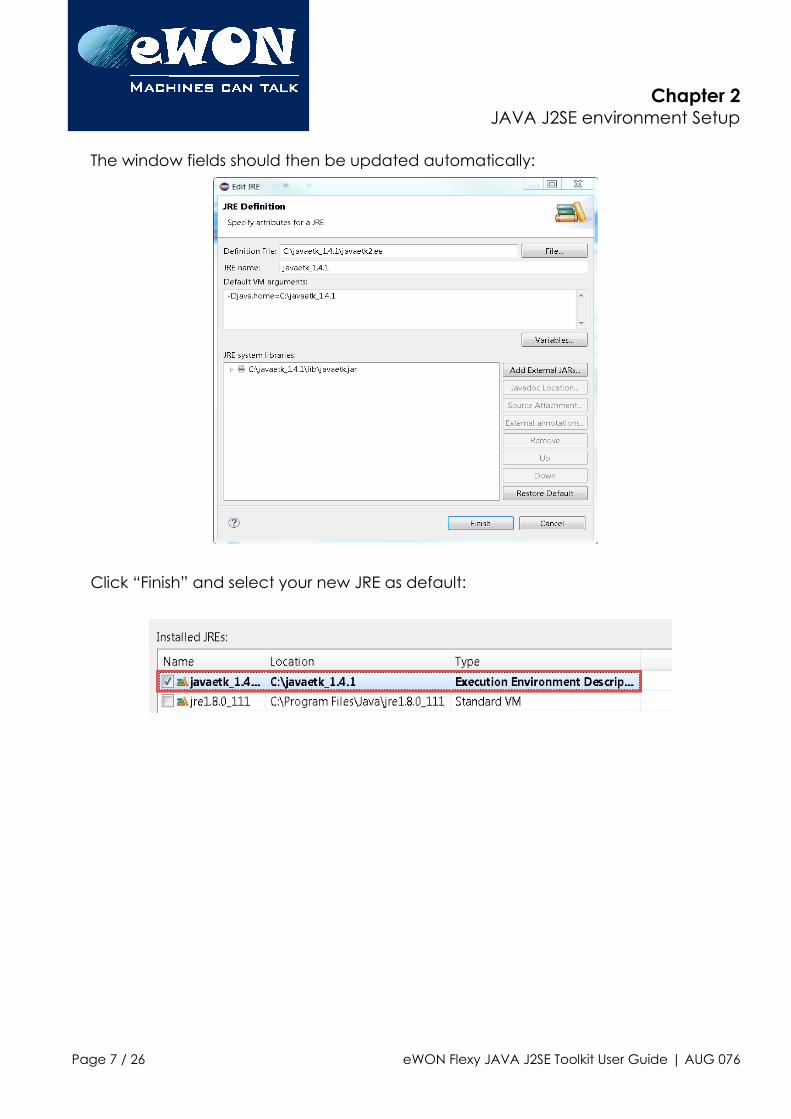
The window fields should then be updated automatically:
Click “Finish” and select your new JRE as default:
Page 7 / 26 eWON Flexy JAVA J2SE Toolkit User Guide | AUG 076
Chapter 3Develop your first JAVA application for eWON
Flexy
3. Develop your first JAVA application for eWON FlexyThe “HelloWorld” application is a simple example that shows how to create, compile, debug and execute a JAVA project.
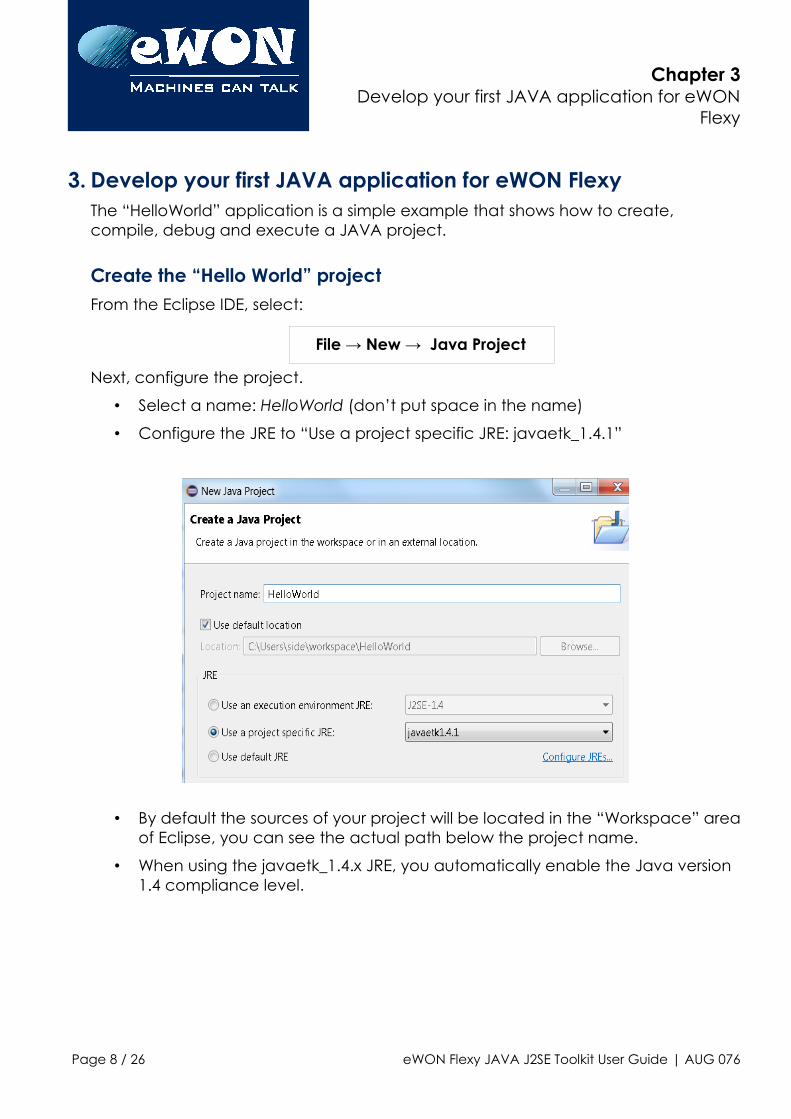
Create the “Hello World” projectFrom the Eclipse IDE, select:
Next, configure the project.
• Select a name: HelloWorld (don’t put space in the name)
• Configure the JRE to “Use a project specific JRE: javaetk_1.4.1”
• By default the sources of your project will be located in the “Workspace” areaof Eclipse, you can see the actual path below the project name.
• When using the javaetk_1.4.x JRE, you automatically enable the Java version 1.4 compliance level.
Page 8 / 26 eWON Flexy JAVA J2SE Toolkit User Guide | AUG 076
File → New → Java Project
Chapter 3Develop your first JAVA application for eWON
Flexy
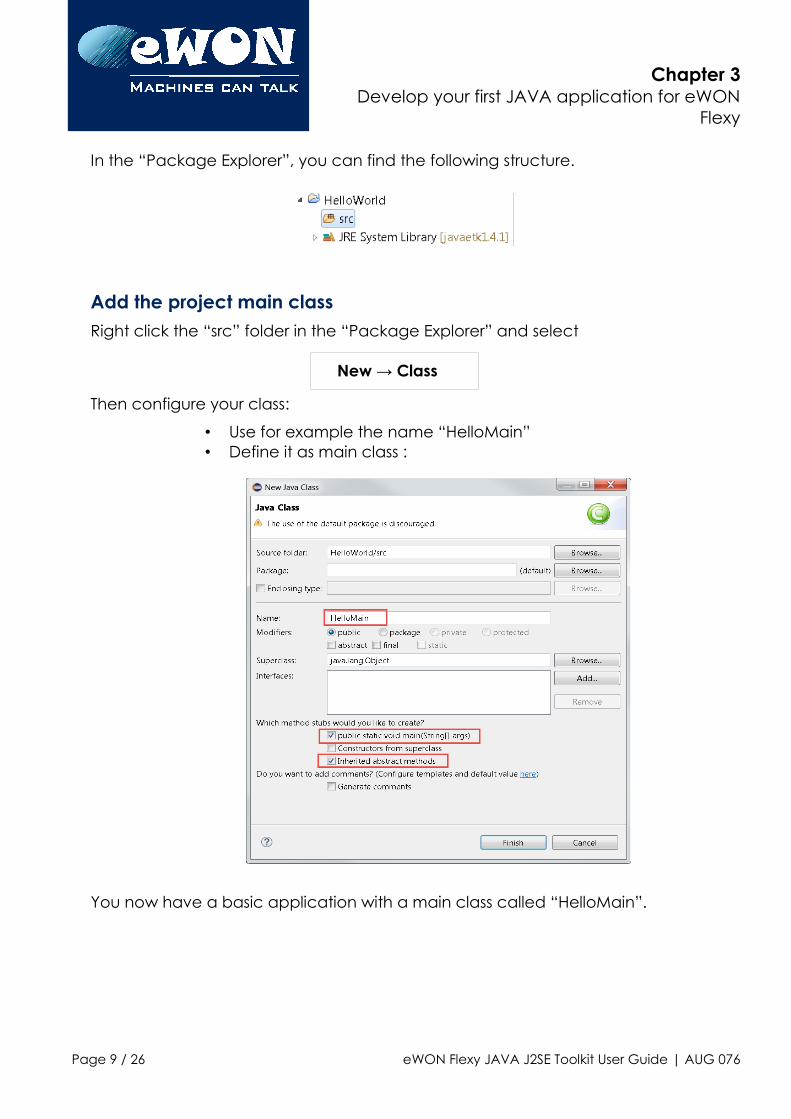
In the “Package Explorer”, you can find the following structure.
Add the project main classRight click the “src” folder in the “Package Explorer” and select
Then configure your class:
• Use for example the name “HelloMain”• Define it as main class :
You now have a basic application with a main class called “HelloMain”.
Page 9 / 26 eWON Flexy JAVA J2SE Toolkit User Guide | AUG 076
New → Class
Chapter 3Develop your first JAVA application for eWON
Flexy
In this project, we will simply create a log entry into the Real Time logs of your eWON Flexy by using the code line :
System.out.println("Hello World");
Build your project
By default , Eclipse compiles your project continuously. Any error you make is displayed immediately, and your classes are compiled at any time.
You can disable that from the “Project → Build automatically” menu.
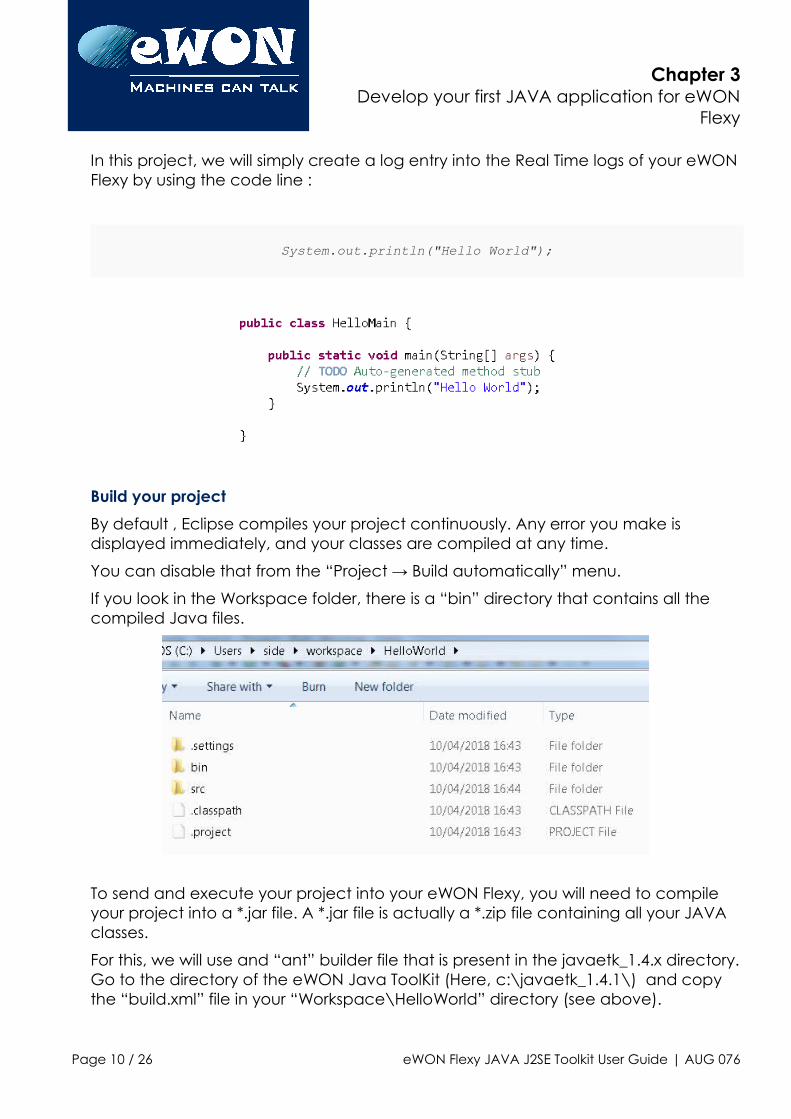
If you look in the Workspace folder, there is a “bin” directory that contains all the compiled Java files.
To send and execute your project into your eWON Flexy, you will need to compile your project into a *.jar file. A *.jar file is actually a *.zip file containing all your JAVA classes.
For this, we will use and “ant” builder file that is present in the javaetk_1.4.x directory.Go to the directory of the eWON Java ToolKit (Here, c:\javaetk_1.4.1\) and copy the “build.xml” file in your “Workspace\HelloWorld” directory (see above).
Page 10 / 26 eWON Flexy JAVA J2SE Toolkit User Guide | AUG 076
Chapter 3Develop your first JAVA application for eWON
Flexy
Now, go back to your Eclipse project and from the “Package Explorer”, right click and click “refresh”.
You now have an additional file called “build.xml” in your project tree
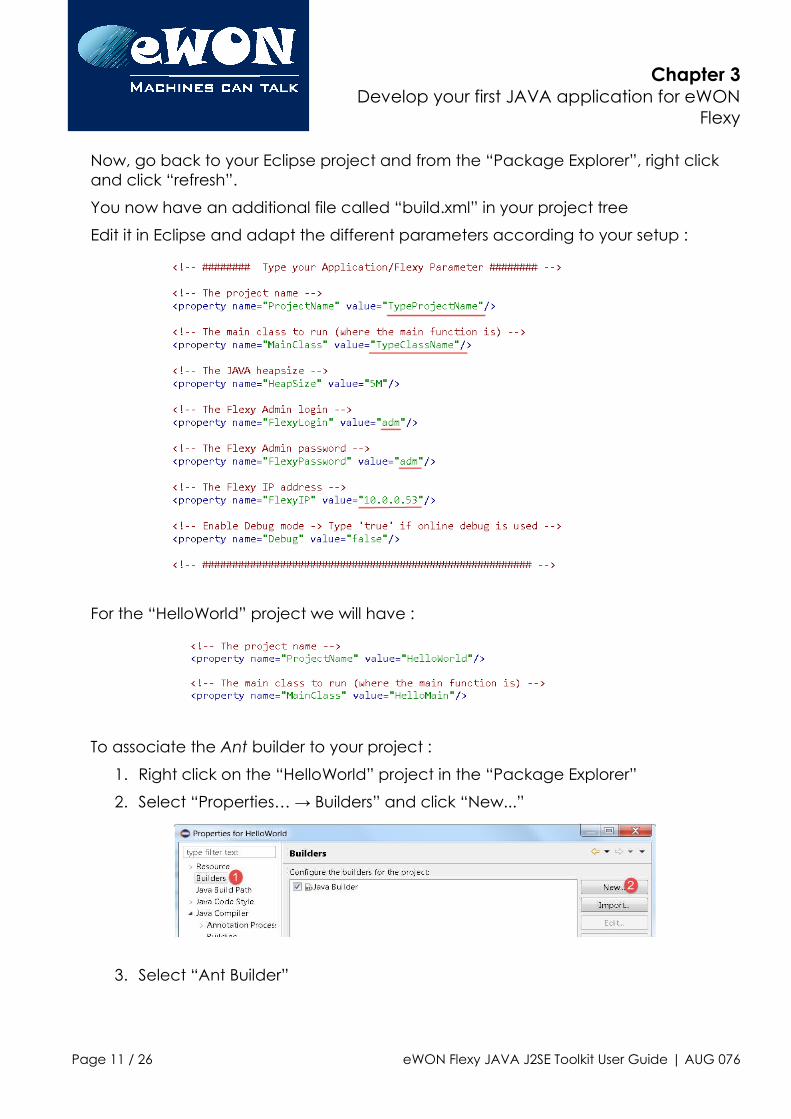
Edit it in Eclipse and adapt the different parameters according to your setup :
For the “HelloWorld” project we will have :
To associate the Ant builder to your project :
1. Right click on the “HelloWorld” project in the “Package Explorer”
2. Select “Properties… → Builders” and click “New...”
3. Select “Ant Builder”
Page 11 / 26 eWON Flexy JAVA J2SE Toolkit User Guide | AUG 076
Chapter 3Develop your first JAVA application for eWON
Flexy
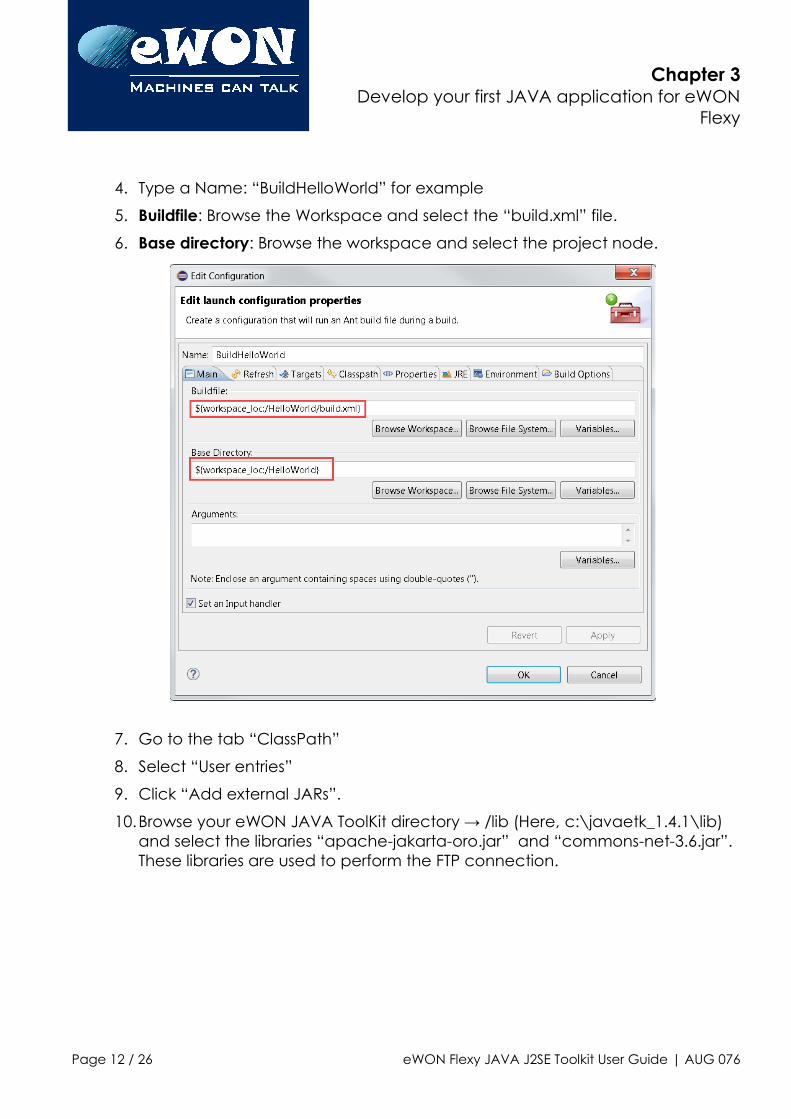
4. Type a Name: “BuildHelloWorld” for example
5. Buildfile: Browse the Workspace and select the “build.xml” file.
6. Base directory: Browse the workspace and select the project node.
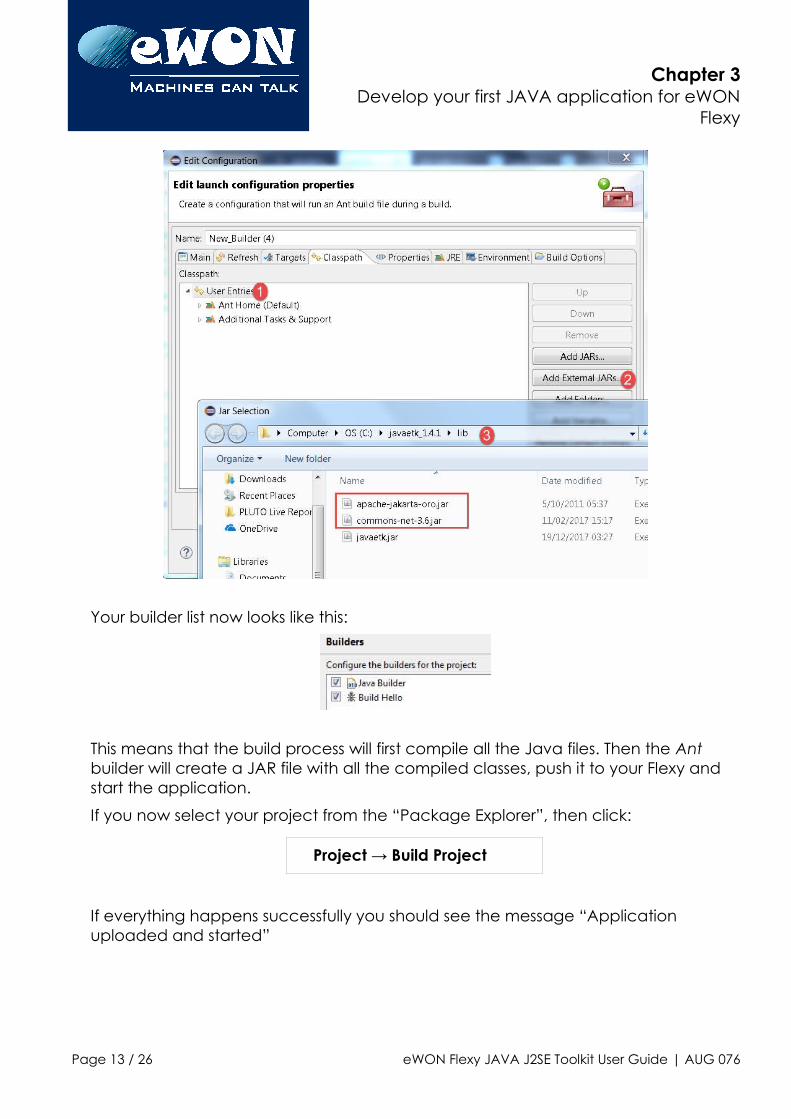
7. Go to the tab “ClassPath”
8. Select “User entries”
9. Click “Add external JARs”.
10.Browse your eWON JAVA ToolKit directory → /lib (Here, c:\javaetk_1.4.1\lib) and select the libraries “apache-jakarta-oro.jar” and “commons-net-3.6.jar”. These libraries are used to perform the FTP connection.
Page 12 / 26 eWON Flexy JAVA J2SE Toolkit User Guide | AUG 076
Chapter 3Develop your first JAVA application for eWON
Flexy
Your builder list now looks like this:
This means that the build process will first compile all the Java files. Then the Ant builder will create a JAR file with all the compiled classes, push it to your Flexy and start the application.
If you now select your project from the “Package Explorer”, then click:
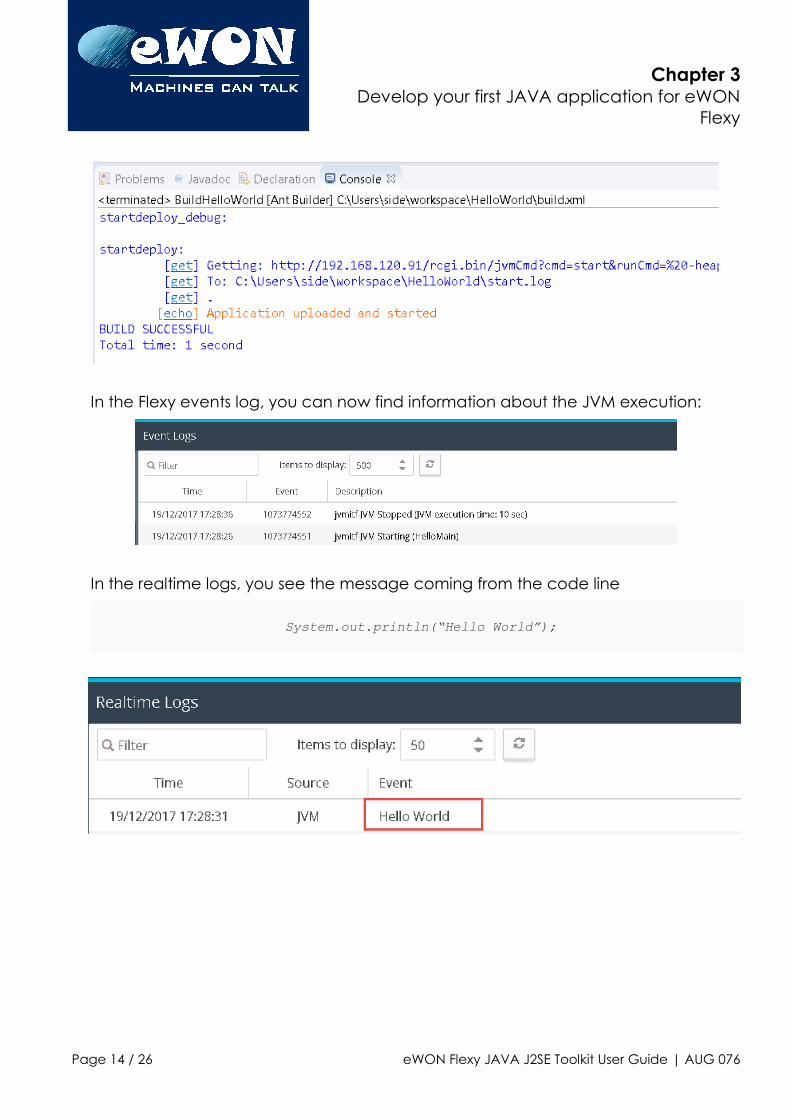
If everything happens successfully you should see the message “Application uploaded and started”
Page 13 / 26 eWON Flexy JAVA J2SE Toolkit User Guide | AUG 076
Project → Build Project
Chapter 3Develop your first JAVA application for eWON
Flexy
In the Flexy events log, you can now find information about the JVM execution:
In the realtime logs, you see the message coming from the code line
System.out.println(“Hello World”);
Page 14 / 26 eWON Flexy JAVA J2SE Toolkit User Guide | AUG 076
Chapter 4Debug your JAVA application with Eclipse
4. Debug your JAVA application with EclipseAt this point, you have your Eclipse project ready to compile and upload your application to your Flexy. Now, let's see how to debug your JAVA application.
The process for debugging the JAVA project is the following:
• Compile and upload the JAR file to the /usr directory of the Flexy by FTP.
• Start the Flexy JVM with the right arguments using an HTTP request.
• Start the Java debugger in Eclipse and connect it to the Flexy JVM.
Eclipse toolsEclipse has several useful tools to automate operations related to the deployment and the debug processes. The launch group (which is part of the Eclipse CDT package which is why we had to install it) allows you to create a sequence of several eclipse operations. In our case, we will need to execute the previously created Ant builder in Debug mode and then start a Remote Java Debug session.
Configure the Remote Java Debug
The Remote Java Debug Application is a standard way for a debugger to communicate with a JVM running in debug mode. This mechanism works over TCP/IP with a protocol called the Java Debug Wire protocol allowing you to debug your program step by step by using breakpoints, variables inspection.
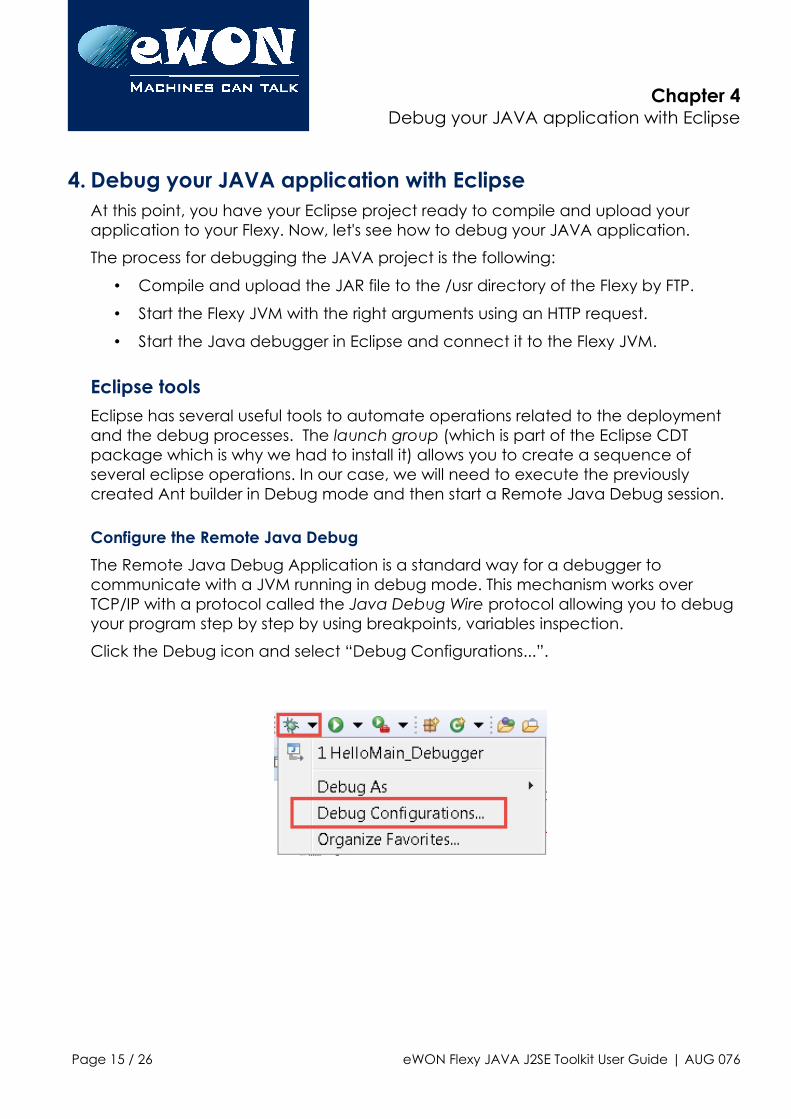
Click the Debug icon and select “Debug Configurations...”.
Page 15 / 26 eWON Flexy JAVA J2SE Toolkit User Guide | AUG 076
Chapter 4Debug your JAVA application with Eclipse
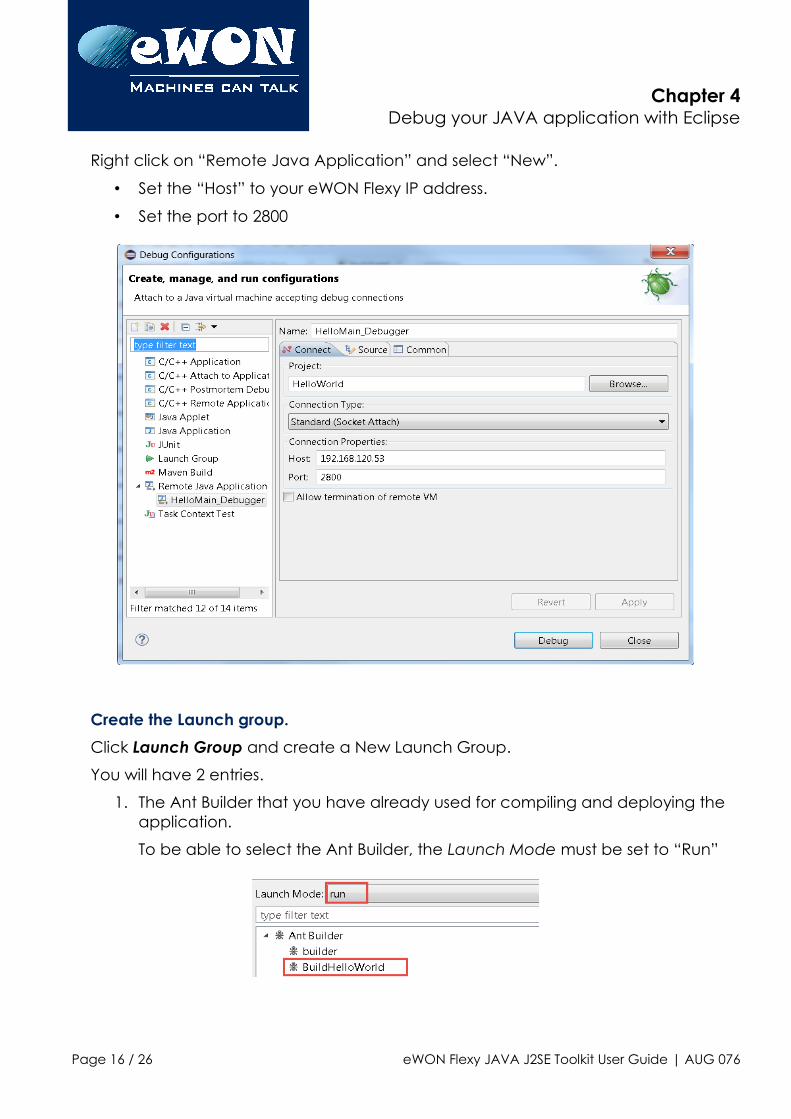
Right click on “Remote Java Application” and select “New”.
• Set the “Host” to your eWON Flexy IP address.
• Set the port to 2800
Create the Launch group.
Click Launch Group and create a New Launch Group.
You will have 2 entries.
1. The Ant Builder that you have already used for compiling and deploying the application.
To be able to select the Ant Builder, the Launch Mode must be set to “Run”
Page 16 / 26 eWON Flexy JAVA J2SE Toolkit User Guide | AUG 076
Chapter 4Debug your JAVA application with Eclipse
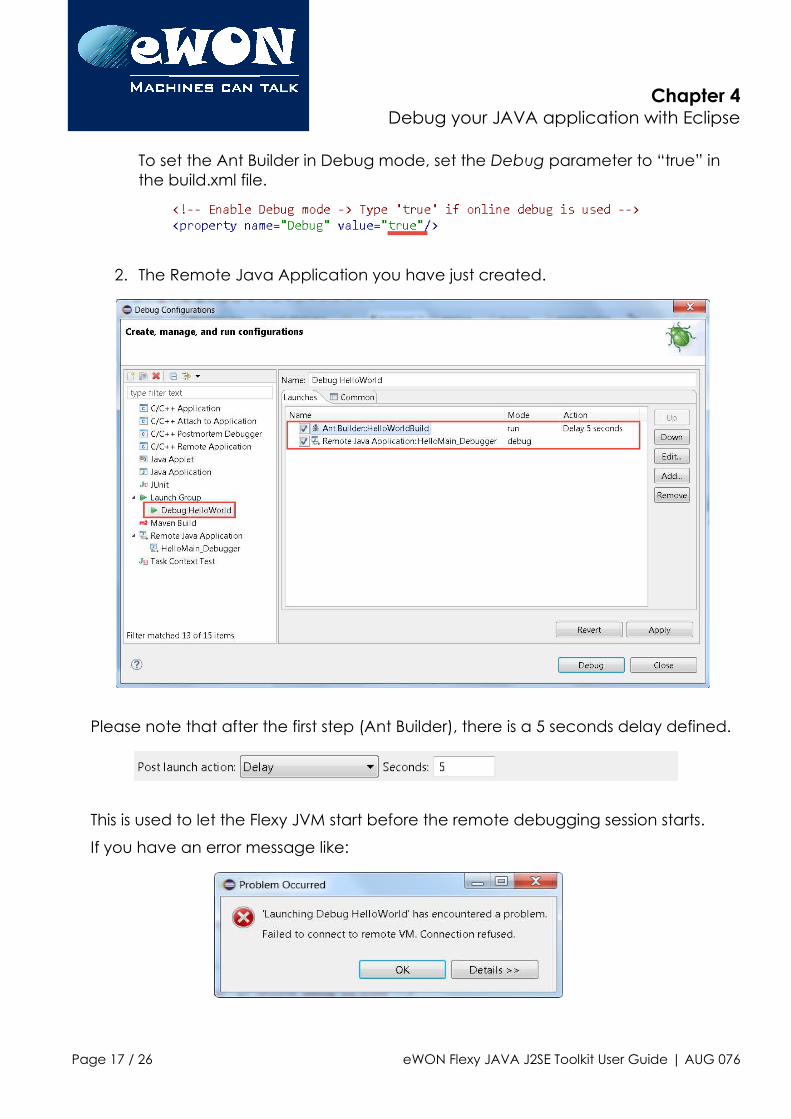
To set the Ant Builder in Debug mode, set the Debug parameter to “true” in the build.xml file.
2. The Remote Java Application you have just created.
Please note that after the first step (Ant Builder), there is a 5 seconds delay defined.
This is used to let the Flexy JVM start before the remote debugging session starts.
If you have an error message like:
Page 17 / 26 eWON Flexy JAVA J2SE Toolkit User Guide | AUG 076
Chapter 4Debug your JAVA application with Eclipse
Then try to increase the delay to more than 5 second, to let more time to the eWON Flexy to start its JVM or double-check that the Debug parameter is well set to “true” in the build.xml.
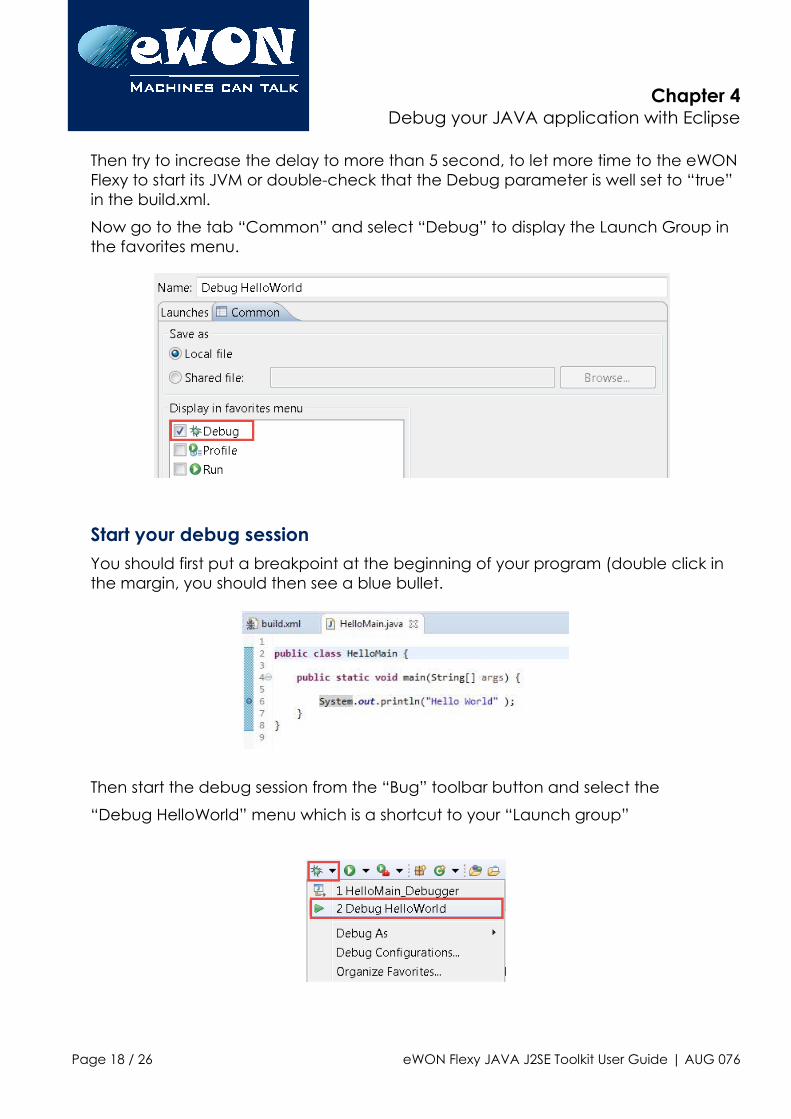
Now go to the tab “Common” and select “Debug” to display the Launch Group in the favorites menu.
Start your debug sessionYou should first put a breakpoint at the beginning of your program (double click in the margin, you should then see a blue bullet.
Then start the debug session from the “Bug” toolbar button and select the
“Debug HelloWorld” menu which is a shortcut to your “Launch group”
Page 18 / 26 eWON Flexy JAVA J2SE Toolkit User Guide | AUG 076
Chapter 4Debug your JAVA application with Eclipse
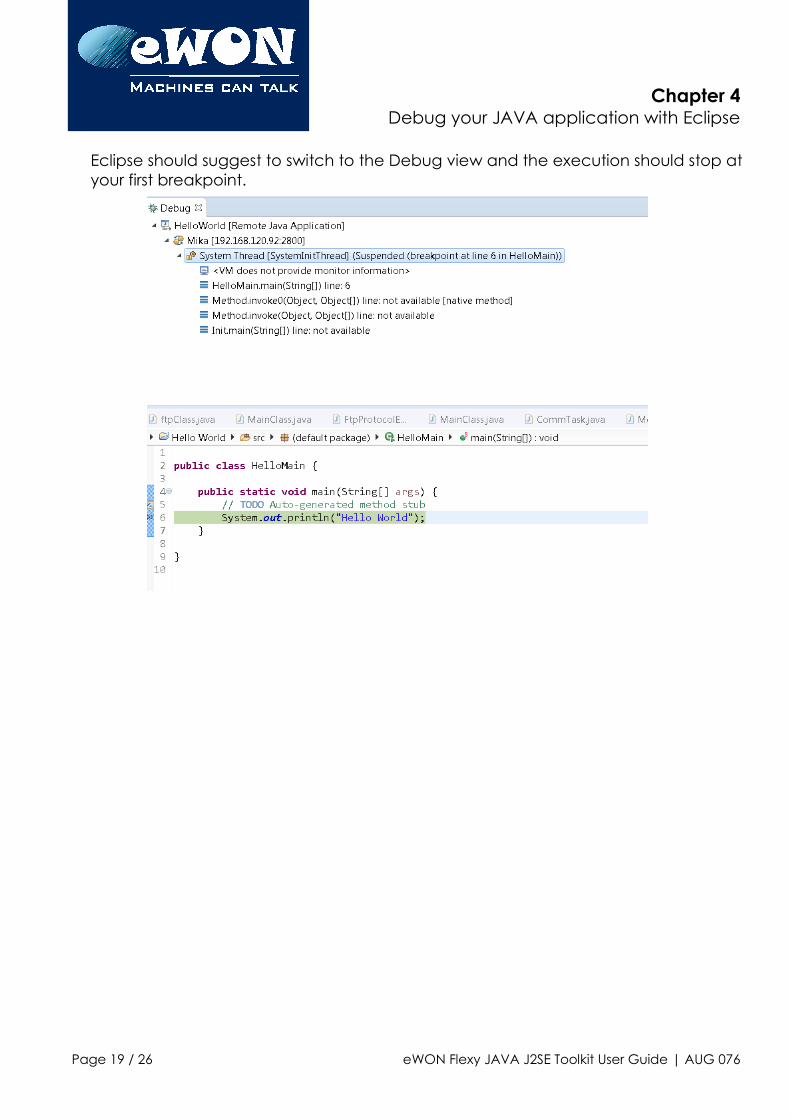
Eclipse should suggest to switch to the Debug view and the execution should stop atyour first breakpoint.
Page 19 / 26 eWON Flexy JAVA J2SE Toolkit User Guide | AUG 076

Chapter 5Transfer the JAVA application manually to the
eWON Flexy
5. Transfer the JAVA application manually to the eWON FlexyEventually you will have to provide the JAR file to the user. The user will have then toupload the JAR file to his Flexy /usr directory through FTP.
Execute the JAVA application manually using the Web InterfaceJAVA execution can be manually started through the Flexy web interface by callinga specific web form.
To run the Hello World application, the following command must be typed:
http://10.0.0.53/rcgi.bin/jvmCmd?cmd=start&runCmd= -heapsize 5M -classpath /usr/HelloWorld.jar -emain HelloMain
NB : 10.0.0.53 must be replaced by your eWON Flexy IP address.
You can start execution of the JVM by typing the execution URL directly in a Web browser:
The Web form is jvmCmd and the parameters are:
• cmd=start: start the JVM
• runCmd= -heapsize......: arguments to pass to the JVM as follow:
-heapsize 5M Memory allocated to JVM (Use 5M as a minimum)
-classpath /usr/HelloWorld.jar Path to application classes repository
-emain HelloMain Name of the class containing the main function.
This is a short summary of the JVM possible arguments, please see “JAVA Virtual Machine (JVM) arguments“ on page 22 for more details.
Page 20 / 26 eWON Flexy JAVA J2SE Toolkit User Guide | AUG 076
Chapter 5Transfer the JAVA application manually to the
eWON Flexy
Configure the JAVA application execution at eWON Flexy boot time
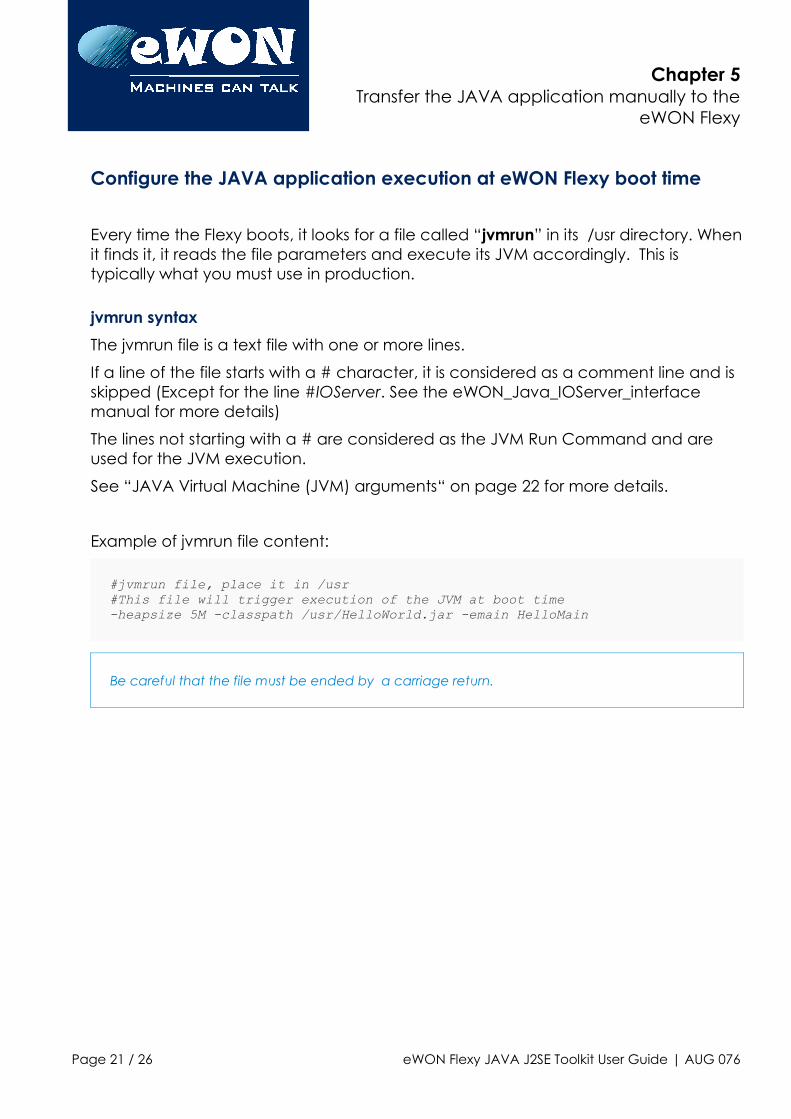
Every time the Flexy boots, it looks for a file called “jvmrun” in its /usr directory. Whenit finds it, it reads the file parameters and execute its JVM accordingly. This is typically what you must use in production.
jvmrun syntax
The jvmrun file is a text file with one or more lines.
If a line of the file starts with a # character, it is considered as a comment line and is skipped (Except for the line #IOServer. See the eWON_Java_IOServer_interface manual for more details)
The lines not starting with a # are considered as the JVM Run Command and are used for the JVM execution.
See “JAVA Virtual Machine (JVM) arguments“ on page 22 for more details.
Example of jvmrun file content:
#jvmrun file, place it in /usr#This file will trigger execution of the JVM at boot time-heapsize 5M -classpath /usr/HelloWorld.jar -emain HelloMain
Be careful that the file must be ended by a carriage return.
Page 21 / 26 eWON Flexy JAVA J2SE Toolkit User Guide | AUG 076
Chapter 6JAVA Virtual Machine (JVM) arguments
6. JAVA Virtual Machine (JVM) argumentsThis chapter describes the parameters available to configure the Flexy JVM execution.
This list of arguments is also called the JVM Run Command
The JVM can be started through multiple ways:
• Using the Flexy HTTP server by using the jvmForm (see “Execute the JAVA application manually using the Web Interface” on page 20).
• By creating a jvmrun file in the eWON /usr directory (see “Configure the JAVAapplication execution at eWON Flexy boot time“ on page 21).
• By using the com.ewon.ewonitf.RuntimeControl.configureNextRunCommand JAVA function (see JAVA Doc).
When the JVM is started, it receives a number of parameters to configure JVM execution. Here is list of supported parameters :
-watchon This command is related to the eWON JAVA watchdog mechanism.When watchon is specified, the JAVA watchdog is enabled with a timeout of 1 minute. The watchdog can be handled using the functions from the class com.ewon.ewonitf.RuntimeControl.When activated, the function com.ewon.ewonitf.RuntimeControl.refreshWatchdog must be called by the JAVA application at least one minute after the JVM was started.Please see the JAVA Doc for more information about watchdog.
Default: no watchdog
-debugger This option is used with the eWON Flexy must listen for a debugger remote connection.REM: this option implies the -suspend option bellow. If suspend is not required, -nosuspend must be specified.
Default: no debugger
-suspend This option forces the JVM to be suspended after startup to wait fordebugging connection. This is only useful with the -debugger option which automatically enables the -suspend option.
Page 22 / 26 eWON Flexy JAVA J2SE Toolkit User Guide | AUG 076
Chapter 6JAVA Virtual Machine (JVM) arguments
Default: true if -debugger specified, false otherwise.
-nosuspend This option will release the execution of the program when -debugger option is specified and will not stop the JVM until the remote debugger is connected.
Default: false
-port N N is the port number on which the eWON JVM will wait for a remote debugging connection. This option is only relevant if -debugger is specified.
Default: 2800
-heapsize N-heapsize Nk-heapsize Nm
N is the amount of memory allocated to JVM execution. This memory will be used to store JAVA classes and user allocate variables.The trailing k or m can be used to specify the heap size in kilobytes or megabytes.A 5 MByte size is a minimum for a normal execution.Out of memory errors (exceptions) will be reported during JVM execution in case the heap size is too small.
Default: 64KBytes
-classpath CP CP is the eWON Flexy JVM classpath. (CP should not contain any space)The classpath is a list of JAR files or class files separated by “:”Each path must be an absolute path.All paths are case sensitive.Classpath maximum length is 1048 characters.Example of valid classfiles:/usr/MyApp.jar/usr/MyApp.jar:/usr/lib/MyLib.jar/usr/MyApp.class:/usr/lib/MyLib.jar
Default: none
-emain MC MC This is the name of the JAVA class of the user's application containing the main function.Only the name of the class must be specified and is case sensitive.
Default: none
Page 23 / 26 eWON Flexy JAVA J2SE Toolkit User Guide | AUG 076

Chapter 7Open existing project in eClipse
7. Open existing project in eClipse
Open someone else project in eClipseWhen you open a project coming from someone else computer, the directory to the JAVA ETK defined in the project or the name of the JAVA ETK JRE instance may differ from the one you have configured on your PC.
This is the warning you may have :
If you have this warning icon, edit the project properties → Java Build Path → Edit the JRE used and select the JAVA ETK JRE you have defined in eClipse.
Page 24 / 26 eWON Flexy JAVA J2SE Toolkit User Guide | AUG 076
Chapter 7Open existing project in eClipse
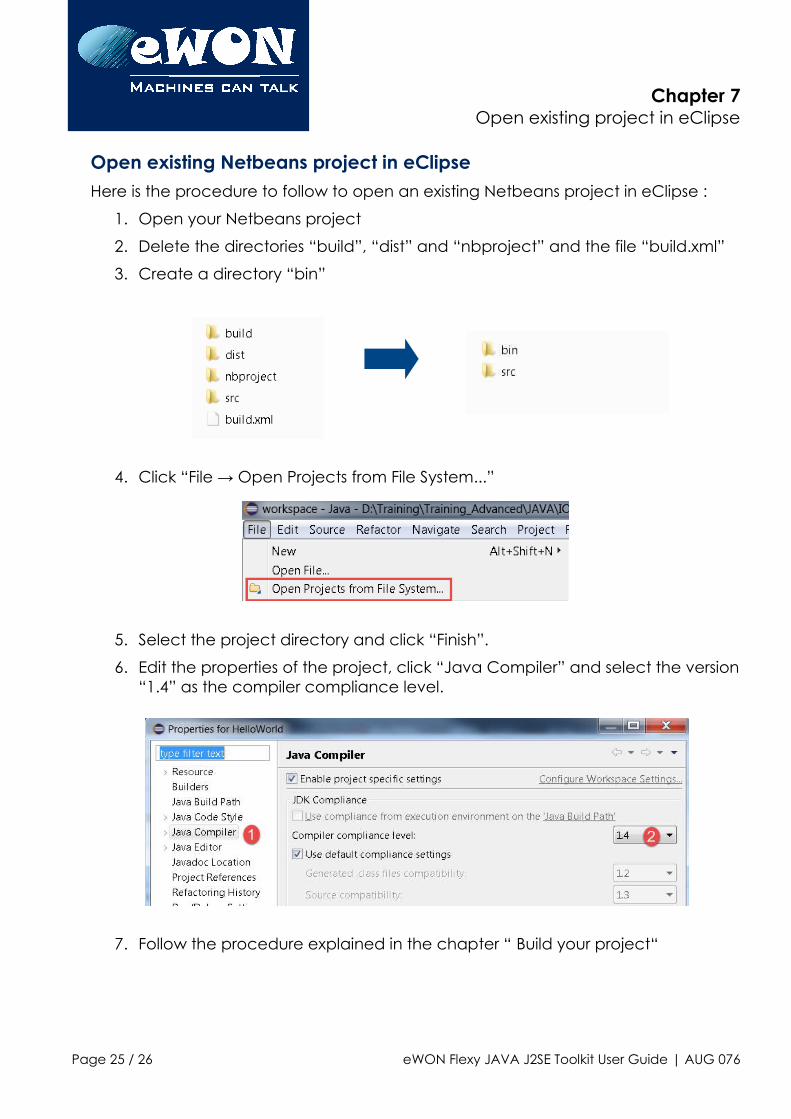
Open existing Netbeans project in eClipseHere is the procedure to follow to open an existing Netbeans project in eClipse :
1. Open your Netbeans project
2. Delete the directories “build”, “dist” and “nbproject” and the file “build.xml”
3. Create a directory “bin”
4. Click “File → Open Projects from File System...”
5. Select the project directory and click “Finish”.
6. Edit the properties of the project, click “Java Compiler” and select the version“1.4” as the compiler compliance level.
7. Follow the procedure explained in the chapter “ Build your project“
Page 25 / 26 eWON Flexy JAVA J2SE Toolkit User Guide | AUG 076

Revision Information
Revision
Revision History
Revision Level Date Description
1.0 11/04/18 Original Document
1.1 29/01/19 ClassPath Syntax updated
Document build number: 154
Note concerning the warranty and the rights of ownership:
The information contained in this document is subject to modification without notice. Check https://ewon.biz/support for the latest documents releases.
The vendor and the authors of this manual are not liable for the errors it may contain, nor for their eventual consequences.
No liability or warranty, explicit or implicit, is made concerning the quality, the accuracy and the correctness of the information contained in this document. In no case the manufacturer's responsibility could be called for direct, indirect, accidental or other damage occurring from any defect of the product of errors coming from this document.
The product names are mentioned in this manual for information purposes only. The trade marks and the product names or marks contained in this document are the property of their respective owners.
This document contains materials protected by the International Copyright Laws. All reproduction rights are reserved. No part of this handbook can be reproduced, transmitted or copied in any way without written consent from the manufacturer and/or the authors of this handbook.
HMS Industrial Networks
Page 26 / 26 eWON Flexy JAVA J2SE Toolkit User Guide | AUG 076