evo viii a/c control build
DESCRIPTION
How-2-article about relocating a factory A/C control.TRANSCRIPT

PERF
ORM
ANCE
AUT
O &
SOU
ND
254
e’re back with the second in a series of installments highlighting the build-up of a Mitsubishi Evolution we’ve featured in issue 8.03 (July 2006.) The vehicle was built by the Installer Institute’s Director Jason
Anderson and Lead Instructor Jack Randall in Daytona Beach, FL. This install centered on moving the factory HVAC controls to make room for an
in-dash monitor.When designing a custom install for certain vehicles it can be difficult to install
the aftermarket equipment in factory locations. For the Evolution it involved relocat-ing the A/C controls to a pocket below the radio and factory A/C bezel. As usual, when they’re done, you’re hard-pressed to tell the HVAC controls are not in their factory locations.
W
2003 Mitsubishi Evolution: Customizing HVAC Controls
Text and Photos supplied by Installer Institute Staff
And here’s how they did it:
For this install we had to remove the factory single-DIN ra-dio and HVAC knobs to make room for Kenwood’s DDX7015 double-DIN head unit. This meant that the HVAC unit would not work in its factory location. The next logical location for the controls was the gauge cluster just below their origi-nal location. We were not worried about losing the gauges because we would be installing new ones into the driver’s side pillar.
01
Phot
o by
Joh
n Ja
ckso
n
Install Inst AC 8.05.indd 1 8/9/06 2:32:09 PM

Next we cut out the gauge bezel. In this step it is very important to retain the factory mounts, so we had to cut around the mounting points. With it all trimmed, we super-glued the cutout HVAC unit to the top and bottom of the gauge cut-out. This would still give us access to the mounts located on the top of the bezel, as well as the clips that hold the bottom to the dash.
03
Next we mounted the HVAC controls into their new permanent location. Then we cut out the plastic HVAC bezel to match the controls. It would be almost impossible to recreate all of the cut-outs for the knobs and buttons, that’s why it is important to reuse the factory bezel.
02
PERF
ORM
ANCE
AUT
O &
SOU
ND
256
Install Inst AC 8.05.indd 2 8/9/06 2:32:20 PM

After mounting the HVAC bezel, we found open areas on the left and right side. To fix this, we took some paper and cut out a piece that would fit into the opening. Then we transferred that to a piece of 1/16-inch ABS plastic. This ABS is very flexible and can be moulded easily using a heat gun. With the pieces shaped, we super-glued them into place. We also super-glued a strip of ABS to the bottom of the bezel to cover another open area.
04
With everything roughed into place we took it to the interior of the car to test-fit our new addition. Now it’s time to make sure that the HVAC unit is functional, meaning the driver is able to see and safely operate the gauges. After some minor ad-justments it was perfect. Now it’s time for body filler. First we sanded the entire bezel with 40-grit sandpaper to smooth everything out and to give the body fill something to stick to. We didn’t have to use a lot of filler because the bezel didn’t require it, due to the time taken when shaping the ABS, it was just needed to fill in and make everything even.
05
2003 Mitsubishi Evolution: Customizing HVAC Controls
PERFORMANCE AUTO &
SOUND
257
Install Inst AC 8.05.indd 3 8/9/06 2:32:32 PM
PERF
ORM
ANCE
AUT
O &
SOU
ND
258
Installer Institute1524 Ridgewood Ave., Holly Hill, FL, 32117(800) 354-6782www.installerinstitute.com
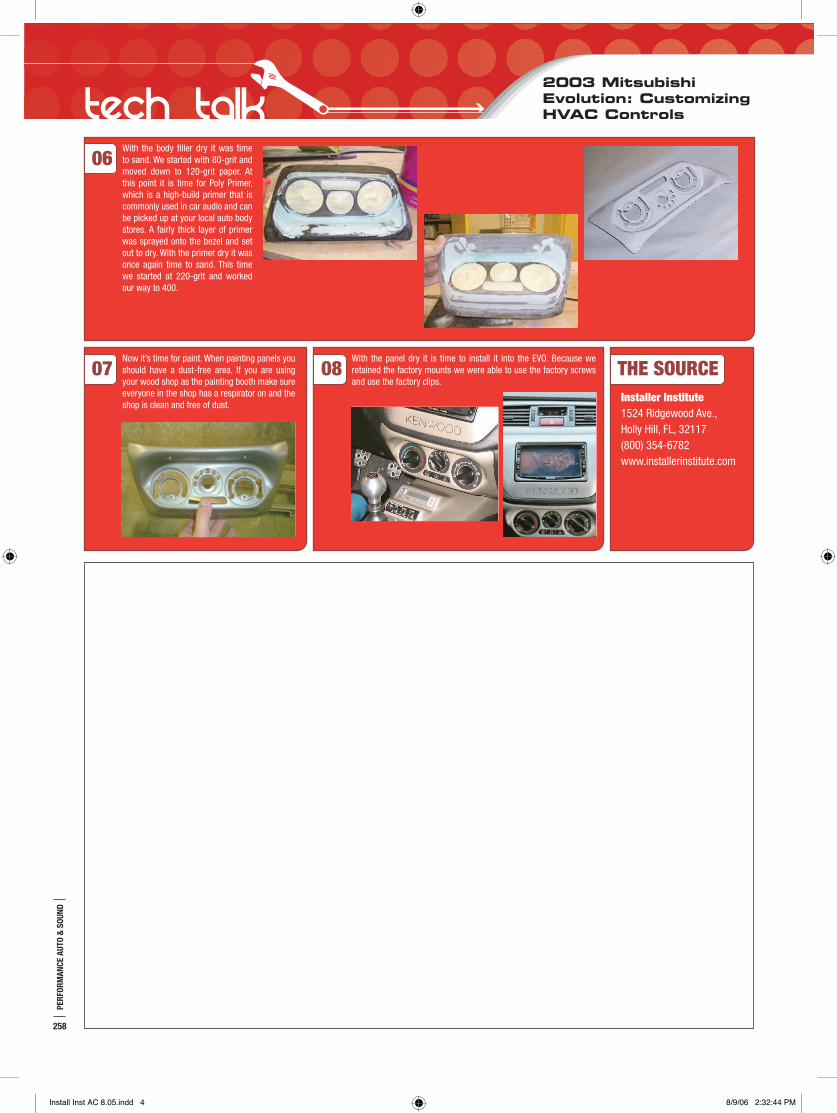
THE SOURCENow it’s time for paint. When painting panels you should have a dust-free area. If you are using your wood shop as the painting booth make sure everyone in the shop has a respirator on and the shop is clean and free of dust.
07
With the body filler dry it was time to sand. We started with 80-grit and moved down to 120-grit paper. At this point it is time for Poly Primer, which is a high-build primer that is commonly used in car audio and can be picked up at your local auto body stores. A fairly thick layer of primer was sprayed onto the bezel and set out to dry. With the primer dry it was once again time to sand. This time we started at 220-grit and worked our way to 400.
06
2003 Mitsubishi Evolution: Customizing HVAC Controls
With the panel dry it is time to install it into the EVO. Because we retained the factory mounts we were able to use the factory screws and use the factory clips.
08
Install Inst AC 8.05.indd 4 8/9/06 2:32:44 PM