event management handbook - bridgewater state … · february 2012 banner general 9.0 7 event...
TRANSCRIPT

Banner General
Event Management Handbook
Release 9.0 February 2012

Banner®, Colleague®, PowerCAMPUS®, Luminis® and Datatel® are trademarks of Ellucian or its affiliates and are registered in the U.S. and othEllu
©1the
Cosub
In pclalawof t
Pre437FaUn
Re
Pu
Fe
er countries. Ellucian, Advance, DegreeWorks, fsaATLAS, Course Signals, SmartCall, Recruiter, MOX, ILP, and WCMS are trademarks of cian or its affiliates. Other names may be trademarks of their respective owners.
992-2012 Ellucian. All rights reserved. The unauthorized possession, use, reproduction, distribution, display or disclosure of this material or information contained herein is prohibited.
ntains confidential and proprietary information of Ellucian and its subsidiaries. Use of these materials is limited to Ellucian licensees, and is ject to the terms and conditions of one or more written license agreements between Ellucian and the licensee in question.
reparing and providing this publication, Ellucian is not rendering legal, accounting, or other similar professional services. Ellucian makes no ims that an institution's use of this publication or the software for which it is provided will insure compliance with applicable federal or state s, rules, or regulations. Each organization should seek legal, accounting and other similar professional services from competent providers he organization’s own choosing.
pared by: Ellucian 5 Fair Lakes Court
irfax, Virginia 22033 ited States of America
vision History
blication Date Summary
bruary 2012 New version that supports the release of Banner General Event Management 9.0 software.
Contents
Banner General 9.0Event Management Handbook
Chapter 1 Overview . . . . . . . . . . . . . . . . . . . . . . . . . . . . . . . . . . . . . . . . . . . . . . . . . . . . . . . . . . . . . 7
Functions of the Event Management module . . . . . . . . . . . . . . . . . . . 7
Event Management process flow. . . . . . . . . . . . . . . . . . . . . . . . . . . 7
Event Management pages . . . . . . . . . . . . . . . . . . . . . . . . . . . . . . . 8
Event Management Self-Service pages . . . . . . . . . . . . . . . . . . . . . . . 9
Forgot password . . . . . . . . . . . . . . . . . . . . . . . . . . . . . . . . . . . . . 10
SPRIDEN users . . . . . . . . . . . . . . . . . . . . . . . . . . . . . . . . . . . . . 10
Non-SPRIDEN users . . . . . . . . . . . . . . . . . . . . . . . . . . . . . . . . . . 10
Chapter 2 How to Get Started . . . . . . . . . . . . . . . . . . . . . . . . . . . . . . . . . . . . . . . . . . . . . . . . . . 13
Define validation codes . . . . . . . . . . . . . . . . . . . . . . . . . . . . . . . . 13
Specify Required New Account Fields . . . . . . . . . . . . . . . . . . . . . . . 16
Manage Buildings and Rooms . . . . . . . . . . . . . . . . . . . . . . . . . . . . 17
Manage Events. . . . . . . . . . . . . . . . . . . . . . . . . . . . . . . . . . . . . . 18
Manage Functions. . . . . . . . . . . . . . . . . . . . . . . . . . . . . . . . . . . . 18
Manage Participants . . . . . . . . . . . . . . . . . . . . . . . . . . . . . . . . . . 18
Chapter 3 Define an Event. . . . . . . . . . . . . . . . . . . . . . . . . . . . . . . . . . . . . . . . . . . . . . . . . . . . . . 19
Create a new event . . . . . . . . . . . . . . . . . . . . . . . . . . . . . . . . . . . 19
February 2012 Banner General 9.0 3Event Management Handbook
Contents
Modify an existing event . . . . . . . . . . . . . . . . . . . . . . . . . . . . . . . . 20
Enter comments for an event . . . . . . . . . . . . . . . . . . . . . . . . . . . . . 20
Chapter 4 Define a Function. . . . . . . . . . . . . . . . . . . . . . . . . . . . . . . . . . . . . . . . . . . . . . . . . . . . 21
Associate a function with an event . . . . . . . . . . . . . . . . . . . . . . . . . 21
Modify an existing function . . . . . . . . . . . . . . . . . . . . . . . . . . . . . . 22
Enter function receipts . . . . . . . . . . . . . . . . . . . . . . . . . . . . . . . . . . 22
Enter function expenses . . . . . . . . . . . . . . . . . . . . . . . . . . . . . . . . . 23
Create function fee structure . . . . . . . . . . . . . . . . . . . . . . . . . . . . . . 23
Identify function target audience . . . . . . . . . . . . . . . . . . . . . . . . . . . . 24
Track function mailings . . . . . . . . . . . . . . . . . . . . . . . . . . . . . . . . . . 24
Identify function menus. . . . . . . . . . . . . . . . . . . . . . . . . . . . . . . . . . 25
Add function comments . . . . . . . . . . . . . . . . . . . . . . . . . . . . . . . . 25
Chapter 5 Registration. . . . . . . . . . . . . . . . . . . . . . . . . . . . . . . . . . . . . . . . . . . . . . . . . . . . . . . . . . 27
Register for a function . . . . . . . . . . . . . . . . . . . . . . . . . . . . . . . . . 27
View event and function details . . . . . . . . . . . . . . . . . . . . . . . . . . . 27
Chapter 6 Manage Registration . . . . . . . . . . . . . . . . . . . . . . . . . . . . . . . . . . . . . . . . . . . . . . . . 29
Manage registration using the Attendance Page . . . . . . . . . . . . . . . . . 29
Add a registrant to a function . . . . . . . . . . . . . . . . . . . . . . . . . . . . . . 29
Remove a registrant from a function . . . . . . . . . . . . . . . . . . . . . . . . . . 30
Add an existing guest to a function . . . . . . . . . . . . . . . . . . . . . . . . . . . 30
Add a new guest to a function . . . . . . . . . . . . . . . . . . . . . . . . . . . . . . 31
Update registration information for a registrant . . . . . . . . . . . . . . . . . . . . 31
Update registration information for a guest . . . . . . . . . . . . . . . . . . . . . . 32
Manage registration using the Event Registration Page. . . . . . . . . . . . . 32
Add a registrant to a function . . . . . . . . . . . . . . . . . . . . . . . . . . . . . . 33
Remove a registrant from a function . . . . . . . . . . . . . . . . . . . . . . . . . . 33
Add an existing guest to a function . . . . . . . . . . . . . . . . . . . . . . . . . . . 34
4 Banner General 9.0 February 2012Event Management HandbookContents
Add a new guest to a function . . . . . . . . . . . . . . . . . . . . . . . . . . . . . . 34
Update registration information for a registrant . . . . . . . . . . . . . . . . . . . . 35
Update registration information for a guest . . . . . . . . . . . . . . . . . . . . . . 36
Chapter 7 Manage Function Participants. . . . . . . . . . . . . . . . . . . . . . . . . . . . . . . . . . . . . . 37
Chapter 8 Track Attendance. . . . . . . . . . . . . . . . . . . . . . . . . . . . . . . . . . . . . . . . . . . . . . . . . . . . 39
Manage attendance using the Attendance Page . . . . . . . . . . . . . . . . . 39
Enter attendance information for a registrant . . . . . . . . . . . . . . . . . . . . . 39
Enter attendance information for an existing guest . . . . . . . . . . . . . . . . . . 40
Enter attendance information for a new guest . . . . . . . . . . . . . . . . . . . . . 40
Update attendance information for a registrant . . . . . . . . . . . . . . . . . . . . 41
Update attendance information for a guest . . . . . . . . . . . . . . . . . . . . . . 41
Manage attendance using the Event Registration Page . . . . . . . . . . . . . 42
Enter attendance information for a registrant . . . . . . . . . . . . . . . . . . . . . 42
Enter attendance information for an existing guest . . . . . . . . . . . . . . . . . . 43
Enter attendance information for a new guest . . . . . . . . . . . . . . . . . . . . . 43
Update attendance information for a registrant . . . . . . . . . . . . . . . . . . . . 44
Update attendance information for a guest . . . . . . . . . . . . . . . . . . . . . . 44
Manage attendance using the Attendance Tracking Page. . . . . . . . . . . . 45
Mark an ID as attending a function . . . . . . . . . . . . . . . . . . . . . . . . . . . 45
Mark an ID as not attending a function . . . . . . . . . . . . . . . . . . . . . . . . . 45
View attendance using the Individual Function Inquiry Page. . . . . . . . . . 46
Query attendance information for an ID . . . . . . . . . . . . . . . . . . . . . . . . 46
Query participation information for an ID . . . . . . . . . . . . . . . . . . . . . . . . 46
Display attendance details for an ID . . . . . . . . . . . . . . . . . . . . . . . . . . 47
Chapter 9 Manage Event Information. . . . . . . . . . . . . . . . . . . . . . . . . . . . . . . . . . . . . . . . . . 49
Atom feeds . . . . . . . . . . . . . . . . . . . . . . . . . . . . . . . . . . . . . . . . 49
Create an Atom feed . . . . . . . . . . . . . . . . . . . . . . . . . . . . . . . . . . . 49
Event Feed Implementations . . . . . . . . . . . . . . . . . . . . . . . . . . . . . . 52
February 2012 Banner General 9.0 5Event Management Handbook
Contents
Facebook “Like” . . . . . . . . . . . . . . . . . . . . . . . . . . . . . . . . . . . . . 53
Integrate the Events details page. . . . . . . . . . . . . . . . . . . . . . . . . . . 54
Customize Styles . . . . . . . . . . . . . . . . . . . . . . . . . . . . . . . . . . . . . 57
Customize the post on a Facebook wall . . . . . . . . . . . . . . . . . . . . . . . . 57
Email . . . . . . . . . . . . . . . . . . . . . . . . . . . . . . . . . . . . . . . . . . . . 57
Mail Merge using the Mail Merge Toolbar or Mailings Tab . . . . . . . . . . . . . . 58
6 Banner General 9.0 February 2012Event Management HandbookContents
Februar
1 Overview
The Banner® Event Management module helps you manage an event and its functions and enable event registration in Self-Service Banner, as well as monitor event registration, attendance, and participation information. This handbook provides instructions for using the Event Management module.
Functions of the Event Management module
You can use the Event Management module to perform the following functions:
• Schedule dates and date ranges, times, buildings, and rooms.
• Determine financial requirements, including fee and rate structures, budgets, costs, anticipated income, and actual income.
• Arrange for speakers, entertainment, ticketing, invitations, and mailings.
• Track registration, guest information, and actual attendance.
Keeping track of this information not only helps you manage the current event, but provides information that can be used to plan future events.
Event Management process flow
The first step in the Event Management process flow is to define an event that is available at your institution. Once the event is defined, you can create the function(s) that constituents can register for in the event.
NoteAn event may have one or more associated functions.
y 2012 Banner General 9.0 7Event Management Handbook
Overview
8
Once an event and its associated functions are created, you can set up and track the following information about each function:
• Budgeted and actual revenue
• Budgeted and actual expenses
• Fee structure
• Target audience
• Mailings
• Menu
After your event and functions are established, you can add and update registrant and guest details, manage participants and event capacity, and track the attendance for the function.
Event Management pages
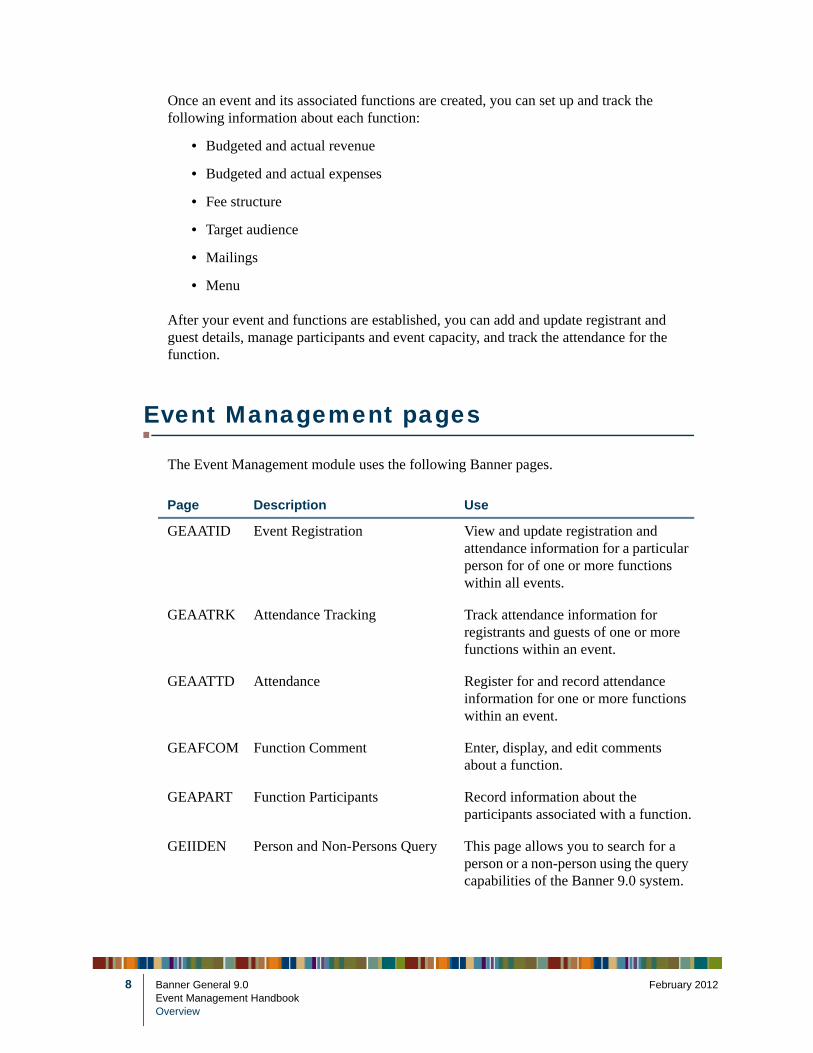
The Event Management module uses the following Banner pages.
Page Description Use
GEAATID Event Registration View and update registration and attendance information for a particular person for of one or more functions within all events.
GEAATRK Attendance Tracking Track attendance information for registrants and guests of one or more functions within an event.
GEAATTD Attendance Register for and record attendance information for one or more functions within an event.
GEAFCOM Function Comment Enter, display, and edit comments about a function.
GEAPART Function Participants Record information about the participants associated with a function.
GEIIDEN Person and Non-Persons Query This page allows you to search for a person or a non-person using the query capabilities of the Banner 9.0 system.
Banner General 9.0 February 2012Event Management HandbookOverview
Februar
Event Management Self-Service pages
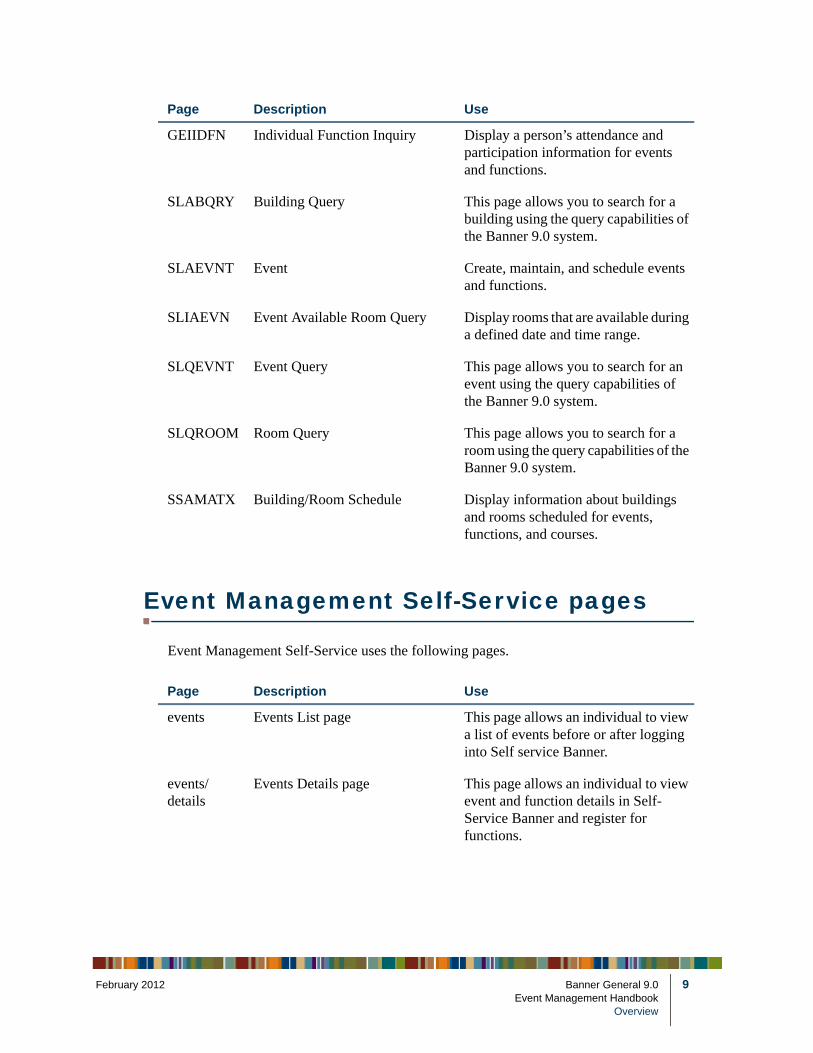
Event Management Self-Service uses the following pages.
GEIIDFN Individual Function Inquiry Display a person’s attendance and participation information for events and functions.
SLABQRY Building Query This page allows you to search for a building using the query capabilities of the Banner 9.0 system.
SLAEVNT Event Create, maintain, and schedule events and functions.
SLIAEVN Event Available Room Query Display rooms that are available during a defined date and time range.
SLQEVNT Event Query This page allows you to search for an event using the query capabilities of the Banner 9.0 system.
SLQROOM Room Query This page allows you to search for a room using the query capabilities of the Banner 9.0 system.
SSAMATX Building/Room Schedule Display information about buildings and rooms scheduled for events, functions, and courses.
Page Description Use
events Events List page This page allows an individual to view a list of events before or after logging into Self service Banner.
events/details
Events Details page This page allows an individual to view event and function details in Self-Service Banner and register for functions.
Page Description Use
y 2012 Banner General 9.0 9Event Management Handbook
Overview
10
Forgot password
Two methods exist in Self-Service Banner for users who have forgotten their password to reset their password and authenticate to the Event Management application.
• SPRIDEN users
• Non-SPRIDEN users
SPRIDEN users
Registered users with a Banner SPRIDEN ID can retrieve their forgotten PIN using the following process:
NoteThe password reset process for registered users uses the settings specified on Enterprise PIN Preferences (GUAPPRF). Security questions can be defined either on Third Party Access Audit Form (GOATPAD) or in the Self-Service application.
1. Enter your user name and click Forgot Password.
2. Answer the security questions on the Forgot Password page and click Continue.
3. Enter a new password and re-enter your password.
4. Click Submit.
You have successfully reset your password.
NoteAfter clicking on Forgot Password link, a SPRIDEN user may cancel the reset password request and continue to use the previously established password.
Non-SPRIDEN users
Unregistered users who do not have a Banner SPRIDEN ID can reset their forgotten password using the following process:
1. Enter your user name and click Forgot Password.An e-mail will be sent to your account that contains a link to reset your password and a recovery code.
2. Click the link to open the Reset Password page.
3. Enter the recovery code contained in the email you received and click Continue.
Banner General 9.0 February 2012Event Management HandbookOverview
Februar
4. Enter a new password and re-enter your password.
5. Click Submit.
You have successfully reset your password.
NoteAfter clicking on Forgot Password link, a non-SPRIDEN user may not cancel the reset password request. A new password must be created to be able to sign in to the application.
y 2012 Banner General 9.0 11Event Management Handbook
Overview

12
Banner General 9.0 February 2012Event Management HandbookOverview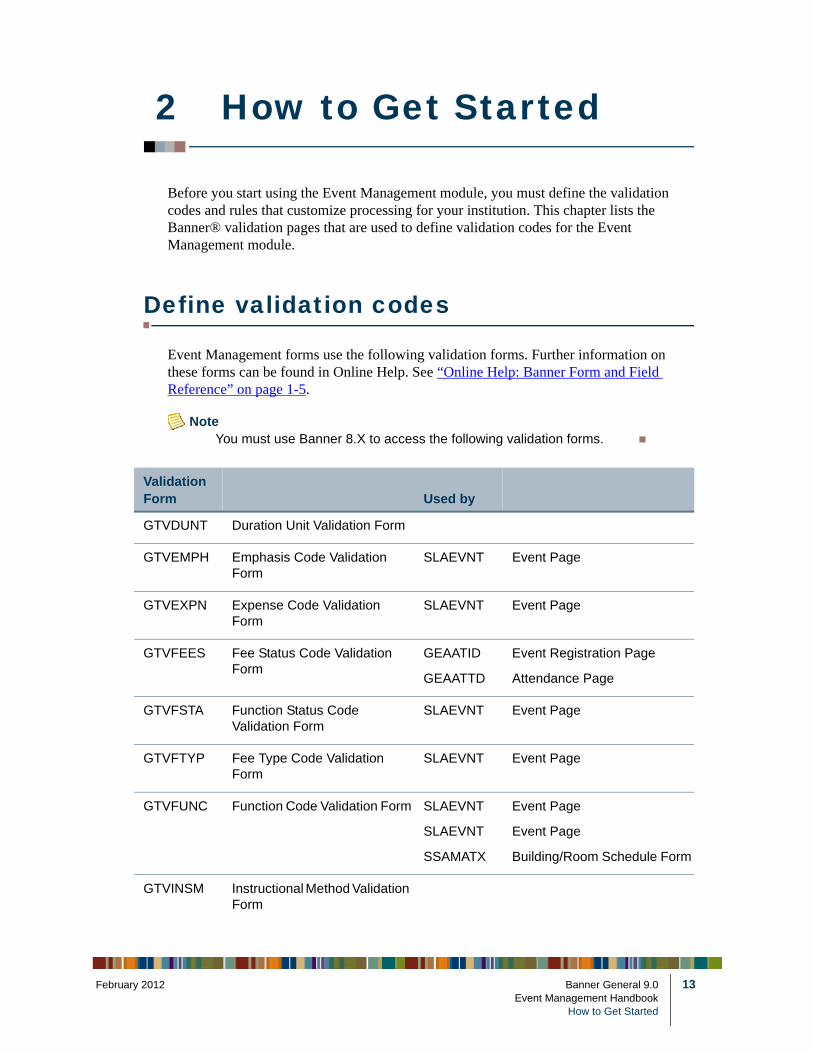
Februar
2 How to Get Started
Before you start using the Event Management module, you must define the validation codes and rules that customize processing for your institution. This chapter lists the Banner® validation pages that are used to define validation codes for the Event Management module.
Define validation codes
Event Management forms use the following validation forms. Further information on these forms can be found in Online Help. See “Online Help: Banner Form and Field Reference” on page 1-5.
NoteYou must use Banner 8.X to access the following validation forms.
Validation Form Used by
GTVDUNT Duration Unit Validation Form
GTVEMPH Emphasis Code Validation Form
SLAEVNT Event Page
GTVEXPN Expense Code Validation Form
SLAEVNT Event Page
GTVFEES Fee Status Code Validation Form
GEAATID
GEAATTD
Event Registration Page
Attendance Page
GTVFSTA Function Status Code Validation Form
SLAEVNT Event Page
GTVFTYP Fee Type Code Validation Form
SLAEVNT Event Page
GTVFUNC Function Code Validation Form SLAEVNT
SLAEVNT
SSAMATX
Event Page
Event Page
Building/Room Schedule Form
GTVINSM Instructional Method Validation Form
y 2012 Banner General 9.0 13Event Management Handbook
How to Get Started
14
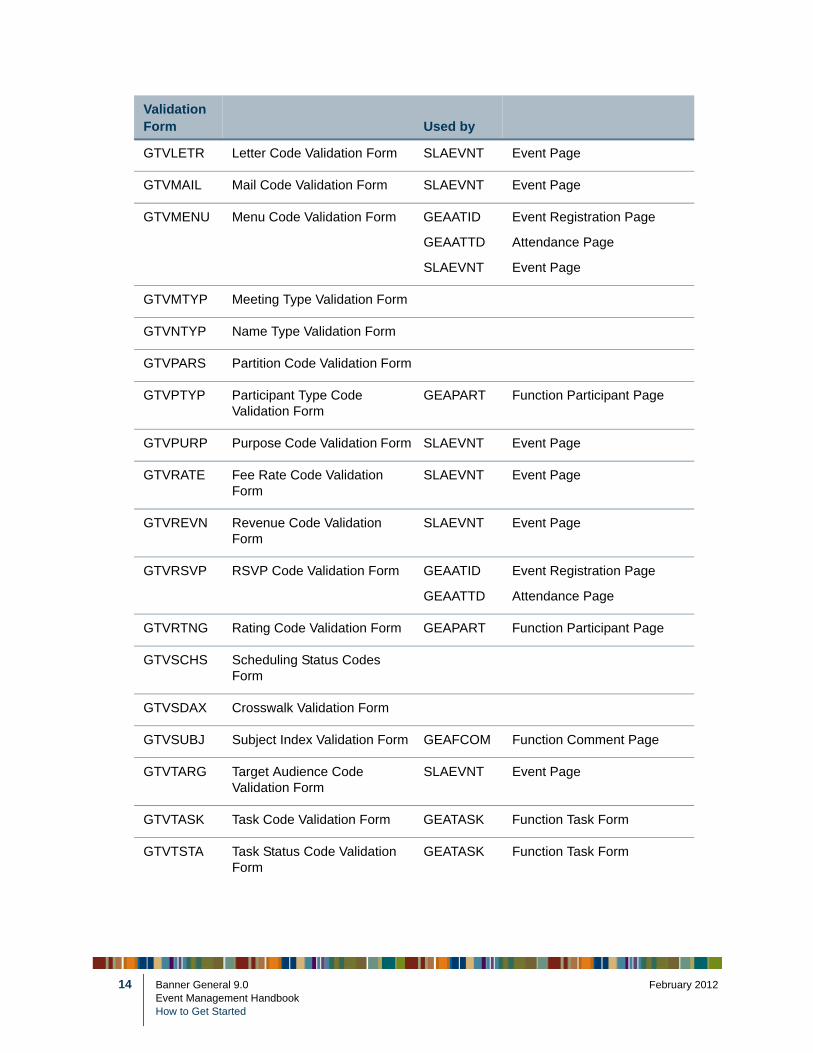
GTVLETR Letter Code Validation Form SLAEVNT Event Page
GTVMAIL Mail Code Validation Form SLAEVNT Event Page
GTVMENU Menu Code Validation Form GEAATID
GEAATTD
SLAEVNT
Event Registration Page
Attendance Page
Event Page
GTVMTYP Meeting Type Validation Form
GTVNTYP Name Type Validation Form
GTVPARS Partition Code Validation Form
GTVPTYP Participant Type Code Validation Form
GEAPART Function Participant Page
GTVPURP Purpose Code Validation Form SLAEVNT Event Page
GTVRATE Fee Rate Code Validation Form
SLAEVNT Event Page
GTVREVN Revenue Code Validation Form
SLAEVNT Event Page
GTVRSVP RSVP Code Validation Form GEAATID
GEAATTD
Event Registration Page
Attendance Page
GTVRTNG Rating Code Validation Form GEAPART Function Participant Page
GTVSCHS Scheduling Status Codes Form
GTVSDAX Crosswalk Validation Form
GTVSUBJ Subject Index Validation Form GEAFCOM Function Comment Page
GTVTARG Target Audience Code Validation Form
SLAEVNT Event Page
GTVTASK Task Code Validation Form GEATASK Function Task Form
GTVTSTA Task Status Code Validation Form
GEATASK Function Task Form
Validation Form Used by
Banner General 9.0 February 2012Event Management HandbookHow to Get Started
Februar
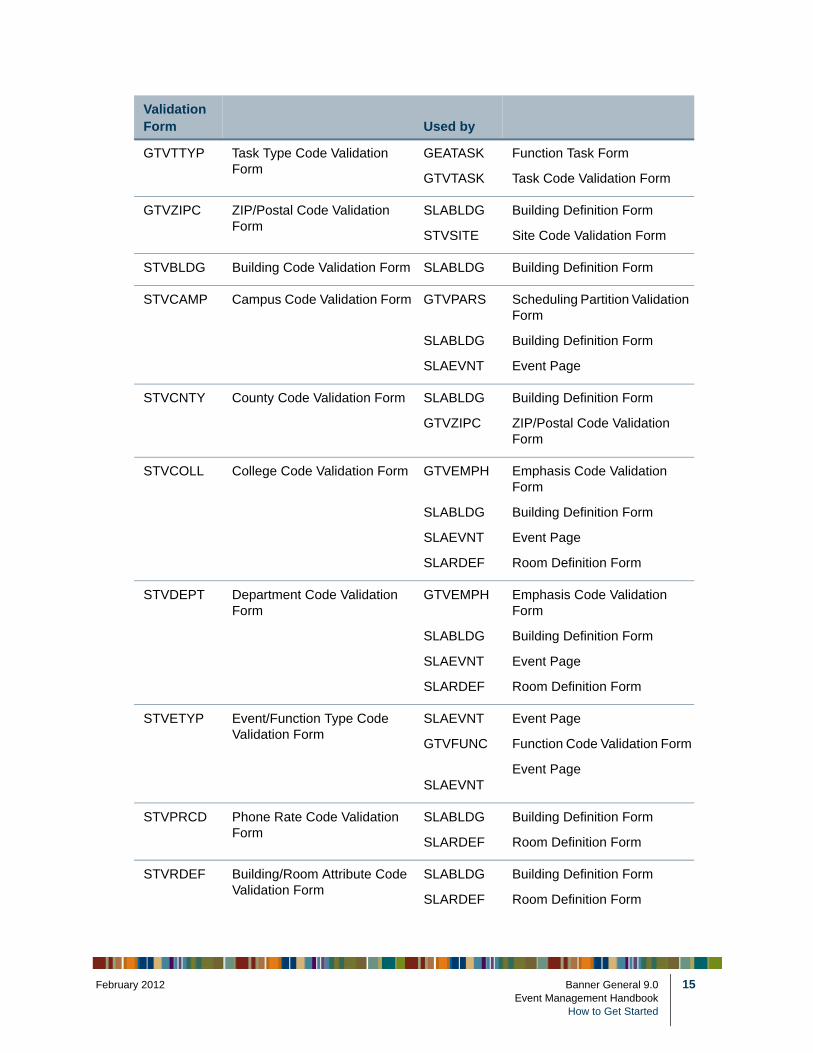
GTVTTYP Task Type Code Validation Form
GEATASK
GTVTASK
Function Task Form
Task Code Validation Form
GTVZIPC ZIP/Postal Code Validation Form
SLABLDG
STVSITE
Building Definition Form
Site Code Validation Form
STVBLDG Building Code Validation Form SLABLDG Building Definition Form
STVCAMP Campus Code Validation Form GTVPARS
SLABLDG
SLAEVNT
Scheduling Partition Validation Form
Building Definition Form
Event Page
STVCNTY County Code Validation Form SLABLDG
GTVZIPC
Building Definition Form
ZIP/Postal Code Validation Form
STVCOLL College Code Validation Form GTVEMPH
SLABLDG
SLAEVNT
SLARDEF
Emphasis Code Validation Form
Building Definition Form
Event Page
Room Definition Form
STVDEPT Department Code Validation Form
GTVEMPH
SLABLDG
SLAEVNT
SLARDEF
Emphasis Code Validation Form
Building Definition Form
Event Page
Room Definition Form
STVETYP Event/Function Type Code Validation Form
SLAEVNT
GTVFUNC
SLAEVNT
Event Page
Function Code Validation Form
Event Page
STVPRCD Phone Rate Code Validation Form
SLABLDG
SLARDEF
Building Definition Form
Room Definition Form
STVRDEF Building/Room Attribute Code Validation Form
SLABLDG
SLARDEF
Building Definition Form
Room Definition Form
Validation Form Used by
y 2012 Banner General 9.0 15Event Management Handbook
How to Get Started
16
Specify Required New Account Fields
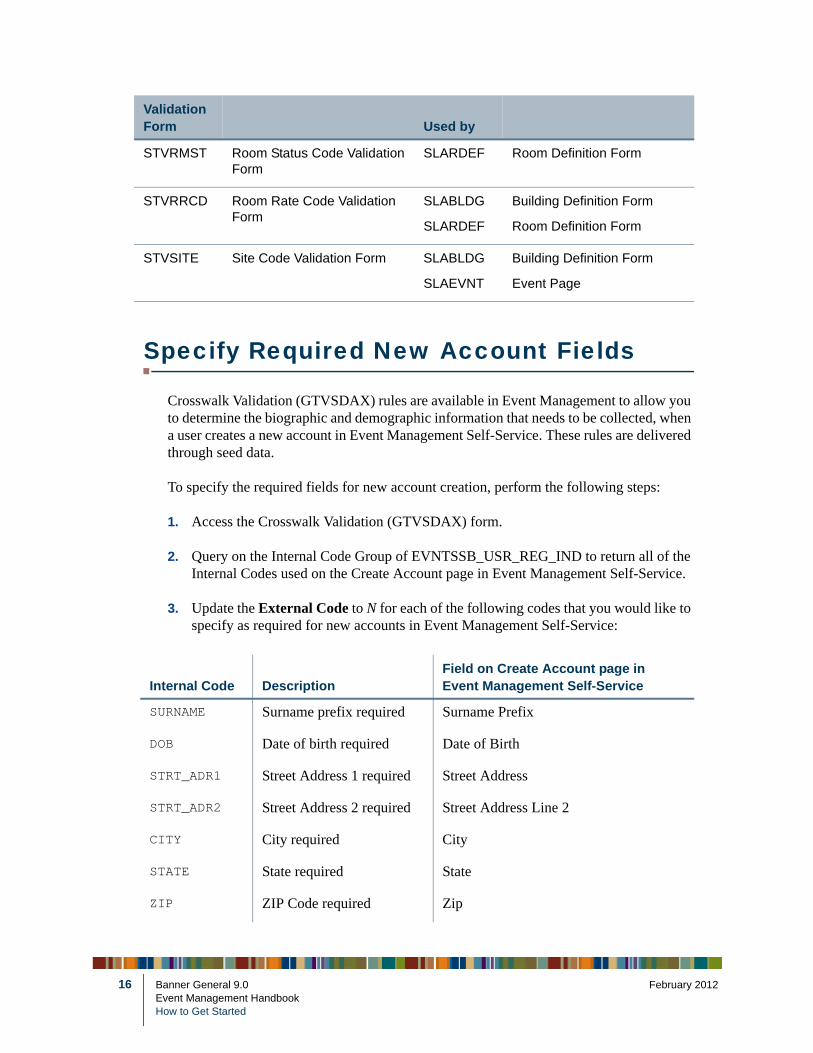
Crosswalk Validation (GTVSDAX) rules are available in Event Management to allow you to determine the biographic and demographic information that needs to be collected, when a user creates a new account in Event Management Self-Service. These rules are delivered through seed data.
To specify the required fields for new account creation, perform the following steps:
1. Access the Crosswalk Validation (GTVSDAX) form.
2. Query on the Internal Code Group of EVNTSSB_USR_REG_IND to return all of the Internal Codes used on the Create Account page in Event Management Self-Service.
3. Update the External Code to N for each of the following codes that you would like to specify as required for new accounts in Event Management Self-Service:
STVRMST Room Status Code Validation Form
SLARDEF Room Definition Form
STVRRCD Room Rate Code Validation Form
SLABLDG
SLARDEF
Building Definition Form
Room Definition Form
STVSITE Site Code Validation Form SLABLDG
SLAEVNT
Building Definition Form
Event Page
Validation Form Used by
Internal Code DescriptionField on Create Account page in Event Management Self-Service
SURNAME Surname prefix required Surname Prefix
DOB Date of birth required Date of Birth
STRT_ADR1 Street Address 1 required Street Address
STRT_ADR2 Street Address 2 required Street Address Line 2
CITY City required City
STATE State required State
ZIP ZIP Code required Zip
Banner General 9.0 February 2012Event Management HandbookHow to Get Started

Februar
Each field, with an External Code of Y will be marked as required with an * next to the field on the Create Account page.
NoteTo remove a field from the list of required fields, just you may update the External Code to N. By default, all these fields are delivered with the External Code set to N.
Manage Buildings and Rooms
Data must be set up for every building and room that is a potential site for an event. Event Management uses the same forms used by the Banner Student System to schedule classes and housing. If your institution uses Banner Student, buildings and rooms may already be set up. If not, you need to set up buildings and rooms.
1. Use the Building Code Validation Form (STVBLDG) to set up building codes for each building at your institution.
2. Use the Building Definition Form (SLABLDG) to enter data for each building where functions can be scheduled.
3. Use the Room Definition Form (SLARDEF) to enter data for each room in a building. Values default from SLABLDG but can be overwritten.
NoteA room can be inactivated for a period of time by defining a Start Date and End Date in the Room Inactivation Block of SLARDEF. For example, a room can be inactivated for scheduled maintenance.
COUNTRY Country required Country
PHONE_ARA Phone area code required Area Code (Phone)
PHONE_NUM Phone number required Phone Number
PHONE_EXT Phone extension required Phone Extension
PHONE_CNT Phone country code required Country Code (Phone)
Internal Code DescriptionField on Create Account page in Event Management Self-Service
y 2012 Banner General 9.0 17Event Management Handbook
How to Get Started
18
Manage Events
Use the Event/Function Type Code Validation Form (STVETYP) to set up codes for each type of event sponsored or offered by your institution (such as alumni gathering, social gathering, and conference).
Manage Functions
Use the Event/Function Type Code Validation Form (STVETYP) to set up codes for each type of function sponsored or offered by your institution (such as meal, break, and sporting function).
You can also enter information on the following optional form to manage additional function details:
• Function Affiliation Form (AEAAFIL). If Banner Alumni/Development is installed, this form lets you affiliate a function with campaigns, designations, and prospect management projects.
Manage Participants
Use the Participant Type Code Validation Form (GTVPTYP) to define each type of participant (such as speaker or caterer) that can be associated with a function.
NoteEach participant must have a Banner ID. These IDs are set up with the ID maintenance form of the appropriate Banner system.
Banner General 9.0 February 2012Event Management HandbookHow to Get Started

Februar
3 Define an Event
Events are created and maintained on the Event Page (SLAEVNT). An event can have one or more functions scheduled for specific dates, times, and places. For example, an event such as an alumni weekend might have a reception, dinner, conference, and lecture scheduled at various times and locations. You can create and schedule functions on SLAEVNT.
Create a new event
To create a new event, perform the following steps:
1. Access the Event Page (SLAEVNT).
2. Click Create.
3. Enter the Title for the event.
4. (Optional) Enter a description of the event.
NoteThis field supports markdown text. The event organizer can use Markdown language to format the Info Text for use in Event Management.
5. Enter the system associated with the event.
6. Enter the event type.
7. (Optional) Enter any other available event information in the Event Details section of the page.
8. (Optional) Select Show on Web to display this event and its functions in Self-Service Banner according to the publish dates.
9. (Optional) Select Restricted to restrict registration for this event to individuals with PIDM records in Self-Service Banner.
10. (Optional) Select Restrict Registration to a Single Function to require users to register for only a single function within this event in Self-Service Banner.
11. Click Save.
y 2012 Banner General 9.0 19Event Management Handbook
Define an Event
20
Modify an existing event
To modify an existing event, perform the following steps:
1. Access the Event Page (SLAEVNT).
2. Select an existing Event.
3. Click Go.
4. Modify the desired event information in the Event Details section of the page.
5. Click Save.
Enter comments for an event
To enter comments for an event, perform the following steps:
1. Access the Event Page (SLAEVNT).
2. Select an existing Event.
3. Enter any comments in the Event Comments section of the page.
4. Click Save.
Banner General 9.0 February 2012Event Management HandbookDefine an Event
Februar
4 Define a Function
A function is an activity associated with an event and scheduled for a specific date, time, and place for which constituents can register. Examples of functions include a reception, dinner, and lecture.
NoteFor a function to display in Self-Service Banner, it must be associated with an event. An event will not be available in Self-Service Banner unless it has one or more published functions associated with it.
Associate a function with an event
To create a new function for an event, perform the following steps:
1. Access the Event Page (SLAEVNT).
2. Select an existing Event.
3. Click Go.
4. Select the Function Information tab.
5. Click Insert.
6. Enter the function code.
7. Enter the type of function.
8. Enter the status of the function.
9. Enter the number of guests that a registrant is permitted to bring.
10. Enter the publish from and publish to dates to establish the date range that the function will be available in Self-Service Banner.
11. Enter any additional details about the function.
12. Select the Function Schedule Summary section.
13. Enter the start and end dates of the function.
14. Enter the begin and end times of the function.
y 2012 Banner General 9.0 21Event Management Handbook
Define a Function
22
15. (Optional) Enter the Building code.
16. (Optional) Enter the Room code.
17. Click Save.
18. If there is a scheduling conflict, return to step 8 to reschedule the function or select the Conflict Override checkbox.
Modify an existing function
To modify an existing function for an event, perform the following steps:
1. Access the Event Page (SLAEVNT).
2. Select an existing Event.
3. Click Go.
4. Select the Function Information tab.
5. Select an existing function.
6. Modify the desired function information.
7. Click Save.
Enter function receipts
To enter receipts for a function, perform the following steps:
1. Access the Event Page (SLAEVNT).
2. Enter an Event.
3. Click Go.
4. Select the Function Information tab.
5. Select the Revenue section.
6. Click Insert.
Banner General 9.0 February 2012Event Management HandbookDefine a Function
Februar
7. Enter the Revenue Code.
8. (Optional) Enter the revenue Budget Amount.
9. Enter the revenue Actual Amount.
10. Click Save.
Enter function expenses
To enter expenses for a function, perform the following steps:
1. Access the Event Page (SLAEVNT).
2. Enter an Event.
3. Click Go.
4. Select the Function Information tab.
5. Select the Expenses section.
6. Click Insert.
7. Enter the Expense Code.
8. (Optional) Enter the expense Budget Amount.
9. Enter the expense Actual Amount.
10. Click Save.
Create function fee structure
To create the fee structure for a function, perform the following steps:
1. Access the Event Page (SLAEVNT).
2. Enter an Event.
3. Click Go.
4. Select the Function Information tab.
y 2012 Banner General 9.0 23Event Management Handbook
Define a Function
24
5. Select the Fee Structure section.
6. Click Insert.
7. Enter the fee Type associated with the function.
8. Enter the Rate type associated with the fee type.
9. Enter the Amount of the rate associated with the fee type and fee rate.
10. Click Save.
Identify function target audience
To identify the target audiences for a function, perform the following steps:
1. Access the Event Page (SLAEVNT).
2. Enter an Event.
3. Click Go.
4. Select the Function Information tab.
5. Select the Target Audience section.
6. Click Insert.
7. Enter the Code that identifies the target audience associated with the function.
8. Click Save.
Track function mailings
To track mailings for a function, perform the following steps:
1. Access the Event Page (SLAEVNT).
2. Enter an Event.
3. Click Go.
4. Select the Function Information tab.
Banner General 9.0 February 2012Event Management HandbookDefine a Function
Februar
5. Select the Mailings section.
6. Click Insert.
7. Enter the Code that identifies the mailing associated with the function.
8. (Optional) Enter any other details about the mailing.
9. Click Save.
Identify function menus
To identify menu items for a function, perform the following steps:
1. Access the Event Page (SLAEVNT).
2. Enter an Event.
3. Click Go.
4. Select the Function Information tab.
5. Select the Meal Menu section.
6. Click Insert.
7. Enter the Code that identifies the menu item associated with the function.
8. Click Save.
Add function comments
Use the Function Comment Page (GEAFCOM) to enter, display, and edit freeform comments about a function. A function can have an unlimited number of comments. You can assign subject indexes (keywords) to a comment to help you search for the comment at a later time.
To enter comments for a function, perform the following steps:
1. Access the Function Comment Page (GEAFCOM).
2. Enter the Event.
y 2012 Banner General 9.0 25Event Management Handbook
Define a Function
26
3. Enter the Function.
4. Click Go.
5. Select the Comments section.
6. Click Insert.
7. Enter the Comment.
Banner General 9.0 February 2012Event Management HandbookDefine a Function
Februar
5 Registration
Registration for event functions can be enabled using the Events List page in Self-Service Banner.
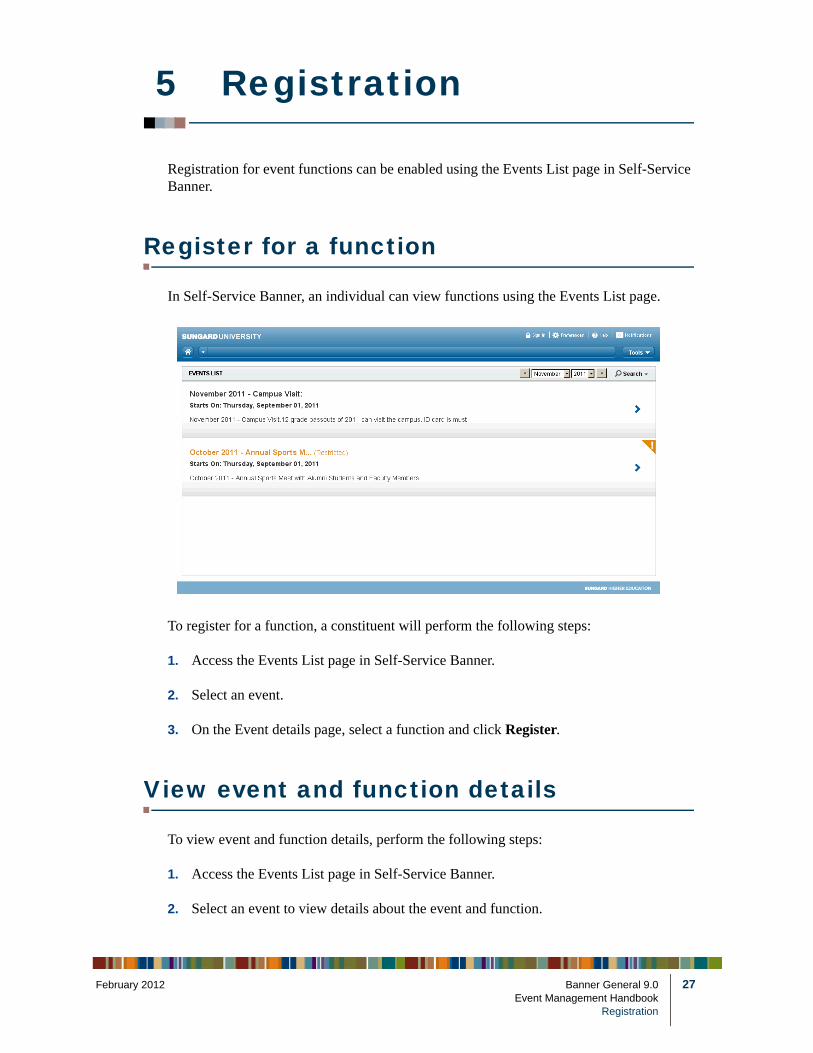
Register for a function
In Self-Service Banner, an individual can view functions using the Events List page.
To register for a function, a constituent will perform the following steps:
1. Access the Events List page in Self-Service Banner.
2. Select an event.
3. On the Event details page, select a function and click Register.
View event and function details
To view event and function details, perform the following steps:
1. Access the Events List page in Self-Service Banner.
2. Select an event to view details about the event and function.
y 2012 Banner General 9.0 27Event Management Handbook
Registration

28
Banner General 9.0 February 2012Event Management HandbookRegistration
Februar
6 Manage Registration
The following pages can be used to manage registrants and guests for a function and manage detailed information about each registrant and guest.
• Attendance Page (GEAATTD)
• Event Registration Page (GEAATID)
Manage registration using the Attendance Page
The Attendance Page allows you to perform the following tasks:
• Add a registrant to a function
• Remove a registrant from a function
• Add a guest to a function
• Update registration information for a registrant
• Update registration information for a guest
Add a registrant to a function
To add a registrant to a function, perform the following steps:
1. Access the Attendance Page (GEAATTD).
2. Enter the Event code.
3. (Optional) Enter the Function code.
4. Click Go.
5. Click Insert.
6. Enter the registrant’s ID.
7. Enter any additional information for the registrant.
8. Click Save.
y 2012 Banner General 9.0 29Event Management Handbook
Manage Registration
30
Remove a registrant from a function
To remove a registrant from a function, perform the following steps:
1. Access the Attendance Page (GEAATTD).
2. Enter the Event code.
3. (Optional) Enter the Function code.
4. Click Go. to display registrant information.
5. Select the registrant record to be removed.
6. Update the Response code for the registrant to indicate that the registrant will not attend the function.
7. Click Save.
NoteTo permanently remove a registrant from a function, you may select the
registrant record and click Delete.
Add an existing guest to a function
To add an existing guest to a function, perform the following steps:
1. Access the Attendance Page (GEAATTD).
2. Enter the Event code.
3. (Optional) Enter the Function code.
4. Click Go.
5. Select the registrant’s ID for which whom are adding a guest.
6. Enter the number of guests for the registrant in the Number of Guest field.
7. Select the Guest Information section.
8. Click Insert.
9. Enter the Guest ID.
Banner General 9.0 February 2012Event Management HandbookManage Registration
Februar
10. Enter any additional information for the guest.
NoteThe number guests entered in the Guest Information section should be the same as the value entered in the Number of Guest field in the Registration and Attendance Information section.
11. Click Save.
Add a new guest to a function
To add a new guest to a function, perform the following steps:
1. Access the Attendance Page (GEAATTD).
2. Enter the registrant’s ID.
3. Enter the Event code.
4. Click Go.
5. Select the ID for which you are adding a guest.
6. Select the Guest Information section.
7. Click Insert.
8. Enter the Last Name of the guest.
9. Enter the First Name of the guest.
10. Enter the Email of the guest.
11. Enter a Relationship for the guest.
12. Update the Attended field for the guest.
13. Click Save.
Update registration information for a registrant
To update registration information for a registrant, perform the following steps:
1. Access the Attendance Page (GEAATTD).
2. Enter the Event code.
y 2012 Banner General 9.0 31Event Management Handbook
Manage Registration
32
3. (Optional) Enter the Function code.
4. Click Go.
5. Select the ID for which you are updating registration information.
6. Update additional information for the registrant.
7. Click Save.
Update registration information for a guest
To update registration information for a guest, perform the following steps:
1. Access the Attendance Page (GEAATTD).
2. Enter the Event code.
3. (Optional) Enter the Function code.
4. Click Go.
5. Select the registrant’s ID for whom you are updating guest information.
6. Select the Guest Information section.
7. Select the Guest ID.
8. Modify any additional information for the guest.
9. Click Save.
Manage registration using the Event Registration Page
The Event Registration Page allows you to perform the following tasks:
• Add a registrant to a function
• Remove a registrant from a function
• Add a guest to a function
• Update registration information for a registrant
• Update registration information for a guest
Banner General 9.0 February 2012Event Management HandbookManage Registration
Februar
Add a registrant to a function
To add a registrant to a function, perform the following steps:
1. Access the Event Registration Page (GEAATID).
2. Enter the registrant’s ID.
3. (Optional) Enter the Event.
4. Click Go.
5. Select the Registration Information section.
6. Click Insert.
7. Enter the Function.
8. Enter registration information for the registrant.
9. Repeat steps 5 through 7 for each function to which the ID is registered.
10. Click Save.
Remove a registrant from a function
To remove a registrant from a function, perform the following steps:
1. Access the Event Registration Page (GEAATID).
2. Enter the registrant’s ID.
3. (Optional) Enter the Event.
4. Click Go.
5. Select the Registration Information section.
6. Click Delete.
7. When asked to confirm the deletion, click OK.
8. Click Save.
y 2012 Banner General 9.0 33Event Management Handbook
Manage Registration
34
Add an existing guest to a function
To add an existing guest to a function, perform the following steps:
1. Access the Event Registration Page (GEAATID).
2. Enter the registrant’s ID.
3. (Optional) Enter the Event.
4. Click Go.
5. Select the Event Registration section.
6. Select the Function for which you are adding a guest.
7. Enter the number of guests for the registrant in the Number of Guest field.
8. Select the Guest Information section.
9. Click Insert.
10. Enter the Guest ID.
11. Enter registration information for the guest.
NoteThe number guests entered in the Guest Information section should be the same as the value entered in the Number of Guest field in the Registration Information section.
12. Click Save.
Add a new guest to a function
To add a new guest to a function, perform the following steps:
1. Access the Event Registration Page (GEAATID).
2. Enter the registrant’s ID.
3. Enter the Event code.
4. Click Go.
5. Select the ID for which you are adding a guest.
Banner General 9.0 February 2012Event Management HandbookManage Registration

Februar
6. Select the Guest Information section.
7. Click Insert.
8. Enter the Last Name of the guest.
9. Enter the First Name of the guest.
10. Enter the Email of the guest.
11. Enter a Relationship for the guest.
12. Update the Attended field for the guest.
13. Click Save.
Update registration information for a registrant
To update registration information for a registrant, perform the following steps:
1. Access the Event Registration Page (GEAATID).
2. Enter the registrant’s ID.
3. (Optional) Enter the Event.
4. Click Go.
5. Select the Event Registration section.
6. Select the Function for which you are updating registration information.
7. Update registration information.
8. Click Save.
y 2012 Banner General 9.0 35Event Management Handbook
Manage Registration
36
Update registration information for a guest
To update registration information for a guest, perform the following steps:
1. Access the Event Registration Page (GEAATID).
2. Enter the registrant’s ID.
3. (Optional) Enter the Event.
4. Click Go.
5. Select the Event Registration section.
6. Select the Function for which you are updating guest registration information.
7. Select the Guest Information section.
8. Select the Guest ID for which you are updating registration information.
9. Update registration information for the guest.
10. Click Save.
Banner General 9.0 February 2012Event Management HandbookManage Registration
Februar
7 Manage Function Participants
The Function Participants page can be used to record information about the participants associated with a function. A participant assists with a function and may or may not attend. A function can have an unlimited number of participants. Examples include speakers, caterers, and presenters.
To add a participant to a function, perform the following steps:
1. Access the Function Participant Page (GEAPART).
2. Select the Event code.
3. Select the Function code.
4. Click Go.
5. Click Insert.
6. Enter the ID of the participant.
7. Enter the code that identifies the Type of participant.
8. (Optional) Enter any additional information for the participant.
9. Click Save.
y 2012 Banner General 9.0 37Event Management HandbookManage Function Participants

38
Banner General 9.0 February 2012Event Management HandbookManage Function Participants
Februar
8 Track Attendance
The following forms can be used to record attendance information for a specific function, including information for each ID invited to the function and the ID’s guests. This information can be used to help you plan successful events.
• Attendance Page (GEAATTD)
• Event Registration Page (GEAATID)
• Attendance Tracking Page (GEAATRK)
NoteThe Attendance Tracking Page allows users who do not have access to either the Attendance Page or the Event Registration Page to track attendance information.
• Individual Function Inquiry Page (GEIIDFN)
Manage attendance using the Attendance Page
The Attendance Page allows you to perform the following tasks:
• Enter attendance information for a registrant
• Enter attendance information for an existing guest
• Enter attendance information for a new guest
• Update attendance information for a registrant
• Update attendance information for a guest
Enter attendance information for a registrant
To enter attendance information for a registrant, perform the following steps:
1. Access the Attendance Page (GEAATTD).
2. Enter the Event code.
3. Enter the Function code.
4. Click Go.
y 2012 Banner General 9.0 39Event Management Handbook
Track Attendance
40
5. Click Insert.
6. Enter the registrant’s ID.
7. Enter attendance information for the registrant.
8. Click Save.
Enter attendance information for an existing guest
To enter attendance information for an existing guest, perform the following steps:
1. Access the Event Registration Page (GEAATID).
2. Enter the registrant’s ID.
3. Enter the Event.
4. Click Go.
5. Select the Function for which you are adding a guest.
6. Select the Guest Information section.
7. Click Insert.
8. Enter the Guest ID.
9. Enter attendance information for the guest.
10. Click Save.
Enter attendance information for a new guest
To enter attendance information for a new guest, perform the following steps:
1. Access the Event Registration Page (GEAATID).
2. Enter the registrant’s ID.
3. Enter the Event.
4. Click Go.
5. Select the Function for which you are adding a guest.
Banner General 9.0 February 2012Event Management HandbookTrack Attendance
Februar
6. Select the Guest Information section.
7. Click Insert.
8. Enter the guest’s First Name.
9. Enter the guest’s Last Name.
10. Enter the guest’s Email.
11. Enter the guest’s Relationship.
12. Enter attendance information for the guest.
13. Click Save.
Update attendance information for a registrant
To update attendance information for a registrant, perform the following steps:
1. Access the Attendance Page (GEAATTD).
2. Enter the Event code.
3. Enter the Function code.
4. Click Go.
5. Select the ID for which you are updating attendance information.
6. Update attendance information for the registrant.
7. Click Save.
Update attendance information for a guest
To enter attendance information for a guest, perform the following steps:
1. Access the Attendance Page (GEAATTD).
2. Enter the Event code.
3. Enter the Function code.
4. Click Go.
y 2012 Banner General 9.0 41Event Management Handbook
Track Attendance
42
5. Select the ID who invited the guest.
6. Select the Guest Information section.
7. Select the Guest ID for which you are updating attendance information.
8. Update attendance information for the guest.
9. Click Save.
Manage attendance using the Event Registration Page
The Event Registration Page allows you to perform the following tasks:
• Enter attendance information for a registrant
• Enter attendance information for an existing guest
• Enter attendance information for a new guest
• Update attendance information for a registrant
• Update attendance information for a guest
Enter attendance information for a registrant
To enter attendance information for a registrant, perform the following steps:
1. Access the Event Registration Page (GEAATID).
2. Enter the registrant’s ID.
3. Enter the Event.
4. Click Go.
5. Click Insert.
6. Enter the Function.
7. Enter attendance information for the registrant.
8. Repeat steps 5 through 7 for each function to which the ID is invited.
9. Click Save.
Banner General 9.0 February 2012Event Management HandbookTrack Attendance
Februar
Enter attendance information for an existing guest
To enter attendance information for an existing guest, perform the following steps:
1. Access the Event Registration Page (GEAATID).
2. Enter the registrant’s ID.
3. Enter the Event.
4. Click Go.
5. Select the Function for which you are adding a guest.
6. Select the Guest Information section.
7. Click Insert.
8. Enter the Guest ID.
9. Enter attendance information for the guest.
10. Click Save.
Enter attendance information for a new guest
To enter attendance information for a new guest, perform the following steps:
1. Access the Event Registration Page (GEAATID).
2. Enter the registrant’s ID.
3. Enter the Event.
4. Click Go.
5. Select the Function for which you are adding a guest.
6. Select the Guest Information section.
7. Click Insert.
8. Enter the guest’s First Name.
y 2012 Banner General 9.0 43Event Management Handbook
Track Attendance
44
9. Enter the guest’s Last Name.
10. Enter attendance information for the guest.
11. Click Save.
Update attendance information for a registrant
To update attendance information for a registrant, perform the following steps:
1. Access the Event Registration Page (GEAATID).
2. Enter the registrant’s ID.
3. (Optional) Enter the Event.
4. Click Go.
5. Update attendance information.
6. Click Save.
Update attendance information for a guest
To enter attendance information for a guest, perform the following steps:
1. Access the Event Registration Page (GEAATID).
2. Enter the registrant’s ID.
3. Enter the Event.
4. Click Go.
5. Select the Function for which you are updating guest attendance information.
6. Select the Guest Information section.
7. Select the Guest ID for which you are updating attendance information.
8. Update attendance information for the guest.
9. Click Save.
Banner General 9.0 February 2012Event Management HandbookTrack Attendance
Februar
Manage attendance using the Attendance Tracking Page
The Event Registration Page allows you to perform the following tasks:
• Mark one or more registrants and/or guests as attending a function
• Mark one or more registrants and/or guests as not attending a function
Mark an ID as attending a function
To mark an ID as attending a function, perform the following steps:
1. Access the Attendance Tracking Page (GEAATRK).
2. Enter the Event code.
3. Click Go.
4. Select the Attendance Tracking section.
5. Select one or more registrants and/or guests that attended the function or select Select All to update the attendance status for all registrants and guests.
6. Click Mark As Attended.
7. Click Save.
Mark an ID as not attending a function
To mark an ID as not attending a function, perform the following steps:
1. Access the Attendance Tracking Page (GEAATRK).
2. Enter the Event code.
3. Click Go.
4. Select the Attendance Tracking section.
5. Select one or more registrants and/or guests that did not attend the function or select Select All to update the attendance status for all registrants and guests.
6. Click Mark As Not Attended.
7. Click Save.
y 2012 Banner General 9.0 45Event Management Handbook
Track Attendance
46
View attendance using the Individual Function Inquiry Page
The Individual Function Inquiry Page allows you to perform the following tasks:
• Query attendance information for an ID
• Query participation information for an ID
• Display attendance details for an ID
Query attendance information for an ID
To query attendance information for an ID, perform the following steps:
1. Access the Individual Function Inquiry Page (GEIIDFN).
2. Enter the ID.
3. Click Go.
4. View attendance information.
Query participation information for an ID
To query participation information for an ID, perform the following steps:
1. Access the Individual Function Inquiry Page (GEIIDFN).
2. Enter the ID.
3. Click Go.
4. View participation information.
Banner General 9.0 February 2012Event Management HandbookTrack Attendance
Februar
Display attendance details for an ID
To display attendance details for an ID, perform the following steps:
1. Access the Individual Function Inquiry Page (GEIIDFN).
2. Enter the ID.
3. Click Go.
4. Select the Event for which you want to display attendance details.
y 2012 Banner General 9.0 47Event Management Handbook
Track Attendance

48
Banner General 9.0 February 2012Event Management HandbookTrack Attendance
Februar
9 Manage Event Information
Event Management allows you to manage event information by using the following methods:
• Create Atom feeds
• Facebook “Like” an event.
• Extract Event data for use in a Mail Merge
Atom feeds
Atom feeds overcome the limitations and ambiguities associated with RSS feeds and provide a more robust standards oriented technology. Atom encompasses two standards, the Atom Syndication Format which is a XML based language used for describing web feed and the Atom Publishing Protocol which is an HTTP-based protocol for creating and updating web resources.
In Event Management the Atom Syndication Format as defined by IETF proposed standard RFC-4287 is used.
An Atom feed consists of metadata about the feed, such as the title of the feed, when it was published, an identifier for the feed, and other details. The actual syndicated data becomes an entry under the feed. The entry provides details including the title of the entry/article, a link to the actual article, and content for this entry. The content can be plain text, HTML, XHTML, XML, binary, or external content such as audio or video streams. A feed can have more than one entry or none at all.
Create an Atom feed
An Atom feed is essentially an xml document. Since we are using Grails in Event Management, there are plugins available that allow the easy creation of an atom feed. The Feeds Plugin is recommended for use. The plugin allows for an easy approach for the creation of feeds without the complexity of dealing directly with XML. This plugin allows for the creation of both Atom and RSS feeds.
To create a feed we need to call the method render() from a controller action. To the render() method we pass a closure to build the feed. The code snippet below demonstrates the basic structure for creating an atom feed. In the sample, a controller called YourFeedController has an action called feedAction. This action calls the method render() which is available via the Feeds Plugin.
y 2012 Banner General 9.0 49Event Management Handbook
Manage Event Information
50
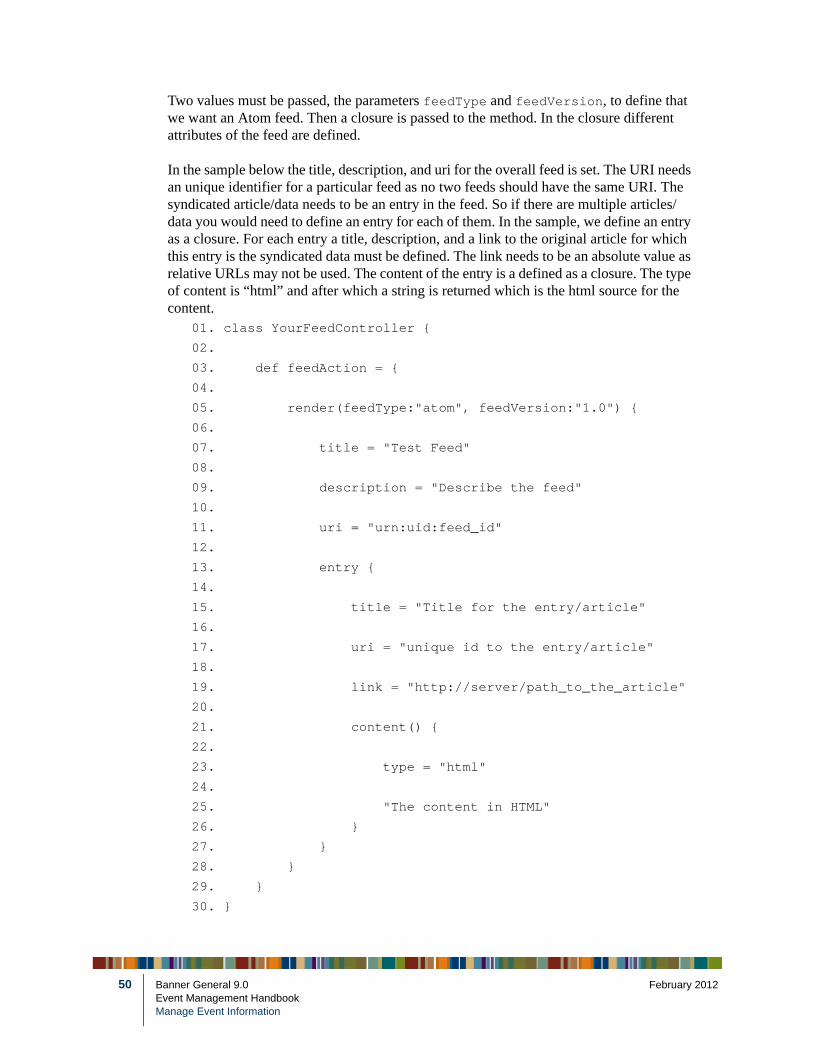
Two values must be passed, the parameters feedType and feedVersion, to define that we want an Atom feed. Then a closure is passed to the method. In the closure different attributes of the feed are defined.
In the sample below the title, description, and uri for the overall feed is set. The URI needs an unique identifier for a particular feed as no two feeds should have the same URI. The syndicated article/data needs to be an entry in the feed. So if there are multiple articles/data you would need to define an entry for each of them. In the sample, we define an entry as a closure. For each entry a title, description, and a link to the original article for which this entry is the syndicated data must be defined. The link needs to be an absolute value as relative URLs may not be used. The content of the entry is a defined as a closure. The type of content is “html” and after which a string is returned which is the html source for the content.
01. class YourFeedController {
02.
03. def feedAction = {
04.
05. render(feedType:"atom", feedVersion:"1.0") {
06.
07. title = "Test Feed"
08.
09. description = "Describe the feed"
10.
11. uri = "urn:uid:feed_id"
12.
13. entry {
14.
15. title = "Title for the entry/article"
16.
17. uri = "unique id to the entry/article"
18.
19. link = "http://server/path_to_the_article"
20.
21. content() {
22.
23. type = "html"
24.
25. "The content in HTML"
26. }
27. }
28. }
29. }
30. }
Banner General 9.0 February 2012Event Management HandbookManage Event Information

Februar
To access the feed a URL similar to the following must be used:http://server:port/context/yourFeed/feedAction.
The output that is generated is displayed below. This XML represents the Atom feed with a single entry.
<?xml version="1.0" encoding="UTF-8" ?>
<feed xmlns="http://www.w3.org/2005/Atom"
xmlns:rdf="http://www.w3.org/1999/02/22-rdf-syntax-ns#" xmlns:sy="http://purl.org/rss/1.0/modules/syndication/"
xmlns:dc="http://purl.org/dc/elements/1.1/"
xmlns:taxo="http://purl.org/rss/1.0/modules/taxonomy/">
<title>Test Feed</title>
<subtitle>Describe the feed</subtitle>
<id>urn:uid:feed_id</id>
<entry>
<title>Title for the entry/article</title>
<link rel="alternate" href="http://server/path_to_the_article" />
<author><name /></author>
<id>unique id to the entry/article</id>
<content type="html">The content in HTML</content>
</entry>
</feed>
y 2012 Banner General 9.0 51Event Management Handbook
Manage Event Information
52
Event Feed Implementations
In Event Management Self-Service three different feed implementations are provided. The controller for the generating the feeds is the class com.sungardhe.banner.general.EventsFeedController. In this controller class the following three actions for the three feed implementations can be found:
• thisMonth – this feed will list all of the applicable Events for the present month. The listing of Events in the feed is same as the listing of Events on the self-service list page for the present month. The com.sungardhe.banner.general.events.EventSSBService.fetchEventList() method is used to get all the applicable events for the present date, then for each event record that is returned an entry is created in the feed.
• allEvents – this feed will list all of the events which are applicable as of the present day. The listing of Events in the feed is same as the listing of Events on the self-service list page for all months. A grails executeQuery() method is used to build the HQL query to retrieve the applicable events records, then for each event record that is returned an entry is created in the feed.
• search – this feed allows search parameters to be passed and based on the search results, the appropriate events will be listed. The search functionality that is available for the self-service application is reused to perform the search. The supported search parameters are the title, description, startDate, endDate, and campus. These parameters would need to be passed to this action as follows:
baseurl/eventsFeed/search?title=Test
In this example we are searching for all applicable events/functions which have the text ‘Test’ in their title. If the there no results found, the feed returned will be empty and it will not have an entry tag inside it.
NoteThe parameters need to be url encoded if they contain any space or characters outside the ASCII set.
The values for startDate and endDate will be text representation of dates conforming to the format mm/dd/yyyy. If the search is successful an entry is created for each of the returned event records.
In all the above feed implementations, for each entry an absolute url to the detail page of that event must be created. For this the createLink() method provided by grails is used. The base url to the application specific configuration file has been externalized, with the configuration key set to banner.eventsFeed.base.url. This should contain the scheme, server name, port, and context for the self-service application to which the links should point to. This allows a greater control to specific the correct url to support access via network load balancers and other reverse proxy servers.
Banner General 9.0 February 2012Event Management HandbookManage Event Information

Februar
For each of the EventsFeedController action, an entry in the UrlMappings.groovy file is required. The mapping needs to be defined as follows:
“/$controller/<actionName>" {
action = "<actionName>"
}
In this sample, <actionName> needs to be replaced with the action, for example thisMonth. The mappings for the three feed implementations would already be available in the file. If a new feed needs to be created or existing ones renamed then the UrlMappings.groovy file needs to be changed accordingly.
Facebook “Like”
The Like button allows a user to share their like on a particular event with their friends on Facebook. A user can optionally add the comments to the liked content and post this information on their Facebook wall.
Each institution has the ability to customize the post that appears on Facebook walls by adding images and customizing the title content that will appear on the page. For example:
The Facebook Like feature can be added using IFRAME, FBML, and HTML5. The recommended approach is to use FBML and HTML5.
Facebook allows you to generate code and run your sample code snippet online using the following code generation tools:
• http://www.fbrell.com
• http://developers.facebook.com/docs/reference/plugins/like/
y 2012 Banner General 9.0 53Event Management Handbook
Manage Event Information
54
The following debugging tool is also available:
• http://developers.facebook.com/tools/debug. - This tool accepts a URL as an argument, for example http://host:port/BannerEventManagementSS/ssb/events/details/SSB13?mepCode=INST and will list any issues or warnings with the URL.
Integrate the Events details page
A javascript file named details-custom.js is required in the following directory of the deployed application to enable the Facebook Like feature:
<deployed_dir>\web-app\js\views\events
The details-custom.js file contains the following code:$( document ).ready( function() {
// Add the namespaces
$( "html" ).attr( "xmlns", "http://www.w3.org/1999/xhtml" );
$( "html" ).attr( "xmlns:fb", "http://ogp.me/ns/fb#" );
$( "html" ).attr( "xmlns:og", "http://ogp.me/ns#" );
//Include the FB js.
$( 'head' ).append( '<script src="http://connect.facebook.net/en_US/all.js#xfbml=1"></script>' );
//if it is HTML5
// $( 'head' ).append( '<script src="http://connect.facebook.net/en_US/all.js"></script>' );
$( 'head' ).append( '<meta property="fb:app_id" content="12345789123" />');
$( 'head' ).append( '<meta property="og:title" content='+bootstraps.eventTitle+'/> ');
$( 'head' ).append( '<meta property="og:type" content="website" />');
//This code snippet is needed to append the mep Code to url, if mep is enabled.
var url =location.toString();
if (bootstraps.mepCode != null) {
url=url + '?mepCode='+bootstraps.mepCode;
}
$( 'head' ).append( '<meta property="og:url" content='+url+'/>');
Banner General 9.0 February 2012Event Management HandbookManage Event Information
Februar
$( 'head' ).append( '<meta property="og:image" content="https://developers.facebook.com/attachment/platformlogo.jpg" />');
$( 'head' ).append( '<meta property="og:site_name" content="UniversityName" />');
$( 'head' ).append( '<meta property="og:description" content="Want to know more about us.Visit our website www.myuniversity.com" />');
//Adds a placeHolder empty div
$( 'body' ).prepend( '<div id="fb-root" ></div>' );
//Init of the FB
window.fbAsyncInit = function() {
FB.init({
appId : 'SampleUniversityEventID',
status : true,
cookie : true,
xfbml : true,
channelURL : location.toString(),
oauth : true
});
};
//fbml example
$( "#eventTitle" ).append( '<span id="fbLikeForEventXFBML"> <fb:like href=' + location.toString() + ' show_faces="no" layout="button_count"></fb:like></span>' );
// HTML version
// $( "#eventTitle" ).append( '<div class="fb-like" id="fbLikeForEvent" data-href=' + url + ' data-send="false" data-width="500" data-show-faces="false" data-font="arial"></div>');
} );
This file contains the custom javascript code to add the Facebook Like button to the Event Details page. Comments describing how to get the implement Facebook Like using FBML or HTML5 are included in the file.
y 2012 Banner General 9.0 55Event Management Handbook
Manage Event Information

56
To add Facebook Like, perform the following steps:
1. Include the all.js.<script src="http://connect.facebook.net/en_US/all.js#xfbml=1"></script>
2. Add the fbml & og namespace to html declaration.$( "html" ).attr( "xmlns", "http://www.w3.org/1999/xhtml" );
$( "html" ).attr( "xmlns:fb", "http://ogp.me/ns/fb#" );
$( "html" ).attr( "xmlns:og", "http://ogp.me/ns#" ); //this is needed for meta tags.
3. Define the meta tags including og:title, og:description, and others.
4. Invoke FB.init to initialize the Facebook context.//Init of the FB
window.fbAsyncInit = function() {
FB.init({
appId : 'SampleUniversityEventID',
status : true,
cookie : true,
xfbml : true,
channelURL : location.toString(),
oauth : true
});
};
5. Add an empty fb-root.$( 'body' ).prepend( '<div id="fb-root" ></div>' );
6. The Facebook Like div or tag is added to the event title pane.
For example, using Fbml:$( "#eventTitle" ).append( '<span id="fbLikeForEventXFBML"> <fb:like href=' + location.toString() + ' show_faces="no" layout="button_count"></fb:like></span>' );
For example, using HTML5:$( "#eventTitle" ).append( '<div class="fb-like" id="fbLikeForEvent" data-href=' + url + ' data-send="false" data-width="500" data-show-faces="false" data-font="arial"></div>');
Banner General 9.0 February 2012Event Management HandbookManage Event Information
Februar
Customize Styles
Styling is available using the details-custom.css file. Add this file to the following directory of the deployed application:
<deployed_dir>\web-app\css\views\events
The details-custom.css file contains the following code:#fbLikeForEventXFBML {
margin: 0 0 0 10px;
position: absolute;
top: 13px;
}
#fbLikeForEventHTML5 {
float:right;
}
Customize the post on a Facebook wall
Meta tags have to be added to customize the post on a Facebook wall. The title, description, and image for example are appended to head tag of the page using jquery and the specified content is used by the Facebook framework to customize the post.
Sending email from Banner Event Management can be achieved by a extracting data from Event Management pages using the Data Extract feature and using mail merge features in popular office tools like Microsoft Word, Outlook etc.
Mail merge allows you to place content from a spreadsheet, database, or table into a Microsoft Word document. Mail merge is ideal for creating personalized letters or labels instead of editing the original letter multiple times to input different personalized information. To create a mail merge, two documents are needed:
• Merge Fields with headers saved in Microsoft Excel
• A Word document
y 2012 Banner General 9.0 57Event Management Handbook
Manage Event Information
58
Mail Merge using the Mail Merge Toolbar or Mailings Tab
Before creating a mail merge, it is important to ensure that your data source is ready. The data will be extracted using data extract feature available in Event Management on the following pages:
• Attendance (GEAATID)
• Attendance Tracking (GEAATRK)
• Event Registration (GEAATTD)
To create a data file using the Data Extract feature, perform the following steps:
1. Access the Attendance (GEAATID), Attendance Tracking (GEAATRK), or Event Registration (GEAATTD) page and enter the appropriate Key block data.
2. Click Data Extract and select the Excel Spreadsheet(.xls) format. Click Next.
3. Select the data to extract and click Next.
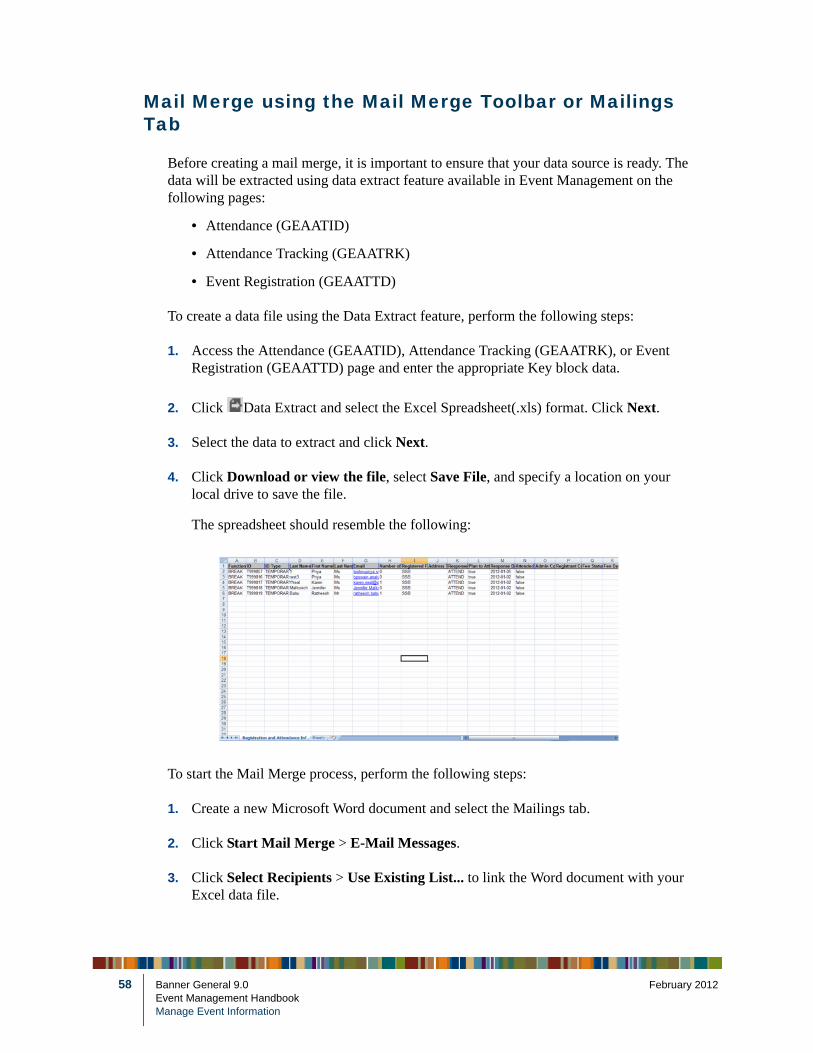
4. Click Download or view the file, select Save File, and specify a location on your local drive to save the file.
The spreadsheet should resemble the following:
To start the Mail Merge process, perform the following steps:
1. Create a new Microsoft Word document and select the Mailings tab.
2. Click Start Mail Merge > E-Mail Messages.
3. Click Select Recipients > Use Existing List... to link the Word document with your Excel data file.
Banner General 9.0 February 2012Event Management HandbookManage Event Information

Februar
4. Navigate to the location where the data source is located and select the appropriate file.
5. Select the appropriate worksheet on the selected spreadsheet and click OK.
6. Click Edit Recipient List and confirm the mail merge recipients. If there are one or more individuals on the list that you do not want to receive the letter, deselect those individuals.
7. Write the contents of the letter that you wish to send. You may click Insert Merge Field to insert recipient information from the data source into the Word document.
8. Once you have entered all of your merged fields into the correct place in the email message and verified that the correct formatting is used, click Preview Results to view a sample of the email message.
9. Once you are satisfied with the way that your mail merge is configured, click Finish & Merge > Send E-mail Messages...
y 2012 Banner General 9.0 59Event Management Handbook
Manage Event Information

60
10. In the Merge to E-mail window, enter the Subject line for your email message and click OK.
Microsoft Word will automatically generate all of the individual emails, and send those emails to your default email client.These email messages will be recorded in your sent items folder.
Banner General 9.0 February 2012Event Management HandbookManage Event Information