ev3 programming workshop for fll coaches · outline •purpose: •this workshop is intended for...
TRANSCRIPT

EV3 Programming
Workshop for FLL Coaches
Tony Ayad
2014

Outline
• Purpose:
• This workshop is intended for FLL coaches who are interested in learning about Mindstorms EV3 programming language.
• Programming
• EV3 Controller (aka: the “brick”)
• User Interface
• Building Blocks
• Controlling the robot with MOVE Blocks
• Turns - there is more than one way to turn
• Geometry and Math for the Robot
• Advanced Programming
• Light Sensor
• Program Control (WAIT, LOOP, SWITCH Blocks)
• Math (VARIABLES, MATH and COMPARE Blocks)
• My Block
• Gyro Sensor
• Resources
2 6/30/2014 EV3 Programming - Tony Ayad

EV3 Brick
6/30/2014 EV3 Programming - Tony Ayad 3
1 = Back, this button is used to reverse actions, to stop a running program, and to shut down the EV3.
2 = Center, press the center button to select and accept options, or run a program.
3 = left, right, Up, Down These four buttons are used to navigate through the various menus.
1
2
3
3
3 3

Ports, Sensors and Motors
6/30/2014 EV3 Programming - Tony Ayad 4
Large Motor
1, 2, 3, 4 = Input ports used for sensors.
Medium Motor
A, B, C, D = Output ports used for motors.
The PC USB port is used to connect to The PC so you can download the
Programs into EV3 Controller

EV3 Navigation
6/30/2014 EV3 Programming - Tony Ayad 5
Lobby Button
Open New Project
Open a previously saved project
Open New Project or previously saved ones

Projects and Programs
6/30/2014 EV3 Programming - Tony Ayad 6
Opened Project
Click to create a new program within the current project
Currently Opened Programs belonging to opened project
Project Properties
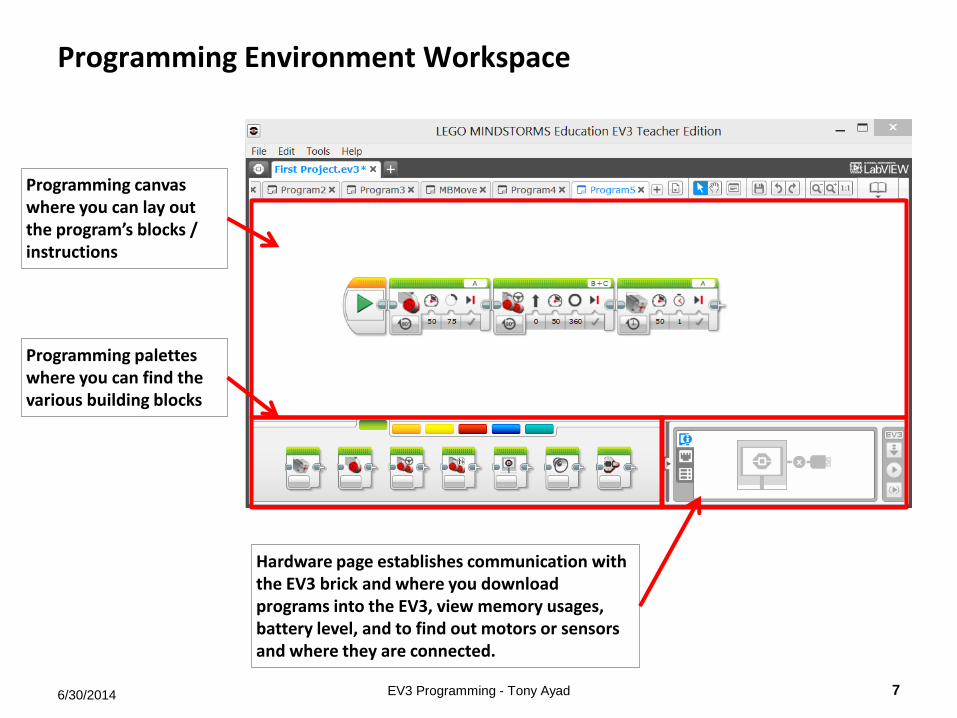
Programming Environment Workspace
6/30/2014 EV3 Programming - Tony Ayad 7
Programming canvas where you can lay out the program’s blocks / instructions
Programming palettes where you can find the various building blocks
Hardware page establishes communication with the EV3 brick and where you download programs into the EV3, view memory usages, battery level, and to find out motors or sensors and where they are connected.

Palettes
6/30/2014 EV3 Programming - Tony Ayad 8
Medium Motor, Large Motor, Move Steering, Move Tank, Display, Sound, Brick Status Light.
Start, Wait, Loop, Switch, Loop Interrupt
Action Blocks
Flow Blocks
Brick Buttons, Color, Gyro, Infrared, Motor Rotation, Temperature, Timer, Touch, Ultrasonic, Energy Meter, Sound
Sensor Blocks

Palettes
6/30/2014 EV3 Programming - Tony Ayad 9
Variable, Constant, Array, Logic, Math, Round, Compare, Range, Text, Random
File Access, Data Logging, Messaging, BlueTooth, Keep Awake, Raw Sensor Value, Unregulated Motor, Invert Motor, Stop Program
Action Blocks
Advanced Blocks
Block you create to repeat same actions in multiple programs. Programmers refer to this as subroutines or functions.
My Blocks

Controlling the EV3 Motors
• Instructing the robot to move and turn is accomplished by the Large Motors which rotate in a predetermined direction where positive amount of power (e.g. 75), will cause a clockwise rotation and negative power (e.g., -45) will cause a counter-clockwise rotation.
NOTE: the same concept applies the medium motor.
• All examples used in this document assume the robot configuration and motor is mounted as shown.
6/30/2014 EV3 Programming - Tony Ayad 10
B - Motor
C - Motor
Positive Power (+60)
Negative Power (-60)

Move Steering Block
6/30/2014 EV3 Programming - Tony Ayad 11
Move Steering
• Controls and regulates two motors.
• Both motors move either forward (positive
power) or backward (negative power)
• Allows steering by applying more power to
one of the two motors
Steering Control from (-100- 100) where 0 = move straight; Positive# = C more power than B negative# = B more power than C
Power (100 to -100); positive number is move forward; negative, moves backward. Note: small amount of power may cause the robot to stall.
Number of motor degrees, rotations or seconds
Brake or Coast

Move Tank Block
6/30/2014 EV3 Programming - Tony Ayad 12
Power (100 to -100); positive number is move forward; negative, moves backward. Note: small amount of power may cause the robot to stall.
Number of motor degrees, rotations or seconds
Brake or Coast
Move Tank
• Control two motors and allows each motor to
move with different power level including in
different direction for turning or spinning.
• For turning: one motor has zero power; the other
has positive (forward) or negative(backward)
power.
• When zero power is specified, the motor is locked
and will not move to ensure accurate turns
• For spinning, use positive power for one and
negative for the other

Large Motor Block
6/30/2014 EV3 Programming - Tony Ayad 13
Power (100 to -100); positive number is move forward; negative, moves backward. Note: small amount of power may cause the robot to stall.
Number of motor degrees, rotations or seconds
Brake or Coast
Large Motor
• Control a single large motor
• When zero power is specified, the motor is
locked and will not move to ensure accurate
turns

Medium Motor Block
6/30/2014 EV3 Programming - Tony Ayad 14
Power (100 to -100); positive number is move forward; negative, moves backward. Note: small amount of power may cause robot to stall.
Number of motor degrees, rotations or seconds
Brake or Coast
Medium Motor
• The Medium Motor block controls the
Medium Motor. You can turn the motor on or
off, control its power level, or turn the motor
on for a specified amount of time or
rotations
• When zero power is specified, the motor is
locked and will not move
• Use positive or negative power to control
direction

Controlling the Robot with Basic Actions
• Basic Actions (sufficient for new teams):
• Move forward and backwards (MOVE STEERING block)
• TURN or SPIN (MOVE TANK block)
• Raise or lower the robotic arm (MEDIUM or LARGE Motor block)
• Advanced Actions
• Color / Light Intensity detection (WAIT or COLOR Sensor blocks)
• Making a decision, e.g., following a line (LOGIC / SWITCH blocks)
• Repeating steps (LOOP block)
• Computations (MATH block)
• Color Sensor Calibration
• Using NXT sensors (RAW SENSOR block)
• My Blocks
6/30/2014 EV3 Programming - Tony Ayad 15

Steps to create a program
6/30/2014 EV3 Programming - Tony Ayad 16
1. Click and hold block a block with left mouse button to drag it
2. Drop the programming block when grey box appears
3. Select / enter options
4. Click download to compile and load the program in the EV3 controller

Turn vs. Spin
• There are two ways in which you can make the robot turn
• Make ONLY one motor move, or
• Using both motors moving in opposite direction, and this is referred to as “spinning"
• One Motor move:
• Right Turn – Use MOVE TANK block and select a power level for the “B” motor and zero for the "C" motor
• In this case the robot’s right wheel will be stationary and the left wheel will move.
• Turning with two motors in opposite direction
• To turn right, use the MOVE TANK block where the “B” motor will turn clockwise (positive power) and the “C” motor will turn counter clockwise (negative power).
6/30/2014 EV3 Programming - Tony Ayad 17
B
C brake
Right
B
C Backward
Forward
TIP: for turning in a tight spot, use the two motors.

Turns Continued
• To make 180 degree right turn using a tank move or large motor
• To make 180 degree right turn using tank move (spin in place)
• Note the distance travelled is shorter (exactly half) when using both two motors.
6/30/2014 EV3 Programming - Tony Ayad 18
B
Start Position End Position
Start Position End Position
C
B
C
C
B
C
B

6/30/2014 EV3 Programming - Tony Ayad 19
Geometry and Math Fun way to see that what is learned in school can be applied to the FIRST LEGO League’s robots. Note: it may be a stretch for younger teams that have not covered these concepts in school.
C = π x Diameter

Inches to Motor Degrees
6/30/2014 EV3 Programming - Tony Ayad 20
• The Circumference of the robot’s wheel determines the number of inches it will travel in 1 rotation
• Circumference of wheel = π x Diameter
• Degrees traveled per inch = 360 / circumference of wheel
3.2 inches
1.6 inches
2.2 inches
1 Rotation = 10 inches
1 Rotation = 7 inches
1 Rotation = 5 inches
• Circumference of wheel = π x Diameter = 3.14 x 3.2 = 10.0 inches
• Degrees traveled per inch = 360 / 10.0 = 36 motor degrees
• Circumference of wheel = π x Diameter = 3.14 x 2.2 = 7 inches
• Degrees traveled per inch = 360 / 7 = 52 motor degrees
• Circumference of wheel = π x Diameter = 3.14 x 1.6 = 5 inches
• Degrees traveled per inch = 360 / 5 = 72 motor degrees
You can use a ruler or measuring tape to plan mission…

Measuring turn travel distance – More Geometry! • When the robot turns using one motor, it will make a circle whose Radius is the
distance between the wheels
• If the robot is using the wheel whose diameter is 2.2 inches and therefore its circumference is 7 inches, how many wheel rotations will it take to make a complete robot turn rotation (34.5 inches)?
Note: it takes 4.9 wheel rotations to make a complete (360º turn) (or 4.9 motor degrees to travel 1 degree of turn circle)
• Example: to make a 90º robot turn
• Motor Degrees = 90 X 4.9 = 441 Motor Degrees
6/30/2014 EV3 Programming - Tony Ayad 21
5.5 in
5.5 in
In this case, the radius is 5.5 inches
Circumference = 2 X π X R
= 2 X 3.14 x 5.5 = 34.5 inches
2.2 inches
Circumference of Robot Turn Circle Diameter X π Circumference of Robot’s Wheel Diameter X π
11 X 3.14
2.2 X 3.14 = 4.9 = =

Programming Process
6/30/2014 EV3 Programming - Tony Ayad 22
• Analysis and Planning Steps
• Define the problem
• Brainstorm solution and select one
• KEEP IT SIMPLE!
• Plan and create a flowchart and take measurements
• Programming suggestions
• Divide the program into small pieces
• Program one pieces at a time
• Example: Move the robot to black line
• Once the step is consistently repeatable, go to the next
• Whenever possible reuse repeatable combination of blocks using MYBLOCK
• ******* BACKUP YOUR PROJECT FILE ******
• Ask for help
• http://forums.usfirst.org/forumdisplay.php?f=24
• The questions should be generic and not specific to strategy
Tips
6/30/2014 EV3 Programming - Tony Ayad 23
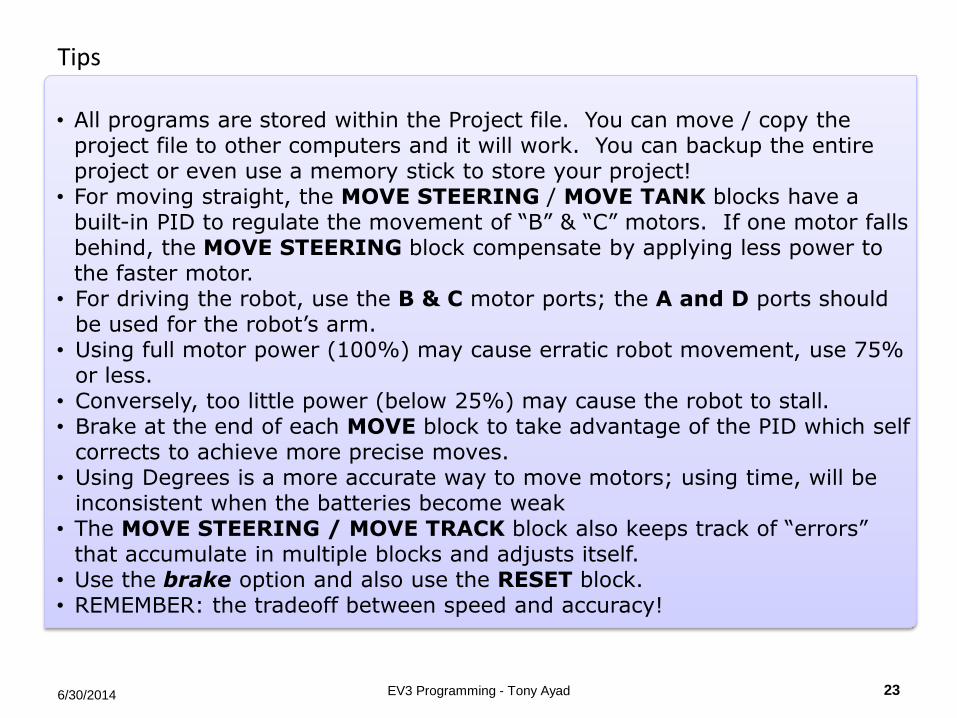
• All programs are stored within the Project file. You can move / copy the
project file to other computers and it will work. You can backup the entire project or even use a memory stick to store your project!
• For moving straight, the MOVE STEERING / MOVE TANK blocks have a built-in PID to regulate the movement of “B” & “C” motors. If one motor falls behind, the MOVE STEERING block compensate by applying less power to the faster motor.
• For driving the robot, use the B & C motor ports; the A and D ports should be used for the robot’s arm.
• Using full motor power (100%) may cause erratic robot movement, use 75% or less.
• Conversely, too little power (below 25%) may cause the robot to stall. • Brake at the end of each MOVE block to take advantage of the PID which self
corrects to achieve more precise moves. • Using Degrees is a more accurate way to move motors; using time, will be
inconsistent when the batteries become weak • The MOVE STEERING / MOVE TRACK block also keeps track of “errors”
that accumulate in multiple blocks and adjusts itself. • Use the brake option and also use the RESET block. • REMEMBER: the tradeoff between speed and accuracy!

6/30/2014 EV3 Programming - Tony Ayad 24
Why Color sensors?
One of the ways for the robot to know its location is to take advantage of the markings on the field mat. Every year, the Robot Game’s mat has lines or dark markings that can be detected by the color Sensor. In this section, we will cover the following • How do color sensors work? • How to calibrate the color sensor? Common use Programming Examples:
• Move until a dark line is encountered by the robot, • Align the robot with a black line • Follow a line

Color Sensors in Reflected Light Detection Mode…
• The COLOR SENSOR shines the red LED light on the mat and reads the reflected brightness level (intensity) level, i.e. dark or bright.
• Light intensity ranges from 0-100% where bright is close to 100% and dark is 0%.
• Example:
6/30/2014 EV3 Programming - Tony Ayad 25
• To obtain more accurate reading, make sure the light sensor is close to the mat (less than ½ inch) • Calibrate the sensor whenever light conditions change
Black Violet
Dark Blue Dark Red / Brown
70%
50%
20%
50%
70%

WAIT for light value block
• The WAIT block keeps checking for the specified light intensity value and when the condition is met, the next step in the program is executed
6/30/2014 EV3 Programming - Tony Ayad 26
Port: identify the EV3 port where the light sensor is connected
Enter value you would like to test.
Select “>” greater than or “<“ less than. Example: if you select “<“ and entered 50, and the light sensor encounters a black block, the result will be the test is “True”

Color Sensors in Color Detection Mode
• In COLOR SENSOR mode:
• The red, green, and blue LED lights are turned on
• The sensor detects the color of a nearby object, or the color of a surface near the sensor.
• Below is a list of detectable colors
• Example:
6/30/2014 EV3 Programming - Tony Ayad 27
1 = Black 2 = Blue 3 = green 4 = Yellow 5= Red 6 = White 7= Brown 0 = No Color

WAIT for Specific Color or Colors
• The WAIT block keeps checking for the specified light intensity value and when the condition is met, the next step in the program is executed
6/30/2014 EV3 Programming - Tony Ayad 28
Port: identify the EV3 port where the color sensor is connected
Color values (1 or 5)
Wail will continue until the detected color is RED
Wail will continue until the detected color is RED or BLACK

Calibrate the Color Sensor – Light Intensity
6/30/2014 EV3 Programming - Tony Ayad 29
• The COLOR SENSOR with factory setting will not provide the best reading and therefore calibration helps improves the accuracy of detection.

6/30/2014 EV3 Programming - Tony Ayad 30
Advanced Blocks and Example
• To create a line follower program you will need to use the light sensor and
repeatedly check the light value and adjust the robot’s position
• LOOP Block
• COMPARE Block – Line follower examples
• Additional Blocks • VARIABLE • MATH • COMPARE
• Data Hubs

The LOOP Block
6/30/2014 EV3 Programming - Tony Ayad 31
• Sometimes, there are actions that you want to repeat. The LOOP block allows you to repeat those actions until an end condition is met (or becomes TRUE).
• Example: make the robot move around a box and return to its starting position
• To move along the box sides, it takes 8 blocks as follows:
Warning: Deleting the LOOP block will also delete all the blocks within the loop. You can move the blocks out of the loop, then delete it.
Using the LOOP block, only
Repeat the loop 4 times

More about the loop block
6/30/2014 EV3 Programming - Tony Ayad 32
• LOOP blocks can be given names
• The LOOP block can be stopped with a condition within the loop or with a new LOOP INTERRUPT
• Multiple parallel programming sequences can be created using a new START block
• Multiple sequences can run simultaneously
• Clicking the green arrow of the START block, will compile and download the entire program to your EV3, but only the selected sequence will run.
Walk and
Chew gum
At the same
Time!

Wait Block – Examples
6/30/2014 EV3 Programming - Tony Ayad 33
Example 1: Move until the robot detects a (black)
dark line and stop
Example 2: Move to detect a black line, using
a LOOP block instead of WAIT.
Simultaneously use the WAIT for
time block and if two seconds
elapsed, end the loop using
LOOP INTERRUPT and stop the
motors.

SWITCH block – Line Follower
• The SWITCH block will check for a condition and will take one action if the condition is true and another action if the condition is false
6/30/2014 EV3 Programming - Tony Ayad 34
C B
Repeat the loop
for 5 seconds
The Switch block
contains two or
more sequences of
programming blocks
that are run based
on condition.

VARIABLE block • The variable block is a “bucket” where you can store
information and retrieve it at a later time. • There are three types: Number, Text, and Logic MATH block • The math block allows the addition, subtraction,
division or multiplication of two numbers. COMPARE block • The compare allows you to determine if
one number is greater than, less than or equal to another number.
6/30/2014 EV3 Programming - Tony Ayad 35
Input Result
Result (True or False)
Input
More Advanced Blocks

The much improved Math Block!!!
6/30/2014 EV3 Programming - Tony Ayad 36
• You can Add, Subtract, Divide, Multiply, and obtain the absolute value. Now you can calculate an exponent and CREATE YOUR CUSTOM FUNCTION under the Advanced option!
• You have up to 4 variable which can be initialized with wires from other math blocks or typed-in.
• Then you can enter your own function and obtain the result
• This reduces the number of math blocks used.
• QUIZ: what is the answer?
VARIABLES –create your own variables
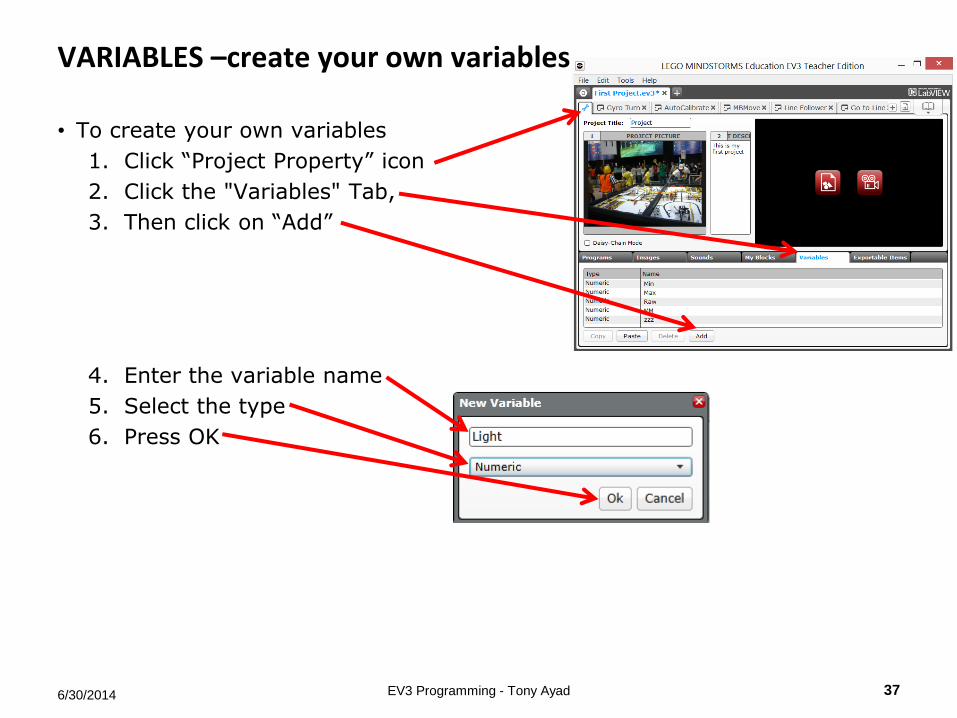
• To create your own variables
1. Click “Project Property” icon
2. Click the "Variables" Tab,
3. Then click on “Add”
4. Enter the variable name
5. Select the type
6. Press OK
6/30/2014 EV3 Programming - Tony Ayad 37

My Block
• My Block is a combination of one or more blocks that are grouped into a single "Block". Once created, it can be used in many programs. My Block can be used in the following ways:
1. Minimize the coding, if certain actions are repeated in multiple programs. Often, you need to repeat certain steps, for example, different programs require that the robot would back into the wall to re-orient itself. This process can be placed into a My Block.
2. Divide a program into smaller manageable pieces
3. Reduces the amount of memory used.
4. Clarify the action taken in programs by creating self explanatory My Blocks
• Example 1: your program already includes 22 blocks and you’re not finished. It is time to consider breaking up the program into “chunks”, i.e., My Blocks.
• Example 2: For turning left or right you use the LARGE MOTOR block. When someone is reviewing the program, they can’t tell which way the robot is turning if you are only using MOTOR block. Solution: create a “Turn Left” My Block to make it easy to understand the program.
• Example 3: One you’ve fine tuned a perfect 90 degree turn, you can create your own My Block for the perfect 90 degree left and right turn.
6/30/2014 EV3 Programming - Tony Ayad 38

My Block Example – Moving using inches instead of degrees • Objective:
• Build a move My Block that takes one input called duration which represent the number of inches
1. Select the Math & Move blocks
2. Under tools, select "My Block Builder”
3. Type My Block Name “MoveInches”, and enter an optional description and select a my block icon
4. Click on the Parameter Icon, then enter parameter name and click on Finish.
6/30/2014 EV3 Programming - Tony Ayad 39

Using My Block
• Once you’ve created My Block, it will become available on the My Block palette
1. Select the My Block palette
2. Drag and drop the My Block named "MoveInches" into the program
• Type the number of inches into the "a" input value…That’s it.
6/30/2014 EV3 Programming - Tony Ayad 40

My Block Tips
• Use My Block to break down a large program into two or more My Blocks
• If you create a My Block with one input and decided later to add another input, you’ll have to start over
• If you create a My Block with two inputs and decided later to remove one, you cannot delete the input; either start over, or ignore it.
6/30/2014 EV3 Programming - Tony Ayad 41

Turning the easy way – Gyro Sensor!
• The gyro sensor has Angle Measure Feature to allow you to control turns based upon the turn angle.
• When the Gyro Sensor is attached to the robot, and robot turns to the right, the gyro sensor will report positive number; if the robot turns left, the Gyro Sensor will report a negative number.
• See example below
6/30/2014 EV3 Programming - Tony Ayad 42
+ Positive
- Negative
NOTE: you must reset the gyro sensor as the first step and immediately before turning so that your turn is measured from the robot’s current position!

6/30/2014 EV3 Programming - Tony Ayad 43
Finally, the resources
• LA Region FLL website http://la-fll.org
• World Class at USFIRST: http://www.firstlegoleague.org/challenge/2014fllworldclass
• FLL Forum: http://forums.usfirst.org/forumdisplay.php?f=24 • A great EV3 tutorial http://www.stemcentric.com/ev3-tutorial/
• A great NXT tutorial http://www.stemcentric.com/nxt-tutorial/
• Instructions to build a variety of robots and sample programs www.nxtprograms.com • Wish you had extra LEGO pieces? www.bricklink.com
• LA Region FLL Google Group https://groups.google.com/forum/#!forum/losangelesfll • If all else fails [email protected]