ev2 manual iss 3.p65
TRANSCRIPT

EV2 USERS HANDBOOKTHIS HANDBOOK REFERS TO THE EV2 MODEL
PLEASE READ THIS MANUAL BEFORE USING YOUR NEW RIFLE, IT CONTAINSIMPORTANT SAFETY INFORMATION AND INSTRUCTION ON ADJUSTMENT ANDMAINTENANCE.
***** SAFETY CODE *****1 - TREAT THIS AIR RIFLE AS IF LOADED.2 - NEVER POINT IT AT ANYONE, EVEN IF UNLOADED.3 - NEVER LEAVE THIS RIFLE UNATTENDED WHEN COCKED OR LOADED.4 - ALWAYS BE SURE OF WHAT LIES BEYOND YOUR TARGET.5 - ALWAYS CONDUCT YOURSELF IN A SPORTSMAN-LIKE MANNER.
ALWAYS BE AWARE THAT YOUR ACTIONS WILL BE UNDER THE SCRUTINY OFOTHER MEMBERS OF THE PUBLIC WHO MAY NOT SHARE YOUR ENTHUSIASM FORAIR WEAPONS. BAD PRACTICES PROMOTE BAD PUBLICITY. DO NOT JEOPARDISEYOUR, OR OTHERS FUTURE ENJOYMENT BY MISUSING THIS WEAPON.
WARNING ! - UNAUTHORISED DISASSEMBLY OF THIS RIFLE WILL INVALIDATE THE MANUFACTURERSWARRANTY
EV2 FP ISS3
Manufacturers Warranty
This product has a limited 12 month back-to-base warranty commencing from the date of pur-chase and is transferable. The warranty is limited to defects in materials and/or workmanship.Proof of purchase is required to receive warranty repairs. The most effective way to prove dateof purchase is to get the warranty registration card supplied with every rifle stamped or signed bythe supplier and post it. Failing that you may be asked to produce a copy of the purchase re-ceipts.
WHAT IS COVERED:1> Replacement of parts and labour.2> Return transportation to the consumer (mainland UK only).
WHAT IS NOT COVERED:1> Transportation from consumer to Air Arms.2> Damage caused by misuse, abuse, lack of routine maintenance or disassembly.3> Parts subject to normal wear and tear.4> Any consequential costs to the consumer.
Checking Performance
The current laws on ownership and use of air rifles make it very difficult for manufacturers tosatisfy both the shooter and legislation. The shooter wants maximum power, legislation demandsan upper limit. Pellets vary in size, weight and design; every rifle performs slightly differently;this results in a performance variable that can in some cases make a 12ft/lb rifle into a firearmjust by a pellet change.Air Arms have adopted the principle of setting up all rifles on AA brand pellets only. The mostimportant factors behind this decision are that the pellets are made to our design parameters inrespect of weight and size thus removing the major variables. It is still essential that regularvelocity checks are made particularly in the first year of ownership.
EV2 models are set up using Air Arms Field pellets to produce between 11.3 and 11.5ft/lbs. Thisis to allow for a normal increase in performance during the running in period, approximately2000 shots.
With access to a reliable chronograph it is possible to check velocity and calculate the muzzleenergy in ft/lbs. Calculate using the following formula applying the constants, V = velocity infeet per second. W = weight of pellet in grams. Check that the chronograph readings are in feetper second.
V x V x W x 15.432450240
Example: V = 800fps, W = 0.52gramstherefore 800 x 800 x 0.52 x 15.432 = 5135769.6 divide by 450240 = 11.4067ft/lbs.
This Air Rifle is not a toy and may cause death or serious injury if used incorrectly or carelessly.Read all instructions before use.
The user has the responsibility to conform to all legislation relating to the ownership and use of air weaponswithin the country of use.
In the United Kingdom of Great Britain, the use of this air rifle requires adult supervision if the user is under theage of 14 years. The supervisor must be at least 21 years old.
1> Before leaving the factory this rifle was inspected and test fired using Air Arms Field pellets to check operationand final adjustments.It was dispatched in a sealed purpose designed box. Air Arms will not be responsible for any damage to the contentsor missing items if the box is not original or has been opened between dispatch from the factory and receipt by theend user.In the event of any complaint regarding this product the supplier should be informed. The consumers rights are withthe supplier not the manufacturer.
2> The air cylinder fitted to this product will have very high internal pressure when ready for use and must not bemodified in any way. Serious personal injury may result if this and the advise below is not followed.a> Only use clean, filtered and dry compressed air. NEVER use any other gas particularly industrial or weldinggases such as Oxygen, Acetyline, Hydrogen etc.b> Do not fill the cylinder if there are any surface abrasions or dents. Contact Air Arms for advise if you have anydoubts on the suitability of the cylinder to be filled.c> Do not store the rifle in a place or near sources with high temperatures such as fires or boilers.d> Do not dismantle when filled.e> Do not fill beyond the stated filling pressure (see filling instructions section). Damage caused by over filling isnot covered by the manufacturers warranty and in any case is potentially very dangerous.
3> If the rifle is being filled by a hand pump it is essential to prevent the ingress of water. The compression of airalways results in the seperation of water, the higher the pressure the greater the effect. Air that is put into scuba tanksby the likes of diving shops is filtered to a high level and therefore helps to keep the internals of the rifle in goodcondition. Most hand pumps do not have filtration to match that of diving air compression systems and as a conse-quence may result in internal corrosion. Internal corrosion caused by the use of unfiltered air is not covered by themanufacturers warranty. Some hand pumps have a purpose designed filtration system that work almost to the levelsof divers air, it is highly recommended that this type of pump/filter combination is used at all times.
4> The cylinder should be inspected for internal corrosion at least every 2 years. Normally a divers shop will havethe equipment to inspect the cylinder but some may not be prepared to give this service to anything other than ascuba tank. Air Arms can provide this service at the factory.
5> To maintain this rifle in good working order it should have an annual inspection/service. Your supplier may beable to provide this service or contact Air Arms.
6> The velocity of this rifle has been set using Air Arms Field pellets. If any other make or type of pellet is to beused it will need testing on a chronograph to establish whether the velocity needs adjusting to ensure the muzzleenergy is within the the limits determined by current legislation. Contact your supplier or Air Arms for any advise onthis matter.
7> Do not store the rifle in a damp place such as garden shed also storage in unlined plastic or pvc type gun bagsshould be avoided. The surface treatments applied to the parts of this rifle are not intended to protect the surfacesfrom corrosion if left in such conditions. External corrosion caused by poor storage conditions or accidental contactwith corrosive substances is not covered by the manufacturers warranty. It should be noted that many substancesfound in the average household are sufficiently corrosive to effect the surface finish of this rifle i.e. vinegar, orangejuice and many cleaning products.

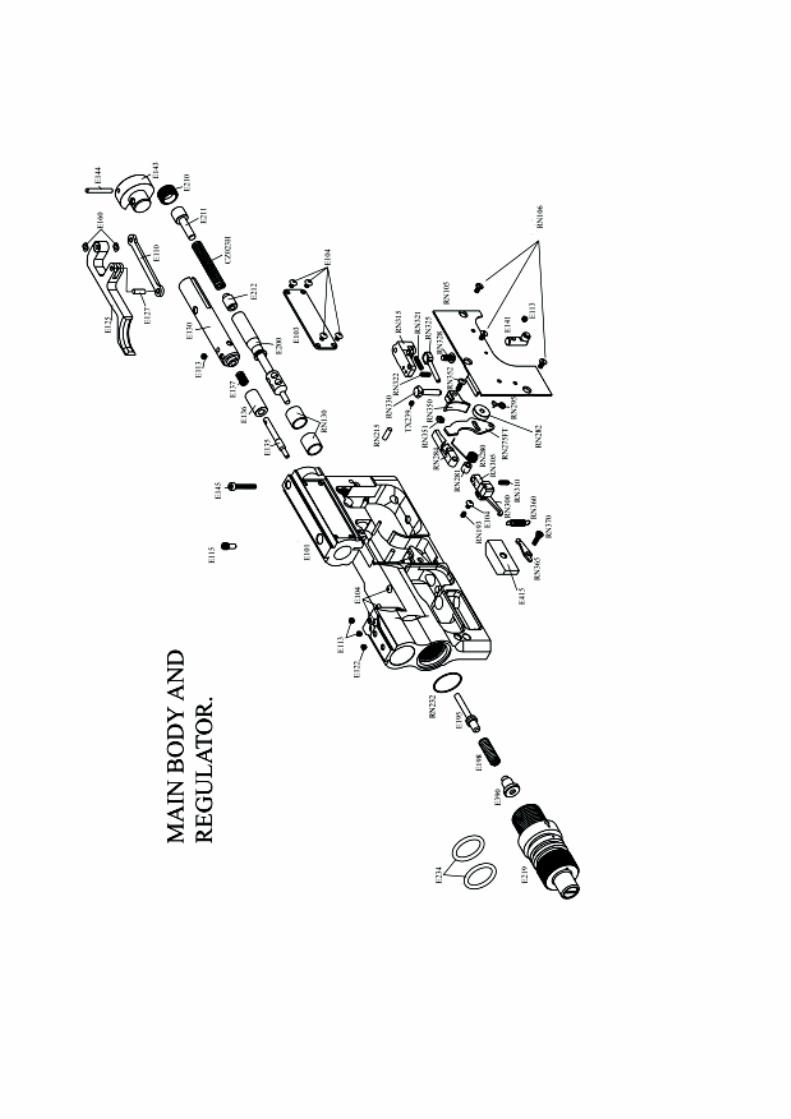
Trigger Adjustments
Anotation1> Weight of pull adjuster. A> Trigger Shoe2> 1st Stage length of pull adjuster. B> Trigger Pillar3> 2nd Stage adjuster. C> Trigger Bar4> Trigger Shoe locking screw. D> Trigger Pivot Block5> Trigger Bar locking screw.6> Trigger Pillar locking screw.7> Follow-through adjuster.
The position of the Trigger Shoe (A) can be adjusted in four planes as below:i: Radially around B - Loosen screw 4, move to required angle and tighten.ii: Vertically - Loosen screw 4, slide Shoe up/down B to required position and tighten.iii: Axially - Loosen screw 6, slide B forward/backward along C to required
position and tighten.iv: Radially around D - Loosen screw 5, move to required angle and tighten.
The weight of pull may be adjusted with screw 1. Turn clockwise to increase or anticlockwiseto decrease the weight of pull. Access to this screw is through the bottom of the stock.
1st Stage travel may be adjusted with screw 2. Turn clockwise to decrease and anticlockwise toincrease travel.
2nd Stage may be adjusted with screw 3. Turn clockwise to decrease and anticlockwise toincrease the travel between the end of 1st travel and beginning of 2nd stage. If this screw isturned too far clockwise the rifle will fire before the end of the 1st travel is reached.
Follow through distance can be adjusted with screw 7. Turn clockwise to decrease andanticlockwise to increase the follow through distance. The mechanism on the EV2 requires thetrigger to follow-through a small amount to allow the sears to reset.
LubricationTrigger Mechanism:
The trigger mechanism has been designed to require minimal lubrication during normal use. Thelubrication applied during assembly at the factory is normally sufficient for 10000 shots, howeverany roughness of operation may indicate that re-lubrication is necessary prior to this usage.
If you have limited knowledge of the workings of a precision mechanism, maintenance andlubrication is best left to an experienced gunsmith or preferably the factory.
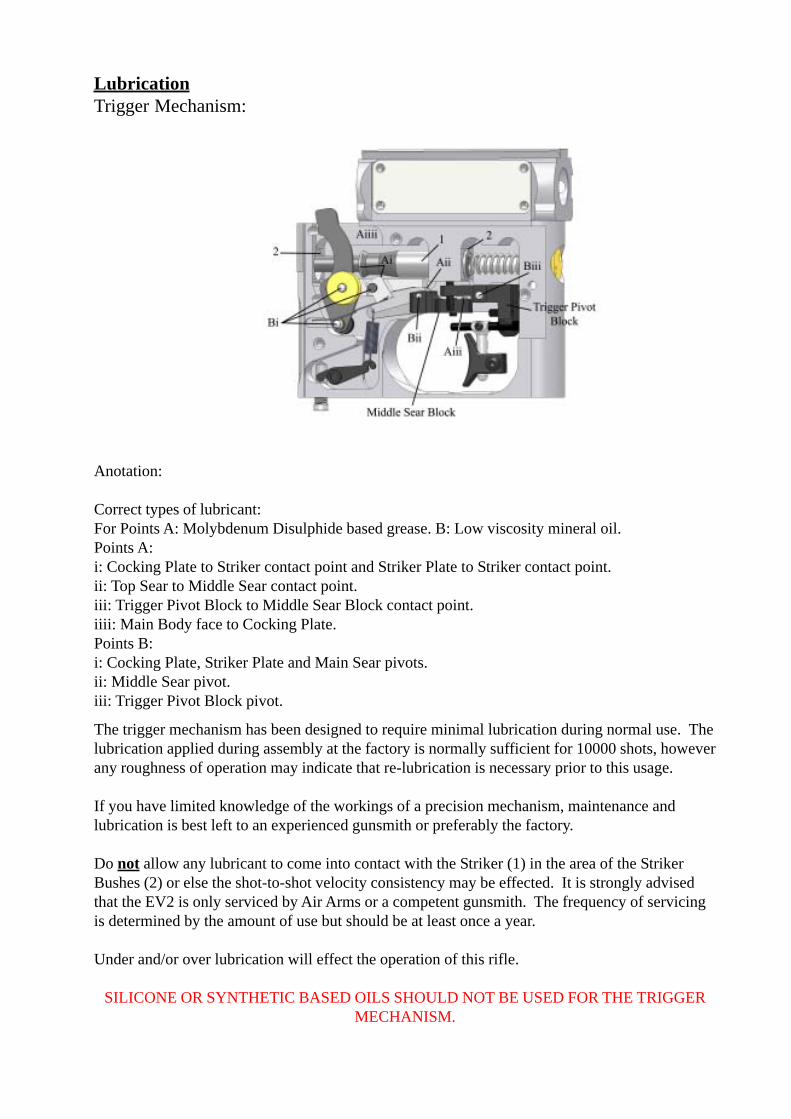
Do not allow any lubricant to come into contact with the Striker (1) in the area of the StrikerBushes (2) or else the shot-to-shot velocity consistency may be effected. It is strongly advisedthat the EV2 is only serviced by Air Arms or a competent gunsmith. The frequency of servicingis determined by the amount of use but should be at least once a year.
Under and/or over lubrication will effect the operation of this rifle.
SILICONE OR SYNTHETIC BASED OILS SHOULD NOT BE USED FOR THE TRIGGERMECHANISM.
Anotation:
Correct types of lubricant:For Points A: Molybdenum Disulphide based grease. B: Low viscosity mineral oil.Points A:i: Cocking Plate to Striker contact point and Striker Plate to Striker contact point.ii: Top Sear to Middle Sear contact point.iii: Trigger Pivot Block to Middle Sear Block contact point.iiii: Main Body face to Cocking Plate.Points B:i: Cocking Plate, Striker Plate and Main Sear pivots.ii: Middle Sear pivot.iii: Trigger Pivot Block pivot.
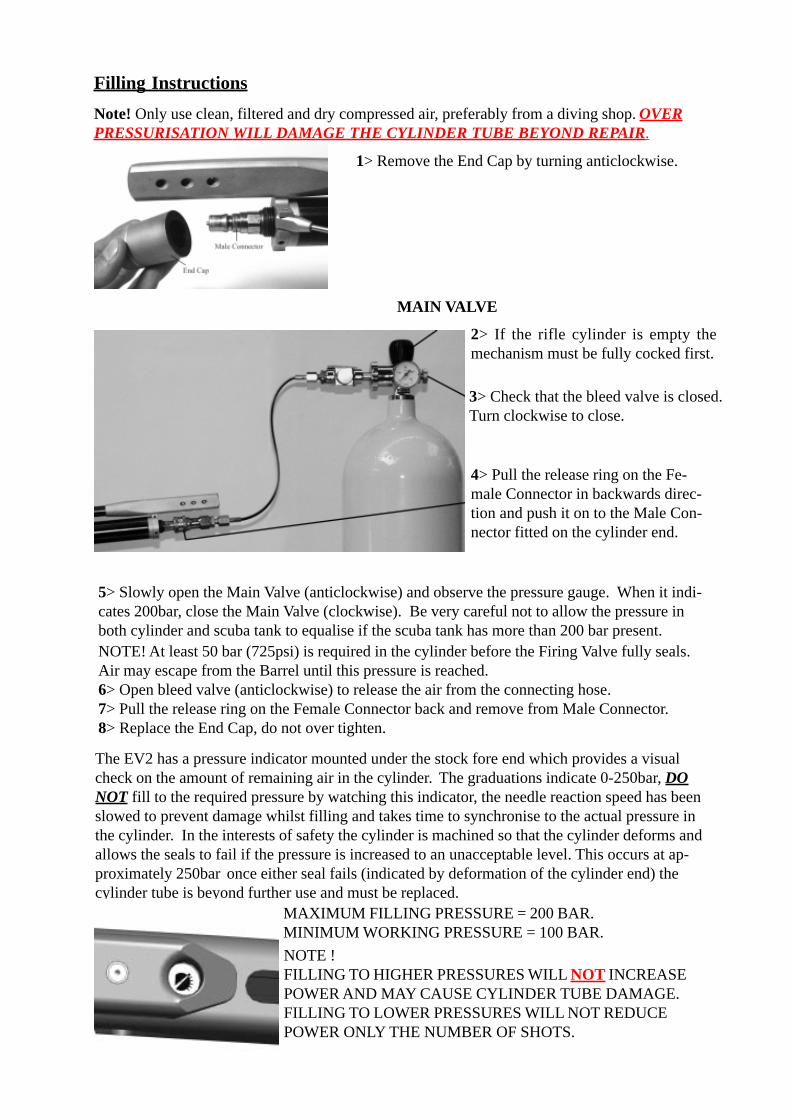
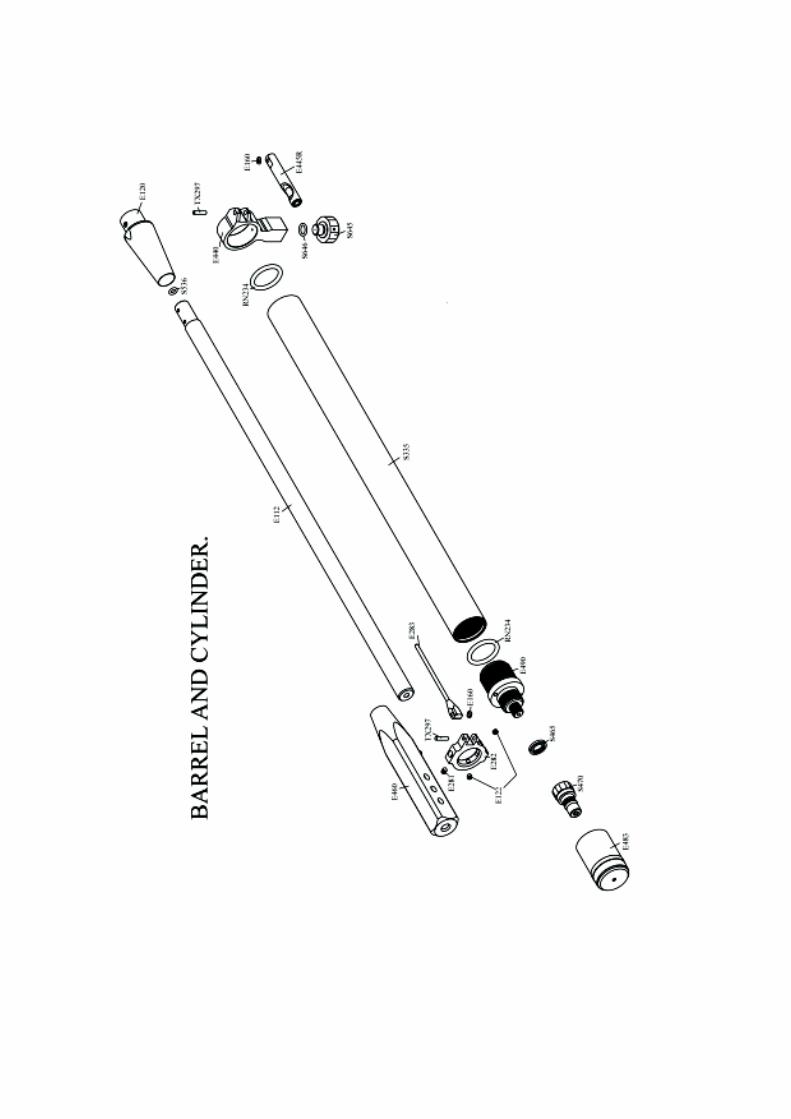
Filling InstructionsNote! Only use clean, filtered and dry compressed air, preferably from a diving shop. OVERPRESSURISATION WILL DAMAGE THE CYLINDER TUBE BEYOND REPAIR.
NOTE! At least 50 bar (725psi) is required in the cylinder before the Firing Valve fully seals.Air may escape from the Barrel until this pressure is reached.6> Open bleed valve (anticlockwise) to release the air from the connecting hose.7> Pull the release ring on the Female Connector back and remove from Male Connector.8> Replace the End Cap, do not over tighten.
3> Check that the bleed valve is closed.Turn clockwise to close.
4> Pull the release ring on the Fe-male Connector in backwards direc-tion and push it on to the Male Con-nector fitted on the cylinder end.
5> Slowly open the Main Valve (anticlockwise) and observe the pressure gauge. When it indi-cates 200bar, close the Main Valve (clockwise). Be very careful not to allow the pressure inboth cylinder and scuba tank to equalise if the scuba tank has more than 200 bar present.
MAXIMUM FILLING PRESSURE = 200 BAR.MINIMUM WORKING PRESSURE = 100 BAR.NOTE !FILLING TO HIGHER PRESSURES WILL NOT INCREASEPOWER AND MAY CAUSE CYLINDER TUBE DAMAGE.FILLING TO LOWER PRESSURES WILL NOT REDUCEPOWER ONLY THE NUMBER OF SHOTS.
The EV2 has a pressure indicator mounted under the stock fore end which provides a visualcheck on the amount of remaining air in the cylinder. The graduations indicate 0-250bar, DONOT fill to the required pressure by watching this indicator, the needle reaction speed has beenslowed to prevent damage whilst filling and takes time to synchronise to the actual pressure inthe cylinder. In the interests of safety the cylinder is machined so that the cylinder deforms andallows the seals to fail if the pressure is increased to an unacceptable level. This occurs at ap-proximately 250bar once either seal fails (indicated by deformation of the cylinder end) thecylinder tube is beyond further use and must be replaced.
MAIN VALVE
1> Remove the End Cap by turning anticlockwise.
2> If the rifle cylinder is empty themechanism must be fully cocked first.
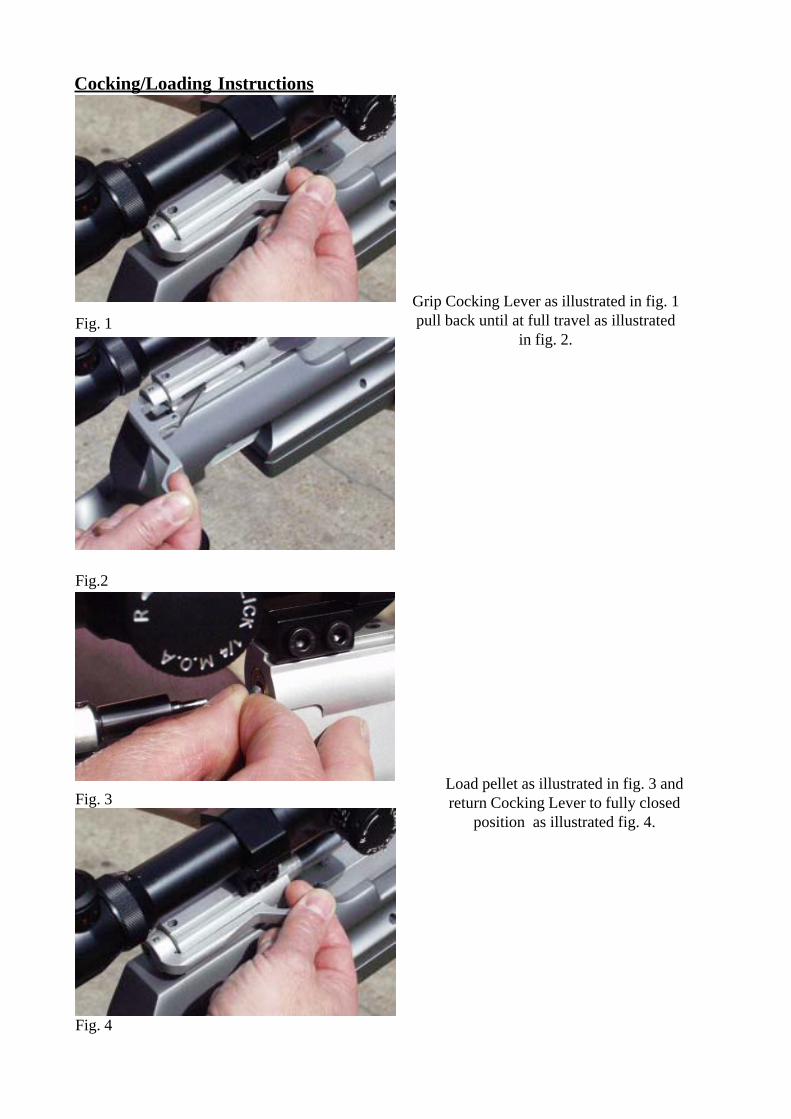
Cocking/Loading Instructions
Grip Cocking Lever as illustrated in fig. 1pull back until at full travel as illustrated
in fig. 2.
Load pellet as illustrated in fig. 3 andreturn Cocking Lever to fully closed
position as illustrated fig. 4.
Fig. 1
Fig.2
Fig. 3
Fig. 4
Stock Adjustments
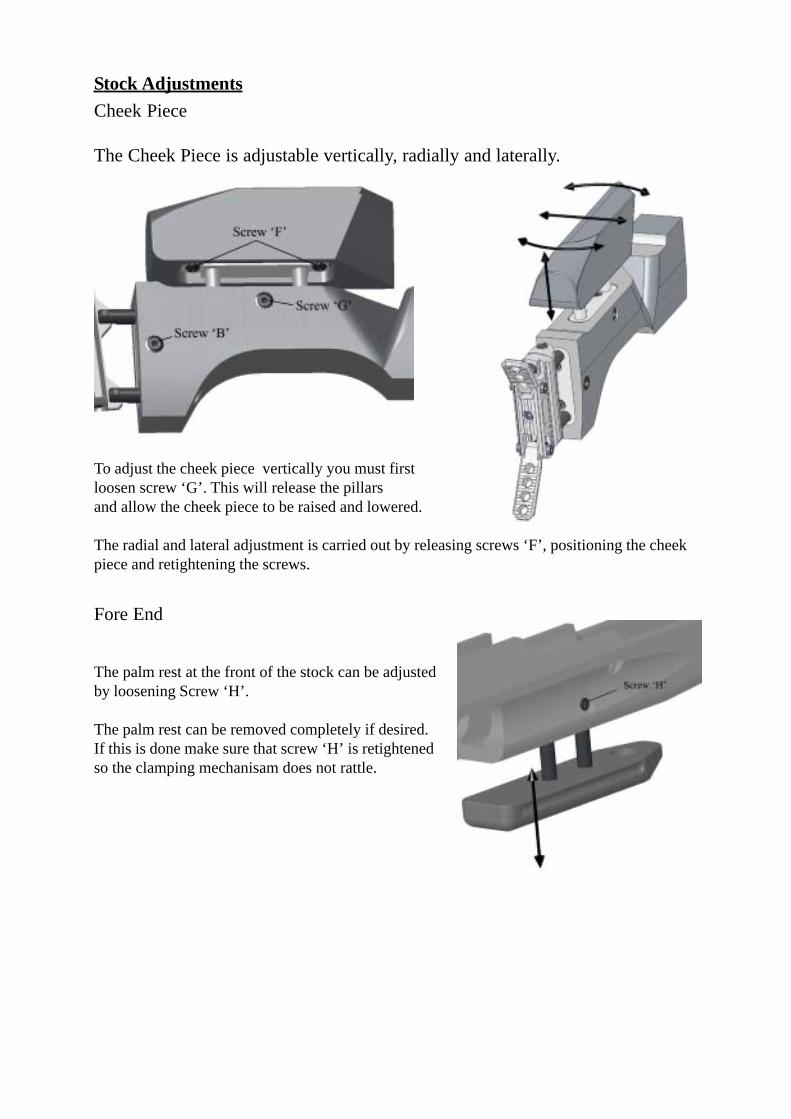
Fore End
Cheek Piece
The Cheek Piece is adjustable vertically, radially and laterally.
To adjust the cheek piece vertically you must firstloosen screw ‘G’. This will release the pillarsand allow the cheek piece to be raised and lowered.
The radial and lateral adjustment is carried out by releasing screws ‘F’, positioning the cheekpiece and retightening the screws.
The palm rest at the front of the stock can be adjustedby loosening Screw ‘H’.
The palm rest can be removed completely if desired.If this is done make sure that screw ‘H’ is retightenedso the clamping mechanisam does not rattle.
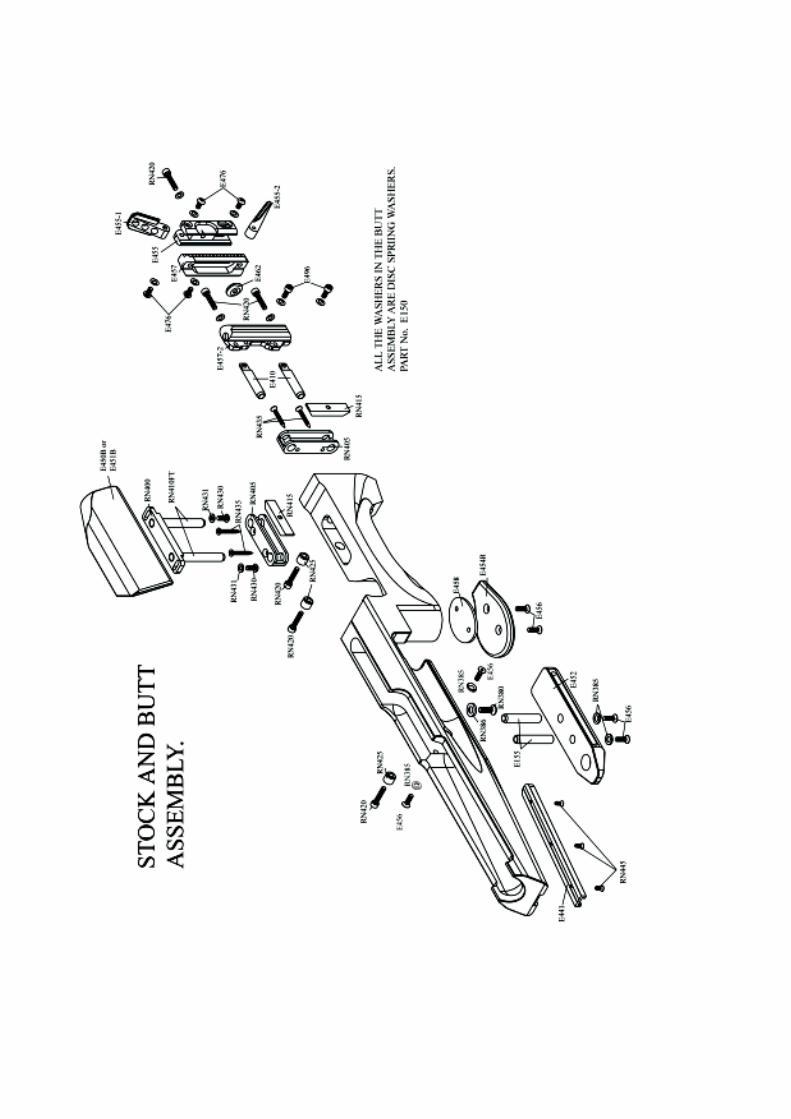
Stock Adjustments
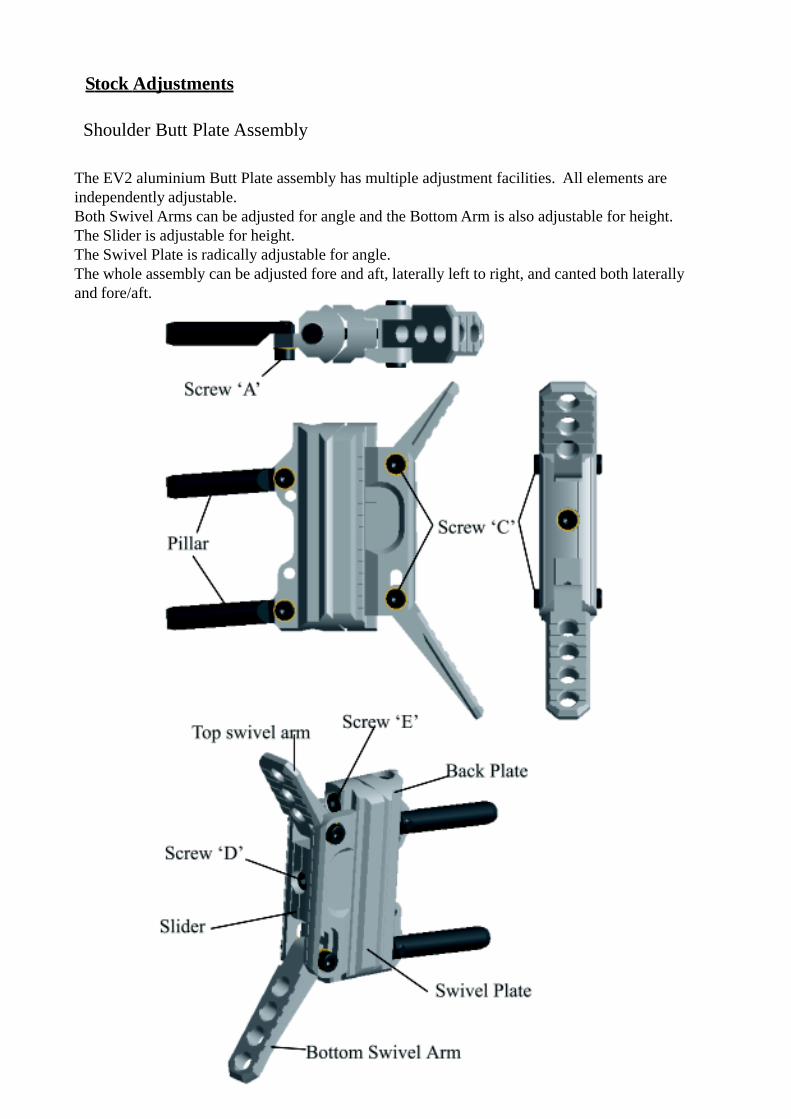
The EV2 aluminium Butt Plate assembly has multiple adjustment facilities. All elements areindependently adjustable.Both Swivel Arms can be adjusted for angle and the Bottom Arm is also adjustable for height.The Slider is adjustable for height.The Swivel Plate is radically adjustable for angle.The whole assembly can be adjusted fore and aft, laterally left to right, and canted both laterallyand fore/aft.
Shoulder Butt Plate Assembly
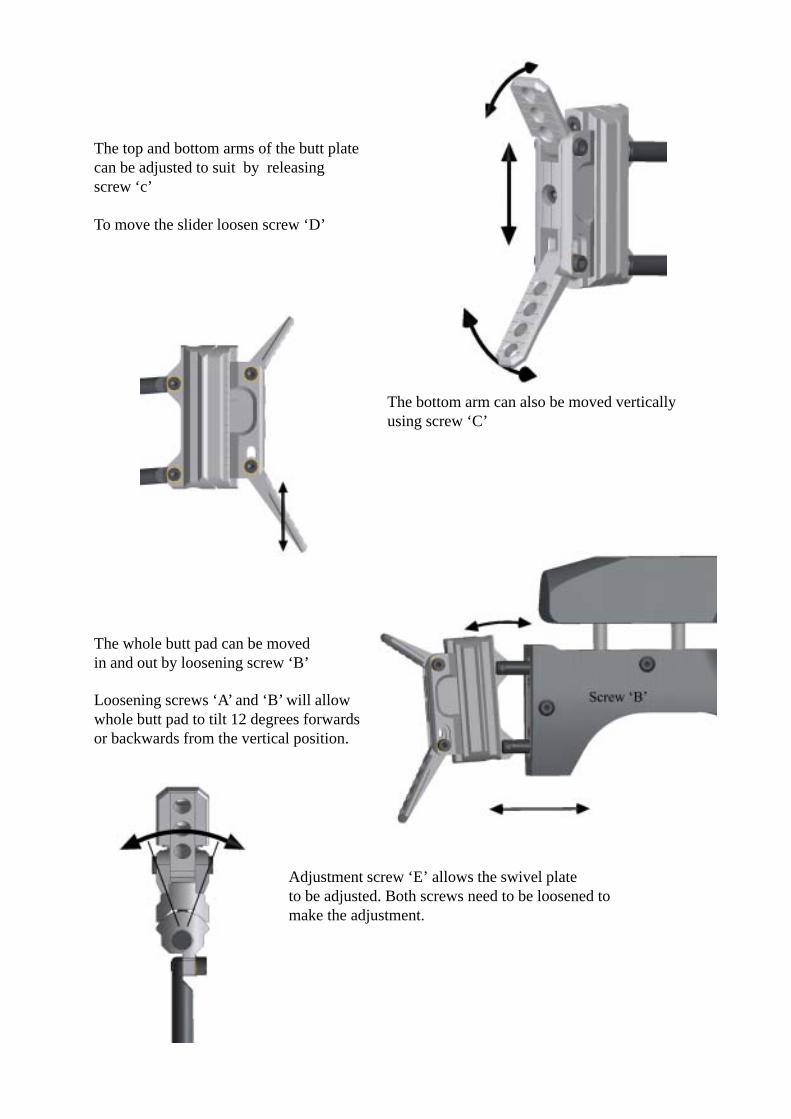
The top and bottom arms of the butt platecan be adjusted to suit by releasingscrew ‘c’
To move the slider loosen screw ‘D’
The bottom arm can also be moved verticallyusing screw ‘C’
The whole butt pad can be movedin and out by loosening screw ‘B’
Loosening screws ‘A’ and ‘B’ will allowwhole butt pad to tilt 12 degrees forwardsor backwards from the vertical position.
Adjustment screw ‘E’ allows the swivel plateto be adjusted. Both screws need to be loosened tomake the adjustment.
Stock Adjustments
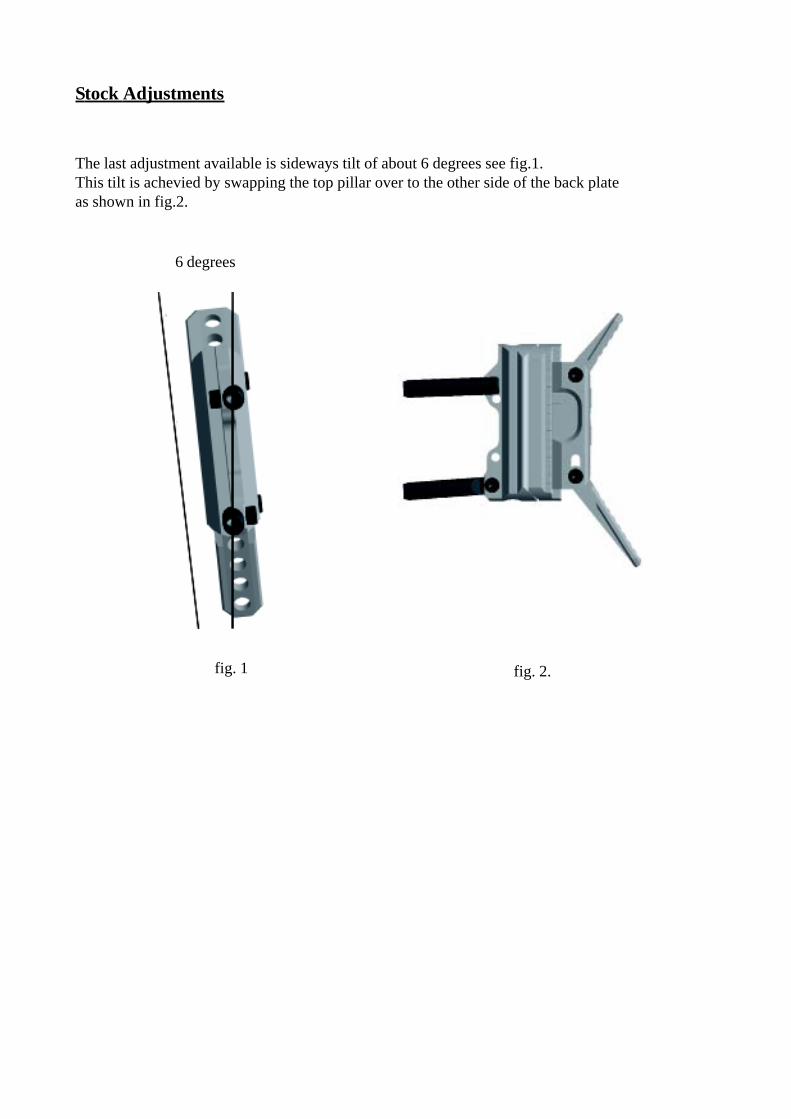
The last adjustment available is sideways tilt of about 6 degrees see fig.1.This tilt is achevied by swapping the top pillar over to the other side of the back plateas shown in fig.2.
fig. 1 fig. 2.
6 degrees