eset nod32 antivirus offline installation.....10 2.2.1 entera l icensek ey.....11 2.2.2 usel icensem...
TRANSCRIPT

USER GUIDE
(intended for product version 11.0 and higher)
Microsoft® Windows® 10 / 8.1 / 8 / 7 / Vista / Home Server 2011
Click here to display Online help version of this document

Copyright ©2018 by ESET, spol. s r. o.ESET NOD32 Antivirus was developed by ESET, spol. s r. o.For more information visit www.eset.com.All rights reserved. No part of this documentation may be reproduced, stored in a retrievalsystem or transmitted in any form or by any means, electronic, mechanical, photocopying,recording, scanning, or otherwise without permission in writing from the author.ESET, spol. s r. o. reserves the right to change any of the described application software withoutprior notice.
Worldwide Customer Support: www.eset.com/support
REV. 3/19/2018

Contents
.......................................................5ESET NOD32 Antivirus1.
....................................................................................................5What's new in this version1.1
....................................................................................................6Which product do I have?1.2
....................................................................................................7System requirements1.3
....................................................................................................7Prevention1.4
.......................................................9Installation2.
....................................................................................................9Live installer2.1
....................................................................................................10Offline installation2.2..............................................................................11Enter a License Key2.2.1
..............................................................................12Use License Manager2.2.2
..............................................................................12Advanced settings2.2.3
....................................................................................................12Common installation problems2.3
....................................................................................................13Product activation2.4
....................................................................................................13Entering your License key2.5
....................................................................................................14Upgrading to a more recent version2.6
....................................................................................................14First scan after installation2.7
.......................................................15Beginner's guide3.
....................................................................................................15The main program window3.1
....................................................................................................17Updates3.2
.......................................................19Working with ESET NOD32 Antivirus4.
....................................................................................................20Computer protection4.1..............................................................................21Detection engine4.1.1
..................................................................................22Real-time file system protection4.1.1.1
........................................................................23Additional ThreatSense parameters4.1.1.1.1
........................................................................23Cleaning levels4.1.1.1.2
........................................................................24When to modify real-time protection configuration4.1.1.1.3
........................................................................24Checking real-time protection4.1.1.1.4
........................................................................24What to do if real-time protection does not work4.1.1.1.5
..................................................................................24Computer scan4.1.1.2
........................................................................25Custom scan launcher4.1.1.2.1
........................................................................27Scan progress4.1.1.2.2
........................................................................28Scan profiles4.1.1.2.3
........................................................................28Computer scan log4.1.1.2.4
..................................................................................28Idle-state scan4.1.1.3
..................................................................................28Startup scan4.1.1.4
........................................................................29Automatic startup file check4.1.1.4.1
..................................................................................29Exclusions4.1.1.5
..................................................................................30ThreatSense parameters4.1.1.6
........................................................................35Cleaning4.1.1.6.1
........................................................................35File extensions excluded from scanning4.1.1.6.2
..................................................................................36An infiltration is detected4.1.1.7
..................................................................................38Document protection4.1.1.8
..............................................................................38Removable media4.1.2
..............................................................................39Device control4.1.3
..................................................................................40Device control rules editor4.1.3.1
..................................................................................41Adding Device control rules4.1.3.2
..............................................................................42Host-based Intrusion Prevention System (HIPS)4.1.4
..................................................................................44Advanced setup4.1.4.1
..................................................................................45HIPS interactive window4.1.4.2
..................................................................................46Potential ransomware behavior detected4.1.4.3
..............................................................................46Gamer mode4.1.5
....................................................................................................47Internet protection4.2..............................................................................48Web access protection4.2.1
..................................................................................48Basic4.2.1.1
..................................................................................49Web protocols4.2.1.2
..................................................................................49URL address management4.2.1.3
..............................................................................50Email client protection4.2.2
..................................................................................50Email clients4.2.2.1
..................................................................................51Email protocols4.2.2.2
..................................................................................52Alerts and notifications4.2.2.3
..................................................................................53Integration with email clients4.2.2.4
........................................................................53Email client protection configuration4.2.2.4.1
..................................................................................53POP3, POP3S filter4.2.2.5
..............................................................................54Protocol filtering4.2.3
..................................................................................54Web and email clients4.2.3.1
..................................................................................55Excluded applications4.2.3.2
..................................................................................56Excluded IP addresses4.2.3.3
........................................................................56Add IPv4 address4.2.3.3.1
........................................................................56Add IPv6 address4.2.3.3.2
..................................................................................57SSL/TLS4.2.3.4
........................................................................58Certificates4.2.3.4.1
........................................................................58Encrypted network traffic4.2.3.4.1.1
........................................................................58List of known certificates4.2.3.4.2
........................................................................59List of SSL/TLS filtered applications4.2.3.4.3
..............................................................................59Anti-Phishing protection4.2.4
....................................................................................................60Updating the program4.3..............................................................................63Update settings4.3.1
..................................................................................65Advanced update setup4.3.1.1
........................................................................65Update mode4.3.1.1.1
........................................................................65Connection options4.3.1.1.2
..............................................................................66Update rollback4.3.2
..............................................................................67How to create update tasks4.3.3
....................................................................................................68Tools4.4..............................................................................68Tools in ESET NOD32 Antivirus4.4.1
..................................................................................69Log files4.4.1.1
........................................................................70Log files4.4.1.1.1
..................................................................................71Running processes4.4.1.2
..................................................................................72Protection statistics4.4.1.3
..................................................................................73Watch activity4.4.1.4
..................................................................................73ESET SysInspector4.4.1.5
..................................................................................74Scheduler4.4.1.6
..................................................................................76System cleaner4.4.1.7
..................................................................................76ESET SysRescue4.4.1.8
..................................................................................76Cloud-based protection4.4.1.9
........................................................................77Suspicious files4.4.1.9.1
..................................................................................78Quarantine4.4.1.10
..................................................................................79Proxy server4.4.1.11
..................................................................................80Email notifications4.4.1.12
........................................................................81Message format4.4.1.12.1

..................................................................................81Select sample for analysis4.4.1.13
..................................................................................82Microsoft Windows® update4.4.1.14
..................................................................................82ESET CMD4.4.1.15
....................................................................................................84User interface4.5..............................................................................84User interface elements4.5.1
..............................................................................85Alerts and notifications4.5.2
..................................................................................86Advanced setup4.5.2.1
..............................................................................87Access setup4.5.3
..............................................................................88Program menu4.5.4
.......................................................90Advanced user5.
....................................................................................................90Profiles5.1
....................................................................................................90Keyboard shortcuts5.2
....................................................................................................91Diagnostics5.3
....................................................................................................92Import and export settings5.4
....................................................................................................92ESET SysInspector5.5..............................................................................92Introduction to ESET SysInspector5.5.1
..................................................................................93Starting ESET SysInspector5.5.1.1
..............................................................................93User Interface and application usage5.5.2
..................................................................................93Program Controls5.5.2.1
..................................................................................95Navigating in ESET SysInspector5.5.2.2
........................................................................96Keyboard shortcuts5.5.2.2.1
..................................................................................97Compare5.5.2.3
..............................................................................98Command line parameters5.5.3
..............................................................................99Service Script5.5.4
..................................................................................99Generating Service script5.5.4.1
..................................................................................99Structure of the Service script5.5.4.2
..................................................................................102Executing Service scripts5.5.4.3
..............................................................................103FAQ5.5.5
..............................................................................104ESET SysInspector as part of ESET NOD32 Antivirus5.5.6
....................................................................................................104Command Line5.6
.......................................................107Glossary6.
....................................................................................................107Types of infiltration6.1..............................................................................107Viruses6.1.1
..............................................................................107Worms6.1.2
..............................................................................107Trojans6.1.3
..............................................................................108Rootkits6.1.4
..............................................................................108Adware6.1.5
..............................................................................108Spyware6.1.6
..............................................................................109Packers6.1.7
..............................................................................109Potentially unsafe applications6.1.8
..............................................................................109Potentially unwanted applications6.1.9
....................................................................................................112ESET Technology6.2..............................................................................112Exploit Blocker6.2.1
..............................................................................112Advanced Memory Scanner6.2.2
..............................................................................112ESET LiveGrid®6.2.3
..............................................................................112Java Exploit Blocker6.2.4
..............................................................................113Script-Based Attacks Protection6.2.5
..............................................................................113Ransomware shield6.2.6
..............................................................................113UEFI Scanner6.2.7
....................................................................................................114Email6.3..............................................................................114Advertisements6.3.1
..............................................................................114Hoaxes6.3.2
..............................................................................115Phishing6.3.3
.......................................................116Common Questions7.
....................................................................................................116How to update the ESET NOD32Antivirus
7.1
....................................................................................................116How to remove a virus from my PC7.2
....................................................................................................117How to create a new task in Scheduler7.3
....................................................................................................117How to schedule a weekly computerscan
7.4

5
1. ESET NOD32 AntivirusESET NOD32 Antivirus represents a new approach to truly integrated computer security. The most recent version ofthe ESET LiveGrid® scanning engine utilizes speed and precision to keep your computer safe. The result is anintelligent system that is constantly on alert for attacks and malicious software that might endanger your computer.
ESET NOD32 Antivirus is a complete security solution that combines maximum protection and a minimal systemfootprint. Our advanced technologies use artificial intelligence to prevent infiltration by viruses, spyware, trojanhorses, worms, adware, rootkits, and other threats without hindering system performance or disrupting yourcomputer.
Features and benefits
Redesigned user interface The user interface in this version has been significantly redesigned andsimplified based on the results of usability testing. All GUI wording andnotifications have been carefully reviewed and the interface now providessupport for right-to-left languages such as Hebrew and Arabic. Online help isnow integrated into ESET NOD32 Antivirus and offers dynamically updatedsupport content.
Antivirus and antispyware Proactively detects and cleans more known and unknown viruses, worms,trojans and rootkits. Advanced heuristics flags even never-before-seenmalware, protecting you from unknown threats and neutralizing thembefore they can do any harm. Web access protection and Anti-Phishingworks by monitoring communication between web browsers and remoteservers (including SSL). Email client protection provides control of emailcommunication received through the POP3(S) and IMAP(S) protocols.
Regular updates Regularly updating the detection engine (previously known as "virussignature database") and program modules is the best way to ensure themaximum level of security on your computer.
ESET LiveGrid®(Cloud-powered Reputation)
You can check the reputation of running processes and files directly fromESET NOD32 Antivirus.
Device control Automatically scans all USB flash drives, memory cards and CDs/DVDs. Blocksremovable media based on the type of media, manufacturer, size and otherattributes.
HIPS functionality You can customize the behavior of the system in greater detail; specify rulesfor the system registry, active processes and programs, and fine-tune yoursecurity posture.
Gamer mode Postpones all pop-up windows, updates or other system-intensive activitiesto conserve system resources for gaming and other full-screen activities.
A license needs to be active in order for features of ESET NOD32 Antivirus to be operational. It is recommended thatyou renew your license several weeks before the license for ESET NOD32 Antivirus expires.
1.1 What's new in this version
The new version of ESET NOD32 Antivirus features the following improvements:
· One-click logging – You can create advanced logs with just one click.
· Unified Extensible Firmware Interface (UEFI) Scanner – Adds elevated levels of malware protection by detectingand removing threats that potentially launch before the operating system boots up. For more information click here.
· High performance and low system impact – This version is designed for efficient use of system resources, allowingyou to enjoy your computer's performance while defending against new types of threats.

6
· Advanced setup reorganized – ESET LiveGrid® settings moved to Detection engine section, Antispam advancedlogging moved to Diagnostic section, etc.
· Improved screen reader support – ESET NOD32 Antivirus supports the most popular screen readers (JAWS, NVDA,Narrator).
· Drag and drop files scan – You can scan a file or folder manually just by moving the file or folder to the markedarea.
· ESET NOD32 Antivirus is now installed with the minimal modules which make the installation light-weight andfaster. After the product is installed and activated, the modules start downloading.
· ESET NOD32 Antivirus will inform you when you connect to an unprotected wireless network or network withweak protection.
For more details about the new features in ESET NOD32 Antivirus please read the following ESET Knowledgebasearticle:What's new in this version of ESET home products
1.2 Which product do I have?
ESET offers multiple layers of security with new products from powerful and fast antivirus solution to all-in-onesecurity solution with minimal system footprint:
· ESET NOD32 Antivirus
· ESET Internet Security
· ESET Smart Security Premium
To determine which product you have installed open the main program window (see the Knowledgebase article)and you will see the name of the product at the top of the window (header).
The table below details features available in each specific product.
ESET NOD32 Antivirus ESET Internet Security ESET Smart SecurityPremium
Antivirus
Antispyware
Exploit Blocker
Script-Based Attack Protection
Anti-Phishing
Web access protection
HIPS (including Anti-Ransomwareprotection)
Antispam
Firewall
Connected Home Monitor
Webcam Protection
Network Attack Protection
Botnet Protection
Banking & Payment Protection
Parental Control
Anti-Theft
ESET Password Manager

7
ESET Secure Data
NOTESome of the products above may not be available for your language / region.
1.3 System requirements
Your system should meet the following hardware and software requirements for ESET NOD32 Antivirus to performoptimally:
Processors Supported
Intel® or AMD x86-x64
Supported Operating Systems
Microsoft® Windows® 10Microsoft® Windows® 8.1Microsoft® Windows® 8Microsoft® Windows® 7Microsoft® Windows® VistaMicrosoft® Windows® Home Server 2011 64-bit
1.4 Prevention
When you work with your computer, and especially when you browse the Internet, please keep in mind that noantivirus system in the world can completely eliminate the risk of infiltrations and attacks. To provide maximumprotection and convenience, it is essential that you use your antivirus solution correctly and adhere to severaluseful rules:
Update regularly
According to statistics from ThreatSense, thousands of new, unique infiltrations are created each day in order tobypass existing security measures and bring profit to their authors – all at the expense of other users. The specialistsat the ESET Research Lab analyze these threats on a daily basis and prepare and release updates in order tocontinually improve the level of protection for our users. To ensure the maximum effectiveness of these updates itis important that updates are configured properly on your system. For more information on how to configureupdates, see the Update setup chapter.
Download security patches
The authors of malicious software often exploit various system vulnerabilities in order to increase the effectivenessof spreading malicious code. With this in mind, software companies watch closely for any vulnerabilities in theirapplications to appear and release security updates to eliminate potential threats on a regular basis. It is importantto download these security updates as they are released. Microsoft Windows and web browsers such as InternetExplorer are two examples of programs for which security updates are released on a regular schedule.
Back up important data
Malware writers usually do not care about users’ needs, and the activity of malicious programs often leads to totalmalfunction of an operating system and the loss of of important data. It is important to regularly back up yourimportant and sensitive data to an external source such as a DVD or external hard drive. This will make it far easierand faster to recover your data in the event of system failure.
Regularly scan your computer for viruses
Detection of more known and unknown viruses, worms, trojans and rootkits are handled by the Real-time filesystem protection module. This means that every time you access or open a file, it is scanned for a malware activity.We recommend that you run a full Computer scan at least once a month because malware signatures may vary andthe detection engine updates itself each day.
8
Follow basic security rules
This is the most useful and most effective rule of all – always be cautious. Today, many infiltrations require userintervention in order to be executed and distributed. If you are cautious when opening new files, you will saveconsiderable time and effort that would otherwise be spent cleaning infiltrations. Here are some useful guidelines:
· Do not visit suspicious websites with multiple pop-ups and flashing advertisements.
· Be careful when installing freeware programs, codec packs, etc. Only use safe programs and only visit safeInternet websites.
· Be cautious when opening email attachments, particularly those from mass-mailed messages and messages fromunknown senders.
· Don't use an Administrator account for everyday work on your computer.
9
2. InstallationThere are several methods for installing ESET NOD32 Antivirus on your computer. Installation methods may varydepending on country and means of distribution:
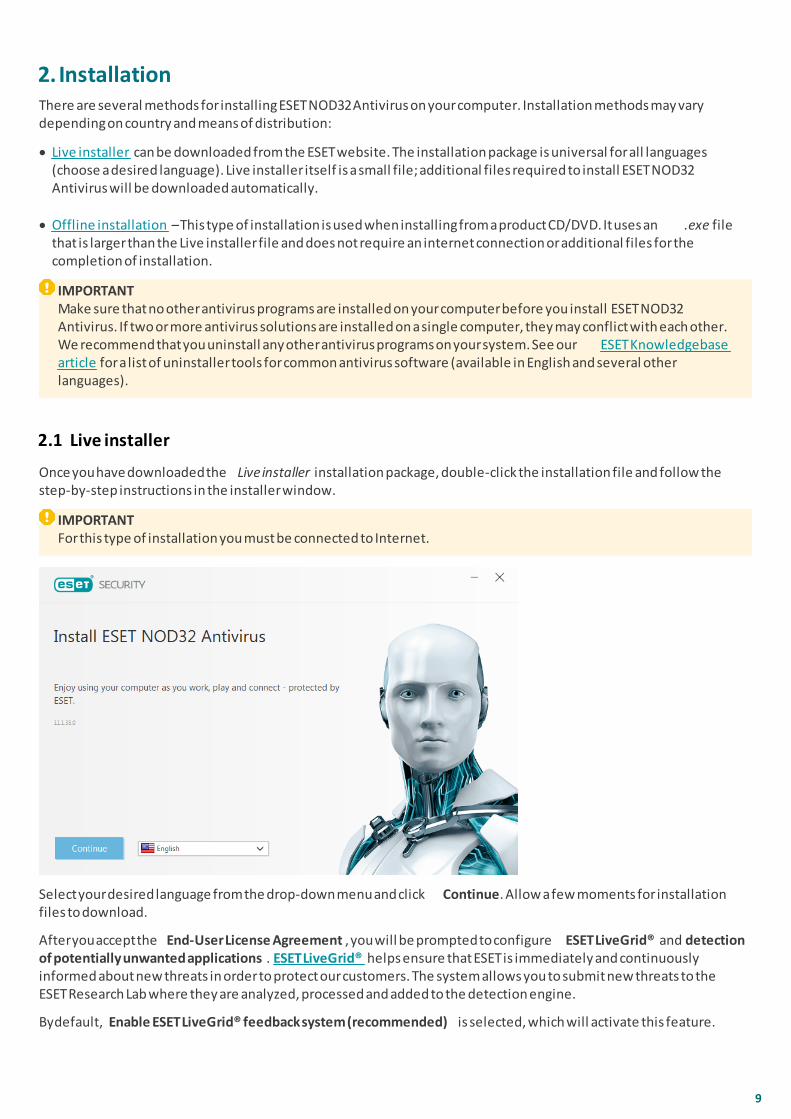
· Live installer can be downloaded from the ESET website. The installation package is universal for all languages(choose a desired language). Live installer itself is a small file; additional files required to install ESET NOD32Antivirus will be downloaded automatically.
· Offline installation – This type of installation is used when installing from a product CD/DVD. It uses an .exe filethat is larger than the Live installer file and does not require an internet connection or additional files for thecompletion of installation.
IMPORTANTMake sure that no other antivirus programs are installed on your computer before you install ESET NOD32Antivirus. If two or more antivirus solutions are installed on a single computer, they may conflict with each other.We recommend that you uninstall any other antivirus programs on your system. See our ESET Knowledgebasearticle for a list of uninstaller tools for common antivirus software (available in English and several otherlanguages).
2.1 Live installer
Once you have downloaded the Live installer installation package, double-click the installation file and follow thestep-by-step instructions in the installer window.
IMPORTANTFor this type of installation you must be connected to Internet.
Select your desired language from the drop-down menu and click Continue. Allow a few moments for installationfiles to download.
After you accept the End-User License Agreement, you will be prompted to configure ESET LiveGrid® and detectionof potentially unwanted applications. ESET LiveGrid® helps ensure that ESET is immediately and continuouslyinformed about new threats in order to protect our customers. The system allows you to submit new threats to theESET Research Lab where they are analyzed, processed and added to the detection engine.
By default, Enable ESET LiveGrid® feedback system (recommended) is selected, which will activate this feature.
10
The next step in the installation process is to configure detection of potentially unwanted applications. Potentiallyunwanted applications are not necessarily malicious, but can negatively affect the behavior of your operatingsystem. See the Potentially unwanted applications chapter for more details.
Click Install to start the installation process. It may take a few moments. Click Done to complete the product setupand begin activation process.
NOTEAfter the product is installed and activated, the modules start downloading. Protection is being initialized andsome features may not be fully functional unless the download is complete.
NOTEIf you have a license that allows you to install other versions of a product, then you can select product accordingto your preferences. For more information about features in each specific product click here.
2.2 Offline installation
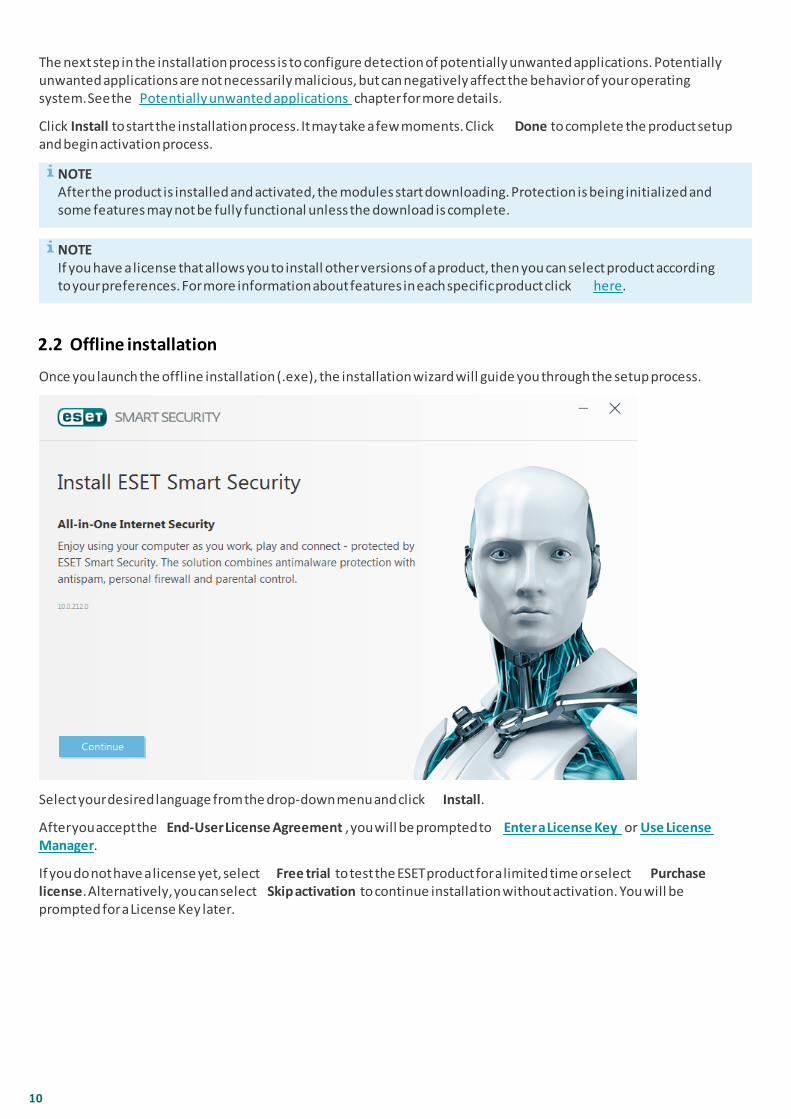
Once you launch the offline installation (.exe), the installation wizard will guide you through the setup process.
Select your desired language from the drop-down menu and click Install.
After you accept the End-User License Agreement, you will be prompted to Enter a License Key or Use LicenseManager.
If you do not have a license yet, select Free trial to test the ESET product for a limited time or select Purchaselicense. Alternatively, you can select Skip activation to continue installation without activation. You will beprompted for a License Key later.

11
2.2.1 Enter a License Key
The Setup Wizard select the product to install according to your license key and display the product name duringinstallation. To view a list products your license can be used to activate, click Change product. For more informationabout the features in each specific product, click here.
Click Continue and select your preferred settings for ESET LiveGrid® and detection of potentially unwantedapplications. ESET LiveGrid® helps ensure that ESET is immediately and continuously informed about new threats inorder to protect our customers. The system allows you to submit new threats to the ESET Research Lab where theyare analyzed, processed and added to the detection engine. Potentially unwanted applications are not necessarilymalicious, but can negatively affect the behavior of your operating system. See the Potentially unwantedapplications chapter for more details.
Click Install to start the installation process. It may take a few moments. Click Done to complete product setup andbegin the activation process.
NOTEAfter the product is installed and activated, the modules start downloading. Protection is being initialized andsome features may not be fully functional unless the download is complete.
NOTEIf you have a license that allows you select between products, you can install a product according to yourpreferences. For more information about the features in each specific product, click here.
For more instructions about installation steps, ESET LiveGrid® and Detection of potentially unwanted applications,follow the instructions in the “Live installer” section.

12
2.2.2 Use License Manager
After selecting Use License Manager you will be asked for your my.eset.com credentials in a new window. Enteryour my.eset.com credentials and click Sign in to use a license in License Manager. Choose a license for activation,click Continue and your ESET NOD32 Antivirus will be activated.
NOTEIf you do not have a my.eset.com account yet, register by clicking the Create account button.
NOTEIf you forgot your password click I forgot my password and follow the steps on the web page you will beredirected to.
ESET License Manager helps you manage all your ESET licenses. You can easily renew, upgrade or extend yourlicense and see the important license details. First, enter your License Key. After that, you will see the product, associated device, the number of available seats and the expiration date. You can deactivate or rename specificdevices. When you click Renew you will be redirected to the online store where you can confirm the purchase andbuy the renewal.
If you want to upgrade your license (for example from ESET NOD32 Antivirus to ESET Smart Security Premium) orwould like to install an ESET security product on another device, you will be redirected to the online store tocomplete the purchase.
In ESET License Manager you can also add different licenses, download products to your devices.
2.2.3 Advanced settings
After selecting Change installation folder, you will be prompted to select a location for the installation. By default,the program installs to the following directory:
C:\Program Files\ESET\ESET NOD32 Antivirus\
Click Browse to change this location (not recommended).
To complete the next installation steps, ESET LiveGrid® and Detection of potentially unwanted applications, followthe instructions in the Live installer section (see “Live installer”).
Click Continue and then Install to complete installation.
2.3 Common installation problems
If problems occur during installation, see our list of common installation errors and resolutions to find a solution toyour problem.

13
2.4 Product activation
After the installation is complete, you will be prompted to activate your product.
There are several methods available to activate your product. Availability of a particular activation scenario in theactivation window may vary depending on country and means of distribution (CD/DVD, ESET web page, etc.):
· If you purchased a retail boxed version of the product, activate your product using a License Key. The License Keyis usually located inside or on the back side of the product package. The License Key must be entered as suppliedfor activation to be successful. License Key – a unique string in the format XXXX-XXXX-XXXX-XXXX-XXXX or XXXX-XXXXXXXX which is used for identification of the license owner and for activation of the license.
· After selecting Use License Manager you will be asked for your my.eset.com credentials in a new window.
· If you would like to evaluate ESET NOD32 Antivirus before making a purchase, select Free trial. Enter your emailaddress and country to activate ESET NOD32 Antivirus for a limited time. Your trial license will be emailed to you.Trial licenses can only be activated once per customer.
· If you do not have a license and would like to buy one, click Purchase license. This will redirect you to the websiteof your local ESET distributor.
2.5 Entering your License key
Automatic updates are important for your security. ESET NOD32 Antivirus will only receive updates once activatedusing your License Key.
If you did not enter your License Key after installation, your product will not be activated. You can change yourlicense in the main program window. To do so, click Help and support > Activate License and enter the license datayou received with your ESET security product into the Product activation window.
When entering your License key, it is important to type it exactly as it is written:
· Your License Key is a unique string in the format XXXX-XXXX-XXXX-XXXX-XXXX which is used for identificationof the the license owner and activation of the license.
14
We recommend that you copy and past your License Key from your registration email to ensure accuracy.
2.6 Upgrading to a more recent version
New versions of ESET NOD32 Antivirus are issued to implement improvements or fix issues that cannot be resolvedby automatic updates to program modules. Upgrading to a more recent version can be accomplished in severalways:
1. Automatically, by means of a program update.Since the program upgrade is distributed to all users and may have an impact on certain system configurations, itis issued after a long testing period to ensure functionality with all possible system configurations. If you need toupgrade to a newer version immediately after its release, use one of the methods below.
2. Manually, in the main program window by clicking Check for updates in the Update section.
3. Manually, by downloading and installing a more recent version over the previous one.
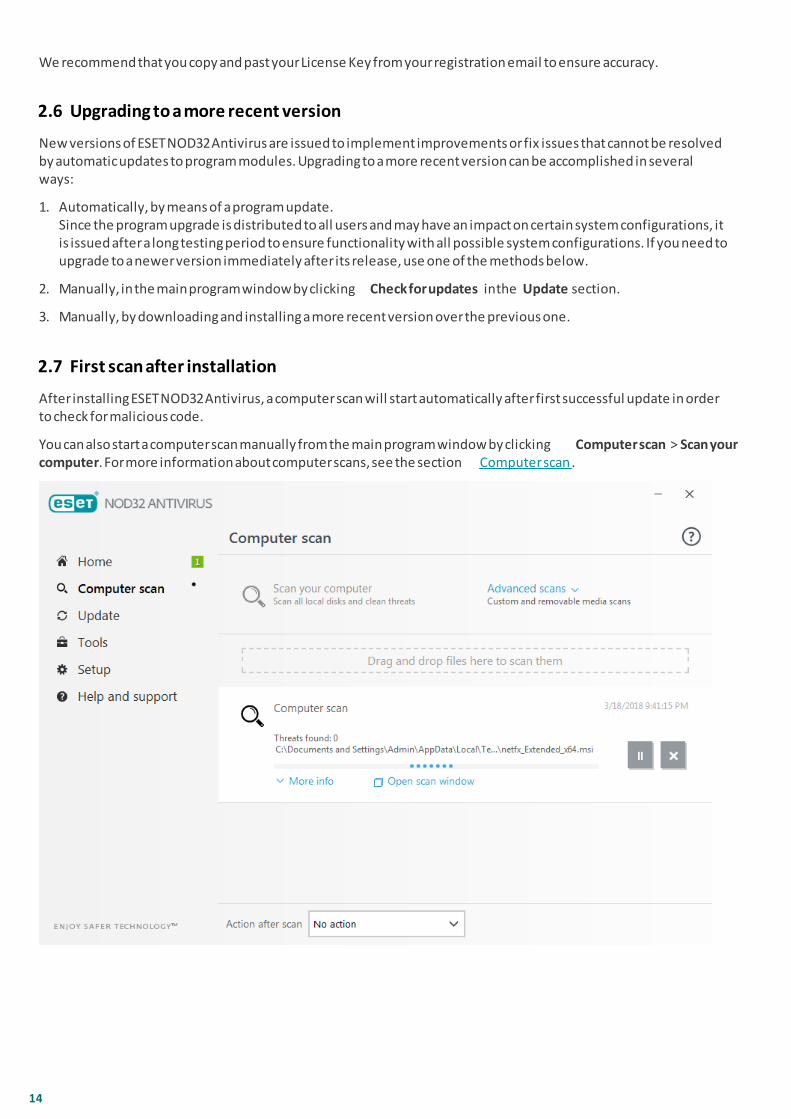
2.7 First scan after installation
After installing ESET NOD32 Antivirus, a computer scan will start automatically after first successful update in orderto check for malicious code.
You can also start a computer scan manually from the main program window by clicking Computer scan > Scan yourcomputer. For more information about computer scans, see the section Computer scan.

15
3. Beginner's guideThis chapter provides an initial overview of ESET NOD32 Antivirus and its basic settings.
3.1 The main program window
The main program window of ESET NOD32 Antivirus is divided into two main sections. The primary window on theright displays information that corresponds to the option selected from the main menu on the left.
The following is a description of options within the main menu:
Home – Provides information about the protection status of ESET NOD32 Antivirus.
Computer scan – Configure and launch a scan of your computer or create a custom scan.
Update – Displays information about detection engine updates.
Tools – Provides access to Log files, Protection statistics, Watch activity, Running processes, Scheduler, ESETSysInspector and ESET SysRescue.
Setup – Select this option to adjust the security level for Computer, Internet.
Help and support – Provides access to help files, the ESET Knowledgebase, the ESET website, and links to submitsupport request.
The Home screen contains important information about the current protection level of your computer. The statuswindow displays frequently used features in ESET NOD32 Antivirus. Information about the most recent update andyour program’s expiration date is also found here.
The green icon and green Maximum protection status indicates that maximum protection is ensured.

16
What to do if the program doesn't work properly?
If an active protection module is working properly its protection status icon will be green. A red exclamation pointor orange notification icon indicates that maximum protection is not ensured. Additional information about theprotection status of each module, as well as suggested solutions for restoring full protection, will be displayedunder Home. To change the status of individual modules, click Setup and select the desired module.
The red icon and red Maximum protection is not ensured status indicate critical problems.There are several reasons this status may be displayed, for example:
· Product not activated – You can activate ESET NOD32 Antivirus from Home by clicking Activate product orBuy now under Protection status.
· Detection engine is out of date – This error will appear after several unsuccessful attempts to update thevirus signature database. We recommend that you check the update settings. The most common reasonfor this error is incorrectly entered authentication data or incorrectly configured connection settings.
· Antivirus and antispyware protection disabled – You can re-enable antivirus and antispyware protectionby clicking Enable antivirus and antispyware protection.
· License expired – This is indicated by a red protection status icon. The program is not able to update afteryour license expires. Follow the instructions in the alert window to renew your license.
The orange icon indicates limited protection. For example, there might be a problem updating the program oryour license may be nearing its expiration date.There are several reasons this status may be displayed, for example:
· Gamer mode active – Enabling Gamer mode is a potential security risk. Enabling this feature disables allpop-up windows and stops any scheduled tasks.
· Your license will expire soon – This is indicated by the protection status icon displaying an exclamationpoint next to the system clock. After your license expires, the program will not be able to update and theProtection status icon will turn red.

17
If you are unable to solve a problem using the suggested solutions, click Help and support to access help files orsearch the ESET Knowledgebase. If you still need assistance, you can submit a support request. ESET Customer Carewill respond quickly to your questions and help find a resolution.
3.2 Updates
Updating the detection engine and updating program components is an important part of protecting your systemagainst malicious code. Pay careful attention to their configuration and operation. In the main menu, click Updateand then click Check for updates to check for a detection engine update.
If the License key was not entered during the activation of ESET NOD32 Antivirus you will be prompted for them atthis point.

18
The Advanced setup window (click Setup in the main menu and then click Advanced setup, or press F5 on yourkeyboard) contains additional update options. To configure advanced update options such as update mode, proxyserver access and LAN connections, click on particular tab in the Update window.

19
4. Working with ESET NOD32 AntivirusESET NOD32 Antivirus setup options allow you to adjust the protection levels of your computer.
The Setup menu is divided into the following sections:
Computer protection
Internet protection
Click a component to adjust advanced settings for the corresponding protection module.
Computer protection setup allows you to enable or disable the following components:
· Real-time file system protection – All files are scanned for malicious code when they are opened, created, or runon your computer.
· HIPS – The HIPS system monitors the events within the operating system and reacts to them according to acustomized set of rules.
· Gamer mode – Enables or disables Gamer mode. You will receive a warning message (potential security risk) andthe main window will turn orange after enabling Gamer mode.
Internet protection setup allows you to enable or disable the following components:
· Web access protection – If enabled, all traffic through HTTP or HTTPS is scanned for malicious software.
· Email client protection – Monitors communication received through POP3 and IMAP protocol.
· Anti-Phishing protection – Filters websites suspected of distributing content intended to manipulate users intosubmitting confidential information.
To re-enable a disabled security component, click the slider so that it displays a green check mark .
20
NOTEWhen disabling protection using this method, all disabled protection modules will be enabled after a computerrestart.
Additional options are available at the bottom of the setup window. Use the Advanced setup link to setup moredetailed parameters for each module. Use Import/Export settings to load setup parameters using an .xmlconfiguration file, or to save your current setup parameters to a configuration file.
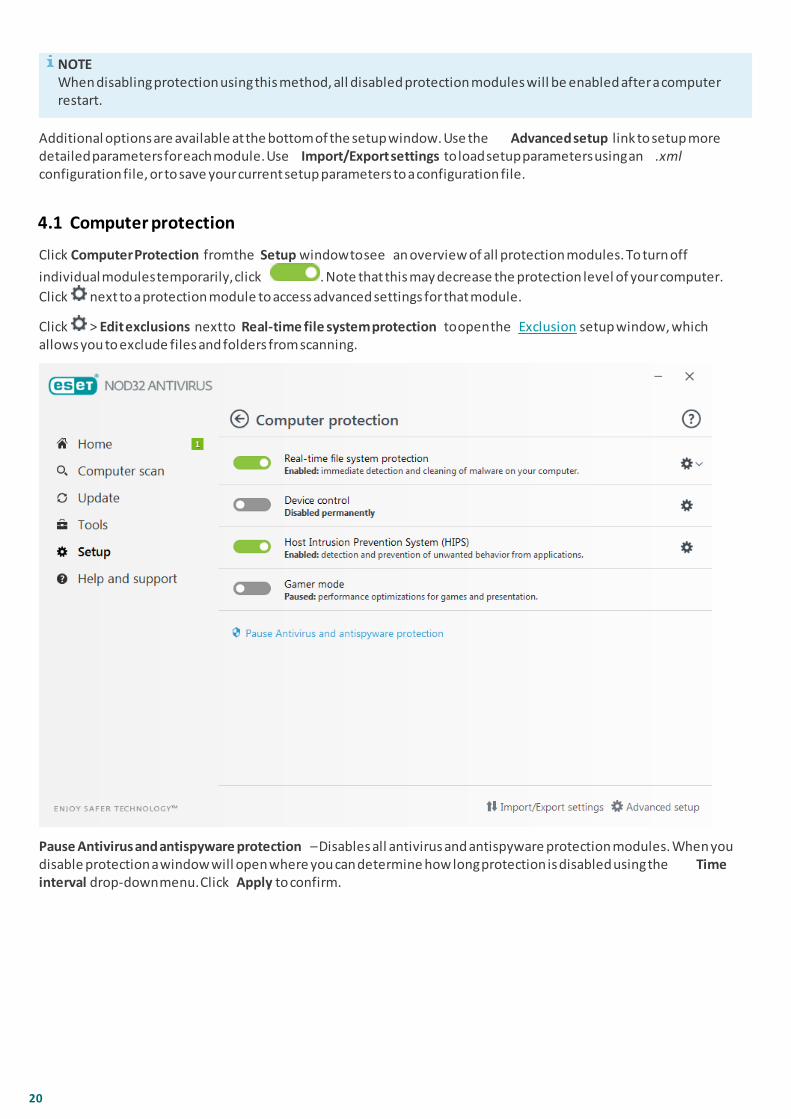
4.1 Computer protection
Click Computer Protection from the Setup window to see an overview of all protection modules. To turn off
individual modules temporarily, click . Note that this may decrease the protection level of your computer.
Click next to a protection module to access advanced settings for that module.
Click > Edit exclusions next to Real-time file system protection to open the Exclusion setup window, whichallows you to exclude files and folders from scanning.
Pause Antivirus and antispyware protection – Disables all antivirus and antispyware protection modules. When youdisable protection a window will open where you can determine how long protection is disabled using the Timeinterval drop-down menu. Click Apply to confirm.

21
4.1.1 Detection engine
Antivirus protection guards against malicious system attacks by controlling file, email and Internet communication.If a threat with malicious code is detected, the Antivirus module can eliminate it by first blocking it and thencleaning, deleting or moving it to quarantine.
Scanner options for all protection modules (e.g. Real-time file system protection, Web access protection, ...) allowyou to enable or disable detection of the following:
· Potentially unwanted applications (PUAs) are not necessarily intended to be malicious, but may affect theperformance of your computer in a negative way.Read more about these types of applications in the glossary.
· Potentially unsafe applications refers to legitimate commercial software that has the potential to be misused formalicious purposes. Examples of potentially unsafe applications include remote access tools, password-crackingapplications, and keyloggers (programs recording each keystroke typed by a user). This option is disabled bydefault.Read more about these types of applications in the glossary.
· Suspicious applications include programs compressed with packers or protectors. These types of protectors areoften exploited by malware authors to evade detection.
Anti-Stealth technology is a sophisticated system that provides the detection of dangerous programs such asrootkits, which are able to hide themselves from the operating system. This means it is not possible to detect themusing ordinary testing techniques.
Exclusions enable you to exclude files and folders from scanning. To ensure that all objects are scanned for threats,we recommend only creating exclusions when it is absolutely necessary. Situations where you may need to excludean object might include scanning large database entries that would slow your computer during a scan or softwarethat conflicts with the scan. To exclude an object from scanning see Exclusions.
Enable advanced scanning via AMSI – Microsoft Antimalware Scan Interface tool that allows application developersnew malware defenses (Windows 10 only).

22
4.1.1.1 Real-time file system protection
Real-time file system protection controls all antivirus-related events in the system. All files are scanned formalicious code when they are opened, created, or run on your computer. Real-time file system protection islaunched at system startup.
By default, Real-time file system protection launches at system start-up and provides uninterrupted scanning. Inspecial cases (for example, if there is a conflict with another real-time scanner), real-time protection can bedisabled by disengaging Enable Real-time file system protection in Advanced setup under Real-time file systemprotection > Basic.
Media to scan
By default, all types of media are scanned for potential threats:
Local drives – Controls all system hard drives.Removable media – Controls CD/DVDs, USB storage, Bluetooth devices, etc.Network drives – Scans all mapped drives.
We recommend that you use default settings and only modify them in specific cases, such as when scanning certainmedia significantly slows data transfers.
Scan on
By default, all files are scanned upon opening, creation, or execution. We recommend that you keep these defaultsettings, as they provide the maximum level of real-time protection for your computer:
· File open – Enables or disables scanning when files are opened.
· File creation – Enables or disables scanning when files are created.
· File execution – Enables or disables scanning when files are run.
· Removable media access – Enables or disables scanning triggered by accessing particular removable media withstorage space.
Real-time file system protection checks all types of media and is triggered by various system events such asaccessing a file. Using ThreatSense technology detection methods (as described in the ThreatSense engine
23
parameter setup section), Real-time file system protection can be configured to treat newly created files differentlythan existing files. For example, you can configure Real-time file system protection to more closely monitor newlycreated files.
To ensure a minimal system footprint when using real-time protection, files that have already been scanned are notscanned repeatedly (unless they have been modified). Files are scanned again immediately after each detectionengine update. This behavior is controlled using Smart optimization. If this Smart optimization is disabled, all filesare scanned each time they are accessed. To modify this setting, press F5 to open Advanced setup and expandDetection engine > Real-time file system protection. Click ThreatSense parameter > Other and select or deselectEnable Smart optimization.
4.1.1.1.1 Additional ThreatSense parameters
Additional ThreatSense parameters for newly created and modified files
The probability of infection in newly-created or modified files is comparatively higher than in existing files. For thisreason, the program checks these files with additional scanning parameters. ESET NOD32 Antivirus uses advancedheuristics which can detect new threats before the detection engine update is released in combination withsignature-based scanning methods. In addition to newly-created files, scanning is also performed on Self-extractingarchives (.sfx) and Runtime packers (internally compressed executable files). By default, archives are scanned up tothe 10th nesting level, and are checked regardless of their actual size. To modify archive scan settings, deselect Default archive scan settings.
Additional ThreatSense parameters for executed files
Advanced heuristics on file execution – By default, Advanced heuristics is used when files are executed. Whenenabled, we strongly recommend keeping Smart optimization and ESET LiveGrid® enabled to mitigate impact onsystem performance.
Advanced heuristics on executing files from removable media – Advanced heuristics emulates code in a virtualenvironment and evaluates its behavior before the code is allowed to run from removable media.
4.1.1.1.2 Cleaning levels
Real-time protection has three cleaning levels (to access cleaning level settings, click ThreatSense engineparameter setup in the Real-time file system protection section and then click Cleaning).
No cleaning – Infected files will not be cleaned automatically. The program will display a warning window and allowthe user to choose an action. This level is designed for more advanced users who know which steps to take in theevent of an infiltration.
Normal cleaning – The program will attempt to automatically clean or delete an infected file based on a predefinedaction (depending on the type of infiltration). Detection and deletion of an infected file is signaled by a notificationthe bottom-right corner of the screen. If it is not possible to select the correct action automatically, the programprovides other follow-up actions. The same happens when a predefined action cannot be completed.
Strict cleaning – The program will clean or delete all infected files. The only exceptions are the system files. If it isnot possible to clean them, the user is prompted to select an action by a warning window.
WARNINGIf an archive contains a file or files which are infected, there are two options for dealing with the archive. Instandard mode (Normal cleaning), the whole archive would be deleted if all the files it contains are infectedfiles. In Strict cleaning mode, the archive would be deleted if it contains at least one infected file, regardless ofthe status of the other files in the archive.
24
4.1.1.1.3 When to modify real-time protection configuration
Real-time protection is the most essential component of maintaining a secure system. Always be careful whenmodifying its parameters. We recommend that you only modify its parameters in specific cases.
After installing ESET NOD32 Antivirus, all settings are optimized to provide the maximum level of system security
for users. To restore default settings, click next to each tab in the window (Advanced setup > Detection engine >Real-time file system protection).
4.1.1.1.4 Checking real-time protection
To verify that real-time protection is working and detecting viruses, use a test file from eicar.com. This test file is aharmless file detectable by all antivirus programs. The file was created by the EICAR company (European Institutefor Computer Antivirus Research) to test the functionality of antivirus programs. The file is available for download athttp://www.eicar.org/download/eicar.com
4.1.1.1.5 What to do if real-time protection does not work
In this chapter, we describe problems that may arise when using real-time protection and how to troubleshootthem.
Real-time protection is disabled
If real-time protection was inadvertently disabled by a user, it needs to be reactivated. To reactivate real-timeprotection, navigate to Setup in the main program window and click Computer protection > Real-time file systemprotection.
If real-time protection is not initiated at system startup, it is usually because Enable Real-time file systemprotection is disabled. To make sure this option is enabled, navigate to Advanced setup (F5) and click Detectionengine > Real-time file system protection.
If Real-time protection does not detect and clean infiltrations
Make sure that no other antivirus programs are installed on your computer. If two antivirus programs are installed atthe same time, they may conflict with each other. We recommend that you uninstall any other antivirus programson your system before installing ESET.
Real-time protection does not start
If real-time protection is not initiated at system startup (and Enable Real-time file system protection is enabled), itmay be due to conflicts with other programs. For assistance resolving this issue, please contact ESET Customer Care.
4.1.1.2 Computer scan
The on-demand scanner is an important part of your antivirus solution. It is used to perform scans of files andfolders on your computer. From a security standpoint, it is essential that computer scans are performed regularly aspart of routine security measures not just when an infection is suspected. We recommend that you perform regularin-depth scans of your system to detect viruses that are not captured by Real-time file system protection when theyare written to the disk. This can happen if Real-time file system protection is disabled at the time, the detectionengine is obsolete or the file is not detected as a virus when it is saved to the disk.
Two types of Computer scan are available. Scan your computer quickly scans the system without the need to specifyscan parameters. Custom scan allows you to select from predefined scan profiles designed to target specificlocations, as well as choose specific scan targets.
Scan your computer
Scan your computer allows you to quickly launch a computer scan and clean infected files with no need for userintervention. The advantage of Scan your computer is it is easy to operate and does not require detailed scanningconfiguration. This scan checks all files on local drives and automatically cleans or deletes detected infiltrations. The

25
cleaning level is automatically set to the default value. For more detailed information on types of cleaning, see Cleaning.
You can also use the Drag and drop scan feature to scan a file or folder manually by clicking the file or folder, movingthe mouse pointer to the marked area while keeping the mouse button pressed, and then releasing it. After that,the application is moved to the foreground.
The following scanning options are available under Advanced scans:
Custom scan
Custom scan lets you specify scanning parameters such as scan targets and scanning methods. The advantage ofCustom scan is the ability to configure the parameters in detail. Configurations can be saved to user-defined scanprofiles, which can be useful if scanning is repeatedly performed with the same parameters.
Removable media scan
Similar to Scan your computer – quickly launch a scan of removable media (such as CD/DVD/USB) that are currentlyconnected to the computer. This may be useful when you connect a USB flash drive to a computer and want to scanits contents for malware and other potential threats.
This type of scan can be also initiated by clicking Custom scan, selecting Removable media from the Scan targetsdrop-down menu and clicking Scan.
Repeat last scan
Allows you to quickly launch the previously performed scan using the same settings it was run with.
See Scan progress for more information about the scanning process.
NOTEWe recommend that you run a computer scan at least once a month. Scanning can be configured as a scheduledtask from Tools > Scheduler. How do I schedule a weekly computer scan?
4.1.1.2.1 Custom scan launcher
You can use the Customer Scan to scan specific parts of a disk, rather than the entire disk. To do so, click Advancedscans > Custom scan and select an option from the Scan targets drop-down menu, or select specific targets from thefolder (tree) structure.
The Scan targets drop-down menu allows you to select predefined scan targets.
· By profile settings – Selects targets specified by the selected scan profile.
· Removable media – Selects diskettes, USB storage devices, CD/DVD.
· Local drives – Selects all system hard drives.
· Network drives – Selects all mapped network drives.
· No selection – Cancels all selections.
To quickly navigate to a scan target or add a target folder or file(s), enter the target directory in the blank fieldbelow the folder list. This is only possible if no targets are selected in the tree structure and the Scan targets menuis set to No selection.

26
You can configure cleaning parameters for the scan under Advanced setup > Detection engine > On-demand scan >ThreatSense parameters > Cleaning. To run a scan with no cleaning action, select Scan without cleaning. Scan historyis saved to the scan log.
When Ignore exclusions is selected, files with extensions that were previously excluded from scanning will bescanned with no exception.
You can choose a profile from the Scan profile drop-down menu to be used when scanning specific targets. Thedefault profile is Smart scan. There are two more pre-defined scan profiles called In-depth scan and Context menuscan. These scan profiles use different ThreatSense parameters. Click Setup... to set up a customized scan profile.Scan profile options are described under Other in ThreatSense parameters.
Click Scan to execute the scan using the custom parameters that you have set.
Scan as Administrator allows you to execute the scan under the Administrator account. Use this if the current userdoesn't have privileges to access the files you want to scan. This button is not available if the current user cannotcall UAC operations as Administrator.
NOTEYou can view the computer scan log when a scan completes by clicking Show log.

27
4.1.1.2.2 Scan progress
The scan progress window shows the current status of the scan and information about the number of files foundthat contain malicious code.
NOTEIt is normal that some files, such as password protected files or files being exclusively used by the system(typically pagef ile.sys and certain log files), cannot be scanned. More details can be found in our knowledgebasearticle.
Scan progress – The progress bar shows the status of already-scanned objects compared to objects still waiting bescanned. The scan progress status is derived from the total number of objects included in scanning.Target – The name of the currently scanned object and its location.Threats found – Shows the total number of scanned files, threats found and threats cleaned during a scan.Pause – Pauses a scan.Resume – This option is visible when scan progress is paused. Click Resume to continue scanning.Stop – Terminates the scan.Scroll scan log – If enabled, the scan log will scroll down automatically as new entries are added so that the mostrecent entries are visible.
NOTEClick the magnifier or arrow to show details about the scan that is currently running. You can run another parallelscan by clicking Scan your computer or Custom scan.
Action after scan – Triggers a scheduled shutdown, reboot or sleep when the computer scan finishes. Once the scanhas finished, a shutdown confirmation dialog window will open with a 60 second timeout.

28
4.1.1.2.3 Scan profiles
Your preferred scan parameters can be saved for future scanning. We recommend that you create a different profile(with various scan targets, scan methods and other parameters) for each regularly used scan.
To create a new profile, open the Advanced setup window (F5) and click Detection engine > Malware scans > On-demand scan > List of profiles. The Profile manager window includes the Selected profile drop-down menu that listsexisting scan profiles and the option to create a new one. To help you create a scan profile to fit your needs, see the ThreatSense engine parameters setup section for a description of each parameter of the scan setup.
NOTESuppose that you want to create your own scan profile and the Scan your computer configuration is partiallysuitable, but you don’t want to scan runtime packers or potentially unsafe applications and you also want toapply Strict cleaning. Enter the name of your new profile in the Profile manager window and click Add. Selectyour new profile from the Selected profile drop-down menu and adjust the remaining parameters to meet yourrequirements and click OK to save your new profile.
4.1.1.2.4 Computer scan log
The computer scan log gives you general information about the scan such as:
· Time of completion
· Total scanning time
· Number of threats found
· Number of scanned objects
· Scanned disk, folders and files
· Date and time of scan
· Version of detection engine
4.1.1.3 Idle-state scan
Enable Idle-state scanning – This will perform a full computer scan when your computer is not in use.
By default, the idle-state scanner will not run when the computer (notebook) is operating on battery power. Youcan override this setting with the Run even if computer is powered from battery feature.
Turn on Enable logging to record a computer scan output in the Log files section (from the main program windowclick Tools > Log files and then select Computer scan from the Log drop-down menu).
Idle-state detection will run when your computer is in the following states:
· Turned off screen or screen saver
· Computer lock
· User logoff
Click ThreatSense parameters to modify scan parameters (for example, detection methods) for the Idle-statescanner.
4.1.1.4 Startup scan
By default the automatic startup file check will be performed on system startup and during detection engineupdates. This scan is dependent upon the Scheduler configuration and tasks.
The startup scan options is part of a System startup file check scheduler task. To modify its settings, navigate toTools > Scheduler, click on Automatic startup file check and then Edit. In the last step, the Automatic startup filecheck window will appear (see the following chapter for more details).
For detailed instructions about Scheduler task creation and management, see Creating new tasks.

29
4.1.1.4.1 Automatic startup file check
When creating a System startup file check scheduled task, you have several options to adjust the followingparameters:
The Commonly used files drop-down menu specifies the scan depth for files run at system startup based on secretsophisticated algorithm. Files are arranged in descending order according to the following criteria:
· All registered files (most files scanned)
· Rarely used files
· Commonly used files
· Frequently used files
· Only the most frequently used files (least files scanned)
Two specific groups are also included:
· Files run before user logon – Contains files from locations that may be accessed without the user being loggedin (includes almost all startup locations such as services, browser helper objects, winlogon notify, Windowsscheduler entries, known dll's, etc.).
· Files run after user logon - Contains files from locations that may only be accessed after a user has logged in(includes files that are only run by a specific user, typically files in HKEY_CURRENT_USER\SOFTWARE\Microsof t\Windows\CurrentVersion\Run).
Lists of files to be scanned are fixed for each aforementioned group.
Scan priority – The level of priority used to determine when a scan will start:
· When idle – the task will be performed only when the system is idle,
· Lowest – when the system load is the lowest possible,
· Lower – at a low system load,
· Normal – at an average system load.
4.1.1.5 Exclusions
Exclusions enable you to exclude files and folders from scanning. To ensure that all objects are scanned for threats,we recommend only creating exclusions when it is absolutely necessary. However, there are situations where youmay need to exclude an object, for example large database entries that would slow your computer during a scan orsoftware that conflicts with the scan.
To exclude an object from scanning:
1. Click Add,2. Enter the path to an object or select it in the tree structure.
You can use wildcards to cover a group of files. A question mark (?) represents a single variable character whereasan asterisk (*) represents a variable string of zero or more characters.
Examples
· If you wish to exclude all files in a folder, type the path to the folder and use the mask “*.*”.
· To exclude an entire drive including all files and subfolders, use the mask "D:\*".
· If you want to exclude doc files only, use the mask “*.doc“.
· If the name of an executable file has a certain number of characters (and characters vary) and you only know thefirst one for sure (say “D”), use the following format: “D????.exe”. Question marks replace the missing (unknown)characters.

30
NOTEA threat within a file will not be detected by the Real-time file system protection module or Computer scanmodule if a file meets the criteria for exclusion from scanning.
Columns
Path – Path to excluded files and folders.
Threat – If there is a name of a threat next to an excluded file, it means that the file is only excluded for thegiven threat, not completely. If that file becomes infected later with other malware, it will be detected by theantivirus module. This type of exclusion can only be used for certain types of infiltrations and it can be createdeither in the threat alert window reporting the infiltration (click Show advanced options and then select Excludefrom detection), or by clicking Tools > Quarantine and then right-clicking the quarantined file and selectingRestore and exclude from detection from the context menu.
Control elements
Add – Excludes objects from detection.
Edit – Enables you to edit selected entries.
Remove – Removes selected entries.
4.1.1.6 ThreatSense parameters
ThreatSense is comprised of many complex threat detection methods. This technology is proactive, which means italso provides protection during the early spread of a new threat. It uses a combination of code analysis, codeemulation, generic signatures and virus signatures which work in concert to significantly enhance system security.The scanning engine is capable of controlling several data streams simultaneously, maximizing efficiency anddetection rate. ThreatSense technology also successfully eliminates rootkits.
ThreatSense engine setup options allow you to specify several scan parameters:
· File types and extensions that are to be scanned
· The combination of various detection methods
· Levels of cleaning, etc.

31
To enter the setup window, click ThreatSense parameters in the Advanced setup window for any module that usesThreatSense technology (see below). Different security scenarios may require different configurations. With this inmind, ThreatSense is individually configurable for the following protection modules:
· Real-time file system protection
· Idle-state scanning
· Startup scan
· Document protection
· Email client protection
· Web access protection
· Computer scan
ThreatSense parameters are highly optimized for each module, their modification can significantly influence systemoperation. For example, changing parameters to always scan runtime packers, or enabling advanced heuristics in theReal-time file system protection module could result in system slow-down (normally, only newly-created files arescanned using these methods). We recommend that you leave the default ThreatSense parameters unchanged forall modules except Computer scan.
Objects to scan
This section allows you to define which computer components and files will be scanned for infiltrations.
Operating memory – Scans for threats that attack the operating memory of the system.
Boot sectors – Scans boot sectors for the presence of viruses in the master boot record.
Email files – The program supports the following extensions: DBX (Outlook Express) and EML.
Archives – The program supports the following extensions: ARJ, BZ2, CAB, CHM, DBX, GZIP, ISO/BIN/NRG, LHA,MIME, NSIS, RAR, SIS, TAR, TNEF, UUE, WISE, ZIP, ACE, and many others.
Self-extracting archives – Self-extracting archives (SFX) are archives that can extract themselves.
Runtime packers – After being executed, runtime packers (unlike standard archive types) decompress in memory.In addition to standard static packers (UPX, yoda, ASPack, FSG, etc.), the scanner is able to recognize severaladditional types of packers through the use of code emulation.
Scan options
Select the methods used when scanning the system for infiltrations. The following options are available:
Heuristics – A heuristic is an algorithm that analyzes the (malicious) activity of programs. The main advantage ofthis technology is the ability to identify malicious software which did not exist, or was not covered by theprevious virus signatures database. The disadvantage is a (very small) probability of false alarms.
Advanced heuristics/DNA signatures – Advanced heuristics are a unique heuristic algorithm developed by ESET,optimized for detecting computer worms and trojan horses and written in high-level programming languages. Theuse of advanced heuristics greatly increases the threat detection capabilities of ESET products. Signatures canreliably detect and identify viruses. Utilizing the automatic update system, new signatures are available within afew hours of a threat discovery. The disadvantage of signatures is that they only detect viruses they know (orslightly modified versions of these viruses).
Grayware (or PUA - a Potentially Unwanted Application) is a broad category of software, whose intent is not asunequivocally malicious as with other types of malware, such as viruses or trojan horses. It may however installadditional unwanted software, change the behavior of the digital device, or perform activities not approved orexpected by the user.
Categories that may be considered grayware include: advertising display software, download wrappers, variousbrowser toolbars, software with misleading behavior, bundleware, trackware, or any other borderline software, orsoftware that uses illicit or at least unethical business practices (despite appearing legitimate) and might bedeemed undesirable by an end user who became aware of what the software would do if allowed to install.
A Potentially Unsafe Application is one that is in itself legitimate (possibly commercial) software but which might
32
be misused by an attacker. Detection of these types of application can be enabled or disabled by users of ESETsoftware.
There are some situations where a user may feel that the benefits of a potentially unwanted application outweighthe risks. For this reason, ESET assigns such applications a lower-risk category compared to other types of malicioussoftware, such as trojan horses or worms.
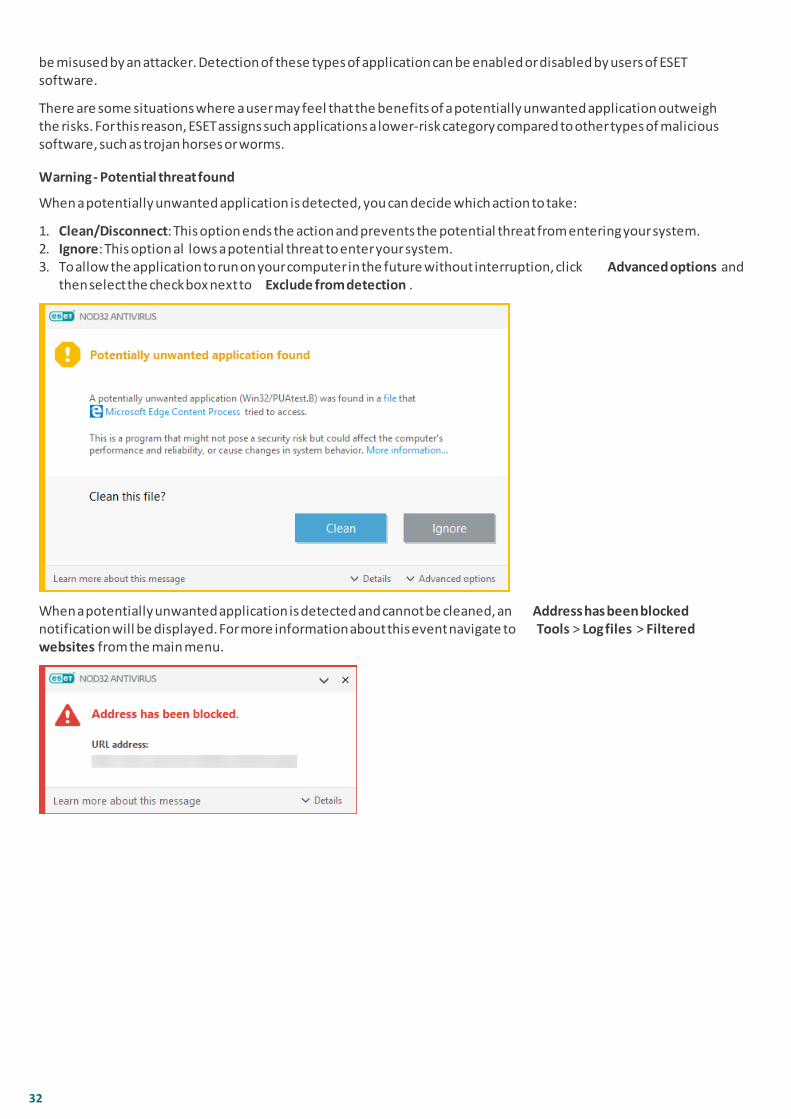
Warning - Potential threat found
When a potentially unwanted application is detected, you can decide which action to take:
1. Clean/Disconnect: This option ends the action and prevents the potential threat from entering your system.2. Ignore: This option allows a potential threat to enter your system.3. To allow the application to run on your computer in the future without interruption, click Advanced options and
then select the check box next to Exclude from detection.
When a potentially unwanted application is detected and cannot be cleaned, an Address has been blockednotification will be displayed. For more information about this event navigate to Tools > Log files > Filteredwebsites from the main menu.

33
Potentially unwanted applications - Settings
While installing your ESET product, you can decide whether to enable detection of potentially unwantedapplications, as shown below:
WARNINGPotentially unwanted applications may install adware, toolbars, or contain other unwanted and unsafe programfeatures.
These settings can be modified in your program settings at any time. To enable or disable the detection ofPotentially unwanted, unsafe or suspicious applications, follow these instructions:
1. Open your ESET product. How do I open my ESET product?2. Press the F5 key to access Advanced setup.3. Click Antivirus and enable or disable options Enable detection of potentially unwanted applications, Enable
detection of potentially unsafe applications and Enable detection of suspicious applications according to yourpreferences. Confirm by clicking OK.

34
Potentially unwanted applications - Software wrappers
A software wrapper is a special type of application modification that is used by some file-hosting websites. It is athird-party tool that installs the program you intended to download but adds additional software, such as toolbarsor adware. The additional software may also make changes to your web browser’s home page and search settings.Also, file-hosting websites often do not notify the software vendor or download recipient that modifications havebeen made, and often hide options to opt out. For these reasons, ESET classifies software wrappers as a type ofpotentially unwanted application to allow users to accept the download or not.
Please see this ESET Knowledgebase article for an updated version of this help page.
Potentially unsafe applications – Potentially unsafe applications is the classification used for commercial,legitimate programs such as remote access tools, password-cracking applications and keyloggers (programs thatrecord each keystroke typed by a user). This option is disabled by default.
The cleaning settings determine the behavior of the scanner while cleaning infected files. There are 3 levels ofcleaning.
Exclusions
An extension is the part of a file name delimited by a period. An extension defines the type and content of a file.This section of the ThreatSense parameter setup lets you define the types of files to scan.
Other
When configuring ThreatSense engine parameters setup for a On-demand computer scan, the following options inOther section are also available:
Scan alternate data streams (ADS) – Alternate data streams used by the NTFS file system are file and folderassociations which are invisible to ordinary scanning techniques. Many infiltrations try to avoid detection bydisguising themselves as alternate data streams.
Run background scans with low priority – Each scanning sequence consumes a certain amount of system resources.If you work with programs that place a high load on system resources, you can activate low priority backgroundscanning and save resources for your applications.
Log all objects – If this option is selected, the log file will show all the scanned files, even those not infected. Forexample, if an infiltration is found within an archive, the log will list also clean files contained within the archive.

35
Enable Smart optimization – With Smart Optimization enabled, the most optimal settings are used to ensure themost efficient scanning level, while simultaneously maintaining the highest scanning speeds. The variousprotection modules scan intelligently, making use of different scanning methods and applying them to specificfile types. If the Smart Optimization is disabled, only the user-defined settings in the ThreatSense core of theparticular modules are applied when performing a scan.
Preserve last access timestamp – Select this option to keep the original access time of scanned files instead ofupdating them (for example, for use with data backup systems).
Limits
The Limits section allows you to specify the maximum size of objects and levels of nested archives to be scanned:
Object settings
Maximum object size – Defines the maximum size of objects to be scanned. The given antivirus module willthen scan only objects smaller than the size specified. This option should only be changed by advanced userswho may have specific reasons for excluding larger objects from scanning. Default value: unlimited.
Maximum scan time for object (sec.) – Defines the maximum time value for scanning of an object. If a user-defined value has been entered here, the antivirus module will stop scanning an object when that time haselapsed, regardless of whether the scan has finished. Default value: unlimited.
Archive scan setup
Archive nesting level – Specifies the maximum depth of archive scanning. Default value: 10.
Maximum size of file in archive – This option allows you to specify the maximum file size for files contained inarchives (when they are extracted) that are to be scanned. Default value: unlimited.
NOTEWe do not recommend changing the default values; under normal circumstances, there should be no reason tomodify them.
4.1.1.6.1 Cleaning
The cleaning settings determine the behavior of the scanner while cleaning infected files. There are 3 levels ofcleaning.
4.1.1.6.2 File extensions excluded from scanning
An extension is the part of a file name delimited by a period. An extension defines the type and content of a file.This section of the ThreatSense parameter setup lets you define the types of files to scan.
By default, all files are scanned. Any extension can be added to the list of files excluded from scanning.
Excluding files is sometimes necessary if scanning certain file types prevents the program that is using certainextensions from running properly. For example, it may be advisable to exclude the .edb, .eml and .tmp extensionswhen using Microsoft Exchange servers.
Using the Add and Remove buttons, you can allow or prohibit the scanning of specific file extensions. To add a newextension to the list, click Add, type the extension into the blank field (for example tmp) and click OK. When youselect Enter multiple values, you can add multiple file extensions delimited by lines, commas or semicolons. Whenmultiple selection is enabled, extensions will be shown in the list. Select an extension in the list and click Removeto delete that extension from the list. If you want to edit a selected extension click Edit.
The special symbol ? (question mark) can be used. The question mark represents any symbol.
NOTEIn order to see the exact extension (if any) of a file in a Windows operating system you have to uncheck the Hideextensions for known file types option at Control Panel > Folder Options > View (tab) and apply this change.

36
4.1.1.7 An infiltration is detected
Infiltrations can reach the system from various entry points such as webpages, shared folders, via email or fromremovable devices (USB, external disks, CDs, DVDs, diskettes, etc.).
Standard behavior
As a general example of how infiltrations are handled by ESET NOD32 Antivirus, infiltrations can be detected using:
· Real-time file system protection
· Web access protection
· Email client protection
· On-demand computer scan
Each uses the standard cleaning level and will attempt to clean the file and move it to Quarantine or terminate theconnection. A notification window is displayed in the notification area at the bottom right corner of the screen. Formore information about cleaning levels and behavior, see Cleaning.

37
Cleaning and deleting
If there is no predefined action to take for Real-time file system protection, you will be prompted to select anoption in the alert window. Usually the options Clean, Delete and No action are available. Selecting No action is notrecommended, as this will leave infected files uncleaned. The exception to this is when you are sure that a file isharmless and has been detected by mistake.
Apply cleaning if a file has been attacked by a virus that has attached malicious code to the file. If this is the case,first attempt to clean the infected file in order to restore it to its original state. If the file consists exclusively ofmalicious code, it will be deleted.
If an infected file is “locked“ or in use by a system process, it will usually only be deleted after it is released(normally after a system restart).
Multiple threats
If any infected files were not cleaned during Computer scan (or the Cleaning level was set to No Cleaning), an alertwindow prompting you to select actions for those files is displayed. Select actions for the files (actions are setindividually for each file in the list) and then click Finish.
Deleting files in archives
In Default cleaning mode, the entire archive will be deleted only if it contains infected files and no clean files. Inother words, archives are not deleted if they also contain harmless clean files. Use caution when performing a Strictcleaning scan, with Strict cleaning enabled an archive will be deleted if it contains at least one infected fileregardless of the status of other files in the archive.

38
If your computer is showing signs of a malware infection, e.g., it is slower, often freezes, etc., we recommend thatyou do the following:
· Open ESET NOD32 Antivirus and click Computer scan
· Click Scan your computer (for more information, see Computer scan)
· After the scan has finished, review the log for the number of scanned, infected and cleaned files
If you only want to scan a certain part of your disk, click Custom scan and select targets to be scanned for viruses.
4.1.1.8 Document protection
The Document protection feature scans Microsoft Office documents before they are opened, as well as filesdownloaded automatically by Internet Explorer such as Microsoft ActiveX elements. Document protection providesa layer of protection in addition to Real-time file system protection, and can be disabled to enhance performanceon systems that do not handle a high number of Microsoft Office documents.
To activate Document protection, open the Advanced setup window (press F5) > Detection engine > Malware scans> Document protection and click the Integrate into system switch.
NOTEThis feature is activated by applications that use the Microsoft Antivirus API (for example, Microsoft Office 2000and higher, or Microsoft Internet Explorer 5.0 and higher).
4.1.2 Removable media
ESET NOD32 Antivirus provides automatic removable media (CD/DVD/USB/...) scanning. This module allows you toscan an inserted media. This may be useful if the computer administrator wishes to prevent the users from usingremovable media with unsolicited content.
Action to take after inserting removable media - Select the default action that will be performed when a removablemedia device is inserted into the computer (CD/DVD/USB). If Show scan options is selected, a notification willdisplay which allows you to choose a desired action:
· Do not scan – No action will be performed and the New device detected window will be closed.
· Automatic device scan – An on-demand computer scan of the inserted removable media device will beperformed.
· Show scan options – Opens the Removable media setup section.
When a removable media is inserted, following dialog will shown:
Scan now – This will trigger scan of removable media.
Scan later – Scan of removable media will be postponed.
Setup – Opens the Advanced setup.
Always use the selected option – When selected, same action will be performed when a removable media isinserted another time.
In addition, ESET NOD32 Antivirus features the Device control functionality, which allows you to define rules for theuse of external devices on a given computer. More details on Device control can be found in the Device controlsection.

39
4.1.3 Device control
Device control
ESET NOD32 Antivirus provides automatic device (CD/DVD/USB/...) control. This module allows you to block oradjust extended filters/permissions and define a users ability to access and work with a given device. This may beuseful if the computer administrator wants to prevent the use of devices containing unsolicited content.
Supported external devices:
· Disk Storage (HDD, USB removable disk)
· CD/DVD
· USB Printer
· FireWire Storage
· Bluetooth Device
· Smart card reader
· Imaging Device
· Modem
· LPT/COM port
· Portable Device
· Microphone
· All device types
Device control setup options can be modified in Advanced setup (F5) > Device control.
Turning the switch on next to Integrate into system activates the Device control feature in ESET NOD32 Antivirus;you will need to restart your computer for this change to take effect. Once Device control is enabled, the Rules willbecome active, allowing you to open the Rules editor window.
NOTEYou can create different groups of devices for which different rules will be applied. You can also create only onegroup of devices for which the rule with action Read/Write or Read only will be applied. This ensures blockingunrecognized devices by Device control when connected to your computer.
If a device blocked by an existing rule is inserted, a notification window will be displayed and access to the devicewill not be granted.
Webcam Protection
Turning the switch on next to Integrate into system activates the Webcam Protection feature in ESET NOD32Antivirus. Once Webcam Protection is enabled, the Rules will become active, allowing you to open the Rules editorwindow.

40
4.1.3.1 Device control rules editor
The Device control rules editor window displays existing rules and allows for precise control of external devices thatusers connect to the computer.
Particular devices can be allowed or blocked per user or user group and based on additional device parameters thatcan be specified in the rule configuration. The list of rules contains several descriptions of a rule such as name, typeof external device, action to perform after connecting an external device to your computer and log severity.
Click Add or Edit to manage a rule. Click Copy to create a new rule with predefined options used for anotherselected rule. XML strings displayed when clicking a rule can be copied to the clipboard to help systemadministrators to export/import these data and use them, for example in ESET Remote Administrator.
By pressing CTRL and clicking, you can select multiple rules and apply actions, such as deleting or moving them up ordown the list, to all selected rules. The Enabled check box disables or enables a rule; this can be useful if you don'twish to delete a rule permanently in case you wish to use it in the future.
The control is accomplished by rules that are sorted in the order determining their priority, with higher priority ruleson top.
Log entries can be viewed from the main window of ESET NOD32 Antivirus in Tools > Log files.
The Device control log records all occurrences where Device control is triggered.

41
4.1.3.2 Adding Device control rules
A Device control rule defines the action that will be taken when a device meeting the rule criteria is connected tothe computer.
Enter a description of the rule into the Name field for better identification. Click the switch next to Rule enabled todisable or enable this rule; this can be useful if you don't want to delete the rule permanently.
Device type
Choose the external device type from the drop-down menu (Disk storage/Portable device/Bluetooth/FireWire/...).Device type information is collected from the operating system and can be seen in the system Device manager if adevice is connected to the computer. Storage devices include external disks or conventional memory card readersconnected via USB or FireWire. Smart card readers include all readers of smart cards with an embedded integratedcircuit, such as SIM cards or authentication cards. Examples of imaging devices are scanners or cameras. Becausethese devices only provide information about their actions and do not provide information about users, they canonly be blocked globally.
Action
Access to non-storage devices can either be allowed or blocked. In contrast, rules for storage devices allow you toselect one of the following rights settings:
· Read/Write – Full access to the device will be allowed.
· Block – Access to the device will be blocked.
· Read Only – Only read access to the device will be allowed.
· Warn – Each time that a device is connected, the user will be notified if it is allowed/blocked, and a log entrywill be made. Devices are not remembered, a notification will still be displayed upon subsequent connectionsof the same device.
Note that not all Actions (permissions) are available for all device types. If it is a device of storage type, all fourActions are available. For non-storage devices, there are only three Actions available (for example Read Only is notavailable for Bluetooth, therefore Bluetooth devices can only be allowed, blocked or warned).

42
Criteria type – Select Device group or Device.
Additional parameters shown below can be used to fine-tune rules and tailor them to devices. All parameters arecase-insensitive:
· Vendor – Filter by vendor name or ID.
· Model – The given name of the device.
· Serial – External devices usually have their own serial numbers. In the case of a CD/DVD, this is the serialnumber of the given media, not the CD drive.
NOTEIf these parameters are undefined, the rule will ignore these fields while matching. Filtering parameters in alltext fields are case-insensitive and no wildcards (*, ?) are supported.
NOTETo view information about a device, create a rule for that type of device, connect the device to your computerand then check the device details in the Device control log.
Logging severity
ESET NOD32 Antivirus saves all important events in a log file, which can be viewed directly from the main menu.Click Tools > Log files and then select Device control from the Log drop-down menu.
· Always – Logs all events.
· Diagnostic – Logs information needed to fine-tune the program.
· Information – Records informative messages, including successful update messages, plus all records above.
· Warning – Records critical errors and warning messages.
· None – No logs will be recorded.
Rules can be limited to certain users or user groups by adding them to the User list:
· Add – Opens the Object types: Users or Groups dialog window that allows you to select desired users.
· Remove – Removes the selected user from the filter.
NOTEAll devices can be filtered by user rules, (for example imaging devices do not provide information about users,only about actions).
4.1.4 Host-based Intrusion Prevention System (HIPS)
WARNINGChanges to HIPS settings should only be made by an experienced user. Incorrect configuration of HIPS settingscan lead to system instability.
The Host-based Intrusion Prevention System (HIPS) protects your system from malware and unwanted activityattempting to negatively affect your computer. HIPS utilizes advanced behavioral analysis coupled with thedetection capabilities of network filtering to monitor running processes, files and registry keys. HIPS is separatefrom Real-time file system protection and is not a firewall; it only monitors processes running within the operatingsystem.
HIPS settings can be found under Advanced setup (F5) > Detection engine > HIPS > Basic. The HIPS state(enabled/disabled) is shown in the ESET NOD32 Antivirus main program window, under Setup > Computerprotection.

43
ESET NOD32 Antivirus uses the built-in Self-defense technology as a part of HIPS to prevent malicious software fromcorrupting or disabling your antivirus and antispyware protection. Self-defense protects crucial system and ESET'sprocesses, registry keys and files from being tampered with.
Enable Protected Service – Enables kernel protection (Windows 8.1, 10).
Advanced memory scanner works in combination with Exploit Blocker to strengthen protection against malware thathas been designed to evade detection by antimalware products through the use of obfuscation or encryption.Advanced memory scanner is enabled by default. Read more about this type of protection in the glossary.
Exploit Blocker is designed to fortify commonly exploited application types such as web browsers, PDF readers,email clients and MS Office components. Exploit blocker is enabled by default. Read more about this type ofprotection in the glossary.
Ransomware shield is another layer of protection that works as a part of HIPS feature. You must have the LiveGrid®reputation system enabled for Ransomware shield to work. Read more about this type of protection here.
Filtering can be performed in one of four modes:
Automatic mode – Operations are enabled with the exception of those blocked by pre-defined rules that protectyour system.
Smart mode – The user will only be notified about very suspicious events.
Interactive mode – User will be prompted to confirm operations.
Policy-based mode – Operations are blocked.
Learning mode – Operations are enabled and a rule is created after each operation. Rules created in this mode canbe viewed in the Rule editor, but their priority is lower than the priority of rules created manually or rules createdin automatic mode. When you select Learning mode from the HIPS Filtering mode drop down menu, the Learningmode will end at setting will become available. Select the time span that you want to engage learning mode for, themaximum duration is 14 days. When the specified duration has passed, you will be prompted to edit the rulescreated by HIPS while it was in learning mode. You can also choose a different filtering mode, or postpone thedecision and continue using learning mode.

44
Mode set after learning mode expiration – Select the filtering mode that will be used after learning mode expires.
The HIPS system monitors events inside the operating system and reacts accordingly based on rules similar to thoseused by the Firewall. Click Edit next to Rules to open the HIPS rule management window. In the HIPS rules windowyou can select, add, edit or remove rules.
In the following example, we will demonstrate how to restrict unwanted behavior of applications:
1. Name the rule and select Block from the Action drop-down menu.2. Enable the Notify user switch to display a notification any time that a rule is applied.3. Select at least one operation for which the rule will be applied. In the Source applications window, select All
applications from the drop-down menu to apply your new rule to all applications attempting to perform anyof the selected application operations on the applications you specified.
4. Select Modify state of another application (all operations are described in product help, which can beaccessed by pressing F1).
5. Select Specific applications from the drop-down menu and Add one or several applications you want toprotect.
6. Click Finish to save your new rule.
4.1.4.1 Advanced setup
The following options are useful for debugging and analyzing an application's behavior:
Drivers always allowed to load – Selected drivers are always allowed to load regardless of configured filteringmode, unless explicitly blocked by user rule.
Log all blocked operations – All blocked operations will be written to the HIPS log.
Notify when changes occur in Startup applications – Displays a desktop notification each time an application isadded to or removed from system startup.
Please see the our Knowledgebase article for an updated version of this help page.

45
4.1.4.2 HIPS interactive window
If the default action for a rule is set to Ask, a dialog window will be displayed each time that the rule is triggered.You can choose to Deny or Allow the operation. If you do not choose an action in the given time, a new action isselected based on the rules.
The dialog window allows you to create a rule based on any new action that HIPS detects and then define theconditions under which to allow or deny that action. Settings for the exact parameters can be accessed by clicking Details. Rules created like this are considered equal to rules created manually, so a rule created from a dialogwindow can be less specific than the rule that triggered that dialog window. This means that after creating such arule, the same operation can trigger the same window.
Remember until application quits causes the action (Allow/Deny) to be used until a change of rules or filteringmode, a HIPS module update or a system restart. After any of these three actions, temporary rules will be deleted.

46
4.1.4.3 Potential ransomware behavior detected
This interactive window will appear when potential ransomware behavior is detected. You can choose to Deny orAllow the operation.
The dialog window allows you submit the file for analysis or exclude from detection. Click Details to view specificdetection parameters.
IMPORTANTESET Live Grid must be enabled for Ransomware protection to function properly.
4.1.5 Gamer mode
Gamer mode is a feature for users that demand uninterrupted usage of their software, do not want to be disturbedby pop-up windows, and want to minimize CPU usage. Gamer mode can also be used during presentations thatcannot be interrupted by antivirus activity. By enabling this feature, all pop-up windows are disabled and theactivity of the scheduler will be stopped completely. System protection still runs in the background but does notdemand any user interaction.
You can enable or disable Gamer mode in the main program window under Setup > Computer protection by clicking
or next to Gamer mode. Enabling Gamer mode is a potential security risk, so the protection statusicon in the taskbar will turn orange and display a warning. You will also see this warning in the main programwindow where you will see Gamer mode active in orange.
Activate Enable Gamer mode when running applications in full-screen mode automatically under Advanced setup(F5) > Tools > Gamer mode to have Gamer mode start whenever you initiate a full-screen application and stop afteryou exit the application.
Activate Disable Gamer mode automatically after to define the amount of time after which Gamer mode willautomatically be disabled.

47
4.2 Internet protection
Web and email configuration can be found in the Setup pane by clicking Internet protection. From here you canaccess more detailed program settings.
Internet connectivity is a standard feature for personal computers. Unfortunately, the Internet has become theprimary medium for distributing malicious code. For this reason it is essential that you carefully consider your Webaccess protection settings.
Click to open web/email/anti-phishing protection settings in Advanced setup.
Email client protection provides control of email communications received through POP3 and IMAP protocols. Usingthe plug-in program for your email client, ESET NOD32 Antivirus provides control of all communications to and fromyour email client (POP3, MAPI, IMAP, HTTP).
Anti-Phishing protection allows you to block web pages known to distribute phishing content. We stronglyrecommend that you leave Anti-Phishing enabled.
You can disable the web/email/anti-phishing protection module temporarily by clicking .

48
4.2.1 Web access protection
Internet connectivity is a standard feature in a personal computer. Unfortunately, it has also become the mainmedium for transferring malicious code. Web access protection works by monitoring communication between webbrowsers and remote servers, and complies with HTTP (Hypertext Transfer Protocol) and HTTPS (encryptedcommunication) rules.
Access to web pages known to contain malicious content is blocked before content is downloaded. All otherwebpages are scanned by the ThreatSense scanning engine when they are loaded and blocked if malicious contentis detected. Web access protection offers two level of protection, blocking by blacklist and blocking by content.
We strongly recommend that Web access protection is enabled. This option can be accessed from the main windowof ESET NOD32 Antivirus by navigating to Setup > Internet protection > Web access protection.
The following options are available in Advanced setup (F5) > Web and email > Web access protection:
· Web protocols – enables you to configure monitoring for these standard protocols which are used by mostInternet browsers.
· URL address management – enables you to specify HTTP addresses to block, allow or exclude from checking.
· ThreatSense parameters – Advanced virus scanner setup – enables you to configure settings such as types ofobjects to scan (emails, archives, etc.), detection methods for Web access protection etc.
4.2.1.1 Basic
Enable Web access protection – When disabled, Web access protection and Anti-Phishing protection will not run.
Enable advanced scanning of browser scripts – When enabled, all JavaScript programs executed by internetbrowsers will be checked by antivirus scanner.
NOTEWe strongly recommend you leave Web access protection enabled.
49
4.2.1.2 Web protocols
By default, ESET NOD32 Antivirus is configured to monitor the HTTP protocol used by most Internet browsers.
HTTP Scanner setup
In Windows Vista and later, HTTP traffic is always monitored on all ports for all applications. In Windows XP, youcan modify the Ports used by HTTP protocol in Advanced setup (F5) > Web and email > Web access protection >Web protocols. HTTP traffic is monitored on the specified ports for all applications, and on all ports forapplications marked as Web and email clients.
HTTPS Scanner setup
ESET NOD32 Antivirus also supports HTTPS protocol checking. HTTPS communication uses an encrypted channelto transfer information between server and client. ESET NOD32 Antivirus checks communication utilizing the SSL(Secure Socket Layer), and TLS (Transport Layer Security) protocols. The program will only scan traffic on portsdefined in Ports used by HTTPS protocol, regardless of operating system version.
Encrypted communication will be scanned by default. To view the scanner setup, navigate to SSL/TLS in Advancedsetup section, click Web and email > SSL/TLS and enable the Enable SSL/TLS protocol filtering option.
4.2.1.3 URL address management
The URL address management section enables you to specify HTTP addresses to block, allow or exclude fromchecking.
Websites in the List of blocked addresses will not be accessible unless they are also included in the List of allowedaddresses. Websites in the List of addresses excluded from checking are not scanned for malicious code whenaccessed.
Enable SSL/TLS protocol filtering must be selected if you want to filter HTTPS addresses in addition to HTTP webpages. Otherwise only the domains of HTTPS sites that you have visited will be added, the full URL will not be.
If you add a URL address to the List of addresses excluded from filtering, the address will be excluded fromscanning. You can also allow or block certain addresses by adding them to the List of allowed addresses or List ofblocked addresses.
If you want to block all HTTP addresses except addresses present in the active List of allowed addresses, add * to theactive List of blocked addresses.
The special symbols * (asterisk) and ? (question mark) can be used in lists. The asterisk substitutes any characterstring, and the question mark substitutes any symbol. Particular care should be taken when specifying excludedaddresses, because the list should only contain trusted and safe addresses. Similarly, it is necessary to ensure thatthe symbols * and ? are used correctly in this list. See Add HTTP address / domain mask for how a whole domainincluding all subdomains can be matched safely. To activate a list, select List active. If you want to be notified whenentering an address from the current list, select Notify when applying.
NOTEURL address management also allows you to block or allow the opening of specific file types during internetbrowsing. For example, if you do not want executable files to be opened, select the list where you want to blockthese files from the drop-down menu and then enter the mask "**.exe".
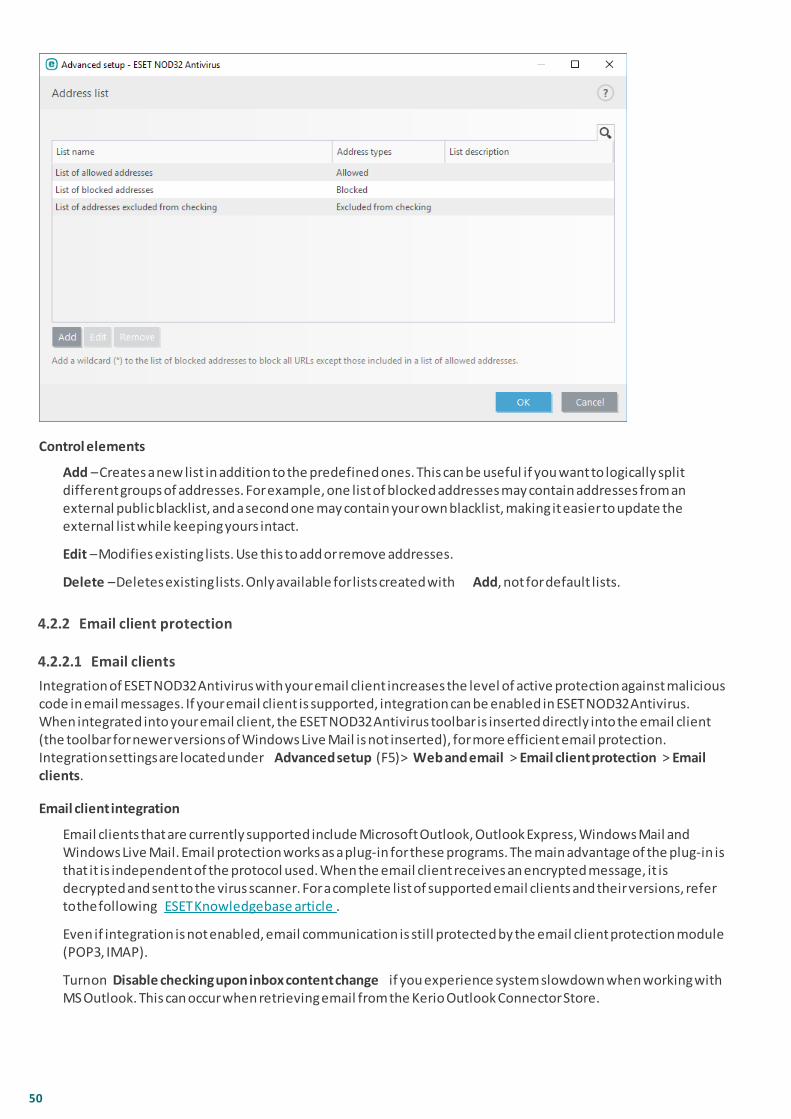
50
Control elements
Add – Creates a new list in addition to the predefined ones. This can be useful if you want to logically splitdifferent groups of addresses. For example, one list of blocked addresses may contain addresses from anexternal public blacklist, and a second one may contain your own blacklist, making it easier to update theexternal list while keeping yours intact.
Edit – Modifies existing lists. Use this to add or remove addresses.
Delete – Deletes existing lists. Only available for lists created with Add, not for default lists.
4.2.2 Email client protection
4.2.2.1 Email clients
Integration of ESET NOD32 Antivirus with your email client increases the level of active protection against maliciouscode in email messages. If your email client is supported, integration can be enabled in ESET NOD32 Antivirus.When integrated into your email client, the ESET NOD32 Antivirus toolbar is inserted directly into the email client(the toolbar for newer versions of Windows Live Mail is not inserted), for more efficient email protection.Integration settings are located under Advanced setup (F5) > Web and email > Email client protection > Emailclients.
Email client integration
Email clients that are currently supported include Microsoft Outlook, Outlook Express, Windows Mail andWindows Live Mail. Email protection works as a plug-in for these programs. The main advantage of the plug-in isthat it is independent of the protocol used. When the email client receives an encrypted message, it isdecrypted and sent to the virus scanner. For a complete list of supported email clients and their versions, referto the following ESET Knowledgebase article.
Even if integration is not enabled, email communication is still protected by the email client protection module(POP3, IMAP).
Turn on Disable checking upon inbox content change if you experience system slowdown when working withMS Outlook. This can occur when retrieving email from the Kerio Outlook Connector Store.

51
Email to scan
Enable email protection by client plugins – When email client protection by email client is disabled, email clientprotection by protocol filtering will be still enabled.Received email – Toggles checking of received messages.Sent email – Toggles checking of sent messages.Read email – Toggles checking of read messages.
Action to be performed on infected email
No action – If enabled, the program will identify infected attachments, but will leave emails without taking anyaction.Delete email – The program will notify the user about infiltration(s) and delete the message.Move email to the Deleted items folder – Infected emails will be moved automatically to the Deleted itemsfolder.Move email to folder – Infected emails will be moved automatically to the specified folder.
Folder – Specify the custom folder where you want to move infected emails when detected.
Repeat scan after update – Toggles rescanning after a detection engine update.
Accept scan results from other modules – If this is selected, the email protection module accepts scan results ofother protection modules (POP3, IMAP protocols scanning).
NOTEWe recommend that you enable Enable email protection by client plugins and Enable email protection byprotocol filtering. These settings are located under Advanced setup (F5) > Web and email > Email clientprotection > Email protocols).
4.2.2.2 Email protocols
The IMAP and POP3 protocols are the most widespread protocols used to receive email communication in an emailclient application. The Internet Message Access Protocol (IMAP) is another Internet protocol for email retrieval.IMAP has some advantages over POP3, for example, multiple clients can simultaneously connect to the samemailbox and maintain message state information such as whether or not the message has been read, replied to ordeleted. ESET NOD32 Antivirus provides protection for these protocols regardless of the email client used, andwithout requiring re-configuration of the email client.
The protection module providing this control is automatically initiated at system startup and is then active inmemory. IMAP protocol control is performed automatically without the need to reconfigure the email client. Bydefault, all communication on port 143 is scanned, but other communication ports can be added if necessary.Multiple port numbers must be delimited by a comma.
You can configure IMAP/IMAPS and POP3/POP3S protocol checking in Advanced setup. To access this setting,expand Web and email > Email client protection > Email protocols.
Enable email protection by protocol filtering – Enables checking of email protocols.
In Windows Vista and later, IMAP and POP3 protocols are automatically detected and scanned on all ports. InWindows XP, only the configured Ports used by the IMAP/POP3 protocol are scanned for all applications, and allports are scanned for applications marked as Web and email clients.
ESET NOD32 Antivirus also supports the scanning of IMAPS and POP3S protocols, which use an encrypted channel totransfer information between server and client. ESET NOD32 Antivirus checks communication utilizing the SSL(Secure Socket Layer), and TLS (Transport Layer Security) protocols. The program will only scan traffic on portsdefined in Ports used by IMAPS/POP3S protocol, regardless of operating system version.
Encrypted communication will be scanned by default. To view the scanner setup, navigate to SSL/TLS in Advancedsetup section, click Web and email > SSL/TLS and enable the Enable SSL/TLS protocol filtering option.
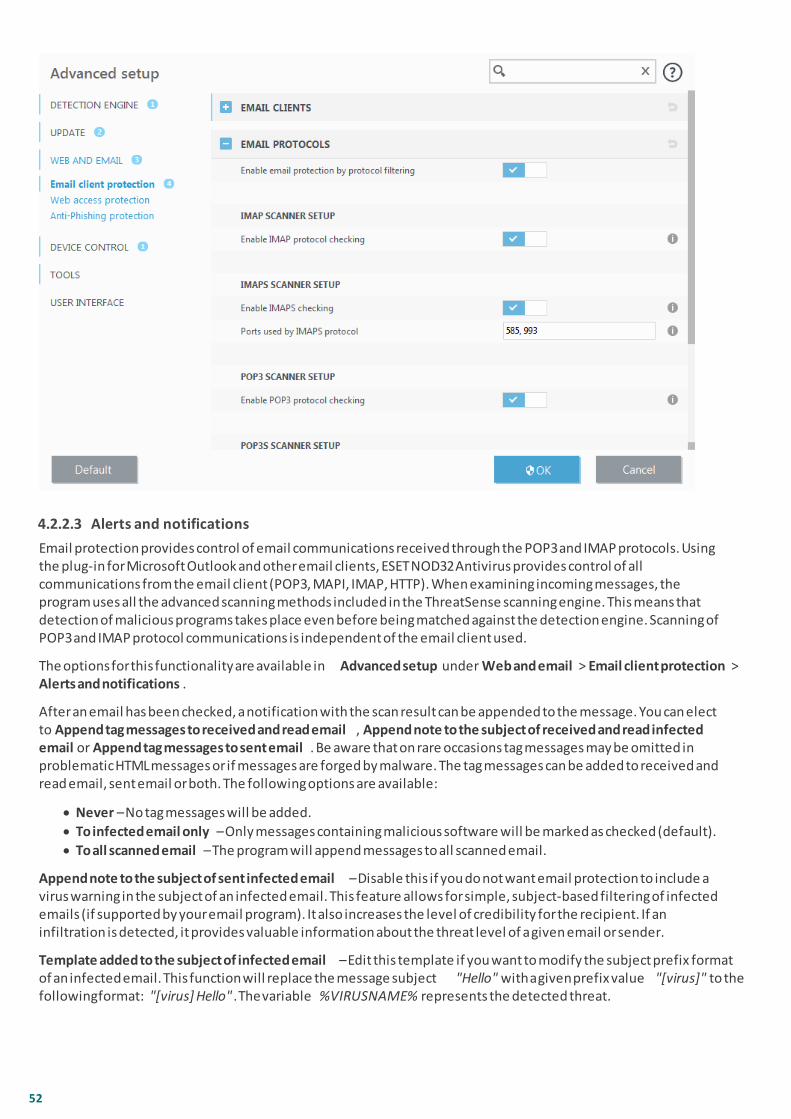
52
4.2.2.3 Alerts and notifications
Email protection provides control of email communications received through the POP3 and IMAP protocols. Usingthe plug-in for Microsoft Outlook and other email clients, ESET NOD32 Antivirus provides control of allcommunications from the email client (POP3, MAPI, IMAP, HTTP). When examining incoming messages, theprogram uses all the advanced scanning methods included in the ThreatSense scanning engine. This means thatdetection of malicious programs takes place even before being matched against the detection engine. Scanning ofPOP3 and IMAP protocol communications is independent of the email client used.
The options for this functionality are available in Advanced setup under Web and email > Email client protection >Alerts and notifications.
After an email has been checked, a notification with the scan result can be appended to the message. You can electto Append tag messages to received and read email, Append note to the subject of received and read infectedemail or Append tag messages to sent email. Be aware that on rare occasions tag messages may be omitted inproblematic HTML messages or if messages are forged by malware. The tag messages can be added to received andread email, sent email or both. The following options are available:
· Never – No tag messages will be added.
· To infected email only – Only messages containing malicious software will be marked as checked (default).
· To all scanned email – The program will append messages to all scanned email.
Append note to the subject of sent infected email – Disable this if you do not want email protection to include avirus warning in the subject of an infected email. This feature allows for simple, subject-based filtering of infectedemails (if supported by your email program). It also increases the level of credibility for the recipient. If aninfiltration is detected, it provides valuable information about the threat level of a given email or sender.
Template added to the subject of infected email – Edit this template if you want to modify the subject prefix formatof an infected email. This function will replace the message subject "Hello" with a given prefix value "[virus]" to thefollowing format: "[virus] Hello". The variable %VIRUSNAME% represents the detected threat.
53
4.2.2.4 Integration with email clients
Integration of ESET NOD32 Antivirus with email clients increases the level of active protection against maliciouscode in email messages. If your email client is supported, integration can be enabled in ESET NOD32 Antivirus.When integration is activated, the ESET NOD32 Antivirus toolbar is inserted directly into the email client, allowingfor more efficient email protection. Integration settings are available through Setup > Advanced setup > Web andemail > Email client protection > Email clients.
Email clients that are currently supported include Microsoft Outlook, Outlook Express, Windows Mail, Windows LiveMail. For a complete list of supported email clients and their versions, refer to the following ESET Knowledgebasearticle.
Select the check box next to Disable checking upon inbox content change if you are experiencing a systemslowdown when working with your email client. This can occur when retrieving email from the Kerio OutlookConnector Store.
Even if integration is not enabled, email communication is still protected by the email client protection module(POP3, IMAP).
4.2.2.4.1 Email client protection configuration
The Email client protection module supports the following email clients: Microsoft Outlook, Outlook Express,Windows Mail, Windows Live Mail. Email protection works as a plug-in for these programs. The main advantage ofthe plug-in is that it is independent of the protocol used. When the email client receives an encrypted message, it isdecrypted and sent to the virus scanner.
4.2.2.5 POP3, POP3S filter
The POP3 protocol is the most widespread protocol used to receive email communication in an email clientapplication. ESET NOD32 Antivirus provides protection for this protocol regardless of the email client used.
The protection module providing this control is automatically initiated at system startup and is then active inmemory. For the module to work correctly, please make sure it is enabled – POP3 protocol checking is performedautomatically without requiring re-configuration of the email client. By default, all communication on port 110 isscanned, but other communication ports can be added if necessary. Multiple port numbers must be delimited by acomma.
Encrypted communication will be scanned by default. To view the scanner setup, navigate to SSL/TLS in Advancedsetup section, click Web and email > SSL/TLS and enable the Enable SSL/TLS protocol filtering option.
In this section, you can configure POP3 and POP3S protocol checking.
Enable POP3 protocol checking – If enabled, all traffic through POP3 is monitored for malicious software.
Ports used by POP3 protocol – A list of ports used by the POP3 protocol (110 by default).
ESET NOD32 Antivirus also supports POP3S protocol checking. This type of communication uses an encryptedchannel to transfer information between server and client. ESET NOD32 Antivirus checks communications utilizingthe SSL (Secure Socket Layer), and TLS (Transport Layer Security) encryption methods.
Do not use POP3S checking – Encrypted communication will not be checked.
Use POP3S protocol checking for selected ports – Check this option to enable POP3S checking only for ports definedin Ports used by POP3S protocol.
Ports used by POP3S protocol – A list of POP3S ports to check (995 by default).

54
4.2.3 Protocol filtering
Antivirus protection for application protocols is provided by the ThreatSense scanning engine, which seamlesslyintegrates all advanced malware scanning techniques. Protocol filtering works automatically, regardless of theInternet browser or email client used. To edit encrypted (SSL/TLS) settings, go to Web and email > SSL/TLS.
Enable application protocol content filtering – Can be used to disable protocol filtering. Note that many ESET NOD32Antivirus components (Web access protection, Email protocols protection, Anti-Phishing, Web control) depend onthis and will be non-functional without it.
Excluded applications – Allows you to exclude specific applications from protocol filtering. Useful when protocolfiltering causes compatibility issues.
Excluded IP addresses – Allows you to exclude specific remote addresses from protocol filtering. Useful whenprotocol filtering causes compatibility issues.
Web and email clients – Used only on Windows XP operating systems, allows you to select applications for which alltraffic is filtered by protocol filtering, regardless of ports used.
4.2.3.1 Web and email clients
NOTEStarting with Windows Vista Service Pack 1 and Windows Server 2008, the new Windows Filtering Platform (WFP)architecture is used to check network communication. Since WFP technology uses special monitoring techniques,the Web and email clients section is not available.
Because of the enormous amount of malicious code circulating the Internet, safe Internet browsing is a veryimportant aspect of computer protection. Web browser vulnerabilities and fraudulent links help malicious codeenter the system unnoticed which is why ESET NOD32 Antivirus focuses on web browser security. Each applicationaccessing the network can be marked as an Internet browser. The check box is two-state:
· Deselected – Communication of applications is filtered only for specified ports.
· Selected – Communication is always filtered (even if a different port is set).

55
4.2.3.2 Excluded applications
To exclude communication of specific network-aware applications from content filtering, select them in the list.HTTP/POP3/IMAP communication of the selected applications will not be checked for threats. We recommend onlyusing this for applications that do not work properly with their communication being checked.
Running applications and services will be available here automatically. Click Add to add an application manually if itis not shown on the protocol filtering list.

56
4.2.3.3 Excluded IP addresses
The entries in the list will be excluded from protocol content filtering. HTTP/POP3/IMAP communication from/tothe selected addresses will not be checked for threats. We recommend that you only use this option for addressesthat are known to be trustworthy.
Click Add to exclude an IP address/address range/subnet of a remote point not shown on the protocol filtering list.
Click Remove to remove selected entries from the list.
4.2.3.3.1 Add IPv4 address
This allows you to add an IP address/address range/subnet of a remote point to which a rule is applied. InternetProtocol version 4 is the older but still the most widely used.
Single address – Adds the IP address of an individual computer for which the rule is to be applied (for example192.168.0.10).
Address range – Enter the starting and ending address IP address to specify the IP range (of several computers) forwhich the rule is to be applied (for example 192.168.0.1 to 192.168.0.99).
Subnet – Subnet (a group of computers) defined by an IP address and mask.
For example, 255.255.255.0 is the network mask for the 192.168.1.0/24 prefix, that means 192.168.1.1 to192.168.1.254 address range.
4.2.3.3.2 Add IPv6 address
This allows you to add an IPv6 address/subnet of a remote point for which the rule is applied. It is the newestversion of the Internet protocol and will replace the older version 4.
Single address – Adds the IP address of an individual computer for which the rule is to be applied (for example2001:718:1c01:16:214:22f f :f ec9:ca5).
Subnet – Subnet (a group of computers) is defined by an IP address and mask (for example: 2002:c0a8:6301:1::1/64).

57
4.2.3.4 SSL/TLS
ESET NOD32 Antivirus is capable of checking for threats in communications that use the SSL protocol. You can usevarious scanning modes to examine SSL protected communications with trusted certificates, unknown certificates,or certificates that are excluded from SSL-protected communication checking.
Enable SSL/TLS protocol filtering – If protocol filtering is disabled, the program will not scan communications overSSL.
SSL/TLS protocol filtering mode is available in following options:
Automatic mode – Default mode will only scan appropriate applications such as web browsers and email clients.You can override it by selecting applications for which their communications will be scanned.
Interactive mode – If you enter a new SSL protected site (with an unknown certificate), an action selectiondialog is displayed. This mode allows you to create a list of SSL certificates / applications that will be excludedfrom scanning.
Policy mode – Select this option to scan all SSL protected communications except communications protected bycertificates excluded from checking. If a new communication using an unknown, signed certificate isestablished, you will not be notified and the communication will automatically be filtered. When you access aserver with an untrusted certificate that is marked as trusted (it is on the trusted certificates list),communication to the server is allowed and the content of the communication channel is filtered.
List of SSL filtered applications – Allows you to customize ESET NOD32 Antivirus behavior for specific applications.
List of known certificates – Allows you to customize ESET NOD32 Antivirus behavior for specific SSL certificates.
Exclude communication with trusted domains – When enabled, communication with trusted domains will beexcluded from checking. Domain trustiness is determined by builtin whitelist.
Block encrypted communication utilizing the obsolete protocol SSL v2 – Communication using the earlier version ofthe SSL protocol will automatically be blocked.
Root certificate
Add the root certificate to known browsers – For SSL communication to work properly in your browsers/emailclients, it is essential that the root certificate for ESET be added to the list of known root certificates(publishers). When enabled, ESET NOD32 Antivirus will automatically add the ESET root certificate to knownbrowsers (for example, Opera and Firefox). For browsers using the system certification store, the certificate isadded automatically (for example, in Internet Explorer).
To apply the certificate to unsupported browsers, click View Certificate > Details > Copy to File... and manuallyimport it into the browser.
Certificate validity
If the certificate cannot be verified using the TRCA certificate store – In some cases, a website certificate cannotbe verified using the Trusted Root Certification Authorities (TRCA) store. This means that the certificate issigned by someone (for example, the administrator of a web server or a small business) and considering thiscertificate as trusted is not always a risk. Most large businesses (for example banks) use a certificate signed bythe TRCA. If Ask about certificate validity is selected (selected by default), the user will be prompted to selectan action to take when encrypted communication is established. You can select Block communication that usesthe certificate to always terminate encrypted connections to sites with unverified certificates.
If the certificate is invalid or corrupt – This means that the certificate expired or was incorrectly signed. In thiscase, we recommend that you leave Block communication that uses the certificate selected.

58
4.2.3.4.1 Certificates
For SSL communication to work properly in your browsers/email clients, it is essential that the root certificate forESET be added to the list of known root certificates (publishers). Add the root certificate to known browsers shouldbe enabled. Select this option to automatically add the ESET root certificate to the known browsers (for example,Opera and Firefox). For browsers using the system certification store, the certificate is added automatically (e.g.Internet Explorer). To apply the certificate to unsupported browsers, click View Certificate > Details > Copy to File...and then manually import it into the browser.
In some cases, the certificate cannot be verified using the Trusted Root Certification Authorities store (e.g.VeriSign). This means that the certificate is self-signed by someone (e.g. administrator of a web server or a smallbusiness company) and considering this certificate as trusted is not always a risk. Most large businesses (forexample banks) use a certificate signed by TRCA. If Ask about certificate validity is selected (selected by default),the user will be prompted to select an action to take when encrypted communication is established. An actionselection dialog will be displayed where you can decide to mark the certificate as trusted or excluded. If thecertificate is not present in the TRCA list, the window is red. If the certificate is on the TRCA list, the window will begreen.
You can select Block communication that uses the certificate to always terminate an encrypted connection to thesite that uses the unverified certificate.
If the certificate is invalid or corrupt, it means that the certificate expired or was incorrectly self-signed. In this case,we recommend that you block the communication that uses the certificate.
4.2.3.4.1.1 Encrypted network traffic
If the computer is configured for SSL protocol scanning, a dialog window prompting you to choose an action may beopened when there is an attempt to establish encrypted communication (using an unknown certificate).
The dialog window contains the following information:
· name of the application that initiated the communication
· name of the certificate used
· action to perform - whether to scan the encrypted communication and whether to remember the action forthe application / certificate
If the certificate is not located in the Trusted Root Certification Authorities store (TRCA), it is considered untrusted.
4.2.3.4.2 List of known certificates
The List of known certificates can be used to customize ESET NOD32 Antivirus behavior for specific SSL certificates,and to remember actions chosen if Interactive mode is selected in SSL/TLS protocol filtering mode. The list can beviewed and edited in Advanced setup (F5) > Web and email > SSL/TLS > List of known certificates.
The List of known certificates window consists of:
Columns
Name – Name of the certificate.
Certificate issuer – Name of the certificate creator.
Certificate subject – The subject field identifies the entity associated with the public key stored in the subjectpublic key field.
Access – Select Allow or Block as the Access action to allow/block communication secured by this certificateregardless of its trustworthiness. Select Auto to allow trusted certificates and ask for untrusted ones. Select Askto always ask user what to do.
Scan – Select Scan or Ignore as the Scan action to scan or ignore communication secured by this certificate.Select Auto to scan in automatic mode and ask in interactive mode. Select Ask to always ask the user what to do.

59
Control elements
Add – Add a new certificate and adjust its settings regarding access and scan options.
Edit – Select the certificate that you want to configure and click Edit.
Remove – Select the certificate that you want to delete and click Remove.
OK/Cancel – Click OK if you want to save changes or click Cancel if you want to exit without saving.
4.2.3.4.3 List of SSL/TLS filtered applications
The List of SSL/TLS filtered applications can be used to customize ESET NOD32 Antivirus behavior for specificapplications, and to remember actions chosen if Interactive mode is selected in SSL/TLS protocol filtering mode. Thelist can be viewed and edited in Advanced setup (F5) > Web and email > SSL/TLS > List of SSL/TLS filteredapplications.
The List of SSL/TLS filtered applications window consists of:
Columns
Application – Name of the application.
Scan action – Select Scan or Ignore to scan or ignore communication. Select Auto to scan in automatic mode andask in interactive mode. Select Ask to always ask the user what to do.
Control elements
Add – Add filtered application.
Edit – Select the certificate that you want to configure and click Edit.
Remove – Select the certificate that you want to delete and click Remove.
OK/Cancel – Click OK if you want to save changes or click Cancel if you want to exit without saving.
4.2.4 Anti-Phishing protection
The term phishing defines a criminal activity that uses social engineering (the manipulation of users in order toobtain confidential information). Phishing is often used to gain access to sensitive data such as bank accountnumbers, PIN numbers and more. Read more about this activity in the glossary. ESET NOD32 Antivirus includes anti-phishing protection, which blocks web pages known to distribute this type of content.
We strongly recommend that you enable Anti-Phishing in ESET NOD32 Antivirus. To do so, open Advanced setup (F5)and navigate to Web and email > Anti-Phishing protection.
Visit our Knowledgebase article for more information on Anti-Phishing protection in ESET NOD32 Antivirus.
Accessing a phishing website
When you access a recognized phishing website, the following dialog will be displayed in your web browser. If youstill want to access the website, click Ignore threat (not recommended).

60
NOTEPotential phishing websites that have been whitelisted will expire after several hours by default. To allow awebsite permanently, use the URL address management tool. From Advanced setup (F5) expand Web and email> Web access protection > URL address management > Address list, click Edit and then add the website that youwant to edit to the list.
Phishing site reporting
The Report link enables you to report a phishing/malicious website to ESET for analysis.
NOTEBefore submitting a website to ESET, make sure it meets one or more of the following criteria:
· the website is not detected at all,
· the website is incorrectly detected as a threat. In this case, you can Report an incorectly blocked page.
Alternatively, you can submit the website by email. Send your email to [email protected]. Remember to use adescriptive subject and enclose as much information about the website as possible (for example, the website thatreferred you there, how you learned of this website, etc.).
4.3 Updating the program
Regularly updating ESET NOD32 Antivirus is the best method to ensure the maximum level of security on yourcomputer. The Update module ensures that both the program modules and the system components are always up-to-date.
By clicking Update in the main program window, you can view the current update status including the date and timeof the last successful update and if an update is needed.
In addition to automatic updates, you can click Check for updates to trigger a manual update. Regularly updating theprogram modules and components is an important aspect of maintaining complete protection against maliciouscode. Please pay attention to their configuration and operation. You must activate your product using your Licensekey to receive updates. If you did not do so during installation, you can enter your License key to activate yourproduct when updating to access ESET update servers.

61
NOTEYour License key is provided in an email from ESET after purchasing ESET NOD32 Antivirus.
Current version – Shows the version number of the current product version you have installed.
Last successful update – Shows the date of the last successful update. If you do not see a recent date, your productmodules may not be current.
Last successful check for updates – Shows the date of the last successful check for updates.
Show all modules – Shows the list of installed program modules.
Click Check for updates to detect the latest available version of ESET NOD32 Antivirus.
Update process
After clicking Check for updates, the download will begin. A download progress bar and remaining time todownload will be displayed. To interrupt the update, click Cancel update.

62
IMPORTANTUnder normal circumstances, you can see the green check mark in the Update window indicating that program isup to date. If this is not the case, the program is out of date and is more vulnerable to infection. Please updatemodules as soon as possible.
If you receive an unsuccessful update message, it may be caused by the following issues:
1. Invalid license – The license key has been incorrectly entered in update setup. We recommend that you checkyour authentication data. The Advanced setup window (click Setup from the main menu and then click Advancedsetup, or press F5 on your keyboard) contains additional update options. Click Help and support > Change licensefrom the main menu to enter a new license key.
2. An error occurred while downloading update files – This can be caused by incorrect Internet connection settings.We recommend that you check your Internet connectivity (by opening any website in your web browser). If thewebsite does not open, it is likely that an Internet connection is not established or there are connectivityproblems with your computer. Please check with your Internet Service Provider (ISP) if you do not have an activeInternet connection.
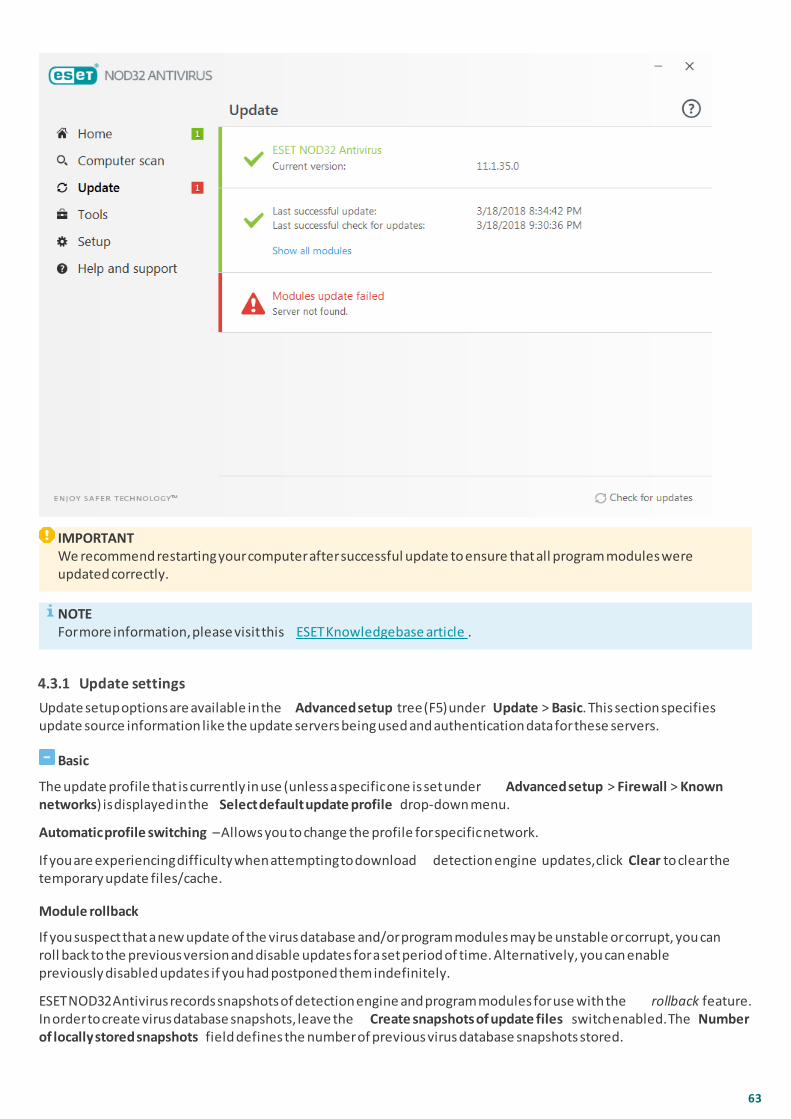
63
IMPORTANTWe recommend restarting your computer after successful update to ensure that all program modules wereupdated correctly.
NOTEFor more information, please visit this ESET Knowledgebase article.
4.3.1 Update settings
Update setup options are available in the Advanced setup tree (F5) under Update > Basic. This section specifiesupdate source information like the update servers being used and authentication data for these servers.
Basic
The update profile that is currently in use (unless a specific one is set under Advanced setup > Firewall > Knownnetworks) is displayed in the Select default update profile drop-down menu.
Automatic profile switching – Allows you to change the profile for specific network.
If you are experiencing difficulty when attempting to download detection engine updates, click Clear to clear thetemporary update files/cache.
Module rollback
If you suspect that a new update of the virus database and/or program modules may be unstable or corrupt, you canroll back to the previous version and disable updates for a set period of time. Alternatively, you can enablepreviously disabled updates if you had postponed them indefinitely.
ESET NOD32 Antivirus records snapshots of detection engine and program modules for use with the rollback feature.In order to create virus database snapshots, leave the Create snapshots of update files switch enabled. The Numberof locally stored snapshots field defines the number of previous virus database snapshots stored.

64
If you click Rollback (Advanced setup (F5) > Update > Basic), you have to select a time interval from the drop-downmenu that represents the period of time that the detection engine and program module updates will be paused.
For updates to be downloaded properly, it is essential that you fill in all update parameters correctly. If you use afirewall, please make sure that your ESET program is allowed to communicate with the Internet (for example, HTTPcommunication).
Profiles
Update profiles can be created for various update configurations and tasks. Creating update profiles is especiallyuseful for mobile users who need an alternative profile for Internet connection properties that regularly change.
The Select profile to edit drop-down menu displays the currently selected profile and is set to My profile by default.To create a new profile, click Edit next to List of profiles, enter your own Profile name and then click Add.
Updates
By default, the Update type is set to Regular update to ensure that update files will automatically be download fromthe ESET server with the least network traffic. Pre-release updates (the Pre-release update option) are updates thathave gone through thorough internal testing and will be available to the general public soon. You can benefit fromenabling pre-release updates by having access to the most recent detection methods and fixes. However, pre-release updates might not be stable enough at all times and SHOULD NOT be used on production servers andworkstations where maximum availability and stability is required.
Ask before downloading update – The program will display a notification where you can choose to confirm ordecline update file downloads.
Ask if an update file size is greater than (kB) – The program will display a notification if the update file size is greaterthan specified value.
Disable notification about successful update – Turns off the system tray notification at the bottom right corner ofthe screen. It is useful to select this option if a full screen application or a game is running. Please note that Gamermode will turn off all notifications.

65
Module updates
Enable more frequent updates of detection signatures – Detection signatures will be updated in shorter interval.Disabling this setting may negatively impact detection rate.
Program component update
Application update – A confirmation dialog will be displayed if reinstallation is needed.
4.3.1.1 Advanced update setup
Advanced update setup options include the configuration of Update mode, HTTP Proxy.
4.3.1.1.1 Update mode
The Update mode tab contains options related to regular program updates. These settings enable you to predefineprogram behavior when new version of detection engine or program component updates are available.
Program component updates include new features or makes changes to features from previous versions, and areincluded as part of regular (detection engine) updates. After a program component update has been installed, acomputer restart may be required.
The following settings are available:
Application update – When enabled, each program component upgrade will be performed automatically andsilently without full product upgrading.
Enable manual program component update – By default disabled. When enabled and newer version of ESETNOD32 Antivirus is available, you can check for updates in Update pane and install the newer version.
Ask before downloading update – When this option is active, a notification will be displayed and you will beasked to confirm the installation of any available updates before they are installed.
Ask if an update file is greater than (kB) – If the update file is larger than the size specified here, a notificationwill be displayed and you will be asked to confirm the installation of any available updates before they areinstalled.
4.3.1.1.2 Connection options
To access the proxy server setup options for a given update profile, click Update in the Advanced setup tree (F5) andthen click Profiles > Updates > Connection options. Click the Proxy mode drop-down menu and select one of thethree following options:
· Do not use proxy server
· Connection through a proxy server
· Use global proxy server settings
Select Use global proxy server settings to use the proxy server configuration options already specified in the Tools >Proxy server branch of the Advanced setup tree.
Select Do not use proxy server to specify that no proxy server will be used to update ESET NOD32 Antivirus.
Connection through a proxy server option should be selected if:
· A different proxy server than the one defined in Tools > Proxy server is used to update ESET NOD32 Antivirus.In this configuration, information for the new proxy should be specified under Proxy server address,communication Port (3128 by default), and Username and Password for the proxy server if required.
· Proxy server settings are not set globally, but ESET NOD32 Antivirus will connect to a proxy server for updates.
· Your computer is connected to the Internet via a proxy server. Settings are taken from Internet Explorerduring program installation, but if they are changed (for example, if you change your ISP), please make surethe HTTP proxy settings listed in this window are correct. Otherwise the program will not be able to connectto update servers.

66
The default setting for the proxy server is Use global proxy server settings.
Use direct connection if proxy is not available – Proxy will be bypassed during update if it is unreachable.
NOTEThe Username and Password fields in this section are specific to the proxy server. Complete these fields only if ausername and password are required to access the proxy server. These fields are not for your ESET NOD32Antivirus Username and password, and should only be completed if you know you need a password to access theinternet via a proxy server.
4.3.2 Update rollback
If you suspect that a new update of the detection engine and/or program modules may be unstable or corrupt, youcan roll back to the previous version and disable updates for a set period of time. Alternatively, you can enablepreviously disabled updates if you had postponed them indefinitely.
ESET NOD32 Antivirus records snapshots of detection engine and program modules for use with the rollback feature.In order to create detection engine snapshots, leave Create snapshots of update files check box selected. TheNumber of locally stored snapshots field defines the number of previous detection engine snapshots stored.
If you click Rollback (Advanced setup (F5) > Update > Basic), you have to select a time interval from the Durationdrop-down menu that represents the period of time that the detection engine and program module updates will bepaused.
Select Until revoked to postpone regular updates indefinitely until you restore update functionality manually.Because it represents a potential security risk, we do not recommend selecting this option.
If a rollback is performed, the Roll back button changes to Allow updates. No updates will be allowed for the timeinterval selected from the Suspend updates drop-down menu. The version of detection engine is downgraded tothe oldest available and stored as a snapshot in the local computer file system.

67
NOTELet the number 6871 be the most recent version of detection engine. 6870 and 6868 are stored as a detectionengine snapshots. Note that 6869 is not available because, for example, the computer was turned off and a morerecent update was made available before 6869 was downloaded. If the Number of locally stored snapshots fieldis set to 2 and you click Roll back, the detection engine (including program modules) will be restored to versionnumber 6868. This process may take some time. Check whether the version of detection engine has downgradedfrom the main program window of ESET NOD32 Antivirus in the Update section.
4.3.3 How to create update tasks
Updates can be triggered manually by clicking Check for updates in the primary window displayed after clickingUpdate from the main menu.
Updates can also be run as scheduled tasks. To configure a scheduled task, click Tools > Scheduler. By default, thefollowing tasks are activated in ESET NOD32 Antivirus:
· Regular automatic update
· Automatic update after dial-up connection
· Automatic update after user logon
Each update task can be modified to meet your needs. In addition to the default update tasks, you can create newupdate tasks with a user-defined configuration. For more details about creating and configuring update tasks, seesection Scheduler.
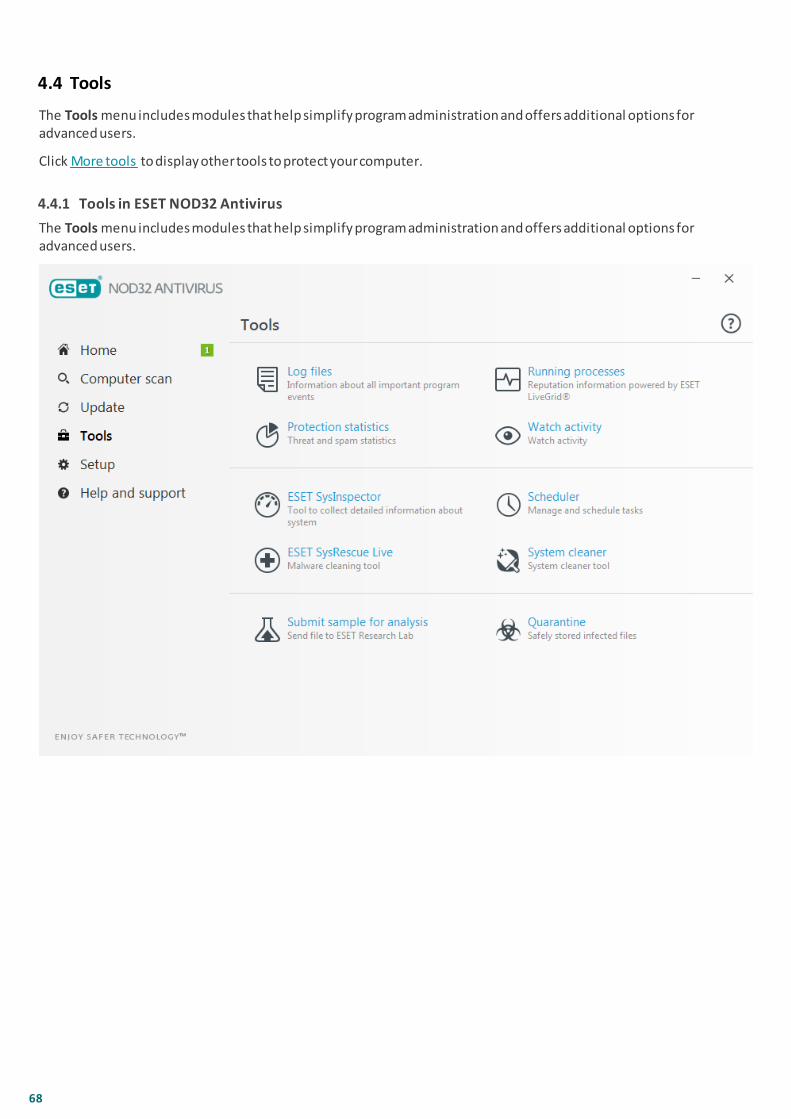
68
4.4 Tools
The Tools menu includes modules that help simplify program administration and offers additional options foradvanced users.
Click More tools to display other tools to protect your computer.
4.4.1 Tools in ESET NOD32 Antivirus
The Tools menu includes modules that help simplify program administration and offers additional options foradvanced users.
69
This menu includes the following tools:
Log files
Protection statistics
Watch activity
Running processes (if ESET LiveGrid® is enabled in ESET NOD32 Antivirus)
ESET SysInspector
ESET SysRescue Live – Redirects you to the ESET SysRescue Live page, where you can download the ESETSysRescue Live image or Live CD/USB Creator for Microsoft Windows operating systems.
Scheduler
System cleaner – Helps you restore the computer to a usable state after cleaning the threat.
Submit sample for analysis – Allows you to submit a suspicious file for analysis to the ESET Research Lab. Thedialog window displayed after clicking this option is described in this section.
Quarantine
NOTEESET SysRescue may not be available for Windows 8 in older versions of ESET security products. In this case werecommend that you upgrade your product or create an ESET SysRescue disk on another version of MicrosoftWindows.
4.4.1.1 Log files
Log files contain information about important program events that have occurred and provide an overview ofdetected threats. Logging is an essential part of system analysis, threat detection and troubleshooting. Logging isperformed actively in the background with no user interaction. Information is recorded based on the current logverbosity settings. It is possible to view text messages and logs directly from the ESET NOD32 Antivirusenvironment, as well as to archive logs.
Log files are accessible from the main program window by clicking Tools > Log files. Select the desired log type fromthe Log drop-down menu. The following logs are available:
· Detected threats – The threat log offers detailed information about infiltrations detected by ESET NOD32Antivirus . Log information includes the time of detection, name of infiltration, location, the action taken andthe name of the user logged in at the time the infiltration was detected. Double-click any log entry to displayits details in a separate window.
· Events – All important actions performed by ESET NOD32 Antivirus are recorded in the event log. The eventlog contains information about events and errors that have occurred in the program. It is designed for systemadministrators and users to solve problems. Often the information found here can help you find a solution fora problem occurring in the program.
· Computer scan – Results of all completed manual or planned scans are displayed in this window. Each linecorresponds to a single computer control. Double-click any entry to view the details of the respective scan.
· HIPS – Contains records of specific HIPS rules which are marked for recording. The protocol shows theapplication that triggered the operation, the result (whether the rule was permitted or prohibited) and therule name.
· Filtered websites – This list is useful if you want to view a list of websites that were blocked by Web accessprotection. Each log includes time, URL address, user and application that created a connection to a particularwebsite.

70
· Device control – Contains records of removable media or devices that were connected to the computer. Onlydevices with respective Device control rules will be recorded to the log file. If the rule does not match aconnected device, a log entry for a connected device will not be created. You can also view details such asdevice type, serial number, vendor name and media size (if available).
Select the contents of any log and press Ctrl + C to copy it to the clipboard. Hold Ctrl and Shift to select multipleentries.
Click Filtering to open the Log filtering window where you can define filtering criteria.
Right-click a specific record to open the context menu. The following options are available in the context menu:
· Show – Shows more detailed information about the selected log in a new window.
· Filter same records – After activating this filter, you will only see records of the same type (diagnostics,warnings, ...).
· Filter.../Find... – After clicking this option, the Search in log window will allow you to define filtering criteriafor specific log entries.
· Enable filter – Activates filter settings.
· Disable filter – Clears all filter settings (as described above).
· Copy/Copy all – Copies information about all the records in the window.
· Delete/Delete all – Deletes the selected record(s) or all the records displayed – this action requiresadministrator privileges.
· Export... – Exports information about the record(s) in XML format.
· Export all... – Export information about all records in XML format.
· Scroll log – Leave this option enabled to auto scroll old logs and view active logs in the Log files window.
4.4.1.1.1 Log files
The Logging configuration of ESET NOD32 Antivirus is accessible from the main program window. Click Setup > Enteradvanced setup... > Tools > Log files. The logs section is used to define how the logs will be managed. The programautomatically deletes older logs in order to save hard disk space. You can specify the following options for log files:
Minimum logging verbosity – Specifies the minimum verbosity level of events to be logged.
· Diagnostic – Logs information needed to fine-tune the program and all records above.
· Informative – Records informative messages, including successful update messages, plus all records above.
· Warnings – Records critical errors and warning messages.
· Errors – Errors such as "Error downloading f ile" and critical errors will be recorded.
· Critical – Logs only critical errors (error starting Antivirus protection, etc...).
Log entries older than the specified number of days in the Automatically delete records older than (days) field willautomatically be deleted.
Optimize log files automatically – If checked, log files will be automatically be defragmented if the percentage ishigher than value specified in the If the number of unused records exceeds (%) field.
Click Optimize to begin defragmenting the log files. All empty log entries are removed during this process, whichimproves performance and log processing speed. This improvement can be observed especially if the logs contain alarge number of entries.
Enable text protocol enables the storage of logs in another file format separate from Log files:
· Target directory – The directory where log files will be stored (only applies to Text/CSV). Each log section has itsown file with a predefined file name (for example, virlog.txt for the Detected threats section of log files, if youuse a plain text file format to store logs).
· Type – If you select the Text file format, logs will be stored in a text file and data will be separated into tabs. Thesame applies to the comma-separated CSV file format. If you choose Event, logs will be stored in the WindowsEvent log (can be viewed using Event Viewer in Control panel) as opposed to the file.
Delete all log files – Erases all stored logs currently selected in the Type drop-down menu. A notification aboutsuccessful deletion of the logs will be shown.

71
NOTEIn order to help resolve issues more quickly, ESET may ask you to provide logs from your computer. ESET LogCollector makes it easy for you to collect the information needed. For more information about ESET Log Collectorplease visit our ESET Knowledgebase article.
4.4.1.2 Running processes
Running processes displays the running programs or processes on your computer and keeps ESET immediately andcontinuously informed about new infiltrations. ESET NOD32 Antivirus provides detailed information on runningprocesses to protect users with ThreatSense technology.
Process – Image name of the program or process that is currently running on your computer. You can also use theWindows Task Manager to see all running processes on your computer. To open Task Manager, right-click an emptyarea on the taskbar and then click Task Manager, or press Ctrl+Shift+Esc on your keyboard.
Risk level – In most cases, ESET NOD32 Antivirus and ThreatSense technology assign risk levels to objects (files,processes, registry keys, etc.) using a series of heuristic rules that examine the characteristics of each object andthen weigh their potential for malicious activity. Based on these heuristics, objects are assigned a risk level from 1 –Fine (green) to 9 – Risky (red).
NOTEKnown applications marked as Fine (green) are definitely clean (whitelisted) and will be excluded from scanningto improve performance.
PID – The process identifier number may be used as a parameter in various function calls such as adjusting theprocess's priority.
Number of users – The number of users that use a given application. This information is gathered by ThreatSensetechnology.
Time of discovery – Period of time since the application was discovered by ThreatSense technology.
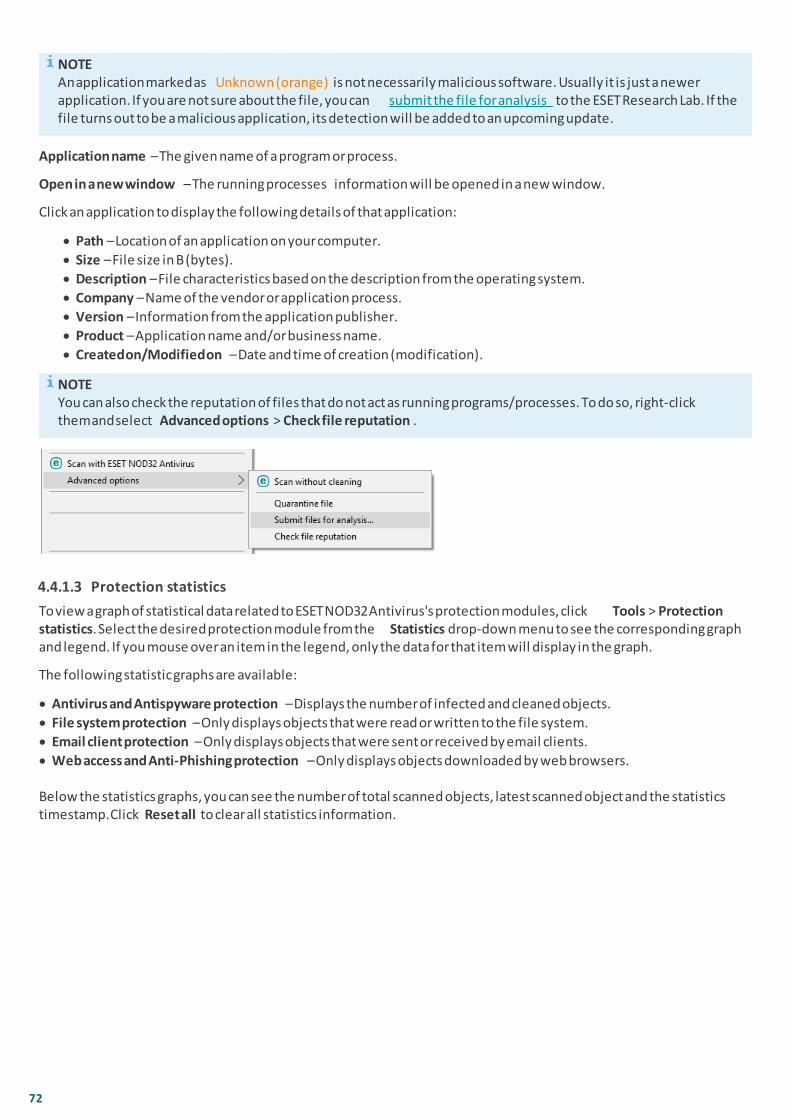
72
NOTEAn application marked as Unknown (orange) is not necessarily malicious software. Usually it is just a newerapplication. If you are not sure about the file, you can submit the file for analysis to the ESET Research Lab. If thefile turns out to be a malicious application, its detection will be added to an upcoming update.
Application name – The given name of a program or process.
Open in a new window – The running processes information will be opened in a new window.
Click an application to display the following details of that application:
· Path – Location of an application on your computer.
· Size – File size in B (bytes).
· Description – File characteristics based on the description from the operating system.
· Company – Name of the vendor or application process.
· Version – Information from the application publisher.
· Product – Application name and/or business name.
· Created on/Modified on – Date and time of creation (modification).
NOTEYou can also check the reputation of files that do not act as running programs/processes. To do so, right-clickthem and select Advanced options > Check file reputation.
4.4.1.3 Protection statistics
To view a graph of statistical data related to ESET NOD32 Antivirus's protection modules, click Tools > Protectionstatistics. Select the desired protection module from the Statistics drop-down menu to see the corresponding graphand legend. If you mouse over an item in the legend, only the data for that item will display in the graph.
The following statistic graphs are available:
· Antivirus and Antispyware protection – Displays the number of infected and cleaned objects.
· File system protection – Only displays objects that were read or written to the file system.
· Email client protection – Only displays objects that were sent or received by email clients.
· Web access and Anti-Phishing protection – Only displays objects downloaded by web browsers.
Below the statistics graphs, you can see the number of total scanned objects, latest scanned object and the statisticstimestamp. Click Reset all to clear all statistics information.

73
4.4.1.4 Watch activity
To see the current File system activity in graph form, click Tools > Watch activity. At the bottom of the graph is atimeline that records file system activity in real-time based on the selected time span. To change the time span,select from Refresh rate drop-down menu.
The following options are available:
· Step: 1 second – The graph refreshes every second and the timeline covers the last 10 minutes.
· Step: 1 minute (last 24 hours) – The graph is refreshed every minute and the timeline covers the last 24 hours.
· Step: 1 hour (last month) – The graph is refreshed every hour and the timeline covers the last month.
· Step: 1 hour (selected month) – The graph is refreshed every hour and the timeline covers the last X selectedmonths.
The vertical axis of the File system activity graph represents read data (blue) and written data (red). Both values aregiven in KB (kilobytes)/MB/GB. If you mouse over either read data or written data in the legend below the graph,the graph will only display data for that activity type.
4.4.1.5 ESET SysInspector
ESET SysInspector is an application that thoroughly inspects your computer and gathers detailed information aboutsystem components such as drivers and applications, network connections or important registry entries andassesses the risk level of each component. This information can help determine the cause of suspicious systembehavior that may be due to software or hardware incompatibility or malware infection.
The SysInspector window displays the following information about created logs:
· Time – The time of log creation.
· Comment – A short comment.
· User – The name of the user who created the log.
· Status – The status of log creation.

74
The following actions are available:
· Show – Opens created log. You can also right-click a given log file and select Show from the context menu.
· Compare – Compares two existing logs.
· Create... – Creates a new log. Please wait until ESET SysInspector is finished (log status will display as Created)before attempting to access the log.
· Delete – Removes the selected log(s) from the list.
The following items are available from the context menu when one or more log files are selected:
· Show – Opens the selected log in ESET SysInspector (same function as double-clicking a log).
· Compare – Compares two existing logs.
· Create... – Creates a new log. Please wait until ESET SysInspector is finished (log status will display as Created)before attempting to access the log.
· Delete – Removes the selected log(s) from the list.
· Delete all – Deletes all logs.
· Export... – Exports the log to an .xml file or zipped .xml.
4.4.1.6 Scheduler
Scheduler manages and launches scheduled tasks with predefined configuration and properties.
The Scheduler can be accessed from the ESET NOD32 Antivirus main program window by clicking Tools > More Tools> Scheduler. The Scheduler contains a list of all scheduled tasks and configuration properties such as the predefineddate, time and scanning profile used.
The Scheduler serves to schedule the following tasks: update modules, scanning task, system startup file check andlog maintenance. You can add or delete tasks directly from the main Scheduler window (click Add task or Delete atthe bottom). You can revert the list of scheduled tasks to default and delete all changes by clicking Default. Rightclick anywhere in the Scheduler window to perform the following actions: display detailed information, performthe task immediately, add a new task, and delete an existing task. Use the checkboxes at the beginning of eachentry to activate/deactivate the tasks.
By default, the following scheduled tasks are displayed in Scheduler:
· Log maintenance
· Regular automatic update
· Automatic update after dial-up connection
· Automatic update after user logon
· Regular checking for latest product version (see Update mode)
· Automatic startup file check (after user logon)
· Automatic startup file check (after successful update of the detection engine)
To edit the configuration of an existing scheduled task (both default and user-defined), right-click the task and click Edit... or select the task you want to modify and click Edit.
Add a new task
1. Click Add task at the bottom of the window.
2. Enter a name of the task.

75
3. Select the desired task from the pull-down menu:
· Run external application – Schedules the execution of an external application.
· Log maintenance – Log files also contains leftovers from deleted records. This task optimizes records in log fileson a regular basis to work effectively.
· System startup file check – Checks files that are allowed to run at system startup or logon.
· Create a computer status snapshot – Creates an ESET SysInspector computer snapshot – gathers detailedinformation about system components (for example, drivers, applications) and assesses the risk level of eachcomponent.
· On-demand computer scan – Performs a computer scan of files and folders on your computer.
· Update – Schedules an Update task by updating the modules.
4. Turn on the Enabled switch if you want to activate the task (you can do this later by selecting/deselectingcheckbox in the list of scheduled tasks), click Next and select one of the timing options:
· Once – The task will be performed at the predefined date and time.
· Repeatedly – The task will be performed at the specified time interval.
· Daily – The task will run repeatedly each day at the specified time.
· Weekly – The task will be run on the selected day and time.
· Event triggered – The task will be performed on a specified event.
5. Select Skip task when running on battery power to minimize system resources while a laptop is running onbattery power. The task will be run on the specified date and time in Task execution fields. If the task could notbe run at the predefined time, you can specify when it will be performed again:
· At the next scheduled time
· As soon as possible
· Immediately, if the time since the last run exceeds a specified value (the interval can be defined using the Timesince last run scroll box)
You can review scheduled task when right click and click Show task details.

76
4.4.1.7 System cleaner
System cleaner is a tool that helps you to restore the computer to usable state after cleaning the threat. Malwarecan disable system utilities such as Registry Editor, Task manager or Windows Updates. System cleaner restores thedefault values and settings for given system in a single click.
System cleaner reports issues from five settings categories:
· Security settings: changes in settings which can cause an increased vulnerability of your computer, such asWindows Update
· System settings: changes in system settings, that can change behavior of your computer, such as file associations
· System appearance: settings that affects how your system looks, such as your desktop wallpaper
· Disabled features: important features and applications that may be disabled
· Windows System Restore: settings for the Windows System Restore feature, that allows you to revert yoursystem to a previous state
System cleaning can be requested:
· when a threat is found
· when a user clicks Reset
You can review the changes and reset settings if appropriate.
NOTEOnly a user with Administrator rights can perform actions in the System cleaner.
4.4.1.8 ESET SysRescue
ESET SysRescue is a utility that enables you to create a bootable disk containing one of the ESET Security solutions -ESET NOD32 Antivirus, ESET Internet Security, ESET Smart Security, ESET Smart Security Premium or certain server-oriented products. The main advantage of ESET SysRescue is the fact that the ESET Security solution runsindependent of the host operating system but has direct access to the disk and file system. This makes it possible toremove infiltrations which normally could not be deleted, for example, when the operating system is running, etc.
4.4.1.9 Cloud-based protection
ESET LiveGrid® (built on the ESET ThreatSense.Net advanced early warning system) utilizes data that ESET users havesubmitted worldwide and sends it to the ESET Research Lab. By providing suspicious samples and metadata from thewild, ESET LiveGrid® enables us to react immediately to needs of our customers and keep ESET responsive to thelatest threats. Read more about ESET LiveGrid® in the glossary.
A user can check the reputation of running processes and files directly from the program's interface or contextualmenu with additional information available from ESET LiveGrid®. There are two options:
1. You can choose not to enable ESET LiveGrid®. You will not lose any functionality in the software, but in somecases, ESET NOD32 Antivirus may respond faster to new threats than detection engine update when ESET LiveGrid is enabled.
2. You can configure ESET LiveGrid® to submit anonymous information about new threats and where the newthreatening code is contained. This file can be sent to ESET for detailed analysis. Studying these threats will helpESET update its threat detection capabilities.
ESET LiveGrid® will collect information about your computer related to newly-detected threats. This informationmay include a sample or copy of the file in which the threat appeared, the path to that file, the filename, the dateand time, the process by which the threat appeared on your computer and information about your computer‘soperating system.
77
By default, ESET NOD32 Antivirus is configured to submit suspicious files to the ESET Virus Lab for detailed analysis.Files with certain extensions such as .doc or .xls are always excluded. You can also add other extensions if there areparticular files that you or your organization wants to avoid sending.
The ESET LiveGrid® setup menu provides several options for enabling / disabling ESET LiveGrid®, which serves tosubmit suspicious files and anonymous statistical information to ESET labs. It is accessible from the Advanced setuptree by clicking Tools > ESET LiveGrid®.
Enable ESET LiveGrid® reputation system (recommended) – The ESET LiveGrid® reputation system improves theefficiency of ESET anti-malware solutions by comparing scanned files to a database of whitelisted and blacklisteditems in the cloud.
Help improve the product by submitting anonymous usage statistics – Allow ESET to collect information about newlydetected threats such as the threat name, date and time of detection, detection method and associated metadata,product version, and configuration including information about your system.
Select Enable logging to create an event log to record file and statistical information submissions. This will enablelogging to the Event log when files or statistics are sent.
Contact email (optional) – Your contact email can be included with any suspicious files and may be used to contactyou if further information is required for analysis. Please note that you will not receive a response from ESET unlessmore information is needed.
Submit infected samples – This will submit all infected samples to ESET for analysis and to improve future detection.
Submit suspicious samples – Suspicious files resembling threats, and/or files (such as executables, archives, scripts,etc.) with unusual characteristics or behavior are submitted to ESET for analysis.
Exclusion – The Exclusion filter allows you to exclude certain files/folders from submission (for example, it may beuseful to exclude files that may carry confidential information, such as documents or spreadsheets). The files listedwill never be sent to ESET labs for analysis, even if they contain suspicious code. The most common file types areexcluded by default (.doc, etc.). You can add to the list of excluded files if desired.
If you have used ESET LiveGrid® before and have disabled it, there may still be data packages to send. Even afterdeactivating, such packages will be sent to ESET. Once all current information is sent, no further packages will becreated.
4.4.1.9.1 Suspicious files
If you find a suspicious file, you can submit it for analysis to our ESET Research Lab. If it is a malicious application, itsdetection will be added to the next virus signature update.
Exclusion filter – The Exclusion filter allows you to exclude certain files/folders from submission. The files listed willnever be sent to ESET Research Lab for analysis, even if they contain a suspicious code. For example, it may beuseful to exclude files that may carry confidential information, such as documents or spreadsheets. The mostcommon file types are excluded by default (.doc, etc.). You can add to the list of excluded files if desired.
Contact email (optional) – Your contact email can be included with any suspicious files and may be used to contactyou if further information is required for analysis. Please note that you will not receive a response from ESET unlessmore information is needed.
Select Enable logging to create an event log to record file and statistical information submissions. This will enablelogging to the Event log when files or statistics are sent.
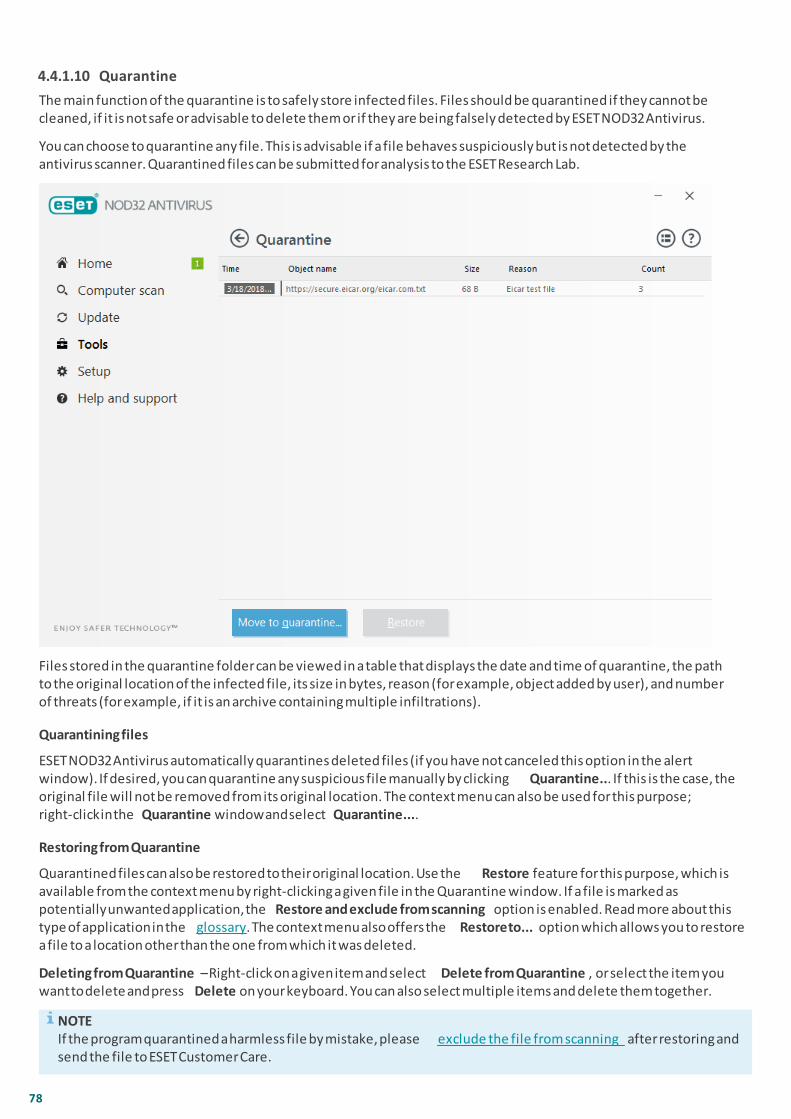
78
4.4.1.10 Quarantine
The main function of the quarantine is to safely store infected files. Files should be quarantined if they cannot becleaned, if it is not safe or advisable to delete them or if they are being falsely detected by ESET NOD32 Antivirus.
You can choose to quarantine any file. This is advisable if a file behaves suspiciously but is not detected by theantivirus scanner. Quarantined files can be submitted for analysis to the ESET Research Lab.
Files stored in the quarantine folder can be viewed in a table that displays the date and time of quarantine, the pathto the original location of the infected file, its size in bytes, reason (for example, object added by user), and numberof threats (for example, if it is an archive containing multiple infiltrations).
Quarantining files
ESET NOD32 Antivirus automatically quarantines deleted files (if you have not canceled this option in the alertwindow). If desired, you can quarantine any suspicious file manually by clicking Quarantine... If this is the case, theoriginal file will not be removed from its original location. The context menu can also be used for this purpose;right-click in the Quarantine window and select Quarantine....
Restoring from Quarantine
Quarantined files can also be restored to their original location. Use the Restore feature for this purpose, which isavailable from the context menu by right-clicking a given file in the Quarantine window. If a file is marked aspotentially unwanted application, the Restore and exclude from scanning option is enabled. Read more about thistype of application in the glossary. The context menu also offers the Restore to... option which allows you to restorea file to a location other than the one from which it was deleted.
Deleting from Quarantine – Right-click on a given item and select Delete from Quarantine, or select the item youwant to delete and press Delete on your keyboard. You can also select multiple items and delete them together.
NOTEIf the program quarantined a harmless file by mistake, please exclude the file from scanning after restoring andsend the file to ESET Customer Care.

79
Submitting a file from the Quarantine
If you have quarantined a suspicious file that was not detected by the program, or if a file was determined to beinfected incorrectly (for example, by heuristic analysis of the code) and subsequently quarantined, please send thefile to the ESET Virus Lab. To submit a file from quarantine, right-click the file and select Submit for analysis from thecontext menu.
4.4.1.11 Proxy server
In large LAN networks, communication between your computer and the internet can be mediated by a proxy server.Using this configuration, the following settings need to be defined. Otherwise the program will not be able toupdate itself automatically. In ESET NOD32 Antivirus, proxy server setup is available from two different sections ofthe Advanced setup tree.
First, proxy server settings can be configured in Advanced setup under Tools > Proxy server. Specifying the proxyserver at this level defines global proxy server settings for all of ESET NOD32 Antivirus. Parameters here will be usedby all modules that require a connection to the Internet.
To specify proxy server settings for this level, select Use proxy server and enter the address of the proxy server intothe Proxy server field along with the Port number of the proxy server.
If communication with the proxy server requires authentication, select Proxy server requires authentication andenter a valid Username and Password into the respective fields. Click Detect to automatically detect and populateproxy server settings. The parameters specified in Internet Explorer will be copied.
NOTEYou must manually enter your Username and Password in Proxy server settings.
Use direct connection if proxy is not available – If a product is configured to utilize HTTP Proxy and the proxy isunreachable, the product will bypass the proxy and communicate directly with ESET servers.
Proxy server settings can also be established from Advanced update setup (Advanced setup > Update > Profiles >Updates > Connection options by selecting Connection through a proxy server from the Proxy mode drop-downmenu). This setting applies for the given update profile and is recommended for laptops that often receive virussignature updates from remote locations. For more information about this setting, see Advanced update setup.

80
4.4.1.12 Email notifications
ESET NOD32 Antivirus can automatically send notification emails if an event with the selected verbosity leveloccurs. Enable Send event notifications by email to activate email notifications.
SMTP server
SMTP server – The SMTP server used for sending notifications (e.g. smtp.provider.com:587, predefined port is 25).
NOTESMTP servers with TLS encryption are supported by ESET NOD32 Antivirus.
Username and password – If the SMTP server requires authentication, these fields should be filled in with a validusername and password to access the SMTP server.
Sender address – Define the sender address that will be displayed in the header of notification emails.
Recipient addresses – Define the recipient addresses that will be displayed in the header of notification emails.Multiple values are supported, please use semi-collon as separator.
From the Minimum verbosity for notifications drop-down menu, you can select the starting severity level ofnotifications to be sent.
· Diagnostic – Logs information needed to fine-tune the program and all records above.
· Informative – Records informative messages such as non-standard network events, including successful updatemessages, plus all records above.
· Warnings – Records critical errors and warning messages (Antistealth is not running properly or update failed).
· Errors – Errors (document protection not started) and critical errors will be recorded.
· Critical – Logs only critical errors error starting antivirus protection or infected system.
Enable TLS – Enable sending alert and notification messages supported by TLS encryption.
Interval after which new notification emails will be sent (min) – Interval in minutes after which new notificationswill be sent to email. If you set this value to 0, the notifications will be sent immediately.
81
Send each notification in a separate email – When enabled, the recipient will receive a new email for eachindividual notification. This may result in large number of emails being received in a short period of time.
Message format
Format of event messages – Format of event messages that are displayed on remote computers.
Format of threat warning messages – Threat alert and notification messages have a predefined default format. Weadvise against changing this format. However, in some circumstances (for example, if you have an automatedemail processing system), you may need to change the message format.
Charset – Converts an email message to the ANSI character encoding based upon Windows Regional settings (forexample, windows-1250), Unicode (UTF-8), ACSII 7-bit (for example "á" will be changed to "a" and an unknownsymbol to "?") or Japanese (ISO-2022-JP).
Use Quoted-printable encoding – The email message source will be encoded to Quoted-printable (QP) formatwhich uses ASCII characters and can correctly transmit special national characters by email in 8-bit format (áéíóú).
4.4.1.12.1 Message format
Here you can set up the format of event messages that are displayed on remote computers.
Threat alert and notification messages have a predefined default format. We advise against changing this format.However, in some circumstances (for example, if you have an automated email processing system), you may needto change the message format.
Keywords (strings separated by % signs) are replaced in the message by the actual information as specified. Thefollowing keywords are available:
· %TimeStamp% – Date and time of the event
· %Scanner% – Module concerned
· %ComputerName% – Name of the computer where the alert occurred
· %ProgramName% – Program that generated the alert
· %InfectedObject% – Name of infected file, message, etc
· %VirusName% – Identification of the infection
· %Action% – Action taken over infiltration
· %ErrorDescription% – Description of a non-virus event
The keywords %InfectedObject% and %VirusName% are only used in threat warning messages, and %ErrorDescription% is only used in event messages.
Use local alphabetic characters – Converts an email message to the ANSI character encoding based upon WindowsRegional settings (e.g. windows-1250). If you leave this deselected, a message will be converted and encoded inACSII 7-bit (for example "á" will be changed to "a" and an unknown symbol to "?").
Use local character encoding – The email message source will be encoded to Quoted-printable (QP) format whichuses ASCII characters and can correctly transmit special national characters by email in 8-bit format (áéíóú).
4.4.1.13 Select sample for analysis
The file submission dialog enables you to send a file or a site to ESET for analysis and can be found in Tools > Submitsample for analysis. If you find a suspiciously behaving file on your computer or suspicious site on the Internet, youcan submit it to the ESET Research Lab for analysis. If the file turns out to be a malicious application or website, itsdetection will be added to an upcoming update.
Alternatively, you can submit the file by email. If you prefer this option, pack the file(s) using WinRAR/ZIP, protectthe archive with the password "infected" and send it to [email protected]. Please remember to use a descriptivesubject and enclose as much information about the file as possible (for example, the website you downloaded itfrom).
NOTEBefore submitting a file to ESET, make sure it meets one or more of the following criteria:

82
· the file is not detected at all
· the file is incorrectly detected as a threat
You will not receive a response unless further information is required for analysis.
Select the description from the Reason for submitting the file drop-down menu that best fits your message:
· Suspicious file
· Suspicious site (a website that is infected by any malware),
· False positive file (file that is detected as an infection but are not infected),
· False positive site
· Other
File/Site – The path to the file or website you intend to submit.
Contact email – This contact email is sent along with suspicious files to ESET and may be used to contact you iffurther information is required for analysis. Entering a contact email is optional. The sample can be submittedanonymously. You will not get a response from ESET unless more information is required, since each day our serversreceive tens of thousands of files, making it impossible to reply to all submissions.
4.4.1.14 Microsoft Windows® update
The Windows update feature is an important component of protecting users from malicious software. For thisreason, it is vital that you install Microsoft Windows updates as soon as they become available. ESET NOD32Antivirus notifies you about missing updates according to the level you specify. The following levels are available:
· No updates – No system updates will be offered for download.
· Optional updates – Updates marked as low priority and higher will be offered for download.
· Recommended updates – Updates marked as common and higher will be offered for download.
· Important updates – Updates marked as important and higher will be offered for download.
· Critical updates – Only critical updates will be offered for download.
Click OK to save changes. The System updates window will be displayed after status verification with the updateserver. Accordingly, the system update information may not be immediately available after saving changes.
4.4.1.15 ESET CMD
This is a feature that enables advanced ecmd commands. It allows you to export and import settings using thecommand line (ecmd.exe). Until now, it was only possible to export settings using the GUI. ESET NOD32 Antivirusconfiguration can be exported to an .xml file.
When you have enabled ESET CMD, there are two authorization methods available:
· None – no authorization. We do not recommend you this method because it allows importation of any unsignedconfiguration, which is a potential risk.
· Advanced setup password – a password is required to import a configuration from an .xml file, this file must besigned (see signing .xml configuration file further down). The password specified in Access Setup must beprovided before a new configuration can be imported. If you do not have access setup enabled, your passworddoes not match or the .xml configuration file is not signed, the configuration will not be imported.
Once ESET CMD is enabled, you can use the command line to import or export ESET NOD32 Antivirus configurations.You can do it manually or create a script for the purpose of automation.
IMPORTANTTo use advanced ecmd commands, you need to run them with administrator privileges, or open a WindowsCommand Prompt (cmd) using Run as administrator. Otherwise, you'll get Error executing command. message.Also, when exporting a configuration, the destination folder must exist. The export command still works whenthe ESET CMD setting is switched off.

83
EXAMPLEExport settings command:ecmd /getcfg c:\config\settings.xml
Import settings command:ecmd /setcfg c:\config\settings.xml
NOTEAdvanced ecmd commands can only be run locally.
Signing an .xml configuration file:
1. Download the XmlSignTool executable.
2. Open a Windows Command Prompt (cmd) using Run as administrator.
3. Navigate to the save location of xmlsigntool.exe
4. Execute a command to sign the .xml configuration file, usage: xmlsigntool /version 1|2 <xml_file_path>
IMPORTANTThe value of the /version parameter depends on your version of ESET NOD32 Antivirus. Use /version 1 forearlier versions of ESET NOD32 Antivirus than 11.1. Use /version 2 for the current version of ESET NOD32Antivirus.
5. Enter and Re-enter your Advanced Setup Password when prompted by the XmlSignTool. Your .xmlconfiguration file is now signed and can be used to import another instance of ESET NOD32 Antivirus with ESETCMD using the password authorization method.
EXAMPLESign exported configuration file command:xmlsigntool /version 1 c:\config\settings.xml
NOTEIf your Access Setup password changes and you want to import a configuration that was signed earlier with an oldpassword, you need to sign the .xml configuration file again using your current password. This allows you to use

84
an older configuration file without exporting it to another machine running ESET NOD32 Antivirus before theimport.
4.5 User interface
The User interface section allows you to configure the behavior of the program's Graphical user interface (GUI).
Using the Graphics tool, you can adjust the program's visual appearance and effects used.
By configuring Alerts and notifications, you can change the behavior of detected threat alerts and systemnotifications. These can be customized to fit your needs.
To provide maximum security of your security software, you can prevent any unauthorized changes by protectingthe settings by a password using the Access setup tool.
4.5.1 User interface elements
User interface configuration options in ESET NOD32 Antivirus allow you to adjust the working environment to fityour needs. These configuration options are accessible in the Advanced setup > User interface > User interfaceelements.
If you want to deactivate the ESET NOD32 Antivirus splash-screen, deselect Show splash-screen at startup.
To have ESET NOD32 Antivirus play a sound when important events occur during a scan, for example when athreat is discovered or when the scan has finished, select Use sound signal.
Integrate into the context menu – Integrate the ESET NOD32 Antivirus control elements into the context menu.
Statuses
Application statuses – Click Edit button to manage (disable) statuses that are displayed in the first pane pane inmain menu.

85
4.5.2 Alerts and notifications
The Alerts and notifications section under User interface allows you to configure how threat alerts and systemnotifications (for example, successful update messages) are handled by ESET NOD32 Antivirus. You can also set thedisplay time and transparency of system tray notifications (this applies only on systems that support system traynotifications).
Alert windows
Disabling Display alerts will cancel all alert windows, and is only suitable for a limited amount of specificsituations. For most users, we recommend that this option be left in its default setting (enabled).
In-product messaging
Display marketing messages – In-product messaging has been designed to inform users of ESET news and othercommunications. Sending marketing messages requires the consent of a user. Therefore, marketing messagesare not sent to a user by default (shown as a question mark). By enabling this option, you agree to receive ESETmarketing messages. If you are not interested in receiving ESET marketing material, disable the option.
Desktop notifications
Notifications on the Desktop and balloon tips are informative only, and do not require user interaction. They aredisplayed in the notification area at the bottom right corner of the screen. To activate Desktop notifications,select Display notifications on desktop.
Enable Do not display notifications when running applications in full-screen mode to suppress all non-interactive notifications. More detailed options, such as notification display time and window transparency canbe modified below.
The Minimum verbosity of events to display drop-down menu allows you to select the severity level of alertsand notifications to be displayed. The following options are available:

86
· Diagnostic – Logs information needed to fine-tune the program and all records above.
· Informative – Records informative messages, including successful update messages, plus all records above.
· Warnings – Records critical errors and warning messages.
· Errors – Errors such as "Error downloading file" and critical errors will be recorded.
· Critical – Logs only critical errors (error starting antivirus protection, etc...).
The last feature in this section allows you to configure the destination of notifications in a multi-userenvironment. The On multi-user systems, display notifications on the screen of this user field specifies whichuser will receive system and other notifications on systems allowing multiple users to connect at the same time.Normally, this would be a system or network administrator. This option is especially useful for terminal servers,provided that all system notifications are sent to the administrator.
Message boxes
To close pop-up windows automatically after a certain period of time, select Close message boxesautomatically. If they are not closed manually, alert windows are automatically closed after the specified timeperiod elapses.
Confirmation messages – Shows you a list of confirmation messages that you can select to display or not todisplay.
4.5.2.1 Advanced setup
From the Minimum verbosity of events to display drop-down menu, you can select the starting severity level ofalerts and notification to be displayed.
· Diagnostic – Logs information needed to fine-tune the program and all records above.
· Informative – Records informative messages, including successful update messages, plus all records above.
· Warnings – Records critical errors and warning messages.
· Errors – Errors such as "Error downloading f ile" and critical errors will be recorded.
· Critical – Logs only critical errors (error starting Antivirus protection, etc...).
The last feature in this section allows you to configure the destination of notifications in a multi-user environment.The On multi-user systems, display notifications on the screen of this user field specifies a user who will receivesystem and other notifications on systems allowing multiple users to connect at the same time. Normally, thiswould be a system or network administrator. This option is especially useful for terminal servers, provided that allsystem notifications are sent to the administrator.

87
4.5.3 Access setup
ESET NOD32 Antivirus settings are a crucial part of your security policy. Unauthorized modifications can potentiallyendanger the stability and protection of your system. To avoid unauthorized modifications, the setup parameters ofESET NOD32 Antivirus can be password protected.
Password protect settings – Indicate password settings. Click to open the Password setup window.
To set or change a password to protect setup parameters, click Set.
Require full administrator rights for limited administrator accounts – Select this to prompt the current user (if he orshe does not have administrator rights) to enter an administrator username and password when modifying certainsystem parameters (similar to the User Account Control (UAC) in Windows Vista and Windows 7). Such modificationsinclude disabling protection modules. On Windows XP systems where UAC is not running, users will have the Require administrator rights (system without UAC support) option available.
For Windows XP only:
Require administrator rights (system without UAC support) – Enable this option to have ESET NOD32 Antivirusprompt for administrator credentials.

88
4.5.4 Program menu
Some of the most important setup options and features are available by right-clicking the system tray icon .
Quick links – Displays the most frequently used parts of ESET NOD32 Antivirus. You can quickly access these from theprogram menu.
Pause protection – Displays the confirmation dialog box that disables Antivirus and antispyware protection, whichguards against malicious system attacks by controlling file, web and email communication.
The Time interval drop-down menu represents the period of time that Antivirus and antispyware protection will bedisabled for.
Advanced setup – Select this option to enter the Advanced setup tree. There are also other ways to open Advancedsetup, such as pressing the F5 key or navigating to Setup > Advanced setup.
Log files – Log files contain information about important program events that have occurred and provide anoverview of detected threats.
Hide ESET NOD32 Antivirus – Hide the ESET NOD32 Antivirus window from the screen.
Reset window layout – Resets the ESET NOD32 Antivirus's window to its default size and position on the screen.
Check for updates – Starts updating the detection engine (previously known as "virus signature database") to ensureyour level of protection against malicious code.

89
About – Provides system information, details about the installed version of ESET NOD32 Antivirus and the installedprogram modules. Here you can also find the license expiration date and information about the operating systemand system resources.

90
5. Advanced user
5.1 Profiles
Profile manager is used in two places within ESET NOD32 Antivirus – in the On-demand computer scan section and inthe Update section.
Computer scan
Your preferred scan parameters can be saved for future scanning. We recommend that you create a different profile(with various scan targets, scan methods and other parameters) for each regularly used scan.
To create a new profile, open the Advanced setup window (F5) and click Detection engine > Malware scans > On-demand scan > List of profiles. The Profile manager window includes the Selected profile drop-down menu that listsexisting scan profiles and the option to create a new one. To help you create a scan profile to fit your needs, see the ThreatSense engine parameters setup section for a description of each parameter of the scan setup.
NOTESuppose that you want to create your own scan profile and the Scan your computer configuration is partiallysuitable, but you don’t want to scan runtime packers or potentially unsafe applications and you also want toapply Strict cleaning. Enter the name of your new profile in the Profile manager window and click Add. Selectyour new profile from the Selected profile drop-down menu and adjust the remaining parameters to meet yourrequirements and click OK to save your new profile.
Update
The profile editor in the Update setup section allows users to create new update profiles. Create and use your owncustom profiles (other than the default My profile) only if your computer uses multiple means to connect to updateservers.
For example, a laptop that normally connects to a local server (Mirror) in the local network but downloads updatesdirectly from ESET update servers when disconnected from the local network (business trip) might use two profiles:the first one for connecting to the local server; the other one for connecting to ESET servers. Once these profiles areconfigured, navigate to Tools > Scheduler and edit the update task parameters. Designate one profile as primary andthe other as secondary.
Update profile – The currently used update profile. To change it, choose a profile from the drop-down menu.
List of profiles – Create new or remove existing update profiles.
5.2 Keyboard shortcuts
For better navigation in your ESET product, the following keyboard shortcuts can be used:
F1 opens help pagesF5 opens Advanced setupUp/Down navigation in product through items- collapses Advanced setup tree nodesTAB moves the cursor in a windowEsc closes the active dialog windowCtrl+U shows information about license (Details for Customer Care)Ctrl+R resets product window to its default size and position on the
screen

91
5.3 Diagnostics
Diagnostics provides application crash dumps of ESET processes (for example, ekrn). If an application crashes, adump will be generated. This can help developers debug and fix various ESET NOD32 Antivirus problems. Click thedrop-down menu next to Dump type and select one of three available options:
· Select Disable (default) to disable this feature.
· Mini – Records the smallest set of useful information that may help identify why the application crashedunexpectedly. This kind of dump file can be useful when space is limited, however because of the limitedinformation included, errors that were not directly caused by the thread that was running at the time of theproblem may not be discovered by an analysis of this file.
· Full – Records all the contents of system memory when the application stops unexpectedly. A complete memorydump may contain data from processes that were running when the memory dump was collected.
Enable Protocol filtering advanced logging – Record all data passing through the Protocol filtering engine in PCAPformat in order to help the developers diagnose and fix the problems related to Protocol filtering.
Enable Update engine advanced logging – Record all events that occur during update process. This can helpdevelopers diagnose and fix problems related to the Update engine.
Enable Licensing advanced logging – Record all product communication with license server.
Enable Anti-Theft engine advanced logging – Record all events that occur in Anti-Theft to allow diagnosing andsolving problems.
Enable Antispam engine advanced logging – Record all events that occur during antispam scanning. This can helpdevelopers to diagnose and fix problems related to ESET Antispam engine.
Log files can be found in:C:\ProgramData\ESET\ESET NOD32 Antivirus\Diagnostics\ in Windows Vista and later or C:\Documents andSettings\All Users\... in earlier versions of Windows.
Target directory – Directory where the dump during the crash will be generated.
Open diagnostics folder – Click Open to open this directory in a new Windows explorer window.
Create diagnostic dump – Click Create to create diagnostic dump files in the Target directory.
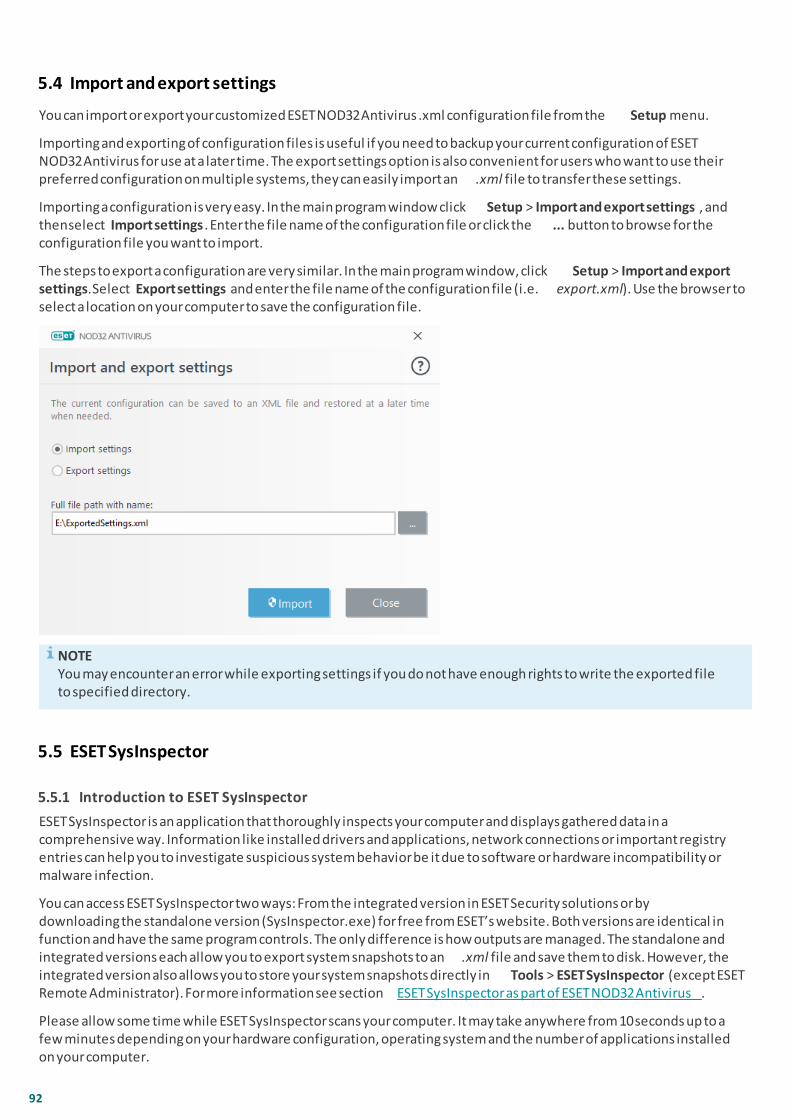
92
5.4 Import and export settings
You can import or export your customized ESET NOD32 Antivirus .xml configuration file from the Setup menu.
Importing and exporting of configuration files is useful if you need to backup your current configuration of ESETNOD32 Antivirus for use at a later time. The export settings option is also convenient for users who want to use theirpreferred configuration on multiple systems, they can easily import an .xml file to transfer these settings.
Importing a configuration is very easy. In the main program window click Setup > Import and export settings, andthen select Import settings. Enter the file name of the configuration file or click the ... button to browse for theconfiguration file you want to import.
The steps to export a configuration are very similar. In the main program window, click Setup > Import and exportsettings. Select Export settings and enter the file name of the configuration file (i.e. export.xml). Use the browser toselect a location on your computer to save the configuration file.
NOTEYou may encounter an error while exporting settings if you do not have enough rights to write the exported fileto specified directory.
5.5 ESET SysInspector
5.5.1 Introduction to ESET SysInspector
ESET SysInspector is an application that thoroughly inspects your computer and displays gathered data in acomprehensive way. Information like installed drivers and applications, network connections or important registryentries can help you to investigate suspicious system behavior be it due to software or hardware incompatibility ormalware infection.
You can access ESET SysInspector two ways: From the integrated version in ESET Security solutions or bydownloading the standalone version (SysInspector.exe) for free from ESET’s website. Both versions are identical infunction and have the same program controls. The only difference is how outputs are managed. The standalone andintegrated versions each allow you to export system snapshots to an .xml file and save them to disk. However, theintegrated version also allows you to store your system snapshots directly in Tools > ESET SysInspector (except ESETRemote Administrator). For more information see section ESET SysInspector as part of ESET NOD32 Antivirus.
Please allow some time while ESET SysInspector scans your computer. It may take anywhere from 10 seconds up to afew minutes depending on your hardware configuration, operating system and the number of applications installedon your computer.
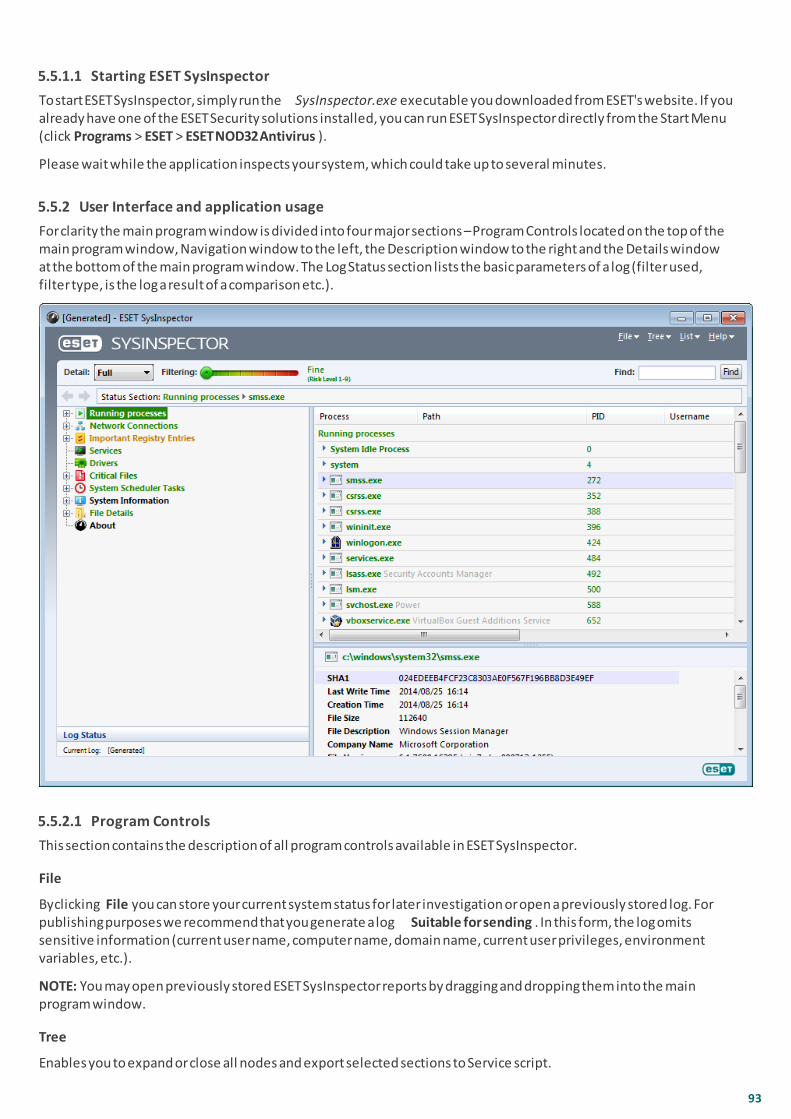
93
5.5.1.1 Starting ESET SysInspector
To start ESET SysInspector, simply run the SysInspector.exe executable you downloaded from ESET's website. If youalready have one of the ESET Security solutions installed, you can run ESET SysInspector directly from the Start Menu(click Programs > ESET > ESET NOD32 Antivirus).
Please wait while the application inspects your system, which could take up to several minutes.
5.5.2 User Interface and application usage
For clarity the main program window is divided into four major sections – Program Controls located on the top of themain program window, Navigation window to the left, the Description window to the right and the Details windowat the bottom of the main program window. The Log Status section lists the basic parameters of a log (filter used,filter type, is the log a result of a comparison etc.).
5.5.2.1 Program Controls
This section contains the description of all program controls available in ESET SysInspector.
File
By clicking File you can store your current system status for later investigation or open a previously stored log. Forpublishing purposes we recommend that you generate a log Suitable for sending. In this form, the log omitssensitive information (current user name, computer name, domain name, current user privileges, environmentvariables, etc.).
NOTE: You may open previously stored ESET SysInspector reports by dragging and dropping them into the mainprogram window.
Tree
Enables you to expand or close all nodes and export selected sections to Service script.
94
List
Contains functions for easier navigation within the program and various other functions like finding informationonline.
Help
Contains information about the application and its functions.
Detail
This setting influences the information displayed in the main program window to make the information easier towork with. In "Basic" mode, you have access to information used to find solutions for common problems in yoursystem. In the "Medium" mode, the program displays less used details. In "Full" mode, ESET SysInspector displaysall the information needed to solve very specific problems.
Filtering
Item filtering is best used to find suspicious files or registry entries in your system. By adjusting the slider, you canfilter items by their Risk Level. If the slider is set all the way to the left (Risk Level 1), then all items are displayed. Bymoving the slider to the right, the program filters out all items less risky than current risk level and only displayitems which are more suspicious than the displayed level. With the slider all the way to the right, the programdisplays only known harmful items.
All items labeled as risk 6 to 9 can pose a security risk. If you are not using a security solution from ESET, werecommend that you scan your system with ESET Online Scanner if ESET SysInspector has found any such item. ESETOnline Scanner is a free service.
NOTE: The Risk level of an item can be quickly determined by comparing the color of the item with the color on theRisk Level slider.
Compare
When comparing two logs, you can choose to display all items, display only added items, display only removeditems or to display only replaced items.
Find
Search can be used to quickly find a specific item by its name or part of its name. The results of the search requestare displayed in the Description window.
Return
By clicking the back or forward arrows, you can return to previously displayed information in the Descriptionwindow. You can use the backspace and space keys instead of clicking back and forward.
Status section
Displays the current node in Navigation window.
Important: Items highlighted in red are unknown, which is why the program marks them as potentially dangerous. Ifan item is in red, it does not automatically mean that you can delete the file. Before deleting, please make sure thatfiles are really dangerous or unnecessary.

95
5.5.2.2 Navigating in ESET SysInspector
ESET SysInspector divides various types of information into several basic sections called nodes. If available, you mayfind additional details by expanding each node into its subnodes. To open or collapse a node, double-click the nameof the node or click or next to the name of the node. As you browse through the tree structure of nodes andsubnodes in the Navigation window you may find various details for each node shown in the Description window. Ifyou browse through items in the Description window, additional details for each item may be displayed in theDetails window.
The following are the descriptions of the main nodes in the Navigation window and related information in theDescription and Details windows.
Running processes
This node contains information about applications and processes running at the time of generating the log. In theDescription window you may find additional details for each process such as dynamic libraries used by the processand their location in the system, the name of the application's vendor and the risk level of the file.
The Detail window contains additional information for items selected in the Description window such as the filesize or its hash.
NOTE: An operating system is comprised of several important kernel components running constantly that providebasic and vital functions for other user applications. In certain cases, such processes are displayed in the tool ESETSysInspector with file path beginning with \??\. Those symbols provide pre-launch optimization for thoseprocesses; they are safe for the system.
Network connections
The Description window contains a list of processes and applications communicating over the network using theprotocol selected in the Navigation window (TCP or UDP) along with the remote address where to which theapplication is connected to. You can also check the IP addresses of DNS servers.
The Detail window contains additional information for items selected in the Description window such as the filesize or its hash.
Important Registry Entries
Contains a list of selected registry entries which are often related to various problems with your system like thosespecifying startup programs, browser helper objects (BHO), etc.
In the Description window you may find which files are related to specific registry entries. You may see additionaldetails in the Details window.
Services
The Description window Contains a list of files registered as windows Services. You may check the way the service isset to start along with specific details of the file in the Details window.
Drivers
A list of drivers installed in the system.
Critical files
The Description window displays content of critical files related to the Microsoft windows operating system.
System Scheduler Tasks
Contains a list of tasks triggered by Windows Task Scheduler at a specified time/interval.
System information
Contains detailed information about hardware and software along with information about set environmentalvariables, user rights and system event logs.

96
File details
A list of important system files and files in the Program Files folder. Additional information specific for the files canbe found in the Description and Details windows.
About
Information about version of ESET SysInspector and the list of program modules.
5.5.2.2.1 Keyboard shortcuts
Key shortcuts that can be used when working with the ESET SysInspector include:
File
Ctrl+O opens existing logCtrl+S saves created logs
Generate
Ctrl+G generates a standard computer status snapshotCtrl+H generates a computer status snapshot that may also log sensitive information
Item Filtering
1, O fine, risk level 1-9 items are displayed2 fine, risk level 2-9 items are displayed3 fine, risk level 3-9 items are displayed4, U unknown, risk level 4-9 items are displayed5 unknown, risk level 5-9 items are displayed6 unknown, risk level 6-9 items are displayed7, B risky, risk level 7-9 items are displayed8 risky, risk level 8-9 items are displayed9 risky, risk level 9 items are displayed- decreases risk level+ increases risk levelCtrl+9 filtering mode, equal level or higherCtrl+0 filtering mode, equal level only
View
Ctrl+5 view by vendor, all vendorsCtrl+6 view by vendor, only MicrosoftCtrl+7 view by vendor, all other vendorsCtrl+3 displays full detailCtrl+2 displays medium detailCtrl+1 basic displayBackSpace moves one step backSpace moves one step forwardCtrl+W expands treeCtrl+Q collapses tree
Other controls
Ctrl+T goes to the original location of item after selecting in search resultsCtrl+P displays basic information about an itemCtrl+A displays full information about an itemCtrl+C copies the current item's treeCtrl+X copies itemsCtrl+B finds information about selected files on the InternetCtrl+L opens the folder where the selected file is located

97
Ctrl+R opens the corresponding entry in the registry editorCtrl+Z copies a path to a file (if the item is related to a file)Ctrl+F switches to the search fieldCtrl+D closes search resultsCtrl+E run service script
Comparing
Ctrl+Alt+O opens original / comparative logCtrl+Alt+R cancels comparisonCtrl+Alt+1 displays all itemsCtrl+Alt+2 displays only added items, log will show items present in current logCtrl+Alt+3 displays only removed items, log will show items present in previous logCtrl+Alt+4 displays only replaced items (files inclusive)Ctrl+Alt+5 displays only differences between logsCtrl+Alt+C displays comparisonCtrl+Alt+N displays current logCtrl+Alt+P opens previous log
Miscellaneous
F1 view helpAlt+F4 close programAlt+Shift+F4 close program without askingCtrl+I log statistics
5.5.2.3 Compare
The Compare feature allows the user to compare two existing logs. The outcome of this feature is a set of items notcommon to both logs. It is suitable if you want to keep track of changes in the system, a helpful tool for detectingmalicious code.
After it is launched, the application creates a new log which is displayed in a new window. Click File > Save log tosave a log to a file. Log files can be opened and viewed at a later time. To open an existing log, click File > Open log.In the main program window, ESET SysInspector always displays one log at a time.
The benefit of comparing two logs is that you can view a currently active log and a log saved in a file. To comparelogs, click File > Compare log and choose Select file. The selected log will be compared to the active one in the mainprogram windows. The comparative log will display only the differences between those two logs.
NOTE: If you compare two log files, click File > Save log to save it as a ZIP file; both files will be saved. If you openthis file later, the contained logs are automatically compared.
Next to the displayed items, ESET SysInspector shows symbols identifying differences between the compared logs.
Description of all symbols that can be displayed next to items:
· new value, not present in the previous log
· tree structure section contains new values
· removed value, present in the previous log only
· tree structure section contains removed values
· value / file has been changed
· tree structure section contains modified values / files
· the risk level has decreased / it was higher in the previous log
· the risk level has increased / it was lower in the previous log
The explanation section displayed in the left bottom corner describes all symbols and also displays the names oflogs which are being compared.

98
Any comparative log can be saved to a file and opened at a later time.
Example
Generate and save a log, recording original information about the system, to a file named previous.xml. Afterchanges to the system have been made, open ESET SysInspector and allow it to generate a new log. Save it to a filenamed current.xml.
In order to track changes between those two logs, click File > Compare logs. The program will create a comparativelog showing differences between the logs.
The same result can be achieved if you use the following command line option:
SysIsnpector.exe current.xml previous.xml
5.5.3 Command line parameters
ESET SysInspector supports generating reports from the command line using these parameters:
/gen generate log directly from the command line without running GUI/privacy generate log with sensitive information omitted/zip save outcome log in compressed zip archive/silent suppress progress window when generating log from the command line/blank launch ESET SysInspector without generating/loading log
Examples
Usage:Sysinspector.exe [load.xml] [/gen=save.xml] [/privacy] [/zip] [compareto.xml]
To load specific log directly into the browser, use: SysInspector.exe .\clientlog.xmlTo generate log from the command line, use: SysInspector.exe /gen=.\mynewlog.xmlTo generate log excluding sensitive information directly in a compressed file, use: SysInspector.exe /gen=.\mynewlog.zip /privacy /zipTo compare two log files and browse differences, use: SysInspector.exe new.xml old.xml
NOTE: If the name of the file/folder contains a gap, then should be taken into inverted commas.

99
5.5.4 Service Script
Service script is a tool that provides help to customers that use ESET SysInspector by easily removing unwantedobjects from the system.
Service script enables the user to export the entire ESET SysInspector log, or its selected parts. After exporting, youcan mark unwanted objects for deletion. You can then run the modified log to delete marked objects.
Service Script is suited for advanced users with previous experience in diagnosing system issues. Unqualifiedmodifications may lead to operating system damage.
Example
If you suspect that your computer is infected by a virus which is not detected by your antivirus program, follow thestep-by-step instructions below:
1. Run ESET SysInspector to generate a new system snapshot.2. Select the first item in the section on the left (in the tree structure), press Shift and select the last item to mark
all items.3. Right click the selected objects and select Export Selected Sections To Service Script.4. The selected objects will be exported to a new log.5. This is the most crucial step of the entire procedure: open the new log and change the – attribute to + for all
objects you want to remove. Please make sure you do not mark any important operating system files/objects.6. Open ESET SysInspector, click File > Run Service Script and enter the path to your script.7. Click OK to run the script.
5.5.4.1 Generating Service script
To generate a script, right-click any item from the menu tree (in the left pane) in the ESET SysInspector mainwindow. From the context menu, select either Export All Sections To Service Script or Export Selected Sections ToService Script.
NOTE: It is not possible to export the service script when two logs are being compared.
5.5.4.2 Structure of the Service script
In the first line of the script’s header, you can find information about the Engine version (ev), GUI version (gv) andthe Log version (lv). You can use this data to track possible changes in the .xml file that generates the script andprevent any inconsistencies during execution. This part of the script should not be altered.
The remainder of the file is divided into sections in which items can be edited (denote those that will be processedby the script). You mark items for processing by replacing the “-” character in front of an item with a “+” character.Sections in the script are separated from each other by an empty line. Each section has a number and title.
01) Running processes
This section contains a list of all processes running in the system. Each process is identified by its UNC path and,subsequently, its CRC16 hash code in asterisks (*).
Example:
01) Running processes:
- \SystemRoot\System32\smss.exe *4725*
- C:\Windows\system32\svchost.exe *FD08*
+ C:\Windows\system32\module32.exe *CF8A*
[...]
In this example a process, module32.exe, was selected (marked by a “+” character); the process will end uponexecution of the script.
02) Loaded modules
This section lists currently used system modules.

100
Example:
02) Loaded modules:
- c:\windows\system32\svchost.exe
- c:\windows\system32\kernel32.dll
+ c:\windows\system32\khbekhb.dll
- c:\windows\system32\advapi32.dll
[...]
In this example the module khbekhb.dll was marked by a “+”. When the script runs, it will recognize the processesusing that specific module and end them.
03) TCP connections
This section contains information about existing TCP connections.
Example:
03) TCP connections:
- Active connection: 127.0.0.1:30606 -> 127.0.0.1:55320, owner: ekrn.exe
- Active connection: 127.0.0.1:50007 -> 127.0.0.1:50006,
- Active connection: 127.0.0.1:55320 -> 127.0.0.1:30606, owner: OUTLOOK.EXE
- Listening on *, port 135 (epmap), owner: svchost.exe
+ Listening on *, port 2401, owner: fservice.exe Listening on *, port 445 (microsoft-ds), owner:
System
[...]
When the script runs, it will locate the owner of the socket in the marked TCP connections and stop the socket,freeing system resources.
04) UDP endpoints
This section contains information about existing UDP endpoints.
Example:
04) UDP endpoints:
- 0.0.0.0, port 123 (ntp)
+ 0.0.0.0, port 3702
- 0.0.0.0, port 4500 (ipsec-msft)
- 0.0.0.0, port 500 (isakmp)
[...]
When the script runs, it will isolate the owner of the socket at the marked UDP endpoints and stop the socket.
05) DNS server entries
This section contains information about the current DNS server configuration.
Example:
05) DNS server entries:
+ 204.74.105.85
- 172.16.152.2
[...]
Marked DNS server entries will be removed when you run the script.
06) Important registry entries
This section contains information about important registry entries.

101
Example:
06) Important registry entries:
* Category: Standard Autostart (3 items)
HKLM\SOFTWARE\Microsoft\Windows\CurrentVersion\Run
- HotKeysCmds = C:\Windows\system32\hkcmd.exe
- IgfxTray = C:\Windows\system32\igfxtray.exe
HKCU\SOFTWARE\Microsoft\Windows\CurrentVersion\Run
- Google Update = “C:\Users\antoniak\AppData\Local\Google\Update\GoogleUpdate.exe” /c
* Category: Internet Explorer (7 items)
HKLM\Software\Microsoft\Internet Explorer\Main
+ Default_Page_URL = http://thatcrack.com/
[...]
The marked entries will be deleted, reduced to 0-byte values or reset to their default values upon script execution.The action to be applied to a particular entry depends on the entry category and key value in the specific registry.
07) Services
This section lists services registered within the system.
Example:
07) Services:
- Name: Andrea ADI Filters Service, exe path: c:\windows\system32\aeadisrv.exe, state: Running,
startup: Automatic
- Name: Application Experience Service, exe path: c:\windows\system32\aelupsvc.dll, state: Running,
startup: Automatic
- Name: Application Layer Gateway Service, exe path: c:\windows\system32\alg.exe, state: Stopped,
startup: Manual
[...]
The services marked and their dependent services will be stopped and uninstalled when the script is executed.
08) Drivers
This section lists installed drivers.
Example:
08) Drivers:
- Name: Microsoft ACPI Driver, exe path: c:\windows\system32\drivers\acpi.sys, state: Running,
startup: Boot
- Name: ADI UAA Function Driver for High Definition Audio Service, exe path: c:
\windows\system32\drivers\adihdaud.sys, state: Running, startup: Manual
[...]
When you execute the script, the drivers selected will be stopped. Note that some drivers won't allow themselvesto be stopped.
09) Critical files
This section contains information about files that are critical to proper function of the operating system.

102
Example:
09) Critical files:
* File: win.ini
- [fonts]
- [extensions]
- [files]
- MAPI=1
[...]
* File: system.ini
- [386Enh]
- woafont=dosapp.fon
- EGA80WOA.FON=EGA80WOA.FON
[...]
* File: hosts
- 127.0.0.1 localhost
- ::1 localhost
[...]
The selected items will either be deleted or reset to their original values.
10) Scheduled tasks
This section contains information about scheduled tasks.
Example:
10) Scheduled tasks
- c:\windows\syswow64\macromed\flash\flashplayerupdateservice.exe
- c:\users\admin\appdata\local\google\update\googleupdate.exe
- c:\users\admin\appdata\local\google\update\googleupdate.exe
- c:\windows\syswow64\macromed\flash\flashplayerupdateservice.exe
- c:\users\admin\appdata\local\google\update\googleupdate.exe /c
- c:\users\admin\appdata\local\google\update\googleupdate.exe /ua /installsource
- %windir%\system32\appidpolicyconverter.exe
- %windir%\system32\appidcertstorecheck.exe
- aitagent
[...]
5.5.4.3 Executing Service scripts
Mark all desired items, then save and close the script. Run the edited script directly from the ESET SysInspector mainwindow by selecting the Run Service Script option from the File menu. When you open a script, the program willprompt you with the following message: Are you sure you want to run the service script “%Scriptname%”? After youconfirm your selection, another warning may appear, informing you that the service script you are trying to run hasnot been signed. Click Run to start the script.
A dialog window will confirm that the script was successfully executed.
If the script could only be partially processed, a dialog window with the following message will appear: The servicescript was run partially. Do you want to view the error report? Select Yes to view a complex error report listing theoperations that were not executed.
If the script was not recognized, a dialog window with the following message will appear: The selected service scriptis not signed. Running unsigned and unknown scripts may seriously harm your computer data. Are you sure youwant to run the script and carry out the actions? This may be caused by inconsistencies within the script (damagedheading, corrupted section title, empty line missing between sections etc.). You can either reopen the script fileand correct the errors within the script or create a new service script.

103
5.5.5 FAQ
Does ESET SysInspector require Administrator privileges to run ?
While ESET SysInspector does not require Administrator privileges to run, some of the information it collects canonly be accessed from an Administrator account. Running it as a Standard User or a Restricted User will result in itcollecting less information about your operating environment.
Does ESET SysInspector create a log file ?
ESET SysInspector can create a log file of your computer's configuration. To save one, click File > Save Log in the mainprogram window. Logs are saved in XML format. By default, files are saved to the %USERPROFILE%\My Documents\directory, with a file naming convention of "SysInpsector-%COMPUTERNAME%-YYMMDD-HHMM.XML". You maychange the location and name of the log file to something else before saving if you prefer.
How do I view the ESET SysInspector log file ?
To view a log file created by ESET SysInspector, run the program and click File > Open Log in the main programwindow. You can also drag and drop log files onto the ESET SysInspector application. If you need to frequently viewESET SysInspector log files, we recommend creating a shortcut to the SYSINSPECTOR.EXE file on your Desktop; youcan then drag and drop log files onto it for viewing. For security reasons Windows Vista/7 may not allow drag anddrop between windows that have different security permissions.
Is a specification available for the log file format? What about an SDK ?
At the current time, neither a specification for the log file or an SDK are available since the program is still indevelopment. After the program has been released, we may provide these based on customer feedback anddemand.
How does ESET SysInspector evaluate the risk posed by a particular object ?
In most cases, ESET SysInspector assigns risk levels to objects (files, processes, registry keys and so forth) using aseries of heuristic rules that examine the characteristics of each object and then weight the potential for maliciousactivity. Based on these heuristics, objects are assigned a risk level from 1 - Fine (green) to 9 - Risky (red). In the leftnavigation pane, sections are colored based on the highest risk level of an object inside them.
Does a risk level of "6 - Unknown (red)" mean an object is dangerous ?
ESET SysInspector's assessments do not guarantee that an object is malicious – that determination should be madeby a security expert. What ESET SysInspector is designed for is to provide a quick assessment for security experts sothat they know what objects on a system they may want to further examine for unusual behavior.
Why does ESET SysInspector connect to the Internet when run ?
Like many applications, ESET SysInspector is signed with a digital signature "certificate" to help ensure the softwarewas published by ESET and has not been altered. In order to verify the certificate, the operating system contacts acertificate authority to verify the identity of the software publisher. This is normal behavior for all digitally-signedprograms under Microsoft Windows.
What is Anti-Stealth technology ?
Anti-Stealth technology provides effective rootkit detection.
If the system is attacked by malicious code that behaves as a rootkit, the user may be exposed to data loss or theft.Without a special anti-rootkit tool, it is almost impossible to detect rootkits.
Why are there sometimes files marked as "Signed by MS", having a different "Company Name" entry at the sametime ?
When trying to identify the digital signature of an executable, ESET SysInspector first checks for a digital signatureembedded in the file. If a digital signature is found, the file will be validated using that information. If a digitalsignature is not found, the ESI starts looking for the corresponding CAT file (Security Catalog - %systemroot%

104
\system32\catroot) that contains information about the executable file processed. If the relevant CAT file is found,the digital signature of that CAT file will be applied in the validation process of the executable.
This is why there are sometimes files marked as "Signed by MS", but having a different "CompanyName" entry.
Example:
Windows 2000 includes the HyperTerminal application located in C:\Program Files\Windows NT. The mainapplication executable file is not digitally signed, but ESET SysInspector marks it as a file signed by Microsoft. Thereason for this is a reference in C:\WINNT\system32\CatRoot\{F750E6C3-38EE-11D1-85E5-00C04FC295EE}\sp4.catpointing to C:\Program Files\Windows NT\hypertrm.exe (the main executable of the HyperTerminal application) andsp4.cat is digitally signed by Microsoft.
5.5.6 ESET SysInspector as part of ESET NOD32 Antivirus
To open the ESET SysInspector section in ESET NOD32 Antivirus, click Tools > ESET SysInspector. The managementsystem in the ESET SysInspector window is similar to that of computer scan logs, or scheduled tasks. All operationswith system snapshots – create, view, compare, remove and export – are accessible within one or two clicks.
The ESET SysInspector window contains basic information about the created snapshots such as create time, a shortcomment, name of the user that created the snapshot and snapshot status.
To compare, create, or delete snapshots, use the corresponding buttons located below the list of snapshots in theESET SysInspector window. Those options are also available from the context menu. To view the selected systemsnapshot, select Show from the context menu. To export the selected snapshot to a file, right-click it and selectExport....
Below is a detailed description of the available options:
· Compare – Allows you to compare two existing logs. It is suitable if you want to track changes between thecurrent log and an older log. For this option to take effect, you must select two snapshots to be compared.
· Create... – Creates a new record. Before that, you must enter a short comment about the record. To find out thesnapshot creation progress (of the currently generated snapshot), see the Status column. All completed snapshotsare marked by the Created status.
· Delete/Delete all – Removes entries from the list.
· Export... – Saves the selected entry in an XML file (also in a zipped version).
5.6 Command Line
ESET NOD32 Antivirus's antivirus module can be launched via the command line – manually (with the “ecls”command) or with a batch (“bat”) file. ESET Command-line scanner usage:
ecls [OPTIONS..] FILES..
The following parameters and switches can be used while running the on-demand scanner from the command line:
Options
/base-dir=FOLDER load modules from FOLDER/quar-dir=FOLDER quarantine FOLDER/exclude=MASK exclude files matching MASK from scanning/subdir scan subfolders (default)/no-subdir do not scan subfolders/max-subdir-level=LEVEL maximum sub-level of folders within folders to scan/symlink follow symbolic links (default)/no-symlink skip symbolic links/ads scan ADS (default)/no-ads do not scan ADS/log-file=FILE log output to FILE/log-rewrite overwrite output file (default – append)/log-console log output to console (default)
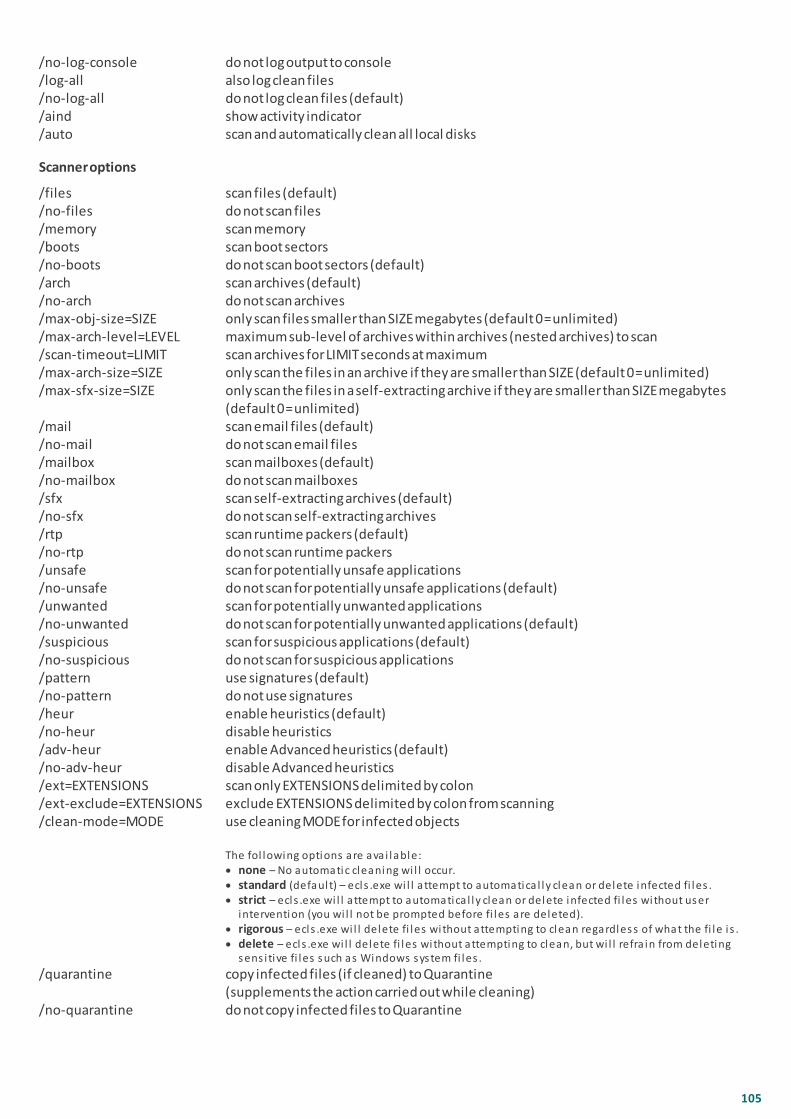
105
/no-log-console do not log output to console/log-all also log clean files/no-log-all do not log clean files (default)/aind show activity indicator/auto scan and automatically clean all local disks
Scanner options
/files scan files (default)/no-files do not scan files/memory scan memory/boots scan boot sectors/no-boots do not scan boot sectors (default)/arch scan archives (default)/no-arch do not scan archives/max-obj-size=SIZE only scan files smaller than SIZE megabytes (default 0 = unlimited)/max-arch-level=LEVEL maximum sub-level of archives within archives (nested archives) to scan/scan-timeout=LIMIT scan archives for LIMIT seconds at maximum/max-arch-size=SIZE only scan the files in an archive if they are smaller than SIZE (default 0 = unlimited)/max-sfx-size=SIZE only scan the files in a self-extracting archive if they are smaller than SIZE megabytes
(default 0 = unlimited)/mail scan email files (default)/no-mail do not scan email files/mailbox scan mailboxes (default)/no-mailbox do not scan mailboxes/sfx scan self-extracting archives (default)/no-sfx do not scan self-extracting archives/rtp scan runtime packers (default)/no-rtp do not scan runtime packers/unsafe scan for potentially unsafe applications/no-unsafe do not scan for potentially unsafe applications (default)/unwanted scan for potentially unwanted applications/no-unwanted do not scan for potentially unwanted applications (default)/suspicious scan for suspicious applications (default)/no-suspicious do not scan for suspicious applications/pattern use signatures (default)/no-pattern do not use signatures/heur enable heuristics (default)/no-heur disable heuristics/adv-heur enable Advanced heuristics (default)/no-adv-heur disable Advanced heuristics/ext=EXTENSIONS scan only EXTENSIONS delimited by colon/ext-exclude=EXTENSIONS exclude EXTENSIONS delimited by colon from scanning/clean-mode=MODE use cleaning MODE for infected objects
The following options are available:· none – No automatic cleaning will occur.· standard (default) – ecls.exe will attempt to automatically clean or delete infected files.· strict – ecls.exe will attempt to automatically clean or delete infected files without user
intervention (you will not be prompted before files are deleted).· rigorous – ecls.exe will delete files without attempting to clean regardless of what the file is.· delete – ecls.exe will delete files without attempting to clean, but will refrain from deleting
sensitive files such as Windows system files.
/quarantine copy infected files (if cleaned) to Quarantine(supplements the action carried out while cleaning)
/no-quarantine do not copy infected files to Quarantine

106
General options
/help show help and quit/version show version information and quit/preserve-time preserve last access timestamp
Exit codes
0 no threat found 1 threat found and cleaned 10 some files could not be scanned (may be threats) 50 threat found 100 error
NOTEExit codes greater than 100 mean that the file was not scanned and thus can be infected.
107
6. Glossary
6.1 Types of infiltration
An Infiltration is a piece of malicious software trying to enter and/or damage a user’s computer.
6.1.1 Viruses
A computer virus is a piece of malicious code that is pre-pended or appended to existing files on your computer.Viruses are named after biological viruses because they use similar techniques to spread from one computer toanother. As for the term “virus”, it is often used incorrectly to mean any type of a threat. This usage is graduallybeing overcome and replaced with a more accurate term “malware” (malicious software).
Computer viruses mainly attack executable files and documents. In short, this is how a computer virus works: afterexecution of an infected file, the malicious code is called and executed prior to the execution of the originalapplication. A virus can infect any files that the current user has write permissions for.
Computer viruses can range in purpose and severity. Some of them are extremely dangerous because of their abilityto purposely delete files from a hard drive. On the other hand, some viruses do not cause any damage – they onlyserve to annoy the user and demonstrate the technical skills of their authors.
If your computer is infected with a virus and cleaning is not possible, submit it to the ESET Research Lab for perusal.In certain cases infected files can be modified to such an extent that cleaning is not possible and the files must bereplaced with a clean copy.
6.1.2 Worms
A computer worm is a program containing malicious code that attacks host computers and spreads via network. Thebasic difference between a virus and a worm is that worms have the ability to propagate by themselves; they arenot dependant on host files (or boot sectors). Worms spread to email addresses in your contact list or exploitsecurity vulnerabilities in network applications.
Worms are therefore much more viable than computer viruses. Due to the wide availability of the Internet, they canspread across the globe within hours or even minutes after their release. This ability to replicate independently andrapidly makes them more dangerous than other types of malware.
A worm activated in a system can cause a number of inconveniences: It can delete files, degrade systemperformance, or even deactivate programs. The nature of a computer worm qualifies it as a “means of transport“ forother types of infiltrations.
If your computer is infected with a worm, we recommend you delete the infected files because they likely containmalicious code.
6.1.3 Trojans
Historically, computer Trojans (Trojan horses) have been defined as a class of threats which attempt to presentthemselves as useful programs and thus trick users into running them.
Since Trojans are a very broad category, it is often divided into several subcategories:
· Downloader – Malicious programs with the ability to download other threats from the Internet.
· Dropper – Malicious programs with the ability to drop other types of malware onto compromised computers.
· Backdoor – Malicious programs which communicate with remote attackers, allowing them to gain access to thecomputer and take control over it.
· Keylogger – (keystroke logger) – A program which records each keystroke that a user types and sends theinformation to remote attackers.
· Dialer – Malicious programs designed to connect via premium-rate numbers instead of the user's Internet serviceprovider. It is almost impossible for a user to notice that a new connection was created. Dialers can only causedamage to users with dial-up modems, which are no longer regularly used.
108
If a file on your computer is detected as a Trojan, it is advisable to delete it, since it most likely contains nothing butmalicious code.
6.1.4 Rootkits
Rootkits are malicious programs that grant Internet attackers unlimited access to a system, while concealing theirpresence. Rootkits, after accessing a system (usually exploiting a system vulnerability), use functions in theoperating system to avoid detection by antivirus software: they conceal processes, files and Windows registry data.For this reason, it is almost impossible to detect them using ordinary testing techniques.
There are two levels of detection to prevent rootkits:
1. When they try to access a system: They are still not present, and are therefore inactive. Most antivirus systemsare able to eliminate rootkits at this level (assuming that they actually detect such files as being infected).
2. When they are hidden from the usual testing: ESET NOD32 Antivirus users have the advantage of Anti-Stealthtechnology, which is also able to detect and eliminate active rootkits.
6.1.5 Adware
Adware is a short for advertising-supported software. Programs displaying advertising material fall under thiscategory. Adware applications often automatically open a new pop-up window containing advertisements in anInternet browser, or change the browser’s home page. Adware is frequently bundled with freeware programs,allowing their creators to cover development costs of their (usually useful) applications.
Adware itself is not dangerous – users will only be bothered with advertisements. Its danger lies in the fact thatadware may also perform tracking functions (as spyware does).
If you decide to use a freeware product, please pay particular attention to the installation program. The installer willmost likely notify you of the installation of an extra adware program. Often you will be allowed to cancel it andinstall the program without adware.
Some programs will not install without adware, or their functionality will be limited. This means that adware mayoften access the system in a “legal” way, because users have agreed to it. In this case, it is better to be safe thansorry.If there is a file detected as adware on your computer, it is advisable to delete it, since there is a highprobability that it contains malicious code.
6.1.6 Spyware
This category covers all applications which send private information without user consent/awareness. Spyware usestracking functions to send various statistical data such as a list of visited websites, email addresses from the user‘scontact list, or a list of recorded keystrokes.
The authors of spyware claim that these techniques aim to find out more about users’ needs and interests and allowbetter-targeted advertisement. The problem is that there is no clear distinction between useful and maliciousapplications and no one can be sure that the retrieved information will not be misused. The data obtained byspyware applications may contain security codes, PINs, bank account numbers, etc. Spyware is often bundled withfree versions of a program by its author in order to generate revenue or to offer an incentive for purchasing thesoftware. Often, users are informed of the presence of spyware during a program‘s installation to give them anincentive to upgrade to a paid version without it.
Examples of well-known freeware products which come bundled with spyware are client applications of P2P (peer-to-peer) networks. Spyfalcon or Spy Sheriff (and many more) belong to a specific spyware subcategory – theyappear to be antispyware programs, but in fact they are spyware programs themselves.
If a file is detected as spyware on your computer, it is advisable to delete it, since there is a high probability that itcontains malicious code.

109
6.1.7 Packers
Packer is a runtime self-extracting executable that rolls up several kinds of malware into a single package.
The most common packers are UPX, PE_Compact, PKLite and ASPack. The same malware may be detecteddifferently when compressed using a different packer. Packers also have the ability to make their "signatures"mutate over time, making malware more difficult to detect and remove.
6.1.8 Potentially unsafe applications
There are many legitimate programs whose function is to simplify the administration of networked computers.However, in the wrong hands, they may be misused for malicious purposes. ESET NOD32 Antivirus provides theoption to detect such threats.
Potentially unsafe applications is the classification used for commercial, legitimate software. This classificationincludes programs such as remote access tools, password-cracking applications, and keyloggers (a program thatrecords each keystroke a user types).
If you find that there is a potentially unsafe application present and running on your computer (and you did notinstall it), please consult your network administrator or remove the application.
6.1.9 Potentially unwanted applications
Grayware (or PUA - a Potentially Unwanted Application) is a broad category of software, whose intent is not asunequivocally malicious as with other types of malware, such as viruses or trojan horses. It may however installadditional unwanted software, change the behavior of the digital device, or perform activities not approved orexpected by the user.
Categories that may be considered grayware include: advertising display software, download wrappers, variousbrowser toolbars, software with misleading behavior, bundleware, trackware, or any other borderline software, orsoftware that uses illicit or at least unethical business practices (despite appearing legitimate) and might bedeemed undesirable by an end user who became aware of what the software would do if allowed to install.
A Potentially Unsafe Application is one that is in itself legitimate (possibly commercial) software but which mightbe misused by an attacker. Detection of these types of application can be enabled or disabled by users of ESETsoftware.
There are some situations where a user may feel that the benefits of a potentially unwanted application outweighthe risks. For this reason, ESET assigns such applications a lower-risk category compared to other types of malicioussoftware, such as trojan horses or worms.
Warning - Potential threat found
When a potentially unwanted application is detected, you can decide which action to take:
1. Clean/Disconnect: This option ends the action and prevents the potential threat from entering your system.2. Ignore: This option allows a potential threat to enter your system.3. To allow the application to run on your computer in the future without interruption, click Advanced options and
then select the check box next to Exclude from detection.

110
When a potentially unwanted application is detected and cannot be cleaned, an Address has been blockednotification will be displayed. For more information about this event navigate to Tools > Log files > Filteredwebsites from the main menu.
Potentially unwanted applications - Settings
While installing your ESET product, you can decide whether to enable detection of potentially unwantedapplications, as shown below:

111
WARNINGPotentially unwanted applications may install adware, toolbars, or contain other unwanted and unsafe programfeatures.
These settings can be modified in your program settings at any time. To enable or disable the detection ofPotentially unwanted, unsafe or suspicious applications, follow these instructions:
1. Open your ESET product. How do I open my ESET product?2. Press the F5 key to access Advanced setup.3. Click Antivirus and enable or disable options Enable detection of potentially unwanted applications, Enable
detection of potentially unsafe applications and Enable detection of suspicious applications according to yourpreferences. Confirm by clicking OK.
Potentially unwanted applications - Software wrappers
A software wrapper is a special type of application modification that is used by some file-hosting websites. It is athird-party tool that installs the program you intended to download but adds additional software, such as toolbarsor adware. The additional software may also make changes to your web browser’s home page and search settings.Also, file-hosting websites often do not notify the software vendor or download recipient that modifications havebeen made, and often hide options to opt out. For these reasons, ESET classifies software wrappers as a type ofpotentially unwanted application to allow users to accept the download or not.
Please see this ESET Knowledgebase article for an updated version of this help page.

112
6.2 ESET Technology
6.2.1 Exploit Blocker
Exploit Blocker is designed to fortify commonly exploited application types such as web browsers, PDF readers,email clients and MS Office components. It works by monitoring the behavior of processes for suspicious activitythat might indicate an exploit.
When Exploit Blocker identifies a suspicious process, it can stop the process immediately and record data about thethreat, which is then sent to the ThreatSense cloud system. This data is processed by the ESET Research Lab andused to better protect all users from unknown threats and zero-day attacks (newly released malware for whichthere is no pre-configured remedy).
6.2.2 Advanced Memory Scanner
Advanced Memory Scanner works in combination with Exploit Blocker to strengthen protection against malwarethat has been designed to evade detection by antimalware products through the use of obfuscation and/orencryption. In cases where ordinary emulation or heuristics might not detect a threat, the Advanced memoryScanner is able to identify suspicious behavior and scan threats when they reveal themselves in system memory.This solution is effective against even heavily obfuscated malware.
Unlike Exploit Blocker, Advanced Memory Scanner is a post-execution method, which means that there is a risk thatsome malicious activity could have been performed prior to its detecting a threat; however in the case that otherdetection techniques have failed, it offers an additional layer of security.
6.2.3 ESET LiveGrid®
Built on ThreatSense.Net® advanced early warning system, ESET LiveGrid® utilizes data that ESET users havesubmitted worldwide and sends it to the ESET Research Lab. By providing suspicious samples and metadata from thewild, ESET LiveGrid® enables us to react immediately to needs of our customers and keep ESET responsive to thelatest threats. ESET malware researchers use the information to build an accurate snapshot of the nature and scopeof global threats, which helps us focus on the right targets. ESET LiveGrid® data plays an important role in settingpriorities in our automated processing.
Additionally, it implements a reputation system that helps to improve the overall efficiency of our anti-malwaresolutions. When an executable file or archive is being inspected on a user’s system, its hash tag is first comparedagainst a database of white- and blacklisted items. If it is found on the whitelist, the inspected file is consideredclean and also flagged to be excluded from future scans. If it is on the blacklist, appropriate actions are taken basedon the nature of the threat. If no match is found, the file is scanned thoroughly. Based on the results of this scan,files are categorized as threats or non-threats. This approach has a significant positive impact on scanningperformance.
This reputation system allows for effective detection of malware samples even before their signatures aredelivered to user’s computer via updated virus database (which happens several times a day).
6.2.4 Java Exploit Blocker
Java Exploit Blocker is an extension to existing Exploit Blocker protection. It monitors Java and looking for exploit-like behavior. Blocked samples can be reported to malware analysts, so they can create signatures to block them ondifferent layers (URL blocking, file download, etc.).

113
6.2.5 Script-Based Attacks Protection
Script-Based Attacks Protection consists of protection against javascript in web browsers and Antimalware ScanInterface (AMSI) protection against scripts in Powershell.
WARNINGHIPS must be enabled for this feature to work.
Script-Based Attacks Protection supports the following web browsers:
· Mozilla Firefox
· Google Chrome
· Internet Explorer
· Microsoft Edge
NOTEThe minimum supported versions of web browsers may vary because the file signature of browsers changeoften. The latest version of web browser is always supported.
6.2.6 Ransomware shield
Ransomware is a type of malware that blocks users from accessing their system by locking the system's screen or byencrypting files. Anti-Ransomware protection monitors the behavior of applications and processes that try tomodify your personal data. If an application's behavior is considered malicious or reputation-based scanning showsan application to be suspicious, the application is blocked or the user will be asked to block or allow it.
IMPORTANTESET Live Grid must be enabled for Anti-Ransomware protection to function properly.
6.2.7 UEFI Scanner
Unified Extensible Firmware Interface (UEFI) Scanner is part of the Host-based Intrusion Prevention System (HIPS)that protects UEFI on your computer. UEFI is a firmware which loads into memory at the beginning of the bootprocess. The code is on a flash memory chip soldered onto the mainboard. By infecting it, attackers can deploymalware that survives system reinstallations and reboots. The malware can also easily remain unnoticed byantimalware solutions as most of them are not scanning this layer.
UEFI Scanner is enabled automatically. You can also start a computer scan manually from the main program windowby clicking Computer scan > Advanced Scans > Custom Scan and selecting the Boot sectors/UEFI target. For moreinformation about computer scans, see the section Computer scan.
If your computer has already been infected by UEFI malware, read the following ESET Knowledgebase article:My computer is infected with UEFI malware, what should I do?

114
6.3 Email
Email, or electronic mail, is a modern form of communication with many advantages. It is flexible, fast and direct,and played a crucial role in the proliferation of the Internet in the early 1990‘s.
Unfortunately, with a high level of anonymity, email and the Internet leave room for illegal activities such asspamming. Spam includes unsolicited advertisements, hoaxes and proliferation of malicious software – malware.The inconvenience and danger to you is increased by the fact that the cost of sending spam is minimal, and authorsof spam have many tools to acquire new email addresses. In addition, the volume and variety of spam makes it verydifficult to regulate. The longer you use your email address, the more likely it will end up in a spam enginedatabase. Some hints for prevention:
· If possible, don’t publish your email address on the Internet
· Only give your email address to trusted individuals
· If possible, don’t use common aliases – with more complicated aliases, the probability of tracking is lower
· Don’t reply to spam that has already arrived in your inbox
· Be careful when filling out Internet forms – be especially cautious of options such as “Yes, I want to receiveinformation”.
· Use “specialized” email addresses – e.g., one for business, one for communication with your friends, etc.
· From time to time, change your email address
· Use an Antispam solution
6.3.1 Advertisements
Internet advertising is one of the most rapidly growing forms of advertising. Its main marketing advantages areminimal costs and a high level of directness; what’s more, messages are delivered almost immediately. Manycompanies use email marketing tools to effectively communicate with current and prospective customers.
This type of advertising is legitimate, since you may be interested in receiving commercial information about someproducts. But many companies send unsolicited bulk commercial messages. In such cases, email advertising crossesthe line and becomes spam.
The amount of unsolicited email has become a problem and it shows no signs of slowing. Authors of unsolicitedemail often attempt to disguise spam as legitimate messages.
6.3.2 Hoaxes
A hoax is misinformation which is spread across the Internet. Hoaxes are usually sent via email or communicationtools like ICQ and Skype. The message itself is often a joke or Urban Legend.
Computer Virus hoaxes try to generate fear, uncertainty and doubt (FUD) in the recipients, bringing them to believethat there is an “undetectable virus“ deleting files and retrieving passwords, or performing some other harmfulactivity on their system.
Some hoaxes work by asking recipients to forward messages to their contacts, perpetuating the hoax. There aremobile phone hoaxes, pleas for help, people offering to send you money from abroad, etc. It is often impossible todetermine the intent of the creator.
If you see a message prompting you to forward it to everyone you know, it may very well be a hoax. There are manywebsites on the Internet that can verify if an email is legitimate. Before forwarding, perform an Internet search onany message you suspect is a hoax.

115
6.3.3 Phishing
The term phishing defines a criminal activity which uses techniques of social engineering (manipulating users inorder to obtain confidential information). Its aim is to gain access to sensitive data such as bank account numbers,PIN codes, etc.
Access is usually achieved by sending email masquerading as a trustworthy person or business (e.g., financialinstitution, insurance company). The email can look very genuine, and will contain graphics and content which mayhave originally come from the source it is impersonating. You will be asked to enter, under various pretenses (dataverification, financial operations), some of your personal data – bank account numbers or usernames andpasswords. All such data, if submitted, can easily be stolen and misused.
Banks, insurance companies, and other legitimate companies will never request usernames and passwords in anunsolicited email.

116
7. Common QuestionsThis chapter covers some of the most frequently asked questions and problems encountered. Click the topic title tofind out how to solve your problem:
How to update ESET NOD32 AntivirusHow to remove a virus from my PCHow to create a new task in SchedulerHow to schedule a scan task (every 24 hours)
If your problem is not included in the help pages list above, try searching the ESET NOD32 Antivirus help pages.
If you cannot find the solution to your problem/question in the help pages, you can visit our regularly updatedonline ESET Knowledgebase. Links to our most popular Knowledgebase articles are included below to help youresolve common issues:
I received an activation error while installing my ESET product. What does it mean?Activate my ESET Windows home product using my Username, Password, or License KeyUninstall or reinstall my ESET home productI receive the message that my ESET installation ended prematurelyWhat do I need to do after renewing my license? (Home users)What if I change my email address?How to start Windows in Safe Mode or Safe Mode with networking
If necessary, you can contact our Customer Care with your questions or problems. The contact form can be found inthe Help and Support tab of ESET NOD32 Antivirus.
7.1 How to update the ESET NOD32 Antivirus
Updating ESET NOD32 Antivirus can be performed either manually or automatically. To trigger the update, click Update now in the Update section.
The default installation settings create an automatic update task which is performed on an hourly basis. If you needto change the interval, please navigate to Tools > Scheduler (for more information on Scheduler, click here).
7.2 How to remove a virus from my PC
If your computer is showing symptoms of malware infection, e.g. it is slower, often freezes, we recommend thatyou do the following:
1. In the main program window, click Computer scan.
2. Click Scan your computer to begin scanning your system.
3. After the scan has finished, review the log with the number of scanned, infected and cleaned files.
4. If you wish to only scan a certain part of your disk, click Custom scan and select targets to be scanned for viruses.
For additional information please see our regularly updated ESET Knowledgebase article.
117
7.3 How to create a new task in Scheduler
To create a new task in Tools > More tools > Scheduler, click Add or right-click and select Add... from the contextmenu. Five types of scheduled tasks are available:
· Run external application – Schedules the execution of an external application.
· Log maintenance – Log files also contains leftovers from deleted records. This task optimizes records in log fileson a regular basis to work effectively.
· System startup file check – Checks files that are allowed to run at system startup or logon.
· Create a computer status snapshot – Creates an ESET SysInspector computer snapshot – gathers detailedinformation about system components (for example, drivers, applications) and assesses the risk level of eachcomponent.
· On-demand computer scan – Performs a computer scan of files and folders on your computer.
· Update – Schedules an Update task by updating the modules.
Since Update is one of the most frequently used scheduled tasks, we will explain how to add a new update taskbelow:
From the Scheduled task drop-down menu, select Update. Enter the name of the task into the Task name field and click Next. Select the frequency of the task. The following options are available: Once, Repeatedly, Daily, Weeklyand Event triggered. Select Skip task when running on battery power to minimize system resources while a laptop isrunning on battery power. The task will be run on the specified date and time in Task execution fields. Next, definethe action to take if the task cannot be performed or completed at the scheduled time. The following options areavailable:
· At the next scheduled time
· As soon as possible
· Immediately, if time since last run exceeds a specified value (the interval can be defined using the Time since lastrun (hours) scroll box)
In the next step, a summary window with information about the current scheduled task is displayed. Click Finishwhen you are finished making changes.
A dialog window will appear, allowing you to select the profiles to be used for the scheduled task. Here you can setthe primary and alternative profile. The alternative profile is used if the task cannot be completed using the primaryprofile. Confirm by clicking Finish and the new scheduled task will be added to the list of currently scheduled tasks.
7.4 How to schedule a weekly computer scan
To schedule a regular task, open the main program window and click Tools > More tools > Scheduler. Below is a shortguide on how to schedule a task that will scan your local drives every 24 hours. See our Knowledgebase article formore detailed instructions.
To schedule a scan task:
1. Click Add in the main Scheduler screen.
2. Select On-demand computer scan from the drop-down menu.
3. Enter a name for the task and select Weekly for the task frequency.
4. Set the day and time the task will execute.
5. Select Run the task as soon as possible to perform the task later if the scheduled task does not run for anyreason (for example, if the computer was turned off).
6. Review the summary of the scheduled task and click Finish.
7. From the Targets drop-down menu, select Local drives.
8. Click Finish to apply the task.