escaux unified communication solution · pdf fileintroduction unify is a modular solution for...
TRANSCRIPT

ESCAUXUnified Communication
SolutionAdministrator guide
Unify v2.0 – Administrator guide v1.0
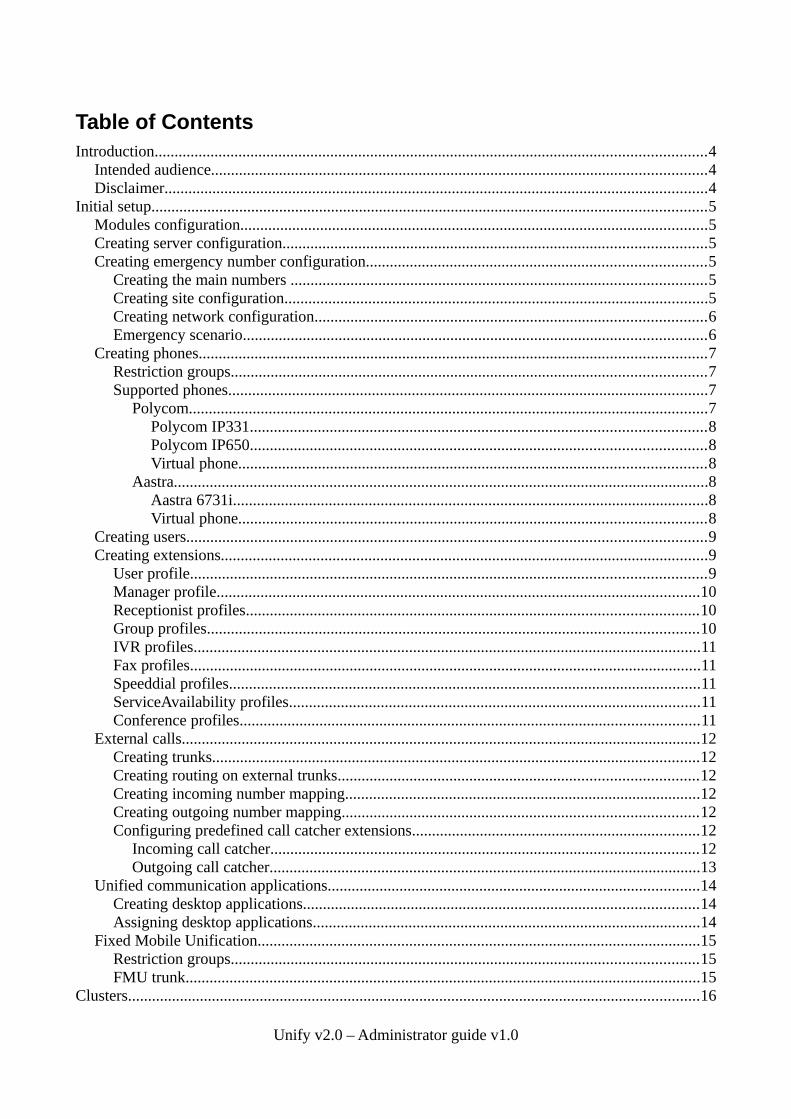
Table of ContentsIntroduction..........................................................................................................................................4
Intended audience............................................................................................................................4Disclaimer........................................................................................................................................4
Initial setup...........................................................................................................................................5Modules configuration.....................................................................................................................5Creating server configuration..........................................................................................................5Creating emergency number configuration.....................................................................................5
Creating the main numbers ........................................................................................................5Creating site configuration..........................................................................................................5Creating network configuration..................................................................................................6Emergency scenario....................................................................................................................6
Creating phones...............................................................................................................................7Restriction groups.......................................................................................................................7Supported phones........................................................................................................................7
Polycom..................................................................................................................................7Polycom IP331..................................................................................................................8Polycom IP650..................................................................................................................8Virtual phone.....................................................................................................................8
Aastra......................................................................................................................................8Aastra 6731i.......................................................................................................................8Virtual phone.....................................................................................................................8
Creating users..................................................................................................................................9Creating extensions..........................................................................................................................9
User profile.................................................................................................................................9Manager profile.........................................................................................................................10Receptionist profiles.................................................................................................................10Group profiles...........................................................................................................................10IVR profiles...............................................................................................................................11Fax profiles................................................................................................................................11Speeddial profiles......................................................................................................................11ServiceAvailability profiles.......................................................................................................11Conference profiles...................................................................................................................11
External calls..................................................................................................................................12Creating trunks..........................................................................................................................12Creating routing on external trunks..........................................................................................12Creating incoming number mapping.........................................................................................12Creating outgoing number mapping.........................................................................................12Configuring predefined call catcher extensions........................................................................12
Incoming call catcher...........................................................................................................12Outgoing call catcher............................................................................................................13
Unified communication applications.............................................................................................14Creating desktop applications...................................................................................................14Assigning desktop applications.................................................................................................14
Fixed Mobile Unification...............................................................................................................15Restriction groups.....................................................................................................................15FMU trunk.................................................................................................................................15
Clusters...............................................................................................................................................16
Unify v2.0 – Administrator guide v1.0

Modules.........................................................................................................................................16Routing...........................................................................................................................................16
Additional trunks.......................................................................................................................16Intra cluster routing...................................................................................................................16Outgoing call catchers...............................................................................................................16Emergency number routing.......................................................................................................16
Adding or changing configuration .....................................................................................................18Adding features to the template.....................................................................................................18Changing template features...........................................................................................................18
Default service extensions..................................................................................................................18Shortcut cheat sheet.......................................................................................................................19Ranges............................................................................................................................................20
Extensions.................................................................................................................................20Callflows...................................................................................................................................20
Unify v2.0 – Administrator guide v1.0

IntroductionUnify is a modular solution for IP-telephony and Unified Communications. The solution is based on open standards and is very efficient from an operational point of view. Unify is software delivered as a service (SaaS). Updates and a water-proof disaster recovery pack (automated and guaranteed back-up, documentation, redundancy) are included. The solution is most scalable and allows you to effectively respond to the changing communication needs of your organisation. Unify is a rich IP-PABX solution, designed to maximize the self-management by IT administrators and end-users.This guide will help you to go through the configuration of your Unify solution.
Intended audience
This guide is intended for certified engineers only.
Disclaimer
This document is confidential. It is provided for informational purposes only and is not guaranteed to be without errors. Some of the functionalities described may be specific to a device, to an application or to a network. Some features may only be available as optional functionality. ESCAUX has a policy of continuous improvement and therefore reserves the right to modify this document without prior notice.
Unify v2.0 – Administrator guide v1.0
Initial setup
Modules configuration
All required modules for the SOP have been preconfigured. For most of them, no manual interaction is required. The parameters of following modules need to be changed for each installation as the configuration will probably be different for each installation:• Mail server • Local admin password : you are strongly advised to change the default admin and customer
password• Sangoma Card Support and Zaptel-Asterisk-1.2x
Creating server configuration
No special actions are required to fill in all parameters.
Creating emergency number configuration
When calling an emergency number, the emergency services see your location on their screen. This location is the physical location of the termination point of your external trunk. When you call an emergency number from a remote site (via a VPN), the emergency services should be aware that you are on a remote site. Some SIP platforms allow you to do this by changing the caller and the called number. Example: You call from a remote site in Tremelo (zip code 3120) to the emergency number 112. The main number of the site in Tremelo is 016123456. Typically, the call should be rerouted to 1992 112 3120 and the caller number should be 016123456• 1992 : This prefix will inform the SIP platform that this is a remote request to an emergency
number• 112 : the actual called emergency number• 3120 : the zip code of the remote location
Remark: Every 3-digit number, starting with 1, followed by a 0 or 1 is considered as an emergency number. These numbers can also be called with a leading 0 (example: 0112 instead of 112).Known limitation: If an internal extension is defined that conflicts with an emergency number (example: you define extension 112), this extension will have priority over the emergency numbers. You should never configure an extension in the emergency range.
Creating the main numbers
Each remote site should have an extension with the main external number associated. Example: Extension 1000 is the main internal number in Tremelo. In the outgoing number mapping, you should set the outgoing number of extension 1000 to 016123456.Attention: The format of this number depends on the operator and on the line type.
Creating site configuration
In the 'site configuration' menu, create a new entry for each of your sites. For each site, you should specify:
Unify v2.0 – Administrator guide v1.0
• Site name: the name of your site• User Attribute 1 : the zip code of this site (example: 3120)• User Attribute 2 : the main internal number of this site (example: 1000)
Creating network configuration
In the network configuration menu, create a new entry for every network you have (on every site). Following parameters are mandatory:
• Site• Network address• Netmask
Emergency scenario
When calling an emergency number, the following will happen:1. Lookup the type of external trunk for the outgoing call catcher for this sop (by default
extension 89991001)2. If this is PRA or BA (meaning it is not IMS, nor NGN), just send the call out3. Else: lookup the site's information (zip code, main number) of the caller according to the ip
address of the phone4. If the site is not known, just send the call out 5. If the site is known: set the main number of this site as callerid and redirect to the correct
emergency number (the one starting with 1992)
Unify v2.0 – Administrator guide v1.0

Creating phones
Restriction groups
Following restriction groups have been predefined and are ready to use:• NoRestrict : This phone is able to call any type of number• RestrictInternal : This phone can only call internal numbers• RestrictNat : This phone can only call national and internal numbers• RestrictNatMob : This phone can only call national, mobile and internal numbers• RestrictNatMobInt : This phone can only call national, mobile, international and internal
numbers• RestrictNatMobPre : This phone can only call national, mobile, premium and internal
numbersTo see which numbers are associated to which type of traffic, please refer to the call routing menu. Remark: Every phone is able to call an emergency number, even if you restricted the phone to internal calls only.
Supported phones
Not all phones are supported in this configuration. This does not mean that they won't work, but that there is no default configuration (buttons to configure, features to (de)activate, …). Other phones can still be used.
A “bulk admin” example has been added for each phone type. Remark: you will have to add certain fields manually if you import this on a cluster (SOP1, SOP2,...). As these fields depend on the configuration, they can not be pre-provisioned.
Remark: If you are using PUM (Personal User Mobility), it is strongly recommended to restrict all physical phones (SDP* and SDR*) to internal calls only. The virtual phones can have a more appropriate restriction group. This will make sure no outgoing calls can be made if the user is not logged in.
At this moment, following phones are supported (more will follow in the future):• Polycom IP 331• Polycom IP650 for netConsole• Aastra 6731i
Polycom
The polycom phones have been configured to support LDAP lookups on the SOP. This will allow the phone to do a live request to the corporate directory on the SOP, including contacts that have been imported using the 'Unified communication model' module. More information about importing contacts can be found here: http://myservice.escaux.com/docs/GenModule89.html#ParametersThe Polycom phone will show the extension's status on the screen. This status is refreshed every 2 minutes, meaning that it can take up to 2 minutes before the correct status is shown.
Unify v2.0 – Administrator guide v1.0

Polycom IP331
This is the record for bulk admin to add a new phone: "";"SDPA0001";"PolycomIP331 4.14";"";"_";"NONE";"NoRestrict";"";"";"";"1";"";"";"local,";"name";"";",,0,0,/polycom/Idle.php?pickup=no&callback=no&missed=no,,120,,,,";"yes,,no,,,,default,";"default,0,,1,1,1,0,dM,1,0,yes,0,0,0,0,0";"1,V.Mail,8567,1,1,0,0,0,0,0,0";"1,Status,8571,1,1,0,0,0,0,0,0";"0,,,0,1,0,0,0,0,0,0";"1,Login,8580,0,1,0,0,0,0,0,0";"";"";"";"";"";"";"";"";"";"";",,,";"";"";"";"-"
Polycom IP650
This is the record for bulk admin to add a new phone: "";"SDP80001";"PolycomIP650 4.13";"netConsole phone";"_";"";"NoRestrict";"";"";"";"1";"7722,7723,7725";"";"local,";"";"";",,0,0,,,0,5,,,";",,no,,,,default,";"default,0,,1,1,1,0,dM,1,0,no,0,0,1,0,1";"0,,,0,1,0,0,0,0,0,0";"0,,,0,1,0,0,0,0,0,0";"0,,,0,1,0,0,0,0,0,0";"0,,,0,1,0,0,0,0,0,0";"";"";"";"";"";"";"";"";"";"";",,,";"";"";"";"-"Remark: The buttons have not been configured on this phone as this is not supported in combination with the netConsole.
Virtual phone
This is the record for bulk admin to add a new phone: "";"SVE20001";"VirtualPhone 2 1.09";"";"_";"NONE";"NoRestrict";"";"";"";"name";"local,first_name,";"";"";"";"";",,0,0,/polycom/Idle.php?pickup=no&callback=no&missed=no,120";",,no,,,";"default,dM,1,0,,1,1,1,0,0,,,1,0,0";"1,V.Mail,8567,1,1,0,0,0,0,0,0";"1,Status,8571,1,1,0,0,0,0,0,0";"0,,,0,1,0,0,0,0,0,0";"1,Logout,8581,0,1,0,0,0,0,0,0";"";"";"";"";"";"";"";"";"";"";"";"";"";"";"-"
Aastra
Aastra 6731i
This is the record for bulk admin to add a new phone: "231";"SDR20001";"Aastra6731i 1.04";"";"_00085D1365DB";"NONE";"NoRestrict";"";"";"";"speeddial,8567,,,xml,/aastra/Dir.php,speeddial,8571,speeddial,8580,,,directory,,,";"";"";"";"";"";"";",,no,,,,";"default,0,,1,1,0,1,BE-Brussels";",,,46,40";"";"";"";"";"";"";"";"";"";"";"";"";"";"";"";"";"";"-"
Virtual phone
This is the record for bulk admin to add a new phone: "";"SVE30001";"AastraVirtualPhone 1.03";"";"_";"NONE";"NoRestrict";"";"";"";"speeddial,8567,,,xml,/aastra/Dir.php,speeddial,8571,speeddial,8580,,,directory,,,";"";"";"";"";"";"";"";"default,0,,1,1,3,1,BE-Brussels";"";"";"";"";"";"";"";"";"";"";"";"";"";"";"";"";"";"";"-"
Unify v2.0 – Administrator guide v1.0
Creating users
For each user of the system, create a new entry containing the following fields:• Login name: e-mail address of the user• Password: the password for this user (can be changed via the SMP by the user)• E-mail : the e-mail address of the user• Language: English, French or Dutch
It might be a good idea to create a dummy user so your technical extensions can have this user as 'admin' field. If you do create such a dummy user, do not forget to reset the password or change it manually to a strong password.
Known limitation: German is not yet supported
Creating extensions
For each extension, you will have to fill in the usual parameters (extension, first name, last name, …). Please note that the 'owner' field will not only be used for net.Desktop or net.Console, but also for the language. Following logic will be applied:For internal calls, the language of the caller will be used. For external calls, the language of the called will be used. Example: Jan Janssens (Dutch speaking) calls his colleague Francois Dupont (French speaking). Francois activated his voicemail as he does not want to be disturbed. Jan will hear the announcement “Please leave your message” in Dutch. When Francois' client calls him, he will hear the announcement in French (as the language of the caller is not known, the same as the called's language is assumed).
Remark: It is rarely necessary to add extensions with a profile that does not start with “Unify-”. These profiles are mostly technical profiles.Example: Access to your voicemail messages.
Remark: You are strongly advised to set a pin code in the profile parameters of each profile that has a pin code and communicate the pin code to the end user. If you fail to do this, the end user will be asked for his pin code the first time he calls to an authenticated number. At this moment, the user can enter any pin code he wants and will be asked to change his pin code. After having changed his pin code, the call will be ended. Example: A user with no pin code calls his voicemail. He is asked for his pin code. The user enters 1305 (any other combination would also have been accepted). The user is asked to enter his new password twice. After this, the call is cut (not send to the voicemail!).Example: A user with no pin code wants to log in on a phone (only if you have PUM users). The user presses login and enters 1985 (any other combination would also have been accepted). The user is asked to enter his new password twice. After this, the call is cut. The user is not logged in but might not notice it and start making outgoing calls with his colleague's phone.
User profile
Please refer to the help file for the user for an explanation of all profile parameters that can be changed. By default, the following settings apply:
• Calls are not being forwarded
Unify v2.0 – Administrator guide v1.0
• The default status is 'Office'• In Office status, the primary and secondary phone will ring simultaneously• After 30 seconds, the call will be sent to voicemail• Call waiting is activated (multiple calls)• The user doesn't belong to any group• No pin code is specified
Remark: certain parameters can not be changed by the user. For the Unify-User-Green profile, this is the case for:
• The entire “My groups” menu. • The pin code. This pin code can be changed by the user via the phone (ext 8570) but not via
netDesktop. If you want to set a value for the user via the SMP, please do not configure any of the pin codes that have been defined in the “UnifyBlockedPincodes” parameter.
Manager profile
Please refer to the help file for the manager for an explanation of all profile parameters that can be changed. By default, the following settings apply:
• Calls are not being forwarded• The default status is 'Office'• In Office status, the primary and secondary phone will ring simultaneously• After 30 seconds, the call will be sent to voicemail• Call waiting is activated (multiple calls)• The user doesn't belong to any group• No pin code is specified
Remark: certain parameters can not be changed by the user. For the Unify-Manager-Green profile, this is the case for:
• The entire “My groups” menu. • The pin code. This pin code can be changed by the user via the phone (ext 8570) but not via
net.Desktop. If you want to set a value for the user via the SMP, please do not configure any of the pin codes that have been defined in the “UnifyBlockedPincodes” parameter.
Receptionist profiles
Please refer to the help file for the receptionist for an explanation of all profile parameters that can be changed. Remark: This profile will not work without filling in the profile parameters first!Known limitation: When calling the receptionist, the call will be queued in the receptionists personal queue for 60 seconds. When leaving the queue, the call will be sent to the extension that is defined in the global UnifyReception parameter. It is not possible to have a different fallback number for different receptionists.
Group profiles
Please refer to the help file for the group for an explanation of all profile parameters that can be changed. You can also find a detailed explanation on how to add messages to your groups in this help file.Remark: This profile will not work without filling in the profile parameters first!Remark: As for all extensions, the language will be set to the called's language for external calls and to the caller's language for internal calls.
Unify v2.0 – Administrator guide v1.0

Example: You would like to define a group with a voicemail message at the end and the voicemail instructions should be in Dutch. For this to work, you should create a user whose language is Dutch and set it as 'owner' of that extension. Known limitation: When sending the call to voicemail, the voicemail instructions (“Please leave your message after the beep”) will always be appended to your recorded voicemail message, meaning it is not possible to only play your recorded message.
IVR profiles
Please refer to the help file for the IVR for an explanation of all profile parameters that can be changed. You can also find a detailed explanation on how to add the messages to your IVRs in this help file.Remark: This profile will not work without filling in the profile parameters first!
Fax profiles
The fax profile is a profile that will simply make the primary phone ring. After 55 seconds, a busy tone will be played (normally, a fax should have answered long before). No profile parameters have to be configured for these extensions.Known limitation: Virtual faxes are not yet included in the default configuration.
Speeddial profiles
This profile will simply redirect to another number and allows you to create short codes for clients, suppliers and so on. To configure a speeddial, fill in the external number in the 'home number' field.Remark: If you program this for all your clients, you will automatically see the name of your client when he calls you (see “Incoming call catcher” below).
ServiceAvailability profiles
Please refer to the help file for the IVR for an explanation of all profile parameters that can be changed. Remark: This profile will not work without filling in the profile parameters first!
Conference profiles
One conference room has been foreseen by default. This conference number uses the first conference room. (extension 8701).Conference rooms should be in the 87XX range. If a different extension is desired, please use a speeddial with the desired extension to the conference room in the 87XX rangePlease refer to the help file for the IVR for an explanation of all profile parameters that can be changed. Remark: This profile will not work without filling in the profile parameters first!Known limitation: There can not be more than 20 different conference rooms per SOP.
Unify v2.0 – Administrator guide v1.0

External calls
Creating trunks
All external trunks should be in the context FromOutside. This will ensure proper pre-processing of all incoming calls.
Creating routing on external trunks
When making an outgoing call, the call should be routed over 1 or more external trunks (BRI, PRI, IMS, NGN). In the call routing, you should fill in the interfaces on the following line:_[0-9+]. Outgoing calls sendAll Goto.INTERFACE.1.38
Only fill in the interfaces, the other options should be left untouched.Known limitation: You can define up to 4 trunks to use for outgoing calls per SOPKnown limitation: All trunks should be of the same type (per SOP) (so it is not possible to mix a PRI and a IMS trunk on one single SOP for example).Known limitation: PRI and FXS cards can not be mixed. Workaround: upgrade the module Zaptel-Asterisk-1.2x to version 1.15
Creating incoming number mapping
In the incoming number mapping, all numbers that arrive on the SOP should be configured. As action, you should use version 2.01 of MapDDI. The format of the numbers depends on the operator and on the type of external trunk. Remark: It is not possible to configure a 'catch all' number that matches on any not configured number. If you would like to send all unused numbers to the reception, you should:
• Create a speeddial (see below) that redirects to the reception. Define a comprehensive first and last name (like 'Unused DDIs' 'Redirect to reception')
• Configure all unused DDIs to be mapped to the speeddial. By configuring it this way, it allows you to easily change later on what happens with unused external numbers (you only need to edit the speeddial to change it instead of changing all the mappings)
Creating outgoing number mapping
For each extension, you can define which number should be shown when this extension makes an outgoing call. The number can be any of your numbers (main number, direct number), or a hidden numberAttention: For every remote site, a main number should already have been configured (see section “Creating emergency number configuration”). Make sure not to change these parameters as it will impact calls to emergency numbers.
Configuring predefined call catcher extensions
Every external call (outgoing or incoming) is routed through a callflow to do some pre- or post-processing. The actions that are taken can (and should be) configured.
Incoming call catcher
Every incoming call will be routed to extension 89991000. Parameters to configure:
Unify v2.0 – Administrator guide v1.0
• Lookup extensions with the calling number associated for incoming calls: If a call is received from a number that exists in the internal directory as mobile number or home number, the caller id will be changed to the internal name and number. This will only be executed if this parameter is set to yes and the caller's number is longer than the parameter InternalNumberLength (8 by default). If your calls arrive in E164 format, the first 3 characters will be dropped for the lookup (meaning that for +32475123456, the lookup will be done for 475123456). The lookup will match any number that contains the value that is used for the lookup (so 475123456 will match on 0475123456)
• Allow transfer instead of redirect : When a user/manager activates his forward, and he forwards to an external number (meaning the number is longer than InternalNumberLength), the forward will be executed on operator level instead of on SOP level. This will allow you to keep the correct caller id and to save some channels on the external trunk. As this is only supported on IMS, this should only be activated in case you use an IMS trunk.
Known limitation: looking up extensions that have been imported using the “Unified communication model” module will not work. The caller id will not be changed to the one in your external database.
Outgoing call catcher
Every outgoing call will by default be routed to extension 89991001. Parameters to configure:
• Type of external connectivity : ◦ IMS : calls will be sent in E164 format (+3216123456)◦ NGN : calls will be sent in the usual format (016123456) and the private asserted
identity number will be set◦ PRA : calls will be sent in the usual format (016123456)◦ BA : calls will be sent in the usual format (016123456)
Testing mode : When activated, calls will not be send out but the called number will be read back to you. This will allow you to test installations before the external line is connected (for example: you can do an initial test for the emergency numbers in this way)
Unify v2.0 – Administrator guide v1.0

Unified communication applications
Creating desktop applications
Following versions should be used when configuring desktop applications:• net.Desktop X100 : v1.3• net.Desktop X300 : v1.5• net.Desktop X350 : v1.0• net.Desktop X500 : v1.10• net.Console X700 : v1.4• net.Console X900 : v1.6
Remark: For net.Console, all required routes and callflows have been implemented to support all available features in module version 3.3.3, except for “active-active” and “internal reception service”.Remark: For net.Console, timer values that are configured in the desktop application on the SMP should not exceed 500 seconds.
Assigning desktop applications
No special actions are required to fill in all parameters.
Unify v2.0 – Administrator guide v1.0

Fixed Mobile Unification
When an FMU device makes an outgoing call, the call should be sent out to the FMU trunk instead of to the default outgoing trunk. The internal routing mechanisms have been built in, the only things that need to be done are defining a FMU restriction group for each FMU device and defining which trunk should be used for FMU calls
Restriction groups
When defining an FMU device, special restriction groups should be used. The same restriction groups have been preconfigured as for normal devices, but they end with 'FMU':
• NoRestrictFMU : This phone is able to call any type of number• RestrictInternalFMU : This phone can only call internal numbers• RestrictNatFMU : This phone can only call national and internal numbers• RestrictNatMobFMU : This phone can only call national, mobile and internal numbers• RestrictNatMobIntFMU : This phone can only call national, mobile, international and
internal numbers• RestrictNatMobPreFMU : This phone can only call national, mobile, premium and internal
numbers
FMU trunk
In the call routing, you should fill in the interface(s) on the following line:_[0-9+]. Outgoing calls FMU sendAllFMU Goto.INTERFACE.1.38
Only fill in the interfaces, the other options should be left untouched
Unify v2.0 – Administrator guide v1.0
Clusters
Modules
The following modules need to be added if there are multiple SOPs in the cluster:• Cluster synchronization : v1.2.0• SSH peer connectivity : v1.0.0
Routing
Additional trunks
For every SOP, a mesh sip trunk should be created:• Version : 1.10• Qualify: yes• Use remote party ID: yes• Codecs: Ulaw and alaw are recommended• Restriction group: if you plan to send outgoing calls over these trunks, NoRestrict is
recommended
Intra cluster routing
No special actions are required to complete the intra cluster routing.
Outgoing call catchers
An outgoing call catcher does a number of actions for you like modifying the called number and adding additional SIP headersExample: Reformat the called number to E164 format for IMSExample: Adding the private asserted identity number SIP headerAs this might not be the same on all SOPs in your cluster, multiple outgoing call catchers might be used (maximum 1 per SOP).For each SOP that does not have the default configuration (the configuration in extension 89991001), a different outgoing call catcher should exist with the correct parameters. Once this call catchers has been configured, you should change the routing on SOP level to use the new outgoing call catcher by modifying the MapNumber parameters of the following line:
_[0-9+]. DefaultOut MapNumber.1.13The only parameter that needs to be changed is the “Add prefix” parameter, which needs to contain the extension of the new outgoing call catcher.
Emergency number routing
When calling the emergency numbers, a lookup is done to the outgoing call catcher to see which type of trunk is being used. This is necessary as the called emergency number should not be modified if the call is sent over BA or PRA trunks. As there might be multiple outgoing call catchers on a cluster, you should specify which trunk is used on which SOP.For each SOP, create a parameter (type: extension) 'OutgoingCallcatcher_<sopkey>' where you substitute <sopkey> with the actual SOPkey. As value, this parameter should contain the extension of the outgoing callcatcher for this SOP. This parameter should be configured as
Unify v2.0 – Administrator guide v1.0

'AdminConst'Example: OutgoingCallcatcher_00001234 with value 89991002.
Attention: If you fail to do this, the value of extension 89991001 will be used (default value). If your default outgoing call catcher (89991001) is configured to use IMS, but you are on a SOP with a BA, calls to emergency numbers might fail if the caller is calling from a remote site as the called number would be modified to 1992... (which does not work on a BA).
Unify v2.0 – Administrator guide v1.0
Adding or changing configuration
Known limitations
At the time of writing, all known limitations have been described in this administration guide. If new limitations are discovered, they will be added to the following Google Docs document:
https://docs.google.com/spreadsheet/ccc?key=0AvUCemQgBO4pdG5lN1JGNC1WLVhrTEhLTExVRXh2cVE
Adding features to the template
You are free to add additional features to the template (extensions, callflows, profiles, modules, …) as long as you respect the reserved ranges for extensions and callflows (see below). The name of custom profiles should never start with “Unify-”.Remark: As these additional features have not been validated in this configuration (yet), you will have to choose the appropriate versions yourself and validate and maintain these features yourself
Changing template features
Changing the following configuration is strictly forbidden without prior written approval from Escaux.
• Callflows in the reserved range (see below)• Default module versions • Default profiles (including parameters, type, …)• Default status names• Default callflow assignments• Extensions as described below in the “Ranges → Extensions” section• Default global parameters
If Escaux approves the changes, this is considered as a known limitation. Escaux should document this limitation in the Google Docs document. The impacted SOPs should be documented by the reseller in the Google Docs document in the known limitations section. You are allowed to change module parameters as described before (example: mail server module). If you need to change other module parameters, you will have to validate and maintain your changes yourself as this has not been validated by Escaux. For certain features, you can copy the existing configuration and make changes to your copy. Example: You want to add a feature to the user callflow. In this case, you will have to:
• Copy the user callflow (ex: to *001)• Copy the user profile (ex: user2)• assign *001 to user2
Default service extensionsSome shortcodes have been foreseen in the configuration that will allow you to change settings via your phone instead of using net.Desktop or the SMP web interface. Remark: Not all parameters apply to all users.Example: A user can not enable the assistant in the personal menu (a user does not have an assistant).
Unify v2.0 – Administrator guide v1.0

Shortcut cheat sheet
Unify v2.0 – Administrator guide v1.0
feature Code Alternative codeToggle call waiting 8522 #2Consult voicemail 8567 #67Consult voicemailConsult voicemail other extension 8568 #68Consult voicemail other extension 8568<extension> #68<extension>Change pin code 8570 #70Change status 8571 #71Change status other extension 8577 #77Change status other extension 8577<extension> #77<extension>Group pickup 8572 #72Extension pickup 8572<extension> #72<extension>Department pickup 8573 #73Disable voicemail in personal menu 857610 #7610Enable voicemail in personal menu 857611 #7611Disable forward to alternative number in personal menu 857620 #7620Enable forward to alternative number in personal menu 857621 #7621Disable forward to cell phone in personal menu 857630 #7630Enable forward to cell phone in personal menu 857631 #7631Disable callback on busy in personal menu 857640 #7640Enable callback on busy in personal menu 857641 #7641Disable the reception in personal menu 857650 #7650Enable the reception in personal menu 857651 #7651Disable the group in personal menu 857660 #7660Enable the group in personal menu 857661 #7661Disable the assistant in personal menu 857670 #7670Enable the assistant in personal menu 857671 #7671Business code 8578*<code>*<number> #78*code*numberDisable all call forwards 8579 #79Enable call forward 85791<number> #791<number>Enable call forward to last number 85791 #791Enable call forward on busy 85792<number> #792<number>Enable call forward on busy to last number 85792 #792Login to all groups 85796 #796Login to first group 857961 #7961Login to second group 857962 #7962Login to third group 857963 #7963Logout from all groups 85797 #797Logout from first group 857971 #7971Logout from second group 857972 #7972Logout from third group 857973 #7973
8580 #808581 #81
Record group welcome message 8590*<group extension> *1 #90*<group extension>*1Record group holiday message 8590*<group extension> *2 #90*<group extension>*2Record group outside office hours message 8590*<group extension> *3 #90*<group extension>*3Record group lunch message 8590*<group extension> *4 #90*<group extension>*4Record group no answer message 8590*<group extension> *5 #90*<group extension>*5Record IVR error messageRecord IVR messageSystem information 888555
8567<pincode> #67<pincode>
Pum loginPum logout
8885*<ivr extension>*9999 #85*<ivr extension>*99998885*<ivr extension>*node #85*<ivr extension>*node

Ranges
Extensions
Following ranges have been used for technical extensions. Except for the 800X, the 87XX and the 899910XX range, no extensions should be added in these ranges. It is also not allowed to change any of the extensions in these ranges, except for the profile parameters of the extensions in the 800X, the 87XX and the 899910XX range.
• 800X : Service availability profiles• 85XX : Service extensions • 85XXX : Service extensions • 85XXXX : Service extensions • 87XX : Conference rooms• 88XX: Technical service extensions• 888XXX : Extensions for debugging purposes• 8899XXXX : Technical service extensions for which should be authenticated. • 8999XXXX : Technical service extensions for rerouting purposes • 899910XX : Call catcher extensions for rerouting purposes
Callflows
Callflows from *100 up to *300 are reserved and should never be modified.
Unify v2.0 – Administrator guide v1.0