erosion-3d simulation with erosion-3d ... for this tutorial you require the sample data from the...
TRANSCRIPT

Erosion-3D
Ver. 3.0
User manual - Samples
GeoGnostics Software

2
This book whether the whole or part is subject to copyright. Any duplication, reprinting, translation, use of illustrations, reproduction on microfilms and storage in data bases is illegal without permission by the author. Violations are liable for prosecution under the German Copyright Law. Erosion-3D Ver. 3.0 User manual - Samples Ver. 3.0 Revision 0.52, 12.03.2003 © 2003 Michael von Werner Berlin

3
Contents 1 Sample project .................................................................................................... 4
1.1 Installation notice.......................................................................................... 4 1.2 Document conventions................................................................................. 4 1.3 Preprocessing the data ................................................................................ 4
1.3.1 Creating a relief parameters data set .................................................... 4 1.3.2 Creating soil parameters files from raster files ...................................... 7 1.3.3 Landuse-related generation of a soil parameter data set using
relational files......................................................................................... 9 1.3.4 Editing the lookup file .......................................................................... 10 1.3.5 Editing the data file.............................................................................. 11 1.3.6 Editing the grid file............................................................................... 11
1.4 Simulation .................................................................................................. 11 1.5 Long term simulation tutorial ...................................................................... 14
1.5.1 Example 1: Long term simulation based on a single event ................. 14 1.5.2 Example 2: Long term simulation based on a reference year ............. 16
1.6 Snow model tutorial.................................................................................... 20 1.7 Check dam model tutorial........................................................................... 25
1.7.1 Preparation of DEM............................................................................. 25 1.7.2 Simulation with Erosion-3D ................................................................. 26 1.7.3 Handling two or more impoundments.................................................. 31

4
1 Sample project The sample data set is a small watershed that comprises an area of approximately 0.78 km². The highest altitude is 526 m in the Northeast, and the lowest altitude is 439 m in the south of the study area. The average slope is 5°. The corresponding grid consists of 108*146 cells with a spatial resolution of 10m.
1.1 Installation notice For this tutorial you require the sample data from the installation CD. The sample data is installed, if you chose a full install or selected the sample data in the custom install option.
1.2 Document conventions Italics denote file names or directory names. Bold text denotes menu commands or dialog names. Monospace style text indicates information that is to be entered by the user.
1.3 Preprocessing the data
1.3.1 Creating a relief parameters data set Before you can use your digital elevation model for simulation runs the data must first be pre-processed. The results are written to a data set. At first the settings for the computation of the relief parameters must be chosen. The command Relief | Options... offers several modes for the computation of slope and flow distribution. Example: In the Flow routing tab sheet set flow routing to divergent and in the slope computation tab sheet set the value to 4 neighbors. The computation algorithm of EROSION-3D demands that the surface must not contain spurious pits. Therefore in the Pits and planes tab sheet the Fill depressions and Treat flat areas check boxes should be switched on. If the sinks are not filled, a derived drainage network may be discontinuous. Close the dialog with the Ok button. After selecting the command Relief/Hydro | Create relief data set the dialog window Relief input file appears. On the left side of the window a button with the label DEM file is located. If you just started up EROSION 3D no values for filename, rows, columns and resolution are displayed next to the button.

5
Figure 1: Relief input file dialog
Press the DEM file button. The File open dialog opens. Select the file dem1.asc in the \samples\indata\relief_hydro\relief_tachy directory.
Figure 2: Selecting a file name for the digital elevation model
Erosion-3D can recognize several file formats automatically (Arc/Info ASCII files, Grass Raster files and Surfer 6 Grid files) otherwise you will be prompted to tell the program what format your file has.

6
Figure 3: Selecting a grid file format
Now the dialog window Relief input file displays the file characteristics. After pressing the Create output data set button the File format dialog appears. There you can choose between ASCII and binary format. For the example select ‘Erosion-3D relief data set (Ascii)’. Press ok. The Save Relief Data set dialog opens. First you should create a new data set. Press the New folder button and enter a name for the new data set (e.g. \samples\outdata\relief_test). A new directory is created. Finally press the Save button. The Create file dialog appears and shows the characteristics of the new data set.
Figure 4: File characteristics
Press Ok again - the computation of the relief parameters starts now. During the computation the current state of processing is displayed in the status bar. On the graphics screen you will see the drainage network that was derived from the DEM. You can change the density of the drainage network by changing the CSA value in Relief/Hydro | Drainage network. Finally select View | Close graphics or

7
press the button. The program now computes the drainage paths. If no problems occurred, a message box appears (‘Normal termination’).
1.3.2 Creating soil parameters files from raster files For each parameter a raster file is required. This file contains data within a rectangular boundary. All input files must have the same number of rows and columns as well as the same grid size and corner coordinates. The files can have different formats (Arc/Info, Grass, Idrisi and Surfer). The grain size distribution is treated the following way: For each of the 9 grain size classes an input file must exist. The sum of all 9 classes must be 100 % in each element. The percentage values are stored as integers. All files have the same file name. The suffix determines the grain size class. The suffix 1 means fine clay, the file with the suffix 9 contains the coarse sand fraction. In the file selection window the file with suffix 1 is chosen. The program will load the other fraction files automatically. Example: Open the Soil/Landuse | Create Soil data set command. The dialog window Soil input files opens. Press the Erodibility button. If needed, select the drive and directory where the sample files are stored (\samples\indata\soil_landuse\soil_cr). All sample files provided on the installation CD are Arc/Info Ascii files. Therefore, set the Arc/Info Ascii file type. Choose the file “ero.asc”. Close the dialog with Ok. The selected filename and the file characteristics are displayed. Choose all required files successively according to the same principle until all Name fields contain file names. A file with the name texture1.asc must be selected in the case of a grain sizes file. Continue with the other files (see Table 1).
Parameter File name Erodibility ero.asc Roughness rough.asc Cover cover.asc Particle texture1.asc Bulk density density.asc Organic corg.asc I.Moisture initmoist.asc Skin factor corr.asc.
Table 1: Soil input files

8
Figure 5: The dialog window Soil input files
Finally, press the Create output data set button. The File format dialog opens. There you can choose between ASCII and binary format. For the example select ‘Erosion-3D soil data set (Ascii)’. Press ok. The Save Soil Data set dialog opens. First you should create a new data set. Press the New folder button and enter a name for the new data set (e.g. \samples\outdata\soil\Soil_cr). A new directory is created. Finally press the Save button. The Create file dialog appears and shows the characteristics of the new data set.

9
Figure 6: File characteristics
Press Ok again - the computation of the soil parameters starts now. During the computation the current state of processing is displayed in the status bar.
1.3.3 Landuse-related generation of a soil parameter data set using relational files
This type of soil parameter input is based on the following principle: Usually, on the areas in agricultural use a change in soil characteristics only occurs, when there was a prior shifting of land use (e.g. shifting of a patch boundary). Soil characteristics within a patch may be equalized especially in the case of anthropogenic soil cultivation methods. A homogeneous soil parameter data set can be assigned to a patch like this. A vector file containing land use boundaries is the assumption for this kind of parameter generation. Polygons have to be created from single segments within a GIS. Numerical IDs are assigned to these polygons in order to enable an unambiguous identification. A vector / grid conversion must be processed within a GIS. Grid elements, each containing the ID of the polygon, are located now inside the boundaries of this polygon. The grid file must be converted to an ASCII file if necessary. An adequate soil parameter data set must be available for each polygon or landuse class (e.g. forest). Single parameters are stored in columns and they are delimited by commas. The first row may be altered; however, it may not be deleted. The first column of the data set is a consecutive numbering, followed by single parameters in the next columns. The last column is the alphanumerical name of the parameter data set. This name enables a linkage of the parameter data set to a lookup table
10
containing areas of the grid file. This linkage file contains a numerical ID for a single area in the first column and the related alphanumerical name of the parameter data set in the second column. The columns are delimited by a comma. The advantage of this procedure is: Land use can be altered easily without altering the ID of the vector file or the ID of the parameter data sets.
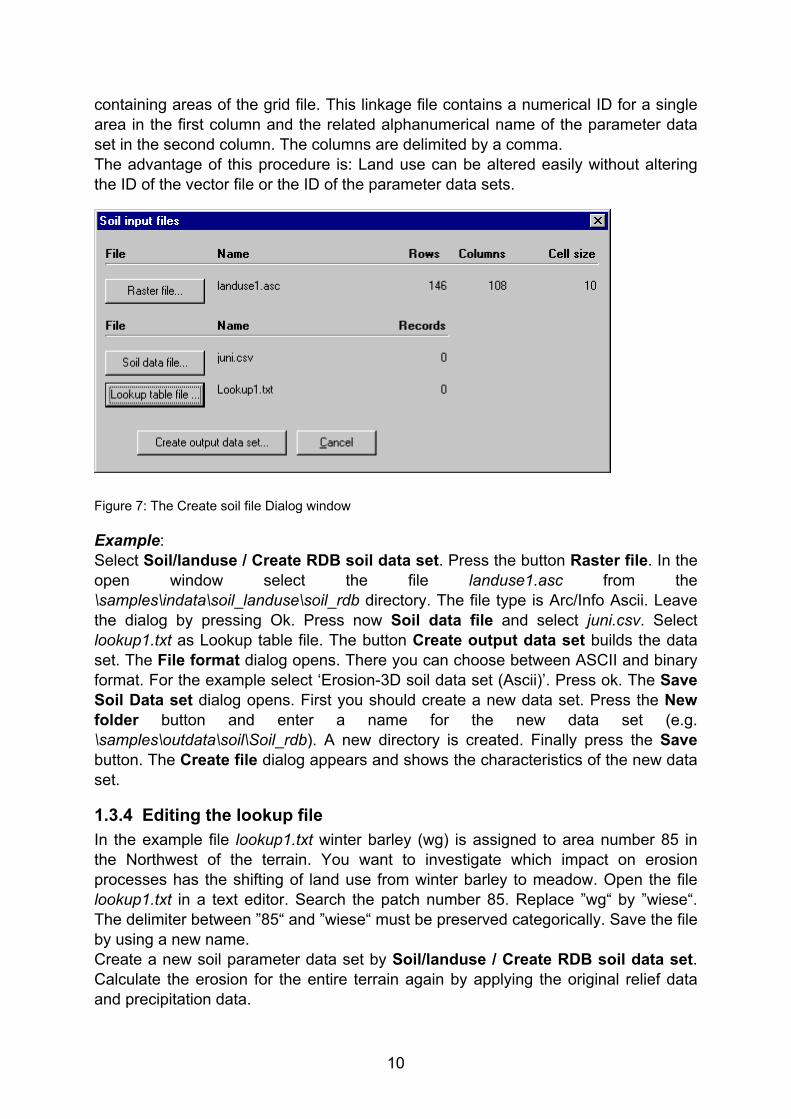
Figure 7: The Create soil file Dialog window
Example: Select Soil/landuse / Create RDB soil data set. Press the button Raster file. In the open window select the file landuse1.asc from the \samples\indata\soil_landuse\soil_rdb directory. The file type is Arc/Info Ascii. Leave the dialog by pressing Ok. Press now Soil data file and select juni.csv. Select lookup1.txt as Lookup table file. The button Create output data set builds the data set. The File format dialog opens. There you can choose between ASCII and binary format. For the example select ‘Erosion-3D soil data set (Ascii)’. Press ok. The Save Soil Data set dialog opens. First you should create a new data set. Press the New folder button and enter a name for the new data set (e.g. \samples\outdata\soil\Soil_rdb). A new directory is created. Finally press the Save button. The Create file dialog appears and shows the characteristics of the new data set.
1.3.4 Editing the lookup file In the example file lookup1.txt winter barley (wg) is assigned to area number 85 in the Northwest of the terrain. You want to investigate which impact on erosion processes has the shifting of land use from winter barley to meadow. Open the file lookup1.txt in a text editor. Search the patch number 85. Replace ”wg“ by ”wiese“. The delimiter between ”85“ and ”wiese“ must be preserved categorically. Save the file by using a new name. Create a new soil parameter data set by Soil/landuse / Create RDB soil data set. Calculate the erosion for the entire terrain again by applying the original relief data and precipitation data.

11
1.3.5 Editing the data file You will realize that the winter barley patch is covered just by 87 %, and not by 100 % at June 29th , because of the bad spring weather conditions. Open the file juni.csv by help of a text editor. Go to row number 7 which ends with ”wg”. Go to the land cover column and change ”100” to ”87”. Please, do not remove blanks. Save the file under a new name. Create a new soil parameter data set by Soil/landuse / Create RDB soil data set. Calculate the erosion for the entire terrain again by applying the original relief data and precipitation data.
1.3.6 Editing the grid file Be careful while editing the grid file. If alterations are needed, better process within the GIS, where you generated this file.
1.4 Simulation The simulation requires the two pre-processed data sets with relief and soil parameters and a precipitation file. The menu item Relief/Hydro | Select relief data set sets the relief parameters data set. Example: Select the relief parameter data set \samples\outdatarelief\relief_t. The other two parameter groups are treated the same way: Choose the Soil/Landuse | Select soil data set command to open the soil parameter data set. The precipitation parameters are selected in the dialog box that is opened with Meteo | Precipitation/Zones. Select the soil parameters data set \samples\outdata\soil\0604 and the precipitation parameters file \samples\indata\meteo\e3d32\refyear\8_7_0604.csv. Note that the relief and soil parameter data sets must be identical with respect to the number of rows and columns and the cell size. The command Simulation | Status gives information about the selected files (Figure 8).

12
Figure 8: Selection of parameter files for the simulation
The command Simulation | Run starts the computation. The File format dialog opens. There you can choose between ASCII and binary format. For the example select ‘Erosion-3D result data set (Ascii)’. Press ok. The Save Result Data set dialog opens. First you should create a new data set. Press the New folder button and enter a name for the new data set (e.g. \samples\result\0604.rs). A new directory is created. Finally press the Save button. Hint: It is a good idea, if you add file extensions to your data set names. This makes it easier to identify the type of data (relief, soil, result) when you want to use the data set on a future occasion. The status bar informs you about the current state of execution. The computation of large study areas and/or small cell sizes can take very long depending on the computer hardware. The computation is finished successfully when the message box ‘Normal termination’ is displayed. Confirm with Ok. The computation results are written automatically into the data set. Thus, a final saving is neither necessary nor possible. Choose Result | View result data set and select the data set that you just created (e.g. \samples\result\0604.rs). If you want to display the sediment budget results in the ‘traditional’ Erosion-3D colors and value classes, choose View | Edit legend. Press the ‘Load’ button and select the file e3d.leg in the program directory and press ‘Apply’: To find out how much sediment has left the watershed, select View | View options, then, on the Flow routing tab sheet, check ‘Show drainage network’. In the tool bar press the (Identify) tool and locate the (blue channel) grid cell in the south west, where the channel leaves the watershed. Select the cell with the center of the cross hair cursor. The Data for selected cell dialog opens. In the upslope data section (channel flow) you will find the value for the sediment volume. As the unit of measurement is [mass/unit width] you need to multiply this

13
value with the cell width (10m), so the total sediment output from the watershed is 2693 kg (= 0.038 t/ha). This sediment mass consists of 90 % of material of the silt size fraction. The same method applies for the runoff which is 29.92 m³. Note: The project can also be run with the project file 0604.par which is located in the \samples directory.

14
1.5 Long term simulation tutorial The long term simulation model performs the simulation of a sequence of events. and / or the reiteration of a sequence or single events.
1.5.1 Example 1: Long term simulation based on a single event A summer rainstorm event is to be simulated for ten times in order to find out about the sediment losses and the change in topography. Example: For the simulation you need a relief (\samples\outdatarelief\relief_t) and a soil (\samples\outdata\soil\0604) data set (Relief/Hydro | Select relief data set and Soil/landuse | Select soil data set) and a rain data file \samples\indata\meteo\e3d32\refyear\8_7_0604.csv (Meteo | Select precipitation/zones). Choose Simulation | Long term simulation. Check the Long term simulation on/off checkbox. Enter the following values in the Long term options tab:
Iterations: 10
Result smooth passes: 0
Result smooth radius: 1
Save result at the end of: each iteration
Modify relief: checked / yes
Relief radius: 10
Relief smooth passes: 0
Relief smooth radius: 1
Save relief at the end of: long term simulation
Close the dialog box with OK and start the simulation with Simulation | Run. Save the data set to \samples\result\longterm\0604l10.rs. In the original relief data set you will find a new data set ‘lts’ which contains the relief parameters of the modified terrain after the simulation. The grid ‘dem_re.asc’ is the modified digital elevation model. The difference in elevation after the simulation is shown in Figure 9. In the result data set you will find:
• lts_sum_sedvol: a grid containing the cumulative sediment volume over all events and iterations.
• lts_ch_sum_sedvol: a grid containing the cumulative sediment volume in channel over all events and iterations.
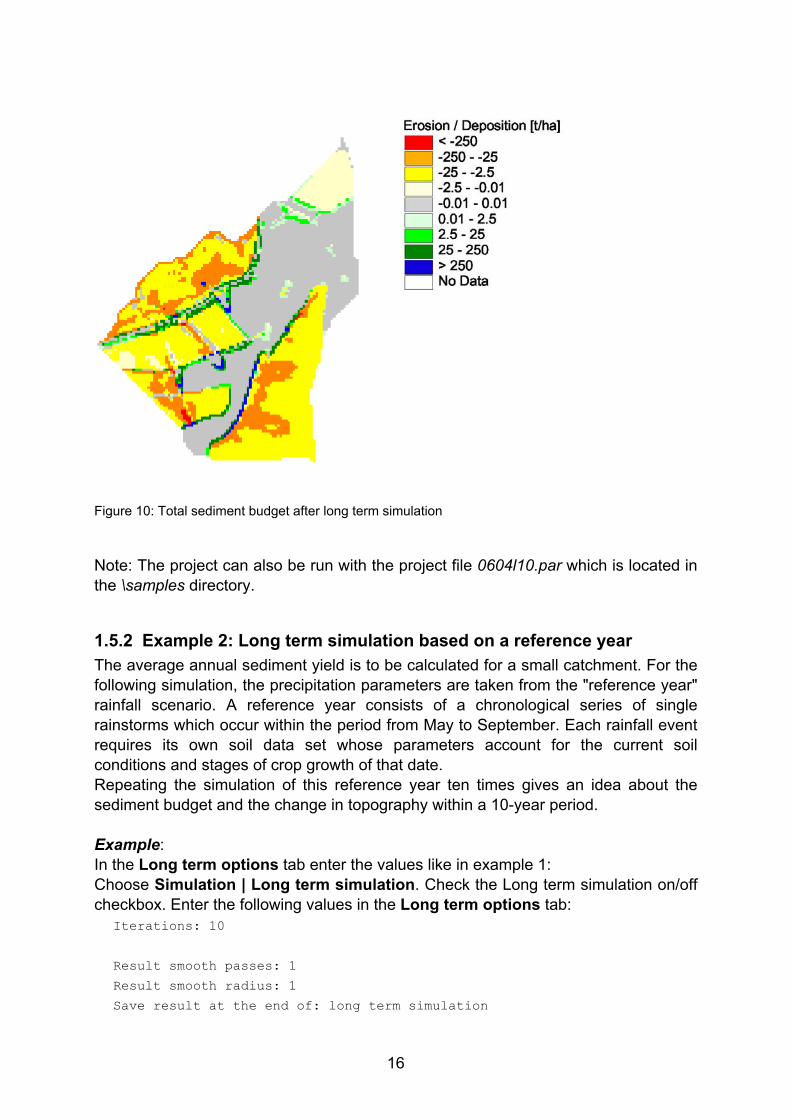
• lts_sedbudget: a grid containing the erosion/deposition values for each grid cell. A grid map of this file is shown in Figure 10.
• a result data set for each iteration (i1..i10) The sediment volume that leaves the catchment through the main drain during the simulation is 27 t which corresponds to 0.377 t/ha. These values can be read at the watershed outlet from the lts_ch_sum_sedvol file (unit of measurement: [kg/m]).

15
Elevation difference [m]-0.1 - -0.001-0.001 - 0.0010.001 - 0.10.1 - 0.20.2 - 0.30.3 - 0.4No Data
Landuse
Figure 9: Changes in elevation after long term simulation
16
Figure 10: Total sediment budget after long term simulation
Note: The project can also be run with the project file 0604l10.par which is located in the \samples directory.
1.5.2 Example 2: Long term simulation based on a reference year The average annual sediment yield is to be calculated for a small catchment. For the following simulation, the precipitation parameters are taken from the "reference year" rainfall scenario. A reference year consists of a chronological series of single rainstorms which occur within the period from May to September. Each rainfall event requires its own soil data set whose parameters account for the current soil conditions and stages of crop growth of that date. Repeating the simulation of this reference year ten times gives an idea about the sediment budget and the change in topography within a 10-year period. Example: In the Long term options tab enter the values like in example 1: Choose Simulation | Long term simulation. Check the Long term simulation on/off checkbox. Enter the following values in the Long term options tab:
Iterations: 10
Result smooth passes: 1
Result smooth radius: 1
Save result at the end of: long term simulation

17
Modify relief: checked / yes
Relief radius: 10
Relief smooth passes: 0
Relief smooth radius: 1
Save relief at the end of: long term simulation
Move to the Sequence files tab. Right click into the Relief/Hydro edit field and choose Add data set. Select the relief data set ‘\samples\outdatarelief\relief_t’. Next go to the first line of the soil and precipitation input grid. Right click into the Soil edit field and choose Add data set / file. Select a soil data set. Start with \samples\outdata\soil\0506 (where 05=month and 06=day). Right click into the Precipitation edit field and choose Add data set / file. Select a corresponding precipitation file. Start with \samples\indata\meteo\e3d32\refyear\0_7_0506.csv). Either press the enter key or the Add event button. Continue with the other 21 dates. If you want to skip this procedure you can press the Load list button on the Sequence files tab sheet and select the file ‘lts_ref22_10.par’. This file contains all the information for the long term simulation dialog. If you choose Save result/relief at the end of each sequence/iteration this operation can occupy a very high amount of hard disk space. Close the dialog box with OK and start the simulation with Simulation | Run. Save the result data set in \samples\result\longterm\lts_ref22_10.rs. In the relief data set you will find a new data set ‘lts’ which contains the relief parameters of the modified terrain after the simulation. The grid ‘dem_re.asc’ is the modified digital elevation model. The difference in elevation after the simulation is shown in Figure 11. In the result data set you will find:
• lts_sum_sedvol: a grid containing the cumulative sediment volume over all events and iterations.
• lts_ch_sum_sedvol: a grid containing the cumulative sediment volume in channel over all events and iterations.
• lts_sedbudget: a grid containing the erosion/deposition values for each grid cell. A grid map of this file is shown in Figure 12.
The result data set itself contains the results for the last event and last iteration. As the rainfall event has a low intensity, no erosion occurs. The sediment volume that leaves the catchment through the main drain during the simulation is 64 t which corresponds to 0.897 t/ha

18
Elevation difference [m]-0.4 - -0.3-0.2 - -0.1-0.1 - -0.001-0.001 - 0.0010.001 - 0.10.1 - 0.20.2 - 0.30.3 - 0.40.4 - 0.50.5 - 0.6No Data
Landuse
Figure 11: Changes in elevation after long term simulation
Figure 12: Total sediment budget after long term simulation
Note: The project can also be run with the project file lts_ref22_10.par which is located in the \samples directory.

19
1.5.2.1 Displaying the modified DEM
You can visualize the change in elevation as follows: First you need to calculate the elevation difference by subtracting the old dem from the new dem: Select File | Grid tools | Grid calculator. Use ‘/relief/lts/dem_re.asc’ for Ingrid1 and ‘/relief/dem_re.asc’ for Ingrid2. Next, set the Outgrid name ‘/dem_diff..asc’, then press Evaluate. The output grid is created. You can display the result with View | View grid file ‘/dem_dif.asc’.
1.5.2.2 Querying the lts result grids
Choose the grid ‘lts_ch_sum_sedvol.asc’ with View | View grid file. Select the Identify tool from the toolbar. Click on the grid cell at column 36 / row 131 with the crosshair cursor. A dialog box appears that shows the grid value for the cell. The grid value for the ‘lts_ch_sum_sedvol.asc’ represents the cumulative sediment volume in channel over all events and iterations in [kg/m]. Multiply this value by the cell size to obtain the total sediment loss in [kg].
20
1.6 Snow model tutorial The snow model is mainly controlled with the snow model dialog box. In order to enter data the snow module must be switched on. Example: The sample data describes a melting event in February and lasts 48 hours. The water equivalent is known for the start of the event. The snow height is known for 3 dates. The table shows that the snow is melted between the morning of the second day and the morning of the third day. Based on the decline of the snow cover during the preceding day and the meteorological data, one can assume that the snow will only last until the middle of the second day.
Date Water equivalent [mm] Snow height [cm] 19.02.1999; 7:40 28 14 20.02.1999; 7:40 - 4 21.02.1999; 7:40 - 0
Table 2: Water equivalent and snow height
A rainfall event starts on 19 February at 2:40 PM. and ends on 20 February at 0:40. The maximum intensity is 0.05 mm/min. The temperature remains always above 0° C, the minimum is on 19 February at 7:40 AM with 0.3°, the maximum is on 20 February at 4:10 PM with 6.2°. In the Meteo | Select Precipitation/zones dialog select the Rain data file n_s1_k1.csv and the Zone grid file meteozn.asc. Now open the snow model dialog with Meteo | Snow model. Choose the following files: Temperature: t_s1_k1.csv Water equivalent: we_s1_k1.csv Snowage: age_s1_k1.csv As no wind data is available, select T-Index method. Set the following values: Transient zone for rain/snow: 1K Temperature limit for rain: 0.6°C Temperature limit snow melt: 0° Degree-day-factor 2.2mm/d/C The evaporation correction should be switched on. The storage capacity of the snow for water need not be set, because it is determined by the model as the snow age is known. Next, change to the exposition tab and switch on the Perform exposition correction check box. Now enter the following values: Scaling factor for temperature correction: 1 (moderate temperature deviation) Control parameter: Radiation + temperature Geographical latitude [°]: 51.3

21
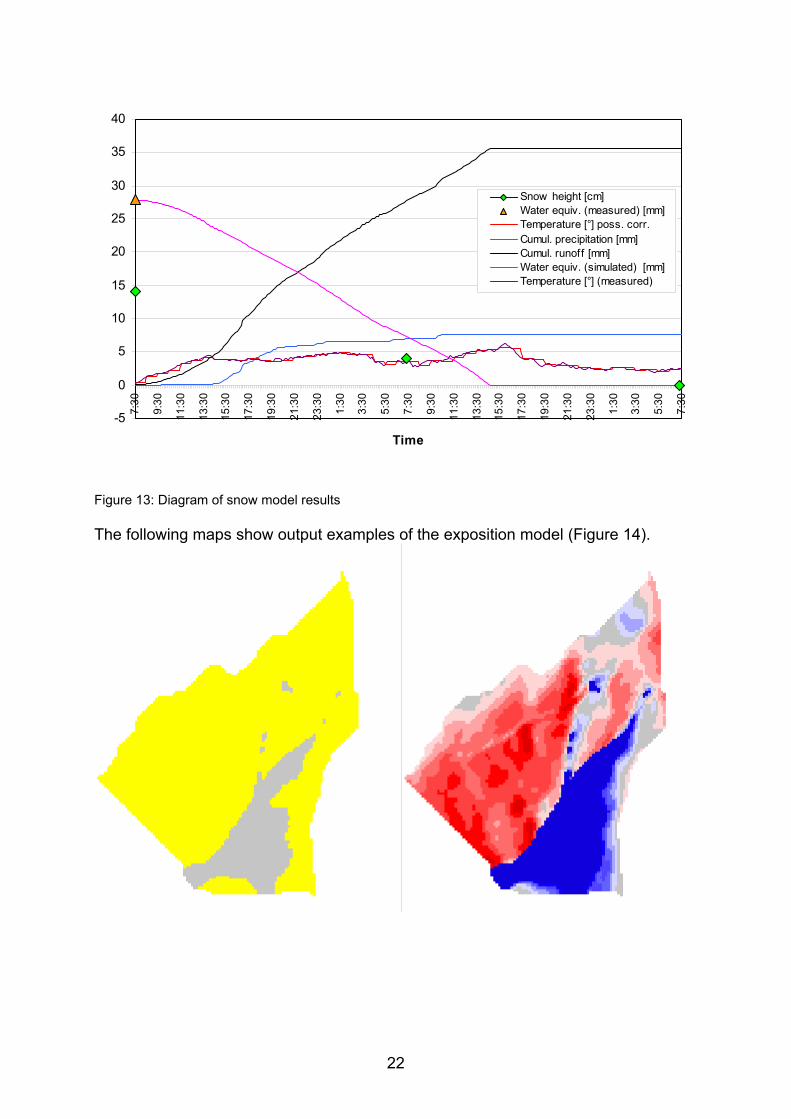
Geographical longitude [°]: 13.1 Center meridian [°]: 15 Time difference [h]: 1 The SSD file is named: ssd_s1_k2.csv. Set the save corrected temperatures box to Every interval, so you can watch the temperature deviations in the watershed. In the Frozen soil tab select Frozen soil and set the Fraction of infiltration to 0. In the Watch cell tab select Watch all parameters (cell) and set Row to 50 and Col to 50. With these settings you will generate a file ‘snow.csv’ that will contain all relevant snow parameters for every time interval of the specified cell. You can save the snow parameters with the Save as… button. Finally close the dialog with Ok. For the simulation you will also need a relief and a soil data set (Relief/Hydro | Select relief data set and Soil/landuse | Select soil data set). Start the simulation with Simulation | Run. When the simulation is finished you will find the file ‘snow.csv’ in the result data set’s directory. You can open this file with Excel © or a text editor. When you examine the course of the simulated water equivalent (the sum of solid and liquid storage) you will find that the water equivalent is still too high on the third day. Therefore, you will have to increase the degree-day-factor in the snow model dialog. Enter a value of 5.5 and re-launch the simulation. The snow result file shows that this time the snow cover is melted between 2 and 3 PM on the second day which corresponds to the previous assumption (Figure 13). The sediment budget for this snow melt event is displayed in Figure 15. Compared to a normal summer rainstorm the sediment loss by erosion is rather high. However, snow melt events in conjunction with a high initial water equivalent, rain and quick rising temperatures are rather rare.
22
-5
0
5
10
15
20
25
30
35
407:
30
9:30
11:3
0
13:3
0
15:3
0
17:3
0
19:3
0
21:3
0
23:3
0
1:30
3:30
5:30
7:30
9:30
11:3
0
13:3
0
15:3
0
17:3
0
19:3
0
21:3
0
23:3
0
1:30
3:30
5:30
7:30
Time
Snow height [cm]Water equiv. (measured) [mm]Temperature [°] poss. corr.Cumul. precipitation [mm]Cumul. runoff [mm]Water equiv. (simulated) [mm]Temperature [°] (measured)
Figure 13: Diagram of snow model results
The following maps show output examples of the exposition model (Figure 14).

23
Shadow (gray) on 19.02.1999 at 7:30 AM for the sample data
Temperature correction on 19.02.1999 at 7:30 AM for the sample data. Red: warmer, blue: colder.
Water equivalent 20.02.1999 at 14:00. Light blue: no snow; dark blue: 4mm water equivalent
Figure 14: Results from the exposition model
Figure 15: Sediment budget for the sample data. The net erosion for the watershed is 5.7 t/ha

24
Note: The project can also be run with the project file s1_snow1prj.par which is located in the \samples directory.

25
1.7 Check dam model tutorial
1.7.1 Preparation of DEM The following example shows one way to create a DEM with check dam information using ESRI’s Arc/Info software. A check dam line was digitised in an external CAD program. The DXF file is imported:
Arc: dxfarc dam1.dxf dam1 40 16
The line topology is created with Arc: build dam1 line
Then ,the line is converted to a grid Arc: linegrid dam1 dam1g dxf-elevation
The altitude information is stored in dxf-elevation. The grid dimensions must be identical to the DEM:
Arc: linegrid dam1 dam1g1 dxf-elevation
Converting arcs from dam1 to grid dam1g1
Cell Size (square cell): 10
Convert the Entire Coverage(Y/N)?: n
Grid Origin (x, y): 4586695,5623395
Grid Size (nrows, ncolumns): 146,108
Enter background value (NODATA | ZERO):
Number of Rows = 146
Number of Columns = 108
The outlet from the impoundment which is a channel element must not be changed. Therefore this cell is assigned the NODATA value.
Grid: display 9999
Grid: mape dam1g
Grid: gridpaint dam1g
Grid: cellvalue dam1g
Grid: cellvalue dam1g 4587080,5623560
The cell containing point (4587080.000,5623560.000) has value 450.000
Grid: gridedit edit dam1g
Floating Point grid
Grid: gridedit fillvalue nodata
Grid: gridedit fillcell 4587080 5623560
Grid: gridedit save
Saving changes for d:\user\delphi3\e3d32\checkdam\dams\dam1g
Floating Point grid
Finally the dam grid is merged with the original DEM:
Grid: dam1grid = merge (dam1g, dem1)
The grid is converted to Asciigrid format with Arc: gridascii dam1grid dam1grid.asc

26
1.7.2 Simulation with Erosion-3D Now move to Erosion-3D and create a relief data set using the new grid ‘dam1grid.asc’. Select Relief/Hydro | Check dam model | Enter pour points. The DEM and the channel network are displayed. Select the pour point tool . Identify the location of the pour point: row 130 (5623560); column 39 (4587080). Only channel elements can be assigned the pour point property. All stage values must be entered in meters above sea level. Enter the following values for ID=1:
Elevation min: 441.86
Elevation max: 450
Infiltration: 0.001
Evaporation: 0.1
Move to the Stage-Discharge data tab and enter the following values:
Stage [m] Discharge [m^3/s] 444.5 0.000 445 0.010 446 0.015 447 0.020 448 0.025 449 0.030 450 0.035
Table 3: Stage-Discharge data
The stage value 444.5 m is the minimum stage below which no discharge takes place. Close the map window (by selecting View | Close graphics or by pressing the tool bar button). The pour point options are written to the relief data set. In the check dam options switch on the model with the Run model checkbox. Also check Save stage/volume list, Save hydro data, Save sediment data. Do not check Save lake cover as this option will use a large amount of disk space. Now, select the check dam relief data set with the menu item Relief/Hydro | Select relief data set. Example: Select the relief parameter data set \samples\outdata\checkdam\cd1.rel. Choose the Soil/Landuse | Select soil data set command to open the soil parameter data set. Select the soil parameters data set \samples\outdata\soil\0604. The precipitation parameters are selected in the dialog box that is opened with Meteo | Precipitation/Zones. Select the precipitation parameters file \samples\indata\meteo\e3d32\cdrain\extr100.csv. This event is a heavy rainstorm with a recurrence interval of 100 years. The total sum is 73.4 mm during two hours, with a maximum intensity of 2.8 mm/min. The command Simulation | Run starts the computation. The file type box lets you choose between ASCII and binary format. For the example select ‘Erosion-3D relief data set (Ascii)’. A Save result data set dialog opens. First you should create a new data set. Press the New folder button and enter a name for the new data set (e.g. checkdam1). A new directory is created. Finally press the Save button.

27
After the calculation is finished you will find two files in the result data set: imp_sed.csv which shows some results for the sediment budget of the impoundment and imp_hyd.csv which shows hydrological parameters. The maximum extent of the impoundment according to the check dam height is shown in Figure 16. The dam is located on the westerly side of the impoundment.
Figure 16: Maximum extent of impoundment according to check dam height
Figure 17 shows the actual maximum extent of the impoundment after the sample rainstorm. The colors indicate the amount of sediment that was deposited in the impoundment.

28
Figure 17: Deposition [kg/m²]in impoundment
0.001
0.01
0.1
1
10
100
1000
10000
0 500 1000 1500 2000 2500 3000 3500 4000 4500
Interval [* 10 min]
Stage [m]Volume [m^3]Imp. Area [m^2]cum. Channel flow (in) [m^3]cum. Channel flow (out) [m^3]Discharge [m^3]
Figure 18: Hydrology of the sample data (with infiltration and evaporation)

29
0.001
0.01
0.1
1
10
100
1000
10000
100000
1000000
0 500 1000 1500 2000 2500 3000 3500 4000 4500
Interval [* 10min]
Deposition Clay [kg]Deposition Silt [kg]Deposition Sand [kg]Sed. Conc. [kg/m^3]Imp. volume [m^3]Sed. volume [kg]
Figure 19: Sedimentation behavior of the impoundment (with infiltration and evaporation)
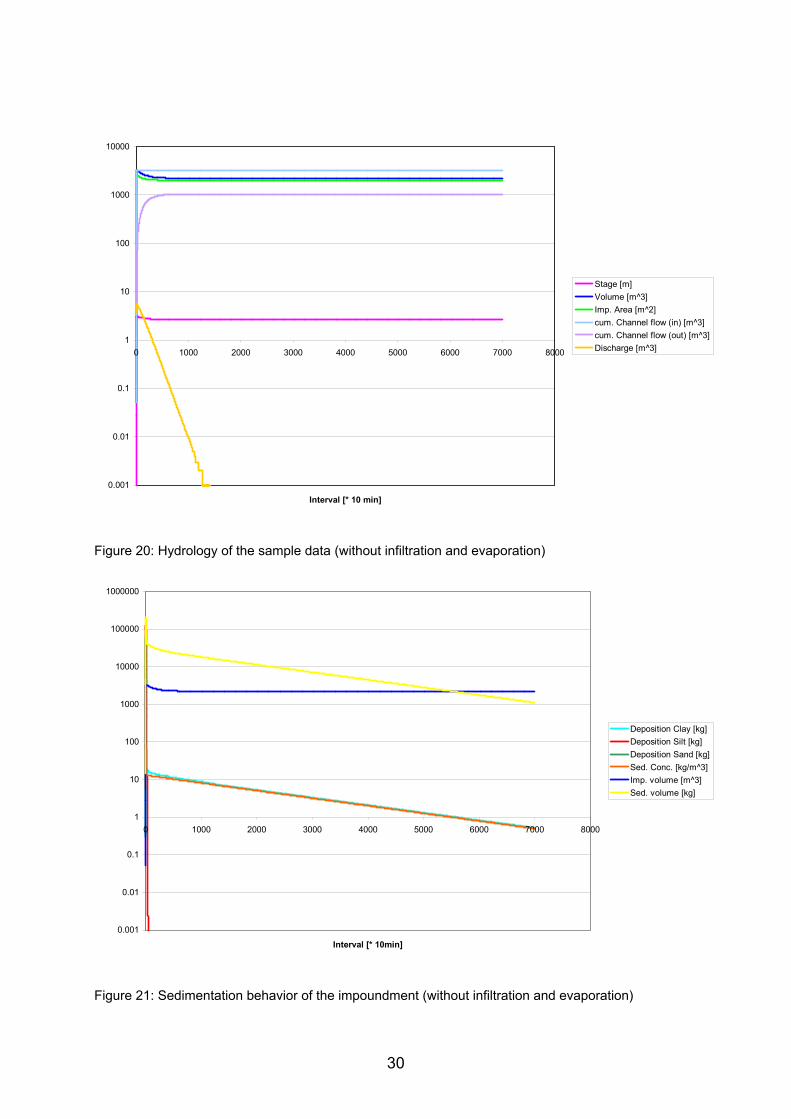
Figure 18 shows that the discharge from the impoundment starts one hour after the begin of the rainstorm, when the impoundment stage is higher than the minimum discharge stage of the outlet structure. The maximum value is 5.6 m³ for the 10min interval. After 45 hours the discharge ceases. After that, the volume is only decreased by infiltration and evaporation. At the end of 28 days there is no water left in the impoundment. Figure 19 shows the sedimentation behavior of the impoundment. The deposition of sand is not visible in the resolution of the diagram, as it takes place as long as inflow occurs during the first hour of sedimentation. The deposition of the silt fraction ends after 7 hours whereas the deposition of the clay particles is stopped when the remaining water is evaporated and infiltrated after 28 days. The sediment concentration increases slowly as the water content of the impoundment decreases. Finally the sediment concentration exceeds the upper limit and the sediment volume is deposited (resulting in a drop of the sediment volume and a rise in the clay deposition). Note: The project can also be run with the project file cd1.par which is located in the \samples directory. Figure 20 and Figure 21 show the same situation, but with the theoretical assumption that no infiltration and evaporation occur. The duration of discharge lasts longer as there are no other water losses. After discharge ceases, the volume, stage and area remain constant. Unlike the first version with evaporation and infiltration, the sediment concentration decreases in time. The settling of the clay particles is undisturbed und is reflected in a smoother deposition curve.
30
0.001
0.01
0.1
1
10
100
1000
10000
0 1000 2000 3000 4000 5000 6000 7000 8000
Interval [* 10 min]
Stage [m]Volume [m^3]Imp. Area [m^2]cum. Channel flow (in) [m^3]cum. Channel flow (out) [m^3]Discharge [m^3]
Figure 20: Hydrology of the sample data (without infiltration and evaporation)
0.001
0.01
0.1
1
10
100
1000
10000
100000
1000000
0 1000 2000 3000 4000 5000 6000 7000 8000
Interval [* 10min]
Deposition Clay [kg]Deposition Silt [kg]Deposition Sand [kg]Sed. Conc. [kg/m^3]Imp. volume [m^3]Sed. volume [kg]
Figure 21: Sedimentation behavior of the impoundment (without infiltration and evaporation)
31
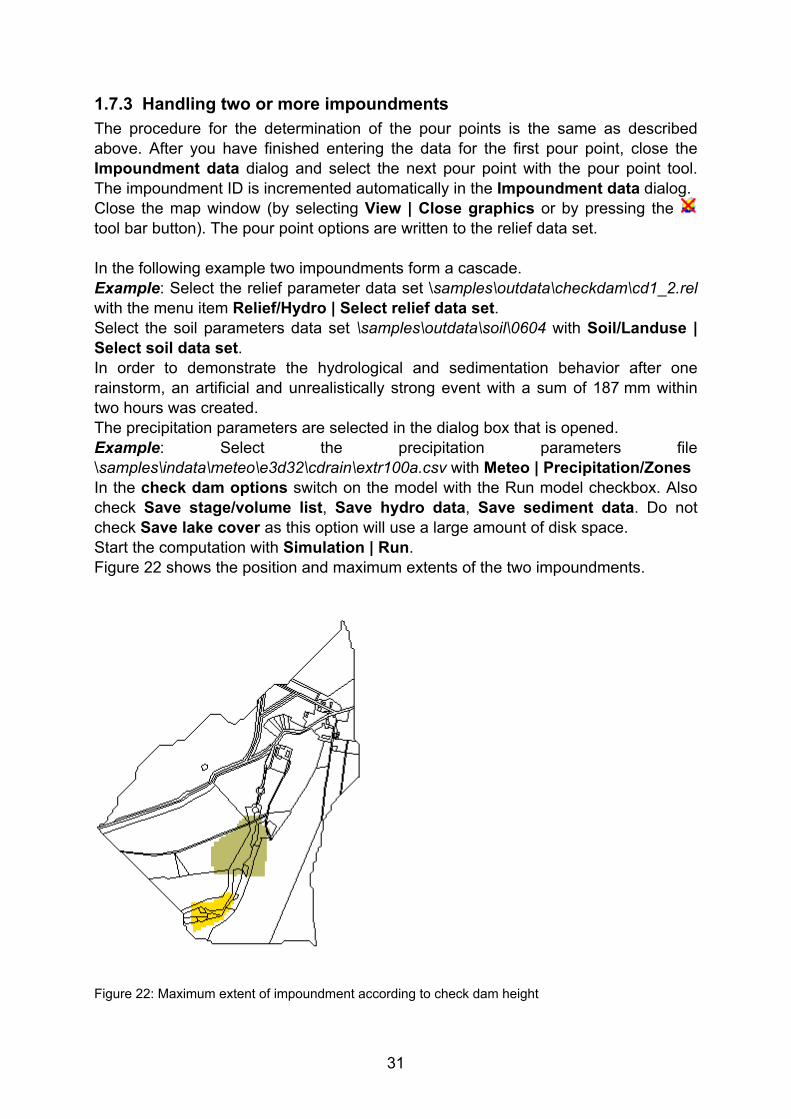
1.7.3 Handling two or more impoundments The procedure for the determination of the pour points is the same as described above. After you have finished entering the data for the first pour point, close the Impoundment data dialog and select the next pour point with the pour point tool. The impoundment ID is incremented automatically in the Impoundment data dialog. Close the map window (by selecting View | Close graphics or by pressing the tool bar button). The pour point options are written to the relief data set. In the following example two impoundments form a cascade. Example: Select the relief parameter data set \samples\outdata\checkdam\cd1_2.rel with the menu item Relief/Hydro | Select relief data set. Select the soil parameters data set \samples\outdata\soil\0604 with Soil/Landuse | Select soil data set. In order to demonstrate the hydrological and sedimentation behavior after one rainstorm, an artificial and unrealistically strong event with a sum of 187 mm within two hours was created. The precipitation parameters are selected in the dialog box that is opened. Example: Select the precipitation parameters file \samples\indata\meteo\e3d32\cdrain\extr100a.csv with Meteo | Precipitation/Zones In the check dam options switch on the model with the Run model checkbox. Also check Save stage/volume list, Save hydro data, Save sediment data. Do not check Save lake cover as this option will use a large amount of disk space. Start the computation with Simulation | Run. Figure 22 shows the position and maximum extents of the two impoundments.
Figure 22: Maximum extent of impoundment according to check dam height

32
Figure 23 shows the actual maximum extent of the impoundment after the sample rainstorm. The colors indicate the amount of sediment that was deposited in the impoundment. The major fraction of the mobilized sediment is captured in the upper impoundment. The lower impoundment receives only a small portion of sediment.
Figure 23: Deposition [kg/m²]in impoundment
Figure 24 and Figure 25 display the hydrology of the two impoundments during the sample rainstorm. The lower impoundment receives input from the discharge of the upper impoundment (input channel flow) and from overland flow input. The stage and volume curves follow the curve of the input channel flow. Due to the low input, the lower impoundment is free from water after about 3000 intervals (21 days). The same goes for the sediments (Figure 26 and Figure 27). The lower impoundment receives a large amount of sediment in a high concentration from the overland flow. That is the reason, why the sediment concentration is quite high from the start.

33
0.001
0.01
0.1
1
10
100
1000
10000
100000
0 500 1000 1500 2000 2500 3000 3500 4000 4500 5000
Interval [* 10 min]
Stage [m]Volume [m^3]Imp. Area [m^2]cum. Channel flow (in) [m^3]cum. Channel flow (out) [m^3]Discharge [m^3]
Figure 24: Hydrology of the sample data (upper impoundment)
0.001
0.01
0.1
1
10
100
1000
10000
0 500 1000 1500 2000 2500 3000 3500 4000 4500 5000
Interval [* 10 min]
Stage [m]Volume [m^3]Imp. Area [m^2]cum. Channel flow (in) [m^3]cum. Channel flow (out) [m^3]Discharge [m^3]
Figure 25: Hydrology of the sample data (lower impoundment)

34
0.001
0.01
0.1
1
10
100
1000
10000
100000
1000000
0 500 1000 1500 2000 2500 3000 3500 4000 4500 5000
Interval [* 10min]
Deposition Clay [kg]Deposition Silt [kg]Deposition Sand [kg]Sed. Conc. [kg/m^3]Imp. volume [m^3]Sed. volume [kg]
Figure 26: Sedimentation behavior of the upper impoundment
0.001
0.01
0.1
1
10
100
1000
10000
100000
0 500 1000 1500 2000 2500 3000 3500 4000 4500 5000
Interval [* 10min]
Deposition Clay [kg]Deposition Silt [kg]Deposition Sand [kg]Sed. Conc. [kg/m^3]Imp. volume [m^3]Sed. volume [kg]
Figure 27: Sedimentation behavior of the lower impoundment
Note: The project can also be run with the project file cd1_2.par which is located in the \samples directory.