ergo frequently asked questions updated november …fallows.ca/dn/ergo faq.pdf · ergo frequently...
TRANSCRIPT

ERGO Frequently Asked Questions Updated May 1, 2018
Copyright © 2018 Creative Express Corporation 1
Table of Contents FMSCAN Data Can I use FMSCAN data with Ergo?
Create dBase IV file How do I create a dBase IV file?
Database File Locations Where do I save my databases?
Other Software & SDR How do I use Ergo with Other Software and SDR?
Using ILGRadio data How do I use ILGRadio data with Ergo?
Changes in Version 4.4 (Effective March 14, 2013)
Installing Ergo How do I install Ergo?
User Folder What is the User Folder and where is it?
Resetting Ergo How do I reset Ergo, and why would I want to?
Removing Ergo How do I remove Ergo from my PC?
Moving Ergo How do I move Ergo to a new/different computer?
Using Databases How do I import HFCC, EIBI and other data files?
64-bit Windows Is Ergo compatible with 64-bit Windows versions?
Windows 10 Can I run Ergo on Windows 10?
Macintosh computer Can I run Ergo on a Mac?
Linux Computer Can I run Ergo on a Linux computer?
Remote Ergo Use Can I control Ergo over a network?
FMSCAN Data How do I import FMSCAN Data into an Ergo Custom Database?
FMSCAN provides a comprehensive list of radio frequencies, schedules and transmitter information
worldwide. Users can extract and download customized data sets from this web site.
It is possible (and not very difficult) to import LW/MW/SW data from FMSCAN into Ergo, but a number
of steps are involved. Rather than put instructions in this FAQ, we have prepared a two page Application
Note describing how to import FMSCAN data into Ergo.
ERGO Frequently Asked Questions Updated May 1, 2018
Copyright © 2018 Creative Express Corporation 2
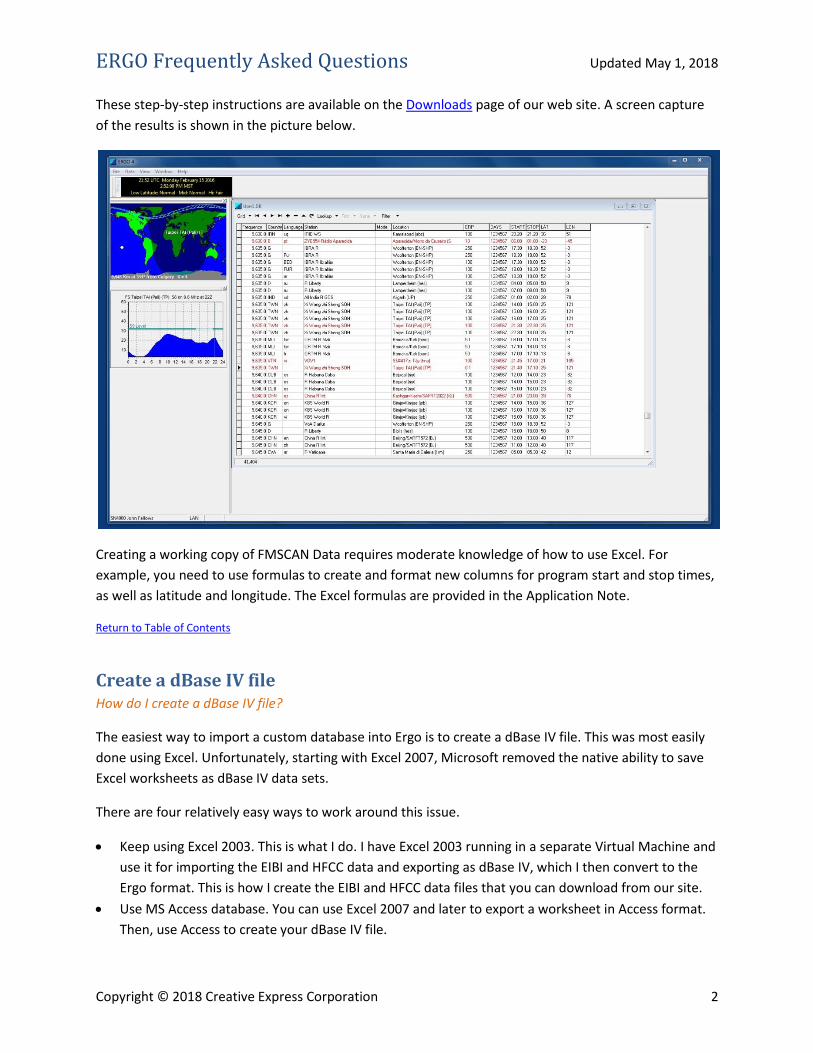
These step-by-step instructions are available on the Downloads page of our web site. A screen capture
of the results is shown in the picture below.
Creating a working copy of FMSCAN Data requires moderate knowledge of how to use Excel. For
example, you need to use formulas to create and format new columns for program start and stop times,
as well as latitude and longitude. The Excel formulas are provided in the Application Note.
Return to Table of Contents
Create a dBase IV file How do I create a dBase IV file?
The easiest way to import a custom database into Ergo is to create a dBase IV file. This was most easily
done using Excel. Unfortunately, starting with Excel 2007, Microsoft removed the native ability to save
Excel worksheets as dBase IV data sets.
There are four relatively easy ways to work around this issue.
Keep using Excel 2003. This is what I do. I have Excel 2003 running in a separate Virtual Machine and
use it for importing the EIBI and HFCC data and exporting as dBase IV, which I then convert to the
Ergo format. This is how I create the EIBI and HFCC data files that you can download from our site.
Use MS Access database. You can use Excel 2007 and later to export a worksheet in Access format.
Then, use Access to create your dBase IV file.

ERGO Frequently Asked Questions Updated May 1, 2018
Copyright © 2018 Creative Express Corporation 3
Install an Excel plug-in. There are various plug-ins for Excel 2007 and later that restore the ability to
save newer Excel worksheets as dBase IV. Try http://exceltodbf.sourceforge.net/ which should
restore the ability of Excel to create dBase files.
Use an online or separate tool to convert. Just do a web search on “convert excel to dbase iv” and
you will find a bunch of them.
Return to Table of Contents
Database File Locations Where do I save my databases?
Each database must be created and kept in its own folder. I recommend keeping a database in folders
located within either Public Documents or My Documents. For example:
C:\Users\Public\Documents\Ergo Data for the main folder
C:\Users\Public\Documents\Ergo Data\EIBIA15 for a specific database folder
Multiple databases cannot be stored in one folder. Databases must not be stored in within Program
Files; they will not work in that protected location.
Backing up your data files is a reasonable precaution. I use a program called SyncBackFree to automate a
regular backup or mirror of my files.
Return to Table of Contents
Support for Other Software and SDR You can now use Ergo 4 to connect with HDSDR, SDR-Radio, Flex Radio, ELAD, Studio 1, SDRuno and
Ham Radio Deluxe. Drivers are available now using Program Update. Information on how to use these
drivers is available below.
We have a video on You Tube which demonstrates this feature.
These new drivers make it possible for you to integrate Ergo with software defined radios (SDR)
supported by SDR-Radio and Flex Radio. This includes a broad range of high end radios, as well as the
RTL-SDR dongles. Here is a list of the radios supported by these software programs as of May 2015 – see
their web sites for more information.
Software Supported Radios
ERGO Frequently Asked Questions Updated May 1, 2018
Copyright © 2018 Creative Express Corporation 4
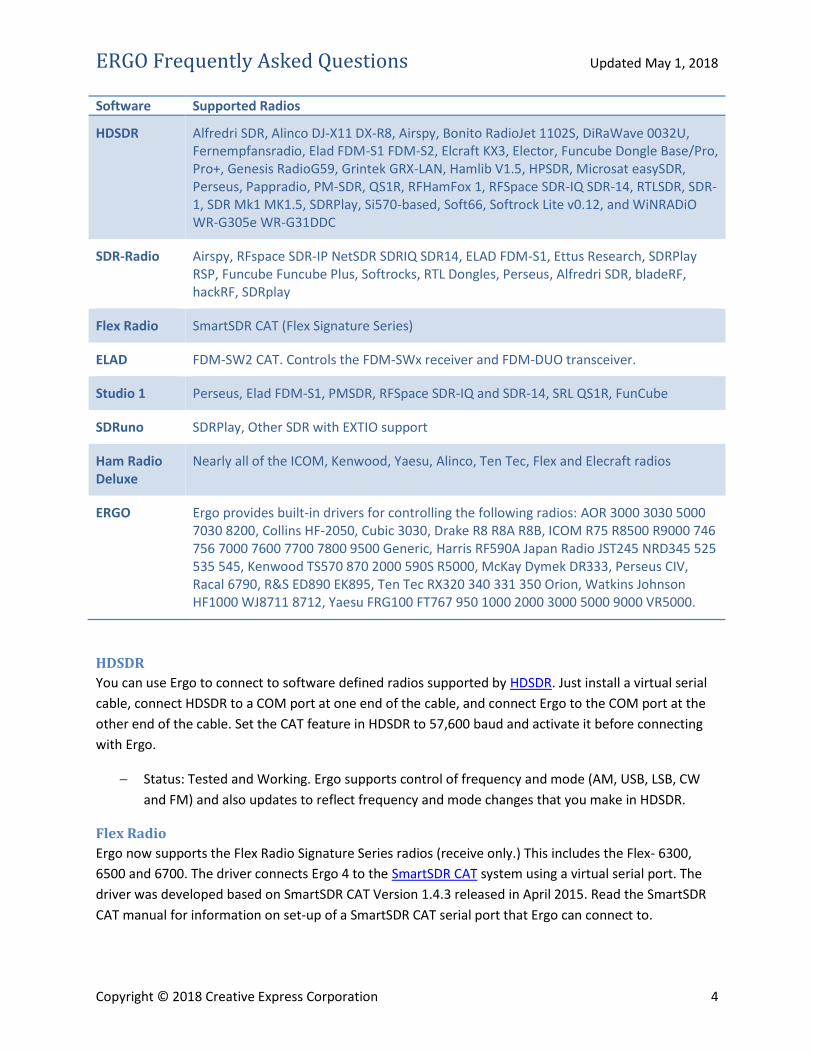
Software Supported Radios
HDSDR Alfredri SDR, Alinco DJ-X11 DX-R8, Airspy, Bonito RadioJet 1102S, DiRaWave 0032U, Fernempfansradio, Elad FDM-S1 FDM-S2, Elcraft KX3, Elector, Funcube Dongle Base/Pro, Pro+, Genesis RadioG59, Grintek GRX-LAN, Hamlib V1.5, HPSDR, Microsat easySDR, Perseus, Pappradio, PM-SDR, QS1R, RFHamFox 1, RFSpace SDR-IQ SDR-14, RTLSDR, SDR-1, SDR Mk1 MK1.5, SDRPlay, Si570-based, Soft66, Softrock Lite v0.12, and WiNRADiO WR-G305e WR-G31DDC
SDR-Radio Airspy, RFspace SDR-IP NetSDR SDRIQ SDR14, ELAD FDM-S1, Ettus Research, SDRPlay RSP, Funcube Funcube Plus, Softrocks, RTL Dongles, Perseus, Alfredri SDR, bladeRF, hackRF, SDRplay
Flex Radio SmartSDR CAT (Flex Signature Series)
ELAD FDM-SW2 CAT. Controls the FDM-SWx receiver and FDM-DUO transceiver.
Studio 1 Perseus, Elad FDM-S1, PMSDR, RFSpace SDR-IQ and SDR-14, SRL QS1R, FunCube
SDRuno SDRPlay, Other SDR with EXTIO support
Ham Radio Deluxe
Nearly all of the ICOM, Kenwood, Yaesu, Alinco, Ten Tec, Flex and Elecraft radios
ERGO Ergo provides built-in drivers for controlling the following radios: AOR 3000 3030 5000 7030 8200, Collins HF-2050, Cubic 3030, Drake R8 R8A R8B, ICOM R75 R8500 R9000 746 756 7000 7600 7700 7800 9500 Generic, Harris RF590A Japan Radio JST245 NRD345 525 535 545, Kenwood TS570 870 2000 590S R5000, McKay Dymek DR333, Perseus CIV, Racal 6790, R&S ED890 EK895, Ten Tec RX320 340 331 350 Orion, Watkins Johnson HF1000 WJ8711 8712, Yaesu FRG100 FT767 950 1000 2000 3000 5000 9000 VR5000.
HDSDR
You can use Ergo to connect to software defined radios supported by HDSDR. Just install a virtual serial
cable, connect HDSDR to a COM port at one end of the cable, and connect Ergo to the COM port at the
other end of the cable. Set the CAT feature in HDSDR to 57,600 baud and activate it before connecting
with Ergo.
Status: Tested and Working. Ergo supports control of frequency and mode (AM, USB, LSB, CW
and FM) and also updates to reflect frequency and mode changes that you make in HDSDR.
Flex Radio
Ergo now supports the Flex Radio Signature Series radios (receive only.) This includes the Flex- 6300,
6500 and 6700. The driver connects Ergo 4 to the SmartSDR CAT system using a virtual serial port. The
driver was developed based on SmartSDR CAT Version 1.4.3 released in April 2015. Read the SmartSDR
CAT manual for information on set-up of a SmartSDR CAT serial port that Ergo can connect to.

ERGO Frequently Asked Questions Updated May 1, 2018
Copyright © 2018 Creative Express Corporation 5
Status: Testing. The Ergo 4 SmartSDR CAT driver has been released for testing, and is awaiting
feedback from users. It is designed to support Ergo integration of Frequency, Mode, Filter, AGC,
NR, NB and S-Meter controls.
ELAD FDM-SW2
Connect Ergo to the FDM-SW2 software defined radio. Ergo controls frequency and mode, and follows
changes made in the SDR.
Status. Tested. Ergo driver connects at 38400 baud which must be selected in SW2 software
before connecting. The Yaesu protocol implemented by the CAT only supports frequency
resolution down to 10 Hz.
Studio 1
Connect Ergo to the Studio 1 software defined radio. Ergo controls frequency and mode, and follows
changes made in the SDR.
Status: Tested. Supports basic Kenwood CAT commands. Still need to add commands for
advanced modes.
SDRuno
Connect Ergo to the SDRuno software defined radio. Use the Studio 1 driver. You need a virtual serial
cable connection. Set the SDRuno baud rate to 4800 in the Settings menu when you set up the SDRuno
end of the connection.
Status: Tested. Supports all the basic Kenwood CAT commands implemented by SDRuno. These
are frequency, mode, VFO, volume, squelch and S-meter reading.
SDR-Radio
Ergo now supports the software defined radios interfaced by SDR-Radio, version 2.3. Set-up is simple.
First create a virtual serial cable using a null-modem emulator such as com0com. In the SDR-Radio Tools
– Program Options – Serial Ports configuration page, you connect SDR-Radio to one end of this cable
(one of the pair of virtual serial ports) at 57,600 baud. Then, you set up the SDR-Radio driver in Ergo and
connect to the other end of this cable (the other of the pair of the virtual serial ports.)
Status: Tested and Working with some limitations. You can use Ergo to connect to SDR-Radio
and control VFO, Frequency, Mode. I will shortly add Filtering if requested. However, other
features of the CAT interface have not yet been fully implemented by SDR-Radio; until this is
done, Ergo will read Volume and AGC settings (but cannot change them), cannot read or write
the Mute function, and does not receive any valid indication of signal strength.
Ham Radio Deluxe
You can now use your copy of Ham Radio Deluxe (HRD) to connect Ergo to the roughly 100 radios
supported by HRD. The connection uses the Ham Radio Deluxe CAT capabilities and a virtual serial cable.
You can set up a virtual serial cable within HRD, or use your own null-modem emulator. In HRD, select
Tools – Hardware – Third Party Serial Port and connect to one end of the virtual cable serial port at
ERGO Frequently Asked Questions Updated May 1, 2018
Copyright © 2018 Creative Express Corporation 6
9600 baud. Make sure to also “Enable” this feature, and connect to the virtual cable automatically when
HRD starts. Then, you set up the HRD driver in Ergo and connect to the other end of this cable (the other
of the pair of virtual serial ports.)
Status: Tested and Working. You can use Ergo to connect to Ham Radio Deluxe and control
receiver Frequency and Mode, as well as read Signal Strength, although I still need to calibrate
the S-Meter properly.
Microtelecom Perseus
Since 2008, Ergo has contained a driver to connect with the Perseus software using CI-V commands over
a virtual audio cable. This is described in the Ergo Help File.
Return to Table of Contents
Using ILGRadio Data with Ergo If you subscribe to ILGRadio, you can easily use this database with Ergo. The Ergo Data Support Interface
will import your copy of ILGRadio into the format needed by Ergo.
Ergo data files are installed as customized Paradox (*.db) files, which also contain special indexes and
fields to enable tuning your receivers and conducting propagation assessment based on location data if
contained in the station record. The Ergo package includes a companion program, the Data Support
Interface DSI (or ergo4dsi.exe) to create or import databases and logs. DSI may be run using the File |
New menu item in Ergo, or directly from the Windows Start menu.
1. Run Program Update to make sure that your version of ERGO4DSI.EXE is 4.4.1.2 or greater. (This
updated version is needed to handle the large size of and format changes in the ILGRadio database.)
2. Extract your ILGRadio data (DBF file) into a folder, if you have not already done so.
3. Run ERGO4DSI from the Windows Start menu, or from the File | New menu item in Ergo.
4. Select Import ILGRadio Data from the options in ERGO4DSI. Complete the following two boxes.
ILGRadio Source File: Select the original ILGRadio data file (e.g. ILGSDATA.DBF)
ILGRadio Working Database: Create the folder and name of the file where you will save the
Paradox version of ILGRadio data for use with Ergo. Each Ergo database must be in its own
(separate) folder.
5. Press Next. The screen will show you the progress of the import. Then, when done, press Finish. This
will close DSI.
6. Run Ergo, and use File | Open menu item to open the imported data in Ergo.
Please note that the Ergo working copy of ILGRadio is read-only and cannot be modified.
Return to Table of Contents
ERGO Frequently Asked Questions Updated May 1, 2018
Copyright © 2018 Creative Express Corporation 7
Changes in Version 4.4 Effective March 14, 2013 Ergo has been updated to provide improved compatibility with newer versions
of Windows. This note describes the changes taking effect with program file versions equal or greater
than 4.4.0.0 (both exe programs and DLL files.)
Description of Changes Serial Ports. Previously, Ergo raised an error when it could not find a serial port on the computer.
This problem has been corrected. Ergo will now run properly in the absence of serial ports, but of
course will not be able to control a receiver without a serial port connection.
Most new laptop and many desktop computers do not contain Serial Ports. Previously, when a
User started Ergo on a computer without a serial port, there was an error.
Users with USB-serial port adaptors should configure these adaptors before running Ergo, so
that serial ports are available to connect to a receiver.
Operating Systems. All newer versions of Windows (Vista, 7 and 8) have stronger protection
features, some of which cause issues for older (legacy) programs such as Ergo. To minimize the
effect of these issues, the following changes have been made.
Administrator Privileges. All Ergo 4 programs are now configured to automatically “Run as
Administrator”, and require the User to have an Administrator Account on the Windows
computer.
“User Folder”. Ergo stores configuration and other information in a “User Folder”, which was
located in the Windows Programs Folder where Ergo was installed. For newer versions of
Windows, this “User Folder” has been moved to C:\ProgramData\Ergo4User. By default, this is
a hidden folder.
Windows XP users should not be affected by these changes. The “User Folder” remains at its old
location of C:\Program Files\CreativeExpress\User. Administrator Privileges are not required.
Installation. There is a new Ergo 4 Installation Program which also requires Administrator Privileges
to run. The Installer is downloadable from the Ergo web site in ergo4.zip. After downloading,
extract the files and run Setup.exe.
Resetting Ergo. The procedure for resetting Ergo has been changed to using menu items in the Start
Menu.
Impact on Existing Ergo Installations Effective March 14, 2013 running Program Update (ergo4update.exe) will automatically obtain all of the
new program files and install them. When the updated Ergo 4 is run on newer versions of Windows, it
will silently relocate the contents of the old “User Folder” to the new location. For the time being, the
contents of the old “User Folder” will not be deleted.
ERGO Frequently Asked Questions Updated May 1, 2018
Copyright © 2018 Creative Express Corporation 8
Impact on New Installations In most cases, there will be none. However, the Installer no longer supports really old versions of
Windows (prior to Windows 2000.) This should not be an issue; as of 2013, versions of Windows older
than Windows 2000 comprise less than 0.07% of Windows installations. The new Installation package
and Ergo programs have been tested on Windows 7, Windows XP, Windows Vista and Windows 8.
These operating systems comprise about 50%, 42%, 6% and 2% of Windows OS in use as of January
2013.
Other Technical Notes
Ergo automatically relocates the Paradox configuration file PDOXSRS.NET to
C:\Users\Public\Documents (Shared Folders in XP)
Ergo automatically locates a default folder for storing Audio Recordings to
C:\Users\Public\Documents\Ergo_Audio (Shared Folders in XP)
Database folders should not be located in the Ergo Program Folder. The recommended location is
either My Documents or Public Documents. Each database should be in its own separate folder.
The Ergo Installer no longer supports Windows Versions older than XP.
On versions of Windows newer than XP, two Ergo programs require “Administrator Privileges” in
order to run properly. These are ergo4update.exe and ergo4net.exe. For this reason, all Ergo
programs are now configured to automatically “Run As Administrator”, as described above.
Return to Table of Contents
Installing Ergo How do I install Ergo?
Ergo may be installed from our web site. The installation package is contained in a compressed archive
called ergo4.zip and the procedure for installing is as follows:
1. Download the installation package (ergo4.zip) from the Downloads page of our web site, and
save it on your computer.
2. Extract all files into a temporary folder
3. Run (double click) SETUP.EXE and ERGO will be installed automatically.
By default, ERGO is installed into C:\Program Files\CreativeExpress\Ergo4.
We no longer provide a CD ROM distribution of the installation package, unless Ergo is purchased
through Universal Radio. Users may archive the installation package onto a DVD or CD ROM.
Please note that newer versions of Ergo program files may become available from time to time and
these are downloaded and installed using Program Update within Ergo. You do not need to do a fresh
installation when these updates occur, just run Program Update.
Return to Table of Contents
ERGO Frequently Asked Questions Updated May 1, 2018
Copyright © 2018 Creative Express Corporation 9
User Folder What and where is the “User Folder”?
Ergo saves configuration and other information in either the Windows System Registry or the User
Folder. This configuration and other information are saved so that Ergo will “remember” previously
configured information. The information saved in the “User Folder” includes: configuration information
for your radios and for Ergo itself, as well as any changes you make to your custom locations data, and
any recording or scan configurations.
As of Version 4.4 (March 14, 2013), the “User Folder” is now called “Ergo4User” and is located as
follows:
C:\ProgramData\Ergo4User in Windows Vista/7/8/10
C:\Documents and Settings\All Users\Application Data\Ergo4User in Windows XP
If you have created a number of customized recording or scanning templates and/or modified you user
locations file, you may want to make a backup copy of this information. Note: These folders are
normally hidden folders.
Return to Table of Contents
Resetting Ergo Why would I want to reset Ergo, and how do I do a reset?
On rare occasions, program configuration data may become garbled causing Ergo to misbehave. Also, if
you have having trouble doing a radio configuration and want a “fresh start” you may want to reset.
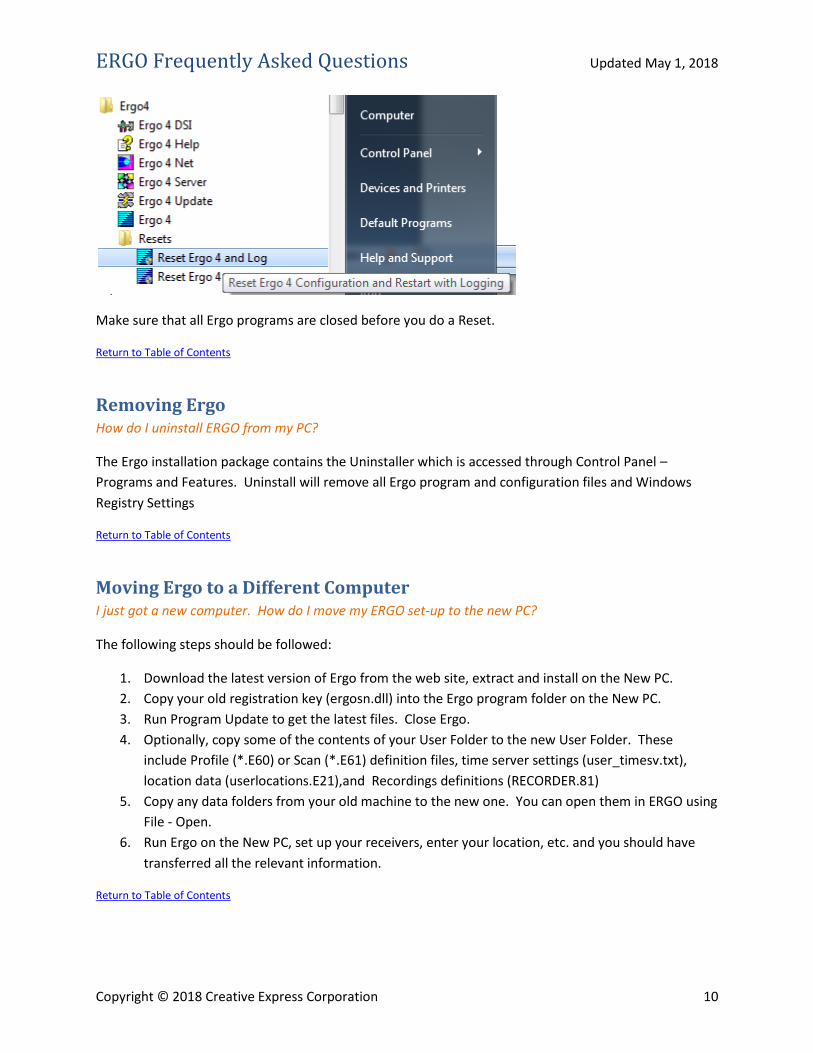
As of Version 4.4 (March 14, 2013), the Start Menu item for Ergo contains a folder called “Resets” which
contains two choices:
Reset Ergo 4 – deletes all Ergo data in the User Folder and Windows System Registry and then starts
Ergo. This provides the equivalent to a new installation.
Reset Ergo 4 and Log – same as above, but also starts Ergo with an open “Program Activities
Window”.
ERGO Frequently Asked Questions Updated May 1, 2018
Copyright © 2018 Creative Express Corporation 10
Make sure that all Ergo programs are closed before you do a Reset.
Return to Table of Contents
Removing Ergo How do I uninstall ERGO from my PC?
The Ergo installation package contains the Uninstaller which is accessed through Control Panel –
Programs and Features. Uninstall will remove all Ergo program and configuration files and Windows
Registry Settings
Return to Table of Contents
Moving Ergo to a Different Computer I just got a new computer. How do I move my ERGO set-up to the new PC?
The following steps should be followed:
1. Download the latest version of Ergo from the web site, extract and install on the New PC.
2. Copy your old registration key (ergosn.dll) into the Ergo program folder on the New PC.
3. Run Program Update to get the latest files. Close Ergo.
4. Optionally, copy some of the contents of your User Folder to the new User Folder. These
include Profile (*.E60) or Scan (*.E61) definition files, time server settings (user_timesv.txt),
location data (userlocations.E21),and Recordings definitions (RECORDER.81)
5. Copy any data folders from your old machine to the new one. You can open them in ERGO using
File - Open.
6. Run Ergo on the New PC, set up your receivers, enter your location, etc. and you should have
transferred all the relevant information.
Return to Table of Contents

ERGO Frequently Asked Questions Updated May 1, 2018
Copyright © 2018 Creative Express Corporation 11
Importing Data
HFCC and EIBI Data Are there any databases that I can use with ERGO?
Yes, there are two public databases – HFCC and EIBI. You can download these from our web site. The
versions on our web site have been customized to integrate into ERGO. The sources of these databases
are HFCC http://hfcc.org/data and EIBI http://www.eibi.de.vu/
Please make sure that each database is saved in its own unique folder.
The process for installing either HFCC or EIBI is as follows.
1. Create a new folder on your PC with a unique name, such as “HFCC B08”.
2. Download the data archive (ZIP file) from our Downloads page.
3. Extract all the files from this archive into your new folder.
4. From ERGO, use the File-Open menu item to open the database.
Custom Data Where do I get more information on how to create and use custom databases?
Download the ERGO Data Manual our Downloads page.
Other Issues I used Excel to create a dBase file, and when I imported it into Ergo, the fractional parts of frequencies
disappeared. What happened?
Before you save the Excel data into a dBase file, format entire the Frequency column to show decimals,
using the formatting commands in Excel. If you do not do this, Excel seems to truncate the data to
integers, for some unknown reason. Formatting the Frequency column forces proper retention of the
fractional parts of frequencies in kHz.
Return to Table of Contents
How do I import CSV files into ERGO? How do I import CSV files into ERGO now that new versions of Excel do not support dBase or Paradox
files?
ERGODSI “Import Custom Data” contains a wizard to help you import a dBase or Paradox database into
the format for ERGO databases. Previously, we recommended using Microsoft Excel to import CSV
(comma separated values) files and then save them in dBase or Paradox format.
This still works fine with Excel 2003. Unfortunately, Excel 2007 no longer supports saving in dBase or
Paradox formats.
Here are some alternative approaches if you longer have Excel 2003.
ERGO Frequently Asked Questions Updated May 1, 2018
Copyright © 2018 Creative Express Corporation 12
Use the Calc program in Open Office, which still supports dBase and Paradox formats.
(http://www.openoffice.org/ )
Obtain a third party add-in for Excel 2007 which supports dBase and Paradox formats. Several of
these are available as shareware.
Use a freeware program such as Exportizer, which will read in CSV and then export dBase or
Paradox. (http://www.vlsoftware.net/exportizer/ )
Return to Table of Contents
64-bit Windows Is Ergo compatible with 64-bit Windows?
Yes. The only difference you should notice is that the program folder is located in
C:\Program Files (x86). All Ergo programs and radio drivers are 32-bit files, and will run properly within
64-bit versions of Windows.
Return to Table of Contents
Running Ergo on Windows 10 Can I run on Windows10 with the new user interface?
Yes, Ergo runs fine on Windows 10.
Installation and program operation are the same as with Windows 7. The program windows look slightly
different due to the difference in Windows 10 design.
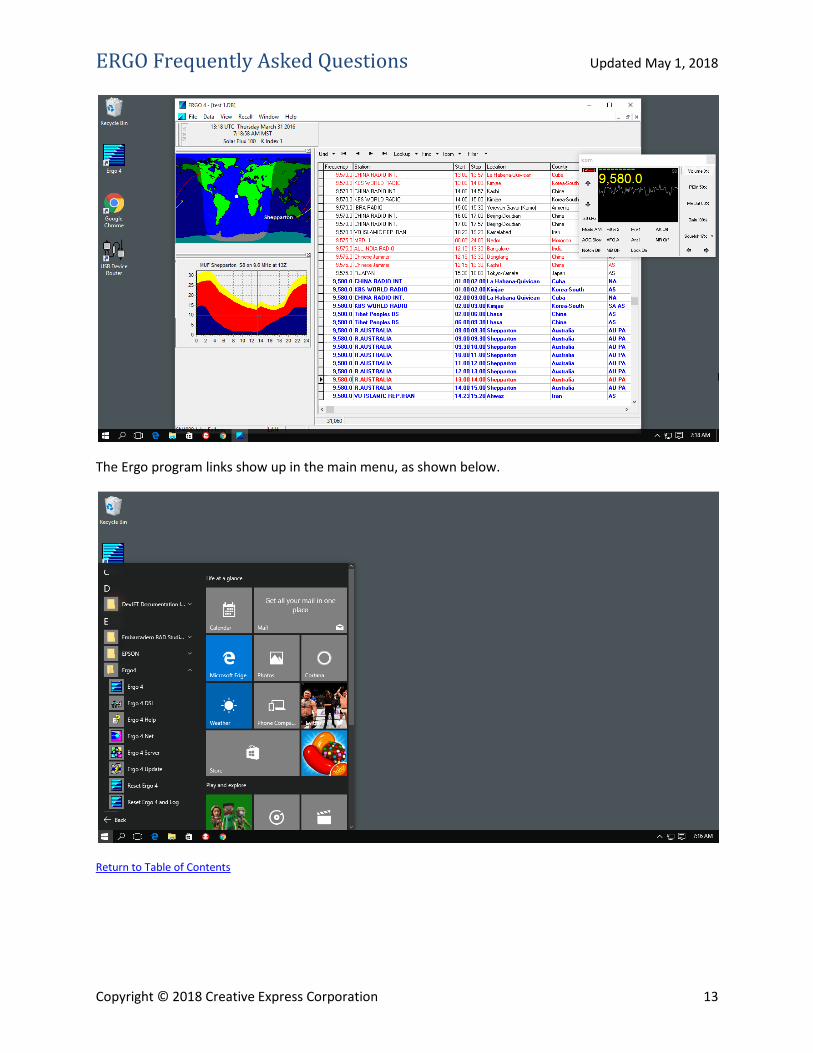
ERGO Frequently Asked Questions Updated May 1, 2018
Copyright © 2018 Creative Express Corporation 13
The Ergo program links show up in the main menu, as shown below.
Return to Table of Contents

ERGO Frequently Asked Questions Updated May 1, 2018
Copyright © 2018 Creative Express Corporation 14
Running ERGO on a Macintosh Computer Can I run ERGO on my Macintosh?
Yes, although it was not designed as a Mac program, many users have successfully reported being able
to do so. The following information was received from a user in 2001.
I am a Mac user and am running Ergo on PC emulation software. Also I had not seen the Mac
info in the FAQ section on your website when I first tried the demo. Even if I had, I still would
have had a problem getting things to work. My comment about that now is that it is outdated,
but the new information is better.
SoftWindows is no longer available having been discontinued at the end of last year. However,
Virtual PC is available and version 4.0 works fine with Ergo on a Mac. The other thing is that
Keyspan makes a USB to serial adapter which works directly on a Mac (or PC) without having to
do the custom modification discussed on your website for the Mac Twin Serial Adapter (which
uses Mac's rs422 wiring on Din connectors).
The Keyspan "High Speed Serial Adapter" (p/n: USA-19W) is a USB to DB9 serial connector,
wired in the most common rs232 fashion, so it works with either Mac or PC (although Keyspan
recommends that you use only the Mac driver when running Virtual PC on a Mac, and not
installing the Windows driver at all). With R8B, you can then just use a straight through wired
m/f DB9 rs232 cable.
The only problem I've noticed in using this setup is that ERGO hangs up sometimes if the R8B is
already turned on when Ergo is launched (if it's off, Ergo turns it on automatically).
This information was received in January 2002:
Good news! I replaced my KeySpan USB-to-Mac serial adapter with the new KeySpan High-
Speed DB9 USB Serial Adapter, and now Ergo4 successfully connects to the R8B under VirtualPC
on the Mac.
Although the KeySpan High-Speed Serial Adapter comes with drivers for both the Mac and
Windows, I found that it really isn't necessary to load the Windows drivers; all that is required is
to tell VirtualPC to use the Keyspan adapter for COM1 (or COM2), and set Ergo to use that port.
Also, make sure that
in the VirtualPC COM port settings, "Non-modem device" is checked.
This information replaced that provided in January, 2001, which is now outdated, but retained below for
background information.
Hi, just thought you'd like to know that I just got ERGO running on my Mac PowerBook, and
controlling my Drake R8B. I normally use two laptops, one a Mac PowerBook, the other a Dell
Inspiron, but often I don't like to lug both back home. So I decided to try to get ERGO running on
the PowerBook.

ERGO Frequently Asked Questions Updated May 1, 2018
Copyright © 2018 Creative Express Corporation 15
Here's how it works: First, I installed FWB's SoftWindows, which is a really good PC emulator,
whose speed is quite acceptable for processor-light tasks. Out of one of the Mac's USB ports, I
have a Keyspan
USB-to-serial adapter.
The trickiest part was building a custom cable, since the Mac's RS-422 spec is different from RS-
232C. I used the following pin assignments (I won't go into a discussion of them here)
Mac DIN-8 RS-232C
========= =======
1 6
-----------------
2 8
-----------------
3 3
-----------------
4 and 8 5
-----------------
5 2
-----------------
6 and 7 none
-----------------
shield 9(GND)
-----------------
Following FWB's recommendation, instead of constructing a special serial cable to go directly
from the R8B to the Mac, I made up an "adapter" cable, which plugs into the female end of a
standard PC RS232C serial cable. I purchased from MacWarehouse a Male-to-Female DIN8 serial
EXTENSION cable (don't just get a modem cable, since some of the wires are missing). I chopped
off the female end of this cable, and replaced it with a male DB9, using the pin assignments
specified.
Return to Table of Contents
Running Ergo on Linux The following information was provided by an Ergo user in 2009.
Can I run ERGO on a Linux distribution?
The answer is most likely yes. ERGO4 was installed and running reliability with Ubuntu 9.10 and Wine
1.1.29 to control a Ten-Tec RX-320D receiver. This same procedure should work with other Linux
distributions that support Wine 1.1 and later. The current version of Wine does not create and
enumerate serial and parallel ports which is why this procedure was created. Future versions of Wine
may solve this problem which will negate the need to do this procedure.
ERGO Frequently Asked Questions Updated May 1, 2018
Copyright © 2018 Creative Express Corporation 16
If Wine is not already installed, install Wine using the package manager tool. The command for Ubuntu
is the following:
sudo apt-get install wine
For some reason Wine does not scan and create any serial or parallel ports when it installs so they have
to be created manually. Serial and parallel port configuration is very similar to drive configuration -
simply create a symbolic link in ~/.wine/dosdevices with the name of the device. Windows serial
ports follow a naming convention of the word "com" followed by a number, such as com1, com2, etc.
Create your serial ports running the following commands in the ~/.wine/dosdevices directory:
ln -s /dev/ttyS0 com1
ln -s /dev/ttyS2 com2
Add as many or few serial ports as may be needed. In addition, Wine does not enumerate those ports in
the Windows Registry during installation because Windows enumerates its hardware each time it boots.
That means that the entries in HKEY_LOCAL_MACHINE are not persistent. Every time an application
wants to use the ports they will need to be added to the Registry. The developer of Wine decided not to
scan the hardware each time an application runs to reduce load time.
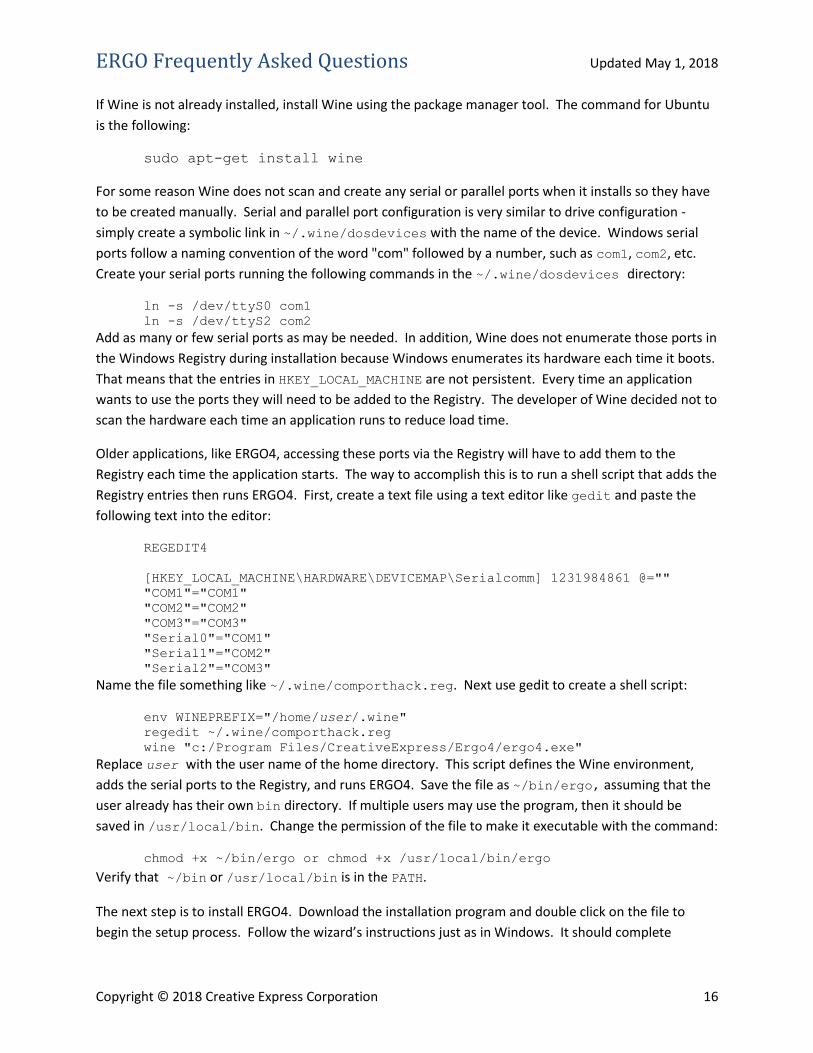
Older applications, like ERGO4, accessing these ports via the Registry will have to add them to the
Registry each time the application starts. The way to accomplish this is to run a shell script that adds the
Registry entries then runs ERGO4. First, create a text file using a text editor like gedit and paste the
following text into the editor:
REGEDIT4
[HKEY_LOCAL_MACHINE\HARDWARE\DEVICEMAP\Serialcomm] 1231984861 @=""
"COM1"="COM1"
"COM2"="COM2"
"COM3"="COM3"
"Serial0"="COM1"
"Serial1"="COM2"
"Serial2"="COM3"
Name the file something like ~/.wine/comporthack.reg. Next use gedit to create a shell script:
env WINEPREFIX="/home/user/.wine"
regedit ~/.wine/comporthack.reg
wine "c:/Program Files/CreativeExpress/Ergo4/ergo4.exe"
Replace user with the user name of the home directory. This script defines the Wine environment,
adds the serial ports to the Registry, and runs ERGO4. Save the file as ~/bin/ergo, assuming that the
user already has their own bin directory. If multiple users may use the program, then it should be
saved in /usr/local/bin. Change the permission of the file to make it executable with the command:
chmod +x ~/bin/ergo or chmod +x /usr/local/bin/ergo
Verify that ~/bin or /usr/local/bin is in the PATH.
The next step is to install ERGO4. Download the installation program and double click on the file to
begin the setup process. Follow the wizard’s instructions just as in Windows. It should complete
ERGO Frequently Asked Questions Updated May 1, 2018
Copyright © 2018 Creative Express Corporation 17
without any errors. Finally, run ERGO4 either from the command line with the ergo command or by
creating a launcher and using the ergo command from above. Do not use the launcher that the setup
program creates because ERGO4 will not know that it has serial ports. ERGO4 should open up in a
window just like on a Windows machine. Follow the setup instructions to add the receiver and other
configuration options. ERGO will communicate with the receiver through the serial port to control the
receiver. All of the other programs work as well to check for updates or refresh the propagation or
change the database format.
Return to Table of Contents
Ergo Remoting Guide (Advanced) Can I control my radios over a network?
Yes. The following guide explains how and updates information from the help file.
Introduction ERGO4 has provided the capability for remote operation since it was originally released. Recently,
interest in remote operation has grown among shortwave listeners and hams, for several reasons.
Increased use of home networks. Many homes now have several computers and a high speed
wireless network.
Increased availability of broadband internet connectivity. Many homes and business locations now
have an always-on high speed internet connection.
Increased restrictions on external antennas in many urban locations. Many radio hobbyists find it
harder to erect towers and significant antennas at their homes, but may have access to a remote
location without such restrictions.
Putting these three factors together, and it is easier than ever to “share a radio shack” across a LAN
(local area network within the home or office) or across the Internet.
ERGO Frequently Asked Questions Updated May 1, 2018
Copyright © 2018 Creative Express Corporation 18
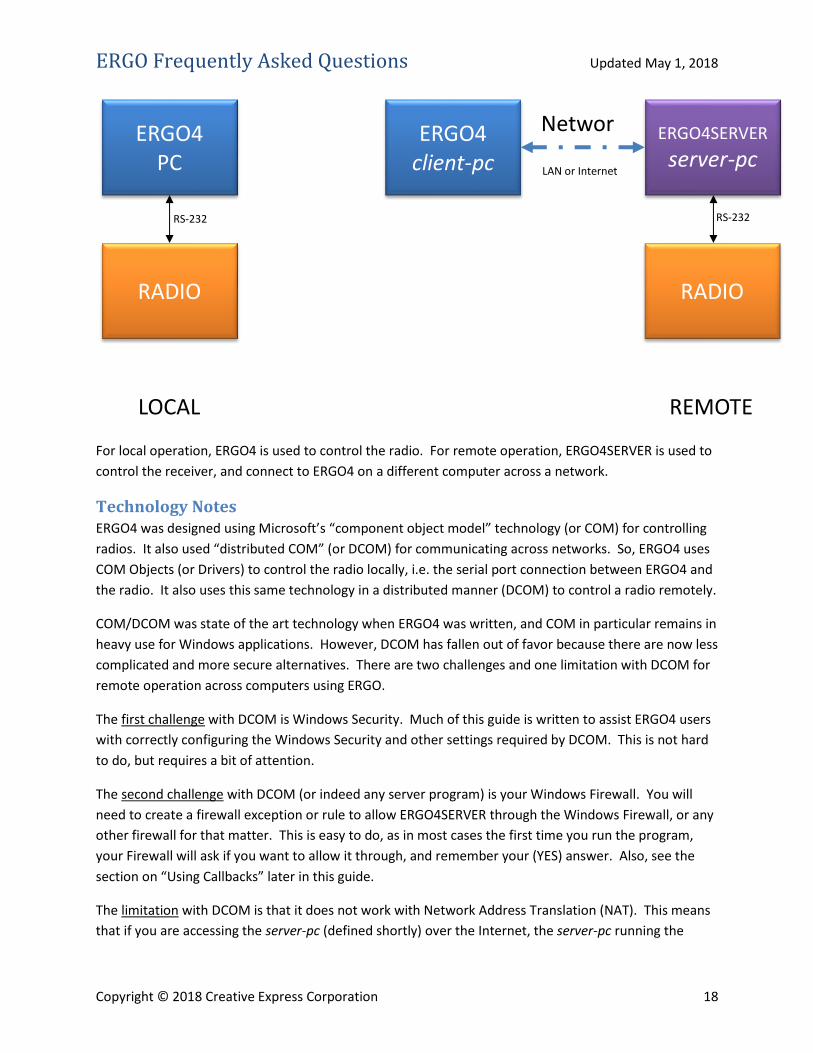
For local operation, ERGO4 is used to control the radio. For remote operation, ERGO4SERVER is used to
control the receiver, and connect to ERGO4 on a different computer across a network.
Technology Notes ERGO4 was designed using Microsoft’s “component object model” technology (or COM) for controlling
radios. It also used “distributed COM” (or DCOM) for communicating across networks. So, ERGO4 uses
COM Objects (or Drivers) to control the radio locally, i.e. the serial port connection between ERGO4 and
the radio. It also uses this same technology in a distributed manner (DCOM) to control a radio remotely.
COM/DCOM was state of the art technology when ERGO4 was written, and COM in particular remains in
heavy use for Windows applications. However, DCOM has fallen out of favor because there are now less
complicated and more secure alternatives. There are two challenges and one limitation with DCOM for
remote operation across computers using ERGO.
The first challenge with DCOM is Windows Security. Much of this guide is written to assist ERGO4 users
with correctly configuring the Windows Security and other settings required by DCOM. This is not hard
to do, but requires a bit of attention.
The second challenge with DCOM (or indeed any server program) is your Windows Firewall. You will
need to create a firewall exception or rule to allow ERGO4SERVER through the Windows Firewall, or any
other firewall for that matter. This is easy to do, as in most cases the first time you run the program,
your Firewall will ask if you want to allow it through, and remember your (YES) answer. Also, see the
section on “Using Callbacks” later in this guide.
The limitation with DCOM is that it does not work with Network Address Translation (NAT). This means
that if you are accessing the server-pc (defined shortly) over the Internet, the server-pc running the
ERGO4 PC
RADIO
ERGO4 client-pc
RADIO
ERGO4SERVER server-pc
Network
LOCAL REMOTE
RS-232 RS-232
LAN or Internet

ERGO Frequently Asked Questions Updated May 1, 2018
Copyright © 2018 Creative Express Corporation 19
ERGO4SERVER program must have a real public IP address, not just a local private IP address assigned by
a router. This is not an issue if you are just Remoting a radio within your local area network (LAN).
However, if you are planning to access your radio over the internet, the server-pc must have a real IP
address. Since most internet service providers give you two IP addresses, you can use one IP address for
your Router/LAN, and dedicate the second IP address to server-pc to share the radio over the Internet.
This Remoting Guide will explain how to set up your computers for remote operations using ERGO4.
When you are connected to a radio remotely, and asterisk will appear before the radio name, as shown
below.
Configuring for Remoting
Preface
The assumed operating systems are Windows XP or higher.
The computer connected to the radio is referred to as server-pc, and to the computer used for
remote access to the radio as client-pc.
The server-pc will use the program ERGO4SERVER.EXE to connect to the radio. In addition to the
serial port connection to the radio, the receiver audio should also be connected to the server-pc
soundcard, using Line In if available, otherwise Microphone In.
The client-pc will use the program ERGO4.EXE. Instead of setting up a serial port connection to a
radio, however, you will set up a DCOM network connection to the IP address of the server-pc.
ERGO Frequently Asked Questions Updated May 1, 2018
Copyright © 2018 Creative Express Corporation 20
You should do a full installation and program update on both the server-pc and the client-pc. This
includes the registration key.
You do not need to leave the ERGO4SERVER.EXE program running on your server-pc. Whenever you
connect remotely, Windows will run it automatically. You only need to run ERGO4SERVER.EXE when
you are configuring the server-pc for use; the program can be accessed from the Ergo4 folder in the
Windows Start Menu.
A good way to begin the remoting set-up is to successfully run both client and server on your server-
pc, using the local host address 127.0.0.1. This way, you can prove the set-up on a single machine
and reduce complexity.
Only one client-pc can connect with the server-pc at one time. However, you can allow multiple
licensed Ergo users to access your server-pc at different times, and set up a password to restrict
access.
Configuring Server-PC
Step Screen Capture
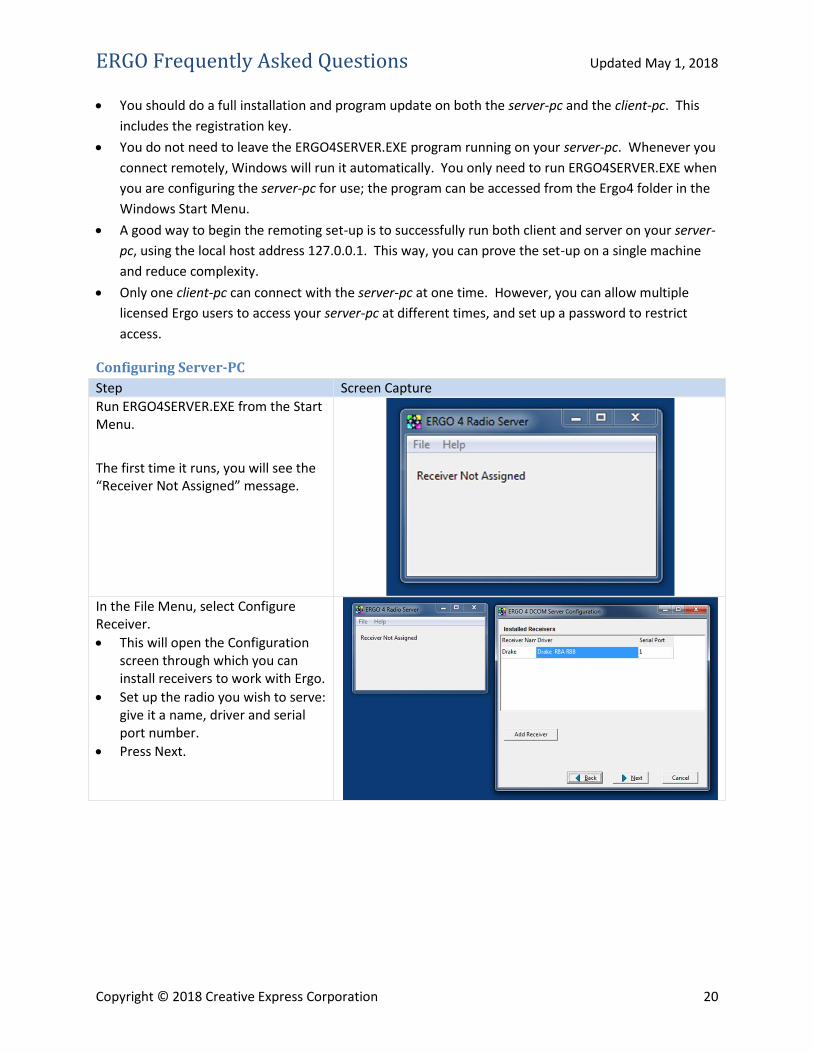
Run ERGO4SERVER.EXE from the Start Menu.
The first time it runs, you will see the “Receiver Not Assigned” message.
In the File Menu, select Configure Receiver.
This will open the Configuration screen through which you can install receivers to work with Ergo.
Set up the radio you wish to serve: give it a name, driver and serial port number.
Press Next.
ERGO Frequently Asked Questions Updated May 1, 2018
Copyright © 2018 Creative Express Corporation 21
Step Screen Capture
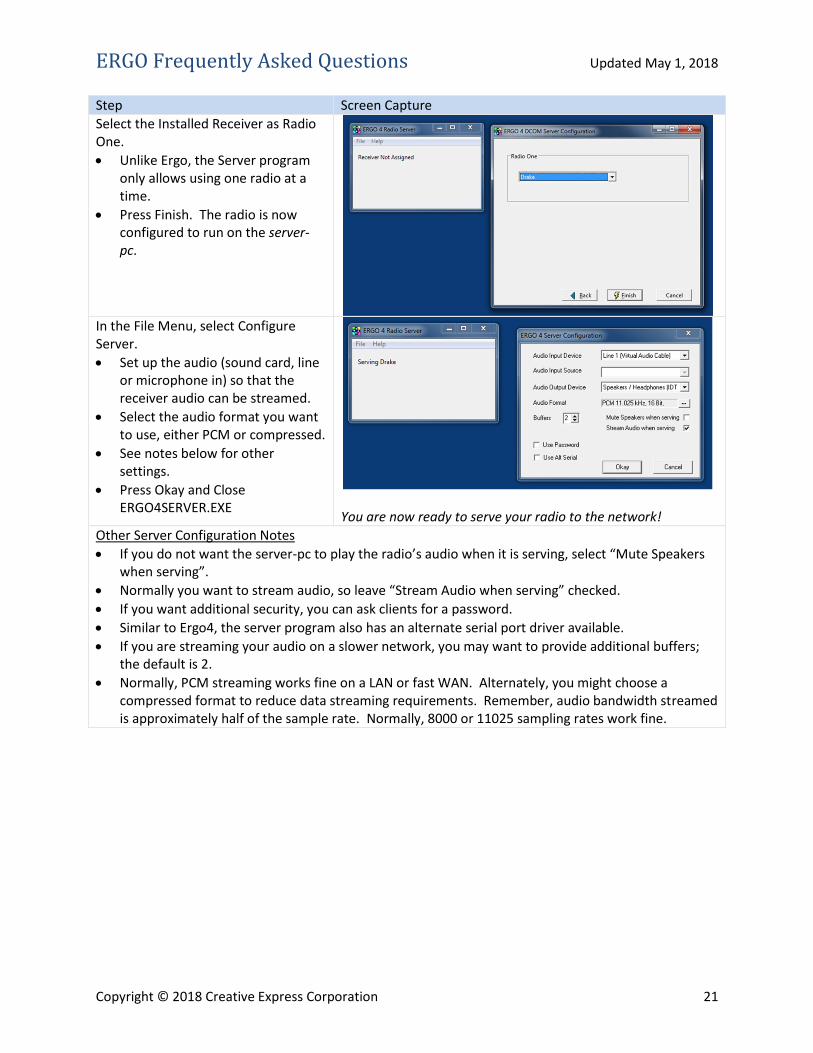
Select the Installed Receiver as Radio One.
Unlike Ergo, the Server program only allows using one radio at a time.
Press Finish. The radio is now configured to run on the server-pc.
In the File Menu, select Configure Server.
Set up the audio (sound card, line or microphone in) so that the receiver audio can be streamed.
Select the audio format you want to use, either PCM or compressed.
See notes below for other settings.
Press Okay and Close ERGO4SERVER.EXE
You are now ready to serve your radio to the network!
Other Server Configuration Notes
If you do not want the server-pc to play the radio’s audio when it is serving, select “Mute Speakers when serving”.
Normally you want to stream audio, so leave “Stream Audio when serving” checked.
If you want additional security, you can ask clients for a password.
Similar to Ergo4, the server program also has an alternate serial port driver available.
If you are streaming your audio on a slower network, you may want to provide additional buffers; the default is 2.
Normally, PCM streaming works fine on a LAN or fast WAN. Alternately, you might choose a compressed format to reduce data streaming requirements. Remember, audio bandwidth streamed is approximately half of the sample rate. Normally, 8000 or 11025 sampling rates work fine.
ERGO Frequently Asked Questions Updated May 1, 2018
Copyright © 2018 Creative Express Corporation 22
Configuring Client-PC
Step Screen Capture
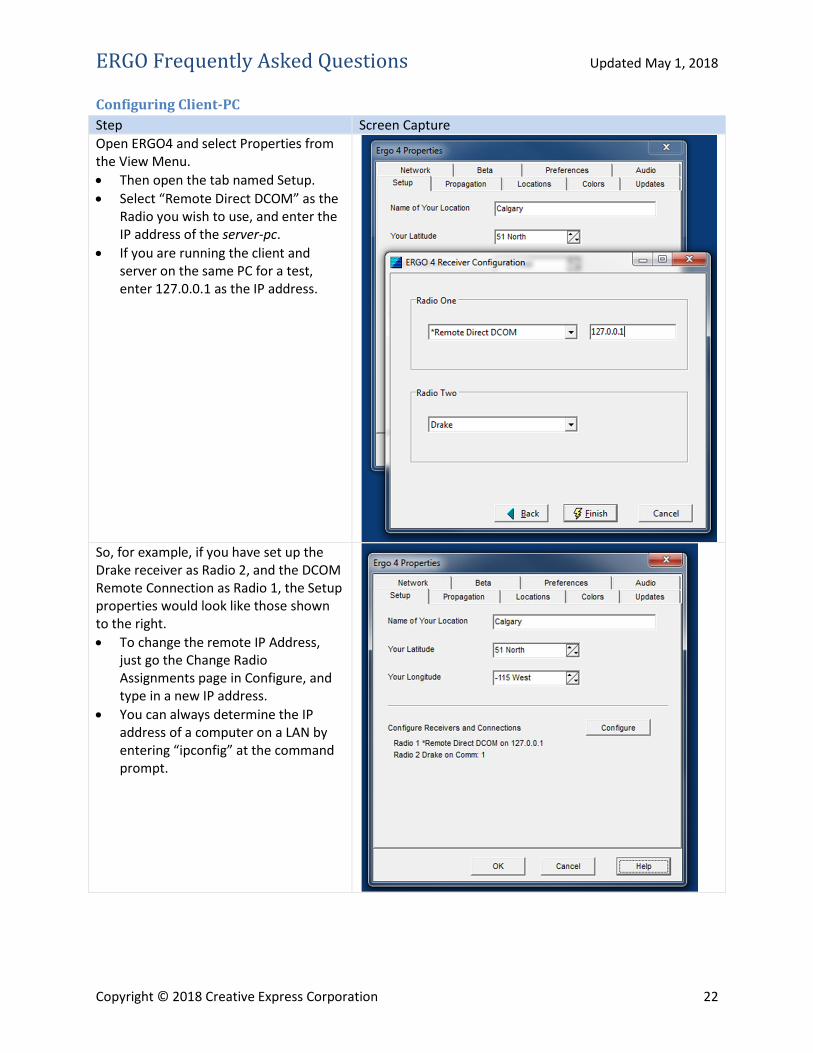
Open ERGO4 and select Properties from the View Menu.
Then open the tab named Setup.
Select “Remote Direct DCOM” as the Radio you wish to use, and enter the IP address of the server-pc.
If you are running the client and server on the same PC for a test, enter 127.0.0.1 as the IP address.
So, for example, if you have set up the Drake receiver as Radio 2, and the DCOM Remote Connection as Radio 1, the Setup properties would look like those shown to the right.
To change the remote IP Address, just go the Change Radio Assignments page in Configure, and type in a new IP address.
You can always determine the IP address of a computer on a LAN by entering “ipconfig” at the command prompt.
ERGO Frequently Asked Questions Updated May 1, 2018
Copyright © 2018 Creative Express Corporation 23
Registry Settings
There are two recommended changes and one optional change which may need to be made in the
Windows Registry. The Registry is edited using the Registry Editor program which is accessed through
Start-> Run -> REGEDIT (or by typing REGEDIT in the Search Programs and Files box.)
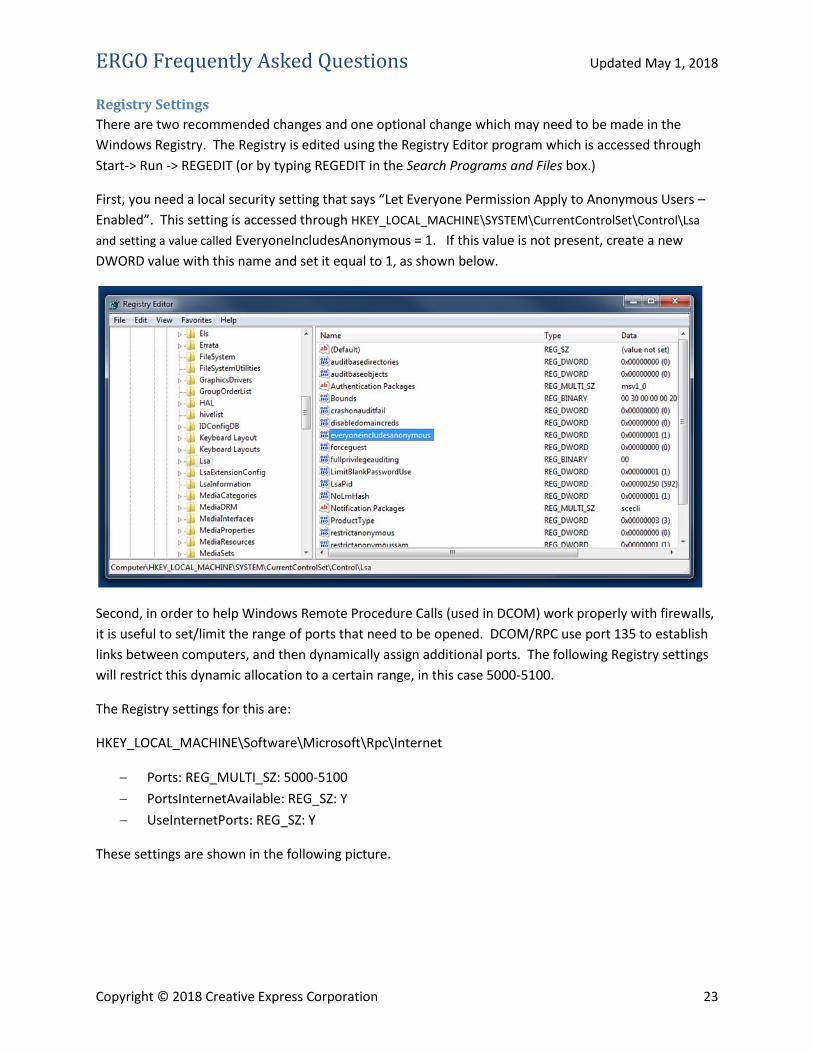
First, you need a local security setting that says “Let Everyone Permission Apply to Anonymous Users –
Enabled”. This setting is accessed through HKEY_LOCAL_MACHINE\SYSTEM\CurrentControlSet\Control\Lsa
and setting a value called EveryoneIncludesAnonymous = 1. If this value is not present, create a new
DWORD value with this name and set it equal to 1, as shown below.
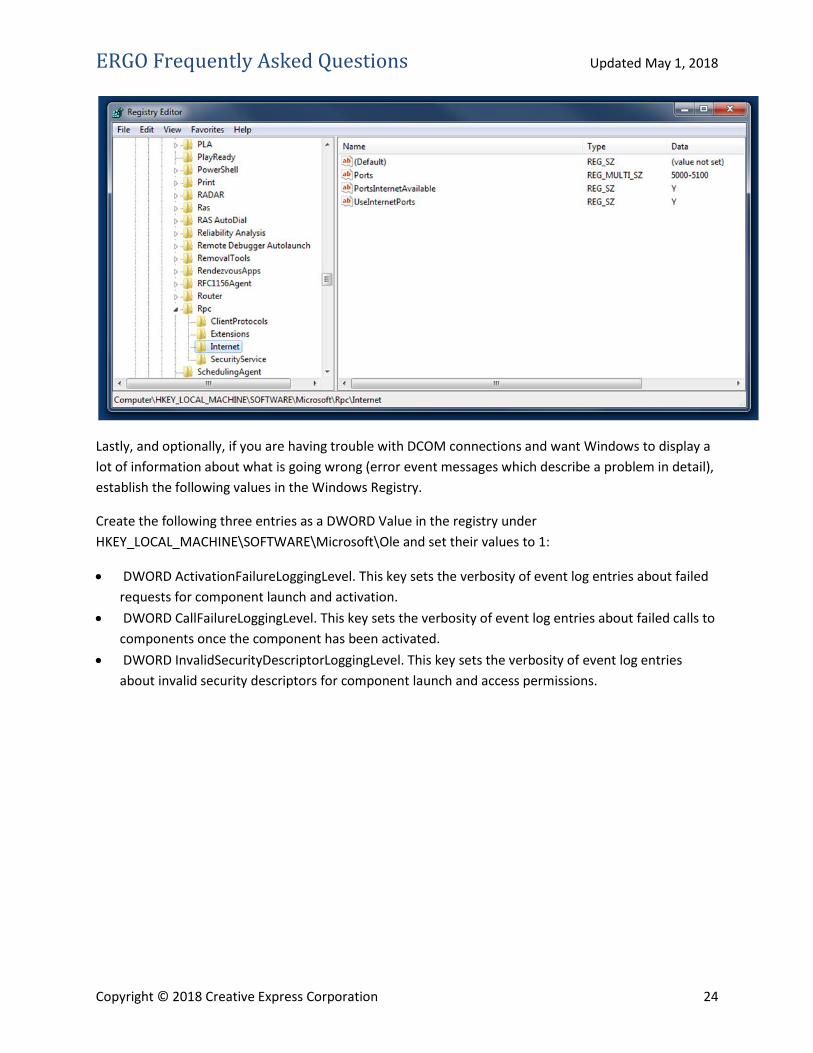
Second, in order to help Windows Remote Procedure Calls (used in DCOM) work properly with firewalls,
it is useful to set/limit the range of ports that need to be opened. DCOM/RPC use port 135 to establish
links between computers, and then dynamically assign additional ports. The following Registry settings
will restrict this dynamic allocation to a certain range, in this case 5000-5100.
The Registry settings for this are:
HKEY_LOCAL_MACHINE\Software\Microsoft\Rpc\Internet
Ports: REG_MULTI_SZ: 5000-5100
PortsInternetAvailable: REG_SZ: Y
UseInternetPorts: REG_SZ: Y
These settings are shown in the following picture.
ERGO Frequently Asked Questions Updated May 1, 2018
Copyright © 2018 Creative Express Corporation 24
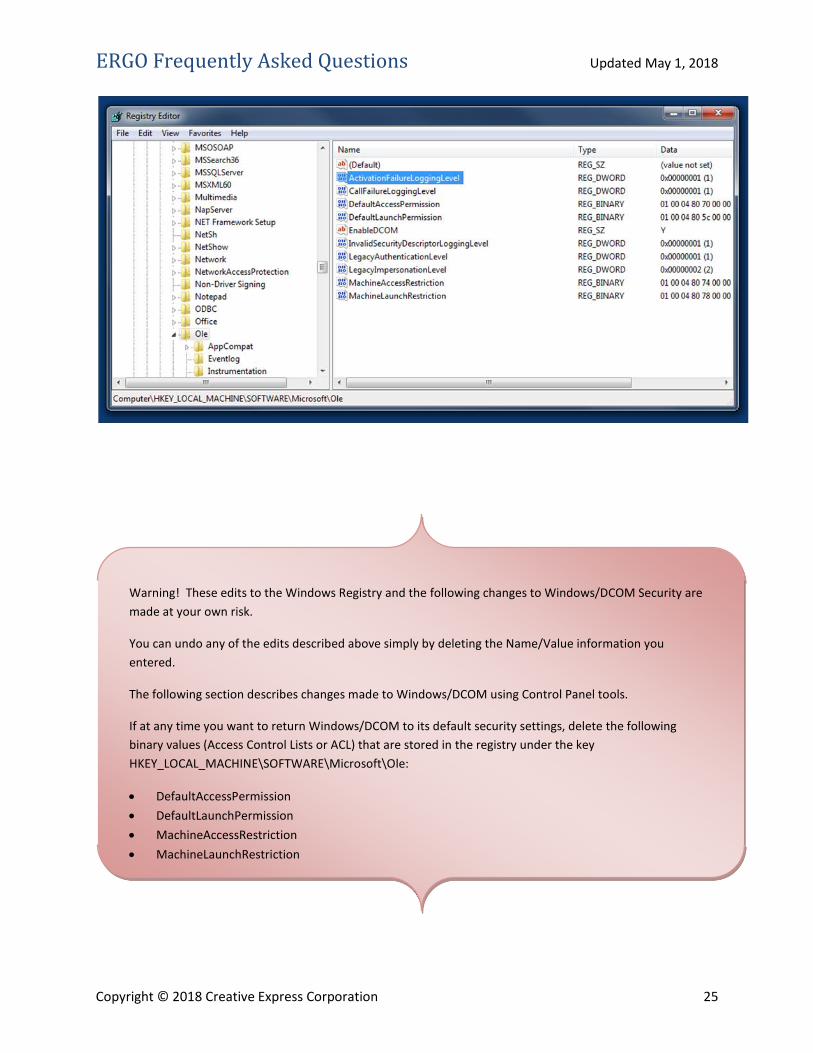
Lastly, and optionally, if you are having trouble with DCOM connections and want Windows to display a
lot of information about what is going wrong (error event messages which describe a problem in detail),
establish the following values in the Windows Registry.
Create the following three entries as a DWORD Value in the registry under
HKEY_LOCAL_MACHINE\SOFTWARE\Microsoft\Ole and set their values to 1:
DWORD ActivationFailureLoggingLevel. This key sets the verbosity of event log entries about failed
requests for component launch and activation.
DWORD CallFailureLoggingLevel. This key sets the verbosity of event log entries about failed calls to
components once the component has been activated.
DWORD InvalidSecurityDescriptorLoggingLevel. This key sets the verbosity of event log entries
about invalid security descriptors for component launch and access permissions.
ERGO Frequently Asked Questions Updated May 1, 2018
Copyright © 2018 Creative Express Corporation 25
Warning! These edits to the Windows Registry and the following changes to Windows/DCOM Security are
made at your own risk.
You can undo any of the edits described above simply by deleting the Name/Value information you
entered.
The following section describes changes made to Windows/DCOM using Control Panel tools.
If at any time you want to return Windows/DCOM to its default security settings, delete the following
binary values (Access Control Lists or ACL) that are stored in the registry under the key
HKEY_LOCAL_MACHINE\SOFTWARE\Microsoft\Ole:
DefaultAccessPermission
DefaultLaunchPermission
MachineAccessRestriction
MachineLaunchRestriction
If DCOM does not find these values in the Registry, it recreates them using default settings.
ERGO Frequently Asked Questions Updated May 1, 2018
Copyright © 2018 Creative Express Corporation 26
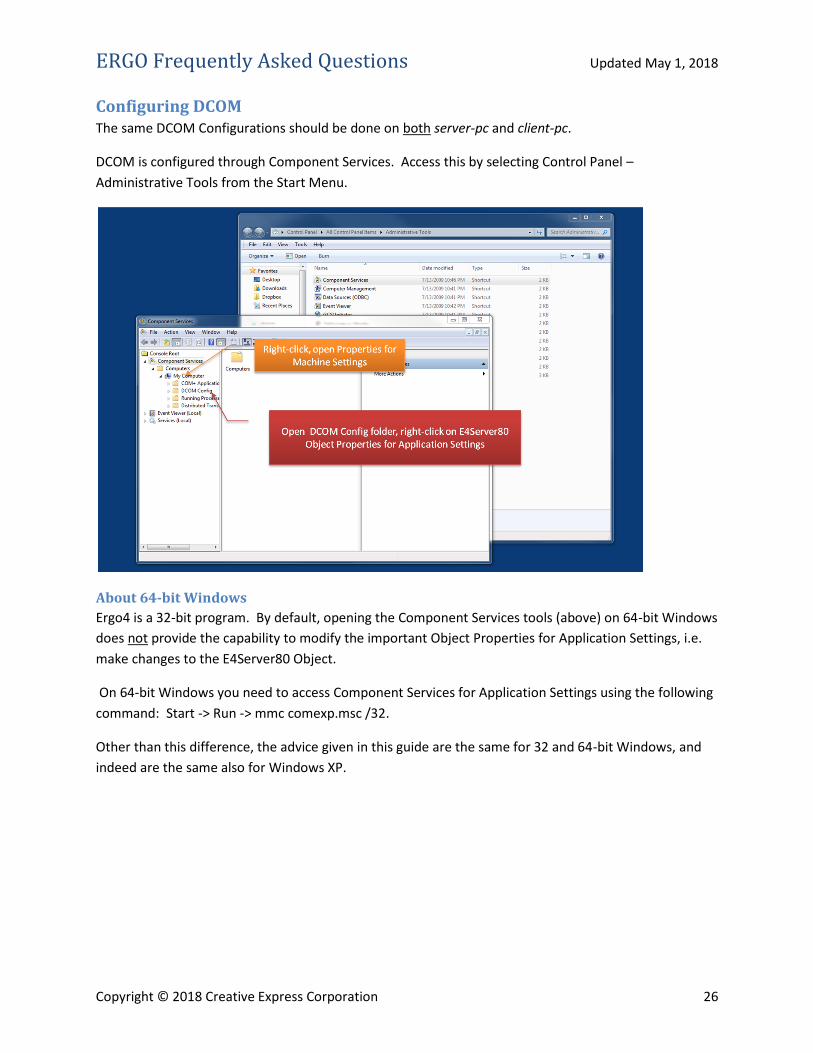
Configuring DCOM The same DCOM Configurations should be done on both server-pc and client-pc.
DCOM is configured through Component Services. Access this by selecting Control Panel –
Administrative Tools from the Start Menu.
About 64-bit Windows
Ergo4 is a 32-bit program. By default, opening the Component Services tools (above) on 64-bit Windows
does not provide the capability to modify the important Object Properties for Application Settings, i.e.
make changes to the E4Server80 Object.
On 64-bit Windows you need to access Component Services for Application Settings using the following
command: Start -> Run -> mmc comexp.msc /32.
Other than this difference, the advice given in this guide are the same for 32 and 64-bit Windows, and
indeed are the same also for Windows XP.
ERGO Frequently Asked Questions Updated May 1, 2018
Copyright © 2018 Creative Express Corporation 27
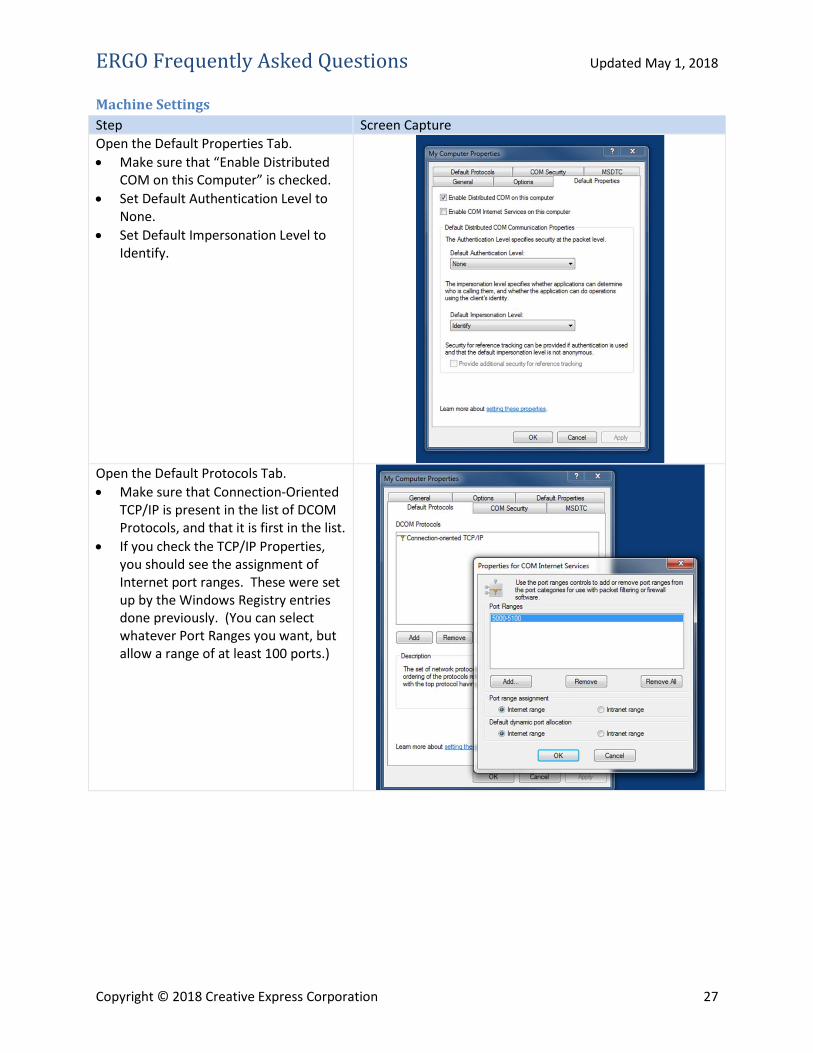
Machine Settings
Step Screen Capture
Open the Default Properties Tab.
Make sure that “Enable Distributed COM on this Computer” is checked.
Set Default Authentication Level to None.
Set Default Impersonation Level to Identify.
Open the Default Protocols Tab.
Make sure that Connection-Oriented TCP/IP is present in the list of DCOM Protocols, and that it is first in the list.
If you check the TCP/IP Properties, you should see the assignment of Internet port ranges. These were set up by the Windows Registry entries done previously. (You can select whatever Port Ranges you want, but allow a range of at least 100 ports.)
ERGO Frequently Asked Questions Updated May 1, 2018
Copyright © 2018 Creative Express Corporation 28
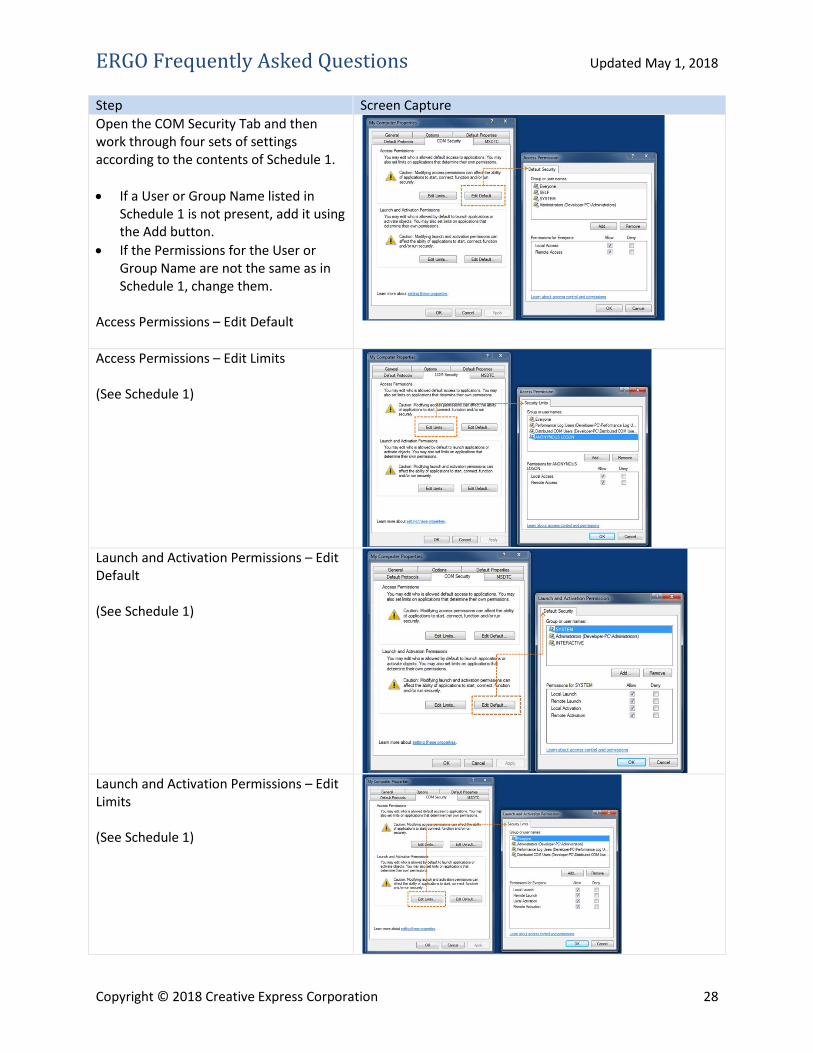
Step Screen Capture
Open the COM Security Tab and then work through four sets of settings according to the contents of Schedule 1.
If a User or Group Name listed in Schedule 1 is not present, add it using the Add button.
If the Permissions for the User or Group Name are not the same as in Schedule 1, change them.
Access Permissions – Edit Default
Access Permissions – Edit Limits (See Schedule 1)
Launch and Activation Permissions – Edit Default (See Schedule 1)
Launch and Activation Permissions – Edit Limits (See Schedule 1)

ERGO Frequently Asked Questions Updated May 1, 2018
Copyright © 2018 Creative Express Corporation 29
Schedule 1 – DCOM Machine Wide Security Settings
Topic User Allow Type(s)
Access Permissions Self Allow Local and Remote Access
Everyone Allow Local and Remote Access
System Allow Local Access
Access Limits Everyone Allow Local and Remote Access
Anonymous Login Allow Local and Remote Access
Launch and Activation Permissions
System Allow Local Launch and Activation
Interactive Allow Local Launch and Activation
Administrators Allow Local and Remote Launch Allow Local and Remote Activation
Launch and Activation Limits Everyone Allow Local and Remote Launch Allow Local and Remote Activation
Administrators Allow Local and Remote Launch Allow Local and Remote Activation
If there are other Users identified, leave them and their settings alone.
ERGO Frequently Asked Questions Updated May 1, 2018
Copyright © 2018 Creative Express Corporation 30
Application Settings
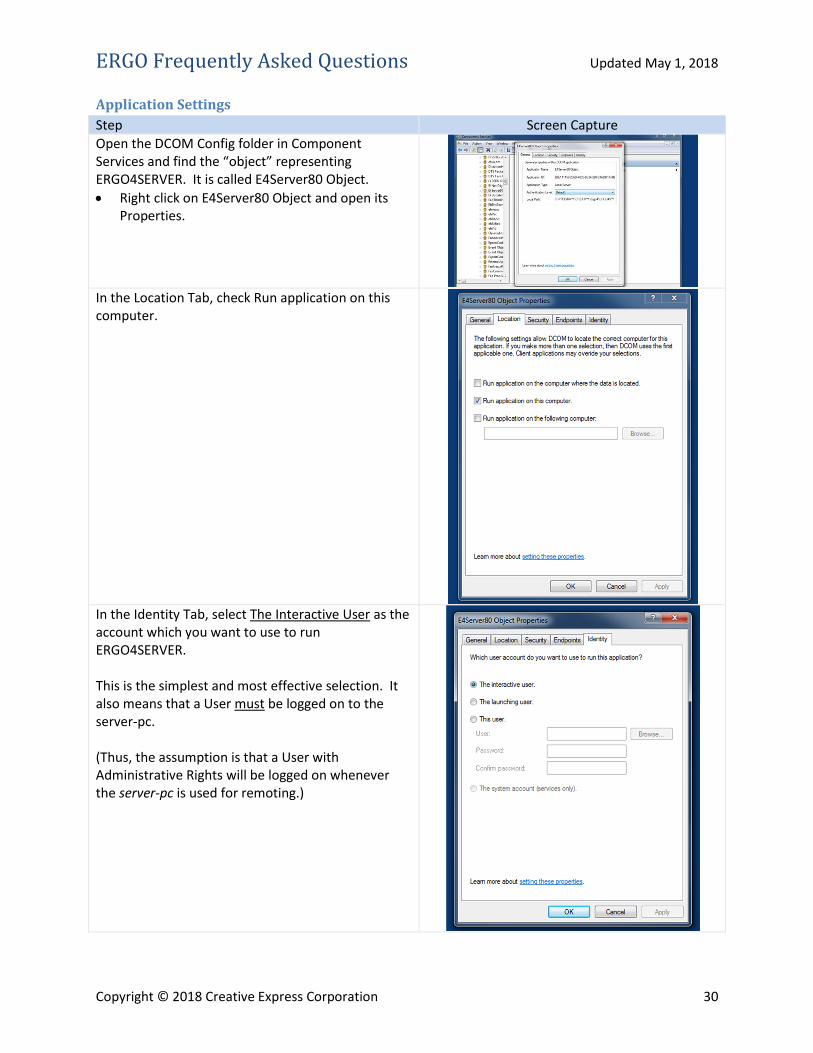
Step Screen Capture
Open the DCOM Config folder in Component Services and find the “object” representing ERGO4SERVER. It is called E4Server80 Object.
Right click on E4Server80 Object and open its Properties.
In the Location Tab, check Run application on this computer.
In the Identity Tab, select The Interactive User as the account which you want to use to run ERGO4SERVER. This is the simplest and most effective selection. It also means that a User must be logged on to the server-pc. (Thus, the assumption is that a User with Administrative Rights will be logged on whenever the server-pc is used for remoting.)
ERGO Frequently Asked Questions Updated May 1, 2018
Copyright © 2018 Creative Express Corporation 31
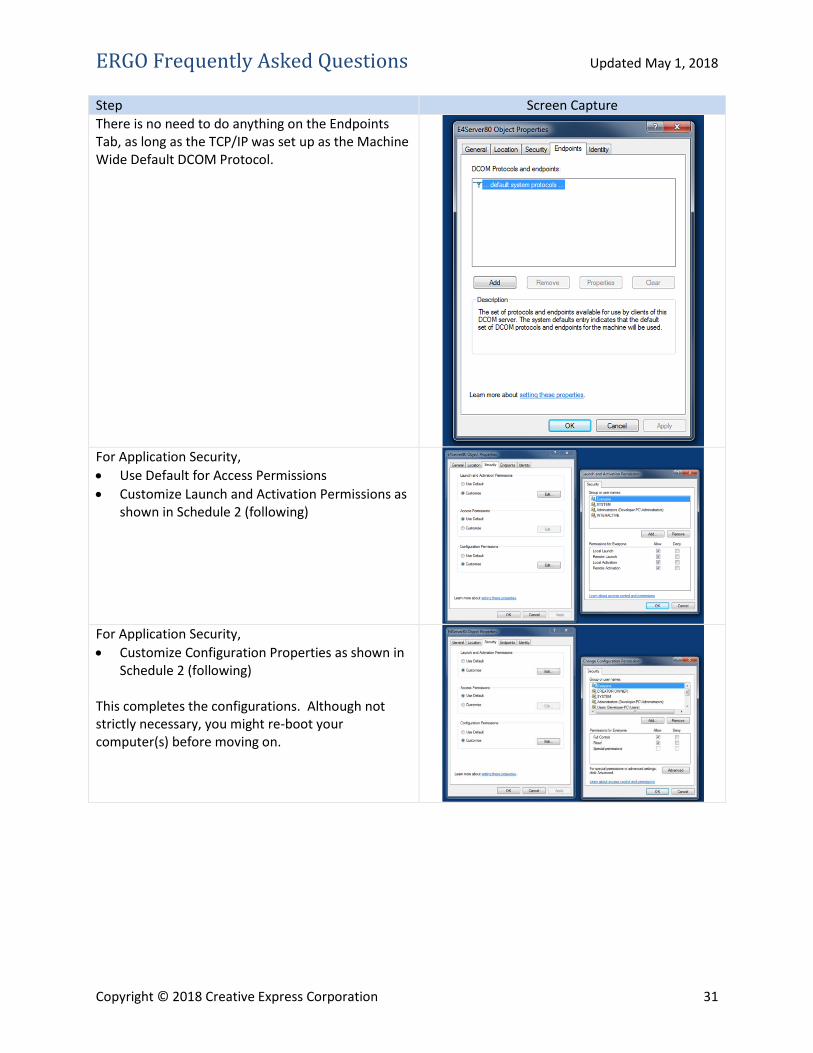
Step Screen Capture
There is no need to do anything on the Endpoints Tab, as long as the TCP/IP was set up as the Machine Wide Default DCOM Protocol.
For Application Security,
Use Default for Access Permissions
Customize Launch and Activation Permissions as shown in Schedule 2 (following)
For Application Security,
Customize Configuration Properties as shown in Schedule 2 (following)
This completes the configurations. Although not strictly necessary, you might re-boot your computer(s) before moving on.
ERGO Frequently Asked Questions Updated May 1, 2018
Copyright © 2018 Creative Express Corporation 32
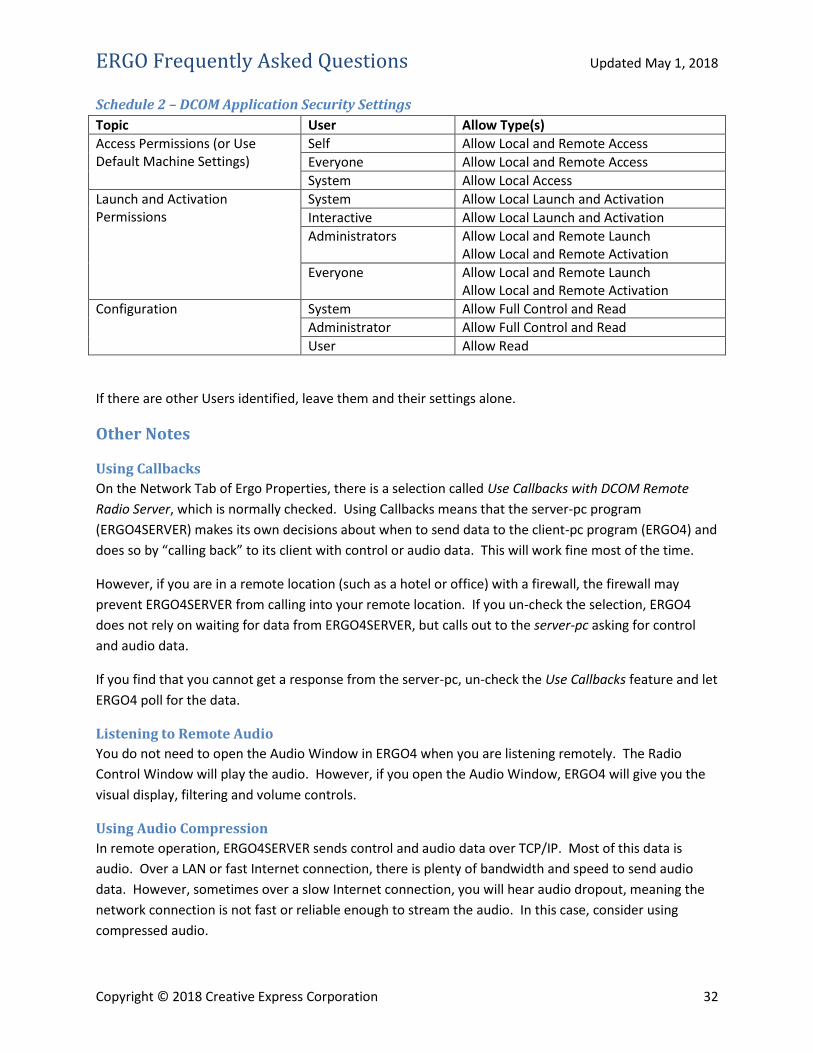
Schedule 2 – DCOM Application Security Settings
Topic User Allow Type(s)
Access Permissions (or Use Default Machine Settings)
Self Allow Local and Remote Access
Everyone Allow Local and Remote Access
System Allow Local Access
Launch and Activation Permissions
System Allow Local Launch and Activation
Interactive Allow Local Launch and Activation
Administrators Allow Local and Remote Launch Allow Local and Remote Activation
Everyone Allow Local and Remote Launch Allow Local and Remote Activation
Configuration System Allow Full Control and Read
Administrator Allow Full Control and Read
User Allow Read
If there are other Users identified, leave them and their settings alone.
Other Notes
Using Callbacks
On the Network Tab of Ergo Properties, there is a selection called Use Callbacks with DCOM Remote
Radio Server, which is normally checked. Using Callbacks means that the server-pc program
(ERGO4SERVER) makes its own decisions about when to send data to the client-pc program (ERGO4) and
does so by “calling back” to its client with control or audio data. This will work fine most of the time.
However, if you are in a remote location (such as a hotel or office) with a firewall, the firewall may
prevent ERGO4SERVER from calling into your remote location. If you un-check the selection, ERGO4
does not rely on waiting for data from ERGO4SERVER, but calls out to the server-pc asking for control
and audio data.
If you find that you cannot get a response from the server-pc, un-check the Use Callbacks feature and let
ERGO4 poll for the data.
Listening to Remote Audio
You do not need to open the Audio Window in ERGO4 when you are listening remotely. The Radio
Control Window will play the audio. However, if you open the Audio Window, ERGO4 will give you the
visual display, filtering and volume controls.
Using Audio Compression
In remote operation, ERGO4SERVER sends control and audio data over TCP/IP. Most of this data is
audio. Over a LAN or fast Internet connection, there is plenty of bandwidth and speed to send audio
data. However, sometimes over a slow Internet connection, you will hear audio dropout, meaning the
network connection is not fast or reliable enough to stream the audio. In this case, consider using
compressed audio.
ERGO Frequently Asked Questions Updated May 1, 2018
Copyright © 2018 Creative Express Corporation 33
In ERGO4, selection of audio for remote operation takes place on the Network Tab of Properties, called
Preferred Codec for DCOM. By default, this is set to PCM (Pulse Code Modulation uncompressed) at
11025 kHz Sample Rate and 16 bits. If you wish to use compression, consider selecting A-law, u-Law or
ADPCM compression which gives similar quality, and reduce data requirements by around fifty percent.
Keep in mind that the Sample Rate should be approximately twice the highest audio frequency you are
sending. Thus, if you are listening to SWBC AM through a 6 kHz filter, a Sample Rate of 11025 kHz is
probably good enough. Streaming at 22050 kHz would double the data requirements, but not really
improve higher end audio much because of the IF filter in the radio. Similarly, if you are listening to SSB
or CW, sending audio at 8000 kHz Sample Rate is good enough.
Also, select Mono rather than Stereo, since your radio audio is monophonic and selecting Stereo would
waste half of the data stream.
Finally, make sure that whatever Codec you select is available on both client-pc and server-pc.
Return to Table of Contents