equipment software loader 2 - · pdf fileit appears the following windows, ... equipment...
TRANSCRIPT

Equipment Software Loader 2
User Manual
Rev. 1.0

Equipment Software Loader 2 – rev1.0
Pagina 2 / 19
Contents 1. SYSTEM REQUIREMENTS .................................................................................................................................... 3
2. INSTALLATION AND CONFIGURATION..................... ...................................................................................... 4
2.1. INSTALLATION ....................................................................................................................................................... 4 2.2. CONFIGURATION ................................................................................................................................................... 4
3. USE THE PROGRAM ............................................................................................................................................... 6
3.1. UPGRADE THE SOFTWARE BY PRESSING “FIRMWARE WIZARD” BUTTON................................................................ 7 3.1.1. Excite and Forma line upgrade................................................................................................................. 7 3.1.2. Isocontrol upgrade .................................................................................................................................. 11 3.1.3. Kinesis personal upgrade........................................................................................................................ 12 3.1.4. Feed Back Point upgrade ........................................................................................................................ 12 3.1.5. Wellness Mate upgrade ........................................................................................................................... 13 3.1.6. TGS reader upgrade................................................................................................................................ 14 3.1.7. Digital Tuner upgrade............................................................................................................................. 15 3.1.8. Start the Upgrade .................................................................................................................................... 15
3.2. READ OR WRITE THE SERIAL NUMBER.................................................................................................................. 17 3.3. IMPORT NEW DATA BASE BY PRESSING “I MPORT DATA BASE” BUTTON ............................................................. 18 3.4. HELP ON LINE...................................................................................................................................................... 19

Equipment Software Loader 2 – rev1.0
Pagina 3 / 19
1. SYSTEM REQUIREMENTS To install and use the program, it is necessary:
1. a PC running the operating system − Windows XP with service pack 3
− Windows Server 2003 with service pack 2
− Windows Vista with service pack 1
− Windows Seven
2. a PC with 9-pin serial port RS232 or an USB to RS 232 adaptor;
3. • administrator rights during the installation and during the use ; 4. serial Communication Cable and RJ-45 Terminal Plug (order code R0002534AB).
5. Direct cable for the upgrade of the TGS reader.
The installation of Equipment Software Loader gives error messages if the minimum System
requirements are not respected, and it is not possible to reach the end

Equipment Software Loader 2 – rev1.0
Pagina 4 / 19
2. INSTALLATION AND CONFIGURATION
2.1. INSTALLATION
Before the installation of the Equipment Software Loader 2, it's recommended to
remove the Service Excite Loader, using the “ADD OR REMOVE PROGRAMS” windows function.
The installation of the new Loader and the removing of the old one won’t delete the binary files
in the “BinFiles” folder, it's suggested to remove the folder manually.
To start the installation double-click on the setup file
2.2. CONFIGURATION
Must be done after the installation before using the software the first time.
a. Run the program by clicking on the short-cut created in the START menu.
The following window appears on the display:
Press the settings button to open the set up window, here you can choose:
− the language desired,
− the right serial port used for the communication between the machine and the laptop.
N.B.
Depending on the USB port used , the serial port number associated may change. To
doublecheck the right COM PORT associated, open the Hardware properties of your PC.

Equipment Software Loader 2 – rev1.0
Pagina 5 / 19
After these choices it's mandatory to verify if the system is properly set and working on a
machine equipped with a LED display. Connect the serial communication cable, to a LED
Excite or Excite + equipment and run the LED test.
Click on the LED Test button and follow the instructions on the warning message appearing on
the display.
If the LEDs of the equipment are going on at the same time, the system is properly set and
working.
N.B:
This test does not load any software on the display, it’s only a communication test.

Equipment Software Loader 2 – rev1.0
Pagina 6 / 19
3. USE THE PROGRAM
1. Connect the Serial Communicator Cable to the PC 9-pin serial port, or to the USB adaptor
2. Run the program by clicking on the short cut created in the start menu.
3. It appears the following windows, where you have the possibility to:
a) Upgrade the software by pressing “Firmware wizard” button,
N.B.
Before and after each software upgrade, they appear on the display 2 “warning messages”. It's
very important to read them to understand:
- which is the right procedure to enable the software upgrade
- what must be done after the upgrade.
b) Read or write the serial number in the memory of the machine by pressing “Serial number”
button,
c) Set up the language and the COM port by pressing “Settings” button (explained in the
Installation and configuration chapter),
d) Perform the LED test by pressing “Led test” button, only on the LED display (explained in
the Installation and configuration chapter),
e) Upgrade all the data base used by the program (BIN FILES, images, messages..) by
pressing “Import data Base” button,

Equipment Software Loader 2 – rev1.0
Pagina 7 / 19
3.1. UPGRADE THE SOFTWARE BY PRESSING “FIRMWARE WIZARD” BUTTON
Pressing “Firmware wizard” button, the program guides you to do some choices (according the
technical data of the equipment you have to upgrade). The choices proposed by the program
may change according the equipment selected. After each choice, to proceed press the button
“Next”. To change your modification press “Back”, “Cancel” button makes you restart all the
configuration.
3.1.1. EXCITE AND FORMA LINE UPGRADE 1) Equipment Select the kind of equipment you want to upgrade by clicking on it. Please note that moving
the mouse pointer on the picture of the machines, a menu authomatically appears. This is the
list of the first part of the serial number of the equipments that can be upgraded by choosing
the machine shown in the picture itself. (the list is not appearing for all the equipment).
2) Hight kit – Low kit Choose if you want to upgrade the Hight kit Software or the Low kit firmware and or brake
table of the equipment by clicking on it.

Equipment Software Loader 2 – rev1.0
Pagina 8 / 19
3) Display Choose if the High kit is TV or LED by clicking on it.
4) Display version Select the right kind of LED installed by clicking on it.
− Round Display or LED display (3 boards)
− UDB display (2 boards)
− ARM display
5) Receiver Select the kind of Receiver installed by clicking on it.
N.B.:
Please note that both the kind of receivers in the pictures can be produced by Polar or
Salutron. It does not matter which is the brand of the board, check if in the equipment there is
installed the combo solution or the non combo solution.

Equipment Software Loader 2 – rev1.0
Pagina 9 / 19
6) Hight Kit Model Select the right equipment by checking the first 4 digits of the serial number by clicking on it.
7) Display Version Select the right TV model installed by clicking on it, between the following:
− Dot matrix
− Old connector board
− New connector board
− Unified board
8) Tuner Model Choose the right kind of TV signals by clicking on it.

Equipment Software Loader 2 – rev1.0
Pagina 10 / 19
9)Software Select the right kind of TV software by clicking on it.
10) DDT Standard Select the right kind of digital TV standard by clicking on it.
11) Low Kit Model Select the right kind of low kit model by clicking on it.
Equipment Software Loader 2 – rev1.0
Pagina 11 / 19
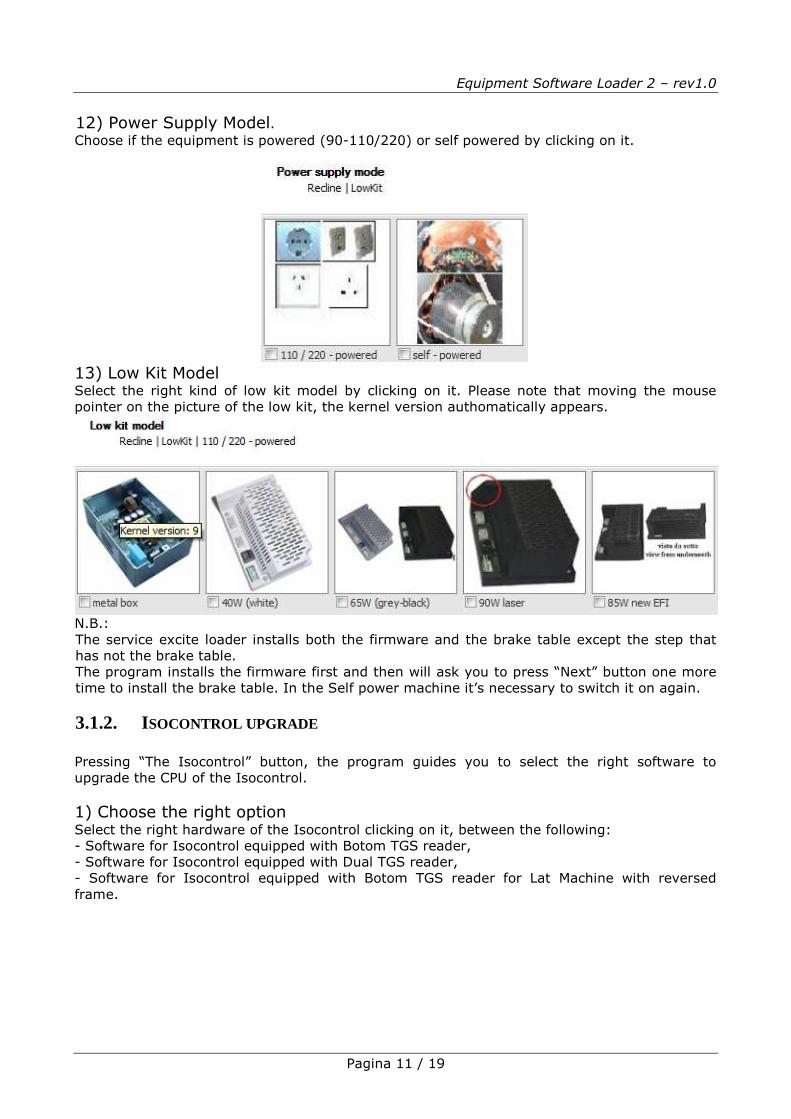
12) Power Supply Model. Choose if the equipment is powered (90-110/220) or self powered by clicking on it.
13) Low Kit Model Select the right kind of low kit model by clicking on it. Please note that moving the mouse
pointer on the picture of the low kit, the kernel version authomatically appears.
N.B.:
The service excite loader installs both the firmware and the brake table except the step that
has not the brake table.
The program installs the firmware first and then will ask you to press “Next” button one more
time to install the brake table. In the Self power machine it’s necessary to switch it on again.
3.1.2. ISOCONTROL UPGRADE
Pressing “The Isocontrol” button, the program guides you to select the right software to
upgrade the CPU of the Isocontrol.
1) Choose the right option Select the right hardware of the Isocontrol clicking on it, between the following:
- Software for Isocontrol equipped with Botom TGS reader,
- Software for Isocontrol equipped with Dual TGS reader,
- Software for Isocontrol equipped with Botom TGS reader for Lat Machine with reversed
frame.

Equipment Software Loader 2 – rev1.0
Pagina 12 / 19
2)Choose the right option Select the right language of the Isocontrol by clicking on it.
3.1.3. K INESIS PERSONAL UPGRADE
Pressing “Kinesis Personal” button, the program proposes you the right software to upgrade
the CPU of the Kinesis. There are no other option, the program opens directly the warning
message that is giving the information of the right procedure to follow to start with the
upgrade.
3.1.4. FEED BACK POINT UPGRADE
Pressing “Feed Back Point” button, the program proposes you some choices to select the right
software to upgrade the CPU of the Feed Back Point.
1) Choose the right option Select to upgrade the Firmware or the Data Base with the mouse:

Equipment Software Loader 2 – rev1.0
Pagina 13 / 19
2) Choose the Option
Select the right language of the Isocontrol clicking on it.
N.B.:Each file has 2 different languages, and one of the 2 is always English.
3.1.5. WELLNESS MATE UPGRADE
Pressing “Wellness Mate” button, the program proposes you some choices to select the right
software to upgrade the CPU of the Wellness Mate.
1) Choose the options Select the right language of the Isocontrol clicking on it.

Equipment Software Loader 2 – rev1.0
Pagina 14 / 19
N.B.:
If the Wellnee Mate can not be upgraded from the stand-by mode menu, try it by starting from
the software set up state: While the WM is witching on, press simultaneously the 2 left button
of the keypad for few sec.
This procedure is suggested authomatically from the warning message that will appear during
the use of the Equipment software Loader.
3.1.6. TGS READER UPGRADE
Pressing “TGS reader” button, the program proposes you some choices to select the right
software to upgrade the CPU of the Wellness Mate.
1) Hight Kit – Low kit Select the right hardware or the kind of upgrade for the TGS clicking on it, between the
following:
- TGS reader installed on Isocontrol equipment,
- TGS reader using the direct cable (not possible on the Isocontrol).
2) Choose the right option Select the right hardaware, checking the sticker on the TGS reader.

Equipment Software Loader 2 – rev1.0
Pagina 15 / 19
3.1.7. DIGITAL TUNER UPGRADE
Pressing “Digital Tuner” button, the program proposes you some choices to select the right
software to upgrade the digital tuner installed in the Wellness TV.
1) Select the right Digital TV standard for your country clicking on it
3.1.8. START THE UPGRADE
After all the choices proposed, for any of the upgrade it's appearing a window similar to the
following,
where you find the following information:
1) the summary of the choices done,

Equipment Software Loader 2 – rev1.0
Pagina 16 / 19
2) the software version selected,
3) the right procedure to start with the software upgrade,
4) the button that is giving the possibility to use a different software (in this case you need
another bin file)
5) in this area there is the possibility:
- to start with the upgrade, pressing the button “next”,
- to go back 1 step, pressing the button “back”,
- to restart from the beginning, pressing the button “Cancel”
N.B.
In case of software upgrade of Brake board, the service excite loader installs both the firmware
and the brake table except the step that has not the brake table.
The program installs the firmware first and then will ask you to press “Next” button one more
time to install the brake table. In the Self power machines it’s necessary to switch them on
again.

Equipment Software Loader 2 – rev1.0
Pagina 17 / 19
3.2. READ OR WRITE THE SERIAL NUMBER
Pressing “Serial number” button, it opens the following window that is giving the possibility to
write the serial number in the CPU (if the software loaded in has this feature).
Connect the serial communication cable to RJ45 connector digit the serial number.
The button “Write” is enable only when 14 digits are written in the line.
The button “Read” reads the serial number in the memory of the CPU.
Equipment Software Loader 2 – rev1.0
Pagina 18 / 19
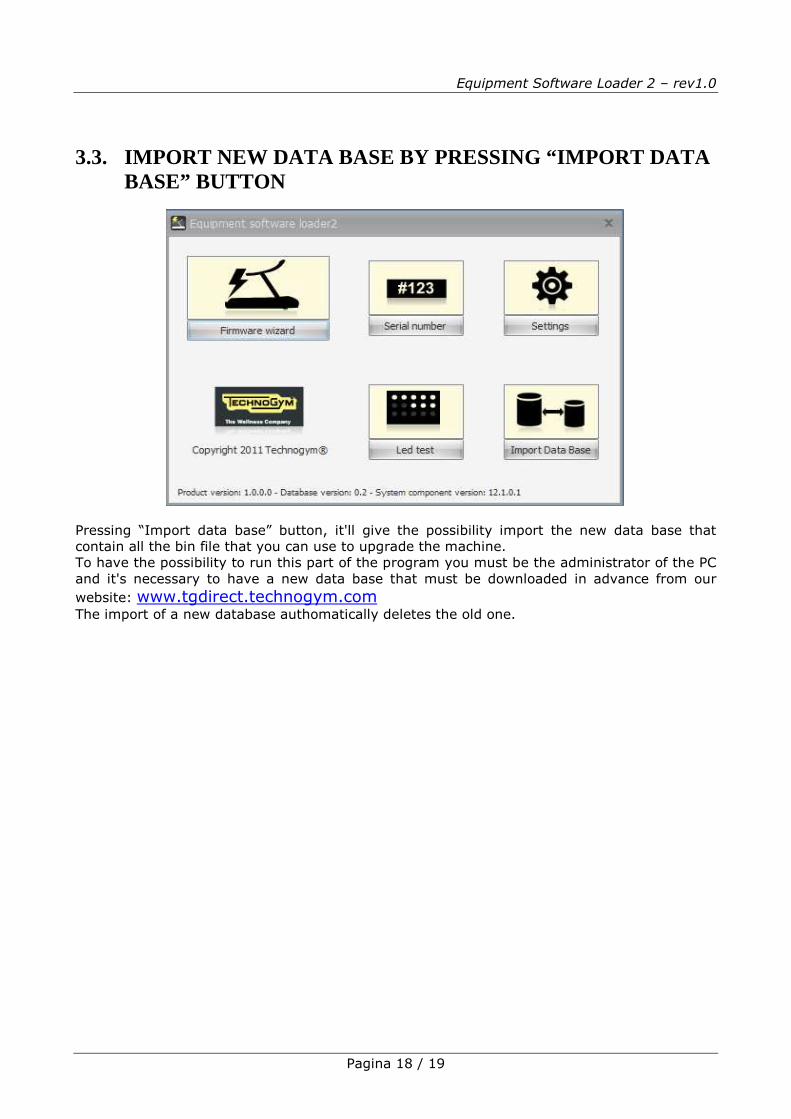
3.3. IMPORT NEW DATA BASE BY PRESSING “IMPORT DATA BASE” BUTTON
Pressing “Import data base” button, it'll give the possibility import the new data base that
contain all the bin file that you can use to upgrade the machine.
To have the possibility to run this part of the program you must be the administrator of the PC
and it's necessary to have a new data base that must be downloaded in advance from our
website: www.tgdirect.technogym.com
The import of a new database authomatically deletes the old one.

Equipment Software Loader 2 – rev1.0
Pagina 19 / 19
3.4. HELP ON LINE
It’s possible to download the user manual in PDF file version from the TG direct: by clicking on
the shortcut highlighted in the picture here below or browsing the address
www.tgdirect.technogym.com .