episiotomy trainer user guide - medical-sim.jp · the episiotomy pad is held in place with 7 white...
TRANSCRIPT

Episiotomy TrainerUser Guide
For more skills training training products visit
www.limbsandthings.comDesigned and manufactured by Limbs & Things Limited,Sussex Street, St. Philips, Bristol, BS2 0RA, UK.Telephone: +44 (0)117 311 0500 Fax: +44 (0)117 311 [email protected] www.limbsandthings.com
Part No: 065-025
Issue 4, March 2007© 2007 Limbs & Things
Episiotomy TrainerPart No: 60225
For the practice and repair of episiotomy, and repair of perineal lacerations.
Skills• Performing an episiotomy• Tissue layer identification and handling• Deep musculature suturing• Subcuticular suturing• Superficial suturing
Features• Full procedure can be carried out• Perineum, vagina and bowel are represented by a replaceable soft tissue pad• Soft tissue pad contains superficial muscle structure and relevant layers for suturing• Cost effective: all layers can be sutured repeatedly• Episiotomy or laceration can be sited to the left, right or directly towards the anus• Perineum can be distended to replicate delivery• Skin surface is washable using soap and water• Clamps stabilise the Trainer during use
Package supplied• 1 Episiotomy Pad Part No: 60226• 1 base• 2 clamps
Care of products made from latex foam rubber• Latex foam is a natural product; store away from strong light, preferably in the case
provided, to reduce exposure to ozone. Ozone is generated by some electrical equipmentincluding telephones and computers.
• Wash your hands before touching the foam. If the foam is handled after contact withcertain metals, eg copper coins, it becomes yellow and discoloured.
• The foam may be washed effectively using any mild soap and rinsed afterwards. ‘Vanish’™soap is very effective. Do not immerse the model in water or allow water to run freely overthe surface
• Do not ingest the product and practice normal hygiene after handling the product.
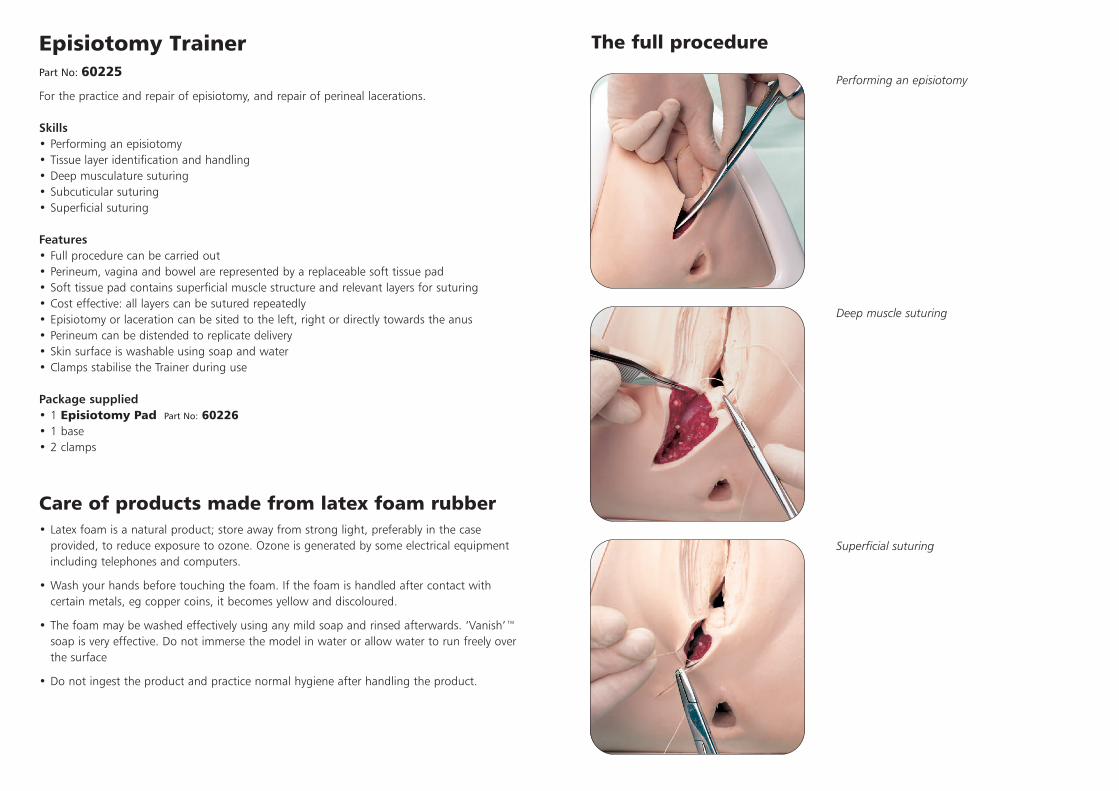
Performing an episiotomy
Deep muscle suturing
Superficial suturing
The full procedure

2
The lever on the back of theTrainer is attached to thePad between the bowel andvagina.
Pull the Pad away from thelever whilst allowing the Pad to slide out from betweenthe arms at the end of thelever.
1
The Episiotomy Pad is heldin place with 7 white HelixConnectors.
Gently pull the Connectorsout from the base (leave theConnectors attached to thePad) and let the Pad fallforwards onto the benchtop.
3
The Pad is ready to bereplaced.
Removing the Episiotomy Pad
2
2
Unscrew the Connectorsand lift off the Frame. Storethe Connectors safely.
The Pad is ready to bechanged.
1
Ensure the lever on the backof the Trainer is disengaged(the 4 notches in the handleshould be clearly visible).
The Frame is held in placeby 4 white Helix Connectors.
Removing the Frame
1

2
Ensure that the holesaround the edge of the Padline up with those on thebase.
Secure the Pad to the basewith the 7 white HelixConnectors.
1
To attach a new Pad slidethe area between the vaginaand bowel into the gapbetween the arms on theend of the lever.
Gently pull the lever towardsthe back of the Trainerwhilst pushing the Pad ontothe base.
3
Gently try the lever to makesure that it is connected andthat the Pad distendsproperly (do not push thelever past the 2nd notch asthe Pad may pop off thebase under pressure).
Reattach the Frame with the4 white Helix Connectors.The Trainer is ready to use.
Attaching a new Episiotomy Pad
3
2
To open the clamp squeezeand hold the small lever onthe bottom jaw.
The jaws will move freelyuntil the lever is released.
1
Place the Trainer on theedge of the work surfaceand secure it in place usingthe two clamps provided.
Place the clamps on the flatfeet on either side of thefront of the model.
3
To close the jaws squeezethe large lever on thebottom jaw.
Each time the lever issqueezed the jaws movecloser together.
Clamping the Base
4