epi info™ 7 cloud data capture user guide · 2018-09-17 · web enablement: epi info™ cloud...
TRANSCRIPT

Epi Info™ 7 Cloud Data Capture User Guide
Version 1 December 2017

Epi Info™ 7 Cloud Data Capture User Guide
1-2
Table of Contents
1 INTRODUCTION........................................................................................................... 4
Key Features .................................................................................................................................................... 4
Accessing Epi Info™ 7 Cloud Data Capture and Creating a Database Account ............................. 5
User Levels in Epi Info™ 7 Cloud Data Capture .................................................................................... 5
2 LOGGING IN / USERS AND ORGANIZATIONS ..................................................... 6
First Login to Cloud Data Capture ............................................................................................................ 6
Logging In to Epi Info™ 7 Cloud Data Capture ...................................................................................... 8
Main Epi Info™ 7 Cloud Data Capture Window ..................................................................................... 8
Forgetting or Changing Passwords ........................................................................................................... 9
Entering Records (all users) ...................................................................................................................... 11
Make Forms Shareable/Select Data Access (Form Publisher / Creator) ........................................ 15
Adding New Cloud Data Capture Users (Org Admin) ......................................................................... 19
Editing Users (Org Admin) ......................................................................................................................... 21
Adding New Organizations (Super Admin) ............................................................................................ 23
Editing Existing Organizations (Super Admin) .................................................................................... 26
Summary of Epi Info 7™ Cloud Data Capture Roles and Available Actions ................................. 28
3 PUBLISHING FORMS ............................................................................................... 29
Publishing Existing Forms to Cloud Data Capture ............................................................................. 29
Setting the Endpoint Address ................................................................................................................... 30
Publishing a Form to Cloud Data Capture ............................................................................................ 33
Using the Quick Publish Option to Publish Revisions ....................................................................... 38

Epi Info™ 7 Cloud Data Capture User Guide
1-3
Using the File Menu Option to Publish Revisions ............................................................................... 38
4 WORKING WITH FORMS ......................................................................................... 42
Accessing Published Forms in Cloud Data Capture ............................................................................ 42
Adding a New Record .................................................................................................................................. 47
Changing Record Settings in Cloud Data Capture .............................................................................. 53
Change Assigned User Settings ................................................................................................................ 62
Changing Form Status in Cloud Data Capture ..................................................................................... 64

Epi Info™ 7 Cloud Data Capture User Guide
1-4
1 Introduction Epi Info™ 7 Cloud Data Capture is a data collection tool that allows public health professionals to collect and manage data remotely through web browsers on desktops, laptops, and mobile devices. Users can enter data securely in Cloud Data Capture from any location within reach of the server, including in the field or locally on site during a public health emergency. Public health professionals can use the system to:
• publish data collection forms and surveys; • enter, edit, and delete records using the Epi Info Cloud Data Capture portal; • download the collected data for an Access-based Epi Info project or directly access
the collected data for a SQL Server-based project if automation is enabled.
Key Features Epi Info™ 7 Cloud Data Capture includes a number of features that facilitate data collection and use:
• Web enablement: Epi Info™ Cloud Data Capture enables forms designed in Epi Info™ 7 to be used on the web and mobile devices for data collection.
• Quick response time: Forms can be made immediately accessible to all users involved in data collection during a public health event via web or mobile.
• Broader reach: Users can collect data in the field using mobile devices, or on premise using a web browser.
• Multi-user data collection: Multiple users can collect data at the same time for a single public health event or multiple public health events.
• Centralized data management: If configured to do so, the system allows for collection and management of data in a single database for all the Epi Info™ forms enabled on the web. It can also be deployed with centralized data management capability for a single event.
• Enterprise database integration: Users can configure the system to write the data in real time to a centralized Epi Info SQL Server database.
• Distributed analysis: Data on a network database or in a virtual cloud network can be accessed using Epi Info™ 7 and Epi Info™ Cloud Data Visualization products for real-time analytics.
• Role-based access: The system permits role-based access, allowing authorized users to enable and share forms, add members to the team, collect and manage data, and perform administrative functions depending on access level. These levels are described in more detail in a subsequent section of this chapter.
Integrated package deployment information for Epi Info™ 7 Cloud Data Capture is available on the CDC website at https://www.cdc.gov/epiinfo/cloud.html.
Epi Info™ 7 Cloud Data Capture User Guide
1-5
Accessing Epi Info™ 7 Cloud Data Capture and Creating a Database Account This User Guide assumes that your database administrator has completed the steps required in the Epi Info™ 7 Cloud Data Capture Deployment Guide, including creating a Super Administrator (Super Admin). The Super Admin needs to create an Organization for your team and designate an Administrator for the Organization. The Deployment Guide, download files and instructions, and a demonstration of the Epi Info™ 7 Cloud Data Capture system are available on the CDC website at https://www.cdc.gov/epiinfo/cloud.html.
User Levels in Epi Info™ 7 Cloud Data Capture There are three user levels in Epi Info™ 7 Cloud Data Capture, each of which has different access rights. These levels are:
• Analyst: can publish forms to Cloud Data Capture from Epi Info™ 7 Form Designer and share those forms with members within their organization. Analysts can also enter, browse, and manage data for their surveys (forms) and any surveys that have been assigned to the Analyst or shared with the Analyst's organization (see the Make Forms Shareable and Change Assigned User Settings sections in this chapter). In addition to browsing and updating records in those forms, Analysts can assign their own forms to other members within the organization, and share their forms with other organizations.
• Organization Administrator (Org Admin): as the administrator of the organization, the Org Admin has all of the abilities of an Analyst. They can also add new members to the organization, adjust user roles within the organization, and deactivate users of their organization.
• Super Administrator (Super Admin): has all the abilities of an Org Admin for their own organization. A Super Admin can set up new organizations to the system and designate each respective Org Admin, and can enable/disable organizations. Once the Super Admin creates an organization and identifies the Org Admin, they cannot do anything further with that user or the organization. Only an Org Admin can add users to an organization.

Epi Info™ 7 Cloud Data Capture User Guide
2-6
2 Logging In / Users and Organizations First Login to Cloud Data Capture Epi Info™ Cloud Data Capture manages users by email address. When the Super Admin or Org Admin creates your account (as described in chapter 1 of this User Guide), you will receive an email confirming your access to a Cloud Data Capture account. The email will contain the web address or URL to the Cloud Data Capture login page and instructions to reset your temporary password. An individual address can only be used in Cloud Data Capture; no duplicate accounts are permitted. Follow these instructions to access your account and create a new password.
1. Review the email to confirm your login ID (your email address) and the link to
access Epi Info™ 7 Cloud Data Capture. You should create a new password as soon as possible after receiving the email.
Figure 2-1: Email confirming creation of Cloud Data Capture account
2. Open the main login screen by clicking on the Epi Info™ 7 Cloud Data Capture URL in your email or pasting the URL into the address bar of your browser.
3. The Epi Info™ Cloud Data Capture main login screen will open. Note: Your System Administrator customizes the content in the text box on the left at the time they establish Cloud Data Capture. The image here may not exactly match the login page of your system.

Epi Info™ 7 Cloud Data Capture User Guide
2-7
Figure 2-2: Epi Info Cloud Data Capture log in screen
4. Enter your email address and type or copy and paste the temporary password from the email. Click Log In.
5. The system will automatically take you to a Create New Password screen. Note: Your System Administrator configures the Password Policy when they initially establish Cloud Data Capture. Your organization’s policy may have different requirements than those in the image.
Figure 2-3: Screen to create new password for Cloud Data Capture
6. Enter your desired new password in the New Password block, following the guidelines in the Password Policy.
7. Confirm your new password by typing it in the Confirm Password block.

Epi Info™ 7 Cloud Data Capture User Guide
2-8
8. Click Submit. If your new password meets the requirements described in the Password Policy and the New Password and Confirm Password blocks match, the system will accept your password change. You will receive an email at your account address confirming that your password was updated. This email is also a safeguard against an unauthorized password change. Contact your organization administrator if you receive such an email and did not request a change to your password.
Logging In to Epi Info™ 7 Cloud Data Capture To log in to Epi Info™ 7 Cloud Data Capture, open the URL provided in the original email indicating your access to a Cloud Data Capture account. Enter your email address and password in the appropriate blocks. Click Log In. If your email address or password is incorrect, a message near the top will indicate the errors. If you need to have your password reset, click the "Forgot Password?" link and follow the steps to reset your password as described in the "Forgetting or Changing Password" section.
Main Epi Info™ 7 Cloud Data Capture Window When you log in, the Epi Info™ 7 Cloud Data Capture opens to the "Home" page. On the left side of the screen, you will see:
• A dropdown list of organizations to which you are assigned (the block that reads “Vector Surveillance Branch” in the screenshot)
• A dropdown list of filters (the block that reads “All Forms” in the screenshot). The dropdown options are My Forms, Forms Assigned to Me, Forms Shared with Me, and All Forms.
• A list of the forms that correspond to the selected filter, if applicable. This list of forms would appear below the two dropdown blocks and above the color-coding key for the forms list. Forms will appear in a colored block in accordance with the key.
In the upper right of the screen, you will see your name and one or more links (e.g. the logout link in the screenshot).
Figure 2-4: Cloud Data Capture home screen
Initially, you may not have any forms or records to display. If you do have forms available to you, there will always be one form selected by default. A yellow box around the form name indicates the selection.

Epi Info™ 7 Cloud Data Capture User Guide
2-9
Figure 2-5: Selected form in Cloud Data Capture home screen
To the right of the list of forms is a line list of records that were entered for the selected form. Up to five indicator fields (e.g. UserEmail, DateUpdated) of the selected form can be displayed. The publisher or owner of the form selected these fields to help identify records. Each record has an Open and Delete button that will be described in a later section. If the number of records exceeds the size of the current page, the system will provide options to sort the list by any of the indicator fields. If your Epi Info™ project was created using a SQL Server database for the data repository, then there will be an option at the top of the line listing to "Search" for specific records. This search option is not available for projects using a Microsoft Access data repository.
Forgetting or Changing Passwords If you forget your password or want to change it, use the “Forgot Password” option on the main Epi Info™ 7 Cloud Data Capture Log In screen.
Figure 2-6: Forgot Password option on Cloud Data Capture log in screen
1. When prompted, enter the email address used to create your Cloud Data Capture account.

Epi Info™ 7 Cloud Data Capture User Guide
2-10
Figure 2-7: Screen to enter your registered email address and retrieve a new password
2. Click Submit. 3. The system will email a new temporary password.
Figure 2-8: Email confirming password change for Cloud Data Capture
4. Return to the main Epi Info™ 7 Cloud Data Capture Log In screen and enter your email address and the temporary password.
5. Click Log In. 6. The system will prompt you to create a new password. Enter your new password
twice, following the Password Policy. 7. Click Submit. 8. The Epi Info™ 7 Cloud Data Capture Home page will open. You will receive an
email confirming that your password has been changed.

Epi Info™ 7 Cloud Data Capture User Guide
2-11
Entering Records (all users) Users at all levels (Super Admin, Org Admin, and Analyst) can enter and manage records. The following section describes how to enter and remove a record in an existing form. More information about publishing and working with forms can be found in the Working with Forms chapter of this User Guide.
1. Once you are logged into Cloud Data Capture, any forms you have published or that
have been assigned to you will be in a list in the left-hand column of the main screen. The active form is always highlighted in yellow.
Figure 2-9: List of forms on Cloud Data Capture home screen
2. Click on the form you want to work with. The form you select will become the active form and will be highlighted with a yellow block. Any records previously entered for that form will appear in the records display list.
3. To add a new record to the form, click +Add New Record at the top of the records display list.

Epi Info™ 7 Cloud Data Capture User Guide
2-12
Figure 2-10: Add New Record button on Cloud Data Capture home screen
4. A blank copy of the form will open.
Figure 2-11: Blank form ready for data entry in Cloud Data Capture

Epi Info™ 7 Cloud Data Capture User Guide
2-13
5. Begin entering information into the form. Use the Tab button on your keyboard to move from one field to the next, or click into each field using your mouse.
6. When you have finished entering all desired information on the current page, click one of the options on the bottom of the page:
a. Save – saves information entered since the last save and remains on the current page;
b. Save and Close – saves information entered since the last save, closes the current page, and opens the main records screen showing a line list of the top 20 records of the current form;
c. Exit – exits the current page. If there are unsaved changes, you are asked if you want to save the data; if you click No, the system exits without saving;
d. Continue – saves information entered on the current page since the last save and advances the form to the next page.
Figure 2-12: Save, Close, and Exit options
You can also click Save & Close or Exit at the top of the record entry screen at any time. The numbered buttons in the left-hand side of the top of the page indicate which page of the form you are viewing.

Epi Info™ 7 Cloud Data Capture User Guide
2-14
Figure 2-13: Page number buttons and save/close and exit options at top of data entry form
7. Once you have entered all desired information for all pages of your form, you can click the Save & Close button, or the Save plus Exit buttons, to save your information and return to the main records screen. Unless the main records screen is sorted by one of the indicator fields, the most recently edited records appear at the top of the list.
8. To open a previously entered record, click the Open button corresponding to that record on the main screen.
Figure 2-14: Open button in main form screen
9. The record will open. In the record screen, you can view or change existing information, or enter new information. If you change information or add new information, you must click Save or Save & Close to record the information in Epi Info™ 7 Cloud Data Capture.

Epi Info™ 7 Cloud Data Capture User Guide
2-15
10. To delete an existing record, click the Delete button corresponding to that record on the main screen.
11. Epi Info™ 7 Cloud Data Capture will ask you to verify that you want to delete the selected record.
Figure 2-15: Record deletion confirmation dialog box
12. If you want to delete the record in question, click Yes to confirm. Epi Info™ 7 Cloud Data Capture will remove the record from the records display list.
13. If you clicked Delete in error, click No to keep the record and return to the main records screen.
Make Forms Shareable/Select Data Access (Form Publisher / Creator) If you published the form to Epi Info™ Cloud Data Capture, you can make the form shareable with other users and organizations.
1. Log in to Epi Info 7™ Cloud Data Capture. 2. Click on the form for which you would like to set or change the shareable features
and/or assign data access. The records for that form will display in the main records screen.
3. Click the Settings button in the top right-hand corner. Note: Only the creator (publisher) of the form will see the Settings button; if you are not the form's creator, this button is hidden. You can see who created the form by checking the “Created By:” line in the form list (left hand column of the screen).
4. The Form Settings page will open. 5. Scrolling in the Form Settings screen will bring up the option to make the form
shareable/not shareable (Make Shareable/Not Shareable) as well as the option to assign data access (Select Data Access Rule).

Epi Info™ 7 Cloud Data Capture User Guide
2-16
Figure 2-16: Sharing and data access options in Form Settings screen
6. To share a form with other users within your organization or across organizations, click the arrow in the Make Shareable/Not Shareable box and select Shareable.
7. Click the arrow in the Select Data Access Rule box and choose desired option. You can hover over the small blue “i” to the right of the Select Data Access Rule box for information about the data access options:
a. Access within organization: Organization users can only access the data of their organization
b. Enable data access for central organization: All users in host organizations will have access to all data of all organizations
c. Enable data access to all: All users of all organizations can access all data.
Figure 2-17: Select Data Access Rule dropdown list in Form Settings screen

Epi Info™ 7 Cloud Data Capture User Guide
2-17
8. Select organizations with which to share a form by highlighting the desired organization in the Available Organizations box.
Figure 2-18: Organizations list to set sharing options in Form Settings screen
9. Click the right-facing arrow to move the organization to the Selected Organizations box.
Figure 2-19: Example illustrating how to add organizations for form sharing
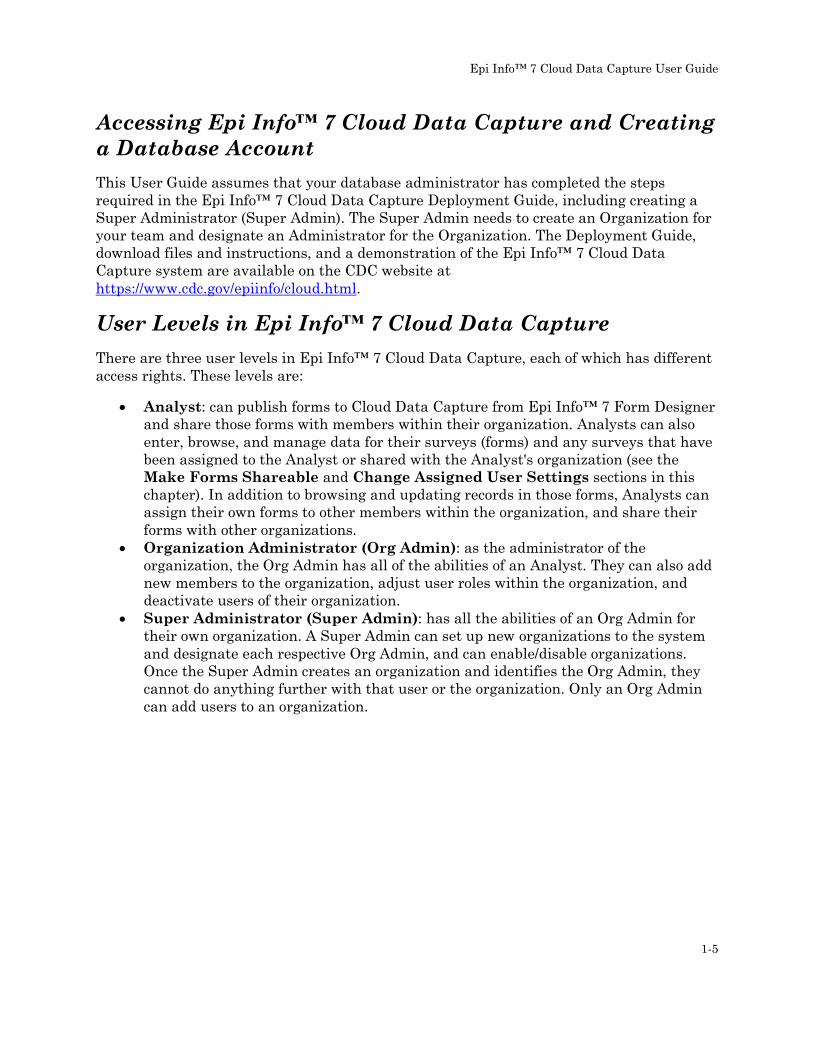
10. The organization will now be listed in the Selected Organizations box. To remove this organization from sharing, highlight it in the Selected Organizations box and click the left-facing arrow to move it back to Available Organizations.
Epi Info™ 7 Cloud Data Capture User Guide
2-18
Figure 2-20: Example illustrating how to remove organizations from form sharing
11. To remove sharing from your form, click the arrow in the Make Shareable/Not Shareable box and select Not Shareable.
Figure 2-21: Dropdown menu to make forms shareable or not shareable in Form Settings screen
12. When you select Not Shareable, the system will remove the organization-sharing options from your settings screen. You will still see the option to assign users to your form.

Epi Info™ 7 Cloud Data Capture User Guide
2-19
Figure 2-22: Illustration of Form Settings page with sharing options removed
13. IMPORTANT: Scroll to the bottom of the screen and click Save Settings to save your changes to sharing and data access options.
Adding New Cloud Data Capture Users (Org Admin) Org Admins can add users to their organization. Note that email addresses are used to manage user accounts and must be unique for every individual. Epi Info™ 7 Cloud Data Capture will not allow more than one account with the same email address. If you attempt to add a user whose email address is already in the system and who is a member of your organization, you will see an error that the user already exists for this organization.
1. Log in to Epi Info™ 7 Cloud Data Capture. 2. Click the Site Administration link in the right side of the main screen. Note: This
link is only visible to users having an Org Admin role. Super Admins are by default an Org Admin, but only for their own original organization.
Figure 2-23: Site Administration link on the Cloud Data Capture home page
3. The Manage Users screen will automatically open, since this is the only Site Administration function Org Admins can do.

Epi Info™ 7 Cloud Data Capture User Guide
2-20
Figure 2-24: Manage Users screen in Cloud Data Capture
4. Click Add New User. 5. The Add User menu will open.
Figure 2-25: Information entry screen to add new users in Cloud Data Capture
6. Enter the desired user’s email, first name, and last name. Use the dropdown menu under “Role in Organization” to select Analyst or Administrator. Selecting Administrator would create them as another Org Admin.
7. If you want the user to be active in the organization immediately, ensure that User is Active is checked.
8. Click Create. 9. The system will return to the Manage Users screen. The new user should be
included in the list of users. 10. The new user will receive an email confirming that he or she has been added to the
organization in Epi Info™ 7 Cloud Data Capture. This email confirmation will
Epi Info™ 7 Cloud Data Capture User Guide
2-21
include the Organization Key the new member will need to publish forms they create to the Epi Info™ Cloud Data Capture system.
Editing Users (Org Admin) Org Admins can only edit users within their own organization. Edits to users include changing a user’s name, their role in the organization, and their active or inactive status.
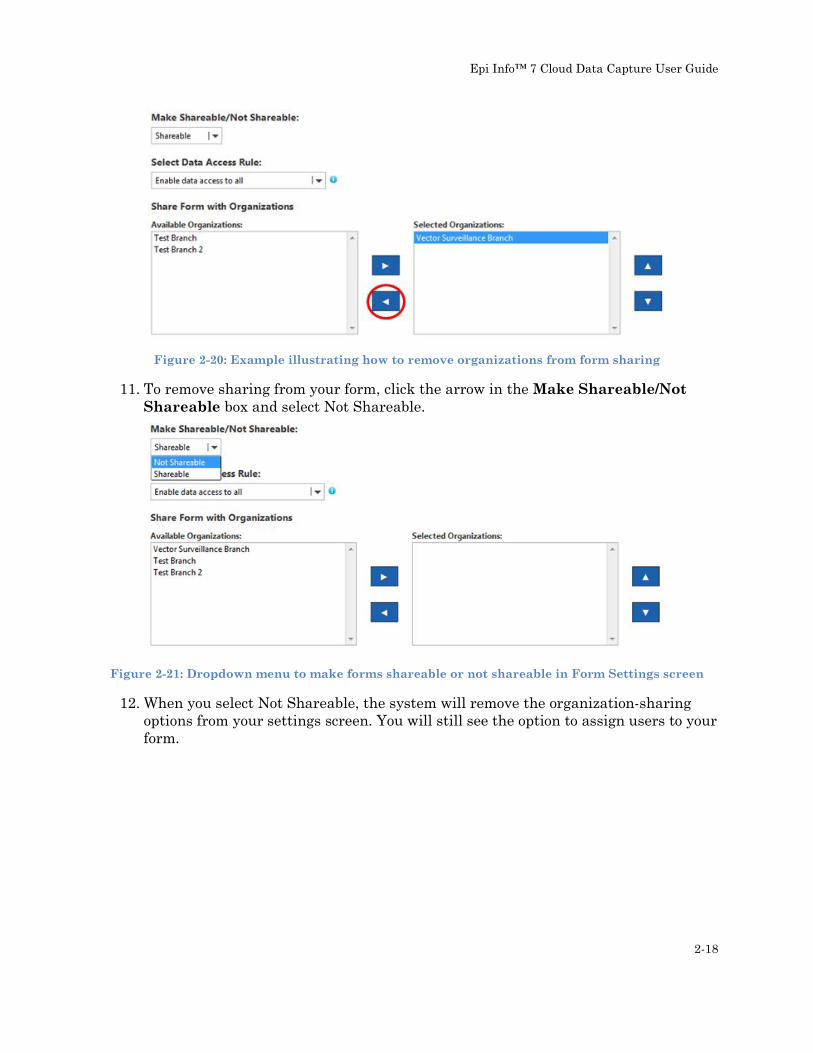
1. Log in to Epi Info™ 7 Cloud Data Capture. 2. Click the Site Administration link in the top right side of the main screen. Note:
This link is only visible to users having the Org Admin role or the Super Admin role. Super Admins are by default an Org Admin, but only for their own original organization. If you have the Super Admin role, you will see two icons at the upper right corner of the screen. Click the icon with the shape of a person to open the Manage Users screen.
Figure 2-26: Manage Users icon in Site Administration
3. From the Manage Users screen, you can: a. Edit a user’s Name b. Change a user’s Role c. Change a user’s Active status
4. To change a user’s name, role, or active status, click Edit next to the appropriate name in the Manage Users screen.

Epi Info™ 7 Cloud Data Capture User Guide
2-22
Figure 2-27: Manage Users screen
4. The Edit Users screen will open.
Figure 2-28: Edit Users screen
5. Make the required changes in the Edit Users screen 6. Click Update to save your changes. The system will return to the Manage Users screen and a green box will confirm that the update was applied. Note: Since the email address is a key field in the system, it cannot be changed. To change a user’s email

Epi Info™ 7 Cloud Data Capture User Guide
2-23
address, you must create a new account using the new email address. The old email address will remain in the system, but you can uncheck the “User is Active” checkbox to deactivate the old email address.
Figure 2-29: Confirmation of update to user information
Adding New Organizations (Super Admin) Only a Super Admin can create new organizations; An Org Admin cannot create new organizations. An Org Admin can only edit and add users for their own organization.
1. Click the Site Administration link in the right side of the main screen. 2. The system will take you directly to the Manage Organizations screen. The screen
will show all organizations in the system. In this example, there is one organization so far: the Vector Surveillance Branch.
3. To add a new organization, click Add New Organization.
Figure 2-30: Add New Organization button in Manage Organizations screen
Epi Info™ 7 Cloud Data Capture User Guide
2-24
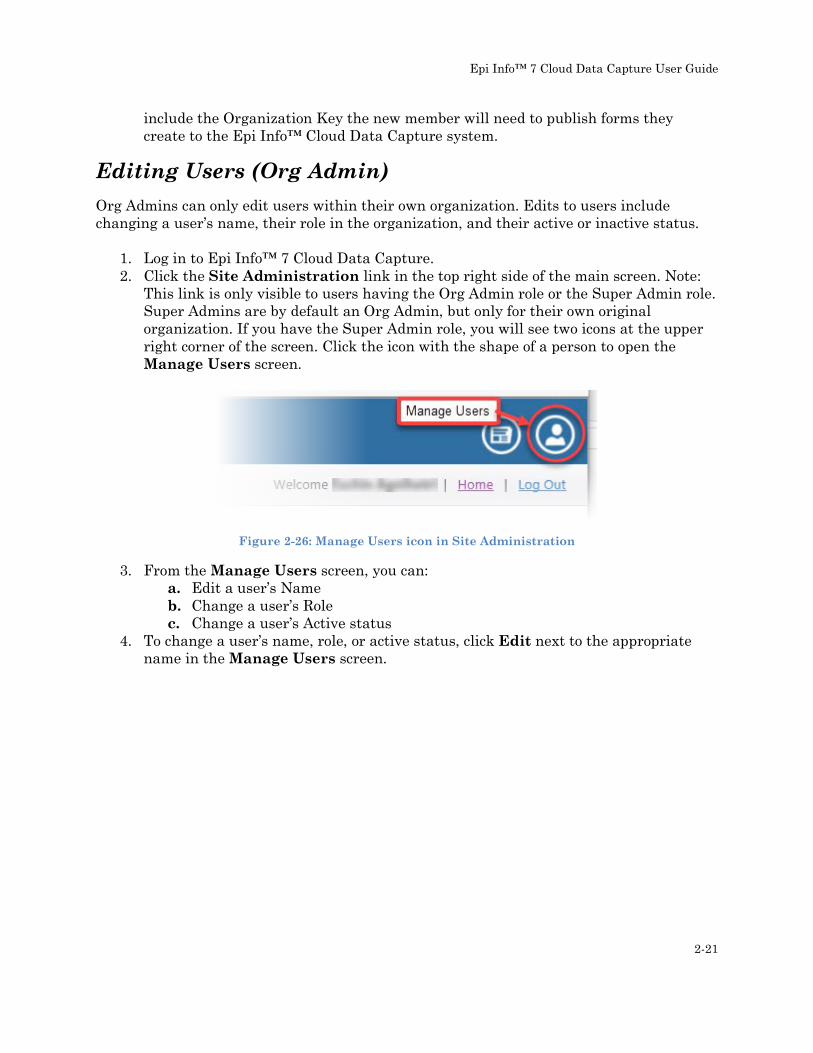
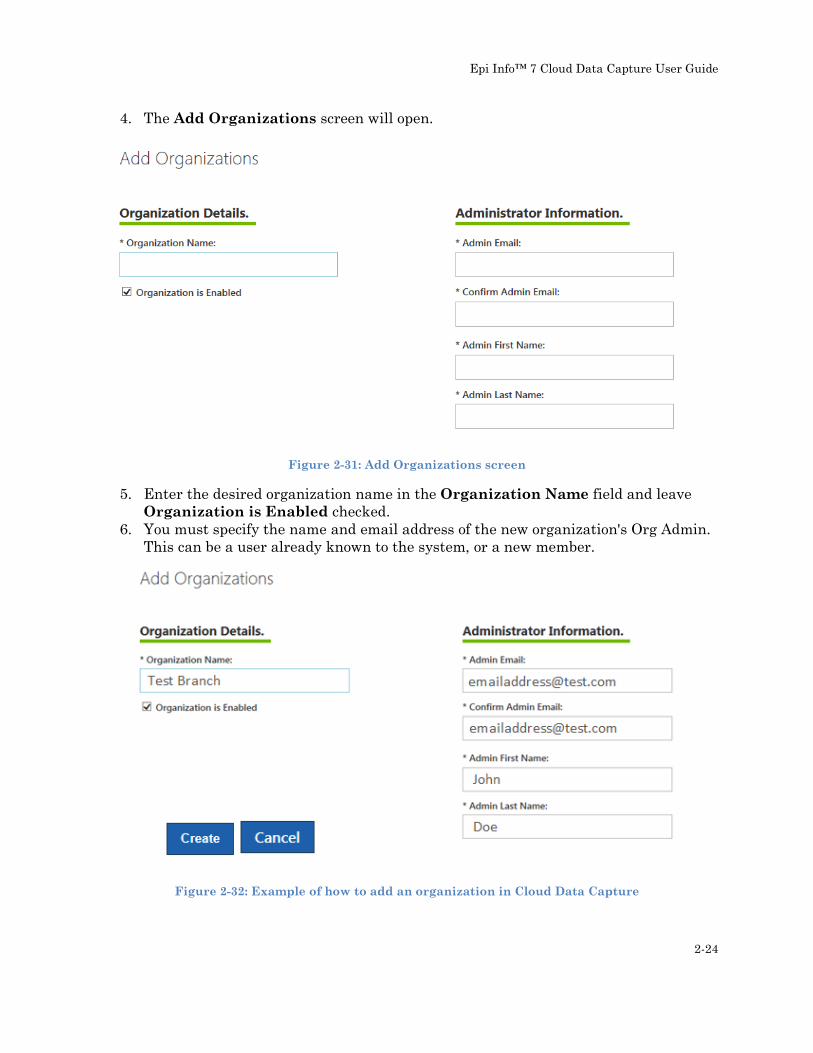
4. The Add Organizations screen will open.
Figure 2-31: Add Organizations screen
5. Enter the desired organization name in the Organization Name field and leave Organization is Enabled checked.
6. You must specify the name and email address of the new organization's Org Admin. This can be a user already known to the system, or a new member.
Figure 2-32: Example of how to add an organization in Cloud Data Capture

Epi Info™ 7 Cloud Data Capture User Guide
2-25
7. Click Create. 8. The system will return to the main Site Administration page. A green box will
confirm that the organization was created, and the new organization name will appear in your organization list.
Figure 2-33: Confirmation of added organization
9. If the Org Admin of the new organization is a new member in the system, they will receive an email with a temporary password and a notice that the new organization was created. If the Org Admin was already a user in the system, they will only receive a notice that the new organization was created, along with the Organization Key needed to publish forms from Epi Info™ 7 Form Designer to the newly created organization. A user who is already in the system will not need to change their password.
Figure 2-34: Organization Key emailed to users upon creation of a new organization

Epi Info™ 7 Cloud Data Capture User Guide
2-26
10. You can now edit the new organization using the steps described in Editing Existing Organizations.
Editing Existing Organizations (Super Admin) Only the Super Admin can add or edit organizations in the system. Edits the Super Admin can do include changing the name of existing organizations, and disabling existing organizations. A Super Admin cannot add or edit users of any organization other than their own. The Super Admin is, by default, the Org Admin of their own original organization.
1. Click the Site Administration link in the top right side of the main screen. 2. The system will take you directly to the Manage Organizations screen. The screen
will show all organizations in the system. In this example, there is one organization: the Vector Surveillance Branch.
3. To change the organization name or to enable/disable an organization, click Edit next to the applicable organization name.
Figure 2-35: Edit button in Manage Organizations screen
4. The Edit Organizations screen will open.

Epi Info™ 7 Cloud Data Capture User Guide
2-27
Figure 2-36: Edit Organizations screen
5. You can use the Organization Name box to change the name, and/or click the Organization is Enabled button to enable or disable the organization. A checkmark in the box indicates whether the organization is enabled; if the checkbox is not checked, the organization is disabled. If an organization is disabled, it will not be available for entry in Epi Info™ 7 Cloud Data Capture. A disabled organization will still be listed in the Edit Organizations screen, but the Active column will read, “False.” Note that the Super Admin cannot disable the organization for which he or she is the Org Admin. Attempting to do so will return an error. As the Org Admin, you can deactivate all other members of the organization if needed.
6. Click Update when you are finished making changes to the organization. You can also click Cancel to cancel any edits and return to the main Epi Info™ 7 Cloud Data Capture screen.
7. Changes to the organization name will be reflected in your organization list in the main Site Administration screen.

Epi Info™ 7 Cloud Data Capture User Guide
2-28
Summary of Epi Info 7™ Cloud Data Capture Roles and Available Actions This table provides an at-a-glance list of Epi Info 7™ Cloud Data Capture roles (Analyst, Org Admin, Super Admin) and the actions each role can conduct in the system.
Action Role:
Analysts Role:
Org Admin Role:
Super Admin
Enter and manage data in their own organization(s)
Publish a form to their own organization(s)
Assign their own published form to users in their own organization
Share their own published form with all admins of another organization
Disable or delete published forms for their own organization
Add new members to their own organization
Change role or deactivate a member from their own organization
Assign an Org Admin
Create an organization in the system
Deactivate an organization

Epi Info™ 7 Cloud Data Capture User Guide
3-29
3 Publishing Forms Epi Info™ 7 Form Designer is used to design survey forms for data entry. Forms can then be published to Epi Info™ 7 Cloud Data Capture. Publishing the form in Cloud Data Capture will facilitate data entry and management via the Internet and mobile devices, by multiple simultaneous users. This section will detail how to publish an already created form to Cloud Data Capture. To review how to create a new project and data entry forms in Epi Info™ 7, see the Form Designer chapter of the Epi Info™ 7 User Guide. Users can find information about Cloud Data Capture user types, logging into Cloud Data Capture, and adding/editing users and organizations in the Logging In / Users and Organizations chapter of this User Guide. Information about viewing and working with your forms in Epi Info™ 7 Cloud Data Capture can be found in the Working with Forms in Cloud Data Capture chapter of this User Guide.
Publishing Existing Forms to Cloud Data Capture In order to publish Epi Info™ 7 forms to Cloud Data Capture and access those forms, you will need a Cloud Data Capture user account as well as your organization’s Organization Key and the correct Cloud Data Capture Endpoint Address. The Organization Key is a series of letters, numbers, and symbols, and the Endpoint Address is a URL. This information was included in the original email notifying you that an account was created for you in Epi Info™ 7 Cloud Data Capture.
Figure 3-1: Cloud Data Capture user account email illustrating Organization Key and Endpoint
Address

Epi Info™ 7 Cloud Data Capture User Guide
3-30
If you do not have the Organization Key and Endpoint Address, you will need to contact your Organization Administrator. Epi Info™ 7 has numerous options for publishing a form and its updates to Cloud Data Capture. However, you must first configure the Epi Info™ 7 Desktop tools to connect to your Cloud Data Capture system.
Setting the Endpoint Address This initial step uses the Tools > Options menu in Epi Info™ 7 Form Designer and generally needs to be completed only once.
1. Open Epi Info™ 7 and select Create Forms from the main menu to open Form Designer.
Figure 3-2: Epi Info 7 main menu
2. Go to the Tools menu and select Options.

Epi Info™ 7 Cloud Data Capture User Guide
3-31
Figure 3-3: Tools Menu in Form Designer
3. In the Options dialog box, select the Cloud Data Capture tab.
Figure 3-4: Options dialog box in Form Designer

Epi Info™ 7 Cloud Data Capture User Guide
3-32
4. In the Cloud Data Capture options dialog box, enter the Endpoint Address provided in your original account email or by your Administrator. If required, confirm that the “Yes (requires basic protocol)” button is clicked under Connect using Windows Authentication? This selection depends on how your system is designed (i.e. whether you use Windows Authentication). The setting to use should be included in the email with your original instructions for setting the Endpoint Address.
5. Click the Ping Service button.
Figure 3-5: Location to enter Cloud Data Capture Endpoint Address and Ping Service in Form
Designer
6. If you entered the correct Endpoint Address and the service is available, the system will confirm that the ping was successful. (If you receive an error message, check that you have entered the Endpoint Address correctly or confirm it with your Organization Administrator.)

Epi Info™ 7 Cloud Data Capture User Guide
3-33
Figure 3-6: Dialog box confirming that ping to Cloud Data Capture Endpoint Address was successful
7. Click OK in the ping message and OK again in the Cloud Data Capture Options tab dialog box.
8. The system will return to the main Form Designer window.
Publishing a Form to Cloud Data Capture These steps will allow you to publish a form from Epi Info™ 7 to Cloud Data Capture.
1. If you aren’t already in Form Designer, open the main Epi Info™ 7 menu and select Create Forms to open Form Designer.
2. Go to File > Open and browse to open the project you would like to publish. 3. Click on the main form of the project. If the form has related (child) forms, be sure
the main form (parent) is the current form open in the Form Designer canvas. Note: The publish process publishes ALL FORMS in the current project. Therefore, if your project has forms that are NOT RELATED (independent forms) in the project, you may want to remove these unrelated forms before attempting to publish.
4. Go to the File menu and select Publish Form to Cloud Data Capture.

Epi Info™ 7 Cloud Data Capture User Guide
3-34
Figure 3-7: File menu in Epi Info 7 illustrating option to publish to Cloud Data Capture
5. The Publish Form for Cloud Data Capture dialog box will open.
Figure 3-8: Publish Form for Cloud Data Capture dialog box
6. In the Organization Key block, copy and paste the Organization Key provided in the email you received when you were added to the system as a user.

Epi Info™ 7 Cloud Data Capture User Guide
3-35
Figure 3-9: Organization Key block in Publish Form for Cloud Data Capture dialog box
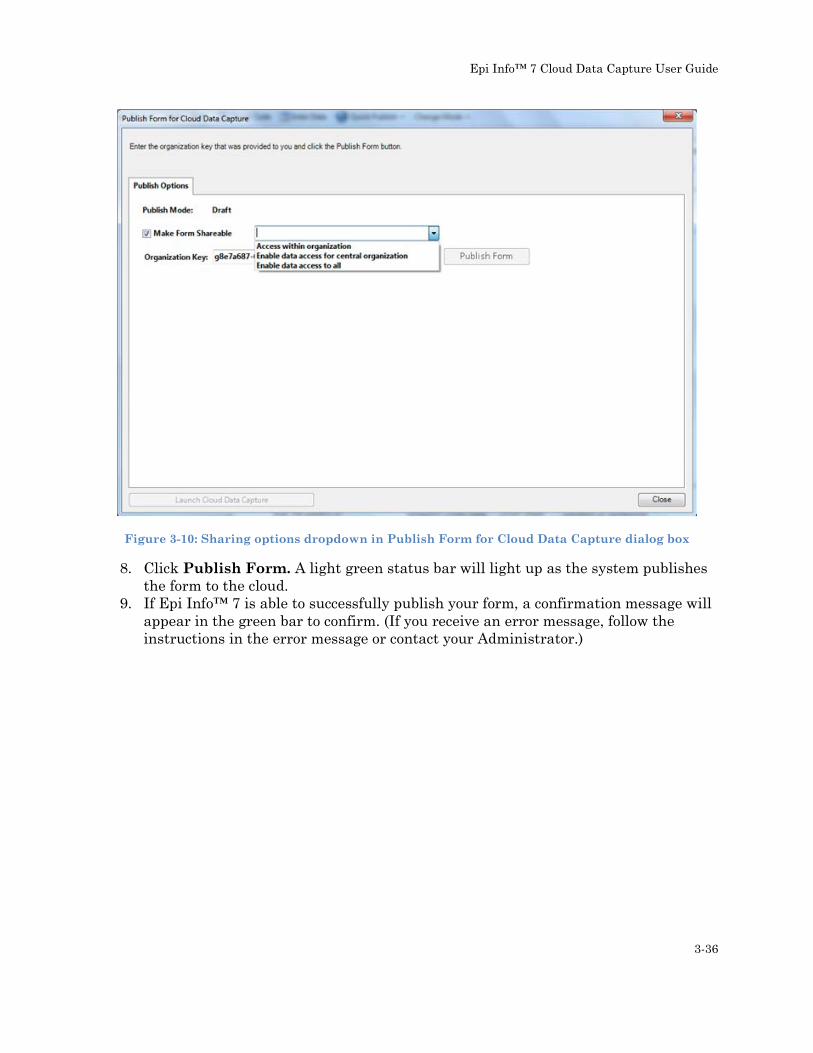
7. To make the form shareable in Cloud Data Capture, click the box next to Make Form Shareable. A check will appear in the box indicating that sharing is on. Click the dropdown arrow to select the sharing parameters for the form.
Epi Info™ 7 Cloud Data Capture User Guide
3-36
Figure 3-10: Sharing options dropdown in Publish Form for Cloud Data Capture dialog box
8. Click Publish Form. A light green status bar will light up as the system publishes the form to the cloud.
9. If Epi Info™ 7 is able to successfully publish your form, a confirmation message will appear in the green bar to confirm. (If you receive an error message, follow the instructions in the error message or contact your Administrator.)
Epi Info™ 7 Cloud Data Capture User Guide
3-37
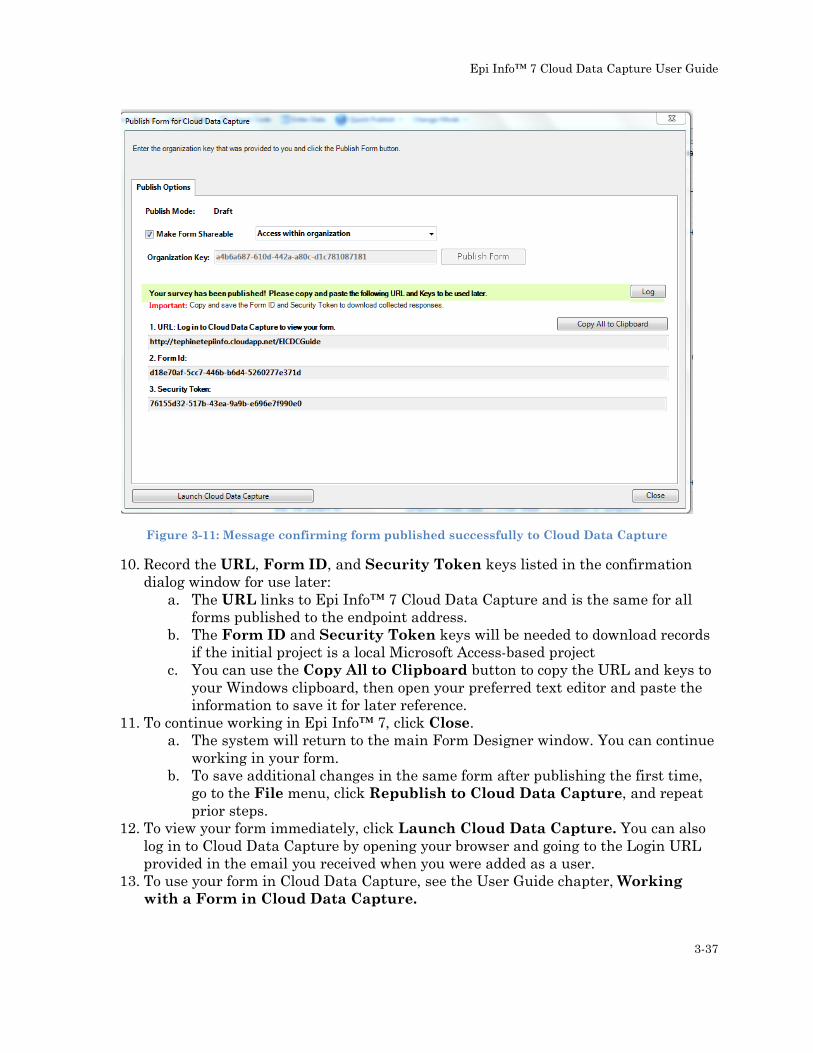
Figure 3-11: Message confirming form published successfully to Cloud Data Capture
10. Record the URL, Form ID, and Security Token keys listed in the confirmation dialog window for use later:
a. The URL links to Epi Info™ 7 Cloud Data Capture and is the same for all forms published to the endpoint address.
b. The Form ID and Security Token keys will be needed to download records if the initial project is a local Microsoft Access-based project
c. You can use the Copy All to Clipboard button to copy the URL and keys to your Windows clipboard, then open your preferred text editor and paste the information to save it for later reference.
11. To continue working in Epi Info™ 7, click Close. a. The system will return to the main Form Designer window. You can continue
working in your form. b. To save additional changes in the same form after publishing the first time,
go to the File menu, click Republish to Cloud Data Capture, and repeat prior steps.
12. To view your form immediately, click Launch Cloud Data Capture. You can also log in to Cloud Data Capture by opening your browser and going to the Login URL provided in the email you received when you were added as a user.
13. To use your form in Cloud Data Capture, see the User Guide chapter, Working with a Form in Cloud Data Capture.

Epi Info™ 7 Cloud Data Capture User Guide
3-38
Using the Quick Publish Option to Publish Revisions You can use the Quick Publish dropdown list at the top of the Form Designer main window to republish forms that you have previously published to Epi Info™ 7 Cloud Data Capture. This option is convenient if you revised a form or its Check Code and only need to update the content that was already published to Cloud Data Capture. The Cloud Data Capture system will update the metadata and any related Check Code.
1. In the main Form Designer window, click Quick Publish in the button menu at the top of the window.
2. Select To Cloud Data Capture.
Figure 3-12: Quick Publish dropdown menu in Form Designer
3. There is no publishing confirmation when using the Quick Publish option. To ensure your changes were made, you will need to open Cloud Data Capture and view your form.
Using the File Menu Option to Publish Revisions to Cloud Data Capture You can use the File > Republish Form to Cloud Data Capture option in Form Designer to publish revisions to forms that already exist in Cloud Data Capture. The Cloud Data Capture system will update the metadata and any related Check Code for revised or new fields. Any data entered to date will remain intact for previous versions of the form.
1. In the main Form Designer window, go to the File menu and click to open the dropdown menu.
2. Select Republish Form to Cloud Data Capture.
Epi Info™ 7 Cloud Data Capture User Guide
3-39
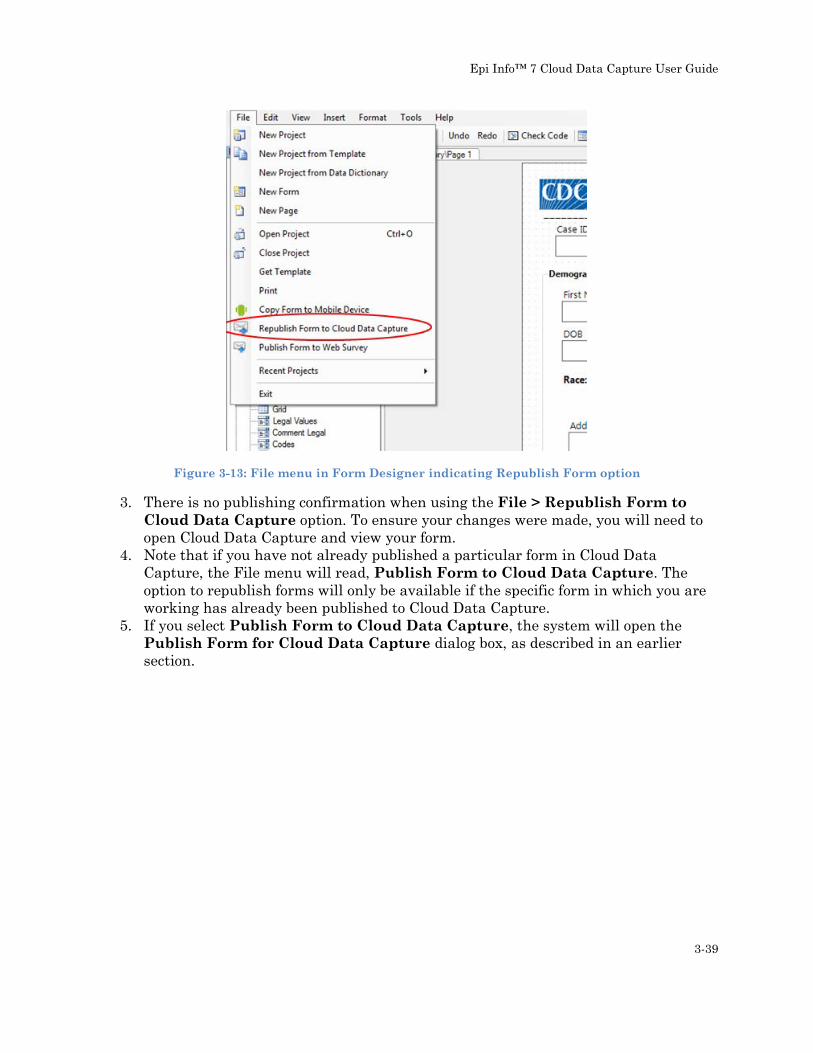
Figure 3-13: File menu in Form Designer indicating Republish Form option
3. There is no publishing confirmation when using the File > Republish Form to Cloud Data Capture option. To ensure your changes were made, you will need to open Cloud Data Capture and view your form.
4. Note that if you have not already published a particular form in Cloud Data Capture, the File menu will read, Publish Form to Cloud Data Capture. The option to republish forms will only be available if the specific form in which you are working has already been published to Cloud Data Capture.
5. If you select Publish Form to Cloud Data Capture, the system will open the Publish Form for Cloud Data Capture dialog box, as described in an earlier section.

Epi Info™ 7 Cloud Data Capture User Guide
3-40
Figure 3-14: Publish Form for Cloud Data Capture dialog box
6. If you have previously entered an Endpoint Address into Epi Info™ 7 using the steps described Setting the Endpoint Address section of this chapter:
a. Paste your Organization Key into the appropriate block within the dialog box.
b. Click Publish Form. c. A light green status bar will light up as the system publishes the form to
Cloud Data Capture. d. If Epi Info™ 7 is able to successfully publish your form, a dialog box will open
to confirm this.

Epi Info™ 7 Cloud Data Capture User Guide
3-41
Figure 3-15: Message confirming form published successfully to Cloud Data Capture
7. If you have not previously entered an Endpoint Address into Epi Info™ 7 using the steps described in Section I of this chapter, you cannot use the File > Publish to Cloud Data Capture option to publish your form. The system will open the dialog box and you can paste in your Organization Key, but it will return an error message. You must use the Tools > Options publication steps detailed in the Setting the Endpoint Address and Publishing a Form to Cloud Data Capture sections of this chapter in order to use the File > Publish or Republish Form to Cloud Data Capture option.
Epi Info™ 7 Cloud Data Capture User Guide
4-42
4 Working with Forms Epi Info™ 7 Form Designer is used to design a survey form for data entry. After the form is created and tested in Form Designer, you can then publish it to Epi Info™ 7 Cloud Data Capture. Once published, you can assign the form to others in your organization or share it with other organizations in the system. Publishing the form in Cloud Data Capture will facilitate data entry and management over the Internet and mobile devices, by multiple authorized users. This section details how to work with a form that is already published in Cloud Data Capture. To review how to create a new project and data entry forms in Epi Info™ 7, see the Form Designer chapter of the Epi Info™ 7 User Guide. To review how to create Cloud Data Capture users or how to publish to Cloud Data Capture, see other chapters of this User Guide.
Accessing Published Forms in Cloud Data Capture To enter and edit data in the form through the Epi Info™ 7 Cloud Data Capture system, follow these steps:
1. Open the Epi Info™ 7 Cloud Data Capture login URL you received when you were enrolled to use your Cloud Data Capture system.
2. Enter your user name, which is your email address used to register you as an authorized user in the system, and your password to log in.
3. The main Cloud Data Capture window will open. The forms to which you have access are listed on the left. These include forms you published, forms assigned to you, and forms shared with your organization.
4. If you are a member of more than one organization, you may need to click the organization dropdown arrow and select another organization to see a specific form.

Epi Info™ 7 Cloud Data Capture User Guide
4-43
Figure 4-1: Cloud Data Capture home page and organization list
5. Use the forms dropdown arrow to filter the form categories displayed to make the form you need easier to locate:
a. My Forms: Forms that you have created or published. b. Forms Assigned to Me: Forms that have been published by another user
within your organization and assigned to you for data entry. c. Forms Shared with Me: Forms that were published by a member of another
organization and shared your organization. All members with the Org Admin role in your organization will see forms shared with your organization. Org Admins can then assign the form to Analysts within their own organization.
d. All Forms: All forms to which you have access.

Epi Info™ 7 Cloud Data Capture User Guide
4-44
Figure 4-2: List of forms categories
6. Select the form you need by clicking on it. A yellow box will highlight the selected form. In this example, we selected the FoodHistory form in the Vector Surveillance Branch organization.
Figure 4-3: Illustration of yellow box showing FoodHistory form as the selected form
Epi Info™ 7 Cloud Data Capture User Guide
4-45
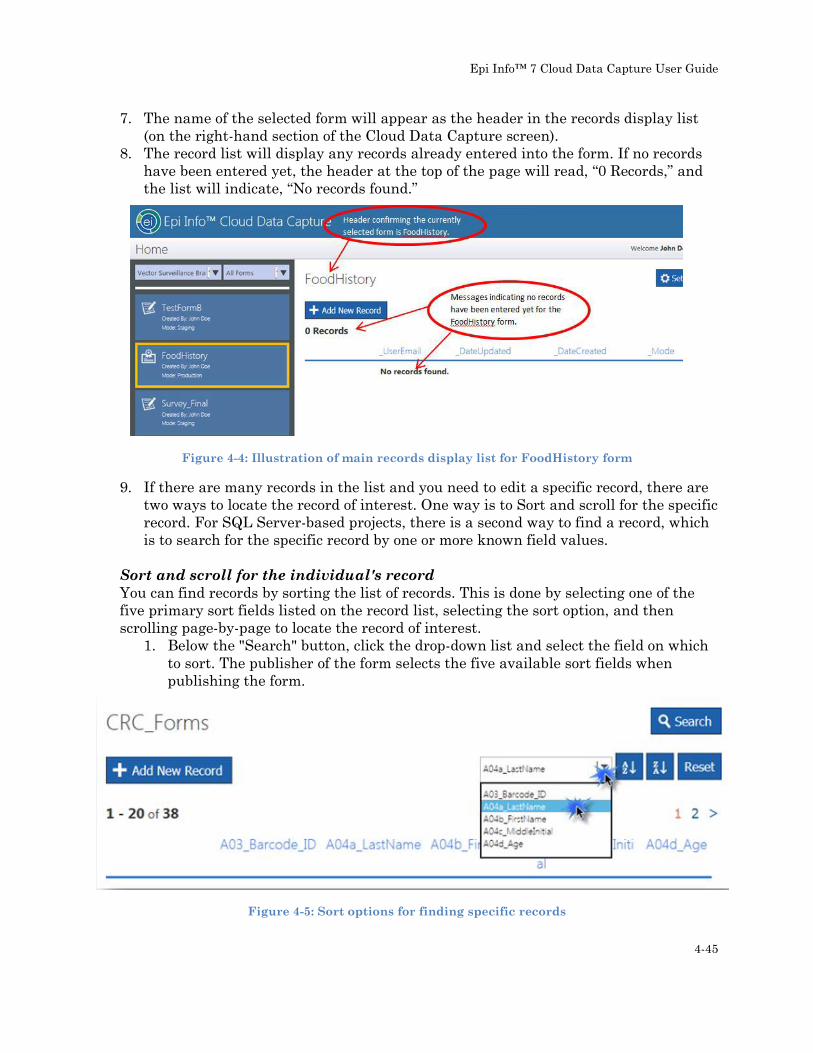
7. The name of the selected form will appear as the header in the records display list (on the right-hand section of the Cloud Data Capture screen).
8. The record list will display any records already entered into the form. If no records have been entered yet, the header at the top of the page will read, “0 Records,” and the list will indicate, “No records found.”
Figure 4-4: Illustration of main records display list for FoodHistory form
9. If there are many records in the list and you need to edit a specific record, there are two ways to locate the record of interest. One way is to Sort and scroll for the specific record. For SQL Server-based projects, there is a second way to find a record, which is to search for the specific record by one or more known field values.
Sort and scroll for the individual's record You can find records by sorting the list of records. This is done by selecting one of the five primary sort fields listed on the record list, selecting the sort option, and then scrolling page-by-page to locate the record of interest.
1. Below the "Search" button, click the drop-down list and select the field on which to sort. The publisher of the form selects the five available sort fields when publishing the form.
Figure 4-5: Sort options for finding specific records

Epi Info™ 7 Cloud Data Capture User Guide
4-46
2. To sort in ascending order, click the button with A above Z. 3. To sort in descending order, click the button with Z above A.
Figure 4-6: Ascending (L) and descending (R) sort buttons
4. Scroll down the list to locate the record. If there are more records than can appear on a page, you may need to click the next button ( > ) or one of the page numbers to see the next set of records.
Search for the individual by one or more known fields Note: This option is only available for forms published from a SQL Server-based project.
1. At the top of the record list, click the "Search" button. A series of search fields
will expand. 2. Click the dropdown arrow on the first row and select a field to search. Any field
in the database is available for searching—it is not limited to the 5 indicator fields.
3. In the next box, type the value to search – for example, if the search field is LastName, then enter the last name that would be on the record. Note that the spelling must be exact. The system does not yet support the “like” operator for finding similar, but not exact matches.
4. Click "Go" to run the search. See steps 1–4 are denoted in Figure 4-7.
Figure 4-7: Steps to search by one or more fields in SQL Server-based records

Epi Info™ 7 Cloud Data Capture User Guide
4-47
5. If the results show "0 Records," you may need to refine the search values, correct the spelling, or proceed to the steps to Add a New Record. Note: The search returns only records that match the field(s) exactly.
6. If one or a few matching records are returned, locate the record for the individual and click the "Open" button to the left of the record.
7. If many records are returned, you may need to refine the search by adding additional search fields.
8. To clear the search, click the "Reset" button.
Adding a New Record If you need to add a new record, follow these steps:
1. Click the button labeled “+Add New Record.”
Figure 4-8: Add New Record button on main records page
2. The selected form will open in Cloud Data Capture. At the top of the form are options for navigating or saving/exiting the form:
a. Page numbers and a “next page” arrow that, when clicked, will take you to the next page of the form.

Epi Info™ 7 Cloud Data Capture User Guide
4-48
Figure 4-9: Navigation and save/exit buttons on main form page
10. Begin entering your data. Use the tab key on your keyboard or the mouse to advance through the fields in your form.

Epi Info™ 7 Cloud Data Capture User Guide
4-49
Figure 4-10: Sample data entry in Food History form
11. Some fields may have been created in Epi Info™ 7 with specific parameters that limit the values that can be entered (Legal Value fields). For instance, in the Food History form, dates entered into the “Date of Interview” field must fall between January 15, 2011 and December 31, 2012. Attempts to enter a date outside of those boundaries will result in an error message. An error message will also result if a field is required to have an answer (e.g. First Name). These validation rules are defined at the time the form is created by using the field attributes or the Check Code editor within the Epi Info™ 7 Form Designer tool.

Epi Info™ 7 Cloud Data Capture User Guide
4-50
Figure 4-11: Example error for a date field with required date range
12. At the bottom of the first page of your form, you will see the following option buttons:
a. Save: Saves the data entered thus far and leaves the form open as is. This option would be used to save data as you go along to prevent accidental data loss.
b. Save & Close: Saves the data entered thus far, closes the form and returns you to the record list.
c. Exit: Exits the form and returns you to the record list. Use this option if you were only browsing the data do not want to save any changes. If changes were made, you will be asked if you want to save the changes or to exit without saving.
d. Continue: If there is more than one page in your form, this takes you to the next page in the sequence.
e. Previous: This takes you back to the previous page if you are within a multi-page form.
Subsequent pages of the form (if applicable) will also have a Previous button at the bottom left, which will navigate back to the previous page in the sequence.

Epi Info™ 7 Cloud Data Capture User Guide
4-51
If you attempt to use one of the save or continue options and have entered invalid data, or left a required field blank, Cloud Data Capture will not save the form or advance to the next page. You must address the validation message(s) before continuing. At any time, you can use the Exit button at the top of each page of your form to exit the form altogether. If there are any unsaved changes to the form, a dialog will appear asking if you want to update the record before closing, or to close without saving. If you click Don't Save, Cloud Data Capture will not save any changes entered since the record was opened, even changes previously saved in the current session on this form or any dependent or related form. For example, if you add a new record on a child form and save it, then return to the parent form and click Exit > Don't Save, ALL CHANGES are lost, including those on the new child record.
Figure 4-12: Exit button on data entry page
13. The bottom of the last page of your form will not have a Continue button. At the last page, you may return to a Previous page, Save your form, Save & Close the form, or Exit the form with or without saving changes.

Epi Info™ 7 Cloud Data Capture User Guide
4-52
Figure 4-13: Last page of data entry, illustrating Previous button
14. When you are done entering information into your form, click the Save & Close button on the last page.
15. Cloud Data Capture will return to the form's record list. A line for the record you just completed (if saved) will be included in the record list. If the list is not sorted, the most recently edited records will be at the top of the list. The fields listed on the form’s record list are selected by the forms publisher (as identified under the form name in the forms list). If you are the publisher of the form, you’ll see a Settings button which can be used to change the columns listed on the record list. See the Changing Record Settings in Cloud Data Capture section of this User Guide for more information about the Settings option.
Figure 4-14: Added record confirmation
16. The Mode for a record indicates if the record was entered while the form was in Draft mode or Final mode.

Epi Info™ 7 Cloud Data Capture User Guide
4-53
a. Use Draft mode to test the form in Cloud Data Capture and confirm all of the skip logic and validation rules are working properly. Any records entered or saved while the form is in “Draft” mode in Form Designer will be marked as Draft in Cloud Data Capture and can be discarded before beginning the official data entry.
b. Forms marked as “Final” in Form Designer will show as Final in the list of records.
c. If you are the publisher (owner) of the form, there are two ways you can change the mode of a form.
i. Using the Epi Info™ 7 Form Designer tool, with the form open in the canvas, use the “Change Mode” dropdown in the top menu.
ii. The second way to change the mode is to use Cloud Data Capture. With the form selected, click Settings. Then, select the mode from the dropdown list under "Form Settings".
Figure 4-15: Option to Change Mode for a form in Epi Info 7
17. You can open a specific record by clicking the Open button next to the record you want to view. If you enter new data or revise previously entered data, be sure to click Save or Save & Close before exiting.
Changing Record Settings in Cloud Data Capture The following features are only available to the Creator or Publisher of a form. Any other users, including organization administrators and system administrators (Super Admins) will not see the Settings button unless they have published the form.
1. The Settings button in Cloud Data Capture allows you, the publisher of the form, to
customize the columns shown in the records display list. 2. In the Forms list, click on the form for which you would like to change the display.
The name of the form will appear at the top of the home page, as will a list of any records entered under that form.

Epi Info™ 7 Cloud Data Capture User Guide
4-54
Figure 4-16: Records display page
3. If applicable for your user status, the Settings button will be located in the upper right-hand corner of the forms list. Remember: Only the creator (publisher) of the form will see the Settings button; if you did not publish the form, this button is hidden. You can see who created the form by checking the “Created By:” line in the form list (left hand column of the screen).
Figure 4-17: Display columns and settings button on records display page
4. Click Settings to revise which display columns users will see when viewing the list of records. The Settings page will open in Cloud Data Capture.

Epi Info™ 7 Cloud Data Capture User Guide
4-55
Figure 4-18: Form field selection column and user selection column on Form Settings page
5. The Settings main page lets you do the following: a. Change the form mode between Draft and Final; b. Disable a form; c. Set the fields or columns to be shown on the records display page; d. Assign the form to other members of your organization; and e. Make the form sharable to share with other organizations in the system.
6. To add fields (or columns) to your records display page list, highlight the desired field(s) to add in the Available Columns list and then click the blue arrow to move the selected fields to the Columns to Display list. You can select up to a total of five (5) columns for display.
7. For this example, we will add columns to display the date of the interview and the person’s name to the FoodHistory record list.

Epi Info™ 7 Cloud Data Capture User Guide
4-56
8. Fields can be added one at a time to the record list display by clicking on them and then clicking the right-facing arrow.
Figure 4-19: Steps to add new columns to your records display list using Form Settings
9. Click DateofInterview in the Available Columns block. 10. Click the right-facing arrow.
Figure 4-20: Illustration of new display column (DateofInterview) being added to the Columns to
Display block

Epi Info™ 7 Cloud Data Capture User Guide
4-57
11. The DateofInterview field will move from the Available Columns list to the Columns to display block.
12. Click Save Settings at the bottom of the Settings screen.
Figure 4-21: Save Settings button at bottom of Form Settings page
13. The column DateofInterview will now be included in the records display list on the main form page.

Epi Info™ 7 Cloud Data Capture User Guide
4-58
Figure 4-22: DateofInterview added to the records display list on the main form page
14. You can also add multiple columns to your display at once by holding the CTRL key on your keyboard and clicking the fields you want to select, or holding down your mouse button and scrolling through the list.
Figure 4-23: Illustration of how to select multiple columns in Form Settings
15. Once you have selected your desired fields from the Available Columns list, click the right-facing arrow to add them to the Columns to Display list.
16. The newly selected columns will now appear in the records display list on the main form page.

Epi Info™ 7 Cloud Data Capture User Guide
4-59
Figure 4-24: FirstName and LastName fields added to records display list
17. Remember that you can select up to a maximum of five columns to appear in the records display list. If you attempt to add more than five columns, Cloud Data Capture will return an error message.
Figure 4-25: Error message for attempting to add more than five display columns
18. The Settings button also includes the option to change the order in which columns appear in the records display list. To do so, start by clicking Settings from the main form screen. Remember: Only the creator (publisher) of the form will see the Settings button; if you did not publish the form, this button is hidden. You can see who published the form by checking the “Created By:” line in the form list (left hand column of the screen).
Epi Info™ 7 Cloud Data Capture User Guide
4-60
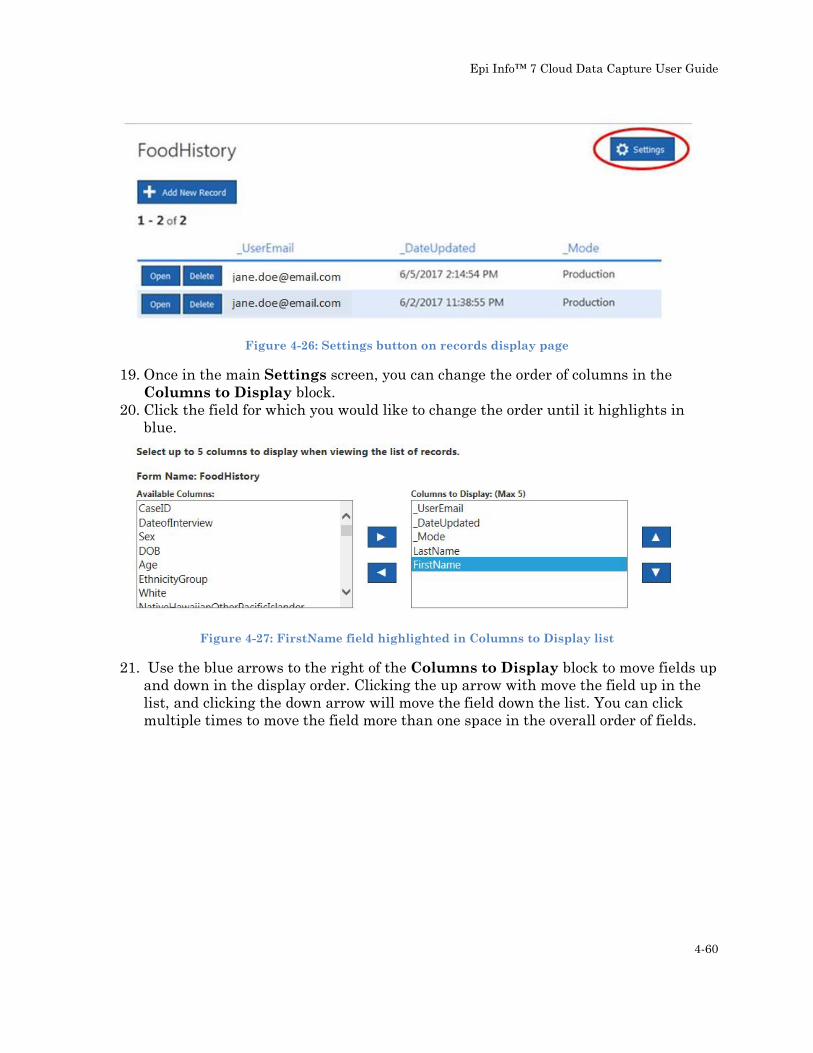
Figure 4-26: Settings button on records display page
19. Once in the main Settings screen, you can change the order of columns in the Columns to Display block.
20. Click the field for which you would like to change the order until it highlights in blue.
Figure 4-27: FirstName field highlighted in Columns to Display list
21. Use the blue arrows to the right of the Columns to Display block to move fields up and down in the display order. Clicking the up arrow with move the field up in the list, and clicking the down arrow will move the field down the list. You can click multiple times to move the field more than one space in the overall order of fields.

Epi Info™ 7 Cloud Data Capture User Guide
4-61
Figure 4-28: Buttons to change the order of displayed columns in records display list
22. In this example, we are moving FirstName and LastName to be the first fields in the records display list by clicking on each field and then clicking the up arrow the appropriate number of times to position each field.
Figure 4-29: Moving LastName field to new location in the Columns to Display block
23. Once you have the fields located in your desired order, click Save Settings at the bottom of the Settings main page.
24. The records display list will now appear with FirstName and LastName as the first two columns.
Figure 4-30: FirstName and LastName moved to first two columns in records display list

Epi Info™ 7 Cloud Data Capture User Guide
4-62
25. To remove columns from the records display list, click the Settings button in the main form page.
26. In the Columns to Display list, click to highlight the field(s) you want to remove from the display. You can hold the CTRL key and click fields to select more than one at a time.
27. Click the left-facing arrow between the two columns lists to move your selected fields from the Columns to Display list to the Available Columns list.
Figure 4-31: Arrow to remove select fields from the display columns
28. The selected field(s) will move back to the Available Columns list. Note that these fields will automatically load to the bottom of the field list, vs. moving back to where they originally appeared in the Available Column list.
29. Click Save Settings. 30. The removed field(s) will no longer display in the records display list.
Figure 4-32: Records display list with FirstName and LastName fields removed
Change Assigned User Settings If you published the form to Epi Info™ Cloud Data Capture, you can change settings for your assigned users.
1. Log in to Epi Info 7™ Cloud Data Capture. 2. Click on the form for which you would like to change the assigned users. The records
for that form will display in the main records screen. 3. Click the Settings button in the top right-hand corner. Note: Only the creator
(publisher) of the form will see the Settings button; if you are not the forms

Epi Info™ 7 Cloud Data Capture User Guide
4-63
publisher, this button is hidden. You can see who published the form by checking the “Created By:” line in the form list (left hand column of the screen).
4. The Form Settings page will open. 5. Scrolling in the Form Settings screen will bring up the option to Assign Users to
your Form (i.e. add or remove users from access to a particular form). To add a user to a form, click the desired user’s email address in Available Users to highlight their address and then click the right-facing arrow to add them to the Assigned Users list.
Figure 4-33: Assign Users fields in Form Settings
6. To remove a user from a form, click the undesired user’s email address in the Assigned Users list and then click the left-facing arrow to move them back to the Available Users list. The form is assigned only to users identified in the Assigned Users block, and only these users will see the form when they log into the Epi Info™ Cloud Data Capture main records screen.
Figure 4-34: Button to remove users from Assigned Users list
7. IMPORTANT: Scroll to the bottom of the screen and click Save Settings to save your changes to assigned users.

Epi Info™ 7 Cloud Data Capture User Guide
4-64
Changing Form Status in Cloud Data Capture You can change the status (final or draft) of your form on the Form Settings page.
1. Click the Settings button on the main form page. 2. The main Settings page will open. The Form Mode dropdown menu is at the top of
the Form Settings menu.
Figure 4-35: Form Mode dropdown menu on Form Settings page
3. Click the dropdown arrow to view status options—Final or Draft—for your form. 4. Scroll and click to select your desired option. 5. Click Save Settings at the bottom of the Settings screen to save your selection. 6. You can also disable a form by checking (clicking) the Disable box at the top of the
Form Settings page.
Figure 4-36: Disable Form option in Form Settings