ensemble travel group clientsite quick start guide · ensemble travel® group clientsite quick...
TRANSCRIPT
Ensemble Travel® Group ClientSite
Quick Start Guide
How to Add, Edit, Publish, and Delete Content Using Your ClientSite Content Management System
Document Date: March 31, 2009
Document Revision: 1.0

Ensemble Travel® Group ClientSite Quick Start Guide
Table of Contents
1. OVERVIEW .................................................................................................................................... 1
1.1. INSTALLING THE CMS EDITOR IN A WEB BROWSER .......................................................................................... 3
1.2. ACCESSING THE CMS ............................................................................................................................ 6
2. USING THE CONTENT MANAGEMENT SYSTEM ............................................................................ 7
2.1. LOGGING IN ........................................................................................................................................ 7
2.2. UNDERSTANDING THE CMS WORKAREA ....................................................................................................... 9
2.3. UNDERSTANDING THE CMS EDITOR .......................................................................................................... 11
2.4. UNDERSTANDING THE CONTENT PUBLISHING PROCESS .................................................................................... 12
2.5. USING THE CMS TO EDIT, ADD AND DELETE CONTENT .................................................................................... 15
2.6. ADDING IMAGES ................................................................................................................................. 22
2.7. ADDING HYPERLINKS ........................................................................................................................... 27
2.8. CHANGING YOUR PASSWORD/USER PROFILE ............................................................................................... 35
3. HELP & OTHER RESOURCES ..................................................................................................... 37

Ensemble Travel® Group ClientSite 1 Quick Start Guide
1. Overview
Intended Audience
The intended audience for the document is Web content authors and administrators who are
responsible for creating or managing your ClientSite content. No technical knowledge or
experience is assumed or required.
About This Guide
This purpose of this document is to provide an overview of how to add, edit, publish, and
delete content from your Ensemble Travel® Group ClientSite. This document is intended as a
“quick start” guide only. As such, it does not provide an exhaustive description of all ClientSite
functionality and features.
The Purpose of a Content Management System (CMS)
Your ClientSite provides content authors and administrators with an easy-to-use and powerful
tool – a content management system (CMS) – to publish and manage Web content without
learning HTML and graphic design skills. The CMS can also provide advanced functionality,
such as content search, multi-lingual content, management of metadata tags, RSS syndication,
simple form/poll creation, (limited) management of navigation menus, automated content
archival, display of content lists, blogs, and more.
Ensemble Travel® Group ClientSite 2 Quick Start Guide
Where to Find Help
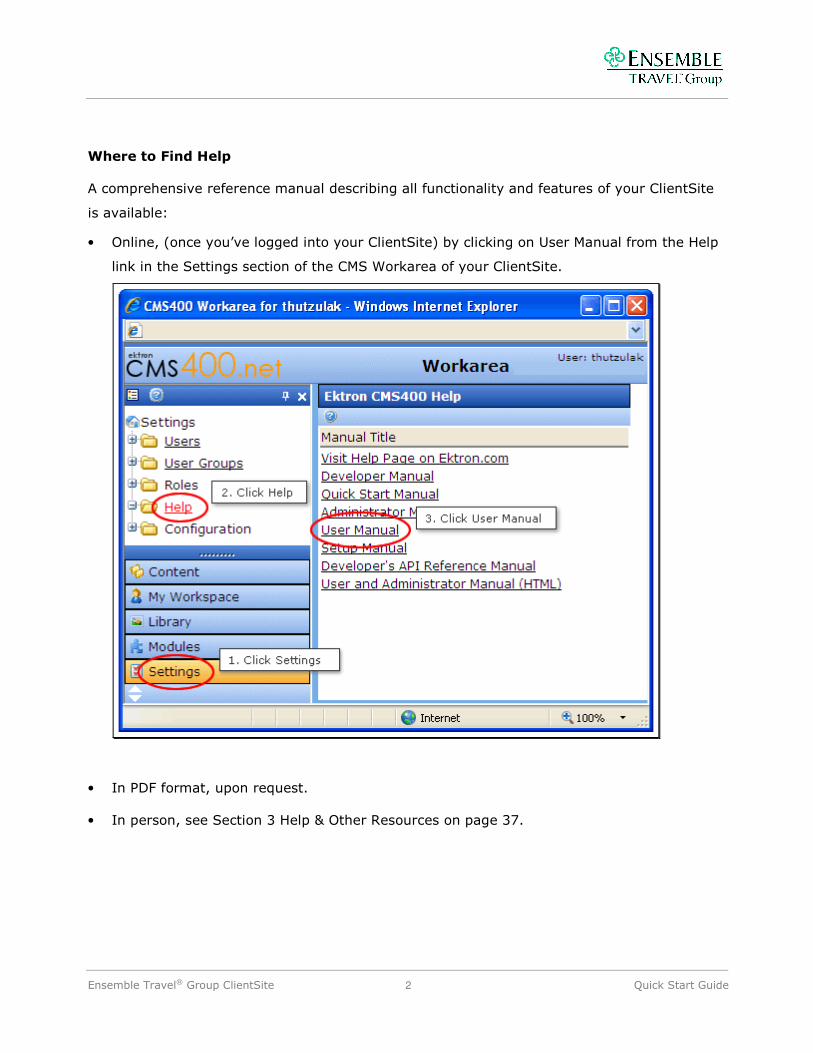
A comprehensive reference manual describing all functionality and features of your ClientSite
is available:
• Online, (once you’ve logged into your ClientSite) by clicking on User Manual from the Help
link in the Settings section of the CMS Workarea of your ClientSite.
• In PDF format, upon request.
• In person, see Section 3 Help & Other Resources on page 37.

Ensemble Travel® Group ClientSite 3 Quick Start Guide
1.1. Installing the CMS Editor in a Web Browser
NOTE: If you are using Microsoft Internet Explorer 6 (or earlier versions), you may need
to install the CMS Editor tool (called eWebEditPro+XML) into your Web browser when you edit
content for the first time. The installation process contains several steps, but is relatively
straight-forward and should not require assistance in order to complete. Installation of the
CMS Editor tool is a one-time only procedure.
If you encounter any problems during the installation of the CMS Editor, ensure that you are
not blocking pop-up windows for your ClientSite, you allow the ActiveX control to be installed
(when prompted), and you have the privileges to install new software on your computer.
If required, you should install the CMS Editor tool on any computer you will be using to access
your ClientSite. For example, you may wish to install the tool on the computer at your office
and also on your home computer.
NOTE: An Internet connection is always required in order to access the CMS tool.
Ensemble Travel® Group ClientSite 4 Quick Start Guide
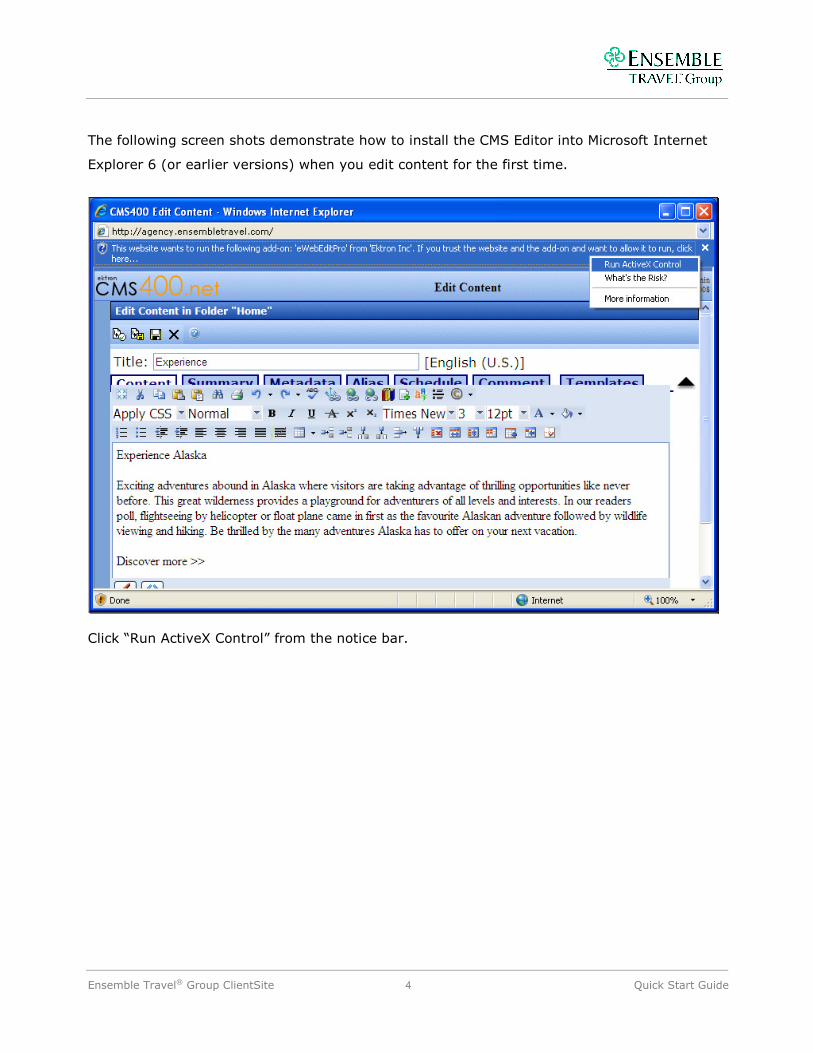
The following screen shots demonstrate how to install the CMS Editor into Microsoft Internet
Explorer 6 (or earlier versions) when you edit content for the first time.
Click “Run ActiveX Control” from the notice bar.

Ensemble Travel® Group ClientSite 5 Quick Start Guide
Click Run from the pop up dialog box.
Enter your ClientSite user name and password to log into the CMS Editor and edit the content.

Ensemble Travel® Group ClientSite 6 Quick Start Guide
1.2. Accessing the CMS
You will need the following in order to access the CMS to add, edit, publish or delete content
from your ClientSite:
• An Internet connection
• A Web browser
• Microsoft Internet Explorer 5.5 or higher
• Netscape Navigator 6.2 or higher
• Mozilla Firefox 1.0 or higher
• Safari
• Microsoft Windows PC running Windows ME, 2000, XP or Vista
• Mac running OSX
• A ClientSite user name and password
Ensemble Travel® Group ClientSite 7 Quick Start Guide
2. Using the Content Management System
2.1. Logging In
The process of logging into your ClientSite is a straight-forward process of supplying a user
name and password. If you do not have a user name and password, contact your CMS
Administrator. In most instances your CMS Administrator is the person at your agency
responsible for managing your ClientSite.
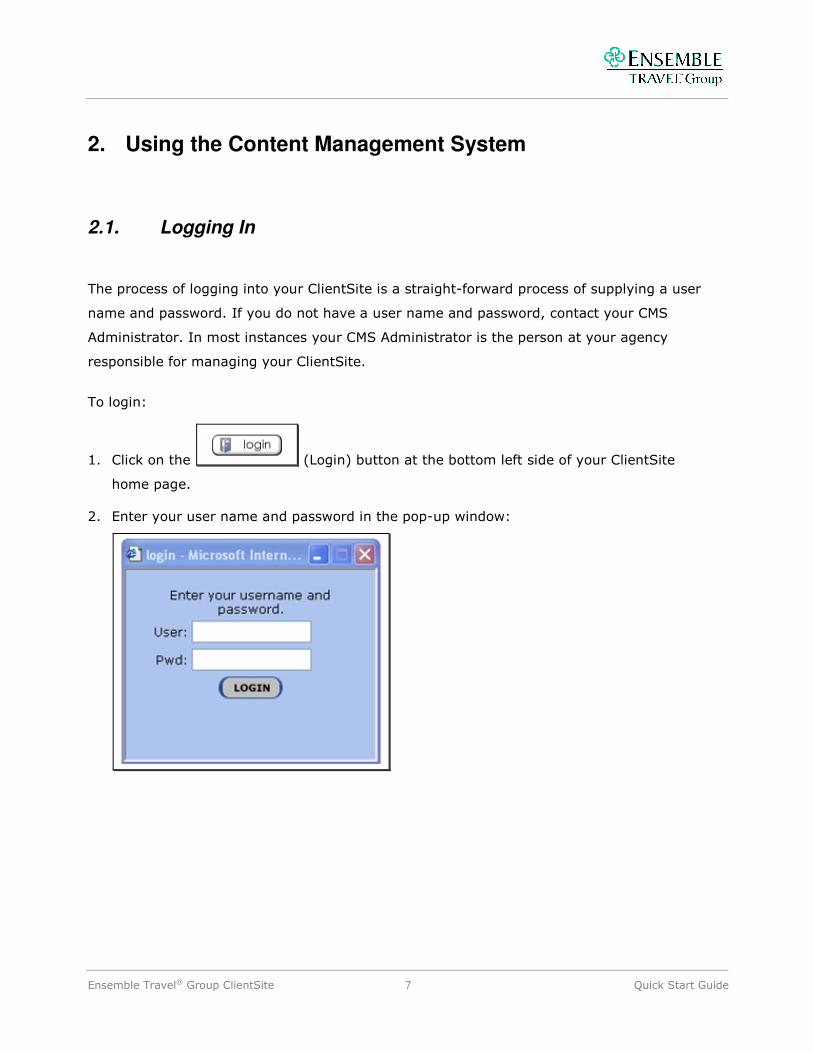
To login:
1. Click on the (Login) button at the bottom left side of your ClientSite
home page.
2. Enter your user name and password in the pop-up window:
Ensemble Travel® Group ClientSite 8 Quick Start Guide
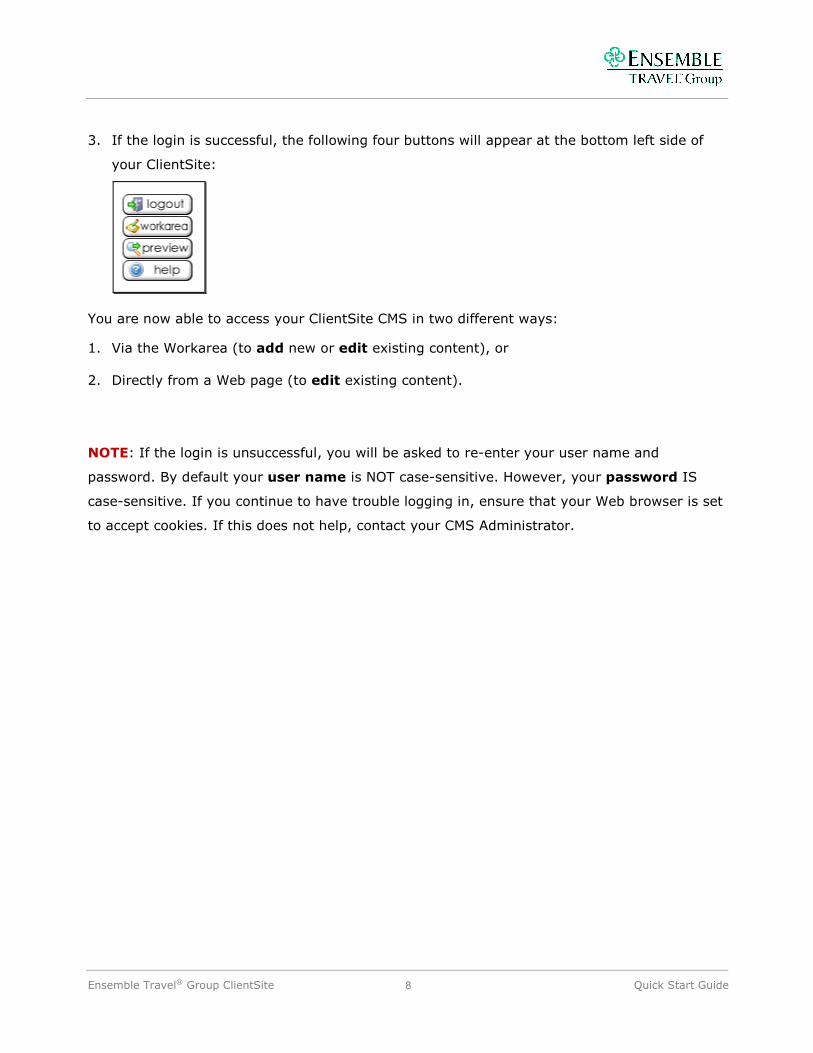
3. If the login is successful, the following four buttons will appear at the bottom left side of
your ClientSite:
You are now able to access your ClientSite CMS in two different ways:
1. Via the Workarea (to add new or edit existing content), or
2. Directly from a Web page (to edit existing content).
NOTE: If the login is unsuccessful, you will be asked to re-enter your user name and
password. By default your user name is NOT case-sensitive. However, your password IS
case-sensitive. If you continue to have trouble logging in, ensure that your Web browser is set
to accept cookies. If this does not help, contact your CMS Administrator.

Ensemble Travel® Group ClientSite 9 Quick Start Guide
2.2. Understanding the CMS Workarea
The Workarea is a Web-based interface for accessing the full functionality of the CMS. You can
access the Workarea by clicking the (Workarea) button at the bottom left side
of each page of your ClientSite.
Contents of the CMS Workarea
When you first access your Workarea, your Smart Desktop is displayed. The following screen
shot presents the basic components of the CMS Workarea on your Smart Desktop:
Ensemble Travel® Group ClientSite 10 Quick Start Guide
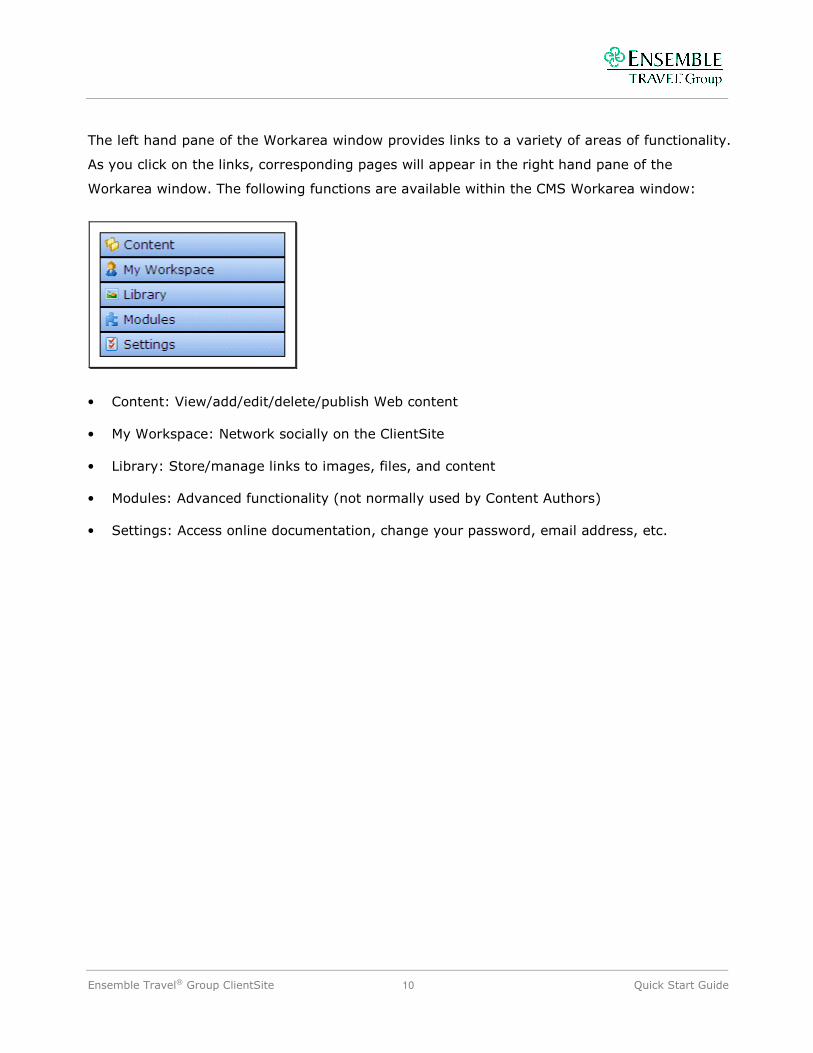
The left hand pane of the Workarea window provides links to a variety of areas of functionality.
As you click on the links, corresponding pages will appear in the right hand pane of the
Workarea window. The following functions are available within the CMS Workarea window:
• Content: View/add/edit/delete/publish Web content
• My Workspace: Network socially on the ClientSite
• Library: Store/manage links to images, files, and content
• Modules: Advanced functionality (not normally used by Content Authors)
• Settings: Access online documentation, change your password, email address, etc.
Ensemble Travel® Group ClientSite 11 Quick Start Guide
2.3. Understanding the CMS Editor
Whenever you add or edit Web content, you will use the WYSIWYG (What You See Is What
You Get) CMS Editor. This tool is a Web-based tool that allows you to make changes to
content in a feature-rich environment. Using the CMS Editor, you can:
• Add, edit and delete text elements
• Format text using bold, italic, underline, and named styles
• Align text in left, center and right alignments
• Add images and/or hyperlinks to your content
• Add numbered or bulleted lists
• Spell check your text
• Add tables to precisely control the layout of text
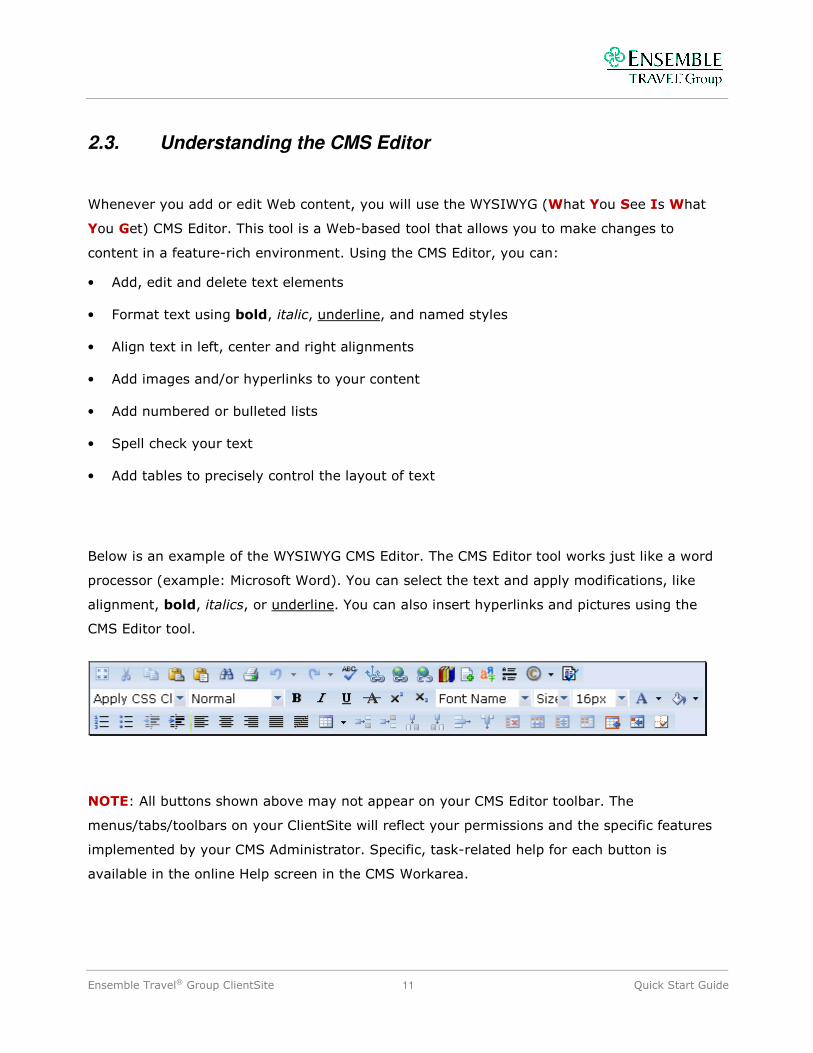
Below is an example of the WYSIWYG CMS Editor. The CMS Editor tool works just like a word
processor (example: Microsoft Word). You can select the text and apply modifications, like
alignment, bold, italics, or underline. You can also insert hyperlinks and pictures using the
CMS Editor tool.
NOTE: All buttons shown above may not appear on your CMS Editor toolbar. The
menus/tabs/toolbars on your ClientSite will reflect your permissions and the specific features
implemented by your CMS Administrator. Specific, task-related help for each button is
available in the online Help screen in the CMS Workarea.

Ensemble Travel® Group ClientSite 12 Quick Start Guide
2.4. Understanding the Content Publishing Process
About Content
What is a Content Block?
Your ClientSite consists of several Web pages. Each page is made up of one or more blocks of
content (see image below). Content blocks are separate, uniquely identified items in the CMS.
This means that two people can work on the same Web page at the same time, but only if
they’re working on two different content blocks.
Ensemble Travel® Group ClientSite 13 Quick Start Guide
The Check-In/Check-Out Process
It is imperative that all users who access the CMS understand and correctly utilize the Check-
In/Check-Out process when working with content on the ClientSite. Any time you edit content,
it is first checked out to you. This process ensures that only one person has access to edit that
content at any one time, thereby preventing accidental overwrites from occurring.
The Check-In/Check-Out process applies at a content block level, which means that two
people can work on the same Web page at the same time, but only if they’re working on two
different content blocks.
NOTE: It is very important that you check your content in when you are done working on it.
Do not leave content in a checked out state. If you are unavailable and someone else
needs to make changes to a content block that is checked out, a CMS Administrator will need
to forcibly check the content block back in to make it available and any edits you may have
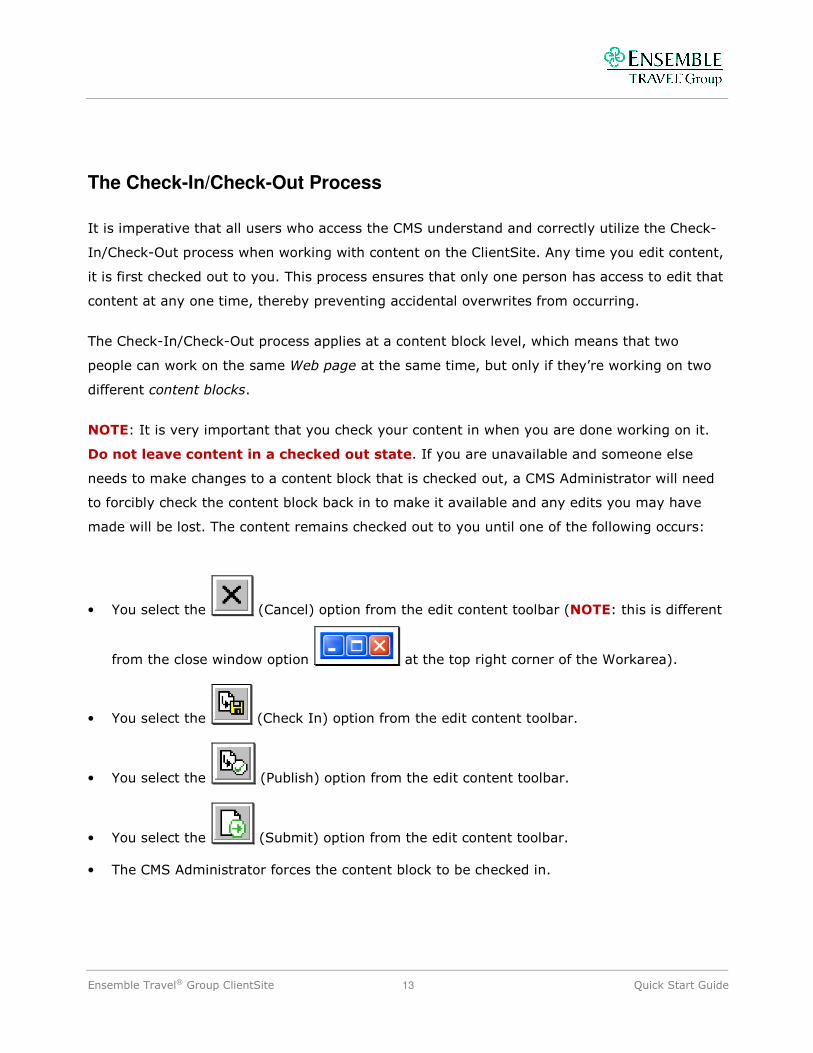
made will be lost. The content remains checked out to you until one of the following occurs:
• You select the (Cancel) option from the edit content toolbar (NOTE: this is different
from the close window option at the top right corner of the Workarea).
• You select the (Check In) option from the edit content toolbar.
• You select the (Publish) option from the edit content toolbar.
• You select the (Submit) option from the edit content toolbar.
• The CMS Administrator forces the content block to be checked in.
Ensemble Travel® Group ClientSite 14 Quick Start Guide
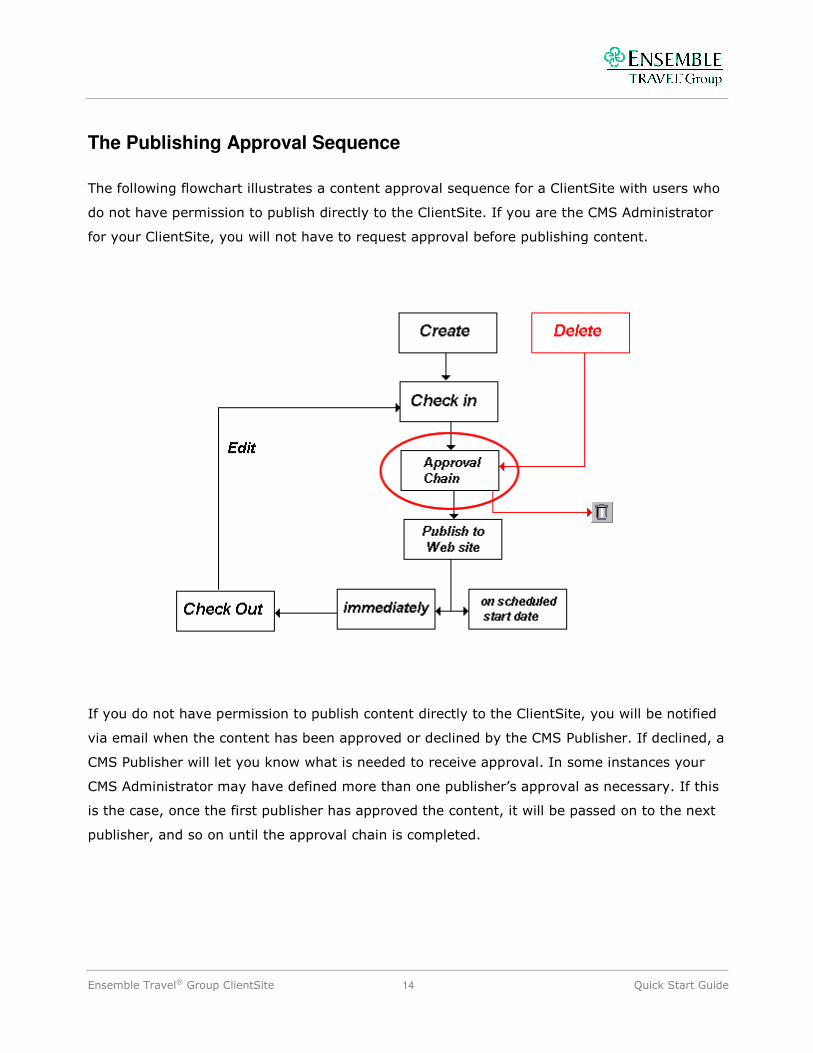
The Publishing Approval Sequence
The following flowchart illustrates a content approval sequence for a ClientSite with users who
do not have permission to publish directly to the ClientSite. If you are the CMS Administrator
for your ClientSite, you will not have to request approval before publishing content.
If you do not have permission to publish content directly to the ClientSite, you will be notified
via email when the content has been approved or declined by the CMS Publisher. If declined, a
CMS Publisher will let you know what is needed to receive approval. In some instances your
CMS Administrator may have defined more than one publisher’s approval as necessary. If this
is the case, once the first publisher has approved the content, it will be passed on to the next
publisher, and so on until the approval chain is completed.

Ensemble Travel® Group ClientSite 15 Quick Start Guide
2.5. Using the CMS to Edit, Add and Delete Content
After logging into your ClientSite, the CMS can be utilized in two ways:
1. Using a Web browser to access and edit content on existing Web pages, or
2. Using the CMS Workarea to add new or edit existing content.
Using a Web Browser to Edit Content
The easiest way to access the CMS functionality of your ClientSite is by using your Web
browser. When you are logged in, and not in preview mode, you will see small, round icons
above the blocks of CMS-managed content. As you move your mouse over these icons, a
drop-down toolbar will appear. By selecting EDIT from the toolbar, you can access the CMS
and edit the content.
NOTE: The items on the toolbar will vary depending upon the permissions granted to you,
whether the content is available for editing, and other factors. For example, if you try to edit
content someone else has already checked out and is in the process of editing, you will not
see the EDIT link in the drop-down toolbar because two users cannot edit the same content
block at the same time.
Ensemble Travel® Group ClientSite 16 Quick Start Guide
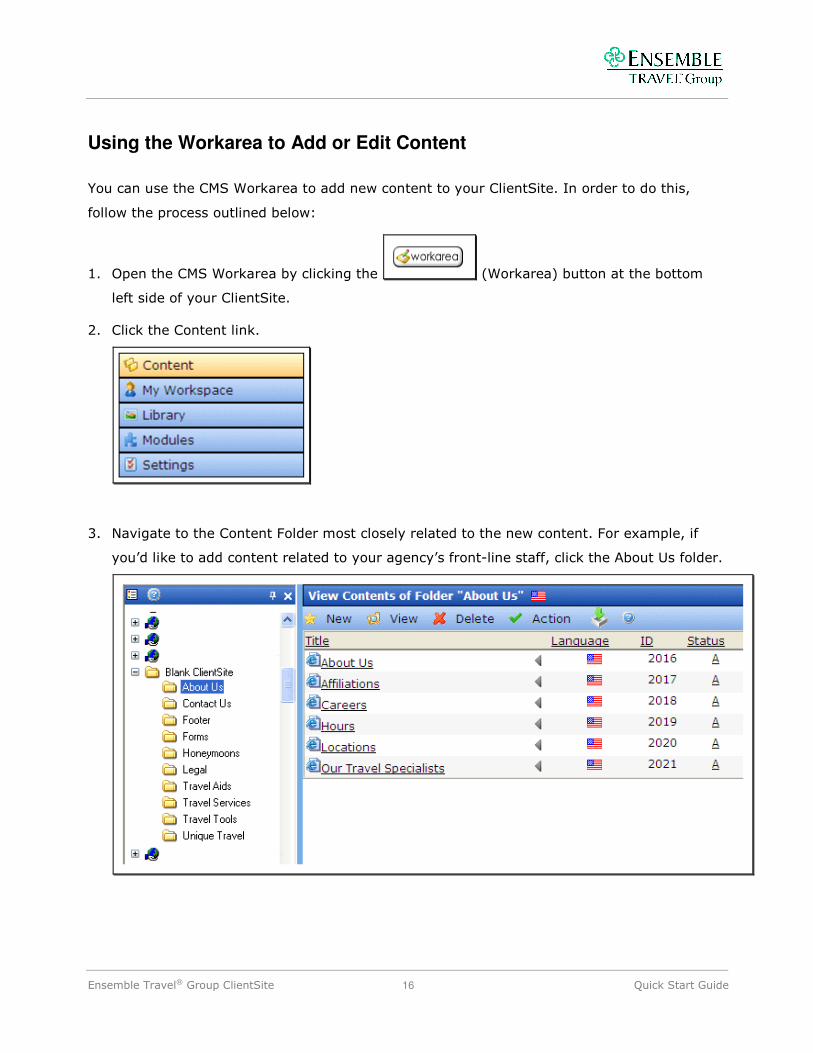
Using the Workarea to Add or Edit Content
You can use the CMS Workarea to add new content to your ClientSite. In order to do this,
follow the process outlined below:
1. Open the CMS Workarea by clicking the (Workarea) button at the bottom
left side of your ClientSite.
2. Click the Content link.
3. Navigate to the Content Folder most closely related to the new content. For example, if
you’d like to add content related to your agency’s front-line staff, click the About Us folder.
Ensemble Travel® Group ClientSite 17 Quick Start Guide
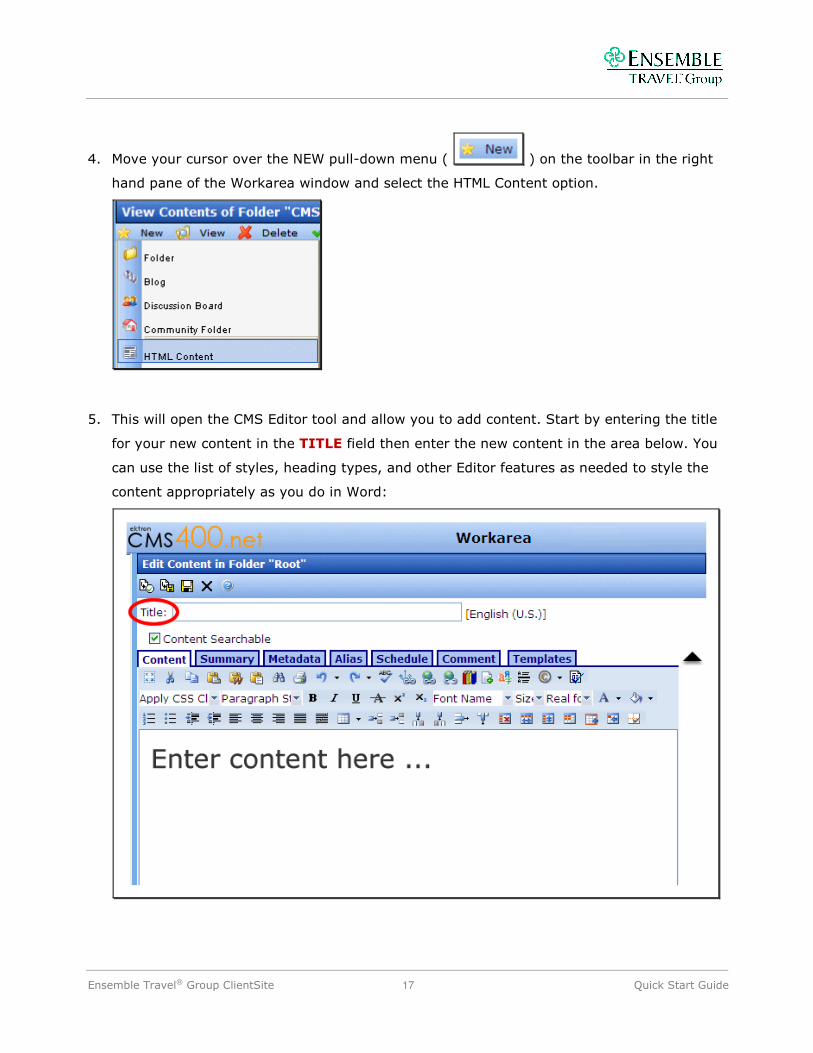
4. Move your cursor over the NEW pull-down menu ( ) on the toolbar in the right
hand pane of the Workarea window and select the HTML Content option.
5. This will open the CMS Editor tool and allow you to add content. Start by entering the title
for your new content in the TITLE field then enter the new content in the area below. You
can use the list of styles, heading types, and other Editor features as needed to style the
content appropriately as you do in Word:

Ensemble Travel® Group ClientSite 18 Quick Start Guide
Additional Content Options
• Select the Summary tab and enter a summary of the content. The summary you enter may
be displayed by a content collection, list summary, or search results.
• Enter relevant metadata information.
Ensemble Travel® Group ClientSite 19 Quick Start Guide
• In the Schedule tab, enter a start date for when the content should appear. You can use
the calendar icon next to the start date to select a date.
• Enter the end date for when the content should no longer be publicly visible on your
ClientSite - this is an optional step. If you enter an end date, be sure to select the
appropriate option to indicate what action should be taken when the date occurs.
• Archive and remove from ClientSite (expire).
• Archive and remain on ClientSite.
• Add to the CMS Refresh Report.
• Enter any comments you have about the content in the Comments field. This is only for
internal use and will only be displayed as commentary for the content’s history and archive.
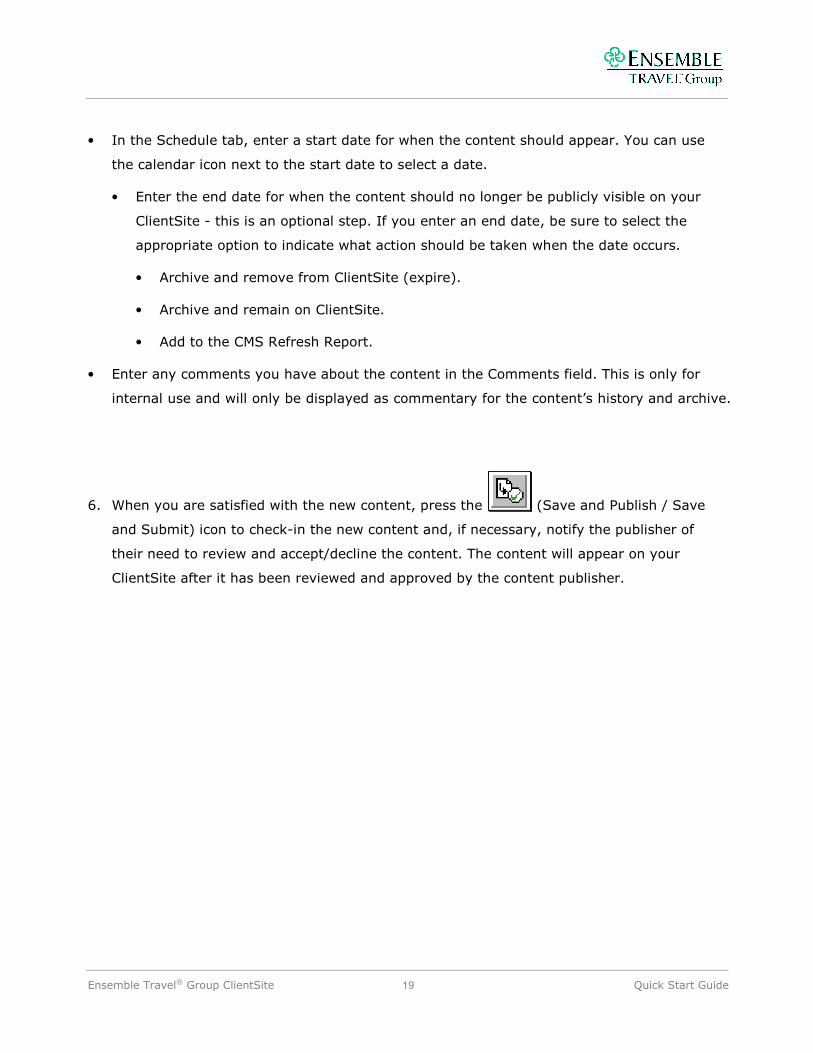
6. When you are satisfied with the new content, press the (Save and Publish / Save
and Submit) icon to check-in the new content and, if necessary, notify the publisher of
their need to review and accept/decline the content. The content will appear on your
ClientSite after it has been reviewed and approved by the content publisher.

Ensemble Travel® Group ClientSite 20 Quick Start Guide
Deleting Content
Although a CMS Administrator may be able to restore deleted content in some circumstances,
deleting content may have serious consequences. Use the Delete command with caution.
NOTE: You may or may not be able to delete content based on the permissions associated
with your ClientSite user profile.
To delete content:
1. Login to the CMS and open the CMS Workarea.
2. Navigate to the appropriate Content folder in the left hand pane of the Workarea window.
3. Click on the arrow to the right of the title of the content you wish to delete in the right
hand pane of the Workarea window.
4. Click DELETE from the drop-down menu.
(continued … )

Ensemble Travel® Group ClientSite 21 Quick Start Guide
5. Based on your permission settings, one of the following two confirmation dialogs will be
displayed:
6. Click OK and the content will be deleted immediately or a delete request will be sent to the
CMS Publisher for approval. As soon as the request is approved, the content block will be
deleted.
Ensemble Travel® Group ClientSite 22 Quick Start Guide
2.6. Adding Images
Before you can insert an image into your content, it must first be added to the CMS Library.
Adding an Image to the CMS Library
To add an image to the library:
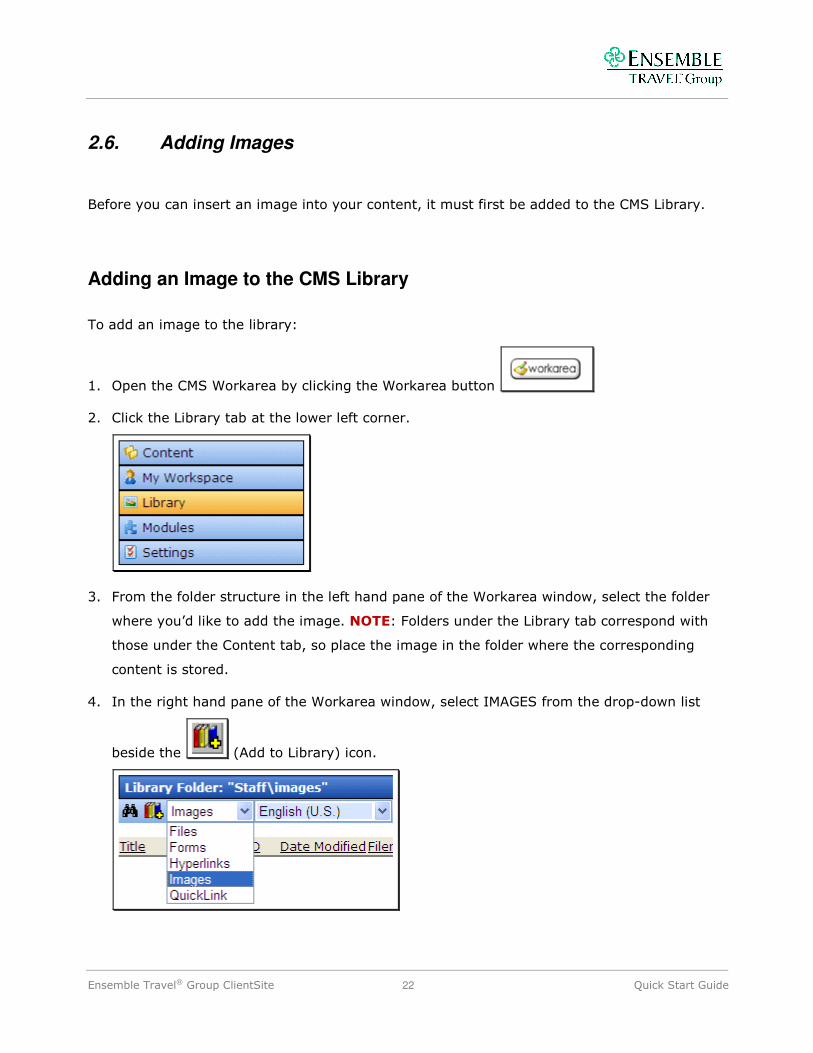
1. Open the CMS Workarea by clicking the Workarea button
2. Click the Library tab at the lower left corner.
3. From the folder structure in the left hand pane of the Workarea window, select the folder
where you’d like to add the image. NOTE: Folders under the Library tab correspond with
those under the Content tab, so place the image in the folder where the corresponding
content is stored.
4. In the right hand pane of the Workarea window, select IMAGES from the drop-down list
beside the (Add to Library) icon.

Ensemble Travel® Group ClientSite 23 Quick Start Guide
5. Click the (Add to Library) button.
6. The Add File screen appears.
7. Click the Browse button to locate the image on your computer you’d like to add to the
CMS Library.
8. Enter the necessary information according to the following:
Title: Enter a title for the image to be copied.
Filename: Enter the path to the image to be copied. You can use the Browse button to
find it on your computer.
Description: You can enter a full text description to help other users identify this image.
9. Click the (Save) button. The image is now added to the CMS Library. Users with
permissions to the selected folder can insert the image into their content.
Ensemble Travel® Group ClientSite 24 Quick Start Guide
Inserting an Image into your Content
You can use the Library feature to insert images while adding or editing content. To add an
image, follow the process described below:
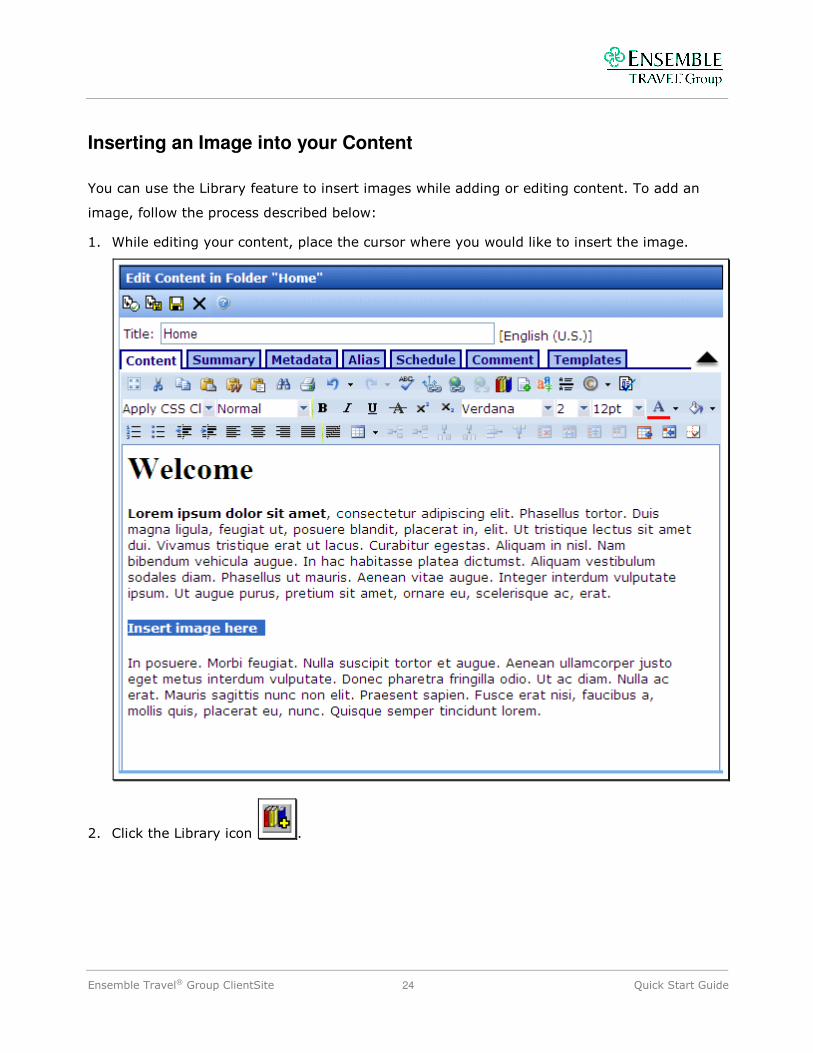
1. While editing your content, place the cursor where you would like to insert the image.
2. Click the Library icon .
Ensemble Travel® Group ClientSite 25 Quick Start Guide
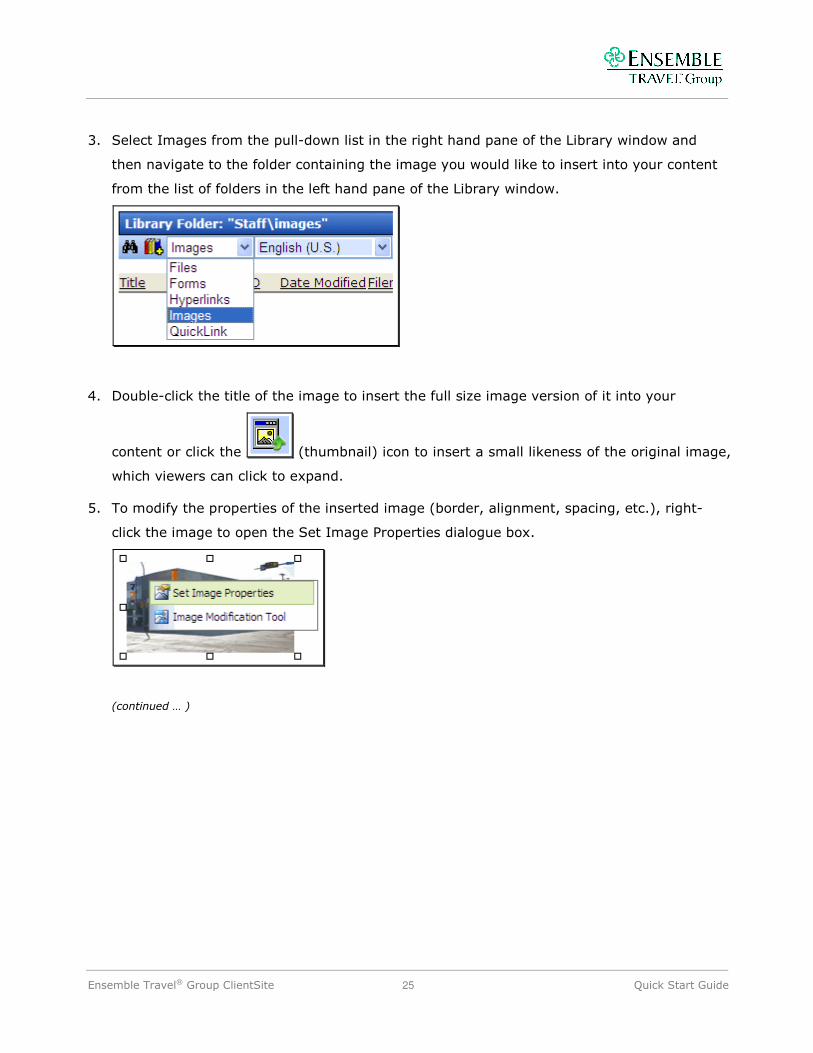
3. Select Images from the pull-down list in the right hand pane of the Library window and
then navigate to the folder containing the image you would like to insert into your content
from the list of folders in the left hand pane of the Library window.
4. Double-click the title of the image to insert the full size image version of it into your
content or click the (thumbnail) icon to insert a small likeness of the original image,
which viewers can click to expand.
5. To modify the properties of the inserted image (border, alignment, spacing, etc.), right-
click the image to open the Set Image Properties dialogue box.
(continued … )

Ensemble Travel® Group ClientSite 26 Quick Start Guide
6. When you have finished modifying the image, press OK.
NOTE: If you forget to make changes to a picture after you have added it to the content block,
you can select the picture and press the Picture icon in the CMS Editor tool to bring the Picture
Properties box back up.
Ensemble Travel® Group ClientSite 27 Quick Start Guide
2.7. Adding Hyperlinks
This section describes the set of hyperlink tools. Hyperlinks are one of the most important
aspects of any Web site. There are a number of different kinds of hyperlinks that can be added,
including links to other Web sites, links to other pages within your site, links that send an
email and links to places within the current Web page. Generally speaking, you add a
hyperlink to either a piece of selected text or to an image. Before proceeding, you should have
the CMS Editor open and have either text or a picture selected.
Adding Hyperlinks to other Web sites
To add a hyperlink to another Web site:
1. Select the text that will become the hyperlink.
(continued … )
Ensemble Travel® Group ClientSite 28 Quick Start Guide
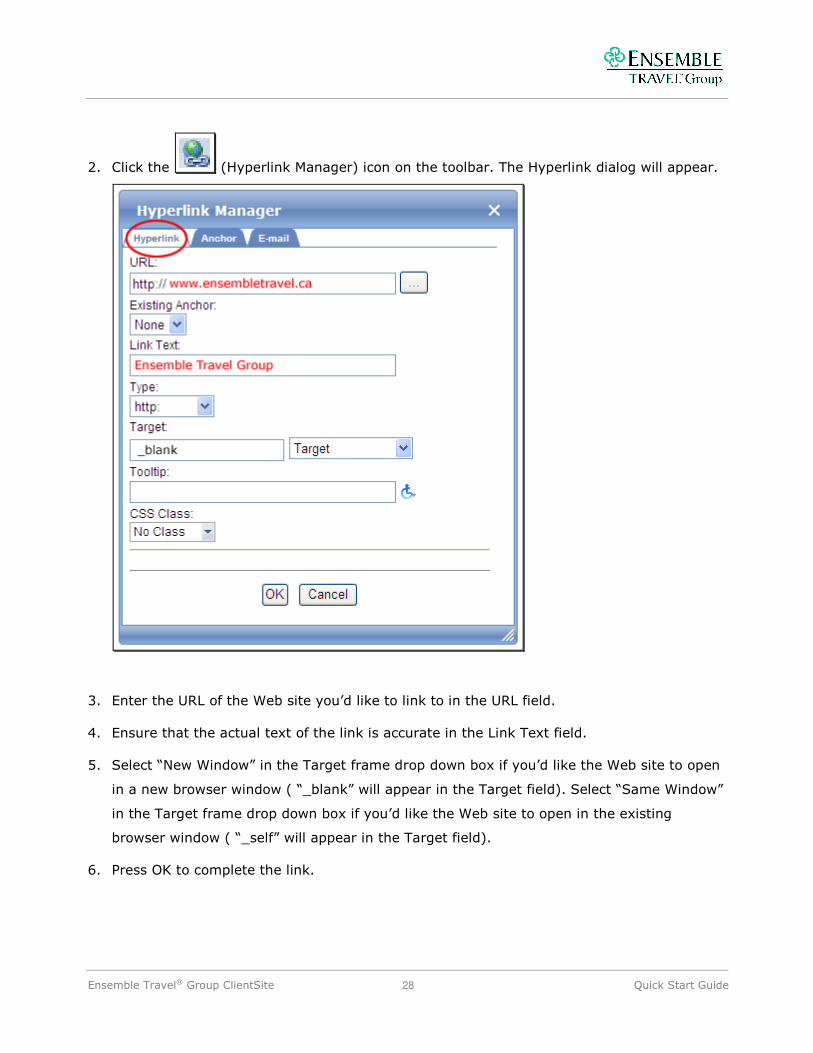
2. Click the (Hyperlink Manager) icon on the toolbar. The Hyperlink dialog will appear.
3. Enter the URL of the Web site you’d like to link to in the URL field.
4. Ensure that the actual text of the link is accurate in the Link Text field.
5. Select “New Window” in the Target frame drop down box if you’d like the Web site to open
in a new browser window ( “_blank” will appear in the Target field). Select “Same Window”
in the Target frame drop down box if you’d like the Web site to open in the existing
browser window ( “_self” will appear in the Target field).
6. Press OK to complete the link.
Ensemble Travel® Group ClientSite 29 Quick Start Guide
Adding Anchor Links
There may be times when you have a long Web page and want to add links that will quickly
take the user to a specific point in the page. To do this, you must create:
• An ANCHOR link, the place on the Web page to jump to when a user clicks the source link,
and
• A SOURCE link, the text a user clicks to jump to the specific point on the Web page.
To create an anchor link:
1. While editing content using the CMS Editor tool, move your cursor to the place you’d like to
create an anchor point and click to position your cursor there.
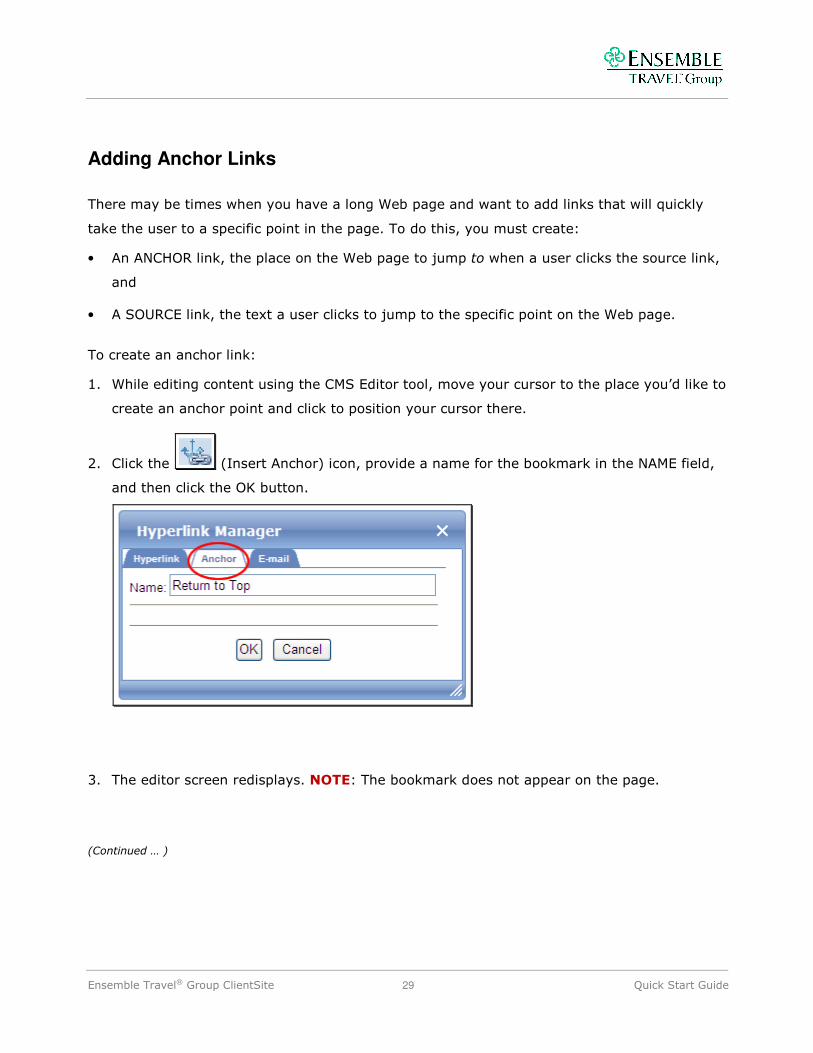
2. Click the (Insert Anchor) icon, provide a name for the bookmark in the NAME field,
and then click the OK button.
3. The editor screen redisplays. NOTE: The bookmark does not appear on the page.
(Continued … )

Ensemble Travel® Group ClientSite 30 Quick Start Guide
4. After you have created the anchor link, select the source text that you’d like to link to the
anchor and click the (Hyperlink Manager) icon. The Hyperlink Manager dialog
appears with the Hyperlink tab selected:
5. From the Existing Anchor drop-down menu, select the name of the bookmark you wish to
link to.
6. Click the OK button to complete the link.
Ensemble Travel® Group ClientSite 31 Quick Start Guide
Adding Email Links
Adding mailto: links is very similar to the external hyperlink process described above. Follow
these steps to add a link that will open a new email addressed to a specific recipient:
1. Select the text that will become the hyperlink.
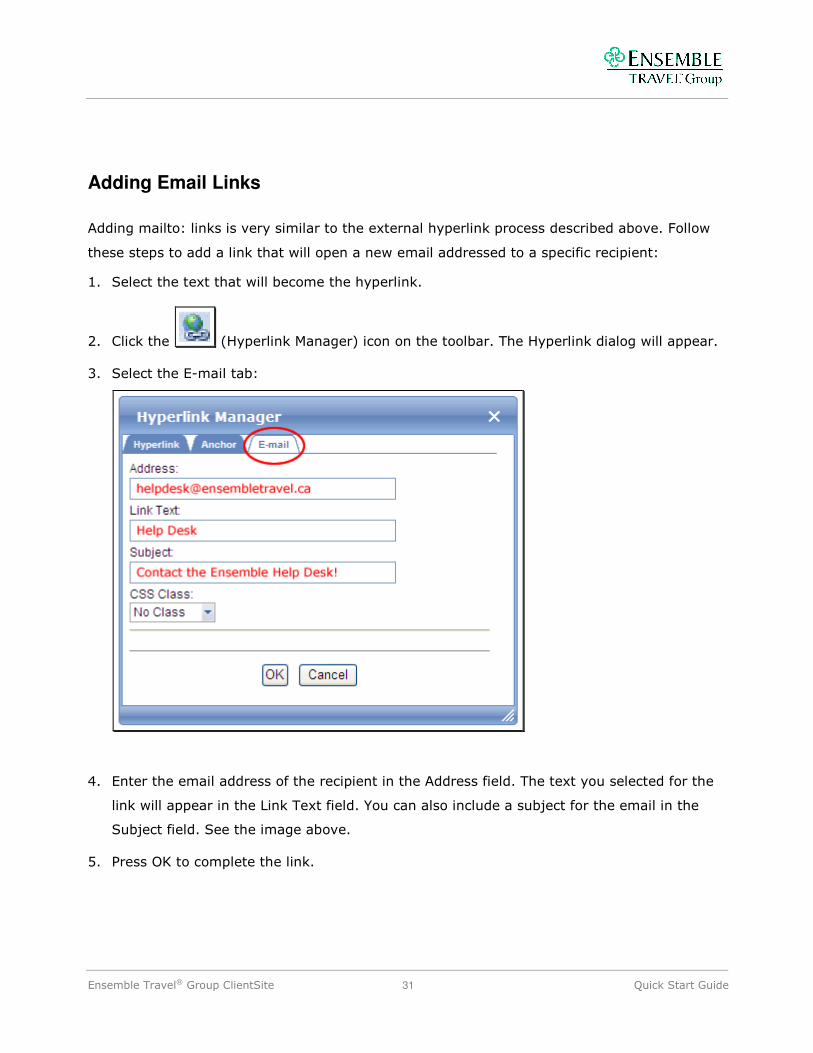
2. Click the (Hyperlink Manager) icon on the toolbar. The Hyperlink dialog will appear.
3. Select the E-mail tab:
4. Enter the email address of the recipient in the Address field. The text you selected for the
link will appear in the Link Text field. You can also include a subject for the email in the
Subject field. See the image above.
5. Press OK to complete the link.

Ensemble Travel® Group ClientSite 32 Quick Start Guide
Adding Links to Files
To create a link to a file - for example, a PDF file or a Microsoft Word document, the file must
first be added to the CMS Library.
Adding a File to the CMS Library
To add a file to the CMS Library:
1. Open the CMS Workarea by clicking the Workarea button
2. Click the Library tab at the lower left corner.
3. From the folder structure in the left hand pane of the Workarea window, select the folder
where you’d like to add the file. NOTE: Folders under the Library tab correspond with
those under the Content tab, so place the file in the folder where the corresponding
content is stored.
4. In the right hand pane of the Workarea window, select Files from the drop-down list near
the top.
Ensemble Travel® Group ClientSite 33 Quick Start Guide
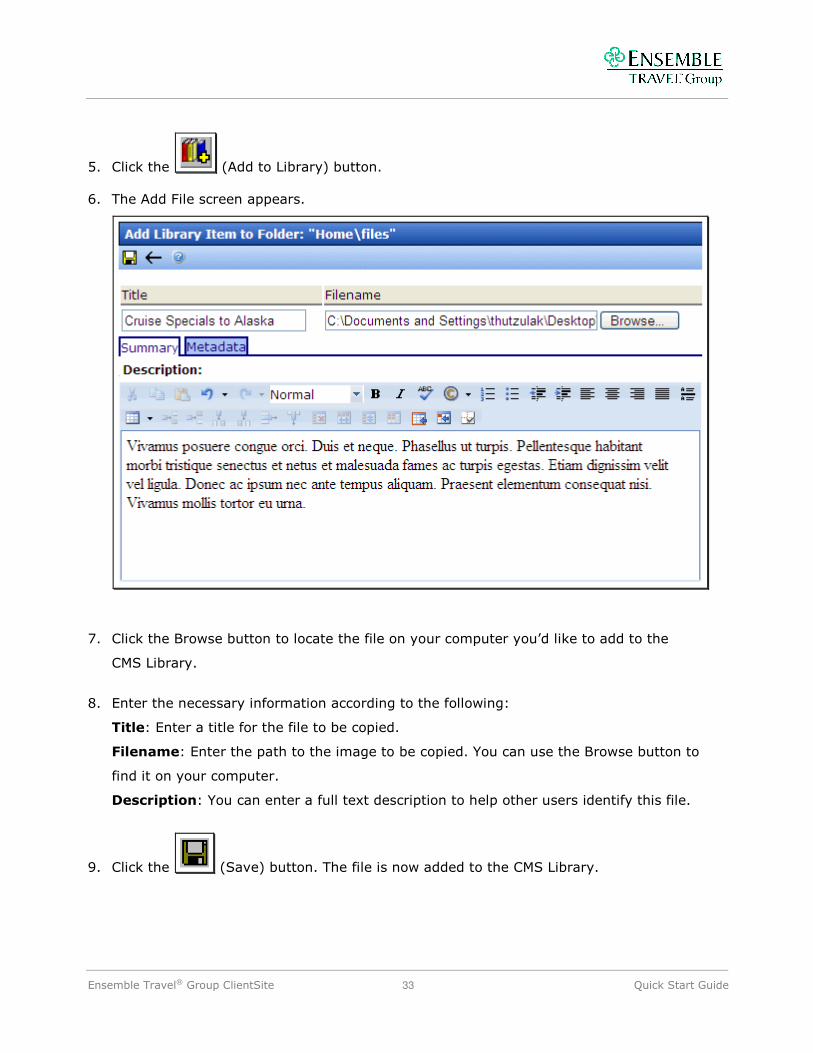
5. Click the (Add to Library) button.
6. The Add File screen appears.
7. Click the Browse button to locate the file on your computer you’d like to add to the
CMS Library.
8. Enter the necessary information according to the following:
Title: Enter a title for the file to be copied.
Filename: Enter the path to the image to be copied. You can use the Browse button to
find it on your computer.
Description: You can enter a full text description to help other users identify this file.
9. Click the (Save) button. The file is now added to the CMS Library.

Ensemble Travel® Group ClientSite 34 Quick Start Guide
Linking to a File
To create a link to a file:
1. While editing content using the CMS Editor tool, select the text that will link to the file.
2. Click the (Library) icon to open the Library window.
3. Select Files from the pull-down list of object types and navigate to the location of the file
you wish to link to.
4. Select the title of the file you wish to insert a link to and press the (Insert) icon, or
simply double-click the file’s title.

Ensemble Travel® Group ClientSite 35 Quick Start Guide
2.8. Changing Your Password/User Profile
To change your CMS password or other user profile information:
1. Login to the CMS and open the CMS Workarea.
2. Select the (Settings) link from the bottom left corner of the
Workarea.
3. Click the User Profile link from the left side navigation to review
your user profile information.
4. Click the edit icon to make changes. A screen similar to the one below appears,
allowing you to change your password, email address, landing page after login, and Web
alert subscriptions (if any exist).
(continued … )

Ensemble Travel® Group ClientSite 36 Quick Start Guide
NOTE: You must leave the box labelled “Disable Receiving of System Notification Email”
unchecked in order to participate in the publishing process.
5. Press the Save icon to save your changes.
Ensemble Travel® Group ClientSite 37 Quick Start Guide
3. Help & Other Resources
As mentioned in the Overview, this document is not the only guide to the functionality and
features of your Ensemble Travel® Group ClientSite. A comprehensive reference manual
describing all functionality and features is available:
• Online, (once you’ve logged into your ClientSite) by clicking on User Manual from the Help
link in the Settings section of the content management system (CMS) Workarea of your
ClientSite.
• In PDF format, upon request.
In-depth training on how to use your ClientSite is also available by:
• Scheduled webinars, and
• Phone.
If you have any questions or concerns regarding your ClientSite, please contact the following:
Canadian Members USA Members
Todd Hutzulak
Web Advisor
P: (604) 732-4401 x303
Steven Holder
Website Content/ClientSite Help Desk Manager
P: (212) 545-7460 x267