english - hph10032. some of its most popular products. this hp product contains lead in the solder,...
TRANSCRIPT

HP Photosmart 8700 series User's Guide
English

Copyrights and trademarks© Copyright 2005 Hewlett-PackardDevelopment Company, L.P.The information contained herein issubject to change without notice.Reproduction, adaptation ortranslation without prior writtenpermission is prohibited, except asallowed under the copyright laws.
NoticeThe only warranties for HP productsand services are set forth in theexpress warranty statementsaccompanying such products andservices. Nothing herein should beconstrued as constituting anadditional warranty. HP shall not beliable for technical or editorial errorsor omissions contained herein.The Hewlett-Packard DevelopmentCompany, L.P. shall not be liable forincidental or consequential damagesin connection with, or arising out ofthe furnishing, performance, or use ofthis document and the programmaterial which it describes.
TrademarksHP, the HP logo, and Photosmart areproperty of Hewlett-PackardDevelopment Company, L.P.The Secure Digital logo is atrademark of the SD Association.Microsoft and Windows are registeredtrademarks of Microsoft Corporation.CompactFlash, CF, and the CF logoare trademarks of the CompactFlashAssociation (CFA).Memory Stick, Memory Stick Duo,Memory Stick PRO, and MemoryStick PRO Duo are trademarks orregistered trademarks of SonyCorporation.MultiMediaCard is a trademark ofInfineon Technologies AG ofGermany, and is licensed to theMMCA (MultiMediaCard Association).Microdrive is a trademark of HitachiGlobal Storage Technologies.xD-Picture Card is a trademark of FujiPhoto Film Co., Ltd., ToshibaCorporation, and Olympus OpticalCo., Ltd.Mac, the Mac logo, and Macintoshare registered trademarks of AppleComputer, Inc.The Bluetooth word mark and logosare owned by the Bluetooth SIG, Inc.
and any use of such marks byHewlett-Packard Company is underlicense.PictBridge and the PictBridge logo aretrademarks of the Camera & ImagingProducts Association (CIPA).Other brands and their products aretrademarks or registered trademarksof their respective holders.The embedded software in the printeris based in part on the work of theIndependent JPEG Group.The copyrights to certain photoswithin this document are retained bythe original owners.
Regulatory modelidentification numberVCVRA-0402For regulatory identification purposes,the product is assigned a RegulatoryModel Number. The RegulatoryModel Number for the product isVCVRA-0402. This regulatory numbershould not be confused with themarketing name (HP Photosmart8700 series printer) or productnumber (Q5745A).
Safety informationAlways follow basic safetyprecautions when using this productto reduce risk of injury from fire orelectric shock.
Warning To prevent fire orshock hazard, do not exposethis product to rain or anytype of moisture.
● Read and understand allinstructions in the setupinstructions that came in thebox with the printer.
● Use only a grounded electricaloutlet when connecting the unitto a power source. If you do notknow whether the outlet isgrounded, check with a qualifiedelectrician.
● Observe all warnings andinstructions marked on theproduct.
● Unplug this product from walloutlets before cleaning.
● Do not install or use this productnear water or when you are wet.
● Install the product securely on astable surface.
● Install the product in a protectedlocation where no one can stepon or trip over the power cord,and where the power cord willnot be damaged.
● If the product does not operatenormally, see thetroubleshooting information inthe onscreen HP PhotosmartPrinter Help.
● There are no operatorserviceable parts inside. Referservicing to qualified servicepersonnel.
● Use in a well-ventilated area.
Environmental statementsHewlett-Packard Company iscommitted to providing qualityproducts in an environmentally soundmanner.
Protecting the environmentThis printer has been designed withseveral attributes to minimize impacton our environment. For moreinformation, go to HP's Commitmentto the Environment web site atwww.hp.com/hpinfo/globalcitizenship/environment/.
Ozone productionThis product generates noappreciable ozone gas (O3).
Paper useThis product is suited for the use ofrecycled paper according to DIN19309.
PlasticsPlastic parts over 24 grams (0.88ounces) are marked according tointernational standards that enhancethe ability to identify plastics forrecycling purposes at the end of theprinter life.
Material safety data sheetsMaterial Safety Data Sheets (MSDS)can be obtained from the HP web siteat www.hp.com/go/msds. Customerswithout Internet access shouldcontact HP Customer Care.
Recycling programHP offers an increasing number ofproduct return and recycling programsin many countries, and partners withsome of the largest electronicsrecycling centers throughout theworld. HP conserves resources by

reselling some of its most popularproducts.This HP product contains lead in thesolder, which may require specialhandling at the end of its life.Important recycling information forour customers in the EuropeanUnion: To preserve the environment,this product must be recycled after itsuseful life as required by law. Thesymbol below indicates that thisproduct may not be disposed in thegeneral trash. Please return theproduct for proper recovery/disposalto the authorized collection locationnearest to you. For more informationregarding return and recycling of HPproducts generally, please visit:www.hp.com/hpinfo/globalcitizenship/environment/recycle/index.html.


Contents
1 Welcome................................................................................................................3Finding more information........................................................................................4Printer parts............................................................................................................4Printer menu...........................................................................................................7
2 Getting ready to print...........................................................................................9Loading paper.........................................................................................................9
Choosing the right paper.................................................................................9Using specialty papers..................................................................................10Loading your paper........................................................................................ 11
Inserting print cartridges.......................................................................................133 Basic printing from a computer........................................................................174 Using color management...................................................................................19
Using printer-based color management................................................................19Using application-based color management.........................................................22
5 Exploring creative projects................................................................................25The large-format templates...................................................................................25The HP Image Zone.............................................................................................26Printing borderless photos from a computer.........................................................27
6 Printing photos without a computer.................................................................29Connecting to other devices.................................................................................29Printing photos from a memory card.....................................................................30
Inserting memory cards.................................................................................30Supported file formats............................................................................30Inserting a memory card.........................................................................31Saving photos to a computer from a memory card.................................32Removing a memory card......................................................................33
Deciding which photos to print.......................................................................33Selecting a photo layout................................................................................33Selecting photos to print................................................................................36Improving photo quality.................................................................................37Doing common printing tasks from a memory card.......................................37
Printing photos from a digital camera...................................................................39Using a PictBridge camera............................................................................39Using a Bluetooth camera.............................................................................39
Printing from other Bluetooth devices...................................................................407 Care and maintenance.......................................................................................41
Cleaning and maintaining the printer....................................................................41Cleaning the outside of the printer.................................................................41Automatically cleaning the print cartridges....................................................41Manually cleaning the print cartridge contacts...............................................42Printing a test page........................................................................................ 42Aligning the print cartridges...........................................................................43Printing a sample page..................................................................................43
Updating the software...........................................................................................43Storing the printer.................................................................................................44
HP Photosmart 8700 series User's Guide 1

Maintaining the supplies.......................................................................................44Storing photo paper.......................................................................................45Handling photo paper....................................................................................45Storing the print cartridges............................................................................45
8 Troubleshooting.................................................................................................47Printer software installation problems...................................................................47Printer hardware problems...................................................................................48Printing problems..................................................................................................50Error messages....................................................................................................54
Paper errors..................................................................................................54Print cartridge errors......................................................................................55Memory card errors.......................................................................................57Computer printing errors................................................................................60Network errors...............................................................................................60
9 HP Customer Care..............................................................................................61HP Customer Care by phone................................................................................61
Placing a call.................................................................................................64Return to HP repair service (North America only).................................................64Additional warranty options...................................................................................64
a Networking..........................................................................................................65Networking basics (Windows and Macintosh)......................................................65
Internet connection........................................................................................66Recommended network configurations.........................................................66
Ethernet network without Internet access...............................................66Ethernet network with Internet access by dial-up modem......................66Ethernet network with broadband Internet access provided by arouter......................................................................................................66
Connecting the printer to the network...................................................................66Installing the printer software on a Windows computer......................................... 67Installing the printer software on a Macintosh.......................................................69Using the embedded web server..........................................................................70Printing a network configuration page..................................................................70
b Specifications.....................................................................................................71System requirements............................................................................................71Printer specifications............................................................................................71
c HP Warranty........................................................................................................75Index...........................................................................................................................77
2 HP Photosmart 8700 series

1 Welcome Thank you for purchasing an HP Photosmart 8700 series printer! With this new photoprinter, you can print professional color and black-and-white photos to sell or displayfor generations.
This guide primarily provides details about specific printing tasks, including whenprinting from a computer. For more information about connecting the printer to acomputer or printing from a computer, install the printer software and view theonscreen HP Photosmart Printer Help. For information about installing the software,see the setup instructions that came in the box with the printer.
The HP Photosmart 8700 series has features that appeal to serious professional andadvanced amateur photographers as well as to creative home users:
Professional and advanced amateurphotographers(Digital photography, fine arts)
Creative home users(Scrapbooking, arts and crafts,creative projects)
● Turn the color managementfeatures of the printer on or off
● Use color management to ensurethat what you see on the computerscreen matches the photos printedon the HP Photosmart
● Use the color management featuresin concert with professionalsoftware such as Adobe®
Photoshop® to produce high-quality,professional prints
For more information, see Using colormanagement.
● Print borderless photos from theprinter's control panel or from acomputer
● Use the HP Image Zone softwarefor creative projects
● Use special large-format templatesfor use in scrapbooking
For more information, see Exploringcreative projects.
The printer comes with the following documentation:
● Quick Start booklet or Setup Guide: The HP Photosmart 8700 series printercomes with setup instructions that explain how to set up the printer and install theprinter software. Which document you receive with the printer varies by country/region.
● User's Guide: The HP Photosmart 8700 series User's Guide is the book you arereading. This book describes the basic features of the printer, explains how touse the printer without connecting a computer, and contains troubleshootinginformation.
● HP Photosmart Printer Help: The onscreen HP Photosmart Printer Helpdescribes how to use the printer with a computer and contains softwaretroubleshooting information.
HP Photosmart 8700 series User's Guide 3

Finding more information After you have installed the HP Photosmart printer software on a computer, you canview the onscreen HP Photosmart Printer Help:
● Windows PC: From the Start menu, select Programs (in Windows XP, select AllPrograms) > HP > Photosmart 320, 370, 7400, 8100, 8400, 8700 series >Photosmart Help.
● Macintosh: Select Help > Mac Help in the Finder, then select Library >HP Photosmart Printer Help.
Printer parts
Front of printer
1 Out tray: Lift to access the Main tray.2 Main tray: Place photo paper, plain paper, transparencies, envelopes, or other media in
this tray for printing.3 Top cover: Lift this cover to access the print cartridges and the print cartridge storage
area, and to clear paper jams.4 Control panel access door: Push down and release to access the printer control panel
and screen. The panel pops up.5 Cancel: Press this button to deselect photos, to exit a menu, or to stop an action you have
requested. There is also a Cancel button on the printer control panel.6 On: Press this button to turn on the printer or put it into power save mode.7 Camera port: Use this port to connect a PictBridge™ digital camera to the printer, or to
insert the optional HP Bluetooth® wireless printer adapter.8 Memory card slots: Insert memory cards here.
Chapter 1
4 HP Photosmart 8700 series

Back of printer
1 Ethernet port: Use this port to connect the printer to a network.2 USB port: Use this port to connect the printer to a computer.3 Power cord connection: Use this port to connect the power cord included with the printer.4 Rear access door: Remove this door to clear paper jams.5 Rear feed slot: Use this slot for supported stiff stock media. Printing through this slot is
possible only from the computer. The rear feed slot does not support photo board orbanner printing. Be sure to load paper straight into the slot and guide it in so the paperdoes not skew. For more information, see Loading your paper.
6 Rear feed slot paper-width guide: Adjust this guide to fit close to the edge of the paper inthe rear paper slot.
Paper trays
1 Out tray: Lift to access the Main tray.2 Front feed slot: Place paper here when you want to bypass the Main tray for a single print
job. For photo media, have the emulsion (glossy) side down. Ideal for envelopes.3 Front feed slot paper-width guide: Adjust this guide to fit close to the edge of the paper
in the front feed slot.4 Out tray extender: Pull it towards you to extend the Out tray to catch the printed paper as
it is ejected from the printer.5 Main tray: Place photo paper, plain paper, transparencies, envelopes, or other media in
this tray for printing. For photo media, have the emulsion (glossy) side down.6 Paper-length guide: Extend and adjust this guide to fit close to the end of small media in
the Main tray.7 Main tray release: Press and pull toward you to release and extend the Main tray. This
lets you load large media that could not normally fit in the tray.8 Main tray paper-width guide: Adjust this guide to fit close to the edge of the paper in the
Main tray. This helps prevent paper skew.
HP Photosmart 8700 series User's Guide 5

Control panel
1 Index page: Press to print an index page (contact sheet) of photos on a memory card.2 Layout: Press to select the print layout for your photos.3 Menu: Press to view the printer menu.4 Navigation arrows: Press to navigate through menu options or photo numbers.5 : Press to select a photo number or menu option.6 Print: Press to print selected photos from the inserted memory card.7 Cancel: Press to deselect photos, to exit a menu, or to stop an action you have requested.
There is also a Cancel button on the front left of the printer to the right of the On button.8 Printer screen: Use this screen to view menus, page layout, ink status, and messages.
Printer screen
1 Messaging area: Displays printer messages and menus.2 Animations: Displays printer activity animations.3 Ink level: Displays the current ink level for each cartridge in the printer.4 Selected photos: Displays the index numbers of photos selected from the printer control
panel for printing.5 Layout/print job status: Displays the current photo layout, number of pages to print, and
layout slots being used.
Chapter 1
6 HP Photosmart 8700 series

Indicator lights
1 On light: Solid blue if the printer is on, otherwise off.2 Memory card light: Solid green if a memory card is correctly inserted, flashing green if the
printer is accessing a memory card, flashing red to indicate memory card errors, and off ifno memory card is inserted or more than one card is inserted.
3 Status light: Flashing green if the printer is busy (non-printing activity), flashing red if thereis an error or if some user action is required, solid amber if an nonrecoverable error hasoccurred.
4 Print light: Solid blue if the printer is ready to print, pulsing blue if the printer is busyprinting.
Printer menu Press Menu to access the printer menu.
To navigate the printer menu:● Press or to scroll through the menus or options displayed on the printer
screen.● Any menu with a triangle next to it has submenus or options. Press to display
the submenus or options.● Press Cancel to exit the current menu.
The print menu structure● Print all: Select to print all the photos on the memory card inserted in the printer.● Date/time stamp option
– Date/time– Date only– Off (default)
HP Photosmart 8700 series User's Guide 7

● SmartFocus: Turn on to focus images for clearer, sharper detail.– On– Off (default)
● Digital Flash: Turn on to improve photos with poor lighting and contrast.– On– Off (default)
● Change the print quality– Normal– Best (default)Normal uses less ink than Best, and applies only to the current print job. Thesetting then automatically resets to Best.
● Print a sample page: Select to print a sample page useful for checking the printquality of the printer.
● Print a test page: Select to print a test page containing information about theprinter that can help in troubleshooting problems.
● Network settings– Display network IP address: Select to display the IP address of the printer.– Print network settings page: Select to print a network configuration page
that you can use for troubleshooting network connections or for the initialnetwork setup.
– Reset network settings: Select to reset the network settings to the factorydefaults.
– Reset Bluetooth settings: Select to reset the Bluetooth settings to thefactory defaults.
● Clean the print cartridges: Select to clean the print cartridges. After the cleaningfinishes, the printer prints a test page. You have the option to clean the cartridgesagain if the test page shows that they are still not clean.
● Calibrate the printer: Select to calibrate the printer.● Select paper settings
– Auto-detect (default): Lets the printer auto-detect paper type and width.– Manually set: Lets the user manually select paper type and width.
● Select language: Select to indicate the language you want used on the printerdisplay.
● Reset all menu settings: Restores factory settings for all menu items exceptSelect language.
Chapter 1
8 HP Photosmart 8700 series

2 Getting ready to printThis section includes information on the following:● Loading paper● Inserting print cartridges
Loading paperLearn how to choose the right paper for your print job and how to load it into thecorrect tray for printing.
Choosing the right paper For a list of available HP inkjet paper, or to purchase supplies, go to:
● www.hpshopping.com (U.S.)● www.hp.com/go/supplies (Europe)● www.hp.com/jp/supply_inkjet (Japan)● www.hp.com/paper (Asia/Pacific)
To get the best and longest-lasting results from the printer, choose from these high-quality HP photo papers.
To print Use this paper
High-quality, long-lasting prints andenlargements
HP Premium Plus photo paper
Medium to high resolution images—instant-dry, water resistant casual andbusiness photos
HP Premium photo paper
Casual photos from e-mail and the web HP Advanced Photo paper
HP Photo paper
HP Everyday photo paper
Text documents, draft versions, test andalignment pages
HP Premium inkjet paper
HP Photosmart 8700 series User's Guide 9

Note HP designs its photo papers to resist fading so your photos remainvibrant for years to come. For more detailed information on this subject, visitthe HP web site. Go to www.hp.com/support, select your country/region andyour language, then type HP Photosmart 8700 in the product/name searchbox. Press ENTER and then select the HP Photosmart 8700 series printer. Inthe Question or keywords search box enter lightfastness orpermanence and then press ENTER. Click the topic you want to review.
To keep your paper in good condition for printing:
● Store the photo paper in its original packaging or in a resealable plastic bag.● Keep the paper flat in a cool, dry place. If the corners curl, place the paper in a
plastic bag and gently bend it in the opposite direction until it lies flat.● Hold photo paper by the edges to avoid smears.
Using specialty papers
Note HP recommends using the Main tray for these specialty medias, but therear feed slot can be used for stiffer medias. Check the HP web site atwww.hp.com/support for more information about printing with fine art media.
Your HP printer also prints on a variety of non-HP specialty media. Experiment withsome of the types listed here for special effects:
● Smooth Fine Art Paper● William Turner Textured Surface● German Etching● Photo Rag● Photo Rag Smooth Surface● Fine Art Water Color● Soft Fine Art Water Color● Photo Rag Duo● Soft Suede● Gallery Gloss
Some media types may not be available in all countries/regions. Check with your localmedia provider.
Warning Do not use photo board as it can damage the printer.
Chapter 2
10 HP Photosmart 8700 series

Loading your paper The HP Photosmart 8700 series supports the following paper sizes:
Supported paper sizesWhen printing from a computer When printing from the printer
control panel
● From 76 x 127 mm (3 x 5 inches)up to 324 x 476 mm (13 x 19 inches)
● 216 mm (8.5 inch-wide) bannerpaper
● 3.5 x 5 inches● 4 x 6 inches● 5 x 7 inches● 8 x 10 inches● 8.5 x 11 inches● 11 x 14 inches● 13 x 19 inches● 10 x 15 cm (with or without tab)● 13 x 18 cm● A3● A4● A6● L● 2L● Hagaki
Paper loading tips:● Before loading paper, slide out the paper-width and length guides to make room
for the paper. After loading paper, adjust the guides to fit close to the edges of thepaper without bending the paper.
● Load only one type and size of paper at a time in the same tray.● After loading paper, extend the Out tray extension to hold your printed pages.
This prevents printed pages from dropping off of the Out tray.
Use the directions in the following table to load the most commonly used paper sizesinto the printer.
HP Photosmart 8700 series User's Guide 11
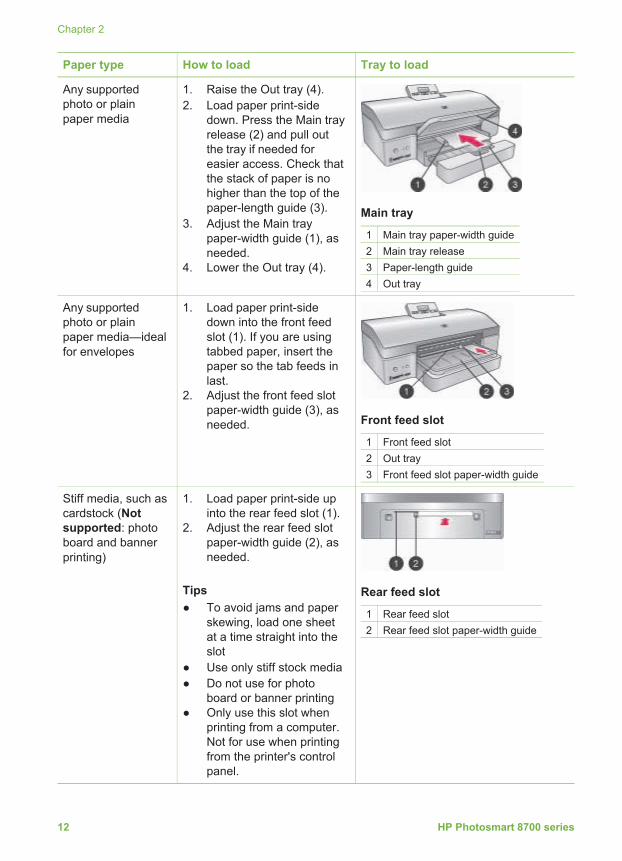
Paper type How to load Tray to load
Any supportedphoto or plainpaper media
1. Raise the Out tray (4).2. Load paper print-side
down. Press the Main trayrelease (2) and pull outthe tray if needed foreasier access. Check thatthe stack of paper is nohigher than the top of thepaper-length guide (3).
3. Adjust the Main traypaper-width guide (1), asneeded.
4. Lower the Out tray (4).
Main tray
1 Main tray paper-width guide2 Main tray release3 Paper-length guide4 Out tray
Any supportedphoto or plainpaper media—idealfor envelopes
1. Load paper print-sidedown into the front feedslot (1). If you are usingtabbed paper, insert thepaper so the tab feeds inlast.
2. Adjust the front feed slotpaper-width guide (3), asneeded. Front feed slot
1 Front feed slot2 Out tray3 Front feed slot paper-width guide
Stiff media, such ascardstock (Notsupported: photoboard and bannerprinting)
1. Load paper print-side upinto the rear feed slot (1).
2. Adjust the rear feed slotpaper-width guide (2), asneeded.
Tips● To avoid jams and paper
skewing, load one sheetat a time straight into theslot
● Use only stiff stock media● Do not use for photo
board or banner printing● Only use this slot when
printing from a computer.Not for use when printingfrom the printer's controlpanel.
Rear feed slot
1 Rear feed slot2 Rear feed slot paper-width guide
Chapter 2
12 HP Photosmart 8700 series

Inserting print cartridges The HP Photosmart 8700 series printer can print color and black-and-white photos, aswell as documents. HP provides different types of print cartridges so you can choosethe best cartridges for your project. The HP Photosmart 8700 series supports theHP Blue Photo print cartridge for color prints with richer blues and better colortransitions.
Note The cartridge numbers you can use with this printer appear on the backcover of the printed HP Photosmart 8700 series User's Guide. If you havealready used the printer several times, you can find the cartridge numbers inthe HP Photosmart 8700 series Toolbox. Windows users: Right-click thesmall printer icon on the far right of the Windows taskbar, and select OpenHP Photosmart 8700 series Toolbox. Click the Estimated Ink Level tab andthen click the Print Cartridge Ordering Information button. Macintoshusers: Click HP Image Zone in the Dock. Choose Maintain Printer from theSettings pop-up menu. Click Utilities, and then choose Supplies from thepop-up menu.
For optimum printing results, HP recommends using only HP print cartridges. Insertinga cartridge that is not in this table may invalidate the printer warranty.
Use the correct print cartridges To print… Insert this print
cartridge in theleft stall
Insert this printcartridge in themiddle stall
Insert this printcartridge in theright stall
Full-color photos
HP Blue Photo HP Tri-color HP Gray Photo
Black-and-whitephotos
HP Blue Photo HP Tri-color HP Gray Photo
Sepia or antiquephotos
HP Photo HP Tri-color HP Gray Photo
Text and coloredline drawings
HP Photo HP Tri-color HP Black
Caution Check that you are using the correct print cartridges. Also, note thatHP does not recommend modifying or refilling HP cartridges. Damage that
HP Photosmart 8700 series User's Guide 13

results from modifying or refilling HP cartridges is not covered by the HPwarranty.
For best print quality, HP recommends that you install all retail print cartridges beforethe date stamped on the box.
Insert or replace the print cartridges
Remove the pink tape
Do not touch here
Prepare the printer and cartridges1. Make sure you have removed the cardboard
from inside the printer and the power is on.2. Lift the main cover of the printer.3. Remove the bright pink tape from all cartridges.
Do not touch the ink nozzles or the copper-coloredcontacts, and do not re-tape the cartridges.
Insert the cartridges1. If you are replacing a cartridge, push down and
pull outward on the cartridge stall cover toopen it and then pull the cartridge out.
2. Match the symbol on the cartridge label to thecorrect stall.
3. Hold the cartridge with the label on top andslide it at a slight upward angle into the stall sothe copper-colored contacts go in first. Pushthe cartridge until it snaps into place.
4. Close the cartridge stall cover.5. Repeat the previous steps to install the other
cartridges, if necessary.6. When you are finished installing cartridges,
close the main cover.
You must install all three cartridges in order for theprinter to work as intended.
Tip Ink-backup printing mode lets you keepprinting even if one of the cartridges fails or runsout of ink. Remove the cartridge and close the maincover to enter ink-backup printing mode. Theprinter continues to print, but at a slower speed andwith inferior print quality. A message reminds youthat the printer is in ink-backup printing mode.Replace the cartridge as soon as possible.
The idle screen of the printer displays three iconsshowing the approximate ink level for each
Chapter 2
14 HP Photosmart 8700 series

cartridge (100%, 75%, 50%, 25%, and nearlyempty). Ink-level icons do not appear if any of theinstalled cartridges are not genuine HP cartridges.
Each time you install or replace a print cartridge, amessage prompts you to print an alignment page.This ensures high-quality prints.
Align the cartridges1. Load paper in the Main tray.2. Follow the onscreen instructions to complete
the cartridge alignment.
See Aligning the print cartridges.
When you are not using a print cartridge Whenever you remove a print cartridge from theprinter, store it in a print cartridge protector. Thecartridge protector keeps the ink from drying out.Storing the cartridge improperly can cause thecartridge to malfunction. A print cartridge protectorcomes in the box with the printer.➔ To insert a cartridge into the cartridge
protector, slide the cartridge into the protectorat a slight angle and snap it securely into place.
Once you have inserted a cartridge into thecartridge protector, place it in the storage arealocated under the top cover.
Insert or replace the print cartridges (continued)
HP Photosmart 8700 series User's Guide 15

Chapter 2
16 HP Photosmart 8700 series

3 Basic printing from acomputer You'll need to save your photos to the computer before you can use them with theprinter driver software that lets you print photos from a computer. For moreinformation, see Saving photos to a computer from a memory card.
For information on installing the printer driver software, see the setup instructions thatcame in the box with the printer.
Be sure to download the latest printer software update every couple of months toensure you have the latest features and improvements. For more information, seeUpdating the software.
The print driver software is the interface that appears whenever you print. This sectiondescribes the print quality settings available for the HP Photosmart 8700 series in theprint driver and how to select the most appropriate setting for the current print job.
Note The onscreen HP Photosmart Printer Help provides more informationon the many print settings available when you print from a computer. To learnhow to access the onscreen help, see Finding more information.
To set print quality settings1. Open the Print dialog box.
If you are using a Windows computer➔ Click the Paper/Quality tab in the Print dialog box (Windows 2000/XP) or
click Properties in the Print dialog box and then click the Paper/Quality tab(Windows 98).
If you are using a Macintosha. Choose Paper Type/Quality in the Copies & Pages pop-up menu.b. Click the Paper tab.
2. Select a setting from the Print quality (Windows) or Quality (Macintosh) pop-upmenu:– Fast Draft: This 300 dpi setting provides the fastest speed and the most
economical use of ink. Use it for proof copies of your photo or creativeproject. Print outs appear light.
– Fast Normal: This 300 dpi setting provides the fastest speed for good qualityprints. Use it for proof copies of your photos.
– Normal: This 600 dpi setting provides the best balance between print qualityand speed. Use it for your final prints.
– Best: This 600 dpi setting provides the best balance between high qualityand speed, and uses PhotoREt color enhancement. Use it for high qualityprints.
– Maximum dpi: This 4800 x 1200 dpi setting provides the highest qualityprints possible, but requires long print times and a large amount of free diskspace.
HP Photosmart 8700 series User's Guide 17

For more information on the HP print driver, do the following:
● Windows: From the Start menu, select Programs (in Windows XP, select AllPrograms) > HP > Photosmart 320, 370, 7400, 8100, 8400, 8700 series >Photosmart Help, then click HP Photosmart Printer Help. In the print dialogitself, right-click any option and click the What's This? box to learn more aboutthat option.
● Macintosh: Select Help > Mac Help in the Finder, then select Library >HP Photosmart Printer Help.
Note For more information on color settings in the print driver, see Usingcolor management.
Chapter 3
18 HP Photosmart 8700 series

4 Using color managementNote This section provides some basic information about using colormanagement with the HP Photosmart 8700 series. For more detailedinformation on this complex subject, visit the HP web site. Go to www.hp.com/support, select your country/region and your language, then typeHP Photosmart 8700 in the product/name search box. Press ENTER andthen select the HP Photosmart 8700 series printer. In the Question orkeywords search box enter color management and then press ENTER. Clickthe topic you want to review.
In many cases, the default printer-based color management of the HP Photosmart8700 series delivers good results, but if you need to have greater control over colormanagement in your workflow, see Using application-based color management.
Color management allows the colors in images or graphics to pass accuratelybetween applications, operating systems, and imaging devices, such as cameras,scanners, monitors, and printers.
Digital cameras, scanners, and monitors use the RGB1 color model, while commercialprinters use the CMYK2 color model. The differences between the two color modelscan cause printed photos to look markedly different from what you see on the monitor.
Warning It's possible to have color management features turned on both inthe printer driver and in an application such as Adobe® Photoshop.® Thisdouble correction produces unsatisfactory results. Use either printer-based orapplication-based color management, but not both at the same time.
Note Color management is a complex subject and a detailed discussion isbeyond the scope of this user guide. The HP Photosmart 8700 series UserGuide provides a couple of typical examples, but for more information, see thedocumentation that came with your third-party image-editing software.
Using printer-based color management The HP Photosmart 8700 series offers built-in automatic color management that'seasy to configure. Printer-based color management produces attractive results andshould be adequate for many users.
For information on a more advanced, professional-level form of color management,see Using application-based color management.
1 The RGB color model is so-named because it creates colors by mixing red, green, and blue coloredlight. Technologies that rely on light (monitors, scanners, or digital cameras) use this model.
2 The CMYK color model used in the printing industry is based on the light-absorbing qualities of inkprinted on paper. CMYK stands for cyan, magenta, yellow, and black, the colors used in four-colorprocess printing.
HP Photosmart 8700 series User's Guide 19

Printer driver color mode settingsSetting When to use it
Colorsmart/sRGBMost imaging devices, such as monitors,cameras, and scanners, normally usesRGB. The printer is also set toColorsmart/sRGB by default. When setto this mode, the printer converts colorsfrom sRGB to the printer's ink colors.
Tip You should not have the printer setto this mode if you are also using ICCprofiles and your application to managecolor. This can result in decreased colorfidelity since the colors are convertedtwice—first by the application and thenby the printer.
● When your digital camera, scanner,or image editing software is set tosRGB
● For the easiest, most basic form ofcolor management
● When you are not using ICC profiles
Adobe RGB or Adobe RGB (1998)You can set some imaging devices toAdobe RGB, an enhanced version of thesRGB color space, developed for high-fidelity digital photography. When set tothis mode, the printer converts colorsfrom Adobe RGB to the printer's inkcolors.
Tip You should not have the printer setto this mode if you are also using ICCprofiles and your application to managecolor. This can result in decreased colorfidelity since the colors are convertedtwice—first by the application and thenby the printer.
● When your digital camera, scanner,or image editing software is set toAdobe RGB
● For high-quality digital photography● When you are not using ICC profiles
Managed by Application (Windows)
Application Managed Colors (Mac OS)
When set to this mode, the printer doesnot do any color management.
Application-based color managementlets image editing software handle colorconversions from image color space tothe printer ink colors. The conversiontakes place in the image-editing software.
Using application-based colormanagement involves changing settings
● When you want to use ICC profiles● When you want to use the color
management features of imagingediting software, such as AdobePhotoshop
● For the greatest level of control overcolor quality
Chapter 4
20 HP Photosmart 8700 series

Setting When to use it
both in the printer driver and in yourapplications, and requires ICC profilesfor all your devices. For moreinformation, see Using application-based color management.
In order to print using the color management features built into the HP Photosmart8700 series, you have to change settings in the printer driver software and in theimage editing software. Here is one example of a typical print job using printer-basedcolor management with Adobe Photoshop (version 7 or CS).
To print using printer-based color management1. Open the file you want to print in Adobe Photoshop.2. Select File > Print with Preview in Adobe Photoshop. Make sure Show More
Options is selected in the Print with Preview dialog box, then select ColorManagement from the pop-up menu.
3. In the Print Space area of the Print with Preview dialog box, select the sameRGB color space setting you intend to use in the print driver (Windows). In mostcases this is sRGB or Adobe RGB. On a Macintosh, choose Printer ColorManagement instead.
4. Click Page Setup in the Print with Preview dialog box, set up the page for thecurrent image, as desired, then click OK.
5. Click Print.If you are using a Windows computera. Click Properties in the Print dialog box.b. Click the Color tab in the Properties dialog box.c. Select a color mode from the Color management pop-up menu in the Print
dialog box:– Colorsmart/sRGB (default)– AdobeRGBSelect the same color mode you selected as an RGB working space in theAdobe Photoshop Color Settings dialog box.
d. Click the Paper/Quality tab, select the desired paper type from the Type ispop-up menu, then click OK.
If you are using a Macintosha. Choose Paper Type/Quality in the Print dialog box.b. Choose a color mode from the Color pop-up menu in the Print dialog box:
– Colorsmart/sRGB– AdobeRGBSelect the same color mode you selected as an RGB working space in theAdobe Photoshop Color Settings dialog box.
6. Click OK in the Print dialog box to begin printing.
Printer driver color mode settings (continued)
HP Photosmart 8700 series User's Guide 21

Tip For best results when printing photos in black and white, make sure youinstall the HP Gray Photo print cartridge and select the Print in Grayscaleoption in the Print dialog box (Windows) or the Grayscale option in the Colorpop-up menu of the Print dialog box (Mac OS). For finer control over theconversion of color photos to black and white, use image editing software tocontrol the conversion.
Using application-based color management Application-based color management offers more sophisticated control than theprinter-based form, but also involves greater complexity and more steps.
For information on the printer-based color management built into the HP Photosmart8700 series, see Using printer-based color management.
Using application-based color management can involve:
● Using device profiles: Application-based color management relies on files calledICC3 device profiles. An ICC profile describes a device's color space. Thesoftware component of your color management system uses these profiles toconvert colors between each device's color space. The HP Photosmart 8700series Typical software installation installs HP ICC profiles automatically for theprinter.
● Calibrating the monitor: Monitors exhibit a color degradation over time that caninterfere with producing professional quality printed photography. As a result, theICC profile that comes with most new monitors gradually becomes invalid and nolonger accurately reflects the color space available on the device. Calibrating themonitor at least once a month to produce a custom ICC profile is the best way toensure that the color space available on the monitor is accurately defined for yourcolor management system. You can calibrate a monitor visually using system orutility software, such as Adobe Gamma, but this type of calibration does not meetthe high-quality standards expected for professional photography. Professionalsusually invest in a calibration kit consisting of software and a piece of hardwarethat captures the current state of the RGB environment on the monitor and savesit as a custom ICC profile. Monitor calibration kits are available fromGretagMacBeth, Monaco Systems, and LaCie, as well as other manufacturers.
In order to print using application-based color management features, you have tochange settings in the printer driver software and in the image editing software. Hereis one example of a typical print job using application-based color management inAdobe Photoshop (version 7 or CS). See the documentation that came with yourimage-editing software for complete instructions on using the product's colormanagement features.
To print using application-based color management1. Open the photo you want to print in Adobe Photoshop.2. Select File > Print with Preview in Adobe Photoshop.3. Make sure Show More Options is checked in the Print with Preview dialog box,
then select Color Management from the pop-up menu.
3 International Color Consortium. ICC enables profile-based color management solutions. For moreinformation, see www.color.org.
Chapter 4
22 HP Photosmart 8700 series

4. In the Print Space area of the Print with Preview dialog box, select theappropriate HP Photosmart 8700 series profile for the paper and ink set you areusing.The HP Photosmart printer software installer installed several profiles for youautomatically.
5. Select Perceptual from the Intent pop-up menu. Checking the Use Black PointCompensation option is also recommended.
6. Click Page Setup in the Print with Preview dialog box, set up the page for thecurrent image, as desired, then click OK.
7. Click Print in the Print with Preview dialog box.
If you are using a Windows computera. Click Properties in the Print dialog box.b. Click the Color tab in the Print dialog box.c. Select Managed by application from the Color Management area of the
Print dialog box, then click OK.d. Click the Paper/Quality tab, select an appropriate paper type from the Type
Is pop-up menu, then click OK.e. Click OK in the Print dialog box to begin printing.
If you are using a Macintosha. Choose Paper Type/Quality in the Print dialog box.b. Choose Application Managed Colors in the Color pop-up menu.c. Select an appropriate paper type from the Paper pop-up menu.
8. Click Print in the Print dialog box.
HP Photosmart 8700 series User's Guide 23

Chapter 4
24 HP Photosmart 8700 series

5 Exploring creative projects The HP Image Zone software that comes with the printer provides tools that makeusing photos in creative projects possible, as well as access to HP Instant Share, anonline service that makes sharing photos with others easy. For more information on allthe features of the HP Image Zone software, see the onscreen HP Photosmart PrinterHelp. See Finding more information.
Note You must select the Typical option when you install the printer softwareor the HP Image Zone will not be installed.
This section contains information about:
● Using large-format templates in scrapbooking and other projects● Using the HP Image Zone● Printing borderless photos from a computer
The large-format templates Large-format templates consist of a plain white background with fixed picture holdersinto which you can drag photos. Photos are automatically cropped by the pictureholders. You can resize the photos and move them around within the picture holder.
Scrapbookers: be sure to visit the HP Scrapbooking web site at www.hp.com/go/scrapbooking. It's a great place to obtain free art downloads, layout ideas,scrapbooking tips, information about purchasing supplies, other online scrapbookingresources, and more. The site is available in English only.
Template pagesize
Description
B Standard U.S./Imperial size. Also known as Ledger or US Legal.
11 x 17 inches. Approximately 279 x 432 mm.
B+ Standard U.S./Imperial size. Also known as Super B.
13 x 19 inches. Approximately 330 x 483 mm.
A3 Standard ISO size.
297 x 420 mm. Approximately 11.7 x 16.5 inches.
A3+ Standard ISO size. Also known as Super A3.
330 x 483 mm. Approximately 13 x 19 inches.
12 x 12 inches Standard U.S./Imperial size. Also known as Photo 12 x 12.Popular for use in scrapbooking albums. Approximately 305 x305 mm.
HP Photosmart 8700 series User's Guide 25

To place photos in a template1. Select some photos and place them in a large-format template.
You can move a photo around in a template's picture holder.
If you are using a Windows computera. In HP Image Zone on the Projects tab, click Album Pages.b. In the Work area, click a page size.c. Click a large-format template.d. Select photos from the My Images tab, then drag each photo from the
Selection Tray into the desired page holder in the template.If you are using a Macintosha. Click HP Image Zone in the Dock.b. Click Services, then double-click HP Image Print in the HP Image Zone
window.c. Select one or more photos, then click Open.
You can add additional photos to the Drawer later by clicking the + button. Ifthe Drawer is not visible, click the Drawer button.
d. Choose Album Page in the Print Style pop-up menu.e. Press the Select Template arrows to select a template.f. Drag each photo from the Drawer into the desired picture holder in the
template.g. Click Page Setup to select a paper size from the Paper Size pop-up menu,
and then click OK.h. Click Print.
For more information on the best print settings to use for quality printing from acomputer, see Basic printing from a computer.
Scrapbookers: add a new level of creativity and energy to your scrapbookingexperience with HP Creative Scrapbook Assistant software. The powerful digital toolsand hundreds of included high-quality, ready-made theme images in this affordable,innovative software make it fun to plan, create, archive, print, and share yourscrapbook elements and pages. It’s a new scrapbooking tool that’s the perfectcomplement to the HP Photosmart 8700 series. Learn more about this software at theHP Scrapbooking web site: www.hp.com/go/scrapbooking. The software and web siteare in English only. HP Creative Scrapbook Assistant may not be available in allcountries/regions.
The HP Image Zone Note You must select the Typical option when you install the printer softwareor the HP Image Zone will not be installed.
Use the HP Image Zone to get creative with your pictures: edit them, share them, andcreate fun projects such as greeting cards. To work with photos, you need to transferthem to a computer that you have connected to the printer. Insert a memory card with
Chapter 5
26 HP Photosmart 8700 series

photos. Follow the instructions on the computer screen to save them to yourcomputer. For more information, see Saving photos to a computer from a memory card.
The HP Image Zone lets you:● Use your photos for creative projects, such as scrapbooking albums, greeting
cards, and iron-on transfers● Organize your photos in albums and search through them by keyword and dates
(Windows only)● Edit and enhance your photos by adding text or doing color correction● Share your photos online through HP Instant Share with family and friends
For more information on the HP Image Zone, explore the onscreen HP PhotosmartPrinter Help:
● Windows: From the Start menu, select Programs (in Windows XP, select AllPrograms) > HP > Photosmart 320, 370, 7400, 8100, 8400, 8700 series >Photosmart Help, then click Use the HP Image Zone.
● Macintosh: Select Help > Mac Help in the Finder, then select Library >HP Image Zone Help.
Printing borderless photos from a computer The quickest and easiest way to print a borderless photo from your computer is byusing the HP Image Zone. The HP Image Zone is available on your computer if youselected Typical during the software installation.
Note You can also do borderless printing from within other imaging software.This section only includes instructions for printing borderless photos from theHP Image Zone.
Printing a borderless photo from Windows1. Load photo paper in the printer.2. Open the HP Image Zone, then choose a photo to print.3. Click Print, then in the HP Print window click Quick Print, if it is not already
selected.4. Make sure the Borderless sizes only option is checked, then select the desired
size from the Paper Size pop-up menu.5. Enter the number of copies in Copies of Current Image.6. Click Print.
Printing a borderless photo from a Macintosh1. Load photo paper in the printer.2. Click HP Image Zone in the Dock.3. Double-click HP Image Print in the HP Image Zone window.4. Choose one or more photos to print, then click Open.5. Choose Photo Print from the Print Style pop-up menu, if it is not already chosen.6. Choose the HP Photosmart 8700 series printer from the Printer pop-up menu.7. Choose a borderless paper size from the Paper Size menu.8. Make sure the Print Borderless option is checked, then click Print Now.
HP Photosmart 8700 series User's Guide 27

Chapter 5
28 HP Photosmart 8700 series

6 Printing photos without acomputer The HP Photosmart 8700 series printer lets you select and print photos without eventurning on the computer. Once you've set up the printer using the setup instructionsthat came in the box with the printer, you can print from any of the following:
● Memory card● PictBridge-compatible digital camera● Bluetooth device
Connecting to other devicesThis printer offers several types of connectivity that do not require a computer, suchas memory cards, PictBridge cameras, and devices with Bluetooth wirelesstechnology. Each connection type lets you do different things.
Connection type and what you need This lets you...
Memory cards
A memory card
A compatible digital camera memory card
Insert the memory card into theappropriate memory card slot on thefront of the printer.
● Print directly from a memory card tothe printer.
● Print quick proofs of photos on amemory card directly from theprinter control panel.
● Save photos from a memory cardinserted in the printer to a computerwhere you can enhance or organizethem in the HP Image Zone or othersoftware. For more information, seeSaving photos to a computer from amemory card and Printing photosfrom a memory card.
PictBridge
The PictBridge symbol
A PictBridge-compatible digital cameraand a USB cable.
Connect the camera to the camera porton the front of the printer.
Print directly from a PictBridge-compatible digital camera to the printer.
For more information, see Printingphotos from a digital camera and thecamera documentation.
HP Photosmart 8700 series User's Guide 29

Connection type and what you need This lets you...
Bluetooth
The HP bt300 Bluetooth® wirelessprinter adapter (Model: Q3395A)
The HP bt300 Bluetooth wireless printeradapter goes into the camera port onthe front of the printer and lets you useBluetooth wireless technology forprinting. See the documentation thatcame with the adapter and the onscreenHP Photosmart Printer Help forinstructions.
Print from any device with Bluetoothwireless technology to the printer. Formore information, see thedocumentation that came with theadapter.
The adapter is not compatible with theMacintosh.
Printing photos from a memory card You can print photos from a memory card by inserting the card into the printer andusing the printer control panel to select, enhance, and print photos. You can also printcamera-selected photos—photos you marked for printing using a digital camera—directly from a memory card.
Printing from a memory card is quick and easy, and does not drain the digital camerabatteries. For more information on inserting memory cards, see Inserting memory cards.
Printing from a memory card is easy. This section tells you how to do the following:
● Insert a memory card● Decide which photos to print● Select a photo layout● Select photos● Improve photo quality● Print the selected photos
Inserting memory cards After you have taken pictures with a digital camera, you can remove the memory cardfrom the camera and insert it into the printer to print your photos or save them to acomputer. The printer can read the following types of memory cards: CompactFlash™,Memory Sticks, Microdrive™, MultiMediaCard™, Secure Digital™, and xD-Picture Card™.
Caution Using any other type of memory card may damage the memory cardand the printer.
To learn about other ways of transferring photos from a digital camera to the printer,see Connecting to other devices.
Chapter 6(continued)
30 HP Photosmart 8700 series

Supported file formats The printer can recognize and print the following file formats directly from the memorycard: JPEG and uncompressed TIFF. If a digital camera saves photos and video clipsin other file formats, save the files to a computer and print them using a softwareapplication. For more information, see the onscreen HP Photosmart Printer Help.
Inserting a memory card
Memory card slots
1 CompactFlash I and II, Microdrive2 Secure Digital, MultiMediaCard (MMC)3 Memory Sticks4 xD-Picture Card
Find the memory card in the following table and use the instructions to insert the cardinto the printer.
Guidelines:
● Insert only one memory card at a time.● Gently push the memory card into the printer until it stops. The memory card
does not insert all the way into the printer; do not try to force it.
Caution Inserting the memory card any other way may damage the card andthe printer.
When the memory card is inserted correctly, the Memory Card light flashes and thenremains solid green.
Caution Do not pull out a memory card while the Memory Card light isflashing. For more information, see Removing a memory card.
HP Photosmart 8700 series User's Guide 31

Memory card How to insert the memory card
CompactFlash
● Front label faces up, and if the label has an arrow, the arrowpoints toward the printer
● Edge with metal pinholes goes into the printer first
Memory Stick
● Angled corner is on the left● Metal contacts face down● If you are using a Memory Stick Duo™ or Memory Stick PRO
Duo™ card, attach the adapter that came with the card beforeyou insert the card into the printer
Microdrive
● Front label faces up, and if the label has an arrow, the arrowpoints toward the printer
● Edge with metal pinholes goes into the printer first
MultiMediaCard
● Angled corner is on the right● Metal contacts face down
Secure Digital
● Angled corner is on the right● Metal contacts face down
xD-Picture Card
● Curved side of card points toward you● Metal contacts face down
Saving photos to a computer from a memory card You can save photos to a computer from any memory card inserted in the printer, ifyou have set up a USB connection between the two devices. You'll need to save thephotos to your computer in order to use them in image editing software, such as theHP Image Zone. You must select Typical when you install the printer software or theHP Image Zone software will not be installed on your computer.
1. Insert a memory card into the printer.
Chapter 6
32 HP Photosmart 8700 series

If you are using a Windows computera. Select Copy pictures to a folder on my computer using Microsoft
Scanner and Camera Wizard.b. Follow the onscreen prompts.
Note The memory card also appears in Windows Explorer as aremovable drive. You can open it and drag photos from the card toany location on your computer.
If you are using a Macintosha. Wait for iPhoto to start and read the contents of the memory card.b. Click Import to save the photos on the card to your Macintosh.
Note The memory card also appears on the desktop as a drive icon.You can open it and drag photos from the card to any location onyour Macintosh.
Removing a memory card Wait until the Memory Card light stops flashing, then gently pull the memory card toremove it from the printer.
Caution Do not pull out a memory card while the Memory Card light isflashing. A flashing light means that the printer is accessing the memory card.Removing a memory card while it is being accessed may damage the printerand the memory card or corrupt the information on the memory card.
Deciding which photos to print You can decide which photos to print from a memory card by printing a photo indexand using the index numbers to select photos.
A photo index shows thumbnail views and index numbers for up to 2000 photos on amemory card. When printing an index page, use plain paper instead of photo paper tocut costs.
A photo index may be several pages long.
To print a photo index:1. Insert a memory card.2. Load several sheets of plain paper in the Main tray.3. Press the Index page button, then press .
Selecting a photo layout Press Layout on the printer to select a layout for the photos you want to print. Allphotos selected from the printer control panel will print in this layout. If you are not
HP Photosmart 8700 series User's Guide 33

using the 1 photo borderless layout, the actual size of the prints will vary accordingto the size of paper you load in the printer, as shown in the following table.
Note The printer may rotate the photos to fit the layout.
Layout Paper size (photo size)
1 photo borderless
The photo fills the page to match thepaper size.
1 photo per page, bordered
3.5 x 5 inches (3.25 x 4.75 inches)4 x 6 inches (3.75 x 5.75 inches)
5 x 7 inches (4.75 x 6.75 inches)
8 x 10 inches (7.75 x 9.75 inches)
11 x 14 inches (10.75 x 13.75 inches)
13 x 19 inches (12.75 x 18.75 inches)
8.5 x 11 inches (8 x 10 inches)
A6 (98.6 x 141.6 mm)
A4 (200 x 250 mm)
A3 (290.6 x 413.5 mm)
10 x 15 cm (95.2 x 146 mm)
13 x 18 cm (120.6 x 171.4 mm)
Hagaki (93.6 x 141.6 mm)
L (82.5 x 120.6 mm)
2 photos per page
3.5 x 5 inches (2.25 x 3.25 inches)
4 x 6 inches (2.75 x 3.75 inches)
5 x 7 inches (3.25 x 4.75 inches)8 x 10 inches (4.75 x 6.5 inches)
8.5 x 11 inches (5 x 7 inches)
11 x 14 inches (6.75 x 9.25 inches)
13 x 19 inches (8 x 10 inches)
A6 (69.2 x 98.6 mm)
A4 (130 x 180 mm)
A3 (204.2 x 272.3 mm)
10 x 15 cm (69.2 x 98.6 mm)
Chapter 6
34 HP Photosmart 8700 series

Layout Paper size (photo size)
13 x 18 cm (84.1 x 120.6 mm)
Hagaki (68 x 93.6 mm)
L (58.7 x 82.5 mm)
3 photos per page
3.5 x 5 inches (1.5 x 2.25 inches)
4 x 6 inches (1.75 x 2.625 inches)
5 x 7 inches (2.25 x 3.375 inches)
8 x 10 inches (3.33 x 5 inches)
8.5 x 11 inches (4 x 6 inches)11 x 14 inches (5 x 7.5 inches)
13 x 19 inches (6 x 9 inches)
A6 (47.7 x 71.5 mm)
A4 (100 x 150 mm)
A3 (139.7 x 209.6 mm)
10 x 15 cm (45.7 x 69 mm)
13 x 18 cm (58.7 x 88 mm)
Hagaki (45.2 x 67.8 mm)
L (39.6 x 59.4 mm)
4 photos per page
3.5 x 5 inches (1.5 x 2.25 inches)
4 x 6 inches (1.75 x 2.5 inches)
5 x 7 inches (2.2 x 3.25 inches)
8 x 10 inches (3.5 x 4.75 inches)
8.5 x 11 inches (3.5 x 5 inches)
11 x 14 inches (4.75 x 6.75 inches)
13 x 19 inches (5 x 7 inches)A6 (47.7 x 69.2 mm)
A4 (90 x 130 mm)
A3 (133.4 x 190.5 mm)
10 x 15 cm (45.7 x 66 mm)
13 x 18 cm (58.7 x 84.1 mm)
Hagaki (45.2 x 65 mm)
L (39.6 x 57 mm)
(continued)
HP Photosmart 8700 series User's Guide 35

Layout Paper size (photo size)
9 photos per page
3.5 x 5 inches (1 x 1.375 inches)
4 x 6 inches (1.125 x 1.5 inches)
5 x 7 inches (1.5 x 2 inches)
8 x 10 inches (2.25 x 3 inches)8.5 x 11 inches (2.5 x 3.25 inches)
11 x 14 inches (3.25 x 4.25 inches)
13 x 19 inches (4 x 6 inches)
A6 (30.7 x 40.5 mm)
A4 (64 x 84 mm)
A3 (88.9 x 120.6 mm)
10 x 15 cm (29.6 x 39.3 mm)
13 x 18 cm (38 x 50.1 mm)
Hagaki (29 x 38.6 mm)
L (25.3 x 33.6 mm)
Selecting photos to print You select the photos you want to print by using the printer control panel.
If you want to… Follow these steps
Select a photo 1. Insert a memory card.2. Press or to display the index number of
the photo you want to select.3. Press to select the photo.
The index number appears in the Selectedphotos area of the printer screen.
4. To select additional photos, repeat steps 2and 3.
Deselect a photoWhen you deselect a photo,the printer discards anychanges you made to the printsettings for that photo.
Note Deselecting photosdoes not delete them from thememory card.
1. Press or to display the photo you want todeselect.
2. Press Cancel to deselect the displayed photofor printing.
Deselect all photos 1. Press Cancel until a message appears on theprinter screen asking if you want to deselectall photos.
2. Press .
Chapter 6(continued)
36 HP Photosmart 8700 series

Improving photo quality The printer lets you improve the brightness or contrast of any photo printed from amemory card. These print settings do not change the original photo. They only affectprinting.
Problem How to correct it
Photos with poor brightness 1. Press Menu.2. Press until Digital Flash
appears, then click .3. Press until On appears, then
press .
Blurred photos 1. Press Menu.2. Press until AutoFocus appears,
then click .3. Press until On appears, then
press .
Doing common printing tasks from a memory card This section describes some of the most common printing tasks you might want to dofrom a memory card.
If you want to… Follow these steps:
Print a borderless photoYou can print borderlessphotos without even beingconnected to a computer.
Before you begin, make surethat the memory card isinserted in the printer and thepaper tray you want to use isloaded with the correct paper.
1. Press Layout on the printer until Layout: 1photo borderless appears on the printerscreen.
2. Select the photo or photos you want to print.For more information, see Selecting photos toprint.
3. Press Print.
Change the print quality toNormal for one print jobYou can change the printquality for photos. Best qualityis the default and producesthe highest quality photos.Normal quality conserves inkand prints faster.
1. Press Menu.2. Select Print quality, then press .3. Select Normal, then press .
Print quality will revert to Best after the next printjob.
Print one or more photosBefore you begin, make surethat the memory card isinserted in the printer and the
1. Press the Layout button to select a photolayout. Select Layout: 1 photo borderlessfor borderless prints.
HP Photosmart 8700 series User's Guide 37

If you want to… Follow these steps:
paper tray you want to use isloaded with the correct paper.
2. Press or to display the index number ofthe photo you want to print, then press . Youcan repeat steps 1 and 2 to select morephotos.
3. Press Print.
Print all photos on thememory cardBefore you begin, make surethat the memory card isinserted in the printer and thepaper tray you want to use isloaded with the correct paper.
1. Press the Layout button to select a photolayout. Select Layout: 1 photo borderlessfor borderless prints.
2. Press Menu.3. Select Print all, then press to begin printing
all photos on the memory card.
Print a continuous range ofphotosBefore you begin, make surethat the memory card isinserted in the printer and thepaper tray you want to use isloaded with the correct paper.
1. Press the Layout button to select a photolayout. Select Layout: 1 photo borderlessfor borderless prints.
2. Press or until the first photo you want toprint appears on the printer screen, thenpress and hold for at least two seconds.
3. Press or until the last photo you want toprint appears on the printer screen, thenpress .The selected range of photos begins printing.
Print camera-selectedphotos from a memory cardWhen you select photos forprinting using a digital camera,the camera creates a DigitalPrint Order Format (DPOF) filethat identifies the selectedphotos. The printer can readDPOF 1.0 and 1.1 files directlyfrom a memory card.
1. Use the digital camera to select the photosyou want to print. For more information, seethe documentation that came with the camera.
2. If you select default as the photo layout withthe camera, press the Layout button on theprinter to select a photo layout.If you select a photo layout other than defaultwith the camera, photos print in the camera-selected layout regardless of the printer setting.
3. Load photo paper.4. Remove the memory card from the digital
camera and insert it into the printer.5. When a message appears on the printer
screen asking if you want to print the camera-selected photos, press .The photos you selected with a camera willprint.
If the printer cannot find or read all of the camera-selected photos on the card, it will print thosephotos that it can read.
After printing, the printer deletes the DPOF file andunmarks the photos.
Chapter 6(continued)
38 HP Photosmart 8700 series

If you want to… Follow these steps:
Stop printing To stop a print job in progress, press Cancel.
Printing photos from a digital camera You can print photos by connecting a PictBridge digital camera directly to the cameraport of the printer with a USB cable. If you have a digital camera with Bluetoothwireless technology, you can insert the optional HP Bluetooth® wireless printeradapter in the printer and send photos to the printer wirelessly.
When you print from a digital camera, the printer uses the settings that you selectedon the camera. For more information, see the documentation that came with thecamera.
Using a PictBridge cameraUsing a PictBridge camera with the printer is easy and fast.
PictBridge camera being connected to camera port
1. Turn on the PictBridge digital camera and select the photos you want to print.2. Load photo paper in the printer.3. Make sure the camera is in PictBridge mode, then connect it to the camera port
on the front of the printer using the USB cable that came with the camera.Once the printer recognizes the PictBridge camera, the selected photos printautomatically.
Using a Bluetooth cameraIf you have a digital camera with Bluetooth wireless technology, you can purchase theoptional HP Bluetooth® wireless printer adapter and print from a camera using aBluetooth wireless connection.
1. Load photo paper in the printer and check that the paper tray you want to use isengaged.
(continued)
HP Photosmart 8700 series User's Guide 39

2. Insert the HP Bluetooth® wireless printer adapter into the camera port on thefront of the printer.The light on the adapter will flash when the adapter is ready to receive data.
3. Follow the instructions in the documentation that came with the digital camera tosend photos to the printer.
Printing from other Bluetooth devicesYou can also print from other devices with Bluetooth wireless technology besidesdigital cameras, such as PDAs, laptops, and mobile phones. For more information,see Connecting to other devices, the onscreen HP Photosmart Printer Help, and thedocumentation that came with the device with Bluetooth wireless technology.
Note To use Bluetooth connectivity, all devices must have the necessaryhardware and software installed. In addition, an HP Bluetooth® wireless printeradapter must be connected to the camera port on the front of the printer. Theadapter is available separately. For more information, see the documentationthat came with the adapter.
The basic procedure for printing from any device with Bluetooth wireless technology isthe same:1. Have the device search for available Bluetooth printers.2. Select the printer when it appears on the device.3. Print.
Check the documentation that came with the device for detailed instructions.
Chapter 6
40 HP Photosmart 8700 series

7 Care and maintenance The HP Photosmart 8700 series printer requires very little maintenance. Follow theguidelines in this section to extend the life span of the printer and printing supplies,and to ensure that the photos you print are always of the highest quality.
Cleaning and maintaining the printerKeep the printer and print cartridges clean and well maintained using the simpleprocedures in this section.
Cleaning the outside of the printer 1. Turn off the printer, then disconnect the power cord from the back of the printer.2. Wipe the outside of the printer with a soft cloth that has been lightly moistened
with water.
Caution Do not use any type of cleaning solution. Household cleaners anddetergents may damage the printer finish. Do not clean the interior of theprinter. Keep all fluids away from the interior. Do not lubricate the metal rod onwhich the print cartridge cradle slides. Noise is normal when the cradle movesback and forth.
Automatically cleaning the print cartridges If you notice white lines or single-color streaks on the photos you print, the printcartridges may need to be cleaned. Do not clean the cartridges more often thannecessary, since cleaning uses up ink. Follow the steps in this section to run anautomatic cartridge-cleaning procedure.
1. Press Menu on the printer control panel.2. Select Clean cartridges, then press .3. Following the directions on the printer screen, load paper so the printer can print
a test page after cleaning the cartridges. Use plain paper to conserve photo paper.4. Press to begin cleaning the print cartridges.5. When the printer finishes cleaning the cartridges and prints a test page, it asks
whether you want to Continue to second level cleaning. Check the test pageand select from the following options:– If the test page has white streaks or missing colors, the print cartridges need
to be cleaned again. Select to continue to a second level cleaning.– If the print quality of the test page looks good, press Cancel.You can clean the cartridges up to three times. Each successive cleaning is morethorough and uses more ink.
If you complete all three levels of cleaning using this procedure and you still noticewhite streaks or missing colors on the test page, you may need to clean the print
HP Photosmart 8700 series User's Guide 41

cartridge contacts. For more information, see Manually cleaning the print cartridgecontacts.
Note If a cartridge has been recently dropped, you may also see whitestreaks or missing colors in your prints. This problem is temporary and clearsup within 24 hours.
Manually cleaning the print cartridge contacts If you use the printer in a dusty environment, debris may accumulate on the copper-colored contacts and cause printing problems.
To clean the print cartridge contacts:1. Gather the following items to clean the contacts:
– Distilled water (tap water may contain contaminants that can damage theprint cartridge)
– Cotton swabs or other soft, lint-free material that will not stick to the printcartridge
2. Open the top cover of the printer.3. Remove the print cartridge and place it on a piece of paper with the ink nozzle
plate facing up. Be careful not to touch the copper-colored contacts or the inknozzle plate with your fingers.
Caution Do not leave the print cartridge outside the printer for more than30 minutes. Ink nozzles exposed to the air longer than this may dry outand cause printing problems.
4. Lightly moisten a cotton swab with distilled water and squeeze any excess waterfrom the swab.
5. Gently wipe the copper-colored contacts with the cotton swab.
Caution Do not touch the ink nozzle plate. Touching the ink nozzle platewill result in clogs, ink failure, and bad electrical connections.
6. Repeat steps 4 and 5 until no ink residue or dust appears on a clean swab.7. Insert the print cartridge in the printer, then close the top of the printer.
Printing a test page You can print a test page to check the condition of the print cartridges.
1. Press Menu on the printer control panel.2. Select Print test page, then press .
The test page contains the following information:
Chapter 7
42 HP Photosmart 8700 series

1 Image print quality. If the lined bars look good, photos should print well.2 Ink nozzle quality. If there are white streaks in the solid bars on this page, try cleaning the
print cartridge. For more information, see Automatically cleaning the print cartridges.3 Estimated ink level. This indicator shows how much ink is left in the print cartridge.4 Diagnostic information. Use the text information on this page when working with
HP Customer Care to solve printing problems.
Aligning the print cartridges The first time you install a print cartridge in the printer, the printer performs a printercalibration automatically to align the cartridges. However, if colors in the photos youprint are misaligned, or if the alignment page does not print correctly when you installa new print cartridge, use the following procedure to calibrate the printer manually.This process aligns the print cartridges.1. Press Menu on the printer control panel.2. Select Calibrate the printer, then press .
Printing a sample pageYou can print a sample page to test the printer photo printing quality and to make surethe paper is loaded correctly.
1. Load paper in the Main tray. Use plain paper to conserve photo paper.2. Press Menu on the printer control panel.3. Select Print a sample page, then press .
Updating the software Download the latest printer software update periodically to ensure you have the latestfeatures and improvements. You can download printer software updates by going towww.hp.com/support or by using HP Software Update.
Note The printer software update that you download from the HP web sitedoes not update the HP Image Zone software.
HP Photosmart 8700 series User's Guide 43

Downloading the software (Windows)
Note Make sure you are connected to the Internet before you useHP Software Update.
1. From the Windows Start menu, select Programs (in Windows XP, select AllPrograms) > Hewlett-Packard > HP Software Update. The HP SoftwareUpdate window opens.
2. Click Check Now. HP Software Update searches the HP web site for printersoftware updates. If the computer does not have the most recent version of theprinter software installed, a software update appears in the HP Software Updatewindow.
Note If the computer has the most recent version of the printer softwareinstalled, the following message appears in the HP Software Updatewindow: “No updates are available for your system at this time”.
3. If a software update is available, click the checkbox next to the software update toselect it.
4. Click Install.5. Follow the onscreen instructions to complete the installation.
Downloading the software (Macintosh)
Note Make sure you are connected to the Internet before you useHP Photosmart Updater.
1. On your Macintosh in the Finder, choose Go > Applications.2. Choose Hewlett-Packard > Photosmart > HP Photosmart Updater.3. Follow the onscreen instructions to check for software updates.
If you are behind a firewall, you need to enter the proxy server information in theupdater.
Storing the printer The printer is built to withstand long or short periods of inactivity.
● Store the printer indoors out of direct sunlight in a place without temperatureextremes.
● If the printer and print cartridges have not been used for one month or more,clean the print cartridges before printing. For more information, see Automaticallycleaning the print cartridges.
Maintaining the supplies For best results with photo paper, follow the guidelines in this section.
Chapter 7
44 HP Photosmart 8700 series

Storing photo paper● Store the photo paper in its original packaging or in a resealable plastic bag.● Store the packaged photo paper on a flat, cool, and dry surface.● Return unused photo paper to the plastic bag. Paper left in the printer or exposed
to the elements may curl.
Handling photo paper● Always hold photo paper by the edges to avoid fingerprints.● If the photo paper has curled edges, place it in its plastic storage bag and gently
bend it in the opposite direction of the curl until the paper lies flat.
Storing the print cartridges When you store the printer, always leave the active print cartridges inside the printer.The printer stores the print cartridges in a protective cap during the power-down cycle.
Caution Make sure the printer completes its power-down cycle before youunplug the power cord. This allows the printer to store the print cartridgesproperly.
Follow these tips to help maintain HP print cartridges and ensure consistent printquality:
● When you remove a print cartridge from the printer, store it in a print cartridgeprotector to prevent the ink from drying out. For more information, see Insertingprint cartridges.
● Keep all unused print cartridges in their original sealed packages until they areneeded. Store print cartridges at room temperature (15–35 degrees C or 59–95degrees F).
● Do not remove the plastic tape covering the ink nozzles until you are ready toinstall the print cartridge in the printer. If the plastic tape has been removed fromthe print cartridge, do not attempt to reattach it. Reattaching the tape damagesthe print cartridge.
HP Photosmart 8700 series User's Guide 45

Chapter 7
46 HP Photosmart 8700 series
8 Troubleshooting The HP Photosmart printer is designed to be reliable and easy to use. This chapteranswers frequently asked questions about using the printer and printing without acomputer. It contains information about the following topics:
● Printer software installation problems● Printer hardware problems● Printing problems● Error messages
For additional troubleshooting information, see:
Printer software and printing from a computer troubleshooting: The onscreenHP Photosmart Printer Help. For information about viewing the onscreenHP Photosmart Printer Help, see Finding more information.
Printer software installation problems Note Before contacting HP Customer Care, read this section fortroubleshooting tips or go to the online support services at www.hp.com/support. The name of HP’s support services may vary by country/region.
If the printer software did not install successfully or if the printer and computer are notcommunicating properly after software installation, check this section for possiblesolutions.
Check all cable connections between the printer and computer, and ensure that youare using the most recent version of the printer software.
The System Requirements dialog box appears during installationCause A component of the computer system does not meet minimum systemrequirements.Solution Upgrade the component to the minimum system requirement andthen reinstall the printer software.
The computer could not read the HP Photosmart CDSolution Make sure the CD isn’t dirty or scratched. If other CDs work but theHP Photosmart does not, you may have a damaged CD. You can request a newCD from HP Customer Care. If other CDs don’t work, you may need to servicethe CD-ROM drive.
The installation software does not start automatically when the CD is inserted(Windows only)
HP Photosmart 8700 series User's Guide 47

Solution From the Windows Start menu, select Run. Click Browse, thennavigate to the CD drive where you inserted the HP Photosmart CD. Double-clickthe setup.exe file.
The Found New Hardware Wizard opens but doesn’t recognize the printer(Windows only)
Cause You may have connected the USB cable before completing thesoftware installation.
Solution Disconnect the USB cable and restart the software installation.Connect the USB cable when prompted during software installation.
The system requirements check indicates that the computer is running anoutdated version of Internet Explorer (Windows only)
Solution Press CTRL + SHIFT on the keyboard and click Cancel in the SystemRequirements dialog box to bypass the block and complete the softwareinstallation. You must update Internet Explorer immediately after installing the HPPhotosmart software, or the HP software will not work properly. You do not haveto reinstall the HP software after updating Internet Explorer.
The computer stops responding during software installationCause Virus protection software or another software program is running in thebackground and slowing down the installation process.
Solution Wait while the software finishes copying files; this may take severalminutes. If, after several minutes, the computer is still not responding, restart thecomputer, pause or disable any active virus protection software, quit all othersoftware programs, and then reinstall the printer software.
Printer hardware problems Note 1 Before contacting HP Customer Care, read this section fortroubleshooting tips or go to the online support services at www.hp.com/support. The name of HP’s support services may vary by country/region.
Note 2 If you want to connect the printer to a computer with a USB cable, HPrecommends using a cable of less than 3 meters (10 feet) in length to minimizeinjected noise due to potential high electromagnetic fields.
The Status light is flashing green but the printer is not printingSolution The printer is busy processing information; wait for it to finish.
The Status light is flashing amber or red
Chapter 8
48 HP Photosmart 8700 series

Solution● Check the printer screen for instructions. If a digital camera is connected to
the printer, check the camera screen for instructions. If the printer isconnected to a computer, check the computer monitor for instructions.
● Turn off the printer, then unplug its power cord. Wait about 10 seconds, thenplug it in again. Turn on the printer.
If the Status light continues to flash red or stay amber, go to www.hp.com/support, or contact HP Customer Care.
The Status light flashed amber briefly after I turned the printer offSolution This is a normal part of the power-down process; it does not indicatea problem with the printer.
The printer does not find the photos I stored on my memory cardCause The memory card may contain file types the printer cannot read directlyfrom the card.
Solution● Save the photos to a computer, then print them from the computer. For more
information, see the onscreen HP Photosmart Printer Help and thedocumentation that came with the camera.
● The next time you take photos, set the digital camera to save them in a fileformat the printer can read directly from the memory card. For a list ofsupported file formats, see Printer specifications. For instructions on settingthe digital camera to save photos in specific file formats, see thedocumentation that came with the camera.
The memory card may need to be reformatted if the problem persists.
The printer is plugged in but will not turn on
Solution● The printer may have drawn too much power. Unplug the printer's power
cord. Wait about 10 seconds, then plug the cord back in. Turn on the printer.● The printer may be plugged into a power strip that is turned off. Turn on the
power strip, then turn on the printer.● The power cord could be defective. Make sure the green light on the power
cord is lit.
The printer makes noises when I turn it on, or starts making noises after sittingunused for a while
HP Photosmart 8700 series User's Guide 49

Solution The printer may make noises after long periods of inactivity(approximately 2 weeks) or when its power supply has been interrupted and thenrestored. This is normal operation. The printer is performing an automaticmaintenance procedure to ensure it produces the best quality output.
Printing problems Note Before contacting HP Customer Care, read this section fortroubleshooting tips or go to the online support services at www.hp.com/support. The name of HP’s support services may vary by country/region.
The printer does not print borderless photos when I print from the control panelSolution Press the Layout button until Layout: 1 photo borderless appears,then try to print again.
Printing is very slowCause You may be printing a PDF or a project containing high-resolutiongraphics or photos. Large, complex projects containing graphics or photos printslower than text documents.
Solution Consider using lower resolution graphics in the project, if possible, orallow for longer print times in your workflow.
Cause The printer may be in Ink-Backup Printing Mode. The printer enters thismode when one of the print cartridges has been removed or is out of ink.
Solution Replace the missing or empty cartridge.
Paper does not feed into the printer correctly from the Main tray
Solution● There may be too much paper loaded in the tray. Remove some paper and
try printing again.● The paper guides may not be adjusted correctly. Make sure the paper-width
and paper-length guides fit close to the edges of the paper without bendingthe paper.
● Two or more pieces of paper may be sticking together. Remove the paperfrom the Main tray, fan the edges of the stack to separate the sheets ofpaper, then reload the paper and try printing again.
● If the paper is wrinkled or bent, try using different paper.● The paper may be too thin or too thick. Use HP inkjet paper for best results.
For more information, see Choosing the right paper.
Printed pages are dropping off of the Out tray
Chapter 8
50 HP Photosmart 8700 series

Solution Always extend the Out tray extension when you print.
The printout is rippled or curledSolution The project you are printing uses a larger amount of ink than normal.Print the project from a computer, and use the printer software to lower the inksaturation level. See the onscreen HP Photosmart Printer Help for moreinformation.
The document printed at an angle or is off-center
Solution● The paper may not be loaded correctly. Reload the paper, making sure it is
correctly oriented in the Main tray and that the paper-width and paper-lengthguides fit close to the edges of the paper. For paper-loading instructions, seeLoading your paper.
● The printer may need to be calibrated. For more information, see Aligning theprint cartridges.
Colors are not printing satisfactorily
Solution● You may not be using the best print cartridges for the project. For more
information, see Inserting print cartridges.● You may be printing in Ink-Backup Printing Mode. The printer enters Ink-
Backup printing mode when one of the print cartridges is missing. Replacethe missing cartridge.
● A cartridge is out of ink. Replace it.● Some of the ink nozzles on a cartridge are clogged. Clean the cartridges.
See Automatically cleaning the print cartridges.● The color management settings of the printer may not be set properly. For
more information, see Using color management.
No page came out of the printer or the paper jammed while printing
Solution● The printer may need attention. Read the printer screen for instructions.● The power may be off or there may be a loose connection. Make sure the
power is on and the power cord is securely connected.
HP Photosmart 8700 series User's Guide 51

● You may not have any paper in the Main tray, front feed slot, or rear feedslot. Check that the paper is loaded correctly. For paper-loading instructions,see Loading your paper.
● If the paper jammed while printing, try the following:– Turn off the printer, then unplug it from the power source. Clear the
printer of any paper obstructing the paper path. Remove the rear accessdoor. Gently remove the jammed paper from the printer, then replacethe rear access door. Plug the printer back in and turn it on. Try printingagain.
– If you were printing labels, make sure a label did not become ungluedfrom the label sheet while going through the printer.
Banner paper jams between the Main and Out traysSolution There is too much banner paper in the Main tray. Clear the paper jam.
A blank page came out of the printer
Solution● Check the ink-level icons on the printer screen. Replace any empty print
cartridges. For more information, see Inserting print cartridges.● You may have begun printing and then cancelled the process. If you
cancelled the process before printing started, the printer may have alreadyloaded paper in preparation for printing. The next time you print, the printerwill eject the blank page before starting the new printing project.
● You may be printing in Ink-Backup Printing Mode with only the black printcartridge installed and borderless printing turned on. Replace the missingprint cartridge with a new one or turn off borderless printing. For moreinformation about printing in Ink-Backup Printing Mode, see Inserting printcartridges.
The photo did not print using the printer's default print settingsSolution You may have changed the print settings for the selected photo. Printsettings you apply to an individual photo override the printer's default printsettings. Discard all print settings that have been applied to an individual photo bydeselecting the photo. For more information, see Selecting photos to print.
The printer ejects the paper when preparing to printSolution Direct sunlight could be interfering with the operation of the automaticpaper sensor. Move the printer out of direct sunlight.
Print quality is poor
Chapter 8
52 HP Photosmart 8700 series

Solution● You may be printing in Ink-Backup Printing Mode. The printer enters Ink-
Backup Printing Mode when one of the print cartridges is missing. Replacethe missing cartridge. For more information, see Inserting print cartridges.
● One of the print cartridges may be running out of ink. If a cartridge is runninglow on ink, replace it. For more information, see Inserting print cartridges.
● Use photo paper designed for the printer. For best results, use HP inkjetpaper.
● You may be printing on the wrong side of the paper. Make sure the paper isloaded with the side to be printed facing down.
● You may have selected a low-resolution setting on the digital camera.Reduce the size of the image and try printing again. For better results in thefuture, set the digital camera to a higher photo resolution.
● There may be a problem with a print cartridge. Try the following:– Remove and then reinsert the print cartridges.– Run an automatic print cartridge cleaning procedure from the printer
control panel. For more information, see Automatically cleaning the printcartridges.
– Calibrate the printer from the control panel. For more information, seeAligning the print cartridges.
– Clean the copper-colored contacts on the print cartridges. For moreinformation, see Manually cleaning the print cartridge contacts.
– If these solutions do not work, replace the print cartridge(s).
Photos are not printing correctly
Solution● You may have loaded the photo paper incorrectly. Load the photo paper with
the side to be printed facing down.● The photo paper may not have fed into the printer correctly. Try the following:
– Check for a paper jam.– Insert the photo paper as far as it will go into the front feed slot.– Load one sheet of photo paper at a time.
The photos I marked for printing in the digital camera do not printSolution Some digital cameras let you mark photos for printing in both thecamera's internal memory and on the memory card. If you mark photos in theinternal memory, and then move photos from the camera's internal memory to thememory card, the marks do not transfer. Mark photos for printing after youtransfer them from the digital camera's internal memory to the memory card.
The photo is clipped when I print itCause You have transferred a photo from your computer to a memory card,inserted the card into the printer, and then tried to print the photo from the printer
HP Photosmart 8700 series User's Guide 53

control panel. This can cause clipping of the photo or change its size ratio inunexpected ways.
Solution Print the photo from the computer to avoid this distortion.
Error messages Note Before contacting HP Customer Care, read this section fortroubleshooting tips or go to the online support services at www.hp.com/support. The name of HP’s support services may vary by country/region.
Error messages that appear on the printer screen can be divided into the followingtypes:
● Paper errors● Print cartridge errors● Memory card errors● Computer printing errors● Network errors
Paper errorsBefore contacting HP Customer Care, read this section for troubleshooting tips or goto the online support services at www.hp.com/support. The name of HP’s supportservices may vary by country/region.
Error message: Paper jam. Clear jam then press .Solution Turn off the printer, then unplug it from the power source. Clear theprinter of any paper that may be obstructing the paper path. Remove the rearaccess door. Gently remove the jammed paper from the printer, then replace therear access door. Plug the printer back in and turn it on.
Error message: Out of paper. Load paper then press .Solution Load paper, then press to print again. For paper-loadinginstructions, see Loading your paper.
Error message: Unsupported media size.Solution The printer cannot use the size of paper loaded in the paper tray.Press , then load a supported paper size instead. For a list of supported papersizes, see Printer specifications.
Error message: Automatic paper sensor failed.Solution The automatic paper sensor is obstructed or damaged. Try movingthe printer out of direct sunlight, then press and try printing again. If this does
Chapter 8
54 HP Photosmart 8700 series

not work, go to www.hp.com/support or contact HP Customer Care. The name ofHP’s support services may vary by country/region.
Error message: Paper size mismatchCause The size of the paper in the paper tray does not match the photo sizeselected to print.
Solution Load a paper size that matches the photo size selected to print. Forpaper-loading instructions, see Loading your paper.
Print cartridge errorsBefore contacting HP Customer Care, read this section for troubleshooting tips or goto the online support services at www.hp.com/support. The name of HP’s supportservices may vary by country/region.
Error message: Cartridge failed.Solution The specified print cartridge may be old or damaged. Remove thecartridge and then reinstall it. For more information, see Inserting print cartridges.If this does not work, replace the cartridge.
Error message: Cartridge failed. Replace it, or remove it to print using ink-backup printing mode.
Solution Remove the cartridge and then reinstall it. For more information, seeInserting print cartridges. If this does not work, replace the cartridge. You canalso print in Ink-Backup Printing Mode by removing the damaged cartridge.
Error message: One or more cartridges have failed. Please remove allcartridges. Reinsert them one at a time, closing the main door each time, to seewhich cartridges have failed.
Solution A print cartridge is old or damaged. Follow these steps to test printcartridges to see if one or more failed:1. Remove all of the print cartridges.2. Reinsert one of the print cartridges in its appropriate print cartridge cradle.3. Close the main door. If the printer screen states that the inserted print
cartridge has failed, replace it.4. Remove the print cartridge, then repeat steps 2–3 with the untested print
cartridges.
Error message: Color cartridge not compatible. Use appropriate HP cartridge. —OR— Photo cartridge not compatible. Use appropriate HP cartridge. —OR—Right cartridge not compatible. Use appropriate HP cartridge.
HP Photosmart 8700 series User's Guide 55

Solution You have inserted a print cartridge that does not work with theprinter. Replace the cartridge with one that is compatible with the printer. Formore information, see Inserting print cartridges.
Error message: Color Cartridge is not installed correctly. Please remove andreinsert it. —OR— Photo Cartridge is not installed correctly. Please remove andreinsert it. —OR— Cartridge is not installed correctly. Please remove andreinsert it.
Solution Remove the specified cartridge and reinstall it. For more information,see Inserting print cartridges.
Error message: Color Cartridge is missing. —OR— Photo Cartridge is missing.—OR— Cartridge is missing. Please install and snap cartridge in completely.
Solution Install the specified cartridge using the instructions in Inserting printcartridges.
Error message: Color Cartridge is low on ink. —OR— Photo Cartridge is low onink. —OR— Cartridge is low on ink. You may need to replace it soon, or removeit to print using ink-backup printing mode.
Solution Replace the specified cartridge. For more information, see Insertingprint cartridges.
Error message: One or more cartridges have failed.Solution Replace the failed cartridges with new HP print cartridges. For moreinformation, see Inserting print cartridges.
Error message: One or more cartridges are not compatible.Solution One or more of the print cartridges are not HP print cartridges.Replace the non HP cartridges with supported HP print cartridges. For moreinformation, see Inserting print cartridges.
Error message: One or more cartridges are not installed correctly.Solution Remove the print cartridges that are not installed correctly and thenreinstall them following the procedures in Inserting print cartridges.
Error message: One or more cartridges are low on ink.Solution Replace the print cartridges that have low ink levels with new HPfactory-filled print cartridges. For more information, see Inserting print cartridges.
Chapter 8
56 HP Photosmart 8700 series

Error message: Cartridge service station is stuck.Solution There is an obstruction blocking the path of the cartridge servicestation. The print cartridge service station is located beneath the print cartridgecradle when the printer is in an inactive state. Follow these steps to clear theobstruction:1. Lift the top cover to access the print cartridges.2. Clear any obstruction blocking the path of the cartridge service station.3. Close the top cover.4. Press the button to continue.
Error message: Print cartridge cradle is stuck. Clear jam then press .Solution Follow these steps to clear any obstruction in the path of the printcartridge cradle:1. Lift the top cover to access the print cartridges.2. Clear any obstruction in the cradle path.3. Close the top cover.4. Press the button to continue.
The current page will eject and the print job will continue on the nextavailable sheet of paper.
Error message: Top cover is open.Solution Close the top cover of the printer.
Memory card errors Before contacting HP Customer Care, read this section for troubleshooting tips or goto the online support services at www.hp.com/support. The name of HP’s supportservices may vary by country/region.
Error message: Photo is missing. —OR— Some photos are missing.Solution The printer cannot read the file on the memory card or one or morefiles specified for the job are missing from the memory card. Try saving thephotos to the computer using the digital camera rather than the memory card. If aphoto is missing, you may have accidentally deleted the photo from the card.
Error message: Card access error. Job was cancelled. See computer for details.Press . —OR— File directory structure is corrupted. —OR— Card may bedamaged. Job was cancelled. See computer for details. Press .
Cause The printer cannot read the data on the memory card and cannotcomplete any current print or save jobs. The data may be corrupted or there maybe a physical problem with the memory card.
HP Photosmart 8700 series User's Guide 57

Solution● Save the files to the computer and access them from there.● If this does not work, use a new memory card or reformat the memory card
using the digital camera. Any photos on the memory card will be lost.● If this does not work, the photo files may be damaged or unreadable. Before
you contact HP Customer Care, try another memory card to determine if it isthe printer or the memory card that is failing.
Error message: Can not print photos.Cause More than 10 photos specified for a print job may be corrupt, missing,or are an unsupported file type. For information about supported file types, seePrinter specifications.
Solution● Save the photos to the computer using the digital camera rather than the
memory card.● Save the files to the computer and print from the computer.● Print a photo index page and reselect photos. For more information, see
Deciding which photos to print.
Error message: Card is password protected. Can not access card.Solution The printer cannot read the memory card because the card ispassword-protected. Follow these steps:1. Remove the memory card from the printer.2. Insert the memory card in the device you originally used to store the
password on the memory card.3. Remove the password from the memory card using the same software you
used to store the password.4. Remove the memory card and reinsert it in the printer memory card slot.5. Try printing again.
Error message: Card is locked. Can not access card.Solution Make sure the lock switch on the card is in the unlocked position.
Error message: Card is not fully inserted. Push card in a little more.Solution The printer can detect the memory card but cannot read it. Push thememory card gently into the memory card slot until it stops. For more information,see Inserting a memory card.
Error message: Use only 1 card at a time. Please remove a memory card.
Chapter 8
58 HP Photosmart 8700 series

Solution The printer has two or more different types of memory cards insertedsimultaneously or a memory card inserted and a digital camera connected to thecamera port at the same time. Remove memory cards or disconnect the camerauntil only one card is in the printer or one camera is connected.
Error message: Card was removed. Job was cancelled. Press .Solution You removed a memory card from the printer while it was busyprinting a file from the card or saving files to the computer. Follow these steps:1. Press the button.2. Reinsert the memory card and print selected photos or saved files again. The
memory card must remain inserted until the print or save job is complete.
To avoid damage to memory cards in the future, do not remove them from theprinter memory card slot while they are being accessed. For more information,see Removing a memory card.
Error message: Camera selections (DPOF) file has error.Solution The printer is unable to read a DPOF file due to corrupted data or anerror on the memory card. Use the printer control panel to reselect the photos.For more information, see Printing photos from a memory card.
Error message: Some camera-selected photos are not on card.Solution Some camera-selected photos are missing or have been deleted. Trythe following:● Confirm that you did not accidentally delete the photo from the memory card.● Reselect the photos again using the digital camera.● Print a new photo index page to see the index numbers associated with each
photo. For more information, see Deciding which photos to print.
Error message: No new photos on card.Solution There are no new photos on the memory card, or the photos havealready been printed once. Select and print the desired photos.
Error message: Cannot display this photo.Solution The memory card contains image formats the printer does notsupport or the file is corrupted. For a list of supported image formats, see Printerspecifications. Access photos using the computer. For information aboutaccessing photos through the computer, see Basic printing from a computer.
Error message: Memory card in backwards. The black side should face up.
HP Photosmart 8700 series User's Guide 59

Solution The memory card has been inserted upside down. Remove thememory card and reinsert it with the gold contacts facing down. For moreinformation, see Inserting a memory card.
Computer printing errorsBefore contacting HP Customer Care, read this section for troubleshooting tips or goto the online support services at www.hp.com/support. The name of HP’s supportservices may vary by country/region.
Error message: Printer memory is full. Job was cancelled. Press .Solution The printer encountered a problem when saving files to the computer.Try the following:● To clear the printer memory, turn the printer off, then turn it on again.● Print fewer photos at a time.● Save the photos to the computer and print from there.● Save the files to the computer using a memory card reader and then print
from the computer.
Error message: Computer is not connected. To save photos...connect printer tocomputer. Press . —OR— Communication error. Check computer connection.Press . —OR— Data was not received. Check computer connection. Press tocontinue. —OR— No response from computer.
Solution The printer cannot communicate properly with the computer. A printerdriver may not be working or a cable may be loose. Make sure the USB cable issecurely attached to both the computer and to the USB port on the back of theprinter. If the cable is secure, verify that the printer software is installed.
Network errorsBefore contacting HP Customer Care, read this section for troubleshooting tips or goto the online support services at www.hp.com/support. The name of HP’s supportservices may vary by country/region. You can also find help with networking theprinter by going to the home page of the embedded web server in the printer. See Toaccess help for the embedded web server.
Error message: Network not connected.Solution The printer cannot find the network. Make sure the Ethernet cable isproperly connected to the Ethernet port and the network. If your network requiresa proxy IP address, access the embedded web server to set the proxy serversettings. See Using the embedded web server.
Chapter 8
60 HP Photosmart 8700 series

9 HP Customer Care Note The name of HP’s support services may vary by country/region.
If you have a problem, follow these steps:
1. Check the documentation that came with the printer.– Quick Start booklet or Setup Guide: The HP Photosmart 8700 series
printer comes with setup instructions that explain how to set up the printerand install the printer software. Which document you receive with the printervaries by country/region.
– User's Guide: The User's Guide is the book you are reading. This bookdescribes the basic features of the printer, explains how to use the printerwithout connecting a computer, and contains hardware troubleshootinginformation.
– HP Photosmart Printer Help: The onscreen HP Photosmart Printer Helpdescribes how to use the printer with a computer and contains softwaretroubleshooting information.
2. If you are unable to solve the problem using the information in the documentation,visit www.hp.com/support to do the following:– Access online support pages– Send HP an e-mail message for answers to your questions– Check for software updates– Connect with an HP technician by using Real Time ChatSupport options and availability vary by product, country/region, and language.
3. For Europe only: Contact your local point of purchase. If the printer has ahardware failure, you will be asked to bring the printer to where you purchased it.Service is free during the printer limited warranty period. After the warrantyperiod, you will be quoted a service charge.
4. If you are unable to solve the problem using the onscreen HP Photosmart PrinterHelp or HP web sites, call HP Customer Care using the number for your country/region. For a list of country/region phone numbers, see HP Customer Care byphone.
HP Customer Care by phoneWhile the printer is under warranty, you can obtain free phone support. For moreinformation, see the warranty information included in the box, or go to www.hp.com/support to check the duration of your free support.
After the free phone support period, you can obtain help from HP at an additional cost.Contact your HP dealer or call the support phone number for your country/region forsupport options.
To receive HP support by phone, call the appropriate support phone number for yourlocation. Standard phone company charges apply.
North America: Call 1-800-HP-INVENT (1-800-474-6836). U.S. phone support isavailable in both English and Spanish languages 24 hours a day, 7 days a week (days
HP Photosmart 8700 series User's Guide 61

and hours of support may change without notice). This service is free during thewarranty period. A fee may apply outside the warranty period.
Western Europe: Customers in Austria, Belgium, Denmark, Spain, France, Germany,Ireland, Italy, Netherlands, Norway, Portugal, Finland, Sweden, Switzerland, and theUnited Kingdom should go to www.hp.com/support to access phone support numbersin their country/region.
Chapter 9
62 HP Photosmart 8700 series

www.hp.com/support
Australia
Australia (out-of-warranty)
Brasil
Brasil (Sao Paulo)
800 171
Canada
Chile
Colombia (Bogota)
Costa Rica
Česká republika
Ecuador (Andinatel)
Ecuador (Pacifitel)
Guatemala
Magyarország
India
Indonesia
1300 721 147
1902 910 910
021-3881-4518
2802 4098
Mexico (Mexico City)
New Zealand
22 404747
Malaysia
Perú
Philippines
Polska
Puerto Rico
România
800 897 1444
Singapore
������ (�����)������ (���- ��������)
Slovakia
Türkiye
�����
United States
Venezuela (Caracas)
Mexico
1588-3003
0800 441 147
1800 805 405
2 867 3551
1-877-232-0589
6 272 5300
095 7973520812 3467997
(380 44) 4903520
800 4520
1-(800)-474-6836
+84 88234530
Nigeria 1 3204 999
61 56 45 43
Argentina (Buenos Aires) Argentina
54-11-4708-16000-800-555-5000
571-606-919101-8000-51-4746-8368
1-999-119 ℡ 800-711-2884
1-800-225-528 ℡ 800-711-2884
1-800-711-2884
2 532 5222
1 382 1111
(0) 9 830 4848
55-5258-9922
01-800-472-68368
58-212-278-8666
Trinidad & Tobago 1-800-711-2884
71 89 12 22
Rest Of West Africa + 351 213 17 63 80
South Africa (International)
South Africa (RSA)
+ 27 11 2589301
086 0001030
2 50222444
República Dominicana 1-800-711-2884
+ 30 210 6073603801 11 22 55 47 800 9 2649
55-11-4004-7751
0-800-10111
22 5666 000
(21) 315 4442
0-800-011-1046
800-360-999
0-800-709-7751Panama 1-800-711-2884
Support for the following countries/regions is available at www.hp.com/support: Austria, Belgium, Central America & The Caribbean, Denmark, Spain, France, Germany, Ireland, Italy, Luxembourg, Netherlands, Norway, Portugal, Finland, Sweden, Switzerland, and the United Kingdom.
02-8722-8000
+62 (21) 350 3408
+66 (2) 353 9000
90 216 444 71 71
261 307 310
1-(800)-474-6836
(905) 206-4663Canada (Mississauga Area)
1 600 44 7737
800-810-3888
Paraguay 009 800 54 1 0006
3001
Colombia
Venezuela 0-800-474-68368
Viêt Nam
0570-000511
Jamaica 1-800-711-2884
El Salvador 800-6160
03-3335-9800
Uruguay 0004-054-177
HP Photosmart 8700 series User's Guide 63

Placing a callCall HP Customer Care while you are near the computer and printer. Be prepared toprovide the following information:
● Printer model number (located on the front of the printer).● Printer serial number (located on the bottom of the printer).● Computer operating system.● Version of printer driver:
– Windows PC: To see the printer driver version, right-click the memory cardicon in the Windows taskbar and select About.
– Macintosh: To see the printer driver version, use the Print dialog box.● Messages displayed on the printer screen or on the computer monitor.● Answers to the following questions:
– Has the situation you are calling about happened before? Can you recreatethe situation?
– Did you install any new hardware or software on the computer around thetime that the situation occurred?
Return to HP repair service (North America only)HP will arrange to have your product picked up and delivered to an HP Central RepairCenter. We pay for the round-trip shipping and handling. This service is free for theduration of the hardware warranty period. This service is available in North Americaonly.
Additional warranty optionsExtended service plans are available for the printer at additional costs. Go towww.hp.com/support, select your country/region and language, then explore theservices and warranty area for information about the extended service plans.
Chapter 9
64 HP Photosmart 8700 series

a Networking The instructions in this section describe how to install the HP Photosmart 8700 series printer inan ethernet (wired) network. A wired setup allows the printer to communicate to computersthrough a router, hub, or switch. Broadband Internet access is required in order to take fulladvantage of the printer feature set.
Note For USB installation, see the setup instructions that came in the box.
Before proceeding with this section, make sure you have already set up your wired network. Seethe documentation that came with your network hardware. Also make sure you have set up theprinter as described in the setup instructions that came in the box.
Networking basics (Windows and Macintosh)Networking lets networked devices, such as computers and printers, communicate with eachother. A wired or ethernet network is the most common type of network in offices and in homes.The network adapter in the printer itself supports both 10 Mbps and 100 Mbps ethernet networks.To connect the printer to a network, you need a CAT-5 ethernet cable equipped with a RJ-45plug. This is not the same as a USB cable. You must purchase the Ethernet cable separately. Itis not included with the printer.
Caution Although the RJ-45 plug of a CAT-5 cable resembles a common telephoneplug, it is not the same. Never use a regular phone wire to connect the printer to anethernet network. You can damage the printer and other network devices by doing so.
The following illustration shows an example of the printer networked with several computersthrough a network hub, switch, or router. A cable or DSL modem links the hub and all thenetworked devices to broadband Internet access.
1 Cable or DSL modem connecting the networked devices to broadband Internet access2 A network access point (hub, switch, or router) into which all the devices are connected through ethernet
cables
HP Photosmart 8700 series User's Guide 65

Networked devices connect to each other through a central device. The most common typesinclude:● Hubs: A simple, inexpensive network device that lets several computers communicate with
each other or share a common printer. Hubs are passive. They only provide a way forcommunication to flow between other devices.
● Switches: Switches are similar to hubs, but can examine the information sent betweendevices and forward the information only to the proper device. They can lessen bandwidthusage on a network and help keep it running more efficiently.
● Routers: Routers or gateways connect both devices and networks. A common use is toconnect several home computers on a network to the Internet. Routers often also include abuilt-in firewall that can help protect a home network from unauthorized access.
Note For specific information about setting up and configuring the hardware on yournetwork, see the documentation that came with the hardware.
Internet connectionIf your network is connected to the Internet through a router or gateway, it is recommended thatyou use a router or gateway that supports Dynamic Host Configuration Protocol (DHCP). Agateway with DHCP support manages a pool of reserved IP addresses that it assignsdynamically as needed. See the documentation that came with the router or gateway.
Recommended network configurationsThe following network configurations support the printer. Determine the type of networkconfiguration you have, then see Connecting the printer to the network and Installing the printersoftware on a Windows computer or Installing the printer software on a Macintosh for instructionson connecting your printer to the network and then installing the software.
Ethernet network without Internet accessThe computers and printer communicate with each other, forming a simple network, through ahub. None of the networked devices has access to the Internet.
Ethernet network with Internet access by dial-up modemThe computers and printer communicate with each other, forming a simple network, through ahub. One of the computers has access to the Internet through a modem and dial-up account.None of the other networked devices, including the printer, have direct access to the Internet.
Ethernet network with broadband Internet access provided by a routerThe printer is connected to a router that acts as a gateway between the user network and theInternet. This is the ideal network configuration.
Connecting the printer to the network To connect the printer to a wired network, you need the following:● A network access point such as a hub, router, or switch with an open port● A CAT-5 ethernet cable with RJ-45 plug
Note 1 You should not connect the printer directly to a computer using an ethernetcable. Peer-to-peer networking is not supported.
Note 2 After you connect the printer to the network as described in this section, youmust install the printer software. See Installing the printer software on a Windowscomputer or Installing the printer software on a Macintosh.
Appendix a
66 HP Photosmart 8700 series

To connect the printer to the network1. Connect the ethernet cable to the back of the printer.
Ethernet connection on the back of the printer
2. Connect the ethernet cable to an empty port on the hub, router, or switch.
After you finish connecting the printer to the network, install the printer software. You cannot printfrom a computer until you do the software installation.● Installing the printer software on a Windows computer● Installing the printer software on a Macintosh
Installing the printer software on a Windows computer Note Set up the printer as indicated in the setup instructions that came in the box.
Installation time can range from 20 minutes (Windows XP) to 1 hour (Windows 98), the amountof available hard drive space, and the processor speed of the computer. Make sure you have
HP Photosmart 8700 series User's Guide 67

already connected the printer to the network with an ethernet cable before you begin theinstallation.
Note The printer software must be installed as described in this section on everynetworked computer from which you want to print to the HP Photosmart 8700 seriesprinter. After the installation, printing is identical to printing through a USB connection.
Tip Do not use the Windows Add Printer control panel utility to install the printersoftware. You must use the HP installer to install the printer on a network properly.
To install the printer software1. Print a network configuration page. You may need the information included in this report if
the installer cannot detect the printer.See Printing a network configuration page.
2. Insert the HP Photosmart printer software CD into the computer's CD-ROM drive.3. Click Next and follow the instructions provided by the Installer to check and prepare the
system, and install drivers, plug-ins, and software. This takes several minutes.4. At the Connection Type screen, select Through the network, then click Next.
The Searching screen appears as the Setup program searches for the printer on thenetwork.If the Printer Found screen appears, do this:a. Verify that the printer description is correct. (Use the configuration page to verify the
printer name and hardware address. See Printing a network configuration page.)b. If the printer description is correct, select Yes, install this printer, then click Next.
If more than one printer is found on the network, select HP Photosmart 8700 seriesas the device to configure and install, then click Next. If you have more than oneHP Photosmart 8700 series printer on your network, use the Hardware Address (MAC)item listed in the network configuration page to identify the specific HP Photosmart8700 series printer you want to install.
If the Check Cable Connection screen appears, do this:a. Follow the onscreen instructions, then select Specify a printer by address, then click
Next.b. On the Specify Printer screen, enter the Hardware Address (MAC) number listed in
the network configuration page in the Hardware Address (MAC) box.Example: 02bad065cb97MAC stands for Media Access Control, a hardware address that identifies the printeron the network.
c. Enter the IP Address listed in the network configuration page in the IP Address box ,then click Next.Example: 169.254.203.151
d. When the Printer Found screen appears, select Yes, install this printer, then clickNext.
e. In the Confirm Settings screen, click Next.f. Follow the onscreen instructions.
5. When prompted, click Finish to exit the installation.
Appendix a
68 HP Photosmart 8700 series

Installing the printer software on a Macintosh Note Set up the printer as indicated in the setup instructions that came in the box.
Installation time can take 3-4 minutes depending on your operating system, the amount ofavailable hard drive space, and the processor speed of the Macintosh. Make sure you havealready connected the printer to the network with an ethernet cable before you begin theinstallation. If you have already installed this printer on a USB connection, you do not have tofollow these instructions to do a network installation. Instead, see To change a USB connectedprinter to a network connection.
Note The printer software must be installed as described in this section on everynetworked computer from which you want to print to the HP Photosmart 8700 seriesprinter. After the installation, printing is identical to printing to a printer connected by aUSB cable.
To install the printer software1. Insert the HP Photosmart printer software CD into the Macintosh CD-ROM drive.2. Double-click the CD icon on the desktop.3. Double-click the Installer icon.
The Authenticate dialog appears.4. Enter the Name and Password used to administer your Macintosh, then click OK.5. Follow the onscreen instructions.6. When the HP Photosmart Install window appears, choose Easy Install, then click Install.7. In the Select Printer window, click the Network tab. The installer searches for any printers
on the network.If the printer is found, do this:a. Select the HP Photosmart 8700 series printer in the Select Printer window, then click
Utilities.b. Follow the onscreen instructions to register the printer.If the printer is not found, do this:a. Print a network configuration page and locate the IP Address entry listed on the page.b. Make sure the printer is connected by the correct type of CAT-5 ethernet cable to the
network. See Connecting the printer to the network.c. Click Find, enter the IP Address, then click Save.d. Select the HP Photosmart 8700 series printer in the Select Printer window, then click
Utilities.e. Follow the onscreen instructions to register the printer.
Note Some browsers may not work with the online registration. If youencounter problems, either try another browser or skip this step.
8. Select the printer in the Print dialog box. If the printer does not appear in the list, select EditPrinter List to add the printer.
9. In the Printer List window, click Add.10. Select Rendezvous from the drop-down list.11. Select the printer from the list, then click Add.
That's it. You're done!
To change a USB connected printer to a network connection1. Connect the printer to the network. See Connecting the printer to the network.2. Print a network configuration page and locate the IP Address entry.
HP Photosmart 8700 series User's Guide 69

3. Open a web browser and enter the IP Address to access the embedded web server in theprinter. For more information on the embedded web server, see Using the embedded webserver.
4. Click the Networking tab.5. Click mDNS in the Applications area on the left.6. Enter a unique name (63 characters or less) in the mDNS Service Name box.7. Click Apply.8. Select the printer in the Print dialog box. If the printer does not appear in the list, select Edit
Printer List to add the printer.9. In the Printer List window, click Add.10. Select Rendezvous from the drop-down list.11. Select the printer from the list, then click Add.
Using the embedded web server The embedded web server in the printer provides a simple way to manage the networked printer.Using any web browser from either a Windows or Macintosh computer, you can communicatewith the printer over the network to:● Check printer status and estimated ink levels● View network statistics● Adjust the printer network configuration such as specifying a proxy server, setting a DNS
name, or manually entering an IP address● Restrict access to configuration pages● Order supplies● Go to the HP web site for support
To access the embedded web server home page1. Print a network configuration page. See Printing a network configuration page.2. Enter the printer IP address indicated on the network configuration page into the address
box of your browser.Example IP address: 10.0.0.81The home page for the embedded web server appears.
For information about network terms and the embedded web server that is not covered in thisguide, access the embedded web server help.
To access help for the embedded web server1. Go to the embedded web server home page. See To access the embedded web server
home page.2. Click Help in the Other Links area of the home page.
Printing a network configuration page You can print a network configuration page from the printer without even being connected to acomputer. The configuration page provides useful information regarding the printer IP address,network statistics, and other network settings. You can also display a summary of select networksettings on the printer itself.
To print a detailed network configuration page1. Press Menu on the printer.2. Press until Network settings appears, then press .3. Press until Print network settings page appears, then press .
Appendix a
70 HP Photosmart 8700 series

b SpecificationsThis section lists the minimum system requirements for installation of the HP Photosmart printersoftware, and provides selected printer specifications.
System requirements
Component Windows PC minimum Macintosh minimum
Operating system Microsoft® Windows 98, 2000Professional, ME, XP Home,and XP Professional
Mac® OS X 10.1.5 through10.3
Processor Intel® Pentium® II (orequivalent) or higher
G3 or greater
RAM 64 MB (256 MBrecommended)
128 MB (256 MBrecommended)
Free disk space 600 MB (2 GB recommended) 500 MB
Video display 800 x 600, 16-bit or higher 800 x 600, 16-bit or higher
CD-ROM drive 4x 4x
Connectivity USB: Microsoft Windows 98,2000 Professional, ME, XPHome, and XP Professional
Ethernet: using the Ethernetport
PictBridge: using frontcamera port
Bluetooth: using optionalHP bt300 Bluetooth wirelessprinter adapter
USB: Front and back ports(Mac OS X 10.1.5 through10.3)
Ethernet: using the Ethernetport
PictBridge: using frontcamera port
Browser Microsoft Internet Explorer5.5 or later
—
Printer specifications
Category Specifications
Connectivity USB: Microsoft Windows 98, 2000 Professional, ME, XPHome, and XP Professional; Mac OS X 10.1.5 through10.3
Ethernet
Dimensions Weight: 11.8 kg (26 lbs)
Height: 203 mm (8 inches)
HP Photosmart 8700 series User's Guide 71

Category Specifications
Width: 643 mm (25.3 inches)
Depth: 398 mm (15.7 inches)
Environmental specifications Recommended during operation: 0–45° C (32–113° F),20–80% RH
Maximum during operation: 5–40° C (41–104° F), 5–95% RH
Storage temperature range: -30–65° C (22–149° F)
Image file formats JPEG Baseline
TIFF 24-bit RGB uncompressed interleaved
TIFF 24-bit YCbCr uncompressed interleaved
TIFF 24-bit RGB packbits interleaved
TIFF 8-bit gray uncompressed/packbits
TIFF 8-bit palette color uncompressed/packbits
TIFF 1-bit uncompressed/packbits/1D Huffman
Media specifications Recommended maximum length: 483 mm (19 inches)
Recommended maximum width: 330 mm (13 inches)
Recommended maximum thickness: 292 µm (11.5 mil)
Recommended plain paper media weight: 60 to 90 g/m2
(16 to 24 lb.)
Recommended maximum photo media weight: 280 g/m2
Media sizes Supported sizes when printing from a computer
76 x 127 mm to 330 x 483 mm (3 x 5 inches to 13 x 19inches)
Supported sizes when printing from the control panel
Metric: 10 x 15 cm (with or without tab),13 x 18 cm, A6,A3, A4, L, 2L; Imperial: 3.5 x 5 inches, 4 x 6 inches (withor without tab), 4 x 12 inches, 5 x 7 inches, 8 x 10 inches,8.5 x 11 inches, 11 x 14 inches, 13 x 19 inches; Other:Hagaki
Media types Paper (photo, plain, and inkjet)
Envelopes
Transparencies
Labels
Cards (index, greeting, Hagaki, A6, L-size)
Iron-on transfers
Memory cards CompactFlash Type I and II
Microdrive
MultiMediaCard
Appendix b(continued)
72 HP Photosmart 8700 series

Category Specifications
Secure Digital
Memory Sticks
xD-Picture Card
Memory card-supported fileformats
Printing: See Image file formats earlier in table.
Saving: All file formats
Paper trays Main tray
76 x 127 mm to 330 x 483 mm (3 x 5 inches to 13 x 19inches)
Front feed slot
10 x 15 cm (4 x 6 inches) to 330 x 483 mm (13 x 19inches)
Rear feed slot
76 x 127 mm to 330 x 483 mm (3 x 5 inches to 13 x 19inches)
Out tray
All supported sizes
Paper tray capacity Main tray
100 sheets of plain paper
14 envelopes
20–40 cards (depending on thickness)
20 sheets of banner paper
30 sheets of labels
25 photo paper, transparencies, or iron-on transfers
Front feed slot
10 sheets of photo paper
Rear feed slot
1 sheet of any media up to 292 µm (11.5 mil) thick
Out tray
50 sheets of plain paper
20 sheets of photo paper, banner paper, or transparencies
10 cards or envelopes
25 sheets of labels or iron-on transfers
Power consumption Printing: 29 W
Idle: 6 W
Off: 5 W
(continued)
HP Photosmart 8700 series User's Guide 73
Power supply model number 0950-4476, 0957-2105; 100-240 Vac (+/-10%) 50/60 Hz (+/- 3 Hz)

Category Specifications
Print cartridges HP Gray Photo
HP Color Photo
HP Tri-color
HP Black
HP Blue Photo
Note The cartridge numbers you can use with thisprinter appear on the back cover of the printedHP Photosmart 8700 series User's Guide. If you havealready used the printer several times, you can find thecartridge numbers in the HP Photosmart 8700 seriesToolbox. For more information on accessing the Toolbox,see Inserting print cartridges.
USB support Microsoft Windows 98, 2000 Professional, ME, XPHome, and XP Professional
Mac OS X 10.1.5 through 10.3
HP recommends that the USB cable be less than 3meters (10 feet) in length
Network support Microsoft Windows 98, 2000 Professional, ME, XPHome, and XP Professional
Mac OS X 10.1.5 through 10.3
Appendix b(continued)
74 HP Photosmart 8700 series

A. Extent of limited warranty 1. Hewlett-Packard (HP) warrants to the end-user customer that the HP products specified above will be free from
defects in materials and workmanship for the duration specified above, which duration begins on the date of purchase by the customer.
2. For software products, HP's limited warranty applies only to a failure to execute programming instructions. HP does not warrant that the operation of any product will be uninterrupted or error free.
3. HP's limited warranty covers only those defects that arise as a result of normal use of the product, and does not cover any other problems, including those that arise as a result of:
a. Improper maintenance or modification; b. Software, media, parts, or supplies not provided or supported by HP; c. Operation outside the product's specifications; d. Unauthorized modification or misuse. 4. For HP printer products, the use of a non-HP ink cartridge or a refilled ink cartridge does not affect either the warranty
to the customer or any HP support contract with the customer. However, if printer failure or damage is attributable to the use of a non-HP or refilled ink cartridge, HP will charge its standard time and materials charges to service the printer for the particular failure or damage.
5. If HP receives, during the applicable warranty period, notice of a defect in any product which is covered by HP's warranty, HP shall either repair or replace the product, at HP's option.
6. If HP is unable to repair or replace, as applicable, a defective product which is covered by HP's warranty, HP shall, within a reasonable time after being notified of the defect, refund the purchase price for the product.
7. HP shall have no obligation to repair, replace, or refund until the customer returns the defective product to HP. 8. Any replacement product may be either new or like-new, provided that it has functionality at least equal to that of the
product being replaced. 9. HP products may contain remanufactured parts, components, or materials equivalent to new in performance. 10. HP's Limited Warranty Statement is valid in any country where the covered HP product is distributed by HP. Contracts
for additional warranty services, such as on-site service, may be available from any authorized HP service facility in countries where the product is distributed by HP or by an authorized importer.
B. Limitations of warrantyTO THE EXTENT ALLOWED BY LOCAL LAW, NEITHER HP NOR ITS THIRD PARTY SUPPLIERS MAKES ANY OTHER WARRANTY OR CONDITION OF ANY KIND, WHETHER EXPRESS OR IMPLIED WARRANTIES OR CONDITIONS OF MERCHANTABILITY, SATISFACTORY QUALITY, AND FITNESS FOR A PARTICULAR PURPOSE.
C. Limitations of liability 1. To the extent allowed by local law, the remedies provided in this Warranty Statement are the customer's sole and
exclusive remedies. 2. TO THE EXTENT ALLOWED BY LOCAL LAW, EXCEPT FOR THE OBLIGATIONS SPECIFICALLY SET FORTH IN
THIS WARRANTY STATEMENT, IN NO EVENT SHALL HP OR ITS THIRD PARTY SUPPLIERS BE LIABLE FOR DIRECT, INDIRECT, SPECIAL, INCIDENTAL, OR CONSEQUENTIAL DAMAGES, WHETHER BASED ON CONTRACT, TORT, OR ANY OTHER LEGAL THEORY AND WHETHER ADVISED OF THE POSSIBILITY OF
SUCH DAMAGES.D. Local law 1. This Warranty Statement gives the customer specific legal rights. The customer may also have other rights which vary
from state to state in the United States, from province to province in Canada, and from country to country elsewhere in the world.
2. To the extent that this Warranty Statement is inconsistent with local law, this Warranty Statement shall be deemed modified to be consistent with such local law. Under such local law, certain disclaimers and limitations of this Warranty Statement may not apply to the customer. For example, some states in the United States, as well as some governments outside the United States (including provinces in Canada), may:
a. Preclude the disclaimers and limitations in this Warranty Statement from limiting the statutory rights of a consumer (e.g., the United Kingdom); b. Otherwise restrict the ability of a manufacturer to enforce such disclaimers or limitations; or c. Grant the customer additional warranty rights, specify the duration of implied warranties which the manufacturer
cannot disclaim, or allow limitations on the duration of implied warranties. 3. THE TERMS IN THIS WARRANTY STATEMENT, EXCEPT TO THE EXTENT LAWFULLY PERMITTED, DO NOT
EXCLUDE, RESTRICT, OR MODIFY, AND ARE IN ADDITION TO, THE MANDATORY STATUTORY RIGHTS APPLICABLE TO THE SALE OF THE HP PRODUCTS TO SUCH CUSTOMERS.
HP product Duration of limited warrantySoftware 90 daysPrinter 1 yearPrint cartridges Until the HP ink is depleted or the end of warranty date printed
on the cartridge has been reached, whichever comes first. This warranty does not cover HP ink products that have been
refilled, remanufactured, refurbished, misused, or tampered with.Accessories 1 year unless otherwise stated.
HP printer limited warranty statement

Appendix c
76 HP Photosmart 8700 series

Index
Aaligning print cartridges 14, 43alignment page 43
Bblack-and-white photos 13Bluetooth
connecting to printer 29wireless printer adapter 30
borderless printsprinting from a computer 27printing from the controlpanel 37
buttons 6
Ccameras
Bluetooth 39connecting to printer 29PictBridge 39port 4printing from 39
care and maintenance 41cartridges. See print cartridgescleaning
print cartridges 41printer 41
color managementapplication-based 22calibrating a monitor 22ICC device profiles 22installing ICC profiles 22printer-based 19
CompactFlash 30computer
printing from 3, 17system requirements 71
control panel 6creative projects
HP Creative ScrapbookAssistant 26large-format templates 25scrapbooking 25
customer care. See HPCustomer Care
Ddigital cameras. See camerasdocumentation, printer 3
Eerror messages 54ethernet 65
Ffile formats, supported 31, 72front feed slot 12
Hhelp. See troubleshootinghelp, onscreen 3, 4HP Creative ScrapbookAssistant 26HP Customer Care 61HP Image Zone 26HP Software Update 43
Iink cartridges. See printcartridgesink level, checking 14, 42ink-backup printing mode 14inserting
memory cards 31print cartridges 14
JJPEG file format 31
Llarge-format templates 25layout
and photo size 33large-format layouttemplates 25
lights 7loading paper
in front feed slot 12in Main tray 12in rear feed slot 12
MMain tray 12memory card errors 57memory cards
errors 57inserting 31printing from 30removing 33supported types 30
Memory Sticks 30menu, printer 7Microdrive 30MultiMediaCard 30
Nnetwork configuration page 70networking
connecting printer tonetwork 66embedded web server 70ethernet 65network configurationpage 70software installation (MacOS) 69software installation(Windows) 67
Oonscreen Help 3
Ppaper
buying and choosing 9loading 11maintaining 9, 44specialty 10specifications 71storing 44trays 4
paper jams 51photos
improving quality 37print cartridges, choosing13printing 30
HP Photosmart 8700 series User's Guide 77

saving to computer 32selecting for print 36supported file formats 31,72
PictBridge camerascamera port 39
print cartridge protector 15print cartridges
aligning 43choosing 13cleaning 41cleaning contacts 42ink level, checking 14ink-backup printing mode14inserting 14numbers. See back coverof this guidereplacing 14storing 15, 45testing 42
print driverrecommended settings 17
print qualitychanging 30
printercare and maintenance 41cleaning 41connecting 29documentation 3error messages 54menu 7parts 4specifications 71storing 44
Printer Helpviewing 4
printer screen 6printer software
updating 43printing
from a computer 17from BlueTooth device 29from cameras 39from computer 3from memory cards 29, 30from PictBridge camera 29photo index 33photos 30range of photos 30test page 42thumbnails 33
troubleshooting problems50without computer 29
Qquality
photo paper 44photos 37printing test page 42
Rrange
printing 30rear feed slot 12regulatory notices 79removing memory cards 33replacing print cartridges 14
Ssaving photos to computer 32scrapbooking
templates 25Secure Digital 30software
driver 17HP Image Zone 26print driver 17templates 25troubleshooting 47
Sony Memory Sticks. SeeMemory Sticksspecialty papers 10specifications 71storing
photo paper 44print cartridge protector 15print cartridges 15, 45printer 44
system requirements 71
Ttest page 42thumbnails, printing 33TIFF file format 31trays
front feed slot 5Main tray 5, 12Out tray 5rear feed slot 5
trays, paper 4troubleshooting
error messages 54
flashing lights 48HP Customer Care 61printer hardwareproblems 48printing problems 50software installation 47
UUSB
port 4specifications 71
XxD-Picture Card 30
78 HP Photosmart 8700 series

Regulatory noticesHewlett-Packard CompanyThis device complies with part 15 of the FCC Rules. Operation is subject to the following two conditions:
● This device may not cause harmful interference, and● This device must accept any interference received, including interference that may cause undesired operation.
Pursuant to Part 15.21 of the FCC Rules, any changes or modifications to this equipment not expressly approved by Hewlett-Packard Company may cause harmful interference, and void your authority to operate this equipment. Use of a shielded datacable is required to comply with the Class B limits of Part 15 of the FCC Rules.
For further information, contact: Hewlett-Packard Company, Manager of Corporate Product Regulations, 3000 HanoverStreet, Palo Alto, CA 94304, (650) 857-1501.
NoteThis equipment has been tested and found to comply with the limits for a Class B digital device, pursuant to part 15 of theFCC rules. These limits are designed to provide reasonable protection against harmful interference in a residentialinstallation. This equipment generates, uses, and can radiate radio frequency energy and, if not installed and used inaccordance with the instructions, can cause harmful interference to radio communications. However, there is no guaranteethat interference will not occur in a particular installation. If this equipment does cause harmful interference to radio ortelevision reception, which can be determined by turning the equipment off and on, the user is encouraged to try to correctthe interference by one or more of the following measures:
● Reorient or relocate the receiving antenna.● Increase the separation between the equipment and the receiver.● Connect the equipment into an outlet on a circuit different from that to which the receiver is connected.● Consult the dealer or an experienced radio/TV technician for help.
LED indicator statementThe display LEDs meet the requirements of EN 60825-1.