english deutsch franÇais - yamaha · the literature accompanying the product. ... combining over...
TRANSCRIPT
EN
GLI
SH
DE
UT
SC
HF
RA
NÇ
AIS
ES
PA
ÑO
L
ES
FR
DE
EN
Before using this instrument, be sure to read “PRECAUTIONS” on pages 6 – 7.When assembling or transporting the unit, consult a qualified AvantGrand dealer. (Refer to page 37 for the assembly instructions.)
Achten Sie darauf, vor Einsatz dieses Instruments die „VORSICHTSMASSNAHMEN“ auf Seiten 6-7 durchzulesen.Wenden Sie sich bezüglich Zusammenbau und Transport des Gerätes an einen qualifizierten AvantGrand-Händler. (Lesen Sie auf Seite 37 für Anweisungen zur Montage.)
Avant d'utiliser cet instrument, lisez attentivement la section « PRÉCAUTIONS D'USAGE » aux pages 6-7.Lors de l'assemblage ou du transport de l'unité, consultez un revendeur qualifié AvantGrand. (Reportez-vous à la page 37 pour obtenir des instructions sur le montage.)
Antes de utilizar el instrumento, lea la sección “PRECAUCIONES”, en las páginas 6-7.Al montar o transportar la unidad, consulte a un distribuidor cualificado de AvantGrand. (Consulte las instrucciones de
Owner’s Manual
Bedienungsanleitung
Mode d'emploi
Manual de instrucciones
montaje en la página 37.)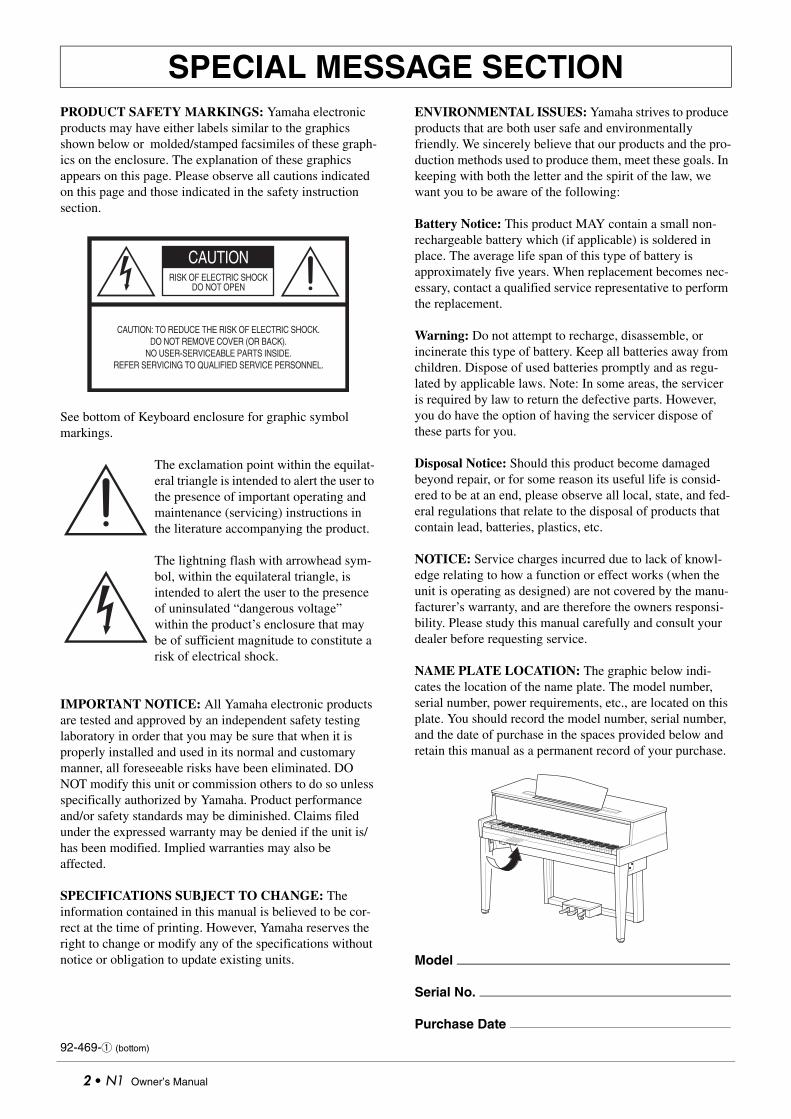
PRODUCT SAFETY MARKINGS: Yamaha electronic products may have either labels similar to the graphics shown below or molded/stamped facsimiles of these graph-ics on the enclosure. The explanation of these graphics appears on this page. Please observe all cautions indicated on this page and those indicated in the safety instruction section.
See bottom of Keyboard enclosure for graphic symbol markings.
The exclamation point within the equilat-eral triangle is intended to alert the user to the presence of important operating and maintenance (servicing) instructions in the literature accompanying the product.
The lightning flash with arrowhead sym-bol, within the equilateral triangle, is intended to alert the user to the presence of uninsulated “dangerous voltage” within the product’s enclosure that may be of sufficient magnitude to constitute a risk of electrical shock.
IMPORTANT NOTICE: All Yamaha electronic products are tested and approved by an independent safety testing laboratory in order that you may be sure that when it is properly installed and used in its normal and customary manner, all foreseeable risks have been eliminated. DO NOT modify this unit or commission others to do so unless specifically authorized by Yamaha. Product performance and/or safety standards may be diminished. Claims filed under the expressed warranty may be denied if the unit is/has been modified. Implied warranties may also be affected.
SPECIFICATIONS SUBJECT TO CHANGE: The information contained in this manual is believed to be cor-rect at the time of printing. However, Yamaha reserves the right to change or modify any of the specifications without notice or obligation to update existing units.
ENVIRONMENTAL ISSUES: Yamaha strives to produce products that are both user safe and environmentally friendly. We sincerely believe that our products and the pro-duction methods used to produce them, meet these goals. In keeping with both the letter and the spirit of the law, we want you to be aware of the following:
Battery Notice: This product MAY contain a small non-rechargeable battery which (if applicable) is soldered in place. The average life span of this type of battery is approximately five years. When replacement becomes nec-essary, contact a qualified service representative to perform the replacement.
Warning: Do not attempt to recharge, disassemble, or incinerate this type of battery. Keep all batteries away from children. Dispose of used batteries promptly and as regu-lated by applicable laws. Note: In some areas, the servicer is required by law to return the defective parts. However, you do have the option of having the servicer dispose of these parts for you.
Disposal Notice: Should this product become damaged beyond repair, or for some reason its useful life is consid-ered to be at an end, please observe all local, state, and fed-eral regulations that relate to the disposal of products that contain lead, batteries, plastics, etc.
NOTICE: Service charges incurred due to lack of knowl-edge relating to how a function or effect works (when the unit is operating as designed) are not covered by the manu-facturer’s warranty, and are therefore the owners responsi-bility. Please study this manual carefully and consult your dealer before requesting service.
NAME PLATE LOCATION: The graphic below indi-cates the location of the name plate. The model number, serial number, power requirements, etc., are located on this plate. You should record the model number, serial number, and the date of purchase in the spaces provided below and retain this manual as a permanent record of your purchase.
Model
Serial No.
Purchase Date
92-469-q (bottom)
SPECIAL MESSAGE SECTION
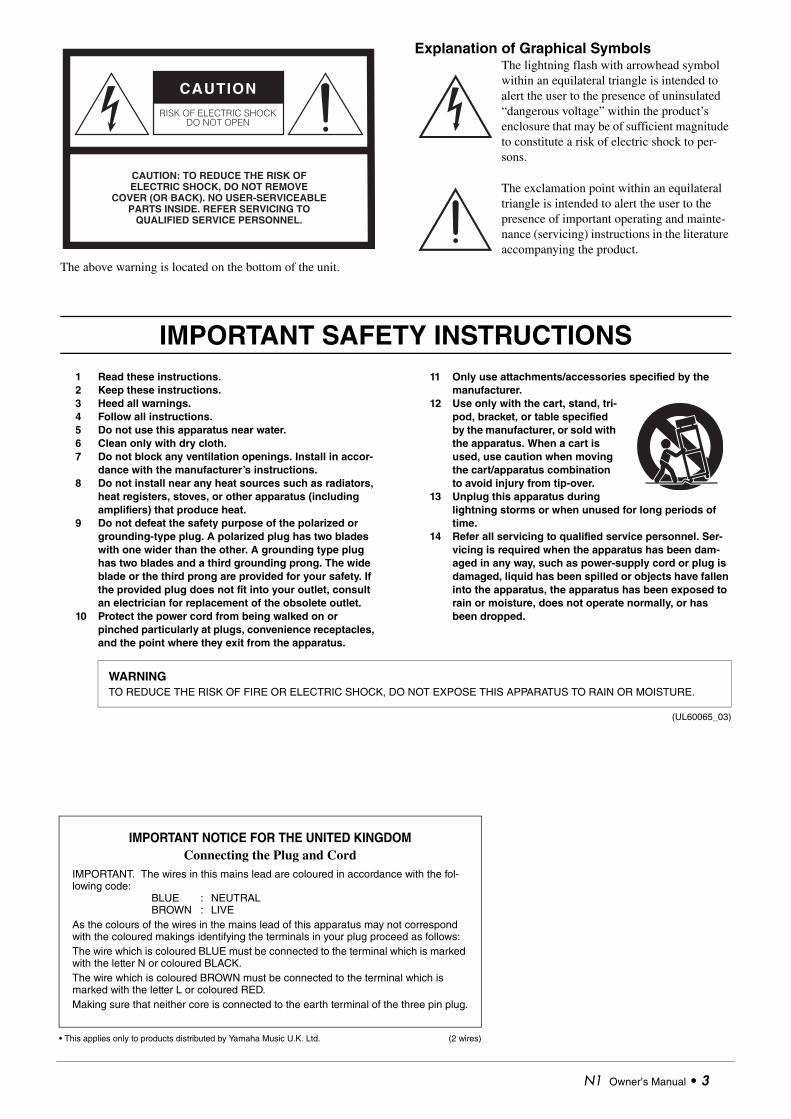
CAUTIONRISK OF ELECTRIC SHOCK
DO NOT OPEN
CAUTION: TO REDUCE THE RISK OF ELECTRIC SHOCK.DO NOT REMOVE COVER (OR BACK).
NO USER-SERVICEABLE PARTS INSIDE.REFER SERVICING TO QUALIFIED SERVICE PERSONNEL.
2 • N1 Owner’s Manual
The above warning is located on the bottom of the unit.
Explanation of Graphical SymbolsThe lightning flash with arrowhead symbol within an equilateral triangle is intended to alert the user to the presence of uninsulated “dangerous voltage” within the product’s enclosure that may be of sufficient magnitude to constitute a risk of electric shock to per-sons.
The exclamation point within an equilateral triangle is intended to alert the user to the presence of important operating and mainte-nance (servicing) instructions in the literature accompanying the product.
1 Read these instructions.2 Keep these instructions.3 Heed all warnings.4 Follow all instructions.5 Do not use this apparatus near water.6 Clean only with dry cloth.7 Do not block any ventilation openings. Install in accor-
dance with the manufacturer’s instructions.8 Do not install near any heat sources such as radiators,
heat registers, stoves, or other apparatus (including amplifiers) that produce heat.
9 Do not defeat the safety purpose of the polarized or grounding-type plug. A polarized plug has two blades with one wider than the other. A grounding type plug has two blades and a third grounding prong. The wide blade or the third prong are provided for your safety. If the provided plug does not fit into your outlet, consult an electrician for replacement of the obsolete outlet.
10 Protect the power cord from being walked on or pinched particularly at plugs, convenience receptacles, and the point where they exit from the apparatus.
11 Only use attachments/accessories specified by the manufacturer.
12 Use only with the cart, stand, tri-pod, bracket, or table specified by the manufacturer, or sold with the apparatus. When a cart is used, use caution when moving the cart/apparatus combination to avoid injury from tip-over.
13 Unplug this apparatus during lightning storms or when unused for long periods of time.
14 Refer all servicing to qualified service personnel. Ser-vicing is required when the apparatus has been dam-aged in any way, such as power-supply cord or plug is damaged, liquid has been spilled or objects have fallen into the apparatus, the apparatus has been exposed to rain or moisture, does not operate normally, or has been dropped.
(UL60065_03)
CAUTION: TO REDUCE THE RISK OF ELECTRIC SHOCK, DO NOT REMOVE
COVER (OR BACK). NO USER-SERVICEABLE PARTS INSIDE. REFER SERVICING TO
QUALIFIED SERVICE PERSONNEL.
CAUTION
RISK OF ELECTRIC SHOCKDO NOT OPEN
IMPORTANT SAFETY INSTRUCTIONS
WARNINGTO REDUCE THE RISK OF FIRE OR ELECTRIC SHOCK, DO NOT EXPOSE THIS APPARATUS TO RAIN OR MOISTURE.
IMPORTANT NOTICE FOR THE UNITED KINGDOMConnecting the Plug and Cord
IMPORTANT. The wires in this mains lead are coloured in accordance with the fol-lowing code:
BLUE : NEUTRALBROWN : LIVE
As the colours of the wires in the mains lead of this apparatus may not correspond with the coloured makings identifying the terminals in your plug proceed as follows:The wire which is coloured BLUE must be connected to the terminal which is marked with the letter N or coloured BLACK.The wire which is coloured BROWN must be connected to the terminal which is marked with the letter L or coloured RED.Making sure that neither core is connected to the earth terminal of the three pin plug.
• This applies only to products distributed by Yamaha Music U.K. Ltd. (2 wires)
N1 Owner’s Manual • 3
Features
Hybrid Piano
Combining over one hundred years of superb piano craftsmanship with the latest advanced technolo-
gies, Yamaha is proud to introduce a true hybrid acoustic/digital piano that meets the demands of con-
temporary musicians.
Authentic Acoustic Piano Touch with Special Grand Piano Action and Piano Keyboard
This innovative keyboard delivers the rich expressive quality of an acoustic grand piano, thanks to its finely
nuanced touch and exceptional response. Drawing on over one hundred years of expertise in crafting grand
pianos, Yamaha has created a unique and yet wholly traditional piano action mechanism for the AvantGrand.
The AvantGrand offers a special action that features the same configuration as the action of an acoustic grand
piano. The movement of the hammers and the weight distribution of each hammer have been meticulously
adjusted to give this instrument an exceptionally smooth feel. The keyboard also features real-wood keys, just
as on a real grand piano, letting you enjoy an authentic touch and feel that goes far beyond any existing digital
piano.
The Realistic Ambience of Grand Piano Voice
The AvantGrand features Yamaha’s original “Spatial Acoustic Sampling” tone-generation sampling technol-
ogy for the grand piano voices. The voices are sampled from four positions around a grand piano, not only
from the left and right (as on most digital pianos), but also from the center and rear.
The instrument also utilizes the “Spatial Acoustic Speaker System,” in which each speaker is equipped with
its own dedicated amplifier. This is essential for preserving the sonic integrity of each frequency range and
making sure that the nuances of each sound are reproduced naturally with absolute clarity.
These technologies provide rich resonance and sonic power heretofore only available on an actual grand
piano.
Best Condition without Tuning
Unlike acoustic pianos, the AvantGrand does not need to be tuned. It always stays perfectly in tune even after
long-time use.
Flexible Volume Control
The AvantGrand gives you full control over the instrument volume, letting you adjust the level just as desired.
Also, you can play or listen in total privacy through one or two pairs of headphones.
4 • N1 Owner’s Manual
N1 Owner’s Manual • 5
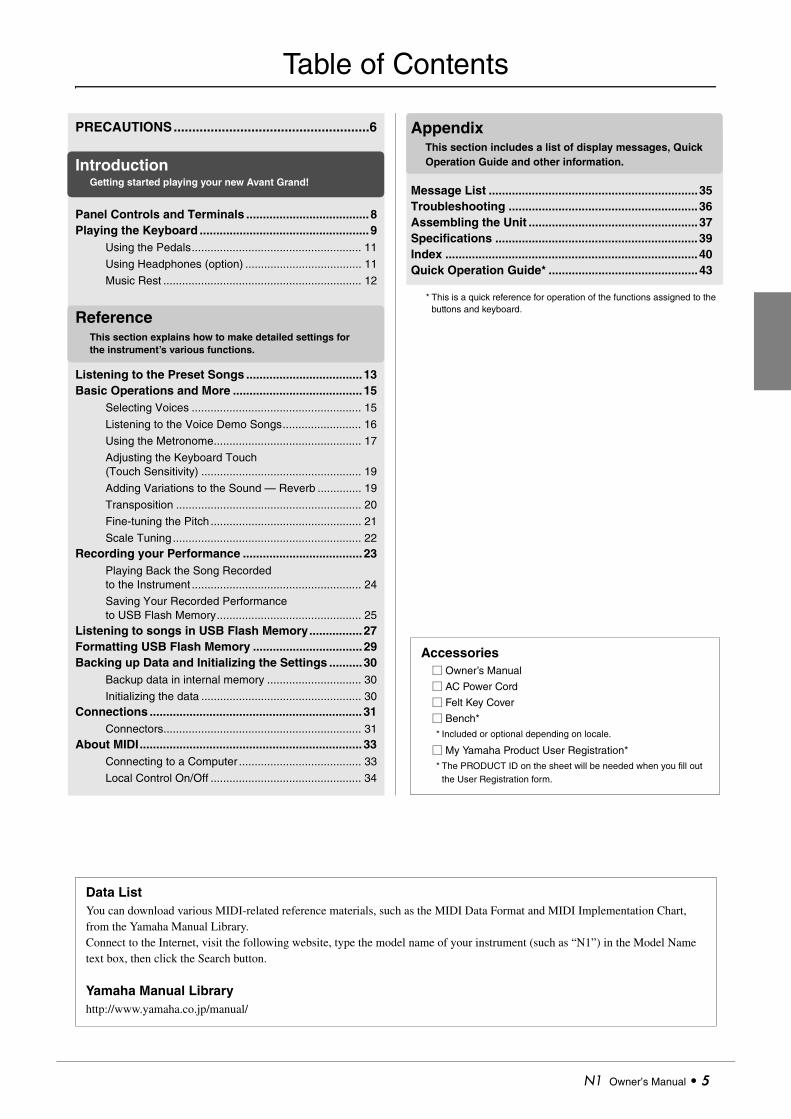
PRECAUTIONS.....................................................6
Introduction
Panel Controls and Terminals .....................................8Playing the Keyboard ...................................................9
Using the Pedals...................................................... 11
Using Headphones (option) ..................................... 11
Music Rest ............................................................... 12
Reference
Listening to the Preset Songs ...................................13Basic Operations and More ....................................... 15
Selecting Voices ...................................................... 15
Listening to the Voice Demo Songs......................... 16
Using the Metronome............................................... 17
Adjusting the Keyboard Touch (Touch Sensitivity) ................................................... 19
Adding Variations to the Sound — Reverb .............. 19
Transposition ........................................................... 20
Fine-tuning the Pitch ................................................ 21
Scale Tuning............................................................ 22Recording your Performance .................................... 23
Playing Back the Song Recorded to the Instrument ...................................................... 24
Saving Your Recorded Performance to USB Flash Memory.............................................. 25
Listening to songs in USB Flash Memory................ 27Formatting USB Flash Memory ................................. 29Backing up Data and Initializing the Settings ..........30
Backup data in internal memory .............................. 30
Initializing the data ................................................... 30Connections ................................................................ 31
Connectors............................................................... 31About MIDI................................................................... 33
Connecting to a Computer ....................................... 33
Local Control On/Off ................................................ 34
Appendix
Message List ...............................................................35Troubleshooting .........................................................36Assembling the Unit ...................................................37Specifications .............................................................39Index ............................................................................40Quick Operation Guide* .............................................43
Table of Contents
* This is a quick reference for operation of the functions assigned to the buttons and keyboard.
This section includes a list of display messages, Quick Operation Guide and other information.
This section explains how to make detailed settings for the instrument’s various functions.
Getting started playing your new Avant Grand!
Accessories Owner’s Manual
AC Power Cord
Felt Key Cover
Bench** Included or optional depending on locale.
My Yamaha Product User Registration** The PRODUCT ID on the sheet will be needed when you fill out
the User Registration form.
Data ListYou can download various MIDI-related reference materials, such as the MIDI Data Format and MIDI Implementation Chart, from the Yamaha Manual Library.Connect to the Internet, visit the following website, type the model name of your instrument (such as “N1”) in the Model Name text box, then click the Search button.
Yamaha Manual Libraryhttp://www.yamaha.co.jp/manual/
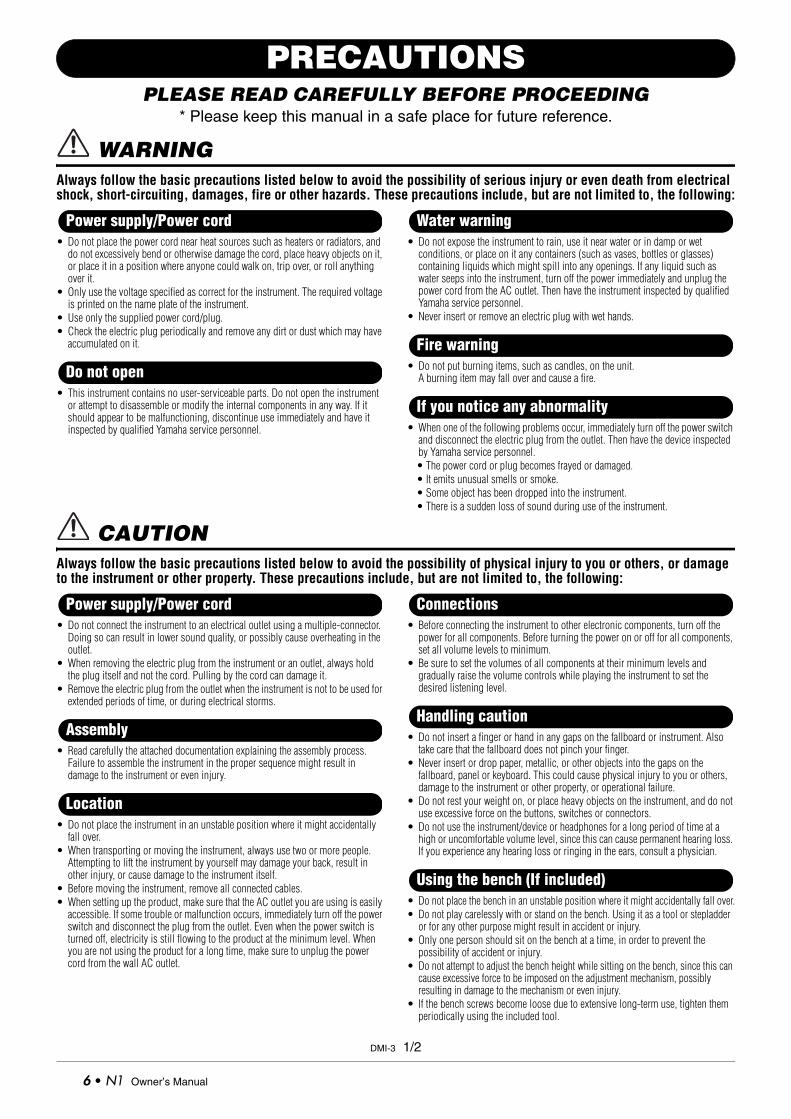
PRECAUTIONSPLEASE READ CAREFULLY BEFORE PROCEEDING
* Please keep this manual in a safe place for future reference.
WARNINGAlways follow the basic precautions listed below to avoid the possibility of serious injury or even death from electrical shock, short-circuiting, damages, fire or other hazards. These precautions include, but are not limited to, the following:
• Do not place the power cord near heat sources such as heaters or radiators, and do not excessively bend or otherwise damage the cord, place heavy objects on it, or place it in a position where anyone could walk on, trip over, or roll anything over it.
• Only use the voltage specified as correct for the instrument. The required voltage is printed on the name plate of the instrument.
• Use only the supplied power cord/plug.• Check the electric plug periodically and remove any dirt or dust which may have
accumulated on it.
• This instrument contains no user-serviceable parts. Do not open the instrument or attempt to disassemble or modify the internal components in any way. If it should appear to be malfunctioning, discontinue use immediately and have it inspected by qualified Yamaha service personnel.
• Do not expose the instrument to rain, use it near water or in damp or wet conditions, or place on it any containers (such as vases, bottles or glasses) containing liquids which might spill into any openings. If any liquid such as water seeps into the instrument, turn off the power immediately and unplug the power cord from the AC outlet. Then have the instrument inspected by qualified Yamaha service personnel.
• Never insert or remove an electric plug with wet hands.
• Do not put burning items, such as candles, on the unit. A burning item may fall over and cause a fire.
• When one of the following problems occur, immediately turn off the power switch and disconnect the electric plug from the outlet. Then have the device inspected by Yamaha service personnel.• The power cord or plug becomes frayed or damaged.• It emits unusual smells or smoke.• Some object has been dropped into the instrument.• There is a sudden loss of sound during use of the instrument.
CAUTIONAlways follow the basic precautions listed below to avoid the possibility of physical injury to you or others, or damage to the instrument or other property. These precautions include, but are not limited to, the following:
• Do not connect the instrument to an electrical outlet using a multiple-connector. Doing so can result in lower sound quality, or possibly cause overheating in the outlet.
• When removing the electric plug from the instrument or an outlet, always hold the plug itself and not the cord. Pulling by the cord can damage it.
• Remove the electric plug from the outlet when the instrument is not to be used for extended periods of time, or during electrical storms.
• Read carefully the attached documentation explaining the assembly process. Failure to assemble the instrument in the proper sequence might result in damage to the instrument or even injury.
• Do not place the instrument in an unstable position where it might accidentally fall over.
• When transporting or moving the instrument, always use two or more people. Attempting to lift the instrument by yourself may damage your back, result in other injury, or cause damage to the instrument itself.
• Before moving the instrument, remove all connected cables.• When setting up the product, make sure that the AC outlet you are using is easily
accessible. If some trouble or malfunction occurs, immediately turn off the power switch and disconnect the plug from the outlet. Even when the power switch is turned off, electricity is still flowing to the product at the minimum level. When you are not using the product for a long time, make sure to unplug the power cord from the wall AC outlet.
• Before connecting the instrument to other electronic components, turn off the power for all components. Before turning the power on or off for all components, set all volume levels to minimum.
• Be sure to set the volumes of all components at their minimum levels and gradually raise the volume controls while playing the instrument to set the desired listening level.
• Do not insert a finger or hand in any gaps on the fallboard or instrument. Also take care that the fallboard does not pinch your finger.
• Never insert or drop paper, metallic, or other objects into the gaps on the fallboard, panel or keyboard. This could cause physical injury to you or others, damage to the instrument or other property, or operational failure.
• Do not rest your weight on, or place heavy objects on the instrument, and do not use excessive force on the buttons, switches or connectors.
• Do not use the instrument/device or headphones for a long period of time at a high or uncomfortable volume level, since this can cause permanent hearing loss. If you experience any hearing loss or ringing in the ears, consult a physician.
• Do not place the bench in an unstable position where it might accidentally fall over.• Do not play carelessly with or stand on the bench. Using it as a tool or stepladder
or for any other purpose might result in accident or injury. • Only one person should sit on the bench at a time, in order to prevent the
possibility of accident or injury.• Do not attempt to adjust the bench height while sitting on the bench, since this can
cause excessive force to be imposed on the adjustment mechanism, possibly resulting in damage to the mechanism or even injury.
• If the bench screws become loose due to extensive long-term use, tighten them periodically using the included tool.
Power supply/Power cord
Do not open
Water warning
Fire warning
If you notice any abnormality
Power supply/Power cord
Assembly
Location
Connections
Handling caution
Using the bench (If included)
DMI-3 1/2
6 • N1 Owner’s Manual
NOTICETo avoid the possibility of malfunction/ damage to the product, damage to data, or damage to other property, follow the notices below.
Handling and Maintenance• Do not use the instrument in the vicinity of a TV, radio, stereo equipment, mobile
phone, or other electric devices. Otherwise, the instrument, TV, or radio may gen-erate noise.
• Do not expose the instrument to excessive dust or vibrations, or extreme cold or heat (such as in direct sunlight, near a heater, or in a car during the day) to pre-vent the possibility of panel disfiguration, damage to the internal components or unstable operation. (Verified operating temperature range: 5° – 40°C, or 41° – 104°F.)
• Do not place vinyl, plastic or rubber objects on the instrument, since this might discolor the panel or keyboard.
• Bumping the surface of the instrument with metal, porcelain, or other hard objects can cause the finish to crack or peel. Use caution.
• When cleaning the instrument, use a soft, dry or slightly damp cloth. Do not use paint thinners, solvents, cleaning fluids, or chemical-impregnated wiping cloths.
• Gently remove dust and dirt with a soft cloth. Do not wipe too hard since small particles of dirt can scratch the instrument’s finish.
• During extreme changes in temperature or humidity, condensation may occur and water may collect on the surface of the instrument. If water is left, the wooden parts may absorb the water and be damaged. Make sure to wipe any water off immediately with a soft cloth.
Saving data• The song data saved to internal memory of this instrument is retained even when
the power is turned off. However, the data could be lost due to malfunction or incorrect operation. Save important data to a USB storage device (page 25).
• To protect against data loss through media damage, we recommend that you save your important data onto two USB storage device.
Always turn the power off when the instrument is not in use.
Information About copyrights• Copying of the commercially available musical data including but not limited to
MIDI data and/or audio data is strictly prohibited except for your personal use.
• This product incorporates and bundles computer programs and contents in which Yamaha owns copyrights or with respect to which it has license to use oth-ers’ copyrights. Such copyrighted materials include, without limitation, all com-puter software, style files, MIDI files, WAVE data, musical scores and sound recordings. Any unauthorized use of such programs and contents outside of per-sonal use is not permitted under relevant laws. Any violation of copyright has legal consequences. DON’T MAKE, DISTRIBUTE OR USE ILLEGAL COPIES.
About this manual• The illustrations and displays as shown in this manual are for instructional pur-
poses only, and may appear somewhat different from those on your instrument.
• The company names and product names in this manual are the trademarks or registered trademarks of their respective companies.
TuningUnlike an acoustic piano, the instrument does not need to be tuned. It always stays perfectly in tune.However, if you feel something wrong concerning the keyboard touch, contact your Yamaha dealer.
IMPORTANT – Check your power supply –Make sure that your local AC mains voltage matches the voltage specified on the name plate on the bottom panel. In some areas a voltage selector may be provided on the bottom of the main keyboard unit near the power cord. Make sure that the voltage selector is set for the voltage in your area. The voltage selector is set at 240V when the unit is initially shipped. To change the setting use a “minus” screwdriver to rotate the selector dial so that the correct voltage appears next to the pointer on the panel. Yamaha cannot be held responsible for damage caused by improper use
or modifications to the instrument, or data that is lost or destroyed.
Transporting / PlacingIf you move to another location, transport the instrument horizontally. Do not lean it up against a wall or stand it up side down. Do not subject the instrument to excessive vibration or shock.
CAUTIONWhen moving the instrument, always hold the bottom of the main unit.Be sure not to hold the headphone jack box or the speaker net. Improper handling can result in damage to the instru-ment or personal injury.
Place the instrument away from the wall by at least 15 cm to optimize and enhance the sound effect.If you find the instrument shaky or unstable after installing, insert the included felt strips. For details, refer to the instructions supplied with the felt strips.
Do not hold here.
Do not hold here.
Do not hold here.
DMI-3 2/2
N1 Owner’s Manual • 7
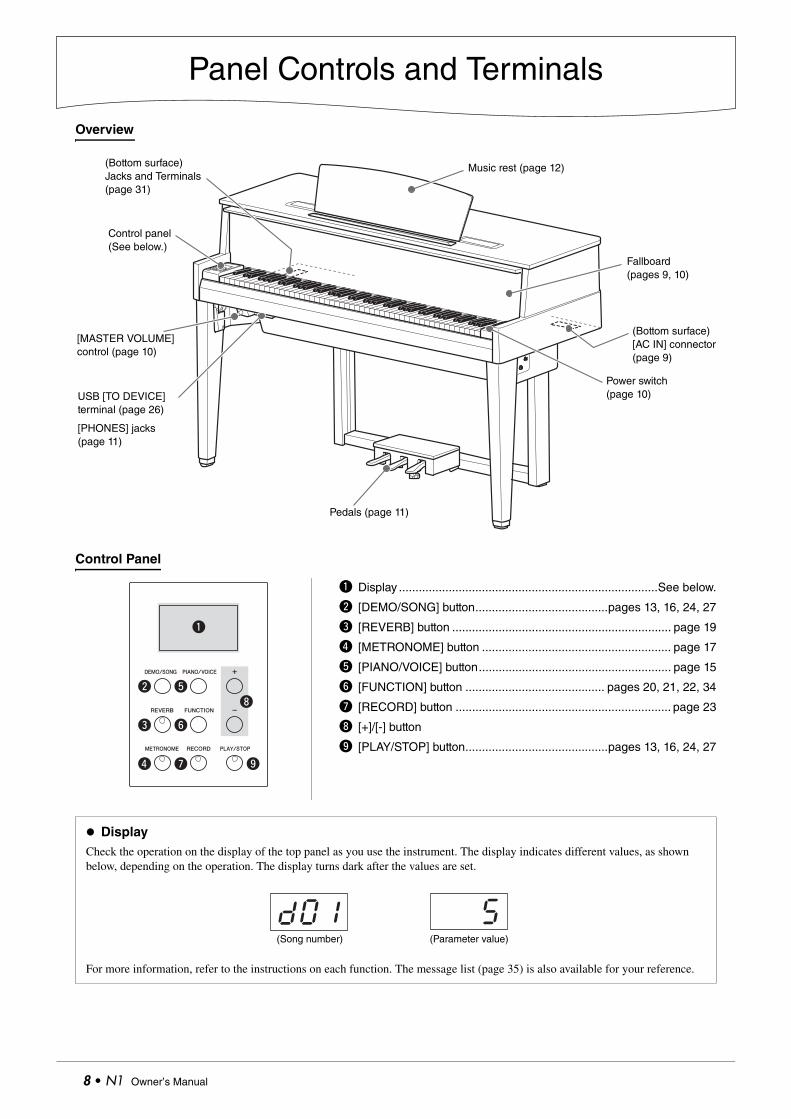
Introduction
Panel Controls and Terminals
Overview
Control Panel
q Display ..............................................................................See below.
w [DEMO/SONG] button........................................pages 13, 16, 24, 27
e [REVERB] button .................................................................. page 19
r [METRONOME] button ......................................................... page 17
t [PIANO/VOICE] button.......................................................... page 15
y [FUNCTION] button .......................................... pages 20, 21, 22, 34
u [RECORD] button ................................................................. page 23
i [+]/[-] button
o [PLAY/STOP] button...........................................pages 13, 16, 24, 27
DisplayCheck the operation on the display of the top panel as you use the instrument. The display indicates different values, as shown below, depending on the operation. The display turns dark after the values are set.
For more information, refer to the instructions on each function. The message list (page 35) is also available for your reference.
Music rest (page 12)
Fallboard(pages 9, 10)
(Bottom surface)[AC IN] connector(page 9)
Power switch(page 10)
Pedals (page 11)
Control panel(See below.)
(Bottom surface)Jacks and Terminals(page 31)
[MASTER VOLUME] control (page 10)
USB [TO DEVICE]terminal (page 26)
[PHONES] jacks(page 11)
q
w
e
r
t
y
u o
i
d01(Song number)
5(Parameter value)
8 • N1 Owner’s Manual
Playing the Keyboard
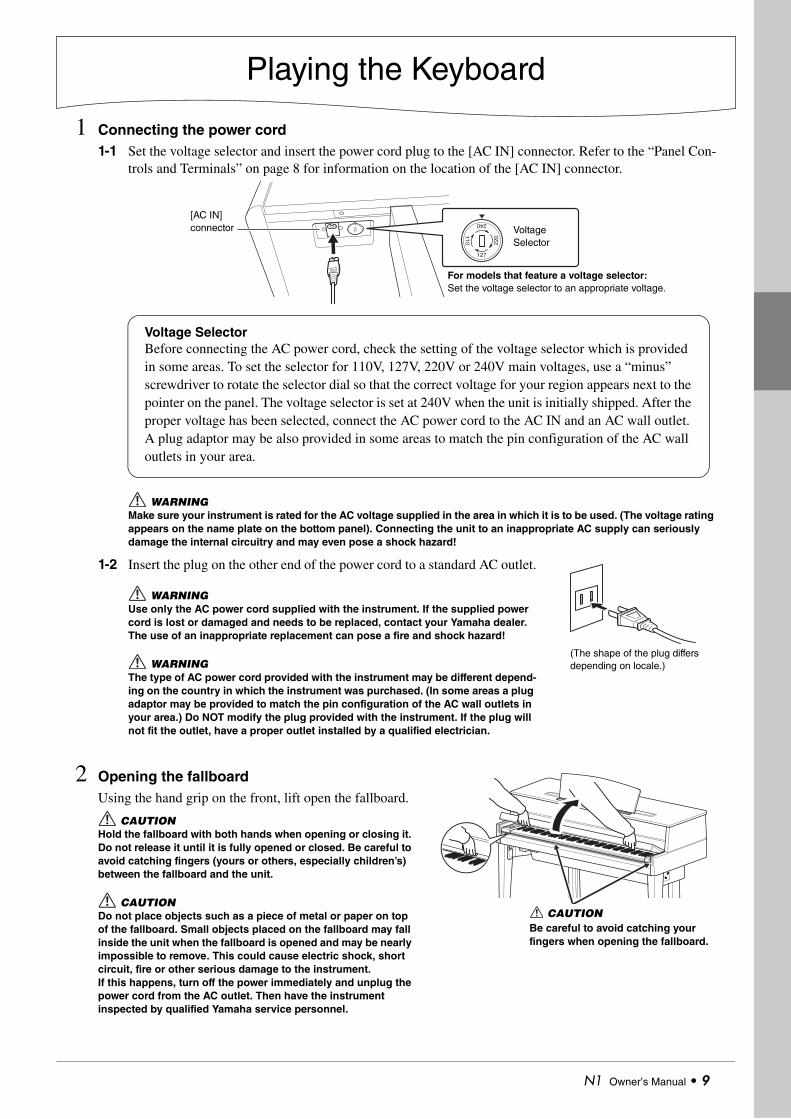
1 Connecting the power cord1-1 Set the voltage selector and insert the power cord plug to the [AC IN] connector. Refer to the “Panel Con-
trols and Terminals” on page 8 for information on the location of the [AC IN] connector.
WARNINGMake sure your instrument is rated for the AC voltage supplied in the area in which it is to be used. (The voltage rating appears on the name plate on the bottom panel). Connecting the unit to an inappropriate AC supply can seriously damage the internal circuitry and may even pose a shock hazard!
1-2 Insert the plug on the other end of the power cord to a standard AC outlet.
WARNINGUse only the AC power cord supplied with the instrument. If the supplied power cord is lost or damaged and needs to be replaced, contact your Yamaha dealer. The use of an inappropriate replacement can pose a fire and shock hazard!
WARNINGThe type of AC power cord provided with the instrument may be different depend-ing on the country in which the instrument was purchased. (In some areas a plug adaptor may be provided to match the pin configuration of the AC wall outlets in your area.) Do NOT modify the plug provided with the instrument. If the plug will not fit the outlet, have a proper outlet installed by a qualified electrician.
2 Opening the fallboardUsing the hand grip on the front, lift open the fallboard.
CAUTIONHold the fallboard with both hands when opening or closing it. Do not release it until it is fully opened or closed. Be careful to avoid catching fingers (yours or others, especially children’s) between the fallboard and the unit.
CAUTIONDo not place objects such as a piece of metal or paper on top of the fallboard. Small objects placed on the fallboard may fall inside the unit when the fallboard is opened and may be nearly impossible to remove. This could cause electric shock, short circuit, fire or other serious damage to the instrument.If this happens, turn off the power immediately and unplug the power cord from the AC outlet. Then have the instrument inspected by qualified Yamaha service personnel.
[AC IN] connector Voltage
Selector
For models that feature a voltage selector: Set the voltage selector to an appropriate voltage.
Voltage SelectorBefore connecting the AC power cord, check the setting of the voltage selector which is provided in some areas. To set the selector for 110V, 127V, 220V or 240V main voltages, use a “minus” screwdriver to rotate the selector dial so that the correct voltage for your region appears next to the pointer on the panel. The voltage selector is set at 240V when the unit is initially shipped. After the proper voltage has been selected, connect the AC power cord to the AC IN and an AC wall outlet. A plug adaptor may be also provided in some areas to match the pin configuration of the AC wall outlets in your area.
(The shape of the plug differs depending on locale.)
CAUTIONBe careful to avoid catching your fingers when opening the fallboard.
N1 Owner’s Manual • 9
Playing the Keyboard
3 Turning the power onPress the [ ] power switch located on the right of the keyboard. This turns the power on, and the power indi-cator located below the left end of the keyboard lights up.
A swirl graphic appears in the display located on the left of the keyboard and the instrument starts up when the swirl in the display stops.
NOTICEDo not press any keys until the instrument has completely started up (approx. eight seconds after turning on the switch). Doing so may cause some keys to not sound normally.
4 Playing the keyboardPlay the keyboard to produce sound.
5 Turning the power offPress the [ ] power switch again. The power indicator turns off when the power turns off.
NOTICEA small amount of electrical current remains even after the power switch is turned off. If you plan not to use the instrument for a long period of time, be sure to unplug the instrument from the AC outlet.
6 Closing the fallboardGrip the fallboard, and close it gently.
MAXMIN
MASTER VOLUME
lights up
power switch
Adjusting the volumeWhile playing the keyboard, adjust the volume level by using the [MASTER VOLUME] control located at the left of the panel.
CAUTIONDo not use this instrument at a high volume level for a long period of time, or your hearing may be damaged.
MAXUSB TO
MIN
MASTER VOLUME
The leveldecreases.
The level increases.
CAUTIONBe careful to avoid catching your fingers when closing the fallboard.
10 • N1 Owner’s Manual
Playing the Keyboard
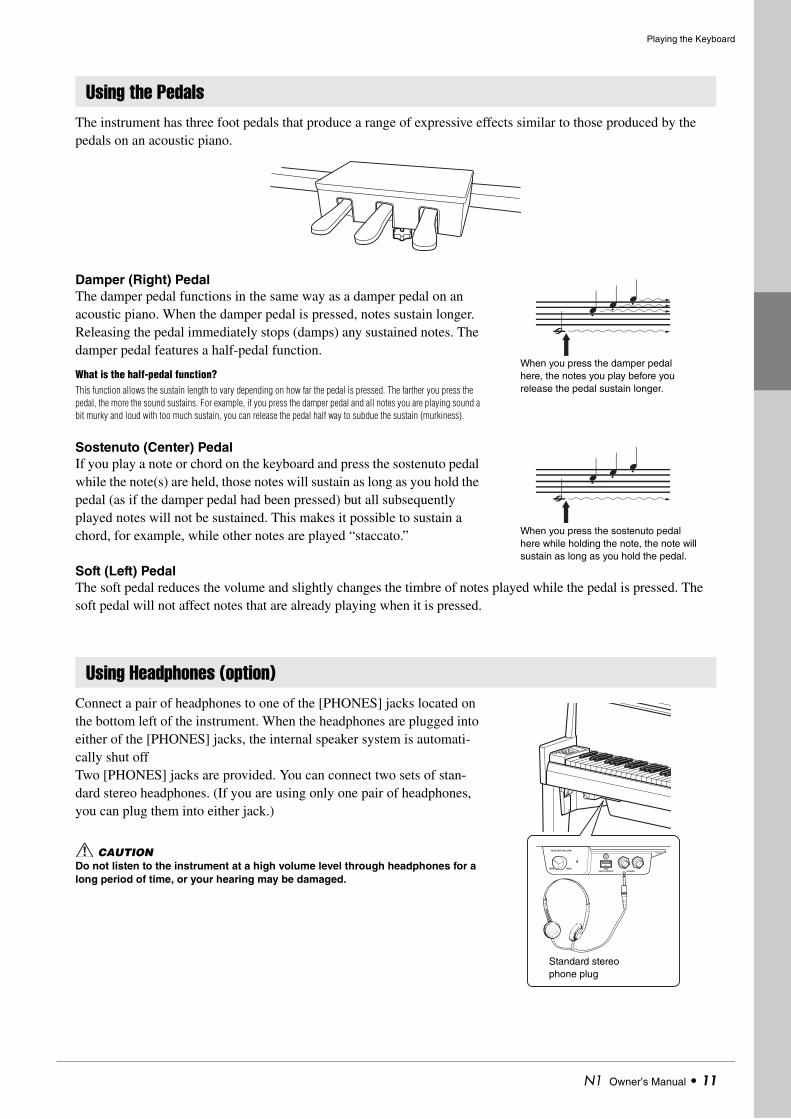
The instrument has three foot pedals that produce a range of expressive effects similar to those produced by the pedals on an acoustic piano.
Damper (Right) PedalThe damper pedal functions in the same way as a damper pedal on an acoustic piano. When the damper pedal is pressed, notes sustain longer. Releasing the pedal immediately stops (damps) any sustained notes. The damper pedal features a half-pedal function.
What is the half-pedal function?This function allows the sustain length to vary depending on how far the pedal is pressed. The farther you press the pedal, the more the sound sustains. For example, if you press the damper pedal and all notes you are playing sound a bit murky and loud with too much sustain, you can release the pedal half way to subdue the sustain (murkiness).
Sostenuto (Center) PedalIf you play a note or chord on the keyboard and press the sostenuto pedal while the note(s) are held, those notes will sustain as long as you hold the pedal (as if the damper pedal had been pressed) but all subsequently played notes will not be sustained. This makes it possible to sustain a chord, for example, while other notes are played “staccato.”
Soft (Left) PedalThe soft pedal reduces the volume and slightly changes the timbre of notes played while the pedal is pressed. The soft pedal will not affect notes that are already playing when it is pressed.
Connect a pair of headphones to one of the [PHONES] jacks located on the bottom left of the instrument. When the headphones are plugged into either of the [PHONES] jacks, the internal speaker system is automati-cally shut offTwo [PHONES] jacks are provided. You can connect two sets of stan-dard stereo headphones. (If you are using only one pair of headphones, you can plug them into either jack.)
CAUTIONDo not listen to the instrument at a high volume level through headphones for a long period of time, or your hearing may be damaged.
Using the Pedals
Using Headphones (option)
When you press the damper pedal here, the notes you play before you release the pedal sustain longer.
When you press the sostenuto pedal here while holding the note, the note will sustain as long as you hold the pedal.
MAXPHONES USB TO DEVICE
MIN
MASTER VOLUME
Standard stereo phone plug
N1 Owner’s Manual • 11
Playing the Keyboard
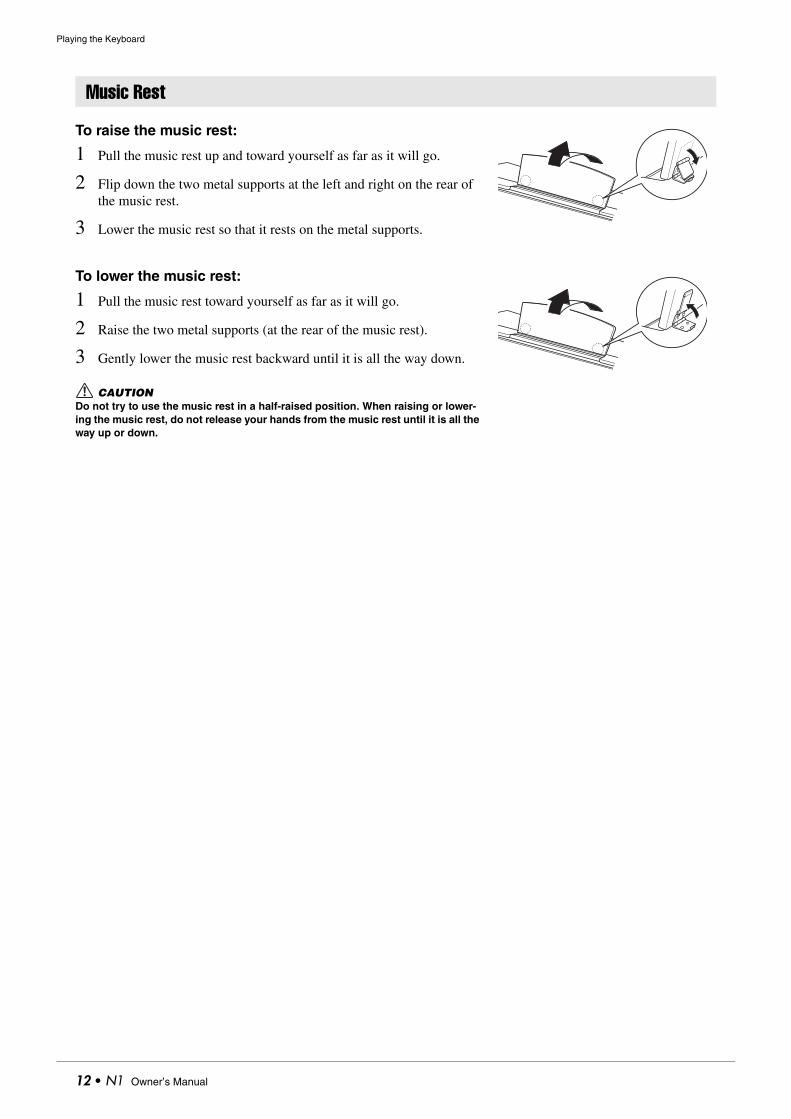
To raise the music rest:
1 Pull the music rest up and toward yourself as far as it will go.
2 Flip down the two metal supports at the left and right on the rear of the music rest.
3 Lower the music rest so that it rests on the metal supports.
To lower the music rest:
1 Pull the music rest toward yourself as far as it will go.
2 Raise the two metal supports (at the rear of the music rest).
3 Gently lower the music rest backward until it is all the way down.
CAUTIONDo not try to use the music rest in a half-raised position. When raising or lower-ing the music rest, do not release your hands from the music rest until it is all the way up or down.
Music Rest
12 • N1 Owner’s Manual
Reference
Listening to the Preset Songs
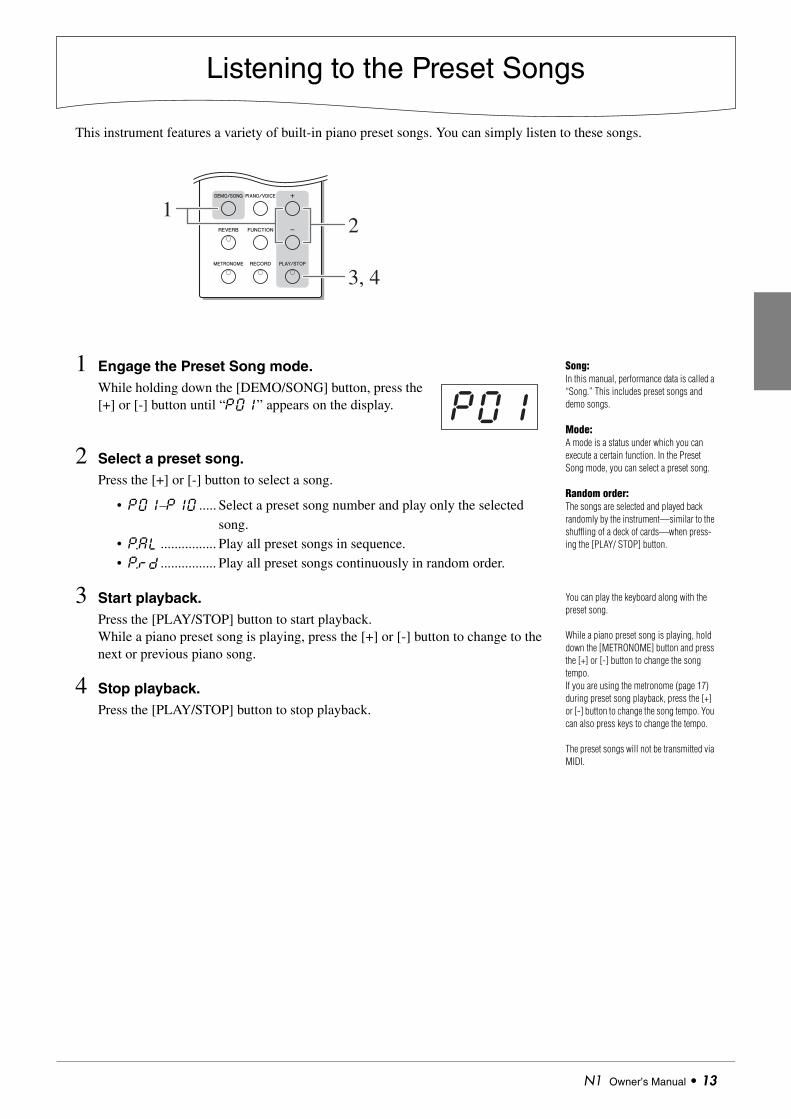
This instrument features a variety of built-in piano preset songs. You can simply listen to these songs.
1 Engage the Preset Song mode.While holding down the [DEMO/SONG] button, press the [+] or [-] button until “P01” appears on the display.
2 Select a preset song.Press the [+] or [-] button to select a song.
• P01–P10 ..... Select a preset song number and play only the selected song.
• P.AL................ Play all preset songs in sequence.• P.rd................ Play all preset songs continuously in random order.
3 Start playback.Press the [PLAY/STOP] button to start playback. While a piano preset song is playing, press the [+] or [-] button to change to the next or previous piano song.
4 Stop playback.Press the [PLAY/STOP] button to stop playback.
2
3, 4
1
Song:In this manual, performance data is called a “Song.” This includes preset songs and demo songs.
Mode:A mode is a status under which you can execute a certain function. In the Preset Song mode, you can select a preset song.
Random order:The songs are selected and played back randomly by the instrument—similar to the shuffling of a deck of cards—when press-ing the [PLAY/ STOP] button.
P01
You can play the keyboard along with the preset song.
While a piano preset song is playing, hold down the [METRONOME] button and press the [+] or [-] button to change the song tempo.If you are using the metronome (page 17) during preset song playback, press the [+] or [-] button to change the song tempo. You can also press keys to change the tempo.
The preset songs will not be transmitted via MIDI.
N1 Owner’s Manual • 13
Listening to the Preset Songs
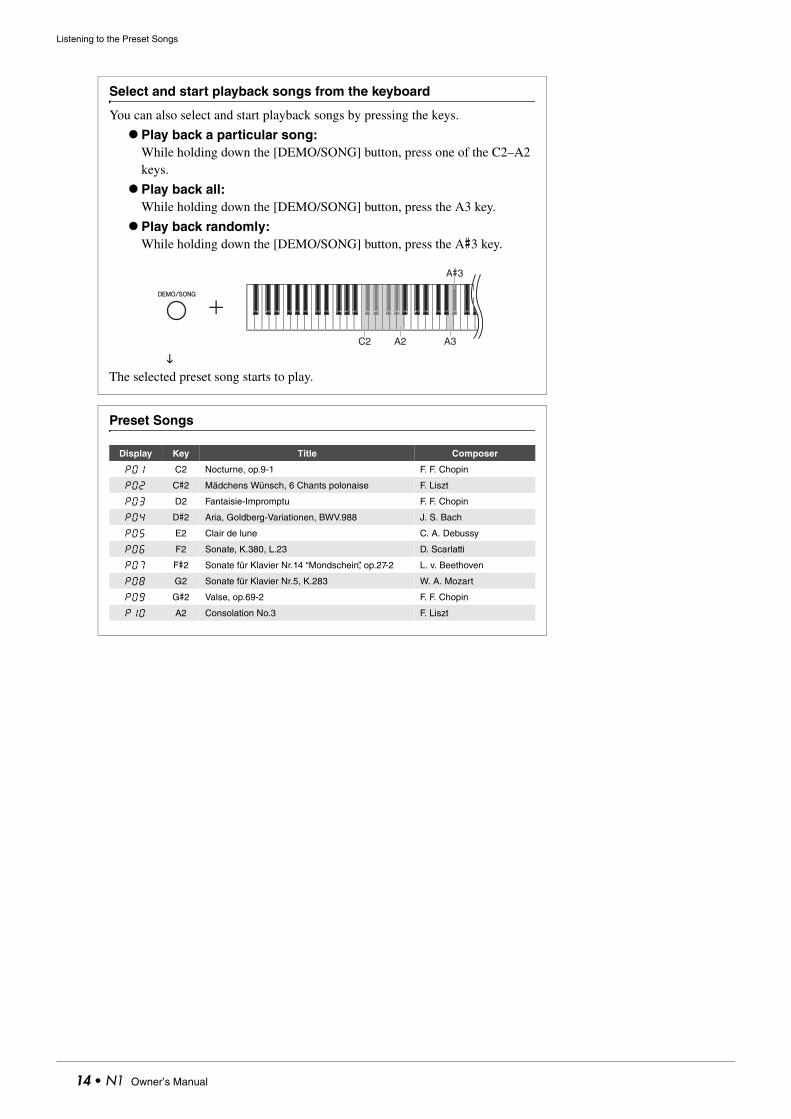
Select and start playback songs from the keyboard
You can also select and start playback songs by pressing the keys.
Play back a particular song:While holding down the [DEMO/SONG] button, press one of the C2–A2 keys.
Play back all:While holding down the [DEMO/SONG] button, press the A3 key.
Play back randomly:While holding down the [DEMO/SONG] button, press the A#3 key.
The selected preset song starts to play.
Preset Songs
C2 A2 A3
A#3
Display Key Title Composer
P01 C2 Nocturne, op.9-1 F. F. Chopin
P02 C#2 Mädchens Wünsch, 6 Chants polonaise F. Liszt
P03 D2 Fantaisie-Impromptu F. F. Chopin
P04 D#2 Aria, Goldberg-Variationen, BWV.988 J. S. Bach
P05 E2 Clair de lune C. A. Debussy
P06 F2 Sonate, K.380, L.23 D. Scarlatti
P07 F#2 Sonate für Klavier Nr.14 “Mondschein”, op.27-2 L. v. Beethoven
P08 G2 Sonate für Klavier Nr.5, K.283 W. A. Mozart
P09 G#2 Valse, op.69-2 F. F. Chopin
P10 A2 Consolation No.3 F. Liszt
14 • N1 Owner’s Manual
Basic Operations and More
The following instructions provide all you need to know about the instrument to take full advantage of its versatile and sophisticated functions.
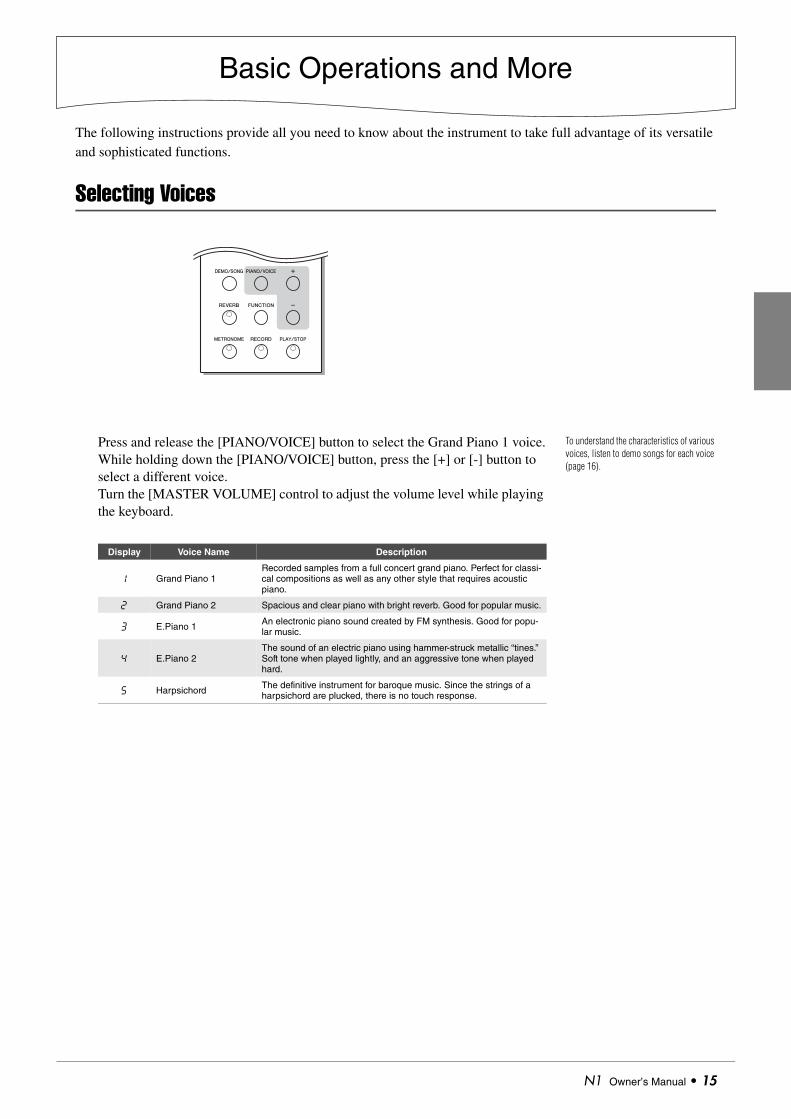
Selecting Voices
Press and release the [PIANO/VOICE] button to select the Grand Piano 1 voice.While holding down the [PIANO/VOICE] button, press the [+] or [-] button to select a different voice.Turn the [MASTER VOLUME] control to adjust the volume level while playing the keyboard.
To understand the characteristics of various voices, listen to demo songs for each voice (page 16).
Display Voice Name Description
1 Grand Piano 1Recorded samples from a full concert grand piano. Perfect for classi-cal compositions as well as any other style that requires acoustic piano.
2 Grand Piano 2 Spacious and clear piano with bright reverb. Good for popular music.
3 E.Piano 1 An electronic piano sound created by FM synthesis. Good for popu-lar music.
4 E.Piano 2The sound of an electric piano using hammer-struck metallic “tines.” Soft tone when played lightly, and an aggressive tone when played hard.
5 Harpsichord The definitive instrument for baroque music. Since the strings of a harpsichord are plucked, there is no touch response.
N1 Owner’s Manual • 15

Basic Operations and More
Listening to the Voice Demo SongsDemo songs are provided that effectively demonstrate each of this instrument’s voices.
1 Engage the Demo Song mode.While holding down the [DEMO/SONG] button, press the [+] or [-] button until the “d01” appears on the display.
2 Select a demo song.Press the [+] or [-] button to select a song.
3 Start playback.Press the [PLAY/STOP] button to start playback. While a demo song is playing, press the [+] or [-] button to select and play the next or previous demo song.
4 Stop playback.Press the [PLAY/STOP] button to stop playback.
2
3, 4
1
Simply press the [DEMO/SONG] button to start playback of the demo song for the cur-rently selected voice.
d01
You can play the keyboard along with the demo song.
While a demo song is playing, press and hold down the [METRONOME] button and press the [+] or [-] button to change the song tempo.If you are using the metronome (page 17) during demo song playback, press the [+] or [-] button to change the song tempo. You can also press keys to change the tempo.
The demo songs will not be transmitted via MIDI.
Select and start playback songs from the keyboard
If you wish to select a particular demo song, press one of the C1–E1 keys while holding down the [DEMO/SONG] button.
The selected demo song starts to play.
Demo Songs
Each of the voices features its own demo song that showcases the corresponding voice.The d01 and d05 songs are re-arranged excerpts from the original composi-tions.The other demo songs are Yamaha’s original pieces (©2010 Yamaha Corpora-tion).
C1 E1
Display Key Voice Name Title Composer
d01 C1 Grand Piano 1 Un sospiro, 3 Études de concert F. Liszt
d02 C#1 Grand Piano 2 — —
d03 D1 E.Piano 1 — —
d04 D#1 E.Piano 2 — —
d05 E1 Harpsichord Concerto a cembalo obbligato, 2 vio-lini, viola e continuo No.7, BWV.1058 J. S. Bach
16 • N1 Owner’s Manual
Basic Operations and More
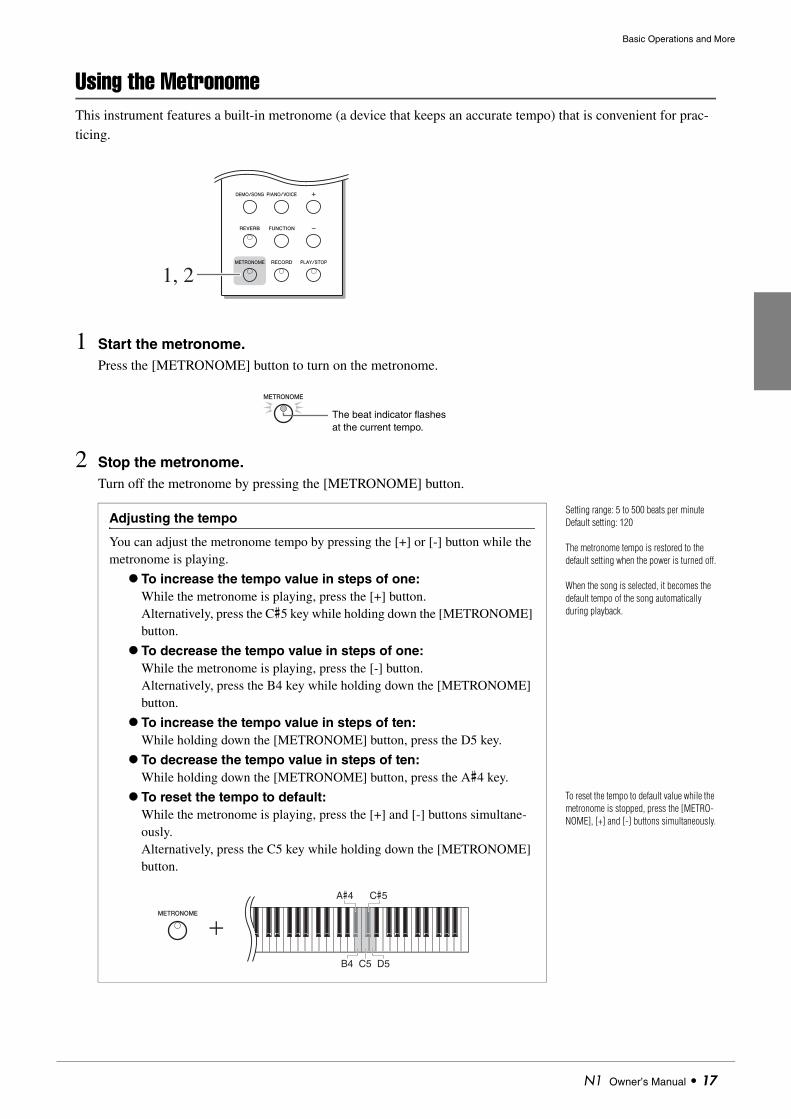
Using the MetronomeThis instrument features a built-in metronome (a device that keeps an accurate tempo) that is convenient for prac-ticing.
1 Start the metronome.Press the [METRONOME] button to turn on the metronome.
2 Stop the metronome.Turn off the metronome by pressing the [METRONOME] button.
1, 2
The beat indicator flashes at the current tempo.
Setting range: 5 to 500 beats per minute Default setting: 120
The metronome tempo is restored to the default setting when the power is turned off.
When the song is selected, it becomes the default tempo of the song automatically during playback.
To reset the tempo to default value while the metronome is stopped, press the [METRO-NOME], [+] and [-] buttons simultaneously.
Adjusting the tempo
You can adjust the metronome tempo by pressing the [+] or [-] button while the metronome is playing.
To increase the tempo value in steps of one:While the metronome is playing, press the [+] button. Alternatively, press the C#5 key while holding down the [METRONOME] button.
To decrease the tempo value in steps of one:While the metronome is playing, press the [-] button. Alternatively, press the B4 key while holding down the [METRONOME] button.
To increase the tempo value in steps of ten:While holding down the [METRONOME] button, press the D5 key.
To decrease the tempo value in steps of ten:While holding down the [METRONOME] button, press the A#4 key.
To reset the tempo to default:While the metronome is playing, press the [+] and [-] buttons simultane-ously.Alternatively, press the C5 key while holding down the [METRONOME] button.
C5 D5B4
A#4 C#5
N1 Owner’s Manual • 17
Basic Operations and More
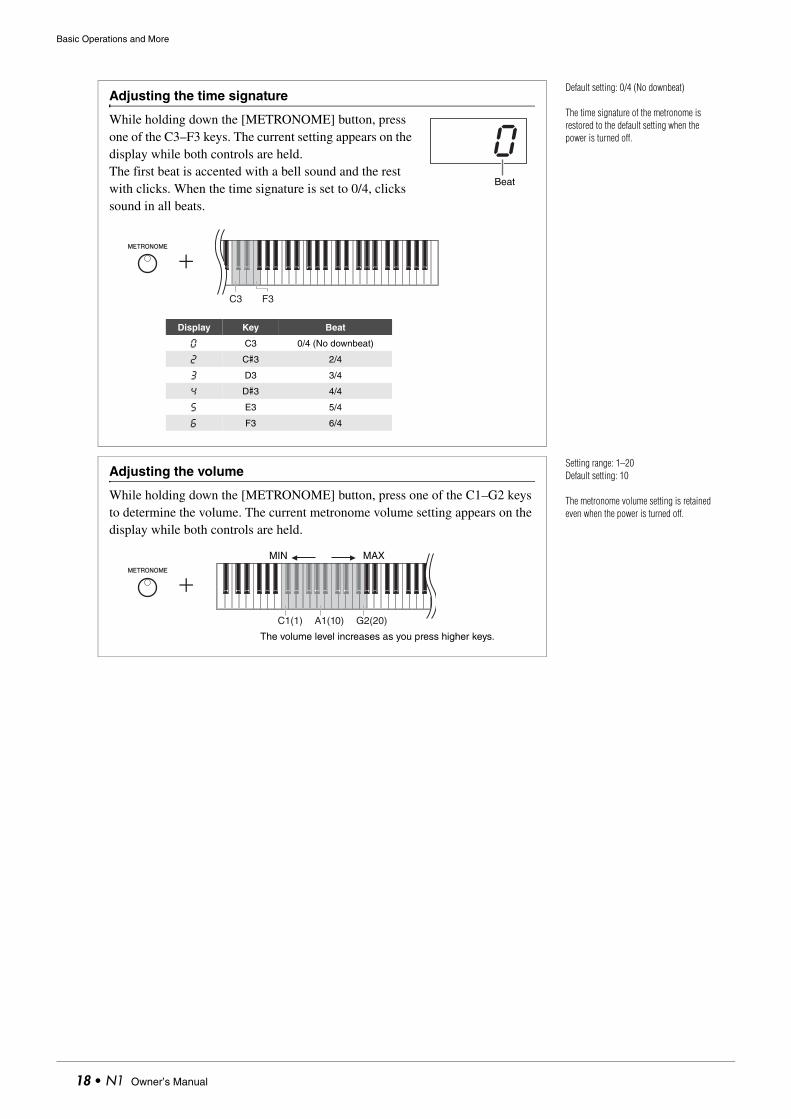
Default setting: 0/4 (No downbeat)
The time signature of the metronome is restored to the default setting when the power is turned off.
Adjusting the time signature
While holding down the [METRONOME] button, press one of the C3–F3 keys. The current setting appears on the display while both controls are held.The first beat is accented with a bell sound and the rest with clicks. When the time signature is set to 0/4, clicks sound in all beats.
0Beat
C3 F3
Display Key Beat
0 C3 0/4 (No downbeat)
2 C#3 2/4
3 D3 3/4
4 D#3 4/4
5 E3 5/4
6 F3 6/4
Setting range: 1–20Default setting: 10
The metronome volume setting is retained even when the power is turned off.
Adjusting the volume
While holding down the [METRONOME] button, press one of the C1–G2 keys to determine the volume. The current metronome volume setting appears on the display while both controls are held.
C1(1) G2(20)A1(10)
The volume level increases as you press higher keys.
MAXMIN
18 • N1 Owner’s Manual
Basic Operations and More
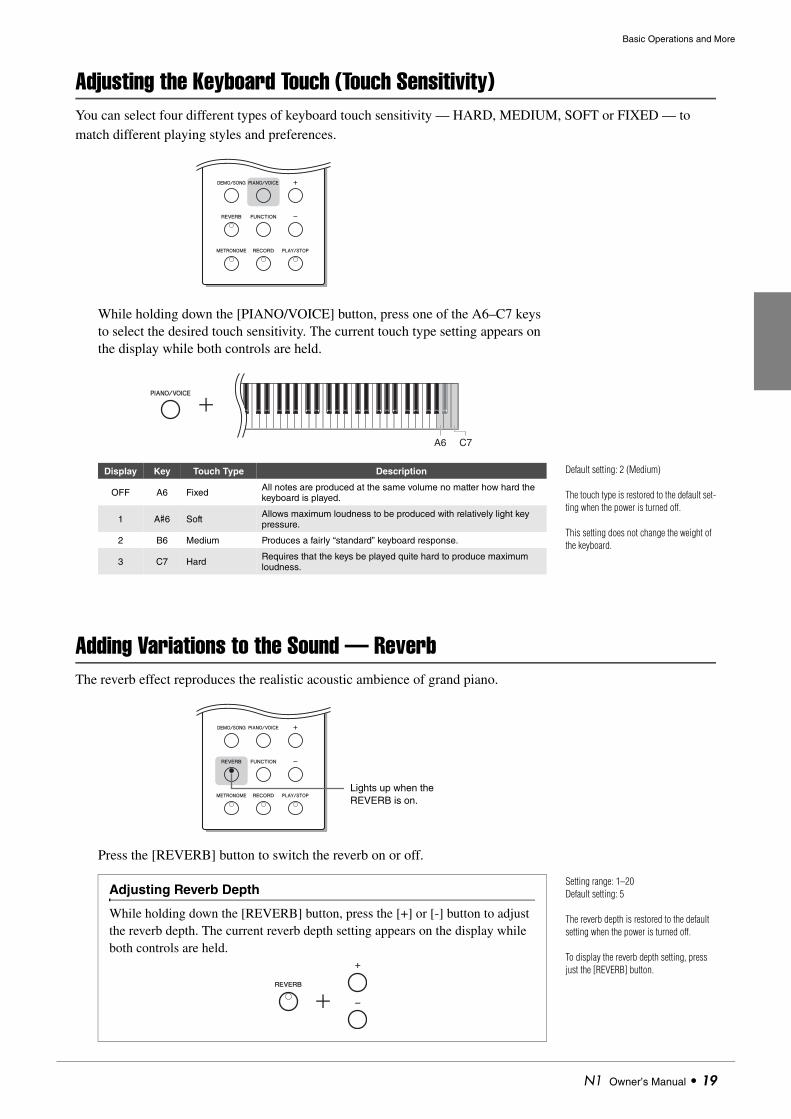
Adjusting the Keyboard Touch (Touch Sensitivity)You can select four different types of keyboard touch sensitivity — HARD, MEDIUM, SOFT or FIXED — to match different playing styles and preferences.
While holding down the [PIANO/VOICE] button, press one of the A6–C7 keys to select the desired touch sensitivity. The current touch type setting appears on the display while both controls are held.
Adding Variations to the Sound — ReverbThe reverb effect reproduces the realistic acoustic ambience of grand piano.
Press the [REVERB] button to switch the reverb on or off.
A6 C7
Default setting: 2 (Medium)
The touch type is restored to the default set-ting when the power is turned off.
This setting does not change the weight of the keyboard.
Display Key Touch Type Description
OFF A6 Fixed All notes are produced at the same volume no matter how hard the keyboard is played.
1 A#6 Soft Allows maximum loudness to be produced with relatively light key pressure.
2 B6 Medium Produces a fairly “standard” keyboard response.
3 C7 Hard Requires that the keys be played quite hard to produce maximum loudness.
Lights up when the REVERB is on.
Setting range: 1–20Default setting: 5
The reverb depth is restored to the default setting when the power is turned off.
To display the reverb depth setting, press just the [REVERB] button.
Adjusting Reverb Depth
While holding down the [REVERB] button, press the [+] or [-] button to adjust the reverb depth. The current reverb depth setting appears on the display while both controls are held.
N1 Owner’s Manual • 19
Basic Operations and More
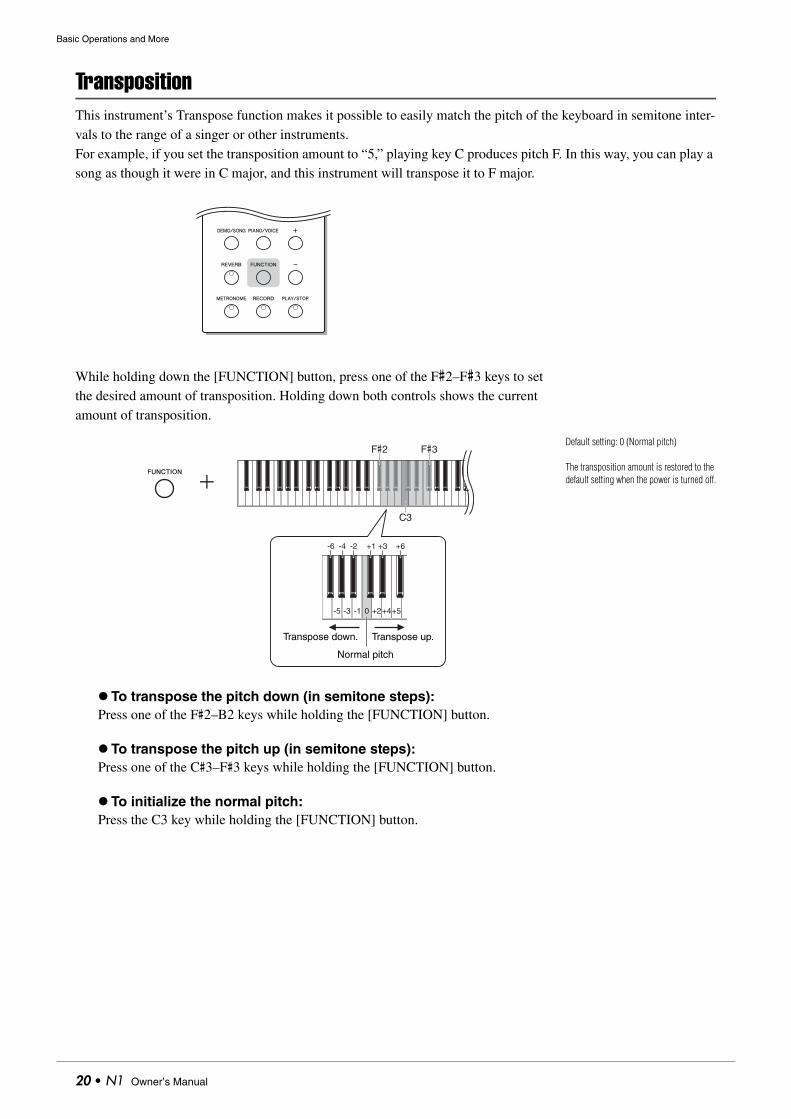
TranspositionThis instrument’s Transpose function makes it possible to easily match the pitch of the keyboard in semitone inter-vals to the range of a singer or other instruments.For example, if you set the transposition amount to “5,” playing key C produces pitch F. In this way, you can play a song as though it were in C major, and this instrument will transpose it to F major.
While holding down the [FUNCTION] button, press one of the F#2–F#3 keys to set the desired amount of transposition. Holding down both controls shows the current amount of transposition.
To transpose the pitch down (in semitone steps):Press one of the F#2–B2 keys while holding the [FUNCTION] button.
To transpose the pitch up (in semitone steps):Press one of the C#3–F#3 keys while holding the [FUNCTION] button.
To initialize the normal pitch:Press the C3 key while holding the [FUNCTION] button.
Default setting: 0 (Normal pitch)
The transposition amount is restored to the default setting when the power is turned off.
C3
F#3F#2
0-1
-2 +1 +3-4
-3-5 +2+4+5
-6 +6
Transpose up.Transpose down.
Normal pitch
20 • N1 Owner’s Manual
Basic Operations and More
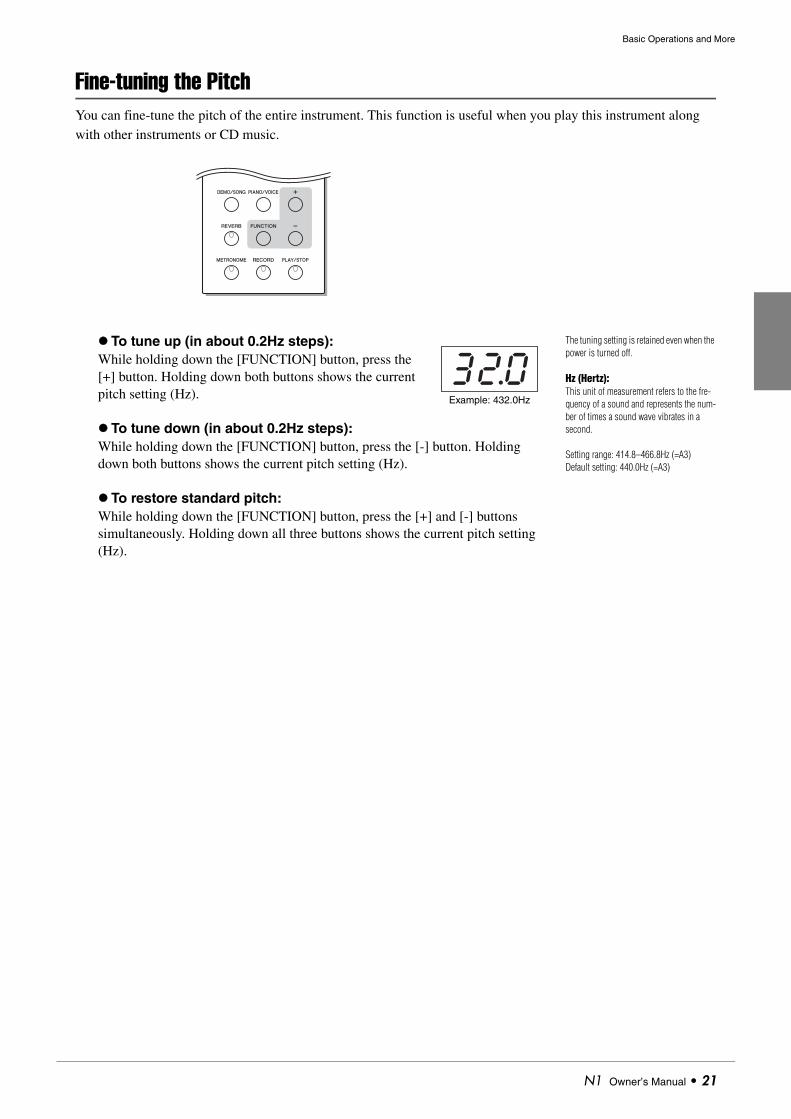
Fine-tuning the PitchYou can fine-tune the pitch of the entire instrument. This function is useful when you play this instrument along with other instruments or CD music.
To tune up (in about 0.2Hz steps):While holding down the [FUNCTION] button, press the [+] button. Holding down both buttons shows the current pitch setting (Hz).
To tune down (in about 0.2Hz steps):While holding down the [FUNCTION] button, press the [-] button. Holding down both buttons shows the current pitch setting (Hz).
To restore standard pitch:While holding down the [FUNCTION] button, press the [+] and [-] buttons simultaneously. Holding down all three buttons shows the current pitch setting (Hz).
The tuning setting is retained even when the power is turned off.
Hz (Hertz):This unit of measurement refers to the fre-quency of a sound and represents the num-ber of times a sound wave vibrates in a second.
Setting range: 414.8–466.8Hz (=A3) Default setting: 440.0Hz (=A3)
32.0Example: 432.0Hz
N1 Owner’s Manual • 21
Basic Operations and More
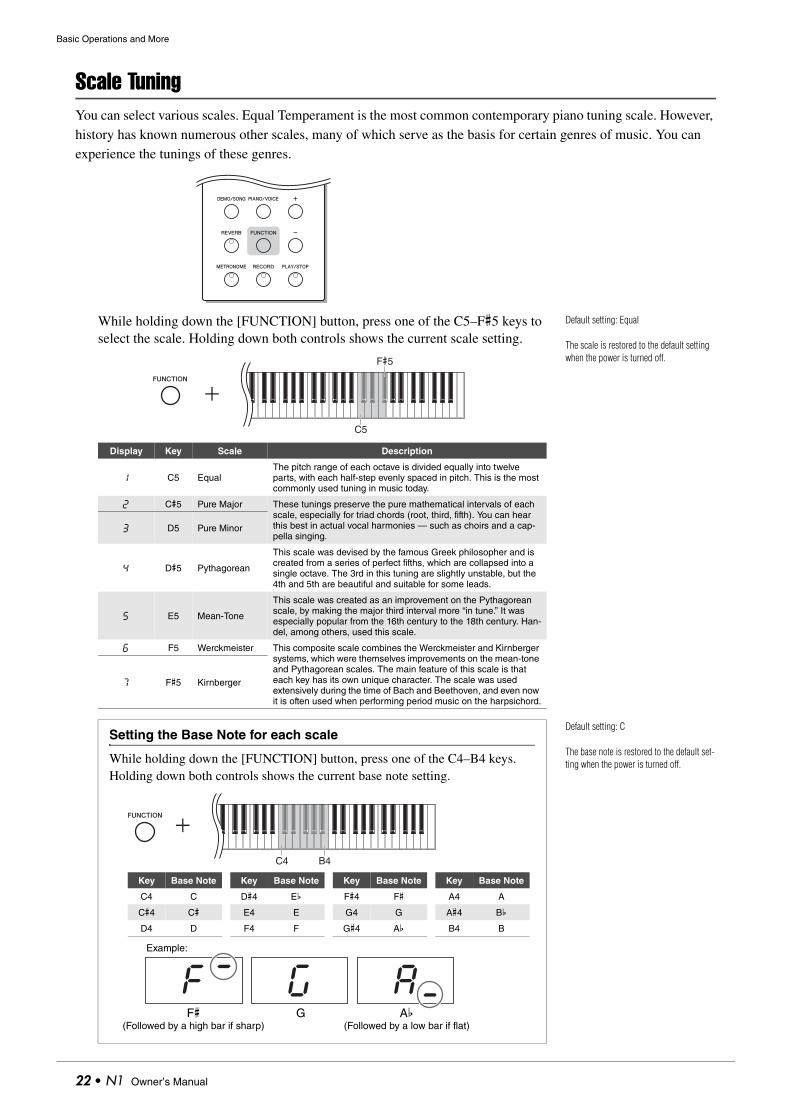
Scale TuningYou can select various scales. Equal Temperament is the most common contemporary piano tuning scale. However, history has known numerous other scales, many of which serve as the basis for certain genres of music. You can experience the tunings of these genres.
While holding down the [FUNCTION] button, press one of the C5–F#5 keys to select the scale. Holding down both controls shows the current scale setting.
Default setting: Equal
The scale is restored to the default setting when the power is turned off.
Display Key Scale Description
1 C5 EqualThe pitch range of each octave is divided equally into twelve parts, with each half-step evenly spaced in pitch. This is the most commonly used tuning in music today.
2 C#5 Pure Major These tunings preserve the pure mathematical intervals of each scale, especially for triad chords (root, third, fifth). You can hear this best in actual vocal harmonies — such as choirs and a cap-pella singing.
3 D5 Pure Minor
4 D#5 Pythagorean
This scale was devised by the famous Greek philosopher and is created from a series of perfect fifths, which are collapsed into a single octave. The 3rd in this tuning are slightly unstable, but the 4th and 5th are beautiful and suitable for some leads.
5 E5 Mean-Tone
This scale was created as an improvement on the Pythagorean scale, by making the major third interval more “in tune.” It was especially popular from the 16th century to the 18th century. Han-del, among others, used this scale.
6 F5 Werckmeister This composite scale combines the Werckmeister and Kirnberger systems, which were themselves improvements on the mean-tone and Pythagorean scales. The main feature of this scale is that each key has its own unique character. The scale was used extensively during the time of Bach and Beethoven, and even now it is often used when performing period music on the harpsichord.
7 F#5 Kirnberger
C5
F#5
Default setting: C
The base note is restored to the default set-ting when the power is turned off.
Setting the Base Note for each scale
While holding down the [FUNCTION] button, press one of the C4–B4 keys. Holding down both controls shows the current base note setting.
B4C4
F~ G A_
Key Base Note
C4 C
C#4 C#
D4 D
D#4 Eb
E4 E
F4 F
Key Base Note
F#4 F#
G4 G
G#4 Ab
Key Base Note
A4 A
A#4 Bb
B4 B
Key Base Note
Example:
F#(Followed by a high bar if sharp)
G Ab(Followed by a low bar if flat)
22 • N1 Owner’s Manual
Recording your Performance
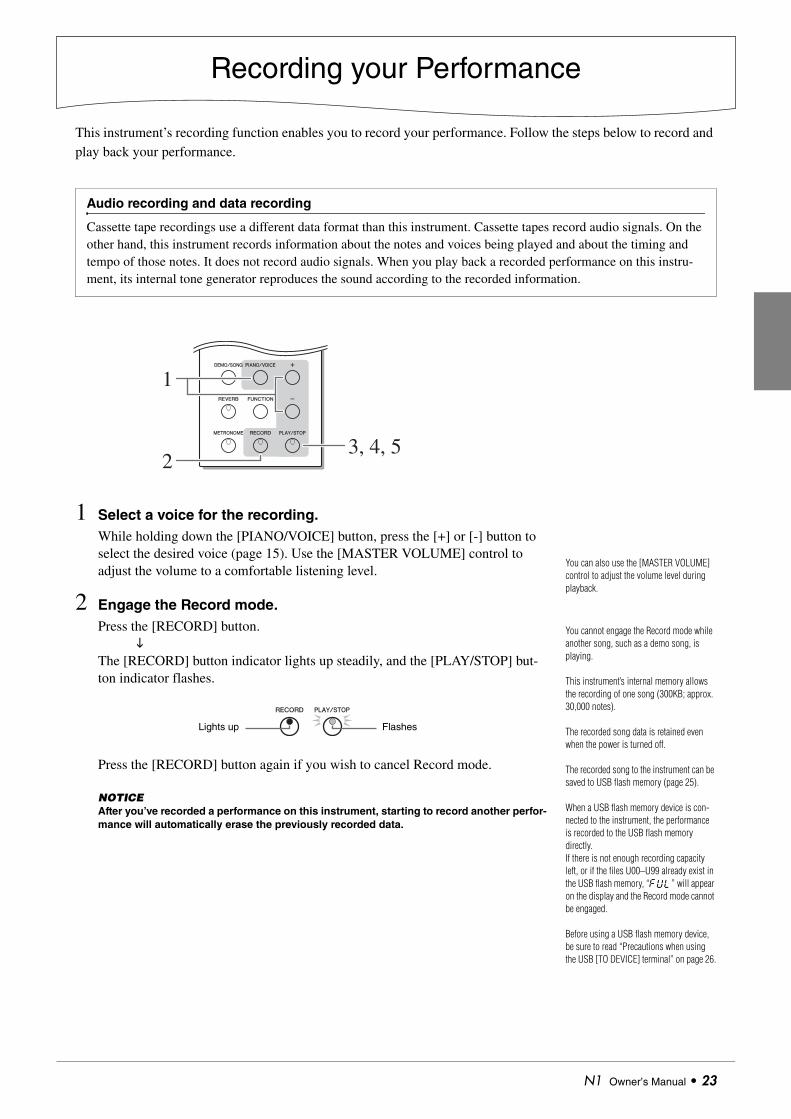
This instrument’s recording function enables you to record your performance. Follow the steps below to record and play back your performance.
1 Select a voice for the recording.While holding down the [PIANO/VOICE] button, press the [+] or [-] button to select the desired voice (page 15). Use the [MASTER VOLUME] control to adjust the volume to a comfortable listening level.
2 Engage the Record mode.Press the [RECORD] button.
The [RECORD] button indicator lights up steadily, and the [PLAY/STOP] but-ton indicator flashes.
Press the [RECORD] button again if you wish to cancel Record mode.
NOTICEAfter you’ve recorded a performance on this instrument, starting to record another perfor-mance will automatically erase the previously recorded data.
Audio recording and data recording
Cassette tape recordings use a different data format than this instrument. Cassette tapes record audio signals. On the other hand, this instrument records information about the notes and voices being played and about the timing and tempo of those notes. It does not record audio signals. When you play back a recorded performance on this instru-ment, its internal tone generator reproduces the sound according to the recorded information.
3, 4, 52
1
You can also use the [MASTER VOLUME] control to adjust the volume level during playback.
You cannot engage the Record mode while another song, such as a demo song, is playing.
This instrument’s internal memory allows the recording of one song (300KB; approx. 30,000 notes).
The recorded song data is retained even when the power is turned off.
The recorded song to the instrument can be saved to USB flash memory (page 25).
When a USB flash memory device is con-nected to the instrument, the performance is recorded to the USB flash memory directly. If there is not enough recording capacity left, or if the files U00–U99 already exist in the USB flash memory, “FUL” will appear on the display and the Record mode cannot be engaged.
Before using a USB flash memory device, be sure to read “Precautions when using the USB [TO DEVICE] terminal” on page 26.
FlashesLights up
N1 Owner’s Manual • 23
Recording your Performance
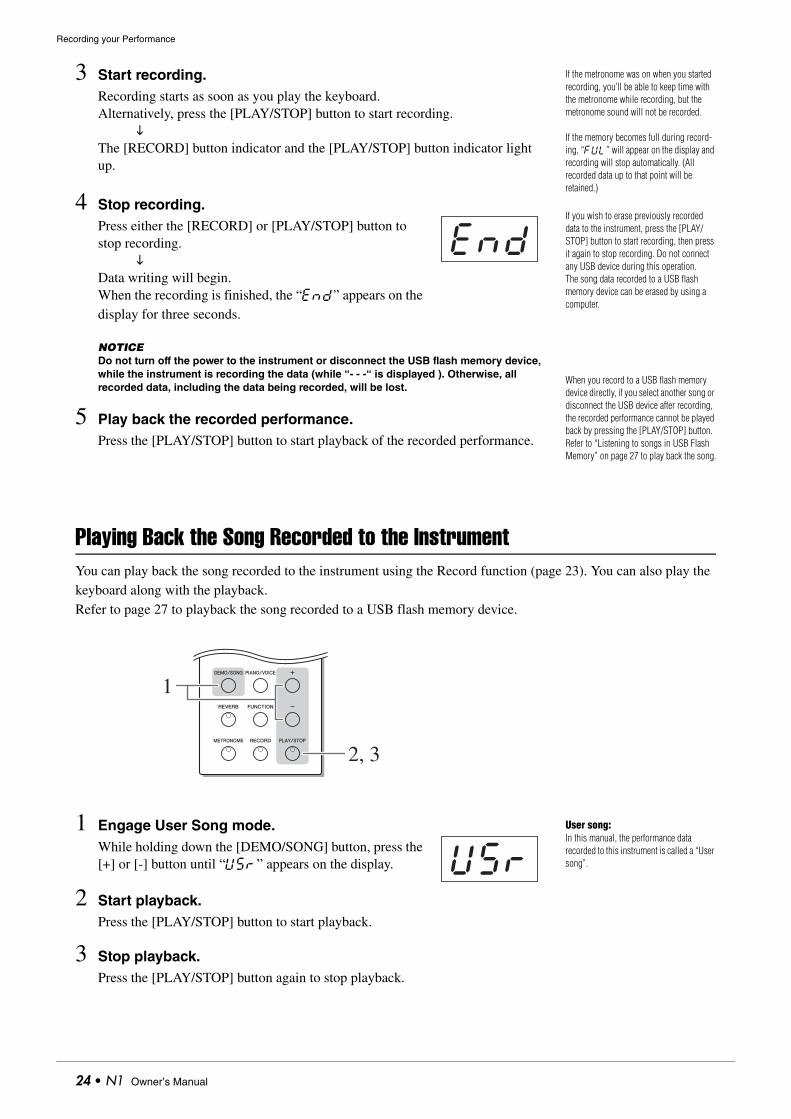
3 Start recording.Recording starts as soon as you play the keyboard.Alternatively, press the [PLAY/STOP] button to start recording.
The [RECORD] button indicator and the [PLAY/STOP] button indicator light up.
4 Stop recording.Press either the [RECORD] or [PLAY/STOP] button to stop recording.
Data writing will begin.When the recording is finished, the “End” appears on the display for three seconds.
NOTICEDo not turn off the power to the instrument or disconnect the USB flash memory device, while the instrument is recording the data (while “- - -“ is displayed ). Otherwise, all recorded data, including the data being recorded, will be lost.
5 Play back the recorded performance.Press the [PLAY/STOP] button to start playback of the recorded performance.
Playing Back the Song Recorded to the InstrumentYou can play back the song recorded to the instrument using the Record function (page 23). You can also play the keyboard along with the playback.Refer to page 27 to playback the song recorded to a USB flash memory device.
1 Engage User Song mode.While holding down the [DEMO/SONG] button, press the [+] or [-] button until “USr” appears on the display.
2 Start playback.Press the [PLAY/STOP] button to start playback.
3 Stop playback.Press the [PLAY/STOP] button again to stop playback.
If the metronome was on when you started recording, you’ll be able to keep time with the metronome while recording, but the metronome sound will not be recorded.
If the memory becomes full during record-ing, “FUL” will appear on the display and recording will stop automatically. (All recorded data up to that point will be retained.)
If you wish to erase previously recorded data to the instrument, press the [PLAY/STOP] button to start recording, then press it again to stop recording. Do not connect any USB device during this operation.The song data recorded to a USB flash memory device can be erased by using a computer.
When you record to a USB flash memory device directly, if you select another song or disconnect the USB device after recording, the recorded performance cannot be played back by pressing the [PLAY/STOP] button. Refer to “Listening to songs in USB Flash Memory” on page 27 to play back the song.
End
2, 3
1
User song:In this manual, the performance data recorded to this instrument is called a “User song”.Usr
24 • N1 Owner’s Manual
Recording your Performance
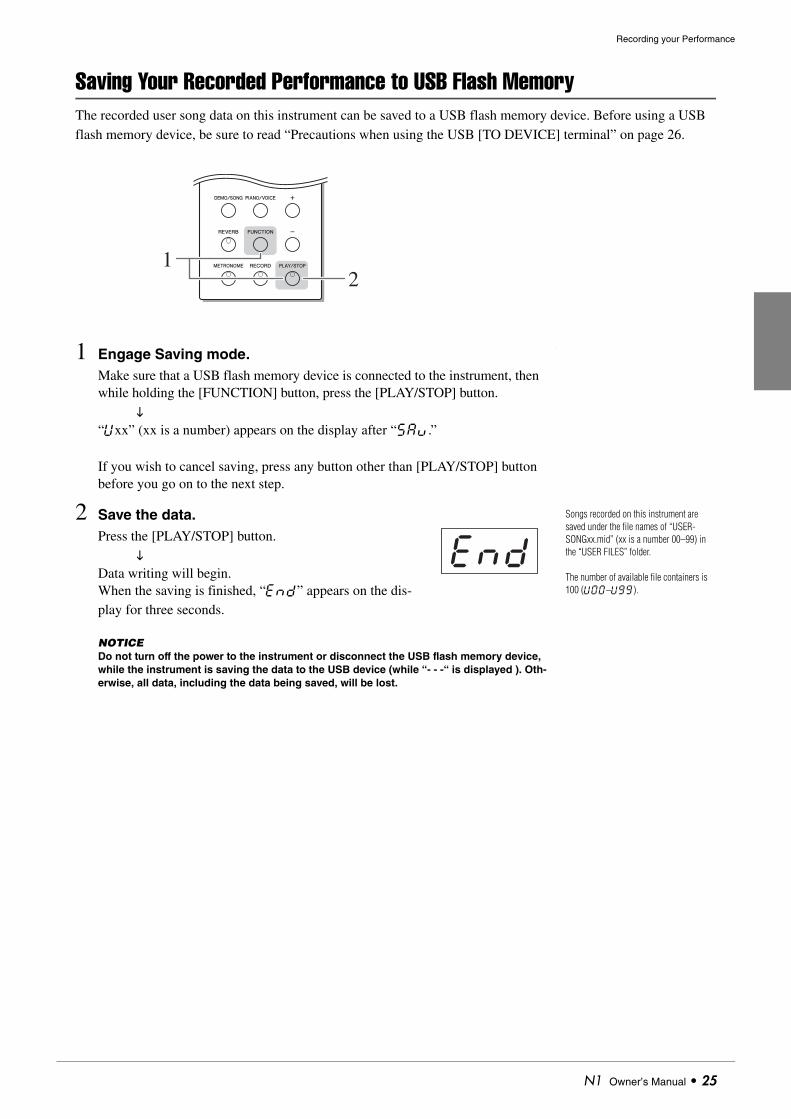
Saving Your Recorded Performance to USB Flash MemoryThe recorded user song data on this instrument can be saved to a USB flash memory device. Before using a USB flash memory device, be sure to read “Precautions when using the USB [TO DEVICE] terminal” on page 26.
1 Engage Saving mode.Make sure that a USB flash memory device is connected to the instrument, then while holding the [FUNCTION] button, press the [PLAY/STOP] button.
“Uxx” (xx is a number) appears on the display after “SAu.”
If you wish to cancel saving, press any button other than [PLAY/STOP] button before you go on to the next step.
2 Save the data.Press the [PLAY/STOP] button.
Data writing will begin.When the saving is finished, “End” appears on the dis-play for three seconds.
NOTICEDo not turn off the power to the instrument or disconnect the USB flash memory device, while the instrument is saving the data to the USB device (while “- - -“ is displayed ). Oth-erwise, all data, including the data being saved, will be lost.
21
Songs recorded on this instrument are saved under the file names of “USER-SONGxx.mid” (xx is a number 00–99) in the “USER FILES” folder.
The number of available file containers is 100 (U00–U99).
End
N1 Owner’s Manual • 25
Recording your Performance
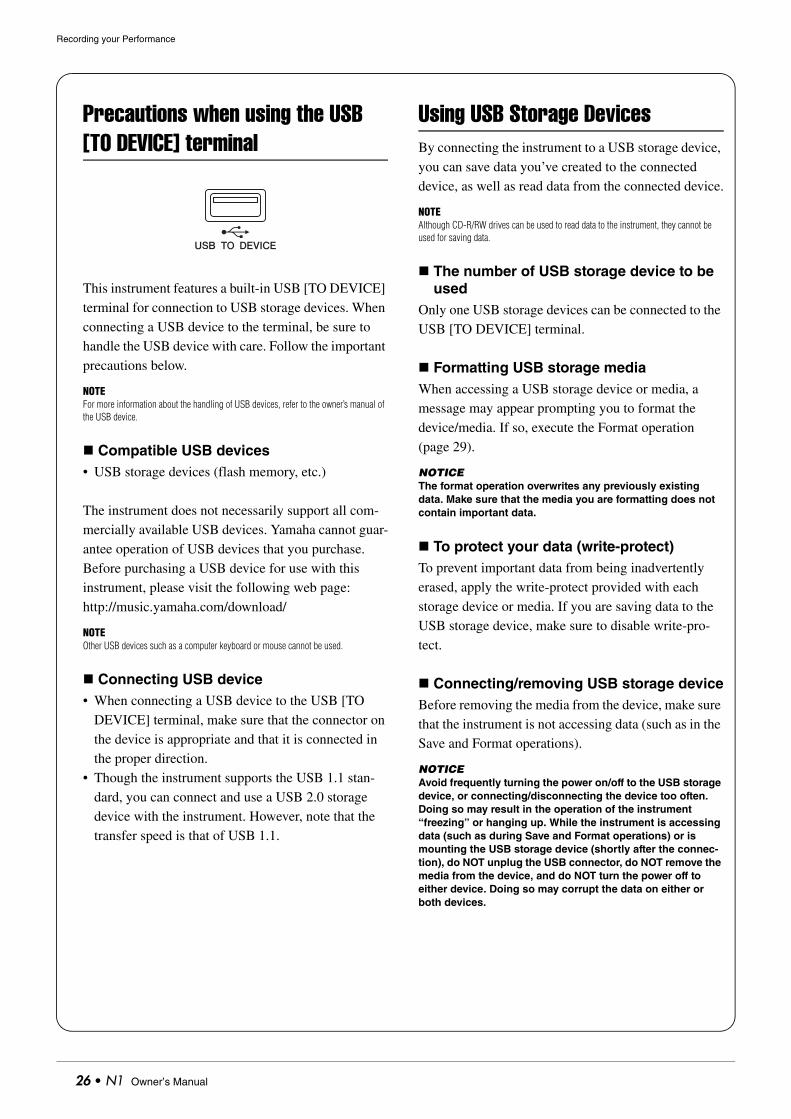
Precautions when using the USB [TO DEVICE] terminal
This instrument features a built-in USB [TO DEVICE] terminal for connection to USB storage devices. When connecting a USB device to the terminal, be sure to handle the USB device with care. Follow the important precautions below.
NOTEFor more information about the handling of USB devices, refer to the owner’s manual of the USB device.
Compatible USB devices• USB storage devices (flash memory, etc.)
The instrument does not necessarily support all com-mercially available USB devices. Yamaha cannot guar-antee operation of USB devices that you purchase. Before purchasing a USB device for use with this instrument, please visit the following web page:http://music.yamaha.com/download/
NOTEOther USB devices such as a computer keyboard or mouse cannot be used.
Connecting USB device• When connecting a USB device to the USB [TO
DEVICE] terminal, make sure that the connector on the device is appropriate and that it is connected in the proper direction.
• Though the instrument supports the USB 1.1 stan-dard, you can connect and use a USB 2.0 storage device with the instrument. However, note that the transfer speed is that of USB 1.1.
Using USB Storage DevicesBy connecting the instrument to a USB storage device, you can save data you’ve created to the connected device, as well as read data from the connected device.
NOTEAlthough CD-R/RW drives can be used to read data to the instrument, they cannot be used for saving data.
The number of USB storage device to be used
Only one USB storage devices can be connected to the USB [TO DEVICE] terminal.
Formatting USB storage mediaWhen accessing a USB storage device or media, a message may appear prompting you to format the device/media. If so, execute the Format operation (page 29).
NOTICEThe format operation overwrites any previously existing data. Make sure that the media you are formatting does not contain important data.
To protect your data (write-protect)To prevent important data from being inadvertently erased, apply the write-protect provided with each storage device or media. If you are saving data to the USB storage device, make sure to disable write-pro-tect.
Connecting/removing USB storage deviceBefore removing the media from the device, make sure that the instrument is not accessing data (such as in the Save and Format operations).
NOTICEAvoid frequently turning the power on/off to the USB storage device, or connecting/disconnecting the device too often. Doing so may result in the operation of the instrument “freezing” or hanging up. While the instrument is accessing data (such as during Save and Format operations) or is mounting the USB storage device (shortly after the connec-tion), do NOT unplug the USB connector, do NOT remove the media from the device, and do NOT turn the power off to either device. Doing so may corrupt the data on either or both devices.
26 • N1 Owner’s Manual
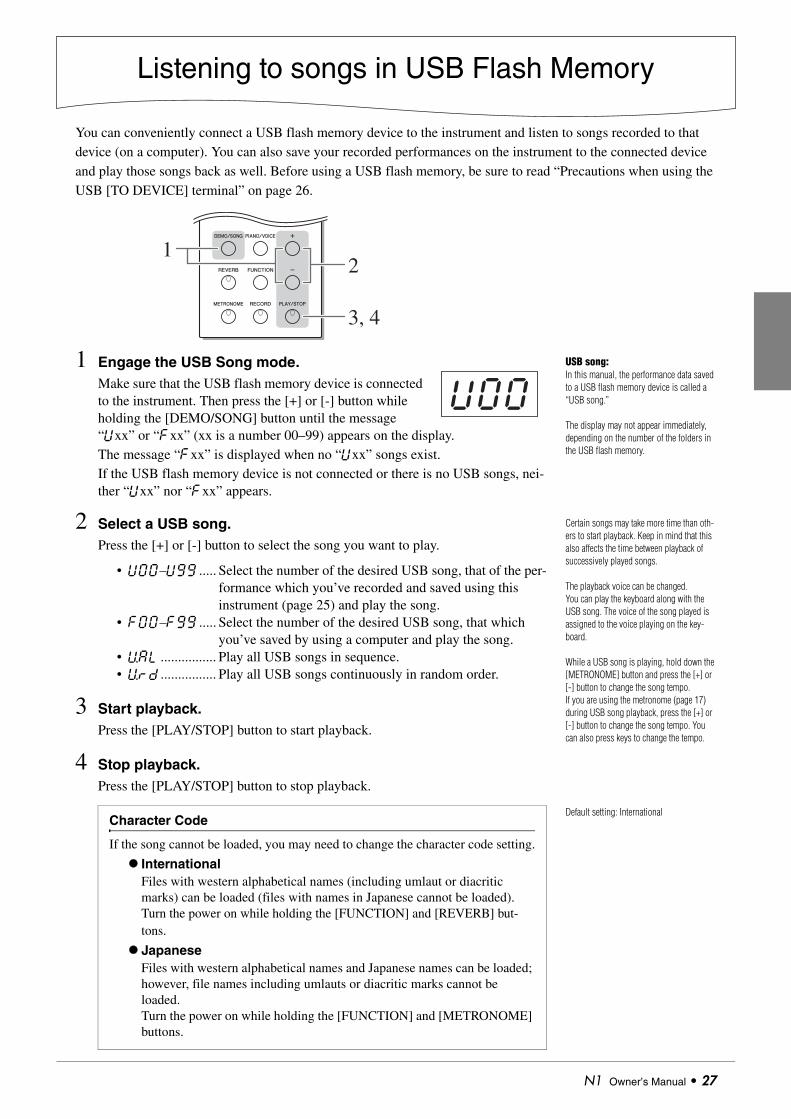
Listening to songs in USB Flash Memory
You can conveniently connect a USB flash memory device to the instrument and listen to songs recorded to that device (on a computer). You can also save your recorded performances on the instrument to the connected device and play those songs back as well. Before using a USB flash memory, be sure to read “Precautions when using the USB [TO DEVICE] terminal” on page 26.
1 Engage the USB Song mode.Make sure that the USB flash memory device is connected to the instrument. Then press the [+] or [-] button while holding the [DEMO/SONG] button until the message “Uxx” or “Fxx” (xx is a number 00–99) appears on the display.The message “Fxx” is displayed when no “Uxx” songs exist. If the USB flash memory device is not connected or there is no USB songs, nei-ther “Uxx” nor “Fxx” appears.
2 Select a USB song.Press the [+] or [-] button to select the song you want to play.
• U00–U99 ..... Select the number of the desired USB song, that of the per-formance which you’ve recorded and saved using this instrument (page 25) and play the song.
• F00–F99 ..... Select the number of the desired USB song, that which you’ve saved by using a computer and play the song.
• U.AL................ Play all USB songs in sequence.• U.rd................ Play all USB songs continuously in random order.
3 Start playback.Press the [PLAY/STOP] button to start playback.
4 Stop playback.Press the [PLAY/STOP] button to stop playback.
2
3, 4
1
USB song:In this manual, the performance data saved to a USB flash memory device is called a “USB song.”
The display may not appear immediately, depending on the number of the folders in the USB flash memory.
U00
Certain songs may take more time than oth-ers to start playback. Keep in mind that this also affects the time between playback of successively played songs.
The playback voice can be changed.You can play the keyboard along with the USB song. The voice of the song played is assigned to the voice playing on the key-board.
While a USB song is playing, hold down the [METRONOME] button and press the [+] or [-] button to change the song tempo.If you are using the metronome (page 17) during USB song playback, press the [+] or [-] button to change the song tempo. You can also press keys to change the tempo.
Default setting: InternationalCharacter Code
If the song cannot be loaded, you may need to change the character code setting.
InternationalFiles with western alphabetical names (including umlaut or diacritic marks) can be loaded (files with names in Japanese cannot be loaded).Turn the power on while holding the [FUNCTION] and [REVERB] but-tons.
JapaneseFiles with western alphabetical names and Japanese names can be loaded; however, file names including umlauts or diacritic marks cannot be loaded.Turn the power on while holding the [FUNCTION] and [METRONOME] buttons.
N1 Owner’s Manual • 27
Listening to songs in USB Flash Memory
“Uxx”:The smallest number among U00–U99 is selected. If there are no any “Uxx” songs, the smallest number among F00–F99 is selected.If a USB flash memory device is not con-nected or there are no USB songs, the “Usr” song is selected.
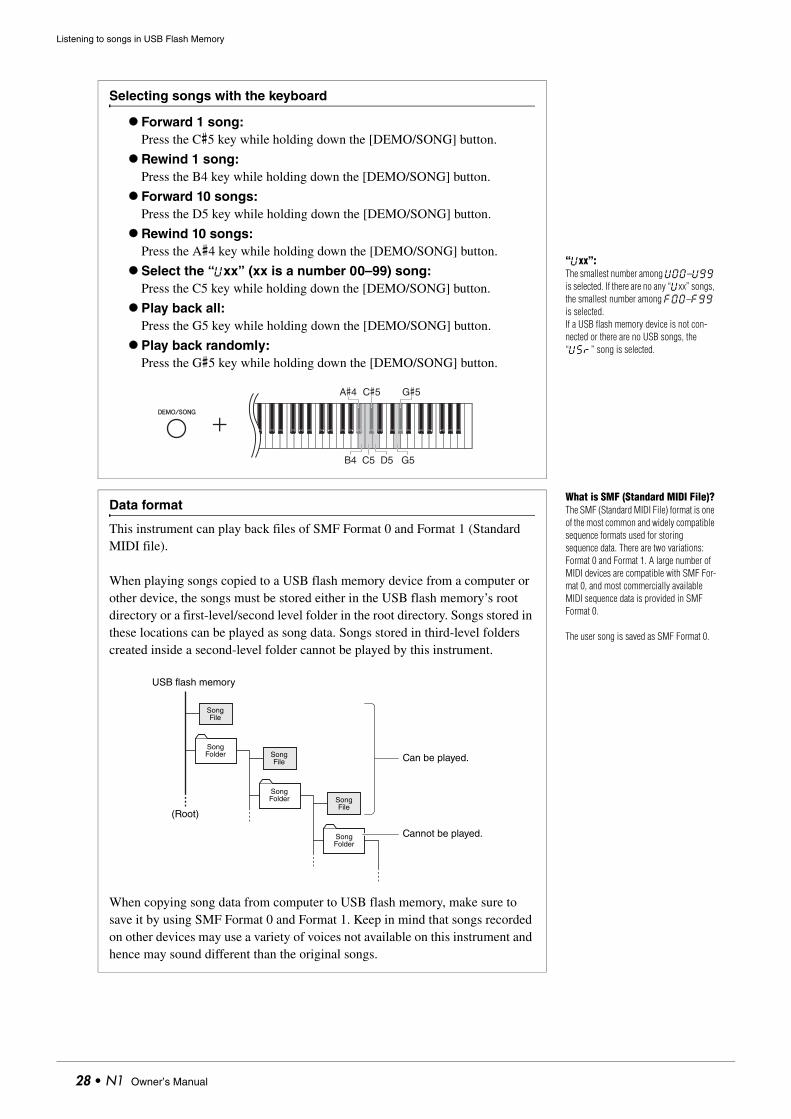
Selecting songs with the keyboard
Forward 1 song:Press the C#5 key while holding down the [DEMO/SONG] button.
Rewind 1 song:Press the B4 key while holding down the [DEMO/SONG] button.
Forward 10 songs:Press the D5 key while holding down the [DEMO/SONG] button.
Rewind 10 songs:Press the A#4 key while holding down the [DEMO/SONG] button.
Select the “Uxx” (xx is a number 00–99) song:Press the C5 key while holding down the [DEMO/SONG] button.
Play back all:Press the G5 key while holding down the [DEMO/SONG] button.
Play back randomly:Press the G#5 key while holding down the [DEMO/SONG] button.
C5 D5 G5B4
C#5 G#5A#4
What is SMF (Standard MIDI File)?The SMF (Standard MIDI File) format is one of the most common and widely compatible sequence formats used for storing sequence data. There are two variations: Format 0 and Format 1. A large number of MIDI devices are compatible with SMF For-mat 0, and most commercially available MIDI sequence data is provided in SMF Format 0.
The user song is saved as SMF Format 0.
Data format
This instrument can play back files of SMF Format 0 and Format 1 (Standard MIDI file).
When playing songs copied to a USB flash memory device from a computer or other device, the songs must be stored either in the USB flash memory’s root directory or a first-level/second level folder in the root directory. Songs stored in these locations can be played as song data. Songs stored in third-level folders created inside a second-level folder cannot be played by this instrument.
When copying song data from computer to USB flash memory, make sure to save it by using SMF Format 0 and Format 1. Keep in mind that songs recorded on other devices may use a variety of voices not available on this instrument and hence may sound different than the original songs.
USB flash memory
Can be played.
Cannot be played.
Song File
Song Folder Song
File
Song Folder Song
File
Song Folder
(Root)
28 • N1 Owner’s Manual
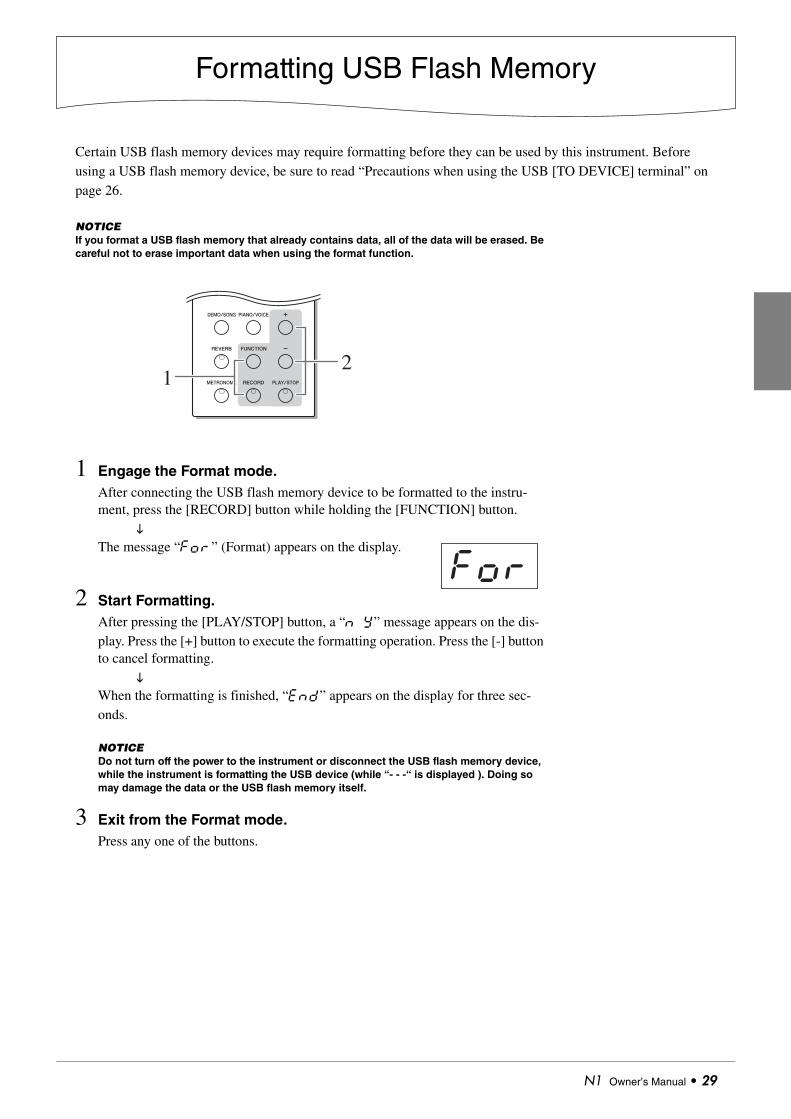
Formatting USB Flash Memory
Certain USB flash memory devices may require formatting before they can be used by this instrument. Before using a USB flash memory device, be sure to read “Precautions when using the USB [TO DEVICE] terminal” on page 26.
NOTICEIf you format a USB flash memory that already contains data, all of the data will be erased. Be careful not to erase important data when using the format function.
1 Engage the Format mode.After connecting the USB flash memory device to be formatted to the instru-ment, press the [RECORD] button while holding the [FUNCTION] button.
The message “For” (Format) appears on the display.
2 Start Formatting.After pressing the [PLAY/STOP] button, a “n Y” message appears on the dis-play. Press the [+] button to execute the formatting operation. Press the [-] button to cancel formatting.
When the formatting is finished, “End” appears on the display for three sec-onds.
NOTICEDo not turn off the power to the instrument or disconnect the USB flash memory device, while the instrument is formatting the USB device (while “- - -“ is displayed ). Doing so may damage the data or the USB flash memory itself.
3 Exit from the Format mode.Press any one of the buttons.
21
For
N1 Owner’s Manual • 29
Backing up Data and Initializing the Settings
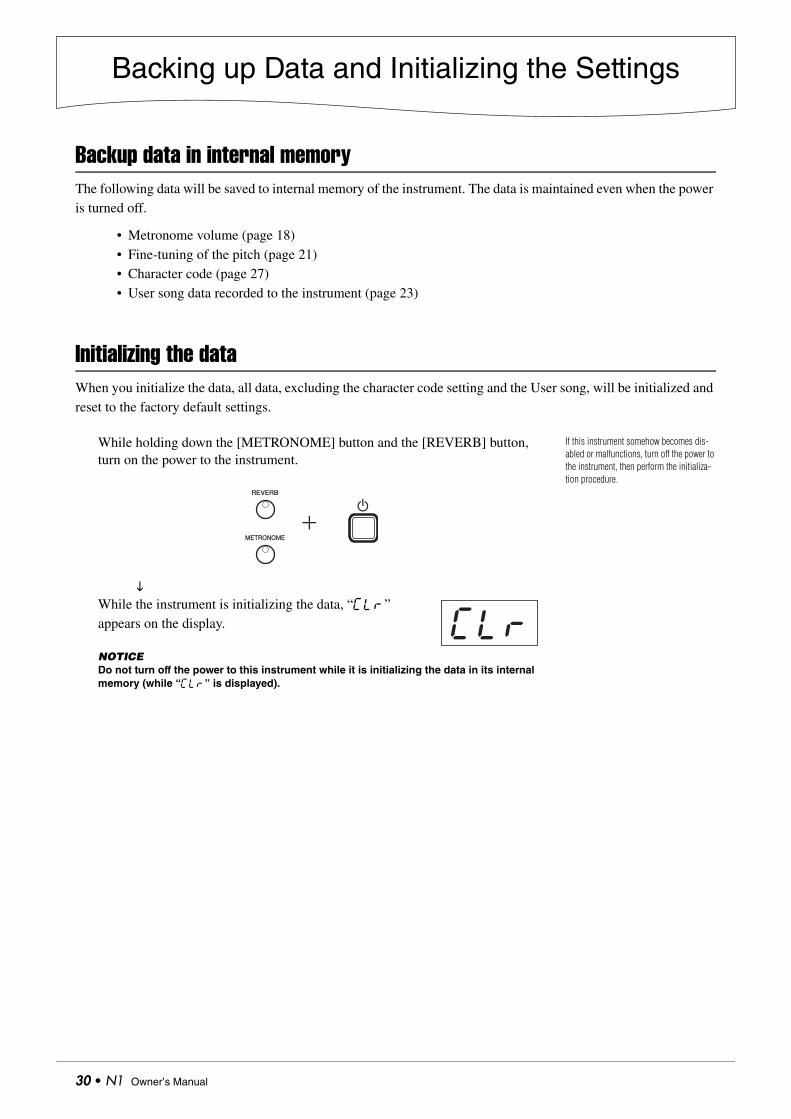
Backup data in internal memoryThe following data will be saved to internal memory of the instrument. The data is maintained even when the power is turned off.
• Metronome volume (page 18)• Fine-tuning of the pitch (page 21)• Character code (page 27)• User song data recorded to the instrument (page 23)
Initializing the dataWhen you initialize the data, all data, excluding the character code setting and the User song, will be initialized and reset to the factory default settings.
While holding down the [METRONOME] button and the [REVERB] button, turn on the power to the instrument.
While the instrument is initializing the data, “CLr” appears on the display.
NOTICEDo not turn off the power to this instrument while it is initializing the data in its internal memory (while “CLr” is displayed).
If this instrument somehow becomes dis-abled or malfunctions, turn off the power to the instrument, then perform the initializa-tion procedure.
CLr
30 • N1 Owner’s Manual
Connections
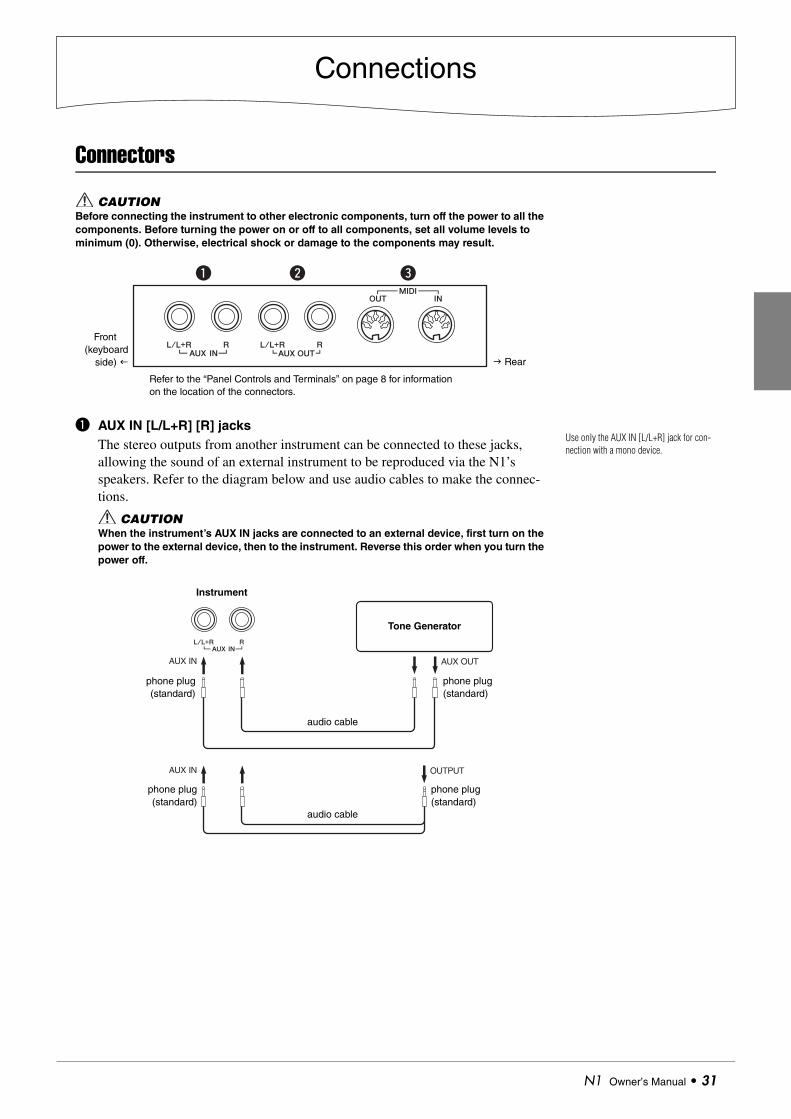
Connectors
CAUTIONBefore connecting the instrument to other electronic components, turn off the power to all the components. Before turning the power on or off to all components, set all volume levels to minimum (0). Otherwise, electrical shock or damage to the components may result.
q AUX IN [L/L+R] [R] jacksThe stereo outputs from another instrument can be connected to these jacks, allowing the sound of an external instrument to be reproduced via the N1’s speakers. Refer to the diagram below and use audio cables to make the connec-tions.
CAUTIONWhen the instrument’s AUX IN jacks are connected to an external device, first turn on the power to the external device, then to the instrument. Reverse this order when you turn the power off.
eq w
Refer to the “Panel Controls and Terminals” on page 8 for information on the location of the connectors.
Rear
Front (keyboard
side)
Use only the AUX IN [L/L+R] jack for con-nection with a mono device.
AUX OUT
OUTPUT
AUX IN
AUX IN
audio cable
audio cable
phone plug (standard)
phone plug (standard)
phone plug(standard)
phone plug(standard)
Instrument
Tone Generator
N1 Owner’s Manual • 31
Connections
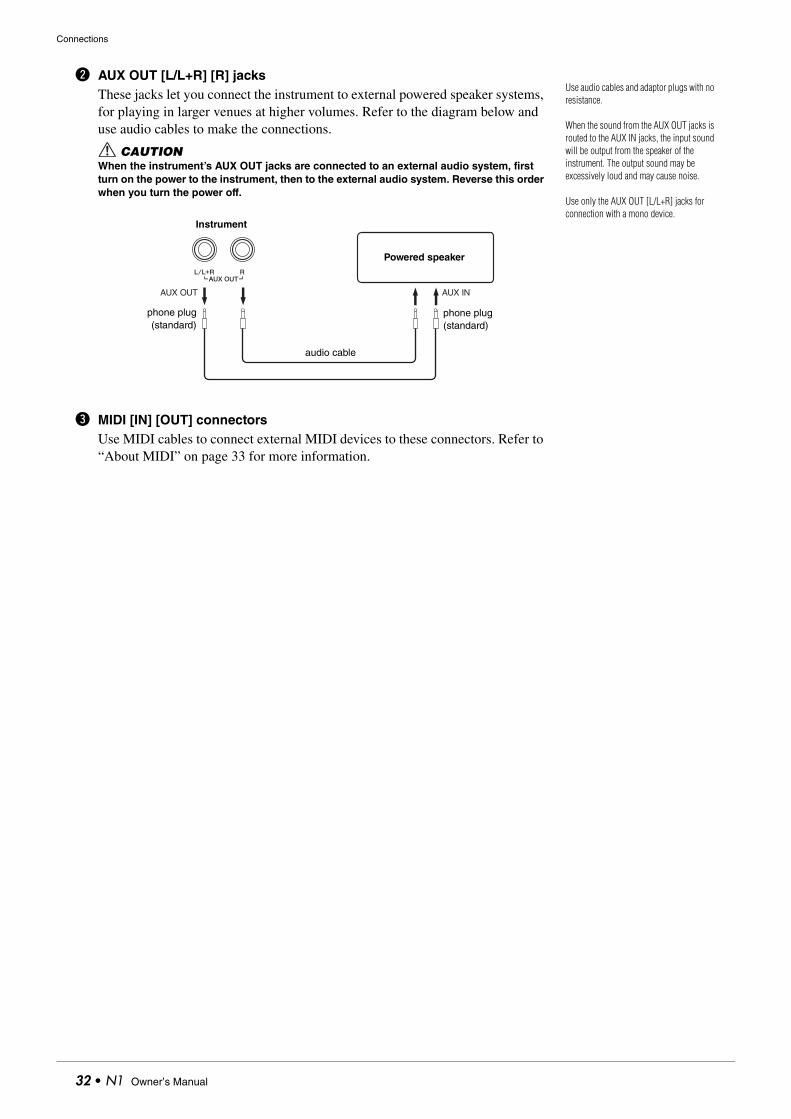
w AUX OUT [L/L+R] [R] jacksThese jacks let you connect the instrument to external powered speaker systems, for playing in larger venues at higher volumes. Refer to the diagram below and use audio cables to make the connections.
CAUTIONWhen the instrument’s AUX OUT jacks are connected to an external audio system, first turn on the power to the instrument, then to the external audio system. Reverse this order when you turn the power off.
e MIDI [IN] [OUT] connectorsUse MIDI cables to connect external MIDI devices to these connectors. Refer to “About MIDI” on page 33 for more information.
Use audio cables and adaptor plugs with no resistance.
When the sound from the AUX OUT jacks is routed to the AUX IN jacks, the input sound will be output from the speaker of the instrument. The output sound may be excessively loud and may cause noise.
Use only the AUX OUT [L/L+R] jacks for connection with a mono device.
AUX INAUX OUT
audio cable
phone plug (standard)
phone plug(standard)
Powered speaker
Instrument
32 • N1 Owner’s Manual
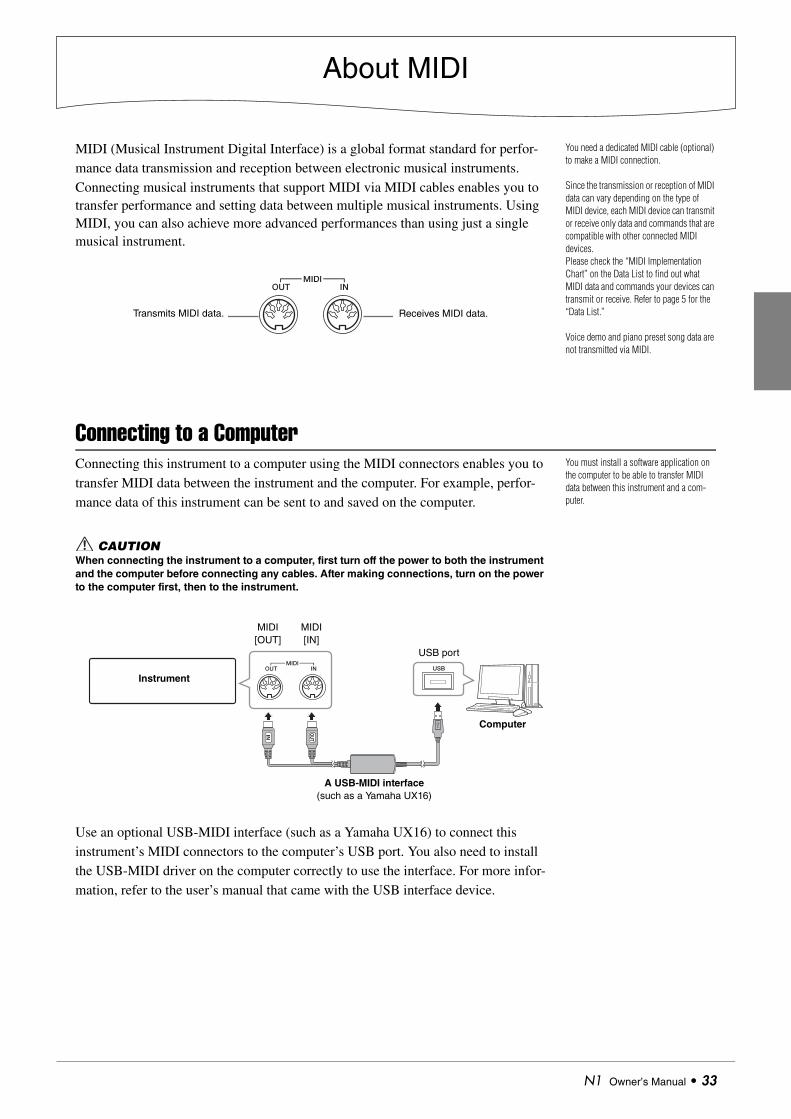
About MIDI
MIDI (Musical Instrument Digital Interface) is a global format standard for perfor-mance data transmission and reception between electronic musical instruments.Connecting musical instruments that support MIDI via MIDI cables enables you to transfer performance and setting data between multiple musical instruments. Using MIDI, you can also achieve more advanced performances than using just a single musical instrument.
Connecting to a ComputerConnecting this instrument to a computer using the MIDI connectors enables you to transfer MIDI data between the instrument and the computer. For example, perfor-mance data of this instrument can be sent to and saved on the computer.
CAUTIONWhen connecting the instrument to a computer, first turn off the power to both the instrument and the computer before connecting any cables. After making connections, turn on the power to the computer first, then to the instrument.
Use an optional USB-MIDI interface (such as a Yamaha UX16) to connect this instrument’s MIDI connectors to the computer’s USB port. You also need to install the USB-MIDI driver on the computer correctly to use the interface. For more infor-mation, refer to the user’s manual that came with the USB interface device.
You need a dedicated MIDI cable (optional) to make a MIDI connection.
Since the transmission or reception of MIDI data can vary depending on the type of MIDI device, each MIDI device can transmit or receive only data and commands that are compatible with other connected MIDI devices.Please check the “MIDI Implementation Chart” on the Data List to find out what MIDI data and commands your devices can transmit or receive. Refer to page 5 for the “Data List.”
Voice demo and piano preset song data are not transmitted via MIDI.
Transmits MIDI data. Receives MIDI data.
You must install a software application on the computer to be able to transfer MIDI data between this instrument and a com-puter.
A USB-MIDI interface(such as a Yamaha UX16)
USB port
Instrument
Computer
MIDI [OUT]
MIDI [IN]
N1 Owner’s Manual • 33
About MIDI
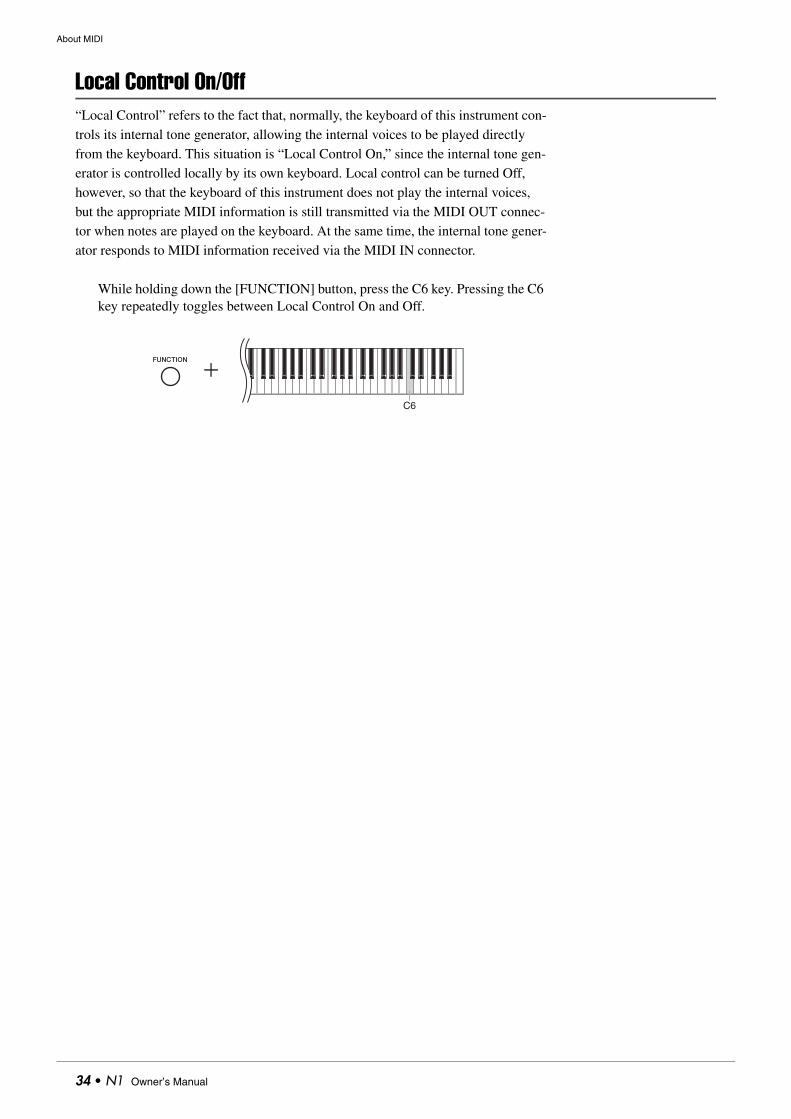
Local Control On/Off“Local Control” refers to the fact that, normally, the keyboard of this instrument con-trols its internal tone generator, allowing the internal voices to be played directly from the keyboard. This situation is “Local Control On,” since the internal tone gen-erator is controlled locally by its own keyboard. Local control can be turned Off, however, so that the keyboard of this instrument does not play the internal voices, but the appropriate MIDI information is still transmitted via the MIDI OUT connec-tor when notes are played on the keyboard. At the same time, the internal tone gener-ator responds to MIDI information received via the MIDI IN connector.
While holding down the [FUNCTION] button, press the C6 key. Pressing the C6 key repeatedly toggles between Local Control On and Off.
C6
34 • N1 Owner’s Manual
Appendix
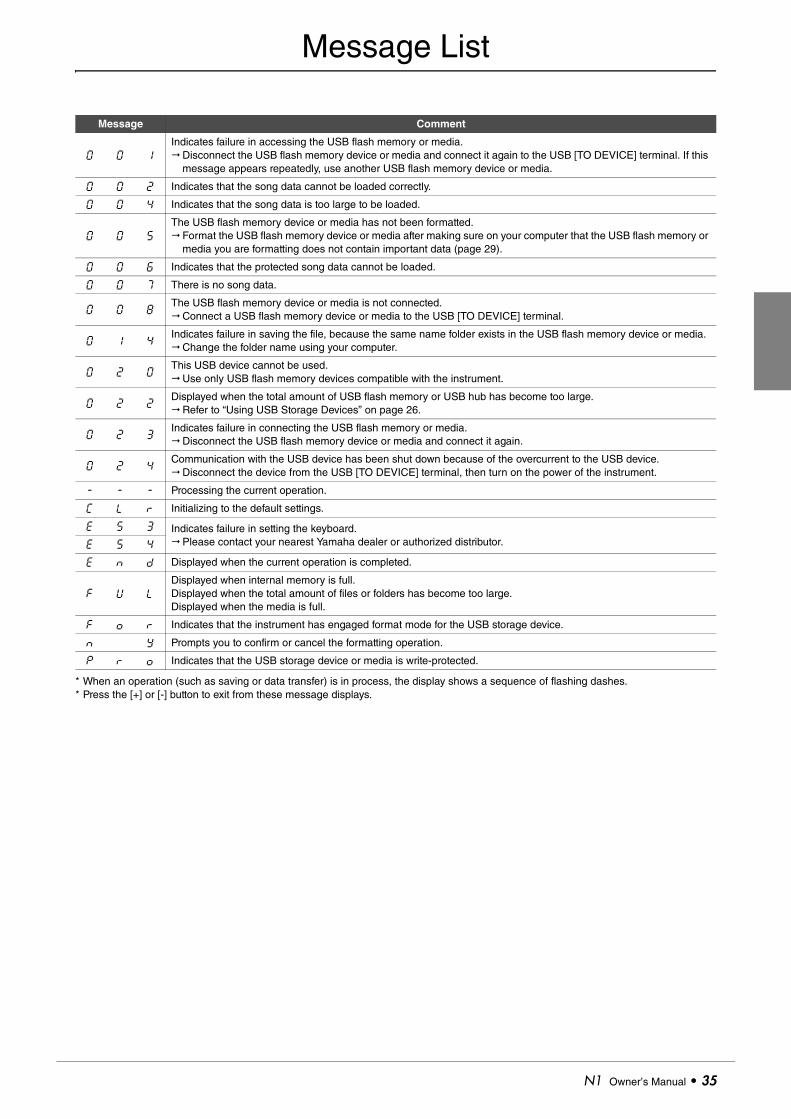
Message List
* When an operation (such as saving or data transfer) is in process, the display shows a sequence of flashing dashes.* Press the [+] or [-] button to exit from these message displays.
Message Comment
0 0 1
Indicates failure in accessing the USB flash memory or media.Disconnect the USB flash memory device or media and connect it again to the USB [TO DEVICE] terminal. If this
message appears repeatedly, use another USB flash memory device or media.
0 0 2 Indicates that the song data cannot be loaded correctly.
0 0 4 Indicates that the song data is too large to be loaded.
0 0 5
The USB flash memory device or media has not been formatted.Format the USB flash memory device or media after making sure on your computer that the USB flash memory or
media you are formatting does not contain important data (page 29).
0 0 6 Indicates that the protected song data cannot be loaded.
0 0 7 There is no song data.
0 0 8The USB flash memory device or media is not connected.Connect a USB flash memory device or media to the USB [TO DEVICE] terminal.
0 1 4Indicates failure in saving the file, because the same name folder exists in the USB flash memory device or media.Change the folder name using your computer.
0 2 0This USB device cannot be used.Use only USB flash memory devices compatible with the instrument.
0 2 2Displayed when the total amount of USB flash memory or USB hub has become too large.Refer to “Using USB Storage Devices” on page 26.
0 2 3Indicates failure in connecting the USB flash memory or media.Disconnect the USB flash memory device or media and connect it again.
0 2 4Communication with the USB device has been shut down because of the overcurrent to the USB device.Disconnect the device from the USB [TO DEVICE] terminal, then turn on the power of the instrument.
- - - Processing the current operation.
C L r Initializing to the default settings.
E 5 3 Indicates failure in setting the keyboard.Please contact your nearest Yamaha dealer or authorized distributor.E 5 4
E n d Displayed when the current operation is completed.
F U L
Displayed when internal memory is full.Displayed when the total amount of files or folders has become too large.Displayed when the media is full.
F o r Indicates that the instrument has engaged format mode for the USB storage device.
n Y Prompts you to confirm or cancel the formatting operation.
P r o Indicates that the USB storage device or media is write-protected.
N1 Owner’s Manual • 35
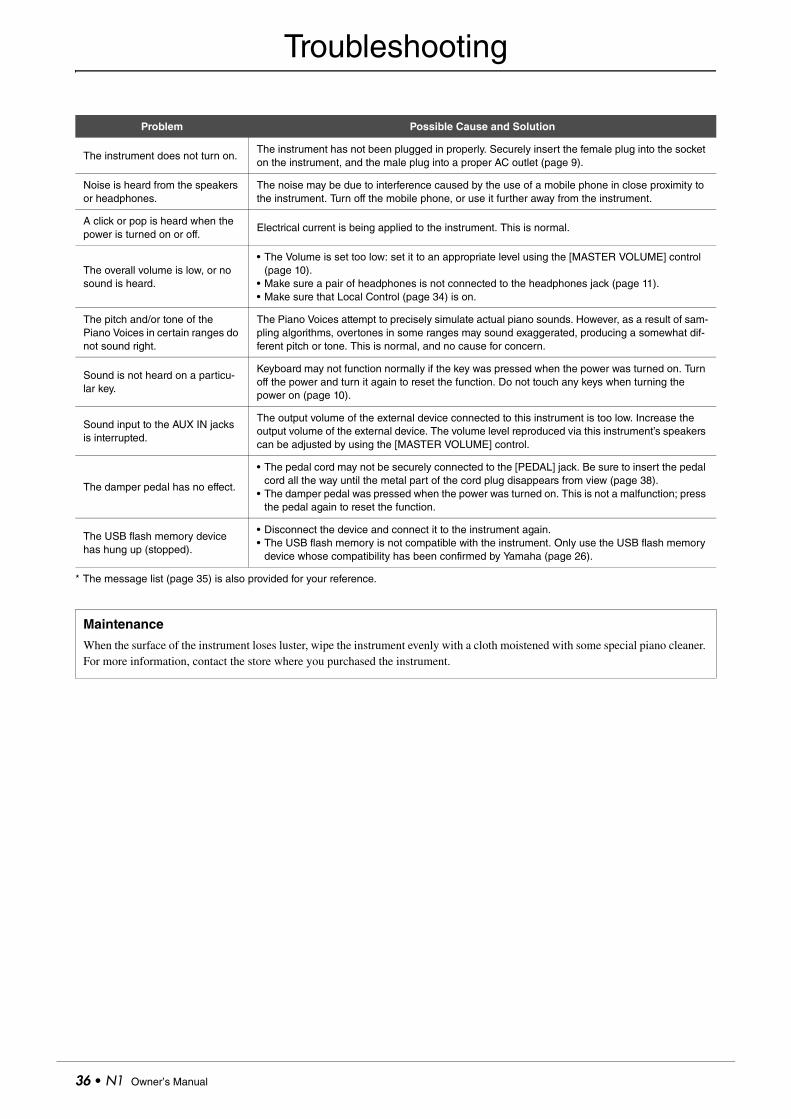
Troubleshooting
* The message list (page 35) is also provided for your reference.
Problem Possible Cause and Solution
The instrument does not turn on.The instrument has not been plugged in properly. Securely insert the female plug into the socket on the instrument, and the male plug into a proper AC outlet (page 9).
Noise is heard from the speakers or headphones.
The noise may be due to interference caused by the use of a mobile phone in close proximity to the instrument. Turn off the mobile phone, or use it further away from the instrument.
A click or pop is heard when the power is turned on or off.
Electrical current is being applied to the instrument. This is normal.
The overall volume is low, or no sound is heard.
• The Volume is set too low: set it to an appropriate level using the [MASTER VOLUME] control (page 10).
• Make sure a pair of headphones is not connected to the headphones jack (page 11).• Make sure that Local Control (page 34) is on.
The pitch and/or tone of the Piano Voices in certain ranges do not sound right.
The Piano Voices attempt to precisely simulate actual piano sounds. However, as a result of sam-pling algorithms, overtones in some ranges may sound exaggerated, producing a somewhat dif-ferent pitch or tone. This is normal, and no cause for concern.
Sound is not heard on a particu-lar key.
Keyboard may not function normally if the key was pressed when the power was turned on. Turn off the power and turn it again to reset the function. Do not touch any keys when turning the power on (page 10).
Sound input to the AUX IN jacks is interrupted.
The output volume of the external device connected to this instrument is too low. Increase the output volume of the external device. The volume level reproduced via this instrument’s speakers can be adjusted by using the [MASTER VOLUME] control.
The damper pedal has no effect.
• The pedal cord may not be securely connected to the [PEDAL] jack. Be sure to insert the pedal cord all the way until the metal part of the cord plug disappears from view (page 38).
• The damper pedal was pressed when the power was turned on. This is not a malfunction; press the pedal again to reset the function.
The USB flash memory device has hung up (stopped).
• Disconnect the device and connect it to the instrument again.• The USB flash memory is not compatible with the instrument. Only use the USB flash memory
device whose compatibility has been confirmed by Yamaha (page 26).
Maintenance
When the surface of the instrument loses luster, wipe the instrument evenly with a cloth moistened with some special piano cleaner. For more information, contact the store where you purchased the instrument.
36 • N1 Owner’s Manual
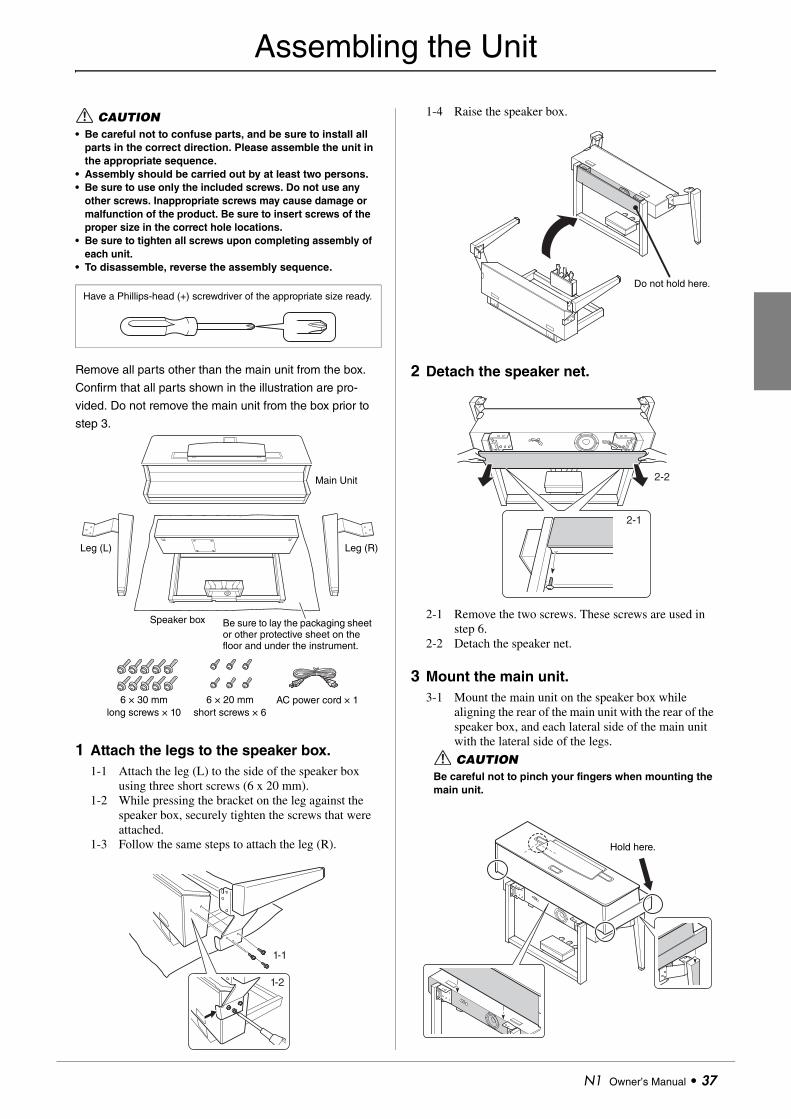
Assembling the Unit
CAUTION• Be careful not to confuse parts, and be sure to install all
parts in the correct direction. Please assemble the unit in the appropriate sequence.
• Assembly should be carried out by at least two persons.• Be sure to use only the included screws. Do not use any
other screws. Inappropriate screws may cause damage or malfunction of the product. Be sure to insert screws of the proper size in the correct hole locations.
• Be sure to tighten all screws upon completing assembly of each unit.
• To disassemble, reverse the assembly sequence.
Remove all parts other than the main unit from the box.
Confirm that all parts shown in the illustration are pro-
vided. Do not remove the main unit from the box prior to
step 3.
1 Attach the legs to the speaker box.1-1 Attach the leg (L) to the side of the speaker box
using three short screws (6 x 20 mm).1-2 While pressing the bracket on the leg against the
speaker box, securely tighten the screws that were attached.
1-3 Follow the same steps to attach the leg (R).
1-4 Raise the speaker box.
2 Detach the speaker net.
2-1 Remove the two screws. These screws are used in step 6.
2-2 Detach the speaker net.
3 Mount the main unit.3-1 Mount the main unit on the speaker box while
aligning the rear of the main unit with the rear of the speaker box, and each lateral side of the main unit with the lateral side of the legs.
Have a Phillips-head (+) screwdriver of the appropriate size ready.
Main Unit
Leg (R)Leg (L)
6 × 30 mm long screws × 10
6 × 20 mm short screws × 6
Speaker box
AC power cord × 1
Be sure to lay the packaging sheet or other protective sheet on the floor and under the instrument.
1-1
1-2
CAUTIONBe careful not to pinch your fingers when mounting the main unit.
Do not hold here.
2-2
2-1
Hold here.
N1 Owner’s Manual • 37
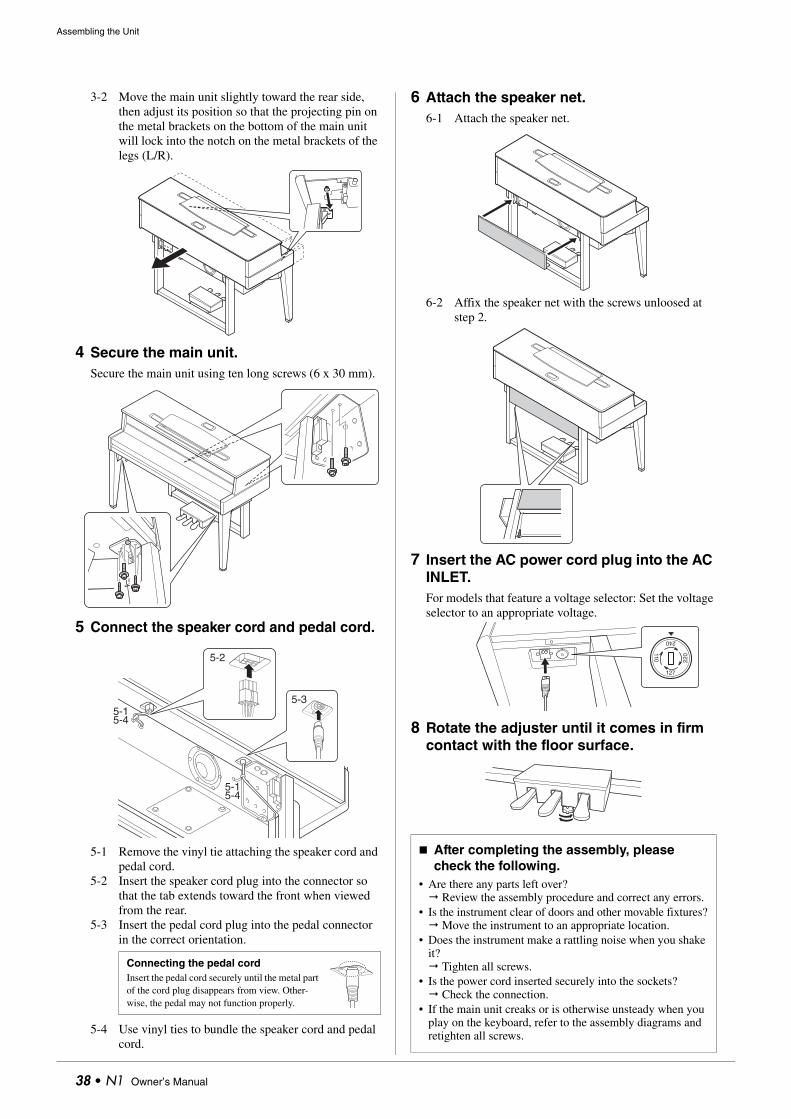
Assembling the Unit
3-2 Move the main unit slightly toward the rear side, then adjust its position so that the projecting pin on the metal brackets on the bottom of the main unit will lock into the notch on the metal brackets of the legs (L/R).
4 Secure the main unit.Secure the main unit using ten long screws (6 x 30 mm).
5 Connect the speaker cord and pedal cord.
5-1 Remove the vinyl tie attaching the speaker cord and pedal cord.
5-2 Insert the speaker cord plug into the connector so that the tab extends toward the front when viewed from the rear.
5-3 Insert the pedal cord plug into the pedal connector in the correct orientation.
5-4 Use vinyl ties to bundle the speaker cord and pedal cord.
6 Attach the speaker net.6-1 Attach the speaker net.
6-2 Affix the speaker net with the screws unloosed at step 2.
7 Insert the AC power cord plug into the AC INLET.For models that feature a voltage selector: Set the voltage selector to an appropriate voltage.
8 Rotate the adjuster until it comes in firm contact with the floor surface.
Connecting the pedal cordInsert the pedal cord securely until the metal part of the cord plug disappears from view. Other-wise, the pedal may not function properly.
5-15-4
5-15-4
5-2
5-3
After completing the assembly, please check the following.
• Are there any parts left over? Review the assembly procedure and correct any errors.
• Is the instrument clear of doors and other movable fixtures? Move the instrument to an appropriate location.
• Does the instrument make a rattling noise when you shake it? Tighten all screws.
• Is the power cord inserted securely into the sockets? Check the connection.
• If the main unit creaks or is otherwise unsteady when you play on the keyboard, refer to the assembly diagrams and retighten all screws.
240
127
110
220
38 • N1 Owner’s Manual
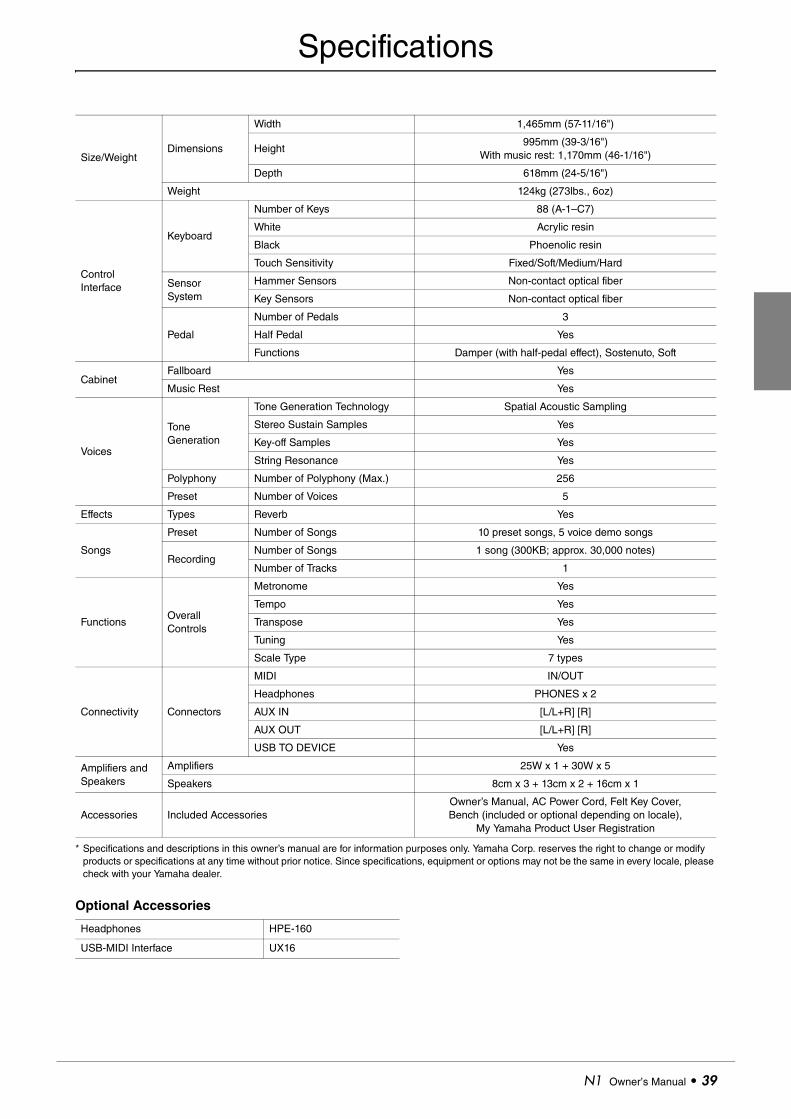
Specifications
* Specifications and descriptions in this owner’s manual are for information purposes only. Yamaha Corp. reserves the right to change or modify products or specifications at any time without prior notice. Since specifications, equipment or options may not be the same in every locale, please check with your Yamaha dealer.
Optional Accessories
Size/WeightDimensions
Width 1,465mm (57-11/16")
Height995mm (39-3/16")
With music rest: 1,170mm (46-1/16")
Depth 618mm (24-5/16")
Weight 124kg (273lbs., 6oz)
Control Interface
Keyboard
Number of Keys 88 (A-1–C7)
White Acrylic resin
Black Phoenolic resin
Touch Sensitivity Fixed/Soft/Medium/Hard
Sensor System
Hammer Sensors Non-contact optical fiber
Key Sensors Non-contact optical fiber
Pedal
Number of Pedals 3
Half Pedal Yes
Functions Damper (with half-pedal effect), Sostenuto, Soft
CabinetFallboard Yes
Music Rest Yes
Voices
Tone Generation
Tone Generation Technology Spatial Acoustic Sampling
Stereo Sustain Samples Yes
Key-off Samples Yes
String Resonance Yes
Polyphony Number of Polyphony (Max.) 256
Preset Number of Voices 5
Effects Types Reverb Yes
Songs
Preset Number of Songs 10 preset songs, 5 voice demo songs
RecordingNumber of Songs 1 song (300KB; approx. 30,000 notes)
Number of Tracks 1
FunctionsOverall Controls
Metronome Yes
Tempo Yes
Transpose Yes
Tuning Yes
Scale Type 7 types
Connectivity Connectors
MIDI IN/OUT
Headphones PHONES x 2
AUX IN [L/L+R] [R]
AUX OUT [L/L+R] [R]
USB TO DEVICE Yes
Amplifiers and Speakers
Amplifiers 25W x 1 + 30W x 5
Speakers 8cm x 3 + 13cm x 2 + 16cm x 1
Accessories Included AccessoriesOwner’s Manual, AC Power Cord, Felt Key Cover, Bench (included or optional depending on locale),
My Yamaha Product User Registration
Headphones HPE-160
USB-MIDI Interface UX16
N1 Owner’s Manual • 39
40 • N1 Owner’s Manual
AAC IN ....................................................................................... 9
Accessories.............................................................................. 5
Assembly ............................................................................... 37
AUX IN ................................................................................. 31
AUX OUT ............................................................................. 32
BBackup ................................................................................... 30
Base Note .............................................................................. 22
CCharacter Code ..................................................................... 27
Connectors............................................................................. 31
DData format ........................................................................... 28
Data List .................................................................................. 5
Demo Song............................................................................ 16
DEMO/SONG ................................................... 13, 16, 24, 27
Display ..................................................................................... 8
FFallboard.................................................................................. 9
Formatting ............................................................................. 29
FUNCTION ....................................................... 20, 21, 22, 34
HHeadphone............................................................................. 11
IInitializing ............................................................................. 30
KKey cover -> Fallboard ......................................................... 9
LLocal Control ........................................................................ 34
MMASTER VOLUME .......................................................... 10
Message List ......................................................................... 35
METRONOME .................................................................... 17
Metronome ............................................................................ 17
MIDI....................................................................................... 33
Music rest .............................................................................. 12
PPedals......................................................................................11
PHONES ................................................................................11
PIANO/VOICE.....................................................................15
Pitch ........................................................................................21
PLAY/STOP.......................................................13, 16, 24, 27
PlaybackDemo Song ....................................................................16
Preset Song ....................................................................13
USB song .......................................................................27
User song .......................................................................24
Power ......................................................................................10
Precautions...............................................................................6
Preset Song ............................................................................13
QQuick Operation Guide .......................................................43
RRecording...............................................................................23
Reverb.....................................................................................19
SSaving .....................................................................................25
Scale........................................................................................22
Specifications ........................................................................39
TTempo.....................................................................................17
Time signature ......................................................................18
Touch Sensitivity..................................................................19
Transposition .........................................................................20
Troubleshooting....................................................................36
Tuning.....................................................................................22
UUSB Song ..............................................................................27
USB storage device ..............................................................26
USB TO DEVICE ................................................................26
User song ...............................................................................24
VVoice.......................................................................................15
Voice Demo...........................................................................16
VolumeMaster Volume .............................................................10
Metronome Volume .....................................................18
Index
Information for Users on Collection and Disposal of Old EquipmentThis symbol on the products, packaging, and/or accompanying documents means that used electrical and electronic products should not be mixed with general household waste.For proper treatment, recovery and recycling of old products, please take them to applicable collection points, in accordance with your national legislation and the Directives 2002/96/EC.
By disposing of these products correctly, you will help to save valuable resources and prevent any potential negative effects on human health and the environment which could otherwise arise from inappropriate waste handling.
For more information about collection and recycling of old products, please contact your local municipality, your waste disposal service or the point of sale where you purchased the items.
[For business users in the European Union]If you wish to discard electrical and electronic equipment, please contact your dealer or supplier for further information.
[Information on Disposal in other Countries outside the European Union]This symbol is only valid in the European Union. If you wish to discard these items, please contact your local authorities or dealer and ask for the correct method of disposal.
(weee_eu)
N1 Owner’s Manual • 41
42
FCC INFORMATION (U.S.A.)
1. IMPORTANT NOTICE: DO NOT MODIFY THISUNIT!This product, when installed as indicated in the instruc-tions contained in this manual, meets FCC requirements. Modifications not expressly approved by Yamaha may void your authority, granted by the FCC, to use the prod-uct.
2. IMPORTANT: When connecting this product to acces-sories and/or another product use only high quality shielded cables. Cable/s supplied with this product MUST be used. Follow all installation instructions. Failure to follow instructions could void your FCC authorization to use this product in the USA.
3. NOTE: This product has been tested and found to com-ply with the requirements listed in FCC Regulations, Part 15 for Class “B” digital devices. Compliance with these requirements provides a reasonable level of assurance that your use of this product in a residential environment will not result in harmful interference with other electronic devices. This equipment generates/uses radio frequen-cies and, if not installed and used according to the instructions found in the users manual, may cause inter-ference harmful to the operation of other electronic
• N1 Owner’s Manual
devices. Compliance with FCC regulations does not guarantee that interference will not occur in all installa-tions. If this product is found to be the source of interfer-ence, which can be determined by turning the unit “OFF” and “ON”, please try to eliminate the problem by using one of the following measures:Relocate either this product or the device that is being affected by the interference. Utilize power outlets that are on different branch (circuit breaker or fuse) circuits or install AC line filter/s.In the case of radio or TV interference, relocate/reorient the antenna. If the antenna lead-in is 300 ohm ribbon lead, change the lead-in to co-axial type cable.If these corrective measures do not produce satisfactory results, please contact the local retailer authorized to dis-tribute this type of product. If you can not locate the appropriate retailer, please contact Yamaha Corporation of America, Electronic Service Division, 6600 Orangetho-rpe Ave, Buena Park, CA90620The above statements apply ONLY to those products dis-tributed by Yamaha Corporation of America or its subsid-iaries.
* This applies only to products distributed by YAMAHA CORPORATION OF AMERICA. (class B)
N1 O
wner’s M
anual•43
Quick Operation Guide / Übersicht über die Kurzbefehle
+6+3+1-2-4-6
0 +2 +4 +5
F# G# A#D#C#
C D E F G A B-5 -3 -1
P.rd
P.AL Usr
P09P07P04P02
P06 P08 P10P01 P03 P05
d04d02
d01 d03
MIN MAX
d05
2 3
1
0
2/4 4/4
6/45/43/40
2 4
531
7 9
10
11
1286
14 16
171513
19
2018 +10
+1-10
-1
U00 +10 U.AL
+1 U.rd-10
-1
z
.⁄0 ⁄1
⁄2 ⁄3 ⁄4 ⁄5
⁄6
x cv b n m,
While holding down the button on the control panel, press one of the corresponding keys shown below to select songs, or set parameters.
z Voice Demo Playback (p.16)x Preset Song Playback (p.14)c Preset Song Playback: all (p.14)v Preset Song Playback: random (p.14)b User Song Playback (p.24)n USB Song Playback (p.27)m USB Song Playback: all (p.27), USB Song Playback: random (p.27)
. Metronome Volume (p.18)⁄0 Metronome Time Signature (p.18)⁄1 Metronome/Song Tempo (p.17)⁄2 Transpose (p.20)⁄3 Base Note (p.22)⁄4 Scale (p.22)⁄5 Local Control on/off (p.34)⁄6 Touch Sensitivity (p.19)
Um Songs auszuwählen oder Parameter einzustellen, halten Sie die Bedienfeldtaste gedrückt und schlagen Sie gleichzeitig eine der betreffenden nachstehend gezeigten Tastaturtasten an.
z Voice-Demo-Wiedergabe (S.16)x Preset-Song-Wiedergabe (S.14)c Preset-Song-Wiedergabe:
alle nacheinander (S.14)v Preset-Song-Wiedergabe:
zufällige Reihenfolge (S.14)b User-Song-Wiedergabe (S.24)n USB-Song-Wiedergabe (S.27)m USB-Song-Wiedergabe:
alle nacheinander (S.27)
, USB-Song-Wiedergabe: zufällige Reihenfolge (S.27)
. Metronomlautstärke (S.18)⁄0 Metronom-Taktart (S.18)⁄1 Metronom-/Song-Tempo (S.17)⁄2 Transponierung (S.20)⁄3 Grundton (S.22)⁄4 Skala (S.22)⁄5 Lokalsteuerung ein/aus (S.34)⁄6 Anschlagempfindlichkeit (S.19)
44•
N1
Ow
ner’s
Man
ual
Guide de fonctionnement rapide / Guía de funcionamiento rápida
+6+3+1-2-4-6
0 +2 +4 +5
F# G# A#D#C#
C D E F G A B-5 -3 -1
P.rd
P.AL Usr
P09P07P04P02
P06 P08 P10P01 P03 P05
d04d02
d01 d03
MIN MAX
d05
2 3
1
0
2/4 4/4
6/45/43/40
2 4
531
7 9
10
11
1286
14 16
171513
19
2018 +10
+1-10
-1
U00 +10 U.AL
+1 U.rd-10
-1
z
.⁄0 ⁄ 1
⁄2 ⁄3 ⁄4 ⁄5
⁄ 6
x cv b n m,
Tout en maintenant les touches du panneau de commande enfoncées, appuyez sur l'une des touches ci-dessous pour sélectionner un morceau ou régler un paramètre.
z Reproduction de voix de démonstration (p. 16)
x Reproduction de morceaux présélectionnés (p. 14)
c Reproduction de morceaux présélectionnés : tous (p. 14)
v Reproduction de morceaux présélectionnés : aléatoire (p. 14)
b Reproduction de morceaux utilisateur (p. 24)
n Reproduction de morceaux USB (p. 27)m Reproduction de morceaux
USB : tous (p. 27)
, Reproduction de morceaux USB : aléatoire (p. 27)
. Volume du métronome (p. 18)⁄0 Type de mesure du métronome (p. 18)⁄1 Tempo du métronome/morceau (p. 17)⁄2 Transposition (p. 20)⁄3 Note fondamentale (p. 22)⁄4 Gamme (p. 22)⁄5 Activation/désactivation
de la commande locale (p. 34)⁄6 Sensibilité au toucher (p. 19)
Pulse el botón del panel de control y, sin soltarlo, pulse cualquiera de las teclas correspon-dientes indicadas a continuación para seleccionar canciones o configurar parámetros.
z Reproducción de demostración de voz (pág.16)
x Reproducción de canción predefinida (pág.14)
c Reproducción de canción predefinida: todas (pág.14)
v Reproducción de canción predefinida: aleatoria (pág.14)
b Reproducción de canción del usuario (pág.24)
n Reproducción de canción USB (pág.27)m Reproducción de canción USB:
todas (pág.27)
, Reproducción de canción USB: aleatoria (pág.27)
. Volumen del metrónomo (pág.18)⁄0 Compás del metrónomo (pág.18)⁄ 1 Tempo de metrónomo/canción (pág.17)⁄2 Transposición (pág.20)⁄3 Nota base (pág.22)⁄4 Escala (pág.22)⁄5 Activación/desactivación
de Local Control (pág.34)⁄6 Sensibilidad a la pulsación (pág.19)
For details of products, please contact your nearest Yamaha representative or the authorized distributor listed below.
Pour plus de détails sur les produits, veuillez-vous adresser à Yamaha ou au distributeur le plus proche de vous figurant dans la liste suivante.
Die Einzelheiten zu Produkten sind bei Ihrer unten aufgeführten Niederlassung und bei Yamaha Vertragshändlern in den jeweiligen Bestimmungsländern erhältlich.
Para detalles sobre productos, contacte su tienda Yamaha más cercana o el distribuidor autorizado que se lista debajo.
THE NETHERLANDS/
CANADAYamaha Canada Music Ltd.135 Milner Avenue, Scarborough, Ontario,M1S 3R1, CanadaTel: 416-298-1311
U.S.A.Yamaha Corporation of America 6600 Orangethorpe Ave., Buena Park, Calif. 90620, U.S.A.Tel: 714-522-9011
MEXICOYamaha de México S.A. de C.V.Calz. Javier Rojo Gómez #1149,Col. Guadalupe del MoralC.P. 09300, México, D.F., MéxicoTel: 55-5804-0600
BRAZILYamaha Musical do Brasil Ltda.Rua Joaquim Floriano, 913 - 4' andar, Itaim Bibi, CEP 04534-013 Sao Paulo, SP. BRAZILTel: 011-3704-1377
ARGENTINAYamaha Music Latin America, S.A. Sucursal de ArgentinaOlga Cossettini 1553, Piso 4 NorteMadero Este-C1107CEKBuenos Aires, ArgentinaTel: 011-4119-7000
PANAMA AND OTHER LATIN AMERICAN COUNTRIES/CARIBBEAN COUNTRIES
Yamaha Music Latin America, S.A.Torre Banco General, Piso 7, Urbanización Marbella, Calle 47 y Aquilino de la Guardia, Ciudad de Panamá, Panamá Tel: +507-269-5311
THE UNITED KINGDOM/IRELANDYamaha Music Europe GmbH (UK)Sherbourne Drive, Tilbrook, Milton Keynes, MK7 8BL, EnglandTel: 01908-366700
GERMANYYamaha Music Europe GmbHSiemensstraße 22-34, 25462 Rellingen, GermanyTel: 04101-3030
SWITZERLAND/LIECHTENSTEINYamaha Music Europe GmbH Branch Switzerland in ZürichSeefeldstrasse 94, 8008 Zürich, SwitzerlandTel: 044-387-8080
AUSTRIAYamaha Music Europe GmbH Branch AustriaSchleiergasse 20, A-1100 Wien, AustriaTel: 01-60203900
CZECH REPUBLIC/HUNGARY/ROMANIA/SLOVAKIA/SLOVENIA
Yamaha Music Europe GmbHBranch Austria (Central Eastern Europe Office)Schleiergasse 20, A-1100 Wien, Austria Tel: 01-602039025
POLAND/LITHUANIA/LATVIA/ESTONIAYamaha Music Europe GmbH Branch Sp.z o.o. Oddzial w Polsceul. 17 Stycznia 56, PL-02-146 Warszawa, PolandTel: 022-500-2925
BULGARIADinacord Bulgaria LTD. Bul.Iskarsko Schose 7 Targowski Zentar Ewropa 1528 Sofia, BulgariaTel: 02-978-20-25
MARTAOlimpus Music Ltd.The Emporium, Level 3, St. Louis Street Msida MSD06Tel: 02133-2144
BELGIUM/LUXEMBOURGYamaha Music Europe Branch BeneluxClarissenhof 5-b, 4133 AB Vianen, The Netherlands Tel: 0347-358 040
FRANCEYamaha Music Europe 7 rue Ambroise Croizat, Zone d'activités Pariest, 77183 Croissy-Beaubourg, FranceTel: 01-64-61-4000
ITALYYamaha Music Europe GmbH, Branch ItalyViale Italia 88, 20020 Lainate (Milano), Italy Tel: 02-935-771
SPAIN/PORTUGALYamaha Music Europe GmbH Ibérica, Sucursal en EspañaCtra. de la Coruna km. 17, 200, 28230 Las Rozas (Madrid), SpainTel: 91-639-8888
GREECEPhilippos Nakas S.A. The Music House147 Skiathou Street, 112-55 Athens, GreeceTel: 01-228 2160
SWEDENYamaha Music Europe GmbH Germany filial ScandinaviaJ. A. Wettergrens Gata 1, Box 30053S-400 43 Göteborg, SwedenTel: 031 89 34 00
DENMARKYamaha Music Europe GmbH, Tyskland – filial DenmarkGeneratorvej 6A, DK-2730 Herlev, DenmarkTel: 44 92 49 00
FINLANDF-Musiikki OyKluuvikatu 6, P.O. Box 260, SF-00101 Helsinki, FinlandTel: 09 618511
NORWAYYamaha Music Europe GmbH Germany - Norwegian BranchGrini Næringspark 1, N-1345 Østerås, Norway Tel: 67 16 77 70
ICELANDSkifan HFSkeifan 17 P.O. Box 8120, IS-128 Reykjavik, IcelandTel: 525 5000
RUSSIAYamaha Music (Russia)Room 37, bld. 7, Kievskaya street, Moscow, 121059, RussiaTel: 495 626 5005
OTHER EUROPEAN COUNTRIESYamaha Music Europe GmbHSiemensstraße 22-34, 25462 Rellingen, GermanyTel: +49-4101-3030
Yamaha Corporation, Asia-Pacific Sales & Marketing GroupNakazawa-cho 10-1, Naka-ku, Hamamatsu, Japan 430-8650Tel: +81-53-460-2313
TURKEY/CYPRUSYamaha Music Europe GmbHSiemensstraße 22-34, 25462 Rellingen, GermanyTel: 04101-3030
OTHER COUNTRIESYamaha Music Gulf FZELOB 16-513, P.O.Box 17328, Jubel Ali, Dubai, United Arab EmiratesTel: +971-4-881-5868
THE PEOPLE’S REPUBLIC OF CHINAYamaha Music & Electronics (China) Co.,Ltd.2F, Yunhedasha, 1818 Xinzha-lu, Jingan-qu, Shanghai, ChinaTel: 021-6247-2211
HONG KONGTom Lee Music Co., Ltd.11/F., Silvercord Tower 1, 30 Canton Road,Tsimshatsui, Kowloon, Hong KongTel: 2737-7688
INDIAYamaha Music India Pvt. Ltd.5F Ambience Corporate Tower Ambience Mall ComplexAmbience Island, NH-8, Gurgaon-122001, Haryana, IndiaTel: 0124-466-5551
INDONESIAPT. Yamaha Musik Indonesia (Distributor) PT. NusantikGedung Yamaha Music Center, Jalan Jend. Gatot Subroto Kav. 4, Jakarta 12930, IndonesiaTel: 021-520-2577
KOREAYamaha Music Korea Ltd.8F, 9F, Dongsung Bldg. 158-9 Samsung-Dong, Kangnam-Gu, Seoul, KoreaTel: 02-3467-3300
MALAYSIAYamaha Music (Malaysia) Sdn., Bhd.Lot 8, Jalan Perbandaran, 47301 Kelana Jaya, Petaling Jaya, Selangor, MalaysiaTel: 03-78030900
PHILIPPINESYupangco Music Corporation339 Gil J. Puyat Avenue, P.O. Box 885 MCPO, Makati, Metro Manila, PhilippinesTel: 819-7551
SINGAPOREYamaha Music (Asia) Pte., Ltd.#03-11 A-Z Building140 Paya Lebor Road, Singapore 409015Tel: 6747-4374
TAIWANYamaha KHS Music Co., Ltd. 3F, #6, Sec.2, Nan Jing E. Rd. Taipei.Taiwan 104, R.O.C.Tel: 02-2511-8688
THAILANDSiam Music Yamaha Co., Ltd.4, 6, 15 and 16th floor, Siam Motors Building, 891/1 Rama 1 Road, Wangmai, Pathumwan, Bangkok 10330, ThailandTel: 02-215-2622
OTHER ASIAN COUNTRIES Yamaha Corporation, Asia-Pacific Sales & Marketing GroupNakazawa-cho 10-1, Naka-ku, Hamamatsu, Japan 430-8650Tel: +81-53-460-2313
AUSTRALIAYamaha Music Australia Pty. Ltd.Level 1, 99 Queensbridge Street, Southbank, Victoria 3006, AustraliaTel: 3-9693-5111
NEW ZEALANDMusic Works LTDP.O.BOX 6246 Wellesley, Auckland 4680, New ZealandTel: 9-634-0099
COUNTRIES AND TRUST TERRITORIES IN PACIFIC OCEAN
Yamaha Corporation,Asia-Pacific Sales & Marketing GroupNakazawa-cho 10-1, Naka-ku, Hamamatsu, Japan 430-8650Tel: +81-53-460-2313
NORTH AMERICA
CENTRAL & SOUTH AMERICA
EUROPE
AFRICA
MIDDLE EAST
ASIA
OCEANIA
DMI1

d/
visionration
-xxC0China
AvantGrand Special Sitehttp://www.avant-grand.com/
Yamaha Home Keyboards Home Pagehttp://music.yamaha.com/homekeyboar
Yamaha Manual Libraryhttp://www.yamaha.co.jp/manual/
U.R.G., Digital Musical Instruments Di© 2010 Yamaha Corpo
109POAPx.xPrinted in
WV41250