engineering notebook - mechatronics - … notebook08.pdfengineering notebook this engineering...
TRANSCRIPT

ENGINEERING NOTEBOOK This Engineering Notebook was developed for use in programs that emphasize S.T.E.M. curriculum. It emulates how Engineers and Architects use an Engineering Notebook. It can be easily adapted as a notebook in a Science class, Technology Education class, or even Math. Engineering Notebooks allow students to practice their writing as well as express their ideas through sketching. Charts and graphs as well as other data are also recorded. Peer review and class discussions can be used, the opportunities are only limited to your imagination. This notebook has a generic design that can be used right off the shelf or be easily edited to fit the unique needs of a school or program. It is our hope that you will try it and then adapt it to your needs. On the first page of the notebook we have outlined how to keep an Engineering Notebook. The Appendix section can be used or adapted. It has samples of some of the Design Briefs we use in class as well as graphic organizers and assignments. We printed this notebook with a cardstock cover (front and back) and staple it down the center. If a student runs out of pages, just as engineers do, they simply tape in another page. All attempts have been made to use royalty free graphics or clip art. We hope you find this document useful, Anna Sumner and David Shabram Westside Middle School Omaha, Nebraska

Engineering Notebook
Firs
t Nam
e
Y
our P
ictu
re
Her
e La
st N
ame
Engi
neer
ing
Not
eboo
k N
umbe
r
Medical Manufacturing Construction Agricultural Energy & Power
Transportation Information & Communication

Rules
Be Safe • Follow Lab Safety Rules • Think before you act • Hand objects – never throw
Be on Time • Coming to class • Handing in work
Follow Instructions • Use the Social Skill by looking at the
person/task, saying o.k. and doing the task immediately
• Keep Following Instructions the entire class time
Cooperate • Use appropriate voice levels • Respect partners – share, take turns,
help, but do your own work • Respect guests and guest teachers • Be mature - monitor your own
behavior • Use your Social Skills
Lab Reminders • To ask a question, use call lights so you can
continue to work – on no call light days, a teacher will come around.
• Keep work area clean and clear. Keep computer pushed under shelf when working on products.
• When using computer nothing touches the screen and only your fingers touch the keyboard. Move computer by the base.
• Use only your period drawer and keep your hands off othersʼ work.
• While waiting in line to use equipment, stand three feet back – behind line – no more than two people in line.
• Sand and file over a waste can.
Partner/Group Reminders
• When someone talks, the other(s) listen. • Allow everyone time to talk. • Use only positive voice tones and
comments – use your manners! • Keep voices at low levels. • Walk your chairs to the group area. • Practice your Employability Skills. (see
back cover)
Daily Instructions
1) Put belongings on shelf (zip trapper) and bring Assignment Notebook (handbag).
2) Use restroom/get a drink/get forms signed, etc. 3) Read and follow instructions on message board. 4) Read make up work if you have been absent. 5) Pick up Engineering Notebook and immediately
follow message board instructions. 6) Sit down, put Name Badge on. If needed pick up
computer - if needed, carefully wash/put safety glasses on (try to keep lenses scratch free).
7) Take inventory and report anything missing or damaged items. Use tools and materials only for the assignment – do not waste materials.
8) Sit with your knees under the workstation, facing the center. If it is more than a step – get up and walk.
9) Talk only with your workstation partner at a low level.
Safety Rules 1) Wear safety glasses at all times while
using tools and equipment. 2) Keep all loose clothing and long hair tied
back. 3) Use tools, materials and equipment for
their designed purpose. 4) Do not talk to a person operating
equipment. 5) Keep your work area clean and clear.
~Safety is EVERYONESʼ responsibility~
Closure Instructions 1) Make Assignment Notebook entry. 2) Restart/shut down – push computer under shelf
or put away. 3) Return everything to its proper place. 4) Take inventory. Report any missing or damaged
items. 5) Brush workstation dust/etc. into waste can – wipe
down if needed. 6) Bookmark Engineering Notebook page with
Name Badge. 7) Sit with your knees under your workstation facing
the center and wait to be dismissed.

Page 1
Notes/Sketches/Questions/Thoughts What is the Purpose of this Notebook? This Engineering Notebook will be used to record your progress, ideas, notes, sketches questions, and thoughts. It is your evidence of the work you have completed. This notebook has all the information you need to be successful in class. It will be kept in the classroom. If you need to take it home, you will need to _______________________________ _____________________________________________. Why an Engineering Notebook? Engineers use an Engineering Notebook to record ideas, inventions, experimentation records, observations, and all work details. Careful attention to how they keep their Engineering Notebook can have a positive impact on the patent outcome of a pending discovery, invention, or innovation. How do I keep an Engineering Notebook?
1. Write NEATLY - anyone should be able to read it. 2. Write down EVERYTHING AS IT HAPPENS.
• If it is not documented, it did not happen • If you write it the next day, it did not happen.
3. Use BOTH sides of a page. 4. Date each entry in chronological order. 5. Clearly separate each dayʼs entry by drawing a line under the entry. 6. Entries should include enough information so someone else could successfully duplicate
your work. • Label figures and sketches. Keep sketches up-to-date – make changes as they
happen. • Use complete sentences – a complete sentence is a complete thought that begins
with capitalization and ends with a form of punctuation. 7. Draw a single line through any errors and enter the correct information nearby . . . it is
o.k. to erase sketches 8. Never leave blank spaces - simply “X” out any blank spots. 9. Never, under any circumstances, remove pages from your notebook. 10. If you add pages, tape or glue it onto a page in your notebook. Clearly label and date it.
Reading a Ruler If you have not memorized what each line on the ruler measures, use the rulers below to help you measure.
16 Division Ruler
1/16 3/16 5/16 7/16 9/16 11/16 13/16 15/16
1/8 3/8 5/8 7/8
1/4
1/2
3/4
8 Division Ruler
1/8 3/8 5/8 7/8
1/4
1/2
3/4
32 Division Ruler
1/16 3/16 5/16 7/16 9/16 11/16 13/16 15/16
1/8 3/8 5/8 7/8
1/4
1/2
3/4
1 3 5 7 9 11 13 15 17 19 21 23 25 27 29 31
32 32 32 32 32 32 32 32 32 32 32 32 32 32 32 32

Page 2
Notes/Sketches/Questions/Thoughts Date:

Page 3
Notes/Sketches/Questions/Thoughts Date:

Page 4
Notes/Sketches/Questions/Thoughts Date:

Page 5
Notes/Sketches/Questions/Thoughts Date:

Page 6
Notes/Sketches/Questions/Thoughts Date:

Page 7
Notes/Sketches/Questions/Thoughts Date:

Page 8
Notes/Sketches/Questions/Thoughts Date:

Page 9
Notes/Sketches/Questions/Thoughts Date:

Page 10
Notes/Sketches/Questions/Thoughts Date:

Page 11
Notes/Sketches/Questions/Thoughts Date:

Page 12
Notes/Sketches/Questions/Thoughts Date:

Page 13
Notes/Sketches/Questions/Thoughts Date:

Page 14
Notes/Sketches/Questions/Thoughts Date:

Page 15
Notes/Sketches/Questions/Thoughts Date:

Page 16
Notes/Sketches/Questions/Thoughts Date:

Page 17
Notes/Sketches/Questions/Thoughts Date:

Page 18
Notes/Sketches/Questions/Thoughts Date:

Page 19
Notes/Sketches/Questions/Thoughts Date:

Page 20
Notes/Sketches/Questions/Thoughts Date:

Appendix A - 1
Design Brief Name Badge
Situation/Challenge In work environments, people need to wear name badges. This may be for identity, security or just so someone can call you by your name. In this class, you will change partners many times. You will be required to wear a name badge, so we can learn each otherʼs names. This badge will remain in the room and be stored in your Engineering Notebook. Criteria and Constraints
• Follow the procedure to complete your name badge. • You may only use the material and tools listed.
Tools, Materials, Equipment
• computer • printer • laminator
• laminating pouch • scissors • badge clip
Procedure
1. Follow this procedure to make your name badge. 2. Identify the problem by re-reading the situation/challenge. 3. You will not be doing any Research for this situation/challenge. 4. The possible solutions have already been Developed for you. 5. The best solution was Selected for you. 6. Construct your name badge by following the steps below.
a. On the desktop of your computer open the name badge template. If it asks, click on OPEN A COPY. It will look like the graphic below:
Your Picture Here
#_______
first name
last name
first name
last nameEngineering Notebook
Number
Next Page

Appendix A - 2
b. Begin with the area below the words “Your Picture Here.”
c. Click on the tool - click above the line and type your first name. d. Click on this name and move it to the correct location.
e. Click the tool - now click on your name - make your first name as big as possible but still fits on the line by changing the size of the text - under FORMAT
f. You may need to make your text box larger by clicking on one of the boxes and dragging it out.
g. Move name close to the line. h. Do the same for your last name. i. Now do the other side of the name badge. j. Type your three-digit Engineering Notebook number, change the text size and move it into
place. k. Have your partner do the steps above. l. Turn on call light (light switch located at your workstation) and have it checked. m. Print the document. n. Cut out name badge and fold in half along “dashed” line. o. Locate your picture and cut it out along the outside edge. p. Return scissors and recycle paper waste in the blue recycle bins. q. Open laminator pouch, place folded name badge - picture UP - towards punched hole. r. Place picture (right side up) on top of picture box and carefully close the laminating pouch. s. Place “closed side” of laminating pouch into laminator - push gently until the machine
rollers take the pouch - it will roll out the back. t. Return to workstation and attach the badge clip to your laminated name badge.
7. Test and Evaluate as well as Communicate who you are by clipping your name badge on your shirt. In this class we will wear our name badge where our heart is located.
8. You will not Redesign or Improve this product. Close your document without saving it. 9. Turn to page 2 in your Engineering notebook and draw a line under your last entry. Then, under
the line, enter todayʼs date. 10. CHOOSE either website below or do both.
a. Begin by opening up the Internet on your computer. b. In your Engineering Notebook, after todayʼs date, practice sketching. Your sketches do
not have to be very big, but you want to be able to add details to it. • Go to bruceblitz.com - select Cartooning Tips - start by selecting the past tip
CARTOON LION - sketch it using the steps. Now choose any of the tips and sketch them.
• Practice basic sketching skills at: http://web.mit.edu/2.009/www/resources/sketchingTutorials.html When the page loads, begin by selecting one of the sketching skills. Follow along with the video sketching in your Engineering Notebook. If you finish one go to the next.
Assessment This assignment will be recorded when it is completed correctly. You will receive and “X” to indicate you completed it. If the computers or printer are not working – a copy of this Design Brief will be provided and you will use the graphic in your Engineering Notebook. Follow the Design brief through step 5 and substitute the paragraph below for steps 5a to 5m.
On the graphic, write your first and last name as large as possible on the lines. Do this on both sides of the name badge. Then write your three-digit Engineering Notebook number on the line. Turn on your call light and have it checked. Now go back to step 5n, and follow the procedure.

Appendix B
DESIG
N
BR
IEF
Situation/ C
hallenge
Procedure Tools,
Materials,
Equipment
Criteria &
C
onstraints
____
____
____
____
____
__
____
____
____
____
____
__
____
____
____
____
____
__
____
____
____
____
____
__
____
____
____
____
____
__
____
____
____
____
____
__
____
____
____
____
____
__
____
____
____
____
____
__
____
____
____
____
____
__
____
____
____
____
____
__
____
____
____
____
____
__
____
____
____
____
____
__
____
____
____
____
____
__
____
____
____
____
____
__
____
____
____
____
____
__
____
____
____
____
____
__
____
____
____
____
____
_
____
____
____
____
____
_
____
____
____
____
____
_
____
____
____
____
____
_
____
____
____
____
____
_
____
____
____
____
____
_
____
____
____
____
____
_
____
____
____
____
____
_
_
____
____
____
____
____
_
____
____
____
____
____
_
____
____
____
____
____
_
____
____
____
____
____
_
____
____
____
____
____
_
____
____
____
____
____
_
____
____
____
____
____
_
____
____
____
____
____
_
_
Read & Follow
IN O
RD
ER
Read & Know
Read &
Think About It
Read & Know

Appendix C
Design Brief Flat to 3D
Situation/Challenge This challenge will help you understand how a flat, 2-Dimensional image can become a 3-Dimensional object. It will also give you background information for solving future challenges. Your challenge is to label a flat image and make it into a 3-Dimensional object. Criteria & Constraints
• Scissors may only be used for cutting the paper. • Use the handle of your scissors and go over the fold lines – this will give you nice creases. See
picture below on how to do this.
• Use very little glue. • Recycle all paper scraps. • Complete this design brief by due date.
Tools, Materials, Equipment
• Computer • Technology: Design and Applications textbook • Scissors – an extra pair of scissors for your partner are located at the Tools, Materials,
Equipment area in your zone • Pencil • Very little glue
Procedure
1. Identify the problem by re-reading the situation/challenge. In your Engineering Notebook, restate the problem in your own words using a complete sentence.
2. Research – a. From your Technology Textbook (index), look up the answer to this question – What is an
isometric drawing? Think . . . How can I put this answer this in my own words? Write your answer in a complete sentence in your Engineering Notebook.
3. The possible solutions have already been Developed for you. 4. Select one of the “boxes” from the Appendix C section (C-1, C-2, C-3, C-4) of your Engineering
Notebook. 5. Construct your box by following the steps below . . .
a. Study the isometric (3D) and flat (2D) drawings b. Label the views (top-front-side-right-left, etc.) on the isometric drawing c. Label the views on the flat drawing – be sure to label the flaps d. On the bottom view of the flat drawing, write your name and Engineering Notebook
number e. Cut your box out of your Engineering Notebook along the dashed lines f. Cut out your box along the solid lines

Appendix C
g. Fold and unfold along each dashed lines – use scissor handle to crease lines h. Fold and shape the box to look like the isometric drawing i. Using very little glue – glue flaps but do not glue the box shut
6. Test and Evaluate your box by comparing it to the criteria and constraints. 7. Communicate the solution by showing the folded box to your partner – point to and name each
of the sides. 8. You will not Redesign or improve this product. 9. When you are finished, in your Engineering Notebook, sketch a 3D object at your workstation. 10. Now sketch what it would like if it were flat. 11. Select another box and repeat steps 5 through 7. 12. You will now design your own box.
a. Think of a PRODUCT and how it could be packaged. b. Write the name of your product in your Engineering Notebook. c. Sketch 3 creative ideas as to how you would package this product. d. From your sketches, select the most creative box and circle it. e. Make a more detailed 3-Dimensional sketch of this box/package. f. Now locate a piece of scrap paper and draw the same box/package flat – include flaps
and dashed lines for folding. g. Cut out your box along the solid lines. h. Fold and unfold along each dashed lines – use scissor handle to crease lines. i. Fold and shape the box to look like the isometric drawing. j. Using very little glue – glue flaps but do not glue the box shut.
13. Now look at other ways to turn Flat images into 3-Dimensional images. Type in one or both of the following addresses:
http://www.papertoys.com/ http://cp.c-ij.com/english/3D-papercraft/index.html – click on Download to view
a. Look at all the 3D object you can make at home, or you could come in and print one after school to make at home.
b. You might want to write these addresses in your Assignment Notebook.
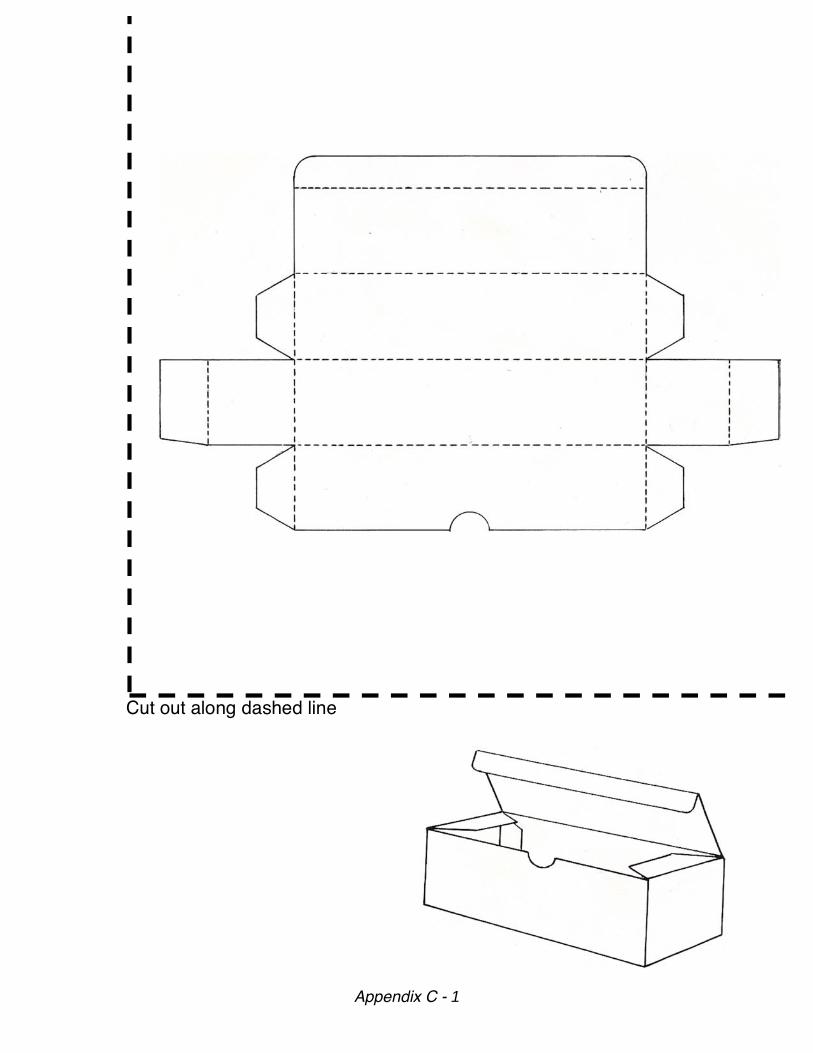
Appendix C - 1
Cut out along dashed line

Appendix C - 2
Cut out along dashed line

Appendix C - 3
Cut out along dashed line

Appendix C - 4
Cut out along dashed line

Design Process Putting Together the Pieces
Directions: Engineers use the Design Process to solve problems. You too can use this process to solve problems, situations and challenges. This activity will help you learn the steps of the process and know happens during each step. Remove this page by cutting along the dashed lines. Cut out the “half” circles. Now, turn to Appendix D-2. With your partner, match the description on the “half” circles to the correct circle in the Design Process. When you feel you have matched the design process with the correct description, make double stick tape and tape it in place.
Appendix D - 1
Does it solve the problem/work? Meet criteria?
best solves the problem – meets
criteria & constraints
use research and creativity to sketch/describe several ideas
restate the problem in your
own words
books – internet databases
experiences use creativity to tell your solution
Could it be better? How?
prototype model

Back of Appendix D - 1
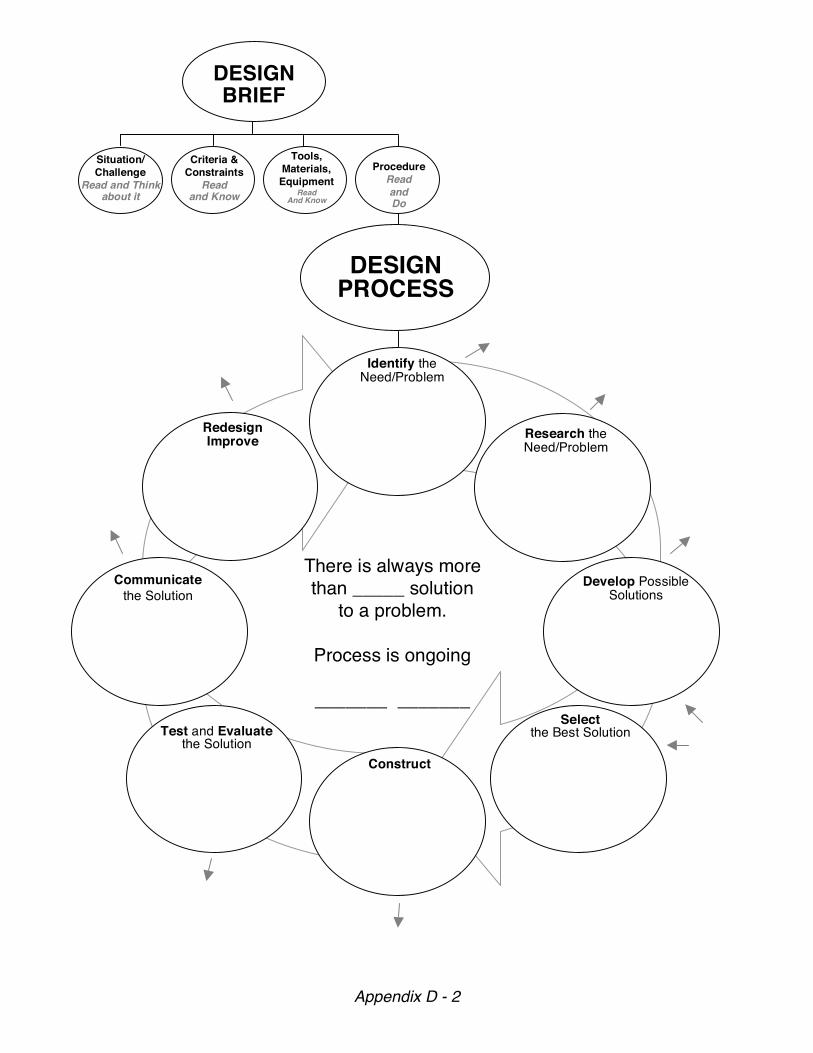
Appendix D - 2
DESIGN BRIEF
There is always more than _____ solution
to a problem.
Process is ongoing
_______ _______
DESIGN PROCESS
Situation/ Challenge
Read and Think about it
Criteria & Constraints
Read and Know
Tools, Materials, Equipment
Read And Know
Procedure Read and Do
Identify the Need/Problem
Research the Need/Problem
Develop Possible Solutions
Redesign Improve
Communicate the Solution
Test and Evaluate the Solution
Construct
Select the Best Solution

Appendix E - 1
Engineering & Technology Notes
Why Study Engineering and Technology?
Process
Technological Literacy
Technological DeviceYOUR EXAMPLE
Tech Device:
Problem it solves:
Problem it creates:
Technology is developed three different ways
Invention Innovation Serendipity
Technology is:
Product
Technological Device
Process
Science is . . . Technology is . . .

Appendix E - 2
Engineers use technology, science, design and the design process to solve their
Situations/Challenges/Problems
Engineering is . . .
Design is . . .
Design Process is . . .
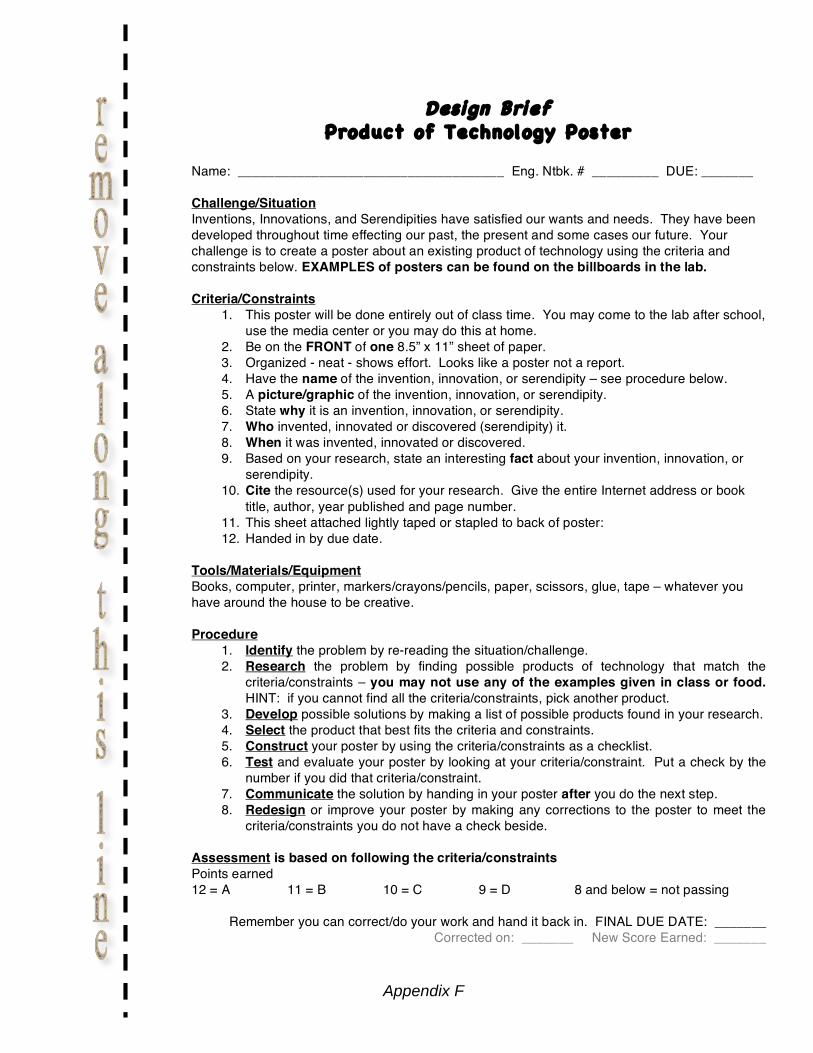
Design Brief Product of Technology Poster
Name: ____________________________________ Eng. Ntbk. # _________ DUE: _______ Challenge/Situation Inventions, Innovations, and Serendipities have satisfied our wants and needs. They have been developed throughout time effecting our past, the present and some cases our future. Your challenge is to create a poster about an existing product of technology using the criteria and constraints below. EXAMPLES of posters can be found on the billboards in the lab. Criteria/Constraints
1. This poster will be done entirely out of class time. You may come to the lab after school, use the media center or you may do this at home.
2. Be on the FRONT of one 8.5” x 11” sheet of paper. 3. Organized - neat - shows effort. Looks like a poster not a report. 4. Have the name of the invention, innovation, or serendipity – see procedure below. 5. A picture/graphic of the invention, innovation, or serendipity. 6. State why it is an invention, innovation, or serendipity. 7. Who invented, innovated or discovered (serendipity) it. 8. When it was invented, innovated or discovered. 9. Based on your research, state an interesting fact about your invention, innovation, or
serendipity. 10. Cite the resource(s) used for your research. Give the entire Internet address or book
title, author, year published and page number. 11. This sheet attached lightly taped or stapled to back of poster: 12. Handed in by due date.
Tools/Materials/Equipment Books, computer, printer, markers/crayons/pencils, paper, scissors, glue, tape – whatever you have around the house to be creative. Procedure
1. Identify the problem by re-reading the situation/challenge. 2. Research the problem by finding possible products of technology that match the
criteria/constraints – you may not use any of the examples given in class or food. HINT: if you cannot find all the criteria/constraints, pick another product.
3. Develop possible solutions by making a list of possible products found in your research. 4. Select the product that best fits the criteria and constraints. 5. Construct your poster by using the criteria/constraints as a checklist. 6. Test and evaluate your poster by looking at your criteria/constraint. Put a check by the
number if you did that criteria/constraint. 7. Communicate the solution by handing in your poster after you do the next step. 8. Redesign or improve your poster by making any corrections to the poster to meet the
criteria/constraints you do not have a check beside. Assessment is based on following the criteria/constraints Points earned 12 = A 11 = B 10 = C 9 = D 8 and below = not passing
Remember you can correct/do your work and hand it back in. FINAL DUE DATE: _______ Corrected on: _______ New Score Earned: _______
Appendix F

Need ideas for your invention/innovation poster? Need some place to start your research?
Look on the E&T webpage of some GOOD websites!
http://invention.smithsonian.org/home/ http://web.mit.edu/invent/invent-main.html
http://www.si.edu/Encyclopedia_SI/Science_and_technology/

Appendix G - 1
Technical Drawings
We Study 2 Types of Technical Drawings
“A ______________ is worth a thousand words.”
A technical drawing includes all the information needed to make a product.
The 3 Views
Length, Height, Width
X = Y = Z =
Scale: ____________________________
Proportion: ________________________
Stock: ____________________________
Object line: ________________________
Hidden line: _______________________
Center line: ________________________
Dimension: ________________________

Appendix G - 2
Isometric Graph Paper
Steps to making an Isometric Drawing: 1. Study the drawing 2. Lightly Sketch X axis 3. Lightly Sketch Y axis 4. Lightly Sketch Z axis 5. Lightly Sketch basic geometric shape
in front view 6. Lightly Sketch in top and side views 7. Lightly Sketch in details beginning
with front view 8. Erase lines not needed 9. Darken object lines

Appendix G - 3
DOOR WEDGE
1. How long is the door wedge? ______________ (length) 2. How wide is the door wedge? ______________ (width) 3. How high is the door wedge at the thick end? ______________ (height) 4. How high is the door wedge at the thin end? ______________ (height) 5. How long is the surface at D? ______________ (length) 6. What is the name of view A? ______________ 7. What is the name of view B? ______________ 8. What is the name of view C? ______________ 9. Make an Isometric drawing of the Door Wedge.

Appendix G - 4
V-BLOCK
1. What is the name of view E? ______________
2. What is the name of view F? ______________
3. What is the name of view G? ______________
4. How wide is the [V] at the top of view E? ______________
5. What does the hidden line at H represent? ______________________________
____________________________________________________________________
6. In order to copy the V-Block, the worker would need a piece of stock:
length ______________ width ______________ height ______________
7. Fill in the correct dimensions for the following:
A. ____________ B. ____________ C. ____________ D. ____________
8. Make an Isometric drawing of the V-Block.

Appendix G - 5
CUTTING BOARD
1. How long is the cutting board? ______________ (length)
2. How wide is the cutting board? ______________ (width)
3. How thick is the cutting board? ______________ (height)
4. What radius is used for the corners? ______________
5. From the center of the hole to the right end of the board it is
____________ inch. What is the diameter of this hole? ______________
6. At what radius would it be in drawing a ½” diameter circle? __________
7. What kind of material is to be used in making this product? ___________
8. Make an Isometric drawing of the Cutting Board.

Appendix G - 6
BOLT PLATE
1. In order to copy this Bolt Plate, you would need a piece of stock:
length ____________ width ____________ height ____________ 2. What is the depth of the drilled holes? ______________ 3. Fill in the correct dimensions for the following:
A. ____________ B. ____________ C. ____________ D. ____________
and E. ____________ 4. Make an Isometric drawing of the Bolt Plate.

Appendix G - 7
U-MAGNET
1. How long is the magnet? ______________ 2. Fill in the correct dimensions for the following:
A. ____________ B. ____________ C. ____________ D. ____________
E. ____________ F. ____________ and G. ____________ 3. On the front view, you will find the dimensions 1 R and 1-7/16” R. What
does the R represent? ______________ 4. Make an Isometric drawing of the U-Magnet.

Key to Employment Todayʼs competitive job market means that minimum acceptable skills are being replaced with higher standards. Among the higher standards are what many call “soft skills” or “employability skills.” An employability skill refers to the cluster of personality traits, social graces, ease with language, personal habits, friendliness, and optimism that mark each of us to varying degrees. People who demonstrate positive skills are generally the people that most employers want to hire. These skills complement hard skills, which are the technical requirements of a job. Employability Skills Work Ethic A motivating belief that employees owe their employer a full day of diligent work including following their supervisorʼs instructions. Is safe. Courtesy The habitual use of “please,” “thank you,” “excuse me,” and “may I help you?” in dealing with customers, supervisors, and colleagues. Use restroom and water fountain at appropriate times. Teamwork The ability to share responsibilities, confer with others, honor commitments, help others do their jobs, and seek help when needed. Follow Instructions and Rules Using your Social Skills to follow the instructions and rules without reminders.
Self-Discipline and Self-Confidence The ability to arrange oneʼs own tasks for best performance, to learn from experience, to ask questions and correct mistakes, and to absorb criticism and direction without feeling defeated, resentful, or insulted. Conformity to Prevailing Norms The ability to govern oneʼs dress, grooming, body language, tone of voice, and vocabulary according to the particular culture of the given workplace. Language Proficiency The ability to speak, read, and writes standard English in a businesslike way. Positive Attitude Upbeat -shows optimism and confidence, shows progress, gain or improvement.
Student Behaviors
Tardies Attendance

In Partnership With: