engi e1112 departmental project report: computer science...
TRANSCRIPT

ENGI E1112 Departmental Project Report:Computer Science/Computer Engineering
Andrew Pope, Will Van Arsdall, Abhinav Mishra
December, 2011
Abstract
The goal of this project was to manipulate the functionalities of a HP 20bBusiness Calculator. The main reason in doing this project was to see howan embedded system, such as this calculator, can be adapted to meet certainneeds that it was not specifically designed for. This calculator was changedfrom a normal business calculator to a RPN (Reverse Polish Notation) cal-culator. The calculator was coded in the C programming language. Thesource code was given for certain functionalities on the calculator, such asprinting on the LCD screen, which were implemented in the rest of the code.Schematics of the calculator keyboard were also used for the design of theprojects. Using basic C knowledge, such as loops, pointers, and stacks, thecode for projects that led to the building of an RPN calculator was writtenwithout the utilization of any C standard libraries. First, code was writtenso that a word could scroll across the screen. The next projects involvedthe reading of the keyboard and the entering and displaying of numbers andoperands. Finally, the RPN calculator code was written by building uponthe code from previous projects. The RPN calculator performs simple arith-metic functions such as addition and multiplication with both negative andpositive integers.
1 IntroductionThe HP 20b Business Calculator (Figure 1) is a standard business calculator mean-ing it contains specal functions for financial applications and for regular arith-metic operations. Some of the functions include an input/memory key for usingthe RPN capabilities of the calculator, Other functions include interest conver-sions and bonds that are especially applicable in finance and business. In these
1

projects, the main goal was manipulating the code and making it more complexwhile building on previous code to make a RPN calculator.
Building certain functions on the calculator required knowledge on the soft-ware and hardware of the calculator. The calculator code was built and manip-ulated in the C programming language, which is one of the more low-level pro-gramming languages. C was used because the calculator barely has any memory(128 kilobytes of flash memory). Typically, in embedded systems, it is better touse languages that do not have a large memory footprint.
Once a knowledge of the fundamentals of C was attained and the first projectwas finished, there was a new attempt to gain a better understanding of the hard-ware of the calculator, especially that of the keyboard so that it could actuallybe used on the calculator. Other important hardware concepts are that in orderto connect to the computer, the calculator uses a USB-JTAG conversion interface(basically USB to Serial Port) and for power, rather than batteries, the calculatoruses a power connecter to draw power from a wall outlet (the interface was cre-ated by Professor Stephen Edwards of Columbia University-Computer ScienceDepartment).
2 User GuideThe calculator has a twelve-digit display, of which ten are active. The keyboardalso has restricted use, and only the number and primary operation (+, -, /, *, =,INPUT) keys are active. A RPN calculator operates in a manner that is very dif-ferent than a normal calculator, as it uses postfix notation instead of infix notation.Infix notation is essentially when the operators are placed between the numbersthat they are performing the operation on. On the other hand, in postfix notation,the operator comes after the numbers. This means that a simple calculation, suchas 2 + 3, is actually represented as 2 3 +. This system is actually quite a bit moreuseful than algebraic notation, as the intermediate results can be checked as oneworks. Math teachers will even use this form of notation to help to show theirpupils how to do calculations [3].
The most important thing to know about RPN is that it uses a LIFO (Last-in-first-out) stack, meaning that each applied operation will only affect the last twonumbers entered. For example, if one was to enter [2] [3] [4] [+], the two itemsremaining would be 2 and 7. If one was to enter a + again, the only remainingnumber would be 9. The use of this system eliminates the need to use PEMDAS,or be concerned about order of operations, as an operation will always affect thelast two items available. This means that calculations such as (3+5)/(4-2) wouldrequire fewer keystrokes to enter, as one wouldn’t have to type parentheses. This
2

Figure 1: The HP 20b (Image courtesy of Professor Edwards)
calculation, for example, would simply be [3] [5] [+] [4] [2] [-] [/]. The keystrokesaving effect is proportional to the complexity of the calculation, as it is dependenton the number of parentheses that won’t need to be typed. This calculator allowsfor the simultaneous storing of up to seven numbers, which is enough to completenearly any calculation with an economical use of keystrokes.
3 Social ImplicationsThe demonstration of the manipulation of the calculator functionality can havesome major social implications. The project has proved that with the necessarymaterials and a relatively simple knowledge of programming, a small device’sfunctions can be changed to something completely different with a very basicknowledge of programming. Moreover, it proves the power of computer science,as, even for such a small device, which has barely any memory and an extremelyweak processor, and without the implementation of any C standard libraries, anRPN calculator was still possible to build using basic C programming tools. Ina social context, people, with a little computer science and programming knowl-edge, can modify simple devices and machines to perform new revolutionary func-tions and make important tools. Essentially, the development of this project hasone major social implication in that it showed us that little devices can be changedto perform new things because of the power of computer science.
3
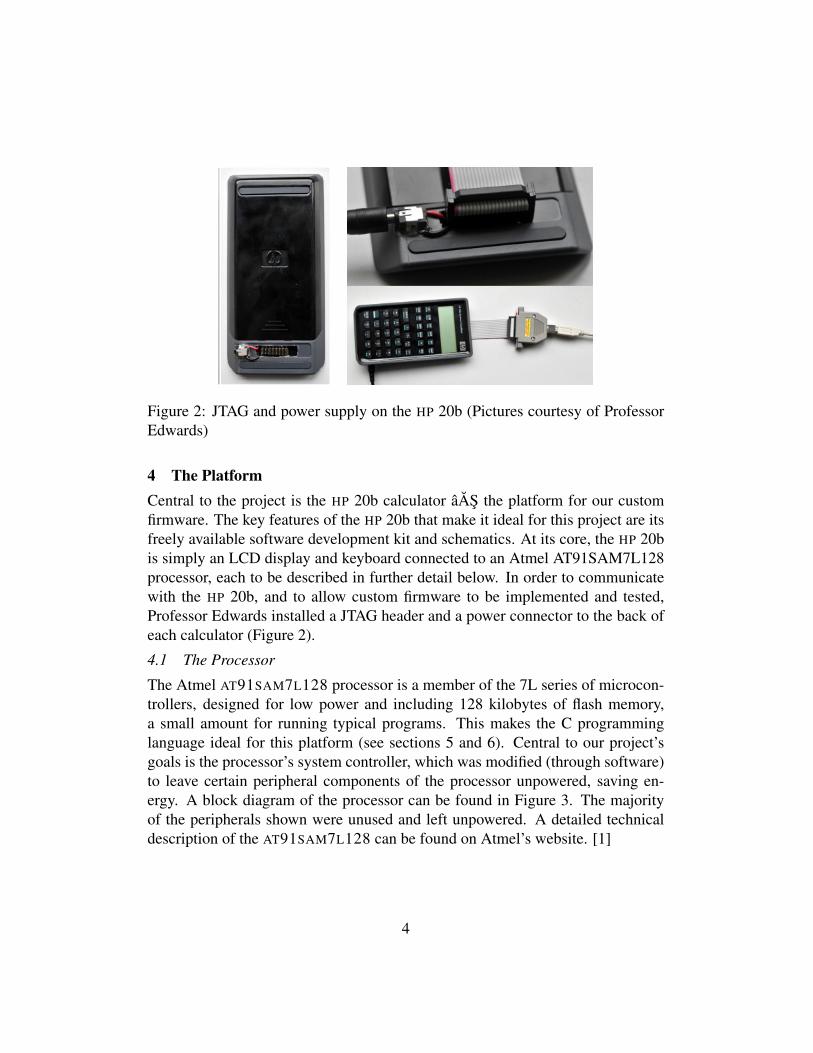
Figure 2: JTAG and power supply on the HP 20b (Pictures courtesy of ProfessorEdwards)
4 The PlatformCentral to the project is the HP 20b calculator âAS the platform for our customfirmware. The key features of the HP 20b that make it ideal for this project are itsfreely available software development kit and schematics. At its core, the HP 20bis simply an LCD display and keyboard connected to an Atmel AT91SAM7L128processor, each to be described in further detail below. In order to communicatewith the HP 20b, and to allow custom firmware to be implemented and tested,Professor Edwards installed a JTAG header and a power connector to the back ofeach calculator (Figure 2).
4.1 The Processor
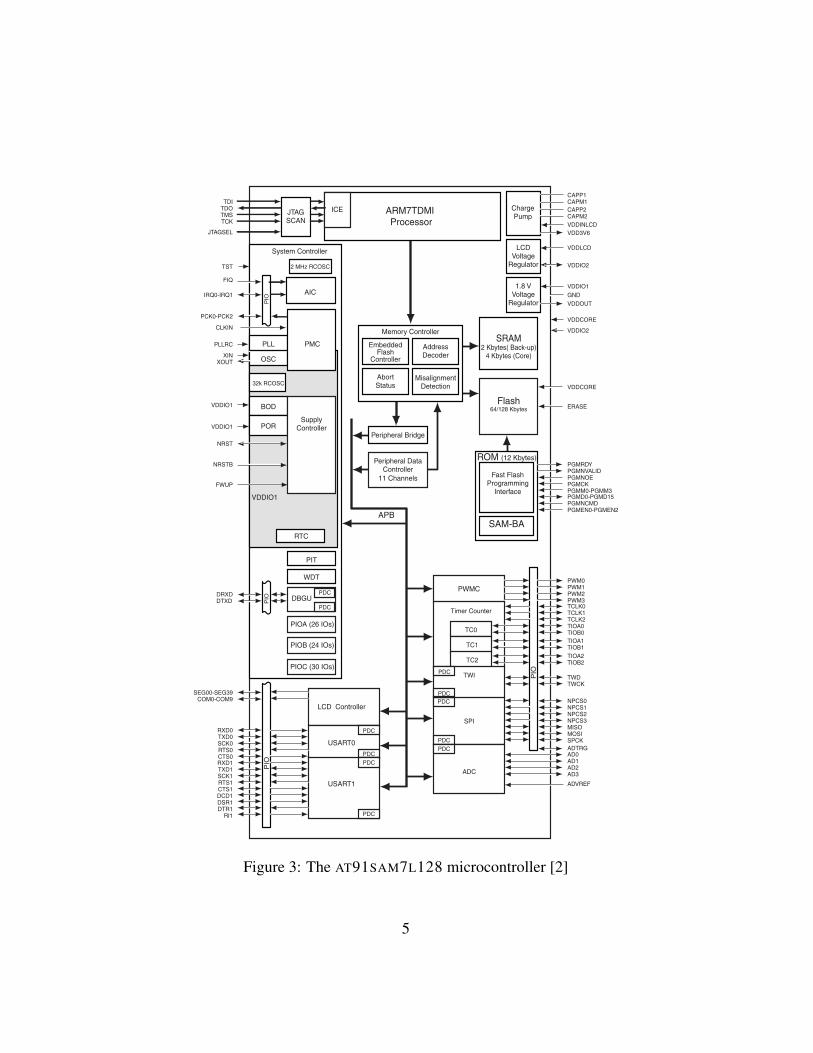
The Atmel AT91SAM7L128 processor is a member of the 7L series of microcon-trollers, designed for low power and including 128 kilobytes of flash memory,a small amount for running typical programs. This makes the C programminglanguage ideal for this platform (see sections 5 and 6). Central to our project’sgoals is the processor’s system controller, which was modified (through software)to leave certain peripheral components of the processor unpowered, saving en-ergy. A block diagram of the processor can be found in Figure 3. The majorityof the peripherals shown were unused and left unpowered. A detailed technicaldescription of the AT91SAM7L128 can be found on Atmel’s website. [1]
4
TDITDOTMSTCK
NRST
FIQ
IRQ0-IRQ1
PCK0-PCK2
PMC
Peripheral Bridge
Peripheral DataController
AIC
PLLSRAM
2 Kbytes( Back-up)4 Kbytes (Core)
ARM7TDMI Processor
ICEJTAGSCAN
JTAGSEL
PIOA (26 IOs)
Timer Counter
NPCS0NPCS1NPCS2NPCS3MISOMOSISPCK
Flash64/128 Kbytes
DRXDDTXD
TCLK0TCLK1TCLK2TIOA0TIOB0
TIOA1TIOB1
TIOA2TIOB2
Memory Controller
AbortStatus
AddressDecoder
MisalignmentDetection
PIO
PIO
APB
EmbeddedFlash
Controller
AD0AD1AD2AD3
ADTRG
11 Channels
PDC
PDC
SPI
PDC
ADC
ADVREF
TC0
TC1
TC2
TWDTWCK
TWI
XINXOUT
VDDIO1
PWMC
PWM0PWM1PWM2PWM3
1.8 VVoltage
RegulatorGND
VDDOUT
VDDCORE
VDDIO1
VDDCORE
Fast FlashProgramming
Interface
ERASE
PGMD0-PGMD15PGMNCMDPGMEN0-PGMEN2
PGMRDYPGMNVALIDPGMNOEPGMCKPGMM0-PGMM3
VDDIO2
TST
DBGUPDC
PDC
PIO
PIT
WDT
System Controller
VDDIO1
SAM-BA
ROM (12 Kbytes)NRSTB
FWUP
PIOB (24 IOs)
LCD Controller
SEG00-SEG39COM0-COM9
PIOC (30 IOs)
32k RCOSC
SupplyControllerPOR
OSC
BOD
2 MHz RCOSC
VDDIO1
RTC
USART0
RXD0TXD0SCK0RTS0CTS0
PDC
PDC
USART1
RXD1TXD1SCK1RTS1CTS1DCD1DSR1DTR1
RI1
PDC
PDC
PIO
PDC
PDC
VDDLCD
CAPP1CAPM1
CAPP2CAPM2
CLKIN
PLLRC
VDD3V6
LCDVoltage
Regulator VDDIO2
ChargePump
VDDINLCD
Figure 3: The AT91SAM7L128 microcontroller [2]
5

Figure 4: Layout of the HP 20b LCD display [2]
4.2 The LCD Display
Critical to our purposes was an understanding of the calculator’s LCD display.Figure 4 shows the layout of the HP 20b’s LCD. The LCD consists of 15 seven-segment displays, 12 large and 3 small, with periods and commas between each,as well as two one-segment negative signs. In the upper right of the LCD thereare displays reserved for specific calculator functions; these were left unused.Professor Edwards provided us with a library of functions to easily manipulatethe calculator’s LCD. These initially included the following: lcd_init(), a func-tion that prepares the LCD to be written to; lcd_put_char7(), a function thatplaces a character A-Z, 0-9 in one of the 15 specified displays; and lcd_print7(),a basic string printing function. Eventually two more functions were added:lcd_print_int(), which prints an integer instead of having to convert it to a charac-ter and lcd_print_int_neg(), which performs the same function except for negativeintegers.
4.3 The Keyboard
As a part of the project we examined the components of various types of key-boards, attempting to understand their underlying mechanisms. Doing this re-vealed a shared basic design between most keyboards, the HP 20b’s is no excep-tion. Keyboards in general work by assigning each key to a point of intersectionin a matrix of wires. When a key is pressed, the two wires that overlap at thatpoint are shorted together, causing low voltage if the line is set to high. In orderto test for a pressed key, a column (or row) is set high, and then each row (or
6

Figure 5: Layout of the HP 20b keyboard [2]
column) is tested. A low row (or column) the represents a pressed key, whose rowand column is known. The HP 20b applies this same principle when testing for apressed key. The keyboard layout is shown in Figure 5, although what is typicallylabeled a row is labeled a column in the schematic, and vice versa. Code for ourimplementation of a key-press testing algorithm can be found in Section 6.2.
5 Software ArchitectureThe final RPN calculator has a variety of interacting pieces of software, each withits own specific purpose and function. The most important of these include theLCD library, the Keyboard library, the Assembly library, and the software to beexecuted (RPN functionality, in our case). Each of them will be described below.
5.1 Assembly Library
The Assembly library is our lowest-level software interface with the HP 20b’s pro-cessor. Functions and resource allocation calls are written in assembly and storedin the HP 20b’s internal memory. Code written in C by developers is compiledinto assembly language and interpreted here, sending low-level instructions to theprocessor and memory. All C libraries and functions are extensions of the func-tionality of the Assembly library.
5.2 LCD Library
The LCD library is a compilation of C functions that can manipulate what is dis-played on the HP 20b’s LCD screen. It serves as a window into the AssemblyLibrary code written in C can use the functions here to easily display characters,
7
integers, and strings on the LCD. Also defined in the LCD Library is the specificcharacter set used; which LCD segments light up for the letter A, for example.5.3 The Keyboard Library
The Keyboard Library is at the core of our software architecture, transfering andinterpreting information when a keyboard key is pressed. Functions in the key-board library give software written in C the ability to collect information about thestate of the keyboard, as well as providing explicit instructions to the processoron how to determine if a key is pressed and which specific key it is. Functionsdefined in this library are called in the highest software layer, and compiled inthe Assembly Library which translates them into keyboard voltages; a detaileddescription of this process and the algorithm used can be found in Section 6.2.5.4 Program Layer
The highest-level software to be run occurs in this layer, which consists of a pro-gram written in C that calls functions from the Keyboard and LCD Libraries. Themajority of user functionality occurs in this layer; in our final example, this con-sisted of RPN functionality. Detailed descriptions of our program’s functionalitycan be found in Section 6.6 Software DetailsIn this section, include cleaned-up listings of every bit of code you wrote for thislab (only include the declarations for the library code I wrote) and explain howthey work, your motivations for them, whether you would do anything differently,etc.6.1 Lab 1: A Scrolling Display (Figure 6)
The first assignment required the design of a system to scroll a message acrossthe calculator LCD screen. Our code consists of primarily of only the main func-tion and a helper function called strlen. Strlen is designed to find the length of astring by iterating through its characters until it reaches a string terminating char-acter. Our main method is composed of two loops, contained within an externalinfinite loop. The first loop iterates through each character of the string, printingit to the screen, and wrapping back to the beginning when it has exceeded thescreen’s width. This allows messages exceeding the screen’s width to be printed,but may cause the message, when read at a given point in time to be unable tobe read properly. A second loop, referred to as a do-nothing loop creates a lag inthe processing that provides a delay, allowing the screen to refresh at a rate thatwill allow for the message to be read. An external counter continually shifts thecolumn to which it starts printing, causing the message to move across the screen.
8

#include "AT91SAM7L128.h"#include "lcd.h"
#define DELAY 50000#define COLUMNS 12
int strlen(const char *s) {int n;for(n=0; *s!=’\0’;s++) n++;return n;
}int main() {lcd_init();
char test[] = "test";int len = 0;len = strlen(test);int x=0;
for(;;) {int i, j;
for(i = x ; i < len + x; i++) {lcd_put_char7(test[i - x],i%COLUMNS); }
while(j<DELAY) { j+=1; }lcd_print7(" ");j=0;x++;
}
return 0;}
Figure 6: Code for Lab 1 Solution
9

#include "AT91SAM7L128.h"#include "lcd.h"#include "keyboard.h"
int main(){lcd_init();
*AT91C_WDTC_WDMR = AT91C_WDTC_WDDIS;
keyboard_init();
for (;;){if(keyboard_key()!=0)lcd_print7(keyboard_key());
elselcd_print7(" ");
}return 0;
}
Figure 7: Code for Lab 2 main.c
6.2 Lab 2: Scanning the Keyboard (Figure 7)
To scan the keyboard, one must begin by setting all of the rows and columns tothe same value. This means that all columns will return the same value when readand any columns that are different will return a slightly different value. In the caseof the calculator, the values were either high (1) or low (0), and when checkingrows, a low value was required for a positive result. To find a match, one must setthe column to low, and then set the row to low, and look for intersections, in whichthe low setting of the row isn’t cancelled out by the high setting of the column.In practice, this is process is carried out through two nested loops, an externalone that iterates through the columns, and an internal one that iterates throughthe rows. At the start of the external loop, the column the loop is on is set high,and then each row is checked to determine if it is low. If a low value is found,the column is set back to high, and the key code of the key pressed is returned.
10

const char keyboard_keys[NUM_COLUMNS][NUM_ROWS] = {{’N’, ’I’, ’P’, ’M’, ’F’, ’A’},{’C’, ’R’, ’V’, ’B’, ’%’, ’L’},{’\r’, ’(’, ’)’, ’~’, ’\b’, 0},{’\v’, ’7’, ’8’, ’9’, ’/’, 0},{’\n’, ’4’, ’5’, ’6’, ’*’, 0},{’S’, ’1’, ’2’, ’3’, ’-’, 0},{ 0, ’0’, ’.’, ’=’, ’+’, 0}};
int keyboard_key(){int i, j;for(i = 0; i < COLUMNS; i++){keyboard_column_low(i);
for(j = 0; j < ROWS; j++){if(!keyboard_row_read(j)){keyboard_column_high(i); //Resets the current columnreturn keys[i][j];
}}
keyboard_column_high(i);}
return 0;}
Figure 8: Code for Lab 2 keyboard.c
11
The key code is obtained by using the number of iterations to match the key to avalue in an array of possible keys. To test that our function worked, we createdan infinite loop in main, and continually called it, printing the result if a key waspressed, and clearing the screen if no key was pressed.
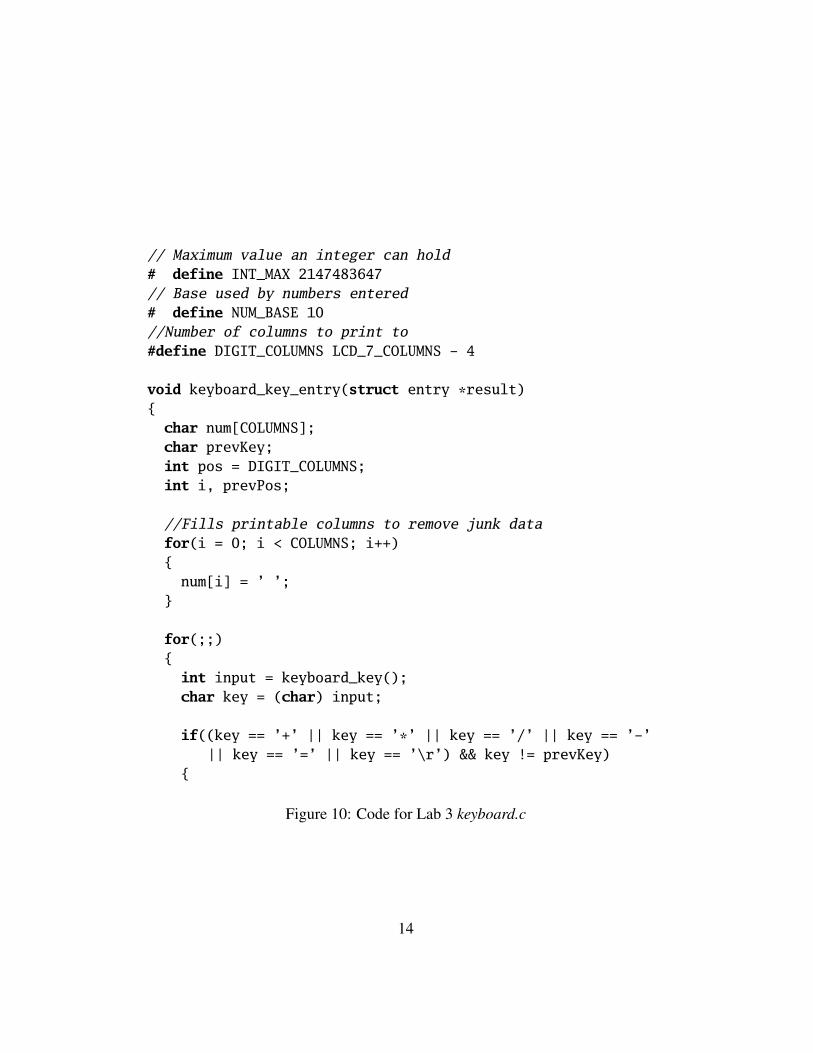
6.3 Lab 3: Entering and Displaying Numbers (Figure 9, Figure 10, Figure 11,Figure 12)
In order to store and display entered numbers, one must create a listener functionthat polls for keyboard activity, and then send the results back to a function forprocessing. We implemented this by having a function continually scanning thekeyboard, and then when a key was pressed, adding the character represented bythe key code to a string containing the numbers entered so far. At the end of eachscanning cycle, the current state of the string was printed, allowing the user to seewhat they had entered. Once the user had finished entering digits, and pressed anoperation, the string was converted into a number and was stored along with theoperation in a struct. A second method called intToStr converted the integer to astring, allowing the final number, and the operation that caused its return, to beprinted to the screen.
In this section, there were several edge cases that needed to be handled, as itwas dealing with user input, which can be relatively unpredictable. One of the firstcases that was encountered was a user pressing an operation without any numberhaving been entered. This case was handled by returning the maximum possibleinteger value, which served as an error message, and as an indicator that no keyhad been pressed. There was also the case of a user entering more digits than couldbe displayed on the screen. This case was handled by discarding any user inputafter the screen had been filled, which seemed to be the best manner of followingthe Principle of Least Surprise.
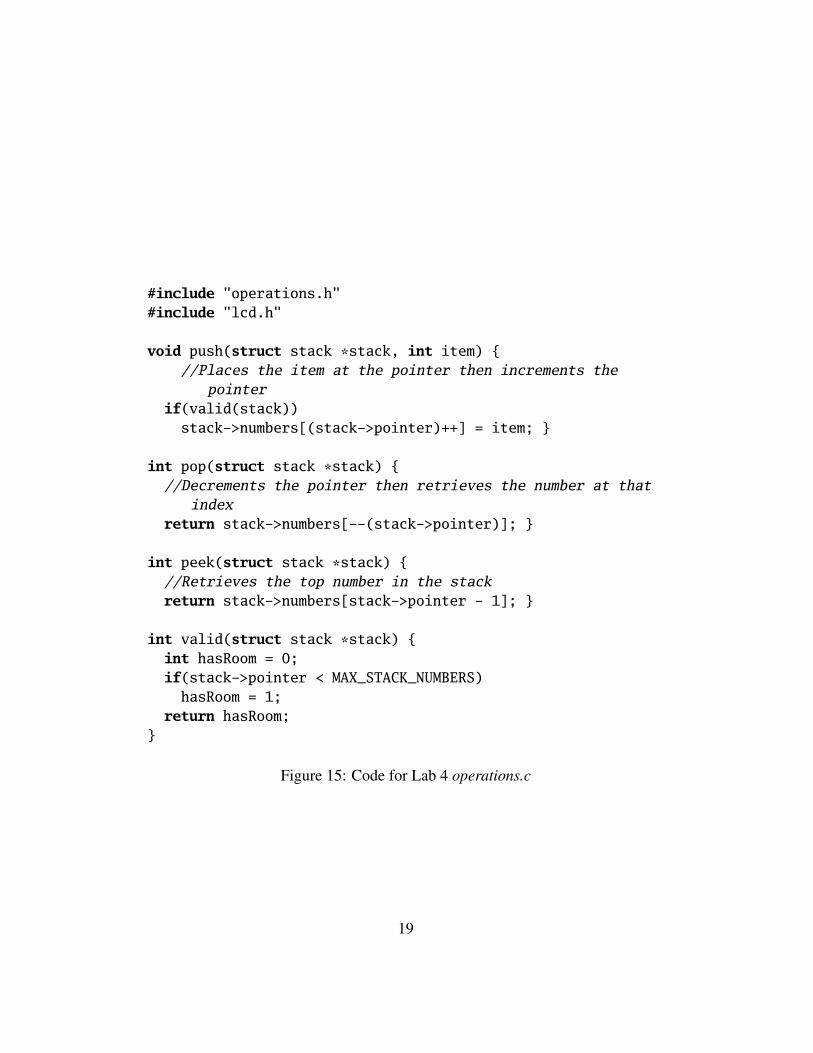
6.4 Lab 4: An RPN Calculator (Figure 13, Figure 14, Figure 15, Figure 16)
The fourth lab combined the code used in the second and third lab to create afully functional RPN calculator. The design that was used was built on top of theexisting code, and added a new library called âAIJoperationsâAI. In the operationslibrary, a LIFO stack was implemented to handle the storage of the entries. Itconsisted of an array and a pointer, with a maximum limit of seven entries, andwas essentially an aggregate data structure. The three primary accessor methodsof a stack, push, pop, and peek were implemented as functions in the operationslibrary, and operations were performed through the utilization of these each ofthese functions. Push places an item at the top of a stack, pop retrieves an item,
12

#include "AT91SAM7L128.h"#include "lcd.h"#include "keyboard.h"
char *intToStr(int number){//Stores string after function returnstatic char str[COLUMNS + 1];int column = LCD_7_COLUMNS - 4;do {str[column--] = number % NUM_BASE + ’0’;number /= NUM_BASE;
} while (number);while (column >= 0) str[column--] = ’ ’;
return str;}
int main(){// Disable the watchdog timer
*AT91C_WDTC_WDMR = AT91C_WDTC_WDDIS;
lcd_init();keyboard_init();
struct entry key;keyboard_key_entry(&key);
char* str = intToStr(key.number);str[COLUMNS - 1] = key.operation;lcd_print7(str);
return 0;}
Figure 9: Code for Lab 3 main.c
13
// Maximum value an integer can hold# define INT_MAX 2147483647// Base used by numbers entered# define NUM_BASE 10//Number of columns to print to#define DIGIT_COLUMNS LCD_7_COLUMNS - 4
void keyboard_key_entry(struct entry *result){char num[COLUMNS];char prevKey;int pos = DIGIT_COLUMNS;int i, prevPos;
//Fills printable columns to remove junk datafor(i = 0; i < COLUMNS; i++){num[i] = ’ ’;
}
for(;;){int input = keyboard_key();char key = (char) input;
if((key == ’+’ || key == ’*’ || key == ’/’ || key == ’-’|| key == ’=’ || key == ’\r’) && key != prevKey)
{
Figure 10: Code for Lab 3 keyboard.c
14

result->operation = key;int val = 0;int numDigits = DIGIT_COLUMNS - pos;if(pos == DIGIT_COLUMNS)val = INT_MAX;
elsefor(i = 1; i <= numDigits; i++) //Iterates through
number string, converting digits to theirnumerical values
{if(num[pos + i] != ’ ’){int digit = num[pos + i] - ’0’;for(j = 0; j < numDigits - i; j++)digit *= NUM_BASE;
val += digit}
}result->number = val;break;
}else if((key >= ’0’ && key <= ’9’) && key != prevKey){
if(pos == DIGIT_COLUMNS) //Places digit in the firstcolumn on first run
{num[pos] = key;prevPos = pos;pos--;
}
Figure 11: Code for Lab 3 keyboard.c (Continued)
15

else{for(i = pos + 1; i <= DIGIT_COLUMNS; i++) //Shifts
numbers on the screen back one space{char temp = num[i];num[i - 1] = temp;
}num[DIGIT_COLUMNS] = key;prevPos = pos;pos--;
}}
//Printingif(pos != DIGIT_COLUMNS && pos != prevPos && input != -1)lcd_print7(num);
//Stores the current key to prevent a single keypress fromentering multiple numbers
if(input == -1)prevKey = ’ ’;
elseprevKey = (char) input;
}}
Figure 12: Code for Lab 3 keyboard.c (Continued)
16

#include "AT91SAM7L128.h"#include "lcd.h"#include "keyboard.h"#include "operations.h"
int main(){struct entry entry;struct stack stack;stack.pointer = 0;// Disable the watchdog timer
*AT91C_WDTC_WDMR = AT91C_WDTC_WDDIS;
lcd_init();keyboard_init();
for(;;){keyboard_get_entry(&entry);if(entry.number != INT_MAX)push(&stack, entry.number);
performOperation(&stack, entry.operation);lcd_print_int(peek(&stack));
}
return 0;}
Figure 13: Code for Lab 4 main.c
17

#ifndef _OPERATIONS_H# define _OPERATIONS_H
# define MAX_STACK_NUMBERS 7
struct stack {int numbers[MAX_STACK_NUMBERS];int pointer;
};
// Adds an item to the top of the stackextern void push(struct stack *, int item);
// Returns the item at the top of the stack, and decrementsthe pointer
extern int pop(struct stack *);
// Returns the item at the top of the stackextern int peek(struct stack *);
// Checks if there is room in the stack (true = room)extern int valid(struct stack *);
// Perform the indicated operation on the stackextern void performOperation(struct stack *, char op);
#endif
Figure 14: Code for Lab 4 operations.c (Continued)
18
#include "operations.h"#include "lcd.h"
void push(struct stack *stack, int item) {//Places the item at the pointer then increments the
pointerif(valid(stack))stack->numbers[(stack->pointer)++] = item; }
int pop(struct stack *stack) {//Decrements the pointer then retrieves the number at that
indexreturn stack->numbers[--(stack->pointer)]; }
int peek(struct stack *stack) {//Retrieves the top number in the stackreturn stack->numbers[stack->pointer - 1]; }
int valid(struct stack *stack) {int hasRoom = 0;if(stack->pointer < MAX_STACK_NUMBERS)hasRoom = 1;
return hasRoom;}
Figure 15: Code for Lab 4 operations.c
19
void performOperation(struct stack *stack, char op) {if(stack->pointer == 1 && valid(stack)) return; //Prevents
operations with one value in stackswitch(op) {case ’+’: {push(stack, pop(stack) + pop(stack));break;
} case ’-’: {int temp = pop(stack);push(stack, pop(stack) - temp);break;
} case ’/’: {int temp = pop(stack);push(stack, pop(stack) / temp);break;
} case ’*’: {push(stack, pop(stack) * pop(stack));break; }
}}
Figure 16: Code for Lab 4 operations.c (Continued)
20

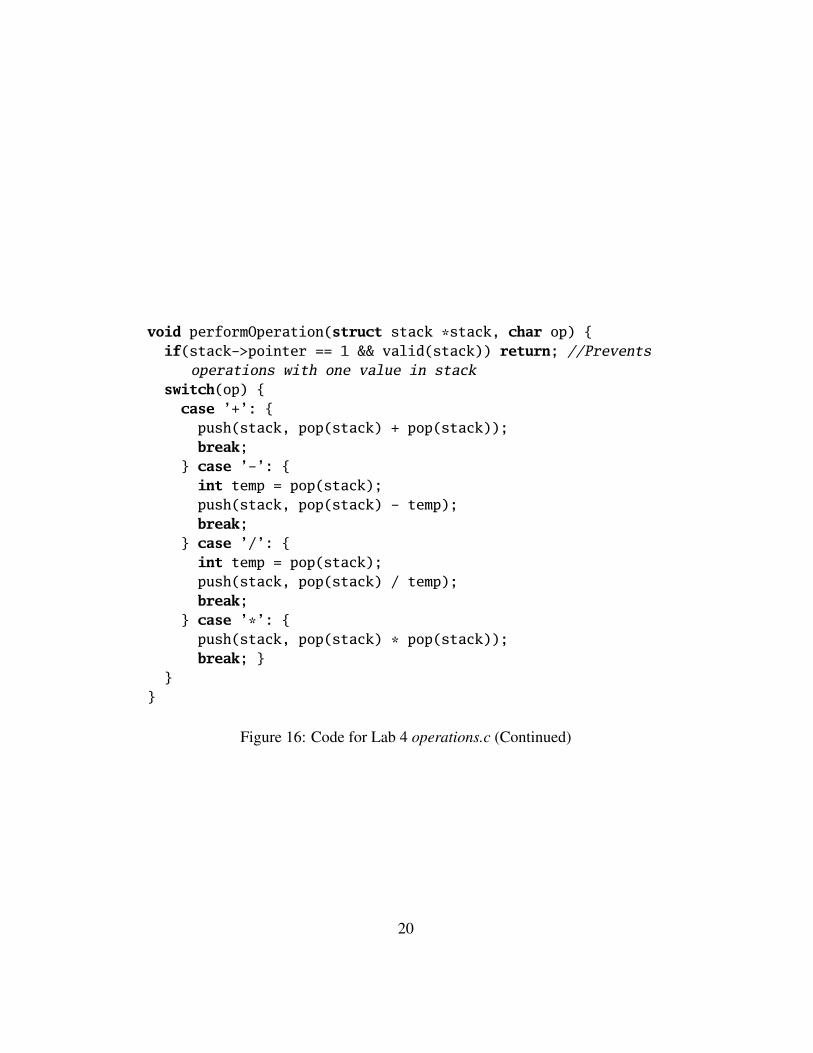
removing it from the top of the stack, and peek retrieves an item, without removingit from the top of the stack. When an operation is given, it, along with the stack,is sent to the operations library, where the top two items of the stack are popped,the operations is performed, then they are pushed back into the stack. The systemthen displays the result of the calculation, or the top item of the stack, in the caseof return, through the peek method.
This implementation is relatively robust, but there were several edge casesthat needed to be accounted for during testing. The most important was handlingoverflow when more than the maximum number of entries were being added to thestack. This was handled by discarding any numbers added once the stack reachedits maximum height. Another key implementation concern was dealing with thepressing of the +/- button, after an operation had been entered, or return had beenpressed. It was determined that if only the item from the stack was present on thescreen, it should be made negative, and if any other numbers had been entered,they should be made negative. There was also the case in which an operationwas entered without a number being pressed, as in 3 4 + +. This was handledby discarding numerical information if the maximum possible integer value wasgiven. It as ensured that this value could never be entered on the calculator byadding a hard cap to the greatest number that could be entered. The final casethat had to be accounted for was if an operation was attempted with nothing in thestack, or if there was only one item in the stack. In either case, no operation wouldbe performed, but if a number were present with the operation, it would be treatedas a return. This meant that both [2] [INPUT] and [2] [+] were valid inputs thatboth would produce the same changes in the stack.
7 Lessons LearnedThis course taught us about the power of embedded programming, and the mean-ing of hacking. It introduced us to a simple device, and showed us that within itsfunctionality there lay endless possibilities for expansion. It illustrated the abil-ity of a system to be completely repurposed with a simple change in its source,and proved to us that many everyday objects are actually computers at their core.But, not everything about this course was focused around the boundless array offunctionality that can be added to everyday objects, there was also a good portionof the course dedicated to showing us the necessity of designing quality software.This portion of the course was perhaps the most beneficial, as it allowed us to seethe errors in our methodology, allowing them to be corrected before becominghabit. However, as in all things, communication was necessary. We learned aboutthe inherent challenges and struggles in programming in a group in which there
21

were a variety of skill levels. We also learned that a seemingly simple problem canhave nearly endless complexity, and an outside perspective is sometimes requiredto point out flaws in the logical structure in which we had become so entangled.Most importantly of all, this course illustrated the potentially dramatic effects ofa populous realizing that everyday devices can be modified to have dramaticallydifferent feature sets, and hopefully ignited a passion within us all to go out andmodify, create, repurpose, and redesign.
8 Criticism of the CourseThis course was one of the most interesting and fun courses that most of us tookthis year, and nearly every aspect was enjoyable. However, there were a couple ofminor gripes that seemed to persist within our group. One member felt that moretime should have been allotted to learning about the C programming language, asit is difficult to pick up for someone without any prior programming experience.Another felt that MatLab may not be necessary for Computer Science majors,as they will learn other more powerful languages later, and will most likely useMathematica if they are planning on doing any work with mathematics. Yet a thirdfelt that a proper development environment, with a simulator might be a better fitfor the type of development we were doing. It would allow for simple errors tobe easily debugged, and may allow for faster course progression. Overall though,criticisms were at a low for Professor Edwards himself, as his teaching style wasquite enjoyable, and often times hilarious.
References[1] At91 arm thumb-based microcontroller preliminary. Online http://www.
atmel.com/dyn/resources/prod_documents/doc6257.pdf, February2008.
[2] Hp-20b developer kit. Online http://h20000.www2.hp.com/bizsupport/TechSupport/SoftwareIndex.jsp?lang=en&cc=us&prodNameId=3732535&prodTypeId=215348&prodSeriesId=3732534&swLang=13&taskId=135&swEnvOID=54, October 2009.
[3] Rpn, an introduction to reverse polish notation. Online http://h41111.www4.hp.com/calculators/uk/en/articles/rpn.html, 2009.
22