energy harvesting for wireless sensor networks
TRANSCRIPT

Energy Harvesting for Wireless Sensor Networks
Vincent Lee
Electrical Engineering and Computer SciencesUniversity of California at Berkeley
Technical Report No. UCB/EECS-2012-141
http://www.eecs.berkeley.edu/Pubs/TechRpts/2012/EECS-2012-141.html
May 30, 2012

Copyright © 2012, by the author(s).All rights reserved.
Permission to make digital or hard copies of all or part of this work forpersonal or classroom use is granted without fee provided that copies arenot made or distributed for profit or commercial advantage and that copiesbear this notice and the full citation on the first page. To copy otherwise, torepublish, to post on servers or to redistribute to lists, requires prior specificpermission.
Acknowledgement
This work is the culmination of a yearlong group project in the Masters ofEngineering program at UC Berkeley. I could not have done it without thecontributions and support of my fellow team members: Ankur Aggarwal,Ameer Ellaboudy, Ryan Moore, and David Stanislowshi. I would also like tothank my advisors, Prof. Kristofer Pister and Prof. Bernhard Boser, for theircontinual support and guidance. I am grateful to graduate students FabienChraim, Igor Izyumin, Mitchell Kline, Travis Massey, Ankur Mehta, andeveryone else in the Kris Pister Group and Bernhard Boser Group foroffering their help in the lab. I would also like to thank the ElectronicSupport Group at UC Berkeley for their assistance.

Energy Harvesting for Wireless Sensor Networks
By
Vincent Chunwan Lee
A master’s project report submitted in partial satisfaction of the
requirements for the degree of
Master of Engineering
in
Engineering – Electrical Engineering and Computer Sciences
in the
Graduate Division
of the
University of California, Berkeley
Committee in charge:
Professor Kristofer S.J. Pister Professor Bernhard E. Boser
Spring 2012

Acknowledgement This work is the culmination of a yearlong group project in the Masters of Engineering
program at UC Berkeley. I could not have done it without the contributions and support of my
fellow team members: Ankur Aggarwal, Ameer Ellaboudy, Ryan Moore, and David
Stanislowshi. Thank you for all the great and fun times we had working together on this project.
Our project turned out to be more successful than we had initially anticipated.
I would like to thank my advisors, Prof. Kristofer Pister and Prof. Bernhard Boser, for
their continual support and guidance. Without their direction, advice, and excellent technical
prowess, our capstone team would still be debugging our project right now. I am very grateful
for their willingness to help and their continual motivation with a can-do attitude. They have
taught me invaluable lessons and perspectives about working with electronics and tackling multi-
faceted challenges.
I am grateful to graduate students Fabien Chraim, Igor Izyumin, Mitchell Kline, Travis
Massey, Ankur Mehta, and everyone else in the Kris Pister Group and Bernhard Boser Group for
offering their help in the lab and troubleshooting our bulky experimental setups. Their advice
and kind actions are exemplary. I would also like to thank the Electronic Support Group at UC
Berkeley for helping us in a bind when we needed spare electronic components or when we just
blew out our last diode. I would especially like to thank Ming Wong and Pete Caragher for their
sense of humor and tirelessness to assist. I am also grateful to Prof. Lee Fleming, Prof. Ikhlaq
Sidhu, Beth Hoch, Celeste Roschuni, Julie McShane, Hazel Palaski, Marcia Steinfeld, Cindy
Chien, Robert Gleeson and everyone at the Fung Institute for their continual support.
Some essential materials used in this work were donated by several companies and
vendors, including Magnetic Shield Corporation, MuShield Company Inc., Cymbet Corporation,
CoilCraft, NXP Semiconductors, and Linear Technology. Thank you for providing the materials
much needed to make this project a success.

In addition, I would like to take this opportunity to thank all of my past and present
teachers, mentors, friends, and colleagues, who have made my experience and life much fuller.
Thank you for their continual encouragement and support. Their friendship is deeply valuable to
me, and their life lessons are worth its weight in gold.
Very dear to my heart, I wish to thank my mom, dad, sister, and everyone else in my
family for their love, care, kindness, patience, and unfailing trust. Thank you for always being
there for me. Mom, though you are not here to see the completion of my degree, I wish to
dedicate it to you. Thank you so much for your unconditional support and love. I would not
have the perseverance to continue facing everyday challenges without your continual and tireless
devotion. Finally, I would like to thank the LORD, my God and Savior, for instilling in me the
faith and courage to live each day by grace. Please take care of my mom in heaven, and thank
You for giving me the strength to complete this degree.

Abstract
As energy demand, electricity prices, and carbon emissions continue to rise, there is a
growing public desire to curb energy consumption to save money and the environment.
According to Energy Star, “the average U.S. household spends $100 per year to power devices
while they are off or in standby mode. On a national basis, standby power accounts for more
than 100 billion kilowatt-hours of annual U.S. electricity consumption and more than $10 billion
in annual energy costs”. Based on PG&E’s analysis, the wasted electricity produces 26.2 million
tons of CO2 each year in the U.S. Unfortunately, information in standard utility bills does not
help consumers identify the culprit appliance responsible for their electricity waste, leaving
consumers guessing for effective ways to save. Consequently, expensive hand-size devices, such
as the Kill-a-Watt and Energy Hub, have emerged to identify energy consumption at a cost of
~$30 per outlet. The high cost and difficult installation of these devices limit their affordability
and popularity. To address these issues, this work proposes a novel, plug-through power
monitoring system for commercial and residential use. Our device detects any appliance’s power
consumption via a current sense transformer, which wirelessly couples magnetic energy from the
appliance to output an electromotive force voltage. The voltage signal is relayed to the analog-
to-digital converter of a GINA radio mote, which wirelessly transmits the data to laptops or
smart phones via the Internet using 6LoWPAN wireless protocol. This allows consumers to
view their real-time power usage from the convenience of their handheld device. The optimized
design cost less than $5 to make and is easily installed, since the device never requires electrical
contact with the outlet but is instead powered by scavenged magnetic energy, which charges an
on-board storage capacitor. For a primary current of 12.6 A RMS, the device harvests up to 7
mW. Compared to present power monitoring devices in the market, our device boasts at least 6
times reduction in size and cost, serving as a disruptive technology to the power monitoring
business while promoting more conscientious electricity usage.

1. Introduction
Electronics and electrical appliances have become an integral part of our everyday lives.
From refrigerators to smart phones, almost every facet of our daily routine depends on some
electrical device. However, we often overlook the amount of electricity required to sustain our
habits. The standard monthly utility bill does not inform us how our daily decisions on
electricity usage directly impact our monetary cost or our effects on the environment. In
particular, the act of leaving electrical devices plugged into the wall outlet is a prime example.
Even when electrical devices are turned off, passive power is continuously dissipated by them as
long as they are connected to the electrical outlet. This leakage power is known as vampire
power or standby power. According to Energy Star, “the average U.S. household spends $100
per year to power devices while they are off or in standby mode. On a national basis, standby
power accounts for more than 100 billion kilowatt-hours of annual U.S. electricity consumption
and more than $10 billion in annual energy costs” [1]. Based on Pacific Gas & Electric’s
(PG&E) analysis, this wasted electricity corresponds to 26.2 million tons of CO2 released each
year in the U.S [2]. If this wasted power can be mitigated or eliminated altogether, consumers
will save significant monetary expenses as well as help improve the environment by reducing
their carbon footprint.
In order for consumers to make informed decisions about electricity usage, they must first
be provided with information or feedback on how their daily habits affect their energy
consumption. Based on a study by the Department of Energy, 71 % of consumers were willing
to change their energy habits when provided with information on their energy usage [3].
However, information in standard utility bills does not help consumers identify the culprit
appliances responsible for their electricity waste. Thus, consumers are left guessing for effective
ways to save.

This work explores approaches for helping consumers make informed choices about
energy usage and recommends best practices to ensure consumers become more energy
conscientious. In particular, this work will review various existing approaches to this problem,
including their respective advantages and disadvantages. Then, this work will propose a novel
solution to monitoring power, based on recent advances in microelectronics and wireless
communication protocols. Technical aspects of the approach will be emphasized, including how
current sense transformers and wireless sensor networks can be combined to achieve energy
saving results. Comparison between the proposed solution and existing options, such as the Kill-
a-Watt, will be made to highlight the advantages of this work. In addition, design
considerations, constraints, and trade-offs of the proposed approach will be examined. Finally,
areas for improvement and future work will be discussed.
2. Background
With continual transistor scaling due to Moore’s law, the same electrical circuit several
years ago can now be reproduced exponentially smaller at lower cost and with orders of
magnitude lower power consumption [4]. Circuits which used to operate on 5 V have been
redesigned to operate on ~1 V [4], allowing electronics to be completely powered by ambient
energy. In addition, wireless communication technology has exploded in growth, allowing
ubiquitous access to the Internet through Wifi, 3G, and other protocols. New wireless protocols
have been pioneered, featuring reduced power consumption and increased robustness. Internet
access is no longer limited to laptops or smart phones. As demonstrated by Dust Networks using
the 6LoWPAN protocol, even the smallest environmental sensors can participate in the “Internet
of Things” paradigm [5]. Combining these two advances establishes the technology necessary to
develop wireless sensor networks completely powered by scavenged energy. Each sensor node

will no longer require the occasional battery replacement, thus extending their mean time
between failures (MTBF).
Moreover, recent advances in wireless sensor technology have found numerous
applications, ranging from mobile devices [6] to temperature sensors in a data center [5] or home
[7], and from moisture sensors in the mountains [5] to current sensing of residential electricity
usage [8]. In particular, this work will focus on power monitoring applications for residential
and commercial use, where each node in the wireless mesh is associated to one outlet in the
building and communicates via the 6LoWPAN wireless protocol.
For the moment, the current landscape for industrial wireless sensor networks consists of
several major standardization efforts, including ZigBee (XBee), WirelessHART, Ultrawideband
(UWB), 6LoWPAN, ISA100, and Bluetooth [9]. However, among those mentioned, only
6LoWPAN utilizes low power wireless IEEE 802.15.4 networks featuring IP version 6 (IPv6)
[9], which allows each wireless sensor node to be assigned an IP address for communication over
the Internet. Consequently, 6LoWPAN wireless sensors can be accessed anywhere in the world
as long as internet connection is available; this cannot be said of sensors using other wireless
protocols.
In terms of advances in energy harvesting, researchers have explored numerous ways to
acquire sufficient power for these wireless networks, including photovoltaic, vibration,
thermoelectric, and electromagnetic sources. A comparison of the various sources and necessary
dimensions to acquire sufficient energy are summarized in Table 1, which is taken from [9].
Among those available, electromagnetic sources seems to be the most promising by allowing for
sufficiently high energy densities.
Researchers at the University of South Carolina have demonstrated 10 mW of scavenged
power from a 5-turn power cord with 13 A RMS of current flow [10]. Their energy scavenger
consists of an open gap transformer core composed of many rolled-up layers of high
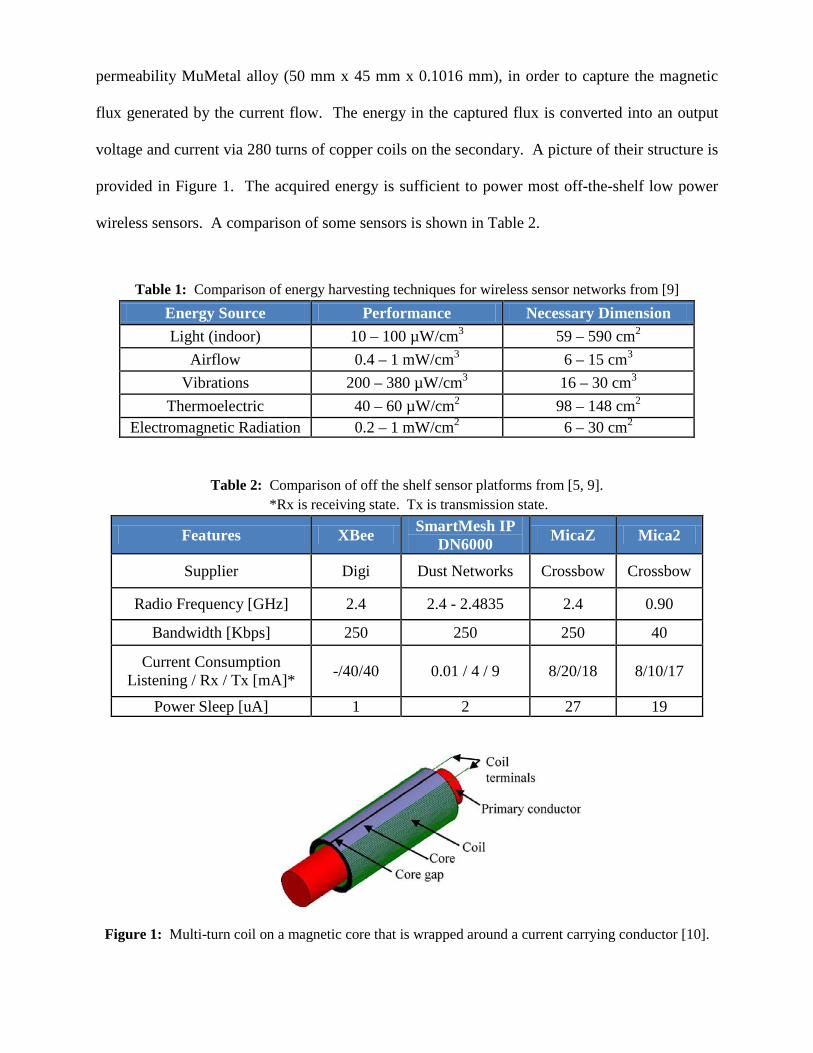
permeability MuMetal alloy (50 mm x 45 mm x 0.1016 mm), in order to capture the magnetic
flux generated by the current flow. The energy in the captured flux is converted into an output
voltage and current via 280 turns of copper coils on the secondary. A picture of their structure is
provided in Figure 1. The acquired energy is sufficient to power most off-the-shelf low power
wireless sensors. A comparison of some sensors is shown in Table 2.
Table 1: Comparison of energy harvesting techniques for wireless sensor networks from [9] Energy Source Performance Necessary Dimension Light (indoor) 10 – 100 µW/cm3 59 – 590 cm2
Airflow 0.4 – 1 mW/cm3 6 – 15 cm3 Vibrations 200 – 380 µW/cm3 16 – 30 cm3
Thermoelectric 40 – 60 µW/cm2 98 – 148 cm2 Electromagnetic Radiation 0.2 – 1 mW/cm2 6 – 30 cm2
Table 2: Comparison of off the shelf sensor platforms from [5, 9]. *Rx is receiving state. Tx is transmission state.
Features XBee SmartMesh IP DN6000 MicaZ Mica2
Supplier Digi Dust Networks Crossbow Crossbow
Radio Frequency [GHz] 2.4 2.4 - 2.4835 2.4 0.90
Bandwidth [Kbps] 250 250 250 40
Current Consumption Listening / Rx / Tx [mA]* -/40/40 0.01 / 4 / 9 8/20/18 8/10/17
Power Sleep [uA] 1 2 27 19
Figure 1: Multi-turn coil on a magnetic core that is wrapped around a current carrying conductor [10].

Unfortunately, several drawbacks of the design in [10] keep this harvester from being
applied to power monitoring systems. For example, their harvester requires access to one of two
wires making up a typical power cord, needs the conducting wire to be wrapped around the
transformer core 5 times, and features a long form factor of 5 cm. This work will show how the
form factor of the core can be reduced, while maintaining high levels of harvested power. By
optimizing the transformer core design, the energy density of the scavenger can be increased
through reducing core loss and decreasing the effect of the magnetizing inductance -- both of
which are dimension dependent [7].
Currently, power monitoring options available to consumers do not employ these recent
advances in wireless sensor networks or energy harvesting technologies. Conventional energy
meter or smart meters [11] used by utility companies are large in size and only report collective
energy usage, preventing consumers from knowing the breakdown of consumption on a per
outlet resolution [11]. Some alternatives are available, but each has their own drawbacks as well.
One alternative is the Kill-a-Watt from P3 International [12] which interfaces between
any appliance and the wall outlet. The device has an LCD display, which indicates real time
energy usage in kilowatt-hours (kW-hr) and has the feature to translate this directly into
monetary cost. However, each Kill-a-Watt retails for $30. In order to characterize energy
consumption of an entire home, each outlet should have one of these devices. For example, if a
home has 10 outlets, then the actual system cost is $300. For electricity usage up to Tier 2, 1
kW-hr cost $0.15 [11]. To recoup the cost of the Kill-a-Watt equipment, one must save 300/0.15
= 2000 kilowatt-hour, which can take roughly 3 years [11]. Other companies, such as Energy
Hub and Powerzoa, offer similarly priced devices with the entire system costing over $300 [13,
14]. A summary of existing approaches to power monitor is provided in Table 3.
In all cases, the present monitoring products are not a viable solution due to large
turnaround times to returns on investment or, in the case of smart meters, limited usefulness of

recorded information. From a technical standpoint, some mentioned devices have limited
wireless capabilities, which do not allow them to be accessible via the internet [12, 13],
hindering the convenience of their use and the report of feedback to users. Fortunately, due to
recent advances in wireless sensor networks, all the mentioned drawbacks in power monitoring
can be overcome, as will be shown.
Table 3: Comparison of power monitoring systems [12, 14, 15].
Cost/outlet Interface Wireless Capability
Ease-of-integration
Kill-a-watt $30 Screen on outlet None Plug into
Powerzoa $30 Browser interface Zigbee Plug into
EnergyHub $40 Central Hub with Screen, Browser Zigbee Plug into
Our goal $10 Browser or smartphone OpenWSN Plug through (non-contact)
3. Methodology and Approach
Two approaches were conducted in creating our proposed power monitoring device. One
approach aimed to use direct electrical connection from the outlet to power the device while the
other aimed to use scavenged energy from magnetic flux. A general overview of the various
modules needed for the power monitoring system is shown in Figure 2. Details on the direct
connection approach can be found in the appendix as this paper primarily focuses on the energy
harvesting solution. Nevertheless, in both approaches, the wireless communication system
consists of the Guidance and Inertial Navigation Assistant (GINA) and GINA base station
(Figure 3). Both are implemented by the Kris Pister Group at UC Berkeley. The board
specifications and schematics are well documented and published on the OpenWSN website
[16]. Though the GINA was built for navigation purposes, it was modified for this work to
sample power consumption at the outlet and wirelessly communicate this information either

directly to the GINA base station or through a mesh network of GINAs before arriving at the
base station. Upon receiving the signals from the GINA, the GINA basestation communicates
via a computer to a remote server that displays the data in real time on a website:
http://mengpowermonitor.appspot.com. This website can be accessed anywhere in the world as
long as internet connection is available, allowing users to monitor their energy usage at will. The
particular website choice is not important in this case, but simply demonstrates a proof-of-
concept for this power monitoring idea.
Figure 2: Overview of power monitoring system. Green: GINA boards used for wireless communication. Orange: Accessories for the GINA board. Breakout is an added board to spread out input/output connection pins. JTAG-adapter is used to program the microcontroller. Gray: Programmer for the GINA board. The actual power sensing is implemented by the current sensor, of which three options are considered. The energy source for the GINA is also listed, of which there are three options as well. Image is taken and modified from [16].
Figure 3: GINA board (left). GINA base station (right).

3.1. Power Supply Requirements
For the energy harvesting approach, all components should be adequately powered by the
scavenger. Thus, specifications for power consumption must be determined. Since the GINA
was not designed for the purposes of this work, many of the components are not necessary. Only
the microcontroller with an analog-to-digital converter (ADC), radio, and antennae are the
essential components. Other components, such as the LEDs, accelerometer, and gyroscope, were
removed to reduce power consumption. As a result, the GINA consumes, on average, 1 mA of
current at 3.3 V. Additional optimization can be done to further reduce power consumption, but
this is beyond the scope of this work. Table 4 lists the power requirement that the energy
scavenger must satisfy in this work. In addition, the power requirement for an optimal design is
included for comparison.
Table 4: Power scavenging requirements for a) the GINA in this work and b) a future well-designed product. Note: GINA’s average current usage is dependent on its communication settings, such as how often it transmits, etc. In this work, the GINA’s setting was made to update the http://mengpowermonitor.appspot.com website every one to two seconds.
Modules Power Consumption for This Work
Power Consumption for Optimized Design
Wireless Mote • Average Usage 1 mA x 3.3 V = 3.3 mW 10 uA x 1.5 V = 15 µW • Sleep Mode 30 uA x 3.3 V = 100 µW 2 uA x 1.5 V = 3 µW
Sensor Circuit • Unity gain amplifier 81 uA x 3 V = 243 µW 0.33 uA x 1.8 V = 0.594 µW
Total Power Consumption 3543 µW 15.6 µW
3.2. Energy Harvesting Approach
The energy harvesting solution consists of the following components: a plug-through
current transformer, 4-stage Cockcroft-Walton (CW) multiplier, storage capacitor in shunt with a
Zener diode, and a unity gain amplifier. The current transformer serves as both the current
sensor and energy harvester. The CW multiplier rectifies the AC output of the transformer and

feeds into the power supply of the GINA and amplifier. The amplifier buffers the transformer’s
AC output from the varying impedance of the GINA’s ADC during switching and also DC
biases the AC output for the ADC. Photograph of the prototype device is shown in Figure 4;
corresponding circuit schematic is shown in Figure 5.
Figure 4: Photograph of prototype power monitoring device, based on energy harvesting approach.
Figure 5: Schematic circuit diagram of power monitoring device, based on energy harvesting approach.
3.3. Design of Transformer Core
The core dimensions design are restricted to the spacing of a typical household 120 VAC
NEMA-5 outlet plug. The thickness of the core must be between 3 to 5 mm to fit between the
plug and outlet. The metal width is determined by the prong separations on the plug, i.e. 5 mm.
In addition, several materials are available for the metal core, including silicon steel (Arnon-5
[17]) or nickel-iron-molybdenum alloy (Co-Netic AA [18] or MuMetal [19]). In general,
materials with higher permeability allow for larger output signal, and those with large saturation

field allows for a wider dynamic range of sensed current [20]. Arnon-5 has a relative
permeability of 6000 with saturation field of 2.0 T, while Co-Netic AA and MuMetal have
relative permeability up to 500,000 and saturation field of 0.8 T. The material properties are
summarized in Figure 6 below.
Three types of transformer cores were built. Two cores were made by cutting up the
metal sheets into “C” and “I” shaped pieces, which were then super-glued together and painted in
insulating varnish. This procedure creates a finite gap at either the butt joint or overlap joint
connection of the metal pieces. The third core is made by gluing together rectangular pieces of
the metal and then drilling an opening in the center using a Dremmel tool. The core was then
painted in varnish. This procedure allows for continuity in the metal but posed a greater
construction challenge due to hardness of the metal and weakness of the glue during drilling. In
all cases, the rough edges of the core was beveled and wrapped in tape to keep them from cutting
the wires during the coil winding process. Either 34 or 30 gauge magnet wire was used to wind
500 secondary coils. Finally, the transformers were characterized using a HP 4192A LF
Impedance Analyzer with the following settings: series circuit configuration, frequency at 60
Hz, and oscillation level at 0.2 V. A summary of the transformers is provided in Table 5 of
Section 4.
Figure 6: Flux density versus magnetizing force graphs for Arnon-5 (left) and Co – Netic AA (right). Note the relative permeability is defined as the flux density divided by magnetizing force.

3.4. Design of CW Multiplier
Due to low AC output voltages from the energy harvester, a Cockcroft-Walton design
was chosen to rectify and boost the output voltage to usable levels. The design is based on the
analysis in [21]. Equations 1 to 4 denote the steps of calculating the optimal capacitance to use
in the CW, when given n stages, frequency f, output current I, and peak voltage Vmax of the AC
signal. In our case, the following parameters were n = 4, f = 60 Hz, I = 1 mA, and Vmax = 1.25
V. Thus, the optimal CW capacitors are 225 uF. However, due to limitations of manufactured
capacitor sizes, 220 uF was used instead.
𝛥𝑉 = 𝐼𝑓𝐶
�23
𝑛3 − 𝑛6
� (1)
𝑉𝑜𝑚𝑎𝑥 = 2𝑛𝑉𝑚𝑎𝑥 − 𝛥𝑉 (2)
𝑛𝑜𝑝𝑡 = �𝑉𝑚𝑎𝑥𝑓𝐶𝐼
, for n ≥ 4 (3)
𝑉𝑜𝑚𝑎𝑥,𝑜𝑝𝑡 = �𝑉𝑚𝑎𝑥𝑓𝐶𝐼
× 43
𝑉𝑚𝑎𝑥 (4)
3.5. Design of Unity Gain Amplifier
The unity gain amplifier is powered by the energy harvester and serves as the interface
between the AC output of the transformer and the ADC input of the GINA, which samples the
waveform for processing. The LT1078 op amp was chosen because it operated at 3 V, which is
very close to the GINA’s voltage supply, and also consumes ~80 uA of supply current. At the
positive input of the LT1078, 10 and 3.3 MOhm resistors were chosen to provide a 1.5 DC bias,
while the 100 nF capacitor reduced effects of ripple in the supply voltage. At the negative input
terminal, two 10 MOhm resistors are chosen to provide unity gain and reduce the current flow
from the transformer’s AC output to the GINA’s ADC. The op amp output sums up the inverted
AC signal from the current sensor with a DC offset of 1.5 V.

4. Results and Discussion
A no-joint transformer core was demonstrated to successfully power the GINA and an
amplifier. With 12 A RMS on the primary, the AC output from the transformer is 470 mV RMS.
The CW open circuit voltage reached 15 V, and a 4.7 V Zener diode was placed in shunt to
clamp the voltage to avoid burning the GINA. With the Zener included, the CW stage can drive
a 3.3 KOhm load with 3.5 V DC and 11 mV RMS ripple, implying a supply current of 1.06 mA
DC and supply power of 3.7 mW. With the CW multiplier, GINA, and amplifier connected
together, the CW output voltage dropped to 3.1 V due to higher than expected current draw, but
the GINA remained operational and was able to wirelessly send packets to the basestation.
Moreover, we found the current sensor’s peak-to-peak voltage to be approximately linear with
primary current.
4.1. Transformer Characteristics
Three types of transformers were created and measured. A summary of their respective
features are provided in Table 5 below. Transformer I was made with 5 layers of Arnon–5 and
features butt joint connections. Transformer II was made with 4 layers of 0.014 inch Co-Netic
AA and features 0.6 x 0.6 cm2 overlap joints. The joint overlap regions are 0.4 cm thick while
other parts of the core are 0.2 cm thick. Transformer III was made of 3 layers of 0.014 inch
MuMetal, stacked together using superglue with the center window cut out using a Dremmel.
Thus, there are no core gaps in this transformer, unlike the previous versions. All three
transformers have ~ 500 turns of 30 or 34 gauge magnet wires.

Figure 7: Three types of transformer designs, from left to right: Version I features Arnon-5 metal with a butt joint connection. Version II features Co-Netic AA metal with an overlapping joint connection. Version III features Co-Netic AA metal made without any joint connections.
Table 5: Summary of Transformer Core Designs. Inductance and resistance were measured using a HP 4192A LF Impedance Analyzer.
Version Structure Design Material Inductance
(mH)
Series Resistance
(Ohm)
Core Periphery (cm x cm)
Core Window
(cm x cm)
Thickness (cm)
Wire Gauge
I Butt Joint
Arnon – 5 5.2 6.1 2.9 x 1.9 1.7 x 0.7 0.3 34
II Overlap Joint
Co-Netic AA 20 9.0 2.3 x 1.9 0.7 x 0.6 0.4 34
III No Joints
Co-Netic AA 185 56.1 2.5 x 2.7 0.5 x 0.7 0.4 30
Explanation for the difference in inductance among the transformers can be attributed to
the core gap size, as analyzed in [20]. The inductance is inversely proportional to the reluctance
of the core metal and the core gap, as illustrated in Figure 8 and described by Equation 5. For
the case where core gap is sufficiently large or the core permeability is high, the core gap
reluctance will dominate and solely determine the performance of the transformer [20]. For the
Arnon-5 material with relative permeability of 6,000 and mean path length of 6 cm, a gap greater
than 10 um is sufficient to dominate the transformer characteristics. Theoretical calculations
indicate transformer I should have inductance value of 0.8 H, but in experiments, the inductance
was found to be 5.2 mH. This is attributed to the joint connections, which also explains why
transformer I and II have lower inductance value than transformer III (i.e the no joint design).
Transformer II has slightly better performance than transformer I because the overlap joint
provided a larger cross sectional area at the gap. Nevertheless, for some unknown reason,
transformer III has an inductance value less than the theoretical 3.4 H, despite using a no joint

design. The theoretical value can be calculated using Equation 5 and 7. Further investigation is
required to understand the cause.
Figure 8: Illustration of a transformer core with a core gap (left). The flux is defined as Φ, Ag is the cross sectional area of the gap, Ac is the cross sectional area of the core, lc is the mean path length of the flux, N is the turns ratio, g is the gap separation, and i is the current. The corresponding magnetic circuit is shown (right), where Rc and Rg are the reluctance of core and core gap, respectively. Images are taken from [20].
𝐿 = 𝑁𝛷𝑖
= 𝑁2 � 1ℛ𝑐+ℛ𝑔
� = 𝑁2 1(µ𝑜 µ𝑐⁄ )𝑙𝑐
µ𝑜𝐴𝑐+ 𝑔
µ𝑜𝐴𝑔
= 𝑁2 µ𝑜𝐴𝑔
𝑔 for 𝑔 ≫ 𝑙𝑐µ𝑜
µ𝑐 (5)
The transformers in all three cases can be modeled as shown in Figure 9, which consists
of an ideal transformer in shunt with a magnetizing inductor Lµ and series resistance Rw [20].
Both of these parasitic components add loss and reduce the power harvested. Table 5 also has a
summary of the measured Lµ and Rw values for each core. The Rconnect represents the connection
resistance between the transformer and rest of the circuit, which is very small and typically 0.1
Ohm.
Figure 9: Model of transformer, including magnetizing inductance Lu, series resistance Rw, and connection resistance Rconnect.

The theoretical values for magnetizing inductance and leakage inductance are given by
Equation 7 and 8, respectively. The leakage inductance was not included in the model because
calculations based on given parameters in Table 5 showed they are much less than 1 mH. As
indicated by Equation 7, larger permeability material results in larger magnetizing inductance.
In the limit where µ approaches infinity, the transformer will become ideal.
𝐿𝑢 = 𝑁2
2𝐴𝑐µ𝑐𝑙𝑐
, 𝐿𝑙 = µ𝑜𝑊𝐿𝑁22
3ℎ (7, 8)
4.2. Performance of Energy Harvester A comparison of the three energy harvesters is presented in Figure 10, which shows the
scavenged power versus load resistance for the three transformer cores mentioned. Notice
transformer III, which utilizes high permeability metal and lacks any core gaps, exhibits the
highest performance in terms of harvested power. From Figure 10, there is an optimal resistance
for peak power due the Maximum Power Transfer Theorem, which states maximum power is
transferred when the load and source impedances are complex conjugates. In our experiments,
we conducted impedance matching using a shunt capacitor for transformer II. The results are
shown in Figure 11. However, the boost in power is not significant because of a low quality
factor, Q = ωL/R = (400) (0.02H) / 9 = 1. The same can be said of transformer III, where Q =
(400) (0.185H) / 56 = 1. Additional results for transformer III is also shown in Figure 11,
indicating scavenged power increases with increasing primary current, as expected from theory
[20]. Note the peak scavenged power reaches ~7 mW when primary current is 12.13 A RMS.
This power level is more than enough to power most wireless motes [9].
Further optimization of the design can provide even higher scavenged power. Notice the
magnetizing inductance Lµ has a N2 dependence while Rw only has an N dependence, where N is
the turns ratio of the transformer. Thus, based on these equations, increasing the number of turns

will provide a higher quality factor. Consequently, impedance matching with higher Q values
will provide a voltage boost larger than 1, resulting in more power.
Figure 10: Comparison of energy harvester performance for three different transformer designs: butt joint, overlap joint and no joint designs. The peak in the curve results from optimal power transfer, when impedances are matched.
Figure 11: Scavenged power versus shunt output capacitance for transformer II. Measurements were performed using a 12.9 Ohm load and primary current of 1 A RMS (left). Scavenged power versus output load resistance for transformer III, performed at various primary current levels. The peak scavenged power slightly exceeds 7 mW for primary current of 12.13 A RMS (right).
Based on the model presented in Figure 9, Advanced Design System (ADS) simulations
were performed and compared to experiments. The model uses measured magnetizing
inductance and series resistance values from transformer III. The model and corresponding

results are shown in Figure 12. Simulation assumes a 60 Hz sinusoidal output voltage from the
transformer, which results in higher calculated power than the measured values. As will be
shown, a sinusoidal output voltage is not a correct assumption due to core saturation [20]. Also,
the output load resistance that yields the peak harvested power is different between simulation
and measurements. The model predicts an optimal load resistance of 86 Ohm, while
measurement indicates 25 Ohms. Further inverstigation is required to understand if this
discrepancy is also due to core saturation.
Figure 12: ADS model used to simulate transformer III (left). Simulation of scavenged power versus output load resistance (right). Notice the simulated scavenged power is higher than the experimentally measured values.
In addition, simulation and experiment results for scavenged power versus primary
current were performed. The simulation setup is shown in Figure 13, and comparison between
simulated and measured results is shown in Figure 14. The discrepancy in scavenged power at
high primary current levels is due to core saturation [20]. Based on the data in Figure 14 and
specifications in Table 4, a primary current of 0.375 A RMS is required to power a state-of-the-
art mote, which consumes 15.6 µW. Since the energy harvester also serves as the current sensor,
the power monitoring device can only sense current levels above 0.375 A RMS, which is still a
useful amount of current to measure. An appliance drawing 0.375 A RMS from a 120 V RMS
outlet is consuming 45 W. A study by the Lawrence Berkeley National Laboratory [22] had
compiled a list of average power consumption for everyday devices. For example, an idle

computer desktop left on consumes 74 W, and a television when on consumes 186 W. Leaving
the computer or television on and walking off to another room is a common habit that can be
monitored with our proposed system. Consequently, users will be able to access this information
and correct their behavior.
Furthermore, as transistors continue to scale due to Moore’s Law and lower supply
currents are needed, lower primary currents will be required to power the mote. Moreover, the
results in Figure 14 are based on measurements from transformer III, which still has room for
improvement.
Figure 13: ADS model of the energy harvester used to generate results in Figure 14.
Figure 14: Measured and simulated results of scavenged power versus primary current for transformer III. Results use constant load resistances: 86 Ohm for simulation and 25 Ohm for measurements because each respectively maximized the harvested power for the simulated and measured cases. The discrepancy between 86 and 25 Ohm requires further investigation as previously mentioned. The left and right charts show the same data, but are plotted on different scales for clarity.

4.3. Performance of Current Sensor
As a current sensor, transformer III exhibits linear behavior for primary current levels
below 5 A RMS: the peak-to-peak output voltage linearly increases with primary current (Figure
15, left). However, at higher current levels, the output voltage no longer follows a linear tread
due to core saturation [20] and a non-sinusoidal output voltage results, like the one in Figure 15
(right). Consequently, the actual power is no longer quadratically depended on (Vpp / (2√2))2 as
assumed for sinusoidal waveforms, and true RMS values must be used in calculating power,
which was done in this study. At higher primary current levels, the protruding voltage peaks
become taller and narrower. In essence, the waveform shown in Figure 15 carries less power
compared to a sinusoidal waveform with the same peak-to-peak voltage [20].
Figure 15: Peak-to-peak output voltage of transformer III versus primary current for various output loads (left). Output voltage waveform for transformer III exhibiting core saturation, when primary current is 6.31 A RMS (right).
4.4. Cost and Size of Power Monitoring Device
Overall, we achieved our goal by creating a smaller and lower cost power monitor device.
The protoboard with on-board components is 0.7 x 3 x 1.5 cubic inches, while the Kill-a-Watt is
5.12 x 2.38 x 1.63 cubic inches [12]. Our prototype device boasts at least 6 times reduction in
size. Of course, as a product, our board must be packaged to cover exposed components,
possibly doubling its size in the worst case. However, even in that scenario, our prototype
device is still 3 times smaller than the Kill-a-Watt and has wireless internet capabilities that no

other monitoring systems currently possess. Moreover, the cost to create our device is under $5,
which is more than 6 times lower cost than the retail price of the Kill-a-Watt or Energy Hub
solutions. With reduced cost due to economy of scale, some added cost from quality control, and
a mark-up price for a profit margin, the overall product can still be sold for around $10 [23].
However, the cost and size can be further reduced by several folds if surface mount
components are used instead. Table 6 summarizes the estimated cost in producing the prototype
as well as the projected cost of the optimized final product. The prototype uses through-hole
components while the final product should use surface mount elements. Projections for the final
product is $2.26 and 2.5 x 2.7 x 1 cubic centimeter, equivalent to 10 times reduction in price and
45 times reduction in size compared to current market solutions.
Table 6: Estimated cost of energy harvesting power monitoring device, excluding cost of GINA.
Prototype used through-hole components. Final product should use surface mounts. [24, 25]
Component Quantity Prototype:
Cost/Component (Through Hole, $)
Prototype: Lump Cost ($)
10 MOhm Resistors 3 0.004 0.012 3.3 MOhm Resistor 1 0.004 0.004 220 uF Capacitors 9 0.038 0.342 100 nF Capacitor 1 0.030 0.030 1N5817 Schottky 8 0.054 0.432 NTE5069A Zener 1 1.070 1.070 LT1078 Op-amp 1 2.800 2.800
Magnetic Core & Wire 1 0.3 0.3 Total Cost $4.99
Component Quantity Final Product:
Cost/Component (Surface Mount, $)
Final Product: Lump Cost ($)
10 MOhm Resistors 3 0.0013 0.0039 3.3 MOhm Resistor 1 0.0013 0.0013 220 uF Capacitors 9 0.0738 0.6642 100 nF Capacitor 1 0.0555 0.0555
MMBD717LT1G Schottky 8 0.03837 0.30696 BZB84-C4V7 Zener 1 0.03995 0.03995
ISL28194FHZ-T7 Op-amp 1 0.88750 0.88750 Magnetic Core & Wire 1 0.3 0.3
Total Cost $ 2.26

Conclusion
A novel power monitoring device has been proposed, featuring real-time energy
management from any internet-connected computer or smartphone. The monitoring device
readily connects to any standard US wall socket or plug and consists of a GINA board interfaced
with a current sensor and power source. Power consumption information is relayed via a
6LoWPAN mesh network of identical devices to a GINA basestation, which then wirelessly
transfers the data to a remote computer server. At any time, residential or commercial users can
retrieve aggregate data on their power usage by simply connecting to the server over the internet.
The optimized system is projected to be at least 10 times lower cost and 45 times smaller size,
compared to present solutions in the market.
The proposed device features an energy harvester capable of scavenging up to ~7 mW of
power with 12.6 A RMS of current flowing through the monitored load. Approximately, three
milli-watts are enough to supply the GINA and even less for other lower power motes. Further
investigation into higher permeability materials and transformer core geometry is necessary to
increase the harvested power level. Overall, based on the proposed solution, the entire mesh
sensor network does not require battery replacement, increasing the mean time between failures.
Though the GINA board was used as a proof of concept, it is not necessarily the optimal
board for use in this application. Among the many components on the GINA, only the
microcontroller with ADC, radio, and antennae are required. Future work includes designing a
lower power communication board capable of being completely powered by scavenged energy.
Additional investigation in network robustness is needed for insights into the quantity and
placement of these devices within an average American home.
Overall, this work has illustrated the feasibility of implementing a wireless power
monitoring system capable of delivering real-time energy usage data to any internet-enabled
computer or smartphone. By closing the feedback loop between our daily habits and energy

usage, this work is a big leap forward in helping users become more aware of their direct
environmental and economic impact. From being more informed, anyone can make sounder
energy choices to better their livelihood and planet.
Appendix
A1. Direct Connection Approach
The direct connection design includes a one stage Cockcroft–Walton rectifier with Zener
diode in shunt with the output capacitor, an air core current sensing inductor, and an amplifier
interfaced to the ADC of the GINA. The circuit schematic is shown in Figure 16. Comparison of
PCB design and final board is shown in Figure 17. The one-stage CW provides a power supply
of 4.2 V and 1.4 mA, with less than 20 mV RMS ripple. Several options were considered when
implementing the current sensor: an air core inductor with an amplified output or a Sentron
Linear 1-Axis Hall IC, CSA-1VG magnetometer. In both cases, the output of these sensors is
converted to voltage and sampled by the ADC of the GINA. The specifications for the ADC are
documented at [16]. The magnetometer was not chosen in the final design because it typically
requires too much supply power: 11 mA supply current and 5 V supply voltage, resulting in 55
mW power consumption. Alternatively, the chosen candidate is the air core inductor. However,
the inductor’s output voltage was too low to be sampled by the ADC on the GINA. Thus, it
requires a low power amplifier, such as LT1078, to gain up the signal. The LT1078 uses a 3 V
supply and consumes ~80 uA supply current. A trans-impedance amplifier circuit configuration
was chosen for the inductor to convert its current signal to an output voltage.
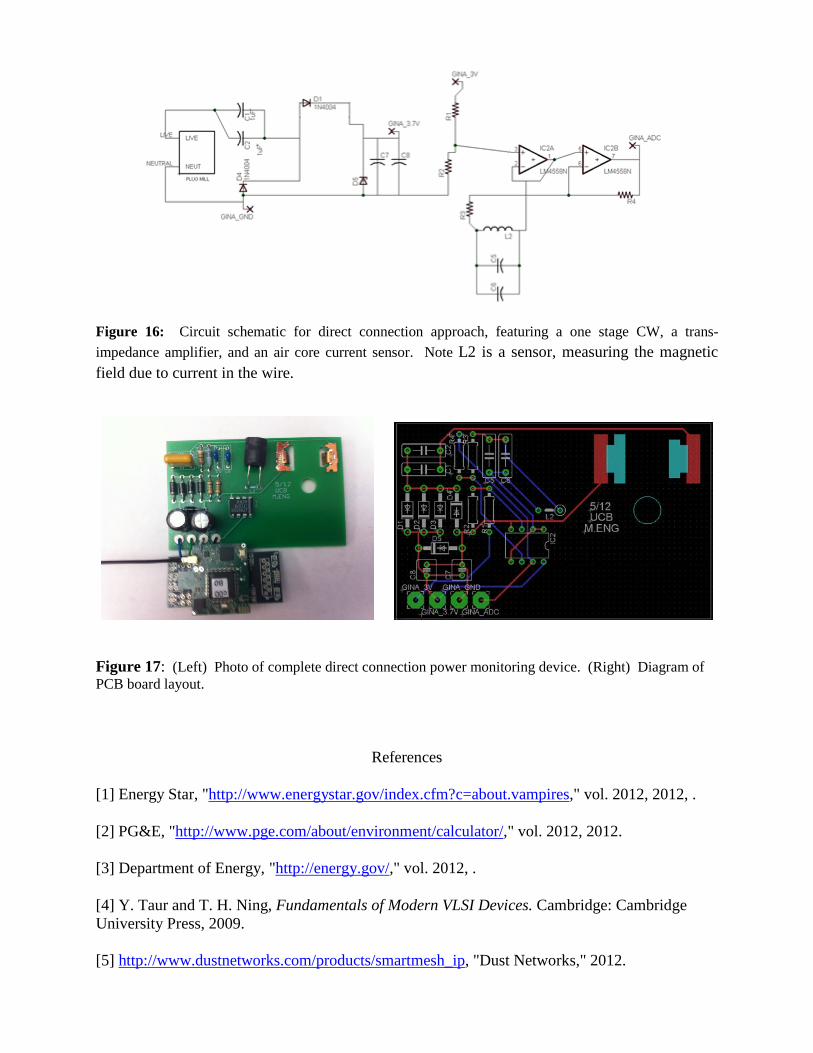
Figure 16: Circuit schematic for direct connection approach, featuring a one stage CW, a trans-impedance amplifier, and an air core current sensor. Note L2 is a sensor, measuring the magnetic field due to current in the wire.
Figure 17: (Left) Photo of complete direct connection power monitoring device. (Right) Diagram of PCB board layout.
References
[1] Energy Star, "http://www.energystar.gov/index.cfm?c=about.vampires," vol. 2012, 2012, .
[2] PG&E, "http://www.pge.com/about/environment/calculator/," vol. 2012, 2012.
[3] Department of Energy, "http://energy.gov/," vol. 2012, .
[4] Y. Taur and T. H. Ning, Fundamentals of Modern VLSI Devices. Cambridge: Cambridge University Press, 2009.
[5] http://www.dustnetworks.com/products/smartmesh_ip, "Dust Networks," 2012.

[6] J. A. Paradiso and T. Starner, "Energy scavenging for mobile and wireless electronics," Pervasive Computing, IEEE, vol. 4, pp. 18-27, 2005.
[7] R. Moghe, Yi Yang, F. Lambert and D. Divan, "Design of a low cost self powered “Stick-on” current and temperature wireless sensor for utility assets," in Energy Conversion Congress and Exposition (ECCE), 2010 IEEE, 2010, pp. 4453-4460.
[8] D. Petersen, J. Steele and J. Wilkerson, "WattBot: A residential electricity monitoring and feedback system," in CHI 2009, April 4 – 9, 2009, Boston, MA, USA, 2009, .
[9] V. C. Gungor and G. P. Hancke, "Industrial Wireless Sensor Networks: Challenges, Design Principles, and Technical Approaches," Industrial Electronics, IEEE Transactions on, vol. 56, pp. 4258-4265, 2009.
[10] R. H. Bhuiyan, R. A. Dougal and M. Ali, "A Miniature Energy Harvesting Device for Wireless Sensors in Electric Power System," Sensors Journal, IEEE, vol. 10, pp. 1249-1258, 2010.
[11] http://www.pge.com/smartmeter/, "PG&E Smart Meter," .
[12] http://www.p3international.com/products/special/p4400/p4400-ce.html, "Kill A Watt," P3 International, .
[13] http://www.energyhub.com/socket/, "Energy Hub," .
[14] Powerzoa, "powerzoa.com/," vol. 2012, .
[15] Energy Hub, "www.energyhub.com/," vol. 2012, .
[16] http://openwsn.berkeley.edu/wiki/Gina#GINA, "Open WSN: Implementing the Internet of Things," vol. 2012, 10 March 2012, 2012.
[17] http://www.arnoldmagnetics.com/Non_Grain_Oriented_Electrical_Steel.aspx, "Arnold Magnetic Technologies Corporation," vol. 2012, 2012.
[18] http://www.magnetic-shield.com/products/alloys.html, "Magnetic Shield Corporation," vol. 2012, 2012.
[19] http://www.mushield.com/shielding-specs.shtml, "MuShield Magnetic Shielding " vol. 2012, 2012.
[20] J. G. Kassakian, M. F. Schlecht and G. C. Verghese., "Magnetic components," in Principles of Power Electronics, 1st ed.Anonymous Prentice Hall, 1991, pp. 565.
[21] C. L. Wadhwa, "Generation of high D.C. and A.C. voltages," in High Voltage Engineering, 1st ed.Anonymous Daryaganj, Delhi, IND: New Age International, 2007, pp. 56.
[22] Lawrence Berkeley National Laboratory, "http://standby.lbl.gov/summary-table.html," vol. 2012, .

[23] M. Mak, "Expert Interview ," vol. Staff Document Control Analyst, Global Product Data Management Group (GPDM) , Manufacturing Engineer, Advanced Micro Devices, Inc., March 10, 2012.
[24] Digi Key Electronics, "www.digikey.com/," .
[25] Mouser Electronics, "www.mouser.com/," .