energy efficiency and airtightness solutionsenergy-efficiency.dupont.com/assets/...guide_en.pdf ·...
TRANSCRIPT

Installation guide
Energy Efficiency and Airtightness Solutions

2
What do you want your project to achieve?
Using Tyvek® and AirGuard®
Environmental Focus Reduce waste, increase performance, extend durability
Energy Efficiency Save resources, energy, costs
Air Quality Improve air and sound quality, reduce indoor pollution
Comfort Increase internal building comfort
Airtightness Stop or reduce air leakage
Durability Extend performance life of building
3
Contents
Introduction 4-7
Products Quick Selector Guide 8-9
Heat Loss in Buildings plus the Risk of Fire and Smoke spreading 10
Internal: AVCL’s for Walls & Ceilings 11-43
AVCL Application Product Selector 12
Installing the AVCL 16-23
Sealing AVCL penetrations 24-27
Creating a service void 28
Ceiling/loft hatch 29-30
Window & Door Sealing 31-43
Renovation & Refurbishment 44
External: Breather Membranes for Walls & Roofs 45-48
Product Portfolio 49-61
Sealing Products Application Table 62-63
Environmental Importance 64
Indoor Air Quality 65
DuPont™ Tyvek® Building Knowledge Centre & BIM Library 67-68

4
Achieve optimal airtightness and long-term performanceWhy is airtightness so important?
As we progress into the future with more energy efficient and sustainable building methods we are becoming more aware of the shortcomings, environmental impact and costs of uncontrolled air leakage.
The requirements and regulations on the energy performance of buildings continue to increase. Because of air leakage from the building envelope, heat losses through convection can occur. Choosing the right air and vapour control layer (AVCL), breather membrane, tapes and accessories will help create a thermally efficient, condensation-free structure.
Installing one of the DuPont™ AirGuard® AVCL membranes will keep your insulation and wall structure dry and can help to reduce energy consumption. On top of choosing the right AVCL it is important to make your building envelope airtight and windtight by sealing gaps between and around insulation layers, AVCL’s and breather membranes. With DuPont accessories you can choose the right products to complement and enhance DuPont™ Tyvek® building envelope solutions. The adhesive tapes are specially designed for use with DuPont membranes to help reduce or even avoid uncontrolled air leakage.

5
What is Air Leakage? Air leakage is the uncontrolled flow of air through a weakness in the building fabric. It can be heat loss (inside to outside), or air infiltration (cold drafts, airborne smells or noise pollution). Before the advent of double and triple glazing and compressible seals in windows and doors, buildings suffered from unwanted draughts and wasted heat.
Air Leakage: • Is uncomfortable • Wastes heat energy • Is difficult to control • Jeopardises ventilation
Passive Energy Efficiency Achieving good airtightness in the building envelope will simplify the process for the energy assessor, result in good SAP ratings and meaningful figures in the Energy Performance Certificate (EPC). Energy bills will be lower. We'll all have warm, comfortable buildings: homes, schools, hospitals and places of work. We'll also save energy.
New to Airtightness? For those who haven’t addressed the subject of airtightness before, it may appear complicated and rather daunting. But when you actually look into it, it’s usually just a case of identifying the weak points and using the right materials in the right way. There can be many places in the building envelope where AIR LEAKAGE can occur. Some obvious ones like windows, doors, service penetrations, membrane laps and board junctions, but also some obscure ones: steelwork connections, wall ties and fixing points for example. All these details would be addressed independently; some would be unique to the individual project and some common ones that reoccur. Because the environment is extremely important for today’s and future generations, over time we will increase our knowledge on the subject, what design solutions are available to us and what products and materials are suitable. Building for airtightness will become second nature! We can then impart our knowledge to others, whether designers or those responsible for installation. After all, detailing and workmanship are fundamental to building airtightness.
A building must be airtight on the inside
A building should be made airtight on the outside
Air and Vapour Control Layer Membranes (AVCL).
Breather MembranesWorking together, airtightness both inside and outside guarantees optimal results (A+, A)

6
The first thing to determine is where in the building envelope the Airtightness line (AT line) is to be established. It would ideally run continuously throughout the roof, wall and floor elements. All the fixings and services that would potentially penetrate this line will need to be considered before the final decision is made.
Continuity is paramount, so the AT line should be durable and uninterrupted. Various materials and components may be used to form the line, such as membranes, boarding and steelwork, but they should be suitably airtight and continuous. Any joints between materials and breaches through them must be sealed.
• Establish which plane within the element is to be the AT line
• Consider all fixings & services that will present a breach
• Remember future proofing - interference
• Ensure continuity - seal it!
The main emphasis within the building element for the AT line is INTERNALLY. The component used for this would normally be the AVCL - behind the dry-lining. This membrane also has the important function of providing condensation control within the construction, by limiting vapour drive. To help with appropriate material selection, please refer to the table on pages 62 & 63.
The AT line may also be established EXTERNALLY, on the cold side of the insulation. It is important that the layer being used for this is vapour-open to avoid trapped moisture within the element. A breather membrane with suitable resistance to air permeability would be ideal. Breather membranes with exceptional durability should be considered to give assurance of long-term performance.
The positioning of the Airtightness line would very much depend on the construction you have, the components you’re using, fixings, services and also the sequence of build, particularly where structural steel and/or masonry components are employed.
Establishing the Airtightness Line
In the short term think about the building sequence and site handling. For the long term, product durability and whether the building occupiers will inadvertently puncture the membrane (with cupboards, shelves, pictures, etc.). Some of these considerations may determine which plane we make the building envelope airtight:
Internal or External?

7
Ventilated void Cold air flow
Cold external air travelling freely around floor boards, up and behind dry-lining.
No dedicated air-barrier in floor or wall.
No insulation around floor perimeter and inadequate air-sealing.
Suspended timber floor / structural wall junction
Common details where air leakage can occur
Futureproofing membrane lap joints Industry research in Norway confirms that variations in moisture within buildings can result in excessive movement between timber components. Over time, the timber batten in this ‘clamped lap’ detail can pull itself away from the stud, opening up the lap in the AVCL and allowing air leakage around the fixing. The solution is to use Tyvek® Butyl Tape between the lap. This will keep the detail airtight in the event of any movement.
The picture on the left is a thermal image of a loft hatch, taken from within a cold loft space of a domestic dwelling. The hatch is a modern insulated plastic type and even though it has compressible draught seals there is air leakage and heat loss around the edges (shown in red). This is because the unit has one locking point and the corners are hanging away from the seals (not compressed). The use of industry certified units with multi-point catch mechanism will ensure it meets with current standards.
The details below show fundamental mistakes commonly made in the construction industry, resulting in significant heat loss. Attention paid to these details will avoid significant CO2 emissions and unnecessary cost to the building owner.
Vapour migration into cold roof space, increasing the risk of condensation.
Dabs/batten space not closed off at ceiling junction, allowing excessive heat loss into cold roof void.
Warm internal air escaping through services, sockets & switchplates.
Junction between internal lining & ceiling
Tyvek® Butyl TapeProviding a seal for the membrane lap and the fixing point
Tyvek® Butyl Tape In lap
Sealing the fixing point in an AVCL ‘clamped lap’

8
Product Portfolio
DuPont™ Tyvek® roofing underlays
• Tyvek® Supro / Tyvek® Supro Plus
• Tyvek® Metal
•• Tyvek® Acrylic Tape with split-release liner
• • Tyvek® Acrylic Tape
• • Tyvek® Metallised Tape
•• Tyvek® Double Sided Tape
•• Tyvek® Butyl Tape
• Tyvek® UV Façade Tape
•• Tyvek® FlexWrap NF
•• Tyvek® FlexWrap EZ
• • Tyvek® Plastering Tape
• DuPont™ AirGuard® Tape
• DuPont™ AirGuard® Sealant
•• Tyvek® Primer
• DuPont™ Insta Stik™
• DuPont™ Great Stuff™
• DuPont™ Froth-Pak™
DuPont™ TyvekTyvek®® and and DuPont™ AirGuardAirGuard®® accessories accessories
• External application• Internal application

9
• Tyvek® FireCurb® Housewrap
• Tyvek® StructureGuard™
• Tyvek® Housewrap
• Tyvek® Reflex
• Tyvek® e-Guard W1
• Tyvek® UV Façade/Tyvek® UV Façade Plus
DuPont™ Tyvek® solutions for Timber Frame and wall construction
DuPont™ Tyvek® and DuPont™ AirGuard® air & vapour control layer (AVCL)
• DuPont™ AirGuard® Control
• DuPont™ AirGuard® Reflective
• DuPont™ AirGuard® Reflective E
• Tyvek® AirGuard® Smart
• DuPont™ Insta Stik™
• DuPont™ Great Stuff™
• DuPont™ Froth-Pak™

10
Heat loss in buildingsIn new (energy efficient) houses:Sources of heat loss
Natural ventilation within buildings will always be needed to provide the occupants with fresh air. As well as to extract moisture, and to provide combustion air for unflued appliances, it will ensure the safety and comfort of occupants by reducing potential build-up of VOC’s. Ventilation should be controllable, but even so it will contribute to a higher air exchange and consequently heat from the building via this mechanism will be lost. When planning the airtightness target, it is always worth taking into consideration that ventilation can account for up to 25% of the heat lost and therefore aiming for an efficient airtightness level is good forward thinking. In energy-efficient buildings it is important to strike a balance between airtightness, ventilation and thermal efficiency to establish the ideal indoor environment for the occupants. Heating and cooling costs can be reduced and mould and decay within the structure can be prevented.
Sealing penetrations to minimise the spread of fire and smokeImportant:Please take care to avoid leaving any gaps (pipework, ducting and cable penetrations, open joints, joists, doors and windows) that could allow smoke and/or fire to permeate the structure by using the appropriate tapes or other sealing products.
Graph source: IFSB Luxembourg
Under floors7 - 10%
Walls 20 - 25%
Thermal bridges 5 - 10%
Roofing 25 - 30%
Windows 10 - 25%
Renewed air & leaks 20 - 25%
(including mechanical and non- mechanical ventilation)

Internal AVCLs for walls and ceilings Warm side of the wall and ceilingsAir and vapour control layer (AVCL) membranes:
• DuPont™ AirGuard® Control: Air Barrier with low vapour resistance
• DuPont™ AirGuard® Reflective : AVCL with high vapour resistance
• DuPont™ AirGuard® Reflective E: Reflective AVCL with Typar® reinforcement
• DuPont™ Tyvek® AirGuard® Smart: AVCL with adaptive vapour resistance
11
12
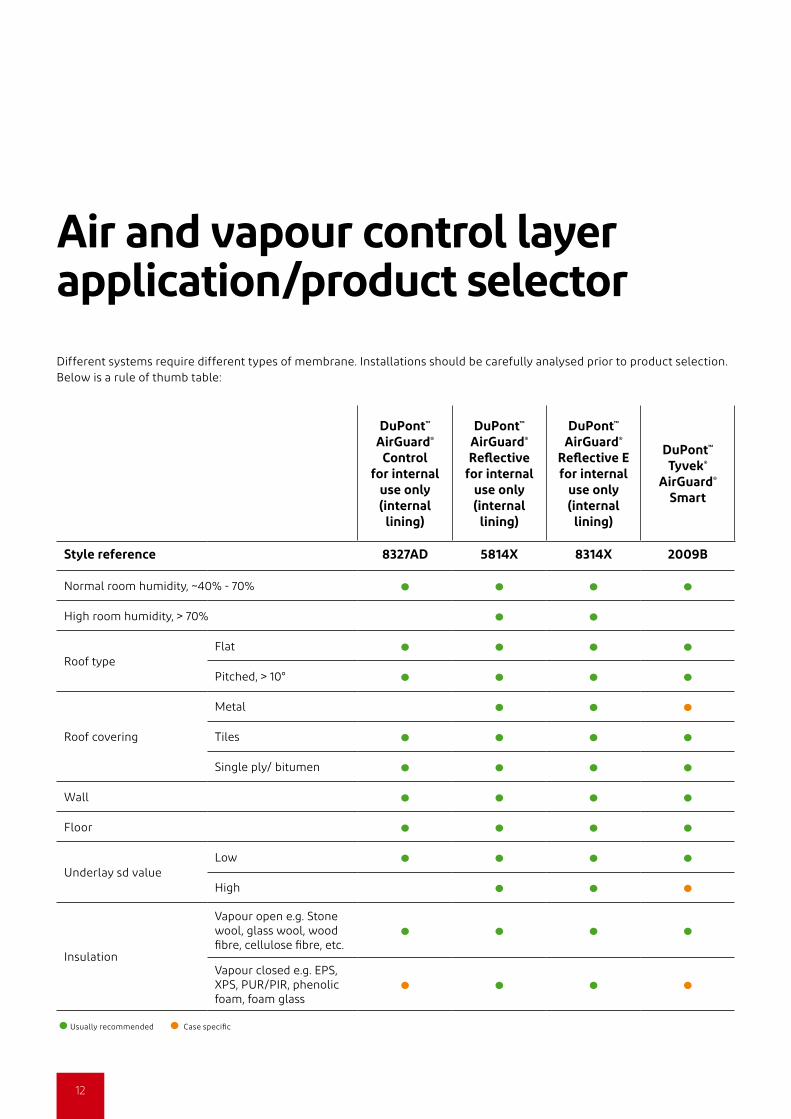
Air and vapour control layer application/product selector
DuPont™
AirGuard® Control
for internal use only (internal
lining)
DuPont™
AirGuard®
Reflectivefor internal
use only (internal
lining)
DuPont™
AirGuard®
Reflective Efor internal
use only (internal
lining)
DuPont™
Tyvek® AirGuard®
Smart
Style reference 8327AD 5814X 8314X 2009B
Normal room humidity, ~40% - 70%
High room humidity, > 70%
Roof typeFlat
Pitched, > 10°
Roof covering
Metal
Tiles
Single ply/ bitumen
Wall
Floor
Underlay sd valueLow
High
Insulation
Vapour open e.g. Stonewool, glass wool, woodfibre, cellulose fibre, etc.
Vapour closed e.g. EPS,XPS, PUR/PIR, phenolicfoam, foam glass
Usually recommended Case specific
Different systems require different types of membrane. Installations should be carefully analysed prior to product selection. Below is a rule of thumb table:

13
Air & Vapour Control Layers (AVCL’s)Using an AVCL such as a DuPont™ AirGuard® membrane has proven to be a popular and effective method of providing airtightness to many building projects. Coupled with the layer’s vapour resistant characteristics an AVCL will help to safeguard against large volumes of moisture laden air infiltrating a roof, wall or floor element.
Naturally, the resulting effect is a reduced condensation risk. It is therefore generally accepted as good practice for an AVCL to be installed into these building elements, particularly in the case of tiled or slated pitched roof systems, regardless of whether they are ventilated or not. This can save up to 75% of convective heat loss.
• The DuPont™ AirGuard® AVCL is installed onto the warm internal side of the building envelope, covering entirely the surfaces of the wall, ceiling & floor (where applicable) to form a continuous layer.
• Install the AVCL either horizontally or vertically to suit the substrate.
• Take care to minimise cuts, joints and junctions as much as possible .
DuPont™ AirGuard® Reflective / DuPont™ AirGuard® Reflective E DuPont™ AirGuard® Control DuPont™ Tyvek® AirGuard® Smart
Silver reflective side facing you*Tyvek® metalised tape or double sided tape to be added to complete the installation
Blue smooth surface facing you Red printed logo facing you
*Note: The reflective surface works with an airspace, such as a batten space behind the plasterboard, so the silver side would normally face into the building. Alternatively, if a void exists within the joist, stud or rafter zone then the reflective surface may face outwards.
AVCL General Installation

14
Fixing The DuPont™ AirGuard® AVCL may be secured to smooth/planed timber, steelwork or primed masonry.The following fixings may also be used to provide extra security:
DuPont™ Tyvek® Butyl Tape (double-sided) may be used to seal fixing points where a compressible washer (e.g. EPDM) is not employed. Apply a small patch of tape to the AVCL and drive the fixing through.
Maintain 100mm laps between each sheet and seal with Tyvek® Tape or Tyvek® Double-sided Tape (acrylic adhesive).
Laps in DuPont™ AirGuard® Reflective/ DuPont™ AirGuard® Reflective E should be sealed with Tyvek® Metallised Tape.
Penetrations Penetrations through a DuPont™ AirGuard® AVCL (lighting, pipework, wiring, etc.) should be sealed with Tyvek® FlexWrap EZ.Tyvek® Butyl Tape (double-sided) may be used to seal fixing points where a compressible washer (e.g. EPDM) is not employed. Apply a small patch of tape to the AVCL and drive the fixing through.
Intermediate floor junction (timber & metal frame)Forming and cutting an AVCL around joists is a fiddly and time-consuming task and is very often curtailed, resulting in an air-leakage detail repeated throughout the building.
The detail opposite shows the AVCL (in orange) and Tyvek® AirGuard® Smart (in red) wrapped continuously around the floor joists. Doing this during the build process will help achieve airtightness and save time.
Tyvek® Butyl Tape may be used beneath the battens at #A to improve sealing where the AVCL sheets connect.For off-site construction the 750mm Tyvek® StructureGuard™ intermediate floor zone strip can be used.
Temporary fixing / fitting out DuPont™ AirGuard® AVCL may be temporarily fixed using Tyvek® Double-sided Tape (acrylic). The membrane should be permanently fixed with timber battens on the internal lining afterwards (permanent fixing before blower door test).
Laps & JunctionsMaintain continuity at adjacent walls, floors and ceiling junctions, lapping the DuPont™ AirGuard® AVCL 100mm and sealing with the appropriate tape as shown on table pages 62 & 63.
Timber: Stainless steel staples or clout nails
SFS: Drill tip screw with EPDM rubber washer
Masonry: Anchor fixing system or a masonry screw and EPDM washer
Cement Board: Stainless steel staples or drill tip screw
Insulation: Proprietary expanding fixing anchor with large plastic collar

15
Installation of DuPont™ Tyvek® AirGuard™ Smart
Roof renovation from the exterior:
Tyvek® AirGuard® Smart may be installed over the rafters from the exterior, but any existing insulation will first need to be removed. For best practice, place Tyvek® Butyl Tape along the inside bottom edge of each rafter. Install the AVCL ‘up and over’ the rafters with the printed side facing outwards and press firmly and neatly against the Tyvek® Butyl Tape. Maintain minimum 100mm laps between each membrane run and seal properly with Tyvek® Butyl Tape. Secure the membrane by fixing a timber batten through the strips of Tyvek® Butyl Tape to the inside bottom edge of each rafter. In this way the tape will seal all fixings through the AVCL. Install the insulation material tightly between the rafters, avoiding any gaps. Once complete the Tyvek® breather membrane can be installed over the rafters. Cover the roof with a tarpaulin during the installation process, if the roof is to remain open for an extended period of time. Safety: Installers working at height should observe the HSE Guide INDG401.
Renovation from the exterior
Wall installation, renovation from the interior
5
1
43
87
2
6
�
�
�
�
�
1
2
5
43
1 Cladding
2 Tyvek® Breather Membrane
3 Sheathing
4 Insulation
5 AVCL Tyvek® AirGuard® Smart
6 Tyvek® Butyl Tape
7 Service void
8 Plasterboard
1 Insulation
2 Tyvek® Acrylic Tape
3 AVCL Tyvek® AirGuard® Smart
4 Timber batten
5 Plasterboard

16
How to install DuPont™ AirGuard® AVCL onto rafters (Also applies to stud walls)
1. Apply Tyvek® Double-sided Tape (20mm) to underside of rafters
4. Tape should also be applied tight up to window/door frames
7. Apply AVCL, ensuring successive runs are adequately lapped to each other and onto adjacent wall surfaces
2. Apply tape to all facing surfaces . . .
5. Measure required length of DuPont™ AirGuard® AVCL. Installation should start with the uppermost layer
8. AVCL should be pressed firmly against tape
3. . . . including in window reveals (where applicable)
6. Remove tape release liner from the Tyvek® Double-sided Tape on all surfaces
9. Extend AVCL over any windows or doors (to be trimmed later)

17
10. Seal laps with Tyvek® Tape (Tyvek® Metallised Tape should be used with DuPont™ AirGuard® Reflective)
13. Remove release liner
11. Measure battens prior to fixing
14. Press batten into position and permanently fix
12. Apply Tyvek® Butyl tape to batten
15. Battens should be suitably positioned for fixing of plasterboard lining
Important.
This sequence demonstrates only the installation of the DuPont™ AirGuard® vapour control membrane and tapes and does not show the use of insulation as it would be seen in a genuine installation. Insulation would certainly be included in buildings. For more information please visit our website.

18
How to connect DuPont™ AirGuard® AVCL to surfaces using DuPont™ AirGuard® Sealant
How to connect DuPont™ AirGuard® AVCL to masonry wall surfaces using DuPont™ Tyvek® Butyl Tape
1. Whilst holding the DuPont™ AirGuard® AVCL back, apply a 4-8mm bead of DuPont™ AirGuard® Sealant to the surface
1. Position Tyvek® Butyl tape onto surface and press firmly into place
2. Lap the membrane onto the sealant and apply pressure with fingers either side of the bead. Ensure that the sealant is not pressed flat as a bead thickness of at least 1mm should be maintained
2. Remove backing paper to expose adhesive
3. Bond membrane to tape and press down to achieve airtight seal
19
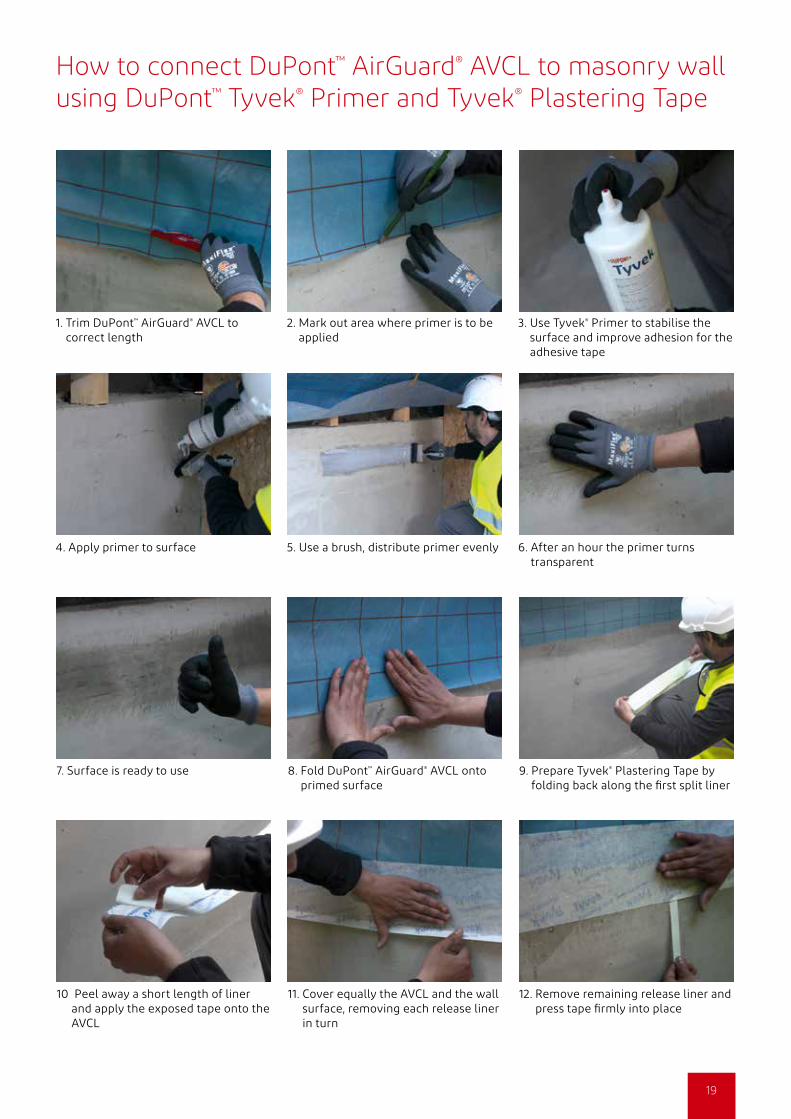
How to connect DuPont™ AirGuard® AVCL to masonry wall using DuPont™ Tyvek® Primer and Tyvek® Plastering Tape
1. Trim DuPont™ AirGuard® AVCL to correct length
2. Mark out area where primer is to be applied
3. Use Tyvek® Primer to stabilise the surface and improve adhesion for the adhesive tape
4. Apply primer to surface 5. Use a brush, distribute primer evenly 6. After an hour the primer turns transparent
7. Surface is ready to use 8. Fold DuPont™ AirGuard® AVCL onto primed surface
9. Prepare Tyvek® Plastering Tape by folding back along the first split liner
10 Peel away a short length of liner and apply the exposed tape onto the AVCL
11. Cover equally the AVCL and the wall surface, removing each release liner in turn
12. Remove remaining release liner and press tape firmly into place
20
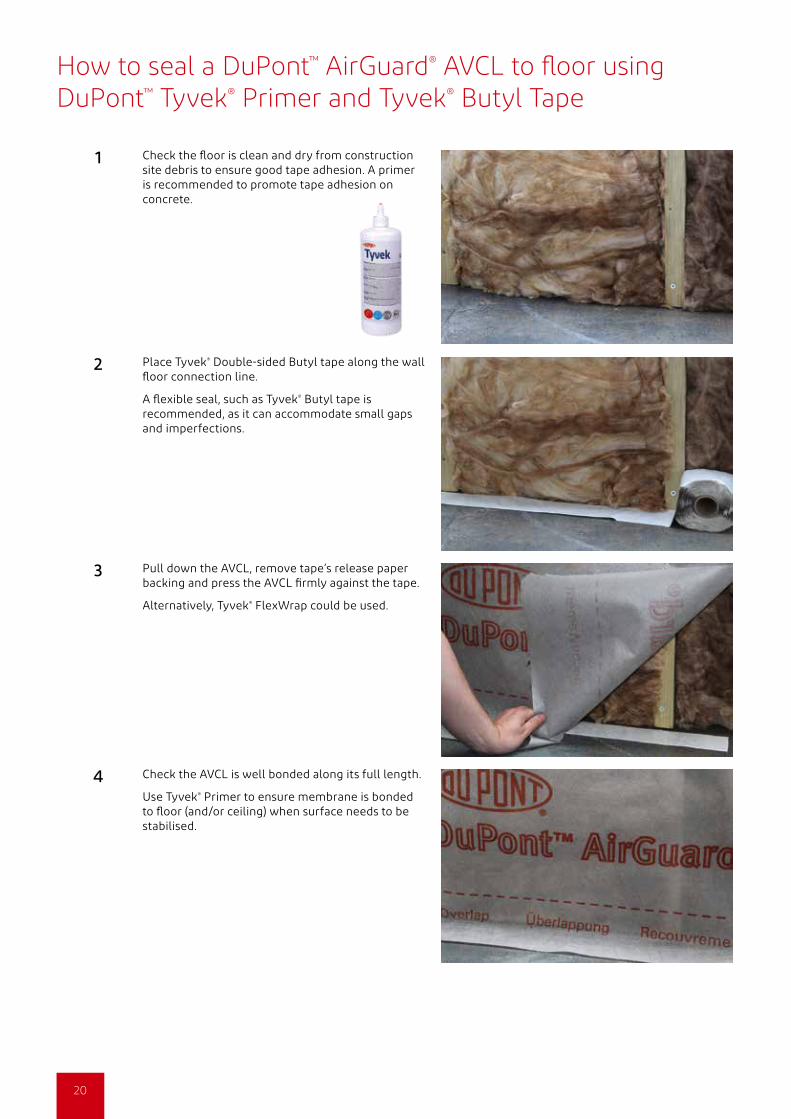
1 Check the floor is clean and dry from construction site debris to ensure good tape adhesion. A primer is recommended to promote tape adhesion on concrete.
2 Place Tyvek® Double-sided Butyl tape along the wall floor connection line.
A flexible seal, such as Tyvek® Butyl tape is recommended, as it can accommodate small gaps and imperfections.
3 Pull down the AVCL, remove tape’s release paper backing and press the AVCL firmly against the tape.
Alternatively, Tyvek® FlexWrap could be used.
4 Check the AVCL is well bonded along its full length.
Use Tyvek® Primer to ensure membrane is bonded to floor (and/or ceiling) when surface needs to be stabilised.
How to seal a DuPont™ AirGuard® AVCL to floor using DuPont™ Tyvek® Primer and Tyvek® Butyl Tape

21
How to seal a DuPont™ AirGuard® AVCL to floor using DuPont™ Tyvek® Primer and Tyvek® FlexWrap EZ
1. Ensure the floor is as clean as possible and brush away any dirt or dust that could hinder adhesion of tape
2. Apply Tyvek® Primer directly to floor 3. Using a paint brush spread the primer evenly over the surface, which will turn transparent after ca. 1 hour
7. Continue this for the entire length 8. Place the folded tape on the floor where it is to be applied
9. Remove the release paper on the floor side only and as you do so, press the tape down with the other hand. Carry this through to the end of the run
4. Measure the amount of Tyvek® FlexWrap EZ you need and cut to suit
5. Fold Tyvek® FlexWrap EZ along its split release liner
6. Run it through your hands to fold
10. The final stage is to repeat the process for the upper release strip. Once all the release paper is removed apply pressure along the tape length to ensure an airtight bond has been achieved.

22
How to connect AirGuard® Vapour control layer to ceiling and wall
1 At the ceiling/wall junction, apply DuPont™ Tyvek® Double-sided tape to the ceiling corners or DuPont™
AirGuard® sealant.
2 Place the membrane against the ceiling, allowing a 100mm lap onto/down the adjacent walls.
Remove the release liner from the tape and press the membrane firmly into place.
Fold the membrane in the corner, do not cut off the fold.
3 Apply DuPont™ Tyvek® Double-sided tape to the walls so that it covers the edges of the ceiling membrane or use DuPont™ AirGuard® sealant.
4 Position the wall membrane into the corners. Remove the tape release paper and press the wall membrane firmly into place.
Ensure that airtightness is achieved and there are no weaknesses in the join.
Using Tyvek® acrylic tape (single-sided) will secure the join and give you a visual confirmation that the job has been done.
Method 1: First ceiling, then wall membrane
Ceiling
Ceiling
Ceiling
Ceiling
First wall layer
Ceiling
23
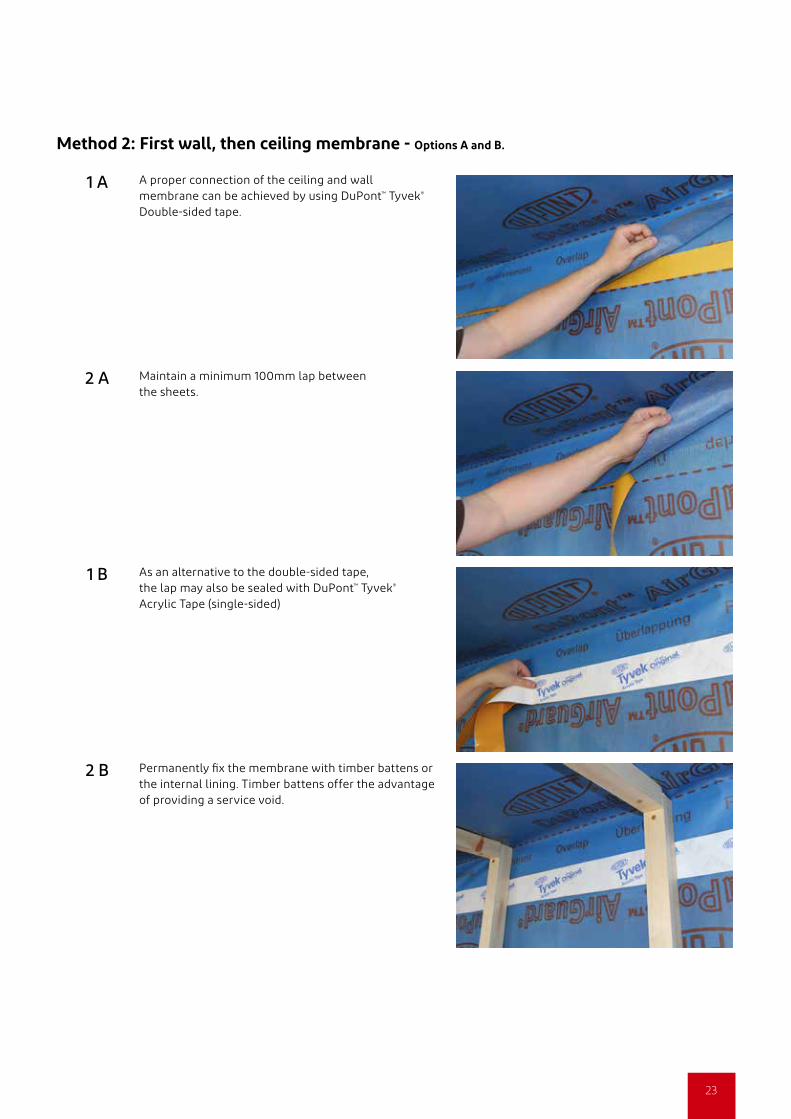
Method 2: First wall, then ceiling membrane - Options A and B.
1 A A proper connection of the ceiling and wall membrane can be achieved by using DuPont™ Tyvek® Double-sided tape.
2 A Maintain a minimum 100mm lap between the sheets.
1 B As an alternative to the double-sided tape, the lap may also be sealed with DuPont™ Tyvek® Acrylic Tape (single-sided)
2 B Permanently fix the membrane with timber battens or the internal lining. Timber battens offer the advantage of providing a service void.

24
For squared penetrations you can follow the same principle as for round penetrations. Tyvek® FlexWrap tape is an easy to seal alternative to the to the single-sided Tyvek® Acrylic Tape shown in the following pictures.
1 Place the membrane into position and cut around any penetrations (in this example we are using a rafter to wall detail).
Cut around the penetration as neatly as possible.
Trim off any excess.
Staples may be used to secure the edges if necessary.
2 Seal around the penetration by using strips of DuPont™ Tyvek® Acrylic Tape (single-sided), placing them vertically over the cuts in the membrane.
3 Apply the tape strips around the penetration until completely sealed.
4 Check the work for gaps and imperfections where air leakage could occur.
Complete the sealing process where necessary, attending particularly to any unsealed laps.
How to seal air leakage and gap penetrations

25
Detailing air leakage & gap penetrationsWhether you have to seal pipes or wiring,it should only takes 8 small steps from cutting to finishing with Tyvek® FlexWrap tape.
1 Calculate or measure perimeter and add 2cm.
2 Cut the appropriate length of Tyvek® FlexWrap.
3 Fold Tyvek® FlexWrap and remove first half of the release paper backing.
4 Attach Tyvek® FlexWrap to the penetration detail and wrap it around, pressing firmly to ensure a good bond.
5 Remove the remaining release paper backing.
6 Attach Tyvek® FlexWrap onto the membrane surface (adjacent to the pipe) on the opposite side to the tape joint.
7 Stretch and press Tyvek® FlexWrap with both hands, from the initial point outwards, pressing firmly into place.
8 Stretch to finish, checking that the tape adhesion and contact is thorough.

26
How to seal cable penetrations with DuPont™ Tyvek® FlexWrap EZ
1. Any cables that penetrate a DuPont™ AirGuard® AVCL must be sealed
2. Cut off a small length of Tyvek® FlexWrap EZ
3. Cut off a 2nd length of equal size
7. Remove the remaining backing strips and press together
4. Remove one strip of release liner and bond to AVCL immediately adjacent to cable
5. Repeat with the 2nd strip on the opposite side
6. Press into position ensuring no gaps are present
After this installation sequence battens would be fitted prior to addition of lining e.g. plasterboard. A surplus quantity of cable can be coiled to enable alterations in the cable length if required.

27
How to seal pipe penetrations with DuPont™ Tyvek® FlexWrap EZ
1. Cut a length of Tyvek® FlexWrap EZ, fold in half and remove one release liner strip
2. Wrap Tyvek® FlexWrap EZ around the pipe base, bonding the exposed adhesive to the pipe
3. Remove the 2nd backing strip
7. Once wrapped around, remove remaining release strip
8. Make sure Tyvek® FlexWrap EZ is bonded to both the pipe & the AVCL
4. Fan the tape out onto the membrane, starting at the centre of the strip
5. Press firmly to establish seal 6. Apply a 2nd length of Tyvek® FlexWrap EZ onto the pipe on the opposite side. Try to keep the folded tape flat by ‘pinching’ together

28
Ceiling - Air and Vapour Control Layers
1 Fix the internal lining into place (typically plasterboard) and cut a suitably sized hole to accommodate the downlight fitting. Take care not to damage the airtightness layer.
2 Before the downlight is fitted, double check the airtightness layer to ensure it has not been damaged during cutting.
Light fittings
Where no services void exists, a sealed enclosure should be formed over light fittings. The enclosure must be sealed to the membrane using Tyvek® Butyl Tape or Tyvek® Metallised Tape. Wiring penetrations must be sealed as much as possible using Tyvek® FlexWrap EZ. Where downlights are specified the preference is to use sealed, low energy (LED) units with F Capped approval, allowing continuous thermal insulation over the light unit.
How to create a service voidMinimise membrane penetrationsThe internal lining (plasterboard, etc.) should be spaced off DuPont™ AirGuard® to create a services void, to help minimise penetrations through the membrane. Timber battens, minimum 25mm, may be used with a Tyvek® Butyl Tape seal between batten and membrane. A deeper service void may be required in kitchens to accommodate a cooker switch/socket. Battens of 50mm should be used in this instance.

29
How to build a ceiling hatch
Ceiling hatch
1 Cut diagonally the opening for the ceiling hatch. Alternative cut shapes:
2 Fold the cuts upwards and staple to the timber.
3 Neatly trim the membrane to size.
4 Seal the cut membrane to the corners of the opening using DuPont™ Tyvek® Acrylic Tape (single-sided). Apply the first piece centrally in the corner.
Apply additional tape strips, starting from the centre of the corner outwards.
Tyvek® FlexWrap EZ also recommended.

30
5 Ensure the tape is sufficiently long enough so that it extends across the underside of the hatch frame.
6 Once the corner is sealed and airtight the internal lining can be installed.
7 Fix the hatch frame into place. Tyvek® Butyl tape between the hatch frame and AVCL can be beneficial to improve the sealing.
8 Fit the hatch, ensuring that all integrated draught seals are effective.

Windows & Doors
• DuPont™ AirGuard® Tape
• DuPont™ Tyvek® Acrylic Tape
• DuPont™ Tyvek® FlexWrap Tapes
• DuPont™ Tyvek® Plastering Tape
• DuPont™ Insta Stik™ Polyurethane Foam Adhesive
• DuPont™ Froth-Pak™ Mini Polyurethane Foam Sealant
• DuPont™ Great Stuff™ Polyurethane Foam Sealant
31

32
How to connect and seal around a window with DuPont™ Tyvek® Acrylic Tape and DuPont™ AirGuard® Tape
1. Cut a ‘Y’ into AVCL, using batten as a guide if preferred
2. As above 3. Cutting the vertical portion
7. Fold Tyvek® Tape and remove smaller release liner strip
8. Bond tape to frame and remove remaining release paper
9. Press firmly into place to create an airtight seal
4. Cut AVCL horizontally across foot of window, in line with the reveal edge
5. Cut off excess 6. Remove release liner from DuPont™ Tyvek® Double-sided Tape (20mm) applied previously
10. Position pre-cut AVCL and press against exposed tape adhesive applied earlier
11. All cuts, laps & junctions in the membrane should be sealed with DuPont™ Tyvek® Acrylic Tape
12. Seal tightly around window
33
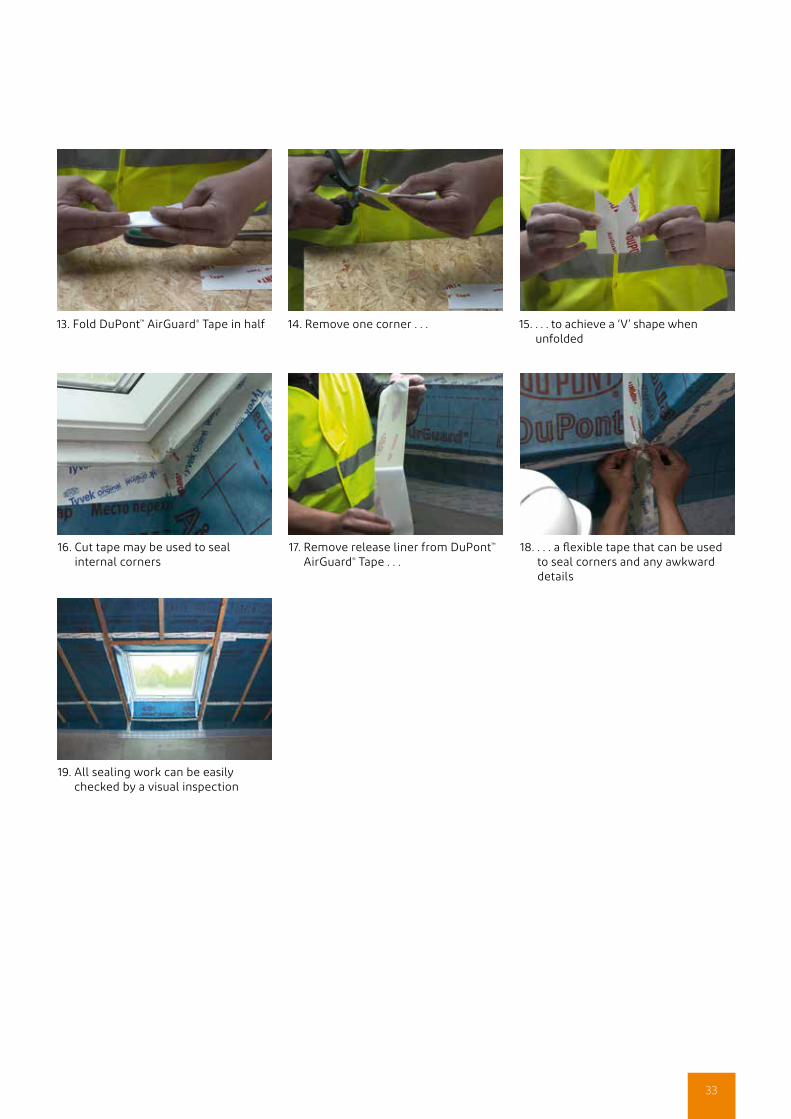
19. All sealing work can be easily checked by a visual inspection
16. Cut tape may be used to seal internal corners
17. Remove release liner from DuPont™ AirGuard® Tape . . .
18. . . . a flexible tape that can be used to seal corners and any awkward details
13. Fold DuPont™ AirGuard® Tape in half 14. Remove one corner . . . 15. . . . to achieve a ‘V’ shape when unfolded

34
How to seal a window with Tyvek® Tapes
Windows and Doors
For the sealing of windows & doors, the flexible Tyvek® FlexWrap tape is recommended: it is easy and quick to install, and thanks to its versatility it limits the risk of gaps in the finished sealing.
1 Cut the hole (diagonal) for the penetration. Alternative cut shapes
2 Calculate or measure the required tape length for the window frame.
Fold the tape at the release paper split.
3 Tape the membrane around the window opening.
4 Use DuPont™ AirGuard® Tape or Tyvek® FlexWrap. Once the DuPont™ AirGuard® AVCL is effectively sealed for airtightness the internal lining (plasterboard and batten) can be installed.
The same principle applies to doors.

35
How to seal a recessed window with DuPont™ Insta Stik™ & DuPont™ Tyvek® Plastering Tape
1. Spray water onto external surfaces to effect bond with DuPont™ Insta Stik™
2. Shake can thoroughly and apply DuPont™
Insta Stik™ into the gaps around the window
6. Tyvek® Primer can be applied onto the wall surface or directly onto the brush
7. The primer is white on application, but will turn transparent when it cures after 1 hour approx.
8. Fold a cut length of Tyvek® Plastering Tape and remove the narrow release strip
3. Repeat the process from inside the building
4. The spray foam will cure in around an hour and any excess can be trimmed off
5. If the surfaces around the frame need to be stabilized Tyvek® Primer can be applied to improve adhesion for sealing tape
9. Starting at the cill, apply the exposed tape to the frame and remove the remaining backing strip
10. Press the tape firmly onto the primed surface
12. Apply Tyvek® Plastering tape to the window head and reveals taking care to seal and brackets.
13. Repeat the process for the internal side of the frame and the gap is sealed!
DuPont™ Tyvek® Plastering Tape is also suitable for external render applications

36
1. The internal window to wall junction can be sealed following the same method described on page 35
2. Internal corners can be sealed with a separate piece of Tyvek® Plastering Tape.Firstly, cut out a square of tape and fold in half
3. Cut half way along the crease
7. Fold and stick the tape to form a small corner detail...
8. ... which can be fitted into the corners of the reveal
9. Remove the release paper from the back of the tape
4. Open the piece out 5. Fold in on itself to make a 3-sided corner 6. Remove a quarter of the release paper from the back of the tape
10. Position and firmly press the corner detail into place
11. Tyvek® Plastering Tape provides a suitable key for the application of plaster or render
How to seal a window on the inside using DuPont™ Tyvek® Plastering Tape - Part 1
12. Plaster or render may be applied immediately if required
37
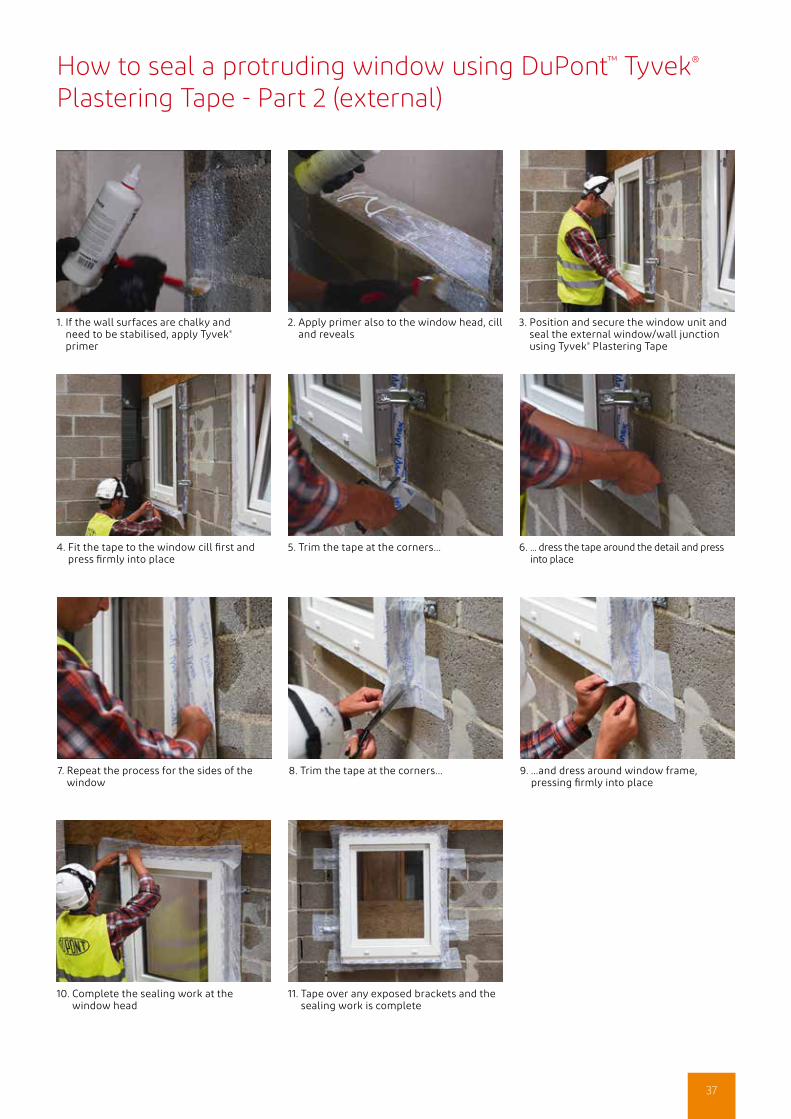
1. If the wall surfaces are chalky and need to be stabilised, apply Tyvek® primer
2. Apply primer also to the window head, cill and reveals
3. Position and secure the window unit and seal the external window/wall junction using Tyvek® Plastering Tape
7. Repeat the process for the sides of the window
8. Trim the tape at the corners... 9. ...and dress around window frame, pressing firmly into place
4. Fit the tape to the window cill first and press firmly into place
5. Trim the tape at the corners... 6. ... dress the tape around the detail and press into place
10. Complete the sealing work at the window head
11. Tape over any exposed brackets and the sealing work is complete
How to seal a protruding window using DuPont™ Tyvek® Plastering Tape - Part 2 (external)
38
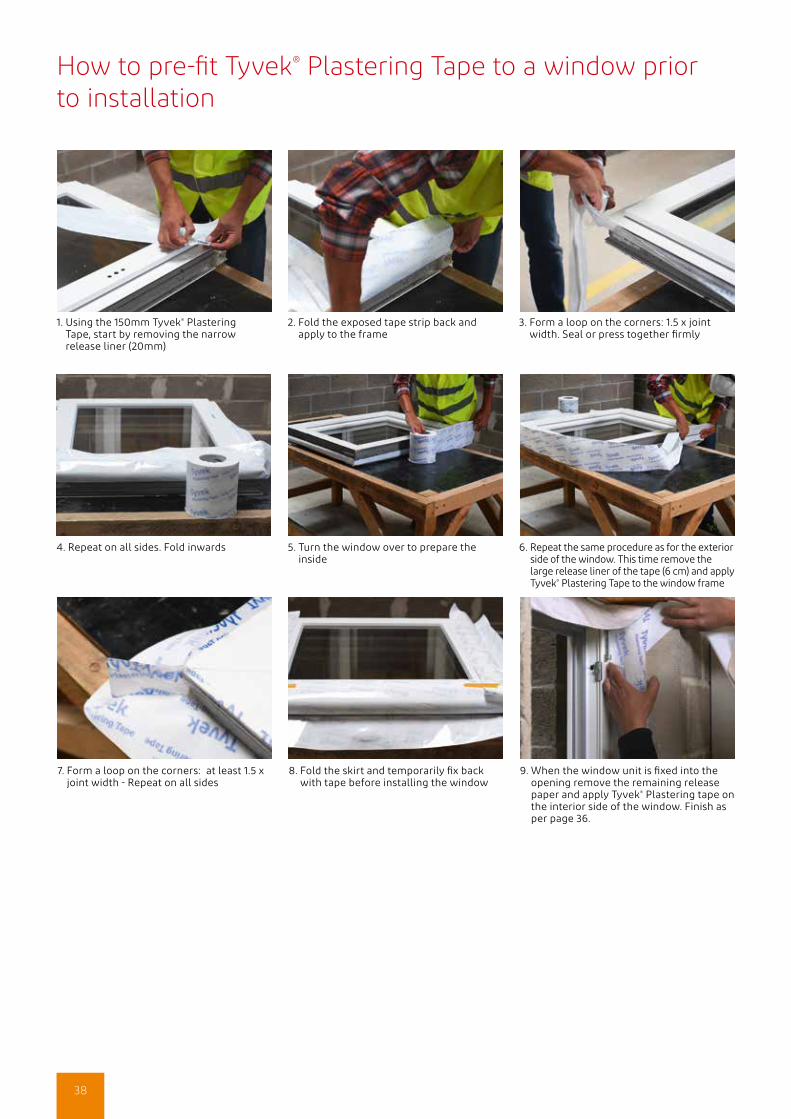
1. Using the 150mm Tyvek® Plastering Tape, start by removing the narrow release liner (20mm)
2. Fold the exposed tape strip back and apply to the frame
3. Form a loop on the corners: 1.5 x joint width. Seal or press together firmly
7. Form a loop on the corners: at least 1.5 x joint width - Repeat on all sides
8. Fold the skirt and temporarily fix back with tape before installing the window
9. When the window unit is fixed into the opening remove the remaining release paper and apply Tyvek® Plastering tape on the interior side of the window. Finish as per page 36.
4. Repeat on all sides. Fold inwards 5. Turn the window over to prepare the inside
6. Repeat the same procedure as for the exterior side of the window. This time remove the large release liner of the tape (6 cm) and apply Tyvek® Plastering Tape to the window frame
How to pre-fit Tyvek® Plastering Tape to a window prior to installation
39
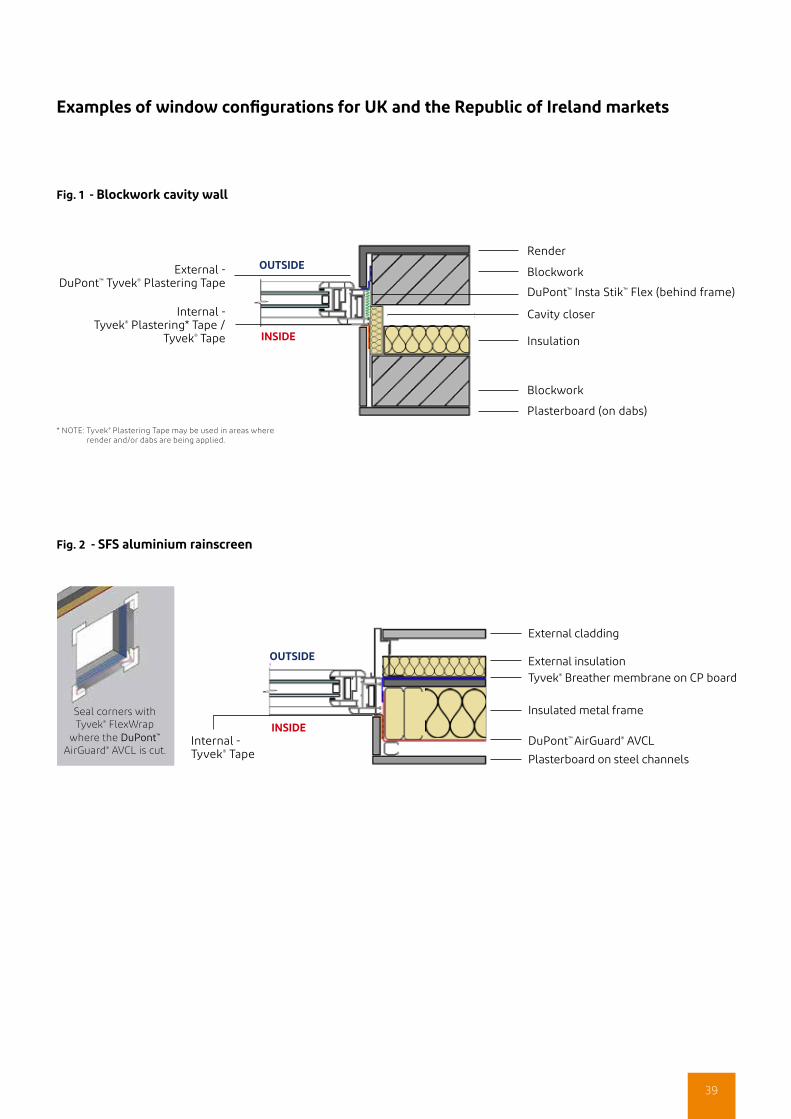
Fig. 1 - Blockwork cavity wall
Fig. 2 - SFS aluminium rainscreen
Examples of window configurations for UK and the Republic of Ireland markets
Render
Blockwork
Cavity closer
Insulation
Blockwork
Plasterboard (on dabs)
OUTSIDE
INSIDE
DuPont™ Insta Stik™ Flex (behind frame)
Internal - Tyvek® Plastering* Tape /
Tyvek® Tape
External - DuPont™ Tyvek® Plastering Tape
* NOTE: Tyvek® Plastering Tape may be used in areas where render and/or dabs are being applied.
OUTSIDE
INSIDE
External cladding
External insulationTyvek® Breather membrane on CP board
Insulated metal frame
Plasterboard on steel channels
DuPont™ AirGuard® AVCLInternal - Tyvek® Tape
Seal corners with Tyvek® FlexWrap
where the DuPont™
AirGuard® AVCL is cut.

40
Fig. 3 - Timber frame (brick external leaf)
Fig. 4 - External wall insulation (EWI systems / ETICS)
Brickwork DPC
Tyvek® breather membraneDPC over cavity closer
Insulated stud
DuPont™ AirGuard® AVCL
Plasterboard lining
OUTSIDE
INSIDESeal corners with Tyvek® FlexWrap
where the AirGuard® AVCL is cut. Internal -
Tyvek® Tape
Render
Insulation
Blockwork
Plasterboard (on dabs)
OUTSIDE
INSIDE
DuPont™ Insta Stik™ Flex (behind frame)
* NOTE: External window sealing can be achieved with either Tyvek® Plastering Tape or DuPont™ Liquidarmor™
Internal - Tyvek® Tape
External - DuPont™ Tyvek®
Plastering Tape* /
Examples of window configurations for UK and the Republic of Ireland markets
41
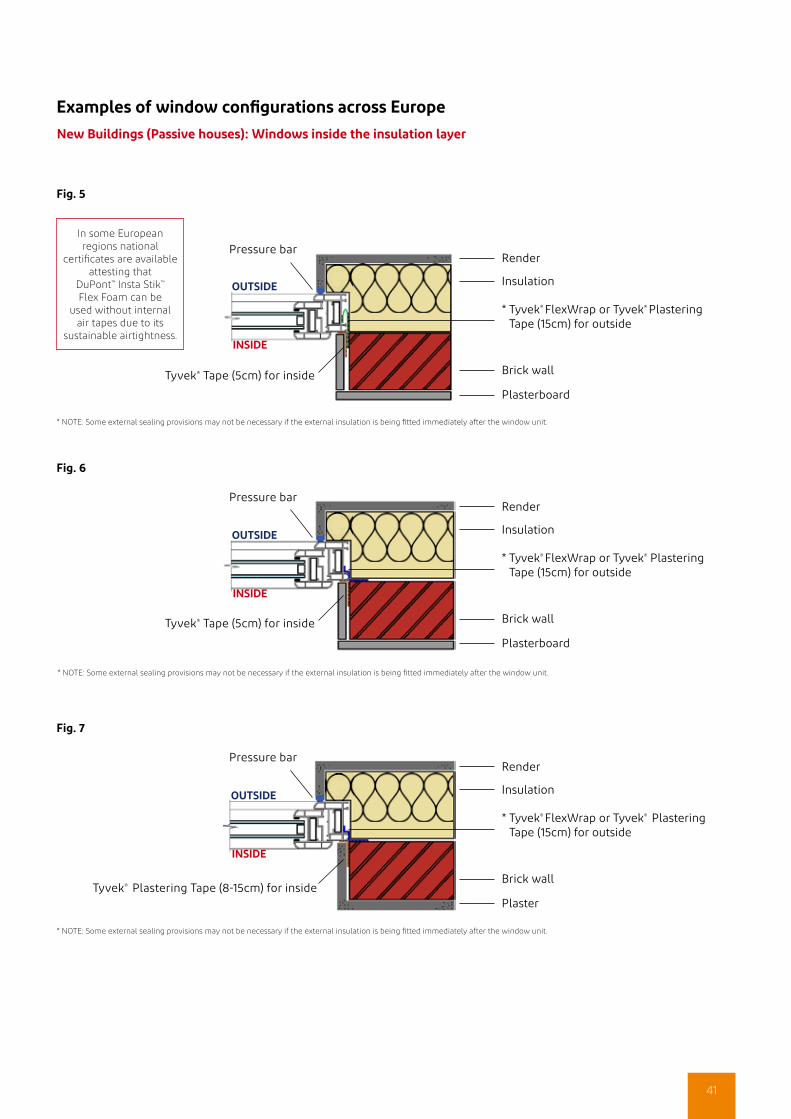
Fig. 5
Fig. 6
Fig. 7
Examples of window configurations across EuropeNew Buildings (Passive houses): Windows inside the insulation layer
Render
Brick wall
Plasterboard
Insulation
Tyvek® Tape (5cm) for inside
Pressure bar
OUTSIDE
INSIDE
* Tyvek® FlexWrap or Tyvek® Plastering Tape (15cm) for outside
* NOTE: Some external sealing provisions may not be necessary if the external insulation is being fitted immediately after the window unit.
In some European regions national
certificates are available attesting that
DuPont™ Insta Stik™ Flex Foam can be
used without internal air tapes due to its
sustainable airtightness.
Render
Brick wall
Plasterboard
InsulationOUTSIDE
INSIDE
Tyvek® Tape (5cm) for inside
Pressure bar
* Tyvek® FlexWrap or Tyvek® Plastering Tape (15cm) for outside
* NOTE: Some external sealing provisions may not be necessary if the external insulation is being fitted immediately after the window unit.
Render
Brick wall
Plaster
Insulation
Tyvek® Plastering Tape (8-15cm) for inside
OUTSIDE
INSIDE
* Tyvek® FlexWrap or Tyvek® Plastering Tape (15cm) for outside
* NOTE: Some external sealing provisions may not be necessary if the external insulation is being fitted immediately after the window unit.
Pressure bar
DuPont™ AirGuard® AVCL
42
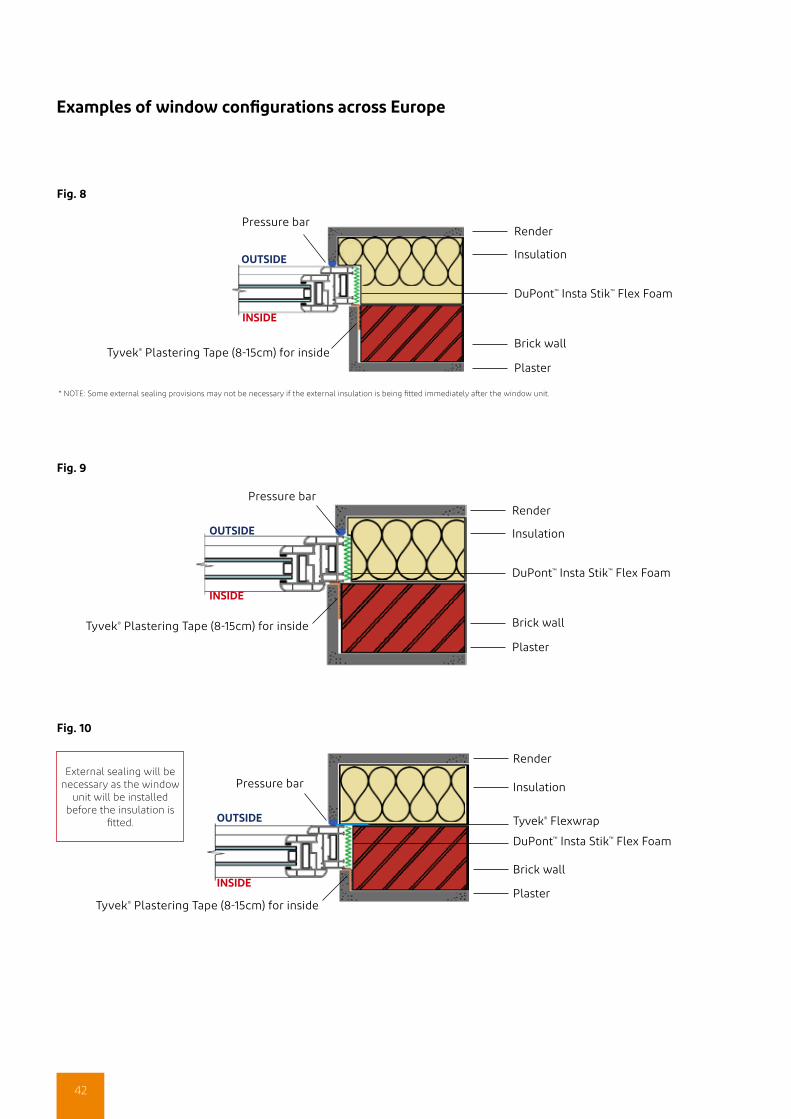
Fig. 8
Fig. 9
Fig. 10
Render
Brick wall
Plaster
InsulationPressure bar
OUTSIDE
INSIDE
Tyvek® Plastering Tape (8-15cm) for inside
DuPont™ Insta Stik™ Flex Foam
Tyvek® Flexwrap
External sealing will be necessary as the window
unit will be installed before the insulation is
fitted.
Pressure bar
OUTSIDE
INSIDE
Tyvek® Plastering Tape (8-15cm) for inside
DuPont™ Insta Stik™ Flex Foam
Render
Brick wall
Plaster
Insulation
DuPont™ Insta Stik™ Flex Foam
OUTSIDE
INSIDE
* NOTE: Some external sealing provisions may not be necessary if the external insulation is being fitted immediately after the window unit.
Render
Brick wall
Plaster
Insulation
Tyvek® Plastering Tape (8-15cm) for inside
Pressure bar
Examples of window configurations across Europe
43
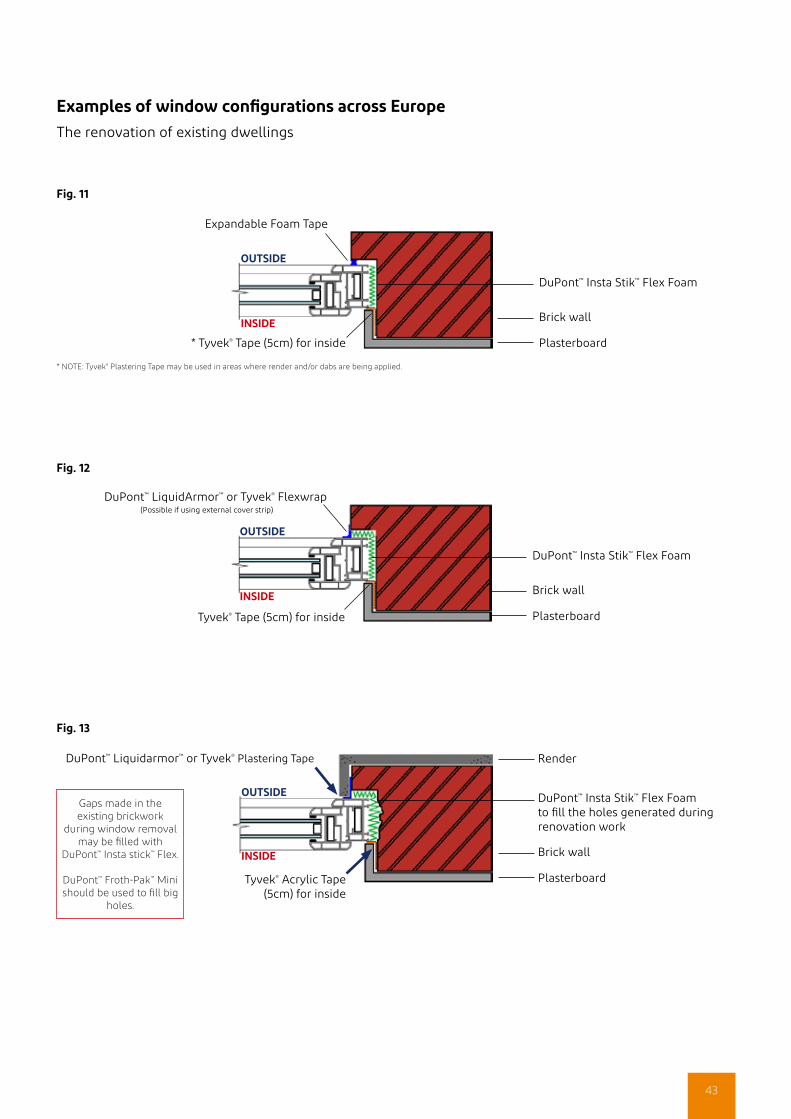
Brick wall
Plasterboard* Tyvek® Tape (5cm) for inside
Expandable Foam Tape
OUTSIDE
INSIDE
DuPont™ Insta Stik™ Flex Foam
* NOTE: Tyvek® Plastering Tape may be used in areas where render and/or dabs are being applied.
Tyvek® Tape (5cm) for inside
DuPont™ LiquidArmor™ or Tyvek® Flexwrap
OUTSIDE
INSIDE Brick wall
Plasterboard
DuPont™ Insta Stik™ Flex Foam
(Possible if using external cover strip)
DuPont™ Insta Stik™ Flex Foam to fill the holes generated during renovation work
Tyvek® Acrylic Tape (5cm) for inside
OUTSIDE
INSIDE
DuPont™ Liquidarmor™ or Tyvek® Plastering Tape
Brick wall
Plasterboard
Render
Fig. 11
Fig. 12
Fig. 13
Gaps made in the existing brickwork
during window removal may be filled with
DuPont™ Insta stick™ Flex.
DuPont™ Froth-Pak™ Mini should be used to fill big
holes.
Examples of window configurations across EuropeThe renovation of existing dwellings

44
This eaves access door should have insulation and draught seals fitted
Ceiling downlight Mains smoke alarm
New buildAt the design stage of a new build domestic construction, the recommendations of BS 9250:2007 can be followed and an AVCL can be specified to establish airtightness at the ceiling line. As a continuous airtight and vapour tight layer, this important component will also regulate vapour drive and greatly reduce the risk of condensation within the roof space or rafter zone. This is especially the case during the early months when the building may be undergoing a drying-out phase.
Renovation & RefurbishmentA refurbishment project such as in strip-and-relay work presents its own obstacles to the method above, as typically there will already be an existing ceiling in place. Installing an AVCL for airtightness and condensation control is therefore not normally possible. However, where no wet trades have been employed within the building the internal humidity levels should be reasonably stable. As the condensation risk is therefore negligible, the existing ceiling (and associated plaster & paint layers) should provide a sufficient level of vapour control. If Tyvek® Supro is being used as the roof underlay, ventilation to the roof beneath will not be necessary. When considering airtightness however, the integrity of the existing ceiling, whether plasterboard or lathe & plaster should be taken into account. Any gaps, cracks or penetrations in the ceiling of a warm or cold pitched roof will allow high levels of internal heat and vapour to flow freely into the roof construction.
Existing loft access hatches should be checked to ensure they are up to current standards and if in doubt, should be replaced with a modern insulated unit that incorporates compressible draught seals. Eaves access doors within a dwarf wall should be checked and if necessary upgraded with insulation and draught sealed.
If new light fittings or smoke alarms are to be installed, any penetrations made for wiring can be made good by sealing with Tyvek® FlexWrap EZ.
The retrospective installation of downlights will present significant disruption to the ceiling line. Special care and attention should be paid to fitments of this kind to reduce the detrimental effect that they can have on airtightness and condensation control. All ceiling spotlights/downlights should be low energy LED type and units which are fire rated (F-Capped approved) and airtight (e.g. IP65 rated) should be considered as best practice, especially over bathrooms or kitchens. Clearance for the unit within the insulation above will still be required, but this should be minimised to avoid cold bridging. The insulation will not need to be cut away entirely, as would be done with older halogen units, as heat emissions from LED units are very low.

Suitable DuPont™ Tyvek® membranes to enhance airtightness on external walls and roofs• Tyvek® Housewrap, Wall
• Tyvek® FireCurb® Housewrap, Wall
• Tyvek® StructureGuard™, Wall
• Tyvek® Supro, Wall, Roof
• Tyvek® Reflex, Wall
• Tyvek® e-Guard W1, Wall
• Tyvek® UV Façade Wall, Roof
• Tyvek® UV Façade Plus, Wall
Useful step by step roof and wall installation videos are available from the DuPont™ Tyvek® Building Knowledge Centre. Please email: [email protected]
45

46
External Airtightness LineWhilst the main emphasis for airtightness should be on the internal side of the construction, it is also possible for external airtightness to be enhanced with a breather membrane. To be suitable, the material should have a low permeability to the passage of air and be installed continuously, with the provision for joint sealing. Please note however, that a very high level of airtightness cannot be achieved with the breather membrane alone, but a combination of both internal and external air sealing would allow optimum energy efficiency to be achieved.
Suitable Tyvek® External Membranes to enhance AirtightnessAs with the internal AVCL, the continuity of a Tyvek® membrane when used as the external airtightness line is fundamental. The principles in installation are therefore the same, with all laps, junctions and penetrations sealed. Many of the tapes and sealants within the Tyvek® & AirGuard® range can be used, but there are also some that are specific to certain products. For information please refer to the Product Selector table on pages 62 & 63.
Suitability & DurabilityNaturally, a membrane that is used to form the airtightness line should be handled with care to avoid damage. Even so, externally applied membranes should be able to cope with normal site handling, which in reality is often quite demanding. Class W1 water resistance, exposure to damaging UV and strong wind forces should also be considered. The durability and robustness of Tyvek® membranes is exceptional, so there is assurance that the products will perform well during the construction phase and for a long time after the project is complete.

47
Roof & Wall membranes: General Installation
OrientationAll Tyvek® membranes are installed with the DuPont™ & Tyvek® brands facing outwards. Membranes are normally laid horizontally, but may also be installed vertically to suit the substrate, cladding, battens and brackets.
FixingTyvek® Acrylic Double-sided Tape may be used to provide short-term temporary fixing, prior to the installation of external insulation, battens or cladding brackets, which should be installed as soon as possible. Galvanised clout nails with a large flat head may also be used at the fixing centres stated below:
Note: Fixing centres for roof applications would be determined by the rafter spacings, e.g. 450mm, 600mm, etc.
Fixings for various substrates:
As the airtightness line, the Tyvek® membrane should be connected and sealed to any adjacent surface, detail or penetration. The correct tape or sealant product can be found in the Tapes Selection table on pages 62 & 63.
Windows & doors In most cases the Tyvek® membrane would be installed before window and door units are fitted. The membrane should be cut and dressed into window/door reveals and sealed with tape to the AVCL. If the window/door units are already in place, dress the membrane around the opening and seal to the frame with the appropriate tape product (see table on pages 62 & 63).
Roof windows Window units for pitched roofs are usually supplied with a dedicated flashing. Although these work well for weather resistance additional sealing for airtightness will need to be considered. In this case, sealing around roof windows can be achieved in a similar way to those for wall systems.
Cavity barriers/trays/flashingsTyvek® membranes used as the airtightness line should lap onto the detail with the appropriate laps contained in table above and sealed with Tyvek® Double-sided Tape (acrylic).
Adjacent roof & wall junctionsContinuity must be maintained by sealing the Tyvek® membrane at all adjacent roof and wall junctions. Laps contained in the table above should be noted.
Timber: Stainless steel staples or clout nailsSFS: Drill tip screw with EPDM rubber washerMasonry: Anchor fixing system or a masonry screw and EPDM washerCP Board: Stainless steel staples or drill tip screwInsulation: Proprietary expanding fixing anchor with large plastic collar
Laps Fixing centres
Walls Roofs Walls Roofs
Horizontal: 100mm Horizontal: 150mm Horizontal: 600mm Horizontal: 600mm
Vertical: 150mm Vertical: 300mm Vertical: 300mm Vertical: 300mm
At corners: 300mm Horizontal: 300mm Horizontal: 150mm Horizontal: 150mm

48
Sealing lapsAll horizontal laps between courses, at ridges, hips and valleys should be sealed with Tyvek® Double-sided Tape (acrylic) or Tyvek® Acrylic Tape (single-sided). It is generally easier to seal laps in a Tyvek® Supro roof underlay with adhesive tape when the membrane is installed fully-supported over insulation or timber boarding. However, the laps can also be sealed when the underlay is laid unsupported and the membrane pulled taut over the support.
Note: Tyvek® Supro Plus has an integral sealing tape provided.
Abutments & Chimney stacksWhere a Tyvek® membrane dresses onto an abutment detail, a chimney or other brick/block/masonry surface, the membrane may be sealed with a butyl based adhesive tape such as Tyvek® Butyl Tape (double-sided) or Tyvek® FlexWrap (single-sided).Tyvek® Primer should be used where necessary to improve adhesion.
Connection to an adjacent buildingWhere a new project is to abut an existing building it is important to accommodate movement between the new and existing structures. The inherent versatility and flexibility of Tyvek® FlexWrap NF should be considered to establish an airtight junction detail and expansion joint. As project details can vary considerably we would recommend liaising with the Tyvek® Building Knowledge Centre to discuss possible solutions.
Pitched Roofs Installation Installation of the Tyvek® roof underlay would be as per the guidance contained within our Technical Guide for Roofs (Vol 1). With respect to achieving airtightness, the following points should be noted:
Eaves (Details also suitable for warm/hybrid roofs)
In all cases with a ‘standard’ eaves detail, the Tyvek® Supro underlay should overlap the eaves sheet by 150mm (minimum) and sealed with Tyvek® Double-sided Tape.
Forming the airtightness line with a pitched roof underlay introduces complications at the wallplate. In some cases it may be possible to make the roof void airtight at the point circled below in Option 1.
Alternatively, it may be more practical to line the inside of the fascia and soffit to form an ‘airtight box’ as in Option 2.
There may be instances where it is not practicable to make the roof underlay the external airtightness line. In these cases the use of a dedicated internal Air-Barrier or AVCL should be considered. Please see section on Internal AT Line for details of AirGuard® AVCL products.
For more details on roof underlay installation please refer to the Tyvek® Technical Guide for Roofs (Vol. 1)

Product Portfolio
• DuPont™ AirGuard® air and vapour control layers
• DuPont™ Tyvek® breather membranes
• DuPont™ Tyvek® and DuPont™ AirGuard® adhesive accessories
• DuPont™ Insta Stik™ Polyurethane Foam Adhesive
• DuPont™ Froth-Pak™ Mini Polyurethane Foam Sealant
• DuPont™ Great Stuff™ Polyurethane Foam Sealant
49

50
DuPont™ AirGuard® ControlStrong AVCL for optimal airtightness in roofs, walls and floors
Properties
Style name 8327AD
Composition DuPont™ Typar® spunbond & Ethylen-Butylacrylate Copolymer
Product designation acc. to EN 13984 Type A
Roll size 1.5 m x 50 m
Roll weight 8.5 kg
Mass per unit area 108 g/m2
Reaction to fire Class E
Water vapour transmission (Sd) 5 m
CE marking Yes
BBA certificate N° 08/4548 and N° 90/2548
• Limited vapour transmission • Airtight and water resistant• CE-conformity for plastic and rubber vapour control layer (EN 13984)• Superior mechanical strength• Reaction to Fire: Class E• Lightweight - easy to install• Reduces convective heat losses• Reduces convective vapour transfer• Reduces risk of trapped moisture in the insulation
** A low emissivity value = high reflectivity = superior thermal performance.
DuPont™ AirGuard® ReflectiveAVCL which boosts your thermal insulation
• Highly vapour resistant• Airtight and water resistant• CE-conformity for plastic and rubber vapour control layer (EN 13984)• Reflects ca. 95% of radiant heat• Reduces heat losses by increasing of R-value of the construction• Superior mechanical strength• Reaction to Fire: Class E• Considerably reduces risk of condensation into the insulation• Reduces convective heat losses
Properties
Style name 5814X
Composition Composite of Polypropylene, Polyethylene and an aluminium foil
Product designation acc. to EN 13984 Type A
Roll size 1.5 m x 50 m
Roll weight 11,5 kg
Mass per unit area 149 g/m2
Reaction to fire Class E
Emissivity** 0.05
Water vapour transmission (Sd) 2000 m
CE marking Yes
BBA certificate N° 08/4548 and N° 90/2548
51
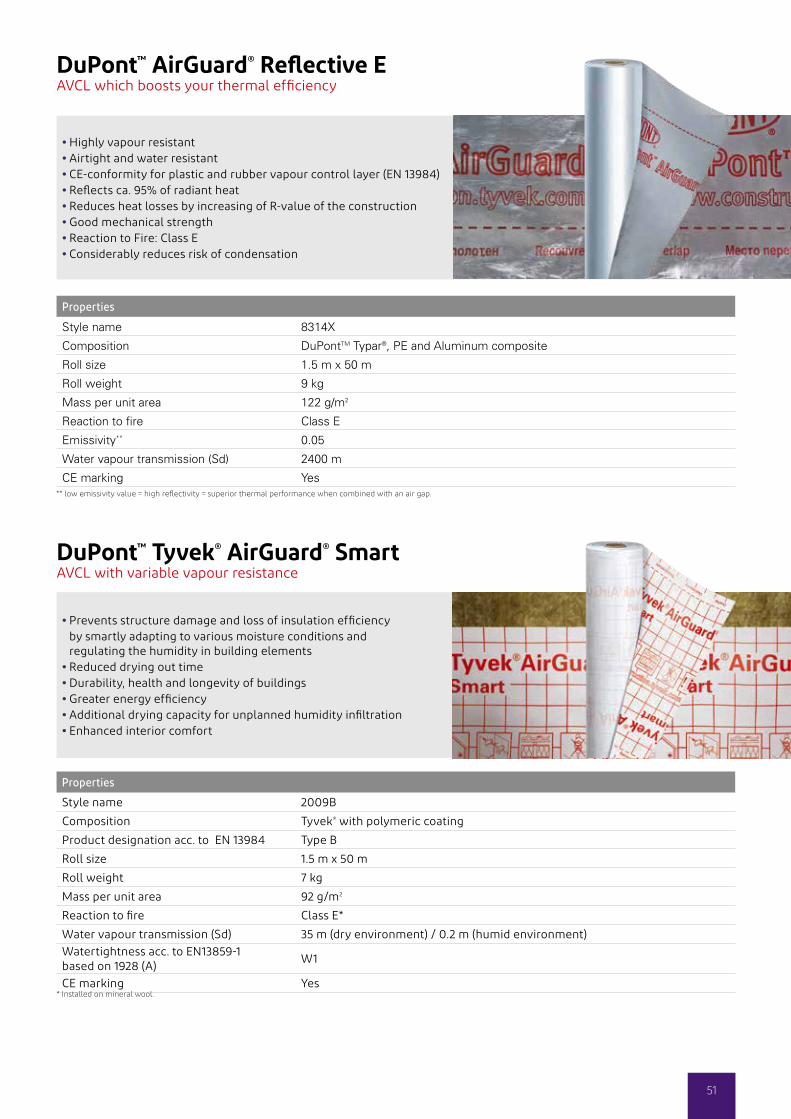
DuPont™ AirGuard® Reflective EAVCL which boosts your thermal efficiency
• Highly vapour resistant• Airtight and water resistant• CE-conformity for plastic and rubber vapour control layer (EN 13984)• Reflects ca. 95% of radiant heat• Reduces heat losses by increasing of R-value of the construction• Good mechanical strength• Reaction to Fire: Class E• Considerably reduces risk of condensation
Properties
Style name 8314X
Composition DuPontTM Typar®, PE and Aluminum composite
Roll size 1.5 m x 50 m
Roll weight 9 kg
Mass per unit area 122 g/m2
Reaction to fire Class E
Emissivity** 0.05
Water vapour transmission (Sd) 2400 m
CE marking Yes** low emissivity value = high reflectivity = superior thermal performance when combined with an air gap.
* Installed on mineral wool.
DuPont™ Tyvek® AirGuard® SmartAVCL with variable vapour resistance
• Prevents structure damage and loss of insulation efficiency by smartly adapting to various moisture conditions and regulating the humidity in building elements
• Reduced drying out time• Durability, health and longevity of buildings• Greater energy efficiency• Additional drying capacity for unplanned humidity infiltration• Enhanced interior comfort
Properties
Style name 2009B
Composition Tyvek® with polymeric coating
Product designation acc. to EN 13984 Type B
Roll size 1.5 m x 50 m
Roll weight 7 kg
Mass per unit area 92 g/m2
Reaction to fire Class E*
Water vapour transmission (Sd) 35 m (dry environment) / 0.2 m (humid environment)Watertightness acc. to EN13859-1 based on 1928 (A)
W1
CE marking Yes

52
DuPont™ Tyvek® Supro / Tyvek® Supro PlusThe market-leading breather membrane
Properties
Style name 2507B
Composition Composite of High Density Polyethylene, Polypropylene
Roll size 1.0 m x 50 m / 1.5 m x 50 m
Roll weight 11 kg
Mass per unit area 145 g/m2
UV exposure 4 months
Product- / Functional layer thickness 450 / 175 µm
Water vapour transmission (Sd) 0.025 m
CE marking Yes
BBA certificate N° 08/4548
NSAI certificate N° 04/0157
Compliant with BS5534 In all 5 UK wind zones
• Available with integrated tape (Supro Plus)• Excellent water resistance• Airtight / Windtight - compliant with BS5534• Vapour-permeable• Provides superior air and moisture management for commercial and
residential buildings• For all supported and unsupported pitched roof applications -
warm, hybrid and cold roofs• Suitable for Scottish sarking board systems• Suitable for wall and floor applications• Long term performance
Properties
Style name 2510B
CompositionComposite of High Density Polyethylene, Polypropylene non-woven and open mesh spacer
Roll size 1.5 m x 25 m
Roll weight 15.5 kg
Mass per unit area 407 g/m2
UV exposure 4 months
Product- / Functional layer thickness 7.40 / 0.22 mm
Water vapour transmission (Sd) 0.03 m
CE marking Yes
DuPont™ Tyvek® MetalA vapour-permeable drainage membrane
• With integrated tape • Excellent water resistance • Airtight / Windtight• Vapour-permeable• Allows condensation beneath stainless steel, aluminium, copper
and zinc roofs to drain away• Should be installed over 150 mm wide timber boarding with
2 mm gaps between• For use as drainage membrane beneath standing seam metal
sheets roofs over timber boarding or SiPs.• Long term performance

53
Properties
Style name 3060B
Composition High Density Polyethylene
Roll size 1.4 m x 100 m / 2.8 m x 100 m
Roll weight 9 kg / 18 kg
Mass per unit area 63 g/m2
UV exposure 4 months
Product- / Functional layer thickness 175 µm
Water vapour transmission (Sd) 0.01 m
CE marking Yes
BBA certificate N° 90/2548
NSAI certificate N° 02/0144
DuPont™ Tyvek® HousewrapThe ideal vapour-permeable timber frame wall membrane
• Highly permeable to water vapour (sd-value: 0.01 m)• Airtight / windtight and highly water resistant (>W1)• Enhances the airtightness of the construction• Lightweight, flexible and easy to install• Should be surface applied, fixed directly to sheathing ply /OSB,
insulation or blockwork• Established & trusted long-term performance• Also suitable for steel-frame and concrete structures
Properties
Style name 1560B
Composition High Density Polyethylene
Roll size 1.4 m x 100 m / 2.7 m x 100 m
Roll weight 9 kg / 18 kg
Mass per unit area 58 g/m2
UV exposure 4 months
Product- / Functional layer thickness 175 µm
Water vapour transmission (Sd) 0.015 m
CE marking Yes
BBA certificate N° 08/4548
DuPont™ Tyvek® StructureGuard™
The professional choice for commercial buildings
• Exceptional airtightness• Windtight and highly water resistant (>W1)• Lightweight, flexible and easy to install• Provides superior air and moisture management for commercial and
residential buildings• Long-term performance• Suitable for walls in timber frame, metal frame, masonry and
internal insulation upgrade
54
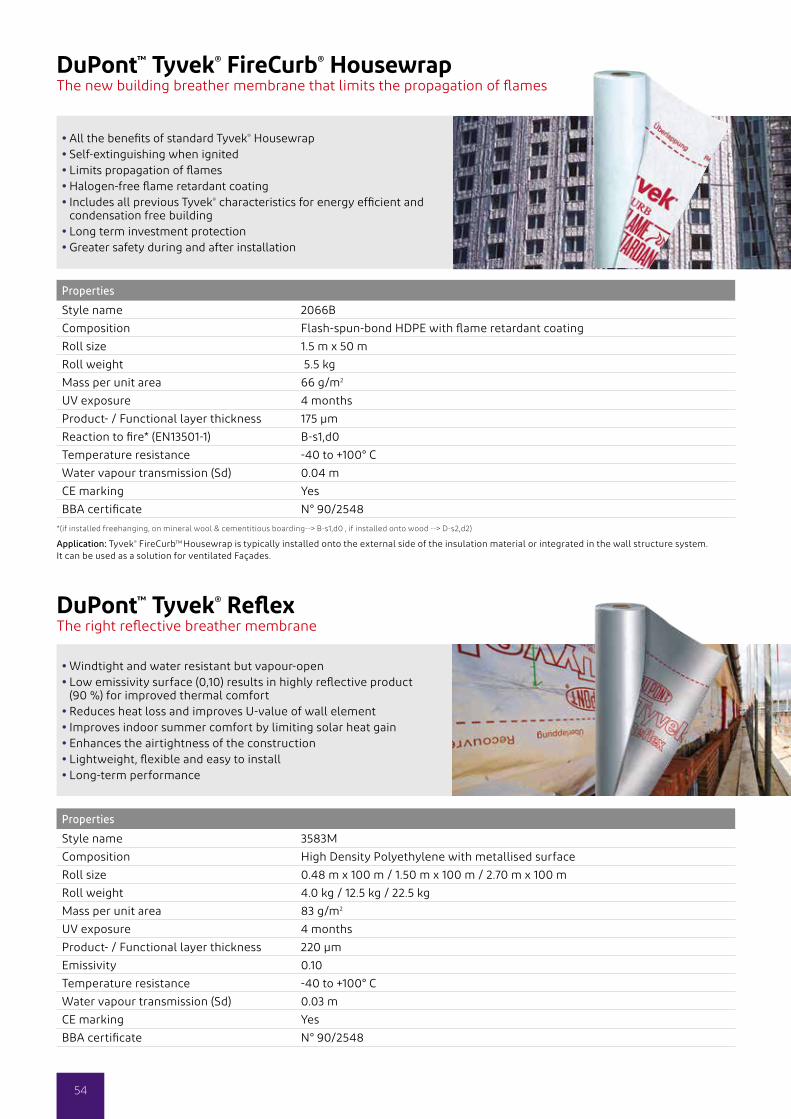
DuPont™ Tyvek® FireCurb® HousewrapThe new building breather membrane that limits the propagation of flames
Properties
Style name 2066B
Composition Flash-spun-bond HDPE with flame retardant coating
Roll size 1.5 m x 50 m
Roll weight 5.5 kg
Mass per unit area 66 g/m2
UV exposure 4 months
Product- / Functional layer thickness 175 µm
Reaction to fire* (EN13501-1) B-s1,d0
Temperature resistance -40 to +100° C
Water vapour transmission (Sd) 0.04 m
CE marking Yes
BBA certificate N° 90/2548
• All the benefits of standard Tyvek® Housewrap• Self-extinguishing when ignited• Limits propagation of flames• Halogen-free flame retardant coating• Includes all previous Tyvek® characteristics for energy efficient and
condensation free building• Long term investment protection• Greater safety during and after installation
*(if installed freehanging, on mineral wool & cementitious boarding--> B-s1,d0 , if installed onto wood --> D-s2,d2)
Application: Tyvek® FireCurbTM Housewrap is typically installed onto the external side of the insulation material or integrated in the wall structure system. It can be used as a solution for ventilated Façades.
Properties
Style name 3583M
Composition High Density Polyethylene with metallised surface
Roll size 0.48 m x 100 m / 1.50 m x 100 m / 2.70 m x 100 m
Roll weight 4.0 kg / 12.5 kg / 22.5 kg
Mass per unit area 83 g/m2
UV exposure 4 months
Product- / Functional layer thickness 220 µm
Emissivity 0.10
Temperature resistance -40 to +100° C
Water vapour transmission (Sd) 0.03 m
CE marking Yes
BBA certificate N° 90/2548
DuPont™ Tyvek® ReflexThe right reflective breather membrane
• Windtight and water resistant but vapour-open• Low emissivity surface (0,10) results in highly reflective product
(90 %) for improved thermal comfort• Reduces heat loss and improves U-value of wall element• Improves indoor summer comfort by limiting solar heat gain• Enhances the airtightness of the construction• Lightweight, flexible and easy to install• Long-term performance

55
Properties
Style name 2018M
Composition High Density Polyethylene with metallised surface
Roll size 2.70 m x 100 m
Roll weight 30 kg
Mass per unit area 110 g/m2
UV exposure 4 months
Product- / Functional layer thickness 250 / 175 µm
Water vapour transmission (Sd) 0.05 m
Emissivity 0.03
CE marking Yes
BBA certificate N° 90/2548
DuPont™ Tyvek® e-Guard W1The new reflective wall membrane for improved thermal efficiency membrane
• Excellent long-term performance windtight and water resistant but vapour-open reflects 97% of heat radiation (emissivity 3%) for improved thermal comfort throughout the year
• Reduces heat loss and improves U-value of wall element
• Improves indoor summer comfort by limiting solar heat gain
• Enhances the airtightness of the construction
• Lightweight, flexible and easy to install
Properties
Style name 2524B
Composition Composite of High Density Polyethylene, and Polypropylene
Roll size 1.5 m x 50 m / 3.0 m x 50 m
Roll weight 15 kg / 30 kg
Mass per unit area 195 g/m2
UV exposure see details on technical datasheet
Product- / Functional layer thickness 600 /220 µm
Water vapour transmission (Sd) 0.035 m
CE marking Yes
BBA certificate N° 90/2548
DuPont™ Tyvek® UV Façade / Tyvek® UV Façade PlusProtection for open and ventilated rainscreen cladding
• Black, unbranded membrane• Tested for 5000 hours UV ageing to EN 13859-2, followed by 90 day
heat exposure at 70 °C. The membrane retained its full performance• Windtight, water resistant and vapour-permeable• For joint width of up to 3 cm• Greatly enhances the airtightness of the construction• Very robust, but flexible & easy to install• Long-term performance• Suitable for open or ventilated cladding in timber, metal, stone and
other materials• Reaction to fire class E

56
• Suitable for sealing membrane laps, but particularly suitable for making good around penetrations and for damage repair for most Tyvek® underlays and AirGuard® vapour control layers
• With a split liner it is ideal to seal the AirGuard® vapour control layer to windows and doors
Essential DuPont™ Tyvek® and DuPont™ AirGuard® Tapes and adhesive accessories
The energy efficiency of domestic and non-domestic buildings is to a great extent dependant on the continuity of materials used in the building envelope. The range of accessories has been developed to complement and enhance building envelope solutions with Tyvek® and AirGuard® membranes.
It helps to:• reduce or avoid air leakage through the building envelope• reduce or avoid wind washing• reduce or avoid dust and pollen penetration• prevent animals (birds, insects...) from entering buildings.
Create windtight, airtight and watertight seals with DuPont™ Tyvek® and DuPont™ AirGuard® tapes and accessories
Tyvek® Acrylic Tape (2060B)Single-sided DuPont™ Tyvek® (HD-PE) with modified acrylic adhesive with or without a paper split-release liner.
Dimensions75mm x 25m
60mm x 25m with split liner
Rolls per box75mm: 8
60mm: 10
57
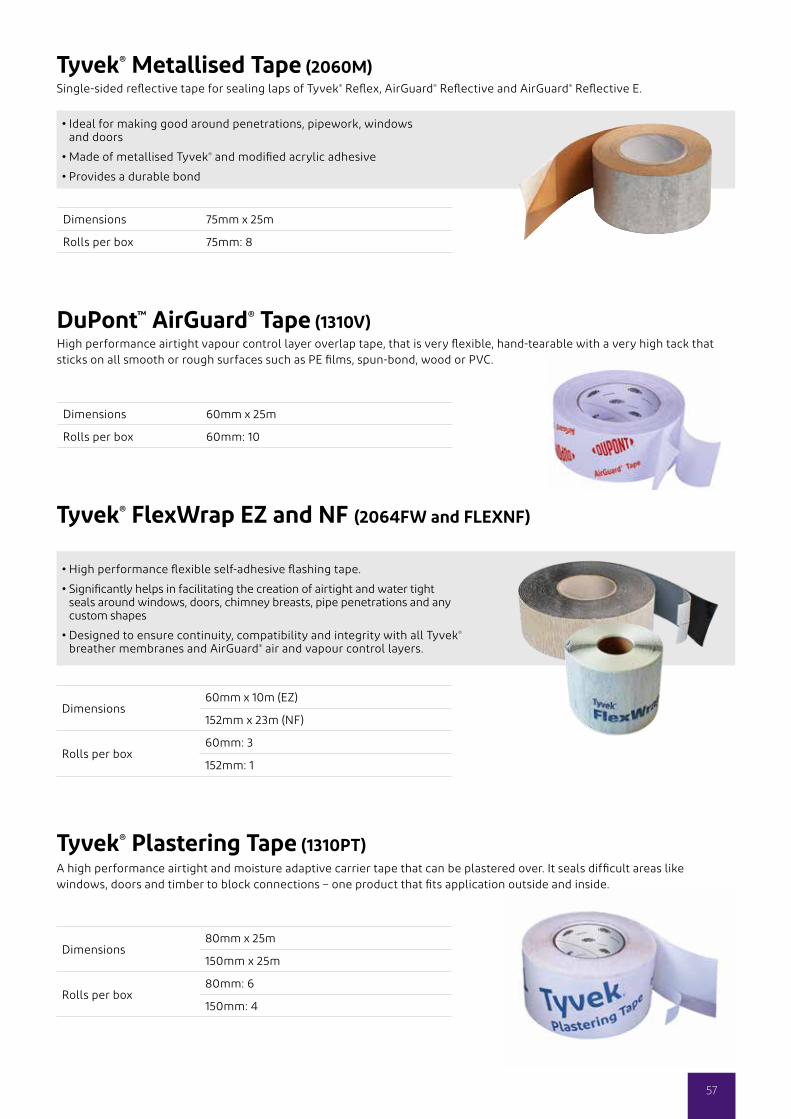
Tyvek® Metallised Tape (2060M)Single-sided reflective tape for sealing laps of Tyvek® Reflex, AirGuard® Reflective and AirGuard® Reflective E.
• Ideal for making good around penetrations, pipework, windows and doors
• Made of metallised Tyvek® and modified acrylic adhesive
• Provides a durable bond
Tyvek® FlexWrap EZ and NF (2064FW and FLEXNF)
• High performance flexible self-adhesive flashing tape.
• Significantly helps in facilitating the creation of airtight and water tight seals around windows, doors, chimney breasts, pipe penetrations and any custom shapes
• Designed to ensure continuity, compatibility and integrity with all Tyvek® breather membranes and AirGuard® air and vapour control layers.
Dimensions60mm x 10m (EZ)
152mm x 23m (NF)
Rolls per box60mm: 3
152mm: 1
Tyvek® Plastering Tape (1310PT)A high performance airtight and moisture adaptive carrier tape that can be plastered over. It seals difficult areas like windows, doors and timber to block connections – one product that fits application outside and inside.
Dimensions80mm x 25m
150mm x 25m
Rolls per box80mm: 6
150mm: 4
Dimensions 75mm x 25m
Rolls per box 75mm: 8
DuPont™ AirGuard® Tape (1310V)High performance airtight vapour control layer overlap tape, that is very flexible, hand-tearable with a very high tack that sticks on all smooth or rough surfaces such as PE films, spun-bond, wood or PVC.
Dimensions 60mm x 25m
Rolls per box 60mm: 10

58
Tyvek® Double-sided Tape (1310D)Double-sided acrylic tape ideal for sealing overlaps and bonding Tyvek® membranes to smooth surfaces.
• Excellent adhesion properties under extreme humidity conditions
• Strong initial tack
• Recommended for Tyvek® UV Façade, but suitable for all Tyvek® membranes and AirGuard® air and vapour control layers (AVCL)
Tyvek® Butyl Tape (1311B)Double-sided butyl based sealant, used to form a moisture and airtight seal between a Tyvek® membrane or an AirGuard® air and vapour control layer and most commonly used building materials.
• The product is compatible with brickwork, blockwork, masonry, timber, metalwork and most plastic products
• Tyvek® Butyl Tape is most effective when used under compression, e.g. under a timber batten and is recommended for use at perimeters, chimneys, abutments and for sealing nail penetrations and around electrical sockets
Dimensions20mm x 30m
50mm x 30m
Rolls per box20mm: 8
50mm: 4
Dimensions 50mm x 25m
Rolls per box 50mm: 12
Tyvek® Double-sided Tape (1310D)Double-sided acrylic tape ideal for temporary fixings of a vapour control layer and limited space detailing.
Dimensions 20mm x 25m
Rolls per box 20mm: 10

59
• Single-sided acrylic tape with high UV resistance.
• Especially designed for sealing Tyvek® UV Façade overlaps, penetration and joints in a durable and non-contrasting manner.
• Excellent ageing and outdoor performance.
Tyvek® UV Façade Tape (1312F)
Dimensions 75mm x 25m
Rolls per box 75mm: 8
Tyvek® Primer (1310P)Transparent primer that is permanently tacky after curing and with very fast curing time. It is recommended for very porous surfaces to create a good adhesion.
Capacity 1L
Bottles per box 6
DuPont™ AirGuard® Sealant (1211S)An adhesive sealant for permanently elastic, airtight bonding of joints and structural connections as well as connections of vapour control layers to many surfaces. It provides excellent adhesion to most surfaces such as stone, concrete, plaster, plasterboard and wood.
Capacity 310ml
Cartridges per box 20

60
Spray Polyurethane Accessories- Sealants, Adhesives and Insulation
• Composition: One component, moisture curing, Polyurethane foam• Product size: 150ml, 300ml, 500ml and 750ml cans• Dispenser: Plastic Straw included
- Expanding foam, can be sprayed with the can in every position, works any way up- Bonds to Masonry, Metal, Glass, wood and most plastics
DuPont™ Great Stuff™ All Direction Straw FoamAll direction Spray Polyurethane Foam
• Description: Spray Polyurethane foam sealant for Windows and Doors • Composition: One component, moisture curing, Polyurethane foam• Product size: 750ml cans• Dispenser: Spray Gun (not included)
- Bonds to Aluminium, PVC, Masonry, Metal, Glass, wood and most plastics
DuPont™ Great Stuff™ Pro Fixer Window & DoorMinimal expansion Spray Polyurethane Sealant
• Foam colour: Pink foam for easy identification • Composition: One component, moisture curing, Polyurethane foam• Product size: 750ml cans• Dispenser: Straw (Plastic Straw included) / Spray Gun (not included)
- Spray Polyurethane foam sealant Fire Rated / B1 Fire Rated according to DIN 4102- 5 hours fire rating obtain with a concrete gap size of 15mm x 220mm according to the BS 476 Pt 20:1987- Different gap size and material will impact the fire performance- Bonds to Masonry, Metal, Glass, wood and most plastics, for other surfaces please contact DuPont- Noise reduction according to EN ISO 717-1:2013 up to 58dB
DuPont™ Great Stuff™ Pro Fire Rated FoamRegular expansion Spray Polyurethane Sealant Fire Rated

61
• Composition: One component, moisture curing, Polyurethane foam• Product size: 750ml cans• Dispenser: Spray Gun (not included)
- Spray Polyurethane foam gap filler and cracks - Bonds to Masonry, Metal, Glass, wood and most plastics, for other surfaces please contact DuPont
DuPont™ Great Stuff™ Pro Gaps & CracksSpray Polyurethane expanding foam
• Description: Spray Polyurethane foam adhesive• Composition: One component, moisture curing, Polyurethane foam• Product size: 750ml cans• Dispenser: Straw (Plastic Straw included) / Spray Gun (not included)
- Fast curing- B2 Fire Rated according to DIN 4102, for thickness up to 10mm- Adhesion to Plasterboard, Insulation boards (PU, PIR, MW, XPS, EPS), Timber, Blockwork, Bricks, Glass,
Metal, Roof tiles, for other surfaces please contact DuPont - Adheres up to 15m² with one can- Can be used horizontally or vertically
DuPont™ Insta Stik™ Multi-Purpose Fast CureSpray Polyurethane foam adhesive
• Description: Spray Polyurethane Flexible foam adhesive• Composition: One component, moisture curing, Polyurethane foam• Product size: 750ml cans• Dispenser: Straw (Plastic Straw included) / Spray Gun (not included)
- Fast curing- Noise reduction according to EN ISO 717-1:2013 up to 60dB- Airtightness according to EN 12114 of 600Pa- B2 Fire Rated according to DIN 4102, for thickness up to 20mm- Adheres to Aluminium, PVC, timber, Blockwork, Bricks, Glass, Metal, Roof tiles
DuPont™ Insta Stik™ Flex +Spray Polyurethane Flexible foam adhesive
• Description: Spray Polyurethane foam insulation• Composition: Two component Polyurethane foam (Component A MID, Component B Polyol)• Product Variant: QR (quick rise), SR (slow rise), HD (high density)• Product size: 2 x 5,5 kg (FP180), 2 x 23 kg (FP600) • Dispenser: INSTA-FLO™ Gun (not included in FP600, include in the FP180)
- Supplied in the UK by DuPont BKC, Bristol, UK- Adheres to timber, Blockwork, Bricks, Glass, Metal, Roof tiles, PVC, Aluminium and
most plastics
DuPont™ Froth-Pak™
Spray Polyurethane Insulation
62
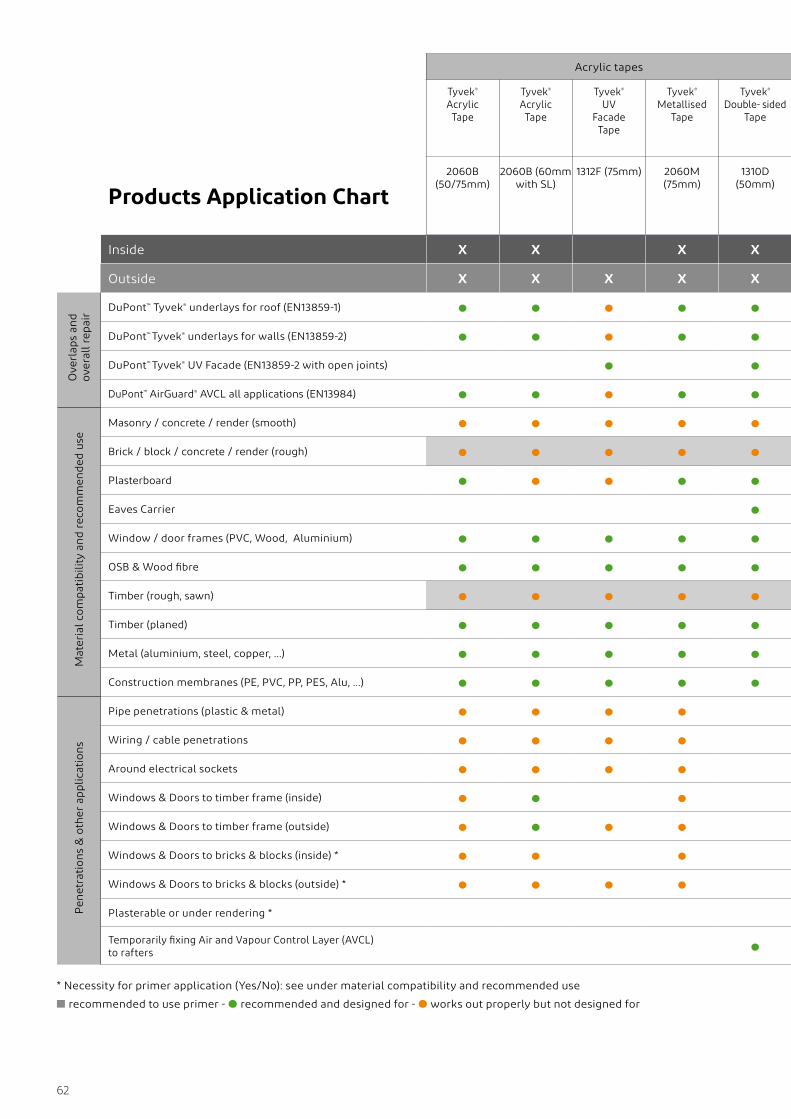
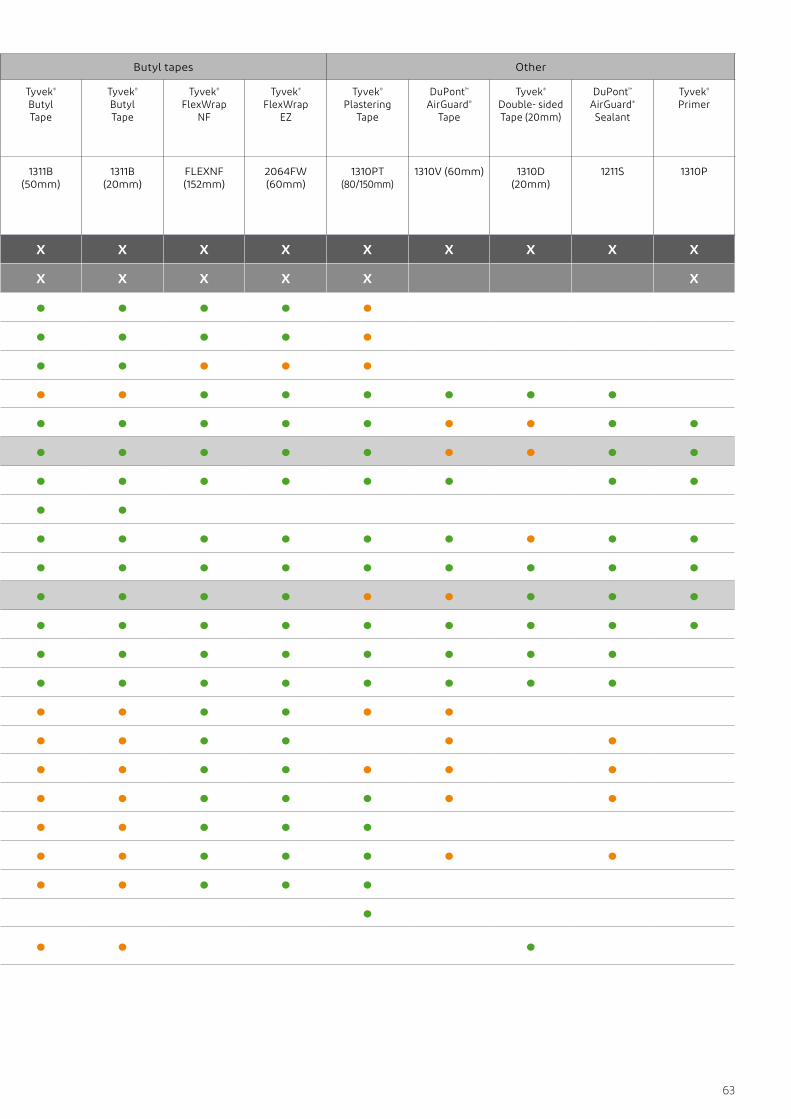
* Necessity for primer application (Yes/No): see under material compatibility and recommended use
■ recommended to use primer - ● recommended and designed for - ● works out properly but not designed for
Acrylic tapes Butyl tapes Other
Tyvek® Acrylic Tape
Tyvek® AcrylicTape
Tyvek® UV
FacadeTape
Tyvek® Metallised
Tape
Tyvek® Double- sided
Tape
Tyvek® Butyl Tape
Tyvek® Butyl Tape
Tyvek® FlexWrap
NF
Tyvek® FlexWrap
EZ
Tyvek® Plastering
Tape
DuPont™ AirGuard®
Tape
Tyvek® Double- sided Tape (20mm)
DuPont™ AirGuard® Sealant
Tyvek® Primer
Products Application Chart2060B
(50/75mm)2060B (60mm
with SL)1312F (75mm) 2060M
(75mm)1310D
(50mm)1311B
(50mm)1311B
(20mm)FLEXNF (152mm)
2064FW (60mm)
1310PT (80/150mm)
1310V (60mm) 1310D (20mm)
1211S 1310P
Inside X X X X X X X X X X X X X
Outside X X X X X X X X X X X
Ove
rlap
s an
d
over
all r
epai
r DuPont™ Tyvek® underlays for roof (EN13859-1)
DuPont™ Tyvek® underlays for walls (EN13859-2)
DuPont™ Tyvek® UV Facade (EN13859-2 with open joints)
DuPont™ AirGuard® AVCL all applications (EN13984)
Mat
eria
l com
pati
bili
ty a
nd
reco
mm
ende
d u
se
Masonry / concrete / render (smooth)
Brick / block / concrete / render (rough)
Plasterboard
Eaves Carrier
Window / door frames (PVC, Wood, Aluminium)
OSB & Wood fibre
Timber (rough, sawn)
Timber (planed)
Metal (aluminium, steel, copper, …)
Construction membranes (PE, PVC, PP, PES, Alu, …)
Pen
etra
tion
s &
oth
er a
pplic
atio
ns
Pipe penetrations (plastic & metal)
Wiring / cable penetrations
Around electrical sockets
Windows & Doors to timber frame (inside)
Windows & Doors to timber frame (outside)
Windows & Doors to bricks & blocks (inside) *
Windows & Doors to bricks & blocks (outside) *
Plasterable or under rendering *
Temporarily fixing Air and Vapour Control Layer (AVCL) to rafters
63
* Necessity for primer application (Yes/No): see under material compatibility and recommended use
■ recommended to use primer - ● recommended and designed for - ● works out properly but not designed for
Acrylic tapes Butyl tapes Other
Tyvek® Acrylic Tape
Tyvek® AcrylicTape
Tyvek® UV
FacadeTape
Tyvek® Metallised
Tape
Tyvek® Double- sided
Tape
Tyvek® Butyl Tape
Tyvek® Butyl Tape
Tyvek® FlexWrap
NF
Tyvek® FlexWrap
EZ
Tyvek® Plastering
Tape
DuPont™ AirGuard®
Tape
Tyvek® Double- sided Tape (20mm)
DuPont™ AirGuard® Sealant
Tyvek® Primer
Products Application Chart2060B
(50/75mm)2060B (60mm
with SL)1312F (75mm) 2060M
(75mm)1310D
(50mm)1311B
(50mm)1311B
(20mm)FLEXNF (152mm)
2064FW (60mm)
1310PT (80/150mm)
1310V (60mm) 1310D (20mm)
1211S 1310P
Inside X X X X X X X X X X X X X
Outside X X X X X X X X X X X
Ove
rlap
s an
d
over
all r
epai
r DuPont™ Tyvek® underlays for roof (EN13859-1)
DuPont™ Tyvek® underlays for walls (EN13859-2)
DuPont™ Tyvek® UV Facade (EN13859-2 with open joints)
DuPont™ AirGuard® AVCL all applications (EN13984)
Mat
eria
l com
pati
bili
ty a
nd
reco
mm
ende
d u
se
Masonry / concrete / render (smooth)
Brick / block / concrete / render (rough)
Plasterboard
Eaves Carrier
Window / door frames (PVC, Wood, Aluminium)
OSB & Wood fibre
Timber (rough, sawn)
Timber (planed)
Metal (aluminium, steel, copper, …)
Construction membranes (PE, PVC, PP, PES, Alu, …)
Pen
etra
tion
s &
oth
er a
pplic
atio
ns
Pipe penetrations (plastic & metal)
Wiring / cable penetrations
Around electrical sockets
Windows & Doors to timber frame (inside)
Windows & Doors to timber frame (outside)
Windows & Doors to bricks & blocks (inside) *
Windows & Doors to bricks & blocks (outside) *
Plasterable or under rendering *
Temporarily fixing Air and Vapour Control Layer (AVCL) to rafters

64
Heating costs and CO2 emissionsReducing air leakage through the fabric of our buildings is a logical first step in conserving energy and keeping the fuel bills down. If the building envelope can be properly sealed, unintentional air movement through cracks, joints and other sources of air leakage can be avoided. Achieving good airtightness is a passive approach to energy efficiency and is fundamental in our goal to reduce CO2 emissions and go carbon neutral.
The effect of air leakage on thermal insulationThe performance of thermal insulation is largely determined by how well it is protected against external air movement. Cold air, washing across the surface of insulation will reduce the operating temperature of that thermal layer. This creates a chilling effect and increases conductivity by way of a steeper temperature gradient. Air movement could also increase convective heat loss around the thermal layer where any discontinuity exists, thus also reducing its effectiveness . These performance reducing effects are commonly referred to as ‘Wind washing.’
Moisture within a thermal layer will also increase thermal conductivity and for this reason insulation layers should be kept dry. Good airtightness both inside and out will help to maintain a suitable environment for the insulation to provide the required values.
Environmental
A suitable & durable AVCL will provide efficient and long lasting airtightness and protect the structure and insulation against harmful condensation.
A vapour open membrane with suitably low air-permeability will keep the insulation dry and provide protection from the wind, to ensure “as designed” performance.
INTERNAL
EXTERNAL
Reduce summer overheating Nature always tries to achieve equilibrium and to balance things out air will naturally move from a warmer area to a colder area. During winter, to varying degrees, internal heat will be lost through the building fabric to outside air. During the summer, heat transfer through the building fabric is reversed, not least via convection (air movement). Any gaps in the building fabric or weaknesses in the airtightness layer will encourage air leakage, meaning that warm air from the outside will flow into the building interior. During hot weather, poor airtightness will make the insulation work harder, making it less efficient and subsequently interior comfort will be affected.
We are becoming increasingly aware of the fragility of our planet’s eco system and the influence mankind has upon it. With careless actions we run the risk of affecting global weather patterns: more intense and frequent hurricanes, more extreme droughts and an increase in flooding, rain storms and snow. Ingrained in our short-term memory are the storms and floods of 2014.
This intensification of weather and climate extremes is the most visible impact of global warming today. The burning of fossil fuels to heat our buildings is contributing to the increased levels of Greenhouse gases. The global estimation is that human activities
produce over 21 billion tons of carbon dioxide every year. In the UK for example, carbon dioxide emissions from buildings accounts for around 32% of total UK greenhouse gas emissions. Much of this relates to space heating.
© M
atth
ew C
lark
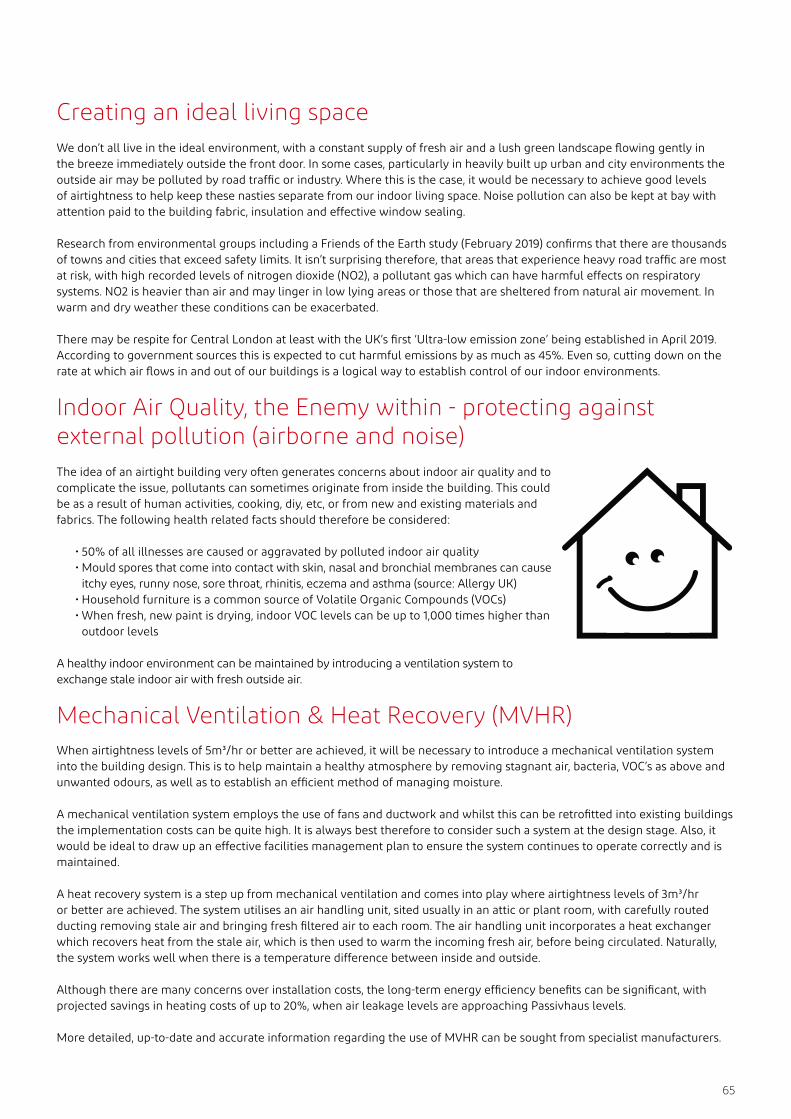
65
Creating an ideal living spaceWe don’t all live in the ideal environment, with a constant supply of fresh air and a lush green landscape flowing gently in the breeze immediately outside the front door. In some cases, particularly in heavily built up urban and city environments the outside air may be polluted by road traffic or industry. Where this is the case, it would be necessary to achieve good levels of airtightness to help keep these nasties separate from our indoor living space. Noise pollution can also be kept at bay with attention paid to the building fabric, insulation and effective window sealing.
Research from environmental groups including a Friends of the Earth study (February 2019) confirms that there are thousands of towns and cities that exceed safety limits. It isn’t surprising therefore, that areas that experience heavy road traffic are most at risk, with high recorded levels of nitrogen dioxide (NO2), a pollutant gas which can have harmful effects on respiratory systems. NO2 is heavier than air and may linger in low lying areas or those that are sheltered from natural air movement. In warm and dry weather these conditions can be exacerbated.
There may be respite for Central London at least with the UK’s first ‘Ultra-low emission zone’ being established in April 2019. According to government sources this is expected to cut harmful emissions by as much as 45%. Even so, cutting down on the rate at which air flows in and out of our buildings is a logical way to establish control of our indoor environments.
Indoor Air Quality, the Enemy within - protecting against external pollution (airborne and noise) The idea of an airtight building very often generates concerns about indoor air quality and to complicate the issue, pollutants can sometimes originate from inside the building. This could be as a result of human activities, cooking, diy, etc, or from new and existing materials and fabrics. The following health related facts should therefore be considered:
• 50% of all illnesses are caused or aggravated by polluted indoor air quality• Mould spores that come into contact with skin, nasal and bronchial membranes can cause
itchy eyes, runny nose, sore throat, rhinitis, eczema and asthma (source: Allergy UK)• Household furniture is a common source of Volatile Organic Compounds (VOCs)• When fresh, new paint is drying, indoor VOC levels can be up to 1,000 times higher than
outdoor levels
A healthy indoor environment can be maintained by introducing a ventilation system to exchange stale indoor air with fresh outside air.
Mechanical Ventilation & Heat Recovery (MVHR)When airtightness levels of 5m³/hr or better are achieved, it will be necessary to introduce a mechanical ventilation system into the building design. This is to help maintain a healthy atmosphere by removing stagnant air, bacteria, VOC’s as above and unwanted odours, as well as to establish an efficient method of managing moisture.
A mechanical ventilation system employs the use of fans and ductwork and whilst this can be retrofitted into existing buildings the implementation costs can be quite high. It is always best therefore to consider such a system at the design stage. Also, it would be ideal to draw up an effective facilities management plan to ensure the system continues to operate correctly and is maintained.
A heat recovery system is a step up from mechanical ventilation and comes into play where airtightness levels of 3m³/hr or better are achieved. The system utilises an air handling unit, sited usually in an attic or plant room, with carefully routed ducting removing stale air and bringing fresh filtered air to each room. The air handling unit incorporates a heat exchanger which recovers heat from the stale air, which is then used to warm the incoming fresh air, before being circulated. Naturally, the system works well when there is a temperature difference between inside and outside.
Although there are many concerns over installation costs, the long-term energy efficiency benefits can be significant, with projected savings in heating costs of up to 20%, when air leakage levels are approaching Passivhaus levels.
More detailed, up-to-date and accurate information regarding the use of MVHR can be sought from specialist manufacturers.

66
ACKNOWLEDGMENTOur global DuPont™ Tyvek® and DuPont™ AirGuard® team would like to thank the countless construction professionals, associations, certification organisations, training and testing centres, architects and designers, end users and other dedicated individuals for continuing to work with us to better understand and meet the needs of a changing market. By working together, we can produce more efficient and comfortable buildings, better and safer living and working conditions and save precious resources today and for the future.
Using Tyvek® and AirGuard®
Always look for approvals from Certified bodies
Check that the data relates to Aged performance
Confirm the products are truly Fit for purpose

67
The DuPontTM Tyvek® Building Knowledge Centre is a resource for building envelope installation and design best practices. It’s a dedicated source for information about evolving building regulations, sustainable building practices and air, water and thermal management, that can help you:
• Select building envelope materials and techniques• Meet or exceed building standards• Enhance energy efficiency• Protect interior air quality• Improve building durability• Increase job site efficiency• Develop project-specific specifications and plans.
We also have a Technical Library which has all our data sheets, installation guides & certificates e.g. BBA, NSAI, CE...
You can contact the technical department by email or phone on:
Technical: 0117 970 9454/9455Sales: 0117 970 9456Technical E-mail: [email protected]
As part of our professional technical service we provide:
• Calculations e.g. Condensation, U-Value...• Training, Site visits and Hands on Toolbox Talks• CPDs• BIM library• Desktop Design Reviews• Plus many more types of support
https://www.bimobject.com/en/product?brand=dp-tyvek
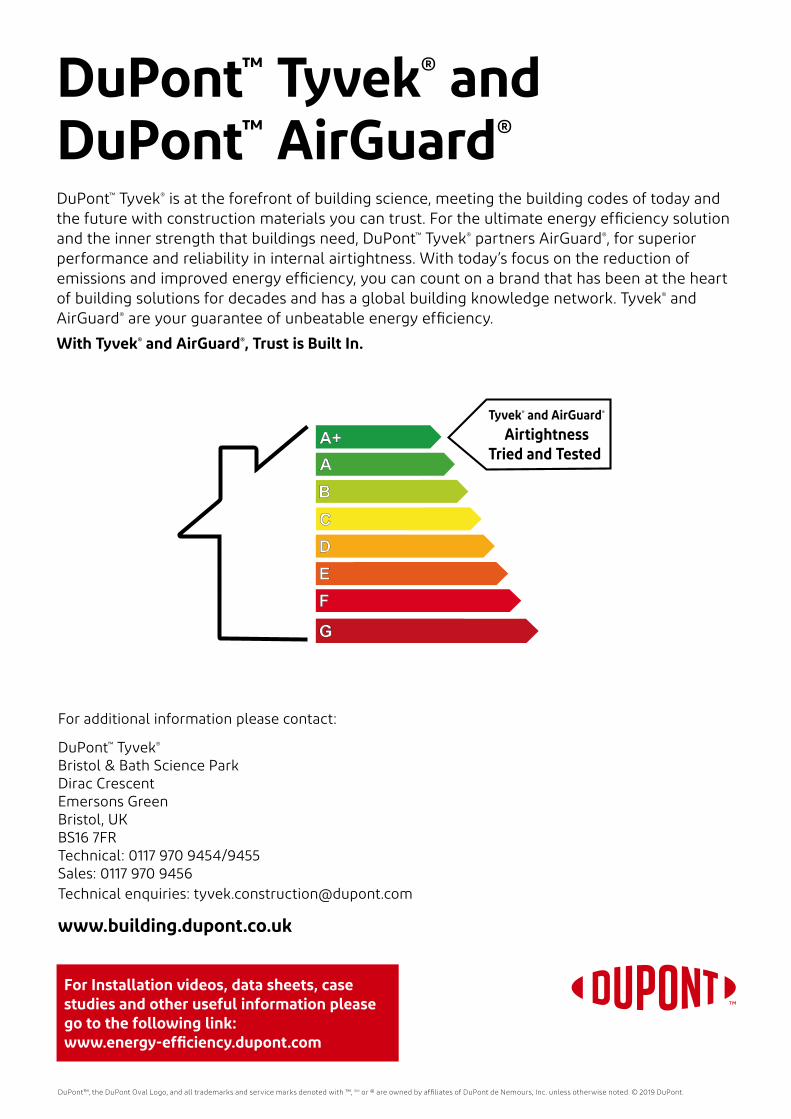
DuPont™, the DuPont Oval Logo, and all trademarks and service marks denoted with ™, SM or ® are owned by affiliates of DuPont de Nemours, Inc. unless otherwise noted. © 2019 DuPont.
DuPont™ Tyvek® is at the forefront of building science, meeting the building codes of today and the future with construction materials you can trust. For the ultimate energy efficiency solution and the inner strength that buildings need, DuPont™ Tyvek® partners AirGuard®, for superior performance and reliability in internal airtightness. With today’s focus on the reduction of emissions and improved energy efficiency, you can count on a brand that has been at the heart of building solutions for decades and has a global building knowledge network. Tyvek® and AirGuard® are your guarantee of unbeatable energy efficiency.
With Tyvek® and AirGuard®, Trust is Built In.
DuPont™ Tyvek® and DuPont™ AirGuard®
For additional information please contact:
DuPont™ Tyvek®
Bristol & Bath Science ParkDirac CrescentEmersons GreenBristol, UKBS16 7FRTechnical: 0117 970 9454/9455Sales: 0117 970 9456Technical enquiries: [email protected]
www.building.dupont.co.uk
For Installation videos, data sheets, case studies and other useful information please go to the following link: www.energy-efficiency.dupont.com