endnote x7 win user manual part 2 using endnote when · pdf fileendnote x7 win user manual...
TRANSCRIPT
DIVISION OF LIBRARY SERVICES
EndNote X7 Win User Manual Part 2 Using EndNote When You Write
Contents
Using EndNote with Word (Cite While You Write) .................................................................................. 2
Inserting Citations into the Text........................................................................................................... 2
Removing Citations – Very Important! ................................................................................................ 3
Adding Text and Pagination ................................................................................................................ 4
Formatting a Bibliography (created with EndNote) in Word ................................................................ 5
Creating Subheadings for your Reference List ................................................................................... 6
Configure your reference list to display headings ........................................................................... 8
Output Styles ........................................................................................................................................... 9
To Activate a Different Style:............................................................................................................... 9
To Remove a Selected Style ............................................................................................................. 10
To Activate a Style Within Word........................................................................................................ 10
Downloading, Saving and Opening Additional Styles ....................................................................... 11
Editing Output Styles ......................................................................................................................... 13
To edit an existing style ................................................................................................................ 13
Editing author display ................................................................................................................... 13
Editing bibliography display .......................................................................................................... 15
Editing templates .......................................................................................................................... 15
Abbreviated Journal Titles and EndNote Term Lists ............................................................................. 16
Adding a Simple Bibliography to an Existing Word Document.............................................................. 16
Adding References and Citations to PowerPoint Slides ....................................................................... 17
Adding a Citation to a PowerPoint Slide ........................................................................................... 17
Adding Multiple Citations to a PowerPoint Slide ............................................................................... 18
Adding a Reference to a PowerPoint Slide ....................................................................................... 18
Adding Multiple References to a PowerPoint Slide........................................................................... 18

2
Using EndNote with Word (Cite While You Write) When you have some records in your library, Word and EndNote can work together so that you can
create a Word document with correctly formatted citations and a bibliography. You will be able to
concentrate on writing your essay or thesis, with the knowledge that EndNote will handle the correct
punctuation and formatting of your references using the referencing style you have selected.
When the programs are working together, you will be able to create a correctly formatted document
with in-text citations and a bibliography, such as in the following example.
When you install EndNote onto your computer, it automatically adds the necessary EndNote tab to the
toolbar in your Word software.
Inserting Citations into the Text 1. Open the EndNote library or libraries that contain the references you wish to cite. For the
example and exercise below, we will use our new library.
2. Start Microsoft Word 2007/2010/2013/2016.
3. Open a new document.
4. Type in a sentence. Place the curser at the point that you wish to insert the citation.
5. Click on the EndNote tab of the tools ribbon.
6. Click on Insert Citation and select Find Citation
Relationships Australia 2003, The Rest: Mental Health, viewed 21st January 2008,
http://www.relationships.com.au/what-we-do/policy-research/the-rest-relationships-statistics/.
The high rate of marriage breakdowns in Australia results in personal, family and community
consequences and costs. Bender and Fuller’s research (1994) confirmed stable and satisfying marriages
contribute to men's and women's improved physical and psychological health, their financial condition
and children's wellbeing. However, these protective benefits of marriage occur only in families where
there aren’t major conflicts or mental health problems in a spouse (Australian Bureau of Statistics 2005;
Relationships Australia 2003). Among the most frequently asked questions are: Why do marriages break
down? What are the reasons for divorce? How can extended family relationships be maintained in the
event of divorce?
Australian Bureau of Statistics 2005, Divorces, Australia (data cube), cat. no. 3307.0.55.001, ABS.
Viewed 26th January 2008, http://www.abs.gov.au/AUSSTATS/
Bender, W N & Fuller, L 1994 'Victimization of non-custodial parents, grandparents, and children',
Journal of Divorce & Remarriage, vol. 21, no. 3, pp. 81-114.
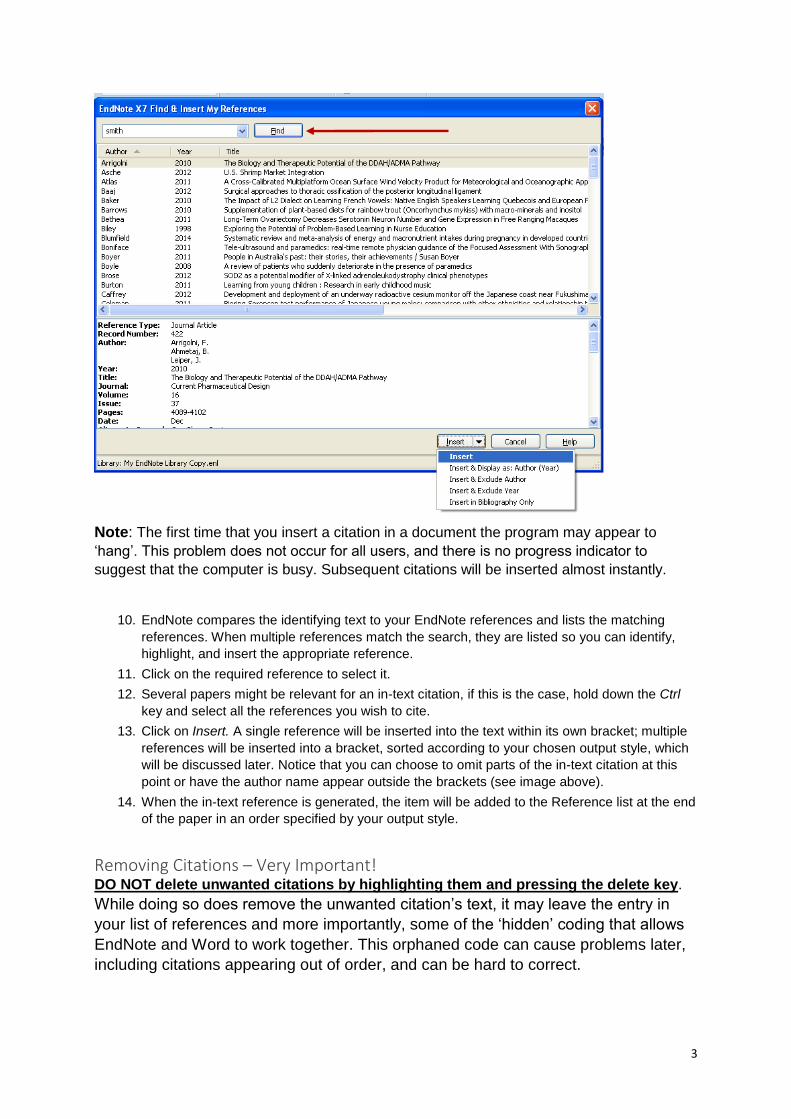
7. EndNote displays a Find Citation(s) dialog window.
8. Type an author's last name, keyword or year into the ‘Search for’ box.
9. Click on Find
3
Note: The first time that you insert a citation in a document the program may appear to
‘hang’. This problem does not occur for all users, and there is no progress indicator to
suggest that the computer is busy. Subsequent citations will be inserted almost instantly.
10. EndNote compares the identifying text to your EndNote references and lists the matching
references. When multiple references match the search, they are listed so you can identify,
highlight, and insert the appropriate reference.
11. Click on the required reference to select it.
12. Several papers might be relevant for an in-text citation, if this is the case, hold down the Ctrl
key and select all the references you wish to cite.
13. Click on Insert. A single reference will be inserted into the text within its own bracket; multiple
references will be inserted into a bracket, sorted according to your chosen output style, which
will be discussed later. Notice that you can choose to omit parts of the in-text citation at this
point or have the author name appear outside the brackets (see image above).
14. When the in-text reference is generated, the item will be added to the Reference list at the end
of the paper in an order specified by your output style.
Removing Citations – Very Important! DO NOT delete unwanted citations by highlighting them and pressing the delete key.
While doing so does remove the unwanted citation’s text, it may leave the entry in
your list of references and more importantly, some of the ‘hidden’ coding that allows
EndNote and Word to work together. This orphaned code can cause problems later,
including citations appearing out of order, and can be hard to correct.

4
If you wish to remove a citation completely:
1. Click on the citation you wish to remove
2. Click on ‘Edit & manage citation(s)’ in the EndNote toolbar.
3. The Edit citation dialogue box will be displayed. All the citations within the
document will be listed on the left portion of the screen. Make sure the citation
you want to delete is highlighted.
4. Click on the Edit Reference drop down list (see image below).
5. Select “Remove Citation”.
6. Click on OK.
Adding Text and Pagination You may wish to modify citations to add pagination details, ‘see also’ references, or remove the author
from the citation bracket.
To hide the author or publication year of a single citation:
1. Click on the ‘Edit and Manage Citation(s)’ in the EndNote toolbar
2. Make the required changes to the ‘Formatting’ options drop-down menu
To customise a formatted citation by adding a prefix, suffix or page numbers, or to
modify several citations:
1. Click on ‘Edit and Manage Citation(s)’
3. All the citations within the document will be listed on the top portion of the
screen. Make sure the citation you want to customise is highlighted
4. In the bottom section of the screen, you can add a prefix, suffix or page
numbers (remember to add a comma and space at the end of your prefix and
a space at the beginning of your suffix)

5
5. Click on OK to implement the change.
Formatting a Bibliography (created with EndNote) in Word
Line spacing Theses often require the references to be double spaced. There is no need to
change the output style. You can make this change while formatting your
bibliography.
1. Open your Word document:
2. Click on the EndNote tab to access the EndNote tools
3. Click on the arrow next to Bibliography to access the Format Bibliography fly
out menu
4. Click on the Layout tab
5. In the box labelled ‘Line spacing’ select the option ‘Double’
6. Click on the OK button
Hanging indent Some referencing styles will format the Reference List with a Hanging Indent (see below)
Asche, F., Bennear, L. S., Oglend, A. and Smith, M. D. (2012), 'U.S. Shrimp Market Integration'. Marine
Resource Economics, 27/2: 181-192.
Klein, C. J., Botuyan, M. V., Wu, Y. H., Ward, C. J., Nicholson, G. A., Hammans, S., Hojo, K., Yamanishi,
H., Karpf, A. R., Wallace, D. C., Simon, M., Lander, C., Boardman, L. A., Cunningham, J. M.,
Smith, G. E., Litchy, W. J., Boes, B., Atkinson, E. J., Middha, S., Dyck, P. J. B., Parisi, J. E., Mer,
G., Smith, D. I. and Dyck, P. J. (2011), 'Mutations in Dnmt1 Cause Hereditary Sensory
Neuropathy with Dementia and Hearing Loss'. Nature Genetics, 43/6: 595-U140.
You can change this by formatting your bibliography
1. Open your Word document:
2. Click on the EndNote tab to access the EndNote tools
3. Click on the arrow next to Bibliography to access the Format Bibliography fly
out menu

6
4. Click on the Layout Tab
5. Change the Hanging Indent to read 0cm
6. You can also change the font and title of the bibliography here
Creating Subheadings for your Reference List EndNote allows you to organise your Reference list with subheadings. You can display references in
groups by reference type or with your own headings

7

8
Configure your reference list to display headings 1. Click on Categorize References in your EndNote toolbar
2. Click on Configure Categories to input the headings you require
3. Add category headings by clicking on
4. Drop and drag the references into the appropriate headings
5. You can arrange the order of the headings by dragging them to the appropriate position in the
list
6. References not placed in a category will appear in the Uncategorized section of the reference
list
7. No you can click on ‘Group References by Custom Categories’

9
Output Styles
An output style determines how the selected reference will be formatted and displayed when you print,
export, preview and create in-text citations or footnote citations and bibliographies for all types of
references. For example, a record formatted in the APA 6th style would look like this:
Argus, M. V., & Matthews, E. K. (1991). Stratigraphic excavation techniques for
palaeontologists. Journal of Palaeontology, 17, 119-127.
and the same record formatted in the Nature style would look like this:
1. Argus, M. V. & Matthews, E. K. Stratigraphic excavation techniques for
palaeontologists. Journal of Palaeontology 17, 119-127 (1991).
EndNote includes the most popular styles by default, including APA 6th, Chicago B, and individual
publication specific styles such as Nature. Many more styles can be downloaded from the EndNote™
website at www.endnote.com/support/enstyles.asp
To Activate a Different Style: The three default styles (Annotated, Numbered, and Show All Fields) are not appropriate for Charles
Sturt University requirements and you will need to select another style. Most Schools at CSU have
adopted the APA 6th edition. Please check the required style for your School or Faculty with your
lecturer. For more information on referencing see: http://student.csu.edu.au/study/referencing-at-csu
1. Click on the ‘Current Style’ drop down menu
2. Click on Select ‘Another Style’
3. Scroll down the list alphabetically by name, or by category
4. If you wish to search by category, click on the grey category title bar or click on the ‘Find’ by
button underneath the list
Styles Drop
Down Menu

10
5. Click on the name of the required output styles to select them
6. Click on ‘Choose’
If you wish to add another style, repeat steps 2-6.
To Remove a Selected Style 1. Select the style in the ‘Current Style’ drop down menu
2. Click on the ‘Edit’ drop down menu
3. Click on ‘Output Styles’
4. Click on ‘Open style manager’
5. The alphabetic list should open at the selected style. Uncheck the ticked box next to your style
to remove it from your list
6. Click on the Close box [x] for the style manager window. The style should no longer appear in
the Current Style drop down menu
To Activate a Style Within Word 1. Click on the Current Style drop down menu.
2. If it appears in the quick list select it, or;

11
3. Click on ‘Select Another Style’
4. Click on the grey ‘Name’ header. You can then scroll down the list alphabetically by name
5. Click on the name of the output style you wish to select
6. Click OK
Downloading, Saving and Opening Additional Styles You can download additional output styles for EndNote X7 from the Thomson Reuters support site for
EndNote by clicking on the ‘Help’ menu at the top of the EndNote screen and selecting ‘Web Styles
Finder…’. You can then search for the style you need on the Thomson website at:
www.endnote.com/support/enstyles.asp
To install and use a style:
1. Locate the style you want using the EndNote Help ‘EndNote Output Styles’ by either browsing through the list or searching for the style by journal name.

12
2. Click on the ‘Download’ link to the right of the style.
3. Save this file somewhere on your computer (the desktop is a good location as files are easy to find there).
4. Double-click on the file (this should open the file in EndNote). 5. Click on ‘File’, ‘Save As’ in EndNote. 6. Remove the word ‘Copy’ from the end of the style name and click on the
‘Save’ button. EndNote will save the file in the appropriate folder. 7. To use the referencing style, click on the drop-down arrow next to the style
window in EndNote and click on ‘Select Another Style’.
8. Once the style manager opens, navigate to the new style and double click it to select it as the active style in your library.

13
Editing Output Styles Sometimes, an existing output style does not meet your publishing needs, so you may need to edit an
existing style or create a new output style.
To edit an existing style 1. Select the output style in the menu
2. Click on Edit > Output Styles > Edit ‘Your selected style’
3. The window that opens contains the display settings for Citations, References and Footnotes
for this style
There are many different settings you can change, including how to display
changing the punctuation of the in-text citations – Templates
different items by the same author, publishing in the same year – Ambiguous Citations
listing authors when there are more than one for a reference – Author Lists
sorting the citations when listed together in brackets – Sort Order
Editing author display You can also choose to change the way the author is displayed, you may wish to display the author’s
surname and initials rather than just the surname.
1. Select Author Name in the Citations menu

14
2. In the drop down menu next to Initials, select the option you wish to display
3. Save the changes by clicking on File > Save
4. To update the citations in your Word document to show the changes you have made to the
output style, you will need to click on “Update Citations and Bibliography” on the EndNote
toolbar in Word

15
Editing bibliography display There are many different settings you can change, including how to display
different items by the same author, publishing in the same year – Ambiguous Citations
sorting the order of the references in the bibliography – Sort Order
listing authors when there are more than one for a reference – Author Lists
how an author is displayed – Author Name
listing editors when there are more than one for a reference – Editor Lists
how an editor is displayed – Editor Name
how the titles should be capitalized – Title Capitalization
Editing templates You can also choose how the references are punctuated and displayed for each reference type,
including what headings are included from the record.
1. Select Templates in the Bibliography menu
2. To add a reference type - select it from the Reference Type button at the top of the screen
3. To alter the format - Highlight the text & use Formatting buttons above the In-Text Citations
window
4. To alter punctuation - type or delete punctuation as required
EndNote uses special characters or 'fields' to control how a record appears in the bibliography. Place
your cursor where you want the character in the template. Go to ‘Insert Field’ on the top right and
select the appropriate character:

16
Singular/plural (^ caret symbol) - used if there is different text for singular/plural forms e.g.
(Ed.),^(Eds.)
Link adjacent text - a non-breaking space (shown as a small grey diamond in the template)
used to link adjacent text to a field so text doesn't appear if the field is empty
Forced separation (| pipe symbol) - used to separate punctuation from adjacent fields. e.g.
you might want a full stop at the end no matter what fields are empty
Field names as literal text (`back apostrophe symbol) - used if you want text in your
records that has already been used as a field name e.g. if you want the word 'year' as well as
the field year
To remove a field - Highlight > click Delete on your keyboard
Remember to save the output style as you go.
TIP! You can also rename your output style to identify it from an existing one by clicking on File >
Save As.
TIP! It is a good idea to test your output style on a test word document
Abbreviated Journal Titles and EndNote Term Lists EndNote provides a number of terms list to ensure that the journal names in your bibliography are
either the full name or abbreviation according to your required output style. To set up your terms list,
first make a backup of your library. Then, follow the steps below.
1. In EndNote, go to "Tools > Open Term Lists > Journal Terms List".
2. Highlight the first journal term, and select [Ctrl]+A to select all, ([Command]+A on a Macintosh
3. Note: If the Journal Terms List is empty, skip to step 4.
4. Next, select "Delete Term" to delete all old terms.
5. Go to the "Lists" tab at the top, and select the "Import List" button.
6. Browse to the Term Lists folder within the EndNote folder, and choose to open the file
according to your required journals.
o For a Windows machine, this folder should default to:
C:\Program Files\EndNote (EndNote Version Number)\Term List
o or on a 64-bit Windows machine, this folder should default to:
C:\Program Files (X86)\EndNote (EndNote Version Number)\Term Lists
o On a Mac, this folder should default to: Hard Drive: Applications: EndNote (EndNote Version Number): Terms
7. This will import the correct abbreviations into your library's term list.
8. Next, to select the correct substitution, go to "Edit > Output Styles > Open Style Manager".
9. Highlight the style you are using and select "Edit".
10. Select "Journal Names" on the left.
11. Using a new document, test that the style is using the Full Name or one of the Abbreviations
as needed.
Adding a Simple Bibliography to an Existing Word Document You may have already written a Word document. The citations are entered into
EndNote and all you want to do is cut and paste a properly formatted bibliography
onto the end of the Word document.
At the EndNote Reference List screen:

17
1. Select the output style you wish to use from the Current Style box e.g. APA
6th
2. Select the references:
3. For multiple references, use Ctrl and click with your mouse
4. For a block of references, use Shift and click with your mouse
5. For all references, click on the Edit menu and click on Select All
6. Click on the Edit dropdown menu
7. Select Copy formatted or press Ctrl + K
8. Open the Word document
9. Use the Ctrl + V command to paste the references, or click on the Edit menu
and ‘Paste’
The document is independent of EndNote. You can modify the information in any
way, and it will not affect the EndNote library.
Adding References and Citations to PowerPoint Slides You can use EndNote to generate citations and references within a PowerPoint Slide. This is not the
Cite While You Write function as you would see in Word – A reference list will not be created at the
end of the PowerPoint presentation.
After you have installed EndNote X7, you will see that an EndNote X7 toolbar has been added in
PowerPoint.
Adding a Citation to a PowerPoint Slide 1. Select the Referencing Style you wish to use
2. Click on the text box in which you wish to add the Citation
3. Click on Insert Citation on the EndNote toolbar and locate your record
4. Click on Insert
TIP! As in Word, you can choose to display the citation in different formats, i.e., Author(Year),
Excluding Author.
TIP! Unlike Word, this citation is inserted as plain text, so if you wish to remove it or edit it, you can do
so as normal text. Similarly, you need to choose the Output Style before you insert the citation

18
Adding Multiple Citations to a PowerPoint Slide 1. Select the Referencing Style you wish to use
2. Click on Go To EndNote
3. Select the records and return to PowerPoint – do not use the Return to Word Processor
button in EndNote
4. Click on Insert Selected Citations
Adding a Reference to a PowerPoint Slide 1. Select the Referencing Style you wish to use
2. Click on the text box in which you wish to add the Reference
3. Click on Insert Reference on the EndNote toolbar and locate your record
4. Click on Insert
TIP! Unlike Word, this reference is inserted as plain text, so if you wish to remove it or edit it, you can
do so as normal text. Similarly, you need to choose the Output Style before you insert the
reference.
Adding Multiple References to a PowerPoint Slide 1. Select the Referencing Style you wish to use
2. Click in the text box in which you wish to add the Reference
3. Click on Go To EndNote
4. Select the records and return to PowerPoint – do not use the Return to Word Processor button
in EndNote
5. Click on ‘Insert Selected References’