endnote x5 introduction for pc and mac users university of otago
TRANSCRIPT

1
EndNote X5 Introduction
for PC and Mac Users
University of Otago Library
www.library.otago.ac.nz/endnote
November 2011

2
Contents Introduction to EndNote X5........................................................................................... 3
What is EndNote X5? ................................................................................................ 3 Where can I use it? ..................................................................................................... 3 Before You Start ........................................................................................................ 3
Creating an EndNote X5 Library ................................................................................... 5 The EndNote X5 Home Screen...................................................................................... 5 Adding References to Your Library .............................................................................. 6
Manually Enter References to Your EndNote X5 Library ........................................ 6 Direct Export from Summon ..................................................................................... 9 Direct Export from a Database ................................................................................ 10 Direct Export using Google Scholar ........................................................................ 12 Direct Import into EndNote X5 ............................................................................... 14
Step 1: Export from database, and create text file ........................................... 14 Step 2: Import the .txt file into EndNote X5 .................................................... 15 More information on Importing Files and using Import Filters ....................... 17
Update References Automatically ........................................................................... 17 Adding a PDF, and other file types to your Library ................................................ 17 Attaching Articles to a Reference ............................................................................ 18 Creating a Reference from a PDF ............................................................................ 18
Organising Your Library.............................................................................................. 20 Grouping References ............................................................................................... 20 Group Sets ................................................................................................................ 20
Using your References in Documents (Cite While You Write) .................................. 21 Insert references into Word documents, using EndNote X5 .................................... 21 Edit citations ............................................................................................................ 23 Convert Word File to Plain Text .............................................................................. 23
Additional Hints & Tips............................................................................................... 24 EndNote X5 Toolbar – Button Navigation .............................................................. 24 Finding References in EndNote X5 ......................................................................... 24 Quick Search ............................................................................................................ 24 Suppressing unwanted fields.................................................................................... 24 Sorting references .................................................................................................... 25 Finding and deleting duplicate references ............................................................... 25 Emailing your EndNote X5 Library (plus your PDFs) ............................................ 26 Moving References between EndNote Desktop and EndNote Web ........................ 26 Formatting your Bibliography in Word ................................................................... 26 Print Your Bibliography in Word 2007 or 2010 ...................................................... 26
Document authors: Library EndNote tutors Last updated 22/11/2011

3
Introduction to EndNote X5
What is EndNote X5? EndNote X5 is a reference management tool which helps you to save and manage bibliographic references. EndNote X5 enables you to organise references into separate libraries, and into smaller groups within each library. It can store copies of files with your references (e.g. PDF, TIFF, DOCX, HTML, XLSX, MP3 documents), so you can take all of your research with you in one easy package. EndNote X5 will display your references in the reference style of your choice (e.g. APA 6th), and will format your research papers for you, placing references and footnotes where necessary, compiling a bibliography as you reference.
Where can I use it? EndNote X5 will be loaded onto all student desktop computers from 2012, so you can access it on campus at any time. Save your EndNote X5 Library to the S: drive or bring it in with you on an external memory drive. You can also purchase a copy of EndNote X5 for your computer / laptop (PC and Mac). Print a copy of the ITS Student EndNote Licence Request Form , fill in your details and return it to the ITS office. A user licence costs $25 including GST per computer for the Student’s time at University of Otago. This entitles the Student to any upgrades released during their time here. All university staff should refer to the appropriate department personnel for information on EndNote licence purchases and upgrades. Refer to the ITS EndNote Software webpage for pricing and conditions.
Before You Start This document uses the word ‘reference’ (or references) when referring to a record in an EndNote Library. This follows the convention used in the EndNote software. The terms ‘reference’ and ‘citation’ can be used interchangeably, and you may find people use either term, or both. A citation can be broadly defined as a reference to a published or unpublished source. In other words, a citation is a record in your EndNote library which contains information that refers to a journal article, a book, a picture, song, musical score, or any other published or unpublished item.
4
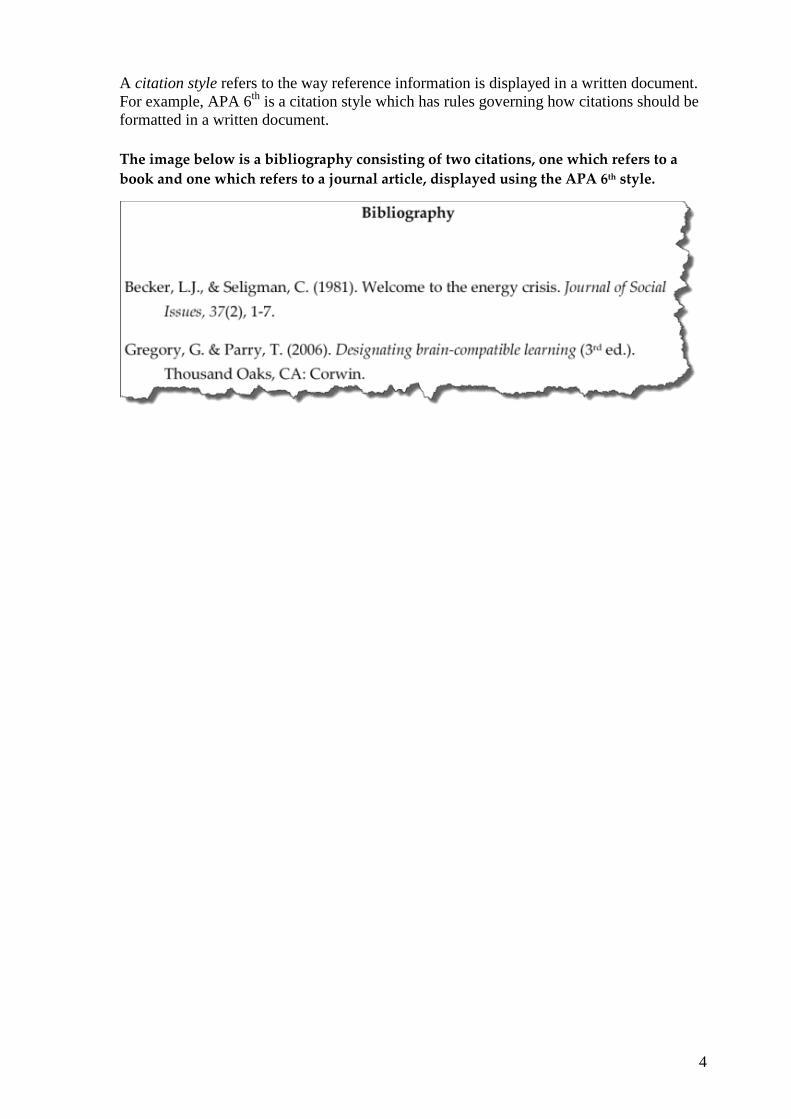
A citation style refers to the way reference information is displayed in a written document. For example, APA 6th is a citation style which has rules governing how citations should be formatted in a written document. The image below is a bibliography consisting of two citations, one which refers to a book and one which refers to a journal article, displayed using the APA 6th style.

5
Creating an EndNote X5 Library 1. Open EndNote X5 - either displays a grey screen, ready to create a library, or may
create an untitled one 2. Go to the top menu on your screen – select File New 3. Name and save this library to your preferred location and select <Save>
Take note of the different areas of the screen. Menus, toolbar, reference list section and reference preview and search sections, which are all empty at the moment.
The EndNote X5 Home Screen After your EndNote Library has been created, but before it has content, your EndNote page should look similar to this:
Some of the databases listed under Online Search in the My Library display area may differ in your own version. Adding databases to this area is dealt with in the EndNote X5 Advanced user guide, under the topic ‘Adding Connection Files’.
EndNote ‘My Library’ display area
EndNote display area will show the references added to your Library
EndNote display area featuring a tab to show a preview of your references in a given style, a tab to search databases online from within EndNote, and a tab which allows you to edit a reference and a PDF file in your Library
6
Adding References to Your Library
There are various ways to add references to your EndNote X5 Library: Manually, Direct Exporting from a database like Summon or Academic Search Complete, Direct Importing into EndNote X5, and creating a reference by importing a PDF document. We will look at each one in turn.
Manually Enter References to Your EndNote X5 Library
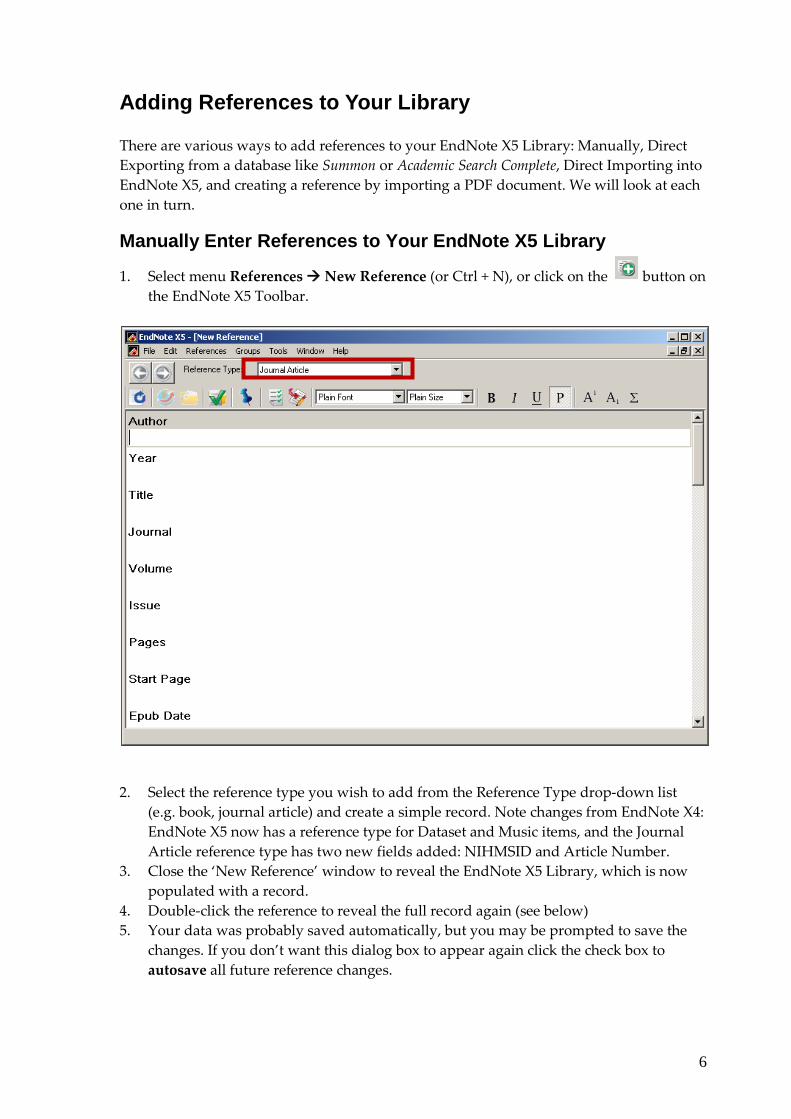
1. Select menu References New Reference (or Ctrl + N), or click on the button on the EndNote X5 Toolbar.
2. Select the reference type you wish to add from the Reference Type drop-down list (e.g. book, journal article) and create a simple record. Note changes from EndNote X4: EndNote X5 now has a reference type for Dataset and Music items, and the Journal Article reference type has two new fields added: NIHMSID and Article Number.
3. Close the ‘New Reference’ window to reveal the EndNote X5 Library, which is now populated with a record.
4. Double-click the reference to reveal the full record again (see below) 5. Your data was probably saved automatically, but you may be prompted to save the
changes. If you don’t want this dialog box to appear again click the check box to autosave all future reference changes.

7
6. A new feature in EndNote X5 allows you to annotate and highlight a pdf and edit a record from the home screen. To do this, click on the PDF & Quick Edit tab at the bottom of the EndNote X5 home screen (See p. 17 for more on adding pdfs)
You can modify any field by overtyping the contents. You can also annotate and highlight sections of an attached pdf in the PDF & Quick Edit tab. To highlight, simply select the text you want to highlight and select the Highlight Text button. To

8
annotate, click on the point in the document you wish to annotate and click on the Sticky Note button (see image below).
Note - When editing a record: 1. Add each extra author on a new line, either as (for example) Michael A Seeds, or
Seeds, Michael A. EndNote will recognise your intention and format the record accordingly.
2. Add a government or organisational author followed by a comma – this keeps words in order, e.g. Ministry of Education, . Use two commas for part of an organisation, e.g. World Trade Organisation,, Geneva.
The use of capital letters for article and chapter titles, book and journal titles, will depend on the citation style used by your department or supervisor. EndNote does not always change the way you use capital letters so you must learn to recognise your chosen style elements. Click the Preview tab to check layout.
Highlighted text Position of annotation Content of annotation

9
Direct Export from Summon Summon will simultaneously find resources from the Otago Library Catalogue and most databases Otago has access to. This is the preferred method of exporting Catalogue records to your EndNote Library. 1. Conduct a search before refining search results 2. Hover your mouse over a record and the button appears to the right of each
required record – click it
3. Each record is temporarily saved as an item to a folder, bottom right of screen 4. Click these <Saved Items> to view selected records

10
5. With your EndNote Library open in
the background, click the <EndNote> export tab in Summon.
6. Click <Open> at this File Download Window, or a tool bar asking you to
<Open> the file 7. On a PC the records initially display in a new window as Imported References
8. On a Mac you will need to Open with <<Choose … EndNote X5>> from your
Applications>EndNote X5>EndNote X5, then <OK> to export the records to your EndNote Library
9. Edit the imported records as required 10. Return to Summon and download the fulltext if available, before dragging on to the
EndNote Library record
NOTE: Records with multiple authors may not display in the correct order so edit them now, as you have the fulltext version to check.
Direct Export from a Database Exporting directly from a database is a quick and easy process. It is recommended that you direct export wherever possible, although other methods will be discussed below. Use either Internet Explorer or Firefox for this function. 1. In your web browser, find the Library Homepage and select <Article Databases>
2. Select Academic Search Complete, listed in Popular Databases (left-hand column)
3. In the Advanced Search window search for Quantum Field Theory (one search box)
4. Limit results to <Scholarly (Peer Reviewed) Journals>
5. Run your search
11
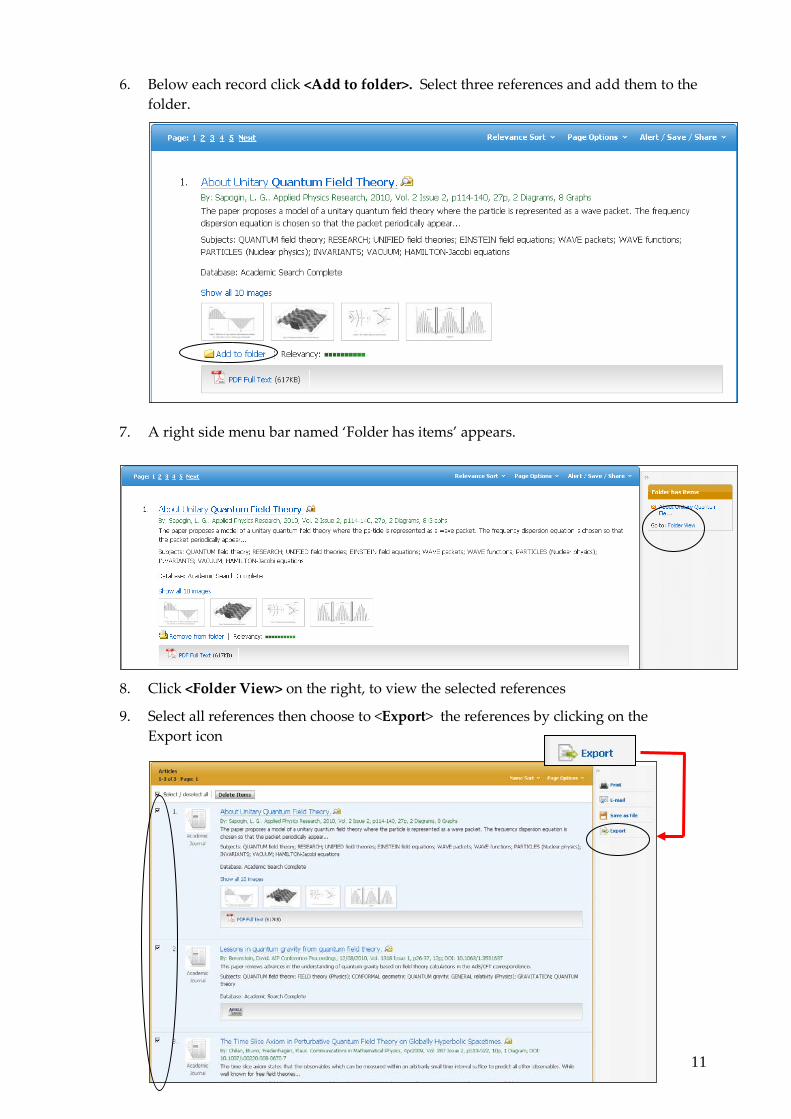
6. Below each record click <Add to folder>. Select three references and add them to the folder.
7. A right side menu bar named ‘Folder has items’ appears.
8. Click <Folder View> on the right, to view the selected references
9. Select all references then choose to <Export> the references by clicking on the Export icon

12
10. At the next screen, leave it on default settings, e.g. Save citations to a file formatted for: Direct Export in RIS Format … EndNote, etc.)
11. Click <Save>. This transfers the references into the EndNote X5 Library of your choice.
If necessary, it will open EndNote X5. You may get the following window if you are using Firefox. If you do, just leave the default set to Open - click <OK>.
PC Users: Mac Users:
For Mac users, click <Choose> then from the Applications folder select <EndNote X5> so the Mac knows which software will open the file. Click <OK>
12. Your EndNote X5 Library will show a temporary Importing window. After the
importing window closes your records will be visible in your EndNote X5 Library as a group of Imported References. Before the import begins you may be prompted to select your EndNote X5 Library from the Desktop, or where you saved it to. (This step depends on how your EndNote X5 access has been set up.)
13. View the three new references.
• Double-click a reference to reveal the populated fields. • Look for additional information: abstract, notes, link to Fulltext • Edit references as necessary
To view the new references on the Mac version of EndNote X5 click <+M>, or click ‘All References’ in the EndNote home screen
Direct Export using Google Scholar When you search Google Scholar as an Otago Article Database, and login, you can view Otago Article Linker links to Otago subscribed fulltext articles. Click Otago Article Linker to access the PDF or HTML file. Save the file to your desktop then drag the file into your EndNote Library record. Transferring citations from Google Scholar1 into EndNote is very easy, from both Internet Explorer and Firefox. The first time you wish to do this, you need to set your preferences within Google Scholar (you need do this only once on your computer).
1 For more information about using Google Scholar, both on and off-campus: http://www.library.otago.ac.nz/pdf/Google_Scholar_Tips.pdf

13
To set preferences: 1. Go to Google Scholar http://scholar.google.com/ 2. Choose Scholar Preferences (behind the wheel top right, or beside the search box) 3. Scroll down to Bibliography Manager 4. Move radio button to <Show links to import into> 5. Choose EndNote from the pull-down menu then <Save Preferences>
To export from Google Scholar into EndNote: 1. Go to Google Scholar via Article Databases (login if working off-campus) 2. Type your search and view results 3. For each citation, choose <Import into EndNote>, only one reference at a time
4. For direct export click <Open>. If no library is open you will be prompted to ‘Select a Reference Library’ – find your EndNote Library and select <Open>
5. Your file may show a temporary Importing window then your records display in your EndNote Library as the latest group of Imported References
6. Show all your citations using <Ctrl + M> or click All References 7. Note: Google Scholar records are at citation level and do not contain abstract and
keywords.

14
Direct Import into EndNote X5 Importing references into EndNote X5 is a two-step process. The first step is to save the references you want from a database in a file format that EndNote X5 can interpret. The second step is to import the file into EndNote X5. When EndNote X5 imports a reference file it needs to know what format it is in so it knows how to read them. This is where filters come in. By selecting the appropriate filter you tell EndNote X5 how to interpret the information in the file. This will turn the information into references. You will need to use a filter if the database you are using cannot directly export into EndNote X5. The example below is from the University of Otago Library Catalogue.
Step 1: Export from database, and create text file 1. In your web browser, find the Library Homepage and open the Catalogue
2. Type search terms in two search boxes, within Keyword (e.g. relativity AND quantum). Click <Search>.
3. Select three results, by ticking boxes on the left
4. Click <Export>
5. Check Export Format displays as ‘EndNote Citation’
6. <Click to Export>
7. You will now see a text file of the records in the web browser

15
8. If using Internet Explorer, choose FileSave As to the Desktop as a text document naming the file e.g. quantum.txt. If using Firefox you will have to append ‘.txt’ to the file name before saving it as a .txt file.
Step 2: Import the .txt file into EndNote X5 1. In EndNote X5 , check you are in the right Library and select File Import, or click
the button on the toolbar 2. Click <Choose File> and navigate to the file you want to open 3. Set Import option to <Otago Library Catalogue>
- If this Import filter option is not listed, select Other Filters under Import Option and find it in the list
- Note: these filters are updated on the university network. For your own laptop or computer, you need to download and keep them up to date. 2
2 See the EndNote X5 Advanced Guide for how to handle import filters and connection files, or contact your Subject Liaison Librarian for help.

16
4. Leave Duplicates and Text Translation choices unchanged
5. Click <Import>
6. Check each new Imported Reference. Use the Quick Edit tab to make changes
Note: Some databases will give the option to export files in RIS format (see example below). The RIS format is recognised by EndNote X5 and will always be interpreted by the EndNote X5 program, regardless of the origin of the file.
Export reference screen from Science Direct:
Export reference screen from IOP:
When importing a file in RIS format, follow the same process as for the Library Catalogue, but select the RIS option from the Import Option drop-down list, as shown below:

17
More information on Importing Files and using Import Filters Go to http://library.otago.ac.nz/endnote/instructions.html for more information on the use of the direct export function from a database, and the Import function on EndNote X5.
If you need to download an import filter, please refer to the EndNote X5: Advanced User Guide, or go to http://library.otago.ac.nz/endnote/connection.html . Both of these resources will tell you how you can save filters to EndNote X5.
Update References Automatically To update a reference automatically, just select a record, click on References Find Reference Update. EndNote will search online for updated reference data. If any updates are found, the differences will be highlighted in a side-by-side display (much like the duplicate references display), from which you can compare the changes. You have the option to update the empty fields only (i.e. fields which were previously empty but now contain data), replace all the fields with the new content, or copy and paste the bits you want.
Adding a PDF, and other file types to your Library You can add the full text file to the appropriate reference in the following way:
- Open the PDF file (or DOCX, TIFF, PPT, MP3, etc.) from the database window. Save the PDF to your desktop
- Find and drag the PDF from your desktop onto the selected record3
3 Documents and images (up to 45) may be included in your EndNote X5 Library in the File Attachments or Figure fields.
18
- The paper clip attachment icon will now display on the left-hand side of the reference in your EndNote X5 Library and inside the File Attachments field for that record
- Delete the temporary PDF file from your desktop as it is safely stored in your EndNote X5 Library.
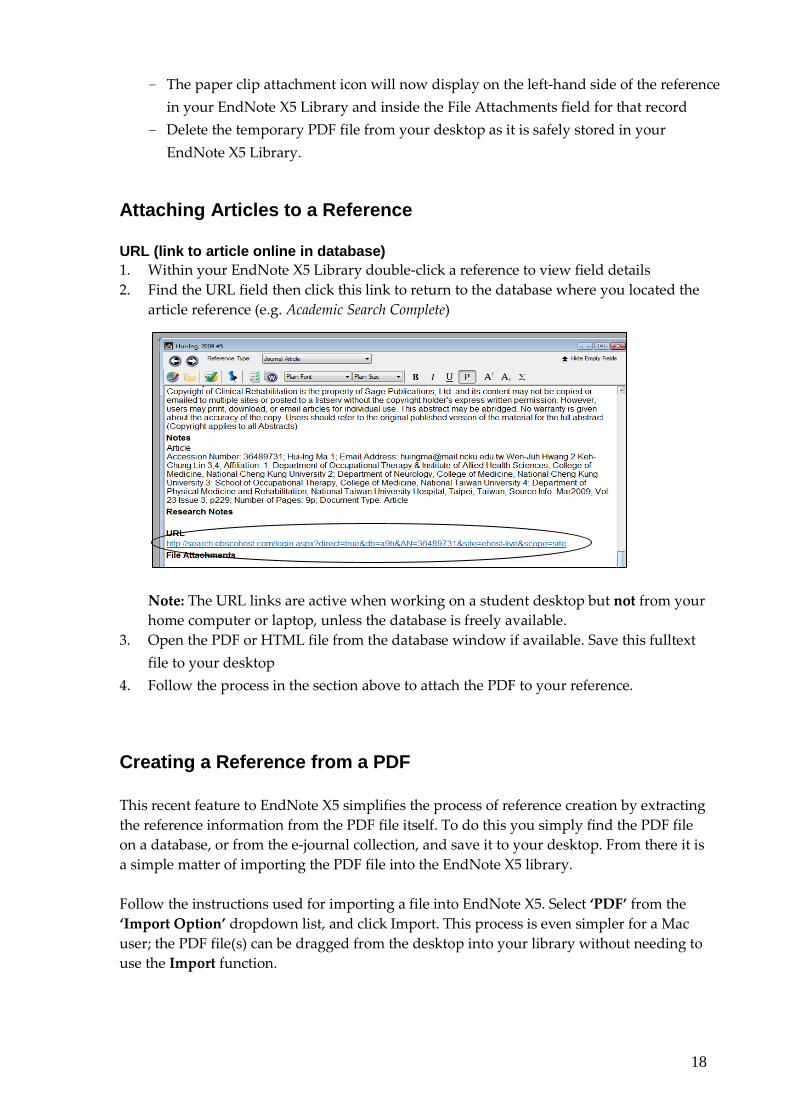
Attaching Articles to a Reference URL (link to article online in database) 1. Within your EndNote X5 Library double-click a reference to view field details 2. Find the URL field then click this link to return to the database where you located the
article reference (e.g. Academic Search Complete)
Note: The URL links are active when working on a student desktop but not from your home computer or laptop, unless the database is freely available.
3. Open the PDF or HTML file from the database window if available. Save this fulltext file to your desktop
4. Follow the process in the section above to attach the PDF to your reference.
Creating a Reference from a PDF This recent feature to EndNote X5 simplifies the process of reference creation by extracting the reference information from the PDF file itself. To do this you simply find the PDF file on a database, or from the e-journal collection, and save it to your desktop. From there it is a simple matter of importing the PDF file into the EndNote X5 library. Follow the instructions used for importing a file into EndNote X5. Select ‘PDF’ from the ‘Import Option’ dropdown list, and click Import. This process is even simpler for a Mac user; the PDF file(s) can be dragged from the desktop into your library without needing to use the Import function.
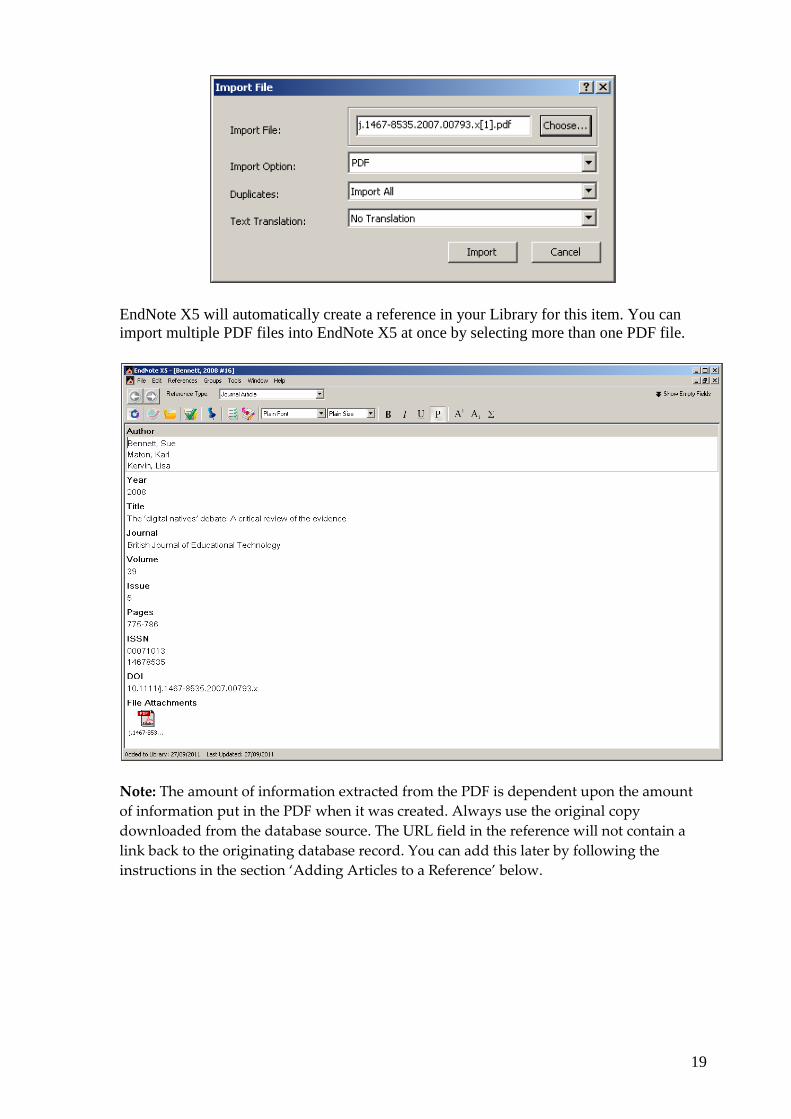
19
EndNote X5 will automatically create a reference in your Library for this item. You can import multiple PDF files into EndNote X5 at once by selecting more than one PDF file.
Note: The amount of information extracted from the PDF is dependent upon the amount of information put in the PDF when it was created. Always use the original copy downloaded from the database source. The URL field in the reference will not contain a link back to the originating database record. You can add this later by following the instructions in the section ‘Adding Articles to a Reference’ below.

20
Organising Your Library
Grouping References EndNote X5 allows you to group references into customised Groups, Group Sets, or Smart Group sections. A maximum of 500 Group Sets per Library is permitted. Break your research into major Group Sets and customise Groups within these, e.g.
Fish Freshwater fish Marine fish
Create a New Group and Add References to it: 1. Click on Groups > Create Group OR right-click My Groups in the left bar and select
Create Group 2. Type the new group name then click <Enter>. The new group contains no references
yet 3. Click on All References to return to your entire library 4. Select the References you want to add to the group by highlighting them. 5. Go to Groups>Add References to > Group name, OR drag and drop the selected
References in the new group
Group Sets Group sets are used to create a subset of references under a main group heading. It gives you the ability to refine your subject sets in a logical way. To create a Group Set: 1. From the Groups menu select Create Group Set, OR right-click My Groups in the left
bar and select Create Group Set 2. Type the new Group Set heading name then <Enter>, e.g. Interviewer. You cannot
add references to a Group Set so create Groups within each Group Set 3. Highlight the Group Set heading then go to Groups > Create Group, OR right click
the Group Set name > select Create Group

21
4. Name the new Group then <Enter> - the new Group contains no references yet 5. Click on All References to return to your entire library 6. Select two sample References by highlighting them. Use your CTRL key if they are
side by side, or positioned apart in the list 7. Go to Groups > Add References to > Begley, OR drag and drop the selected
References in the new Group
NB. See the EndNote X5 Advanced Guide for information on Smart Groups
Using your References in Documents (Cite While You Write) With EndNote X5 you can insert selected references into your Word 2003, 2007, and 2010 document while you are writing it. You can do the same with OpenOffice Writer 3. This applies to PC and Mac versions of these word processing programs.
There is a new ribbon tab for EndNote X5 users. Check behind commands with a pull-down arrow for more actions, e.g. Find Citation is part of Insert Citation.
Insert references into Word documents, using EndNote X5 1. Open a Word document and create some practice text 2. Position cursor where you want the in-text citation, and insert a space 3. Go to your EndNote X5 ribbon tab and select Insert Citation Find Citation
Group Smart Group Group in a Group Set
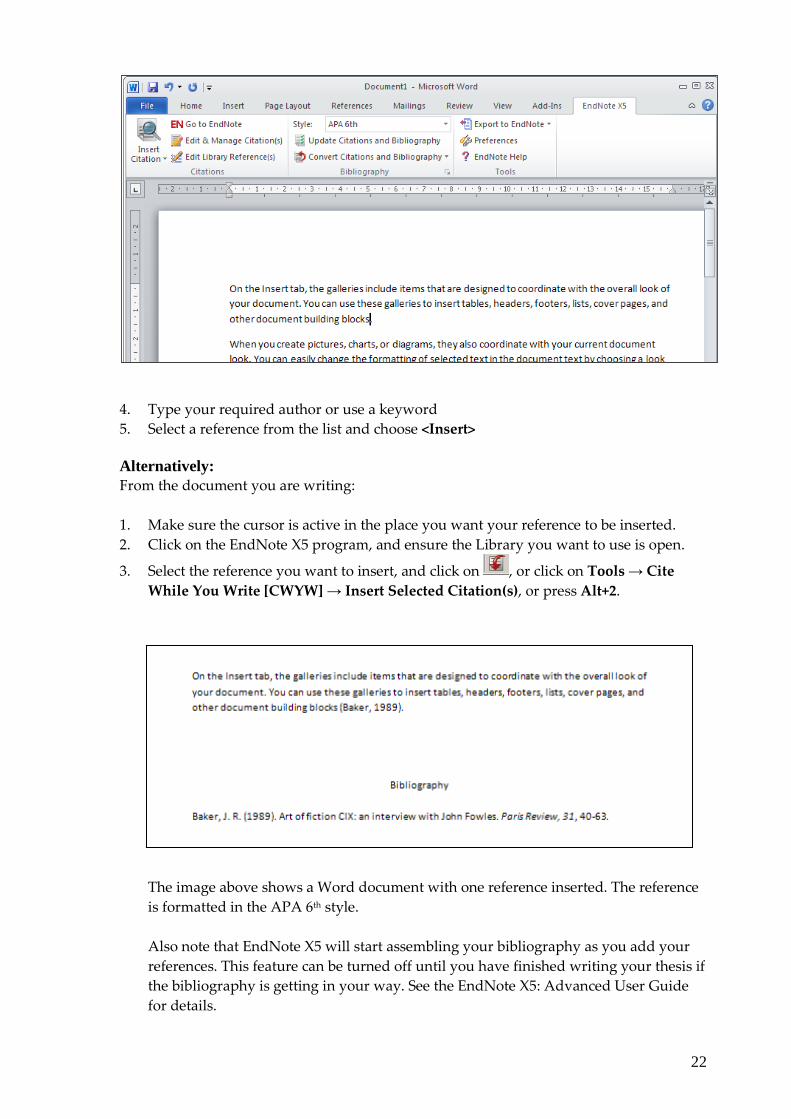
22
4. Type your required author or use a keyword 5. Select a reference from the list and choose <Insert> Alternatively: From the document you are writing: 1. Make sure the cursor is active in the place you want your reference to be inserted. 2. Click on the EndNote X5 program, and ensure the Library you want to use is open.
3. Select the reference you want to insert, and click on , or click on Tools → Cite While You Write [CWYW] → Insert Selected Citation(s), or press Alt+2.
The image above shows a Word document with one reference inserted. The reference is formatted in the APA 6th style. Also note that EndNote X5 will start assembling your bibliography as you add your references. This feature can be turned off until you have finished writing your thesis if the bibliography is getting in your way. See the EndNote X5: Advanced User Guide for details.

23
Edit citations 1. To add page numbers to your in-text reference, ensure your Word document and your
EndNote Library are both displaying the same output style, e.g. APA 6th.
2. Pull down Formatting and choose to <Exclude author> or <Exclude year> if already mentioned in the body of your document
Convert Word File to Plain Text When you have written your Word document and added in-text citations and bibliography you may want to do some final editing. Disconnect from your EndNote Library using Word >EndNote X5 > Convert Citations and Bibliography > Convert to Plain Text. Save the converted file and edit as required. This removes any connection to EndNote field codes (those #numbered references in text) so you cannot make EndNote related changes to this file anymore.
On the Insert tab, the galleries include items that are designed to coordinate with the overall look of your document. You can use these galleries to insert tables, headers, footers, lists, cover pages, and other document building blocks (Baker, 1989).
Highlight the in-text citation Click <Edit & Manage Citations> on your Word EndNote X5 toolbar Add page number/s Click <OK>

24
Additional Hints & Tips
EndNote X5 Toolbar – Button Navigation Import Insert Citation Export Format Bibliography
Return to word processor
Output style
Online Search mode EndNote X5 PC toolbar
Local Library mode Add a new Reference Integrated Library & Online Search Mode - click each to explore screen changes
EndNote X5 Mac Toolbar
Online Search mode
Local Library mode Add a new Reference Integrated Library & Online Search Mode - click each to explore screen changes
Finding References in EndNote X5 You may wish to find a particular reference within your EndNote X5 Library. To do so: 1. Within EndNote X5, go to the Search tab in the lower pane 2. Type word(s) you wish to search, in either ‘Any Field’, or a selected field 3. Select <Search Whole Library>
Quick Search EndNote X5 offers a Quick Search box on the top menu bar – find References by keyword, author or title, etc. instead of using the advanced Search tab in the lower pane.
Suppressing unwanted fields You may prefer to suppress reference fields which are unused (this can make it easier to view the populated fields on a single screen). To do so: 1. Within EndNote X5, double-click a reference to reveal the full record 2. Above the reference, on the right-hand side, select <Hide Empty Fields> 3. Click again, to reverse this process, and <Show Empty Fields> 4. On a Mac click the double arrow in the Reference window, top right menu bar.
Choose to Toggle Empty Fields hidden or open to view

25
Sorting references Within your EndNote X5 screen of references click on the grey headers, e.g. Author, to sort in alphabetical order, or Year, or Record Number. If you click a second time some headers sort in reverse order.
Finding and deleting duplicate references When searching a variety of databases, it is possible to import the same reference more than once. This can become a problem in large EndNote X5 libraries, with hundreds of references. It is important to be able to find these duplicates, choose the most complete reference, and delete the duplicate reference. To do so:
1. Within EndNote X5, go to <References> and select <Find Duplicates> 2. Any duplicate references will display in twin columns for easier comparison. Fields
which contain similar but different information are automatically highlighted to draw your attention to the differences (note the image below: there is a full stop following the author name in the record on the right but not on the left, and the placement of the colon is different in the two title fields). This helps you to select the record you think is most accurate. Scrolling is locked so that both records remain aligned as you move through a record.
3. Check the record contents before selecting the reference(s) you wish to keep or paste field information to retain one valuable record
4. Choose <Keep this record> Note: The Record Number assigned to a deleted Reference will not be re-used so if sorting by Record Number there will be gaps eventually. Note: If using Online Search the Edit-Preferences-Duplicates can be set to automatically discard duplicates already in your Library.

26
Emailing your EndNote X5 Library (plus your PDFs) If you are on dial-up internet access at home it may be easier to search for, and save, references to a student desktop EndNote X5 Library (access via the Start menu). You can then email this Library to yourself, and merge it with your existing EndNote X5 Library. Any PDFs which have been ‘dragged’ into your Library will also be included. To do so:
1. Create and populate an EndNote X5 Library via the Student Desktop 2. Choose File > Compressed Library…choose to Create with/out file attachments for
selected/all references 3. Save the new file to your desktop 4. This file looks slightly different to the .enl file – this file ending is .enlx 5. Attach this .enlx file to an email and send a test (to yourself) 6. On your own computer, double-click the emailed Library to open; or right click the
attachment then Save as a Target to your desktop. Open the library from within EndNote X5
7. All references, plus any associated PDFs will now appear Note: Despite compression the file may be large depending on how many PDFs it contains.
Moving References between EndNote Desktop and EndNote Web It is possible to move references and attached files between your EndNote Desktop Library and your EndNote Web account. For information on how to do this refer to the ‘Using EndNote Web’ document at http://library.otago.ac.nz/services/reference/tute.html#endnote
Formatting your Bibliography in Word Once your references have been transferred into your Word document you may wish to format your bibliography, e.g. add a title and change the spacing between references. All formatting can easily be done in Word, using Bibliography Preferences>Format Bibliography or click in your EndNote Library. Further tips:
- Check all imported references, to eliminate any errors - Layout looks best with no additional line spaces within each reference, but with at
least 1.5 line spacing between references - Text font and size can also be managed from within Word
Note: If further editing is required, but the EndNote X5 styles disallow, you can Remove Field Codes once the document is finalised in Word. You cannot return to your original document with Field Codes in place, so this final action should be avoided.
Print Your Bibliography in Word 2007 or 2010 1. Select all your references in your full EndNote X5 Library or customised Group
Library. 2. Option A: File > Export and save as a rich-text formatted (.rtf) file. Ensure the correct
output style is displaying. 3. Open your file in Word. It will display in alphabetical order by author, no matter
which column you last sorted your references by. This is useful for visual correction. 4. Option B: Edit > Copy Formatted. Paste it into a Word document.