enabling z/vm for openstack (edition 4.0) consult your ibm sales representative or business partner...
TRANSCRIPT

z/VM
Enabling z/VM for OpenStack(Support for OpenStack Havana Release)Version 6 Release 3
���

This edition (Edition 4.0) applies to version 6, release 3, modification 0 of IBM z/VM (product number 5741-A07)and to all subsequent releases and modifications until otherwise indicated in new editions.
© Copyright IBM Corporation 2014.US Government Users Restricted Rights – Use, duplication or disclosure restricted by GSA ADP Schedule Contractwith IBM Corp.

Contents
Figures . . . . . . . . . . . . . . . . . . . . . . . . . . . . . . . . . . . . v
Tables . . . . . . . . . . . . . . . . . . . . . . . . . . . . . . . . . . . . vii
About This Document . . . . . . . . . . . . . . . . . . . . . . . . . . . . . ixWho Should Read This Book. . . . . . . . . . . . . . . . . . . . . . . . . . . . . . ix
How to Send Your Comments to IBM . . . . . . . . . . . . . . . . . . . . . . . xi
Chapter 1. Introduction . . . . . . . . . . . . . . . . . . . . . . . . . . . . . 1Architecture for z/VM Management . . . . . . . . . . . . . . . . . . . . . . . . . . . 1
Chapter 2. Planning and Requirements . . . . . . . . . . . . . . . . . . . . . . 5
Chapter 3. z/VM Configuration . . . . . . . . . . . . . . . . . . . . . . . . . . 9z/VM System Configuration . . . . . . . . . . . . . . . . . . . . . . . . . . . . . . 9Configuring the DMSSICNF COPY File . . . . . . . . . . . . . . . . . . . . . . . . . . 9SMAPI and Directory Manager Configuration . . . . . . . . . . . . . . . . . . . . . . . . 10SMAPI and External Security Manager Configuration . . . . . . . . . . . . . . . . . . . . . 11Storage Configuration . . . . . . . . . . . . . . . . . . . . . . . . . . . . . . . . 11
Chapter 4. xCAT Configuration . . . . . . . . . . . . . . . . . . . . . . . . . 13xCAT z/VM Setup . . . . . . . . . . . . . . . . . . . . . . . . . . . . . . . . . 13Starting xCAT for the First Time . . . . . . . . . . . . . . . . . . . . . . . . . . . . 13
Chapter 5. OpenStack Configuration . . . . . . . . . . . . . . . . . . . . . . . 15CONF Files . . . . . . . . . . . . . . . . . . . . . . . . . . . . . . . . . . . 16
Settings for Nova . . . . . . . . . . . . . . . . . . . . . . . . . . . . . . . . 16Settings for Cinder . . . . . . . . . . . . . . . . . . . . . . . . . . . . . . . . 21Settings for Neutron . . . . . . . . . . . . . . . . . . . . . . . . . . . . . . . 22
Configuration of SSH for xCAT and Nova Compute Nodes . . . . . . . . . . . . . . . . . . . 24SSH Key Between xCAT and Nova . . . . . . . . . . . . . . . . . . . . . . . . . . 24SSH Key Between Nova Compute Nodes for Resize . . . . . . . . . . . . . . . . . . . . . 25
Network Configurations . . . . . . . . . . . . . . . . . . . . . . . . . . . . . . . 25Sample Configuration . . . . . . . . . . . . . . . . . . . . . . . . . . . . . . . 25Network Scenarios . . . . . . . . . . . . . . . . . . . . . . . . . . . . . . . . 28
Verify the Configuration of OpenStack . . . . . . . . . . . . . . . . . . . . . . . . . . 34Nova . . . . . . . . . . . . . . . . . . . . . . . . . . . . . . . . . . . . 34Neutron . . . . . . . . . . . . . . . . . . . . . . . . . . . . . . . . . . . 34Cinder . . . . . . . . . . . . . . . . . . . . . . . . . . . . . . . . . . . . 36
Chapter 6. Image and cloud-init Configuration. . . . . . . . . . . . . . . . . . . 37Image Requirements . . . . . . . . . . . . . . . . . . . . . . . . . . . . . . . . 37Make a Deployable z/VM Image . . . . . . . . . . . . . . . . . . . . . . . . . . . . 38
Install the Linux on System z on a Virtual Machine . . . . . . . . . . . . . . . . . . . . . 38Configuration of xcatconf4z . . . . . . . . . . . . . . . . . . . . . . . . . . . . . 39Installation and Configuration of cloud-init . . . . . . . . . . . . . . . . . . . . . . . . 39Define the Source System as an xCAT Node . . . . . . . . . . . . . . . . . . . . . . . 42Capture the Node to Generate the Image in the xCAT MN . . . . . . . . . . . . . . . . . . 45Export the Image to the Nova Compute Server . . . . . . . . . . . . . . . . . . . . . . 45Upload the Image from the Nova Compute Server to Glance . . . . . . . . . . . . . . . . . . 46Remove the Image from the xCAT Management Node . . . . . . . . . . . . . . . . . . . . 47Deactivate cloud-init on the Captured Source System . . . . . . . . . . . . . . . . . . . . 47
© Copyright IBM Corp. 2014 iii

Appendix A. Installation Verification Programs . . . . . . . . . . . . . . . . . . 49Location of the IVP Programs . . . . . . . . . . . . . . . . . . . . . . . . . . . . . 49Overview of IVP Operation . . . . . . . . . . . . . . . . . . . . . . . . . . . . . . 49Installing the IVP Preparation Program . . . . . . . . . . . . . . . . . . . . . . . . . . 49Running the Preparation Script on the Compute Node . . . . . . . . . . . . . . . . . . . . . 49Uploading the Driver Script to Your System . . . . . . . . . . . . . . . . . . . . . . . . 50Running the Driver Script from the xCAT GUI . . . . . . . . . . . . . . . . . . . . . . . 50Running IVP Without the Driver Script from the xCAT GUI . . . . . . . . . . . . . . . . . . . 52Messages from the Preparation Script. . . . . . . . . . . . . . . . . . . . . . . . . . . 53Messages from the xCAT IVP Program . . . . . . . . . . . . . . . . . . . . . . . . . . 53
Appendix B. Getting Logs from xCAT or ZHCP . . . . . . . . . . . . . . . . . . 57
Appendix C. Checklist for Capture/Deploy/Resize . . . . . . . . . . . . . . . . . 63
Appendix D. Checklist for Live Migration . . . . . . . . . . . . . . . . . . . . . 65
Appendix E. Sample Configuration Files . . . . . . . . . . . . . . . . . . . . . 67Sample File for Nova z/VM Driver . . . . . . . . . . . . . . . . . . . . . . . . . . . 67Sample File for Cinder z/VM Driver . . . . . . . . . . . . . . . . . . . . . . . . . . . 68Sample Files for Neutron z/VM Driver . . . . . . . . . . . . . . . . . . . . . . . . . . 69
Appendix F. Increasing the httpd Timeout in the xCAT MN . . . . . . . . . . . . . 71
Appendix G. Troubleshooting . . . . . . . . . . . . . . . . . . . . . . . . . . 73Logging within the Compute Node . . . . . . . . . . . . . . . . . . . . . . . . . . . 73prep_zxcatIVP Issues . . . . . . . . . . . . . . . . . . . . . . . . . . . . . . . . 73zxcatIVP Issues . . . . . . . . . . . . . . . . . . . . . . . . . . . . . . . . . . 74Exchanging SSH Key Issues . . . . . . . . . . . . . . . . . . . . . . . . . . . . . . 74Compute Node Startup Issues . . . . . . . . . . . . . . . . . . . . . . . . . . . . . 77Deployment Issues . . . . . . . . . . . . . . . . . . . . . . . . . . . . . . . . . 79Capture Issues . . . . . . . . . . . . . . . . . . . . . . . . . . . . . . . . . . 90Importing Image Issues . . . . . . . . . . . . . . . . . . . . . . . . . . . . . . . 91xCAT Management Node Issues . . . . . . . . . . . . . . . . . . . . . . . . . . . . 92
Space Issues on /install Directory Can Lead to xCAT MN Issues . . . . . . . . . . . . . . . . 92LVM Errors in the /install Directory Can Lead to xCAT MN Issues. . . . . . . . . . . . . . . . 92Space Issues on /persistent Directory Can Lead to xCAT MN Issues . . . . . . . . . . . . . . . 93
ZHCP Node Issues . . . . . . . . . . . . . . . . . . . . . . . . . . . . . . . . . 95Space Issues on /persistent Directory Can Lead to ZHCP Issues. . . . . . . . . . . . . . . . . 95
Notices . . . . . . . . . . . . . . . . . . . . . . . . . . . . . . . . . . . 99Trademarks . . . . . . . . . . . . . . . . . . . . . . . . . . . . . . . . . . . 100
iv Enabling z/VM for OpenStack (Edition 4.0)
||
||||||||||||

Figures
1. A Single xCAT Management Node Managing Three z/VM Hypervisor Instances. . . . . . . . . . . 22. The Architecture for z/VM Management . . . . . . . . . . . . . . . . . . . . . . . . 33. Sample Configuration . . . . . . . . . . . . . . . . . . . . . . . . . . . . . . 264. Flat Network, Using Public IP Addresses. . . . . . . . . . . . . . . . . . . . . . . . 295. Flat Network, Using Private IP Addresses . . . . . . . . . . . . . . . . . . . . . . . 316. Selecting the xCAT Node . . . . . . . . . . . . . . . . . . . . . . . . . . . . . 427. Selecting “Run script” . . . . . . . . . . . . . . . . . . . . . . . . . . . . . . 438. Entering Script . . . . . . . . . . . . . . . . . . . . . . . . . . . . . . . . 449. The Nodes Panel . . . . . . . . . . . . . . . . . . . . . . . . . . . . . . . . 51
10. Actions Pulldown on The Nodes Panel . . . . . . . . . . . . . . . . . . . . . . . . 5111. The Script Panel . . . . . . . . . . . . . . . . . . . . . . . . . . . . . . . . 5212. Completion of IVP on the Script Panel . . . . . . . . . . . . . . . . . . . . . . . . 5213. Sample Messages from the xCAT IVP Program. . . . . . . . . . . . . . . . . . . . . . 5414. Selecting the xCAT Node . . . . . . . . . . . . . . . . . . . . . . . . . . . . . 5715. Information Box with File Names . . . . . . . . . . . . . . . . . . . . . . . . . . 5816. Selecting the Node . . . . . . . . . . . . . . . . . . . . . . . . . . . . . . . 5917. Selecting “Event log” . . . . . . . . . . . . . . . . . . . . . . . . . . . . . . 5918. Filling in the Logs Fields . . . . . . . . . . . . . . . . . . . . . . . . . . . . . 6019. Information Box Confirming Copy . . . . . . . . . . . . . . . . . . . . . . . . . . 6120. Going to the Files Screen . . . . . . . . . . . . . . . . . . . . . . . . . . . . . 6121. Choosing “Save Link As...” on the Files Screen. . . . . . . . . . . . . . . . . . . . . . 6222. Selecting xcat Node Checkbox . . . . . . . . . . . . . . . . . . . . . . . . . . . 7123. Selecting Timeout Value . . . . . . . . . . . . . . . . . . . . . . . . . . . . . 7224. Unlock Panel for Node Checkbox on demonode . . . . . . . . . . . . . . . . . . . . . 7425. SSH to Node from Run Script Screen . . . . . . . . . . . . . . . . . . . . . . . . . 7526. 'makeknownhosts demonode -r' from Run Script Screen . . . . . . . . . . . . . . . . . . 76
© Copyright IBM Corp. 2014 v
||

vi Enabling z/VM for OpenStack (Edition 4.0)

Tables
1. OpenStack vs. Neutron z/VM Driver Terminology . . . . . . . . . . . . . . . . . . . . . 52. DMSSICNF COPY File, With Hints for Updating . . . . . . . . . . . . . . . . . . . . . 103. Warning IDs and Possible Causes . . . . . . . . . . . . . . . . . . . . . . . . . . 54
© Copyright IBM Corp. 2014 vii

viii Enabling z/VM for OpenStack (Edition 4.0)

About This Document
This document is intended to provide guidance to z/VM customers who wish to configure a product thatincludes the z/VM plug-in for enabling OpenStack for z/VM.
Notes:
1. This support works only after obtaining the z/VM plug-in included with a product. The plug-in is notavailable from the OpenStack community source.
2. This document is not intended to describe how to use OpenStack or other products that use the z/VMcompute node. Consult either the OpenStack documentation or the documentation for those otherproducts for that information.
Who Should Read This BookThis book is designed for administrators responsible for managing their system with products thatinclude the OpenStack for z/VM plug-in.
© Copyright IBM Corp. 2014 ix

x Enabling z/VM for OpenStack (Edition 4.0)

How to Send Your Comments to IBM
We appreciate your input on this publication. Feel free to comment on the clarity, accuracy, andcompleteness of the information or give us any other feedback that you might have.
Use one of the following methods to send us your comments:1. Send an email to [email protected]. Go to IBM z/VM Reader's Comments (www.ibm.com/systems/z/os/zvm/zvmforms/webqs.html).3. Mail the comments to the following address:
IBM CorporationAttention: MHVRCFS Reader CommentsDepartment H6MA, Building 7072455 South RoadPoughkeepsie, NY 12601-5400U.S.A.
4. Fax the comments to us as follows:From the United States and Canada: 1+845+432-9405From all other countries: Your international access code +1+845+432-9405
Include the following information:v Your name and addressv Your email addressv Your telephone or fax numberv The publication title:
Enabling z/VM for OpenStackv The topic name or page number related to your commentv The text of your comment
When you send comments to IBM, you grant IBM a nonexclusive right to use or distribute yourcomments in any way it believes appropriate without incurring any obligation to you.
IBM or any other organizations will use the personal information that you supply only to contact youabout the issues that you submit to IBM.
If You Have a Technical Problem
Do not use the feedback methods listed above. Instead, do one of the following:v Contact your IBM service representative.v Contact IBM technical support.v See IBM: z/VM Service Resources (www.ibm.com/vm/service/).v Go to IBM Support Portal (www.ibm.com/support/entry/portal/Overview/).
© Copyright IBM Corp. 2014 xi

xii Enabling z/VM for OpenStack (Edition 4.0)
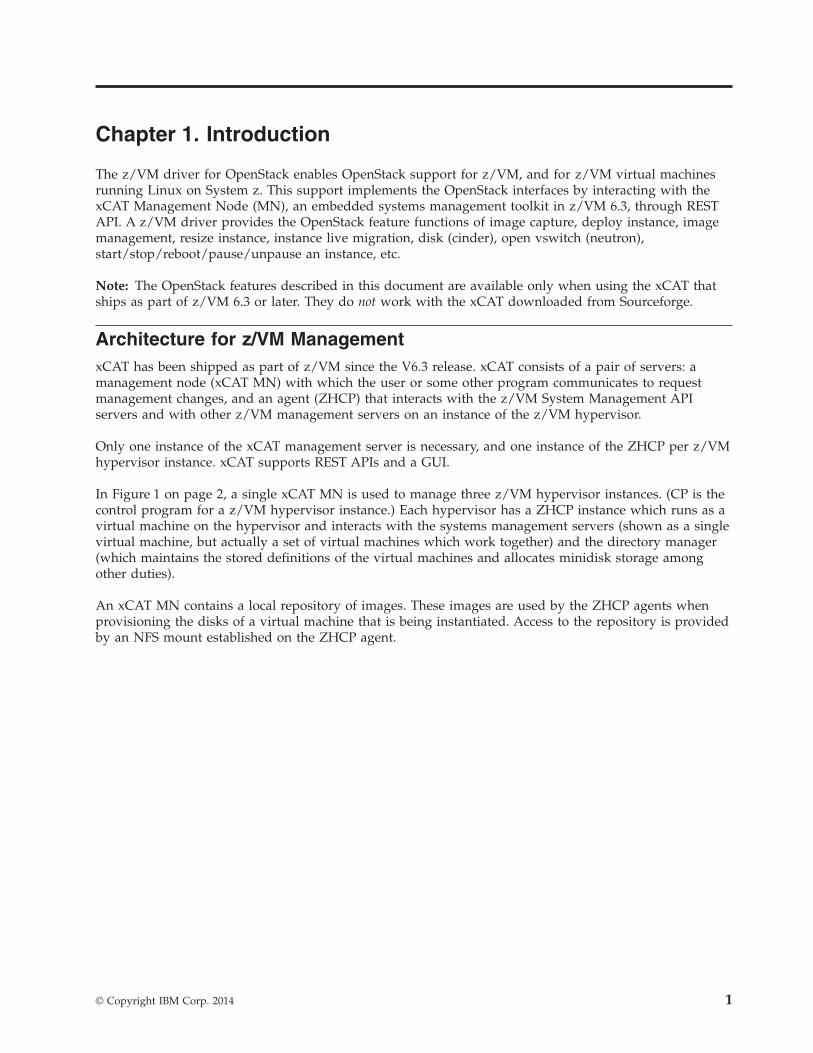
Chapter 1. Introduction
The z/VM driver for OpenStack enables OpenStack support for z/VM, and for z/VM virtual machinesrunning Linux on System z. This support implements the OpenStack interfaces by interacting with thexCAT Management Node (MN), an embedded systems management toolkit in z/VM 6.3, through RESTAPI. A z/VM driver provides the OpenStack feature functions of image capture, deploy instance, imagemanagement, resize instance, instance live migration, disk (cinder), open vswitch (neutron),start/stop/reboot/pause/unpause an instance, etc.
Note: The OpenStack features described in this document are available only when using the xCAT thatships as part of z/VM 6.3 or later. They do not work with the xCAT downloaded from Sourceforge.
Architecture for z/VM ManagementxCAT has been shipped as part of z/VM since the V6.3 release. xCAT consists of a pair of servers: amanagement node (xCAT MN) with which the user or some other program communicates to requestmanagement changes, and an agent (ZHCP) that interacts with the z/VM System Management APIservers and with other z/VM management servers on an instance of the z/VM hypervisor.
Only one instance of the xCAT management server is necessary, and one instance of the ZHCP per z/VMhypervisor instance. xCAT supports REST APIs and a GUI.
In Figure 1 on page 2, a single xCAT MN is used to manage three z/VM hypervisor instances. (CP is thecontrol program for a z/VM hypervisor instance.) Each hypervisor has a ZHCP instance which runs as avirtual machine on the hypervisor and interacts with the systems management servers (shown as a singlevirtual machine, but actually a set of virtual machines which work together) and the directory manager(which maintains the stored definitions of the virtual machines and allocates minidisk storage amongother duties).
An xCAT MN contains a local repository of images. These images are used by the ZHCP agents whenprovisioning the disks of a virtual machine that is being instantiated. Access to the repository is providedby an NFS mount established on the ZHCP agent.
© Copyright IBM Corp. 2014 1

Figure 2 on page 3 shows the architecture for z/VM management. You can see the relationship betweenOpenStack and z/VM. It also shows the possible relationship with the IBM Smart Cloud set of offerings.Smart Cloud products will use pieces of the OpenStack services, along with additional pieces written forSmart Cloud to make up the Smart Cloud product.
There is a one-to-one relationship between a compute node and a z/VM hypervisor. The compute node isconfigured to communicate with a specific xCAT MN and a ZHCP node. In this figure, you see a SmartCloud controller with two compute nodes. Each node controls the z/VM shown underneath the computenode.
z/V
MD
irecto
ryM
anager
z/V
MD
irecto
ryM
anager
z/V
MD
irecto
ryM
anager
LIN
UX
LIN
UX
LIN
UX
LIN
UX
LIN
UX
LIN
UX
ZH
CP
ZH
CP
ZH
CP
SSH
REST
SSH
SSH
CP
LPAR
LPAR
LPAR
CP
CP
xCAT UI
SM
AP
I
SM
AP
IS
MA
PI
xC
AT
MN
Figure 1. A Single xCAT Management Node Managing Three z/VM Hypervisor Instances
2 Enabling z/VM for OpenStack (Edition 4.0)
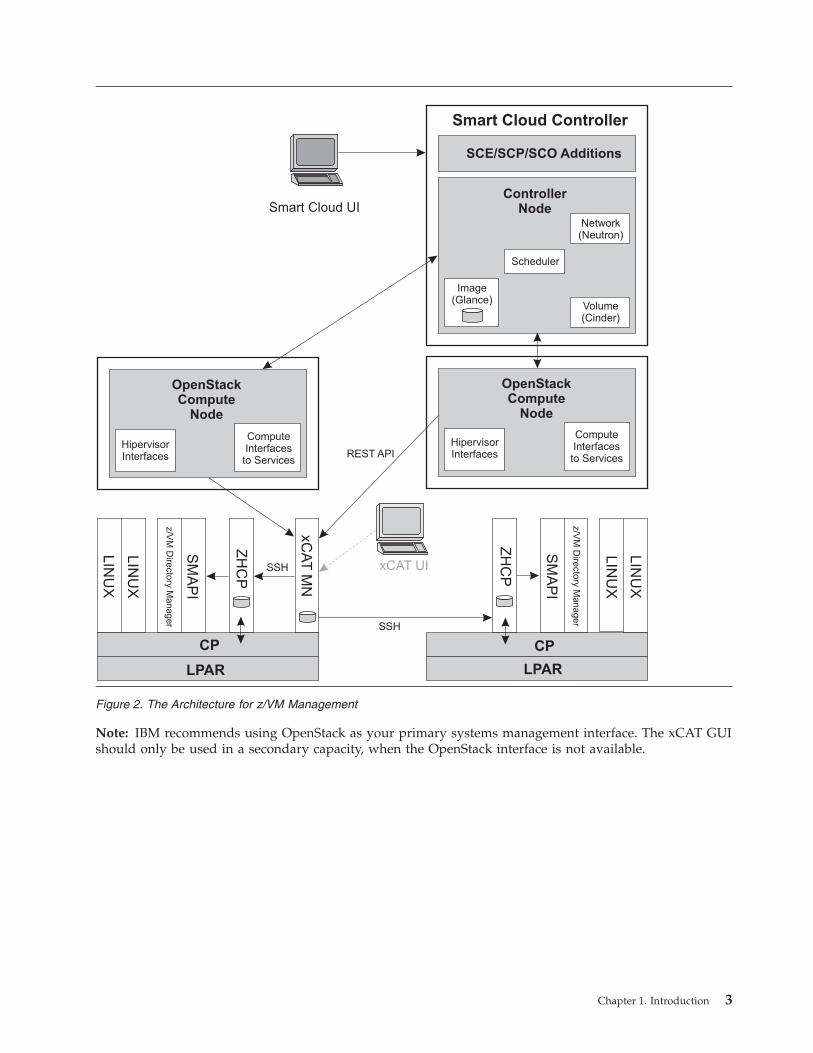
Note: IBM recommends using OpenStack as your primary systems management interface. The xCAT GUIshould only be used in a secondary capacity, when the OpenStack interface is not available.
LIN
UX
LIN
UX
LIN
UX
LIN
UX
ZH
CP
ZH
CP
ComputeInterfacesto Services
HipervisorInterfaces
SSH
REST API
SSH
CP
LPAR LPAR
CP
Smart Cloud UI
xCAT UI
ControllerNode
OpenStackCompute
Node
OpenStackCompute
Node
SCE/SCP/SCO Additions
Smart Cloud Controller
Scheduler
Image(Glance)
Volume(Cinder)
Network(Neutron)
SM
AP
I
SM
AP
I
xC
AT
MN
ComputeInterfacesto Services
HipervisorInterfaces
z/V
MD
irecto
ryM
anager
z/V
MD
irecto
ryM
anager
Figure 2. The Architecture for z/VM Management
Chapter 1. Introduction 3

4 Enabling z/VM for OpenStack (Edition 4.0)

Chapter 2. Planning and Requirements
z/VM System Requirementsv A supported version of z/VM 6.3.v In order to use live migration, the z/VM system must be configured in a Single System Image (SSI)
configuration, and must have been created using the IBM-provided installation instructions for SSIconfigurations.
v PTF UM34270 for APAR VM65513, and its prerequisites.
Note: System z hardware requirements are based on both the applications and the load on the system.Please consult your IBM Sales Representative or Business Partner for assistance in determining thespecific hardware requirements for your environment.
Network Considerations
The Neutron z/VM driver is designed as a Neutron Layer 2 plugin/agent, to enable OpenStack to exploitSystem z and z/VM virtual network facilities. Typically, from the OpenStack Neutron perspective, aneutron plugin performs the database related work, while a neutron agent performs the realconfiguration work on hypervisors. Note that in this document, the terms “Neutron z/VM plugin” and“Neutron z/VM agent” both refer to the Neutron z/VM driver.
The main component of the Neutron z/VM driver is neutron-zvm-agent, which is designed to work witha Neutron server running with the OpenVswitch plugin. The Neutron z/VM driver uses the NeutronOpenVswitch plugin to do database related work, and neutron-zvm-agent will use the xCAT REST API todo real configuration work on z/VM.
Notes:
v Because neutron-zvm-agent will only configure a network on z/VM, if you plan to use Neutron Layer3 network features or DHCP features, you need to configure and run the Neutron OpenVswitch agentand other Layer 3 agents with the Neutron server. Refer to The Networking Chapter of the OpenStackCloud Administrator Guide for more information. Otherwise, the Neutron OpenVswitch agent is notneeded.
v One neutron-zvm-agent can work with or configure only one z/VM host.v The neutron-zvm-agent does not need to run on the same server with nova-compute.v The Neutron z/VM driver does not support IPV6.
Note that there are some terminology differences between OpenStack and the Neutron z/VM driver, asfollows:
Table 1. OpenStack vs. Neutron z/VM Driver Terminology
OpenStack Neutron z/VM Driver
Physical network z/VM vswitch
Segmentation ID VLAN ID
FLAT VLAN UNAWARE
base_mac System prefix or user prefix
The Neutron z/VM driver uses a z/VM vswitch to provide connectivity for OpenStack instances. Refer toz/VM: Connectivity for more information on vswitches and the z/VM network concept.
© Copyright IBM Corp. 2014 5

Physical Network and VLAN Considerations
In the Neutron server configuration file, network_vlan_ranges is a required parameter, as in this example:network_vlan_ranges=xcatvsw2,datanet1:1:4094,datanet2:2:355,datanet3
In this example, each comma-delimited field is the configuration for the physical network. Thecolon-delimited physical network configuration fields is divided into a physical network name, VLAN IDstart, and VLAN ID end. If the physical network only has one field, the physical network is treated as aFLAT network.
Refer to Chapter 5, “OpenStack Configuration,” on page 15 for more information on the configuration.
A VLAN is used to separate the network with a VLAN ID. Only instances with the same VLAN ID cancommunicatie with each other. From the OpenStack perspective, when a network is created by theneutron server, and if the network type is VLAN, the neutron server will assign one VLAN ID(segmentation_id) for the network. The user also can specify the segmentation_id when creating thenetwork. The segmentation_id must be in the range defined in network_vlan_ranges. In this way, VLANranges can be used to control how many networks can be created on the physical network. z/VMvswitch supports VLAN ID ranges from 1 to 4094. A VLAN range defined in network_vlan_ranges cannot be larger than this. (It can be a subset of the 1-4094 range.) If more than 4094 networks are needed,the user needs to define more physical networks. From a system management perspective, for example, auser can choose different physical networks for different departments.
When planning a VLAN, you should also consider the network which the z/VM system is in. Ask thenetwork administrator which VLAN ranges are authorized for the z/VM system.
If the network is FLAT, network traffic is exposed among all instances on the physical network. From asystem management perspective, for example, again, when the user chooses different physical networksfor different departments, more than one FLAT physical network can be defined.
When the neutron-zvm-agent starts, it will:v Read the OpenVswitch configuration file to get the network_vlan_ranges configuration.v Treat each physical network in network_vlan_ranges as a vswitch name, and try to create each of them
in z/VM, if the vswitch does not already exist.
All of these newly created vswitches are working on Layer 2. If the physical network is FLAT, thecorresponding vswitch in z/VM will be created as VLAN UNAWARE. Otherwise, it will be created asVLAN AWARE and use the same VLAN range as the physical network. For example:network_vlan_ranges=xcatvsw2,datanet1:1:4094,datanet2:2:355,datanet3
In this example, the neutron-zvm-agent will try to create/setup four vswitches: xcatvsw2 and datanet3are VLAN UNAWARE, datanet1 is VLAN AWARE (and supports VLAN ID range 1-4094), and datanet2is VLAN AWARE (and supports VLAN ID range 2-355).
Notes:
v By default, xcatvsw2 is created by xCAT. The neutron-zvm-agent will create only the other threevswitches. By default, xcatvsw2 is a Layer 2, VLAN UNAWARE vswitch.
v By default, there is a built-in vswitch, xcatvsw1. It is a Layer 3, VLAN UNAWARE vswitch. It shouldonly be used by xCAT and zHCP for internal communication.
IP Address/MAC Address Considerations
An IP address range is needed when creating a subnet in the Neutron server. When a server instance iscreated, the Neutron server will assign one IP address from the subnet. If you are using a private IPaddress or an isolated network, you need to consider how many instances you need to support, then
6 Enabling z/VM for OpenStack (Edition 4.0)
|

choose the appropriate IP range. If you will use a public IP address or your own network, you need toget input from the network administrator. The Neutron server will generate MAC addresses for allports/NICs of the server instances. In the Neutron server configuration file, base_mac is used to controlthe first three/four fields of the generated MAC. All generated MAC addresses have the same prefix, asdefined in base_mac. base_mac can also be used to prevent MAC address conflicts. base_mac values shouldbe the same as the z/VM user prefix or system prefix. Refer to z/VM: CP Planning and Administration formore information on z/VM MAC address management.
Chapter 2. Planning and Requirements 7

8 Enabling z/VM for OpenStack (Edition 4.0)

Chapter 3. z/VM Configuration
This chapter shows the basic configurations for z/VM. For more information on setting up z/VM, referto the “Setting up and Configuring the Server Environment” chapter in z/VM: Systems ManagementApplication Programming.
z/VM System Configuration
To set up z/VM V6.3 with an SSI configuration, see z/VM: Installation Guide.
You may also find the following two IBM Redbooks to be helpful:v An Introduction to z/VM Single System Image (SSI) and Live Guest Relocation (LGR)v Using z/VM v 6.2 Single System Image (SSI) and Live Guest Relocation (LGR).
Configuring the DMSSICNF COPY File
Edit the DMSSICNF COPY file as appropriate for your system, use the local modifications processdescribed in the “The Server Configuration File” section of z/VM: Systems Management ApplicationProgramming. Some of these values can be obtained from the backup of DMSSICNF COPY you createdearlier. The xCAT-related sections of DMSSICNF COPY appear below, along with some hints on how toupdate those fields:
© Copyright IBM Corp. 2014 9

Table 2. DMSSICNF COPY File, With Hints for Updating
DMSSICNF COPY File Hints for Updating
/*********************************************************************//* XCAT server defaults *//*********************************************************************/XCAT_User = "XCAT" /* xCAT z/VM user ID */XCAT_Addr = "10.10.10.10" /* XCAT IP Address */XCAT_Host = "xcat" /* xCAT hostname */XCAT_Domain = ".yourcompany.com" /* xCAT domain name */XCAT_vswitch = "XCATVSW1" /* xCAT Vswitch name */XCAT_OSAdev = "NONE" /* OSA address for xCAT */XCAT_zvmsysid = "zvmnode" /* xCAT z/VM system id */XCAT_notify = "OPERATOR" /* Notify when xCAT started */XCAT_gateway = "10.10.10.1" /* Network gateway IP addr. */XCAT_netmask = "255.255.255.0" /* Default network mask */XCAT_iso = "volid1 volid2 volid3 volid4 volid5 volid6 volid7 volid8
volid9 volidA"XCAT_MN_Addr = "x.xx.xx.xxx" /* xCAT mgmt node IP address */XCAT_MN_vswitch = "XCATVSW2" /* xCAT MN Vswitch name */XCAT_MN_OSAdev = "NONE" /* OSA address for xCAT MN */XCAT_MN_gateway = "NONE" /* Network gateway IP addr. */XCAT_MN_Mask = "255.255.255.0" /* Netmask for xCAT MN */
XCAT_MN_admin = "mnadmin" /* MN administrator userid */
XCAT_MN_pw = "NOLOG" /* MN admin password *//* (if NOLOG, userid cannot *//* ssh into XCAT MN */
/*********************************************************************//* ZHCP server defaults *//*********************************************************************/ZHCP_User = "ZHCP" /* zhcp z/VM user ID */ZHCP_Addr = "10.10.10.20" /* zhcp IP ADDRESS */ZHCP_Host = "zhcp" /* zhcp hostname */ZHCP_Domain = ".yourcompany.com" /* zhcp domain name */ZHCP_vswitch = "XCATVSW1" /* zhcp Vswitch name */ZHCP_OSAdev = "NONE" /* OSA address for zhcp */
Do not changeDo not changeDo not changeYour site, for example: ".ibm.com"Do not changeDo not changeSystem name where XCAT is runningNotification, as desiredDo not changeDo not changeVolume labels of one or moredisks to hold the xCAT ISO filesIP address assigned to xCAT Management NodeDo not changeOSA OSA address to attach to XCATVSW2Network gateway, if not x.xx.xx.1Net mask for your network
Userid of xCAT maintenance ID forSSH access to XCATPassword for the XCAT_MN_admin user above.If set to the default ’nolog’, the userwill not be created.Notes:- XCAT_MN_pw is a requirement for using
OpenStack with z/VM- If the password is set, it should
then be changed after logging on to theXCAT_MN_admin user (via SSH).
Do not changeDo not changeDo not changeYour site, for example: ".ibm.com"Do not changeDo not change
Note: The XCAT server values and ZHCP server values included here should be used in place of the values documented in theV6.3 version of the z/VM: Systems Management Application Programming.
The information specified in the DMSSICNF COPY file is used to configure the xCAT management node.This includes creating xCAT nodes representing:v The xCAT MN with the name specified in the XCAT_Host property.v The ZHCP agent with the name specified in the ZHCP_Host property.v The z/VM Hypervisor with the name specified in the XCAT_zvmsysid property.
SMAPI and Directory Manager Configuration
Refer to the “Setting up and Configuring the Server Environment” chapter in z/VM: Systems ManagementApplication Programming to configure the z/VM Systems Management API (SMAPI) server.
If you use DirMaint as your Directory Manager, see z/VM: Directory Maintenance Facility Tailoring andAdministration Guide. If you are using another Directory Manager product, consult their publications forfurther information.
10 Enabling z/VM for OpenStack (Edition 4.0)
|

SMAPI and External Security Manager Configuration
If you use an External Security Manager (ESM), ensure that you have followed the directions in the“Using SMAPI with an External Security Manager” appendix of z/VM: Systems Management ApplicationProgramming. Additionally, see your Directory Manager product documentation for configuring yourDirectory Manager to work with an ESM.
If you are using RACF, the following RACF changes must also be made:1. Enable ZHCP to link to minidisks for image deployments.
RAC ALU ZHCP OPERATIONS
2. All users managed by OpenStack must have access to the vswitch XCATVSW2. Because the supportto grant this authority from ZHCP is not implemented, the RACF profile for XCATVSW2 should bedeleted. Access validation for XCATVSW2 will then defer to CP.
RAC RDELETE VMLAN SYSTEM.XCATVSW2
After all RACF permissions are established, z/VM Systems Management should be restarted by restartingVSMGUARD.
Storage Configuration
If using FBA disks, live migration requires that those FBA disks shared among SSI members have thesame EDEV and EQID. Log on to MAINT and issue following command to set EQID for the volume:
SET EDEV edev EQID eqid TYPE FBA ATTR SCSI FCP_DEV fcp_rdev WWPN wwpn LUN lun
where:
edev is the edevice ID.
eqid is the equivalency identifier to use for the device.
fcp_rdevis the real device number used to access the device.
wwpn is the world-wide port name.
lun is the logical unit number.
Chapter 3. z/VM Configuration 11

12 Enabling z/VM for OpenStack (Edition 4.0)

Chapter 4. xCAT Configuration
xCAT z/VM Setup
Refer to the “Configuring the Extreme Cloud Administration Toolkit (xCAT) for z/VM” section in the“Setting up and Configuring the Server Environment” chapter of z/VM: Systems Management ApplicationProgramming.
Starting xCAT for the First Time
When the xCAT GUI is started for the first time, the administrator userid/passoword will be set toadmin/admin. The password for admin should be changed as soon as possible.
© Copyright IBM Corp. 2014 13

14 Enabling z/VM for OpenStack (Edition 4.0)

Chapter 5. OpenStack Configuration
Each compute node is related to a single z/VM system. There are two services running in the computenode that need to be configured: nova and neutron. These services do not need to be running in the sameLinux server but common practice is to do so. Each service needs to be configured to talk to the xCATMN and to identify the ZHCP agent (or z/VM hypervisor) that it will manage. In addition, configurationproperties specify resource choices to be used when creating virtual server instances and virtualnetworks.
When the xCAT machine logged on, it created an xCAT node that represents the xCAT MN, in additionto nodes that represent the ZHCP agent and the z/VM system.
To complete the configuration, you will need to have the following xCAT information (see “Configuringthe DMSSICNF COPY File” on page 9 for more information on the properties specified in the DMSSICNFCOPY file):v IP address of the xCAT MN. This was specified with the XCAT_MN_Addr property in the DMSSICNF
COPY file. You also use this IP address when using the xCAT GUI.v Netmask for the xCAT management network. This was specified with the XCAT_MN_Mask property in
the DMSSICNF COPY file.v xCAT node name that represents the xCAT MN. This was specified with the XCAT_Host property in the
DMSSICNF COPY file. When the xCAT machine logged on, it created an xCAT node that representsthe xCAT MN.
v ZHCP node name that represents the ZHCP agent. This was specified with the ZHCP_Host property inthe DMSSICNF COPY file. When the xCAT machine logged on, it created an ZHCP node thatrepresents the ZHCP agent.
v z/VM system node name that represents the z/VM system. This was specified with the XCAT_zvmsysidproperty in the DMSSICNF COPY file. When the xCAT machine logged on, it created an xCAT nodethat represents the z/VM system.
v User and password that will be used in the xCAT GUI to contact the xCAT MN and also by theservices using the REST API.
You will also need this information from your z/VM system administrator:v The z/VM Directory Manager disk pool name. This is the Directory Manager's pool/group that has
been set up for allocation of minidisks used when a virtual server is created by xCAT.
Important: In the following configuration sections, information is provided for each property that is usedby the z/VM plugin, as follows:v Whether the property is Required or Optional. A property is Required if it is necessary for the
mainline operation of the support. If a property is only necessary for an optional feature, then theproperty will be specified as Optional and the notes for that property will indicate when it is needed.
v Name of the configuration file section where the property is specified. Most of the configurationproperties reside in either the DEFAULT or AGENT section. Some, however, are specified in othersections of a configuration file.
v The format of the value, and its definition.v Additional notes. This may include recommended values, default values, or other information, as
appropriate.
© Copyright IBM Corp. 2014 15

CONF Files
In each of the following three sections (“Settings for Nova,” “Settings for Cinder” on page 21, and“Settings for Neutron” on page 22), the settings are described individually. See Appendix E, “SampleConfiguration Files,” on page 67 for sample files that can be copied and pasted, and then edited, asappropriate.
Settings for Nova
This section describes the configuration settings related to the Nova z/VM driver. For a sample/etc/nova/nova.conf file, see “Sample File for Nova z/VM Driver” on page 67.v In file /etc/nova/nova.conf:
compute_driver
Required
Section: DEFAULT
Value: nova.virt.zvm.ZVMDriver
Notes: Driver to use for controlling virtualization. For z/VM, it is "nova.virt.zvm.ZVMDriver"or "zvm.ZVMDriver".
config_drive_format
Required
Section: DEFAULT
Value: tgz – format of the config drive.
Notes: The default value is iso9660, but for z/VM this must be changed to "tgz".
force_config_drive
Required
Section: DEFAULT
Value: True – controls whether a config drive is used to pass configuration data to a deployedvirtual server instance.
Notes: The value must be "True". The z/VM driver supports only the config drive forcloud-init.
host
Required
Section: DEFAULT
Value: Same value as specified for the zvm_host property.
Notes: This is a unique identifier of the compute node. A compute node is related to a singlez/VM hypervisor – therefore this property is recommended to be the same value as specifiedfor the zvm_host property. If a Linux on System z were running multiple compute nodes, eachnode would be configured for a different z/VM system with the host property used touniquely identify compute node and zvm_host to identify the z/VM hypervisor that thecompute node supports.
image_cache_manager_interval
Optional
Section: DEFAULT
16 Enabling z/VM for OpenStack (Edition 4.0)

Value: Integer – the number of seconds to wait between runs of the image cache manager.
Notes: Not z/VM specific. Default is 86400, which equals 24 hours.
instance_name_template
Required
Section: DEFAULT
Value: 8 characters or less – template string to be used to generate instance names.
Notes:
– The template should contain a fixed portion, which is included in the name of each createdinstance, followed by the number of hexadecimal digits to be generated. For example, avalue of "abc%05x" indicates that each server begins with "abc", followed by 5 hexadecimaldigits. The hexadecimal value is incremented as systems are created.
– The first three characters of the instance name should not be "rsz" or "RSZ".– The template should be chosen so that the generated instance names do not conflict with
other instances that can be defined on the xCAT management node. Thus, if two or morecompute nodes are using the same xCAT management node, then each compute nodeshould have a unique instance template. In addition, you should ensure that the instancenames will not conflict with names defined in the z/VM system where the virtual machinewill be created. This will avoid name clashes in both the xCAT MN and the z/VM systemswhere the virtual machines are created.
ram_allocation_ratio
Optional
Section: DEFAULT
Value: Integer – the memory over commit ratio for the z/VM Driver.
Notes: The recommended value is 3.
rpc_response_timeout
Optional
Section: DEFAULT
Value: Integer.
Notes: Required only if zVM live migration is to be used. The recommended value for z/VM is180, to allow zVM live migration to succeed. Live migration will not succeed with the defaultvalue, so set it to 180 seconds.
xcat_free_space_threshold
Optional
Section: DEFAULT
Value: Integer – the size in gigabytes of the threshold at which purge operations will occur onthe xCAT MN disk space to remove images.
Notes: The recommended value is 20. The default value is 50.
xcat_image_clean_period
Optional
Section: DEFAULT
Value: Integer – number of days an unused xCAT image will be retained before it is purged.
Notes: The default is 30 days.
Chapter 5. OpenStack Configuration 17

zvm_config_drive_inject_password
Optional
Section: DEFAULT
Value: True or False – defines whether to inject the password in config drive.
Notes:
– The default value is False.– If set to True, the root password of the newly booted VM will be the random value of the
adminPass property that is shown in the output of the nova boot command.– If set to False, the root password of the newly booted VM will be the value specified in
zvm_image_default_password.
zvm_diskpool
Required
Section: DEFAULT
Value: The volume group name in your z/VM system from which xCAT will allocate diskfrom for new servers.
Notes: The zvm_diskpool name is the name of the storage 'group' defined in the DirectoryManager.
zvm_diskpool_type
Optional
Section: DEFAULT
Value: ECKD or FBA – the disk type of disks in your diskpool.
Notes:
– The default is ECKD disks.– The diskpool is the storage 'group' defined in the Directory Manager.– It is not recommended to mix disk types in the Directory Manager disk pool.
zvm_fcp_list
Optional
Section: DEFAULT
Value: The list of FCPs used by virtual server instances. The FCP addresses may be specified aseither an individual address or a range of addresses connected with a hyphen. Multiple valuesare specified with a semicolon connecting them (for example, “1f0e;2f02-2f1f;3f00”).
Notes: Required only if persistent disks are to be attached to virtual server instances. Eachinstance needs one FCP in order to attach a volume to itself. Those FCPs should be wellplanned, available, and online before OpenStack can use them. OpenStack will not check theirstatus but use them directly, so if they are not ready, errors may be returned. Contact yourz/VM system administrator if you don’t know which FCPs you can use.
zvm_host
Required
Section: DEFAULT
Value: Same value as XCAT_sysid in DMSSICNF COPY file.
Notes: The xCAT node name of the z/VM Hypervisor.
zvm_image_default_password
18 Enabling z/VM for OpenStack (Edition 4.0)

Required
Section: DEFAULT
Value: The default password to be used as the default OS root password for the newly bootedvirtual server instances.
Notes:
– If the zvm_config_drive_inject_password property is set to False, this password will be usedas default OS root password for the newly booted VM.
– It is recommended that if the default OS root password is used, the root password in thedeployed system be changed as soon as possible.
zvm_image_tmp_path
Optional
Section: DEFAULT
Value: The path at which images will be stored (snapshot, deploy, etc.).
Notes: This value defaults to /var/lib/nova/images.
zvm_reachable_timeout
Optional
Section: DEFAULT
Value: Integer – timeout value for powering on an instance, in seconds.
Notes: The default is 300. This value should be 300 or larger.
zvm_scsi_pool
Optional
Section: DEFAULT
Value: The name of xCAT SCSI pool.
Notes: The default value is xcatzfcp. Users can specify any name. xCAT will create andmanage it.
zvm_user_profile
Required
Section: DEFAULT
Value: OSDFLT – profile in the user directory for new servers.
Notes: Required value, should be set to OSDFLT.
zvm_vmrelocate_force
Optional
Section: DEFAULT
Value: ARCHITECTURE, DOMAIN, or STORAGE – this is the type of relocation to beperformed.
Notes: The values indicate the following:
ARCHITECTUREAttempt relocation even though hardware architecture facilities or CP features are notavailable on the destination system.
Chapter 5. OpenStack Configuration 19

DOMAINAttempt relocation even though the VM would be moved outside of its domain.
STORAGERelocation should proceed even if CP determines that there are insufficient storageresources on the destination system.
zvm_xcat_connection_timeout
Optional
Section: DEFAULT
Value: Integer – timeout value for waiting for an xCAT response.
Notes: The default is 3600 seconds.
zvm_xcat_master
Required
Section: DEFAULT
Value: The xCAT master node (the node name in the xCAT definition).
Notes: Same value as XCAT_Host in the DMSSICNF COPY file.
zvm_xcat_password
Required
Section: DEFAULT
Value: The password of the xCAT REST API user specified with the XCAT_MN_pw property in theDMSSICNF COPY file.
Notes: This password should be changed from the default of 'admin'.
zvm_xcat_server
Required
Section: DEFAULT
Value: The xCAT MN IP address or host name.
zvm_xcat_username
Required
Section: DEFAULT
Value: The xCAT REST API user name.
Notes: The recommended value is 'admin'.
zvm_zhcp_fcp_list
Optional
Section: DEFAULT
Value: The list of FCPs used only by the xCAT ZHCP node. The FCP addresses may bespecified as either an individual address or a range of addresses connected with a hyphen.Multiple values are specified with a semicolon connecting them (for example,“1f0e;2f02-2f1f;3f00”).
Notes:
– The FCP addresses must be different from the ones specified for the zvm_fcp_list. AnyFCPs that exist in both zvm_fcp_list and zvm_zhcp_fcp_list will lead to errors.
20 Enabling z/VM for OpenStack (Edition 4.0)

– It is strongly recommended to specify only one FCP for ZHCP to avoid resource waste.Contact your z/VM system administrator if you don’t know which FCPs you can use.
Settings for Cinder
This section describes the configuration settings related to the Cinder z/VM driver. For a sample/etc/cinder/cinder.conf file, see “Sample File for Cinder z/VM Driver” on page 68.
Note: Please refer to the IBM Redbook: Implementing the IBM System Storage SAN Volume ControllerV6.3 for SVC (V7000) to properly setup a SVC in order to make cinder connect to the SVC and applythese parameters.v In file /etc/cinder/cinder.conf:
san_ip
Required
Section: DEFAULT
Value: The IP address of your SVC storage.
Notes: Contact your SVC service manager if you don’t know the address.
san_private_key
Required
Section: DEFAULT
Value: Fully-qualified specification of the private key file to use for SSH authentication to yourSVC storage.
Notes: Contact your SVC service manager to get the file.
storwize_svc_connection_protocol
Required
Section: DEFAULT
Value: FC – connection protocol used by z/VM.
Notes: This value must be FC.
storwize_svc_volpool_name
Required
Section: DEFAULT
Value: The name of the VDISK pool from which cinder will carve disks.
Notes: It must be created and ready to work before OpenStack can use it. The volumes thatcan be created depend on the capability of the VDISK pool. Contact your SVC service managerif you don’t know which pool you can use.
storwize_svc_vol_iogrp
Required
Section: DEFAULT
Value: The io_group_id or io_group_name with which to associate the virtual disk.
Notes: Contact your SVC service manager if you don’t know which I/O group you can use.
volume_driver
Required
Chapter 5. OpenStack Configuration 21

Section: DEFAULT
Value: cinder.volume.drivers.zvm.storwize_svc.StorwizeSVCZVMDriver
Notes: The driver for ZVM SVC must use this value.
Settings for Neutron
Setting Descriptions
This section describes the configuration settings related to the Neutron z/VM driver. For a sample/etc/neutron/neutron.conf, /etc/neutron/plugins/openvswitch/ovs_neutron_plugin.ini, and/etc/neutron/plugins/zvm/neutron_zvm_plugin.ini file, see “Sample Files for Neutron z/VM Driver”on page 69v In file /etc/neutron/neutron.conf:
base_mac
Required
Section: DEFAULT
Value: Base MAC address that is used to generate MAC for virtual interfaces specified as 6pairs of hexadecimal digits separated by colons (for example, 02:00:00:EE:00:00).
Notes: The first three pairs of hexadecimal digits should be the same as USERPREFIX in theVMLAN statement in the z/VM SYSTEM CONFIG file. You can modify the fourth pair to anyrange, as appropriate to your system. The final two pairs of hexadecimal digits for the MACaddress should be 00 and will be replaced with generated values.
core_plugin
Required
Section: DEFAULT
Value: neutron.plugins.openvswitch.ovs_neutron_plugin.OVSNeutronPluginV2
Notes: z/VM supports only the OpenVswitch plugin.v In file /etc/neutron/plugins/openvswitch/ovs_neutron_plugin.ini:
network_vlan_ranges
Required
Section: ovs
Value: Physical network name (VSWITCH IDs) and optional VLAN range available forallocation to tenant networks (for example, xcatvsw2,datanet1:1:4094,datanet2,datanet3:1:4094).
Notes:
– Each physical network (VSWITCH) intended to be used by virtual server instances shouldbe specified in this property separated by commas.
– A network that is flat network is specified with the network name only (for example,xcatvsw2).
– A network that is a VLAN network is specified with the VLAN ID start and end separatedby colons (for example, datanet1:1:4094).
tenant_network_type
Required
Section: ovs
22 Enabling z/VM for OpenStack (Edition 4.0)
Value: vlan or flat – network provider type, specifying the physical mechanism by which thevirtual network is realized
Notes: When a network is created with neutron command, if --provider:network_type ismissing, this parameter is used as default.
v In file /etc/neutron/plugins/zvm/neutron_zvm_plugin.ini:
polling_interval
Optional
Section: AGENT
Value: Interger – agent polling interval specified in number of seconds.
Notes: This value depends on the network and workload. The default value is 2.
rdev_list
Optional
Section: vswitch_name
Value: The RDEV address of the OSA cards which are connected to the vswitch.
Notes:
– Only one RDEV address may be specified per vswitch. You should choose an active RDEVaddress.
– The section name (for example, xcatvsw2) is the name of the vswitch.
xcat_mgt_ip
Optional
Section: AGENT
Value: IP address – xCAT management interface IP address used by xCAT to communicatethrough to newly-deployed instance servers.
Notes:
– This property is used when new instances do not have public IP addresses to allow thexCAT MN to communicate with new instances.
– It is recommended that xCAT MN be defined so that this is the first IP address of yourmanagement network.
xcat_mgt_mask
Optional
Section: AGENT
Value: Netmask of your xCAT management network (for example, 255.255.255.0).
Notes: This property is used when new instances do not have public IP addresses to allow thexCAT MN to communicate with the instances.
xcat_zhcp_nodename
Optional
Section: AGENT
Value: ZHCP node name in xCAT, as specified with the ZHCP_Host property in the DMSSICNFCOPY file.
Notes: The default is "zhcp".
zvm_xcat_password
Chapter 5. OpenStack Configuration 23

Optional
Section: AGENT
Value: The password of the xCAT REST API user specified with the XCAT_MN_pw property in theDMSSICNF COPY file.
Notes: The default is "admin". It should be changed to another value.
zvm_xcat_server
Required
Section: AGENT
Value: The xCAT MN IP address or host name.
zvm_xcat_timeout
Optional
Section: AGENT
Value: Integer – timeout value, in seconds, for waiting for an xCAT response.
Notes: The default is 300 seconds.
zvm_xcat_username
Optional
Section: AGENT
Value: The xCAT REST API user name.
Notes: The default is "admin".
Configuration of SSH for xCAT and Nova Compute Nodes
In order for OpenStack to be able to deploy systems or resize/move systems, SSH communication isneeded between the xCAT MN and the compute node, and between compute nodes involved in a resizefunction. This sections covers setting up communication between xCAT and the compute node, andsetting up communication between two or more compute nodes.
SSH Key Between xCAT and Nova
xCAT MN’s root user needs to be authorized by the user of nova-compute service. This is required by theimage import/export function. By default, the nova-compute service uses “nova” as its default user, sobefore you deploy an instance, you need to ensure that the xCAT root user's public key is added to thenova user's authorized_keys file on your nova-compute server. Refer to the following steps to configureit:1. Log on to the nova-compute server and change the nova user’s right to be able to log in.
ssh root@nova-compute-IPusermod -s /bin/bash nova
where:
nova-compute-IPis the IP address of the nova compute node.
2. Change to nova user and inject xCAT MN’s public key into it.su - novascp mnadmin@xCAT_MN_IP:/root/.ssh/id_rsa.pub $HOMEmkdir -p $HOME/.sshmv $HOME/id_rsa.pub $HOME/.ssh/authorized_keys
24 Enabling z/VM for OpenStack (Edition 4.0)
||||
|
||
|
||
|
||||

where:
mnadminis the user defined for SSH access to xCAT MN.
xCAT_MN_IPis the IP address of the xCAT MN.
Note: If the $HOME/.ssh/authorized_keys file already exists, you just need to append the xCATMN’s public key to it.
3. Ensure that the file mode under the $HOME/.ssh folder is 644.chmod -R 644 $HOME/.ssh/*
4. Set SELinux contexts on the nova home directory.su -chcon -R -t ssh_home_t nova_home
where:
nova_homeis the home directory for the nova user on the compute node.
Note: You can obtain nova_home by issuing:echo ~nova
SSH Key Between Nova Compute Nodes for Resize
In addition to configuring SSH between xCAT MN and the nova compute-service server, the nova’s resizefunction requires that the servers running nova-compute service be authorized by each other. Otherwise,the temporary images generated during resize process will not be transferred between the resize sourceand destination host and result in a resize failure. Use the following steps to configure it:1. Identify how many nova-compute hosts you use for resize test. Issue:
nova hypervisor-list
2. Refer to “SSH Key Between xCAT and Nova” on page 24 to put the public key of nova-computeservice’s user into the other nova compute nodes. For example, if there are two hosts (A and B)running nova-compute services, both of them using nova user to run the nova-compute service. Inthis case, you need to ensure that if you logon nova@hostA, you can directly SSH to nova@hostBwithout typing a password, and vice-versa.
Network Configurations
Sample Configuration
Figure 3 on page 26 shows a typical configuration in an SSI environment. Note that the two z/VMsystems (ZVMa and ZVMb) in this figure are members of the same SSI.
Chapter 5. OpenStack Configuration 25
|
||
||
||
|
|
|
||
|
||
|
|
|

Use the following guide to understand this configuration:v Networks:
The network connection shown in Figure 3 are divided into the following four groups, according totheir roles:
ZVMa
ZVMb
...
...
Instance a001
Instance b001
Instance annn
OpenStackController
xCAT REST API and other
Management Network
Data/Compute Network
xCAT/zHCP Internal Network
Instance bnnn
zHCP
zHCP
10.10.10.20
10.10.10.30
10.1.10.2/16
10.1.11.2/16
10.1.10. /16n
10.1.11. /16n
192.168.1.2
192.168.1.x
192.168.1.n
192.168.1.y
eth0eth0
eth0
OSAa1
OSAb1
OSAa2
OSAb2
OSAa3
OSAb3
eth0
eth0
eth0
eth1
eth0
eth1 eth1
eth1
eth1
eth0
eth1
eth2
xCAT MN
10.10.10.10 1.2.3.4 10.1.0.1/16
xcatvsw1(xCAT/zHCP Internal Network)
xcatvsw1(xCAT/zHCP Internal Network)
xcatvsw2(Vswitch for Management Network)
xcatvsw2(Vswitch for Management Network)
datanet1(Vswitch for Data/Compute Network)
datanet1(Vswitch for Data/Compute Network)
Figure 3. Sample Configuration
26 Enabling z/VM for OpenStack (Edition 4.0)

– Connection between the OpenStack controller and xCAT: OpenStack z/VM drivers use xCAT RESTAPI to issue commands on xCAT or instance servers. The OpenStack controller needs to be able toconnect to the xCAT MN. In OpenStack z/VM driver configuration files, zvm_xcat_server is used tospecify the xCAT MN's(REST API server) IP address.
– Connection between xCAT and instance servers: xCAT uses SSH protocol to issue commands on theinstance servers. The xCAT MN needs to be able to connect to the instance servers using the IPaddress defined in xcat_mgt_ip in the Neutron z/VM driver configuration file.
– Connection for instance servers to connect outside or among other instance servers.– Connection between xCAT and zHCP: this connection allows the xCAT MN to issue SMAPI
functions on zHCP.From a system management perspective, each of the groups can have one or more dedicate networksto prevent unexpected network access:– The Management Network is for connection between xCAT and instance servers.– The Data/Compute Network is for the instance server to connect outside or among other instance
servers.– The xCAT/zHCP Internal Network is for connection between xCAT and zHCP
v Vswitches:
The vswitches xcatvsw1 and xcatvsw2 are defined in the DMSSICNF COPY file and created by xCAT.xcatvsw1 is a VLAN UNAWARE, Layer 3 vswitch, and xcatvsw2 is a VLAN UNAWARE, Layer 2vswitch.zHCP and the xCAT MN are granted authority to couple to xcatvsw1. The xCAT MN and all newOpenStack instances are granted authority to couple to xcatvsw2.The uplink ports (OSAa1, OSAa2 or OSAb1, OSAb2) of the two vswitches are defined in the DMSSICNFCOPY file.The datanet1 vswitch and other vswitches are listed in the network_vlan_ranges in the NeutronOpenVswitch configuration file, except xcatvsw2, which is created by the Neutron agent.The vswitches access authorization depends on the Neutron network configuration of the tenant. All ofthese VSWITCHes will be defined as Layer 2. The uplink port (OSAa3 or OSAb3) of the vswitches aredefined in the Neutron agent configuration file.
v NIC:
NICs in zHCP: The IP address of eth0 is defined in the DMSSICNF COPY file. Refer to Chapter 3,“z/VM Configuration,” on page 9. The NIC of the interface (eth0) is defined when zHCP logged on,and eth0 is initialized while zHCP is starting up.NICs in the xCAT MN: The IP addresses of eth0 and eth1 are defined in the DMSSICNF COPY file.Refer to Chapter 3, “z/VM Configuration,” on page 9. The NICs and interfaces (eth0 and eth1) aredefined when the xCAT MN is logged on, and eth0 and eth1 are initialized while the xCAT MN isstarting up.The IP address of eth2 is defined in the Neutron agent configuration file (in xcat_mgt_ip). While theNeutron agent is starting up, it will define a new NIC, and create and initialize a new interface (eth2).NICs in instances: All NICs and interfaces are defined by the OpenStack driver.
v OSA:
ZVMa and ZVMb are in different LPARs: The connection between the OSA cards can be done bysharing OSA ports (OSAa1 and OSAb1 share the same OSA card port, OSAa2 and OSAb2 share anotherOSA card port).ZVMa and ZVMb in are different CECs: There must be a physical connection between the OSA ports(there is physical connection between OSAa1 and OSAb1).
Chapter 5. OpenStack Configuration 27
||

Network Scenarios
Single Flat Network
This scenario uses a single flat network, with a mixed xCAT management network and an OpenStackcompute/data network together. The two following sections describe this scenario using public IPaddresses and private IP addresses for instances.
Using Public IP Addresses for Instances:
Figure 4 on page 29 shows a flat network that uses public IP addresses, which can be reached fromoutside the network.
28 Enabling z/VM for OpenStack (Edition 4.0)

To use this scenario, the following configuration options are needed:v In the Neutron Openvswitch plugin configure file (default file name is /etc/neutron/plugins/
openvswitch/ovs_neutron_plugin.ini), make sure that xcatvsw2 is in the network_vlan_ranges option:network_vlan_ranges = xcatvsw2
ZVMa
ZVMb
...
...
Instance a001
Instance b001
Instance annn
OpenStackController
xCAT REST API
Mixed Networks
xCAT/zHCP Internal Network
Instance bnnn
zHCP
zHCP
10.10.10.20
10.10.10.30
1.2.3.5/16
1.2.4.1/16
1.2.3.n/16
1.2.4. /16n
eth0eth0
eth0
OSAa1
OSAb1
OSAa2
OSAb2
eth0
eth0
eth0
eth0
eth1
eth0
xCAT MN
10.10.10.10 1.2.3.4/16
xcatvsw1(xCAT/zHCP Internal Network)
xcatvsw1(xCAT/zHCP Internal Network)
xcatvsw2(Vswitch for Mixed Networks)
xcatvsw2(Vswitch for Mixed Networks)
Figure 4. Flat Network, Using Public IP Addresses
Chapter 5. OpenStack Configuration 29

v In the Neutron z/VM agent configure file (default file name is /etc/neutron/plugins/zvm/neutron_zvm_plugin.ini), the options xcat_mgt_ip and xcat_mgt_mask should be commented out. Also,make sure that the following options are present:[AGENT]zvm_xcat_username = adminzvm_xcat_password = adminzvm_xcat_server = 1.2.3.4xcat_zhcp_nodename = zhcp
Notes:
1. The xcat_mgt_ip and xcat_mgt_mask options are not defined, so the Neutron z/VM agent will notcreate a new interface on xCAT MN. The xCAT MN will use eth1 to connect to the instances.
2. The Neutron z/VM agent configuration shown above is for ZVMa. Update the xcat_zhcp_nodenameoption to configure for ZVMb.
After restarting the Neutron server and Neutron z/VM agent, follow these steps to create the networkand subnet:1. Create the single flat network:
neutron net-create singleflat --provider:network_type flat --provider:physical_network xcatvsw2
2. Create the appropriate subnet for the network:neutron subnet-create --allocation-pool start=1.2.3.5,end=1.2.4.254--gateway 1.2.3.1 singleflat 1.2.0.0/16
Using Private IP Addresses for Instances:
Figure 5 on page 31 shows a flat network that uses private IP addresses, which can be reached only bereached by xCAT.
30 Enabling z/VM for OpenStack (Edition 4.0)

To use this scenario, the following configuration options are needed:v In the Neutron Openvswitch plugin configure file (default file name is /etc/neutron/plugins/
openvswitch/ovs_neutron_plugin.ini), make sure that xcatvsw2 is in the network_vlan_ranges option:network_vlan_ranges = xcatvsw2
v In the Neutron z/VM agent configure file (default file name is /etc/neutron/plugins/zvm/neutron_zvm_plugin.ini), the following options are needed:
ZVMa
ZVMb
...
...
Instance a001
Instance b001
Instance annn
OpenStackController
xCAT REST API
Mixed Networks
xCAT/zHCP Internal Network
Instance bnnn
zHCP
zHCP
10.10.10.20
10.10.10.30
192.168.1.2/16
192.168.2.2/16
192.168.1.n/16
192.168.2.n/16
eth0eth0
eth0
OSAa1
OSAb1
OSAa2
OSAb2
eth0
eth0
eth0
eth0
eth1 eth2
eth0
xCAT MN
10.10.10.10 1.2.3.4 192.168.0.2/16
xcatvsw1(xCAT/zHCP Internal Network)
xcatvsw1(xCAT/zHCP Internal Network)
xcatvsw2(Vswitch for Mixed Networks)
xcatvsw2(Vswitch for Mixed Networks)
Figure 5. Flat Network, Using Private IP Addresses
Chapter 5. OpenStack Configuration 31

[AGENT]zvm_xcat_username = adminzvm_xcat_password = adminzvm_xcat_server = 1.2.3.4xcat_zhcp_nodename = zhcpxcat_mgt_ip = 192.168.0.2xcat_mgt_mask = 255.255.0.0
Notes:
1. The Neutron z/VM agent will not create a new interface (eth2, 192.168.0.2/16) on xCAT MN. ThexCAT MN will use this interface to connect to the instances.
2. The Neutron z/VM agent configuration shown above is for ZVMa. Update the xcat_zhcp_nodenameoption to configure for ZVMb.
After restarting the Neutron server and Neutron z/VM agent, follow these steps to create the networkand subnet:1. Create the single flat network:
neutron net-create singleflat --provider:network_type flat --provider:physical_network xcatvsw2
2. Create the appropriate subnet for the network:neutron subnet-create --allocation-pool start=192.168.1.2,end=192.168.2.254--gateway 192.168.1.1 singleflat 192.168.0.0/16
Note: The gateway 192.168.1.1 can be a physical gateway or a virtual gateway created by Neutron L3agent or others, depending on the OpenStack configuration. Refer to “Chapter 7. Networking” in theOpenStack Administrator's Guide for more information about OpenStack Layer 3 support.
Flat and VLAN Mixed Network
Figure 3 on page 26 shows a sample configuration of a flat and VLAN mixed network. To use thisscenario, the following configuration options are needed:v In the Neutron Openvswitch plugin configure file (default file name is /etc/neutron/plugins/
openvswitch/ovs_neutron_plugin.ini), make sure that the network_vlan_ranges option line reads asfollows:network_vlan_ranges = xcatvsw2, datanet1:1:4094
Physical network names will be used as z/VM vswitch names, as follows:
xcatvsw2is used by the xCAT Management Network. By default, there is a VLAN UNAWARE Layer 2vswitch on z/VM with the name xcatvsw2. It is created and configured for xCAT managementnetwork, so you can use xcatvsw2 as in this example.
datanet1is used by the OpenStack Data/Compute network. Neutron z/VM agent will create a VLANAWARE vswitch, with the name datanet1. The range of possible VLAN IDs is from 1 to 4094(i.e. the complete VLAN ID range).
v In the Neutron z/VM agent configure file (default file name is /etc/neutron/plugins/zvm/neutron_zvm_plugin.ini), the following options are needed:[AGENT]zvm_xcat_username = adminzvm_xcat_password = adminzvm_xcat_server = 1.2.3.4xcat_zhcp_nodename = zhcpxcat_mgt_ip = 10.1.0.1xcat_mgt_mask = 255.255.0.0[datanet1]# OSAa3 uses RDEV A3rdev_list=a3
32 Enabling z/VM for OpenStack (Edition 4.0)

Note: The Neutron z/VM agent configuration shown above is for ZVMa. Update thexcat_zhcp_nodename option to configure for ZVMb.
After restarting the Neutron server and Neutron z/VM agent, follow these steps to create the networksand the subnet for each of the physical networks:1. Create the xCAT management network:
neutron net-create xcat_management --provider:network_type flat --provider:physical_network xcatvsw2
2. Create the appropriate subnet for xCAT management network, changing the IP range to theappropriate values according to xCAT configuration. The xCAT MN interface (xcat_mgt_ip) should beable to reach this range:neutron subnet-create --allocation-pool start=10.1.0.2,end=10.1.11.254 xcat_management 10.1.0.0/16
3. Create the Data/Compute network for physical network datanet1:neutron net-create opnstk_datanet1 --provider:network_type vlan --provider:physical_network datanet1
4. Create the appropriate subnet for the Data/Compute network opnstk_datanet1:neutron subnet-create opnstk_datanet1 192.168.1.0/24
Note: The xCAT Management Network ID should always be passed in the first --nic network_IDparameter when creating a new instance with the nova boot command. This restriction ensures that thexCAT MN can reach and manage the new instances through the management network.
Optionally Creating More Than One Data/Compute Networks
In the current Neutron z/VM agent implementation, physical network names are used as vswitch names.There is no limitation on the number or the order of physical networks, so in the In the NeutronOpenVswitch plugin configure file (/etc/neutron/plugins/openvswitch/ovs_neutron_plugin.ini), youcould have:network_vlan_ranges = xcatvsw2, datanet1:1:4094, datanet2, datanet3:1:4094
And in the Neutron z/VM agent configure file (/etc/neutron/plugins/zvm/neutron_zvm_plugin.ini),you could have:[AGENT]zvm_xcat_username = adminzvm_xcat_password = adminzvm_xcat_server = 1.2.3.4xcat_zhcp_nodename = zhcpxcat_mgt_ip = 10.1.0.1xcat_mgt_mask = 255.255.0.0[datanet1]# OSAa3 uses RDEV A3rdev_list=a3[datanet3]# OSAa4 uses RDEV A4rdev_list=a4[datanet2]# OSAa5 uses RDEV A5rdev_list=a5
In this case, xcatvsw2 will be used by xCAT Management Network, and datanet1-datanet3 will be usedby Compute/Data Network. The Neutron z/VM agent will create vswitches with the name datanet1,datanet2, and datanet3. datanet2 will be a VLAN UNAWARE vswitch, while datanet1 and datanet3 willbe VLAN AWARE.
Note: Each of the switches needs at least one OSA defined. The OSA card needs to be connected to thetrunk port if the VLAN is enabled. The related rdev_list should be updated to list one of the OSAs.
With datanet2 and datanet3, more Data/Compute networks can be defined, as follows:
Chapter 5. OpenStack Configuration 33

1. Create the Data/Compute network for physical network datanet2:neutron net-create opnstk_datanet2 --provider:network_type flat --provider:physical_network datanet2
2. Create the appropriate subnet for the Data/Compute network opnstk_datanet2:neutron subnet-create opnstk_datanet2 192.168.2.0/24
3. Create the Data/Compute network for physical network datanet3:neutron net-create opnstk_datanet3 --provider:network_type vlan --provider:physical_network datanet3
4. Create the appropriate subnet for the Data/Compute network opnstk_datanet3:neutron subnet-create opnstk_datanet3 192.168.3.0/24
In this example, all Data/Compute networks have gateways defined. If an instance wants to connect tomore than one of the Data/Compute networks, only one gateway is supported. Because opnstk_datanet3is created later, the gateway of opnstk_datanet3 (192.168.3.1) will be set as the gateway in the instance. Tomake the gateway in opnstk_datanet1 the gateway of the instance, add the --no-gateway parameter whencreating opnstk_datanet2 and opnstk_datanet3, as follows:neutron subnet-create --no-gateway opnstk_datanet2 192.168.2.0/24neutron subnet-create --no-gateway opnstk_datanet3 192.168.3.0/24
Verify the Configuration of OpenStack
Nova
Verify that the nova services, especially nova-compute, can start successfully. Start the nova services andissue the nova service-list command. The services status should be "enabled" and the state should be"up".
Neutron
Start the neutron services (neutron-server and neutron-zvm-agent) and issue the neutron net-list andneutron subnet-list commands to see the net and subnet you created.
nova service-list
+------------------+--------------------------+----------+---------+-------+----------------------------+-----------------+| Binary | Host | Zone | Status | State | Updated_at | Disabled Reason |+------------------+--------------------------+----------+---------+-------+----------------------------+-----------------+| nova-conductor | openstack | internal | enabled | up | 2013-09-02T02:02:29.000000 | None || nova-scheduler | openstack | internal | enabled | up | 2013-09-02T02:02:31.000000 | None || nova-consoleauth | openstack | internal | enabled | up | 2013-09-02T02:02:24.000000 | None || nova-cert | openstack | internal | enabled | up | 2013-09-02T02:02:22.000000 | None || nova-compute | openstack | nova | enabled | up | 2013-09-02T02:02:24.000000 | None |+------------------+--------------------------+----------+---------+-------+----------------------------+-----------------+
neutron net-list
+--------------------------------------+-----------------+------------------------------------------------------+| id | name | subnets |+--------------------------------------+-----------------+------------------------------------------------------+| 1928c22c-8017-4a48-9d2d-9944fcc27845 | opnstk_datanet1 | 35265a86-59a7-48a4-bf4c-43d4ee7cf6cd 192.168.1.0/24 || 2928c2cc-8212-4a43-9d2d-9243fcc24355 | opnstk_datanet2 | 35265343-54a2-4434-fbcc-4353534f6433 192.168.2.0/24 || 2c482d06-77eb-483f-bde5-db9d132a112d | xcat_management | fe2b5c0c-4193-496b-bbdf-fc5d88cd8473 10.1.0.0/16 |+--------------------------------------+-----------------+------------------------------------------------------+
34 Enabling z/VM for OpenStack (Edition 4.0)

neutron subnet-list
+--------------------------------------+------+-----------------+----------------------------------------------------+| id | name | cidr | allocation_pools |+--------------------------------------+------+-----------------+----------------------------------------------------+| 35265a86-59a7-48a4-bf4c-43d4ee7cf6cd | | 192.168.1.0/24 | {"start": "192.168.1.1", "end": "192.168.1.254"} || 35265343-54a2-4434-fbcc-4353534f6433 | | 192.168.2.0/24 | {"start": "192.168.2.1", "end": "192.168.2.254"} || fe2b5c0c-4193-496b-bbdf-fc5d88cd8473 | | 10.1.0.0/16 | {"start": "10.1.13.100", "end": "10.1.13.200"} |+--------------------------------------+------+-----------------+----------------------------------------------------+
Chapter 5. OpenStack Configuration 35

Cinder
Start cinder services (cinder-api, cinder-volume, cinder-scheduler) and try to create a volume using thenova volume-create command. Then show the volume you just created with the nova volume-listcommand.nova volume-create 1
+---------------------+--------------------------------------+| Property | Value |+---------------------+--------------------------------------+| status | creating || display_name | None || attachments | [] || availability_zone | nova || bootable | False || created_at | 2013-09-02T08:18:44.207684 || display_description | None || volume_type | None || snapshot_id | None || source_volid | None || size | 1 || id | 4d146af5-3502-4db7-9e3d-0d88a4147cb8 || metadata | {} |+---------------------+--------------------------------------+
nova volume-list
+--------------------------------------+-----------+--------------+------+-------------+-------------+| ID | Status | Display Name | Size | Volume Type | Attached to |+--------------------------------------+-----------+--------------+------+-------------+-------------+| 4d146af5-3502-4db7-9e3d-0d88a4147cb8 | available | None | 1 | scsi | || e879fe83-641e-4cd8-8f70-27cea3cbd0c7 | available | hycva | 1 | scsi | |+--------------------------------------+-----------+--------------+------+-------------+-------------+
36 Enabling z/VM for OpenStack (Edition 4.0)

Chapter 6. Image and cloud-init Configuration
This section discusses setting up the Linux on System z that is the target of the initial image capture,along with the process to define the system to xCAT. In addition, this section will discuss capturing thesystem in xCAT, and then uploading and importing the image into OpenStack.
Image Requirements
These are the requirements for an image to be captured and deployed by z/VM OpenStack support:v A supported Linux distribution (for deploy):
– RHEL6.5– RHEL6.4– RHEL6.3– RHEL6.2– SLES11.3– SLES11.2
v A supported root disk type for snapshot/spawn:– FBA– ECKD
v An image deployed on a compute node must match the disk type supported by that compute node, asconfigured by the zvm_diskpool_type property in the nova.conf configuration file. A compute nodesupports deployment on either an ECKD or FBA image, but not both at the same time. If you wish toswitch image types, you need to change the zvm_diskpool_type and zvm_diskpool properties in thenova.conf file, accordingly. Then restart the nova-compute service to make the changes take effect.
v If you deploy an instance with an ephemeral disk, both the root disk and the ephemeral disk will becreated with the disk type that was specified by zvm_diskpool_type property in the nova.conf file. Thatproperty can specify either ECKD or FBA.
v When resizing, remember that you can only resize an instance to the same type of disk. For example, ifan instance is built on an FBA type disk, you can resize it to a larger FBA disk, but not to an ECKDdisk.
v For nova image-create, it is strongly suggested that you capture an instance with a root disk size nogreater than 5GB. If you really want to capture a larger root device, you will need to logon xCAT MNand modify the timeout value in for httpd service to make image-create work as expected. Refer toAppendix F, “Increasing the httpd Timeout in the xCAT MN,” on page 71 for information on increasingthe timeout.
v For nova boot, it is recommended that you deploy an instance with a root disk size no greater than5GB. If you really want to deploy a larger root device, you will need to logon xCAT MN and modifythe timeout value in for httpd service to make boot work as expected.
v For nova resize operation, we suggest that you resize an instance with a root disk size no greater than5GB.
v The network interfaces must be IPv4 interfaces.v Image names should be restricted to the UTF-8 subset, which corresponds to the ASCII character set. In
addition, special characters such as /, \, $, %, @ should not be used.
The virtual server/Linux instance used as the source of the new image should meet the following criteria:v The root filesystem must not be on an LVM.v The minidisk on which the root filesystem resides should:
– be a minidisk of the same type as desired for a subsequent deploy (for example, an ECKD diskimage should be captured for a subsequent deploy to an ECKD disk),
© Copyright IBM Corp. 2014 37
|||||
|||
|||
||

– not be a full-pack minidisk, since cylinder 0 on full-pack minidisks is reserved, and– be defined with virtual address 0100. Deployed virtual server instances created by the OpenStack
code will contain a root disk as a minidisk with address of 0100.v The Linux on System z should support SSH access using keys instead of specifying a password. The
subsequent steps to capture the image will perform a key exchange to allow xCAT to access the Linuxon System z.
v The Linux distro should be one of those supported. Refer to Chapter 2, “Planning and Requirements,”on page 5 for more information.
In addition to the specified criteria, the following recommendations allow for efficient use of the image:v The minidisk on which the root filesystem resides should be defined as a multiple of full gigabytes in
size (for example, 1GB or 2GB). OpenStack specifies disk sizes in full gigabyte values, whereas z/VMhandles disk sizes in other ways (cylinders for ECKD disks, blocks for FBA disks, and so on).
v During subsequent deploys of the image, the OpenStack code will ensure that a disk image is notcopied to a disk smaller than the source disk, as this would result in loss of data. The disk specified inthe flavor should therefore be equal to or slightly larger than the source virtual machine's root disk.IBM recommends specifying the disk size as 0 in the flavor, which will cause the virtual machine to becreated with the same disk size as the source disk.
v During subsequent deploys of an image to an ECKD disk which is larger than the source ECKD disk,the additional space will not be usable until the user re-partitions the disk and resizes the file system.Using a flavor with disk size of 0 will cause the virtual machine to be created with the same disk sizeas the source disk and therefore avoid the issue. This issue occurs only with ECKD disks.
Make a Deployable z/VM Image
If you already have an image file created by xCAT (example: /root/0100.img), go to Steps 3 and 4 of“Upload the Image from the Nova Compute Server to Glance” on page 46 to upload it directly to Glance.Otherwise, create that file using the steps described below.
Install the Linux on System z on a Virtual Machine1. Prepare a Linux on System z virtual server on the z/VM system that is managed by xCAT. For more
information, refer to the IBM Redbook: The Virtualization Cookbook for z/VM 6.3, RHEL 6.4 andSLES 11 SP3.
2. Install mkisofs and openssl a module on it.3. Make sure SELinux is disabled and the SSH connection (default port number is 22) can pass the
firewall.
Notes:
v SELinux must be disabled the entire time you are running the OpenStack z/VM driver.v By default, RHEL installation will enable the SSH connection and enable SELinux. SLES will disable
SELinux. Refer to the Redhat instructions for Enabling and Disabling SELinux on RHEL. Forgeneral Linux information, refer to Red Hat Enterprise Linux documentation and SUSE LinuxEnterprise Server documentation.
4. Set UseDNS no in /etc/ssh/sshd_config file in order to improve the inventory collection efficiency.
To do useful work with the user data, the virtual machine image must be configured to run a service thatretrieves the user data passed from the zVM driver and then takes some action based on the contents ofthat data. This service is also known as an activate engine (AE). Customers can choose their ownunderlying AE, such as cloud-init, scp-cloud-init, and so on, according to their requirements. In thisdocument, we use cloud-init as an example when showing how to configure an image. These steps aredescribed in subsequent sections.
38 Enabling z/VM for OpenStack (Edition 4.0)

Configuration of xcatconf4z
xCAT supports initiating changes to a Linux on System z virtual machine while Linux is shut down orthe virtual machine is logged off. The changes to Linux are implemented when Linux is booted the nexttime. To facilitate this, a script must be installed in the Linux on System z so it can process changerequest files transmitted by the xCAT ZHCP to the reader of the virtual machine as a class X file. Thescript is xcatconf4z and is located at /opt/xcat/share/xcat/scripts in the xCAT MN machine.
The xcatconf4z script should be installed in a machine that can be managed while it is logged off. Thisincludes a Linux on System z that will be captured for netboot or sysclone deploys. Perform thefollowing steps:1. Obtain the xcatconf4z script from the xCAT MN.2. Change the script to specify the authorizedSenders. It can be set to '*', which indicates any virtual
machine may send configuration requests to it (not recommended), or it can be set to a list of useridsof xCAT ZHCP machines which are allowed to transmit changes to the machine.
3. xcatconf4z is configured to run with run level 2, 3 and 5. It is not configured to run as part of customrun level 4. If that run level is going to be used, then the # Default-Start: line at the beginning ofthe file should be updated to specify run level 4 in addition to the current run levels.
4. Install the xcatconf4z file in the target Linux machine:a. Copy the xcatconf4z file to /etc/init.d and make it executable.b. Add the xcatconf4z as a service by issuing:
chkconfig --add xcatconf4z
c. Activate the script.On RHEL 6 and SLES 10/11, issue:
chkconfig xcatconf4z on
On RHEL 5, issue:chkconfig --level 235 xcatconf4z on
If you wish to run with custom run level 4, then add 4 to the list of levels:chkconfig --level 2345 xcatconf4z on
Installation and Configuration of cloud-init
OpenStack uses cloud-init as its activation engine. You can download the code from Init scripts for use oncloud images. Install it and then make sure that, after installation, if you issue cloud-init init --local,no error occurs. The cloud-init’s installation and configuration differ among different Linux distributions,and cloud-init source code may change. This section provides a reference, but it may not fit your Linuxon System z version. Please change your steps accordingly.
The z/VM OpenStack support has been tested with cloud-init 0.7.4 and 0.7.5. The examples insubsequent sections use 0.7.4. If you are using a different version, then you should change yourspecification of the indicated commands accordingly.
Installation and Configuration of cloud-init on RHEL1. Download the cloud-init tar file from Init scripts for use on cloud images.2. Untar it with the command:
tar -zxvf cloud-init-0.7.4.tar.gz
3. Issue the following to install cloud-init:cd <cod-dir>/cloud-init-0.7.4python setup buildpython setup installcp <code_dir>/cloud-init-0.7.4/sysvinit/redhat/* /etc/init.d
Chapter 6. Image and cloud-init Configuration 39

4. Update /etc/init.d/cloud-init-local to ensure that it starts after the xcatconf4z service. On RHEL 6,change the # Required-Start line in the ### BEGIN INIT INFO section from:
### BEGIN INIT INFO# Provides: cloud-init-local# Required-Start: $local_fs $remote_fs# Should-Start: $time# Required-Stop:
to:### BEGIN INIT INFO# Provides: cloud-init-local# Required-Start: $local_fs $remote_fs xcatconf4z# Should-Start: $time# Required-Stop:
On RHEL 5, multiple changes are required:a. Add a line near the top of the /etc/init.d/cloud-init-local file to specify the start and stop priority,
so that the cloud-init service is started after the xcatconf4z service. For example:# chkconfig: 235 08 92
where 08 is the service start priority and 93 is the stop priority.b. Update the /etc/init.d/xcatconf4z file with a similar line, but with a start priority that is smaller
than the one specified for the cloud-init-local file. For example:# chkconfig: 235 07 92
5. The default configuration file /etc/cloud/cloud.cfg is for ubuntu, not RHEL. To tailor it for RHEL:a. Replace distro:ubuntu with distro:rhel at around line 79.b. Change the default user name, password and gecos as you wish, at around lines 82 to 84.c. Change the groups at around line 85: groups: [adm, audio, cdrom, dialout, floppy, video,
dip]
d. Cloud-init will try to add user syslog to group adm. This needs to be changed. RHEL does nothave a syslog user by default, so issue:
useradd syslog
6. Add the cloud-init related service with the following commands:chkconfig --add cloud-init-localchkconfig --add cloud-initchkconfig --add cloud-configchkconfig --add cloud-final
Then start them with the following sequence:chkconfig cloud-init-local onchkconfig cloud-init onchkconfig cloud-config onchkconfig cloud-final on
At this point, you should find that the services in /etc/rcX.d appear as you would expect (make surethat xcatconf4z starts before any cloud-init service):
lrwxrwxrwx. 1 root root 22 Jun 13 04:39 S50xcatconfinit -> ../init.d/xcatconf4zlrwxrwxrwx. 1 root root 26 Jun 13 04:39 S51cloud-init-local -> ../init.d/cloud-init-locallrwxrwxrwx. 1 root root 20 Jun 13 04:39 S52cloud-init -> ../init.d/cloud-initlrwxrwxrwx. 1 root root 22 Jun 13 04:39 S53cloud-config -> ../init.d/cloud-configlrwxrwxrwx. 1 root root 21 Jun 13 04:39 S54cloud-final -> ../init.d/cloud-final
7. To verify cloud-init configuration, issue:cloud-init init –local
making sure that no errors occur.8. rm -rf /var/lib/cloud if it exists, or cloud-init will not work after reboot.
40 Enabling z/VM for OpenStack (Edition 4.0)

Installation and Configuration of cloud-init on SLES1. Make sure that Zypper works well and that python-setuptools has been installed. Then download
Cloud-init from Init scripts for use on cloud images.2. Untar it with the command:
tar -zxvf cloud-init-0.7.4.tar.gz
3. Issue the following commands to install cloud-init:cd <cod-dir>/cloud-init-0.7.4python setup.py buildpython setup.py installcp <cod-dir>/cloud-init/sysvinit/redhat/* /etc/init.dcd /etc/init.d
You will find that four scripts, cloud-init-local, cloud-init, cloud-config, and cloud-final are added to/etc/init.d. Modify each of them by replacing the variable:
cloud_init="/usr/bin/cloud-init"
with:cloud_init="/usr/local/bin/cloud-init"
Note: In some versions of SLES, after installing cloud-init, the <cod-dir>/cloud-init/sysvinit/sles/will not exist. In this case, you need to copy the cloud-init related services to /etc/init.d:
cp <cod-dir>/cloud-init/sysvinit/redhat/* /etc/init.d
4. Update /etc/init.d/cloud-init-local to ensure that it starts after the xcatconf4z service. On SLES,change the # Required-Start line in the ### BEGIN INIT INFO section from:
### BEGIN INIT INFO# Provides: cloud-init-local# Required-Start: $local_fs $remote_fs# Should-Start: $time# Required-Stop:
to:### BEGIN INIT INFO# Provides: cloud-init-local# Required-Start: $local_fs $remote_fs xcatconf4z# Should-Start: $time# Required-Stop:
5. The default configuration file /etc/cloud/cloud.cfg is for ubuntu, not SLES. To tailor it for SLES:a. Replace distro:ubuntu with distro:sles at around line 79.b. Change the default user name, password and gecos as you wish, at around lines 82 to 84.c. Change the groups at around line 85: groups: [adm, audio, cdrom, dialout, floppy, video,
dip]
d. Cloud-init will try to add user syslog to group adm. This needs to be changed. For SLES, issue thefollowing commands:
useradd sysloggroupadd adm
6. Start the cloud-init related services with the following commands, ignoring the error “insserv: Servicenetwork is missed in the runlevels 4 to use service cloud-init” if it occurs:
insserv cloud-init-localinsserv cloud-initinsserv cloud-configinsserv cloud-final
At this point, you should find that the services in /etc/init.d/rcX.d appear as you would expect(make sure that xcatconf4z starts before any cloud-init service):
Chapter 6. Image and cloud-init Configuration 41

lrwxrwxrwx. 1 root root 22 Jun 13 04:39 S50xcatconfinit -> ../init.d/xcatconf4zlrwxrwxrwx. 1 root root 26 Jun 13 04:39 S51cloud-init-local -> ../init.d/cloud-init-locallrwxrwxrwx. 1 root root 20 Jun 13 04:39 S52cloud-init -> ../init.d/cloud-initlrwxrwxrwx. 1 root root 22 Jun 13 04:39 S53cloud-config -> ../init.d/cloud-configlrwxrwxrwx. 1 root root 21 Jun 13 04:39 S54cloud-final -> ../init.d/cloud-final
7. To verify cloud-init configuration, issue:cloud-init init –local
making sure that no errors occur.8. rm -rf /var/lib/cloud if it exists, or cloud-init will not work after reboot.
Define the Source System as an xCAT Node1. Log on to the xCAT user interface as admin. Then click on Nodes/Nodes. Click the xcat node
checkbox.
Then select Actions/Run script.
Figure 6. Selecting the xCAT Node
42 Enabling z/VM for OpenStack (Edition 4.0)

In the script box enter:/opt/xcat/bin/mkdef -t node -o demonode userid=ftest03a hcp=zhcp.ibm.com mgt=zvm groups=all
where:
demonodeis the node name you want to create for the z/VM user you created in Step 1 on page 38.
ftest03ais the userid name you created in Step 1 on page 38.
zhcp.ibm.comis the zhcp server’s host name.
Figure 7. Selecting “Run script”
Chapter 6. Image and cloud-init Configuration 43
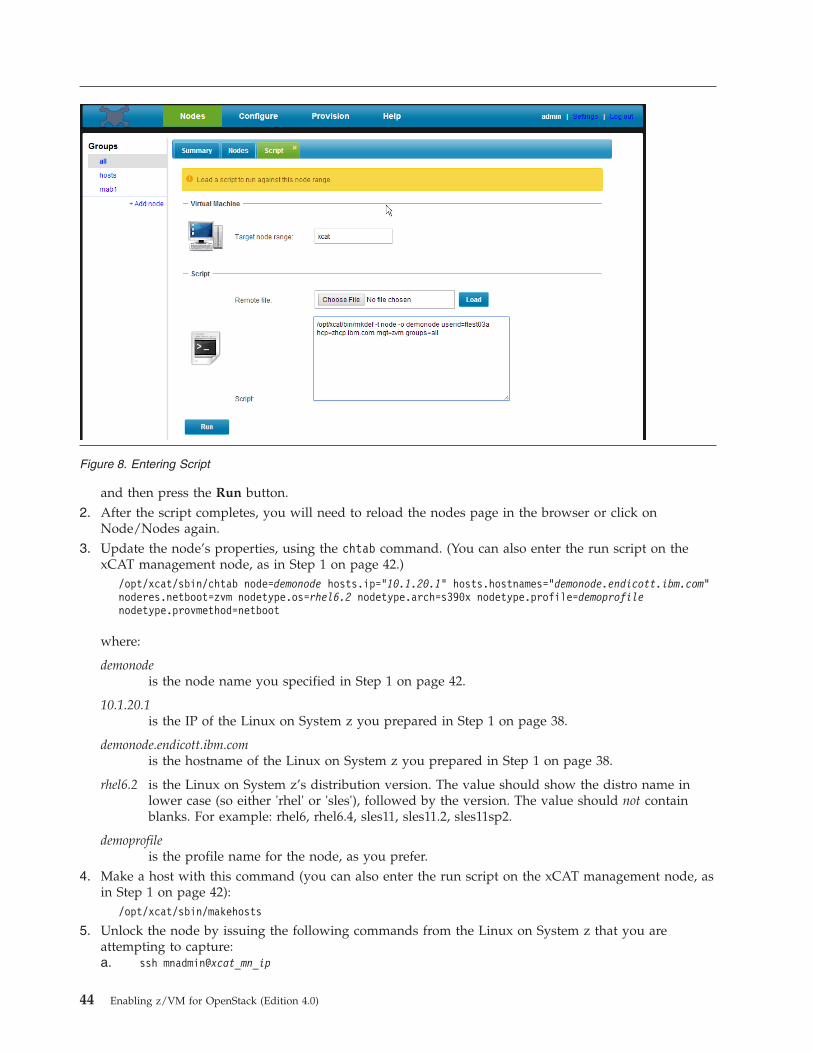
and then press the Run button.2. After the script completes, you will need to reload the nodes page in the browser or click on
Node/Nodes again.3. Update the node’s properties, using the chtab command. (You can also enter the run script on the
xCAT management node, as in Step 1 on page 42.)/opt/xcat/sbin/chtab node=demonode hosts.ip="10.1.20.1" hosts.hostnames="demonode.endicott.ibm.com"noderes.netboot=zvm nodetype.os=rhel6.2 nodetype.arch=s390x nodetype.profile=demoprofilenodetype.provmethod=netboot
where:
demonodeis the node name you specified in Step 1 on page 42.
10.1.20.1is the IP of the Linux on System z you prepared in Step 1 on page 38.
demonode.endicott.ibm.comis the hostname of the Linux on System z you prepared in Step 1 on page 38.
rhel6.2 is the Linux on System z’s distribution version. The value should show the distro name inlower case (so either 'rhel' or 'sles'), followed by the version. The value should not containblanks. For example: rhel6, rhel6.4, sles11, sles11.2, sles11sp2.
demoprofileis the profile name for the node, as you prefer.
4. Make a host with this command (you can also enter the run script on the xCAT management node, asin Step 1 on page 42):
/opt/xcat/sbin/makehosts
5. Unlock the node by issuing the following commands from the Linux on System z that you areattempting to capture:a. ssh mnadmin@xcat_mn_ip
Figure 8. Entering Script
44 Enabling z/VM for OpenStack (Edition 4.0)

where:
xcat_mn_ipis the host name or IP address of the xCAT management node.
b. scp /root/.ssh/id_rsa.pub root@demonode:/root/.ssh/authorized_keys
where:
demonodeis the node name of the virtual machine you want to capture.
Capture the Node to Generate the Image in the xCAT MN
Log on to xCAT, then use the imgcapture command to capture the node’s root disk and stored in thexCAT MN. (You can also enter the run script on the xCAT management node, as in Step 1 on page 42.)
/opt/xcat/bin/imgcapture demonode --profile demonewprofile
where:
demonodeis the node name.
demonewprofileis the profile name that you want to store the captured image in xCAT.
Example:#/opt/xcat/bin/imgcapture demonode --profile demonewprofiledemonode: Capturing the image using ZHCP nodedemonode: SOURCE USER ID: "FTEST03A"DISK CHANNEL: "0100"IMAGE FILE: "/mnt/xcat.ibm.com/install/staging/rhel6.2/s390x/demonewprofile/0100.img"
Creating 0100.img image file for FTEST03A’s disk at channel 0100 with disk size 4370 CYL.Image creation successful.
demonode: Moving the image files to the deployable directory:/install/netboot/rhel6.2/s390x/demonewprofiledemonode: Completed capturing the image(rhel6.2-s390x-netboot-demonewprofile) and stored at/install/netboot/rhel6.2/s390x/demonewprofile
Export the Image to the Nova Compute Server
Using the imgexport command, you can export the image generated in “Capture the Node to Generatethe Image in the xCAT MN” to the nova compute server. (You can also enter the run script on the xCATmanagement node, as in Step 1 on page 42.)
/opt/xcat/bin/imgexport rhel6.2-s390x-netboot-demonewprofile --remotehost [email protected]
where:
rhel6.2-s390x-netboot-demonewprofileis the image name in xCAT that you generated in “Capture the Node to Generate the Image inthe xCAT MN.”
[email protected] the userid@host of your nova compute node.
Example:-bash-4.1# /opt/xcat/bin/imgexport rhel6.2-s390x-netboot-demonewprofile --remotehost [email protected] rhel6.2-s390x-netboot-demonewprofile to [email protected] /install/imgexport.49859.hblUPI.
Chapter 6. Image and cloud-init Configuration 45

Compressing rhel6.2-s390x-netboot-demonewprofile bundle. Please be patient.Done!Moving the image bundle to the remote system location rhel6.2-s390x-netboot-demonewprofile.tgz
Upload the Image from the Nova Compute Server to Glance
By default, the exported image bundle is stored in the userid folder in the compute node. You will need tountar the image bundle firstly and then upload the image into Glance.1. Untar the image bundle. The name of the bundle is stated in the last line of the response on the
imgexport command that was issued in “Export the Image to the Nova Compute Server” on page 45,and has the suffix “.tgz”.
cd /roottar –xvf rhel6.2-s390x-netboot-demonewprofile.tgz
where:
/root is the location of the directory containing the image bundle.
rhel6.2-s390x-netboot-demonewprofile.tgzis the name of the image bundle.
2. Locate the image file. It is in the untarred directory tree with a suffix of .img (e.g. /root/0100.img).3. Upload the image into Glance:
glance image-create --name imagetest --disk-format=raw --container-format=bare--is-public=True < /root/0100.img
where:
imagetestis the name of the image as known to Glance.
Image names should be restricted to the UTF-8 subset, which corresponds to the ASCIIcharacter set. In addition, special characters such as /, \, $, %, @ should not be used.
/root/0100.imgis the file specification of the image file.
4. Update the image properties for the image generated in Step 3 in Glance with the followingcommand:
glance image-update --property image_type_xcat=linux --property architecture=s390x --propertyos_name=Linux --property os_version=os_version --property provisioning_method=netboot --propertyimage_file_name=0100.img uuid
where:
os_versionis the OS version of your capture source node.
Currently, only redhat and suse type images are supported. For a redhat type image, you canspecify the OS version as rhelx.y, redhatx.y, or red hatx.y, where x.y is the release number.For a suse type image, you can specify the OS version as slesx.y or susex.y, where x.y is therelease number. (If you don't know the real value, you can get it from the osvers propertyvalue in the manifest.xml file.)
uuid is the value generated in Step 3.
Note that all of these properties must be updated for a zVM type image. When updating, the propertiesvalue of image_type_xcat, architecture, os_name,provisioning_method, and image_file_name shouldalways be the specific value, as appropriate, in the command line. Otherwise, it will cause errors whendeploying. For os_version and uuid, you need to change them according to your system.
46 Enabling z/VM for OpenStack (Edition 4.0)
||

Remove the Image from the xCAT Management Node
From the xCAT management node, issue the rmimage command with the --xcatdef option. (You can alsoenter the run script on the xCAT management node, as in Step 1 on page 42.)
Note: This step is optional. If you wish to keep this image in the xCAT MN for exporting to anothernova compute, you can ignore this step.
/opt/xcat/bin/rmimage rhel6.2-s390x-netboot-demonewprofile --xcatdef
where:
rhel6.2-s390x-netboot-demonewprofileis the image name that was created by the imgcapture command.
Deactivate cloud-init on the Captured Source System
Please note that after you finish the configuration of your source virtual machine, when you reboot it,you may see that cloud-init attempts to locate the metadata service, and there may be logs such as"Attempting to open 'http://169.254.169.254/2009-04-04/meta-data/instance-id' with 1 attempts (0 retries,timeout=50) to be performed". This is because your system does not have a configuration disk forcloud-init, and that disk will only be created when you do a deployment with z/VM OpenStack code. Toavoid cloud-init searching for the configuration on the source virtual machine, we suggest that youdisable the cloud-init service on the system that was the source for your capture. This will ensure thatyou can do any operations (start, stop, reboot, etc.) on your source system without cloud-init attemptingto perform configuration.
If you see such logs when you do a new deployment, it indicates that you didn't create your image withthe necessary activation engines (xcatconf4z, cloud-init, etc.) installed and correctly configured, or thatsome other error in the deploy process itself may have occurred.
Chapter 6. Image and cloud-init Configuration 47

48 Enabling z/VM for OpenStack (Edition 4.0)

Appendix A. Installation Verification Programs
To ensure that you have installed and configured your xCAT systems on z/VM and your IBM CloudManagement Suite for System z compute node, you should run two installation verification programs:
prep_zxcatIVP.plA perl script that scans configuration files on your compute node and produces a simple driverprogram which contains the configuration information.
zxcatIVP.plA perl script that runs within the xCAT Management Node (xCAT MN). It can perform generalvalidation that xCAT is set up correctly, and also validate the xCAT setup using the informationgathered by the prep_zxcatIVP.pl script.
Location of the IVP Programs
The zxcatIVP.pl script is shipped with the xCAT service on z/VM. The IVP script file is located at/opt/xcat/bin directory.
The prep_zxcatIVP.pl script is available on the z/VM download page at Enabling z/VM for OpenStack.This script should be downloaded to your IBM Cloud Management Suite for System z compute node.Place it in a directory where you would like the preparation script to create the driver script file. It isrecommended that you create a directory, /opt/xcat, and place the preparation script in that directory.This will allow you to easily locate the script at a later time.
Overview of IVP Operation
To run the IVP, the following steps should be performed:1. Install the IVP preparation program on the IBM Cloud Management Suite for System z compute node.2. Run the preparation script to gather the information and to perform basic validation of the specified
data on the compute node.3. Upload the driver script to a system which has browser access to the xCAT Management Node.4. Invoke the xCAT GUI to run the script on the xCAT Management Node and to validate the settings
from the xCAT MN. The result of the IVP will be shown in a yellow box at the top of the GUI panel.
Installing the IVP Preparation Program
As indicated in “Location of the IVP Programs,” you should download the preparation script to thecompute node. Ensure that you select the appropriate driver preparation code for the level of OpenStackor IBM Cloud Management Suite for System z that you are using. No additional installation is requiredon the script other than ensuring you place the script in a directory where it will be able to create asubsequent driver script.
Running the Preparation Script on the Compute Node
The preparation script can be run anywhere on the compute node. You should run it using a user thathas access to the following configuration files:v /etc/nova/nova.confv /etc/neutron/neutron.confv /etc/neutron/plugins/openvswitch/ovs_neutron_plugin.ini
© Copyright IBM Corp. 2014 49

v /etc/neutron/plugins/zvm/neutron_zvm_plugin.ini
The script will create a driver script, which you have specified as an input parameter to the script, orwhich it will name by default. The default name is: “zxcatIVPDriver_xxxx.sh” where xxxx is the IPaddress of the compute node (for example, zxcatIVPDriver_7.47.46.152.sh). This name allows you toeasily identify the script in an environment where you are maintaining and setting up multiple computenodes. When the name of the driver is specified on the command line invocation, then “.sh” is appendedto the name (for example, ivp.sh).
The simplest invocation is:perl prep_zxcatIVP.pl
Additional operands are supported. They allow you to display help for the command along withinvocation information:perl prep_zxcatIVP.pl --help
or override defaults, for example:perl prep_zxcatIVP.pl -V -d drivername
where: -V indicates the script should run in verbose mode and -d indicates the name of the driverprogram to be created.
The IVP performs 3 steps:1. Scans the configuration files to gather the xCAT-related operands.2. Validates the settings in the configuration files and warns of defaults being used or unexpected
settings in the operands (for example, properties for two different services which should contain thesame value but do not).There are three types of messages created: normal processing messages indication the status of thepreparation run, warning messages indicated possible problems detected on in the configuration fileproperties, and information messages which can indicate defaults that will be used in the normaloperation of the compute node. We suggest you review the information messages, in addition to thewarning messages, because they may indicate a default that you had intended to override.
3. Constructs the driver program.Note that an existing program of the same name is renamed to end with the string “_old”.
Uploading the Driver Script to Your System
Once you have created the driver program, you should upload the script to a system from which you caninvoke a browser into the xCAT MN's GUI. The script contains a property that has the password so youshould upload it in a secure manner.
Running the Driver Script from the xCAT GUI
The following steps should be performed to run the IVP on the xCAT MN.1. Bring up the GUI and authenticate into xCAT. The url for the GUI is normally the IP address of the
xCAT MN followed by “/xcat,” (for example, https://9.9.27.91/xcat). Make certain you use“https://” so that secure sockets are used for the communication.
2. Navigate to the Nodes panel (the default panel) and the Nodes sub-frame. From there, select thexCAT management node.
50 Enabling z/VM for OpenStack (Edition 4.0)

3. From the Actions pulldown, select “Run Scripts” to bring up the Script panel.
4. Specify the location of the “remote file”, which is the driver script you created with the preparationscript, and load it into the script section by clicking on the Load button. Then click on the Run buttonto cause the script to be downloaded to the xCAT MN and run.
Figure 9. The Nodes Panel
Figure 10. Actions Pulldown on The Nodes Panel
Appendix A. Installation Verification Programs 51

5. The yellow box at the top of the panel will show the results of the run upon completion of the IVP.
Running IVP Without the Driver Script from the xCAT GUI
It can sometimes be beneficial to run the IVP without a driver script. This will allow you to validatesome basic configuration of the xCAT environment. Fewer tests will be run because running the IVPstandalone does not provide all necessary information to fully test the environment. In addition, allpossible disk pools are validated for space.
Figure 11. The Script Panel
Figure 12. Completion of IVP on the Script Panel
52 Enabling z/VM for OpenStack (Edition 4.0)
|
||||

To do this, follow the directions in “Running the Driver Script from the xCAT GUI” on page 50 with theexception that instead of loading a driver script into the script box on the Script panel, you will specifythe following command in the script box:perl /opt/xcat/bin/zxcatIVP.pl
Messages from the Preparation Script
The preparation script produces information messages that alert you to defaults being taken due tounspecified options. The messages begin with “Info:” and can span multiple lines. You can avoid some ofthe messages by specifying the defaults. For example, specifying the xcat_free_space_threshold optionavoids an information message indicating that a default will be used for that parameter. Others cannot beavoided, if you are not using the function. For example, if you are not using persistent SCSI disks, thenyou would not have specified the zvm_scsi_pool parameter.
Warning messages begin with “Warn:”. These messages indicate more serious conditions which youshould consider. A warning message can be an error condition, such as specifying a xCAT user name inthe nova.conf file that is different from the one specified in the neutron_zvm_plugin.ini file. In this case,it is likely that one of the files is wrong.
Messages from the xCAT IVP Program
The messages from the xCAT IVP indicate the various tests that it will run. Each test is dynamicallynumbered, i.e. the numbering can vary based on what tests are selected to be run, based on the input. Atthe end of the run, a message indicates how many tests ran and which tests were in error. A significanterror that would prevent further testing will cause the IVP program to stop.
If a test generates a warning, then information about the warning is provided. Figure 13 on page 54illustrates this possibility. Test 10 generates a warning because the MACID user prefix specified on thez/VM host does not match the one configured for neutron's use. Notice how the warning messagefollows the test-verifying message and that the last line indicates which test generated the warning.
Appendix A. Installation Verification Programs 53
|||
|
|

Table 3 shows possible causes for the various warning messages. Each message has an identifier specifiedwith parentheses. For most messages, you should review the driver script that was created to drive theverification. The script will indicate what was the value specified and which configuration file providedthe value along with the name of the property. Note that many causes of warning are due to typographicerrors in a configuration file.
Table 3. Warning IDs and Possible Causes
Warning ID Possible Cause/Resolution
MAIN01A significant warning was detected, which prevents further tests from accurately validating thesystem. These tests will not be run. You should correct the situation indicated by previous warningmessages and then rerun the IVP.
VCNC01
The xCAT MN could not SSH into the compute node. This can occur if the SSH keys were not set upon the compute node to allow the xCAT MN to push data to that node. The error message indicatesthe IP address and user name that the IVP thinks xCAT MN will use. Verify the my_ip property, if itwas specified in /etc/nova/nova.conf, or verify the local IP address of the compute node. The localIP address is used by the prep_zxcatIVP.pl script as a default when the my_ip property is not set. ThezxcatIVP.pl program uses this address to verify that the xCAT MN can access the compute node.Also, verify the value specified in the driver script by the prep_zxcatIVP.pl script. This valuedefaults to 'nova', which is the user name under which the compute node will allow xCAT MN toaccess the system.
VDP01 The specified disk pool was not found. Verify the zvm_diskpool property in /etc/nova/nova.conf.
VDP02
The indicated disk pool has no space for minidisk creation. You may need to add disks to thedirectory manager's disk pool or specify a different disk pool for the zvm_diskpool property in/etc/nova/nova.conf.
If you are running the IVP standalone (without a driver script) and see this message for disk poolXCAT1, you can ignore the warning. Disk pool XCAT1 is a special disk pool that normally has noavailable space. This disk pool is not intended to be used as a disk pool by the compute node.
Figure 13. Sample Messages from the xCAT IVP Program
54 Enabling z/VM for OpenStack (Edition 4.0)
|||
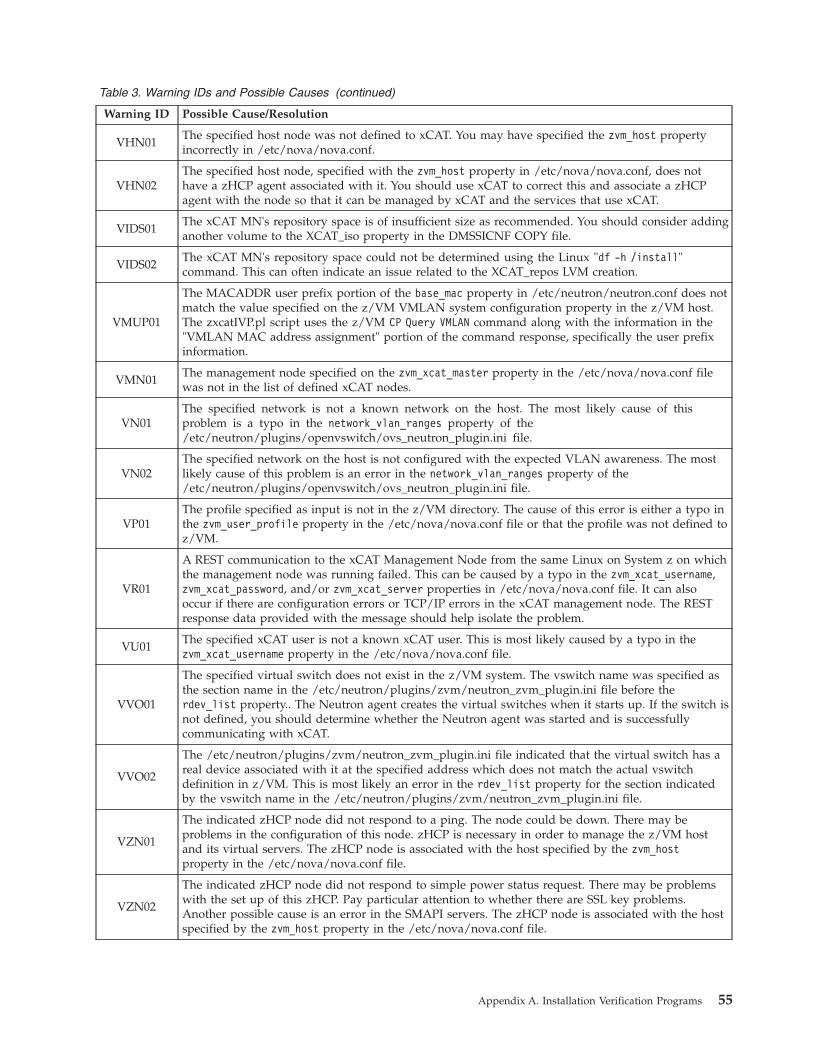
Table 3. Warning IDs and Possible Causes (continued)
Warning ID Possible Cause/Resolution
VHN01The specified host node was not defined to xCAT. You may have specified the zvm_host propertyincorrectly in /etc/nova/nova.conf.
VHN02The specified host node, specified with the zvm_host property in /etc/nova/nova.conf, does nothave a zHCP agent associated with it. You should use xCAT to correct this and associate a zHCPagent with the node so that it can be managed by xCAT and the services that use xCAT.
VIDS01The xCAT MN's repository space is of insufficient size as recommended. You should consider addinganother volume to the XCAT_iso property in the DMSSICNF COPY file.
VIDS02The xCAT MN's repository space could not be determined using the Linux "df -h /install"command. This can often indicate an issue related to the XCAT_repos LVM creation.
VMUP01
The MACADDR user prefix portion of the base_mac property in /etc/neutron/neutron.conf does notmatch the value specified on the z/VM VMLAN system configuration property in the z/VM host.The zxcatIVP.pl script uses the z/VM CP Query VMLAN command along with the information in the"VMLAN MAC address assignment" portion of the command response, specifically the user prefixinformation.
VMN01The management node specified on the zvm_xcat_master property in the /etc/nova/nova.conf filewas not in the list of defined xCAT nodes.
VN01The specified network is not a known network on the host. The most likely cause of thisproblem is a typo in the network_vlan_ranges property of the/etc/neutron/plugins/openvswitch/ovs_neutron_plugin.ini file.
VN02The specified network on the host is not configured with the expected VLAN awareness. The mostlikely cause of this problem is an error in the network_vlan_ranges property of the/etc/neutron/plugins/openvswitch/ovs_neutron_plugin.ini file.
VP01The profile specified as input is not in the z/VM directory. The cause of this error is either a typo inthe zvm_user_profile property in the /etc/nova/nova.conf file or that the profile was not defined toz/VM.
VR01
A REST communication to the xCAT Management Node from the same Linux on System z on whichthe management node was running failed. This can be caused by a typo in the zvm_xcat_username,zvm_xcat_password, and/or zvm_xcat_server properties in /etc/nova/nova.conf file. It can alsooccur if there are configuration errors or TCP/IP errors in the xCAT management node. The RESTresponse data provided with the message should help isolate the problem.
VU01The specified xCAT user is not a known xCAT user. This is most likely caused by a typo in thezvm_xcat_username property in the /etc/nova/nova.conf file.
VVO01
The specified virtual switch does not exist in the z/VM system. The vswitch name was specified asthe section name in the /etc/neutron/plugins/zvm/neutron_zvm_plugin.ini file before therdev_list property.. The Neutron agent creates the virtual switches when it starts up. If the switch isnot defined, you should determine whether the Neutron agent was started and is successfullycommunicating with xCAT.
VVO02
The /etc/neutron/plugins/zvm/neutron_zvm_plugin.ini file indicated that the virtual switch has areal device associated with it at the specified address which does not match the actual vswitchdefinition in z/VM. This is most likely an error in the rdev_list property for the section indicatedby the vswitch name in the /etc/neutron/plugins/zvm/neutron_zvm_plugin.ini file.
VZN01
The indicated zHCP node did not respond to a ping. The node could be down. There may beproblems in the configuration of this node. zHCP is necessary in order to manage the z/VM hostand its virtual servers. The zHCP node is associated with the host specified by the zvm_hostproperty in the /etc/nova/nova.conf file.
VZN02
The indicated zHCP node did not respond to simple power status request. There may be problemswith the set up of this zHCP. Pay particular attention to whether there are SSL key problems.Another possible cause is an error in the SMAPI servers. The zHCP node is associated with the hostspecified by the zvm_host property in the /etc/nova/nova.conf file.
Appendix A. Installation Verification Programs 55

Table 3. Warning IDs and Possible Causes (continued)
Warning ID Possible Cause/Resolution
VZN03
The indicated zHCP node did not respond to request for information on a user in the z/VMdirectory. The SMAPI servers or the directory manager may not be configured to communicate withthe zHCP agent. The zHCP node is associated with the host specified by the zvm_host property inthe /etc/nova/nova.conf file.
56 Enabling z/VM for OpenStack (Edition 4.0)
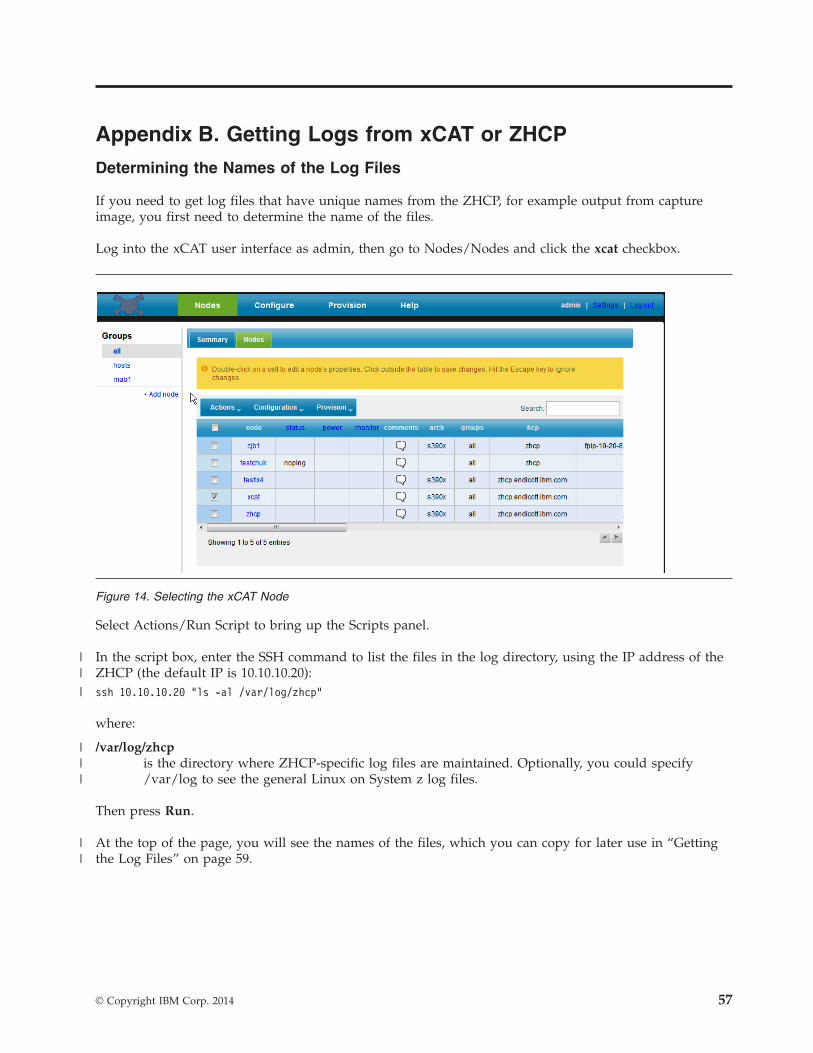
Appendix B. Getting Logs from xCAT or ZHCP
Determining the Names of the Log Files
If you need to get log files that have unique names from the ZHCP, for example output from captureimage, you first need to determine the name of the files.
Log into the xCAT user interface as admin, then go to Nodes/Nodes and click the xcat checkbox.
Select Actions/Run Script to bring up the Scripts panel.
In the script box, enter the SSH command to list the files in the log directory, using the IP address of theZHCP (the default IP is 10.10.10.20):ssh 10.10.10.20 "ls -al /var/log/zhcp"
where:
/var/log/zhcpis the directory where ZHCP-specific log files are maintained. Optionally, you could specify/var/log to see the general Linux on System z log files.
Then press Run.
At the top of the page, you will see the names of the files, which you can copy for later use in “Gettingthe Log Files” on page 59.
Figure 14. Selecting the xCAT Node
© Copyright IBM Corp. 2014 57
||
|
|||
||

Figure 15. Information Box with File Names
58 Enabling z/VM for OpenStack (Edition 4.0)

Getting the Log Files
To get a log file from xCAT or ZHCP, you need to navigate to the Logs panel. To get a file, you need toknow the name – it could be a well-known name as in messages, or else you may need to run acommand to list the files names, as shown in “Determining the Names of the Log Files” on page 57.
Go to Nodes/Nodes and click the checkbox for either the xCAT or ZHCP. In this example, we're usingthe ZHCP.
Select Configuration/Event log.
In the Source log field, enter the file specification of the log file you wish to copy -- for example:/var/log/zhcp/creatediskimage_trace_2014-02-18-22_10_28.849.txt
Figure 16. Selecting the Node
Figure 17. Selecting “Event log”
Appendix B. Getting Logs from xCAT or ZHCP 59
|
|

Click the Retrieve log checkbox, then enter:/install
in the Log destination field. Then press the Run button.
Figure 18. Filling in the Logs Fields
60 Enabling z/VM for OpenStack (Edition 4.0)

You will see in the information box that the file has been copied to the xCAT management node /installdirectory.
Go to the Configure/Files panel and you should see the file you copied. You can click on it and see it inthe browser.
Figure 19. Information Box Confirming Copy
Figure 20. Going to the Files Screen
Appendix B. Getting Logs from xCAT or ZHCP 61

Or else right-click and choose “Save Link As...” if you wish to copy it to your workstation.
Figure 21. Choosing “Save Link As...” on the Files Screen
62 Enabling z/VM for OpenStack (Edition 4.0)

Appendix C. Checklist for Capture/Deploy/Resize1. Make sure you can SSH from MN to nova compute without a password. Refer to Chapter 5,
“OpenStack Configuration,” on page 15.2. Make sure you have z/VM images in glance. Refer to “Upload the Image from the Nova Compute
Server to Glance” on page 46.3. If the nova-compute is started up by service, the default user is "nova". Ensure that the folder
/var/lib/nova/ has the following mode, otherwise it will cause the image copy from xCAT MN tonova-compute server fail (note that "server" must have a lowercase "s"):
server :/var/lib/novadrwxr-sr-x. 2 nova nova 4096 Aug 23 14:25 .ssh
4. Make sure that nova services and neutron services are started.5. Make sure that neutron net and subnet are created.6. If you want to boot with volume, make sure that cinder services are started and that available
volume(s) exist.7. Note that the host name of the new deployed instance is case insensitive. For example, in nova boot
command, if you typed TEST001 or test001 as the instance name, after the deployment finish, logonthe target instance you will see the both of their host name are test001.
8. Capture should be based on a successfully deployed instance. So if the items above are fulfilled fordeploy, they will be ready for capture.
9. To perform a resize, you need to additionally configure the SSH keys between nova compute nodes.Refer to “SSH Key Between Nova Compute Nodes for Resize” on page 25.
© Copyright IBM Corp. 2014 63

64 Enabling z/VM for OpenStack (Edition 4.0)

Appendix D. Checklist for Live Migration1. The z/VM version is V6.3 or later.2. The z/VM SSI cluster is configured correctly.3. Important restriction: A virtual machine with a persistent volume attached cannot perform live
migration through OpenStack.4. It is recommended that there be only one XCAT MN per SSI cluster.5. Each vswitch has an OSA attached in each SSI member. The volumes that are shared in SSI cluster
have same EQID configured in each SSI member.6. Spawn an OpenStack instance, then log on to MAINT and issue:
vmrelocate test instance_name destination_zvm
Make sure the test passed.7. xCAT nodes have been created to represent each z/VM hypervisor and its ZHCP server.
© Copyright IBM Corp. 2014 65
|

66 Enabling z/VM for OpenStack (Edition 4.0)

Appendix E. Sample Configuration Files
Sample File for Nova z/VM Driver
The following is a sample /etc/nova/nova.conf configuration file, with values:/etc/nova/nova.conf:
# The xCAT server IP that this nova compute node operates onzvm_xcat_server = 1.2.3.4
# The user name of xCAT server which will be used for REST API callzvm_xcat_username = admin
# The password of xCAT server which will be used for REST API callzvm_xcat_password = xxxxxxxx
# The disk pool name that xCAT will allocate disk from for new servers# Note: The zvm_diskpool name is the name of the storage ’group’ defined in the Directory Managerzvm_diskpool = FBAPOOL1
# The disk pool type (can be FBA or ECKD )zvm_diskpool_type=FBA
# The xCAT node name of the z/VM hypervisorzvm_host= zvmhost1
# The host is used to distinguish different nova compute host, it can be same with zvm_hosthost= zvmhost1
# Default template of user directory for new servers# User should not use lnxdflt but should define his own profile.zvm_user_profile = osdflt
# The path that images will be stored (snapshot, deploy etc)zvm_image_tmp_path = /var/lib/nova/images
# The xCAT master node (the node name in xCAT definition)zvm_xcat_master = xcat
# The config driver format, should be tgzconfig_drive_format=tgz
# Define whether to inject the password in config drive, if zvm_config_drive_inject_password# is set to be True, the default os root password for the new booted vm will be the random value of# adminPass property that is shown in the output of nova boot command.zvm_config_drive_inject_password=False
# If zvm_config_drive_inject_password is set to be False, this password will be# used as default os root password for the new booted vm.zvm_image_default_password=xxxxxxxx
# z/VM only suport config drive for cloud-initforce_config_drive=true
# Timeout value for spawn in seconds, if new spawn machine can’t be reachable# after this value, deploy will report error “Failed to power on instance”zvm_reachable_timeout=600
#Timeout value for reading xCAT response.zvm_xcat_connection_timeout=3600
# Default instance name template
© Copyright IBM Corp. 2014 67

# There is restriction that you should define the template with length 8, and first 3 should be# characters, should not use “rsz” or “RSZ” as the first 3 characters.instance_name_template = abc%05x
# z/VM drivercompute_driver = nova.virt.zvm.ZVMDriver
# NOT z/VM specific, set it default 86400(s) = 24hoursimage_cache_manager_interval=86400
#xCAT image that not used for a long time (default is 30 days) will be purgedxcat_image_clean_period=30
# The threshold when xCAT MN disk space is not big enough(default is 1G), purge operation will startxcat_free_space_threshold=1
# The name of xCAT SCSI pool. Users can specify any name as their wish. xCAT will# create and manage it.zvm_scsi_pool=scsipool
# The list of FCPs used by instances. Each instance needs one FCP in order to attach a# volume to itself. Those FCPs should be well planned and made online before# OpenStack can use them. OpenStack will not check their status but use them directly.# So if they are not ready, errors may be returned. The format of this variable should look# like “ min1-max1;min2-max2;min3-max3”. Please contact your z/VM system manager# if you don’t know what FCPs you can use.zvm_fcp_list=B15B-B15F
# The list of FCPs used only by xCAT HCP node. It must be different to zvm_fcp_list.# Any FCP exist in both zvm_fcp_list and zvm_zhcp_fcp_list leads to errors. The format# of this variable should look like “ min1-max1;min2-max2;min3-max3”. Strongly# recommend to specify only one FCP for HCP to avoid resource waste. Please contact# your z/VM system manager if you don’t know what FCPs you can use.zvm_zhcp_fcp_list=B159
#Live migration#Choose one of “ARCHITECTURE”, “DOMAIN” or “STORAGE”zvm_vmrelocate_force=ARCHITECTURE | DOMAIN | STORAGE
# Live migration will not success with default rpc value, set to 180rpc_response_timeout=180
# Set the memory overcommit ratio for z/VM Driverram_allocation_ratio=3
Sample File for Cinder z/VM Driver
The following is a sample configuration file, with values:/etc/cinder/cinder.conf:
# The driver for ZVM SVC, should use this valuevolume_driver=cinder.volume.drivers.zvm.storwize_svc.StorwizeSVCZVMDriver
# The path of private key for connecting SVC. To avoid inputing password everytime,# public/private key pair is used for authentication. Please generate private/public key# pair, put public key at SVC and put private key at local. Put the local path of the private# key here.san_private_key=/home/test/key/id_rsa
# SVC IP address. Please contact your SVC service manager if you don’t know the# address.san_ip=1.2.3.4
# VDISK pool that cinder will carve disk from. It must be created and ready to work# before OpenStack can use it. The volumes can be created depend on the capability of
68 Enabling z/VM for OpenStack (Edition 4.0)
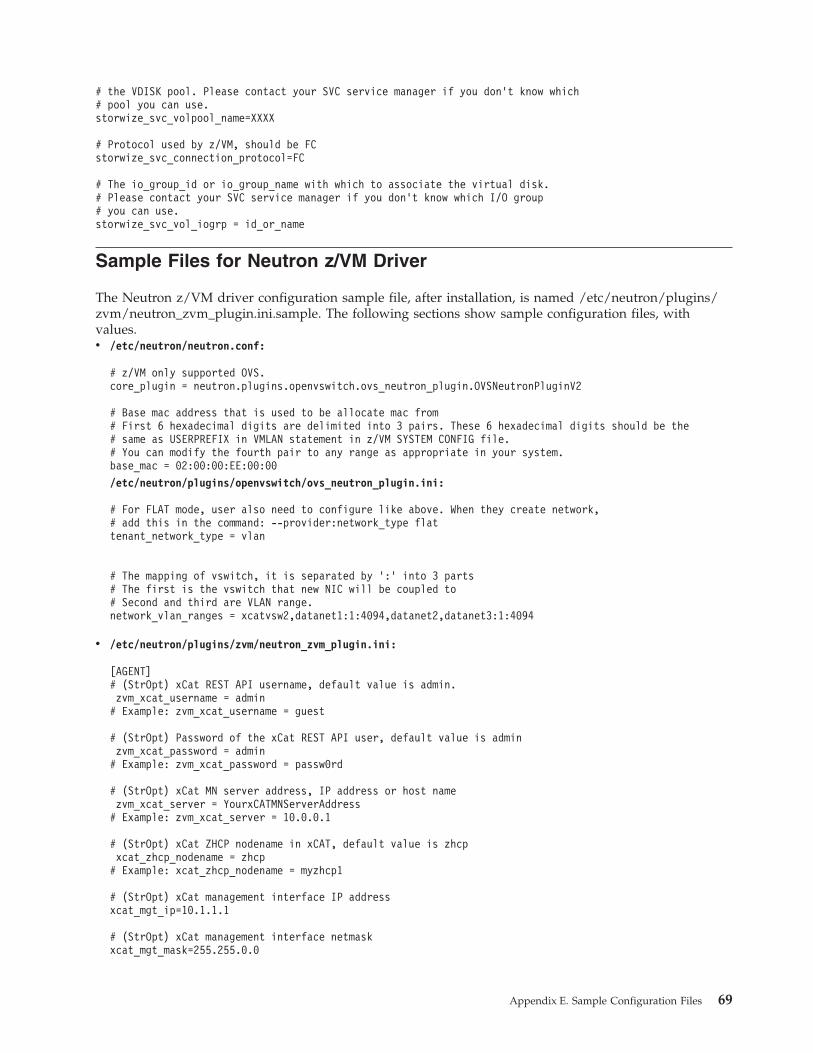
# the VDISK pool. Please contact your SVC service manager if you don’t know which# pool you can use.storwize_svc_volpool_name=XXXX
# Protocol used by z/VM, should be FCstorwize_svc_connection_protocol=FC
# The io_group_id or io_group_name with which to associate the virtual disk.# Please contact your SVC service manager if you don’t know which I/O group# you can use.storwize_svc_vol_iogrp = id_or_name
Sample Files for Neutron z/VM Driver
The Neutron z/VM driver configuration sample file, after installation, is named /etc/neutron/plugins/zvm/neutron_zvm_plugin.ini.sample. The following sections show sample configuration files, withvalues.v /etc/neutron/neutron.conf:
# z/VM only supported OVS.core_plugin = neutron.plugins.openvswitch.ovs_neutron_plugin.OVSNeutronPluginV2
# Base mac address that is used to be allocate mac from# First 6 hexadecimal digits are delimited into 3 pairs. These 6 hexadecimal digits should be the# same as USERPREFIX in VMLAN statement in z/VM SYSTEM CONFIG file.# You can modify the fourth pair to any range as appropriate in your system.base_mac = 02:00:00:EE:00:00
/etc/neutron/plugins/openvswitch/ovs_neutron_plugin.ini:
# For FLAT mode, user also need to configure like above. When they create network,# add this in the command: --provider:network_type flattenant_network_type = vlan
# The mapping of vswitch, it is separated by ’:’ into 3 parts# The first is the vswitch that new NIC will be coupled to# Second and third are VLAN range.network_vlan_ranges = xcatvsw2,datanet1:1:4094,datanet2,datanet3:1:4094
v /etc/neutron/plugins/zvm/neutron_zvm_plugin.ini:
[AGENT]# (StrOpt) xCat REST API username, default value is admin.zvm_xcat_username = admin# Example: zvm_xcat_username = guest
# (StrOpt) Password of the xCat REST API user, default value is adminzvm_xcat_password = admin# Example: zvm_xcat_password = passw0rd
# (StrOpt) xCat MN server address, IP address or host namezvm_xcat_server = YourxCATMNServerAddress# Example: zvm_xcat_server = 10.0.0.1
# (StrOpt) xCat ZHCP nodename in xCAT, default value is zhcpxcat_zhcp_nodename = zhcp# Example: xcat_zhcp_nodename = myzhcp1
# (StrOpt) xCat management interface IP addressxcat_mgt_ip=10.1.1.1
# (StrOpt) xCat management interface netmaskxcat_mgt_mask=255.255.0.0
Appendix E. Sample Configuration Files 69

# (IntOpt) Agent’s polling interval in seconds, default value is 2 secondspolling_interval = 2# Example: polling_interval = 5
# (IntOpt) The number of seconds the agent will wait for# xCAT MN response, default value is 300 secondszvm_xcat_timeout = 300# Example: zvm_xcat_timeout = 600
# OSA configuration for each of the vswitches, these configurations are required if vswitch# needs to connect outside of z/VM[datanet1]# RDEV address of the OSA cards which are connected to the vswitch.rdev_list=6243[datanet3]# RDEV address of the OSA cards which are connected to the vswitch.rdev_list=6343
Notes:
v In above example file, no rdev_list is configured for datanet2, so the Neutron z/VM driver will notconfigure an UPLINK port for vswitch datanet2.
v Since z/VM needs the neutron-zvm-agent to initialize the network for Nova and xCAT MN,neutron-zvm-agent service should be started prior to Nova-Compute service, and must be restartedonce the xCAT MN is restarted.
70 Enabling z/VM for OpenStack (Edition 4.0)

Appendix F. Increasing the httpd Timeout in the xCAT MN
Use the following steps to change the timeout value of the httpd service.1. Log on to the xCAT user interface as admin. Then click on Nodes/Nodes. Click the xcat node
checkbox.
Then select Actions/Run script to bring up the Scripts panel.In the script box, enter:sed -i 's/^Timeout[[:space:]\t]\+[0-9]*/Timeout 7200/' /etc/httpd/conf/httpd.confgrep -i ^Timeout /etc/httpd/conf/httpd.conf
where:
7200 is the timeout value you wish to specifyThen press the Run button.The yellow status box at the top of the frame should show a line indicating the word Timeout and thevalue that you specified (for example, Timeout 7200).
Figure 22. Selecting xcat Node Checkbox
© Copyright IBM Corp. 2014 71
||
||

2. Restart httpd service on the xCAT node in the same Run script panel by entering the following in thescript box:service httpd restart
3. Wait 30 seconds, then log out the xCAT GUI and then log back in to make sure the changes havetaken effect.
Figure 23. Selecting Timeout Value
72 Enabling z/VM for OpenStack (Edition 4.0)
|
|||
||
|

Appendix G. Troubleshooting
This appendix discusses the recommended troubleshooting procedures for problems encountered whileusing the OpenStack for z/VM support. It is oriented specifically towards compute node and z/VM. It isnot intended to discuss problems caused above these layers by products which may include the z/VMcompute node.
The troubleshooting discussion attempts to constrain the problem set by first dividing the problems bythe major function which is affected. The subsections include:v “prep_zxcatIVP Issues”v “zxcatIVP Issues” on page 74v “Exchanging SSH Key Issues” on page 74v “Compute Node Startup Issues” on page 77v “Deployment Issues” on page 79v “Capture Issues” on page 90v “Importing Image Issues” on page 91v “xCAT Management Node Issues” on page 92v “ZHCP Node Issues” on page 95v Migration and resize issues – refer to “Deployment Issues” on page 79 and “Capture Issues” on page
90.
With any issue, we recommend running the IVP programs as the first step to isolate the problem. Anincorrect environment setting, environment setup, or a change in the status of a z/VM server could causea problem which surfaces later. For example, if the z/VM system runs out of disk space used for virtualservers, you might not encounter the problem when you first ran the IVP after install of the OpenStackfor z/VM support.
Logging within the Compute Node
Depending upon the function being driven, there are various logs within the compute node which wouldbe helpful to review for problem determination. Consult Logging and Monitoring in the onlineOpenStack documentation for information on the location of the logs and a general overview of logging.
Information on how to control logging (i.e. increase the log level) is provided in the Manage Logs sectionof the online OpenStack documentation.
prep_zxcatIVP Issues
One of two types of issues can occur during a run of the prep_zxcatIVP script. These are indicated by“Info” or “Warning” messages. The best method to resolve these issues is to review Appendix A,“Installation Verification Programs,” on page 49, Chapter 3, “z/VM Configuration,” on page 9, andChapter 5, “OpenStack Configuration,” on page 15.
It is recommended that each type of message be reviewed. It is possible that the OpenStack functionsmay appear to work, but that you have not yet encountered the condition in which the problem indicatedin the warning or info message will cause a function to not operate as desired.
Warning messages should always be considered a problem. The cause of those issues should beaddressed.
Info messages may not be a problem. They are intended to inform you of a condition that you may notrealize exists. These messages often indicate that a property was not specified and a default might be in
© Copyright IBM Corp. 2014 73
||

use. In general, it is recommended that you specify the property to avoid the info messages. This makesthe output of future runs of the prep_zxcatIVP program easier to review, having eliminated the messageswarning about defaults.
zxcatIVP Issues
Issues identified by the zxcatIVP script are primarily related to incorrect settings in the compute nodeconfiguration properties or the z/VM environment. Messages generated by the zxcatIVP script aredocumented in this manual and are intended to assist in addressing the issue. Refer to “Messages fromthe xCAT IVP Program” on page 53.
Exchanging SSH Key Issues
If using the xCAT Nodes/Nodes/Configuration/Unlock to a Linux on System z userid fails, try an SSHcommand in the Nodes/Nodes/Actions/Run script on the xCAT node, as follows.
Here's an example of trying to do an unlock on demonode:
Figure 24. Unlock Panel for Node Checkbox on demonode
74 Enabling z/VM for OpenStack (Edition 4.0)

To check for an SSH problem, use the Nodes/Nodes/checkmark xCAT node this time, then choseActions/Run Script. Try to do an SSH to that node from the run script:
Figure 25. SSH to Node from Run Script Screen
Appendix G. Troubleshooting 75

If you see this response:@@@@@@@@@@@@@@@@@@@@@@@@@@@@@@@@@@@@@@@@@@@@@@@@@@@@@@@@@@@@ WARNING: REMOTE HOST IDENTIFICATION HAS CHANGED! @@@@@@@@@@@@@@@@@@@@@@@@@@@@@@@@@@@@@@@@@@@@@@@@@@@@@@@@@@@@IT IS POSSIBLE THAT SOMEONE IS DOING SOMETHING NASTY!
Then remove the old SSH fingerprint of that node by issuing makeknownhosts demonode -r from the RunScript screen:
You can now go back and do the original unlock to demonode that failed.
Figure 26. 'makeknownhosts demonode -r' from Run Script Screen
76 Enabling z/VM for OpenStack (Edition 4.0)
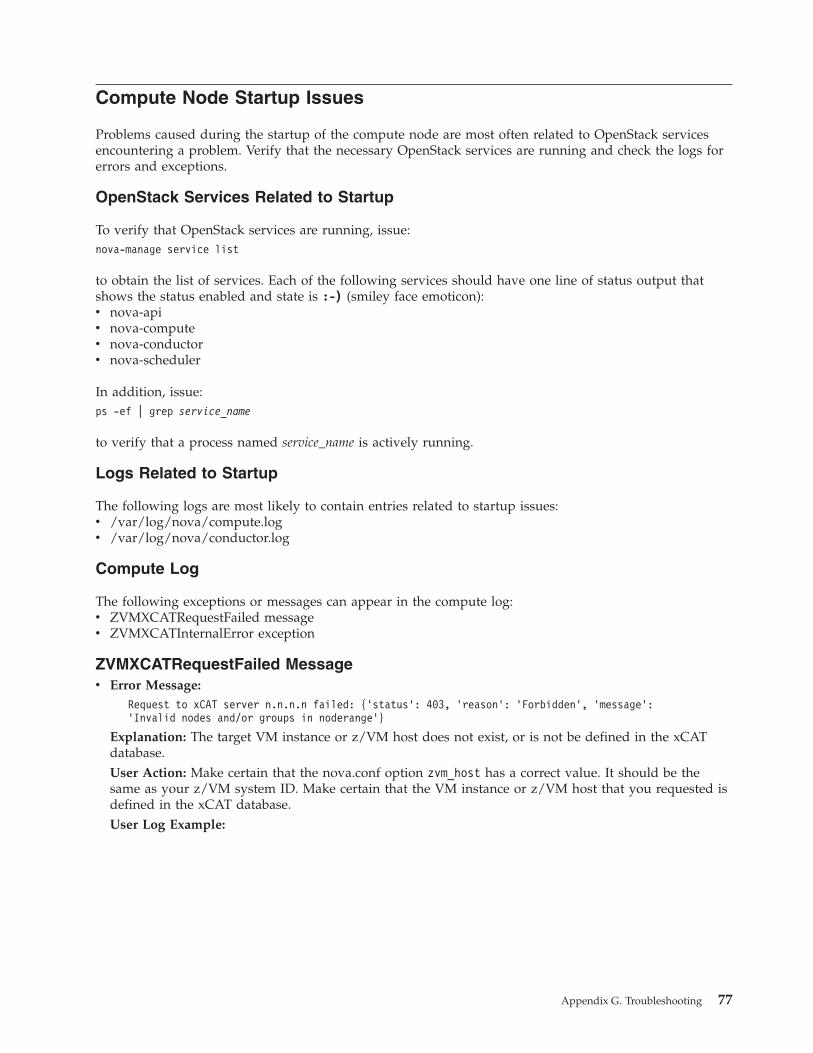
Compute Node Startup Issues
Problems caused during the startup of the compute node are most often related to OpenStack servicesencountering a problem. Verify that the necessary OpenStack services are running and check the logs forerrors and exceptions.
OpenStack Services Related to Startup
To verify that OpenStack services are running, issue:nova-manage service list
to obtain the list of services. Each of the following services should have one line of status output thatshows the status enabled and state is :-) (smiley face emoticon):v nova-apiv nova-computev nova-conductorv nova-scheduler
In addition, issue:ps -ef | grep service_name
to verify that a process named service_name is actively running.
Logs Related to Startup
The following logs are most likely to contain entries related to startup issues:v /var/log/nova/compute.logv /var/log/nova/conductor.log
Compute Log
The following exceptions or messages can appear in the compute log:v ZVMXCATRequestFailed messagev ZVMXCATInternalError exception
ZVMXCATRequestFailed Messagev Error Message:
Request to xCAT server n.n.n.n failed: {’status’: 403, ’reason’: ’Forbidden’, ’message’:’Invalid nodes and/or groups in noderange’}
Explanation: The target VM instance or z/VM host does not exist, or is not be defined in the xCATdatabase.User Action: Make certain that the nova.conf option zvm_host has a correct value. It should be thesame as your z/VM system ID. Make certain that the VM instance or z/VM host that you requested isdefined in the xCAT database.User Log Example:
Appendix G. Troubleshooting 77

v Error Message:Request to xCAT server n.n.n.n failed Authentication failure: {’status’: 401, ’reason’:’Unauthorized’, ’message’: ’Authentication failure’}
Explanation: An incorrect xCAT user and/or password is specified in the configuration files.User Action: Check nova.conf options zvm_xcat_username and zvm_xcat_password. Review the values inboth the /etc/nova/nova.conf and the /etc/neutron/neutron.conf files.User Log Example:
ZVMXCATInternalError Exceptionv Error Message:
Error during ComputeManager.update_available_resource
Explanation: The nova compute manager will run a periodic task (update_available_resource) to obtaininformation on the available z/VM hypervisor resources. This includes disk info. xCAT will eventuallycall the directory manager to get the disk pool info. An error can occur if the directory managerencounters problems.User Action: Contact the z/VM system administrator to check if the directory manager is configuredproperly.
2013-08-26 15:57:23.803 28134 TRACE nova Traceback (most recent call last):2013-08-26 15:57:23.803 28134 TRACE nova File "/usr/bin/nova-compute", line 9, in module2013-08-26 15:57:23.803 28134 TRACE nova load_entry_point(’nova==2013.2.a3.g62141be’, ’console_scripts’, ’nova-compute’)()2013-08-26 15:57:23.803 28134 TRACE nova File "/usr/lib/python2.6/site-packages/nova/cmd/compute.py", line 68, in main2013-08-26 15:57:23.803 28134 TRACE nova db_allowed=False)2013-08-26 15:57:23.803 28134 TRACE nova File "/usr/lib/python2.6/site-packages/nova/service.py", line 260, in create2013-08-26 15:57:23.803 28134 TRACE nova db_allowed=db_allowed)2013-08-26 15:57:23.803 28134 TRACE nova File "/usr/lib/python2.6/site-packages/nova/service.py", line 142, in __init__2013-08-26 15:57:23.803 28134 TRACE nova self.manager = manager_class(host=self.host, *args, **kwargs)2013-08-26 15:57:23.803 28134 TRACE nova File "/usr/lib/python2.6/site-packages/nova/compute/manager.py", line 402, in __init__2013-08-26 15:57:23.803 28134 TRACE nova self.driver = driver.load_compute_driver(self.virtapi, compute_driver)2013-08-26 15:57:23.803 28134 TRACE nova File "/usr/lib/python2.6/site-packages/nova/virt/driver.py", line 1003, in load_compute_driver2013-08-26 15:57:23.803 28134 TRACE nova virtapi)2013-08-26 15:57:23.803 28134 TRACE nova File "/usr/lib/python2.6/site-packages/nova/openstack/common/importutils.py", line 52, in import_object_ns2013-08-26 15:57:23.803 28134 TRACE nova return import_class(import_value)(*args, **kwargs)2013-08-26 15:57:23.803 28134 TRACE nova File "/usr/lib/python2.6/site-packages/nova/virt/zvm/driver.py", line 178, in __init__2013-08-26 15:57:23.803 28134 TRACE nova self._host_stats = self.get_host_stats(refresh=True)2013-08-26 15:57:23.803 28134 TRACE nova File "/usr/lib/python2.6/site-packages/nova/virt/zvm/driver.py", line 1138, in get_host_stats2013-08-26 15:57:23.803 28134 TRACE nova self._host_stats = self.update_host_status()2013-08-26 15:57:23.803 28134 TRACE nova File "/usr/lib/python2.6/site-packages/nova/virt/zvm/driver.py", line 1103, in update_host_status2013-08-26 15:57:23.803 28134 TRACE nova info = self._get_host_inventory_info(host)2013-08-26 15:57:23.803 28134 TRACE nova File "/usr/lib/python2.6/site-packages/nova/virt/zvm/driver.py", line 1167, in _get_host_inventory_info2013-08-26 15:57:23.803 28134 TRACE nova inv_info_raw = zvmutils.xcat_request("GET", url)[’info’][0]2013-08-26 15:57:23.803 28134 TRACE nova File "/usr/lib/python2.6/site-packages/nova/virt/zvm/utils.py", line 236, in xcat_request2013-08-26 15:57:23.803 28134 TRACE nova resp = conn.request(method, url, body, headers)2013-08-26 15:57:23.803 28134 TRACE nova File "/usr/lib/python2.6/site-packages/nova/virt/zvm/utils.py", line 229, in request2013-08-26 15:57:23.803 28134 TRACE nova msg=err)2013-08-26 15:57:23.803 28134 TRACE nova ZVMXCATRequestFailed: Request to xCAT server9.12.27.140 failed: {’status’: 403, ’reason’: ’Forbidden’, ’message’: ’nvalid nodes and/or groups in noderange: scezvm3’}
2013-09-23 04:14:43.035 CRITICAL nova [-] Request to xCAT server 9.60.29.96 failed: {’status’: 401, ’reason’: ’Unauthorized’, ’message’:’Authentication failure’}2013-09-23 04:14:43.035 TRACE nova Traceback (most recent call last):2013-09-23 04:14:43.035 TRACE nova File "/usr/bin/nova-compute", line 10, in module2013-09-23 04:14:43.035 TRACE nova sys.exit(main())2013-09-23 04:14:43.035 TRACE nova File "/usr/lib/python2.6/site-packages/nova/cmd/compute.py", line 68, in main2013-09-23 04:14:43.035 TRACE nova db_allowed=False)2013-09-23 04:14:43.035 TRACE nova File "/usr/lib/python2.6/site-packages/nova/service.py", line 257, in create2013-09-23 04:14:43.035 TRACE nova db_allowed=db_allowed)2013-09-23 04:14:43.035 TRACE nova File "/usr/lib/python2.6/site-packages/nova/service.py", line 139, in __init__2013-09-23 04:14:43.035 TRACE nova self.manager = manager_class(host=self.host, *args, **kwargs)2013-09-23 04:14:43.035 TRACE nova File "/usr/lib/python2.6/site-packages/nova/compute/manager.py", line 415, in __init__2013-09-23 04:14:43.035 TRACE nova self.driver = driver.load_compute_driver(self.virtapi, compute_driver)2013-09-23 04:14:43.035 TRACE nova File "/usr/lib/python2.6/site-packages/nova/virt/driver.py", line 1049, in load_compute_driver2013-09-23 04:14:43.035 TRACE nova virtapi)2013-09-23 04:14:43.035 TRACE nova File "/usr/lib/python2.6/site-packages/nova/openstack/common/importutils.py", line 52, in import_object_ns2013-09-23 04:14:43.035 TRACE nova return import_class(import_value)(*args, **kwargs)2013-09-23 04:14:43.035 TRACE nova File "/usr/lib/python2.6/site-packages/nova/virt/zvm/driver.py", line 178, in __init__2013-09-23 04:14:43.035 TRACE nova self._host_stats = self.get_host_stats(refresh=True)2013-09-23 04:14:43.035 TRACE nova File "/usr/lib/python2.6/site-packages/nova/virt/zvm/driver.py", line 1143, in get_host_stats2013-09-23 04:14:43.035 TRACE nova self._host_stats = self.update_host_status()2013-09-23 04:14:43.035 TRACE nova File "/usr/lib/python2.6/site-packages/nova/virt/zvm/driver.py", line 1108, in update_host_status2013-09-23 04:14:43.035 TRACE nova info = self._get_host_inventory_info(host)2013-09-23 04:14:43.035 TRACE nova File "/usr/lib/python2.6/site-packages/nova/virt/zvm/driver.py", line 1172, in _get_host_inventory_info2013-09-23 04:14:43.035 TRACE nova inv_info_raw = zvmutils.xcat_request("GET", url)[’info’][0]2013-09-23 04:14:43.035 TRACE nova File "/usr/lib/python2.6/site-packages/nova/virt/zvm/utils.py", line 235, in xcat_request2013-09-23 04:14:43.035 TRACE nova resp = conn.request(method, url, body, headers)2013-09-23 04:14:43.035 TRACE nova File "/usr/lib/python2.6/site-packages/nova/virt/zvm/utils.py", line 228, in request2013-09-23 04:14:43.035 TRACE nova msg=err)2013-09-23 04:14:43.035 TRACE nova ZVMXCATRequestFailed: Request to xCAT server 9.60.29.96 failed: {’status’: 401, ’reason’: ’Unauthorized’, ’message’:’Authentication failure’}
78 Enabling z/VM for OpenStack (Edition 4.0)

User Log Example:
Deployment Issues
Most deployment issues are due to encountering resource constraints in the z/VM hypervisor oractivation problems. Verify that the necessary OpenStack services are running, and check the logs forexceptions or error messages.
OpenStack Services Related to Deployment
To verify that OpenStack services are running, issue:nova-manage service list
to obtain the list of services. Each of the following services should have one line of status output thatshows the status enabled and state is :-) (smiley face emoticon):v nova-apiv nova-computev nova-conductorv nova-schedulerv glance-apiv glance-registryv neutron-server
2014-02-19 20:21:24.275 37880 AUDIT nova.compute.resource_tracker [-] NV-313322F Auditing locally available compute resources2014-02-19 20:21:26.549 37880 ERROR nova.openstack.common.periodic_task[-] NV-FC817DE Error during ComputeManager.update_available_resource: Error returned from xCAT:{"data":[{"errorcode":["1"],"error":["tivlp40: (Error) Unable to obtain disk pool information for SCOLIST,additional information: Failed\n Return Code: 8\n Reason Code: 241\n Description: Internal communication error\n"]}]}2014-02-19 20:21:26.549 37880 TRACE nova.openstack.common.periodic_task Traceback (most recent call last):2014-02-19 20:21:26.549 37880 TRACE nova.openstack.common.periodic_task
File "/usr/lib/python2.6/site-packages/nova/openstack/common/periodic_task.py", line 180, in run_periodic_tasks2014-02-19 20:21:26.549 37880 TRACE nova.openstack.common.periodic_task
task(self, context)2014-02-19 20:21:26.549 37880 TRACE nova.openstack.common.periodic_task
File "/usr/lib/python2.6/site-packages/nova/compute/manager.py", line 4903, in update_available_resource2014-02-19 20:21:26.549 37880 TRACE nova.openstack.common.periodic_task
rt.update_available_resource(context)2014-02-19 20:21:26.549 37880 TRACE nova.openstack.common.periodic_task
File "/usr/lib/python2.6/site-packages/nova/openstack/common/lockutils.py", line 246, in inner2014-02-19 20:21:26.549 37880 TRACE nova.openstack.common.periodic_task
return f(*args, **kwargs)2014-02-19 20:21:26.549 37880 TRACE nova.openstack.common.periodic_task
File "/usr/lib/python2.6/site-packages/nova/compute/resource_tracker.py", line 274, in update_available_resource2014-02-19 20:21:26.549 37880 TRACE nova.openstack.common.periodic_task
resources = self.driver.get_available_resource(self.nodename)2014-02-19 20:21:26.549 37880 TRACE nova.openstack.common.periodic_task
File "/usr/lib/python2.6/site-packages/nova/virt/zvm/driver.py", line 887, in get_available_resource2014-02-19 20:21:26.549 37880 TRACE nova.openstack.common.periodic_task
stats = self.update_host_status()[0]2014-02-19 20:21:26.549 37880 TRACE nova.openstack.common.periodic_task
File "/usr/lib/python2.6/site-packages/nova/virt/zvm/driver.py", line 1177, in update_host_status2014-02-19 20:21:26.549 37880 TRACE nova.openstack.common.periodic_task
info = self._get_host_inventory_info(host)2014-02-19 20:21:26.549 37880 TRACE nova.openstack.common.periodic_task
File "/usr/lib/python2.6/site-packages/nova/virt/zvm/driver.py", line 1241, in _get_host_inventory_info2014-02-19 20:21:26.549 37880 TRACE nova.openstack.common.periodic_task
dp_info = self._get_diskpool_info(host)2014-02-19 20:21:26.549 37880 TRACE nova.openstack.common.periodic_task
File "/usr/lib/python2.6/site-packages/nova/virt/zvm/driver.py", line 1270, in _get_diskpool_info2014-02-19 20:21:26.549 37880 TRACE nova.openstack.common.periodic_task
res_dict = zvmutils.xcat_request("GET", url)2014-02-19 20:21:26.549 37880 TRACE nova.openstack.common.periodic_task
File "/usr/lib/python2.6/site-packages/nova/virt/zvm/utils.py", line 243, in xcat_request2014-02-19 20:21:26.549 37880 TRACE nova.openstack.common.periodic_task
return load_xcat_resp(resp[’message’])2014-02-19 20:21:26.549 37880 TRACE nova.openstack.common.periodic_task
File "/usr/lib/python2.6/site-packages/nova/virt/zvm/utils.py", line 271, in decorated_function2014-02-19 20:21:26.549 37880 TRACE nova.openstack.common.periodic_task
return function(*arg, **kwargs)2014-02-19 20:21:26.549 37880 TRACE nova.openstack.common.periodic_task
File "/usr/lib/python2.6/site-packages/nova/virt/zvm/utils.py", line 381, in load_xcat_resp2014-02-19 20:21:26.549 37880 TRACE nova.openstack.common.periodic_task
raise exception.ZVMXCATInternalError(msg=message)2014-02-19 20:21:26.549 37880 TRACE nova.openstack.common.periodic_taskZVMXCATInternalError: Error returned from xCAT: {"data":[{"errorcode":["1"],"error":["tivlp40:(Error) Unable to obtain disk pool information for SCOLIST, additional information:Failed\n Return Code: 8\n Reason Code: 241\n Description: Internal communication error\n"]}]}2014-02-19 20:21:26.549 37880 TRACE nova.openstack.common.periodic_task
Appendix G. Troubleshooting 79

v neutron-zvm-agent
In addition, issue:ps -ef | grep service_name
to verify that a process named service_name is actively running. Depending on network topologies, otherservices may need to be running to support other OpenStack network features – for example, DHCP, L3,and so on. To simplify network configuration, you need to run only those services that are needed. Forexample, if you choose the use a FLAT-only network with a public IP pool, you need to run only theneutron-server and the neutron-zvm-agent.
Logs Related to Deployment
The following logs related to nova, neutron, and OpenStack message processing will be most helpful indebugging deploy issues:v /var/log/nova/compute.logv /var/log/neutron/zvm-agent.logv /var/log/nova/conductor.log
After a deployment is finished, you may occasionally find that some expected configurations have notbeen done on that system. In this case, the following logs may contain useful debug information:v /var/log/boot.log for Redhat, or /var/log/boot.msg for SuSEv /var/log/cloud-init-output.log (if you installed cloud-init as the underlying AE)v /opt/ibm/scp/scp-cloud-init.log (if you installed scp-cloud-init as the underlying AE)
Compute Log
The following exceptions or messages can appear in the compute log:v ZVMImageError exceptionv “Failed to create z/VM userid” messagev ZVMXCATDeployNodeFailed exceptionv ZVMNetworkError exceptionv InstancePowerOnFailure exceptionv ZVMXCATXdshKeyFailed exception
ZVMImageError Exceptionv Error Message:
Image error: This is not a valid zVM image.
Explanation: One or more required image properties are missing in Glance.User Action: Issue the glance image-show command to verify that all of the following six imageproperties have values:– image_file_name– image_type_xcat– architecture– os_name– provisioning_method– os_version
Issue the glance image-update --property command to set the appropriate values.User Log Example:
80 Enabling z/VM for OpenStack (Edition 4.0)
|||||
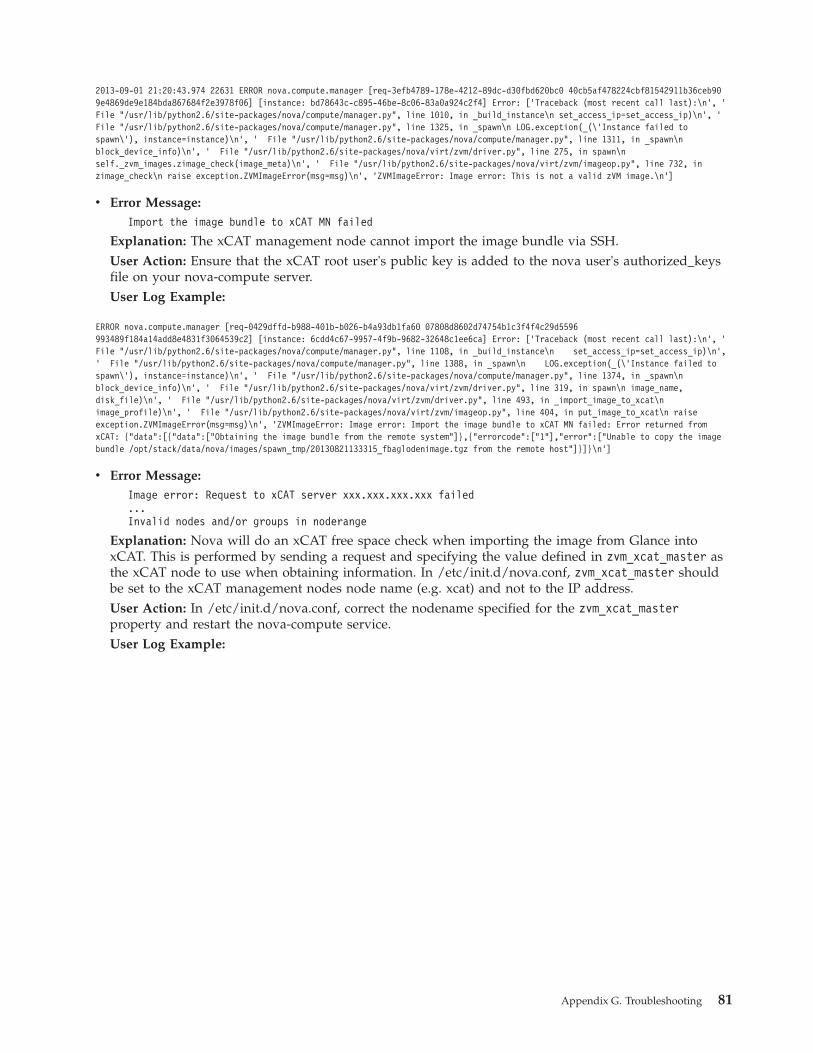
v Error Message:Import the image bundle to xCAT MN failed
Explanation: The xCAT management node cannot import the image bundle via SSH.User Action: Ensure that the xCAT root user's public key is added to the nova user's authorized_keysfile on your nova-compute server.User Log Example:
v Error Message:Image error: Request to xCAT server xxx.xxx.xxx.xxx failed...Invalid nodes and/or groups in noderange
Explanation: Nova will do an xCAT free space check when importing the image from Glance intoxCAT. This is performed by sending a request and specifying the value defined in zvm_xcat_master asthe xCAT node to use when obtaining information. In /etc/init.d/nova.conf, zvm_xcat_master shouldbe set to the xCAT management nodes node name (e.g. xcat) and not to the IP address.User Action: In /etc/init.d/nova.conf, correct the nodename specified for the zvm_xcat_masterproperty and restart the nova-compute service.User Log Example:
2013-09-01 21:20:43.974 22631 ERROR nova.compute.manager [req-3efb4789-178e-4212-89dc-d30fbd620bc0 40cb5af478224cbf81542911b36ceb909e4869de9e184bda867684f2e3978f06] [instance: bd78643c-c895-46be-8c06-83a0a924c2f4] Error: [’Traceback (most recent call last):\n’, ’File "/usr/lib/python2.6/site-packages/nova/compute/manager.py", line 1010, in _build_instance\n set_access_ip=set_access_ip)\n’, ’File "/usr/lib/python2.6/site-packages/nova/compute/manager.py", line 1325, in _spawn\n LOG.exception(_(\’Instance failed tospawn\’), instance=instance)\n’, ’ File "/usr/lib/python2.6/site-packages/nova/compute/manager.py", line 1311, in _spawn\nblock_device_info)\n’, ’ File "/usr/lib/python2.6/site-packages/nova/virt/zvm/driver.py", line 275, in spawn\nself._zvm_images.zimage_check(image_meta)\n’, ’ File "/usr/lib/python2.6/site-packages/nova/virt/zvm/imageop.py", line 732, inzimage_check\n raise exception.ZVMImageError(msg=msg)\n’, ’ZVMImageError: Image error: This is not a valid zVM image.\n’]
ERROR nova.compute.manager [req-0429dffd-b988-401b-b026-b4a93db1fa60 07808d8602d74754b1c3f4f4c29d5596993489f184a14add8e4831f3064539c2] [instance: 6cdd4c67-9957-4f9b-9682-32648c1ee6ca] Error: [’Traceback (most recent call last):\n’, ’File "/usr/lib/python2.6/site-packages/nova/compute/manager.py", line 1108, in _build_instance\n set_access_ip=set_access_ip)\n’,’ File "/usr/lib/python2.6/site-packages/nova/compute/manager.py", line 1388, in _spawn\n LOG.exception(_(\’Instance failed tospawn\’), instance=instance)\n’, ’ File "/usr/lib/python2.6/site-packages/nova/compute/manager.py", line 1374, in _spawn\nblock_device_info)\n’, ’ File "/usr/lib/python2.6/site-packages/nova/virt/zvm/driver.py", line 319, in spawn\n image_name,disk_file)\n’, ’ File "/usr/lib/python2.6/site-packages/nova/virt/zvm/driver.py", line 493, in _import_image_to_xcat\nimage_profile)\n’, ’ File "/usr/lib/python2.6/site-packages/nova/virt/zvm/imageop.py", line 404, in put_image_to_xcat\n raiseexception.ZVMImageError(msg=msg)\n’, ’ZVMImageError: Image error: Import the image bundle to xCAT MN failed: Error returned fromxCAT: {"data":[{"data":["Obtaining the image bundle from the remote system"]},{"errorcode":["1"],"error":["Unable to copy the imagebundle /opt/stack/data/nova/images/spawn_tmp/20130821133315_fbaglodenimage.tgz from the remote host"]}]}\n’]
Appendix G. Troubleshooting 81

“Failed to create z/VM userid” Messagev Error Message:
Adding disk to nnnnnnnn’s active configuration...Failed Return Code: 200 Reason Code: 12 Description: Image not active\n
Explanation: It is possible that the same IP address is being used by another existing server instance.xCAT thought the newly created server is active, but it is not.User Action: Locate the virtual server that is using the IP address and then shutdown or purge theserver instance that is using the same IP address.User Log Example:
v Error Message:
2014-03-03 16:05:21.856 2507 ERROR nova.compute.manager[req-1ecb87a1-d3ea-4767-8c98-d340ed9b8f13 a7fbf5a1eb5a4c9f8dd6e0e1d479b42e 816c88b5613f49dcbd6ebb35ff737c5e][instance: 1f60ab7c-f03d-4b8c-b2a0-a6f0c9681216] Error: Image error: Request to xCAT server 9.42.46.130 failed:{’status’: 403, ’reason’: ’Forbidden’, ’message’: ’Invalid nodes and/or groups in noderange: 9.42.46.130’}2014-03-03 16:05:21.856 2507 TRACE nova.compute.manager [instance: 1f60ab7c-f03d-4b8c-b2a0-a6f0c9681216]Traceback (most recent call last):2014-03-03 16:05:21.856 2507 TRACE nova.compute.manager [instance: 1f60ab7c-f03d-4b8c-b2a0-a6f0c9681216]
File "/usr/lib/python2.6/site-packages/nova/compute/manager.py", line 1045, in _build_instance2014-03-03 16:05:21.856 2507 TRACE nova.compute.manager [instance: 1f60ab7c-f03d-4b8c-b2a0-a6f0c9681216]
set_access_ip=set_access_ip)2014-03-03 16:05:21.856 2507 TRACE nova.compute.manager [instance: 1f60ab7c-f03d-4b8c-b2a0-a6f0c9681216]
File "/usr/lib/python2.6/site-packages/nova/compute/manager.py", line 1444, in _spawn2014-03-03 16:05:21.856 2507 TRACE nova.compute.manager [instance: 1f60ab7c-f03d-4b8c-b2a0-a6f0c9681216]
LOG.exception(_(’Instance failed to spawn’), instance=instance)2014-03-03 16:05:21.856 2507 TRACE nova.compute.manager [instance: 1f60ab7c-f03d-4b8c-b2a0-a6f0c9681216]
File "/usr/lib/python2.6/site-packages/nova/compute/manager.py", line 1430, in _spawn2014-03-03 16:05:21.856 2507 TRACE nova.compute.manager [instance: 1f60ab7c-f03d-4b8c-b2a0-a6f0c9681216]
block_device_info)2014-03-03 16:05:21.856 2507 TRACE nova.compute.manager [instance: 1f60ab7c-f03d-4b8c-b2a0-a6f0c9681216]
File "/usr/lib/python2.6/site-packages/nova/virt/zvm/driver.py", line 404, in spawn2014-03-03 16:05:21.856 2507 TRACE nova.compute.manager [instance: 1f60ab7c-f03d-4b8c-b2a0-a6f0c9681216]
zvm_inst.delete_xcat_node()2014-03-03 16:05:21.856 2507 TRACE nova.compute.manager [instance: 1f60ab7c-f03d-4b8c-b2a0-a6f0c9681216]
File "/usr/lib/python2.6/site-packages/nova/virt/zvm/driver.py", line 344, in spawn2014-03-03 16:05:21.856 2507 TRACE nova.compute.manager [instance: 1f60ab7c-f03d-4b8c-b2a0-a6f0c9681216]
tmp_file_fn)2014-03-03 16:05:21.856 2507 TRACE nova.compute.manager [instance: 1f60ab7c-f03d-4b8c-b2a0-a6f0c9681216]
File "/usr/lib/python2.6/site-packages/nova/virt/zvm/driver.py", line 549, in _import_image_to_xcat2014-03-03 16:05:21.856 2507 TRACE nova.compute.manager [instance: 1f60ab7c-f03d-4b8c-b2a0-a6f0c9681216]
CONF.zvm_xcat_master)2014-03-03 16:05:21.856 2507 TRACE nova.compute.manager [instance: 1f60ab7c-f03d-4b8c-b2a0-a6f0c9681216]
File "/usr/lib/python2.6/site-packages/nova/virt/zvm/imageop.py", line 397, in check_space_imgimport_xcat2014-03-03 16:05:21.856 2507 TRACE nova.compute.manager [instance: 1f60ab7c-f03d-4b8c-b2a0-a6f0c9681216]
os.remove(tar_file)2014-03-03 16:05:21.856 2507 TRACE nova.compute.manager [instance: 1f60ab7c-f03d-4b8c-b2a0-a6f0c9681216]
File "/usr/lib/python2.6/site-packages/nova/virt/zvm/imageop.py", line 384, in check_space_imgimport_xcat2014-03-03 16:05:21.856 2507 TRACE nova.compute.manager [instance: 1f60ab7c-f03d-4b8c-b2a0-a6f0c9681216]
xcat_free_space_threshold, zvm_xcat_master)2014-03-03 16:05:21.856 2507 TRACE nova.compute.manager [instance: 1f60ab7c-f03d-4b8c-b2a0-a6f0c9681216]
File "/usr/lib/python2.6/site-packages/nova/virt/zvm/imageop.py", line 605, in get_free_space_xcat2014-03-03 16:05:21.856 2507 TRACE nova.compute.manager [instance: 1f60ab7c-f03d-4b8c-b2a0-a6f0c9681216]
return xcat_free_space_threshold2014-03-03 16:05:21.856 2507 TRACE nova.compute.manager [instance: 1f60ab7c-f03d-4b8c-b2a0-a6f0c9681216]
File "/usr/lib64/python2.6/contextlib.py", line 34, in __exit__2014-03-03 16:05:21.856 2507 TRACE nova.compute.manager [instance: 1f60ab7c-f03d-4b8c-b2a0-a6f0c9681216]
self.gen.throw(type, value, traceback)2014-03-03 16:05:21.856 2507 TRACE nova.compute.manager [instance: 1f60ab7c-f03d-4b8c-b2a0-a6f0c9681216]
File "/usr/lib/python2.6/site-packages/nova/virt/zvm/utils.py", line 291, in except_xcat_call_failed_and_reraise2014-03-03 16:05:21.856 2507 TRACE nova.compute.manager [instance: 1f60ab7c-f03d-4b8c-b2a0-a6f0c9681216]
raise exc(**kwargs)2014-03-03 16:05:21.856 2507 TRACE nova.compute.manager [instance: 1f60ab7c-f03d-4b8c-b2a0-a6f0c9681216]ZVMImageError: Image error: Request to xCAT server 9.42.46.130 failed: {’status’: 403, ’reason’: ’Forbidden’,’message’: ’Invalid nodes and/or groups in noderange: 9.42.46.130’}
2013-09-01 06:27:15.970 23277 ERROR nova.virt.zvm.instance [req-f758fccf-5e3d-48cb-86f0-0d0efe90cb71 bcd9adddbbf8413f9f518a4efad182acab2c805b83514fbd8f5fb93661c2fca4] Failed to create z/VM userid: Error returned from xCAT:{"data":[{"errorcode":["1"],"error":["gcb000bd: Adding a disk to GCB000BD’s directory entry... Done\ngcb000bd: Adding disk toGCB000BD’s active configuration... Failed\ngcb000bd: Return Code: 200\ngcb000bd: Reason Code: 12\ngcb000bd: Description: Imagenot active\n"]}]}
82 Enabling z/VM for OpenStack (Edition 4.0)

Adding a disk to FTEST00B’s directory entry... Failed\nftest00b: Return Code: 596\nftest00b:Reason Code: 3610\nftest00b: Description: Internal directory manager error - product-specificreturn code: 3610\n
Explanation: The size of the root disk for the instance being deployed is greater than the availablecontiguous disk space in the directory manager's disk pool.User Action: Redeploy the instance using a flavor with smaller root disk in size, according to theirDASD pool capability. Either add larger contiguous disk space to the directory manager's disk pool, ordeploy an image with a smaller root disk. If the size of the root disk for the image is known to beavailable in the disk pool, then specify a flavor with a root disk size of 0, which generates a request fora disk from the disk pool that matches the size. Otherwise, choose a smaller image or increase thespace in the disk pool as previously suggested.User Log Example:
ZVMXCATDeployNodeFailed Exceptionv Error Message:
(Error) Unable to deploy the image to nnnnnnnn 0100. Reason: Failed to connect disk: nnnnnnnn:0100
Explanation: The ZHCP agent attaches the disk to itself so that it can copy the image to the disk. Theattempt to attach the disk failed. This can occur if the original configuration of ZHCP did not do thestep which permits the ZHCP agent to link disks, or the DASD volume on which the minidisk residesis not varied online to the z/VM system, or the minidisk was not correctly released from previousdeleted instance.User Action: Perform the following actions:– Review the z/VM xCAT configuration to ensure that ZHCP is allowed to link disks.– Verify that all defined volumes in the directory manager's disk pool are online.– Verify that the volumes and the sizes specified for the directory manager's disk pool are valid.– Make sure all deleted virtual server instance's minidisk were detached from ZHCP.User Log Example:
2014-03-04 02:57:09.684 ERROR nova.compute.manager [req-a8b0dea3-fcb7-4053-aff4-b1d19c624c7b admin admin][instance: 209b5cdc-2fb7-450d-8479-914ab89360a3] NV-BA150B8 Instance failed to spawn2014-03-04 02:57:09.684 TRACE nova.compute.manager [instance: 209b5cdc-2fb7-450d-8479-914ab89360a3]Traceback (most recent call last):2014-03-04 02:57:09.684 TRACE nova.compute.manager [instance: 209b5cdc-2fb7-450d-8479-914ab89360a3]
File "/usr/lib/python2.6/site-packages/nova/compute/manager.py", line 1498, in _spawn2014-03-04 02:57:09.684 TRACE nova.compute.manager [instance: 209b5cdc-2fb7-450d-8479-914ab89360a3]
block_device_info)2014-03-04 02:57:09.684 TRACE nova.compute.manager [instance: 209b5cdc-2fb7-450d-8479-914ab89360a3]
File "/usr/lib/python2.6/site-packages/nova/virt/zvm/driver.py", line 421, in spawn2014-03-04 02:57:09.684 TRACE nova.compute.manager [instance: 209b5cdc-2fb7-450d-8479-914ab89360a3]
block_device_info)2014-03-04 02:57:09.684 TRACE nova.compute.manager [instance: 209b5cdc-2fb7-450d-8479-914ab89360a3]
File "/usr/lib/python2.6/site-packages/nova/openstack/common/excutils.py", line 68, in __exit__2014-03-04 02:57:09.684 TRACE nova.compute.manager [instance: 209b5cdc-2fb7-450d-8479-914ab89360a3]
six.reraise(self.type_, self.value, self.tb)2014-03-04 02:57:09.684 TRACE nova.compute.manager [instance: 209b5cdc-2fb7-450d-8479-914ab89360a3]
File "/usr/lib/python2.6/site-packages/nova/virt/zvm/driver.py", line 354, in spawn2014-03-04 02:57:09.684 TRACE nova.compute.manager [instance: 209b5cdc-2fb7-450d-8479-914ab89360a3]
zvm_inst.create_userid(block_device_info, image_meta)2014-03-04 02:57:09.684 TRACE nova.compute.manager [instance: 209b5cdc-2fb7-450d-8479-914ab89360a3]
File "/usr/lib/python2.6/site-packages/nova/virt/zvm/instance.py", line 263, in create_userid2014-03-04 02:57:09.684 TRACE nova.compute.manager [instance: 209b5cdc-2fb7-450d-8479-914ab89360a3]
msg=msg)2014-03-04 02:57:09.684 TRACE nova.compute.manager [instance: 209b5cdc-2fb7-450d-8479-914ab89360a3]ZVMXCATCreateUserIdFailed: Create xCAT user id ftest00b failed: Failed to create z/VM userid: Error returned from xCAT:{"data":[{"errorcode":["1"],"error":["ftest00b: Adding a disk to FTEST00B’s directory entry... Failed\nftest00b:Return Code: 596\nftest00b: Reason Code: 3610\nftest00b: Description: Internal directory manager error- product-specific return code : 3610\n"]}]}
Appendix G. Troubleshooting 83

v Error Message:(Error) Unable to deploy the image to OS000079 0100. Reason: Target disk is too small for specified image
Explanation: The image being deployed contains a root disk that is larger in size than the root disksize specified in the flavor.User Action: Choose a flavor with larger root disk size that is at least as large as the source disk of theimage or a flavor with a root disk size of 0, which causes a disk of the same exact size as required bythe image to be obtained.User Log Example:
v Error Message:(Error) Unable to deploy the image to xxxxxxxx 0100.Reason: Failed deploy disk image 0100.img at stage(rc): dd(141), zcat(141), ckddecode(x)
where:
xxxxxxxxis the name of the virtual machine being deployed.
0100 is the device number of the disk that is being updated.
0100.imgis the name of the image file.
2013-08-29 08:17:20.928 2554 ERROR nova.scheduler.filter_scheduler [req-906d6cb0-c0c2-4944-8fd9-8735a4aa2859bcd9adddbbf8413f9f518a4efad182ac ab2c805b83514fbd8f5fb93661c2fca4] [instance: 40c93f15-2594-40b0-84fd-dc81efa91b0d] Error from lasthost: scezvm3 (node SCEZVM3): [u’Traceback (most recent call last):\n’, u’ File "/usr/lib/python2.6/site-packages/nova/compute/manager.py", line 1010, in _build_instance\n set_access_ip=set_access_ip)\n’, u’ File "/usr/lib/python2.6/site-packages/nova/compute/manager.py", line 1325, in _spawn\n LOG.exception(_(\’Instance failed to spawn\’), instance=instance)\n’, u’ File"/usr/lib/python2.6/site-packages/nova/compute/manager.py", line 1311, in _spawn\n block_device_info)\n’, u’ File"/usr/lib/python2.6/site-packages/nova/virt/zvm/driver.py", line 392, in spawn\n self.destroy(instance, network_info,block_device_info)\n’, u’ File "/usr/lib/python2.6/site-packages/nova/virt/zvm/driver.py", line 350, in spawn\nzvm_inst.deploy_node(deploy_image_name, transportfiles)\n’, u’ File "/usr/lib/python2.6/site-packages/nova/virt/zvm/instance.py",line 533, in deploy_node\n zvmutils.xcat_request("PUT", url, body)\n’, u’ File "/usr/lib64/python2.6/contextlib.py", line 34, in__exit__\n self.gen.throw(type, value, traceback)\n’, u’ File "/usr/lib/python2.6/site-packages/nova/virt/zvm/utils.py", line 285,in except_xcat_call_failed_and_reraise\n raise exc(**kwargs)\n’, u’ZVMXCATDeployNodeFailed: Deploy image on node gcb000a8 failed:Error returned from xCAT: {"data":[{"info":["gcb000a8: Deploying the image using the zHCPnode"]},{"errorcode":["1"],"error":["gcb000a8: (Error) Unable to deploy the image to GCB000A8 0100. Reason: Failed to connect disk:GCB000A8:0100"]}]}\n’]
2013-12-04 06:49:10.844 2612 TRACE nova.compute.manager [instance: 296adc07-b7dd-4b6c-8aa4-ace38bd7e402]Traceback (most recent call last):2013-12-04 06:49:10.844 2612 TRACE nova.compute.manager [instance: 296adc07-b7dd-4b6c-8aa4-ace38bd7e402]
File "/usr/lib/python2.6/site-packages/nova/compute/manager.py", line 1430, in _spawn2013-12-04 06:49:10.844 2612 TRACE nova.compute.manager [instance: 296adc07-b7dd-4b6c-8aa4-ace38bd7e402]
block_device_info)2013-12-04 06:49:10.844 2612 TRACE nova.compute.manager [instance: 296adc07-b7dd-4b6c-8aa4-ace38bd7e402]
File "/usr/lib/python2.6/site-packages/nova/virt/zvm/driver.py", line 397, in spawn2013-12-04 06:49:10.844 2612 TRACE nova.compute.manager [instance: 296adc07-b7dd-4b6c-8aa4-ace38bd7e402]
self.destroy(instance, network_info, block_device_info)2013-12-04 06:49:10.844 2612 TRACE nova.compute.manager [instance: 296adc07-b7dd-4b6c-8aa4-ace38bd7e402]
File "/usr/lib/python2.6/site-packages/nova/virt/zvm/driver.py", line 358, in spawn2013-12-04 06:49:10.844 2612 TRACE nova.compute.manager [instance: 296adc07-b7dd-4b6c-8aa4-ace38bd7e402]
zvm_inst.deploy_node(deploy_image_name, transportfiles)2013-12-04 06:49:10.844 2612 TRACE nova.compute.manager [instance: 296adc07-b7dd-4b6c-8aa4-ace38bd7e402]
File "/usr/lib/python2.6/site-packages/nova/virt/zvm/instance.py", line 520, in deploy_node2013-12-04 06:49:10.844 2612 TRACE nova.compute.manager [instance: 296adc07-b7dd-4b6c-8aa4-ace38bd7e402]
zvmutils.xcat_request("PUT", url, body)2013-12-04 06:49:10.844 2612 TRACE nova.compute.manager [instance: 296adc07-b7dd-4b6c-8aa4-ace38bd7e402]
File "/usr/lib64/python2.6/contextlib.py", line 34, in __exit__2013-12-04 06:49:10.844 2612 TRACE nova.compute.manager [instance: 296adc07-b7dd-4b6c-8aa4-ace38bd7e402]
self.gen.throw(type, value, traceback)2013-12-04 06:49:10.844 2612 TRACE nova.compute.manager [instance: 296adc07-b7dd-4b6c-8aa4-ace38bd7e402]
File "/usr/lib/python2.6/site-packages/nova/virt/zvm/utils.py", line 291, in except_xcat_call_failed_and_reraise2013-12-04 06:49:10.844 2612 TRACE nova.compute.manager [instance: 296adc07-b7dd-4b6c-8aa4-ace38bd7e402]
raise exc(**kwargs)2013-12-04 06:49:10.844 2612 TRACE nova.compute.manager [instance: 296adc07-b7dd-4b6c-8aa4-ace38bd7e402]ZVMXCATDeployNodeFailed: Deploy image on node os000079 failed: Error returned from xCAT: {"data":[{"info":["os000079:Deploying the image using the zHCP node"]},{"errorcode":["1"],"error":["os000079: (Error) Unable to deploy theimage to OS000079 0100. Reason: Target disk is too small for specified image."]}]}
84 Enabling z/VM for OpenStack (Edition 4.0)
|
||
|
||
||
||

ckddecode(x)is the return code from the ckddecode function.
Explanation: The image being deployed could not be written to the disk. The “ckddecode” string inthe log entry contains the return code from the ckddecode function and has the following meanings:
2 Unable to open the disk for writing.
3 Unable to allocate 64KB of memory on a page buffer for use as a work buffer. This internalerror can occur if the ZHCP server is overloaded with deploy or capture requests.
4 A negative return code was received on one of the functions calls.
5 An error occurred reading data from STDIN. This error occurs when a pipe error occurs oraccess is lost to the image file.
6 Unable to write a track buffer to the disk.User Action: The user action is based on the return code from ckddecode. For return code(s):
2 Verify the DASD volume is attached to the z/VM system so that minidisks on the volume canbe accessed. See the action for return code 6 for more information on resolving the issue.
3 This problem can be resolved by increasing the virtual storage size of the ZHCP virtualmachine. In normal operation, this should not be required. After the storage size has beenincreased and the SMAPI servers (by restarting VSMGUARD virtual machine), the xCAT MN,ZHCP agent, and OpenStack compute node should be restarted. After the servers have beenrestarted, retry the deploy.
4 Obtain the /var/log/zhcp/unpackdiskimage* log from the ZHCP agent and provide this toIBM. See Appendix B, “Getting Logs from xCAT or ZHCP,” on page 57 for more informationon obtaining the log files.
5 Obtain the /var/log/zhcp/unpackdiskimage* log from the ZHCP agent. See Appendix B,“Getting Logs from xCAT or ZHCP,” on page 57 for more information on obtaining the logfiles. This error can occur if the xCAT MN has been stopped or logged off. Resolve the errorindicated in the log and try the deploy again.
6 This error can be caused by an incorrect specification of the DASD volume's cylinder count inthe DirMaint EXTENT CONTROL file. To verify this error, run the IVP as documented inAppendix A, “Installation Verification Programs,” on page 49. If the DASD volumes shown forthe disk pool do not contain the correct device type for the listed volumes, or the number ofcylinders shown is greater than the number of cylinders expected for the type of device, thenyou have a mismatch in the definition, which will cause I/O errors as the deploy codeattempts to write beyond the expected available cylinders. The following list shows some ofthe most common 3390 device types and the supported maximum number of cylinders foreach:– 3390-03: 3339 cylinders– 3390-09: 10017 cylinders– 3390-27: 32760 cylinders– 3390-54: 65520 cylinders
Additional information on the required cylinder sizes is provided in “Appendix C. DeviceCharacteristics” in the z/VM: Directory Maintenance Facility Tailoring and Administration Guide.
To recover from this issue, the DASD volume should be configured to have the number ofcylinders that match the values in the above appendix for the desired device type. Next, theDirMaint EXTENT CONTROL file should be updated to specify the correct number ofcylinders for this volume. Once the changes have been made, DirMaint, SMAPI, the xCAT MN,and xCAT ZHCP should all be restarted and then a new deploy may be attempted.
If you do not have a DASD type mismatch, then the probable cause is I/O errors in the DASD.The volume should be analyzed for errors, and another volume should be used.
Appendix G. Troubleshooting 85
||
||
||
|||
||
|||
||
|
|||
||||||
||||
|||||
||||||||||||||
||
|||||
||

User Log Example:
ZVMNetworkError Exceptionv Error Message:
Failed to bound vswitch
Explanation: The server instance failed to couple its virtual NIC to the vswitch. As part of deployingthe instance, the neutron-zvm-agent will invoke SMAPI calls to grant instance and couple the instance'sNIC to the vswitch according to the network definition. The nova z/VM driver will check theinstance's NIC status before powering on the instance. There are several possible reasons why theneutron-zvm-agent may not be able to perform the grant and couple process successfully. For example,the neutron-zvm-agent may not be able to connect to the xCAT MN, or the xCAT MN may not beworking properly. These types of problems usually happen when the xCAT MN is restarting or whenz/VM SMAPI servers are restarting. To prevent this, the compute node should be restarted after xCATMN or SMAPI is restarted.User Action:
– Restart the compute node if either the xCAT MN or SMAPI is restarted.– Ensure that the neutron-zvm-agent is started and working correctly. To verify that the
neutron-zvm-agent is running, issue the ps command, as in this example:# ps aux | grep neutron-zvm-agentneutron 53243 0.4 0.3 133476 27980 ? S 16:42 0:15 /usr/bin/python /usr/bin/neutron-zvm-agent--config-file /etc/neutron/neutron.conf--config-file /etc/neutron/plugins/openvswitch/ovs_neutron_plugin.ini--config-file /etc/neutron/plugins/zvm/neutron_zvm_plugin.ini--log-file /var/log/neutron/zvm-agent.log
User Log Example:
ZVMXCATRequestFailed Exceptionv Error Message:
Request to xCAT server n.n.n.n failed: Communication error: [Errno 113] EHOSTUNREACH
Explanation: Cannot communicate with xCAT MN.User Action: Ensure that the xCAT management node is running and that the OpenStack configurationfiles correctly specify the IP information for the xCAT management node.User Log Example:
2013-12-04 06:49:10.844 2612 TRACE nova.compute.manager [instance: 296adc07-b7dd-4b6c-8aa4-ace38bd7e402] ZVMXCATDeployNodeFailed:Deploy image on node os000079 failed: Error returned from xCAT: {"data":[{"info":["os000079: Deploying the image using the zHCPnode"]},{"errorcode":["1"],"error":["os000079: (Error) Unable to deploy the image to OS000079 0100. Reason: Failed deploying diskimage 0100.img at stage(rc): dd(141), zcat(141), ckddecode(6)"]}]}
2013-08-21 14:08:36.929 30635 ERROR nova.compute.manager [req-316467f8-84ed-4e05-9c9b-b5f671d2a548 07808d8602d74754b1c3f4f4c29d5596993489f184a14add8e4831f3064539c2] [instance: 465f27ae-e27f-457f-a182-494388cd8481] Error: [’Traceback (most recent call last):\n’, ’File "/usr/lib/python2.6/site-packages/nova/compute/manager.py", line 1108, in _build_instance\n set_access_ip=set_access_ip)\n’, ’File "/usr/lib/python2.6/site-packages/nova/compute/manager.py", line 1388, in _spawn\n LOG.exception(_(\’Instance failed tospawn\’), instance=instance)\n’, ’ File "/usr/lib/python2.6/site-packages/nova/compute/manager.py", line 1374, in _spawn\nblock_device_info)\n’, ’ File "/usr/lib/python2.6/site-packages/nova/virt/zvm/driver.py", line 362, in spawn\n raiseexception.ZVMNetworkError(msg=msg)\n’, ’ZVMNetworkError: z/VM network error: Failed to bound vswitch\n’]
86 Enabling z/VM for OpenStack (Edition 4.0)
|||||
||
|||||||||
|
|
||
||||||

InstancePowerOnFailure Exceptionv Error Message:
InstancePowerOnFailure: Failed to power on instance: timeout.
Explanation: If the deployed instance cannot be pinged and accessed with SSH from xCAT, it willcomes up with that error. The most likely reason is a network configuration problem. This can happenif the activation engine chosen for the deployed system has not properly activated the IP address or setthe other Linux IP related configuration information.User Action: Verify that you specify the right NIC net-id=xxx in the nova boot command, and makesure that the IP assigned to this instance can be accessed by the xCAT management node using thexCAT GUI node/node panel. From that panel, select the “status” column header. Clicking on theheader name of “status” causes xCAT to poll the servers to verify their status.
2013-08-26 15:17:14.024 27285 TRACE nova.openstack.common.threadgroupTraceback (most recent call last):2013-08-26 15:17:14.024 27285 TRACE nova.openstack.common.threadgroup
File "/usr/lib/python2.6/site-packages/nova/openstack/common/threadgroup.py", line 117, in wait2013-08-26 15:17:14.024 27285 TRACE nova.openstack.common.threadgroup
x.wait()2013-08-26 15:17:14.024 27285 TRACE nova.openstack.common.threadgroup
File "/usr/lib/python2.6/site-packages/nova/openstack/common/threadgroup.py", line 49, in wait2013-08-26 15:17:14.024 27285 TRACE nova.openstack.common.threadgroup
return self.thread.wait()2013-08-26 15:17:14.024 27285 TRACE nova.openstack.common.threadgroup
File "/usr/lib/python2.6/site-packages/eventlet/greenthread.py", line 168, in wait2013-08-26 15:17:14.024 27285 TRACE nova.openstack.common.threadgroup
return self._exit_event.wait()2013-08-26 15:17:14.024 27285 TRACE nova.openstack.common.threadgroup
File "/usr/lib/python2.6/site-packages/eventlet/event.py", line 116, in wait2013-08-26 15:17:14.024 27285 TRACE nova.openstack.common.threadgroup
return hubs.get_hub().switch()2013-08-26 15:17:14.024 27285 TRACE nova.openstack.common.threadgroup
File "/usr/lib/python2.6/site-packages/eventlet/hubs/hub.py", line 187, in switch2013-08-26 15:17:14.024 27285 TRACE nova.openstack.common.threadgroup
return self.greenlet.switch()2013-08-26 15:17:14.024 27285 TRACE nova.openstack.common.threadgroup
File "/usr/lib/python2.6/site-packages/eventlet/greenthread.py", line 194, in main2013-08-26 15:17:14.024 27285 TRACE nova.openstack.common.threadgroup
result = function(*args, **kwargs)2013-08-26 15:17:14.024 27285 TRACE nova.openstack.common.threadgroup
File "/usr/lib/python2.6/site-packages/nova/openstack/common/service.py", line 65, in run_service2013-08-26 15:17:14.024 27285 TRACE nova.openstack.common.threadgroup
service.start()2013-08-26 15:17:14.024 27285 TRACE nova.openstack.common.threadgroup
File "/usr/lib/python2.6/site-packages/nova/service.py", line 157, in start2013-08-26 15:17:14.024 27285 TRACE nova.openstack.common.threadgroup
self.manager.init_host()2013-08-26 15:17:14.024 27285 TRACE nova.openstack.common.threadgroup
File "/usr/lib/python2.6/site-packages/nova/compute/manager.py", line 766, in init_host2013-08-26 15:17:14.024 27285 TRACE nova.openstack.common.threadgroup
self.driver.init_host(host=self.host)2013-08-26 15:17:14.024 27285 TRACE nova.openstack.common.threadgroup
File "/usr/lib/python2.6/site-packages/nova/virt/zvm/driver.py", line 189, in init_host2013-08-26 15:17:14.024 27285 TRACE nova.openstack.common.threadgroup
self._volumeop.init_zhcp_fcp(self._host_stats)2013-08-26 15:17:14.024 27285 TRACE nova.openstack.common.threadgroup
File "/usr/lib/python2.6/site-packages/nova/virt/zvm/volumeop.py", line 801, in init_zhcp_fcp2013-08-26 15:17:14.024 27285 TRACE nova.openstack.common.threadgroup
self.volume_op.online_device(hcpnode, hcpuser, fcp_cur_str)2013-08-26 15:17:14.024 27285 TRACE nova.openstack.common.threadgroup
File "/usr/lib/python2.6/site-packages/nova/virt/zvm/volumeop.py", line 76, in online_device2013-08-26 15:17:14.024 27285 TRACE nova.openstack.common.threadgroup
self._execute_dsh(hcpnode, body)2013-08-26 15:17:14.024 27285 TRACE nova.openstack.common.threadgroup
File "/usr/lib/python2.6/site-packages/nova/virt/zvm/volumeop.py", line 59, in _execute_dsh2013-08-26 15:17:14.024 27285 TRACE nova.openstack.common.threadgroup
zvmutils.xcat_request("PUT", url, body)2013-08-26 15:17:14.024 27285 TRACE nova.openstack.common.threadgroup
File "/usr/lib/python2.6/site-packages/nova/virt/zvm/utils.py", line 236, in xcat_request2013-08-26 15:17:14.024 27285 TRACE nova.openstack.common.threadgroup
resp = conn.request(method, url, body, headers)2013-08-26 15:17:14.024 27285 TRACE nova.openstack.common.threadgroup
File "/usr/lib/python2.6/site-packages/nova/virt/zvm/utils.py", line 208, in request2013-08-26 15:17:14.024 27285 TRACE nova.openstack.common.threadgroup
raise exception.ZVMXCATRequestFailed(xcatserver=self.host, msg=msg)2013-08-26 15:17:14.024 27285 TRACE nova.openstack.common.threadgroupZVMXCATRequestFailed: Request to xCAT server 9.12.27.140 failed: Communication error: [Errno 113] EHOSTUNREACH
Appendix G. Troubleshooting 87

User Log Example:
ZVMXCATXdshKeyFailed Exceptionv Error Message:
Xdsh key to node nnnnnnnn failed
Explanation:
Reason 1: The VM's assigned IP address has already be in use by other VMs.Reason 2: The image that is being deployed has a firewall enabled.User Action:
For reason 1, stop the VM that is using the same IP address.For reason 2, disable the firewall and make another image to deploy.User Log Example:
2013-09-24 22:17:43.983 16148 ERROR nova.compute.manager[req-06174c1e-7aeb-4a90-b407-88fe39e1f22c 767e6c58a76d478880046d2829e9d8bf be994626d0dd454a8603de9f8c27bfcb][instance: cb93fbdf-9a41-4d6e-84ca-b7c104e13512] Error: Failed to power on instance: timeout.2013-09-24 22:17:43.983 16148 TRACE nova.compute.manager [instance: cb93fbdf-9a41-4d6e-84ca-b7c104e13512]Traceback (most recent call last):2013-09-24 22:17:43.983 16148 TRACE nova.compute.manager [instance: cb93fbdf-9a41-4d6e-84ca-b7c104e13512]
File "/usr/lib/python2.6/site-packages/nova/compute/manager.py", line 1046, in _build_instance2013-09-24 22:17:43.983 16148 TRACE nova.compute.manager [instance: cb93fbdf-9a41-4d6e-84ca-b7c104e13512]
set_access_ip=set_access_ip)2013-09-24 22:17:43.983 16148 TRACE nova.compute.manager [instance: cb93fbdf-9a41-4d6e-84ca-b7c104e13512]
File "/usr/lib/python2.6/site-packages/nova/compute/manager.py", line 1445, in _spawn2013-09-24 22:17:43.983 16148 TRACE nova.compute.manager [instance: cb93fbdf-9a41-4d6e-84ca-b7c104e13512]
LOG.exception(_(’Instance failed to spawn’), instance=instance)2013-09-24 22:17:43.983 16148 TRACE nova.compute.manager [instance: cb93fbdf-9a41-4d6e-84ca-b7c104e13512]
File "/usr/lib/python2.6/site-packages/nova/compute/manager.py", line 1431, in _spawn2013-09-24 22:17:43.983 16148 TRACE nova.compute.manager [instance: cb93fbdf-9a41-4d6e-84ca-b7c104e13512]
block_device_info)2013-09-24 22:17:43.983 16148 TRACE nova.compute.manager [instance: cb93fbdf-9a41-4d6e-84ca-b7c104e13512]
File "/usr/lib/python2.6/site-packages/nova/virt/zvm/driver.py", line 396, in spawn2013-09-24 22:17:43.983 16148 TRACE nova.compute.manager [instance: cb93fbdf-9a41-4d6e-84ca-b7c104e13512]
raise err2013-09-24 22:17:43.983 16148 TRACE nova.compute.manager [instance: cb93fbdf-9a41-4d6e-84ca-b7c104e13512]InstancePowerOnFailure: Failed to power on instance: timeout.2013-09-24 22:17:43.983 16148 TRACE nova.compute.manager [instance: cb93fbdf-9a41-4d6e-84ca-b7c104e13512]
2013-09-03 02:44:00.158 ERROR nova.compute.manager [req-5e288b29-18f2-4066-93b7-a1d4da668591 admin admin][instance: 82be1d50-e7f8-47e8-b625-ce358bb4b1ad] Instance failed to spawn2013-09-03 02:44:00.158 TRACE nova.compute.manager [instance: 82be1d50-e7f8-47e8-b625-ce358bb4b1ad]Traceback (most recent call last):2013-09-03 02:44:00.158 TRACE nova.compute.manager [instance: 82be1d50-e7f8-47e8-b625-ce358bb4b1ad]
File "/usr/lib/python2.6/site-packages/nova/compute/manager.py", line 1315, in _spawn2013-09-03 02:44:00.158 TRACE nova.compute.manager [instance: 82be1d50-e7f8-47e8-b625-ce358bb4b1ad]
block_device_info)2013-09-03 02:44:00.158 TRACE nova.compute.manager [instance: 82be1d50-e7f8-47e8-b625-ce358bb4b1ad]
File "/usr/lib/python2.6/site-packages/nova/virt/zvm/driver.py", line 390, in spawn2013-09-03 02:44:00.158 TRACE nova.compute.manager [instance: 82be1d50-e7f8-47e8-b625-ce358bb4b1ad]
self.destroy(instance, network_info, block_device_info)2013-09-03 02:44:00.158 TRACE nova.compute.manager [instance: 82be1d50-e7f8-47e8-b625-ce358bb4b1ad]
File "/usr/lib/python2.6/site-packages/nova/virt/zvm/driver.py", line 365, in spawn2013-09-03 02:44:00.158 TRACE nova.compute.manager [instance: 82be1d50-e7f8-47e8-b625-ce358bb4b1ad]
zvm_inst.xdsh_key(admin_password)2013-09-03 02:44:00.158 TRACE nova.compute.manager [instance: 82be1d50-e7f8-47e8-b625-ce358bb4b1ad]
File "/usr/lib/python2.6/site-packages/nova/virt/zvm/instance.py", line 543, in xdsh_key2013-09-03 02:44:00.158 TRACE nova.compute.manager [instance: 82be1d50-e7f8-47e8-b625-ce358bb4b1ad]
zvmutils.xcat_request("PUT", url, body)2013-09-03 02:44:00.158 TRACE nova.compute.manager [instance: 82be1d50-e7f8-47e8-b625-ce358bb4b1ad]
File "/usr/lib64/python2.6/contextlib.py", line 34, in __exit__2013-09-03 02:44:00.158 TRACE nova.compute.manager [instance: 82be1d50-e7f8-47e8-b625-ce358bb4b1ad]
self.gen.throw(type, value, traceback)2013-09-03 02:44:00.158 TRACE nova.compute.manager [instance: 82be1d50-e7f8-47e8-b625-ce358bb4b1ad]
File "/usr/lib/python2.6/site-packages/nova/virt/zvm/utils.py", line 285, in except_xcat_call_failed_and_reraise2013-09-03 02:44:00.158 TRACE nova.compute.manager [instance: 82be1d50-e7f8-47e8-b625-ce358bb4b1ad]
raise exc(**kwargs)2013-09-03 02:44:00.158 TRACE nova.compute.manager [instance: 82be1d50-e7f8-47e8-b625-ce358bb4b1ad]ZVMXCATXdshKeyFailed: Xdsh key to node WSOST004 failed: Error returned from xCAT:{"data":[{"errorcode":["1"],"error":["remoteshellexp failed sending keys to disablenodes."]},{"errorcode":["1"],"error":["SSH setup failed for the following nodes: WSOST004."]},{"data":["return code = 1"]},{"errorcode":["0"]}]}
88 Enabling z/VM for OpenStack (Edition 4.0)

Additional Network Debug Procedures
Some network related deployment issues cannot be fully identified using the logs. Validation of thenetworking-related environment is necessary in order to debug the issue. The following arerecommended debug procedures related to networking.
If the OpenStack compute node is a z/VM Linux on System z virtual machine, then check the followingitems from the compute node:v Verify that all network interfaces, including real OSA cards, NICs, and other Linux virtual
devices/bridges have the correct MAC addresses and IP addresses. Issue:ip addr
or:ifconfig -a
to get the configurations for all network interfaces. The interfaces which need to connect outside of thez/VM server need to comply with z/VM MAC address management.
v Verify that the controller has the correct privilege on connected vswitches, that the VLAN configurationof the vswitches is correct, and that the vswitch configuration has an associated real device for theuplink port. Issue:
modprobe vmcp && vmcp --buffer 1M q vswitch vswitchName det
where vswitchName is the name of the vswitch.Using the information returned by this command, verify that all required privileges are satisfied. Forexample, if interface eth0 needs to run in promiscuous mode, then the corresponding NIC needs tohave promiscuous privilege on the vswitch.Then verify that the VLAN configuration of the vswitches in z/VM are configured to support theconfigured settings in OpenStack. The vswitch VLAN awareness and VLAN ID range (if it is VLANaware) should match the configured settings in OpenStack.Finally, if the deployed virtual machine is intended to communicate with systems outside of z/VM,verify that the vswitch configuration in z/VM has an associated real device for the uplink port.
v Verify that the gateway associated with the subnet to be used by the deployed system is valid for theTCP/IP environment. Issue:
neutron subnet-list
to obtain the list of subnets defined to OpenStack for this compute node.Using the ID of the subnet that is intended to be used by the deployed system, issue the followingcommand to show the configured values for the subnet (pay particular attention to the gateway):
neutron subnet-show 1a5634d2-1bbd-49b4-84a9-3afee962d86f
where 1a5634d2-1bbd-49b4-84a9-3afee962d86f is the ID of the subnet being verified.
Next, log on to xCAT and verify that xCAT can reach management network.
If OpenStack compute node is not running in a z/VM virtual machine:v Run the prep_zxcatIVP.pl and use the driver script to drive the zxcatIVP.pl script. The scripts will
validate some of the network settings. See Appendix A, “Installation Verification Programs,” on page49 for more information on the IVP scripts.
Appendix G. Troubleshooting 89
Deployment to Larger Root Disk and Additional Space is Not Available
When a deployment of an ECKD disk image is made to a system with a larger physical disk for the rootdisk, or when a resize of an ECKD disk occurs, the space will not be available to Linux on System z touse. The Linux on System z does not recognize the additional space.
To avoid this issue, deploy the ECKD image to a system with a root disk of the same size or else deploywith an FBA disk image. To recover the additional space, resize the partition and file system.
Deployment of an Image to a Different Disk Type Fails
An image created from an FBA disk can only be deployed to an FBA disk. Similarly, an image createdfrom an ECKD disk can only be deployed to an ECKD. If there is a mismatch, the deploy will fail. Forexample, if you deploy a FBA type image to a ECKD disk, you will be receive the following error:
To resolve this issue, make certain to deploy the image on a compute node that supports the appropriatedisk type. Each z/VM compute node is configured to create images of a specific disk type.
This error can occur in a mixed disk environment, where two compute nodes with different disk typesare in the same OpenStack zone. OpenStack will choose the next available host and related compute nodein the zone. If the compute node is configured for the other disk type, the deploy will fail. OpenStackwill then attempt the deployment on the other host/compute node where it could succeed.
To avoid this issue in a mixed disk environment, use the --availability_zone parameter on the bootcommand to specify the desired host.
Periodic Failure Due to Unavailable Resources or Timeouts
Symptom: When performing multiple concurrent operations, the operations periodically fail due toresources being unavailable or timeouts.
Resolution: In the z/VM environment:v Some resources such as disk space can be in recovery mode from previous usage when a subsequent
request is submitted by the user.v Operations fail because they take too long due to excessive concurrent requests. These issues can be
avoided by having sufficient resources defined to allow concurrent operations, and by pacing therequests to avoid delays due to concurrent operations consuming resources within the z/VMenvironment.
v Performance issues related to concurrent requests can also occur because multiple requests areconsuming too much resources of the xCAT MN and ZHCP. You can address this by increasing the sizeof the virtual machines by 1-2GB.
Capture Issues
Problems encountered during capture are most often related to xCAT being unable to access the Linux onSystem z or the disk containing the image, or space issues within either the xCAT management node orin the OpenStack compute node. Verify that the necessary OpenStack services are running and check thelogs for errors and exceptions.
ZVMXCATDeployNodeFailed: Deploy image on node ftest027 failed: Error returned from xCAT: {"data":[{"info":["ftest027:Deploying the image using the zHCP node"]},{"errorcode":["1"],"error":["ftest027: (Error) Unable to deploy the image toFTEST027 0100. Reason: Specified image is of a fixed-block volume, but specified disk is not a fixed-block volume."]}]}
90 Enabling z/VM for OpenStack (Edition 4.0)
OpenStack Services Related to Capture
To verify that OpenStack services are running, issue:nova-manage service list
to obtain the list of services. Each of the following services should have one line of status output thatshows the status enabled and state is :-) (smiley face emoticon):v nova-apiv nova-computev nova-conductorv nova-schedulerv glance-apiv glance-registry
In addition, issue:ps -ef | grep service_name
to verify that a process named service_name is actively running.
Logs Related to Capture
The following logs are most likely to contain entries related to capture issues:v /var/log/nova/compute.logv /var/log/nova/conductor.log
Periodic Failure Due to Unavailable Resources or Timeouts
Symptom: When performing multiple concurrent operations, the operations periodically fail due toresources being unavailable or timeouts.
Resolution: In the z/VM environment:v Some resources such as disk space can be in recovery mode from previous usage when a subsequent
request is submitted by the user.v Operations fail because they take too long due to excessive concurrent requests. These issues can be
avoided by having sufficient resources defined to allow concurrent operations, and by pacing therequests to avoid delays due to concurrent operations consuming resources within the z/VMenvironment.
v Performance issues related to concurrent requests can also occur because multiple requests areconsuming too much resources of the xCAT MN and ZHCP. You can address this by increasing the sizeof the virtual machines by 1-2GB.
Importing Image Issues
Problems encountered when importing an image into Glance are most often related to problems in thecompute node, either space issues or service failures. Verify that the necessary OpenStack services arerunning and check the logs for errors and exceptions.
OpenStack Services Related to Image Import
To verify that OpenStack services are running, issue:nova-manage service list
to obtain the list of services. Each of the following services should have one line of status output thatshows the status enabled and state is :-) (smiley face emoticon):
Appendix G. Troubleshooting 91
v nova-apiv nova-computev nova-conductorv nova-schedulerv glance-apiv glance-registry
In addition, issue:ps -ef | grep service_name
to verify that a process named service_name is actively running.
Logs Related to Image Import
The following logs are most likely to contain entries related to capture issues:v /var/log/nova/compute.logv /var/log/nova/conductor.log
xCAT Management Node Issues
This section contains xCAT management node items that are not necessarily related to a specificOpenStack task.
Space Issues on /install Directory Can Lead to xCAT MN Issues
The /install directory holds temporary space used for importing/exporting images and permanent spaceused to hold images that are deployed by xCAT. Running out of space in /install will cause the failuresin capture and deploy of images. To verify that the /install disk is full, use the xCAT GUI:1. Go to the Nodes/Nodes panel and select the xCAT management node. Next select the Actions pull
down and chose Run Script.2. On the Run Script panel, enter the following command in the script box:
df -h /install
3. Press Run. Response data and return codes indicating the result of the commands will appear in theyellow status box at the top of the panel. 0 means it was successful. A nonzero means there was anerror. If the response shows usage at 100% or nearing 100%, then the /install directory is full and theLVM that provides space for the directory must have additional disks added or files removed. If theresponse shows errors, or is unable to show a usage percentage, then it is possible that the LVM isdamaged and you should review the troubleshooting information in “LVM Errors in the /installDirectory Can Lead to xCAT MN Issues.”
To add volumes, refer to the "Defining the Linux ISO Repository for z/VM Images" section in Chapter 4of z/VM: Systems Management Application Programming. Prior to performing this task, you shouldshutdown xCAT MN with the signal command from a class A or C z/VM userid:SIGNAL SHUTDOWN USER XCAT WITHIN 10
where:
XCAT is the z/VM userid of the xCAT MN.
LVM Errors in the /install Directory Can Lead to xCAT MN Issues
If the LVM that contains the disk storage for the /install directory is corrupted or has errors, then failurescan occur with capture and deploy of images. The corruption of the LVM can be observed in the xCATGUI in the Configure/Files panel. A number of errors can appear:
92 Enabling z/VM for OpenStack (Edition 4.0)
|
||
|
|||
||
|
|
|||||||
|||
|
|
||
|
|||

v /install and subdirectories show file icons while files may show directory icons.v Files in the directory cannot be opened.v Permission denied errors occur for the files in the /install directory and subdirectories.v Response to a df command against the /install returns "can't find mount point".
Errors in the LVM occur most often in one of two ways:v The LVM is missing some disks. Disks might not be attached because they are not available to the
virtual machine. This can occur when the volume is not attached to the system or the full volume wasnot successfully added by xCAT MN to the directory manager.
v The filesystem in the LVM was corrupted by not properly shutting down the xCAT MN's Linux onSystem z.
To identify the extent of the problem, first use the xCAT GUI to verify that all volumes are attached:1. Go to the Nodes/Nodes panel and select the xCAT management node. Next select the Actions pull
down and chose Run Script.2. On the Run Script panel, enter the following commands in the script box:
vgdisplay -v xcat
If the "Cur PV" and "Act PV" values are not the same value, then a volume is missing. You should locatethe volume and correct the issues that prevent it from coming online. The DMSSICNF COPY file lists thevolumes in order and this can be used to verify that the necessary volumes are attached to the system.
If the "Cur PV" and "Act PV" values are the same value, then obtain the xCAT MN's virtual machineconsole log and look for errors related to LVM processing in the log file. Any LVM setup errors will bedisplayed after the "LVM setup return code" line. To access the console log, log onto the MAINT useridand issue the following commands:for xcat cmd sp cons start to maintfor xcat cmd close console
The spoolid of the console log spool file will be listed as output of the commands. The RDRLISTcommand can be used to view the log.
To resolve the corruption of the LVM providing storage for the /install directory, the LVM will need to beunmounted, deleted and disks reallocated. The directions to do this are detailed in the X_SMAPI package,located at VM Download Packages and described at Description of X_SMAPI.
Space Issues on /persistent Directory Can Lead to xCAT MN Issues
Persistent disk (/persistent) full could cause problems in various xCAT commands and functions. Thiscan be caused by a single large file or by multiple large files. Resolution of the problems is oftenprovided by freeing up space on the /persistent directory. Problems will occur when the disk is 100% inuse. It is recommended that space be recovered when the disk is over 80% in use.
You can check on the usage percentage for the /persistent directory tree and locate large files with thexCAT GUI:1. Go to the Nodes/Nodes panel and select the xCAT management node. Next select the Actions pull
down and chose Run Script.2. On the Run Script panel, enter the following command in the script box:
df -h /persistentfind /persistent/ -type f -size +30000k -exec ls -lh {} \; | awk '{ print $9 ": " $5 }'
where:
Appendix G. Troubleshooting 93
|
|
|
|
|
|||
||
|
||
|
|
|||
||||
||
||
|||
|
||||
||
||
|
||
|
+30000kis the minimum size of files for which you want to be notified. You can specify a differentnumber if you have a different criteria for large files.
3. Press Run. Response data and return codes indicating the result of the commands will appear in theyellow status box at the top of the panel. 0 means it was successful. A nonzero means there was anerror.
If you wish to save a copy of a file from the xCAT MN before recovering the space, perform thefollowing steps:1. Go to the Configure/Files panel and click on New Folder. Enter a name and then press Create.2. Go to the Nodes/Nodes panel and select the xCAT management node. Next select the Actions pull
down and chose Run Script.3. In the script box, enter:
cp file_to_copy /install/newdirname
where:
file_to_copyis the file you wish to copy.
newdirnameis the new directory into which you wish the file to be copied.
Then press Run. A 0 return code indicates success.4. Go to the Configure/Files panel and double click on the appropriate subdirectory name, and you
should see your file.5. Right click on the file and choose "Save as" to the desired location on your workstation.
Now that you have identified the large log files, and optionally created copies of them, you can removethem. Refer to the following subsections for those instructions.
/persistent/etc/xcat/auditlog.sqlite Log File is Using Up a Lot of Space and Needsto be Reduced
The /persistent/etc/xcat/auditlog.sqlite file will always grow and never shrink. If a tabprune is not doneregularly it could use up a lot of the persistent disk. This file can be removed if xcatd is stopped, andwill be recreated when xcatd is started. The early support for xCAT did not regularly prune theauditlog.sqlite file. Later releases will be pruning this file to contain only seven days of entries.
The file can be removed using the xCAT GUI:1. Go to the Nodes/Nodes panel and select the xCAT management node. Next select the Actions pull
down and chose Run Script.2. On the Run Script panel, enter the following command in the script box:
service xcatd stopsleep 3rm /persistent/etc/xcat/auditlog.sqlitesleep 3service xcatd start
3. Press Run. You will see an error message since xcatd has been stopped, but the commands to removethe file will work. The message is:A fatal error was encountered, the following information may help identify a bug:Not a subroutine reference at /usr/lib64/perl5/IO/Select.pm line 105.
94 Enabling z/VM for OpenStack (Edition 4.0)
|||
|||
||
|
||
|
|
|
||
||
|
||
|
||
||
||||
|
||
|
|||||
||
||

Archived Log Files Are Too Large
The xCAT MN can have large archived log files that have reduced the available space on the /persistentdirectory tree. Archived log files can appear with a timestamp or timestamp.gz as the file suffix (forexample, messages-2014-02-21-1393015085.gz or messages-2014-02-21-1393015085).
The files can be removed using the xCAT GUI:1. Go to the Nodes/Nodes panel and select the xCAT management node. Next select the Actions pull
down and chose Run Script.2. On the Run Script panel, enter the following command in the script box:
rm -f file_spec
where:
file_specis the fully-qualified file specification of the file to be removed.
3. Press Run. A return code indicating the result of the remove will appear in the yellow status box atthe top of the panel. 0 means it was successful. A nonzero means there was an error.
Active Log Files Are Too Large
The xCAT MN can have large active log files that are not being pruned. Normal logrotate jobs shouldprune the log files before they become too large, but it is possible that something is preventing this.Reducing the space constraint can be the first step to addressing another issue.
The files can be removed using the xCAT GUI:1. Go to the Nodes/Nodes panel and select the xCAT management node. Next select the Actions pull
down and chose Run Script.2. On the Run Script panel, enter the following command in the script box:
/etc/init.d/rsyslog stoprm -f file_spec/etc/init.d/rsyslog start
where:
file_specis the fully-qualified file specification of the file to be removed.
3. Press Run. A return code indicating the result of the remove will appear in the yellow status box atthe top of the panel. 0 means it was successful. A nonzero means there was an error.
ZHCP Node Issues
This section contains ZHCP node items that are not necessarily related to a specific OpenStack task.
Space Issues on /persistent Directory Can Lead to ZHCP Issues
Persistent disk (/persistent) full could cause problems in various xCAT commands and functions. Thiscan be caused by a single large file or by multiple large files. Resolution of the problems is oftenprovided by freeing up space on the /persistent directory. Problems will occur when the disk is 100% inuse. It is recommended that space be recovered when the disk is over 80% in use.
You can check on the usage percentage for the /persistent directory tree and locate large files with thexCAT GUI:
Appendix G. Troubleshooting 95
|
|||
|
||
|
|
|
||
||
|
|||
|
||
|
|||
|
||
||
||
|
|
||||
||

1. Go to the Nodes/Nodes panel and select the xCAT management node. Next select the Actions pulldown and chose Run Script.
2. On the Run Script panel, enter the following command in the script box:ssh zhcp df -h /persistentssh zhcp find /persistent/ -type f -size +30000k -exec 'ls -lh {} \;' | awk '{ print $9 ": " $5 }'
where:
zhcp is the node name of the ZHCP agent as it appears on the xCAT GUI's Nodes/Nodes panel.
+30000kis the minimum size of files for which you want to be notified. You can specify a differentnumber if you have a different criteria for large files.
3. Press Run. Response data and return codes indicating the result of the commands will appear in theyellow status box at the top of the panel. 0 means it was successful. A nonzero means there was anerror.
If you wish to save a copy of a file from the ZHCP before recovering the space, perform the followingsteps:1. Go to the Configure/Files panel and click on New Folder. Enter a name and then press Create.2. Go to the Nodes/Nodes panel and select the xCAT management node. Next select the Actions pull
down and chose Run Script.3. In the script box, enter:
scp zhcp:zhcp_file_to_copy /install/newdirname
where:
zhcp_file_to_copyis the ZHCP file you wish to copy.
newdirnameis the new directory into which you wish the file to be copied.
Then press Run. A 0 return code indicates success.4. Go to the Configure/Files panel and double click on the appropriate subdirectory name, and you
should see your file.5. Right click on the file and choose "Save as" to the desired location on your workstation.
Now that you have identified the large log files, and optionally created copies of them, you can removethem. Refer to the following subsections for those instructions.
Archived Log Files Are Too Large
The ZHCP can have large archived log files that have reduced the available space on the /persistentdirectory tree. Archived log files can appear with a timestamp or timestamp.gz as the file suffix (forexample, messages-2014-02-21-1393015085.gz or messages-2014-02-21-1393015085).
The files can be removed using the xCAT GUI:1. Go to the Nodes/Nodes panel and select the xCAT management node. Next select the Actions pull
down and chose Run Script.2. On the Run Script panel, enter the following command in the script box:
ssh zhcp rm -f file_spec
where:
zhcp is the node name of the ZHCP agent as it appears on the xCAT GUI's Nodes/Nodes panel.
96 Enabling z/VM for OpenStack (Edition 4.0)
||
|
||
|
||
|||
|||
||
|
||
|
|
|
||
||
|
||
|
||
|
|||
|
||
|
|
|
||

file_specis the fully-qualified file specification of the file to be removed.
3. Press Run. A return code indicating the result of the remove will appear in the yellow status box atthe top of the panel. 0 means it was successful. A nonzero means there was an error.
Active Log Files Are Too Large
The ZHCP can have large active log files that are not being pruned. Normal logrotate jobs should prunethe log files before they become too large, but it is possible that something is preventing this. Reducingthe space constraint can be the first step to addressing another issue.
The files can be removed using the xCAT GUI:1. Go to the Nodes/Nodes panel and select the xCAT management node. Next select the Actions pull
down and chose Run Script.2. On the Run Script panel, enter the following command in the script box:
ssh zhcp /etc/init.d/rsyslog stopssh zhcp rm -f file_specssh zhcp /etc/init.d/rsyslog start
where:
zhcp is the node name of the ZHCP agent as it appears on the xCAT GUI's Nodes/Nodes panel.
file_specis the fully-qualified file specification of the file to be removed.
3. Press Run. A return code indicating the result of the remove will appear in the yellow status box atthe top of the panel. 0 means it was successful. A nonzero means there was an error.
Appendix G. Troubleshooting 97
||
||
|
|||
|
||
|
|||
|
||
||
||

98 Enabling z/VM for OpenStack (Edition 4.0)

Notices
This information was developed for products and services offered in the U.S.A.
IBM may not offer the products, services, or features discussed in this document in other countries.Consult your local IBM representative for information on the products and services currently available inyour area. Any reference to an IBM product, program, or service is not intended to state or imply thatonly that IBM product, program, or service may be used. Any functionally equivalent product, program,or service that does not infringe any IBM intellectual property right may be used instead. However, it isthe user's responsibility to evaluate and verify the operation of any non-IBM product, program, orservice.
IBM may have patents or pending patent applications covering subject matter described in thisdocument. The furnishing of this document does not grant you any license to these patents. You can sendlicense inquiries, in writing, to:
IBM Director of LicensingIBM CorporationNorth Castle DriveArmonk, NY 10504-1785U.S.A.
For license inquiries regarding double-byte character set (DBCS) information, contact the IBM IntellectualProperty Department in your country or send inquiries, in writing, to:
Intellectual Property LicensingLegal and Intellectual Property LawIBM Japan Ltd.19-21, Nihonbashi-Hakozakicho, Chuo-kuTokyo 103-8510, Japan
The following paragraph does not apply to the United Kingdom or any other country where suchprovisions are inconsistent with local law: INTERNATIONAL BUSINESS MACHINES CORPORATIONPROVIDES THIS PUBLICATION “AS IS” WITHOUT WARRANTY OF ANY KIND, EITHER EXPRESSOR IMPLIED, INCLUDING, BUT NOT LIMITED TO, THE IMPLIED WARRANTIES OFNON-INFRINGEMENT, MERCHANTABILITY OR FITNESS FOR A PARTICULAR PURPOSE. Somestates do not allow disclaimer of express or implied warranties in certain transactions, therefore, thisstatement may not apply to you.
This information could include technical inaccuracies or typographical errors. Changes are periodicallymade to the information herein; these changes will be incorporated in new editions of the publication.IBM may make improvements and/or changes in the product(s) and/or the program(s) described in thispublication at any time without notice.
Any references in this information to non-IBM websites are provided for convenience only and do not inany manner serve as an endorsement of those websites. The materials at those websites are not part ofthe materials for this IBM product and use of those websites is at your own risk.
IBM may use or distribute any of the information you supply in any way it believes appropriate withoutincurring any obligation to you.
© Copyright IBM Corp. 2014 99
|

Licensees of this program who wish to have information about it for the purpose of enabling: (i) theexchange of information between independently created programs and other programs (including thisone) and (ii) the mutual use of the information which has been exchanged, should contact:
IBM CorporationSite Counsel2455 South RoadPoughkeepsie, NY 12601-5400U.S.A.
Such information may be available, subject to appropriate terms and conditions, including in some cases,payment of a fee.
The licensed program described in this document and all licensed material available for it are providedby IBM under terms of the IBM Customer Agreement, IBM International Program License Agreement orany equivalent agreement between us.
Any performance data contained herein was determined in a controlled environment. Therefore, theresults obtained in other operating environments may vary significantly. Some measurements may havebeen made on development-level systems and there is no guarantee that these measurements will be thesame on generally available systems. Furthermore, some measurement may have been estimated throughextrapolation. Actual results may vary. Users of this document should verify the applicable data for theirspecific environment.
Information concerning non-IBM products was obtained from the suppliers of those products, theirpublished announcements or other publicly available sources. IBM has not tested those products andcannot confirm the accuracy of performance, compatibility or any other claims related to non-IBMproducts. Questions on the capabilities of non-IBM products should be addressed to the suppliers ofthose products.
All statements regarding IBM's future direction or intent are subject to change or withdrawal withoutnotice, and represent goals and objectives only.
This information may contain examples of data and reports used in daily business operations. Toillustrate them as completely as possible, the examples include the names of individuals, companies,brands, and products. All of these names are fictitious and any similarity to the names and addressesused by an actual business enterprise is entirely coincidental.
COPYRIGHT LICENSE:
This information may contain sample application programs in source language, which illustrateprogramming techniques on various operating platforms. You may copy, modify, and distribute thesesample programs in any form without payment to IBM, for the purposes of developing, using, marketingor distributing application programs conforming to the application programming interface for theoperating platform for which the sample programs are written. These examples have not been thoroughlytested under all conditions. IBM, therefore, cannot guarantee or imply reliability, serviceability, orfunction of these programs. The sample programs are provided "AS IS", without warranty of any kind.IBM shall not be liable for any damages arising out of your use of the sample programs.
TrademarksIBM, the IBM logo, and ibm.com are trademarks or registered trademarks of International BusinessMachines Corp., registered in many jurisdictions worldwide. Other product and service names might betrademarks of IBM or other companies. A current list of IBM trademarks is available on the web at IBMcopyright and trademark information - United States (www.ibm.com/legal/us/en/copytrade.shtml).
100 Enabling z/VM for OpenStack (Edition 4.0)

Linux is a registered trademark of Linus Torvalds in the United States, other countries, or both.
Other company, product, and service names may be trademarks or service marks of others.
Notices 101

102 Enabling z/VM for OpenStack (Edition 4.0)


����
Product Number: 5741-A07
Printed in USA