Û en - mectron medicalmedical.mectron.com/fileadmin/user_upload/medical/english/pdf/... · and...
TRANSCRIPT

EN
Û Use and maintenance manual
EN
flexflex

EN
01 Û INTRODUCTION . . . . . . . . . . . . . . . . . . . . . . . . . . . . . . . . . . . . . . . . . . . . . . . . . . 4 01.1 Intended use of the PIEZOSURGERY® flex . . . . . . . . . . . . . . . . . . . . . . . . 4 01.2 Description of the device . . . . . . . . . . . . . . . . . . . . . . . . . . . . . . . . . . . . . . . . 5 01.3 Responsibility waiver . . . . . . . . . . . . . . . . . . . . . . . . . . . . . . . . . . . . . . . . . . . . 5 01.4 Safety precautions . . . . . . . . . . . . . . . . . . . . . . . . . . . . . . . . . . . . . . . . . . . . . . 6 01.5 Symbols used . . . . . . . . . . . . . . . . . . . . . . . . . . . . . . . . . . . . . . . . . . . . . . . . . . . 8
02 Û IDENTIFICATION DATA . . . . . . . . . . . . . . . . . . . . . . . . . . . . . . . . . . . . . . . . . . . 9 02.1 Identification plate of the device . . . . . . . . . . . . . . . . . . . . . . . . . . . . . . . . 9 02.2 Identification data of the handpiece . . . . . . . . . . . . . . . . . . . . . . . . . . . . . 9 02.3 Identification data of the inserts . . . . . . . . . . . . . . . . . . . . . . . . . . . . . . . . . 9
03 Û DELIVERY . . . . . . . . . . . . . . . . . . . . . . . . . . . . . . . . . . . . . . . . . . . . . . . . . . . . . . . . . 10 03.1 List of the components of the PIEZOSURGERY® flex . . . . . . . . . . . . . . 10
04 Û INSTALLATION . . . . . . . . . . . . . . . . . . . . . . . . . . . . . . . . . . . . . . . . . . . . . . . . . . . 11 04.1 First installation . . . . . . . . . . . . . . . . . . . . . . . . . . . . . . . . . . . . . . . . . . . . . . . 11 04.2 Safety precautions during the installation . . . . . . . . . . . . . . . . . . . . . . . 11 04.3 Connection of the accessories . . . . . . . . . . . . . . . . . . . . . . . . . . . . . . . . . . 12
05 Û USE . . . . . . . . . . . . . . . . . . . . . . . . . . . . . . . . . . . . . . . . . . . . . . . . . . . . . . . . . . . . . . . 14 05.1 Switching the device on and off . . . . . . . . . . . . . . . . . . . . . . . . . . . . . . . . 14 05.2 Description of the keyboard . . . . . . . . . . . . . . . . . . . . . . . . . . . . . . . . . . . . 15 05.3 Foot pedal button . . . . . . . . . . . . . . . . . . . . . . . . . . . . . . . . . . . . . . . . . . . . . 16 05.4 Safety precautions before and during use . . . . . . . . . . . . . . . . . . . . . . . 17 05.5 Instructions for use . . . . . . . . . . . . . . . . . . . . . . . . . . . . . . . . . . . . . . . . . . . . 20 05.6 Important information on the inserts . . . . . . . . . . . . . . . . . . . . . . . . . . . 22
2
Û TABLE OF CONTENTS

EN
06 Û MAINTENANCE . . . . . . . . . . . . . . . . . . . . . . . . . . . . . . . . . . . . . . . . . . . . . . . . . . 23
07 Û DISPOSAL MODES AND PRECAUTIONS . . . . . . . . . . . . . . . . . . . . . . . 23
08 Û TECHNICAL DATA . . . . . . . . . . . . . . . . . . . . . . . . . . . . . . . . . . . . . . . . . . . . . . . . 24 08.1 Electromagnetic compatibility EN 60601-1-2 . . . . . . . . . . . . . . . . . . . . . 25
09 Û TROUBLESHOOTING . . . . . . . . . . . . . . . . . . . . . . . . . . . . . . . . . . . . . . . . . . . . 29 09.1 Diagnostic system and symbols on the keyboard . . . . . . . . . . . . . . . . 29 09.2 Quick solution to problems . . . . . . . . . . . . . . . . . . . . . . . . . . . . . . . . . . . . . 30 09.3 Replacement of the fuses . . . . . . . . . . . . . . . . . . . . . . . . . . . . . . . . . . . . . . 32 09.4 Sending the device to an Authorized Mectron Service . . . . . . . . . . . . 33
10 Û WARRANTY . . . . . . . . . . . . . . . . . . . . . . . . . . . . . . . . . . . . . . . . . . . . . . . . . . . . . . 34

4
EN
flexflex
01.1 Û INTENDED USE OF THE PIEZOSURGERY® flexPIEZOSURGERY® flex is a piezoelectric surgical system intended for use in bone cutting, equipped with special insert tips to perform osteotomy, osteoplasty and drilling in a variety of surgical procedures:- Otolaryngology- Oral/Maxillofacial Surgery- Hand and foot Surgery- Plastic/Reconstructive Surgery
It may also be used with endoscopic assistance to perform the above listed procedures .
WARNING: Use the device only for the intended use . Failure to meet these requirements may cause serious injuries to the patient, the operator, and damages/breakdowns of the device .
WARNING: Carefully read this manual and follow its recommendations in order to avoid to compromise the patient and/or the user safety . Failure to meet these requirements may cause serious injuries to the patient and/or the operator .
WARNING: Qualified and specialized personnel only. The use of the device is restricted solely to qualified, trained and competent health care practitioners such as a Surgeon . The device does not cause side effects if it is used correctly . Misuse might cause tissues heating .
WARNING: The device must be used in a hospital environment, such as an operating theatre .
01 Û INTRODUCTIONBefore proceeding with the installation, use, maintenance, or other operations on the device please read this manual carefully. Always keep this manual within easy reach. IMPORTANT: to avoid potential serious injuryto the user and the patient and/or this deviceor other equipments, read all the “Safetyprecautions” present in the manual withparticular attention . Depending on their degree of seriousness, the safety precautions are classified with the following indications:
WARNING (always refers o personal injury)
CAUTION (refers to possible damage to property)
The purpose of this manual is to make the operator knowledgeable of the safety precautions, the installation procedures, and the instructions for a correct use and maintenance of the device and its accessories .Use of this manual for purposes other than those strictly tied to the installation, use and maintenance of the device is forbidden .The information and illustrations in this manual are updated as of the date of issue reported on the last page .Mectron, is committed to continuously update its products with possible modifications to device components . In case you uncover discrepancies between what is described in this manual and the device in your possession, contact your Retailer or the After-Sales Service of Mectron for clarifications and support .

5
EN
01 Û INTRODUCTION
01.2 Û DESCRIPTION OF THE DEVICE
01.3 Û RESPONSIBILITY WAIVER
The user interface has been optimized with the PIEZOSURGERY® flex making all the functions readily available by integrating them in the touch keyboard . The PIEZOSURGERY® flex is a device that uses ultrasonic piezoelectric technology to generate mechanical microvibrations of the inserts (from 20 to 60 µm), to effectively cut mineralized tissues . This allows an efficient and safe cutting which preserves the integrity of the osteotomized surfaces .
The micrometric, ultrasonic vibrations of the inserts provide greater precision and a selective cutting action compared to traditional methods such as drills or oscillating saws (which act with macrovibrations), therefore minimizing traumatic effect on soft tissues .The cavitation effect of the irrigating solution helps to keep the operatory field blood-free . This provides an optimal intra-operatory visual control thus increasing safety, even in areas that are anatomically most difficult to access .
The manufacturer Mectron disclaim any liability, expressed or implied, and shall have no responsibility for any direct, indirect or other damages and personal injury arising out in connection with any improper practice in the use of the device and its accessories .The manufacturer Mectron shall be under no liability, expressed or implied, with respect to any damages (personal injury and/or damage to property) which might arise or be caused, whether by the customer or by any of the users of the product and its accessories, as result of:1 Procedures different than those specified in
the intended use of the product;2 The environmental conditions for the
preservation and storage of the device are not compliant with the precautions indicated in the Chapter 08 - TECHNICAL DATA;
3 The device is not used in compliance with all the instructions and precautions described in this manual;
4 The electrical system of the relevant operating room is not compliant with the applicable regulations and with electrical safety requirements;
5 The assembly operations, extensions, adjustments, updates, and repairs on the device are performed by personnel not authorized by Mectron;
6 Improper use, mistreatments, and/or incorrect interventions;
7 Any and all attempts to tamper with or modify the device, under any circumstance;
8 Use of non-original Mectron inserts that damage the threading of the handpiece, thus compromising correct operation and causing risk of harm to the patient ;
9 Use of non-original Mectron inserts, even if they are used in accordance to designed and tested settings of Mectron original inserts . The correct use of the settings is guaranteed only with original Mectron inserts;
10 Lack of stock materials (handpiece, inserts, wrenches) to be used in the event of device stop due to fault or of inconveniences .
6
EN
flexflex
WARNING: Risk of explosion. The device cannot operate in environments where the atmosphere is saturated with flammable gases (anesthetic mixtures, oxigen, etc .) .
WARNING: Contraindications. Interference with other devices. The PIEZOSURGERY® flex device complies with the standard IEC 60601-1-2 . However, it may interfere with other devices in its vicinity . Install the PIEZOSURGERY® flex at safety distance from life-support systems . If adjacent or stacked use of the device is necessary, normal operation of the equipment and the PIEZOSURGERY® flex , in the configuration in which they will be used, should be verified prior their use .
WARNING: Contraindications. Interference from other devices. An electro-surgical knife or other electro-surgical units placed in the vicinity of the PIEZOSURGERY® flex device may interfere with its correct functioning .
CAUTION: In the case the hospital must subject the electro-medical equipment and systems to periodical inspections in order to adhere to imposed requirements in its own structure, the test procedures that must be applied to electro-medical equipment and systems to evaluate safety must be performed in line with norm EN 62353 ‘Electro-medical devices - Periodical inspections and tests to be performed after repair interventions on electro-medical devices’ .
WARNING: Checking device status before the treatment. Always check that there is no water underneath the device . Before every treatment, always check that the device works perfectly and that the accessories are efficient . If anything unusual is noted during operation, do not perform the treatment . If the problem concerns the device, contact an Authorized Mectron Service Center .
CAUTION: The electrical system of the relevant operating room, where the device is installed and used, must comply with the applicable regulations and with electrical safety requirements .
CAUTION: To avoid any risk of electric shock this device must be grounded .
WARNING: Do not operate the foot pedal of the PIEZOSURGERY® flex when the peristaltic pump cover is open . Moving parts could injure the operator .
WARNING: Injuries to persons. Make sure that power cables do not interfere with free circulation of people in the area .
CAUTION: Federal Laws (United States of America) restrict this device to sale by or on the order of a physician .
WARNING: Prior to any use, system components should be inspected for damage . Do not use if damage is apparent .
WARNING: Do not start using the device in case the handpiece is defective, damaged or broken . Immediately replace the handpiece .
WARNING: Only use original Mectron inserts, accessories, and spare parts .
CAUTION: No modification of this equipment is allowed .
WARNING: Contraindications. Do not use the PIEZOSURGERY® flex on patients with heart stimulators (Pace-makers) or other implantable electronic devices . This precaution also applies to the operator .
CAUTION: Contraindications. Do not perform treatments on prosthetic artifacts made of metal or ceramics . The ultrasonic vibrations could lead to the de-cementing of the artifacts .
WARNING: Infections control. To ensure maximum safety of the patient and the operator, verify the reusable
01.4 Û SAFETY PRECAUTIONS
7
EN
01 Û INTRODUCTION
parts and accessories has been cleaned and sterilized prior to use, following the instructions of the Cleaning and Sterilization Manual .
WARNING: All the accessories of the new or repaired devices are not sterile. All new and repaired accessories are supplied in non-sterile conditions . Before use, and after each treatment, they must be cleaned and sterilised in strict compliance with the instructions given in the Cleaning and Sterilization Manual .
CAUTION: Contraindications. When the reusable items (the handpiece, the torque wrench, and any other accessory that can be sterilized ) have been autoclave sterilized, wait for them to cool down to room temperature prior to usage . The cooling process must not be accelerated .
WARNING: Breakage and wear-out of the inserts. In rare cases, high frequency oscillations and wear-out may lead to breakage of an insert . Deformed or otherwise damaged inserts are susceptible to breakage during their use . These inserts must never be used . Should an insert fracture during use, extreme care must be exercised to ensure that all the fragments of the insert are retrieved and removed from the surgical site and, at the same time, that an effective suction is applied . During surgery, frequently check that the insert is intact, especially in its apical part . During surgery, avoid prolonged contact with retractors or other metal objects being used . During surgery, do not apply excessive pressure on the inserts .
8
EN
flexflex
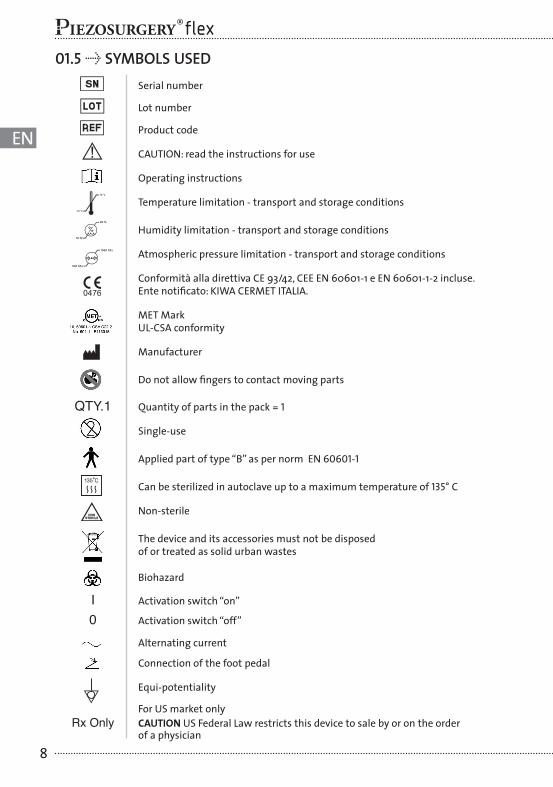
Serial number
Lot number
Product code
CAUTION: read the instructions for use
Operating instructions
Temperature limitation - transport and storage conditions
Humidity limitation - transport and storage conditions
Atmospheric pressure limitation - transport and storage conditions
Conformità alla direttiva CE 93/42, CEE EN 60601-1 e EN 60601-1-2 incluse . Ente notificato: KIWA CERMET ITALIA .
MET MarkUL-CSA conformity
Manufacturer
Do not allow fingers to contact moving parts
QTY.1 Quantity of parts in the pack = 1
Single-use
Applied part of type “B” as per norm EN 60601-1
Can be sterilized in autoclave up to a maximum temperature of 135° C
Non-sterile
The device and its accessories must not be disposed of or treated as solid urban wastes
Biohazard
I Activation switch “on”
0 Activation switch “off”
Alternating current
Connection of the foot pedal
Equi-potentiality
For US market only Rx Only CAUTION US Federal Law restricts this device to sale by or on the order of a physician
01.5 Û SYMBOLS USED
-10 °C
70 °C
10 %
90 %
1060 hPa
500 hPa
9
EN
02 Û IDENTIFICATION DATA
1 2
ManufacturerMectron S.p.A.Via Loreto 15/A16042 Carasco -GE- Italy
413000000 made in Italy
PIEZOSURGERY FLEX100-240 V~ 120 VA - 50/60 Hz.Intermittent operation
UL 60601-1 CSA C22.2 No. 601-1 - E113015
Rx
Onl
y0476
MT1
-10
AA/XXX
XX
02 Û IDENTIFICATION DATA
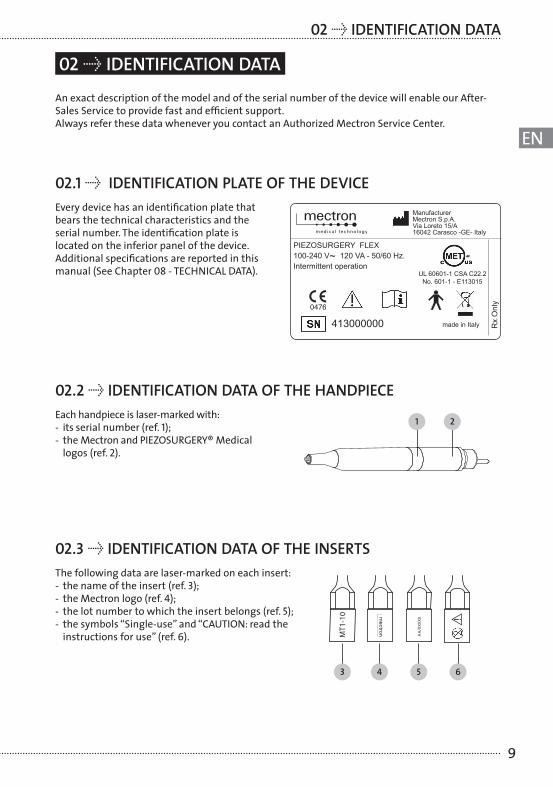
Every device has an identification plate that bears the technical characteristics and the serial number . The identification plate is located on the inferior panel of the device . Additional specifications are reported in this manual (See Chapter 08 - TECHNICAL DATA) .
Each handpiece is laser-marked with:- its serial number (ref . 1);- the Mectron and PIEZOSURGERY® Medical
logos (ref . 2) .
The following data are laser-marked on each insert:- the name of the insert (ref . 3);- the Mectron logo (ref . 4);- the lot number to which the insert belongs (ref . 5);- the symbols “Single-use” and “CAUTION: read the
instructions for use” (ref . 6) .
02.1 Û IDENTIFICATION PLATE OF THE DEVICE
02.2 Û IDENTIFICATION DATA OF THE HANDPIECE
02.3 Û IDENTIFICATION DATA OF THE INSERTS
An exact description of the model and of the serial number of the device will enable our After-Sales Service to provide fast and efficient support .Always refer these data whenever you contact an Authorized Mectron Service Center .
3 4 5 6

10
EN
flexflex
03.1 Û LIST OF THE COMPONENTS OF THE PIEZOSURGERY® flex See inside cover PIEZOSURGERY® flex consists of: A device bodyB peristaltic pump C drip stand for supporting the saline bags D manual of use and maintenance and manual of cleaning and sterilization E electrical power supply cableF foot pedal with bracket, cord and connectorG handpiece complete with cord
CAUTION the handpiece and the cord cannot be separated
H single use insertsI irrigation kitJ torque wrenchK case
03 Û DELIVERY
The PIEZOSURGERY® flex consists of accessories that can be ordered separately . The package of the device is sensitive to strong collisions, because it contains electronic components . Therefore, special precautions must be taken for transport and storage .All the materials shipped by Mectron have been inspected upon their delivery .The device is delivered duly protected and packed .When receiving the device, check if the shipping packaging is damaged or the protective material shows signs of stress . Should that be the case, notify the carrier .
After unpacking the PIEZOSURGERY® flex save the original package . During prolonged periods of disuse pack the equipment in its original packaging . Should the PIEZOSURGERY® flex equipment need servicing or repair, return it to an Authorized Mectron Service Center in the original packaging .
WARNING: Before starting to operate with the device, make sure that you have stock material (handpiece, inserts, wrenches) available to use in case the device stops due to a fault or of inconveniences .

11
EN
04 Û INSTALLATION
04.2 Û SAFETY PRECAUTIONS DURING INSTALLATION
WARNING: Contraindications. Interference with other devices. The PIEZOSURGERY® flex device complies with the standard IEC 60601-1-2 . However, it may interfere with other devices in its vicinity . Install the PIEZOSURGERY® flex at safety distance from life-support systems . If adjacent or stacked use of the device is necessary, normal operation of the equipment and the PIEZOSURGERY® flex , in the configuration in which they will be used, should be verified prior their use .
WARNING: Contraindications. Interference from other devices. An electro-surgical knife or other electro-surgical units placed in the vicinity of the PIEZOSURGERY® flex device may interfere with its correct functioning .
WARNING: Risk of explosion. he device cannot operate in environments where the atmosphere is saturated with flammable gases (anesthetic mixtures, oxigen, etc .) .
CAUTION: The electrical system of the relevant operating room, where the device is installed and used, must comply with the applicable regulations and with electrical safety requirements .
CAUTION: To avoid any risk of electric shock this device must be grounded .
WARNING: Do not operate the foot pedal of the PIEZOSURGERY® flex when the peristaltic pump cover is open . Moving parts could injure the operator .
WARNING: Install the device in a place protected against impacts or accidental splashes of water or other liquids .
WARNING: Do not install the device on top of or close to sources of heat .When installing, make sure that adequate air circulates around the device . Leave sufficient room around it, with particular reference to the fan on the rear .
CAUTION: Do not expose the device to direct sunlight or to sources of UV light .
CAUTION: The device is transportable but must be handled with care when moved . Position the footswitch on the floor in such a way that it can only be activated intentionally by the operator .
CAUTION: Before connecting the handpiece cord to the device, make sure that the electrical contacts are perfectly dry . If necessary, dry them with compressed air .
CAUTION: Do not allow the device console and the foot pedal to get wet . If liquid enters the console or footswitch, damage could occur .
CAUTION: No modification of this equipment is allowed .
04.1 Û FIRST INSTALLATION
04 Û INSTALLATION
To ensure correct operation of the device, it must be installed by a person authorized by Mectron . The device must be installed in a suitable place that is handy for its use . The technician will do the following 6 steps:1 . Unpack the device;2 . Explain to the user the precautions to be
followed so that the installation is correctly performed;
3. Explain to the user the possible configurations of the device;
4. Explain how to clean, sterilize and maintain the system;
5 . Fill in the installation form;6 . Send to Mectron S .p .A . the installation
form filled in to ensure traceability and the warranty activation .

12
EN
flexflex
Connect the foot pedal to the back of the device in the socket marked with the symbol by means of the plug of the pedal cable, until you hear a “click” sound . In order to disconnect the foot pedal from the device grab the connector of the foot pedal, press the release flap and pull the connector back;NOTE: the button on the back of the device, left hand side, under the symbol can be used to bring the treatment to its end in case the foot pedal is not functioning .
04.3 Û CONNECTION OF THE ACCESSORIES
1
2
3
4
Plug the power supply cord into the power socket on the back of the device and then into the mains power outlet;
NOTE: The foot pedal comes equipped with a bracket that allows it to be moved to the place most suitable for the operation, without the need to use your hands to move it;
The bracket can also be positioned horizontally if it is not used;
Equipotential plug: The device is equipped with an additional equipotential plug located on the rear of the console .This plug is in accordance with DIN 42801 .Insert the connector of the equipotential cord (optional) to the plug on the rear of the device’s console .The purpose of additional potential equalization is to reduce differences of potential which can occur during operation between the device’s body and conductive parts of other objects within the medical environment;

13
EN
04 Û INSTALLATIONFit the drip stand for supporting the saline bag into the dedicated hole;
7
6
8
9
5
STEPS TO BE CARRIED OUT IN THE “NOT STERILE AREA”:Open the pump lid completely;
STEPS TO BE CARRIED OUT IN THE “STERILE AREA”:Open the sterile package of the handpiece and of the irrigation kit, remove the tube and the clips; Connect the end of the irrigation tubing onto the dedicated handpiece irrigation nozzle;Use the 6 clips provided in order to clip together the irrigation tubing and handpiece cable;
Insert the thicker and 15 cm long tubing segment of the sterile line into the pump;
Close completely the irrigation pump lid;
Hang the saline bag to its specific drip stand;Remove the protective cap from the spike and connect it to the irrigation bag;

14
EN
flexflex
Turning the device onFacing the front of the device, press the power switch on the left of the device body to the “I” position, being careful not to press the foot pedal . The device does a self-test and 4 symbols appear on the device (ref . P inside cover) . At the end of the self-test the symbols turn off one by one, the device sets on the default setting and is ready to be used .
Turning the device offFacing the front of the device, press the power switch on the left of the device body to the “O” position, being careful not to press the foot pedal . The device turns off .
NOTE: whenever the device is started, the following default setting is programmed: - “Power” 1- “irrigation” 1- “mode” 1
05.1 Û SWITCHING THE DEVICE ON AND OFF
11With the marked dot facing upward, insert the connector of the handpiece cord into the handpiece socket on the console . Gently push the handpiece-cord connector until it bottoms out .
Open the air inlet on the tube before operating . Release the irrigation tube clamp, if this is closed;
onoff
CAUTION: To avoid damaging the handpiece-cord, grasp only the connector when disconnecting the cord . Never pull the cord .
10
05 Û USE
CAUTION: Once turned off, It is necessary to wait 5 seconds before switching the device on again . The device can give an error message .
15
EN
05 Û USE
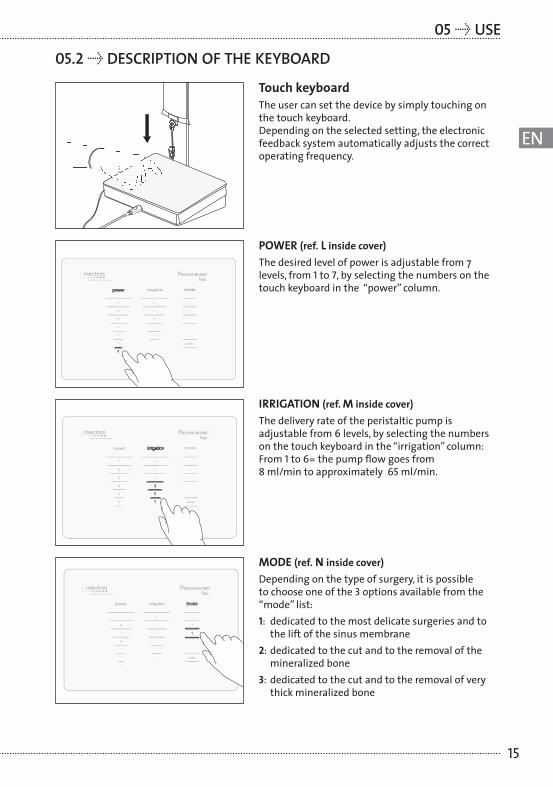
Touch keyboard The user can set the device by simply touching on the touch keyboard . Depending on the selected setting, the electronic feedback system automatically adjusts the correct operating frequency .
05.2 Û DESCRIPTION OF THE KEYBOARD
MODE (ref. N inside cover)Depending on the type of surgery, it is possible to choose one of the 3 options available from the “mode” list:1: dedicated to the most delicate surgeries and to
the lift of the sinus membrane2: dedicated to the cut and to the removal of the
mineralized bone 3: dedicated to the cut and to the removal of very
thick mineralized bone
POWER (ref. L inside cover)The desired level of power is adjustable from 7 levels, from 1 to 7, by selecting the numbers on the touch keyboard in the “power” column .
IRRIGATION (ref. M inside cover)The delivery rate of the peristaltic pump is adjustable from 6 levels, by selecting the numbers on the touch keyboard in the “irrigation” column:From 1 to 6= the pump flow goes from 8 ml/min to approximately 65 ml/min .
1
2
3
4
5
6
power irrigation mode
3
2
1
pump
1
2
3
4
5
6
7
flex
1
2
3
4
5
6
power irrigation mode
3
2
1
pump
11
2
3
4
5
6
7
flex
1
2
3
4
5
6
power irrigation mode
2
1
pump
11
2
3
4
5
6
7
flex
3

16
EN
flexflex
SYMBOLS (ref. P inside cover)The PIEZOSURGERY® flex is equipped with a diagnostic system able to detect operating anomalies . Icons are displayed on the touchpanel according to the detected operating anomalies .To help the user identify the malfunctioning part, four symbols are foreseen which are described in paragraph 09 .1 .
FILLING THE IRRIGATION TUBING KIT (ref. O inside cover)The device is equipped with the “pump” key which allows to perform the PUMP function .The PUMP function can be used at the beginning of the treatment, to fill the entire irrigation tubing up to the insert, so that the surgery can be started with the necessary irrigation (see paragraph 05.5) .
1
2
3
4
5
6
power irrigation mode
3
2
1
pump
11
2
3
4
5
6
7
flex
1
2
3
4
5
6
power irrigation mode
3
2
1
pump
11
2
3
4
5
6
7
flex
05.3 Û FOOT PEDAL BUTTON In case the foot pedal is not functioning, the button on the back of the device, left hand side, under the symbol , can be used to bring the treatment to its end .
CAUTION: in the event you need to use the foot pedal button, first disconnect it from the socket of the unit .
WARNING: Use the foot pedal button only upon user request . The users must train their staff on how and when they have to use this button .
WARNING: the foot pedal button must be used only in case of malfunction of the foot pedal supplied with the unit . This button allows to end the surgical treatment in the event of a foot pedal malfunction .

17
EN
05 Û USE
05.4 Û SAFETY PRECAUTIONS BEFORE AND DURING USE
WARNING: Before starting to operate with the device, make sure that you have stock material (handpiece, inserts, wrenches) available to use in case the device stops due to a fault or of inconveniences .
WARNING: Only use original Mectron inserts, accessories, and spare parts.
WARNING: Use of non-original Mectron inserts: this use may damage the threading of the handpiece, thus compromising correct operation and risking to cause harm to the patient .
CAUTION: Contraindication. Do not perform treatments on prosthetic artifacts made of metal or ceramics . The ultrasonic vibrations could lead to the de-cementing of the artifacts .
WARNING: Contraindications. Do not use the PIEZOSURGERY® flex on patients with heart stimulators (Pace-makers) or other implantable electronic devices . This precaution also applies to the operator .
WARNING: Checking device status before the treatment. Always check that there is no water underneath the device . Before every treatment, always check that the device works perfectly and that the accessories are efficient . If anything unusual is noted during operation, do not perform the treatment . If the problem concerns the device, contact an Authorized Mectron Service Center .
WARNING: Infections control. First use: All new and repaired accessories are supplied in NON STERILE conditions . Before use, and after each treatment, they must be cleaned and sterilised in strict compliance with the instructions given in the Cleaning and Sterilization Manual . Subsequent uses: After every treatment, clean and sterilize all the reusable parts and accessories, following the instructions provided in the Cleaning and Sterilization Manual .
CAUTION: When the reusable items (the handpiece, the torque wrench, and any other accessory that can be sterilized) have been autoclave sterilized, wait for them to cool down to room temperature prior to usage . The cooling process must not be accelerated .
CAUTION: The electrical contacts inside the cord connector must be dry. Upon completition of the sterilization cycle, before connecting the handpiece cord to the device, make sure that the electrical contacts are perfectly dry . If necessary, dry them with compressed air .
WARNING: To ensure that the handpiece cools down, do not operate it without the irrigation circuit correctly installed and filled . To fill the irrigation circuit, always use the PUMP function .
WARNING: Always check delivery of the irrigation before and during use . Make sure the fluid comes out from the insert . Do not operate the device if the water is not delivered or if the pump is defective .
WARNING: Check the level of the physiological solution inside the relative saline bag . Replace the irrigation bag with a new saline bag before it is empty .
WARNING: The PIEZOSURGERY® Medical irrigation kit is guaranteed for one treatment only . Remove and dispose of the sterile line according to local regulations related to the hospital waste .
WARNING: Before using PIEZOSURGERY® Medical Irrigation Kit inspect the sterile package and the product for any damage .Do not use the irrigation kit if package is opened or damaged .Irrigation kit loses sterility in case of broken or damaged packaging .In case of damaged packaging, dispose of the irrigation kit . Do not sterilized or re-use the kit .
WARNING: Verify that the irrigation clamp is in the ‘Open’ position before

18
EN
flexflex
operation, and that it is closed before disconnecting the irrigation tubing from the bag at the end of the procedure .
CAUTION: Never force the connector into the console port as this may damage the connector and/or console .If the connector and the port do not join with reasonable ease, they probably don’t match . Make sure that the marked dot on the handpiece-cord connector is facing upwards .
CAUTION: Check that the PIEZOSURGERY® Medical handpiece is correctly connected before using the system .
WARNING: Before every treatment, make sure that the insert appropriate for the treatment is securely attached to the handpiece . Use exclusively the PIEZOSURGERY® Medical torque wrench to securing the insert to the handpiece . Do not use any other tool such as pliers, pincers, etc .
WARNING: Before every treatment, make sure that the selected insert has been correctly screwed onto the handpiece . This happens when the PIEZOSURGERY® Medical torque wrench used to tighten the insert emits a mechanical “CLICK“ sound .
CAUTION: Hold only the connector when connecting/disconnecting the foot pedal . Never actually pull on the cord itself .
CAUTION: Do not attempt to screw or twist the connector during insertion or removal: the connector could get damaged by twisting .
CAUTION: The foot pedal is specifically designed to be used only in connection with the PIEZOSURGERY® flex device . Only use an original foot pedal otherwise damages or malfunctions can happen .
CAUTION: Do not activate the handpiece while the insert is in contact with the part to be treated .Doing so will not allow the electronic
control circuit of the console to recognise the best point of resonance of the insert required for efficient, optimum performance .
WARNING: The patient must not come into contact with the device body or the foot pedal .
WARNING: Single use - Before the surgery. - Before using any PIEZOSURGERY® Medical insert inspect the sterile package and the product for any damage .Insert loses sterility in case of broken or damaged packaging .In case of damaged packaging, the insert can be re-sterilized by following the procedures described in the Manual of Cleaning and Sterilization, Chapter 3 . Before starting the surgery correctly tighten the insert onto the handpiece by means of the torque wrench .
WARNING: Do not change the insert while the handpiece is operating to prevent possible user injury .
WARNING: During the tightening and removing operations, the user must pay particular attention to avoiding injury from inserts with sharp points and cutting edges .
WARNING - Breakage and wear-out of the inserts. In rare cases, high frequency oscillations and wear-out may lead to breakage of an insert . Do not bend, reshape or re-sharpen an insert in any way . Bending or prying the insert tip may cause it to fracture . Deformed or otherwise damaged inserts are susceptible to breakage during their use . These inserts must never be used .During surgery, excessive pressure applied on the insert tip may cause it to fracture .If the insert tip contacts with metal objects, it may break, leaving pieces in the surgical site . Should an insert fracture during use, extreme care must be exercised to ensure

19
EN
05 Û USE
that all the fragments of the insert are retrieved and removed from the surgical site and, at the same time, that an effective suction is applied . During surgery, frequently check that the insert is intact, especially in its apical part . During surgery, avoid prolonged contact with retractors or other metal objects being used .
WARNING: The PIEZOSURGERY® Medical device is intended for bone cutting . However, prolonged contact and/or excessive force of the instrumenttip on soft tissues should be avoided as this may cause thermal and/or blunt injury . Particular care should be exercized when sharp tip inserts are used . Prolonged mechanical action of a sharp insert may also result in the soft tissue being cut . In close proximity to soft tissues/nerves (e .g . the perinevrium of the peripheral nerve system, or dura mater of central nerve system), it is recommended to complete the cut with a blunt tip diamond coated insert, to minimize the potential for soft tissue damage .
WARNING: Carefully check that the PIEZOSURGERY® Medical handpiece is correctly working in all its parts before using it on the patient .
CAUTION: Intermittent operation. Long operational periods could cause overheating of the handpiece body . Refer to the Chapter 08 TECHNICAL DATA for the recommended duty cycle .
WARNING: Sterility. The insert tip is supplied sterile by prior exposure to ethylene oxide gas (ETO) .
WARNING: Single-use. The PIEZOSURGERY® Medical insert is intended to be used on an individual patient during a single surgical procedure and then discarded .The insert is not intended to be reprocessed, re-sterilized and used again .Remove and discard the insert following local regulations for proper disposal of contaminated surgical materials .
20
EN
flexflex
1
2
3
4
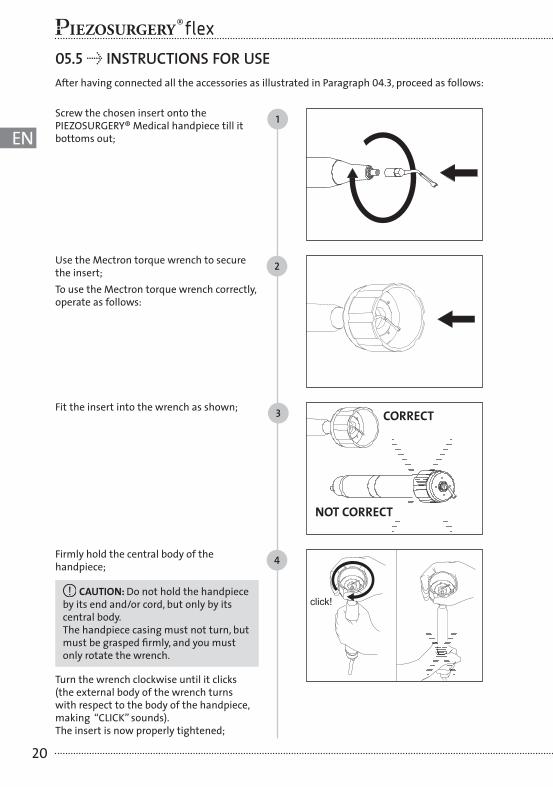
Screw the chosen insert onto the PIEZOSURGERY® Medical handpiece till it bottoms out;
Use the Mectron torque wrench to secure the insert;To use the Mectron torque wrench correctly, operate as follows:
Fit the insert into the wrench as shown;
Firmly hold the central body of the handpiece;
CAUTION: Do not hold the handpiece by its end and/or cord, but only by its central body . The handpiece casing must not turn, but must be grasped firmly, and you must only rotate the wrench .
Turn the wrench clockwise until it clicks (the external body of the wrench turns with respect to the body of the handpiece, making “CLICK” sounds) .The insert is now properly tightened;
click!
05.5 Û INSTRUCTIONS FOR USE After having connected all the accessories as illustrated in Paragraph 04 .3, proceed as follows:
CORRECT
NOT CORRECT

21
EN
05 Û USEFill the irrigation tubing by selecting the PUMP function on the touch keyboard . The irrigation circuit starts to fill up;
As soon as the peristaltic pump starts, the entire scale of values of the “irrigation” column lights up and during the liquid passage the value of the irrigation shifts from 6 to 1;
As soon as the irrigation comes out from the PIEZOSURGERY® Medical handpiece, the cycle can be stopped by pressing PUMP again or, alternatively, by pressing the foot pedal . The PUMP function is disabled and the keyboard is enabled again, and displays the last setting used;
8 On the keyboard, select the necessary power, irrigation and mode;
CAUTION: According to the selected insert, for the correct setting of the parameters consult the Chart annexed to this manual titled “Recommended settings for the inserts” on the PIEZOSURGERY® flex or the illustrative leaflet of the PIEZOSURGERY® Medical insert you’ve purchased .
6
7
5
1
2
3
4
5
6
power irrigation mode
3
2
1
pump
11
2
3
4
5
6
7
flex
1
2
3
4
5
6
power irrigation mode
3
2
1
pump
11
2
3
4
5
6
7
flex
1
2
3
4
5
6
irrigation
1
2
3
4
5
6
irrigation
1
2
3
4
5
6
irrigation
1
2
3
4
5
6
irrigation
1
2
3
4
5
6
irrigation
1
2
3
4
5
6
irrigation
22
EN
flexflex
WARNING:- Do not activate the handpiece while the
insert is in contact with the part to be treated .Doing so will not allow the electronic control circuit of the console to recognise the best point of resonance of the insert required for efficient, optimum performance .
- Use original PIEZOSURGERY® Medical inserts only . Use of non-original inserts, in addition to voiding the warranty, damages the threading of the PIEZOSURGERY® Medical handpiece, with the risk of no longer being able to screw the original inserts correctly during subsequent use . Moreover, the device settings are tested and guaranteed to operate correctly only when original PIEZOSURGERY® Medical inserts are used .
- Do not reshape, bend or re-sharpen an insert in any way . Doing so may cause the insert to fracture .
- Deformed or otherwise damaged inserts must never be used .
- Always check that the threaded parts of the insert and of the handpiece are perfectly clean – see the Cleaning and Sterilization Manual .
- During surgery, excessive pressure applied on the insert tip may cause it to fracture, resulting in harm to the patient .
- For information on how to correctly use the inserts, consult the Chart annexed to this manual titled “Recommended settings for the inserts” on the PIEZOSURGERY® flex or the illustrative leaflet of the PIEZOSURGERY® Medical insert you’ve purchased .
- Before using the PIEZOSURGERY® flex, make sure you have prepared the surgical site by moving away the soft tissues, to avoid damaging them . While cutting the bone, an accidental contact of certain parts of the insert with the soft tissues may cause them small injuries . To minimize this risk, use specific protective instruments .
05.6 Û IMPORTANT INFORMATION ON THE INSERTS
23
EN
06 Û MAINTENANCE
06 Û MAINTENANCEIf the device is not used for prolonged time, observe the following recommendations:1 Disconnect the device from the electrical
system;2 If the period of disuse is prolonged, put the
device back in its original package and store it in a safe place;
3 Prior to using the device again, clean and sterilize the handpiece and the wrench following the instructions provided in the Cleaning and Sterilization Manual;
WARNING: Periodically check that the electrical power supply cable is intact; if it is damaged, replace it with an original Mectron spare part .
07 Û DISPOSAL MODES AND PRECAUTIONS
WARNING: Hospital waste. Treat the following items as hospital waste:- Inserts at the end of each surgery;- Irrigation kit at the end of each surgery;- Torque wrench: when worn out or broken .
The use and throw-away materials and materials that entail a biological risk must be disposed according to local regulations related to the hospital waste .
PIEZOSURGERY® flex must be disposed of and treated as a waste for separate collection .Disregard of the previous points may entail a fine, pursuant to Directive 2002/96/CE .It is up to the purchaser to hand over the device for its disposal to the retailer who supplies him new equipment; the instructions for proper disposal are available from Mectron .

24
EN
flexflex
Device compliant to Dir. 93/42/CEE: Class IIa
Classification as per EN 60601-1: I Applied part type B (handpiece, insert) IP 20 (device) IP X8 (foot pedal)
Device for intermittent operation: 60sec . ON - 30sec . OFF with irrigation
Power supply voltage: 100-240 50/60 Hz
Max. power absorbed: 120 VA
Fuses: Tipo 5 x 20 mm T 2AL, 250V
Operating frequency: Automatic scan From 24 KHz to 36 KHz
Power types: Adjustable on the touch screen: 7 power levels, from 1 to 7
Modes: Adjustable on the touch screen: from 1 to 3
Peristaltic pump capacity: Adjustable on the touch screen: 6 flow levels, from 1 to 6 (from 8 ml/min to approximately 65ml/min)
Protections of the APC circuit: No handpiece detected Cord interruption Insert not tightened correctly or broken Operating conditions: from +10°C to +35°C Relative humidity from 30% to 75%
Pressure of air P: 800hPa/1060hPa
Transport and storage conditions: from -10°C to +70°C Relative humidity from 10% to 90% Pressure of air P: 500hPa/1060hPa
Weights and sizes: 3,2 Kg L - W - H 300 x 250 x 95 mm
08 Û TECHNICAL DATA

25
EN
08 Û TECHNICAL DATA
08.1 Û ELECTROMAGNETIC COMPATIBILITY EN 60601-1-2
Guidance and manufacturer’s declaration - Electromagnetic emissions
The PIEZOSURGERY® flex is intended for use in the electromagnetic environment specified below . The customer or user of the PIEZOSURGERY® flex should ensure that it is used in such an environment .
Emissions test
RF emissions CISPR 11
RF emissionsCISPR 11
Harmonic emissions IEC 61000-3-2
Voltage fluctuations / flicker emissionsIEC 61000-3-3
Compliance
Group 1
Class B
Class A
Complies
Electromagnetic environment – Guidance
The PIEZOSURGERY® flex only uses RF energy for internal function . Therefore, its FR emissions are very low and are not likely to cause any interference with nearby electronic equipment .
The PIEZOSURGERY® flex is suitable for use in all establishments, including domestic establishments and those directly connected to the public low-voltage power supply network that supplies buildings used for domestic purposes .
WARNING: Contraindications. Interference with other devices. The PIEZOSURGERY® flex device complies with the standard IEC 60601-1-2 . However, it may interfere with other devices in its vicinity . Install the PIEZOSURGERY® flex at safety distance from life-support systems . If adjacent or stacked use of the device is necessary, normal operation of the equipment and the PIEZOSURGERY® flex , in the configuration in which they will be used, should be verified prior their use .
WARNING: Portable and mobile radio communication devices may influence the correct functioning of the device .
WARNING: Contraindications. Interference from other devices. An electro-surgical knife or other electro-surgical units placed in the vicinity of the PIEZOSURGERY® flex device may interfere with its correct functioning .
WARNING: The device requires specific EMC precautions and must be installed and activated in conformity with the EMC information contained in this paragraph .

26
EN
flexflex
Guidance and manufacturer’s declaration - Electromagnetic immunity
The PIEZOSURGERY® flex is intended for use in the electromagnetic environment specified below . The customer or user of the PIEZOSURGERY® flex should ensure that it is used in such an environment .
Immunity test
Electrostatic discharge (ESD)IEC 61000-4-2
Electrical fast transient/burstIEC 61000-4-4
Power frequency (50/60 Hz) magnetic fieldIEC 61000-4-8
N .B .: Ut is the AC mains voltage prior to application of the test level .
SurgeIEC 61000-4-5
Voltage dips, short interruptions and voltage variations on power supply input linesIEC 61000-4-11
Test levelIEC 60601
±6 kV contact±8 kV air
±2 kV for power supply lines
±1 kV for input/output lines
3 A/m
±1 kV differential mode
±2 kV common mode
<5 % Ut (>95 % dip in Ut) for 0,5 cycles
40 % Ut (60 % dip in Ut) for 5 cycles
70 % Ut (30 % dip in Ut) for 25 cycles
<5 % Ut
(>95 % dip in Ut) for 5 s
Electromagnetic environment - Guidance
Floors should be wood, concrete or ceramic tile . If floors are covered with synthetic material, the relative humidity should be at least 30% .
Mains power quality should be that of a typical commercial or hospital environment .
Power frequency magnetic fields should be at levels characteristic of a typical location in a commercial or hospital environment .
Mains power quality should be that of a typical commercial or hospital environment .
Mains power quality should be that of a typical commercial or hospital environment .
Compliance level
The device continues to work regularly and in safety
The device continues to work regularly and in safety
The device continues to work regularly and in safety
The device continues to work regularly and in safety
The device can vary from the required levels of immunity with a duration of <5% / >95% / 5 s as long as the device remains in safety, no malfunctions have been detected and can be restored to pre-test status with the intervention of the operator

27
EN
08 Û TECHNICAL DATA
Guidance and manufacturer’s declaration - Electromagnetic immunity
The PIEZOSURGERY® flex is intended for use in the electromagnetic environment specified below . The customer or user of the PIEZOSURGERY® flex should ensure that it is used in such an environment .
Immunity test
Conducted RFIEC 61000-4-6
Radiated RFIEC 61000-4-3
N.B.:(1) at 80 MHz and 800 MHz, the higher frequency range applies .(2) These guidelines may not apply in all situations . Electromagnetic propagation is affected by absorption and
reflection from structures, objects and people .a Field strengths from fixed transmitters, such as base stations for radio (cellular/cordless) telephones and land
mobile radios, amateur radio, AM and FM radio broadcast and TV broadcast cannot be predicted theoretically with any reasonable accuracy . To assess the electromagnetic environment due to fixed RF transmitters, an electromagnetic site survey should be considered . If the measured field strength in the location in which the PIEZOSURGERY® flex is used exceeds the applicable RF compliance level given above, the PIEZOSURGERY® flex should be observed to verify normal operation . If abnormal performance is observed, additional measures may be necessary, such as re-orienting or relocating the PIEZOSURGERY® flex .
b Over the frequency range from 150 kHz to 80 MHz, field strengths should be less than 3 V/m .
Test levelIEC 60601
3 Vefffrom 150 kHz to 80 MHz
3 V/mfrom 80 MHz to 2,5 GHz
Electromagnetic environment Guidance
Portable and mobile RF communications equipment should be used no closer to any part of the device including cables, than the recommended separation distance calculated from the equation applicable to the frequency of the transmitter .
Recommended separation distanced = 1,2 √P
d = 1,2 √P from 80 MHz to 800 MHzd = 2,3 √P from 800 MHz to 2,5 GHz
where P is the maximum output power rating of the transmitter in watts (W) according to the transmitter manufacturer and d is the recommended separation distance in metres (m) .Field strengths from fixed RF transmitters, as determined by an electromagnetic site surveya, may be less than the compliance level in each frequency rangeb .Interference may occur in the vicinity of equipment marked with the following symbol:
Compliance level
The device continues to work regularly and in safety

28
EN
flexflex
Recommended separation distances between portable and mobile RF communications equipment and the PIEZOSURGERY® flex
The PIEZOSURGERY® flex is intended for use in an electromagnetic environment in which radiated RF disturbances are controlled . The customer or user of the PIEZOSURGERY® flex can help prevent electromagnetic interference by maintaining a minimum distance between portable and mobile FR communications equipment (transmitters) and the PIEZOSURGERY® flex as recommended below, according to the maximum output power of the communications equipment .
Rated maximum output power of transmitter
‘W’
0,01 0,12 0,12 0,23
0,1 0,38 0,38 0,73
1 1,2 1,2 2,3
10 3,8 3,8 7,3
100 12 12 23
For transmitters rated at a maximum output power not listed above, the recommended separation distance d in metres (m) can be calculated using the equation applicable to the frequency of the transmitter, where P is the maximum output power rating of the transmitter in watts (W) according to the transmitter manufacturer .N.B.:(1) at 80 MHz and 800 MHz, the higher frequency range applies .(2) These guidelines may not apply in all situations . Electromagnetic propagation is affected by absorption and
reflection from structures, objects and people .
from 150 kHz to 80 MHzd = 1,2 √P
from 800 MHz to 2,5 GHzd = 2,3 √P
Separation distance according to the frequency of transmitter ‘m’
from 80 MHz to 800 MHzd = 1,2 √P

29
EN
09 Û TROUBLESHOOTING
09 Û TROUBLESHOOTING
The PIEZOSURGERY® flex is equipped with a diagnostic system able to detect operating anomalies . Icons are displayed on the touchpanel according to the detected operating anomalies .By using the following chart, the user is guided toward the identification and possible solution of the malfunction detected .
09.1 Û DIAGNOSTIC SYSTEM AND SYMBOLS ON KEYBOARD
Symbols on keyboard Possible cause Solution
Handpiece cord contacts wet
Insert not correctly tightened on handpiece
Thoroughly dry the contacts with compressed air
Unscrew the insert and correctly screw it on again with the Mectron torque wrench (see paragraph 05 .5)
PIEZOSURGERY® Medical handpiece not connected to device
Peristaltic pump malfunction
Insert broken, worn-out or deformed
Handpiece failure
Handpiece cord contacts wet
Connect the handpiece
Check that there are no impediments to pump rotation
Replace the insert
Replace the handpiece
Thoroughly dry the contacts with compressed air
Sync circuit malfunction
Irrigation kit not positioned correctly inside the pump
Contact an Authorized Mectron Service Center
Correctly reposition the Irrigation kit inside the pump (see paragraph 04 .3)
The device has been turned off and on again without waiting 5 seconds
Turn device off and wait 5 seconds before turning it on again
Anomalies on electrical network or excessive electrostatic discharges or internal anomalies
Turn device off and wait 5 seconds before turning it on again If the signal persists, contact an Authorized Mectron Service Center
Turn-on procedure incorrect: the device has been turned on with the foot pedal pressed
Check that the foot pedal is not pressed . If the problem persists, disconnect the pedal and, if need be, contact an Authorized Mectron Service Center

30
EN
flexflex09.2 Û QUICK SOLUTION TO PROBLEMS
Problem Possible cause SolutionThe electrical power cable terminal is badly inserted in the rear plug of the device
The foot pedal plug is incorrectly inserted in the device socket
Check that the power supply cable is firmly connected
Correctly insert the pedal plug in the socket on the back of the device
The electrical power cable is defective
The foot pedal does not work
The fuses are out of order
Check that the power supply socket works properly . Replace the electrical power cable
Replace the fuses (see paragraph 09 .3)
The device does not turn on after having brought the switch into position
“I”
The device is on but not working. The
display does not signal any error
See paragraph 09 .1 for the possible cause, according to the symbol that has been displayed
See paragraph 09 .1 for the action to undertake, according to the symbol that has been displayed
The device is on but not working. One of
the following symbols appears on the screen:
The insert is not correctly tightened on the handpiece
The irrigation circuit has not been completely filled
Unscrew and correctly screw the insert again with the Mectron torque wrench (see paragraph 05 .5)
Fill the irrigation circuit via the PUMP function (see paragraph 05 .5)
A slight whistling sound coming from the
PIEZOSURGERY® Medical handpiece is heard during operation.
During the surgery: disconnect the foot pedal from the console and use the button replacing the pedal (see paragraph 05.3) . At the end of the intervention contact an Authorized Mectron Service Center

31
EN
09 Û TROUBLESHOOTING
Problem Possible cause SolutionThe insert is obstructed
The handpiece is obstructed
The air inlet of the flow adjuster has not been opened
Irrigation kit not positioned correctly inside the pump
Excessive pressure of the impeller on the peristaltic pump tube
The saline bag is empty
Unscrew the insert from the handpiece and free the insert water passage by blowing compressed through it . If the problem persists, replace the insert with a new one
Contact an Authorized Mectron Service Center
Open the air inlet of the flow adjuster
Check that the Irrigation kit is properly connected
Check that the tube inside the peristaltic pump is properly positioned (See paragraph 04 .3)
Replace the bag with a full one
No irrigation comes out from the insert during
operation
The device works properly but the pump strains/
stresses
The lid of the peristaltic pump is not closed correctly
The insert is not correctly tightened on the handpiece
Insert broken, worn-out, or deformed
Check that the lid of the peristaltic pump is perfectly closed (See paragraph 04 .3)
Unscrew and correctly screw the insert again with the Mectron torque wrench
Replace the insert with a new one
The pump turns correctly, but when it stops,
irrigation comes out from the handpiece
Insufficient performance

32
EN
flexflex09.3 Û REPLACEMENT OF THE FUSES
Apply leverage with a flat screwdriver, inserting its tip in the seat of the fuse-holder drawer located under the power supply socket;
WARNING: Switch the device off.Always turn the device off with the main switch and disconnect it from the electrical power socket before performing the following intervention .
WARNING: Replace the fuses, complying to the characteristics indicated in Chapter 08 - TECHNICAL DATA
Pull out the fuse-holder drawer;
Reinsert the drawer in its housing .
1
2
3

33
EN
9 Û TROUBLESHOOTING
09.4 Û SENDING THE DEVICE TO AN AUTHORISED MECTRON SERVICE CENTREIn the event that technical assistance is needed on the device, contact one of the Authorized Mectron Service Centers or your Retailer . Do not attempt to repair or modify the device and its accessories .
Clean and sterilize all the parts that need to be sent to an Authorized Mectron Service Center, following the instructions provided in the Cleaning and Sterilization Manual supplied with the device .Leave the sterilized parts in the packet, procedure that confirms the sterilization process has been performed .
The cleaning and sterilization requirements are in line with those in force concerning the safeguarding of health and safety on the workplace, as per Law Decree 626/94 and DLgs 81/08 and its subsequent amendments, both laws of the Italian State .In the case that the customer does not fulfill the requirements, Mectron reserves the right to charge him or her the cleaning and sterilization expenses, or to reject the goods received in unsuitable conditions, returning them to the customer, at his or her expense, for them to be correctly cleaned and sterilized .
The device must be returned properly packaged, accompanied by all the accessories and by a sheet bearing the:• Data of the owner with telephone number• Product name• Serial number and/or lot number • Reason for goods returned / description of
the malfunction• Photocopy of delivery note or purchase
invoice of the device
CAUTION: Package Pack the device in its original package to prevent damages during transport .
Once the material has been received by the Authorized Mectron Service Center, qualified technical personnel will provide its evaluation to the given circumstance . The repair works will be performed only upon their prior acceptance by the end customer . For further details, contact the closest Authorized Mectron Service Center or your retailer .
Unauthorized repair works may damage the system and make the warranty void, and absolve Mectron of any responsibility for direct or indirect harm to persons or damages to things .
34
EN
flexflex
10 Û WARRANTYAll the Mectron devices are subjected to an accurate end inspection that ascertains their full functionality before they are placed on the market .Mectron provides warranty on the PIEZOSURGERY® flex purchased new from a retailer or a Mectron importer to cover material or manufacturing defects for:- 2 YEARS (TWO) on the device from the date
of purchase;- 1 YEAR (ONE) on the handpiece complete
with cord from the date of purchase .The accessories are not included in the warranty .During the period in which the warranty is valid, Mectron commits itself to repair (or at its own free choice, replace) those product parts that were to prove defective according to its judgment, free of charge .
The warranty of the manufacturer and the homologation of the device are not valid in the following cases:- The device is not used in accordance to the
intended use foreseen for it .- The device is not used in compliance to all
the instructions and precautions described in this manual .
- The electrical system of the relevant operating room, where the device is installed and used, does not comply with the applicable regulations and with electrical safety requirements .
- The assembly operations, extensions, adjustments, updates, and repair works are performed by personnel not authorized by Mectron .
- The environmental conditions for the preservation and storage of the device are not compliant to the precautions indicated in the Chapter 08 - TECHNICAL DATA .
- Use of non-original Mectron inserts, accessories, and spare parts that can compromise correct device operation and cause harm to the patient .
- Accidental breakage due to transport .- Damages due to incorrect use or negligence,
or to connection to a power voltage other than the one foreseen .
- Warranty expiry .
PLEASE NOTE The warranty period starts from the installation date, as written on the installation and test module .
The warranty is void in case the device has been tamepered with, or repaired by not authorized personnel .
See paragraph 09 .4 for the details relative to the procedure to send the device to an Authorized Mectron Service Center .
The indications that appear in this publication are not binding and can be modified without fore-notice .The Italian version of this manual is the original document from which its translations have been obtained . In case of any discrepancy, the Italian version will have pertinence .
Texts, images, and graphics of this manual are property of Mectron S .p .A ., Carasco, Italy . All rights reserved . The contents cannot be copied, distributed, changed, or made available to third parties without the written approval of Mectron S .p .A .