en electric slide-in range e n e ue - whitesell...
TRANSCRIPT
Use and care gUideEN ELECTRIC SLIDE-IN RANGE
A00539701 rev. A (15/01)
2 Finding Information
©2015 Electrolux Home Products, Inc. All rights reserved. Printed in U.S.A.
Table of contentsThank you for choosing Electrolux, the new pre-mium brand in home appliances. This Use & Care Guide is part of our commitment to customer satis-faction and product quality throughout the service life of your new appliance.
We view your purchase as the beginning of a relationship. To ensure our ability to continue serv-ing you, please use this page to record important product information.
Keep a record for quick reference
Please read & save this guide
Questions?
Serial plate location
For toll-free telephone support in the U.S. and Canada:1-877-4ELECTROLUX (1-877-435-3287)
NOTERegistering your product with Electrolux enhances our ability to serve you. You can register online at www.electroluxappliances.com or by dropping your Product Registration Card in the mail.
Purchase date
Electrolux model number
Electrolux serial number
For online support and Internet production information visit http://www.electroluxappliances.com
Finding information .......................................................2Important safety instructions ...................................3-6Grounding instructions .................................................7Features.....................................................................8-11• Yourrangefeatures ......................................................8• Inductioncooktopfeatures ...........................................8• OvencontrolPadFunctions ....................................9-11Getting Started ........................................................12-13• Settingclockatpowerup ...........................................12• Controlpaneldisplaymodes ......................................12• Temperaturevisualdisplay .........................................12• Ovenlight ...................................................................12• Controllock ................................................................13• Settingthekitchentimers ...........................................13Surface cooking......................................................14-16• Abouttheceramicglasscooktop ...............................14• Usethecorrectcookwaretype ...................................14• Minimumpansizerequirements ................................14• Cookwarerecommendations......................................15• Usequalitycookwareingoodcondition .....................16Setting Surface Controls .......................................17-18• Settingthecooktop.....................................................17• Availablecooktopsettings ..........................................17• Settingcooktopelements ...........................................17• Hotelement(HE)message ........................................17• Suggestedcooktoppowersettings ............................18• Settingpowerboostfeature .......................................18• Operationnoises ........................................................18Setting the Lower Oven ..............................................19Before setting the oven controls ..........................20-21• Aircirculationintheoven ...........................................20• Ovenventslocation ....................................................20• Ovenracksposition ....................................................20• Ovenracks ............................................................20-21 Regular rack ...................................................................20 Glide rack ........................................................................21Setting Oven Controls ............................................22-35• Baking ........................................................................22• Cooktime ...................................................................23• Endtime .....................................................................23• Convectionbaking ......................................................24• Convectionconvert.....................................................25• Rapidpreheat .............................................................25• Convectionroasting....................................................26• Broiling .......................................................................27• Convectionbroiling .....................................................28• Keepwarm .................................................................29• Slowcook ...................................................................29• Dehydrating ................................................................30• Defrosting ...................................................................30• Breadproofing ............................................................31• Perfectturkey .............................................................31• Temperatureprobe .....................................................32• Multistage ..................................................................33• Myfavorite ..................................................................34• Sabbathfeature ..........................................................35Setting your preferences .......................................36-38Setting self-clean cycle ..........................................39-40Care & Cleaning ......................................................41-46Solutions to Common Problems ...........................47-50
BakingProblems .......................................................47Solutions ..............................................................48-50
Warranty Information ..................................................51

3Important Safety Instructions
Indicates a potentially hazardous situationwhich, if not avoided, may result in death or serious injury.
Definitions
Read all instructions before using this appliance.
This manual contains important safety symbols and instructions. Please pay attention to these symbolsandfollowallinstructionsgiven.Donotattempttoinstalloroperateyourapplianceuntilyou have read the safety precautions in this manual.
This is the safety alert symbol. It is used toalertyoutopotentialpersonalinjuryhazards.Obey all safety messages that follow this symboltoavoidpossibleinjuryordeath.Donotattempt to install or operate your appliance until you have read the safety precautions in this manual. Safety items throughout this manual are labeled with a WARNING or CAUTION statement based on the risk type.
IMPORTANT!indicatesinstallation,opera-tion, maintenance or valuable information thatisnothazardrelated.
Indicatesapotentiallyhazardoussituationwhich, if not avoided, may result in minor or moderate injury.
Save these instructions for future reference.
This unit has been tested and found to comply with the limitsforaclassBdigitaldevice,pursuanttoPart18of the FCC rules. These limits are designed to provide reasonable protection against harmful interference in a residential installation. This unit generates, uses and can radiate radio frequency energy and, if not installed and used in accordance with the instructions, may cause harmful interference to radio communications. However there is no guarantee that interference will not occur in a particular installation. If this unit does cause harmful interference to radio or television reception, which can be determined by turning the unit off and on, the user is encouraged to try to correct the interference by one or more of the following measures:• Reorient or relocate the receiving antennae.• Increase the distance between the unit and receiver.• Connect the unit into an outlet or a circuit different
from that to which the receiver is connected.• Removeall tapeandpackagingwrapbefore
using the appliance. Destroy the carton and plastic bags after unpacking the appliance. Never allow children to play with packaging material.
Tip Over Hazard• A child or adult can tip the
range and be killed.• Verify the anti-tip device has beeninstalledtofloororwall.
• Ensuretheanti-tipdeviceisre-engagedtoflooror wall when the range is moved.
• Donotoperatetherangewithouttheanti-tipdevice in place and engaged.
• Failure to follow these instructions can result in death or serious burns to children and adults.
To check if the anti-tip bracket is installed properly, use both arms and grasp the rear edge of range back. Carefully attempt to tilt range forward. When properly installed,
the range should not tilt forward.Refer to the anti-tip bracket installation instructions supplied with your range for proper installation.

4
• Storage in or on Appliance—Flammablematerials should not be stored in an oven, near surface units or in the drawer (if equipped). This includes paper, plastic and cloth items, such as cookbooks, plasticware and towels, as well as flammable liquids. Do not store explosives,such as aerosol cans, on or near the appliance. Flammable materials may explode and result in fireorpropertydamage.
Important Safety Instructions
Never use your appliance for warming or heating the room.
Do not store items of interest to children in the cabinets above the appliance. Children climbing on the range to reach items could be seriously injured.
• Donotleavechildrenalone.Childrenshouldnotbe left alone or unattended in the area where an appliance is in use. They should never be allowed to sit or stand on any part of the appliance.
• DO NOT TOUCH SURFACE UNITS, AREASNEAR THESE UNITS, OVEN HEATINGELEMENTSORINTERIORSURFACESOFTHEOVENORWARMERDRAWER (if equipped).Bothsurfaceunitsandovenheatingelementsmaybe hot even though they are dark in color. Areas near surface units may become hot enough to causeburns.Duringandafteruse,donottouch,orletclothingorotherflammablematerialstouchtheseareasuntiltheyhavehadsufficienttimetocool. Among these areas are the cooktop, surfaces facing the cooktop, the oven vent openings and surfaces near these openings, oven door and window.
• WearProperApparel—Loose-fittingorhanginggarments should never be worn while using the appliance. Donotletclothingorotherflammablematerials contact hot surfaces.
• DoNotUseWaterorFlouronGreaseFires—Smotherthefirewithapanlid,orusebakingsoda, a dry chemical or foam-type extinguisher.
• Whenheatingfatorgrease,watchitclosely.Fatorgreasemaycatchfireifallowedtobecometoo hot.
• Do not use the oven or warmer drawer (if equipped) for storage.
• Stepping, leaning or sitting on the door or drawer of this appliance can result in serious injuries and may also cause damage to the appliance. Donotallowchildren to climb or play around the appliance. The weight of a child on an open door may cause the appliance to tip, resulting in serious burns or other injury. An open drawer, when hot, may cause burns.
Persons with a pacemaker or similar medical device should exercise caution using or standing near an induction unit while it is in operation, as theelectromagneticfieldmayaffecttheworkingof the pacemaker or similar medical device. It would be advisable to consult yourDoctoror the pacemaker or similar medical device manufacturer about your particular situation.
• ProperInstallation—BesureyourapplianceisproperlyinstalledandgroundedbyaqualifiedtechnicianinaccordanceintheUnitedStateswithNationalElectricalCodeANSI/NFPANo.70—latesteditionandlocalcoderequirements,andinCanadawithCSAC22.1PART1—latestedition and local code requirements. Install only per installation instructions provided in the literature package for this appliance.Ask your dealer to recommend a qualified technicianandanauthorizedrepairservice.Knowhow to disconnect the electrical power to the range at the circuit breaker or fuse box in case of an emergency.
• User Servicing—Do not repair or replaceanypartoftheapplianceunlessspecificallyrecommended in the manuals. All other servicing shouldbedoneonlybyaqualifiedtechniciantoreduce the risk of personal injury and damage to the appliance.
• Never modify or alter the construction of a range by removing leveling legs, panels, wire covers,anti-tipbrackets/screws,oranyotherpart of the product.
Save these instructions for future reference.

5
• Use Only Dry Potholders—Moist or damppotholders on hot surfaces may result in burns from steam. Donotletthepotholderstouchhotheating surface units or interior oven elements. Donotuseatowelorotherbulkyclothinsteadofa potholder.
• DoNotHeatUnopenedFoodContainers—Buildup of pressure may cause the container to burst and result in injury.
• Remove the oven door from any unused appliance if it is to be stored or discarded.
• IMPORTANT—Donotattempt tooperate theoven during a power failure. If the power fails, always turn the oven off. If the oven is not turned off and the power resumes, the oven may begin to operate again. Food left unattended could catch fireorspoil.
• Be sure to have an appropriate foam-typefireextinguisheravailable,visible,andeasyaccessible located near the appliance.
Important Safety Instructions
Electronic controllers can be damaged by cold temperatures. When you use your appliance forthefirsttime,orifithasnotbeenusedfora long period of time, make sure that it has beenexposedtoatemperatureabove0°C/32°Ffor at least 3 hours before connecting it to the power supply.
IMPORTANT INSTRUCTIONSFORUSINGYOURCOOKTOP• Knowwhichkeyscontroleachsurfacecooking
zone. Place pan with food on the cooking zone before turning it on. Turn the cooking zone off before removing food.
• UseProperPanSize—This appliance is equipped withoneormoresurfaceunitsofdifferentsizes.Selectutensilshavingflatbottomslargeenough
Save these instructions for future reference.
tocoverthesurfaceunit.Theuseofundersizedutensils will expose a portion of the surface heating unit to direct contact and may result in ignition of clothing. Proper relationship of utensil to the surfaceunitwillalsoimproveefficiency.
• UtensilHandlesShouldBeTurnedInwardandShould Not Extend Over Adjacent SurfaceUnits—To reduce the risk of burns, ignition of flammable materials, and spillage due tounintentional contact with the utensil. The handle of the utensil should be positioned so that it is turned inward, and does not extend over adjacent surface unit.
• Never Leave Surface Units Unattended—Boiloverscausesmokingandgreasyspilloversthatmay ignite, or a pan that has boiled dry may melt.
• Protectiveliners—Donotusealuminumfoiltoline oven bottom or any other part of the appliance. Only use aluminum foil as recommended for baking if used as a cover placed on the food. Any other use of protective liners or aluminum foil may result inariskofelectricshockorfireorashortcircuit.
• Glazed Cooking Utensils—Only certain types of glass, glass/ceramic, ceramic, earthenware, orotherglazedutensilsaresuitableforcooktopservice without breaking due to the sudden change in temperature. Check the manufacturer’s recommendations for cooktop use.
• Do Not Use Decorative Surface ElementCovers. If an element is accidentally turned on, the decorative cover will become hot and possibly melt.Burnswilloccurifthehotcoversaretouched.Damagemayalsobedonetothecooktop.
• Whenflamingfoodsunderaventilatinghood,turn on the fan.
FORGLASSCOOKTOPSONLY• DoNotCleanorOperateaBrokenCooktop
—If cooktop should break, cleaning solutions and spillovers may penetrate the broken cooktop and createariskofelectricshock.Contactaqualifiedtechnician immediately.
• CleanCooktopGlasswithCaution—If a wet sponge or cloth is used to wipe spills on a hot cooking area, be careful to avoid a steam burn. Some cleaners can produce harmful fumes if applied to a hot surface.
• Avoidscratchingthecooktopglasswithsharpobjects.
Never cover any slots, holes, or passages in the oven bottom or cover an entire oven rack withmaterialssuchasaluminumfoil.Alumi-numfoilliningsmaytrapheat,causingafirehazard.

6 Important Safety Instructions
IMPORTANT INSTRUCTIONSFORUSINGYOUROVEN• UseCareWhenOpeningDoororDrawer—Stand
to the side of the appliance when opening the door of a hot oven. Let hot air or steam escape before you remove or replace food in the oven/warmer drawer.
• Keep Oven Vent Ducts Unobstructed. The oven is vented at the front above the oven door (ceramic glass cooktop models) or through the right rear element (coil element models). Touching the surfaces in this area when the oven is operating may cause severe burns. Also, do not place plastic or heat-sensitive items on or near the oven vent. These items could melt or ignite.
• Placement of Oven/Warmer Drawer (ifequipped) Racks. Always place oven racks in desired location while oven/drawer (if equipped) is cool. Remove all utensils from the rack before removing rack. If rack must be moved while oven is hot, use extreme caution. Use potholders and grasptherackwithbothhandstoreposition.Donot let potholders contact the hot oven element or interior of the oven/warmer drawer (if equipped).
• Donotuseabroilerpanwithoutitsinsert.The broiler pan and grid allow dripping fat to drain and be kept away from the high heat of the broiler.
• Do not cover your broiler or warmer drawer (if equipped) grid with aluminum foil. Exposed fat and grease could ignite.
• Donottouchahotlightbulbwithadampcloth. Doingsocouldcausethebulbtobreak.Disconnectthe appliance or turn off the power to the appliance before removing and replacing light bulb.
• Donotcookfoodontheovenbottom.Alwayscook in proper bakeware and always use the oven racks.
Important safety noticeTheCaliforniaSafeDrinkingWaterandToxicEnforcement Act requires the Governor of California to publish a list of substances known to the state to cause cancer, birth defects or other reproductive harm, and requires businesses to warn customers of potential exposure to such substances.
The health of some birds is extremely sensitive to the fumes given off during the self-clean cycle of any range. Move birds to another well ventilated room.
Save these instructions for future reference.
IMPORTANT INSTRUCTIONSFORCLEANINGYOURRANGE• Cleantherangeregularlytokeepallpartsfree
of grease that could catch fire.Exhaust fan ventilationhoodsandgreasefiltersshouldbekeptclean.Donotallowgreasetoaccumulate.Greasydepositsinthefancouldcatchfire.Refertothehood manufacturer’s instructions for cleaning.
• Cleaners/aerosols—Always fol low the manufacturer’s recommended directions for use. Beawarethatexcessresiduefromcleanersandaerosols may ignite causing damage and/or injury.
SELF-CLEANINGOVENS• Cleanintheself-cleaningcycleonlytheparts
of the oven listed in this owner’s guide. Beforeself-cleaning the oven, remove all utensils stored in the oven.
• Donotclean theovendoorgasket.The door gasket is essential for a good seal. Care should be taken not to rub, damage or move the gasket.
• Ovenracks. Oven racks may be damaged if not properly used and maintained. See the Self-Clean and Care and Cleaning section for information on how to properly care for your oven racks.
• Donotuseovencleaners.No oven cleaner or oven liner protective coating of any kind should be used in or around any part of the oven.

7Grounding Instructions
ELECTRIC MODELS WITH NO FACTORY-SUPPLIEDPOWERCORD(USAelectric,international,etc)Avoidfirehazardorelectricalshock.Failuretofollowthiswarningmaycauseseriousinjury,fire,ordeath.For personal safety, this appliance must be properly grounded. For maximum safety, the power cord must be plugged into an electrical outlet that isthecorrectvoltage,iscorrectlypolarizedandproperly grounded in accordance with local codes. It is the personal responsibility of the consumer to have the appropriate outlet with the correct, properly grounded wall receptacle installed by aqualifiedelectrician.Itistheresponsibilityandobligationoftheconsumertocontactaqualifiedinstaller to assure that the electrical installation is adequate and is in conformance with all local codes and ordinances.See the installation instructions packaged with this appliance for complete installation and grounding instructions.
CANADIANELECTRICMODELSFor models factory-equipped with a power cord: Avoidfirehazardorelectricalshock.Failuretofollowthiswarningmaycauseseriousinjury,fire,ordeath.For personal safety, this appliance must be properly grounded. For maximum safety, the power cord must be plugged into an electrical outlet that isthecorrectvoltage,iscorrectlypolarizedandproperly grounded in accordance with local codes.
Power supply cord with 4-prong grounding plug 240V grounded
wall receptacle
It is the personal responsibility of the consumer to have the appropriate outlet with the correct, properly grounded wall receptacle installed by a qualifiedelectrician.See the installation instructions packaged with this appliance for complete installation and grounding instructions.

8
BroilingElement
Oven Rack Support
Dual-FanConvection
OvenDoorLatch
Broilerpan
Broilerpangrid
Oven vent
Convection Roasting rack
Lower oven rack
Ceramic glass cooktop
Touch activated glass control panel
Large metal handle
Glass oven door
Lower ovendoor
Features
Yourrangefeatures
The Cooking Zones may appear to be cool while turned ON and after they have been turned OFF. The glass surface may be HOT from residual heat transferred from the cookware and burns may occur.
7” Induction element
6” Induction element
8” Induction element
10” Induction element
ACOOLERCOOKTOP- A unique feature of the Induction Cooktop is whether turned ON or OFF, the cooktop surface remains cooler than standard ceramic cooktops.
MAGNETICDETECTOR- The coil sensor automatically detects whether the pan is magnetic and eliminates accidental “turn-ONs.”PANSIZEDETECTION- The pan recognition sensor automatically detectsandadaptstheCookingZonestothepansizesinuse.EFFICIENT- Induction cooking heats faster while using less energy. Induction power levels are quick to boil and delicate when simmering.
READTHESEINSTRUCTIONSCAREFULLYBEFOREUSINGTHECOOKTOP
Induction cooktop features

9
1. Light Pad- Used to turn the oven light on and off.
2. Bake Pad- Used to enter the normal baking mode temperature.
3. Broil Pad- Used to select the variable broil mode.
4. Convection Bake Pad- Used to select the convection baking mode.
5. Convection Roast Pad- Used to select the convection roasting mode.
6. Convection Broil Pad- Used to select the convection broil mode.
7. Keep Warm Pad- Used to select the keep warm mode.
8. Slow Cook Pad- Used to select the slow cook mode.
9. Perfect Turkey Pad- Used to select the perfect turkey cooking mode.
10. Control Lock Pad- Used to disable all oven function.
Oven control pad functions
1
10
2
11
3
12
4
13
5
14
6
15
7
16
8
17
9
Features
11. Multi Stage Pad- Used to enter up to three subsequent modes.
12. Cook Options Pad- Used to light up the cooking options pads.
13. Cook Time Pad- Used to set a cooking duration time.
14. End Time Pad- Used to select the time at which the cooking will end.
15. Probe Pad- Used to activate the meat probe mode.
16. Rapid Preheat Pad- Used to preheat the oven to the desired temperature.
17. Convection Convert Pad- Used to convert a standard temperature to a convection temperature.

10
18. Defrost Pad- Used to select the defrost mode.19. Dehydrate Pad- Used to select the dehydrate
mode.20. Bread Proof Pad- Used to select the bread
proof mode.21. Clean Pad- Used to select the self-cleaning
mode.22. My Favorite 1 Pad- Used to save or recall the
favorite 1 cooking mode.23. My Favorite 2 Pad- Used to save or recall the
favorite 2 cooking mode.24. My Favorite 3 Pad- Used to save or recall the
favorite 3 cooking mode.25 Lite Pad- Used to start a 2 hours self-clean
cycle.26. Med Pad- Used to start a 3 hours self-clean
cycle.27. Heavy Pad- Used to start a 4 hours self-clean
cycle.
Oven control pad functions
Features
18
22
19
23
20
24
21
25
26
27
28 32
32
34
29
30 33
35 36
31
28. UpperOvenPad- Used to activate the upper oven for cooking operation.
29. Lower Oven Pad- Used to activate the lower oven for cooking operation.
30. UserPreferencePad- Used to bring the user preference menu in the display.
31. Cancel Pad- Used to cancel any function previously entered except the time of day and minute timer. Push Cancel pad to stop cooking.
32. Timer Pads- Used to set or cancel the minute timer. The minute timer does not start or stop cooking.
33. Start Pad- Used to start all oven functions.34. 0 Thru 9 Number Pads- Used to enter
temperature and times.35. - lo Pad- Used to lower the temperature and
times.36. + hi Pad- Used to raise the temperature and
times.

11
37. ON/OFFPad- Used to toggle ON and OFF the associated induction element.
38. HI + Pad-Usedtoselectthe“PowerBoost”temperature or raise the temperature currently displayed.
39. MED Pad- Used to select the medium temperature.
40. LO - Pad- Used to select the lowest temperature or lower the temperature currently displayed.
41. Pan Detection Indicator Ring- Will light up when a pan made of magnetic material is placedinacookingzone.
Oven control pad functions
Features
37
39
4041
42
43
44
45
38
42. LeftFrontZoneControlsandDisplay- Used tosettheleftfrontcookingzonepowerlevels.
43. LeftRearZoneControlsandDisplay- Used tosettheleftrearcookingzonepowerlevels.
44. RightFrontZoneControlsandDisplay- Usedtosettherightfrontcookingzonepowerlevels.
45. RightRearZoneControlsandDisplay- Usedtosettherightrearcookingzonepowerlevels.

12 Getting Started
Setting clock at power up
Control panel display modes
Temperature visual display
Whentheunitisfirstpluggedin,orwhenthepowersupply to the range has been interrupted, the timer in thedisplaywillflashwith“12:00”. The clock cannot be set when the oven is on. If an invalid time of day is entered, the control will triple beep to prompt you to re-enter a valid time of day.To set the clock (example for 1:30):1. Press 1 3 0 pads to set the time of day to 1:30.
The pads hi or lo can also be pressed to raise or lower the actual time displayed.
2. Press START to accept the changes or CANCEL to start with a time of 12:00.
Sleep Mode:Your control will remain in a sleep mode when not in use. Only the clock will display during this mode. You will need to wake the control to begin any function.
Your oven is equipped with a temperature visual display for each oven. When a cooking mode is set, the actual temperature will be shown in the display and will rise as the unit preheats. When the unit has reached its target temperature, a chime will sound to remind you to place the food in the oven. This feature will be active with some cooking modes; bake, convection bake, convection roast and perfect turkey. The cooking modes which does not feature the temperature visual display will be noted in their descriptions.NOTE: The lowest temperature that can be displayed is 100°F.
Wake Mode:To wake the control, touch within the display panel. After 2 minutes without activity the control will chime and go back into sleep mode.
To start a cooking feature you must select either the upper oven or the lower oven. User preferences will be available during this mode as well as timers, oven light and the control lock.
Oven lightYour appliance includes a “theater” style oven lighting feature that gradually lights both the upper and lower oven interiors to full brightness. The upper oven is equipped with 2 halogen lights and the lower oven is equipped with 1 halogen light. The oven lights will turn on automatically when the oven door is opened. The oven light may be turned on when the door is closed by using the oven light pad located on the control panel. The oven light key will toggle the lights in both ovens at the same time at full intensity.NOTE: For best results, keep the oven light turned OFF during baking. Remember to turn the light OFF after checking food.
To toggle the Oven Lights ON and OFF:1. Press OVENLIGHT .

13
Setting the kitchen timers
See example below to set the timer for 5 minutes:
Thisunit isequippedwith2KitchenTimerswhichserves as extra timers in the kitchen that will chime when the set time has run out. It does not start or stop cooking. The Timer feature can be used during any of the other oven control functions and cooking modes
To cancel the Timer before the set time has run out:Press TIMER . The display will return to the time of day.
Example
Step Press
1. Press TIMER. “00:00” will appear in the display.
2. Enter 5 minutes. The pads hi or lo can also be pressed to raise or lower the actual time displayed.
3. Press TIMER. to accept and start the countdown.
4. When the set time has run out, “00:00” will be displayed and the TIMER padwillflash.Theclockwill sound a chime that will be repeated at regular intervals until the TIMER pad is pressed.
NOTEThe timer(s) will not affect the cooking process.
Getting Started
Control lock
The Control Lock feature automatically locks the upper oven door, control panel and the cooktop. The Control Lock is only allowed when the oven and the cooktopareturnedOFF(notactive).DOORLOCKwillflashinthedisplayfor20secondsoruntilthedoorhasfinishedlocking.Oncethedoorhasbeenlocked,Loc message will appear in the upper display and “- -” willappearinthecooktopdisplays.DonotattempttoopentheovendoorwhileDOORLOCKisflashing.
To toggle the Control Lock ON and OFF:1. KeepCONTROL LOCK pressed for 3 seconds.

14
NOTE: Pan bottom should not exceed 1/2” (13mm) from Cooking Zone (Induction) longer marking.
The ceramic cooktop has inductor elements located below the surface of the glass. The design of the ceramic cooktop outlines the area of the inductor element underneath. Make sure the diameter of the panmatchesthesizeoftheelementoutlineonthecooktop.Onlyflat-bottomcookwareshouldbeused.Heat may be transferred from the cookware to the ceramic glass and the areas surrounding the elements may become hot enough to cause burns. The type andsizeofcookware,thenumberofinductorelementsin use and the settings, are all factors that will affect the amount of heat that will spread to areas beyond the surface elements
The magnetic Cooking Zone sensors located below the cooktop surface require the use of cookware made with magnetic material in order to start the heating process on any of the Cooking Zones.
Whenpurchasingpans,lookforcookwarespecificallyidentifiedbythemanufacturerforusewithInductioncooktops. If you are not sure, use a magnet to test whether the cookware type will work. If a magnet sticks to the bottom of the cookware, the material type is correct for Induction cooking.It is recommended to always use heavier high quality stainless steel cookware on your Induction Cooktop surface. This will greatly reduce the possibility of developing scratches on the ceramic surface.Even quality cookware can scratch the cooktop surface, especially if cookware is slid over the ceramic cooktop surface without being lifted up. Over time sliding ANY type of cookware over the ceramic cooktop will likely alter the overall appearance of the cooktop. Eventually the buildup of scratches will make cleaningthesurfacedifficultanddegradetheoverallappearance of the cooktop.
USE THECORRECTSIZECOOKWARE - The Cooking Zones available on the Induction Cooktop require a MINIMUM pan size to be used at eachlocation. The shorter marking of each Cooking Zone isyourguidetothecorrectMINIMUMpansize.Thepan bottom must FULLY cover the inner ring for proper cooking to occur.
The longer marking at each Cooking Zone is helpful to determine the pan MAXIMUMsize.Aftercenteringthecookware on the cooktop, make sure the cookware does not extend more than 1/2” beyond the longer marking on the Cooking Zone. The pan must make FULL contact on the glass surface without the bottom of the pan touching the metal cooktop trims.
NOTE: If a pan made of the correct material is centered properly on any of the active Cooking Zones butisTOOSMALL,thecirclearoundthedigitalpartof the display will stay off and the pan will not heat.
Surface Cooking
Abouttheceramicglasscooktop
Usethecorrectcookwaretype
Minimum pan size requirements

15
PLEASENOTE-ANYoneof the incorrect conditions listedabove inFig. 1maybedetectedbythe sensors located below the ceramic cooktop surface. If the cookware does not meet any of theseconditions,oneormoreoftheCookingZoneswillnotheatindicatedbytheturnedoffcirclesurrounding the digital display for that affected zone. Correct the problems before attempting to reactivate the cooktop.
INCORRECT CORRECT
• Cookware not centered on Cooking Zone surface.
• Cookware centered correctly on Cooking Zone surface.
• Curved or warped pan bottoms or sides.
• Flat pan bottom & straight sides.
• Pan does not meet the minimum sizerequiredfortheCookingZoneused.
•Pan sizemeets or exceeds therecommendedminimumsizefortheCooking Zone.
• Pan bottom rests on cooktop trim or does not rest completely on the cooktop surface.
• Pan rests completely on the Cooktop surface.
• Heavy handle tilts pan. • Pan is properly balanced.
Fig. 1
Surface Cooking
Cookware recommendations

16
The cookware used with the Induction Cooktop should have flat bottoms that make good contactwith the entire surface of the Cooking Zone. Check forflatnessbyrotatingaruleracrossthebottomofthecookware(SeeFig.1).Besuretofollowalltherecommendations for using cookware.
Fig. 1
Prior tousingyourcooktopfor thefirst time,applythe recommended cooktop cleaning creme to the ceramic surface.Buffwith a non-abrasive cloth orpad. This will make cleaning easier when soiled from cooking. The special cooktop cleaning cream leaves a protectivefinishontheglasstohelppreventscratchesand abrasions.
Surface Cooking
The Cooking Zones may appear to be cool while turned ON and after they have been turned OFF. The glass surface may be HOT from residual heat transferred from the cookware and burns may occur.DONOTTOUCHHOTCOOKWAREorPANSdirectly with hands. Always use oven mitts or pot holders to protect hands from burns.DO NOT SLIDE Cookware across the cooktop surface.Doingsomaypermanentlydamagetheappearance of the ceramic cooktop.
Usequalitycookwareingoodcondition
Home Canning
Alsorememberto:• Use cookware made with the correct material
type for Induction Cooking.• Use quality cookware with heavier bottoms for
better heat distribution allowing for more even cooking results.
• Thepansizeshouldmatchtheamountoffoodbeing prepared.
• Donotletpansboildry.This may cause permanent damage in the form of breakage, fusion, or marring that can affect the ceramic cooktop. (This type of damage is not covered by your warranty).
• Donotusedirtypanswithgreasebuildup.Always use pans that are easy to clean after cooking.
• Donotstraddlecookwarebetweentwocookingzones,unlessthatcookwareisdesignedforthispurpose, such as a griddle.
Besuretoreadandobserveallthefollowingpoints when home canning with your appliance. CheckwiththeUnitedStatesDepartmentofAgriculture(USDA)websiteandbesuretoreadall the information they have available as well as follow their recommendations for home canning procedures.• Useonlyqualityflatbottomcannerswhenhome
canning. Use a straight-edge to check canner bottom (see See “Use quality cookware in good condition).
• Useonlyacompletelyflatbottomcannerwithnoridges that radiate from the bottom center when home canning using a range with a ceramic glass cooktop.
• Makesurethediameterofthecannerdoesnotexceed1inchbeyondthecookingzonemarkings.
• Itisrecommendedtousesmallerdiametercanners on ranges with ceramic glass or open coil electric cooktops.
• Startwithhottapwatertobringwatertoboilmore quickly.
•Usethehighestheatsettingwhenfirstbringingthe water to a boil. Once boiling is achieved, reduce heat to lowest possible setting to maintain that boil.
IMPORTANT! Never place or straddle cookware overtwodifferentsurfacecookingzonesheatingat the same time. This will cause uneven heating results and could cause the ceramic cooktop to fracture. The only exception is when using large cookware or the griddle with the bridge elements activated.

17
The hi+ and lo- keys provide incremental adjustments for more precise control when changing settings between the lower heat levels (Lo to 3.0 power levels). Higher heat level setting changes (between 3.0 to HI) will change much faster.
• The ON OFF key pad is used to power-up or power-offthecookingzone.
• The hi+ keypadisusedtosetthecookingzoneatPowerBoost(Fig.4)whenusedaftertheON OFF key is pressed. It can also be used during cooking to raise the power setting.
• The med keypadisusedtosetthecookingzoneat 5.0 (Fig. 2).
• The lo- keypadisusedtosetthecookingzoneat Lo (Fig. 1) if used after the ON OFF key pad. It can also be used at any moment to lower the powersettingofthecookingzone.
Fig. 1 Fig. 2
Fig. 4Fig. 3
Fig. 5
Setting the cooktop
Availablecooktopsettings
The cooktop control provides 4 digital display windows tohelpsetpowerlevelsfortheheatingzoneslocatedon the cooktop. These settings work the same way as normal knob settings except the settings are displayed inLCDstyledisplays.
Your control provides 23 different settings for each cookingzone.SomeofthesepowerlevelsincludeLo (1%) Fig. 1, 5.0 (medium 50%) Fig. 2, Hi (100%) Fig. 3, Pb (PowerBoost)Fig. 4.
• Ifneeded,wakethecontrolpanel.• Touch the ON OFF key for the desired heating zone.
• Press thedesiredpower levelkey (hi+, med or lo-) or for more precise level settings use the hi+ or lo-keystomakespecificlevelchanges.
Setting cooktop elements
Hot element (HE) message
After using any of the inductionheatingzones,the ceramic cooktop will become very hot from heat transferred by the cookware. Even after turning the control off, the cooktop will remain hot for some time.The cooktop control monitors the temperature of the cooktop surface and displays a message “HE” (hot element) when the cooktop is still too hot to touch -Fig. 5-. If the HEmessageremainsdisplayedintheLCD,theheatingzonemaybesetagainandusedforcooking.
Setting Surface Controls
Display Settings ChangesSetting/Power Incremental changeLo to 3.0 (1-30%) 0.2
3.0 to 7.0 (30-70%) 0.57.0 to Hi (70-100%) 1.0

18 Setting Surface Controls
Use the chart below to determine the suggested setting for the type of food you are preparing when using the cooktop.
Your induction cooktop is equipped with a Power Boostfeatureoneachcookingzone.ThePowerBoostfeatureisusedtobringlargequantitiesofwater or food to cooking temperature at the fastest speedpossible.ThePowerBoostfeaturewillgiveyou up to 139% power output for a maximum of 10 minutes.To Turn ON the Power Boost Feature:- Press the ON OFFpadtoturnonthecookingzoneyouwanttosettoPowerBoost.
- Press the “hi +” key pad and the PB will be shown inthedisplay(figure1).
Recommended surface setting chartSetting Type of CookingPOWERBOOST(Pb)
Start most foods; bring water to a boil and pan broiling.
HIGH (8-HI) Continue a rapid boil; frying, deep fat frying.
MEDIUM(6) Maintainaslowboil;thickensauces and gravies; steaming vegetables..
MEDIUMLOW (4- 5)
Keepfoodscooking;poachingand stewing.
LOW (Lo-3) Keepwarm,meltingandsimmering.
Suggested cooktop power settings
Setting power boost feature
Heat may be transferred from the cookware to the ceramic glass and the areas surrounding the elements may become hot enough to cause burns. The Hot Element Message Light will turn ON and will continue to glow until the glass cooktop has cooled down to a moderate level. The glass surface may still be hot and burns may occur if the glass surface is touched before the indicator light has turned OFF.Do not place plastic items such as salt and pepper shakers, spoon holders or plastic wrappings on top of the range when it is in use. These items could melt or ignite. Potholders, towelsorwoodenspoonscouldcatchfireifplacedtoo close to the surface elements.
Figure 1TosetthePowerBoost,press hi + whenthezoneisfirstturnedon.
The electronic processes involved with Induction Cooking create some unusual background noises. These noises are normal and part of the Induction Cooking process.
Please note that these noises are more noticeable whilecookingatthePowerBOOSTlevel.Veryloudnoises are not part of normal Induction Cooking.
Operational noises
19
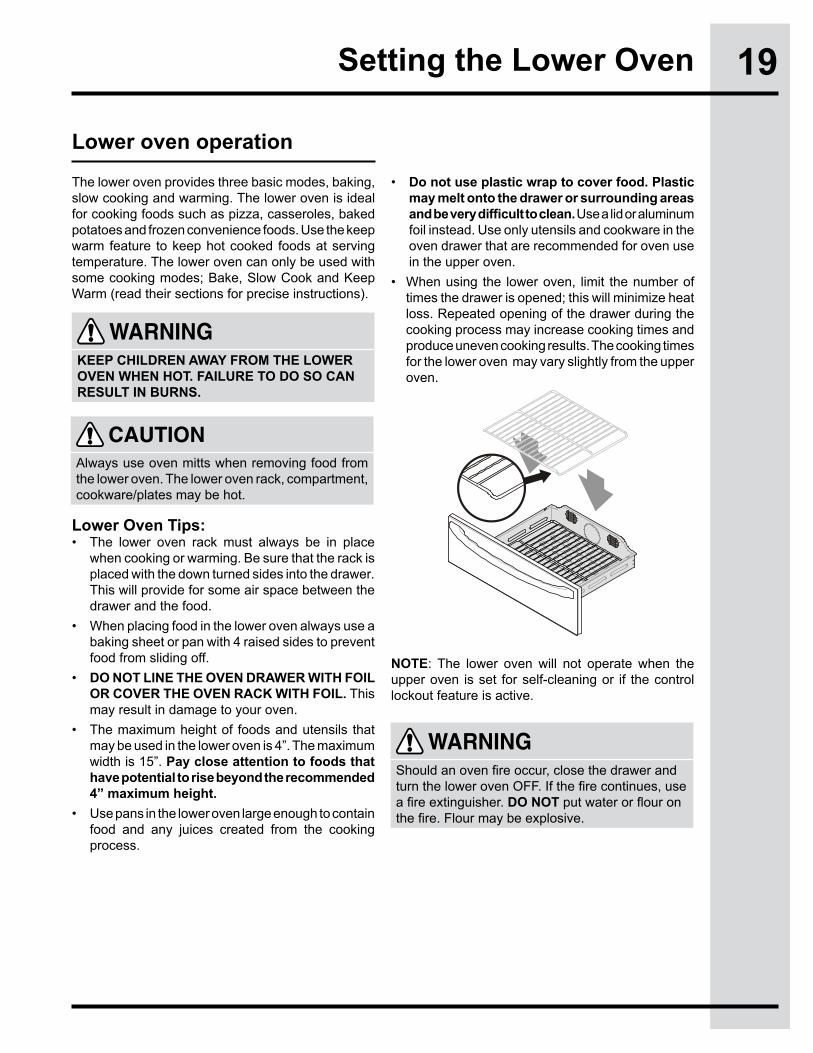
Lower Oven Tips:• The lower oven rack must always be in place
whencookingorwarming.Besurethattherackisplaced with the down turned sides into the drawer. This will provide for some air space between the drawer and the food.
• Whenplacingfoodinthelowerovenalwaysuseabaking sheet or pan with 4 raised sides to prevent food from sliding off.
• DONOTLINETHEOVENDRAWERWITHFOILORCOVERTHEOVENRACKWITHFOIL.This may result in damage to your oven.
• Themaximumheightof foodsandutensils thatmay be used in the lower oven is 4”. The maximum width is 15”. Pay close attention to foods that have potential to rise beyond the recommended 4” maximum height.
• Usepansinthelowerovenlargeenoughtocontainfood and any juices created from the cooking process.
NOTE: The lower oven will not operate when the upper oven is set for self-cleaning or if the control lockout feature is active.
The lower oven provides three basic modes, baking, slow cooking and warming. The lower oven is ideal forcookingfoodssuchaspizza,casseroles,bakedpotatoesandfrozenconveniencefoods.Usethekeepwarm feature to keep hot cooked foods at serving temperature. The lower oven can only be used with somecookingmodes;Bake,SlowCookandKeepWarm (read their sections for precise instructions).
Lower oven operation
Setting the Lower Oven
Always use oven mitts when removing food from the lower oven. The lower oven rack, compartment, cookware/plates may be hot.
KEEPCHILDRENAWAYFROMTHELOWEROVENWHENHOT.FAILURETODOSOCANRESULTINBURNS.
Shouldanovenfireoccur,closethedrawerandturnthelowerovenOFF.Ifthefirecontinues,useafireextinguisher.DO NOTputwaterorflouronthefire.Flourmaybeexplosive.
• Do not use plastic wrap to cover food. Plastic may melt onto the drawer or surrounding areas andbeverydifficulttoclean.Use a lid or aluminum foil instead. Use only utensils and cookware in the oven drawer that are recommended for oven use in the upper oven.
• Whenusing the loweroven, limit thenumberoftimesthedrawerisopened;thiswillminimizeheatloss. Repeated opening of the drawer during the cooking process may increase cooking times and produce uneven cooking results. The cooking times for the lower oven may vary slightly from the upper oven.

20
OvenVentWarmAir
Oven racksAircirculationintheoven
Oven vents location
Oven rack positions
Regular rackThis model comes with lubricated porcelain oven racks, which can remain in the oven during the self-cleancycle.Donotcleanthisvegetableoil lubrication off the racks. It is important that the sides of the oven racks always have a light coating of vegetable oil. To maintain optimal rack performance, re-apply a thin layer of vegetable oil to the sides of the rack after every self-clean cycle orwhentherackbecomesdifficulttoslide.
For best air circulation and baking results allow 2-4" (5-10 cm) around the cookware for proper air circulation and be sure pans and cookware do not touch each other, the oven door, sides or back of the oven cavity. The hot air must circulate around the pans and cookware in the oven for even heat to reach around the food.
Alwaysusepotholdersor oven mitts when removing food or adjusting the oven racks. Wait until the oven has completely cooled if possible. Oven racks may be HOT and may cause burns.
Regular oven rack
The regular oven rack may be used in all of the rack position.
NOTEAlways use caution when removing food from the oven.
Rack positions
Before Setting the Oven Controls
The oven is vented above the door. When the oven is on, warm air is released through the vents. This venting is necessary for proper air circulation in the oven and good baking results.Steam and moisture may appear near the oven vent. This is normal.
Removing,replacing,andarrangingflator offset oven racks•Toarrange- Always arrange the oven racks when
the oven is cool (prior to operating the oven).•Toremove- Pull the oven rack straight forward until
it reaches the stop position. Lift up the front of the oven rack slightly and slide out.
•Toreplace- Place the oven rack on the rack guides on both sides of oven walls. Tilt the front of oven rack upward slightly and slide the oven rack back into place.Besureovenracksarelevelbeforeusing.

21
Full extendable Luxury-GlideTM oven rack
Glide rackThe glide rack is an extendable rack that makes food preparation easier. It has glide tracks that allow the rack to be pulled away from the oven without rubbing the sides of the oven wall.It is recommended to remove all racks from the oven during self-clean cycles, but porcelain racks may be left in the oven if they are soiled. After a self-clean cycle, or anytime the gliding is rough, the glide racks should be treated with graphite lubrication. For instructions on how to care for your oven racks, see “Caring for Your Porcelain Enameled Glide Racks” in the Care and Cleaning section.
Before Setting the Oven Controls
Figure 1 - Extendable glide rack with release lever in locked position
Figure 2 - Extendable glide rack with release lever in unlocked position
Figure 3 - Removing and replacing the oven glide rack.
Release lever
• Protectiveliners-Donotusealuminumfoilto line the oven bottom. Only use aluminum foil as recommended in this manual. Improper installation of these liners may result in risk of electric shock or fire.
• Itisrecommendedtoremoveallracksfrom the oven during a self-clean cycle, but porcelain racks may be left in the oven if they are soiled. For care of oven racks, see the Care and Cleaning section.
• Besuretoremoveallovenaccessoriesbeforestarting a self clean cycle.
Always use pot holders or oven mitts when using the oven. When cooking, the oven interior and exterior, as well as the oven racks, will become very hot which can cause burns.
Removing and replacing the glide racksTo remove the glide rack:1. Lift up on the release lever located across the lower
front of the rack, as shown in figure 1.2. While holding up the release lever (see figure 2),
pull the glide rack out of the oven until the stop position is reached, use two hands if necessary.
3. Using both hands, grasp the upper and lower portions of the glide rack (see figure 3).
4. Lift up the front of the rack slightly and continue to pull the rack away from the oven.
5.Besuretograspbothupperandlowerrackportionstogether when removing or handling the glide rack. The rack portions move independently and are difficult to handle unless held together.
To replace the glide rack:1. Grasp both upper and lower portions of the glide
rack (see figure 3).2. Lift and hold the rack level between the oven cavity
walls.3. Tilt the front of the rack upward slightly and slide
the rack completely into position. Some force may be necessary to make sure the oven rack has snapped into place.
22
Lower Oven Baking Tips:• Follow recommendations for lower oven cooking
modes in the Lower Oven Operation section of this manual.
To set a Bake Temperature of 350°F:1. Arrange interior oven racks.2. Select oven by pressing UPPEROVEN UPPER
OVEN or LOWEROVENLOWER
OVEN.
3. Press BAKE .
4. Press START . The oven display shows PRE-HEATING.
5. Place food in the oven when the chime signals and temperature display shows that the oven has reached the set target temperature and the PRE-HEATING message disappear.
6. Cook Time, Timer and End Time features can be set to control your cooking time in both ovens (read their sections for directions). The Temperature Probe and Rapid Preheat features can be used only with the upper oven.
7. Remove food. Always use oven mitts when removing hot pans from the oven.
8. Press CANCEL tostoporcanceltheBakefeature at any time.
To change to a Bake Temperature of 425°F:1. Select oven by pressing UPPEROVEN
UPPER
OVEN or LOWEROVEN
LOWER
OVEN.
2. Press the HI +
hi or LO -
lo pads to get to the desired temperature.
Baking ProblemsRefertotheBakingProblemsTableintheSolutionsto Common Problems section of this manual.
Setting Oven Controls
This mode is best used for your standard recipes. The hidden bake element is used to heat the air and maintain temperature. The temperature probe can be used in this cooking mode. The upper oven can be programmed to bake at any temperature from 170°F to 550°F with a default temperature of 350°F. The lower oven can be programmed to bake at any temperature from 170°F to 450°F with a default temperature of 350°F.
Baking
• Duringpreheat,the3elementsandtheconvec-tion fan are used in cycle to quickly heat the oven. The convection fan will turn off once the oven is fully preheated.
• Fully preheat the oven before baking items like cookies, cakes, biscuits and breads.
• When using any single oven rack, position the rack in the oven so that the food is in the center of the oven. For multiple rack baking, use the convection bake function.
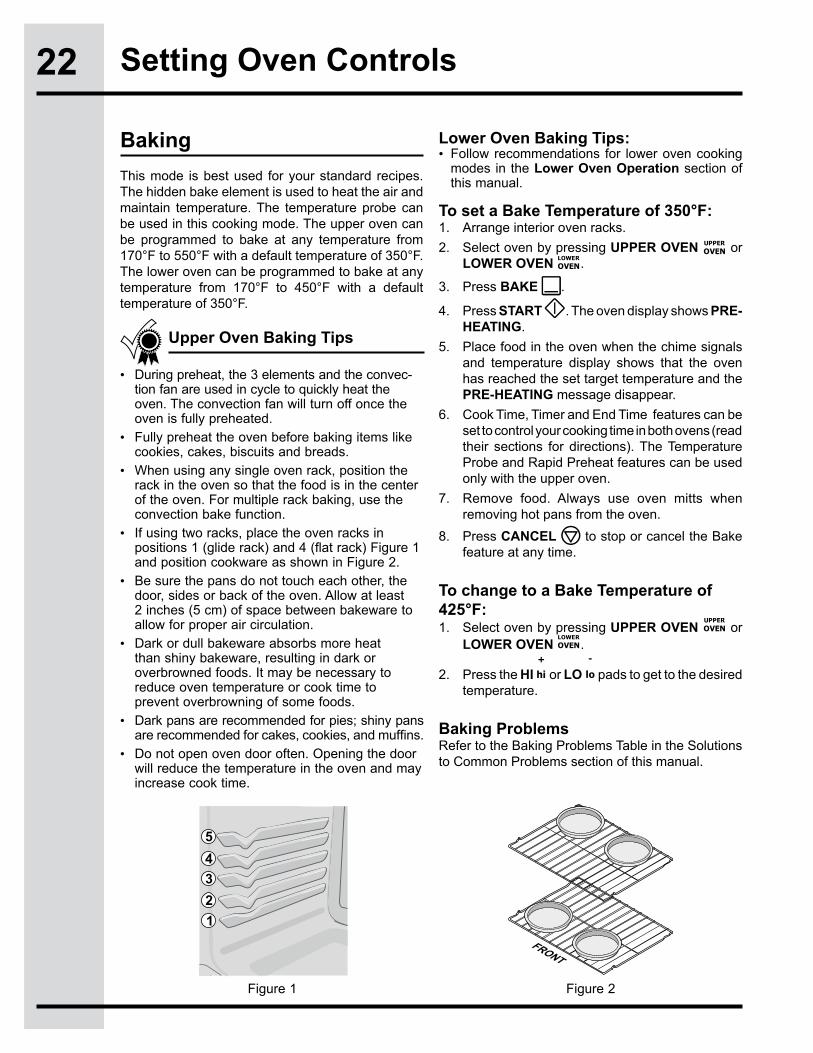
• If using two racks, place the oven racks in positions1(gliderack)and4(flatrack)Figure1and position cookware as shown in Figure 2.
• Besurethepansdonottoucheachother,thedoor, sides or back of the oven. Allow at least 2 inches (5 cm) of space between bakeware to allow for proper air circulation.
• Darkordullbakewareabsorbsmoreheatthan shiny bakeware, resulting in dark or overbrowned foods. It may be necessary to reduce oven temperature or cook time to prevent overbrowning of some foods.
• Darkpansarerecommendedforpies;shinypansarerecommendedforcakes,cookies,andmuffins.
• Donotopenovendooroften.Openingthedoorwill reduce the temperature in the oven and may increase cook time.
UpperOvenBakingTips
Figure 1 Figure 2

23Setting Oven Controls
Cook Time allows the oven to be set to cook for a set length of time and shut off automatically.The time remaining will always be shown in the timer section of the display. The oven will shut off and will chimewhenthecountdownisfinished.ThisfeaturecanbeusedwithBake,ConvectionBake,ConvectionRoast,SlowCook,KeepWarm,Defrost,BreadProofandDehydratecookingmodes.ItcanalsobepartofaMulti-Stagesequence.
To set a timed cooking (example is a 450°F Bake for 30 minutes):1. Select oven by pressing UPPEROVEN
UPPER
OVEN.2. Press BAKE . The temperature numbers will
blink in the display.3. Enter temperature needed; 4 5 0 .4. Press COOK OPTIONS to bring up the cook
options items.
5. Press COOK TIME .
6. Enter time needed; 3 0 .
7. Press START . The oven will start heating. The cook time will start counting down for the set time.
8. Press CANCEL to stop the audible alarm or to cancel cooking at anytime.
End Time allows the oven to be set to shut off automatically at a set time of day. The oven control will calculate the remaining time by itself. The time remaining will always be shown in the timer section of the display. The oven will shut off and will chime whenthecountdownisfinished.ThisfeaturecanbeusedwithBake,ConvectionBake,ConvectionRoast,SlowCook,KeepWarm,Defrost,Dehydrate,CleanandBreadProofcookingmodes.Thisovencanbeprogrammed with Cook Time and End Time to start and stop by itself at the right time.
To set a delayed timed cooking (example is a 450°F Bake for 30 minutes which will end at 6:00PM):1. Select oven by pressing UPPEROVENUPPER
OVEN.
2. Press BAKE . The temperature numbers will blink in the display.
3. Enter temperature needed; 4 5 0 .4. Press COOK OPTIONS to bring up the cook
options items.5. Press COOK TIME .6. Enter time needed; 3 0 .
7. Press END TIME .8. Enter time of day needed; 6 0 0 .
9. Press START . The time remaining will be shown in the display.
10. Press CANCEL to stop the audible alarm or to cancel cooking at anytime.
Cook time End time
Use caution with the COOK TIME or END TIME features. Use the automatic timer when cooking cured orfrozenmeatsandmostfruitsandvegetables.Foodsthatcaneasilyspoilsuchasmilk,eggs,fish,meatorpoultry,shouldbechilledintherefrigeratorfirst.Evenwhenchilled,theyshouldnotstandinthe oven for more than 1 hour before cooking begins, and should be removed promptly when cooking is completed. Eating spoiled food can result in sickness from food poisoning.

24
ConvectionBakeAirFlowFigure 1
Setting Oven Controls
This mode of cooking enables you to obtain the best culinary results when baking with multiple pans and racks. Multiple rack baking may slightly increasecook time for some foods but the overall result is time saved.Most foodscooked inastandardovenwillcookfasterandmoreevenlywithConvectionBake.Convection baking uses the three elements and a fan to circulate the oven’s heat evenly and continuously within the oven. The temperature probe can be used in this cooking mode. The oven can be programmed for Convection baking at any temperature between 170°F to 550°F with a default temperature of 350°F.
Convection baking
•Fullypreheattheovenbeforebakingitemslikecookies, cakes, biscuits and breads.
•Ifyourrecipe’sbakingtemperaturehasalreadybeen converted for convection baking there is no need to reduce your oven temperature. If your recipe has not had the temperature converted for convection baking you can easily reduce the temperature using the Convection Convert feature. Please see Convection Convert section on next page for further instruction on temperature conversion.
•Usetestedrecipeswithtimesadjustedforconvection baking when using this mode. With single rack convection baking some foods may have as much as a 25% reduction in cook time; check food at minimum time. Time reductions will vary depending on the amount and type of food to be cooked.
• Cookiesandbiscuitsshouldbebakedonpanswith no sides or very low sides to allow heated air to circulate around the food.
• Forsinglerackbaking,usetheradiantbakefunction.
• Whenbakingusingtwoovenracks,positioncookware as shown in Figure 2.
• Allowatleast2inches(5cm)ofspacebetweenbakeware to allow for proper air circulation.
• Darkordullbakewareabsorbsmoreheatthan shiny bakeware, resulting in dark or overbrowned foods. It may be necessary to reduce oven temperature or cook time to prevent overbrowning of some foods.
• Darkpansarerecommendedforpies;shinypansarerecommendedforcakes,cookies,andmuffins.
• Donotopenovendooroften.Openingthedoorwill reduce the temperature in the oven and may increase cook time.
Convection Baking Tips
To set a Convection Bake Temperature of 350°F:1. Arrange interior oven racks.2. Select oven by pressing UPPEROVENUPPER
OVEN.
3. Press CONVECTIONBAKE .
4. Press START . The oven display shows PRE-HEATING.
5. Place food in the oven when the chime signals and temperature display shows that the oven has reached the set target temperature and the PRE-HEATING message disappear.
6. Remove food. Always use oven mitts when removing hot pans from the oven.
7. Press CANCEL to stop or cancel the ConvectionBakefeatureatanytime.
Figure 2 Figure 3

25Setting Oven Controls
The Convection Convert pad is used to automatically convert a standard baking recipe for convection baking. When set properly, this feature is designed to display the actual converted (reduced) temperature in the display. Convection Convert may ONLY be used with a Convection Bakecookingmode.Itcanbeusedwiththefeatures End Time and Cook Time (see their sections for directions). If convection conversion is used with the cook time and end time features, “CF” (check food) will be displayed when 75% of the bake time is complete. At this time the oven control will chime at regular intervals until baking hadfinished.Whenthebaketimehascompletelyfinishedthecontrolwillchimeatregularintervaluntil the CANCEL pad is pressed. NOTE: To use this feature with the COOK TIME option, the COOK TIME pad must be pressed before the CONVECTIONCONVERT pad.
Changing from a normal bake temperature to a convection bake temperature:1. Select oven by pressing UPPEROVENUPPER
OVEN.
2. Press CONVECTIONBAKE .
3. Press COOK OPTIONS . The cook options items will light up.
4. Press CONVECTIONCONVERT . The temperature displayed will be 25°F lower than what it used to be.
5. Press START to begin the convection baking(seeConvectionBakingsectionformore informations).
The Preheat feature will bring the oven up to temperature faster than a regular preheat and then indicate when to place the food in the oven. Preheating is not necessary when roasting or cooking casseroles. The oven can be programmed to preheat at any temperature between 170°F to 550°Fwithsomeofthecookingmodes;Bake,ConvectionBakeandConvectionRoast.
IMPORTANT!The rapid preheat feature is for single rack ONLY. The heat distribution with multiple rack will be uneven. For batter- and dough-based baked goods such as cakes, pastries, and breads, use the standard bake and convection bake functions for best results.
To set a rapid preheat (example is for a 350°F Bake):1. Select oven by pressing UPPEROVENUPPER
OVEN.
2. Press BAKE .
3. Press COOK OPTIONS . The cook options items will light up.
4. Press RAPIDPREHEAT .5. Press START to begin the baking with the
rapid preheat feature enabled.6. Place food in the oven when the chime signals
and temperature display shows that the oven has reached the set target temperature.
Convection convert Rapid preheat

26
To set a Convection Roast Temperature of 350°F:1. Arrange interior oven racks.2. Select oven by pressing UPPEROVENUPPER
OVEN.3. Press CONVECTIONROAST .
4. Press START . 5. The Temperature Probe, Cook Time, Timer, End
Time and Rapid Preheat features can be set to control your cooking time (read their sections for directions).
6. Remove food. Always use oven mitts when removing hot pans from the oven.
7. Press CANCEL to stop or cancel the Convection Roast feature at any time.
RoastingRack
Grid
BroilerPanFigure 1
* For beef: med rare 145°F, med 160°F, well done 170°F ** Stuffed turkey requires additional roasting time. Shield legs and breast with foil to prevent overbrowning and dying of the skin.
Setting Oven Controls
This mode is best for cooking tender cuts of beef, lamb, pork and poultry. Use this mode when cooking speed is desired. The Convection Roasting gently browns the exterior and seals in the juices. Convection roasting uses the hidden bake element, the hidden convection element, the broil element and a fan to circulate the oven’s heat evenly and continuously within the oven. The temperature probe can be used in this cooking mode. The oven can be programmed for Convection Roasting at any temperature between 170°F to 550°F with a default temperature of 350°F.
Convection roasting
•Usethebroilerpanandgrid,andtheroastingrack(Figure 1). The broiler pan will catch grease spills and the grid will help prevent spatters. The roast-ing rack will hold the meat.
•Place an oven rack on rack position 2 (next-bottom).
• Makesuretheroastingrackissecurelyseatedonthegridinthebroilerpan.Theroastingrackfitsonthe grid allowing the heated air to circulate under the food for even cooking and helps to increase browning on the underside.
• There is no need to reduce the convectiontemperature or to use the Convection Convert feature with this cooking mode.
• DO NOT use the broiler pan without the grid or cover the grid with aluminum foil.
• Alwayspulltherackouttothestoppositionbeforeremoving food.
• Positionfood(fatsideup)ontheroastingrack.
Convection Roasting Tips
Convection Roasting ChartMeat Weight Oven Temp Internal Temp Minperlb.
Beef Standing rib roast 4 to 6 lbs. 350° F * 25-30Rib eye roast 4 to 6 lbs. 350° F * 25-30Tenderloin roast 2 to 3 lbs. 400° F * 15-25
Poultry Turkey, whole** 12 to 16 lbs. 325° F 180° F 8-10Turkey, whole** 16 to 20 lbs. 325° F 180° F 10-15Turkey, whole** 20 to 24 lbs. 325° F 180° F 12-16Chicken 3 to 4 lbs. 350-375° F 180° F 12-16
Pork Ham roast, fresh 4 to 6 lbs. 325° F 160° F 30-40Shoulder blade roast 4 to 6 lbs. 325° F 160° F 20-30Loin 3 to 4 lbs. 325° F 160° F 20-25Pre-cooked ham 5 to 7 lbs. 325° F 160° F 30-40

27
To set a Broil Temperature of 550°F:1. Arrange interior oven racks.2. Select oven by pressing UPPEROVEN
UPPER
OVEN.
3. Press BROIL .
4. Press START .5. Place food in the oven after 2 minutes. Close the
oven door.6. Turn food when the top side is browned and cook
on the second side.7. Remove food. Always use oven mitts when
removing hot pans from the oven.8. Press CANCEL tostoporcanceltheBroil
feature at any time.
Grid
Broiler Pan
Figure 1
Setting Oven Controls
Thismodeisbestformeats,fishandpoultryupto1”thick.Broilingisamethodofcookingtendercutsof meat by direct heat under the broil element of the oven. The high heat cooks quickly and gives a rich, brown outer appearance. The temperature probe cannot be used with this mode. The oven can be programmed to broil at any temperature from 300°F to 550°F with a default temperature of 550°F.
Broiling
•Broiling is direct heat cooking and will producesome smoke. If smoke is excessive, place food further away from the broil element. Always watch food carefully to prevent burning.
•Foroptimumbrowning,preheatthebroilelementfor 2 minutes.
•Broilonesideuntilthefoodisbrowned;turnandcook on the second side. Season and serve.
•Always pull the rack out to the “stop” positionbefore turning or removing food.
•Alwaysusethebroilerpananditsgridwhenbroiling.It allows the dripping grease to be kept away from the high heat of the broil element (see Figure 1).
•DONOT use the broil pan without the insert. DO NOT cover the broil pan insert with foil. The exposedgreasecouldcatchfire.DO NOT use the roasting rack when broiling.
Broiling Tips
Broiling Times
• Shouldanovenfireoccur,closetheovendoorandturnofftheoven.Ifthefirecontinues,throwbakingsodaonthefireoruseafireextinguisher.DO NOT putwaterorflouronthefire.Flourmaybeexplosiveandwatercancauseagreasefiretospreadandcausepersonalinjury.
• Use pot holders or oven mitts when working with a hot oven.• Consumingraworundercookedmeats,poultry,seafoodorshellfishmayincreaseyourriskoffood
borne illness.
Electric Wall Oven Broiling Table RecommendationsFoodItem
Rackposition
TempSetting
Cook Time1st side 2nd side Doneness
Steak 1” thick 5 550° F 6:00 4:00 Rare5 550° F 7:00 5:00 Medium
Pork Chops 3/4” thick 5 550° F 8:00 6:00 WellChicken-BoneIn 3 450° F 20:00 10:00 WellChicken-Boneless 5 450° F 8:00 6:00 WellFish 5 500° F 13:00 0:00 WellShrimp 3 550° F 5:00 0:00 WellHamburger 1” thick 5 550° F 9:00 7:00 Medium
3 550° F 10:00 8:00 Well
Figure 2

28
Grid
Broiler PanFigure 1
Shouldanovenfireoccur,closetheovendoorandturnofftheoven.Ifthefirecontinues,throwbakingsodaonthefireoruseafireextinguisher.DO NOT putwaterorflouronthefire.Flourmaybeexplosiveandwatercancauseagreasefiretospread and cause personal injury.
Setting Oven Controls
Usethismodeforthickercutsofmeat,fishandpoultry.TheConvectionBroilinggentlybrownstheexteriorandseals in the juices. Convection broiling uses the broil element and a fan to circulate the oven’s heat evenly and continuously within the oven. The temperature probe cannot be used in this cooking mode. The oven canbeprogrammedforConvectionBroilingatanytemperature between 300°F to 550°F with a default temperature of 550°F.
Convection broiling
• For optimum browning, preheat the broil element for 2 minutes.
• Broilonesideuntilthefoodisbrowned;turnandcook on the second side. Season and serve.
• Always pull the rack out to the “stop” position be-fore turning or removing food.
• Always use the broiler pan and its grid when broil-ing. It allows the dripping grease to be kept away from the high heat of the broil element (see Figure 1).
• DO NOT use the broil pan without the insert. DO NOT cover the broil pan insert with foil. The exposedgreasecouldcatchfire.DO NOT use the roasting rack when broiling.
• Convection broiling is generally faster than con-ventional broiling. Check for doneness at the minimum recommended time.
Convection Broiling Tips
IMPORTANTAlways use this cooking mode with the oven door closed or the fan will not turn on.
To set a Convection Broil Temperature of 550°F:1. Arrange interior oven racks.2. Select oven by pressing UPPEROVENUPPER
OVEN.
3. Press CONVECTIONBROIL .
4. Press START . 5. Place food in the oven after 2 minutes.6. Turn food when the top side is browned and cook
on the second side.7. Remove food. Always use oven mitts when
removing hot pans from the oven.
8. Press CANCEL to stop or cancel the ConvectionBroilfeatureatanytime.
29
To set a Keep Warm Temperature of 170°F:1. Arrange interior oven racks (for upper oven only).2. Select oven by pressing UPPEROVEN UPPER
OVEN or LOWEROVENLOWER
OVEN.
3. Press KEEPWARM .
4. Press START .5. TheMulti-Stage,CookTime,TimerandEndTime
features can be set to control your warming time (read their sections for directions).
6. Remove food. Always use oven mitts when removing hot pans from the oven.
7. Press CANCEL tostoporcanceltheKeepWarm feature at any time.
Setting Oven Controls
This mode is best for keeping oven baked foods warm forservingaftercookinghasfinished.TheKeepWarmfeature uses the hidden bake element to maintain the temperaturewithintheoven.TheKeepWarmfeaturemaybeusedwithMulti-Stage(refertoitssectionfordirections)ifyouwishtohavetheKeepWarmfeatureturnONautomaticallywhen cooking has finished.TheovencanbeprogrammedforKeepWarmatanytemperature between 150°F to 190°F with a default temperature of 170°F.
This mode may be used to cook foods more slowly, at lower oven temperatures and provide cooking results much the same way as a Slow Cooker or Crock-Pot. The Slow Cook feature is ideal for roasting beef, pork & poultry. Slow Cooking meats may result in the exterior of meats becoming dark but not burnt. This is normal. The Slow Cook mode uses the hidden bake element to maintain a low temperature in the oven. The temperature probe cannot be used in this cooking mode. There are 2 settings available, high (HI) or low (LO). The maximum cook time for the Slow Cook feature is 12 hours unless the oven control has beenchangedtotheContinuousBakemodeortheSabbath mode has been activated.
Keep warm Slow cook
• Always start with hot food.• Donotuse theKeepWarm feature toheatcold
food.• Food in heat-safe glass and glass ceramic
containers may need higher temperature settings compared to food in regular containers.
• Avoid repeated openings of the oven, it will allow hot air to escape and the food to cool.
• Aluminum foil may be used to cover food to in-crease moisture content.
KeepWarmTipsforUpperOven
• Completely thawall frozenfoodsbeforecookingwith the Slow Cook feature.
• Whenusingasingleovenrack,positionitsothefood is in the center of the oven.
• Positionmultiple racks to accommodate size ofcooking utensils when cooking multiple food items.
• Donotopentheovendooroftenorleavethedooropen when checking foods. If the oven heat escapes often, the Slow Cook time may need to be extended.
• Coverthefoodstokeepthemmoistorusealooseorvented type cover to allow foods to turn crisp or brown.
• Cooktimeswillvary;dependingontheweight,fatcontent, bone & the shape of the meat.
• Usetherecipe’srecommendedfoodtemperatureandafood thermometer to determine when the food is done.
• Preheatingtheovenwillnotbenecessarywhenusing the Slow Cook feature.
• Addanycreamorcheesesaucesduringthelasthour of cooking.
Slow Cook Tips
•Follow recommendations for lower oven cooking modes in the Setting Lower Oven section of this manual.
Keep Warm Tips for Lower Oven
To set a Slow Cook:1. Arrange interior oven racks and place food in the
oven.2. Select oven by pressing UPPEROVEN UPPER
OVEN or LOWEROVENLOWER
OVEN.3. Press SLOW COOK .4. Press
+
hi for high (HI) setting or
-
lo low (Lo) setting.5. Press START .6. The Cook Time, Timer and End Time features
can be set to control your Slow Cook time (read their sections for directions).
7. Remove food. Always use oven mitts when removing hot pans from the oven.
8. Press CANCEL to stop or cancel the Slow Cook feature at any time.
Food poisoning hazard: do not let food sit for more than one hour before or after cooking. Doingsomayresultinfoodborneillness.

30 Setting Oven Controls
This mode dries foods with heat from the bake and the convection element. The heat is circulated throughout theovenbytheconvectionfan.Dehydratingisusedto dry and/or preserve foods such as fruits, meats, vegetables and herbs. This mode holds an optimum low temperature while circulating the heated air to slowly remove moisture. The oven can be programmed forDehydratingatanytemperaturebetween100°Fto225°F with a default temperature of 120°F.
Use the defrost feature to thaw small portions of delicateitemssuchascreamcakes,frozencreampies and cheesecake, at room temperature. While in the defrost mode, the convection fan will operate to circulate room temperature air around the food slowly, accelerating the natural defrosting of the food without heat.
Dehydrating Defrosting
•Donotpreheattheoven.•Multiplerackscanbeusedsimultaneously.•Dryingtimesvarydependingonthemoistureandsugarcontentofthefood,thesizeofthepieces,the amount being dried and the humidity in the air.
•Check food at the minimum drying time.•Treat fruits with antioxidants to avoid discolor-
ation.•Consult a food preservation book or a library for
additional information.
Dehydrating Tips
To set a Dehydrate Temperature of 120°F:1. Arrange interior oven racks and place food.2. Select oven by pressing UPPEROVENUPPER
OVEN.3. Press DEHYDRATE .4. Press START to begin dehydrating.5. Remove food. Always use oven mitts when
removing hot pans from the oven.
6. Press CANCEL to stop or cancel the Dehydratefeatureatanytime.
NOTEThisfeatureisnotmeantforthawingfrozenmeats, poultry, seafood or other foods that need tobecookedbeforeserving.FollowUSDArecommendationsforthawingfoods.Onlyfrozenfoods that can be defrosted and served without cooking should be used with this feature.
To set a Defrost:1. Arrange interior oven racks and place food in the
oven.2. Select oven by pressing UPPEROVENUPPER
OVEN.
3. Press DEFROST .4. Press START to start the defrosting. A “dEF”
message is displayed when active.5. TheCookDuration,EndTimeandTimerfeatures
canbesettocontrolyourDefrosttime(readtheirsections for directions).
6. Press CANCEL tostoporcanceltheDefrostfeature at any time.

31Setting Oven Controls
Proofing bread prepares the dough for baking byactivatingtheyeast.Thisfeatureisidealforproofing,or rising bread dough. The oven can be programmed forBreadProofingatanytemperaturebetween85°Fto 100°F with a default temperature of 100°F. The temperature visual display is not available for this function.
This mode uses the temperature probe to control precisely the cooking of a perfect turkey. The convection system gently browns the turkey’s exterior and seals in the juices. The temperature probe is required with this cooking mode (read its section on next page for more details). The oven can be programmed for Perfect Turkey at any temperature between 170°F to 550°F with a default temperature of 325°F. The probe default temperature for the perfect turkey feature is 180°F.
BreadProofing Perfect turkey
• Noneedtopreheatforthisfeature.• Proofbreaduntildoughhasdoubledinbulk.• Forbestresults,placeashallowpanwith1to
3 cups of boiling hot water on the lowest rack position to keep the air moist inside the oven cavity.
• Allowatleast1”betweenedgeofpanandwallsof the oven.
• Limitfrequentdooropeningstopreventlosingheatandlengtheningproofingtime.
BreadProofingTips
• Thawtheturkeyintherefrigeratoratleast24hoursper 5 lbs before cooking the bird.
• Usethebroilerpanandgrid,andtheroastingrack.The broiler pan will catch grease spills and the grid will help prevent spatters. The roasting rack will hold the turkey.
• Placeanovenrackonrackposition2(next-bottom).• Makesuretheroastingrackissecurelyseatedonthegridinthebroilerpan.Theroastingrackfitsonthe grid allowing the heated air to circulate under the food for even cooking and helps to increase browning on the underside.
Perfect Turkey Tips
To set a Bread Proof temperature of 100°F:1. Arrange interior oven racks and place bread
dough in the oven.2. Select oven by pressing UPPEROVENUPPER
OVEN.3. Press BREADPROOF .4. Press START tobeginthebreadproofing.5. The Cook Time, Timer and End Time features
canbesettocontrolyourBreadProoftime(readtheir sections for directions).
6. Remove food.7. Press CANCEL tostoporcanceltheBread
Proof feature at any time.
To change a Bread Proof temperature while the function is active:1. Select oven by pressing UPPEROVENUPPER
OVEN.
2. Press the HI +
hi or LO
-
lo pads to get to the desired
temperature.
To set a Perfect Turkey of 325°F:1. Arrange interior oven racks and place food in the oven.2. Insert the meat probe into the bird and connect
it in the oven (read the Probe section).3. Select oven by pressing UPPEROVENUPPER
OVEN.4. Press PERFECTTURKEY . A temperature
can be entered if another value than the default is needed.
Optional : Press PROBE if you wish to change the probe target temperature (see Probe section).5. Press START .6. Remove food from the oven when the temperature
probe chime signals that the oven has reached the set target temperature.
7. Press CANCEL to stop or cancel the Perfect Turkey feature at any time.
* Stuffed turkey requires additional roasting time. Shield legs and breast with foil to prevent overbrowning and dying of the skin.
Perfect Turkey ChartWeight
(lbs)OvenTemp.
InternalTemp.
Minuteper lb.
Turkey, Whole*12 to 16 325°F 180°F 8-10
Turkey, Whole* 16 to 20 325°F 180°F 10-15
Turkey, Whole* 20 to 24 325°F 180°F 12-16
Chicken 3 to 4 350-375°F 180°F 12-16
32
Figure 1
Setting Oven Controls
For many foods, especially roasts and poultry, testing the internal temperature is the best method to insure properly cooked food. The Temperature Probe gets the exact temperature you desire without having to guess.ThisfeaturecanbeusedwithBake,ConvectionBake,ConvectionRoastandPerfectTurkeycookingmodes. The oven can be programmed for Probe at any temperature between 130°F to 210°F with a default temperature of 170°F. This unit is equipped with one temperature probe entry in the upper oven.
Temperature probe
IMPORTANT• Useonlytheprobesuppliedwithyour
appliance; any other may result in damage to the probe or the appliance.
• HandletheTemperatureProbecarefullywheninserting and removing it from the food and outlet.
• Donotusetongstopullthecablewheninsertingorremoving the Probe. It could damage the Probe.
• Defrostyourfoodcompletelybeforeinsertingthe Probe to avoid breaking it.
• NeverleaveorstoretheTemperatureProbeinside the oven when not in use.
• Topreventthepossibilityofburns,carefullyunplug the Temperature Probe using hot pads.
Proper Temperature Probe Placement:1. Always insert the probe so that the tip rests in
thecenterofthethickestpartofthemeat.Donotallow probe to touch bone, fat, gristle or pan.
2. For bone-in ham or lamb, insert the Probe into the center of the lowest large muscle or joint. For dishes such as meat loaf or casseroles, insert the Probe into the center of the food. When cooking fish,inserttheProbefromjustabovethegillintothe meatiest area, parallel to the backbone.
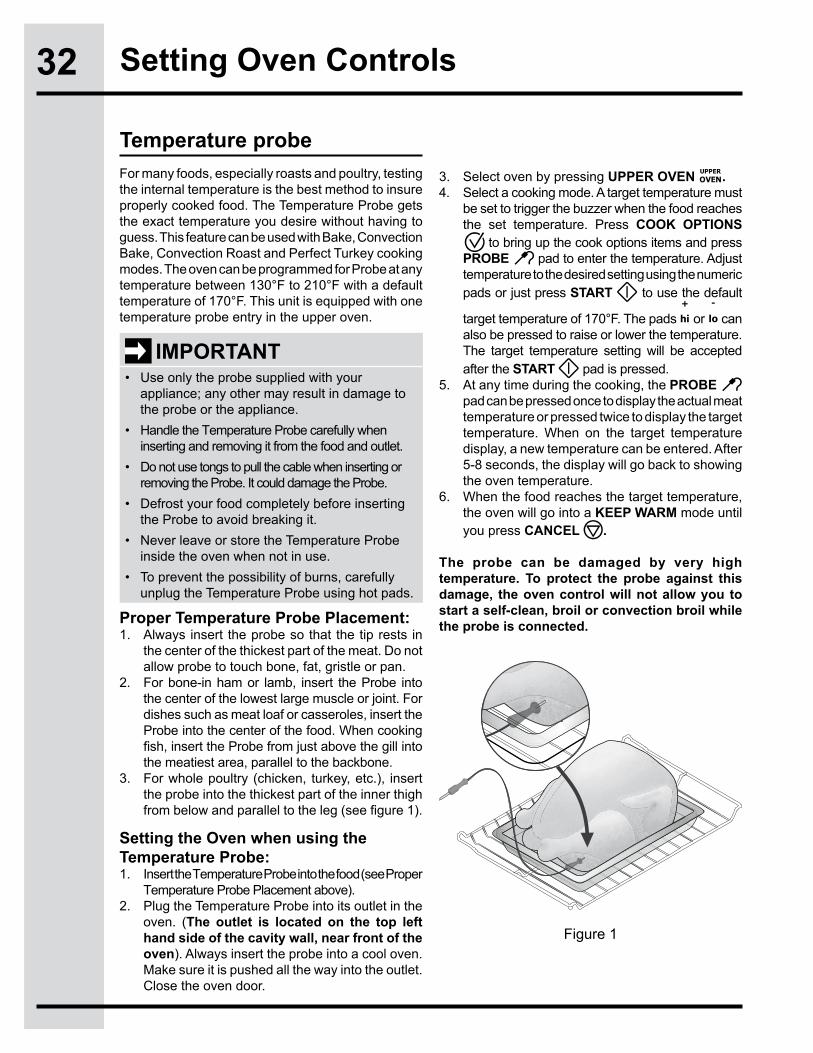
3. For whole poultry (chicken, turkey, etc.), insert the probe into the thickest part of the inner thigh frombelowandparalleltotheleg(seefigure1).
Setting the Oven when using the Temperature Probe:1. Insert the Temperature Probe into the food (see Proper
Temperature Probe Placement above).2. Plug the Temperature Probe into its outlet in the
oven. (The outlet is located on the top left hand side of the cavity wall, near front of the oven). Always insert the probe into a cool oven. Makesureitispushedallthewayintotheoutlet.Close the oven door.
3. Select oven by pressing UPPEROVEN UPPER
OVEN.4. Select a cooking mode. A target temperature must
besettotriggerthebuzzerwhenthefoodreachesthe set temperature. Press COOK OPTIONS
to bring up the cook options items and press PROBE pad to enter the temperature. Adjust temperature to the desired setting using the numeric pads or just press START to use the default
target temperature of 170°F. The pads +
hi or -
lo can also be pressed to raise or lower the temperature. The target temperature setting will be accepted after the START pad is pressed.
5. At any time during the cooking, the PROBE pad can be pressed once to display the actual meat temperature or pressed twice to display the target temperature. When on the target temperature display, a new temperature can be entered. After 5-8 seconds, the display will go back to showing the oven temperature.
6. When the food reaches the target temperature, the oven will go into a KEEPWARM mode until you press CANCEL .
The probe can be damaged by very high temperature. To protect the probe against this damage, the oven control will not allow you to start a self-clean, broil or convection broil while the probe is connected.

33Setting Oven Controls
This feature enables you to perform sequential cooking at the touch of a button. Its purpose is to program a queue of up to three cooking modes with individual cooking time and temperatures in a sequence. This feature can be used with most cooking modes; Baking, Broiling, Convection Baking, ConvectionRoasting,ConvectionBroiling,KeepWarmandBreadProof. A Cook Time can be programmed with your cooking mode and then queued. An auto-suggested set temperature outputs in the display as a default value during the set temperature programming. Any stage programmed with Broil or Convection Broilcannot last longer than 10 minutes. A proper cook time and a set temperature are required for every stage programming. At least two stages must be programmedbeforeaMulti-Stagecookingoperationstarts.Duringstage1cookingtheelectroniccontrolprovides temperature visual output in the display. Duringstage2and3,theelectroniccontroldisplaysthe set temperature only.
To set a Multi Stage sequence (Timed Convection Bake, Timed Broil, Keep Warm):1. Arrange interior oven racks and place food.2. Select oven by pressing UPPEROVENUPPER
OVEN.
3. Press MULTISTAGE .Stage 1
4. Press CONVECTIONBAKE . “350”willflashinthe display prompting to enter a temperature.
5. Enter a temperature using the numeric pads 0 to 9 .
6. Press START . “00:00”willstartflashinginthedisplay prompting to enter a cook time.
7. Enter a cook time using the numeric pads 0 to 9 .
8. Press START .TheMulti-Stageindicatorwillnow display the 2nd stage.
Multi stageStage 2
9. Press BROIL . “550”willstartflashing in thedisplay prompting to enter a temperature.
10. Enter a temperature using the numeric pads 0 to 9 .
11. Press START . “00:00”willstartflashinginthedisplay prompting to enter a cook time.
12. Enter a cook time using the numeric pads 0 to 9 .
13. Press START .TheMulti-Stageindicatorwillnow display the 3rd stage. If a third stage is not needed, press START a second time. This will start the cooking sequence.
Stage 3
14. Press KEEPWARM . “170”willstartflashingin the display prompting to enter a temperature.
15. Enter a temperature using the numeric pads 0 to 9 .
16. Press START . “00:00”willstartflashinginthedisplay prompting to enter a cook time.
17. Enter a cook time using the numeric pads 0 to 9 .
18. Press START . The cooking sequence will begin.
Canceling
19. At the end of the sequence, the display will show
“End” and a chime will sound.
20. Remove food.
21. Press CANCEL tostoporcanceltheMulti-
Stage sequence at any time (see below for further
details).
To cancel a Multi Stage sequence:A multi stage cooking can be canceled any time while it is in progress (or during its programming) by the Cancel key.
If the key is pressed during a multi-stage programming, the electronic control returns to Idle mode.

34 Setting Oven Controls
My favoriteThe Favorites settings allows you to save your most frequently used or most complex cooking sequences. This feature will save the cooking mode, the target temperature and the cooktime (if any). The oven can recall up to six cooking sequences from its internal memory, three for each oven, which are easily accessible from a one touch button. These functions can be used with all cooking modes and features.
To save a Favorite (example is a 450°F Bake for 30 minutes):- Saving a Favorite can only be done for an oven
which is currently in operation.1. Select oven by pressing either UPPEROVEN
UPPER
OVEN orLOWEROVENLOWER
OVEN.
2. Press BAKE . The default temperature will appear in the display.
3. Enter temperature needed; 4 5 0 .4. Press COOK OPTIONS to bring up the cook
options items.
5. Press COOK TIME .6. Enter time needed; 3 0 .
7. Press START .8. Press and hold for 3 seconds any MYFAVORITE
pad. Notice that the red indicator above the key will light up.
To recall a Favorite:- Recalling a Favorite can only be done for an oven
which is not currently in operation.1. Select oven by pressing either UPPEROVEN
UPPER
OVEN orLOWEROVENLOWER
OVEN.2. Press any MY FAVORITE pad which is
currently lighted up.
3. Press START .
To overwrite a Favorite:1. TooverwriteaMyFavoritesimplystartanew
cookingsequenceandsaveitintothesameMyFavorite location (1, 2 or 3) for the selected oven asshowninexampleabove.ThenewMyFavoritesettings will overwrite the old ones.
To delete a Favorite:1. Select oven by pressing either UPPEROVEN
UPPER
OVEN orLOWEROVENLOWER
OVEN.2. Press the currently lighted up MYFAVORITE
pad you wish to delete for 3 seconds.

35Setting Oven Controls
The HI +
hi and LO
-
lo pads are used to set the Sabbath
feature. The Sabbath feature may only be used with the BAKE pad. The oven temperature may be set higher or lower after setting the Sabbath feature (the oven temperature adjustment feature should be used only during Jewish Holidays), however the display will not visibly show or provide any audible tones indicating whether the change occurred correctly. Once the oven is properly set usingBakewith theSabbathfeature active, the oven will remain continuously ON until cancelled. This will override the factory preset 12-Hour Energy Saving feature.If the oven light will be needed during the Sabbath, press OVENLIGHT before activating the Sabbath feature. Once the oven light is turned ON and the Sabbath feature is active, the oven light will remain ON until the Sabbath feature is turned OFF. If the oven light needs to be OFF, be sure to turn the oven light OFF before activating the Sabbath feature.
Sabbath feature (for use on the Jewish sabbath & holidays)
IMPORTANTIt is not advised to attempt to activate any other program feature other than BAKE while the Sabbath feature is active. ONLY the following key pads will function after setting the Sabbath feature; CANCEL
, HI +
hi and LO -
lo.ALLOTHERKEYPADS will
not function once the Sabbath feature is properly activated.
To Program the Upper Oven to BeginBaking Immediately & Activate theSabbath feature (example: baking at 350°F)1. Place the food in the oven.2. Select oven by pressing either UPPEROVEN
UPPER
OVEN orLOWEROVENLOWER
OVEN.3. Press BAKE .4. If you desire to set the oven control for a COOK
TIME do so at this time. If not, skip this step and continue to step 5. Refer to their section for complete instructions. Remember the oven will shut down after using COOK TIME and therefore may only be used once during the Sabbath/Jewish Holidays.
5. Press START .
6. The oven will turn ON and begin heating immediately.
7. Press and hold both the HI +
hi and LO -
lo pads for at least 3 seconds. SAb will appear in the oven display and Sb in the cooktop displays. Once SAb appears in the display the oven control will no longer sound or display any further changes and the oven is properly set for the Sabbath feature.
8. The oven may be turned OFF at any time by pressing CANCEL pad (this will turn the oven OFF only). To turn OFF the Sabbath feature press and hold both the HI
+
hi and LO
-
lo pads for at least 3 seconds. SAb
will disappear from the display.
Should you experience a power failure or interruption, the oven will shut off. When power is returned the oven will not turn back on automatically. SF (Sabbath Failure) will be displayed in the oven control display and the surface element displays. The oven will remember that it is set for the Sabbath and the food may be safely removed from the oven while still in the Sabbath feature, however the oven cannot be turned back on until after the Sabbath. After the Sabbath observance turn OFF the Sabbath feature. Press and hold both the HI
+
hi and LO
-
lo pads for at least
3 seconds. SAb will disappear from the display and the oven may be used with all normal functions. For further assistance, guidelines for proper usage, and a complete list of models with the Sabbath feature, please visit the web at http:\\www.star-k.org.
NOTEYou may change the oven temperature once baking has started. The HI +
hi key pad will increase the
temperature by 5°F (2°C) at each key press. The LO
-
lo key pad will decrease the temperature by
5°F (2°C) at each key press. Remember that the oven control will no longer sound or display any further changes once the oven is set for the Sabbath feature.
Food poisoning hazard: do not let food sit for more than one hour before or after cooking. Doingsomayresultinfoodborneillness.
Notes for the use of the cooktop in Sabbath mode:• No Sabbath mode is available for induction
cooktops. When Sabbath mode is enabled, the cooktop will lock and it will not be possible to turn acookingzoneON.IfacookingzoneisONwhenSabbath is set, it will turn off.
36 SettingYourPreferences
UserpreferencesTheUserPreferencesmenuincludesalluserdefinedoptions. This feature enables you to control the various options of the electronic controls. This menu features theTimeofDay,CelsiusorFahrenheitdisplaymode,ContinuousBakeor12HourEnergySavingmodes,Clock display or No-Clock display, 12 Hours Time ofDayor24HoursTimeofDay,AudioControl,andAdjusting the oven temperature. The User Preferences menu is only available when the oven is not being used (not cooking).
TobrowsethroughtheUserPreferences menu:1. Press USERPREF to bring up the User
Preferences menu.
2. Press USERPREF again to browse through the menu pages.
3. Press +
hi or -
lo to toggle between the available
options.
4. Press START while the chosen option is on display to change.
5. Press CANCEL whenfinishedtogetbackto the standard oven display.
UserPreferencesmenuitems:•CLO 12:00; Setting the clock.•CLO on; Clock on/off.•CLO 12hr; 12/24 hour time of day display.• UPO; Adjusting oven temperature.• F-C F ; Fahrenheit / Celcius display.• AUd; Audio on/off and volume.• E S on ; 12 hour Energy Saving on/off.• rSt ; Reset to default factory settings.
Setting the clock - time of day
Setting clock display- on or off
The clock may be set for 12 or 24 hour time of day operation (see advanced settings section). The clock has been preset at the factory for the 12 hour operation.Whentherangeisfirstpluggedin,orwhenthe power supply to the range has been interrupted, the display will show “CLO 12:00”. The clock must be set before the oven can be used.When power to the unit has been interrupted, “12:00” appearsandflashesinthedisplay.TosettheClockin this case, skip step 1 in the example below and follow steps 2 and 3.
To set the clock (example for 1:30):1. Press USERPREF until you get to the CLO
12:00 menu page.
2. Press 1 3 0 pads to set the time of day to
1:30. The pads +
hi or -
lo can also be pressed to raise or lower the actual time displayed.
3. Press START to accept the changes and go back to user preferences menu display.
The oven control can be programmed to display the time of day or not. The oven has been preset at the factory to display the time of day.
Changing clock display between ON and OFF:1. Press USERPREF until you get to the
CLO on menu page.
2. Press -
lo or +
hi to toggle between displaying or hiding the clock.
3. Press START to accept the changes and go back to user preferences menu display.
37SettingYourPreferences
AudiocontrolAdjustingoventemperature The Audio Control feature allows the oven
control to be operated without or with sounds whenever necessary. If desired the control can be programmed for silent operation and later returned to operating with all the default sounds and chimes. The volume of the chimes can also be adjusted.
To change the audio mode or audio volume:1. Press USERPREF until you get to the AUd
menu page.
2. Press +
hi or -
lo to toggle between the available volume settings. AUd5 for the highest volume setting to AUd1 for the lowest volume. AUdOFF to disable the chimes.
3. Press START to accept the changes and go back to user preferences menu display.
The temperature in the oven has been pre-set at thefactory.Whenfirstusingtheoven,besuretofollow recipe times and temperatures. If you think the oven is too hot or too cool, the temperature in theovencanbeadjusted.Beforeadjusting,testarecipe by using a temperature setting that is higher or lower than the recommended temperature. The baking results should help you to decide how much of an adjustment is needed. Each oven can be individually adjusted.Donotuseoventhermometerssuchasthosefound in grocery stores to check the temperature settings inside the oven. These thermometers may display temperatures that vary greatly from the actual temperature.
To adjust the oven temperature:1. Press USERPREFERENCES until you get
to the UPO menu page.2. To select the oven you want to adjust, press
USERPREFERENCES again to toggle between the upper and the lower display.
3. Enter the temperature by pressing the +
hi or
-
lo
pads. The temperature can only be adjusted by ± 35°F.
4. Press START to accept the changes and go back to user preferences menu display.
The oven control can be programmed to display time of day in 12 hours or 24 hours mode. The oven has been preset at the factory to display in 12 hours mode.
Changing between 12 or 24 hour time of day display:1. Press USERPREF until you get to the
CLO 12hr menu page.
2 Press -
lo or +
hi to toggle the display of the clock in 12 or 24 hours.
3. Press START to accept the changes and go back to user preferences menu display.
4. Remember to set your clock after changing the time of day display mode.
The oven control can be programmed to display temperatures in Fahrenheit or Celsius. The oven has been preset at the factory to display in Fahrenheit.
To change display from Fahrenheit to Celsius or Celsius to Fahrenheit:1. Press USERPREF until you get to the F-C
F menu page.
2. Press +
hi or
-
lo to toggle between the °C and °F
display options.
3. Press START to accept the changes and go back to user preferences menu display.
Setting time of day display - 12 or 24 hours
Setting temperature display - Fahrenheit or Celsius

38 SettingYourPreferences
The oven control has a factory preset built-in 12 Hour Energy Saving feature that will shut off the oven if the oven control is left on for more than 11 hours and 59 minutes. The oven can be programmed to override this feature for Continuous Baking.
Changing between 12 hour energy saving and continuous bake:1. Press USERPREF until you get to the E S
menu page.
2. Press +
hi or
-
lo to toggle the energy saving
setting on and off.
3. Press START to accept the changes and go back to user preferences menu display.
The oven control can be set to return to its original factory settings. This includes: Setting the Clock ON/OFF to ON, Setting the clock display mode to 12h,DisplaymodetoFahrenheit,Settingtheoventemperatureadjustmenttozero,Settingaudiolevelto 5 and Enabling the 12h energy saving mode. ResetingthecontrolalsoerasetheMyFavoriterecipes.
To reset the oven control to its original settings:1. Press USERPREF until you get to the rSt
no menu page.
2. Press +
hi or -
lo to select YES.
3. Press START to reset to default factory settings.
Setting continuous bake or 12 hour energy saving
Re-setting to default factory settings

39
AdheretotheFollowingCleaningPrecautions:•Allowtheoventocoolbeforecleaning.•Wearrubbergloveswhencleaninganyexteriorparts of the oven manually.
Duringtheself-cleaningcycle,theoutsideoftheovencanbecomeveryhottothetouch.DONOT leave small children unattended near the appliance.
Beforecleaninganypartoftheoven,besuretheoven is turned off or else push CANCEL pad. Wait until the oven is cool.
DO NOT use commercial oven cleaners or oven protective coatings in or around any part of the self-cleaningoven.DONOTcleantheovendoorgasket. The gasket on the oven door is essential for a good seal. Care should be taken not to rub, damageormovethegasket.DONOTuseanycleaningmaterialsonthegasket.Doingsocoulddamageit.DONOTusealuminumfoiltolinetheoven bottom. This may affect cooking or foil could melt and damage the oven surface.
Preparing the Oven for Self-Cleaning:• Remove any excess spillovers in the oven
cavity before starting the self-cleaning cycle. To clean, use hot soapy water and a cloth. Large spilloverscancausesmokeorafirewhensubjectedtohightemperatures.DONOTallowfood spills with a high sugar or acid content (such as tomatoes, sauerkraut, fruit juices or piefilling)toremainonthesurfaceastheymayleave a dull spot even after cleaning.
• Clean any soil from the oven frame and the door liner (see illustration). These areas heat sufficientlyduringaself-cleantoburnsoilon.Clean with hot soapy water.
Usingtheself-cleanfeature
Setting Self-Clean Cycle
• Thehealthofsomebirdsisextremelysensitiveto the fumes given off during the self-cleaning cycleofanyrange.Movebirdstoanotherwell-ventilated room.
• Remove the broiler pan and insert, all utensils and any foil. These items can not withstand high cleaning temperatures.
• This model comes with lubricated porcelain oven racks, which can remain in the oven during theself-cleancycle.Donotcleanthisvegetableoil lubrication off the racks. It is important that the sides of the oven racks always have a light coating of vegetable oil. To maintain optimal rack performance, re-apply a thin layer of vegetable oil to the sides of the rack after every self-clean cycle or when the rack becomes difficulttoslide.
• After a self-clean cycle, or anytime the gliding is rough, the glide racks should be treated with graphite lubrication. For instructions on how to care for your oven racks, see “Caring for Your Porcelain Enameled Glide Racks” in the Care and Cleaning section.
DoHandCleanDoorAreaoutside of the Door Gasket
Do Hand Clean Frame
Do NOT Hand Clean Door Gasket

40
A self-cleaning oven cleans itself with high temperatures (well above cooking temperatures) which eliminate soil completely or reduce it to a finepowderedashyoucanwhiskawaywithdampcloth. If you are planning to use the oven directly after a self-clean cycle remember to allow time for the oven to cool down and the oven door to unlock. This normally takes about one hour.
To set the controls for a Self-Cleaning cycle:1. Porcelain racks can stay in the oven during
the self-clean cycle but it is recommended to remove them.
2. Besuretheclockissetwiththecorrecttimeofday and the oven door is closed.
3. Select oven by pressing UPPEROVEN UPPER
OVEN.4. Press CLEAN .5. Press LITE for a 2 hour self-clean, or press
MEDIUM for 3 hours, or press HEAVY for 4 hours.
6. Press START . The “DOOR ” icon will flash.
7. As soon as the control is set, the motor driven oven door lock will begin to close automatically. Once the door has been locked the “DOOR ”indicatorlightwillstopflashingandremainon.
Note: When the oven is set to run a self-clean cycle, the motor door lock will begin locking the ovendoor.Donotopentheovendoorwhilethe lock motor is running or when any locking indicators or displays are showing. The oven door is completely locked in about 15 seconds.
To set the controls for a delayed Self-Cleaning cycle:1. Follow the instructions above.
2. Press COOK OPTIONS to bring up the cook options items.
3. Press END TIME .4. Enter time of day needed for the end of the cycle
(example for “6:00”; 6 0 0 ).
5. Press START .
Starting self-clean cycle
Setting Self-Clean Cycle
When the Self-Clean Cycle is Completed:1. The time of day and “DOOR ” will remain
ON.2. The display will show an “Hot” message while
the oven is still too hot to open door.3. Once the oven has cooled down for 1 HOUR,
and the “DOOR ” icon is no longer displayed, the oven door can then be opened.
Stopping or Interrupting a Self-Cleaning Cycle:If it becomes necessary to stop or interrupt a self-cleaning cycle due to excessive smoke:1. PressCANCEL .2. Once the oven has cooled down for
approximately 1 HOUR and the “DOOR ” icon is no longer displayed, the oven door can then be opened.
• Duringtheself-cleaningcycle,theoutsideoftheappliance can become very hot to the touch. DO NOT leave small children unattended near the appliance; they may be burned if they touch the hot oven door surfaces.
• Donotforcetheovendooropenwhenself-clean is active. This can damage the automatic door-locking system. Use caution when open-ing the door after self-clean cycle is complete; the oven may still be very hot.
•The oven bake and broil elements may appear to have cooled after they have been turned off. The elements may still be hot and burns may occur if these elements are touched before they have cooled.
•To avoid possible burns, use care when open-ing the oven door after the self-cleaning cycle. Stand to the side of the oven when opening the door to allow hot steam and air to escape.

41
Cleaning various parts of your appliance chart
Care & Cleaning
CleaningVariousPartsofYourapplianceBeforecleaninganypartoftheappliance,besureallcontrolsareturnedOFFandtheapplianceisCOOL.REMOVESPILLOVERSANDHEAVYSOILINGASSOONASPOSSIBLE. REGULAR CLEANINGS WILL REDUCETHENUMBEROFMAjORCLEANINGSLATER
Surfaces How to CleanGlass, Painted and Plastic BodyPartsandDecorativeTrim
For general cleaning, use hot, soapy water and a cloth. For more difficult soils and built-up grease, apply a liquid detergent directly onto the soil. Leave on soil for 30 to 60 minutes. Rinse with a damp cloth and dry. DO NOT use abrasive cleaners on any of these materials; they can scratch.
Control Panel Before cleaning the control panel, turn all controls to OFF. Lightly spray the control panelwithaliquidcleaner.Wipewithasoftclothorpapertowel.DONOTuseabrasive cleaners or scouring pads. These can permanently damage the control panel surface.
Porcelain EnamelBroilerPanandGrid
Gentle scouring with a soapy scouring pad will remove most spots. Rinse with a 1:1 solution of clear water and ammonia. If necessary,coverdifficultspotswithanammonia-soaked paper towel for 30 to 40 minutes. Rinse with clean water and a dampcloth,andthenscrubwithasoap-filledscouringpad.Rinseandwipedrywith a clean cloth. Remove all cleaners or the porcelain may become damaged during future heating.
Stainless Steel, ChromeDecorative Trim, Oven Racks,Oven Racks Support
Clean with hot, soapy water and a dishcloth. Rinse with clean water and a cloth. Cover stubborn spots with an ammonia-soaked paper towel for 30 to 40 minutes. Rinse.Cleanersmadeespeciallyforstainlesssteelarerecommended.Besuretorinse the cleaners as bluish stains may occur during heating and cannot be removed.
Porcelain Coated Oven Racks This oven comes with lubricated porcelain oven racks, which can remain in the ovenduringtheself-cleancycle.Donotcleanthisvegetableoillubricationoffthe racks. It is important that the sides of the oven racks always have a light coating of vegetable oil. To maintain optimal rack performance, re-apply a thin layer of vegetable oil to the sides of the rack after every self-clean cycle or whentherackbecomesdifficulttoslide.For instructions on how to care for your glide racks, see “Caring for Your Porce-lain Enameled Glide Racks” on page 46.
Oven Door To clean oven door, wash with hot, soapy water and a clean cloth. DO NOT immerse the door in water or clean the oven door gasket
Oven Door Gasket The oven gasket located on the inner frame of the door and visible when the door is opened is essential for a good seal. Care should be taken not to rub, damage or remove the gasket.
Lower Oven To remove burned-on fat on oven walls, moisten soiled parts with household am-monia,usingawetcloth.Completecleaningwithadampclothanduseafinesteel wool scouring agent if necessary.

42 Care & Cleaning
Replacingthedualleft/rightcorner oven lights
1. Turn electrical power off at the main source.2. Remove interior oven light shield by turning a
quarter turn counter-clockwise.3. Replace bulb with a new T-4 type Halogen 25
wattappliancebulb.Donottwistthebulb,pullit straight out.
IMPORTANT!Donotallowyourfingerstotouchthe new bulb when replacing. This will shorten the life of the bulb. Use a paper towel or cotton glove while handling the new bulb when installing.
4. Replace glass oven light shield by rotating clockwise.
5. Turn power back on again at the main source (or plug the appliance back in).
6. Besuretoresetthetimeofdayontheclock.
Besuretherangeisunpluggedandallpartsare COOL before replacing oven light. Wear a leather-faced glove for protection against possible broken glass.
Special care and cleaning are required for maintaining the appearance of stainless parts. Please refer to the table provided at the beginning of the General Care & Cleaning section in this Use&CareManual.
The interior oven lights are located at the rear of the oven cavity and are covered with a glass shield. The glass shield must be in place whenever the oven is in use.
To replace the oven interior light bulb:
Care and cleaning of stainless steel
• Do not close the oven door until all the interior oven racks are fully inserted and retracted to the back of the oven.
• Donothittheglasswithpots,pans,oranyother object. The oven door glass may break or even break at a later time unexpectedly.
• Scratching,hitting,jarringorstressingtheovendoor glass may weaken its structure causing an increased risk of breakage at a later time.
• Youmayuseaglasscleanerontheoutsideof the oven door glass. Do not spray or allow water or the cleaner to enter or drip down into the oven door vents. Spray cleaner on cloth firstandthenwipetheovendoorclean.
• Do not use strong oven cleaners, powders or any harsh abrasive cleaning materials on the outside of the oven door or glass.
• Never clean the oven door gasket. The oven door gasket should always clean during the Self-clean cycle.
Special door care instructions
IMPORTANTMost oven doors contain glass that can break. Read the following recommendations:

43Care & Cleaning
Removing and replacing the oven door
To prevent possible burns, do not attempt to remove the oven door until the oven has completely cooled.
To Remove Oven Door:1. Openovendoorcompletely(horizontalwithfloor-Fig.1).2. Pull the door hinge locks on both left and right door hinges
down from the oven frame completely towards the oven door (Fig.2).Atoolsuchasasmallflat-bladescrewdrivermayberequired.
3. Firmly grasp both sides of oven door along the door sides (Donotusetheovendoorhandle).
4. Close the door to about a 10 degrees. The oven door will stop into this position just before fully closing.
5. With the oven door in this position (Fig. 3), lift and carefully pulltheovendoorawayfromtheovenframe.Toavoidfinishdamage, be careful not to allow the oven door hinges to contact the oven front frame.
To Replace Oven Door:1. Firmly grasp both sides of oven door along the door sides
(Donotusetheovendoorhandle).2. Holding the oven door at the same angle as the removal
position, carefully line up and insert both door hinge arms between the pins located on each side of the oven door frame (Fig. 4)
3. With both door hinge arms in place, open the oven door (horizontalwithfloor-Fig.1).
4. Push the door hinge locks up towards and into the oven frame for both left and right oven door hinges (Fig. 2) to the locked position.
5. Close the oven door.
Special Door Care InstructionsCAUTION-Mostovendoorscontainglassthatcanbreak.
Read the following recommendations: • Donotclosetheovendooruntilalltheovenracksarefullyin
place.• Donothittheglasswithpots,pans,oranyotherobject.• Scratching, hitting, jarring or stressing the glass may weaken
its structure causing an increased risk of breakage at a later time.
Figure 1 - Door hinge location
Figure 2 - Door hinge locks
Figure 3 - Holding door for removal
Figure 4 - Location of hinge arm and roller pin
Oven door hinge location
About
Ovendoor
Hinge
Roller pin
Hinge arm
The door is heavy. Be careful when removing and lifting the door. Do not lift the oven door by the handle.

44 Care and Cleaning
Cooktop cleaning and maintenance
Cleaning recommendations for the ceramic glass cooktop
Consistent and proper cleaning is essential to maintaining your ceramic glass cooktop
Priortousingyourcooktopforthefirsttime,apply the recommended Cleaning Creme to the ceramic surface. A sample of that cleaning creme is supplied with your cooktop and it is available in most hardware stores. Clean and buff with a paper towel. This will make cleaning easier when soiled from cooking. The special cooktop cleaning cream leavesaprotectivefinishontheglasstohelpprevent scratches and abrasions.
Sliding aluminum or copper clad bottom pans on the cooktop can cause metal markings on the cooktop surface. These marks should be removed immediately after the cooktop has cooled using thecooktopcleaningcream.Metalmarkscanbecome permanent if not removed prior to future use.
Cookware (cast iron, metal, ceramic or glass) with rough bottoms can mark or scratch the cooktop surface. Do not slide anything metal or glass across the cooktop. Do not use your cooktop as a cutting board or work surface in the kitchen. Do not cook foods directly on the cooktop surface without a pan. Do not drop heavy or hard objects on the glass cooktop, they may cause it to crack or break.
DO NOT use a cooktop cleaner on a hot cooktop. The fumes can be hazardous to your health, and can chemically damage the ceramic-glass surface.
Before cleaning the cooktop, be sure the controls are turned to OFF and the cooktop is COOL.
For light to moderate soil:Apply a few drops of CookTop® Cleaning Creme directly to the cooktop. Use a paper towel to clean theentirecooktopsurface.Makesurethecooktopiscleanedthoroughly,leavingnoresidue.Donotuse the towel you use to clean the cooktop for any other purpose.For heavy, burned on soil:First, clean the surface as described above. Then, if soils remain, carefully scrape soils with a metal razorbladescraper,holdingscraperata30degreeangle to the surface. Remove loosened soils with cooktop cleaning cream and buff surface clean.

45
Cleaning recommendations for the ceramic glass cooktop (continued)
Care and Cleaning
Damage to the ceramic glass cooktop may occur if you use scrub pad.
Plastic or foods with a high sugar content:These types of soils must be removed immediately if spilled or melted onto the ceramic cooktop surface. Permanent damage (such as pitting of the cooktop surface) may occur if not removed immediately. After turning the surface elements OFF,usearazorbladescraperorametalspatulawith a mitt and scrape the soil from the hot surface (as illustrated on previous page). Allow the cooktop to cool, and use the same method for heavy or burned on soils.
Do not use the following on the ceramic glass cooktop:
SpecialCautionforAluminumFoilandAluminumCookingUtensils•Aluminumfoil-Use of aluminum foil will damage thecooktop.Donotusethinaluminumcookingutensils or allow foil to touch the ceramic cooktop under ANY circumstances.
•Aluminumutensils-The melting point of aluminum is much lower than that of other metals. Care must be taken when aluminum pots or pans are used on the cooktop. If allowed to boil dry, not only will the utensil be destroyed, but it may fuse to, break or mark the ceramic glass surface, permanently damaging the cooktop surface.
To make cleaning easier, line the bottom of the broilerpanwithaluminumfoil.DONOTcoverthebroiler grid with foil.
To prevent grease from baking on, remove the broiler pan from the oven as soon as cooking is completed. Use hot pads because the broiler pan is extremely hot. Pour off grease. Soak the pan in HOT, soapy water.
Clean the broiler pan as soon as possible after eachuse.Ifnecessary,usesoap-filledsteelwoolpads. Heavy scouring may scratch the grid.
Grid
BroilerPan
Broiler pan cleaning tips
• Donotuseabrasivecleanersandscouringpads, such as metal and some nylon pads. They may scratch the cooktop, making it moredifficulttoclean.
• Donotuseharshcleaners,suchaschlorinebleach, ammonia or oven cleaners, as they may etch or discolor the cooktop.
• Donotusedirtysponges,clothsorpapertowels, as they can leave soil or lint on the cooktop which can burn and cause discoloration.
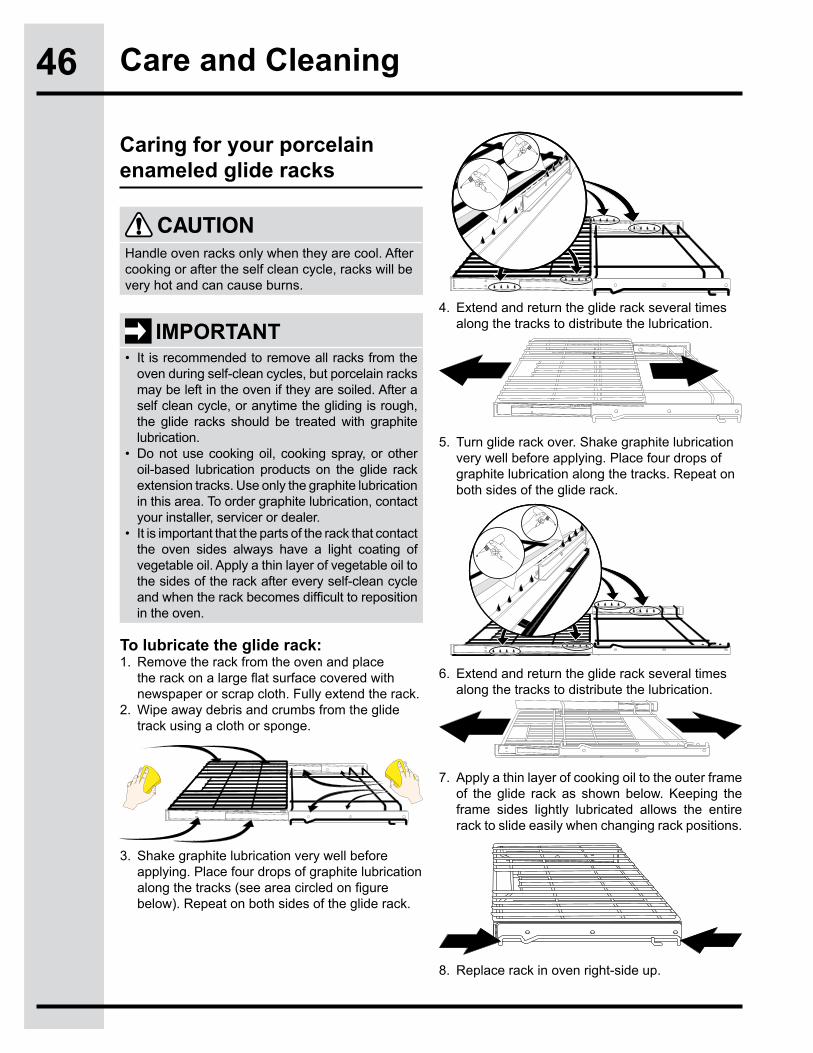
46
To lubricate the glide rack:1. Remove the rack from the oven and place
therackonalargeflatsurfacecoveredwithnewspaper or scrap cloth. Fully extend the rack.
2. Wipe away debris and crumbs from the glide track using a cloth or sponge.
4. Extend and return the glide rack several times along the tracks to distribute the lubrication.
5. Turn glide rack over. Shake graphite lubrication very well before applying. Place four drops of graphite lubrication along the tracks. Repeat on both sides of the glide rack.
6. Extend and return the glide rack several times along the tracks to distribute the lubrication.
7. Apply a thin layer of cooking oil to the outer frame of the glide rack as shown below.Keeping theframe sides lightly lubricated allows the entire rack to slide easily when changing rack positions.
8. Replace rack in oven right-side up.
Care and Cleaning
Caring for your porcelain enameled glide racks
Handle oven racks only when they are cool. After cooking or after the self clean cycle, racks will be very hot and can cause burns.
IMPORTANT• It is recommended to remove all racks from the
oven during self-clean cycles, but porcelain racks may be left in the oven if they are soiled. After a self clean cycle, or anytime the gliding is rough, the glide racks should be treated with graphite lubrication.
• Donotusecookingoil, cookingspray,orotheroil-based lubrication products on the glide rack extension tracks. Use only the graphite lubrication in this area. To order graphite lubrication, contact your installer, servicer or dealer.
• It is important that the parts of the rack that contact the oven sides always have a light coating of vegetable oil. Apply a thin layer of vegetable oil to the sides of the rack after every self-clean cycle andwhentherackbecomesdifficulttorepositionin the oven.
3. Shake graphite lubrication very well before applying. Place four drops of graphite lubrication alongthetracks(seeareacircledonfigurebelow). Repeat on both sides of the glide rack.
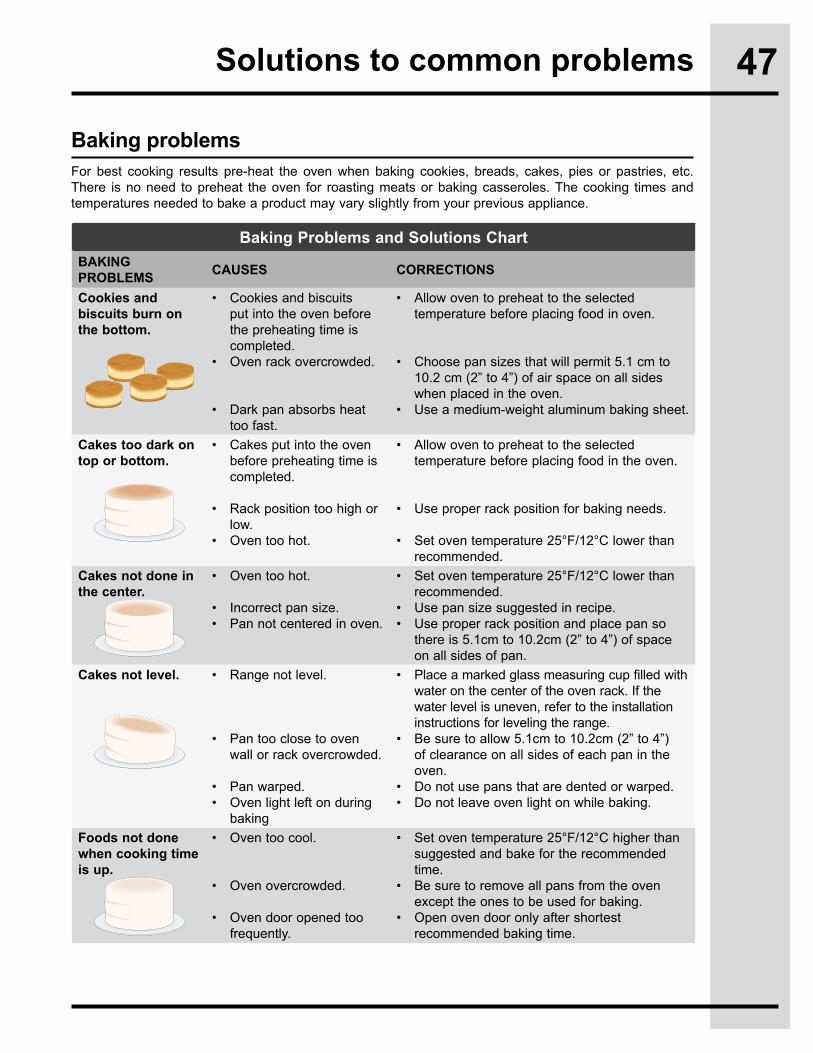
47Solutions to common problems
Baking Problems and Solutions ChartBAKINGPROBLEMS CAUSES CORRECTIONS
Cookies and biscuits burn on the bottom.
• Cookiesandbiscuitsput into the oven before the preheating time is completed.
• Ovenrackovercrowded.
• Darkpanabsorbsheattoo fast.
• Allowoventopreheattotheselectedtemperature before placing food in oven.
• Choosepansizesthatwillpermit5.1cmto10.2 cm (2” to 4”) of air space on all sides when placed in the oven.
• Useamedium-weightaluminumbakingsheet.
Cakes too dark on top or bottom.
• Cakesputintotheovenbefore preheating time is completed.
• Rackpositiontoohighorlow.
• Oventoohot.
• Allowoventopreheattotheselectedtemperature before placing food in the oven.
• Useproperrackpositionforbakingneeds.
• Setoventemperature25°F/12°Clowerthanrecommended.
Cakes not done in the center.
• Oventoohot.
• Incorrectpansize.• Pannotcenteredinoven.
• Setoventemperature25°F/12°Clowerthanrecommended.
• Usepansizesuggestedinrecipe.• Useproperrackpositionandplacepanso
there is 5.1cm to 10.2cm (2” to 4”) of space on all sides of pan.
Cakes not level. • Rangenotlevel.
• Pantooclosetoovenwall or rack overcrowded.
• Panwarped.• Ovenlightleftonduring
baking
• Placeamarkedglassmeasuringcupfilledwithwater on the center of the oven rack. If the water level is uneven, refer to the installation instructions for leveling the range.
• Besuretoallow5.1cmto10.2cm(2”to4”)of clearance on all sides of each pan in the oven.
• Donotusepansthataredentedorwarped.• Donotleaveovenlightonwhilebaking.
Foods not done when cooking time is up.
• Oventoocool.
• Ovenovercrowded.
• Ovendooropenedtoofrequently.
• Setoventemperature25°F/12°Chigherthansuggested and bake for the recommended time.
• Besuretoremoveallpansfromtheovenexcept the ones to be used for baking.
• Openovendooronlyaftershortestrecommended baking time.
Baking problemsFor best cooking results pre-heat the oven when baking cookies, breads, cakes, pies or pastries, etc. There is no need to preheat the oven for roasting meats or baking casseroles. The cooking times and temperatures needed to bake a product may vary slightly from your previous appliance.

48 Solutions to common problems
Before calling for service, review this list. It may save you both time and expense. This list includes common experiences that are not the result of defective workmanship or material in your cooktop.
Questions or for service call: 1-877-4ELECTROLUX (1-877-435-3287)
Before you call
Problem Solution
Oven control chimes and displays an F error code.
• Electroniccontrolhasdetectedafaultcondition.PushCANCELpad to clear the display and stop the display from beeping. Reprogram the oven. If a fault reoccurs, record the fault number, push the CANCELpad and contact an authorizedservicer.
Installation • Placeovenrackincenterofoven.Placealevelontheovenrack.Contactinstallingagentifrackandcabinetcutoutflooringarenotlevel.
• Kitchencabinetmisalignmentmaymake rangeappear tobenot level.Besurecabinets are square and level. Contact cabinet maker to correct problem.
Entire range does not operate
• Whentherangeisfirstpluggedin,orwhenthepowersupplytotheovenhasbeeninterrupted,thedisplaywillflash.Therangecannotbeprogrammeduntiltheclockis set.
• Besureelectricalcordissecurelyconnectedintotheelectricaljunctionbox.• Cord/plugisnotinstalledand/orconnected.Cordisnotsuppliedwithrange.Contact
yourdealer,installingagentorauthorizedservicer.• Servicewiringnot complete.Contact yourdealer, installingagentor authorized
servicer.• Poweroutage.Checkhouselightstobesure.Callyourlocalelectriccompany.• Shortincord/plug.Replacecord/plug.• Controlsarenotsetproperly.Seeinstructionstosetthecontrols.• Housefusehasblownorcircuitbreakerhastrippedimmediatelyfollowinginstallation.• House fusemaynotbe fullyengaged.Check fuseandscreworengagecircuit
breaker securely.Oven light does not work
• Burned-outorloosebulb.FollowtheinstructionsunderOven Light to replace or tighten the bulb.
Self-cleaning cycle does not work
• Makesuretheovendoorisclosed.• Controlsnotsetproperly.Followinstructionsunder“SettingSelf-Clean”.
Oven smokes excessively during broiling
• Meattooclosetothebroilerelement.Repositiontheracktoprovidemoreclearance between the meat and the broiler. Preheat broil element for quick searing operation.
• Meatnotproperlyprepared.Removeexcessfatfrommeat.Cutremainingfattyedges to prevent curling, but do not cut into the lean.
• Gridonbroilerpanwrongside-up.Greasedoesnotdrainintobroilerpan.Alwaysplace the grid on the broiler pan with the ribs up and the slots down to allow grease to drip into the pan.
• Broilerpanusedwithoutgridorgridcoverwithaluminumfoil. DO NOT use the broiler pan without the grid or cover the grid with aluminum foil.
• Ovenneedstobecleaned.Greasehasbuiltuponovensurfaces.Regularcleaning is necessary when broiling frequently. Grease or food spatters cause excessive smoking.

49
Before you call
Problem Solution
Soil not completely remove after self-cleaning cycle is completed
• Failure to clean bottom, from top of oven, frame of oven or door area outside oven seal. These areas are not in the self-cleaning area, but get hot enough to burn on residue.Cleantheseareasbeforetheself-cleaningcycleisstarted.Burnedonresiduecanbecleanedwithastiffnylonbrushandwateroranylonscrubber.Becareful not to damage the oven gasket.
• Excessive spillovers in oven. Set the self-clean cycle for longer cleaning time.Poor cooking results
• Manyfactorsaffectbakingresults.Seebakingforhints,causeandcorrections.See Adjusting Oven Temperature.
• Adjusttherecipe’srecommendedpowerlevelsorcookingtimes.• Cookwareistoolightweightorwarped.Useheavierqualitycookwaresofoods
being prepared may cook more evenly.Flames inside oven or smoking from oven vent
• Excessive spillovers in oven. This is normal, especially for high oven temperatures, pie spillovers or for large amounts of grease on bottom of oven. Wipe up excessive spillovers.
Surface element does not heat
• No power to appliance. Check/reset breaker or replace fuse. If the problem is a circuit overload, or improper connection of the armored cable supplied with the appliance, havethissituationcorrectedbyaqualifiedelectrician.
• Too low heat setting. Turn control to a slightly higher setting until element comes on.
• Incorrect control is ON.Besuretousecorrectcontrolfortheelementneeded.
• Nocookwarewasplacedontheinductioncookingzonesorthecookwarematerialtype is incorrect for induction cooking.
Surface element too hot or not hot enough
• Incorrect control setting. Raise or lower setting until proper amount of heat is obtained. Dialmarkingsareanindicatorofrelativeheatsettingsandwillvaryslightly.
• Lightweightorwarpedpansbeingused.Useonlyflat,evenlybalanced,mediumorheavyweight cookware.
• Voltageisincorrect.Besureapplianceisproperlyconnectedtothespecifiedpowersource.
• Useonlyflatbottom,evenlybalanced,mediumorheavyweightcookware.Panshaving a flat bottomheat better thanwarped pans.Cookwarematerial affectsheating.Heavyandmediumweightpansheatevenly.Because lightweightpansheat unevenly, foods may burn easily.
Food not heating evenly
• Impropercookware.Selectflat-bottomedcookwareofapropersizetofitelement.• Incorrect control setting. Raise or lower setting until proper amount of heat is obtained.
Oven racks do not slide easily.
• This oven comes with lubricated porcelain oven racks, which can remain in the ovenduringtheself-cleancycle.Donotcleanthisvegetableoillubricationoffthe racks. It is important that the sides of the oven racks always have a light coating of vegetable oil. To maintain optimal rack performance, re-apply a thin layer of vegetable oil to the sides of the rack after every self-clean cycle or when therackbecomesdifficulttoslide.
Questions or for service call: 1-877-4ELECTROLUX (1-877-435-3287)
Solutions to common problems

50
Before you call
Problem Solution
Glide racks do not slide smoothly
• Glide racks need lubrication. For instructions on how to care for your oven racks, see “Caring for Your Porcelain Enameled Glide Racks” on page 46.
Scratches or abrasions on ceramic glass cooktop surface
• Coarseparticles(suchassaltorsand)arebetweencooktopandutensil.Besurecooktop surface and bottom of utensils are clean before use. Small scratches do not affect cooking and will become less visible with use.
• Cleaning materials not recommended for glass ceramic cooktop have been used. See Ceramic-Glass Cooktop section in this Owner’s Guide.
• Cookwarewithroughbottomhasbeenused.Useflat-bottomed,smoothutensils.See Selecting SurfaceCookingUtensils in this Owner’s Guide
Brown streaks and specks on ceramic glass cooktop surface
• Boilovershavecookedontosurface.Userazorbladescrapertoremovesoil.Seeinstructions under General Care & Cleaning.
• Cleaningmaterialsnotrecommendedforceramic-glasscooktophavebeenused.Use recommended cleaners and cleaning method. See Ceramic-Glass Cooktop section in this Owner’s Guide.
Areasofdiscoloration on ceramic glass cooktop surface
• Mineral deposits fromwater and food.Wet surfacewithwater and sprinkle ona cooktop cleaning creme. Scrub with a clean damp paper towel until the stain disappears. Wipe remaining paste away, then apply a small amount of cooktop cleaning creme and polish with a clean paper towel. Use cookware with clean, dry bottoms. See Ceramic-Glass Cooktop section in this Owner’s Guide.
Metal marks on ceramic glass cooktop surface
• Slidingorscrapingofmetalutensilsoncooktopsurface.Donotslidemetalutensilson cooktop surface. Use a mildly abrasive cleanser to remove marks
Questions or for service call: 1-877-4ELECTROLUX (1-877-435-3287)
Solutions to common problems

51
Your appliance is covered by a one year limited warranty. For one year from your original date of purchase, Electrolux will repair or replace any parts of this appliance that prove to be defective in materials or workmanship when such appliance is installed, used, and maintained in accordance with the provided instructions. In addition, the glass cooktop or radiant surface element of your appliance (excluding built-in and free-standing range appliances) is covered by a two through fiveyearlimitedwarranty.Duringthe2ndthrough5thyearsfromyouroriginaldateofpurchase,Electroluxwillprovidea replacement glass cooktop or radiant surface element for your appliance which has proven to be defective in materials or workmanship when such appliance is installed, used, and maintained in accordance with the provided instructions.
Exclusions This warranty does not cover the following:1. Products with original serial numbers that have been removed, altered or cannot be readily determined.2. Product that has been transferred from its original owner to another party or removed outside the USA or Canada.3. Rust on the interior or exterior of the unit.4. Products purchased “as-is” are not covered by this warranty. 5. Foodlossduetoanyrefrigeratororfreezerfailures.6. Products used in a commercial setting. 7. Service calls which do not involve malfunction or defects in materials or workmanship, or for appliances not in ordinary
household use or used other than in accordance with the provided instructions.8. Service calls to correct the installation of your appliance or to instruct you how to use your appliance.9. Expenses for making the appliance accessible for servicing, such as removal of trim, cupboards, shelves, etc., which
are not a part of the appliance when it is shipped from the factory. 10.Servicecallstorepairorreplaceappliancelightbulbs,airfilters,waterfilters,otherconsumables,orknobs,handles,
or other cosmetic parts.11.Labororin-homeservicecostsduringtheadditionallimitedwarrantyperiodsbeyondthefirstyearfromyouroriginal
date of purchase.12. Pickup and delivery costs; your appliance is designed to be repaired in the home.13. Surcharges including, but not limited to, any after hour, weekend, or holiday service calls, tolls, ferry trip charges, or
mileage expense for service calls to remote areas, including the state of Alaska.14.Damagestothefinishofapplianceorhomeincurredduringtransportationorinstallation,includingbutnotlimitedto
floors,cabinets,walls,etc.15.Damagescausedby:servicesperformedbyunauthorizedservicecompanies;useofpartsotherthangenuineElectrolux
partsorpartsobtainedfrompersonsotherthanauthorizedservicecompanies;orexternalcausessuchasabuse,misuse,inadequatepowersupply,accidents,fires,oractsofGod.
DISCLAIMEROFIMPLIEDWARRANTIES;LIMITATIONOFREMEDIESCUSTOMER’S SOLEAND EXCLUSIVE REMEDY UNDER THIS LIMITEDWARRANTY SHALL BE REPAIR ORREPLACEMENTASPROVIDEDHEREIN.CLAIMSBASEDONIMPLIEDWARRANTIES,INCLUDINGWARRANTIESOFMERCHANTABILITYORFITNESSFORAPARTICULARPURPOSE,ARELIMITEDTOONEYEARORTHESHORTESTPERIODALLOWEDBYLAW,BUTNOTLESSTHANONEYEAR. ELECTROLUXSHALLNOTBELIABLEFORCONSEQUENTIALORINCIDENTALDAMAGESSUCHASPROPERTYDAMAGEANDINCIDENTALEXPENSES RESULTING FROM ANY BREACH OF THIS WRITTEN LIMITED WARRANTY OR ANY IMPLIEDWARRANTY.SOMESTATESANDPROVINCESDONOTALLOWTHEEXCLUSIONORLIMITATIONOFINCIDENTALORCONSEQUENTIALDAMAGES,ORLIMITATIONSONTHEDURATIONOFIMPLIEDWARRANTIES,SOTHESELIMITATIONSOREXCLUSIONSMAYNOTAPPLYTOYOU.THISWRITTENWARRANTYGIVESYOUSPECIFICLEGALRIGHTS.YOUMAYALSOHAVEOTHERRIGHTSTHATVARYFROMSTATETOSTATE.
IfYouNeedServiceKeepyour receipt,deliveryslip,orsomeotherappropriatepayment record toestablish thewarrantyperiodshouldservice be required. If service is performed, it is in your best interest to obtain and keep all receipts. Service under this warranty must be obtained by contacting Electrolux at the addresses or phone numbers below.This warranty only applies in the USA, Puerto Rico and Canada. In the USA and Puerto Rico, your appliance is warranted byElectroluxMajorAppliancesNorthAmerica,adivisionofElectroluxHomeProducts,Inc.InCanada,yourapplianceiswarrantedbyElectroluxCanadaCorp.Electroluxauthorizesnopersontochangeoraddtoanyobligationsunderthiswarranty.ObligationsforserviceandpartsunderthiswarrantymustbeperformedbyElectroluxoranauthorizedservicecompany.Productfeaturesorspecificationsasdescribedorillustratedaresubjecttochangewithoutnotice.
USA1.800.944.9044Electrolux Home Products, Inc.,10200DavidTaylorDriveCharlotte, NC 28262
Canada1-800-265-8352Electrolux Canada Corp.5855 Terry Fox Way Mississauga,Ontario,CanadaL5V3E4
Warranty

www.electrolux-store.com