employee self-service new hire guide self service (ess) new hire guide 3 what is ess: welcome to...
TRANSCRIPT

Employee Self-Service New Hire Guide

Employee Self Service (ESS) New Hire Guide
2
Index What is ESS………………………………………………………….…………………3
Quick Reference Guide………………………………………………………………4 New Hires Employee Self Service Enrollment and Password Reset…….…...6 Logging In……………………………………………………………....9 Home Page……………………………………………………………..9 ESS Menu Options……………………………………………..……...9 New Hire Set-up
UPersonal DataU (View all links under personal data for accuracy, make any necessary changes.)
Add Dependents……………………………………….....…10 Update Tax Withholding…………………………….….…..12 Add Direct Deposit Account(s)……………………………..15 UNew Hire Benefit EnrollmentU……………………………….……17 Payment Information………………………………………………..21 Life Events……………………………………………………………22 Questions……………………………………………………………………………23 Notes………………………………………………………………………………….24

Employee Self Service (ESS) New Hire Guide
3
What is ESS: Welcome to your quick guide for Employee Self-Service (ESS). ESS is a web based tool which allows associates to manage their personal information from their desktop or from home. As a LHS associate, you will use Employee Self-Service (ESS) to check your personal and payroll information and make benefit elections, if eligible. Upon hire LHS will mail information to your home listing your ESS User ID and Password; DO NOT GIVE YOUR USER ID AND PASSWORD TO ANYONE. Using the letter and this packet, you can log on for the first time to view or update your personal information or enroll for benefits within 31 days of becoming eligible for benfits. You can return to the site as you like to change or check your personal/payroll information and check your current benefit enrollments. ESS gives you secure access anywhere, around-the-clock, to maintain your Personal HR/Payroll information. With ESS, You Can:
UUPDATE/CHANGE U UVIEW U UENROLL U
Dependents Paycheck History For benefits for Newly Eligible or New Hired Associates
Name (must match SSCard)
Home Address & Phone Number
Year-to-date Earnings/Deductions
For benefits during Open Enrollment
Emergency Contacts Current Benefits
Payroll Information (Direct Deposit & Tax Withholding)
Performance Review Scores
Beneficiaries Leave Balances (PPL/ESL)
USE UALL CAPS U when updating information in ESS. After inputting a change, do not exit a page until you have clicked on “update” or “add” if data is to be processed. You may need to adjust the window using a scroll bar on a form if update/add buttons do not appear.

Employee Self Service (ESS) New Hire Guide
4
EMPLOYEE SELF-SERVICE (ESS) Quick Reference Guide Type this url into your address bar to access Lawson ESS - HTUhttps://lawsoness.che.org/lawson/portal/ UTH
Log in to ESS with your ADID/Network ID and password. Enter Data using ALL CAPS. After inputting a change, do not exit a page until you have clicked on “update” or “add” if data is to be processed. You may need to adjust the window if update/add buttons do not appear. Select Logout (top right of screen) to close Employee Self-Service.
NEW HIRE PERSONAL INFORMATION PAY
New Associates will verify personal data, enroll in benefits and/or set-up payment and beneficiary information online in ESS. New Hire menu options available to New Associates include: • Personal Data
Review/Update personal information for your employment record/benefits.
o UDependents U – must be added before enrolling in benefits. Send required documents to the Lourdes Benefit Center fax 856-365-4088.
o UHome AddressU – verify accuracy. Other personal information to view is listed under Personal Information.
• Benefits
o UNew Hire Enrollment U - *You must add dependents under personal data before enrolling in benefits, if the dependents are to be covered under benefits. New Associates must elect benefits dates within 31 days of their hire date via ESS. Any questions about your eligibility please contact the benefits helpline 1-855-236-9371. UBeneficiaryU – Add beneficiaries
o Associates budgeted for 20 hours or more per week are eligible for Basic Life Insurance after 3 months of employment. Basic life provides coverage equal to one times your base salary. The cost is fully paid by LHS.
• Payment Set-up
o UDirect DepositU Add direct deposit account(s) for paycheck distribution.
o UTax Withholding (W-4)U Update your Federal and State tax withholding information. If no action is taken by the associate, the highest tax, Single-0 will be withheld.
Associates are responsible for updating their personal information. This allows Associates to quickly make sure the HR system accurately reflects their information without waiting for any paperwork to process. Select the appropriate menu option and update your information. ESS will walk you through all the additional information you may need to update due to a personal information change. If the system prompts you, be sure to look at each of these sections in order to be certain you have accurately updated your records. Personal Information menu options available to Associates include:
• Ethnicity – view/change information
• Marital Status – view change information (does not affect tax withholding, must go to Pay/Tax withholding)
• Nickname – add a preferred name, please remember this is your official employment record.
• Veteran Status – view/change
• Dependents U- Umust add before enrolling in benefits – add/review/change dependent information. Send required documents to the Lourdes Benefit Center fax 856-365-4088
• Emergency – add/review/change emergency contact information.
• Leave Balances - this is informational only and reflects PPL and ESL leave balances, if applicable. If there is a discrepancy bring it to the attention of your Leader.
• Personal Profile - review personal information such as birth date, gender, race, etc. Disability status data is not being stored.
Associates can quickly review and maintain information pertaining to their pay. Pay menu options available to Associates include:
• Direct Deposit – add/review/update. The default account is the one in which the remaining funds will be deposited after you have determined the amount to be deposited to other accounts.
• Pay Checks – pay history, review only. Click on the diamonds to view details. To print a pay stub or pay check detail, select printable view once you have selected a payment to view. Go to the toolbar on the printable view document at the top and click on File and then Print.
• Pay Modeling – model pay for taxes and deductions. Change the hours to your biweekly hours, not the 80 which defaults. Section 125 refers to your pre-tax deductions which may indicate health/dental insurance, and spending accounts
• UTax Withholding (W-4)U – review/update your Federal and State tax withholding information.
Year-to-Date – pay history, review only.

Employee Self Service (ESS) New Hire Guide
5
EMPLOYEE SELF-SERVICE (ESS) Quick Reference Guide Type this url into your address bar to access Lawson ESS - HTUhttps://lawsoness.che.org/lawson/portal/ UTH
Log in to ESS with your ADID/Network ID and password. Enter Data using ALL CAPS. After inputting a change, do not exit a page until you have clicked on “update” or “add” if data is to be processed. You may need to adjust the window if update/add buttons do not appear. Select Logout (top right of screen) to close Employee Self-Service.
CURRENT BENEFITS LIFE EVENTS EMPLOYMENT
Associates have the ability to review and update benefit information on-line in ESS. Benefits menu options available to Associates include: • Beneficiaries – Associates can access,
create and update beneficiary information. Associates with budgeted hours are eligible for Basic Life and are required to maintain beneficiaries via ESS.
• Benefits Enrollment – Associates whose
status changes and they become eligible for benefits should enroll in benefits via New Hire Enrollment or contact the benefit center 1-855-236-9371. Associates who do not have a qualifying life event or status change will have to wait until open enrollment to elect/change benefits.
• Current Benefits – Associates can review
current benefit selections and pre-tax costs. Many deductions are taken from gross earnings before taxes are applied, resulting in higher net pay. IRS regulations may govern whether you can change or stop this deduction without a qualifying event. Post-tax cost - some deductions are taken from gross earnings after taxes are applied, such as Prudential supplemental life insurance, and opt- up disability insurance.
• Benefits Information – the ESS site has links to the HR SharePoint site where benefit booklets, forms and other information can be accessed and printed from LHS computers.
Associates are responsible for updating personal information that changes as a result of a life event. This allows Associates to directly input changes in their information. Life Events menu options available to Associates include:
• Adoption
• Birth
• Divorce
• Legal Separation
• Marriage
• Move (Address & Phone#)
(True Marital Status and Name Changes can be addressed under Divorce, Legal Separation or Marriage). Please update your information with Social Security first and then send a copy to or bring HR by fax to 856-757-3044 or interoffice mail. ESS will walk you through all the information you may need to update your information due to a life event, including home address, tax withholding, dependent address, beneficiaries, emergency contacts and direct deposit. Be sure to look at each of these sections in order to be certain you have accurately updated your records.
If the life event change you are updating will affect your benefits, you must make the changes (including changes to your dependents) via ESS and then call the Benefits Help Line at 1-855-236-9371 for further enrollment instructions. You are required to provide proof of the life event and proof of your relationship to your dependent(s). Send required documents to the Lourdes Benefit Center fax 856-365-4088.
Associates have access to detailed employment information such as: • Job Profile - Lists job code, job
title and job-related information. Adjusted hire date is the basis of accrued paid leave.
• Review History - View annual performance reviews.
For Password assistance contact the helpdesk (Press option #2): OLLMC 856-757-3945 or LMCBC 609-835-5888

Employee Self Service (ESS) New Hire Guide
6
NEW HIRE LAWSON EMPLOYEE SELF-SERVICE ENROLLMENT AND PASSWORD RESET STEP 1: Go to Lawson Site (links provided below):
Create a Personal Password for Lawson before Logging in to access Employee Self Service.
Log Off Employee Self-Service
From Lourdes Health System (LHS): Access ESS at the kiosks in the cafeteria or Human Resources Lobby by selecting the Lawson Portal button. From the Lourdes Intranet Homepage (LINC), click Business Services, and Lawson BPR MSS/RSS/ESS.
From other locations: Access ESS wherever you have internet connection by typing the following URL into your internet browser.
HTUhttps://lawsoness.che.org/lawson/portal/ UTH
1. Always Click Logout at the top right of the screen.
2. Close all open Employee Self-Service windows by clicking the “X” in the upper right corner of each window.
• STEP 2: New Users Click on the “Self Service Password Reset” link if you recently received a username and initial password, you will need to create a personal password:

Employee Self Service (ESS) New Hire Guide
7
USELF SERVICE PASSWORD ENROLLMENT • STEP 3: Click on “Enrollment Tool”
• STEP 4: Enter your current Network (AD) “Username and Initial Password”, then click the “Login” button
Tips for Challenge Questions:
• You cannot use the same three answers for the challenge questions.
• Choose one word answers. • Do not use complicated characters that you may not
remember in your answers.
• STEP 5: Answer the questions on the boxes. (Ex:
camden, baseball, smith) Remember your answers and the format for these questions for future reference U!!!
• STEP 6: Then click on the “Enroll” button
Note: If you are a first time Network/Active (AD) or Lawson user you will be prompted to change your password after you click the Enroll button, select the reset password link to the far right of the page.

Employee Self Service (ESS) New Hire Guide
8
USELF SERVICE PASSWORD RESET
• STEP 5: Click Reset Tool (If you are a current user, new users will be prompted to Reset Tool upon
enrolling, proceed to next bullet.) • Type a personal password in both the New Password field and Confirm New Password field then click on
the “Reset Password” button.
*Note: Your password must meet the following criteria: • At least 8 characters long • The password contains characters from Uthree U of the following four categories: 1. Uppercase letters (A -Z) 2. Lowercase letters (a - z) 3. Numbers (0- 9) 4. Non-alphanumeric characters (For example: !, $, #, &, @, ?, }, ^,*, &, + or %) • The password does not contain your account name or your full name. • You cannot re-use any of the last 24 passwords that you have used before.
• STEP 2: Click Reset Password Button.

Employee Self Service (ESS) New Hire Guide
9
Return to Lawson login page HTUhttps://lawsoness.che.org/lawson/portal/UTH
Sign-in with User Name and Personal Password
Lawson Home Page ESS Menu Options
Employee Self-Service
Benefits
Employment
Life Events
UNew Hire
Pay
Personal Information
Savings Plan Modeling
New Hire
Parent Menu
Benefits
Payment Setup
Personal Data
Work Information

Employee Self Service (ESS) New Hire Guide
10
U NEW HIRE - PERSONAL DATA/DEPENDENTS Add dependents you want covered under your benefits. (You must add dependents before enrolling in benefits). Send required documents to the Lourdes Benefit Center fax 856-365-4088. Repeat these steps for each dependent you want covered under your benefit elections.
1. Select New Hire Employee Self-Service
Benefits
Employment
Life Events
UNew Hire Pay
Personal Information Savings Plan Modeling
2. Select Personal Data New Hire
Parent Menu
Benefits
Payment Setup
UPersonal Data
Work Information
3. Select Dependents
Personal Data
Parent Menu
Ethnicity
Marital Status
Nickname
Veteran Status
UDependents
Emergency
Home Address
Personal Profile
ADDING DEPENDENTS
4. Select Add Button to add new dependent
Review all personal data areas for accuracy and to personalize your employment record. Please remember this is your employment record, all fields are maintained in the Human Resources Information System.

Employee Self Service (ESS) New Hire Guide
11
UNEW HIRE - PERSONAL DATA/DEPENDENTSU
ADDING DEPENDENTS
5. Complete all required fields (marked with red * asterisk).
UHome U address will default to the Associate’s address in Lawson. If different from “home address” select different from home and enter address on address tab.
6. Select Update to save information.
Employee Self Service (ESS) New Hire Guide
12
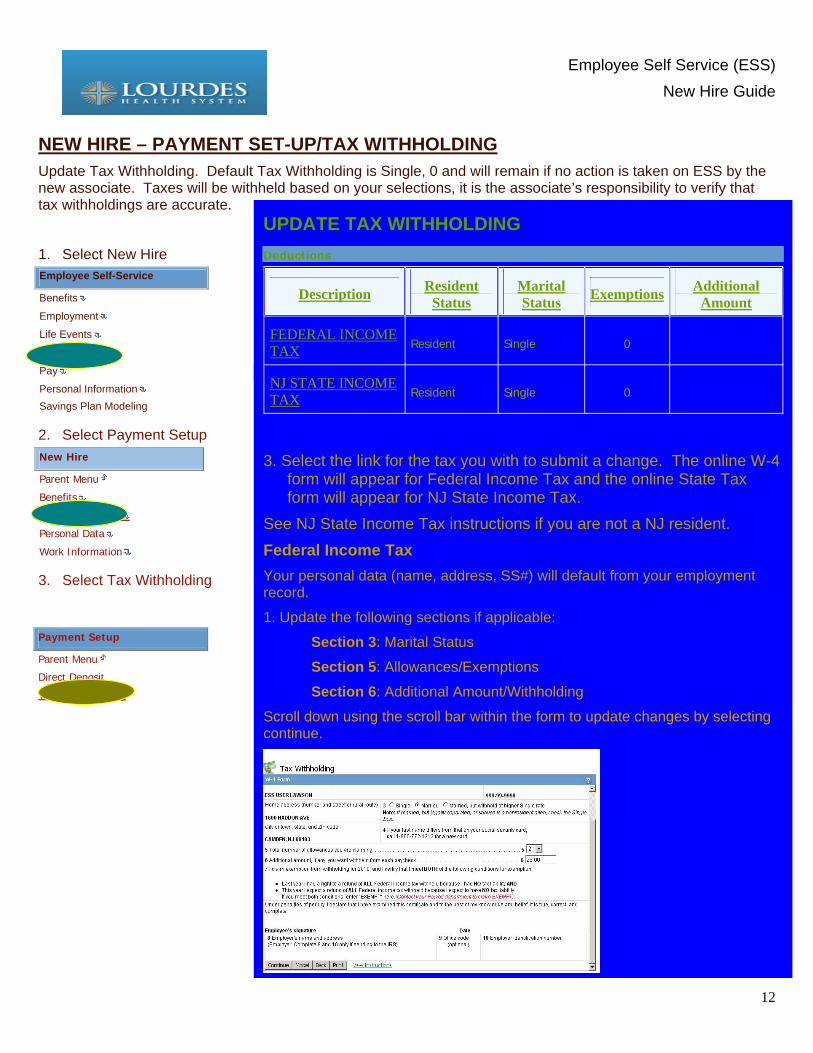
UNEW HIRE – PAYMENT SET-UP/TAX WITHHOLDING Update Tax Withholding. Default Tax Withholding is Single, 0 and will remain if no action is taken on ESS by the new associate. Taxes will be withheld based on your selections, it is the associate’s responsibility to verify that tax withholdings are accurate.
1. Select New Hire Employee Self-Service
Benefits
Employment
Life Events
UNew Hire Pay
Personal Information Savings Plan Modeling
2. Select Payment Setup New Hire
Parent Menu
Benefits
UPayment Setup
Personal Data
Work Information
3. Select Tax Withholding
Payment Setup
Parent Menu
Direct Deposit
UTax Withholding U
UPDATE TAX WITHHOLDING Deductions
TUDescription UT TUResident
StatusUT TUMarital StatusUT
TUExemptionsUT
TUAdditional Amount UT
HTUFEDERAL INCOME TAXUTH
Resident Single 0
HTUNJ STATE INCOME TAXUTH
Resident Single 0
3. Select the link for the tax you with to submit a change. The online W-4
form will appear for Federal Income Tax and the online State Tax form will appear for NJ State Income Tax.
See NJ State Income Tax instructions if you are not a NJ resident. Federal Income Tax Your personal data (name, address, SS#) will default from your employment record.
1. Update the following sections if applicable:
Section 3: Marital Status
Section 5: Allowances/Exemptions
Section 6: Additional Amount/Withholding
Scroll down using the scroll bar within the form to update changes by selecting continue.

Employee Self Service (ESS) New Hire Guide
13
UPDATE TAX WITHHOLDING 2. Select Update to Verify Changes Verify W-4 Changes Under penalties of perjury, I declare that I have examined this certificate and to the best of my knowledge and belief, it is true, correct, and complete.
• If you select "Update", you are authorizing these changes.
• If you "Cancel", your changes will not be processed.
Update Cancel
4. Select Update again to finalize and view Federal changes Verify W-4 Changes Under penalties of perjury, I declare that I have examined this certificate and to the best of my knowledge and belief, it is true, correct, and complete.
• If you select "Update", you are authorizing these changes.
• If you "Cancel", your changes will not be processed.
Update Cancel Deductions
TUDescription UT TUResident StatusUT TUMarital StatusUT TUExemptionsUT TUAdditional Amount UT
HTUFEDERAL INCOME TAXUTH Resident Married 2 $25.00
3. The following warning may appear:
Warning-tax errors; partial update; PR13.8; OK to cont
Select OK to continue.

Employee Self Service (ESS) New Hire Guide
14
UPDATE TAX WITHHOLDING
NJ State Income Tax 1. Select the NJ State Income Tax Link
TUDescriptionUT TUResident Status UT TUMarital Status UT TUExemptionsUT TUAdditional AmountUT
HTUNJ STATE INCOME TAXUTH Resident Single 0
2. Make necessary changes to the following:
• Residency – State Tax will be applied based on
Residency. Select Residency status.
• Status – Select from the drop down Married or Single
• Exemptions – Enter number of exemptions
• Additional Amount – Enter any additional amount
to be withheld (ex. 25.00)
3. Select Update to submit changes.
4. The following warning may appear:
Warning-tax errors; partial update; PR13.8; OK to cont
Select OK to continue.
5. Select Update again to finalize and view State changes.
Deductions
TUDescriptionUT TUResident Status UT TUMarital Status UT TUExemptionsUT TUAdditional AmountUT
HTUNJ STATE INCOME TAXUTH Resident Married 1
NJ STATE INCOME TAX
Residency Resident
Status (Each option may not be valid in all states.
If unsure, contact your payroll office
or tax professional.)
Married
Exemptions 1
Additional Amount
Update Back
Required

Employee Self Service (ESS) New Hire Guide
15
UNEW HIRE – PAYMENT SET-UP/DIRECT DEPOSIT U
You can add up to 99 direct deposit accounts. Initial deposit(s) may take a couple pay periods. Checks will be mailed if no direct deposit accounts are added on ESS by the new associate.
1. Select New Hire Employee Self-Service
Benefits
Employment
Life Events
UNew Hire Pay
Personal Information Savings Plan Modeling
2. Select Payment Setup New Hire
Parent Menu
Benefits
UPayment Setup
Personal Data
Work Information
3. Select Direct Deposit
Payment Setup
Parent Menu
UDirect Deposit
Tax Withholding
ADD DIRECT DEPOSIT ACCOUNT(S)
Direct Deposit
Accounts
TYou may open up to 99 accounts.T
Add
4. Select Add to set-up Direct Deposit Account(s). You may add open up to 99 accounts.
Authorization I hereby authorize my employer, OLL HEALTHCARE SERVICES, INC, to initiate credit entries and if necessary, to initiate debit entries and adjustments for any credit entries in error to my accounts.
This authority is to remain in full force until OLL HEALTHCARE SERVICES, INC has received written notification from me of its termination in such timely manner as to give OLL HEALTHCARE SERVICES, INC and my financial institution a reasonable opportunity to act on it, or until the termination of my employment.
I agree with the above statement.
I do not agree with the above statement.
5. Read the Authorization. Agree to terms by selecting the circle next to “I agree…”.

Employee Self Service (ESS) New Hire Guide
16
ADD DIRECT DEPOSIT ACCOUNT(S)
6. Fill in the Direct Deposit Information. (Be sure to have you account information to verify accuracy before adding accounts).
.
7. Complete blank fields below (See example).
If you use this drop down be sure that the routing number matches your banks routing number. The routing number will default when you select the bank name. Be sure to use ALL CAPS. Your personal information will default from your employment record.
If you wish to set-up direct deposit for a set amount, enter that amount in the flat amount box. You can only add an account as flat amount or Percent/Net, it cannot be both. Account Type can be Checking Uor USavings.
8. Select Update to add account. Select Cancel if you need to come back at a later time. Add Account
Bank WACHOVIA
09/24/2010
Description DEPOSIT
Account Type Checking Savings
ESS USER LAWSON 1600 HADDON AVE CAMDEN, NJ 08103 US
Flat Amount or
Percent of Net 100.00
Deposit _____________________________________________________________ ___________________________________________________________________________________ AMOUNT
11111111
Routing Number
123456789000
Account Number
Update Cancel
Your first account will update as the “Default” account. If you wish to add additional accounts, select Add and repeat completion of direct deposit account for new account.
Accounts
TYou may open up to 98 accounts.T
Bank Account Description Type Amount
WACHOVIA 3. TU123456789000UTT**DefaultT DEPOSIT Checking 100.00% TUClose Account UT
Add Select New Default Re-Order

Employee Self Service (ESS) New Hire Guide
17
NEW HIRE BENEFIT ENROLLMENT Associates budgeted for 20 hours or more per week are eligible for benefits after three (3) months of employment. If you are a benefits-eligible new hire, or if you just recently changed your status to a benefits-eligible status, please follow these easy steps to make benefit elections via Lawson Employee Self-Service (ESS):
All associates have 31 days from their benefit eligibility date (hire date or status change date) to enroll in benefits online. For more benefit information refer to the benefits information provided in orientation or posted on the HR SharePoint site/Benefits Tab. If you do not enroll within the 31 days you will have to wait to enroll in benefits during annual open enrollment.
You will need your ADID/User ID and password. If you misplaced it, or cannot remember it, please contact the helpdesk. Camden Associates 856-757-3945 – Burlington Associates 609-835-5888
Review all benefit material provided so you can elect the best coverage for you! You must add dependents before enrolling in benefits, as noted in the adding dependents section. If you have not added dependents please refer to this section first and come back to the Enrollment Process. Send required documents to the Lourdes Benefit Center fax 856-365-4088. Repeat these steps for each dependent you want covered under your benefit elections.
1. Select New Hire Employee Self-Service
Benefits
Employment
Life Events
UNew Hire Pay
Personal Information Savings Plan Modeling
2. Select Benefits New Hire
Parent Menu
UBenefits
Payment Setup
Personal Data
Work Information
3. Select New Hire Enrollment
Benefits
Parent Menu
Beneficiary
UNew Hire EnrollmentU
Welcome This message for new hires can be easily defined to meet your requirements.
The new hire enrollment process uses the flexibility of the benefits system to tailor the open enrollment process to each employee. For example, full-time employees may enroll in different plans than part-time employees, or the enrollment process for corporate employees may be different from regional employees.
Click the continue button below to proceed. PLEASE USE UPPERCASE LETTERS WHEN UPDATING INFORMATION
Continue 4. Read the welcome message
5. Select Continue to start enrollment process.
6. View Enrollment Order
7. Select Continue
If at any time during the enrollment process you need to cancel the enrollment select Exit without saving. No changes will be saved and you can restart the enrollment process at a later date, as long as it’s within the allotted enrollment period.

Employee Self Service (ESS) New Hire Guide
18
NEW HIRE BENEFIT ENROLLMENT The New Hire Benefit Enrollment process will take you through each eligible benefit. You will need to select the circle next to an option for each benefit plan.
8. Select Continue after selecting each plan. The Coverage Begin Date will appear for each plan so you will have an idea of the period when deductions will be withheld from your paycheck.
If you do not wish to carry coverage for any plan, select the “No Coverage” option.
9. Select a Coverage Option for each plan, the estimated cost per pay period is shown next to the options.
Select Continue.
Reminder: If you chose to cover spouse or dependents they must be added before starting enrollment process.
10. If you select to cover a spouse or dependent for any plan, attach them but selecting the box next to the name
of the spouse/dependent.
11. Select Continue to go to enroll in the next plan. If you wish to go back to at any time and the Previous button is available, select previous to go back to the previous enrollment section.

Employee Self Service (ESS) New Hire Guide
19
NEW HIRE BENEFIT ENROLLMENT
12. Verify enrollment information on each screen. For some plans, your costs/remaining deductions will depend on your eligibility date (date deductions start) and the number of pay periods remaining in the current plan year.
13. Select Continue to get through all eligible plans. You will reach a final verification screen to review all
elections before updating.
14. Verify all elections once you have gone through all eligible plan enrollment screens. If you are satisfied with the elections select Update these elections. If you need to make changes to any plan select Make changes to these elections and select the plan that you need to change. If you want to cancel the enrollment and come back at a later time select Exit without saving. If you exit without saving all elections will be cancelled and you will have to start enrollment process again. You must complete the enrollment within 31 days from your hire date or status change or you will have to wait until annual open enrollment to elect benefits.
15. Select OK to keep these benefits

Employee Self Service (ESS) New Hire Guide
20
NEW HIRE BENEFIT ENROLLMENT
16. Select Yes to print benefit elections to keep for your records.
17. Select Print to print election record.
You have successfully completed benefit enrollment!!
18. Select Continue
Employee Self Service (ESS) New Hire Guide
21
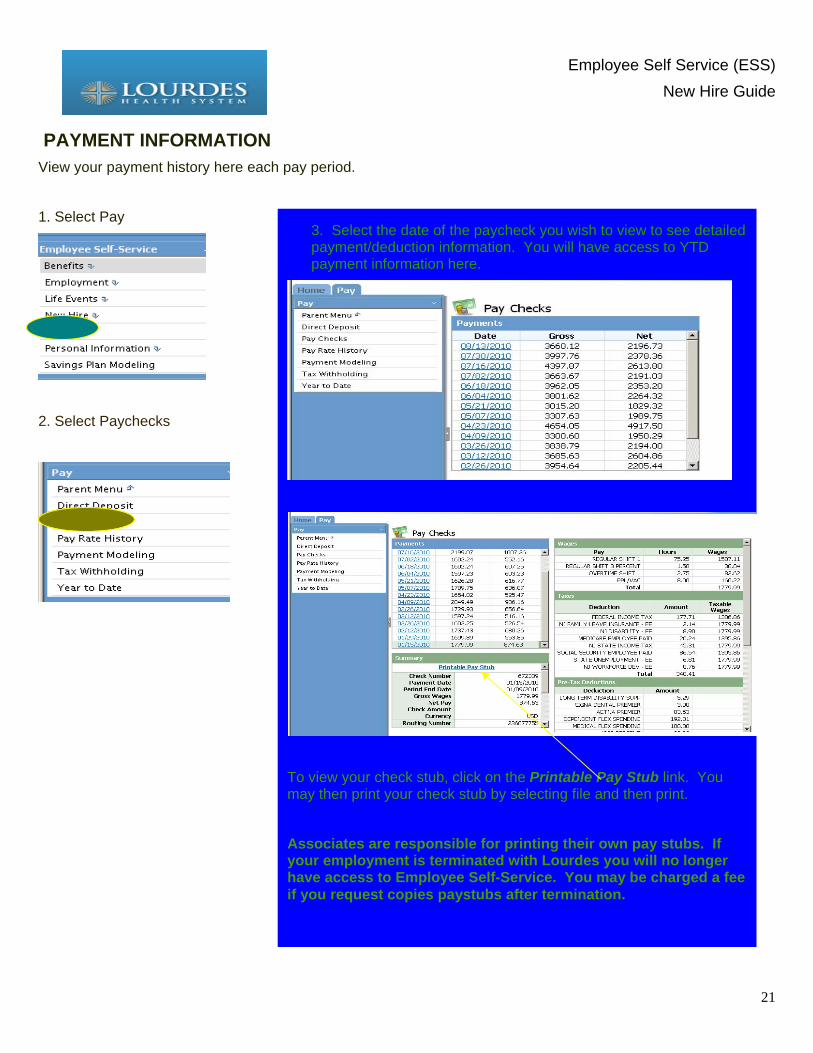
PAYMENT INFORMATION View your payment history here each pay period.
1. Select Pay
2. Select Paychecks
3. Select the date of the paycheck you wish to view to see detailed payment/deduction information. You will have access to YTD payment information here.
To view your check stub, click on the Printable Pay Stub link. You may then print your check stub by selecting file and then print.
Associates are responsible for printing their own pay stubs. If your employment is terminated with Lourdes you will no longer have access to Employee Self-Service. You may be charged a fee if you request copies paystubs after termination.

Employee Self Service (ESS) New Hire Guide
22
LIFE EVENTS
Through life events associates can update personal and family life events. Add dependents such as children and/or spouse due to life events such as birth, adoption, marriage etc. PLEASE NOTE: ADDING DEPENDENT DATA THROUGH LIFE EVENTS DOES NOT ATTACH THEM TO BENEFIT PLANS FOR COVERAGE ELIGIBILITY.
To attach dependents/spouse to benefits associates need to contact the Benefits Help Line 1-855-236-9371 within 31 days of the qualifying life event to complete benefit enrollment. Documentation is required when adding dependents/spouse for benefit coverage. Send required documents to the Lourdes Benefit Center fax 856-365-4088 within 31 days of the qualifying event.
1. Select Life Events
2. Select the respective Life Event and complete the necessary information on the form.
Required data will be marked with a red asterisk *
*If you need to update your address and/or contact number select the MOVE life event. Submit Name Changes via Divorce, Legal Separation or Marriage. Do NOT submit name changes as a result of Divorce, Marriage or Separation until you have updated your information with Social Security. Please be prepared to provide Human Resources with copies of documentation for Name Changes.

Employee Self Service (ESS) New Hire Guide
23
Questions INFORMATION SYSTEMS DEPARTMENT LOURDES IT HELP DESK If you have difficulty logging on, get an error on page, or forget your password, please contact the CHE IT Help Desk. Press option 2 for password assistance.
Call: 856-757-3945 – Camden Associates:
609-835-5888 – Burlington Associates
BENEFITS HELPLINE Call the helpline for ALL benefit related questions or concerns. E-mail and fax provided for submitting required documentation.
Call: 1-855-236-9371
Fax: 856-365-4088 (Secure)
E-mail: [email protected]
DEPARTMENT SUPERVISOR Your department supervisor is your first point of contact before calling Human Resources or Payroll. Make note of this number below and keep if for future reference.
Call: _____________________
Fax: _____________________
FOR HUMAN RESOURCES INFORMATION Employee Self-Service Assistance (LHS) – Classie Carter (Phone) 856-580-6482 (Fax) 856-757-3044
Lourdes Internal Sharepoint Site: HTUhttp://boreas/lhs/humanresources/default.aspxUTH
Health Management Services (HMSO) – Sonia Roman – (Phone) 856-796-9258 (Fax) 856-547-5570
Associated Cardiovascular Consultants (ACC) – Sarah Thomas – (Phone) 856-673-1325 (Fax) 856-673-1359
FOR PAYROLL INFORMATION Lourdes Health System (LHS) – Linda Ballance – (Phone) 856-824-3182 (Fax) 856-824-3477
Health Management Services (HMSO) – Patricia Fenton – (Phone) 856-796-9222 (Fax) 856-547-5570
Associated Cardiovascular Consultants (ACC) - Patricia Fenton – (Phone) 856-796-9222 (Fax) 856-547-5570

Employee Self Service (ESS) New Hire Guide
24
NOTES: