employee details - storage.googleapis.com · profession as on iqama (tf) enter the profession...
TRANSCRIPT

Human Resource (HR)
In this competitive business environment, almost every type of business has to face the pressure to
cut operating costs and deliver more value. With our HR solutions that are designed to help
employers to reduce cost, enhance employee satisfaction and improve the delivery of HR strategies.
We have been revolutionizing HR management for several companies with our expertise in HR
strategy, process redesign, organization change and employee relationship management.
Employee Management
Employee Details:
At this screen, user can capture the data of an employee, such as Employee code, Employee Name, Nationality etc. when employee newly join in the organization.
Acronyms Used:
DF – Date Field NF – Numeric Field TF – Text Field DD – Drop Down
Fields Description
Employee Code* (TF) Enter the Employee Code
Employee Type * (DD) Select the employee type from the list
Nationality* (DD) Select the employee Nationality from the list
First Name* (TF) Enter the First Name of the Employee Last Name* (TF) Enter the First Name of the Employee

Gender* Select the Gender from the available option Email Id (TF) Enter the Email id of the employee Password*(TF) Enter the Password Religion* (DD) Select the Religion of the employee from the list Business Unit (DD) Select the employee Business unit from the list Location (DD) Select the employee Location from the list Division (DD) Select the employee Division from the list Sub Division (DD) Select the employee Sub Division from the list
Designation (DD) Select the employee Designation from the list
Security Group (DD) Select the employee Security Group from the list
Department (DD) Select the employee Department from the list
Emp Joined Date* (DF) Enter the employee Joining date
Emp Resigned Date (DF) Enter the employee Resigned date
Driving License Number (TF) Enter the employee Driving License Number
Driving License Issued date (DD) Enter the employee Driving License Issued Date
Driving License Expiry date (DD) Enter the employee Driving License Expiry Date
Marital Status (TF) Enter the employee Marital Status
GOSI No (TF) Enter the employee GOSI No
Probation Day (DD) Enter the employee Probation date
Report To (DD) Select the employee Reporting Manager
Status (DD) Select the employee Status
Active/Inactive Chose the option for employee Active/Inactive
Iqama No/National id Enter the employee National Id / Iqama No

Contact Details:
At this screen, use can capture the information of employee Home, Work, Emergency and Other contact number and email id. Acronyms Used:
Fields Description
Contact Type (DD) Select the employee Contact Type from the list Contact Number (TF) Enter the employee Contact Number Email (TF) Enter the employee Email Id
DF – Date Field NF – Numeric Field TF – Text Field DD – Drop Down

Address Details:
At this screen, user can capture the information of employee Home, Work, Emergency and Other address. Acronyms Used:
Fields Description
Address Type (DD) Select the employee Address Type from the list Address1 (TF) Enter the employee Address1 Address2 (TF) Enter the employee Address2 City (TF) Enter the employee City
State (TF) Enter the employee State
Country (TF) Enter the employee Country
Zip Code (TF) Enter the employee Zip Code
DF – Date Field NF – Numeric Field TF – Text Field DD – Drop Down

Salary Details:
At this screen, user can capture the information of employee earnings and deductions based on Hourly, Weekly, Monthly, Annual, Commission and Performance Pay select from the salary type drop down list.
Acronyms Used:
DF – Date Field NF – Numeric Field TF – Text Field DD – Drop Down
Fields Description
Salary Type (DD) Select the employee Salary Type from the list Basic (NF) Enter the employee earning Basic Salary HRA (NF) Enter the employee earning Housing Rent Allowance Conveyance (NF) Enter the employee earning Conveyance
Food Allowance (NF) Enter the employee earning Food Allowance
Transport Allowance(NF) Enter the employee earning Transport Allowance
Mobile Allowance (NF) Enter the employee earning Mobile Allowance
Car Allowance (NF) Enter the employee earning Car Allowance
Deductions (NF) Enter the employee Deductions

Project Details:
At this screen, user can select the Project Name and Client Name from the drop down list, and start date, end date of the project. Acronyms Used:
DF – Date Field NF – Numeric Field TF – Text Field DD – Drop Down
Fields Description
Project Name (DD) Select the employee Project Name from the list Client Name (DD) Select the employee Project Client Name from the list Start Date (DF) Enter the employee Project Stat date End Date (DF) Enter the employee Project End date
Status Enter the employee earning Food Allowance
Transport Allowance(NF) Enter the employee earning Transport Allowance
Mobile Allowance (NF) Enter the employee earning Mobile Allowance
Car Allowance (NF) Enter the employee earning Car Allowance
Deductions (NF) Enter the employee Deductions

Bank Details:
At this screen, user can enter the bank details of the employee, for transfer the salary
Acronyms Used:
DF – Date Field NF – Numeric Field TF – Text Field DD – Drop Down
Fields Description
Bank Name (TF) Enter the employee Bank Name Account No (TF) Enter the employee Bank Account No IBAN (TF) Enter the employee Bank IBAN details Branch (TF) Enter the employee Bank Branch details
Address (TF) Enter the employee Bank Address details
City (TF) Enter the employee Bank City details
State (TF) Enter the employee Bank State details
Country (TF) Enter the employee Bank Country details
Zip Code (TF) Enter the employee Bank Zip Code details
Notes (TF) Enter the notes, if required

Education Details:
At this screen, user can enter the bank details of the employee, for transfer the salary
Acronyms Used:
DF – Date Field NF – Numeric Field TF – Text Field DD – Drop Down
Fields Description
Qualification (DD) Select the employee Qualification from the available list Specialization (DD) Select the employee Specialization from the available list Year of Passing (TF) Enter the Year of Passing of the employee qualification Institute (TF) Enter the Institute name of employee qualification

Passport/Visa Details:
At this screen, user can capture the Passport/Visa details of the employee.
Acronyms Used:
DF – Date Field NF – Numeric Field TF – Text Field DD – Drop Down
Fields Description
Passport Number (TF) Enter the Passport Number of the employee Passport Passport Issued Date (DF) Enter the Passport Issued Date of the employee Passport Passport Expiry Date (DF) Enter the Passport Expiry Date of the employee Passport Visa Type (TF) Enter the Visa type of the employee
Visa Number (TF) Enter the Visa Number of the employee
Visa Issue Date (DF) Enter the Visa issued date of the employee
Visa Expiry Date (DF) Enter the Visa expiry date of the employee
Eligible Status (TF) Enter the Eligible status of the employee
Issued By (TF) Enter the Issued details of employee visa
Medical Insurance Category Enter the Medical Insurance Category of the employee
Profession as on Iqama (TF) Enter the Profession mentioned on employee iqama
Active Visa Select the Visa status Active or In-Active

Employment Documents:
At this screen, user can attach the required documents of the employee
Acronyms Used:
DF – Date Field NF – Numeric Field TF – Text Field DD – Drop Down
Fields Description
File Attach the required documents of the employee

Attendance:
At this screen, user can post the employee attendance, this attendance day by day or at the end of the month, with using the Full Month Attendance option.
Acronyms Used:
DF – Date Field NF – Numeric Field TF – Text Field DD – Drop Down
Fields Description
Employee (DD) Select the employee from the drop down list Full Month Attendance User can post full attendance to selected employee with a click on this option
Other Allowance (NF) User can enter the additional amount for that particular month to selected employee other than the monthly payroll at Other Allowance column
OT Amount (NF) User can enter the Overtime amount for that particular month of selected employee at OT Amount column, if the employee having any overtime hours
Other Deductions (NF) User can enter the deduction amount for that particular month of selected employee at Other Deductions column, if the employee having any deductions
Arrears (NF) User can enter the any previous months’ pending salary of the selected employee at Arrears column

Payroll Process:
At this screen, user can process the payroll of the employees’ and generate the paysilp for those they enter the attendance in the previous screen.
Acronyms Used:
DF – Date Field NF – Numeric Field TF – Text Field DD – Drop Down
Fields Description
Date (DF) Enter the date for which user want generate the pay slip Employee Name (DD) Select the employee from the drop down list for generate the pay slip
Generate Pay slip After enter the date and selected the employee, user click the generate Pay slip option to view the pay slip of the selected employee
OT Amount (NF) User can enter the Overtime amount for that particular month of selected employee at OT Amount column, if the employee having any overtime hours
Other Deductions (NF) User can enter the deduction amount for that particular month of selected employee at Other Deductions column, if the employee having any deductions
Arrears (NF) User can enter the any previous months’ pending salary of the selected employee at Arrears column

Apply New Leave:
At this screen, user can request for leave through MUFTAAH payroll system, this request employee can raise directly through access the self-service or HR department can process the request behalf of the employee.
Acronyms Used:
DF – Date Field NF – Numeric Field TF – Text Field DD – Drop Down
Fields Description
Employees (DD) Select the employee from the drop down list, for whom request the leave
Contact Person (DD) Select the reporting manager of the leave requested employee, if the reporting manager define at employee master this column will filled by system automatically from the employee master
Leave Status (DD) This status will update by the system, as per the nature, when request it is showing as pending after approval process, it will show as approved
Leave Type (DD) Select the leave type from the drop down list
Leave From (DF) Enter the Leave start date
Leave To (DF) Enter the Leave end date
Total No. Of Leaves (NF) This field will update with leave requested days by system automatically based on the leave start date and leave end date
Comments (TF) Enter the comments when required
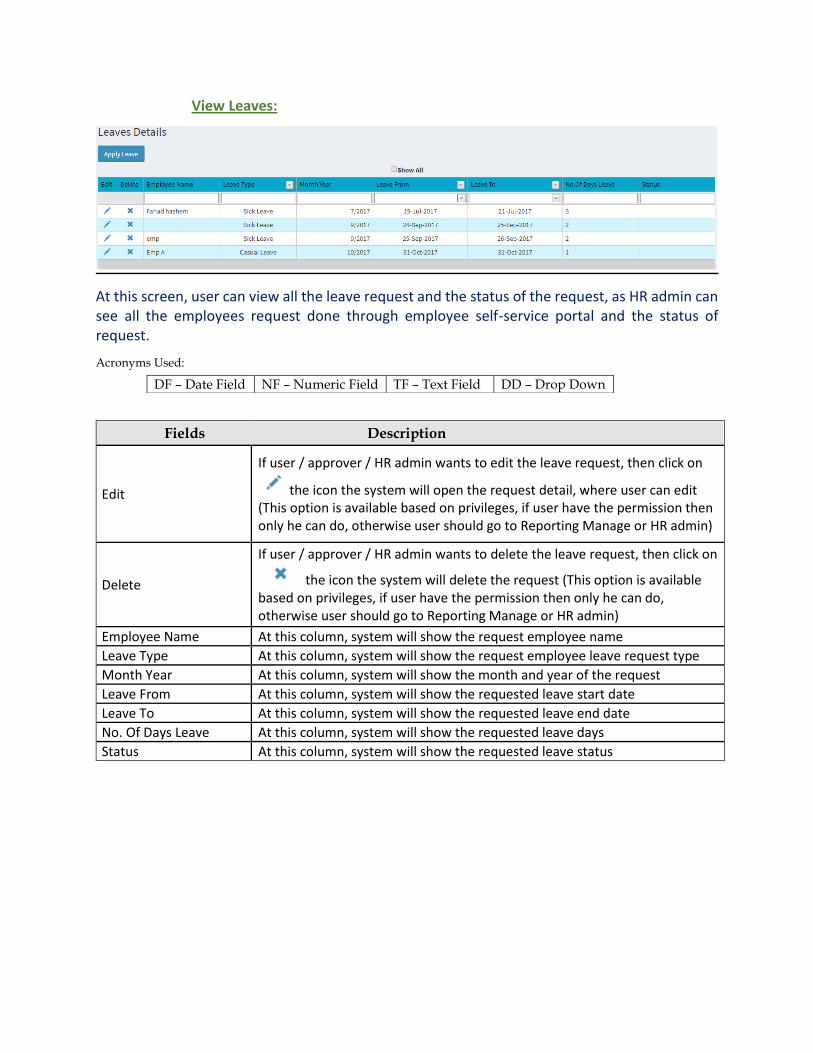
View Leaves:
At this screen, user can view all the leave request and the status of the request, as HR admin can see all the employees request done through employee self-service portal and the status of request.
Acronyms Used:
DF – Date Field NF – Numeric Field TF – Text Field DD – Drop Down
Fields Description
Edit
If user / approver / HR admin wants to edit the leave request, then click on
the icon the system will open the request detail, where user can edit (This option is available based on privileges, if user have the permission then only he can do, otherwise user should go to Reporting Manage or HR admin)
Delete
If user / approver / HR admin wants to delete the leave request, then click on
the icon the system will delete the request (This option is available based on privileges, if user have the permission then only he can do, otherwise user should go to Reporting Manage or HR admin)
Employee Name At this column, system will show the request employee name
Leave Type At this column, system will show the request employee leave request type
Month Year At this column, system will show the month and year of the request
Leave From At this column, system will show the requested leave start date
Leave To At this column, system will show the requested leave end date
No. Of Days Leave At this column, system will show the requested leave days
Status At this column, system will show the requested leave status

Vacation Request:
At this screen, user can request for vacation through MUFTAAH payroll system, this request employee can raise directly through access the MUFTAAH self-service portal or HR department can process the request behalf of the employee.
Acronyms Used:
DF – Date Field NF – Numeric Field TF – Text Field DD – Drop Down
Fields Description
Employees (DD) Select the employee from the drop down list, for whom request the Vacation Total No. Of Vacation Days (NF) System will display the total vacation days of employee as per define
Available vacation days System will show you the actual available vacation days
Vacation From (DF) Enter the Vacation start date
Vacation To (DF) Enter the Vacation end date
Selected Vacation Days (NF) This field will update with vacation requested days by the system automatically based on the vacation start date and vacation end date
Report To (DD) Select the reporting manager of the leave requested employee, if the reporting manager define at employee master this column will filled by system automatically from the employee master
Comments (TF) Enter the comments when required

Reports Menu:
WPS Report:
MUFTAAH Payroll system ready with wage protect system report, which is easily export the data to excel and user can copy the date from excel to bank WPS file.

GOSI Pool Report:
MUFTAAH Payroll system will generate a GOSI pool report, in this report user can see the calculations of GOSI 10% and 12% of Saudi and 2% of expats easily at any given time.

End of Service (Termiation and Resignation)
MUFTAAH Payroll system will generate an End of Service Benefit calculation report, this report calculate values accurately, this report help user to make employee settlement quickly on Termination or Resignation.
End of Service Provision
MUFTAAH Payroll system will generate an End of Service Benefit provision calculation report, this report calculate values accurately, this report help user to make financial data entry of employee Provision.
Settings Manu:
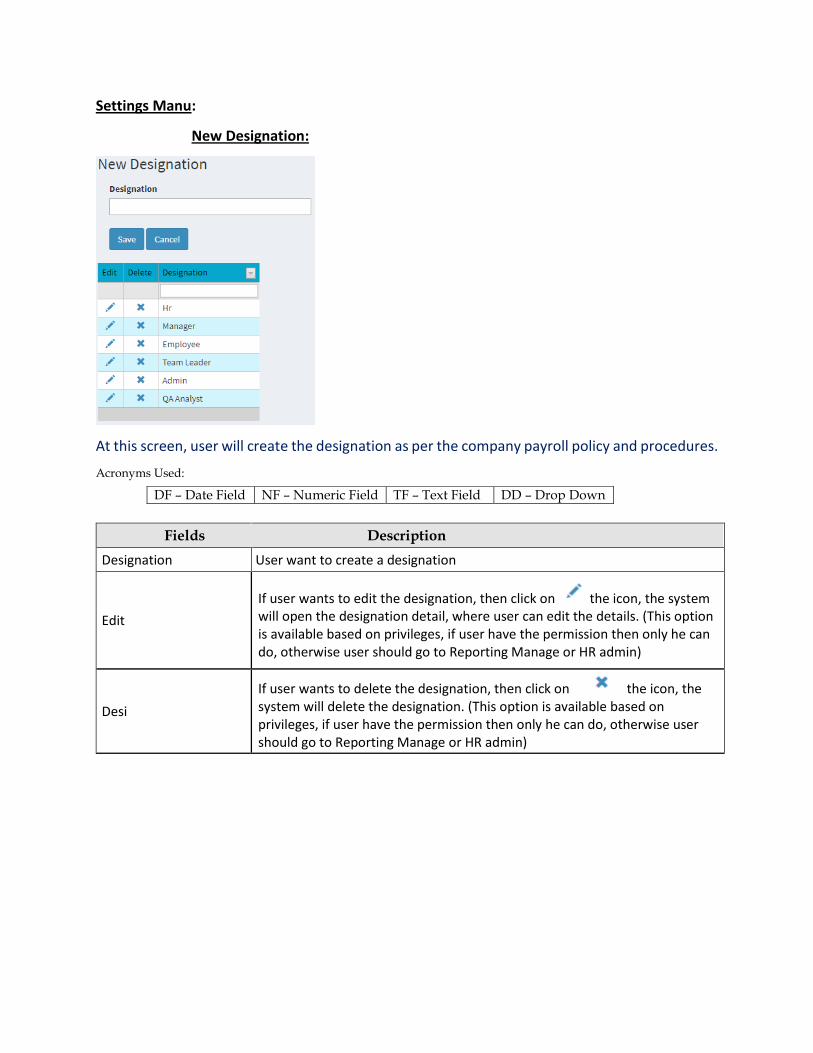
New Designation:
At this screen, user will create the designation as per the company payroll policy and procedures.
Acronyms Used:
DF – Date Field NF – Numeric Field TF – Text Field DD – Drop Down
Fields Description
Designation User want to create a designation
Edit
If user wants to edit the designation, then click on the icon, the system will open the designation detail, where user can edit the details. (This option is available based on privileges, if user have the permission then only he can do, otherwise user should go to Reporting Manage or HR admin)
Desi
If user wants to delete the designation, then click on the icon, the system will delete the designation. (This option is available based on privileges, if user have the permission then only he can do, otherwise user should go to Reporting Manage or HR admin)

New Business Unit Designation:
At this screen, user can create the multiple business units, once user click on the
then system will populate another window to create the business unit as shown below.
Acronyms Used:
DF – Date Field NF – Numeric Field TF – Text Field DD – Drop Down
Fields Description
Business Unit Name (TF) Enter the business unit name
Description (TF) Enter the description related to the entered business unit, when required
Phone No (TF) Enter the Phone no off entered business unit
Web Site (TF) Enter the web site address of entered business unit
Email Id (TF) Enter the email id of the entered business unit
Status (DD) Select the status of the business unit from drop down