emp ns connection - epson projector support · the emp ns connection toolbar is displayed on the...
TRANSCRIPT

Operation Guide
EMP NS ConnectionMacintosh Version

Notations Used in This Guide
When "this unit", or "projector" appears in the text of this guide, it may refer to items which are accessories or optional equipment in addition to the main projector unit itself.
Caution : Indicates procedures which may result in damage or injury if sufficient care is not taken.
Tip : Indicates additional information and points which may be useful to know regarding a topic.
Indicates pages where related information or more detailed description is provided.
Indicates that an explanation of the underlined word or words in front of this symbol appears in the glossary of terms. See "Glossary". p.35
ProcedureIndicates operating methods and the order of operations.The procedure indicated should be carried out in the order of the numbers.
[(Button Name)]Shows the buttons on the control panel projectors input ports, or on the remote control. Ex: [ESC]
Indicates that explanation continues on the next page.

Contents
Connecting to a Network................................................................... 4Steps to connection ................................................................................ 4Computer connection settings................................................................ 4Connecting to a Computer ..................................................................... 5
Using the Toolbars .......................................................................... 11Icon Use and Actions ........................................................................... 11E-Zoom ................................................................................................ 13Basic Settings....................................................................................... 14
Disconnecting from a Network Connection..................................... 16Disconnecting at the Computer............................................................ 16Disconnecting at the Projector ............................................................. 16
What If the Projector You Want does not Appear?.......................... 17Connecting in IP Connect Mode.......................................................... 17Creating and Connecting to Groups..................................................... 22
Transmitting Encrypted Data........................................................... 32Glossary.......................................................................................... 35Index ............................................................................................... 36
3

Connecting to a Network
Here we will explain the steps for connecting to a computer via a network and projecting from it.
Steps to connection
Follow these steps to begin projecting images. 1. Select the connection mode on the projector. Setup Guide
(Easy Connect Mode, Access Point Mode, Wired LAN Connection Mode)2. Make connection settings on the computer. p.4 3. Connect using EMP NS Connection. p.5
Computer connection settings
The communication port settings will be explained here.For advanced port settings (network settings) refer to your computer or AirPort card manual.
Procedure
1 Select “System Preferences” then “Network” from the Apple Menu. The Network Settings screen is displayed.
2 In “Port Configurations”, check the port you wish to use then click “Apply Now”.
Check the port you wish to use.
4
Connecting to a Network
Tip :When making “Location” settings, you can select the desired location and change all the network settings one at a time.
3 Close the window.
Tip :• Be sure to select only a single port in “Network Port Configurations” and uncheck all
other ports. Otherwise, it is possible that you might connect to an incorrect network.
• For optional performance, set the screen resolution of the computer you are using to XGA or lower with a color depth of Thousands.
When the projector has been set to “ESSID add hoc ”, click on the communication status icon in the top right corner of the computer screen. Select the projector’s ESSID name from the pull-down menu which is displayed.
Tip :“Channel ad hoc” can only be used with Windows.
Connecting to a Computer
When finished applying the settings, run EMP NS Connection on the computer, and establish a connection with the projector. Once these settings have been made, future connections can begin by connecting the devices in this way.Make the following preparations before connecting.Refer to the Setup Guide for instructions on how to make settings. • Make sure the projector is turned on.• Set a LAN card into the card slot of the projector. • Make settings for either Easy Connect Mode, Access Point Mode or Wired
LAN Connection Mode. • Make sure EMP NS Connection has been installed on the computer you
will be using.
5

Connecting to a Network
Procedure
1 Check the following according to the LAN you are using.
When using an AirPort card (wireless LAN) click on the communication status icon in the top right corner of the screen and ensure that the following is displayed:
When using the Wired LAN Connection mode, be sure to click on the communication status icon in the top right corner of the screen and ensure that the following is displayed. If “AirPort: Off” is not displayed, there is a possibility that you can connect to an incorrect network.
Tip :To change modes, click on the icon and select “Turn AirPort On” or “Turn AirPort Off”.
2 Double click on the “Applications” folder of the hard disk volume on which EMP NS Connection was installed, then double click on the EMP NS Connection icon.EMP NS Connection starts up.
Tip :If you selected a different directory at the time of installation, first click on that folder first, then double click on the EMP NS Connection icon.
AirPort:OnYou can connect to the Wireless LAN
AirPort:OffYou cannot connect to the Wireless LAN
6

Connecting to a Network
3 Select the check box for the name of the projector that you want to connect, and then click the "Connect" button. The projector name is shown in the projector’s Connection Stand-by screen.
Tip :• When you want to change the network you are using, click the “Extension” button. The
“Extension” screen is displayed. Then click the “Set up Network...” button to display the Network Settings screen. Refer to your computerís operation manual for instructions on how to make settings.
• In the event that a projector already connected to another computer is selected, the previous connection is automatically terminated and the images of the newly connected computer are projected.
• When multiple projectors are selected, one computer's display can be projected simultaneously by up to a maximum of four projectors.
• Once the connection has been made, additional connections cannot be added.
The icon status meaning differs according to colour as follows.Grey : Not connectedOrange : Connected to
another computer
7

Connecting to a Network
4 If the "Projector keyword" is set to "ON", enter the projector keyword displayed on the Connection Stand-by screen on the projector, and click "OK".
5 A network connection is established between the computer and projector, and the computer screens are projected by the projector.
The EMP NS Connection toolbar is displayed on the computer screen. Use the toolbar to operate the projector, change options and settings, and disconnect from the network. p.11 If the toolbar is in the way during a presentation, you can minimise it. You can perform projector operations and setup using the remote control.
User’s GuideRefer to the User’s Guide of your projector for information about adjusting the screen image and other functions.
Tip :To connect to a different computer when changing presenters, start EMP NS Connection on the selected computer and connect. The connection with the current connected computer will be terminated automatically, and the next computer will be connected.
Toolbar
8
Connecting to a Network
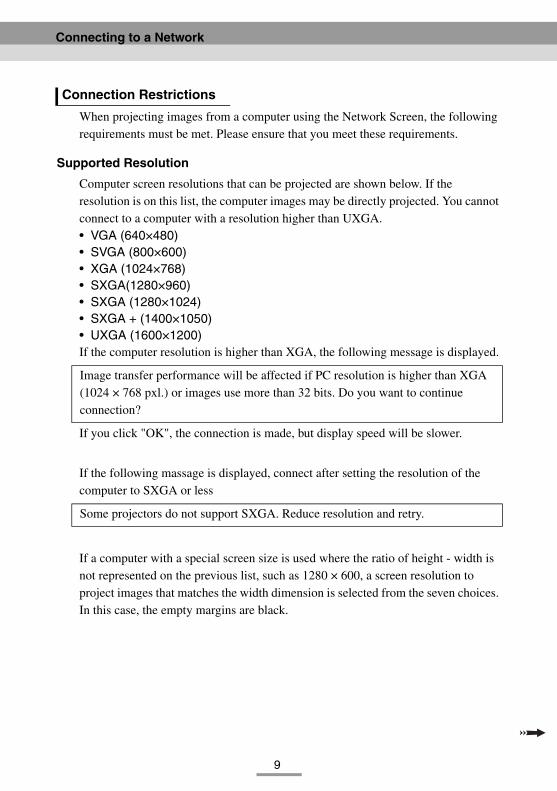
When projecting images from a computer using the Network Screen, the following requirements must be met. Please ensure that you meet these requirements.
Supported Resolution
Computer screen resolutions that can be projected are shown below. If the resolution is on this list, the computer images may be directly projected. You cannot connect to a computer with a resolution higher than UXGA. • VGA (640×480)• SVGA (800×600)• XGA (1024×768)• SXGA(1280×960)• SXGA (1280×1024)• SXGA + (1400×1050)• UXGA (1600×1200)If the computer resolution is higher than XGA, the following message is displayed.
If you click "OK", the connection is made, but display speed will be slower.
If the following massage is displayed, connect after setting the resolution of the computer to SXGA or less
If a computer with a special screen size is used where the ratio of height - width is not represented on the previous list, such as 1280 × 600, a screen resolution to project images that matches the width dimension is selected from the seven choices. In this case, the empty margins are black.
Connection Restrictions
Image transfer performance will be affected if PC resolution is higher than XGA (1024 × 768 pxl.) or images use more than 32 bits. Do you want to continue connection?
Some projectors do not support SXGA. Reduce resolution and retry.
9

Connecting to a Network
Colour Depth
The number of colours on a computer screen that can be projected are shown below. • Thousands (16-bit colour)• Millions (32-bit colour)If "Millions" is used, the following message is displayed.
If you click “OK”, the connection is made, but performance will decrease.
Number of Connection Devices
A maximum of four projectors can be connected simultaneously to project images from a single computer. One projector cannot connect to multiple computers simultaneously.
Other
• If the transmission speed of the wireless LAN is low it may be difficult to maintain a connection, or the connection may terminate unexpectedly.
• Audio is not transmitted.• Animation does not play as smoothly as when played on a computer.• Due to a limitation in the specifications of Mac OS X 10.2.X, displaying in
full screen mode may not be possible. For example, screens will not display correctly when performing a slideshow using the Keynote presentation software.
Image transfer performance will be affected if PC resolution is higher than XGA (1024 × 768 pxl.) or images use more than 32 bits. Do you want to continue connection?
10

Using the Toolbars
Icon Use and Actions
The following functions are displayed on a toolbar on the computer screen when connected to a projector through a network.
The use and actions of icons are explained below.
Help Display EMP NS Connection help.
Connection status screen
Click to toggle between displaying/hiding the connection status screen. The icon for the currently connected projector is displayed in green in the connection status screen. You cannot change or add connections.
Projector operation URL display
EasyWeb is displayed. Operation Guide
Freeze Temporarily stops the image. For animations, the images on the computer continue to play while projection is stopped. Play does not resume from the point the images were frozen.
A/V Mute This temporarily hides images.For example, if you need to change files when projecting computer images, and you do not want to show this activity, A/V Mute will conveniently hide the images from the audience. Bear in mind that images on the computer continue to play even while the animation is hidden. Play does not resume from the point the images were hidden.
Help
Connection status screen
Projector operation URL display
Freeze
A/V Mute
Basic settings
Switch video source
Switch PC source
Disconnect
Connection status indicator
E-ZOOM
MinimiseExit
11

Using the Toolbars
E-ZOOM Enlarges the view of the image without changing the projection size. Display the setting screen, and modify the position and magnification. p.13
Basic settings
Displays the setting screen to modify the brightness, contrast and colour mode and perform keystone correction. p.14
Switch video source
Toggles between the signals being input to the projector. Cannot be used when connecting to multiple projectors.
Switch PC source
Toggles between the signals being input to the projector. Cannot be used when connecting to multiple projectors.
Disconnect Ends the current network communication connection between the projector and computer.
Connection status indicator
Continuously flashes the top, middle, and bottom indicators in sequence as long as the computer and projector are connected through the network. This light goes out when no connection is possible.
Exit This terminates the current network connection with the projector, and closes EMP NS Connection.
Minimise This minimises the toolbar.
12

Using the Toolbars
E-Zoom
Clicking the "E-Zoom" icon displays the following setting screen allowing you to modify the zoom magnification and position.
E-Zoom This adjusts the E-Zoom magnification. "+" button: enlarges"-" button: reduces the effect of the zoom
Position This indicates the portion to be enlarged/reduced. This is the same as the E-Zoom function on the projector to move the cross and indicate the area to enlarge/reduce.
Cancel This cancels E-Zoom and returns to the original display.
Projector This displays the name of the target projector. If multiple projectors are connected, select the projector to perform the E-Zoom operation.
Close This closes the screen.
E-Zoom Position
Cancel Projector
Close
13

Using the Toolbars
Basic Settings
Clicking the "Basic settings" icon displays the following setting screen allowing you to modify the brightness, contrast and colour mode and perform keystone correction.
Brightness This adjusts the brightness of the projected image."+" button: increases brightness"-" button: decreases brightness
Keystone "+" button: narrows top edge"-" button: narrows bottom edge
Contrast This adjusts the screen contrast."+" button: increases contrast"-" button: decreases contrast
Color Mode The following five settings are available for you to get the best from your selected images. Simply select the settings to project the optimum quality of each image. The brightness of the projected images will be affected differently by each mode. Each time you click the "Color Mode" button, the settings are toggled in order.
Projector This displays the name of the target projector. If multiple projectors are connected, select the projector to which you want to make basic setting changes.
Close This closes the screen.
Brightness Keystone
Color Mode
Close
ProjectorContrast
14
Using the Toolbars
Tip :• Using keystone correction will make the screen smaller.
• Try reducing sharpness to make any unevenness emphasised by keystone correction less noticeable. User’s Guide
• If during keystone correction, the screen gauge values stop changing, this means that you have reached the limit of possible keystone correction. Ensure that this projector is not placed beyond the permissible projection angle.
15

Disconnecting from a Network Connection
The network connection between a computer and projector can be disconnected either from the computer or from the projector.
Tip :The display of the computer being projected is not saved by or stored at the projector. When the connection is terminated by one of the following operations, all internal image data is lost.
Disconnecting at the Computer
Click the "Disconnect" or "Exit" icons on the toolbar.
Clicking the "Disconnect" icon closes only the network connection.Clicking the "Exit" icon disconnects the network connection and closes EMP NS Connection.
Tip :If a computer is connected to multiple projectors and performs the disconnect operation, the connections to all projectors will be broken.
Disconnecting at the Projector
Procedure
1 Press the [ESC] button on the remote control. The Exit menu is displayed.
2 Select the "Exit" button, and press the [Enter] button on the remote control. "Network Screen has been disconnected by the projector." is displayed on the screen of the disconnected computer.
Exit
Disconnect
16

What If the Projector You Want does not Appear?
If the projector to which you want to connect does not appear on the projector selection screen of EMP NS Connection, please check the following:• If connecting with a wireless LAN, is the wireless LAN signal weak, or not
being received at all?• Is the connection mode set up correctly?• Are the subnets different ?When using Easy connect mode:• Are the computer network name and the projector’s ESSID set to the
same name ?In the event that you are connecting the projector on a network where the subnets differ, you can use "IP connection mode" to establish a connection.IP connection mode works by using the IP address of the projector to establish a connection.
Connecting in IP Connect Mode
Perform the following steps to connect using IP connection mode.
Tip :The projector name will not be displayed in the projector selection screen of EMP NS Connection if the projector’s IP address and the computer’s IP address belong to a different subnet.
Caution :• Do not unplug the power cable when EasyMP is in use (screens are changing or the
access lamp on the wireless LAN card slot is lit green).
• Do not remove the wireless LAN card when the access lamp on the wireless LAN card is lit green, or when connected to a network. Doing so may damage the wireless LAN card.
• For information about the Wired LAN card access lamp(s), refer to the documentation of the wired LAN card you are using.
17

What If the Projector You Want does not Appear?
Procedure
1 This performs a connection setup between the projector and computer in Access point mode or Wired LAN connection mode.
2 Double click on the “Applications” folder of the hard disk volume on which EMP NS Connection was installed, then double click on the EMP NS Connection icon.EMP NS Connection starts up.
Tip :If you selected a different directory at the time of installation, first click on that folder first, then double click on the EMP NS Connection icon.
3 Click the "Extension" button on the next screen.
18

What If the Projector You Want does not Appear?
4 This displays the Extension screen. Select "Use IP connect mode" and then click the "OK" button.
5 The following screen is displayed. Click "IP connection" in the upper right of the screen.
19
What If the Projector You Want does not Appear?
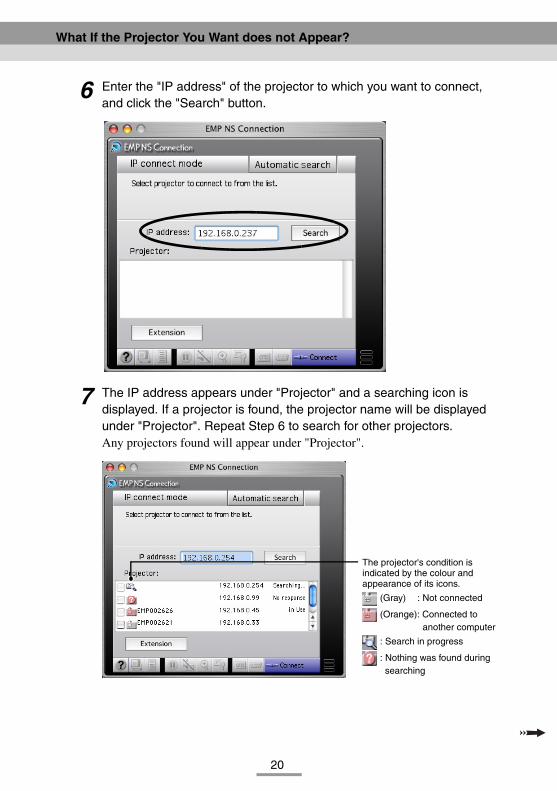
6 Enter the "IP address" of the projector to which you want to connect, and click the "Search" button.
7 The IP address appears under "Projector" and a searching icon is displayed. If a projector is found, the projector name will be displayed under "Projector". Repeat Step 6 to search for other projectors.Any projectors found will appear under "Projector".
The projector's condition is indicated by the colour and appearance of its icons.
(Gray) : Not connected
(Orange): Connected to another computer
: Search in progress
: Nothing was found during searching
20

What If the Projector You Want does not Appear?
Tip :• A maximum of 16 projectors can be added. If you try to add 17 or more projectors,
projectors will be deleted starting with the one which was added first. A maximum of four projectors can be connected at once.
• The next time EMP NS Connection is started, the same projector will not appear under the "Projector" list. If you want the same projector to be displayed for future use, create a group and register the target projector. p.22
8 Click on the check box belonging to the name of the projector you wish to connect, then click the "Connect" button.
Tip :• In the event that a projector already connected to another computer is selected, the
previous connection is terminated and the images of the newly connected computer are projected.
• When multiple projectors are selected, one computer’s display can be projected simultaneously by up to a maximum of four projectors.
• Once the connection has been made, additional connections cannot be added.
The projector and a computer are connected via a network and the computer screen is projected.
21

What If the Projector You Want does not Appear?
Creating and Connecting to Groups
In EMP NS Connection, a maximum of 16 projectors can be registered as a group. If you frequently connect to a particular projector over a network, you can register it easily and connect to it quickly by creating and registering it to a group.
For example, in an environment where numerous projectors in various branches are connected over a network and you want to project from the projectors located in a specific branch, register the projectors in that individual branch into a single group. Once projectors have been registered to a group, they can be connected to by simply selecting that group at the time of connection, saving the time and effort otherwise required to search for and register the projectors.
Group information can be saved (exported) to a file and retrieved (imported). You can connect to a target projector easily by importing the group you need to connect to from a group which has been created and exported by the network administrator.
Perform the following steps to create a group.
Procedure
1 Perform Steps 1-3 of "Connecting in IP Connect Mode" p.17
Creating Groups
22

What If the Projector You Want does not Appear?
2 The Extension screen is displayed. Select "Use IP connect mode" and "Use Group List" by clicking on the check boxes, then click on the "Advanced" button.
3 The Advanced screen is displayed. Click "New" to create a new group."New Group" is displayed as the "Connection group" and the "IP address" and list of registered projectors disappear.
Tip :• If changing a projector registered to an existing group, select a group name from the
"Connection group" list, then proceed to Step 5.
• If you click on the "New" button during creating or editing of a group, the message "Group is not saved. Save? ", is displayed. If you click "OK" the group you are working on is saved. If you click "Cancel" the group will be cancelled without being saved.
23
What If the Projector You Want does not Appear?
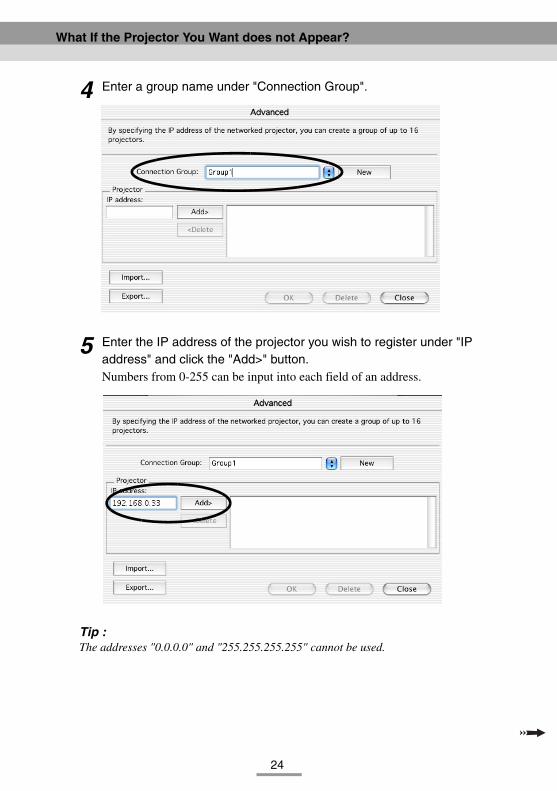
4 Enter a group name under "Connection Group".
5 Enter the IP address of the projector you wish to register under "IP address" and click the "Add>" button.Numbers from 0-255 can be input into each field of an address.
Tip :The addresses "0.0.0.0" and "255.255.255.255" cannot be used.
24

What If the Projector You Want does not Appear?
6 The IP address is added to the list of registered projectors, and the "Searching" icon is displayed. If a projector is found, the projector name will be displayed on the list. Repeat Step 5 to register other projectors.The registered projector is added to the list.
Tip :• A maximum of 16 projectors can be added. A maximum of four projectors can be
connected at once.• To delete a projector from a list, select the projector then click on the "<Delete" button.
7 Click "OK" if you want to add all of the registered projectors to the list. The message "Save group. OK?" will be displayed. Click the "OK" button.The group is saved.If you click "Cancel" in response to the message screen, the group will not be saved.
Tip :The message "This group name already exists. Overwrite?" is displayed when editing and saving the existing group, or, if a group of the same name as the group you are saving already exists. If you click the "OK" button the group will be overwritten. If you wish to save under a different name, click the "Cancel" button. Enter a new group name in the "Connection Group" list of the Advanced screen, and click "OK".
The projector's condition is indicated by the colour and appearance of its icons
(Gray) : Not connected
(Orange): Connected to another computer
: Search in progress
: Nothing was found during searching
25

What If the Projector You Want does not Appear?
8 Click the "Close" button.The Advanced screen is closed and the extension screen is displayed.
Tip :To delete a group, select the projector from the "Connection group" list of the Advanced screen, then click on the "Delete" button.
Perform the following steps to connect with a projector registered to a group.If you have created a group as described in "Creating Groups" and wish to connect to it, please start with Step 3.
Procedure
1 Perform Steps 1-3 of "Connecting in IP Connect Mode" p.17
2 The Extension screen is displayed. Select "Use IP connect mode" and "Use Group List" by clicking on the check boxes, then click on the "Advanced" button.
Connecting to a Group
26

What If the Projector You Want does not Appear?
3 From the "Connection Group" list, choose the group you want to connect to, and click the "OK" button.
4 When the following screens are displayed, click on "IP Connection" displayed in the upper right corner of the screen. If "IP connect mode" is displayed in the upper left corner of the screen, please proceed to Step 5 without doing anything.
27

What If the Projector You Want does not Appear?
5 The projectors registered into the group is displayed under "Projector". Click on the check box belonging to the name of the projector you wish to connect, then click the "Connect" button. The projector name is displayed on the Connection Stand-by screen of the projector.
Tip :• In the event that a projector already connected to another computer is selected, the
previous connection is terminated automatically and the images of the newly connected computer are projected.
• When multiple projectors are selected, one computer’s display can be projected simultaneously by up to a maximum of four projectors.
• Once the connection has been made, additional connections cannot be added.
The projector and computer are connected via a network and the computer screen is projected.
The projector's condition is indicated by the colour and appearance of its icons.
(Gray) : Not connected
(Orange): Connected to another computer
: Search in progress
: Nothing was found during searching
28

What If the Projector You Want does not Appear?
Perform the following steps to export a group.
Tip :• You can only export all the groups in the "Connection Group" list. You cannot export
specific groups.
• Before exporting a group, create and save at least one group. p.22
• You cannot export during the creation or editing of a group.
Procedure
1 Perform Steps 1 and 2 of "Creating Groups". p.22
2 Click on the "Export" button.
3 Select the folder to export to on the screen that is displayed, then click "OK".The group belonging to specified file name is exported.
Tip :• The extension of the exported file will be ".prgp."
• If a group with the same name as the group you are exporting appears in the “Connection Group” list, the message “An item named “xxx.prgp” already exists in this location. Do you want to replace it with the one you are saving?” appears. If you click the “Replace” button, the group which appeared in the “Connection Group” list will be overwritten. To save under another name, click the “Cancel” button, enter a different file name, and click “Save”.
Exporting Groups
29

What If the Projector You Want does not Appear?
Perform the following steps to import a group.
Tip :You cannot import during the creation or editing of a group.
Procedure
1 Perform Steps 1 and 2 of "Creating Groups". p.22
2 The Advanced screen is displayed. Click on the "Import" button.
Importing Groups
30

What If the Projector You Want does not Appear?
3 On the screen which is displayed, select the file you wish to import, then click the "Open" button.The group is imported and the name of the imported group is added to in the "Connection group" list.
Tip :• The extension of the exported file will be ".prgp."
• If a group with the same name as the group you are importing appears in the “Connection Group” list, the message “This group name already exists. Overwrite?” appears. If you click the “OK” button the group in the “Connection Group” list will be overwritten with the group you are importing. If you click “Cancel” the group will not be imported.
Perform Steps 3-5 of "Connecting to a Group" to connect with the projector registered to the imported group. p.27
31
Transmitting Encrypted Data
When projecting images from a computer connected to a projector over a network, image data can be encrypted and transmitted. Encryption of data ensures security. However, it reduces baud rates.Perform the following steps to use encrypted transmission.
Tip :• Do not unplug the power cable when EasyMP is in use (screens are changing or the
access lamp on the wireless LAN card is lit green).
• Do not remove the wireless LAN card when the access lamp on the wireless LAN card is lit green, or when connected to a network. Doing so may damage the wireless LAN card.
• For information about the Wired LAN card access lamp(s), refer to the documentation of the wired LAN card you are using.
Procedure
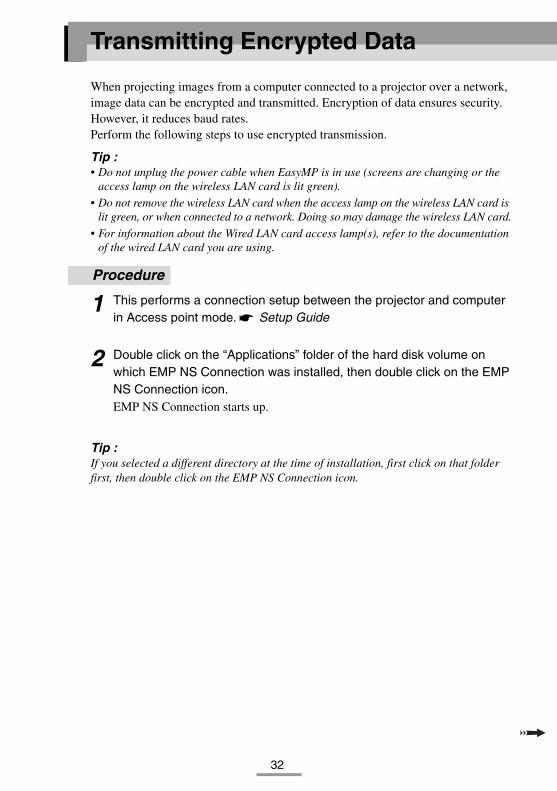
1 This performs a connection setup between the projector and computer in Access point mode. Setup Guide
2 Double click on the “Applications” folder of the hard disk volume on which EMP NS Connection was installed, then double click on the EMP NS Connection icon.EMP NS Connection starts up.
Tip :If you selected a different directory at the time of installation, first click on that folder first, then double click on the EMP NS Connection icon.
32

Transmitting Encrypted Data
3 Click the "Extension" button on the next screen.
4 This displays the Extension screen. Select "Use encrypted communication", and then click the "OK" button.
33

Transmitting Encrypted Data
5 Select the name of the projector that you want to connect, and then click the "Connect" button.
A network connection is established between the computer and projector, and the computer screens are projected by the projector. Data transmitted between the computer and projector is encrypted.
34

Glossary
This is a glossary of terms used in this guide which were not explained within the text or which may be difficult to understand. Use other commercially available documentation for further details.
Ad hoc mode A method of wireless LAN connection that communicates with wireless LAN clients without using an access point.
Channel Communication speeds will drop if there are too many devices performing wireless communication using the same frequency. If this is the case, interference from other wireless LANs can be avoided by setting a different wireless channel for each wireless LAN network.
ESSID ESS is an abbreviation of Extended Service Set. The ESSID is an identification number for connecting with a counterpart on a wireless LAN. Wireless communication is possible between devices with corresponding ESSID numbers.Use the ESSID for the network name which is displayed in the "Computer to Computer" network on the Macintosh.
IP Address A series of numbers that identifies a device that is connected to a network.
35

Index
A/V Mute ..................................................... 11
Basic settings ..........................................12,14
Brightness .................................................... 14
Color Mode .................................................. 14
Colour Depth................................................ 10
Connection status screen.............................. 11
Contrast ........................................................ 14
Disconnect ................................................... 16
Encryption.................................................... 32
E-Zoom ........................................................ 12
Freeze........................................................... 11
Groups.......................................................... 22
IP connect mode........................................... 17
Keystone ...................................................... 14
Number of Connection Devices................... 10
Projector operation URL display ................. 11
Supported Resolution..................................... 9
Switch PC source ......................................... 12
Switch video source ..................................... 12
Using the Toolbars....................................... 11
36

All rights reserved. No part of this publication may be reproduced, stored in a retrieval system, or transmitted in any form or by any means, electronic, mechanical, photocopying, recording, or otherwise, without the prior written permission of SEIKO EPSON CORPORATION. No patent liability is assumed with respect to the use of the information contained herein. Neither is any liability assumed for damages resulting from the use of the information contained herein.
Neither SEIKO EPSON CORPORATION nor its affiliates shall be liable to the purchaser of this product or third parties for damages, losses, costs, or expenses incurred by purchaser or third parties as a result of: accident, misuse, or abuse of this product or unauthorized modifications, repairs, or alterations to this product, or (excluding the U.S.) failure to strictly comply with SEIKO EPSON CORPORATION’s operating and maintenance instructions.
SEIKO EPSON CORPORATION shall not be liable against any damages or problems arising from the use of any options or any consumable products other than those designated as Original EPSON Products or EPSON Approved Products by SEIKO EPSON CORPORATION.
General Notice:EPSON is a registered trademark of SEIKO EPSON CORPORATION. Macintosh, Mac, and iMac are registered trademarks of Apple Computer, Inc.IBM is a registered trademark of International Business Machines Corporation.Windows and Windows NT are trademarks of Microsoft Corporation in the United States of America.Dolby is registered trademarks of Dolby Laboratories.Portions of this software are based in part on the work of the Independent JPEG Group.The freely available TIFF library written by Sam Leffler, Copyright © 1988-1997 Sam Leffler and Copyright © 1991-1997 Silicon Graphics, Inc., is used for loading, drawing and writing the TIFF file.
Other product names used herein are also for identification purposes only and may be trademarks of their respective owners. EPSON disclaims any and all rights in those marks.This product uses open source software.
Copyright © 2003 by SEIKO EPSON CORPORATION